1
MODEL: MX-C300P
MX-C300PE
MX-C300PL
DIGITAL FULL COLOUR PRINTER
OPERATION GUIDE
INTRODUCTION
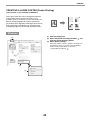
This manual describes MX-C300P/MX-C300PE/MX-C300PL Digital full colour printer.
Note
• Where "MX-XXXX" appears in this manual, please substitute the name of your model for "XXXX". For the
name of your model, see p.6.
• The screen images and procedures that appear in this manual are mainly for Windows 7. With other versions
of Windows, some screen images may be different from those in this manual.
• For information on using your operating system, refer to your operating system's manual or online Help.
The display screens, messages, and key names shown in the manual may differ from those on the actual machine
due to product improvements and modifications.
2
CONTENTS
INTRODUCTION ................................................ 2
USING THE MANUAL ....................................... 5
● ABOUT THE MANUALS ...................................5
● CONVENTIONS USED IN THIS MANUAL .......5
DIFFERENCES BETWEEN MODELS............... 6
1
2
BEFORE USING THE MACHINE
PART NAMES AND FUNCTIONS ..................... 7
PRINTER FUNCTION OF THE MACHINE ...... 22
PRINTING FROM WINDOWS ......................... 23
● OPERATION PANEL ........................................9
● PRINTER DRIVER PROPERTIES WINDOW ... 23
● BASIC PRINTING PROCEDURE..................... 24
● PRINTING WHEN THE USER AUTHENTICATION
FUNCTION IS ENABLED ................................ 26
● VIEWING PRINTER DRIVER HELP................. 27
● SAVING FREQUENTLY USED PRINT SETTINGS....... 28
● CHANGING THE PRINTER DRIVER DEFAULT
SETTINGS ...................................................... 30
DISPLAY .......................................................... 10
● HOME SCREEN .............................................10
● HOW TO USE THE DISPLAY ........................11
POWER ON AND OFF..................................... 12
● POWER ON ....................................................12
● POWER OFF ..................................................12
● POWER SAVE MODES..................................12
LOADING PAPER............................................ 13
●
●
●
●
PRINTER
PRINTING FROM A MACINTOSH .................. 31
USEABLE PAPER ..........................................13
PRINT SIDE FACE UP OR FACE DOWN ......14
LOADING PAPER...........................................16
TRAY SETTINGS ...........................................19
● BASIC PRINTING PROCEDURE..................... 31
● PRINTING WHEN THE USER AUTHENTICATION
FUNCTION IS ENABLED ................................ 34
FREQUENTLY USED FUNCTION .................. 35
USER AUTHENTICATION MODE................... 20
●
●
●
●
●
● USING USER AUTHENTICATION MODE .....20
ENTERING CHARACTERS............................. 21
● CHARACTERS THAT CAN BE ENTERED ....21
SELECTING THE COLOUR MODE ................. 35
SELECTING A PRINT MODE SETTING .......... 37
TWO-SIDED PRINTING .................................. 38
FITTING THE PRINT IMAGE TO THE PAPER ......39
PRINTING MULTIPLE PAGES ON ONE PAGE ... 40
CONVENIENT PRINTING FUNCTIONS.......... 42
● CONVENIENT FUNCTIONS FOR CREATING
PAMPHLETS AND POSTERS ......................... 42
● FUNCTIONS TO ADJUST THE SIZE AND
ORIENTATION OF THE IMAGE ...................... 45
● COLOUR MODE ADJUSTMENT FUNCTION... 47
● FUNCTIONS THAT COMBINE TEXT AND
IMAGES.............................................................. 51
● PRINT FUNCTIONS FOR SPECIAL PURPOSES.......54
● CONVENIENT PRINTER FUNCTIONS............ 55
PRINTING WITHOUT THE PRINTER DRIVER... 57
● DIRECTLY PRINTING A FILE IN USB FLASH
MEMORY ....................................................... 58
● DIRECTLY PRINTING FROM A COMPUTER.............59
● CANCELLING A PRINT JOB FROM THE MACHINE........59
● CHANGE THE MACHINE TO OFFLINE MODE......59
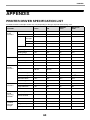
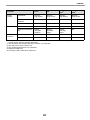
APPENDIX ....................................................... 60
● PRINTER DRIVER SPECIFICATION LIST..............60
3
3
6
TROUBLESHOOTING
WEB FUNCTIONS IN THE MACHINE
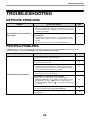
TROUBLESHOOTING ..................................... 63
ABOUT THE WEB PAGES .............................. 95
● NETWORK PROBLEMS.................................63
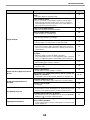
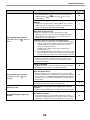
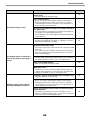
● PRINTING PROBLEMS..................................63
● HOW TO ACCESS THE WEB PAGE ............ 95
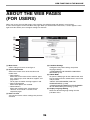
ABOUT THE WEB PAGES (FOR USERS) ...... 96
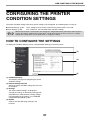
CONFIGURING THE PRINTER CONDITION
SETTINGS........................................................ 97
INDICATORS AND DISPLAY MESSAGES .... 67
MISFEED REMOVAL............................................ 68
●
●
●
●
● HOW TO CONFIGURE THE SETTINGS....... 97
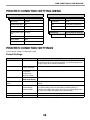
● PRINTER CONDITION SETTING MENU ...... 98
● PRINTER CONDITION SETTINGS ............... 98
MISFEED IN THE BYPASS TRAY .................68
MISFEED IN THE MACHINE..........................69
MISFEED IN THE PAPER TRAY 1 ................73
MISFEED IN THE PAPER TRAY 2 (Option) ..73
ABOUT THE WEB PAGES (FOR THE
ADMINISTRATOR)......................................... 100
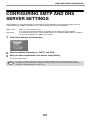
CONFIGURING SMTP AND DNS SERVER
SETTINGS...................................................... 101
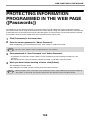
PROTECTING INFORMATION PROGRAMMED
IN THE WEB PAGE ([Passwords]) ............... 102
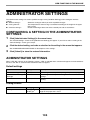
ADMINISTRATOR SETTINGS ....................... 103
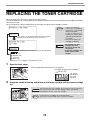
REPLACING THE TONER CARTRIDGE ........ 74
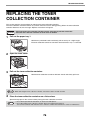
REPLACING THE TONER COLLECTION
CONTAINER .................................................... 76
4
ROUTINE MAINTENANCE
● CONFIGURING A SETTING IN THE
ADMINISTRATOR SETTINGS .................... 103
● ADMINISTRATOR SETTINGS .................... 103
CHECKING THE TOTAL OUTPUT COUNT AND
TONER REMAINING ........................................ 78
LIST PRINT (USER)......................................... 78
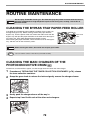
ROUTINE MAINTENANCE.............................. 79
E-MAIL STATUS AND E-MAIL ALERT
SETTINGS...................................................... 104
● CLEANING THE BYPASS TRAY PAPER FEED
ROLLER..........................................................79
● CLEANING THE MAIN CHARGER OF THE
PHOTOCONDUCTIVE DRUM........................79
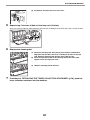
● CLEANING THE LASER UNIT .......................80
●
●
●
●
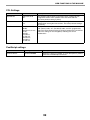
INFORMATION SETUP ............................... 104
SMTP SETUP .............................................. 104
STATUS MESSAGE SETUP ....................... 105
ALERTS MESSAGE SETUP ....................... 105
ADJUSTING THE DISPLAY CONTRAST .......... 82
5
SYSTEM SETTINGS
TRADEMARK ACKNOWLEDGMENTS ......... 107
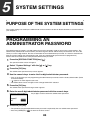
PURPOSE OF THE SYSTEM SETTINGS ........ 83
PROGRAMMING AN ADMINISTRATOR
PASSWORD..................................................... 83
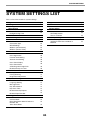
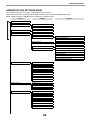
SYSTEM SETTINGS LIST ................................ 84
USING THE SYSTEM SETTINGS .................... 87
●
●
●
●
●
●
●
●
●
●
●
Change Admin PW .........................................88
Initial Setting ...................................................88
Printer .............................................................88
Network...........................................................88
User Control....................................................90
Device Control ................................................91
Operation Setting ............................................91
Energy Save ...................................................92
List Print ..........................................................92
Colour Adjust. .................................................92
Security Settings .............................................94
4
USING THE MANUAL
This machine has been designed to provide convenient printing features in a minimum amount of office space and
with maximum operational ease. To enjoy the full benefit of the machine's features, read and understand this
manual before using the machine. In addition, read the manual for your computer. For quick reference during
machine use, SHARP recommends printing out this manual and keep it in a handy location.
ABOUT THE MANUALS
The manuals for the machine are as follows:
Start Guide
This manual explains:
• Specifications
• Cautions for using the machine in safety
Operation Guide (on the accessory CD-ROM)
This manual explains:
How to use the machine and what to do if trouble occurs.
Software Setup Guide (on the accessory CD-ROM)
This manual explains:
How to install software to operate the machine from your computer.
CONVENTIONS USED IN THIS MANUAL
The icons in the manuals indicate the following types of information:
Warning
Warns the user that injury may result if the contents of the warning are not properly followed.
Caution
Cautions the user that damage to the machine or one of its components may result if the contents
of the caution are not properly followed.
Note
Notes provide information relevant to the machine regarding specifications, functions,
performance, operation and such, that may be useful to the user.
5
DIFFERENCES BETWEEN MODELS
This manual covers the following models.
Model
Wireless LAN
MX-C300P
Yes
MX-C300PE
MX-C300PL
No
AB series (metric) and inch series references
Both specifications are quoted where applicable.
For example:
Page 4:
A4 and B5 (8-1/2" x 11" and 5-1/2" x 8-1/2")
Although AB series size indications are shown on the operation panel of this manual, inch series indications are
displayed on the inch series machines.
6
1
BEFORE USING THE MACHINE
This chapter contains basic information that should be read before using the machine.
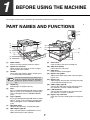
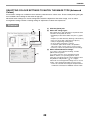
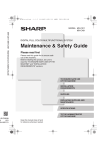
PART NAMES AND FUNCTIONS
(14)
(15)
(7)
(1)
(2)
(3)
(8)
(9)
(4)
(3)
(10)
(11)
(12)
(16)
(3)
(13)
(5)
(6)
(1)
(2)
(3)
Note
(4)
(5)
(6)
(7)
(8)
(9)
Power switch
Press to turn the machine power on and off.
Output tray extension
When you eject the paper of A4 size or larger,
you can open to the outside.
Handles
Use to move the machine. When attaching tray
2, use the handle at the bottom.
(10)
(11)
(12)
The main unit is extremely heavy, and thus two
people are required to do the work. When lifting
the main unit, grasp the handles on each side
firm.
(13)
(14)
Output tray
Printed pages are output to this tray.
Tray 1
Tray 1 can hold approximately 250 sheets of paper
(80 g/m2 (21 lbs.)). For restrictions on paper types,
sizes, and weights, refer to "USEABLE PAPER"
(p.13).
Tray 2 (Option)
Tray 2 can hold approximately 500 sheets of paper
(80 g/m2 (21 lbs.)). For restrictions on paper types,
sizes, and weights, refer to "USEABLE PAPER"
(p.13).
Operation panel
Contains operation keys and indicator lights.
USB 2.0 port (Type A)
This is used to connect a USB device such as
USB flash memory to the machine.
(15)
(16)
7
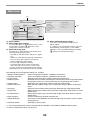
Front cover
Open to replace the toner cartridge etc.
Side cover handle
Pull to open the side cover.
Side cover
Open to remove misfed paper.
Bypass tray guides
Adjust to the width of the paper when using the
bypass tray.
Bypass tray
Special paper (heavy paper or transparency film)
can be fed from the bypass tray.
USB 2.0 port (Type B)
Connect the USB cable to this connector when
the machine is used on a USB connection.
LAN connector
Connect the LAN cable to this connector when
the machine is used on a network.
Bypass tray extension
Open this tray when loading paper in the bypass
tray.
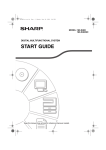
BEFORE USING THE MACHINE
(19)
(20)
(22)
(23)
(17)
(21)
(18)
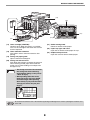
(21) Roller rotating knob
Rotate to remove misfed paper.
(22) Paper tray right side cover
Open this to remove misfed paper in trays.
(23) Duplex conveyor cover
Open this cover to remove misfed paper.
(17) Toner cartridge (Y/M/C/Bk)
Contains toner. When the toner in a cartridge
runs out, the cartridge of the colour that ran out
must be replaced.
(18) Toner collection container
This collects excess toner that remains after
printing.
(19) Fusing unit paper guide
Open to remove misfed paper.
(20) Fusing unit release levers
Push down these levers to release the pressure
when removing misfed paper from inside the
fusing area or when feeding an envelope from
the bypass tray.
Warning
Note
• The fusing unit is hot. Do not touch
the fusing unit when removing
misfed paper. Doing so may cause
a burn or injury.
• When pushing down the levers,
pinch the levers with your thumb
and index finger while pushing
down slowly. If you push the levers
strongly, the levers may hit your
fingers.
Do not block the exhaust slots of the machine by placing something in front of them or placing the machine close
to the wall.
8
BEFORE USING THE MACHINE
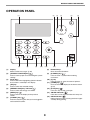
OPERATION PANEL
(1)
(7)
(1)
(2)
(3)
(4)
(5)
(6)
(7)
(2)
(8)
(9)
(10)
(11)
(8)
Display
Shows various messages. (p.10)
[SPECIAL FUNCTION] key (
)
Press to set the paper size and configure system
settings.
Arrow keys
Press to move the highlighting (which indicates
that an item is selected) in the display.
[OK] key
Press to enter the selected setting.
[ENERGY SAVE] key / indicator ( )
Press to enter the energy save mode.
[BACK] key ( )
Press to return the display to the previous
screen.
[LOGOUT] key (
)
Press this key to log out after you have logged in
and used the machine.
(9)
(10)
(11)
(12)
(13)
(14)
9
(12)
(3)
(4)
(5)
(13)
(6)
(14)
Numeric keys
Enter characters/numbers.
[SYMBOL] key (
)
Press to enter a symbol when entering
characters.
[C] key
Press to clear an enter character of printers.
[HOME] key (
)
Press to return the display to the home screen.
(p.10)
[STOP] key (
)
Press this key to stop a print job.
ONLINE indicator (
)
Print data can be received when this lamp is lit.
DATA indicator (
)
Blinks when print data is being received. Lights
steadily during printing.
BEFORE USING THE MACHINE
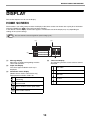
DISPLAY
This section explains how to use the display.
HOME SCREEN
The machine is set at the factory to return the display to the home screen one minute after a print job is finished or
when the [HOME] key (
) is pressed (auto clear function).
In the default state the display shown below appears. The default state of the display may vary depending on
settings in the system settings.
Note
The auto clear time can be changed in the system settings. (p.91)
(1)
(3)
(2)
(4)
(1)
(2)
(3)
Message display
Messages are displayed regarding machine
status and operation.
Paper size display
The size of paper loaded in each tray is
displayed.
Connection status display
(Models with the wireless LAN function only)
Displayed when wireless LAN is on.
(4)
Toner level display
The remaining amount of each colour of toner is
displayed.
76 to 100%
51 to 75%
26 to 50%
Wireless infrastructure mode:
Connecting
1 to 25%
Wireless infrastructure mode:
Not connected
0%
Wired + wireless access point mode
Connection failure of wireless LAN
device inside machine
10
BEFORE USING THE MACHINE
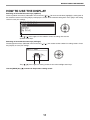
HOW TO USE THE DISPLAY
Selecting an item with the arrow keys (up/down)
Use the up/down arrow keys (indicated in this manual by [ ] [ ]) to move to and select (highlight) a setting item in
the selection screen. Press the [OK] key to display the screen of the selected setting item. Press [OK] in the setting
screen to save your settings.
The [ ] [ ] icons appear in the selection screen of settings that use the
up/down arrow keys.
Selecting an item with the arrow keys (left/right)
The left/right arrow keys (indicated in this manual by [
the [OK] key to save your settings.
The [
Use the [BACK] key (
][
][
]) are used to set the numbers in setting screens. Press
] icons appear in setting screens that use the left/right arrow keys.
) to return to the previous setting screen.
11
BEFORE USING THE MACHINE
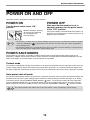
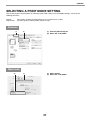
POWER ON AND OFF
The power switch is located on the left side of the machine.
POWER ON
POWER OFF
Turn the power switch to the "ON"
position.
Make sure that the machine is not in
operation and then turn the power switch
to the "OFF" position.
While the machine is warming
up, the message "Warming
Up" will appear in the
message display.
Note
If the power switch is turned off while the machine is in
operation, a misfeed may occur and the job that was in
progress will be cancelled.
• The machine is set at the factory to return the display to the home screen one minute after a print job is finished
or when the [HOME] key (
) is pressed (auto clear function). The "Auto clear" time can be changed in the
system settings. (p.91)
• The machine is initially set to automatically enter power save mode if not used for printing, for a preset period of
time. This setting can be changed in the system settings. (p.92)
POWER SAVE MODES
The machine has two power save modes to reduce overall power consumption thereby reducing the cost of
operation. In addition, these modes conserve natural resources and help reduce environmental pollution. The two
power save modes are "Preheat mode" and "Auto power shut-off mode".
Preheat mode
This function automatically switches the machine to a low power consumption state if the duration of time set in the
system settings elapses without the machine being used when the power is on. In preheat mode the display turns
off. Normal operation automatically resumes when a key on the operation panel is pressed or a print job is received.
Auto power shut-off mode
This function automatically switches the machine to a state that consumes even less power than preheat mode if the
duration of time set in the system settings elapses without the machine being used when the power is on. During
auto power shut-off, only the [ENERGY SAVE] indicator ( ) blinks. To restore the machine to normal operation,
press the [ENERGY SAVE] key ( ). Normal operation also resumes automatically when a print job is received.
While auto power shut-off is in effect, pressing a key other than the [ENERGY SAVE] key ( ) will have no effect.
Note
The preheat activation time and the "Auto power shut-off timer" can be changed using system settings.
12
BEFORE USING THE MACHINE
LOADING PAPER
The message "TRAY< >:Add paper." will be displayed when there is no paper in the selected paper tray.
(< > is the tray number.) Load paper in the indicated paper tray.
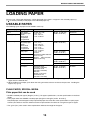
USEABLE PAPER
The following types of paper can be loaded in each tray.
Paper tray type
Tray 1
Tray 2 (Option)
Bypass tray
Paper type
Plain paper
Recycled paper
Colour
Letter head
Pre-printed
Pre-punched
Size
A4, B5, A5, 16K,
8-1/2" x 11",
5-1/2" x 8-1/2",
7-1/4" x 10-1/2"
Plain paper
Recycled paper
Colour
Letter head
Pre-printed
Pre-punched
A4, B5, A5, A6, 16K,
8-1/2" x 11",
5-1/2" x 8-1/2",
7-1/4" x 10-1/2",
8-1/2" x 14",
8-1/2" x 13-1/2",
8-1/2" x 13-2/5",
Thin paper
8-1/2" x 13",
Custom
(Horizontal:140 to 356 mm
Labels
(5-1/2" to 14")
90 to 216 mm
Transparency film Vertical:
(3-5/8" to 8-1/2"))
Heavy paper
Glossy Paper
Envelopes*2
International DL
(110 mm x 220 mm)
International C5
(162 mm x 229 mm)
Monarch
(98 mm x 191 mm)
Commercial 10
(105 mm x 241 mm)
Weight
60 g/m2 to 105 g/m2
(16 lbs. to 28 lbs.)
60 g/m2 to 105 g/m2
(16 lbs. to 28 lbs.)
Capacity*1
250 sheets
500 sheets
50 sheets
55 g/m2 to 59 g/m2
(13 lbs. to 16 lbs.)
–
1 sheet
10 sheets
106 g/m2 to 220 g/m2 20 sheets
(28 lbs. to 80 lbs.)
–
1 sheet
75 g/m2 to 90 g/m2
(20 lbs. to 24 lbs.)
10 sheets
*1 The number of sheets of the paper which can be set changes with the weight of a paper. The paper must not be
higher than the indicator line.
*2 When feeding an envelope, push down the fusing unit release levers to release the pressure. "Loading the
bypass tray" (p.17)
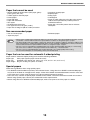
PLAIN PAPER, SPECIAL MEDIA
Plain paper that can be used
• SHARP standard plain paper (80 g/m2 (21 lbs.)). For paper specifications, see the specifications in the Start
Guide.
• Plain paper other than SHARP standard paper (60 g/m2 to 105 g/m2 (16 lbs. to 28 lbs.))
Recycled paper, coloured paper and pre-punched paper must meet the same specifications as plain paper.
Contact your dealer or nearest authorised service representative for advice on using these types of paper.
* The "g/m2" (lbs.) units used in these explanations indicate the weight of the paper.
13
BEFORE USING THE MACHINE
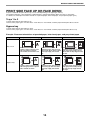
PRINT SIDE FACE UP OR FACE DOWN
Paper is loaded with the print side face up or face down depending on the paper type and tray.
The loading orientation of punched paper, letterhead paper, and pre-printed paper differs from that of other paper.
For details, see "Example: Placement orientations of punched paper, letter head paper, and pre-printed paper" (p.14).
Trays 1 to 2
Load the paper with the print side face up.
However, if the paper type is "Pre-Punched", "Letter Head" or "Pre-Printed", load the paper with the print side face down.
Bypass tray
Load the paper with the print side face down.
However, if the paper type is "Pre-Punched", "Letter Head" or "Pre-Printed", load the paper with the print side face up.
Example: Placement orientations of punched paper, letter head paper, and pre-printed paper
Pre-punched (Left binding)
Letter head
Pre-printed
Load the paper with the print
side facing down with the letter
head (top edge) toward the
left.
Load the paper with the print
side (pre-printed side) facing
down with the top edge toward
the left.
Tray 1 to 2
Load the paper with the print
side facing down with the
punch holes toward the back.
Bypass tray
A
Load the paper with the print
side facing up with the punch
holes toward the back.
A
Load the paper with the print
side facing up with the letter
head (top edge) toward the
right.
14
Load the paper with the print
side (pre-printed side) facing
up with the top edge toward
the right.
BEFORE USING THE MACHINE
Paper that cannot be used
•
•
•
•
•
Irregularly shaped paper
Stapled paper
Damp paper
Curled paper
Paper on which either the print side or the reverse
side has been printed on by another printer or
multifunction device.
• Paper with a wave-like pattern due to moisture
absorption
• Special media for inkjet printers (fine paper, glossy
paper, glossy film, etc.)
• Carbon paper or thermal paper
• Pasted paper
• Paper with clips
• Paper with fold marks
• Torn paper
• Oil-feed transparency film
• Thin paper less than 55 g/m2 (13 lbs.)
• Paper that is 220 g/m2 (80 lbs. index) or heavier
Non-recommended paper
• Iron-on transfer paper
• Japanese paper
Note
• Perforated paper
• Various types of plain paper and special media are sold. Some types cannot be used with the machine. Contact
your dealer or nearest authorised service representative for advice on using these types of paper.
• The image quality and toner fusibility of paper may change due to ambient conditions, operating conditions, and
paper characteristics, resulting in image quality inferior to that of SHARP standard paper. Contact your dealer or
nearest authorised service representative for advice on using these types of paper.
• The use of non-recommended or prohibited paper may result in skewed feeding, misfeeds, poor toner fusing
(the toner does not adhere to the paper well and can be rubbed off), or machine failure.
• The use of non-recommended paper may result in misfeeds or poor image quality. Before using
non-recommended paper, check if printing can be performed properly.
Paper that can be used for automatic 2-sided printing
Paper used for automatic duplex printing must meet the following conditions.
Paper type:
Plain paper (special paper cannot be used.)
Paper size:
Standard sizes (A4, B5, A5, 16K, 8-1/2" x 14", 8-1/2" x 13", 8-1/2" x 11")
Paper weight: 60 g/m2 to 105 g/m2 (16 lbs. to 28 lbs.)
Special papers
Follow these guidelines when using special papers.
• Use SHARP recommended transparency film and label sheets. Using other than SHARP recommended paper
may result in misfeeds or smudges on the output. If other than SHARP recommended media must be used, feed
each sheet one at a time using the bypass tray (do not attempt continuous printing).
• There are many varieties of special paper available on the market, and some cannot be used with this machine.
Before using special paper, contact your authorised service representative.
• Before using other than SHARP recommended paper, make a test print to see if the paper is suitable.
15
BEFORE USING THE MACHINE
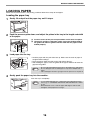
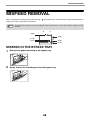
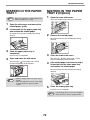
LOADING PAPER
Make sure that the machine is not printing, and then follow these steps to load paper.
Loading the paper tray
1
Gently lift and pull out the paper tray until it stops.
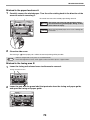
2
Push the pressure plate down, and adjust the plates in the tray to the length and width
of the paper.
(2)
(2)
(2)
Plate B
3
(1) Push the centre of the pressure plate down until it locks into place.
(2) The plate A and B are slide-type guides. Grasp the locking knob on
the guide and slide the guides until the width that the paper can be
loaded properly.
(1)
Plate A
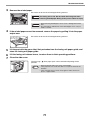
Load paper into the tray.
Line on
the guide
Roller
Protrusion
4
• Load the paper with the print side face up. Make sure the stack of paper is
straight before loading it.
• Place the paper under the roller on the right side of the tray.
• After loading the paper, close the guides to the paper width not to leave the
gap from the guides.
Note
• Do not load paper higher than the line on the guide (up to 250 sheets).
• Do not add paper to the loaded paper. It may cause multiple feed of
paper.
• The loaded paper should not go higher than the protrusion of the plate A.
Gently push the paper tray into the machine.
Push the tray in completely.
Note
• If you loaded a different size of paper than was loaded previously in
the tray, go to "CHANGING THE PAPER SIZE SETTING OF A TRAY"
(p.19).
• When misfeed occurs, rotate the paper 180 degrees and reload it.
• Straighten curled paper before using it.
16
BEFORE USING THE MACHINE
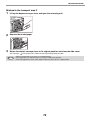
Loading the bypass tray
To feed an envelope, first press down the fusing unit
release levers (2 places) to release the pressure,
and then follow the steps below.
1
Open the bypass tray.
Open out the bypass tray extension.
2
Push the centre of the pressure plate down until it locks into place.
3
Set the paper guides to the paper width.
4
Insert the paper (print face down) all the way into the bypass tray.
To prevent a misfeed, verify once more that the paper guides are adjusted to
the width of the paper.
Warning
Note
After feeding an envelope, be sure to press up and return the fusing unit release levers
(2 places) to their original positions.
If you loaded paper into the bypass tray, press the [SPECIAL FUNCTION] key (
select the bypass tray.
17
) and select "Paper Select" to
BEFORE USING THE MACHINE
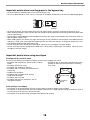
Important points when inserting paper in the bypass tray
• Up to 50 sheets of standard paper can be set in the bypass tray.
• Be sure to place A6, B6 or 5-1/2" x 8-1/2" size paper or envelopes horizontally as shown in the following diagram.
Available
Not
available
• To feed an envelope, first press down the fusing unit release levers (2 places) to release the pressure. (p.17)
• When loading envelopes, make sure that they are straight and flat and do not have loosely glued construction flaps
(not the closure flap).
• Special papers except SHARP recommended transparency film, labels, and envelopes must be fed one sheet at a
time through the bypass tray.
• When adding paper, first remove any paper remaining in the tray, combine it with the paper to be added and then
reload as a single stack. The paper to be added must be the same size and type as the paper already in the tray.
• Use SHARP-recommended transparency film.
• Do not use paper that is smaller than the original. This may cause smudges or unclean images.
• Do not use paper that has already been printed on by a laser printer or plain paper fax machine. This may cause
smudges or unclean images.
Important points when using envelopes
Envelopes that cannot be used
Do not use the following envelopes. Envelopes misfeed, and smudges may result.
• Envelopes with an incorrectly aligned corner gluing
• Envelopes with metal clasps, plastic hooks, or ribbon
position on the back cannot be used as creasing
hooks
may result.
• Envelopes closed with string
• Envelopes with windows or backing
• Envelopes with an uneven front surface due to
embossing
• Double-layer envelopes
• Envelopes with an adhesive for sealing
Can be used
• Hand-made envelopes
• Envelopes with air inside
• Envelopes with creases, fold marks, torn or
Cannot be
damaged envelopes
used
Print quality on envelopes
• Print quality is not guaranteed in the area 10 mm (13/32") around the edges of the envelope.
• Print quality is not guaranteed on parts of envelopes where there is a large step-like change of thickness, such as
on four-layer parts or parts less than three layers.
• Print quality is not guaranteed on envelopes with adhesive for sealing.
18
BEFORE USING THE MACHINE
Inserting transparency film
• Use SHARP-recommended transparency film.
• Do not touch the print side of transparency film.
• When loading multiple sheets of transparency film in the bypass tray, be sure to fan the sheets several times before
loading.
• When printing on transparency film, be sure to remove each sheet as it exits the machine. Allowing sheets to stack
in the output tray may result in curling.
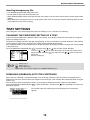
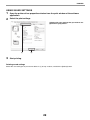
TRAY SETTINGS
These programs are used to change the paper size setting of a tray, and auto tray switching.
CHANGING THE PAPER SIZE SETTING OF A TRAY
If the size of the loaded paper is different from the size shown in the display, follow the steps below to change the
paper size setting of the tray.
The paper size setting cannot be changed during printing, or when a misfeed has occurred. However, if the machine
is out of paper or out of toner, the paper size setting can be changed during printing.
See "USEABLE PAPER" (p.13) for information on the specifications for the types and sizes of paper that can be loaded
in the paper trays.
Press the [SPECIAL FUNCTION] key (
), and press the [ ] or [ ] key to select "Paper Size Set".
Press the [ ] or [ ] key to select the paper tray for which the paper size is
being changed. Press the [ ] key and press the [ ][ ] keys to select the
paper size.
Press the [OK] key.
Note
: Shows tray "1".
: Shows tray "2".
: Shows Bypass tray.
For the paper trays and tray numbers, see "USEABLE PAPER" (p.13).
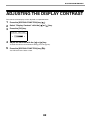
DISABLING (ENABLING) AUTO TRAY SWITCHING
When auto tray switching is enabled and paper runs out during printing, the job will continue using paper from a
different tray if that tray has the same size of paper in the same type. (This function does not operate when using the
bypass tray.)
This function has been enabled at the factory. If you prefer to disable the function, follow the steps below.
Press the [SPECIAL FUNCTION] key (
), select "Paper Size", and press the [ ] key repeatedly until "Auto Tray
Switching" appears.
To re-enable auto tray switching, press the [OK] key that a checkmark
appears.
19
BEFORE USING THE MACHINE
CHANGING THE PAPER TYPE OF A TRAY
To change the paper type setting for a tray, follow the steps below.
Press the [SPECIAL FUNCTION] key (
), select "Paper Type", select the tray with the [
the [OK] key. Select the desired paper type and press the [OK] key.
] or [
] key, and press
See "USEABLE PAPER" (p.13) for information on the specifications for the types and sizes of paper that can be loaded
in the paper trays.
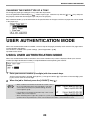
USER AUTHENTICATION MODE
When user authentication mode is enabled, a count is kept of the pages printed by each account. The page counts
can be viewed in the display.
This function is enabled in the system settings. ("User Registration" (p.90))
Up to 30 can be stored.
USING USER AUTHENTICATION MODE
When user authentication mode is turned on, the account number entry screen is displayed. Enter your account
number (five-digit identification number) as explained below before operating the machine.
1
Enter your account number (five digits) with the numeric keys.
As the account number is entered, the hyphens (-) change to asterisks ( ). If you enter an incorrect digit, press
[C] key and re-enter the correct digit.
2
When the job is finished, press the [LOGOUT] key (
Note
).
• When a valid account number is entered, the current count of
the account will appear in the message display of the base
screen. After 6 seconds (factory default setting), the base
screen appears. (p.10)
• If an invalid account number is entered in step 1, the account
number entry screen reappears.
• When "A Warning when Login Fails" (p.90) in the system settings is enabled, a warning message will appear and
operation will not be permitted for 1 minute if an invalid account number is entered 3 times in a row.
20
BEFORE USING THE MACHINE
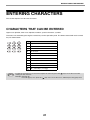
ENTERING CHARACTERS
This section explains how to enter characters.
CHARACTERS THAT CAN BE ENTERED
Upper case alphabet, lower case alphabet, numbers, special characters, symbols.
Characters are entered by pressing the numeric keys on the operation panel. The letters entered with each numeric
key are shown below.
Key
Characters that can be entered
1
1 Space
2
abc2ABC
3
def3DEF
4
ghi4GHI
5
jkl5JKL
6
mno6MNO
7
pqrs7PQRS
8
tuv8TUV
9
wxyz9WXYZ
0
0
#@.-_/!"$%&'()+,:;=<>?[]{}*
Note
To enter two characters in succession that require the same key, press the [ ] key to move the cursor after
entering the first character.
Example: Entering "ab"
Press the [2] key once, press the [ ] key once to move the cursor, and then press the [2] key twice.
21
2
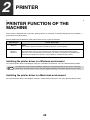
PRINTER
PRINTER FUNCTION OF THE
MACHINE
The machine is equipped with a full colour printing function as standard. To enable printing from your computer, a
printer driver must be installed.
See the table below to determine which printer driver to use in your environment.
Environment
Printer driver type
Windows
PCL6
The machine supports the Hewlett-Packard PCL6 printer control languages.
Windows /
Macintosh
PS
This printer driver supports the PostScript 3 page description language developed by Adobe
Systems Incorporated, and enables the machine to be used as a PostScript 3 compatible printer.
(A PPD file is available if it is desired to use the Windows standard PS printer driver.)
Installing the printer driver in a Windows environment
To install the printer driver and configure settings in a Windows environment, see in the Software Setup Guide.
Note
The explanations in this manual of printing in a Windows environment generally use the screens of the PCL6
printer driver. The printer driver screens may differ slightly depending on the printer driver that you are using.
Installing the printer driver in a Macintosh environment
To install the printer driver and configure settings in a Macintosh environment, see in the Software Setup Guide.
22
PRINTER
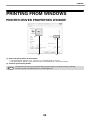
PRINTING FROM WINDOWS
PRINTER DRIVER PROPERTIES WINDOW
(1)
(2)
(1) Select the printer driver of the machine.
• If the printer drivers appear as icons, click the icon of the printer driver to be used.
• If the printer drivers appear as a list, select the name of the printer driver to be used from the list.
(2) Click the [Preferences] button.
Note
The button that is used to open the printer driver properties window (usually [Properties] or [Printing
Preferences]) may vary depending on the software application.
23
PRINTER
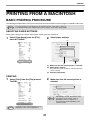
BASIC PRINTING PROCEDURE
The following example explains how to print a document from "WordPad", which is a standard accessory program in
Windows.
1
Select [Print] from the [File] menu of
WordPad.
(1) Click the [Paper] tab.
(2) Select the paper size.
2
Open the printer driver properties
window.
(3) Click the [OK] button.
3
Select print settings.
(1)
To select settings on other tabs, click the desired tab
and then select the settings.
Note
(2)
• Make sure the paper size is the same as
the paper size set in the software
application.
• Up to eight custom paper sizes can be
stored. Storing a custom paper size
makes it easy to specify that size each
time you need to use it.
To store a paper size, select [Custom
Paper] or one of [User1] to [User7] from
the pull-down menu and click the
[Custom] button.
4
Click the [Print] button.
Printing begins.
(3)
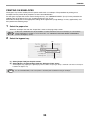
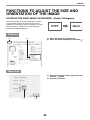
SELECTING THE PAPER
This section explains how to configure the "Paper Selection" setting on the [Paper] tab
of the printer driver properties window.
Before printing, check the paper sizes, paper types, and paper remaining in the
machine's trays. To view the most recent tray information, click the [Tray Status] button.
• When [Auto Select] is selected in "Paper Source"
The tray that has the size and type of paper selected in "Paper Size" and "Paper
Type" on the [Paper] tab is automatically selected.
• When other than [Auto Select] is selected in "Paper Source"
The specified tray is used for printing regardless of the "Paper Size" setting.
• When [Bypass Tray] is selected
The "Paper Type" must also be selected. Check the bypass tray and make sure that the desired type of paper is
loaded, and then select the appropriate "Paper Type" setting.
Note
Special media such as envelopes can also be placed in the bypass tray. For the procedure for loading paper and
other media in the bypass tray, see "Loading the bypass tray" (P.17) .
• When [Auto Select] is selected in "Paper Type"
A tray with plain paper of the size specified in "Paper Size" is automatically selected.
• When other than [Auto Select] is selected in "Paper Type"
A tray with the specified type of paper and the size specified in "Paper Size" is used for printing.
24
PRINTER
PRINTING ON ENVELOPES
The bypass tray can be used to print on special media such as envelopes. The procedure for printing on an
envelope from the printer driver properties screen is described below.
For the types of paper that can be used in the bypass tray, see "USEABLE PAPER" (P.13). For the procedure for
loading paper in the bypass tray, see "Loading the bypass tray" (P.17).
Select the envelope size in the appropriate settings of the application ("Page Settings" in many applications) and
then perform the following steps.
(1)
(1) Click the [Paper] tab.
(2) Select the envelope size from the "Paper Size"
menu.
(2)
The paper tray and paper type are automatically
selected.
Note
• It is recommended that you do a test print to check the print result before using an envelope.
• In the case of media that can only be loaded in a certain orientation such as an envelope, you can rotate the
image 180 degrees if needed. For more information, see "ROTATING THE PRINT IMAGE 180 DEGREES
(Rotate 180 degrees)" (P.45).
• When feeding an envelope, push down the fusing unit release levers (see p.8) to release the pressure.
25
PRINTER
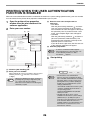
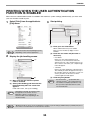
PRINTING WHEN THE USER AUTHENTICATION
FUNCTION IS ENABLED
When the user authentication function is enabled in the machine's system settings (administrator), your user number
must be entered in the printer driver properties window before you can print.
1
Open the printer driver properties
window from the print window of the
software application.
2
Enter your user number.
(1)
(3) Enter the user name and job name as
necessary.
• User Name
Click the [User Name] checkbox
and enter
your user name (maximum of 32 characters).
Your entered user name will appear at the top of
the operation panel. If you do not enter a user
name, your computer login name will appear.
• Job Name
Click the [Job Name] checkbox
and enter a
job name (maximum of 80 characters). The
entered job name will appear at the top of the
operation panel as a file name.
If you do not enter a job name, the file name set
in the software application will appear.
(4) Click the [OK] button.
(2)
Note
3
(4)
To have a confirmation window appear
before printing starts, select the [Auto Job
Control Review] checkbox so that a
checkmark
appears.
Start printing.
(3)
(1) Click the [Job Handling] tab.
(2) Enter your user number.
When authentication is by user number. Click the [User
Number] checkbox
and enter a user number
(5 digits).
Note
Note
When [User Number] has been checked on
[Printing Policy] in the [Configuration] tab,
you cannot enter the user number.
Enter the user information in the dialog box
whenever you print.
26
• The machine's user authentication
function cannot be used when the PPD
file* is installed and the Windows standard
PS printer driver is used. For this reason,
printing will not be possible if printing by
invalid users is prohibited in the system
settings (administrator).
*The PPD file enables the machine to print
using the standard PS printer driver of
the operating system.
System Setting(Administrator):Disable
Print by Inv. User
• “Disable Print by Inv. User” can be
enabled in the machine’s system settings
(Administrator) to prohibit print jobs of
users whose user information is not stored
in the machine. When this function is
enabled, printing is not allowed when user
information is not entered or incorrect
information is entered.
PRINTER
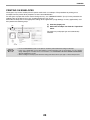
VIEWING PRINTER DRIVER HELP
When selecting settings in the printer driver, you can display Help to view explanations of the settings.
1
Open the printer driver properties window from the print window of the software
application.
2
Click the [Help] button.
The Help window will open to let you view explanations of the settings on the tab.
To view Help for settings in a dialog box, click the underlined text at the top of the Help window.
Pop-up help
Help can be displayed for a setting by clicking the setting and pressing the [F1] key.
* To view Help for a setting in Windows XP/Server 2003, click the
button in the upper right-hand corner of the
printer driver properties window and then click the setting.
Information icon
Some restrictions exist on the combinations of settings that can be selected in the printer driver properties window.
When a restriction exists on a selected setting, an information icon (
) will appear next to the setting.
Click the icon to view an explanation of the restriction.
27
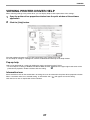
PRINTER
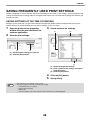
SAVING FREQUENTLY USED PRINT SETTINGS
Settings configured on each of the tabs at the time of printing can be saved as user settings. Saving frequently used
settings or complex colour settings under an assigned name makes it easy to select those settings the next time you
need to use them.
SAVING SETTINGS AT THE TIME OF PRINTING
Settings can be saved from any tab of the printer driver properties window. Settings configured on each tab are
listed at the time of saving, allowing you to check the settings as you save them.
1
2
3
Open the printer driver properties
window from the print window of the
software application.
Check and save the settings.
(1)
(2)
Save the print settings.
(1)
(2)
(1) Configure print settings on each tab.
(2) Click the [Save] button.
(3)
(1) Check the displayed settings.
(2) Enter a name for the settings (maximum
of 20 characters).
(3) Click the [OK] button.
4
5
Note
Click the [OK] button.
Start printing.
• Up to 30 sets of user settings can be saved.
• The following items cannot be saved in user settings.
• A watermark that you created
• Paper insertion settings
• Overlay file
• The user number, user name, and job name entered in the [Job Handling] tab
28
PRINTER
USING SAVED SETTINGS
1
Open the printer driver properties window from the print window of the software
application.
2
Select the print settings.
(1) Select the user settings that you wish to use.
(2) Click the [OK] button.
(1)
3
(2)
Start printing.
Deleting saved settings
Select the user settings that you want to delete in (1) of step 2 above, and click the [Delete] button.
29
PRINTER
CHANGING THE PRINTER DRIVER DEFAULT
SETTINGS
The default settings of the printer driver can be changed using the procedure below. The settings selected using this
procedure are saved and become the default settings when printing from a software application. (Settings selected
in the printer driver properties window when printing from an application remain in effect only while the application is
in use.)
1
Click the [Start] button ( ) and select
[Control Panel] and then [View
devices and printers].
3
Click the [Printing Preferences] button
on the [General] tab.
4
Configure the settings and click the
[OK] button.
• In Windows XP/Server 2003, click the [start]
button and then click [Printers and Faxes].
• In Windows 8/8.1/Server 2012, right-click the
start screen (or swipe up from the bottom edge
of the screen), and click [All apps] - [Control
Panel] - [View devices and printers] - [Printer]
on the taskbar.
Note
2
In Windows XP, if [Printers and Faxes] does
not appear in the [start] menu, select
[Control Panel], select [Printers and Other
Hardware], and then select [Printers and
Faxes].
Open the printer properties window.
(1)
(2)
For explanations of the settings, see printer driver
Help.
(1) Right-click the icon of the printer driver of
the machine.
(2) Select [Printer properties].
In Windows XP/Server 2003, click the [File]
menu.
30
PRINTER
PRINTING FROM A MACINTOSH
BASIC PRINTING PROCEDURE
The following example explains how to print a document from the standard accessory program "TextEdit" in Mac OS X.
Note
To use the machine for the Macintosh, the machine must be connected to a network.
To install the PPD file and configure printer driver settings, see Software Setup Guide.
SELECTING PAPER SETTINGS
Select paper settings in the printer driver before selecting the print command.
1
2
Select [Page Setup] from the [File]
menu of TextEdit.
Select paper settings.
(1)
(2)
(3)
(1) Make sure that the correct printer is selected.
(2) Select paper settings.
The paper size, paper orientation, and enlarge/reduce
can be selected.
(3) Click the [OK] button.
PRINTING
1
2
Select [Print] from the [File] menu of
TextEdit.
Make sure that the correct printer is
selected.
Note
Note
The menu used to execute printing may vary
depending on the software application.
31
Depending on the OS, the machine name
that appears in the "Printer" menu is
[MX-xxxx]. ("xxxx" is a sequence of
characters that varies depending on the
machine model.)
PRINTER
3
4
Select print settings.
Click
in the menu to select a setting. The
corresponding setting screen will appear.
If the settings do not appear in Mac OS X v10.5,
10.6 and 10.7, click " " next to the printer name.
Click the [Print] button.
Printing begins.
SELECTING THE PAPER
This section explains the [Paper Feed] settings in the print settings window.
• When [Auto Select] is selected
A tray with plain paper or recycled paper (the factory default setting is plain paper only) of the size specified in
"Paper Size" in the page settings window is automatically selected.
• When a paper tray is selected
The specified tray is used for printing regardless of the "Paper Size" setting in the page settings window.
For the bypass tray, a paper type can also be specified. Make sure that the paper type setting for the bypass tray
is correct and that the set type of paper is actually loaded in the bypass tray, and then select the appropriate
bypass tray (paper type).
Note
• Special media such as envelopes can also be placed in the bypass tray. For the procedure for loading paper
and other media in the bypass tray, see "Loading the bypass tray" (P.17).
• When "Enable Detected Paper Size in Bypass Tray" (disabled by factory default) or "Enable Selected Paper
Type in Bypass Tray" (enabled by factory default) is enabled in the system settings (administrator), printing will
not take place if the paper size or paper type specified in the printer driver is different from the paper size or
paper type specified in the settings of the bypass tray.
• When a paper type is selected
A tray with the specified type of paper and the size specified in "Paper Size" in the page settings window is used
for printing.
32
PRINTER
PRINTING ON ENVELOPES
The bypass tray can be used to print on special media such as envelopes. The procedure for printing on an
envelope from the printer driver properties screen is described below.
For the types of paper that can be used in the bypass tray, see "USEABLE PAPER" (P.13). For the procedure for
loading paper in the bypass tray, see "Loading the bypass tray" (P.17).
Select the envelope size in the appropriate settings of the application ("Page Settings" in many applications) and
then perform the following steps.
1
Select the paper size.
Select the envelope size from the "Paper Size" menu on the page setup screen.
Note
2
In the case of media that can only be loaded in a certain orientation such as an envelope, you can rotate the
image 180 degrees if needed. For more information, see "ROTATING THE PRINT IMAGE 180 DEGREES
(Rotate 180 degrees)" (P.45)".
Select the bypass tray.
(1)
(2)
(1) Select [Paper Feed] on the print screen.
(2) Select [Bypass Tray(Envelope)] from the "All Pages From" menu.
Set the bypass tray paper type to [Envelope] in the machine’s “Paper Type Setup”, and make sure that an envelope is
loaded in the bypass tray.
Note
It is recommended that you do a test print to check the print result before using an envelope.
33
PRINTER
PRINTING WHEN THE USER AUTHENTICATION
FUNCTION IS ENABLED
When the user authentication function is enabled in the machine's system settings (administrator), you must enter
your user number in order to print.
1
3
Select [Print] from the application's
[File] menu.
Start printing.
(1)
(2)
(3)
(1) Enter your user information.
Note
2
When authentication is by user number
Enter your user number (5 digits) in "User
Number".
The menu used to execute printing may vary
depending on the software application.
(2) Enter the user name and job name as
necessary.
Display the job handling screen.
• User Name
Enter your user name (maximum of 32
characters). Your entered user name will
appear at the top of the operation panel. If you
do not enter a user name, your computer login
name will appear.
• Job Name
Enter a job name (maximum of 30 characters).
The entered job name will appear at the top of
the operation panel as a file name. If you do not
enter a job name, the file name set in the
software application will appear.
(1)
(3) Click the [Print] button.
(2)
(1) Make sure that the machine's printer
name is selected.
(2) Select [Job Handling] and then click the
[Authentication] tab in the screen that
appears.
Note
You can click the
(lock) button after
entering your login name and password, or
user number, to simplify operation the next
time you wish to print based on the same
user authentication.
In Mac OS X v10.4, select [Job Handling].
Note
Note
Depending on the OS, the machine name
that appears in the "Printer" menu is
[MX-xxxx]. ("xxxx" is a sequence of
characters that varies depending on the
machine model.)
"Disable Print by Inv. User" can be enabled in the machine's system settings (Administrator) to prohibit print jobs of
users whose user information is not stored in the machine.
34
PRINTER
FREQUENTLY USED FUNCTION
This section explains frequently used functions.
• "SELECTING THE COLOUR MODE" (P.35)
• "TWO-SIDED PRINTING" (P.38)
• "FITTING THE PRINT IMAGE TO THE PAPER"
(P.39)
• "PRINTING MULTIPLE PAGES ON ONE PAGE"
(P.40)
The explanations assume that the paper size and other basic settings have already been selected. For the basic
procedure for printing and the steps for opening the printer driver properties window, see the following section:
• Windows : "BASIC PRINTING PROCEDURE" (P.24)
• Macintosh : "BASIC PRINTING PROCEDURE" (P.31)
In Windows, view printer driver Help for details on printer driver settings for each printing function.
SELECTING THE COLOUR MODE
This section explains how to select the colour mode in the printer driver properties window. The following three
selections are available for the colour mode:
Automatic:
The machine automatically determines whether each page is colour or black and white and prints
the page accordingly. Pages with colours other than black and white are printed using
Y (Yellow), M (Magenta), C (Cyan) and Bk (Black) toner. Pages that are only black and white are
printed using Bk (Black) toner only. This is convenient when printing a document that has both
colour and black and white pages, however, the printing speed is slower.
Color:
All pages are printed in colour. Both colour data and black and white data are printed using
Y (Yellow), M (Magenta), C (Cyan) and Bk (Black) toner.
Black and White: All pages are printed in black and white. Colour data such as images or materials for a
presentation are printed using black toner only. This mode helps conserve colour toner when you
do not need to print in colour, such as when proofreading or checking the layout of a document.
When "Color Mode" is set to [Automatic]
Even if the print result is black and white, the following types of print jobs will be counted as 4-colour (Y (Yellow),
M (Magenta), C (Cyan), and Bk (Black)) print jobs. To be always counted as a black and white job, select [Black and
White].
• When the data is created as colour data.
• When the application treats the data as colour data even though the data is black and white.
• When an image is hidden under a black and white image.
.
Windows
(1) Click the [Color] tab.
(2) Select the "Color Mode" that you wish to use.
(1) (2)
35
PRINTER
BLACK AND WHITE PRINTING
[Black and White] can be selected on the [Main] tab as well as on the [Color] tab. Click the [Black and White Print]
checkbox on the [Main] tab so that a checkmark
appears.
The [Black and White Print] checkbox on the [Main] tab and the "Color Mode" setting on the [Color] tab are linked.
When the [Black and White Print] checkbox is selected
on the [Main] tab, [Black and White] is also selected on
the [Color] tab.
Macintosh
(2)
(1) Select [Color].
(2) Select the "Color Mode" that you wish to use.
(1)
36
PRINTER
SELECTING A PRINT MODE SETTING
This section explains the procedure for selecting a print mode setting. The "Print Mode Settings" consist of the
following two items:
Normal:
High Quality:
This mode is suitable for printing data such as regular text or a table.
The print quality of colour photos and text is high.
Windows
(1)
(2)
(1) Click the [Advanced] tab.
(2) Select the "Print Mode".
(1)
(1) Select [Color].
(2) Select the "Print Mode".
Macintosh
(2)
37
PRINTER
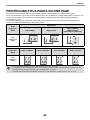
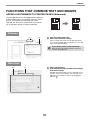
TWO-SIDED PRINTING
The machine can print on both sides of the paper. This function is useful for many purposes, and is particularly
convenient when you want to create a simple pamphlet. Two-sided printing also helps conserve paper.
Paper
orientation
Print results
Windows
Macintosh
Windows
Macintosh
2-Sided(Book)
Long-edged binding
(Flip on long edge)
2-Sided(Tablet)
Short-edged binding
(Flip on short edge)
Windows
Macintosh
Windows
Macintosh
2-Sided(Book)
Short-edged binding
(Flip on short edge)
2-Sided(Tablet)
Long-edged binding
(Flip on long edge)
Vertical
Horizontal
The pages are printed so that they can be
bound at the side.
Windows
(1)
The pages are printed so that they can be
bound at the top.
Macintosh
(2)
(1)
(1) Configure the settings on the [Main] tab.
(2) Select [2-Sided(Book)] or [2-Sided(Tablet)].
(2)
(1) Select [Layout].
(2) Select [Long-edged binding] or [Short-edged
binding].
38
PRINTER
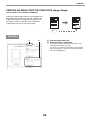
FITTING THE PRINT IMAGE TO THE PAPER
This function is used to automatically enlarge or reduce the printed image to match the size of the paper loaded in
the machine.
This is convenient for such purposes as enlarging an A5 or invoice size document to A4 or letter size to make it
easier to view, and to print when the same size of paper as the document image is not loaded in the machine.
A5
A4
The following example explains how to print an A5 size document on A4 size paper.
Windows
(1)
(3)
(2)
(4)
(1) Click the [Paper] tab.
(2) Select the size of the print image (for example:
A5).
(3) Select [Fit To Paper Size].
(4) Select the actual paper size to be used for
printing (for example: A4).
(2)
(1) Select [Paper Handling].
(2) Check the size of the print image (for example:
A5).
Macintosh
(1)
To change the print image size, use the "Paper Size"
menu that appears when [Page Setup] is selected.
(3) Select [Scale to fit paper size].
(4) Select the actual paper size to be used for
printing (for example: A4).
(3)
(4)
39
PRINTER
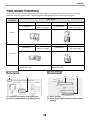
PRINTING MULTIPLE PAGES ON ONE PAGE
This function can be used to reduce the print image and print multiple pages on a single sheet of paper.
This is convenient when you want to print multiple images such as photos on a single sheet of paper, and when you
want to conserve paper. This function can also be used in combination with two-sided printing for maximum
conservation of paper.
For example, when [2-Up] (2 pages per sheet) and [4-Up] (4 pages per sheet) are selected, the following print
results will be obtained, depending on the order selected.
Print results
N-Up
(Pages per
sheet)
Left To Right
Right To Left
Top To Bottom
(When the print
orientation is landscape)
2-Up
(2 pages per
sheet)
N-Up
(Pages per
sheet)
Right, and Down
Down, and Right
Left, and Down
Down, and Left
4-Up
(4 pages per
sheet)
• The page orders for 6-Up, 8-Up, 9-Up, and 16-Up are the same as for 4-Up.
• In a Windows environment, the page order can be viewed in the print image in the printer driver properties window.
In a Macintosh environment, the page orders are displayed as selections.
• In a Macintosh environment, the number of pages that can be printed on a single sheet is 2, 4, 6, 9, or 16.
40
PRINTER
Windows
(1) Configure the settings on the [Main] tab.
(2) Select the number of pages per sheet.
(3) If you wish to print borderlines, click the
[Border] checkbox so that a checkmark
appears.
(4) Select the order of the pages.
(1)
(2) (3)
(4)
Macintosh
(1)
(1)
(2)
(3)
(4)
(2)
(4)
(3)
41
Select [Layout].
Select the number of pages per sheet.
Select the order of the pages.
If you wish to print borderlines, select the
desired type of borderline.
PRINTER
CONVENIENT PRINTING FUNCTIONS
This section explains convenient functions for specific printing objectives.
• "FUNCTIONS THAT COMBINE TEXT AND
IMAGES" (P.51)
• "PRINT FUNCTIONS FOR SPECIAL PURPOSES"
(P.54)
• "CONVENIENT PRINTER FUNCTIONS" (P.55)
• "CONVENIENT FUNCTIONS FOR CREATING
PAMPHLETS AND POSTERS" (P.42)
• "FUNCTIONS TO ADJUST THE SIZE AND
ORIENTATION OF THE IMAGE" (P.45)
• "COLOUR MODE ADJUSTMENT FUNCTION"
(P.47)
The explanations assume that the paper size and other basic settings have already been selected. For the basic
procedure for printing and the steps for opening the printer driver properties window, see the following section:
• Windows : "BASIC PRINTING PROCEDURE" (P.24)
• Macintosh : "BASIC PRINTING PROCEDURE" (P.31)
In Windows, view printer driver Help for details on printer driver settings for each printing function.
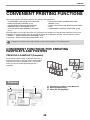
CONVENIENT FUNCTIONS FOR CREATING
PAMPHLETS AND POSTERS
CREATING A PAMPHLET (Pamphlet)
The pamphlet function prints on the front and back of
each sheet of paper so that the sheets can be folded
and bound to create a pamphlet. This is convenient
when you wish to compile printed output into a
pamphlet.
Windows
(1)
(2)
(1) Configure the settings on the [Main] tab.
(2) Select [Pamphlet Style]
(3) Select the "Binding Edge".
(3)
42
PRINTER
Macintosh
(1)
(1) Select [Printer Features].
(2) Select the "Binding Edge".
(3) Select [Tiled Pamphlet] or [2-Up Pamphlet].
(2)
(3)
INCREASING THE MARGIN (Margin Shift)
This function is used to shift the print image to
increase the margin at the left, right, or top of the
paper. This is convenient when you wish to staple or
punch the output but the binding area overlaps the
text.
Windows
(1)
(1) Configure the settings on the [Main] tab.
(2) Select the "Binding Edge".
(3) Select the "Margin Shift".
(2)
Select from the "Margin Shift" menu. If you wish to
configure another numeric setting, select the setting
from the pull-down menu and click the [Settings] button.
Click the
button or directly enter the number.
(3)
Macintosh
(1)
(1) Select the "Printer Features".
(2) Select the "Binding Edge".
(3) Select the "Margin Shift".
(2)
(3)
43
PRINTER
CREATING A LARGE POSTER (Poster Printing)
(This function is only available in Windows.)
One page of print data can be enlarged and printed
using multiple sheets of paper (4 sheets (2 x 2),
9 sheets (3 x 3) or 16 sheets (4 x 4)). The sheets can
then be attached together to create a large poster.
To enable precise alignment of the edges of the sheets
during attachment, borderlines can be printed and
overlapping edges can be created (overlap function).
Windows
(1) Click the [Paper] tab.
(2) Select the [Poster Printing] checkbox
click the [Poster Settings] button.
(3) Select poster settings.
(1)
and
Select the number of sheets of paper to be used from
the pull-down menu. If you wish to print borderlines
and/or use the overlap function, select the
corresponding checkboxes
.
(2)
(3)
44
PRINTER
FUNCTIONS TO ADJUST THE SIZE AND
ORIENTATION OF THE IMAGE
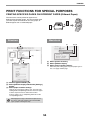
ROTATING THE PRINT IMAGE 180 DEGREES (Rotate 180 degrees)
This feature rotates the image 180 degrees so that it
can be printed correctly on paper that can only be
loaded in one orientation (such as envelopes or paper
with punch holes). (In Mac OS X, a portrait image
cannot be rotated 180 degrees.)
ABCD
ABCD
Windows
(1)
(1) Select the setting on the [Main] tab.
(2) Select the [Rotate 180 degrees] checkbox
(2)
Macintosh
(1) Select [Page Setup] from the [File] menu and
click the
button.
(2) Click the [OK] button.
(1)
(2)
45
.
PRINTER
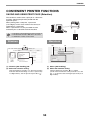
ENLARGING/REDUCING THE PRINT IMAGE (Zoom/XY-Zoom)
This function is used to enlarge or reduce the image to a selected
percentage.
This allows you to enlarge a small image or add margins to the paper
by slightly reducing an image.
When using the PS printer driver (Windows), you can set the width
and length percentages separately to change the proportions of the
image. (XY-Zoom)
Windows
(1) Click the [Paper] tab.
(2) Select [Zoom] and click the [Settings] button.
(1)
The actual paper size to be used for printing can be
selected from the pull-down menu.
(3) Select the zoom ratio.
Directly enter a number (%) or click the
button to
change the ratio in increments of 1%. You can also
select [Upper Left] or [Center] for the base point on the
paper.
(2)
(3)
REVERSING THE IMAGE (Mirror Image)
The image can be reversed to create a mirror image.
This function can be used to conveniently print a
design for a woodblock print or other printing medium.
B
B
Windows
(This function can be used when the PS printer driver is used.)
(1)
(1) Click the [Advanced] tab.
(2) Select a mirror image setting.
(2)
If you wish to reverse the image horizontally, select
[Horizontal]. If you wish to reverse the image vertically,
select [Vertical].
46
PRINTER
Macintosh
(This function can not be used in Mac OS X 10.4/10.5.)
(1) Select [Layout].
(2) Select a mirror image setting.
(1)
If you wish to reverse the image horizontally, select [Flip
horizontally] checkbox so that a checkmark
appears.
If you wish to reverse the image vertically, select
[Reverse page orientation] checkbox so that a
appears.
checkmark
(2)
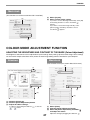
COLOUR MODE ADJUSTMENT FUNCTION
ADJUSTING THE BRIGHTNESS AND CONTRAST OF THE IMAGE (Colour Adjustment)
The brightness and contrast can be adjusted in the print settings when printing a photo or other image. These settings
can be used for simple corrections when you do not have image editing software installed on your computer.
Windows
Macintosh
(This function can only be used in Mac OS X v10.4.)
(1)
(1)
(2)
(2)
(3)
(3)
(1) Click the [Color] tab.
(2) Click the [Color Adjustment] button.
(3) Adjust the colour settings.
To adjust a setting, drag the slide bar
or
button.
or click the
(1) Select [Color].
(2) Click the [Color Adjustment] button.
(3) Select the [Color Adjustment] checkbox
and adjust the colour.
Adjust the settings by dragging the slide bars
47
.
PRINTER
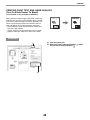
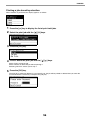
PRINTING FAINT TEXT AND LINES IN BLACK
(Text To Black/Vector To Black)
(This function is only available in Windows.)
•
When printing a colour image in greyscale, colour text
and lines that are faint can be printed in black. (Raster
data such as bitmap images cannot be adjusted.) This
allows you to bring out colour text and lines that are
faint and difficult to see when printed in greyscale.
• [Text To Black] can be selected to print all text other
than white text in black.
• [Vector To Black] can be selected to print all vector
graphics other than white lines and areas in black.
ABCD
ABCD
Windows
(1) Click the [Color] tab.
(2) Select the [Text To Black] checkbox
the [Vector To Black] checkbox
.
(1)
(2)
48
and/or
PRINTER
SELECTING COLOUR SETTINGS TO MATCH THE IMAGE TYPE (Advanced
Colour)
Preset colour settings are available in the machine's printer driver for various uses. These enable printing using the
most suitable colour settings for the colour image type.
Advanced colour settings can also be configured to match the objective of the colour image, such as colour
management settings and the screening setting for adjustment of colour tone expression.
Windows
(1)
(1) Click the [Color] tab.
(2) Select the "Image Type".
(2)
A document type to match the data to be printed can be
selected from the pull-down menu.
• Standard (for data that includes text, photos, graphs,
etc.)
• Graphics (for data with many drawings or illustrations)
• Photo (for photo data or data that uses photos)
• CAD (for engineering drawing data)
• Scan (for data scanned by a scanner)
• Colorimetric (Data which needs to be printed in
almost the same colours as those on the screen)
• Custom (for data to be printed with special settings)
(3) Select advanced colour settings.
If you wish to select advanced settings, click the
[Advanced Color] button.
If you wish to perform colour management using
Windows ICM* in your operating system, select
[Custom] for the image type at step (2) and then select
the [Windows ICM] checkbox
. To configure
advanced colour management settings such as "Source
Profile", select the desired settings from the menus.
* Cannot be selected when using the PS printer driver
on Windows 7/Vista/Server 2008/8/8.1/Server 2012.
(3)
49
PRINTER
Macintosh
(1)
(4)
(2)
(3)
(1) Select [Color].
(2) Select colour print settings.
(4) Select advanced colour settings.
If you wish to select detailed settings, click the
[Advanced] tab.
To configure colour management settings, select the
desired settings from the menus. To use "CMYK
Simulation", select the [CMYK Simulation] checkbox
and then select the desired setting.
To use the Mac OS Color Management function, select
the [ColorSync] checkbox
. When this is done,
"Image Type" cannot be selected.
(3) Select the Image Type.
An image type to match the data to be printed can be
selected from the pull-down menu.
• Standard (for data that includes text, photos, graphs,
etc.)
• Graphics (for data with many drawings or illustrations)
• Photo (for photo data or data that uses photos)
• CAD (for engineering drawing data)
• Scan (for data scanned by a scanner)
• Colorimetric (Data which needs to be printed in
almost the same colours as those on the screen)
• Custom (for data to be printed with special settings)
[Neutral Gray] can be used when [Custom] is selected.
The following colour management settings are available.
•
•
•
•
Windows ICM checkbox*1:
ColorSync checkbox:
Source Profile:
Rendering Intent:
• Output Profile:
• CMYK Correction*2:
• Screening:
• Neutral Gray:
• Pure Black Print:
• Black Overprint:
• CMYK Simulation:
• Simulation Profile:
Colour management method in a Windows environment
Colour management method in a Macintosh environment
Selection of the input colour profile used for the printed image
Standard value used when converting the colour balance of the image displayed on
the computer screen to a colour balance that can be printed by the machine.
Selection of the output colour profile used for the printed image
When printing a CMYK image, you can correct the image to obtain the optimum
result.
Select the most suitable image processing method for the image being printed.
Select whether grey halftones are printed with single-colour black toner or 4-colour
CMYK toners.
Select whether black areas are printed with single-colour black toner or 4-colour
CMYK toners.
Prevents whitening of the outline of black text.
The colour can be adjusted to simulate printing using the process colours used by
printing presses.
Selecting a process colour.
*1 Cannot be enabled when using a PS printer driver in Windows 7/Vista/Server 2008/8/8.1/Server 2012.
*2 Only the PCL6 printer driver can be used.
50
PRINTER
FUNCTIONS THAT COMBINE TEXT AND IMAGES
ADDING A WATERMARK TO PRINTED PAGES (Watermark)
CO
NF
ID
EN
TI
AL
Faint shadow-like text can be added to the background
of the printed image as a watermark. The size, colour,
density, and angle of the watermark text can be
adjusted. The text can be selected from a pre-stored
list, or entered to create an original watermark.
Windows
(1)
(1) Click the [Watermarks] tab.
(2) Select the watermark settings.
(2)
Select a stored water mark from the pull-down menu.
You can click the [Edit] button to edit the font colour and
select other detailed settings.
If you wish to create a new watermark...
Enter the text of the watermark in the "Text" box
and click the [Add] button.
Macintosh
(2)
(1) Select [Watermarks].
(2) Click the [Watermark] checkbox and configure
watermark settings.
(1)
Detailed watermark settings can be configured such as
selection of the text and editing of the font and colour.
Adjust the size and angle of the text by dragging the
slide bar
.
51
PRINTER
PRINTING AN IMAGE OVER THE PRINT DATA (Image Stamp)
(This function is only available in Windows.)
A bitmap or JPEG image stored on your computer can
be printed over the print data. The size, position, and
angle of the image can be adjusted. This feature can
be used to "stamp" the print data with a frequently
used image or an icon of your own creation.
MEMO
MEMO
Windows
(1)
(1) Click the [Watermarks] tab.
(2) Select the image stamp setting.
(2)
If an image stamp has already been stored, it can be
selected from the pull-down menu.
If you have not stored an image stamp, click the [Image
File], select the file you wish to use for the image stamp,
and click the [Add] button.
52
PRINTER
CREATING OVERLAYS FOR PRINT DATA (Overlays)
(This function is only available in Windows.)
The print data can be printed in a previously created
overlay. By creating table rulings or a decorative frame
in an application different from that of the text file and
registering the data as an overlay file, an attractive
print result can be easily obtained without the need for
complex manipulations.
XXXX
XXX
XXXX
XXX
XXXX
XXXX
1
10
0
10
100
150
120
250
XXX
XXXX
XXX
XXXX
1
10
0
10
100
150
120
250
Overlay file
Windows
Create an overlay file.
(1)
(1) Click the [Advanced] tab.
(2)
Configure the printer driver settings from the software
application that you wish to use to create the overlay
file.
(2) Click the [Edit] button.
(3) Create an overlay file.
Click the [Create Overlay] button and specify the name
and folder to be used for the overlay file that you wish to
create. The file will be created when the settings are
completed and printing is started.
• When printing is started, a confirmation message
will appear. The overlay file will not be created
until the [Yes] button is clicked.
• To register a previously existing overlay file, click
the [Load Overlay] button.
(3)
Printing with an overlay file
(1)
(1) Click the [Advanced] tab.
(2)
Configure the printer driver settings from the application
from which you wish to print using the overlay file.
(2) Select the overlay file.
A previously created or stored overlay file can be
selected from the pull-down menu.
53
PRINTER
PRINT FUNCTIONS FOR SPECIAL PURPOSES
PRINTING SPECIFIED PAGES ON DIFFERENT PAPER (Different Paper)
The front cover can be printed on paper that is
different from the other pages. Use this function when
you wish to print the front cover on heavy paper, or
different paper such as coloured paper.
1
2
3
4
5
Windows
Macintosh
(1)
(1)
(2) (3)
(2)
(3)
(1) Select [Printer Features].
(2) Select [Different Paper].
(3) Select cover insertion settings.
Select the print setting, paper tray, and paper type for
the cover page and last page.
(1) Click the [Special Modes] tab.
(2) Select [Different Paper] and click the [Settings]
button.
(3) Select paper insertion settings.
Click the [Cover Page] checkbox (
), and select the
feeding method and printing method for the insert paper
from the respective menus. Select the insertion
position, paper source, and printing method from the
corresponding menus.
When [Bypass Tray] is selected in "Paper Source",
be sure to select the "Paper Type" and load that
type of paper in the bypass tray.
54
PRINTER
CONVENIENT PRINTER FUNCTIONS
SAVING AND USING PRINT FILES (Retention)
This function is used to store a print job as a file on the
machine, allowing the job to be printed from the
operation panel.
When printing from a computer, a password
(5 to 8 digits) can be set to maintain the secrecy of
information in a stored file.
When a password is set, the password must be
entered to print a stored file from the machine.
• Print data is erased when the power is turned off.
• Print data that exceeds 5 MB cannot be saved.
• A maximum of 5 files can be saved.
Windows
Macintosh
(1)
(2)
(1)
(2)
(1) Click the [Job Handling] tab.
(2) Select the retention setting.
(1) Select [Job Handling].
(2) Select the retention setting.
Click the [Retention] checkbox
. Select the retention
method in "Retention Settings". To enter a password (5
to 8 digit number), click the [Password] checkbox
.
Click the [Retention] checkbox
. To simplify
operation the next time the same password is set, click
the
(lock) button after entering the password (5 to 8
digit number).
55
PRINTER
Printing a job stored by retention
When retention is performed, the display appears as follows:
1
2
Press the [
3
Press the [OK] key.
4
Print or delete the print job with the [
] key to display the list of print hold jobs.
Select the print job with the [
][
] keys.
][
] keys.
Select "Print" to print the job.
Select "Delete" to delete the job without printing it.
Selecting "No Print" returns you to step 1.
5
Press the [OK] key.
The print job is printed or deleted. If a password is set, the job will be printed or deleted after you enter the
password with the numeric keys and press the [OK] key.
56
PRINTER
PRINTING WITHOUT THE PRINTER
DRIVER
When you do not have the printer driver installed on your computer, or when the software application used to open a
file that you wish to print is not available, you can print directly to the machine without using the printer driver.
The file types (and corresponding extensions) that can be printed directly are shown below.
File Type
TIFF
JPEG
PCL
PDF,
Encrypted PDF
PS
Extension
tiff, tif
jpeg, jpg,
jpe, jfif
pcl, prn, txt
pdf
ps, prn
• Even if the print result is black and white, the following types of print jobs will be counted as 4-colour (Y (Yellow),
M (Magenta), C (Cyan), and Bk (Black)) print jobs. To be always counted as a black and white job, select black and
white printing.
• When the data is created as colour data.
• When the application treats the data as colour data even though the data is black and white.
• When an image is hidden under a black and white image.
• The file format of some files may not be printable even if the file is listed in the above table.
• A password-protected PDF file cannot be printed.
57
PRINTER
DIRECTLY PRINTING A FILE IN USB FLASH MEMORY
A file in a USB flash memory connected to the machine can be printed from the operation panel of the machine
without using the printer driver. When the printer driver of the machine is not installed on your computer, you can
copy a file into a commercially available USB flash memory and connect the device to the machine to print the file
directly.
1
Connect the USB flash memory to the machine.
When a USB flash memory is inserted and the
machine recognizes the device, the display shows the
files to select.
Use a FAT32 USB flash memory with a capacity of
no more than 32 GB.
2
Select the file that you wish to print with [
] or [
] key.
A name with "/" to its left is the name of a folder in the USB flash memory. To display the files and folders in a
folder, select the folder and press the [OK] key.
• A total of 100 files and folders can be displayed.
• Press the [BACK] key (
) to move up one folder level.
3
4
Press the [OK] key.
Select "Print" with the [
] or [
] key and then press the [OK] key.
When forwarding of the selected file is completed, printing starts.
Print settings can be selected in the machine’s Web page. However, if a file that includes print settings (PCL,
PS) is selected, the file’s print settings will be applied.
58
PRINTER
DIRECTLY PRINTING FROM A COMPUTER
Settings can be configured in the Web pages of the machine to enable direct printing from a computer without using
the printer driver. For the procedure for accessing the Web pages, see "ABOUT THE WEB PAGES" (P.95).
FTP PRINT
You can print a file from your computer by simply dragging and dropping the file onto the FTP server of the machine.
• Configuring settings
To enable FTP Print, click [Application Settings] and then [Setting for Print from the PC] in the Web page menu,
and configure the port number. (Administrator rights are required.)
• Performing FTP Print
Type "ftp://" and then the IP address of the machine in the address bar of your computer's Explorer as shown
below.
(Example)
ftp://192.168.1.28
Drag and drop the file that you wish to print onto the "lp" folder that appears in your Web browser. The file will
automatically begin printing.
• If you printed a file (PCL, PS) that includes print settings, the settings will be applied.
• When user authentication is enabled in the system settings (administrator) of the machine, the print function may be
restricted. For more information, ask your administrator.
CANCELLING A PRINT JOB FROM THE MACHINE
Press the [STOP] key (
) on the operation panel.
CHANGE THE MACHINE TO OFFLINE MODE
To change the machine to offline mode, follow the steps below.
1
Press the [SPECIAL FUNCTION] key (
keys.
2
Select "Offline" with the [
][
) and select "Online/Offline" with the [
][
]
] keys and press the [OK] key.
Printing stops and the mode changes to offline mode. To cancel
printing, press the [C] key. To resume printing, select "Online"
and press the [OK] key.
59
PRINTER
APPENDIX
PRINTER DRIVER SPECIFICATION LIST
Available functions and output results may vary depending on the type of printer driver being used.
PCL6
PS
Windows
PPD*1
Macintosh
PPD*1
Copies
1-999
1-999
1-999
1-999
Orientation
Yes
Yes
Yes
Yes
Number
of pages
2,4,6,8,9,16
2,4,6,8,9,16
2,4,6,9,16
2,4,6,9,16
Order
Yes
Yes
Yes
Yes
Border
Yes
Yes
Yes
Yes
2-Sided Print
Yes
Yes
Yes
Yes
Fit To Page
Yes
Yes
No
Yes
Binding Edge
Yes
Yes
No
Yes
Black and White Print
Yes
Yes
Yes
Yes
Paper Size
Yes
Yes
Yes
Yes
Custom Paper
8 size
8 size
Yes
Yes
Paper Selection
Yes
Yes
Yes
Yes
Pamphlet
Yes
Yes
Yes
Yes
Margin Shift
0 mm to
30 mm
0 mm to
30 mm
Yes
Yes
Poster Printing
Yes
Yes
No
No
Rotate 180 degrees
Yes
Yes
Yes
Yes*4
Zoom/XY-Zoom
Yes*2
Yes
Yes*2
Yes*2
Mirror Image
No
Yes
Yes*5
Yes*6
Different Paper
Yes
Yes
No
Yes
Page Interleave
Yes
No
No
No
Retention
Yes
Yes
No
Yes
Colour Adjustment
Yes
Yes
No
Yes*3
Text To Black/
Vector To Black
Yes
Yes
No
No
Advanced Colour
Yes
Yes
Yes
Yes
Watermark
Yes
Yes
Yes
Yes
Image Stamp
Yes
Yes
No
No
Overlay
Yes
Yes
No
No
Function
Frequently
used
functions
N-Up
Paper
Convenient
printer
functions
Special
functions
Colour
mode
adjusting
function
Functions to
combine
text and
images
60
PRINTER
PCL6
PS
Windows
PPD*1
Macintosh
PPD*1
Print Mode
Normal/
High Quality
Normal/
High Quality
Normal/
High Quality
Normal/
High Quality
Graphics Mode
Selection
Yes
No
No
No
Toner Save
Yes
Yes
Yes
Yes
Resident font
80 fonts
136 fonts
136 fonts
136 fonts
Selectable download
font
bitmap,
TrueType,
Graphics
bitmap,
TrueType,
Type1
bitmap,
TrueType,
Type1
No
Auto Configuration
Yes
Yes
No
Yes
User Authentication
Yes
Yes
No
Yes
Function
Image
Quality
Font
Other
functions
*1 The specifications of each function in Windows PPD and Macintosh PPD vary depending on the operating
system version and the software application.
*2 The horizontal and vertical proportion cannot be set separately.
*3 Only Mac OS X v10.4 can be used.
*4 Only landscape documents are supported.
*5 Horizontal mode only.
*6 Cannot be used in Mac OS X v10.4/10.5.
61
3
TROUBLESHOOTING
This chapter describes troubleshooting and misfeed removal.
If you encounter a problem when using the machine, check the following troubleshooting guide before calling for
service. If you cannot resolve the problem using the troubleshooting guide, turn off the main switch, disconnect the
power cord from the power outlet, and contact your dealer.
If you experience difficulty using the machine, check the following troubleshooting guide before calling for service.
Many problems can be easily resolved by the user. If you are unable to solve the problem using the troubleshooting
guide, turn off the power switch and unplug the machine, and contact your authorised service representative.
"**-**" represents a code consisting of numbers and letters. When contacting your dealer, inform your dealer of the
code that is displayed.
TROUBLESHOOTING ...................................................................................... 63
NETWORK PROBLEMS ............................................................................... 63
The machine does not connect to the network. ......................................................................................... 63
PRINTING PROBLEMS ................................................................................ 63
The machine does not operate. ................................................................................................................. 63
Paper misfeed............................................................................................................................................ 64
Paper size for a paper tray cannot be set. ................................................................................................. 64
A print job stops before it is finished. ......................................................................................................... 64
The display turns off................................................................................................................................... 64
Lighting fixture flickers. .............................................................................................................................. 64
The machine does not print. (ONLINE indicator ( ) does not blink.) ....................................................... 65
The machine does not print. (ONLINE indicator ( ) was blinking.) .......................................................... 65
Printing is slow. .......................................................................................................................................... 65
The printed image is light and uneven. ...................................................................................................... 65
The printed image is dirty........................................................................................................................... 66
The printed image is skewed or it runs off the paper or the image is cut off.............................................. 66
Wrinkles appear in the paper or the image disappears in places. ............................................................. 66
INDICATORS AND DISPLAY MESSAGES ..................................................... 67
MISFEED REMOVAL........................................................................................ 68
MISFEED IN THE BYPASS TRAY ................................................................................................................. 68
MISFEED IN THE MACHINE.......................................................................................................................... 69
MISFEED IN THE PAPER TRAY 1................................................................................................................. 73
MISFEED IN THE PAPER TRAY 2 (Option)................................................................................................... 73
REPLACING THE TONER CARTRIDGE ......................................................... 74
REPLACING THE TONER COLLECTION CONTAINER................................. 76
62
TROUBLESHOOTING
TROUBLESHOOTING
NETWORK PROBLEMS
Problem
Cause and solution
Page
The LAN cable is disconnected.
Make sure that he LAN cable is firmly inserted in the connectors
on the machine and your computer. To connect the cable, see the
"Software setup guide".
The machine does not connect to
the network.
7
Is the machine configured for use on the same network as
the computer?
The machine cannot be used if it is not connected to the same
network as the computer, or if it is not configured for use on the
network.
For more information, consult your network administrator.
–
PRINTING PROBLEMS
In addition to this section, troubleshooting information can also be found in the README files for each of the
software programs. To view a README file, see "SOFTWARE SETUP GUIDE".
Problem
Cause and solution
The machine is not plugged into a power outlet.
Plug the machine into a grounded outlet.
Power switch OFF.
Turn the power switch ON.
Page
–
12
The machine is warming up.
The machine requires some time to warm up after the power
switch is turned on. While the machine is warming up, settings
can be performed but printing is not possible.
The front cover or the side cover is not completely closed.
The machine does not operate.
Close the front cover or the side cover.
12
–
The machine is in auto power shut-off mode.
When auto power shut-off mode has activated, only the
[ENERGY SAVE] indicator ( ) blinks; all other indicators and
the display are off. The machine returns to normal operation
when the [ENERGY SAVE] key ( ) is pressed, when a print job
is received.
Misfeed occurs.
To remove the misfeed, see "MISFEED REMOVAL".
The tray is out of paper.
Load paper.
63
12
68
16
TROUBLESHOOTING
Problem
Cause and solution
The paper is outside of the specified size and weight
range.
Page
13
Use paper within the specified range.
Paper curled or damp.
Do not use curled or crimped paper. Replace with dry paper.
During periods when the machine is not used for a long time,
remove the paper from the tray and store it in a dark place in a
bag to prevent moisture absorption.
Paper is not loaded properly.
Make sure the paper is properly installed.
Pieces of paper inside machine.
Remove all pieces of misfed paper.
Several sheets of paper stick together.
Fan the paper well before loading it.
Paper misfeed.
A paper misfeed has occurred in the tray.
Turn the paper over and/or turn it around, and reload.
–
16
68
–
16
Too much paper is loaded in the tray.
If the stack of paper is higher than the indicator line on the tray,
remove some of the paper and reload so that the stack does not
exceed the line.
16
The guides on the bypass tray do not match the width of
the paper.
Adjust the guides to match the width of the paper.
If the paper guide presses too hard against the paper, a misfeed
may occur. Adjust the guide so that it lightly contacts the paper.
The bypass tray extension is not pulled out.
When loading paper, open the extension.
The bypass paper feed roller is dirty.
Clean the roller.
Printing is performed.
Paper size for a paper tray cannot
be set.
Set the paper size after printing is complete.
The machine has stopped temporarily due to running out
of paper or a misfeed.
17
17
79
9
16, 68
Load paper or remove the misfeed, and then set the paper size.
The paper output tray is full.
A print job stops before it is
finished.
Remove the output in the paper output tray to resume printing.
The tray is out of paper.
7
16
Load paper.
Any other indicators turned off.
The display turns off.
If other indicators are lit, the machine is in "Preheat mode". Press
any key on the operation panel to resume normal operation.
[ENERGY SAVE] indicator (
) blinks.
The machine is in auto power shut-off mode. Press the [ENERGY
SAVE] key ( ) to resume normal operation.
Lighting fixture flickers.
The same power outlet being used is for the lighting
fixture and the machine.
Connect the machine to a power outlet which is not used for other
electric appliances.
64
12
12
–
TROUBLESHOOTING
Problem
Cause and solution
Page
The machine is set to off-line mode.
If the ONLINE indicator (
) is not on, press the [SPECIAL
FUNCTION] key (
) and then use the [ ] key to select
"Online/Offline".
59
The machine is not correctly connected with your
computer.
Check both ends of the printer cable and make sure you have a
solid connection. Try a known good cable. For information on
cables, see "SPECIFICATIONS (START GUIDE)".
7
Your machine is not selected correctly in the current
application for the print job.
The machine does not print.
(ONLINE indicator (
) does not
blink.)
When choosing "Print" from the "File" menu located in
applications, be sure you have selected "SHARP MX-XXXX"
(where XXXX is the model name of your machine) printer
displayed in the "Print" dialog box.
–
The printer driver has not been installed properly.
Follow these steps to check and see if the printer driver is installed.
1 Click the "Start" button, and then click "Devices and Printers".
In Windows Vista, click the "Start" button, click "Control
Panel", and then click "Printer".
In Windows XP, click the "start" button, and then click
"Printers and Faxes".
2 If the "SHARP MX-XXXX" printer driver icon is shown but you
still cannot print, the printer driver may not have been installed
correctly. In this case, delete the software and then reinstall it.
–
The port setting is not correct.
Printing is not possible if the printer driver port setting is not
correct. Set the port correctly. For more information, see the
Software Setup Guide.
–
Printing is disabled.
If "Disable Print by Inv. User" is enabled in the system settings,
printing will not be possible. Consult the administrator.
90
The tray size settings are not the same on the machine
and in the printer driver.
The machine does not print.
(ONLINE indicator (
) was
blinking.)
Make sure that the same tray paper size is set on the machine
and in the printer driver. To change the tray's paper size setting on
the machine, see "CHANGING THE PAPER SIZE SETTING OF
A TRAY" (p.19) or see Software Setup Guide to change it in the
printer driver.
The specified size of paper has not been loaded.
Load the specified size of paper in the paper tray.
Printing is slow.
Simultaneous use of two or more application software
programs.
19
16
–
Start printing after quitting all unused application software programs.
The printed image is light and
uneven.
The paper is loaded so that printing takes place on the
back side of the paper.
Some paper types have a front and back side. If the paper is
loaded so that printing takes place on the back side, toner will not
adhere well to the paper and a good image will not be obtained.
65
16
TROUBLESHOOTING
Problem
Cause and solution
Page
You are using paper that is outside the specified size and
weight range.
13
Use paper within the specified range.
Paper curled or damp.
Do not use curled or crimped paper. Replace with dry paper.
During periods when the machine is not used for a long time,
remove the paper from the tray and store it in a dark place in a
bag to prevent moisture absorption.
The printed image is dirty.
–
You did not set sufficient margins in the paper settings of
your application.
The top and bottom of the paper may be dirty if the margins are
set outside of the specified print quality area.
Set the margins in the software application within the specified
print quality area.
–
Black dots or smudges appear on the printed output.
Run fixing cleaning mode. The letter "V" is printed on a sheet of
paper and the fusing unit is cleaned.
91
The paper loaded in the tray is not the same size as that
specified in the printer driver.
Check if the "Paper Size" options suit the size of the paper loaded
in the tray.
If the "Fit To Paper Size" setting is activated, make sure that the
paper size selected from the drop-down list is the same as the
size of the loaded paper.
The printed image is skewed or it
runs off the paper or the image is
cut off.
–
The orientation of document setting is not correct.
Click the "Main" tab in the printer driver setup screen, and verify if
the "Image Orientation" option is set to your requirements.
Paper is not loaded properly.
Make sure the paper is properly loaded.
–
16
You did not correctly specify the margins for the
application in use.
Check the layout of the document margins and the paper size
settings for the application you are using. Also check if the print
settings are specified correctly to suit the paper size.
The paper is outside of the specified size and weight range.
Use paper within the specified range.
–
16
Paper curled or damp.
Wrinkles appear in the paper or
the image disappears in places.
Do not use curled or crimped paper. Replace with dry paper.
During periods when the machine is not used for a long time,
remove the paper from the tray and store it in a dark place in a
bag to prevent moisture absorption.
–
The fusing unit release levers were not returned to their
original positions
If the fusing unit release levers are not returned, poor toner
adhesion, smudging, and lines may occur. Be sure to press both
levers up to return to their original positions.
66
70
TROUBLESHOOTING
INDICATORS AND DISPLAY
MESSAGES
If one of the following messages appears in the display, take prompt action as instructed by the message.
Message
Maintenance required. Call for
service.
Action
Maintenance required soon. Contact your authorised service
representative.
(Maintenance icon)
Obtain replacement toner.
The toner cartridge must be replaced soon.
Install the toner cartridge.
Check to see if the toner cartridge has been installed properly.
Replace waste box.
Replace the toner collection container as explained in "REPLACING THE
TONER COLLECTION CONTAINER" (p.76).
Change the toner cartridge.
Replace the toner cartridge as explained in "REPLACING THE TONER
CARTRIDGE" (p.74).
Remove paper from the output tray.
The number of sheets in the output tray has reached the limit. Remove the
paper.
Load <
The paper size specified for the tray is different from the actual size.
(p.19)
> paper into tray < >.
Clear paper path.
Refer to "MISFEED REMOVAL" (p.68), check the location and remove the
misfeed.
Close the cover.
Make sure that the front cover and side cover are properly closed.
< >: Tray number
<
>: Size of paper that should be loaded
67
TROUBLESHOOTING
MISFEED REMOVAL
When a misfeed occurs during printing, the message "
Check the location and remove the misfeed.
Note
Clear paper path." and the location of the misfeed will appear.
The paper may tear when you remove a misfeed. In this event, be sure to remove all torn pieces of paper from the
machine.
(p.69)
(p.69)
(p.73)
(p.73)
(p.68)
(p.73)
MISFEED IN THE BYPASS TRAY
1 Remove any paper remaining in the bypass tray.
2
Gently remove the misfed paper from the bypass tray.
68
TROUBLESHOOTING
If you were able to remove the misfed paper
3
If you are unable to remove the misfed paper
Close the auxiliary tray and then the
bypass tray, grasp the side cover
open/close handle, and gently open
and close the side cover.
3
Grasp the side cover open/close
handle and gently open the side
cover.
4
Turn the paper feed knob and feed out
the paper that is inside. ("Misfeed in
the paper feed area A" (p.70))
5
Close the side cover.
(1)
(2)
The message "
Clear paper path." will be
cleared and printing will be possible.
The message "
Clear paper path." will be
cleared and printing will be possible.
MISFEED IN THE MACHINE
To remove a misfeed from inside the machine, open the side cover, check whether the misfeed occurred in "A", "B",
or "C" below, and follow the misfeed removal procedure.
1
Open the bypass tray and the side cover.
Note
2
If paper remains in the bypass tray, remove the paper.
("MISFEED IN THE BYPASS TRAY" (p.68))
Check the misfeed location.
Area C
If paper is misfed here, go to
"Misfeed in the transport area C"
(p.72).
Area B
If the misfed paper is visible
here, go to "Misfeed in the
fusing area B" (p.70).
Area A
If paper is misfed here, go to
"Misfeed in the paper feed
area A" (p.70).
69
TROUBLESHOOTING
Misfeed in the paper feed area A
1
Carefully remove the misfed paper. Turn the roller rotating knob in the direction of the
arrow to assist in removing it.
Roller rotating knob
Fusing unit
Be careful not to tear the misfed paper during removal.
The fusing unit is hot. Do not touch the fusing
Warning unit when removing misfed paper. Doing so may
cause a burn or injury.
When removing misfed paper, do not touch or damage the
Caution transfer belt.
2
Close the side cover.
The message "
Note
Clear paper path." will be cleared and printing will be possible.
• When closing the side cover, press on around the handle.
• If the message does not clear, check again to make sure that no pieces of paper remain.
Misfeed in the fusing area B
1
Lower the fusing unit release levers to allow easier removal.
Fusing unit release levers
2
Lower the part with the green label that protrudes from the fusing unit paper guide,
and open the fusing unit paper guide.
70
TROUBLESHOOTING
3
Remove the misfed paper.
Be careful not to tear the misfed paper during removal.
Warning The fusing unit is hot. Do not touch the fusing unit when
removing misfed paper. Doing so may cause a burn or injury.
Caution
4
• When removing misfed paper, do not touch or damage the transfer
belt.
• Be careful about unfixed toner on the misfed paper not to soil your
hands or clothes.
If the misfed paper cannot be removed, remove the paper by pulling it into the paper
output area.
Be careful not to tear the misfed paper during removal.
5
Lift the part with the green label that protrudes from the fusing unit paper guide, and
close the fusing unit paper guide.
6
7
Lift the fusing unit release levers, to return them to their operating positions.
Close the side cover.
The message "
possible.
Note
Clear paper path." will be cleared and printing will be
• When closing the side cover, press on the handle.
• If the paper was torn, make sure that no torn pieces remain in the
machine.
• If the message does not clear, check again to make sure that no
pieces of paper remain.
71
TROUBLESHOOTING
Misfeed in the transport area C
1
Lift up the duplex conveyor lever and open the reversing unit.
2
Remove the misfed paper.
3
Return the duplex conveyor lever to its original position and close the side cover.
The message "
Note
Clear paper path." will be cleared and printing will be possible.
• When closing the side cover, press on around the handle.
• If the paper was torn, make sure that no torn pieces remain in the machine.
• If the message does not clear, check again to make sure that no pieces of paper remain.
72
TROUBLESHOOTING
MISFEED IN THE PAPER
TRAY 1
Note
MISFEED IN THE PAPER
TRAY 2 (Option)
1 Open the lower side cover.
Make sure that there is no misfed paper in the
tray before pulling it out. (p.69)
1
Open the side cover and remove the
misfed paper. (p.69)
2
Lift and pull out the upper paper tray
and remove the misfed paper.
Grasp the handle to open the lower side cover.
Be careful not to tear the misfed paper during
removal.
2
Remove the misfed paper.
Be careful not to tear the misfed paper during
removal.
3
Push the upper paper tray in
completely.
3
Push the tray in completely.
4
The message "
Clear paper path." will be
cleared and printing will be possible.
Open and close the side cover.
The message "
Clear paper path." will be
cleared and printing will be possible.
4
(1)
If the misfed paper is not seen in step 2,
lift and pull out the lower paper tray
and remove the misfed paper.
Be careful not to tear the misfed paper during
removal.
(2)
Note
Close the lower side cover.
• When closing the side cover, press on the
handle.
• If the message does not clear, check again
to make sure that no pieces of paper
remain.
5
Close the lower paper tray.
Push the tray in completely.
Note
73
If the message does not clear, check again to
make sure that no pieces of paper remain.
TROUBLESHOOTING
REPLACING THE TONER CARTRIDGE
When the "Prepare a new toner." appears, little toner remains.
You should keep one set of replacement toner cartridges on hand so that you can replace a toner cartridge immediately
when toner runs out.
Be sure to replace the toner cartridge when the message "Change the toner cartridge." appears.
Note
If you continue to use the machine without replacing the cartridge,
the following message will appear when the toner runs out.
Warning
Colours that are running low or have run out of toner are indicated in
(
).
: Yellow toner
: Magenta toner
: Cyan toner
: Black toner
Replace the toner cartridges of the indicated colours.
1
• If any one of the toner
colours runs out (including
black toner), colour printing
will not be possible.
If Y, M, or C toner runs out
but Bk toner remains, black
and white printing will still
be possible.
• Be sure to install 4 toner
cartridges (Y/M/C/Bk).
• Do not throw the toner
cartridge into a fire.
Toner may splatter and
cause burns.
• Store toner cartridges out
of the reach of small
children.
Open the front cover.
Push on both ends of the front cover and open it.
Locations of colour toner cartridges
(A) (B) (C) (D)
2
(A): Yellow
(B): Magenta
(C): Cyan
(D): Black
Grasp the handle of the top and bottom of the toner cartridge, pull the toner cartridge
out.
After removing the toner cartridge, do not shake it or tap on it. Doing so
Caution may cause toner to leak from the cartridge. Put the old cartridge
immediately in the box of the new cartridge.
Note
Keep used toner cartridges (do not discard them).
Your service technician will collect used toner cartridges.
74
TROUBLESHOOTING
3
Take out the new toner cartridge. Shake it vertically five or six times.
When holding the toner cartridge, do not grasp the shutter. This may
Caution cause toner to leak.
4
Insert the toner cartridge along the guides until it locks in place.
If there is any dirt or dust on the toner cartridge, remove it before installing the
cartridge.
Note
A toner cartridge of a different colour cannot be installed. Be sure to
install a toner cartridge of the same colour.
5
Press the centre of the toner cartridge until the cartridge locks into place.
6
Close the front cover.
The message will be cleared and printing will be possible.
Note
• Even after a new toner cartridge is installed, the message may still appear, indicating that printing cannot be
resumed (toner is not fed sufficiently). In this case, open and close the front cover. The machine will feed toner
again for about two minutes and then printing can be resumed.
• Before closing the front cover, make sure that the toner cartridge is correctly installed.
• When closing the front cover, gently hold both ends.
75
TROUBLESHOOTING
REPLACING THE TONER
COLLECTION CONTAINER
This section explains the procedure for replacing the toner collection container.
The toner collection container collects any excess toner that occurs during printing. When the toner collection
container becomes full, the message "Replace waste box" will appear.
• Do not throw the toner collection container into fire. Toner may fly out and cause burns.
Caution • Store the toner collection container out of the reach of children.
1
Pull out the paper tray 1.
Hold the tray with both hands and slowly pull out and up at a slight angle.
The toner collection container cannot be removed unless tray 1 is removed.
2
Open the front cover.
3
Pull out the toner collection container.
Hold the toner collection container with both hands and slowly pull it out.
Note
4
When removing the toner collection container, it is easier to draw one side at a time.
Place the toner collection container on a flat surface.
Spread newspaper on the surface before placing the toner collection container.
Note
• Do not tilt the part with the hole down, as waste toner will spill out.
• Do not discard the toner collection container. Place it in a plastic bag and store.
Your service technician will collect the toner collection container the next time he comes for maintenance.
76
TROUBLESHOOTING
5
Install a new toner collection container.
Push the toner collection container in completely.
6
Close the front cover.
Note
7
You cannot close the front cover when the toner collection container is not attached.
Replace tray 1.
77
4
ROUTINE MAINTENANCE
This chapter explains how to keep the machine operating smoothly, including viewing print count, and cleaning the
machine.
CHECKING THE TOTAL OUTPUT
COUNT AND TONER REMAINING
You can check by pressing the [SPECIAL FUNCTION] key (
) and
selecting "Total Count" in the function menu screen. The total output count
can be used as a guideline for cleaning. When the total output count
exceed "99,999,999", the counts return to "0".
• Each two-sided sheet that is output is counted as two pages.
• Blank prints are included in the count.
• If the last page of a two-sided printing job is blank, it is not included in the count.
Note
LIST PRINT (USER)
You can print lists of the settings and information registered in the machine. Press the [SPECIAL FUNCTION] key
(
), select "List Print (User)", and select a list to print it.
List name
Description
All Custom Setting List
This list shows the hardware status, software status, printer condition settings,
paper tray settings, and total counts.
PCL Symbol Set List
This is used to print the PCL Symbol Set List, various font lists, and the NIC page
(network interface settings, etc.).
PCL Internal Font List
PS Font List
NIC Page
78
ROUTINE MAINTENANCE
ROUTINE MAINTENANCE
Do not spray flammable cleaner gas. Gas from the spray may come in contact with the internal
Warning electrical components or high-temperature parts of the fusing unit, creating a risk of fire or
electrical shock.
CLEANING THE BYPASS TRAY PAPER FEED ROLLER
If misfeeds occur frequently when feeding envelopes, heavy paper, etc.
through the bypass tray. Before starting, remove the paper from the
bypass tray. Turn the power switch off, remove the roller cover from the
bypass tray and wipe the paper feed roller at the feed slot of the bypass
tray with a soft, clean cloth dampened with alcohol or water.
After cleaning the paper feed roller, attach the roller cover on the bypass
tray, and then turn on the machine's power.
Paper feed
roller
Warning When cleaning the rollers, be careful not to injure your hands.
Note
Do not touch the surface of the roller if your hands are dirty.
CLEANING THE MAIN CHARGER OF THE
PHOTOCONDUCTIVE DRUM
If black lines or coloured lines appear, use the charger cleaner to clean the main charger.
1
Procedure of "REPLACING THE TONER COLLECTION CONTAINER" (p.76), release
the toner collection container.
2
Grasp the green knob to release the lock and gently remove the charger cleaner.
3
4
Gently push the charger cleaner all the way in.
Repeat step 2 and 3 with each of the other main chargers.
79
ROUTINE MAINTENANCE
5
Procedure of "REPLACING THE TONER COLLECTION CONTAINER" (p.76), push the
toner collection container into the machine.
Note
• If this does not solve the problem, pull the knob out and push it back in 2 more times.
• When pulling and pushing the knob to clean the charger, pull and push the knob slowly from one end to the
other.
• Touching the waste toner outlet or the toner collection container may soil your hands and clothes. Exercise
caution when cleaning the charger.
CLEANING THE LASER UNIT
When the laser unit inside the machine becomes dirty, line patterns (coloured lines) may form in the printed image.
Identifying lines (coloured lines) caused by a dirty laser unit.
If the above problems occur, follow the steps below to clean the laser unit.
1
2
Turn the power switch off.
3
Take out the cleaning tool for the laser unit.
Procedure of "REPLACING THE TONER COLLECTION CONTAINER" (p.76), release
the toner collection container.
The cleaning tool is attached to the front cover.
Pull the right side of the cleaning instrument and unfasten it from the claw.
(2)
(1)
(3)
boss
4
Clean the laser unit.
(1) Push up and open the laser unit cover (grey colour).
(2) Point the cleaner down and gently push the cleaning tool all the way
in.
(3) Gently pull the cleaning tool out.
80
ROUTINE MAINTENANCE
(4) Push down and close the laser unit cover.
5
Repeat step 4 to clean all holes in the laser unit (4 holes).
There are a total of 4 places to be cleaned in the laser unit, including the hole cleaned in step 4. Clean all holes.
Cover
6
Replace the cleaning tool.
(1) Rotate the cleaning tool after putting it on the boss and hook its
edge (the side that does not have a handle) to the claw on the left
side. Hook the cleaning tool with the clean side face up.
(2) Place the right-hand side of the cleaning tool on the inner side,
spread across the top of the claw.
(3) Hook the cleaning tool to the claw.
7
Procedure of "REPLACING THE TONER COLLECTION CONTAINER" (p.76), push the
toner collection container into the machine.
81
ROUTINE MAINTENANCE
ADJUSTING THE DISPLAY CONTRAST
The contrast of the display can be adjusted as explained below.
1
2
3
Press the [SPECIAL FUNCTION] key (
4
Adjust the contrast with the [ ] or [ ] key.
).
Select "Display Contrast" with the [ ] or [ ] key.
Press the [OK] key.
To reset the contrast to the default setting, press the [C] key.
5
Press the [SPECIAL FUNCTION] key (
).
You will return to the base screen.
82
5
SYSTEM SETTINGS
PURPOSE OF THE SYSTEM SETTINGS
The system settings are used by the administrator of the machine to enable or disable functions to suit the needs of
your workplace.
PROGRAMMING AN
ADMINISTRATOR PASSWORD
The administrator password is a 5-digit number that must be entered in order to access the system settings. The
administrator (administrator of the machine) should change the default administrator password that was set at the
factory to a new 5-digit number. Be sure to remember the new administrator password, as it must be entered each
time the system settings are subsequently used. (Only one administrator password can be programmed.)
Refer to the Start Guide for the factory default administrator password.
1
Press the [SPECIAL FUNCTION] key (
).
The special function screen will appear.
2
3
Select "System Settings" with the [ ] or [ ] key.
Press the [OK] key.
The administrator password entry screen appears.
4
Use the numeric keys to enter the five-digit administrator password.
• If this is the first time you are programming the administrator password, enter the factory default code. (Refer
to the Start Guide)
• " " appears for each digit that you enter.
• The mode select screen will appear with "Change Admin PW" selected.
5
Press the [OK] key.
The administrator password change screen appears.
6
Enter the new 5-digit administrator password with the numeric keys.
Any 5 digits can be used for the administrator password.
7
Press the [OK] key.
• The previously programmed administrator password is replaced by the new administrator password.
• Press the [HOME] key (
) to return to the base screen.
83
SYSTEM SETTINGS
SYSTEM SETTINGS LIST
This is a list of the machine's system settings.
Program name
Change Admin PW
Change Admin PW
Initial Setting
Date & Time Set
Daylight Saving Time
Printer
Notice Page
Network
Confirmation of Network
Connection Type
Wired Settings
Wireless (Infrastructure)
Wireless (Access Point)
User Control
User Authentication
User Registration
Function Limit Setting
Account Limit Setting
User Count Display
User Count Reset
A Warning when Login Fails
Disable Print by Inv. User
Device Control
Fusing Control
Fusing Cleaning
Registration Adjustment
Operation Setting
Auto Clear
Language Setting
Message Time
Key Touch Sound
Key Press Time
Disable Auto Key Repeat
Disable Paper Size Set
Energy Save
Auto Power Shut-Off Timer
Preheat Mode
Enter Auto Power Shut-Off after the
Remote Job
Toner Save Mode
Page
Program name
List Print
User Info. Print
Colour Adjust.
Easy Calibration
Tone Adjustments
Return to Default
Security Settings
IPsec Settings
Initialize Private Data and Data in
Machine
88
88
88
88
88
88
88
89
89
90
90
90
90
90
90
90
90
91
91
91
91
91
91
91
91
92
92
92
92
92
92
84
Page
92
93
93
94
94
94
SYSTEM SETTINGS
ADMINISTRATOR SETTINGS MENU
The system settings are accessed via the following menu structure.
Refer to this menu when enabling or disabling the settings that are explained beginning on p.88.
Some settings contain an additional level of settings (a settings screen).
Administrator Password
Level 1
Level 2
Level 3
Change Admin PW
Initial Setting
Date & Time Set
Daylight Saving Time
Printer
Notice Page
Network
Confirmation of Network
User Control
Connection Type
Wired
Wireless Infrastructure
Wired + Wireless AP
Wired Settings
IPv4 Settings
IPv6 Settings
Wireless (Infrastructure)
Manual Input of SSID
Wireless (Access Point)
Setting of SSID
Security Settings
Device IP Address Settings
Channel Settings
Sending Output Settings
Bandwidth Settings
IP Addr. Distribution Range
User Authentication
User Registration
Function Limit Setting
Account Limit Setting
User Count Display
User Count Reset
A Warning when Login Fails
Disable Print by Inv. User
Device Control
Fusing Control
Fusing Cleaning
Registration Adjustment
Operation Setting
Auto Clear
Language Setting
Message Time
Key Touch Sound
Key Press Time
Disable Auto Key Repeat
Disable Paper Size Set
85
SYSTEM SETTINGS
Level 1
Energy Save
Level 2
Auto Power Shut-Off Timer
Preheat Mode
Enter Auto Power Shut-Off after
the Remote Job
Toner Save Mode
List Print
User Info. Print
Colour Adjust.
Easy Calibration
Tone Adjustments
Return to Default
Security Settings
IPsec Settings
Initialize Private Data and Data in
Machine
86
Level 3
SYSTEM SETTINGS
USING THE SYSTEM SETTINGS
1
2
3
Press the [SPECIAL FUNCTION] key (
).
Select "System Settings" with the [ ] or [ ] key and press the [OK] key.
Enter the administrator password with the numeric keys.
• " " appears for each digit that you enter.
• The mode selection screen appears.
4
Select the desired mode with the [ ] or [ ] key.
5
6
7
Press the [OK] key.
Select the desired setting with the [ ] or [ ] key.
Press the [OK] key and follow the instructions in the setting screen.
Several settings will have checkboxes in front of them. To enable a function (make a checkmark appear), press
the [OK] key. To disable the setting, press the [OK] once again to remove the checkmark. To configure a
setting that has a checkbox, go to step 8.
8
To use another setting for the same mode, select the desired setting with the [ ] or
[ ] key.
To use a setting for a different mode, press the [BACK] key (
system settings, press the [HOME] key (
).
87
) and select the desired mode. To exit the
SYSTEM SETTINGS
Change Admin PW
Confirmation of Network
Confirm network settings.
Use this function to change administrator password.
To change the administrator password, see
"PROGRAMMING AN ADMINISTRATOR
PASSWORD" (p.83).
Connection Type
You can change the machine's network connection
type.
Wired Settings
IPv4 Settings
Initial Setting
When using the machine on a TCP/IP (IPv4) network,
use this setting to configure the IP address of the
machine.
The settings are shown below.
The default settings for operation of the machine can
be configured. Select the [Initial Setting] to configure
the settings.
Enable DHCP
Use this setting to have the IP address obtained
automatically using DHCP (Dynamic Host
Configuration Protocol). When this setting is enabled,
it is not necessary to manually enter an IP address.
Date & Time Set
Use this to set the date and time in the machine's
built-in clock.
IPv4 Address
Enter the IP address of the machine.
Daylight Saving Time
Enable daylight saving time.
Subnetmask
Enter the Subnetmask.
Default Gateway
Enter the Default Gateway.
Printer
IPv6 Settings
Settings related to the printer function can be
configured.
Select the [Printer] to configure the settings.
When using the machine on a TCP/IP (IPv6) network,
use this setting to configure the IP address of the
machine.
The settings are shown below.
Enable IPv6 Protocol
Enable this setting.
Enable DHCPv6
Use this setting to have the IP address obtained
automatically using DHCP (Dynamic Host
Configuration Protocol). When this setting is enabled,
it is not necessary to manually enter an IP address.
Notice Page
Set whether a notice page is printed when printing
does not take place due to an error such as memory
full.
Manual Address
Enter the IP address of the machine.
Prefix Length
Enter the prefix length (0 to 128).
Default Gateway
Enter the IP Gateway address.
Network
Network settings are described below.
Select the [Network] key to configure the settings.
Note
88
• If DHCP is used, the IP address assigned
to the machine may change automatically.
If the IP address changes, printing will not
be possible.
• In an IPv6 environment, the machine can
use LPD protocol.
SYSTEM SETTINGS
Wireless (Infrastructure)
Wireless (Access Point)
(Only on models with wireless LAN)
(Only on models with wireless LAN)
This sets connection using wireless infrastructure
mode.
This sets connection using wireless access point
mode.
Manual Input of SSID
Enter up to 32 half-width characters for the SSID.
Setting of SSID
Enter up to 32 half-width characters for the SSID.
Security Type
Select the security type.
(none/WEP/WPA Personal/WPA2 Personal)
Security Settings
• Security Type
Select the security type.
(none/WEP/WPA Personal/WPA2 Personal)
Setting of Encrypt
Select the encryption method based on the "Setting of
Security Type" setting.
(none/WEP/TKIP/AES)
• Setting of Encrypt
Select the encryption method based on the
"Setting of Security Type" setting.
(none/WEP/TKIP/AES)
Security Key Settings
Set the security key used for wireless connection.
WEP
WPA
Personal
• Security Key Settings
Set the security key used for wireless connection.
5 half-width numeric digits,
10 hexadecimal (64 bit) digits,
13 half-width numeric digits,
or 26 hexadecimal (128 bit) digits
8 to 63 half-width numeric digits or
64 hexadecimal digits
WPA2
Personal
WEP
5 half-width numeric digits,
10 hexadecimal (64 bit) digits,
13 half-width numeric digits,
or 26 hexadecimal (128 bit) digits
WPA
Personal
8 to 63 half-width numeric digits or
64 hexadecimal digits
WPA2
Personal
Device IP Address Settings
Set the IP address of the access point.
Channel Settings
Set the channel used for the access point.
Sending Output Settings
Set the transmission output of the access point.
Bandwidth Settings
Set the frequency band of the access point.
IP Addr. Distribution Range
Set the lease range and lease period of the IP address
used for the access point.
89
SYSTEM SETTINGS
User Control
User Count Display
This setting is used to display the print page counts of
each account, and the usage limits for printing. Misfed
pages are not included in the page counts.
User Control is used to configure settings for user
authentication. Select the [User Control] to configure
the settings.
To change to a different account number, press the
[ ] or [ ] key.
Select and display the type with the [ ] or [ ] key.
User Count Reset
This setting is used to reset the print page counts of an
individual account, or all accounts, to zero.
User Authentication
These settings enable or disable user authentication
and specify the authentication method.
When user authentication is enabled, each user of the
machine is registered. When a user logs in, settings for
that user are applied.
A Warning when Login Fails
When this setting is enabled, the machine will not
allow operation for one minute if an incorrect account
number is entered three times in a row. During this
time, "This operation is disabled. Please contact your
administrator." will appear in the display.
User Registration
Users can be added, deleted, and changed.
Note
Disable Print by Inv. User
When enabled, this setting cancels a print job if no
account number is entered or an invalid account
number is entered. This setting is only effective when
"User Authentication" has been enabled.
The function is initially enabled (factory default
setting).
• When entering a user number, the [OK]
key is not enabled until 5 digits have been
entered.
• If the [Clear] key is pressed during entry of
a user number, the displayed user number
changes to "-----".
Function Limit Setting
Note
Set functions that all users or a specific user can use.
• Colour
• B/W
• USB Memory Direct Print
Note
For the users that are prohibited to use
Colour, using USB Memory Direct Print will
be prohibited even if they have been
permitted to use it.
Account Limit Setting
Printing paper limits can be set for all users or specific
users.
90
Pages printed by invalid account numbers
are added to the page count of "Others"
(account number).
SYSTEM SETTINGS
Device Control
Operation Setting
These settings are used to configure settings for
hardware functions of the machine. To access one of
these settings, select "Device Control" in the mode
selection screen, select the desired setting in the
device control screen, and press the [OK] key.
These settings are used to configure various settings
related to the operation panel. To access one of these
programs, select "Operation Setting" in the mode
selection screen, select the desired setting in the
operation setting screen, and press the [OK] key.
Auto Clear
Fusing Control
The machine is set at the factory to return the display
to the home screen one minute after a print job is
finished or when the [HOME] key (
) is pressed.
Time selections are "0 sec.", "10 sec.", "20 sec.", "60
sec.", "90 sec." and "120 sec.".
The factory default setting is 60 seconds.
Select "Auto Clear" and press the [OK] key. The
following screen will appear.
The temperature of toner fusing is controlled according
to the weight of the paper that is used.
Note
• Be sure to use only paper that is in the
same weight range as the weight range
set here. Do not mix in other standard
paper that differs from the set range.
• When settings are changed, the changes
will take effect after the machine is
restarted. To restart the machine, see
"POWER ON AND OFF" (p.12).
Select the desired time with the [ ] or [ ] key.
If you do not want auto clear to operate, select "0".
Fusing Cleaning
Language Setting
Use this function to clean the machine's fusing unit
when dots or other dirt appear on the printed side of
the paper. When this function is executed, "V" printed
paper is output and the fusing unit is cleaned.
Note
This setting is used to select the display language.
Select "Language Setting", press the [OK] key, and
follow the steps below.
Message Time
If improvement is not noticed after the first
time you use the function, try executing the
function again.
This setting is used to set the length of time that
messages appear in the display (this applies to
messages that appear for a certain length of time and
then automatically disappear.) Select from "Short (3
sec.)", "Normal (6 sec.)", or "Long (9 sec.)".
The factory default setting is "Normal (6 sec.)".
Registration Adjustment
If the colours are out of place on the printed surface
when colour printing is performed, the print positions of
the colours can be adjusted.
Select "Registration Adj." and press [OK] key to start
automatic registration. When appearing the complete
message, the adjustment is completed.
Note
Key Touch Sound
This setting is used to set the length of the key touch
sound that is heard each time a key is pressed.
The initial factory setting is "Short".
Select the desired length with the [ ] or [ ] key.
To turn the key touch sound off, select "Off".
Depending on the machine's condition,
adjustment error message may appear.
In that case, execute the registration
adjustment again.
Key Press Time
This setting is used to set the duration of time that a
key must be pressed to take effect.
A longer setting can be selected to prevent keys
pressed accidentally from taking effect. Keep in mind,
however, that when a longer setting is selected more
care is required when pressing keys to ensure that the
key input is registered.
The initial factory setting is "Minimum".
91
SYSTEM SETTINGS
Disable Auto Key Repeat
Enter Auto Power Shut-Off after the
Remote Job
This setting is used to stop a setting from changing
continuously when the [ ] or [ ] key is held down,
such as selecting a menu item (auto key repeat will not
operate). When this setting is enabled, a key must be
pressed repeatedly instead of holding it down.
Auto key repeat is initially set to operate (factory
default setting).
When the machine completes a print job received from
the PC, the machine immediately returns to the Auto
Power Shut-Off mode.
Toner Save Mode
You can reduce the amount of toner used for printing.
Disable Paper Size Set
Note
This setting is used to disable "Paper Size Set" in the
special functions menu. When disabled, "Paper Size
Set" cannot be used when the [Special Function] key
( ) is pressed, which prevents users other than the
administrator from easily changing the paper size
setting.
"Disable Paper Size Set" is initially disabled (factory
default setting).
Toner Save Mode is only effective when the
machine's printer driver is not used. When
the printer driver is used, the printer driver
setting takes precedence.
This function may not operate in some
applications and operating systems.
List Print
This is used to print lists and reports that are only for
use by the administrator of the machine.
Select the [List Print] to configure the settings.
• User Info. Print
The user name, user number, paper used, paper
limits, and function permission settings can be
printed for each user.
Energy Save
These settings are used to configure energy saving
settings. To access one of these settings, select
"Energy Save" in the mode selection screen, and
select the desired setting in the energy save screen,
and then press the [OK] key.
Colour Adjust.
This machine provides the colour adjustment ways as
shown below.
Auto Power Shut-Off Timer
This setting is used to set the duration of time until
auto power shut-off mode activates when the
operation panel is not used. Using this function helps
conserve energy, preserve natural resources, and
reduce environmental pollution.
"1 min.", "3 min.", "5 min.", "10 min.", "15 min.", "30 min.",
"45 min." or "60 min." can be selected for the duration of
time. Select a setting that suits your work conditions.
Easy Calibration and Tone Adjustments
Preheat Mode
• Tone Adjustments
Use to adjust the tone density of each colour. This
function does not implement a test page print out.
The machine has two colour adjustment functions. Use
the appropriate function depending on the situation.
• Easy Calibration
Use to fit the grey balance. This function implements
a test page print out.
This setting is used to set the duration of time until
preheat mode, which automatically lowers the fusing
unit temperature, activates when the operation panel is
not used. Using this function helps conserve energy,
preserve natural resources, and reduce environmental
pollution. "1 min.", "3 min.", "5 min.", "10 min.",
"15 min.", "30 min.", "45 min." or "60 min." can be
selected for the duration of time. Select a setting that
suits your work conditions.
92
SYSTEM SETTINGS
Easy Calibration
Note
This function is performed by selecting the desired
colour of grey (processed grey), which is a
combination of cyan, magenta, and yellow on the
printed test page.
Before using the Easy Calibration, load A4 or
8-1/2" x 11" white plain paper in the tray.
Note
The test page is divided into cells with 7 on
the horizontal axis (X) and 7 on the vertical
axis (Y). Each cell is filled in with grey mixed
with a varied hue of colour.
(4) Enter the coordinates of the colour selected in
step (3) in [X] and [Y] of the Easy Calibration
and press [OK] key.
The result of colour reproduction depends
on paper quality. It is recommended to
adjust with the actual paper to be printed.
(1) Select [Colour Adjust.] on the operation panel
and press [OK] key.
Note
(2) Select [Easy Calibration] and press [OK] key,
then press again [OK] key to print out the test
page.
If X = 4 and Y = 4 are entered, grey balance
doesn't change.
If the colour adjustment is not satisfactory
on the trial print, repeat the above procedure
(1) to (4).
If the colour is still not satisfactory after
repeating the procedure several times, use
the "Tone Adjustments".
Tone Adjustments
This function is used to adjust each of the density
levels (low, mid, and high) of the four colour
components, cyan, magenta, yellow and black.
(3) View the test page from directly in front, and
select the cell that is closest to the neutral
grey.
Place five sheets of white plain paper under the
printed test page so that no background colour or
pattern shows through the test page.
Note
(1) Select [Colour Adjust.] on the operation panel
and press [OK] key.
Be careful that the visibility of the grey patch
may be affected by the environmental
illumination.
(2) Select [Tone Adjustments] and press [OK] key,
then Tone Adjustments setting screen
appears.
If you desire this
colour of grey, the
coordinates are
X = 2, Y = 5.
X = 4, Y = 4
position shows
the current value
of grey balance.
Enter each number in the range of 1 to 7 to the
colours of C (Cyan), M (Magenta), Y (Yellow) and
Bk (Black).
Initially the setting screen for [Low] level appears.
You can change the screen for [Middle] and [High]
with [ ][ ] keys.
93
SYSTEM SETTINGS
Security Settings
The following settings are related to security.
Select the [Security Settings] to configure the settings.
Factory default number for each colour is set to
"4" respectively.
Increasing the number will make the print darker
and decreasing the number will make it lighter.
IPsec Settings
Return to Default
IPsec can be used for data transmission/reception on
a network.
The colour adjustment setting values can be initialized
to the factory default ones by selecting [Return to
Default] in [Colour Adjust.] menu.
(1) Select [Return to Default] in [Colour Adjust.]
menu and press [OK] key.
IKEv1 Settings
Configure the IKEv1 settings.
Initialize Private Data and Data in
Machine
The system-set values can be restored to the factory
default state after eliminating the data stored in the
machine.
•
•
•
•
•
•
(2) Confirmation screen appears and select [Yes]
to initialize the value to default, or select [No]
to return to [Mode Select] screen.
•
94
Current values set for system settings
Current values set for network settings
User information > User registration information
User information > Paper limits
User information > Function usage restrictions
User information > User counts
(Excluding default users)
Product key
6
WEB FUNCTIONS IN THE
MACHINE
ABOUT THE WEB PAGES
The machine includes a built-in Web server. The Web server is accessed using a Web browser on your computer.
The Web pages include both pages for users and pages for the administrator. In the user Web pages, users can
monitor the machine, and select printer configuration settings. In the administrator Web pages, the administrator can
configure the machine's settings, and passwords. Only the administrator is allowed to configure these settings.
HOW TO ACCESS THE WEB PAGE
Use the following procedure to access the Web pages.
1
Open the Web browser on your computer.
Supported browsers:
Internet Explorer:
Netscape Navigator:
Firefox:
2
6.0 or higher (Windows®)
9 (Windows®)
2.0 or higher (Windows®)
In the "Address" field of your Web browser, enter the IP address that has been
configured in the machine.
When the connection is completed, the Web page will appear in your Web browser.
"ABOUT THE WEB PAGES (FOR USERS)" (p.96)
3
When finished, close the Web pages.
When you have finished using the Web pages, click the
95
(close) button in the top right corner of the page.
WEB FUNCTIONS IN THE MACHINE
ABOUT THE WEB PAGES
(FOR USERS)
When you access the user Web pages in the machine, the following page will appear in your browser.
A menu frame appears on the left side of the page. When you click an item in the menu, a screen appears in the
right frame that allows you to configure settings for that item.
(1)
(2)
(3)
(4)
(5)
(6)
(4) Condition Settings
Configure basic printer settings and printer
language settings.
"CONFIGURING THE PRINTER CONDITION
SETTINGS" (p.97)
(5) Admin Mode
To open the Web pages for the administrator, click
here and then enter the administrator's user name
and password.
"ABOUT THE WEB PAGES (FOR THE
ADMINISTRATOR)" (p.100)
"PROTECTING INFORMATION PROGRAMMED
IN THE WEB PAGE ([Passwords])" (p.102)
(6) Display Language Setting
Select the desired language setting from the
pull-down menu.
(1) Menu frame
Click a setting in the menu to configure it.
(2) System Information
Shows the current status of the machine and
model name.
• Device Status
Shows the current status of the machine, paper
trays, output trays, toner and other supplies, and
page counts.
Out of paper and other warnings appear in red.
• Device Configuration
Shows what options are installed.
• Network Status
Shows the network status. Information on
"General" and "TCP/IP" is shown on the
respective pages.
(3) Data List Print
You can print out the various settings that you have
selected.
96
WEB FUNCTIONS IN THE MACHINE
CONFIGURING THE PRINTER
CONDITION SETTINGS
The printer condition settings allow basic printer settings to be configured. The following items can be set:
● "Default Settings" (p.98):
● "PCL Settings" (p.99):
Note
Basic settings that are mainly used when the printer driver is not used.
PCL symbol set, font, line feed code, and other settings.
When the printer driver is used and the same settings are configured both in the printer driver and in the above
screens, the settings configured in the printer driver override the settings in the above screens. If a setting is
available in the printer driver, use the printer driver to configure the setting.
HOW TO CONFIGURE THE SETTINGS
To display the Condition Settings screen, click [Condition Settings] in the menu frame.
(2)
(3)
(1)
(4)
(1) Condition Settings
This displays the page for configuring the printer
condition settings.
(2) Default Settings/ PCL/PS
Select the type of condition settings that you wish
to configure.
(3) Settings
The factory default settings are displayed.
Change the settings as desired by selecting from
drop-down lists and by directly entering settings.
For information on the settings, see "PRINTER
CONDITION SETTINGS" (p.98).
(4) Submit
Click to store the Web page settings in the
machine.
97
WEB FUNCTIONS IN THE MACHINE
PRINTER CONDITION SETTING MENU
Condition Settings
Condition Settings
Default Settings
Factory default settings
PCL Settings
Factory default settings
Orientation
Portrait
Symbol Set
PC-8
Default Paper Size
A4
Font
0: Courier (internal font)
Default Paper Type
Plain
Line Feed Code
CR=CR; LF=LF; FF=FF
Default Resolution
600dpi (High Quality)
Disable Blank Page
Disable
Print
2-Sided Print
1-Sided
Colour Mode
Auto
Fit To Page
ON
PS Settings
Print PS Errors
Factory default settings
Disable
PRINTER CONDITION SETTINGS
Factory default settings are indicated in bold.
Default Settings
Item
Selections
Description
Orientation
Portrait, Landscape
This sets the orientation of the printed page. Select [Portrait] when
the image is longer in the vertical direction, or [Landscape] when the
image is longer in the horizontal direction.
Default Paper Size
A4, B5, A5, Letter,
Invoice, Executive
Set the default paper size used for printing.
Default Paper Type
Plain, Letter head,
Pre-printed,
Pre-punched,
Recycled, Colour
Set the type of paper used for printing.
Default Resolution
600dpi,
600dpi (High Quality)
Set the printing resolution.
Disable Blank Page
Print
Enable, Disable
When this is specified, blank pages with no print data will not be
printed.
2-Sided Print
1-Sided,
2-Sided (Book),
2-Sided (Tablet)
When [2-Sided (Book)] is selected, two-sided printing takes place so
as to allow binding at the left side. When [2-Sided (Tablet)] is
selected, two-sided printing takes place so as to allow binding at the
top. (Only for models that support two-sided printing.)
Colour Mode
Auto, Black & White
Set the colour mode used for printing.
Fit To Page
ON, OFF
Set whether the printed image is fit to the size of the paper.
98
WEB FUNCTIONS IN THE MACHINE
PCL Settings
Item
Selections
Description
Symbol Set
Select one of 35
sets.
This specifies which country's characters (PCL symbol set) are
assigned to certain of the symbols in the character code list.
The factory default setting is [PC-8].
Font
Select one internal
font.
This specifies which PCL font to use for printing. One font can be
specified from among the internal fonts. The factory default setting is
[0: Courier].
Line Feed Code
CR=CR; LF=LF;
FF=FF,
CR=CR+LF; LF=LF;
FF=FF,
CR=CR;
LF=CR+LF;
FF=CR+FF,
CR=CR+LF;
LF=CR+LF;
FF=CR+FF
This specifies the line break code by means of a combination of the
"CR" (return) code, "LF" (line break) code, and "FF" (page break)
code. The factory default setting is printing based on the transmitted
code. The setting can be changed by selecting one of four
combinations.
PostScript settings
Item
Settings
Description
Print PS Errors
Enable, Disable
When this setting is enabled, an error description is printed
each time a PostScript error occurs.
99
WEB FUNCTIONS IN THE MACHINE
ABOUT THE WEB PAGES
(FOR THE ADMINISTRATOR)
In addition to the menus that appear for users, other menus that can only be used by the administrator appear in the
administrator Web pages.
A menu frame appears on the left side of the page. When you click an item in the menu, a screen appears in the
right frame that allows you to configure settings for that item. Settings that can only be configured by the
administrator are explained here.
(1)
(2)
(3)
(4)
(5)
(6)
(7)
(8)
100
(1)Information
Configure machine identification information for
the status & alert E-mail function.
"INFORMATION SETUP" (p.104)
(2)Passwords
To protect the Web site, the system administrator
can establish passwords. Enter a password that
you would like to establish and click the [Submit]
button.
One password can be established for the
administrator and one password can be
established for users.
"PROTECTING INFORMATION PROGRAMMED
IN THE WEB PAGE ([Passwords])" (p.102)
(3)Administrator Settings
Setting changes can be prohibited and interface
settings can be configured.
"ADMINISTRATOR SETTINGS" (p.103)
(4)Status Message
Configure parameters required for sending status
messages, such as destination addresses and
time schedules.
"STATUS MESSAGE SETUP" (p.105)
(5)Alerts Message
Store destination addresses for alert messages.
"ALERTS MESSAGE SETUP" (p.105)
(6)Security
Unused ports can be disabled for greater security
and port numbers can be changed.
(7)Services
Configure information concerning the e-mail
system.
"SMTP SETUP" (p.104)
(8)Print Port
Configure settings for LPD and Raw print.
WEB FUNCTIONS IN THE MACHINE
CONFIGURING SMTP AND DNS
SERVER SETTINGS
The procedures for using [Quick Setup] are explained here. [Quick Setup] is used to quickly configure only the
required settings for "SMTP", and "DNS" servers. These settings are normally configured first.
SMTP server:
DNS server:
SMTP is used to transmit e-mail.
To use these transmission methods, your SMTP server settings must be configured.
If you entered a host name in "Primary SMTP Server" or "Secondary SMTP Server" of "SMTP",
you must also configure your DNS server settings.
1
Click [Quick Setup] in the menu frame.
2
3
Enter the required information in "SMTP" and "DNS".
When you have completed all of the entries, click [Submit].
The entries will be stored.
Note
If you need to configure advanced settings for the SMTP, and DNS servers, follow the procedures below.
Click [Services] in the menu frame to display the services setup screen. Select the desired server and then
configure the required parameters for that server.
101
WEB FUNCTIONS IN THE MACHINE
PROTECTING INFORMATION
PROGRAMMED IN THE WEB PAGE
([Passwords])
Passwords can be set (click [Passwords] in the menu frame) to restrict Web page access and protect settings.
The administrator must change the password from the factory default setting. The administrator must also take care
to remember the new password. The next time the Web pages are accessed, the new password must be entered.
A password can be set for the administrator and a password can be set for users.
1
2
Click [Passwords] in the menu frame.
Enter the current password in "Admin Password".
When establishing a password for the first time, enter "admin" in "Admin Password".
Note
3
Be sure to enter "admin" in lower case (passwords are case sensitive).
Enter passwords in "User Password" and "Admin Password".
• A maximum of 7 characters and/or numbers can be entered for each password (passwords are case
sensitive).
• Be sure to enter the same password in "Confirm Password" as you did in "New Password".
4
When you have finished entering all items, click [Submit].
The entered password is stored.
After setting the password, turn the machine power off and then back on.
Note
When prompted to enter a user name, a user should enter "users" and an administrator should enter "admin" in
"User Name". In "Password", the respective password for the entered user name should be entered.
102
WEB FUNCTIONS IN THE MACHINE
ADMINISTRATOR SETTINGS
The administrator settings are used to prohibit changes to the [Condition Settings] and to configure interface
settings.
● "Default settings":
Select the setting for which you wish to prohibit changes.
● "Fusing Control" :
The temperature of toner fusing is controlled according to the weight of the paper
that is used.
● "Interface settings":
Enable monitoring of data sent to the network port and set restrictions.
CONFIGURING A SETTING IN THE ADMINISTRATOR
SETTINGS
1 Click [Administrator Settings] in the menu frame.
The "Default Settings" screen of the [Administrator Settings] will appear. If you wish to select a setting in the
"Default Settings" screen, go to step 3.
2
Click the desired setting, and make a selection for the setting in the screen that appears.
See "ADMINISTRATOR SETTINGS" for descriptions of the settings.
3
Click [Submit] to store the entered information.
ADMINISTRATOR SETTINGS
When "YES, NO" appears in the "Settings" column, "YES" is selected when a checkmark appears in the checkbox of
the item, and "NO" is selected when checkmark does not appear.
Default settings
Item
Settings
Description
Prohibit Test Page Printing
YES, NO
This setting is used to prohibit printing of a printer test page.
Disable Default Setting
Changes
YES, NO
This setting is used to prohibit changes to the default condition
settings.
List Prints
1-Sided, 2-Sided
Set whether lists are printed by 1-sided printing or 2-sided
printing.
Fusing Control
Item
Fusing Control
Settings
g/m2,
2
60-89
90-105 g/m
Description
The temperature of toner fusing is controlled according to the
weight of the paper that is used.
103
WEB FUNCTIONS IN THE MACHINE
Interface settings
Item
Settings
Description
I/O Timeout
1- 60 - 999 (sec)
During reception of a print job, if remaining data is not received
after the time set here elapses, the port connection is broken and
the next print job is begun.
Emulation Switching
Auto*,
PostScript, PCL
Select the printer language. When [Auto] is selected, the
language is automatically selected from the data sent to the
printer. Unless errors occur frequently, do not change the setting
from [Auto] to another setting.
Port Switching Method
Switch at End
of Job, Switch
after I/O Timeout
Select the method for switching network ports.
E-MAIL STATUS AND E-MAIL
ALERT SETTINGS
These functions send information on machine use (print count, etc.) and error conditions (paper misfeed, out of
paper, out of toner, etc.) via e-mail to the administrator of the machine or the dealer.
INFORMATION SETUP
Machine identification information for the status and alert e-mail functions is configured in the "Information Setup"
screen. The entered information will be included in status and alert e-mail messages.
1
Click [Information] in the menu frame.
The "Information Setup" screen will appear.
2
3
Enter the machine information.
Click [Submit] to store the entered information.
SMTP SETUP
The Status and alert e-mail functions use SMTP (Simple Mail Transport Protocol) to send e-mail. The following
procedure is used to set up the e-mail environment. This must be done by the system administrator or other person
familiar with the network.
1
Click [Services] in the menu frame.
The "Services Setup" screen will appear.
2
3
4
Click [SMTP].
Enter the information required to set up the e-mail environment.
Click [Submit] to store the entered information.
104
WEB FUNCTIONS IN THE MACHINE
STATUS MESSAGE SETUP
Use the status message function to send the current counter information, including print count and total output
count, based on the specified schedule. The destinations can be set for administrators and dealers respectively.
To set up the status message, follow these steps.
1
Click [Status Message] in the menu frame.
The "Status Message Setup" screen will appear.
2
Enter the required information, including the destination addresses and time
schedule.
3
Click [Submit] to store the entered information.
When the E-mail Status settings are completed, printer count information will be sent periodically by e-mail to
the specified e-mail addresses.
Note
If you quit the browser before clicking [Submit], the settings will be cancelled. To send printer information
immediately to the specified e-mail addresses, click [Send Now].
ALERTS MESSAGE SETUP
Use the alert message function to send alert information, such as empty toner and paper and trouble including paper
misfeeds, to specified destinations when such problems occur. The destinations can be set for administrators and
dealers respectively.
To set up the alert message, follow the procedure below.
1
Click [Alerts Message] in the menu frame.
The "Alerts Message Setup" screen will appear.
2
3
Enter the destination addresses.
Click [Submit] to store the entered information.
If these parameters are set, event information for the printer will be transmitted to the specified addresses via
E-mail each time a specified event occurs. The meaning of each event item is shown below.
(Example)
Paper Jam:
Toner Low:
Toner Empty:
Paper Empty:
Note
A paper misfeed has occurred.
Toner is low.
Toner must be added.
Paper must be loaded.
If you quit the browser before clicking [Submit], the settings will be cancelled.
105
WEB FUNCTIONS IN THE MACHINE
Information on the Software License for This Product
Software composition
The software included in this product is comprised of various software components whose individual copyrights are
held by SHARP or by third parties.
Software developed by SHARP and open source software
The copyrights for the software components and various relevant documents included with this product that were
developed or written by SHARP are owned by SHARP and are protected by the Copyright Act, international treaties,
and other relevant laws. This product also makes use of freely distributed software and software components whose
copyrights are held by third parties. These include software components covered by a GNU General Public License
(hereafter GPL), a GNU Lesser General Public License (hereafter LGPL) or other license agreement.
Obtaining source code
Some of the open source software licensors require the distributor to provide the source code with the executable
software components. GPL and LGPL include similar requirements.
For information on obtaining the source code for the open source software and for obtaining the GPL, LGPL, and
other license agreement information, visit the following website:
http://sharp-world.com/products/copier/source/download/index.html
We are unable to answer any questions about the source code for the open source software. The source code for
the software components whose copyrights are held by SHARP is not distributed
106
TRADEMARK ACKNOWLEDGMENTS
The following trademarks and registered trademarks are used in conjunction with the machine and its peripheral
devices and accessories.
• Microsoft®, Windows®, Windows® XP, Windows Server® 2003, Windows Vista®, Windows Server®
2008, Windows® 7, Windows® 8, Windows® 8.1, Windows Server® 2012 and Internet Explorer® are
either registered trademarks or trademarks of Microsoft Corporation in the United States and/or other
countries.
• Intel® is a trademark of Intel Corporation in the U.S. and/or other countries.
• Adobe, the Adobe logo, PostScript, Acrobat, the Adobe PDF logo, and Reader are either registered
trademarks or trademarks of Adobe Systems Incorporated in the United States and/or other countries.
• Apple, Macintosh, Mac OS, AppleTalk, EtherTalk and LaserWriter are registered trademarks of Apple
Inc.
• Netscape Navigator is a trademark of Netscape Communications Corporation.
• PCL is a registered trademark of the Hewlett-Packard Company.
• IBM, PC/AT, and PowerPC are trademarks of International Business Machines Corporation.
• Sharpdesk is a trademark of Sharp Corporation.
• All other trademarks and copyrights are the property of their respective owners.
Candid and Taffy are trademarks of Monotype Imaging, Inc. registered in the United States Patent and Trademark
Office and may be registered in certain jurisdictions. CG Omega, CG Times, Garamond Antiqua, Garamond
Halbfett, Garamond Kursiv, Garamond and Halbfett Kursiv are trademarks of Monotype Imaging, Inc. and may be
registered in certain jurisdictions. Albertus, Arial, Coronet, Gill Sans, Joanna and Times New Roman are trademarks
of The Monotype Corporation registered in the United States Patent and Trademark Office and may be registered in
certain jurisdictions. Avant Garde, ITC Bookman, Lubalin Graph, Mona Lisa, Zapf Chancery and Zapf Dingbats are
trademarks of International Typeface Corporation registered in the United States Patent and Trademark Office and
may be registered in certain jurisdictions. Clarendon, Eurostile, Helvetica, Optima, Palatino, Stempel Garamond,
Times and Univers are trademarks of Heidelberger Druckmaschinen AG, which may be registered in certain
jurisdictions, exclusively licenced through Linotype Library GmbH, a wholly owned subsidiary of Heidelberger
Druckmaschinen AG. Apple Chancery, Chicago, Geneva, Monaco and New York are trademarks of Apple Inc. and
may be registered in certain jurisdictions. HGGothicB, HGMinchoL, HGPGothicB and HGPMinchoL are trademarks
of Ricoh Company, Ltd. and may be registered in some jurisdictions. Wingdings is a registered trademark of
Microsoft Corporation in the United States and other countries. Marigold and Oxford are trademarks of Arthur Baker
and may be registered in some jurisdictions. Antique Olive is a trademark of Marcel Olive and may be registered in
certain jurisdictions. Hoefler Text is a trademark of Johnathan Hoefler and may be registered in some jurisdictions.
ITC is a trademark of International Typeface Corporation registered in the United States Patent and Trademark
Office and may be registered in certain jurisdictions. Agfa is a trademark of the Agfa-Gevaert Group and may be
registered in certain jurisdictions. Intellifont, MicroType and UFST are trademarks of Monotype Imaging, Inc.
registered in the United States Patent and Trademark Office and may be registered in certain jurisdictions.
Macintosh and TrueType are trademarks of Apple Inc. registered in the United States Patent and Trademark Office
and other countries. PostScript is a trademark of Adobe Systems Incorporated and may be registered in some
jurisdictions. HP, PCL, FontSmart and LaserJet are trademarks of Hewlett- Packard Company and may be
registered in some jurisdictions. The Type 1 processor resident in Monotype ImagingÅfs UFST product is under
licence from Electronics For Imaging, Inc. All other trademarks are the property of their respective owners.
107
OPERATION GUIDE
MXC300P-GB1