1
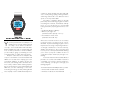
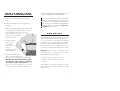
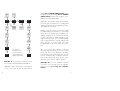
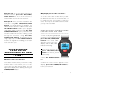
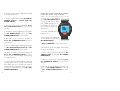
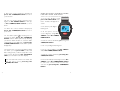
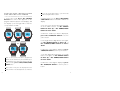
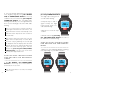
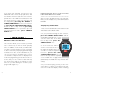
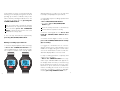
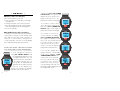
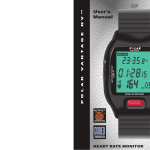
GBR 179102.C
L
A
U
N
A
M
R
'
S
PROTRAINER NV
E
S
U
POLAR PROTRAINER NV HRM
www.polar.fi
™
Recyclable material. Low emissions during production.
Printed in Finland. Graphic design CIS, Kajaani, Finland.
Polar Electro Oy
Professorintie 5
FIN-90440 KEMPELE
Finland
Tel. +358-8-520 2100
Fax +358-8-520 2300
GBR
LA
LA
STORE/LAP
CONTENTS
Polar Protrainer NV HRM...................................4
How to wear your Transmitter ...........................8
The Basics.........................................................9
Programming Polar Protrainer NV ...................12
Setting the time ...............................................13
Setting the alarm .............................................15
Setting the date ...............................................17
Setting target heart rate zone limits ................23
Exercising with Polar Protrainer NV.................27
Recall ..............................................................30
Care and maintenance....................................32
Precautions .....................................................34
Troubleshooting ..............................................35
Service ............................................................37
Polar books and accessories..........................38
Technical specifications..................................40
Limited one year warranty...............................41
Disclaimer .......................................................42
3
PROTRAINER NV
LAP
LAP
STORE/LAP
POLAR
PROTRAINER NV™ HRM
ou have purchased an essential piece of
equipment for scientific training based
on today’s most advanced athletic
concepts - the Polar Protrainer NV Heart Rate
Monitor (HRM). Now, with a sophisticated and
most accurate performance monitor available,
you are ready to gauge your training to reach
your full potential, no matter what your sport is.
Everyone cannot become a champion, but
everyone can train like one! Polar Protrainer NV
HRM is an essential tool in helping you reach
your athletic ambitions. To optimise the time you
invest into your training and to eliminate hit-ormiss activity, modern athletic training requires
precise measurements. The Polar Protrainer NV
HRM lets you take advantage of the same
measuring technology used by winning WorldClass Olympic Teams and World Champions in
Y
4
a variety of sports ranging from track and field,
cross country skiing, cycling, running, triathlon,
swimming and aerobics into different racket
sports, ice hockey and football.
For today’s competitive athlete a carefully
planned personal training program includes
measuring time intervals, intermediate and lap
times etc. For full benefit one should add
testing of baseline physiological functions, such
as:
• Heart Rate (Beats Per Minute)
• Efficiency in oxygen use
(maximal aerobic capacity - VO 2max)
• Accumulation of lactic acid
(anaerobic threshold - AT).
When these internal functions are accurately
measured, areas for improvement can be
identified. A planned training program can be
implemented, focusing on improving weaknesses through controlled use of exercise intensity,
duration and frequency. Stress (intensity) and
recovery levels can be predetermined allowing
you to reach your peak condition in time for
competition and/or avoid injury through overtraining.
Your Polar Protrainer NV Heart Rate Monitor
provides an accurate and reliable method for
controlling your exercise intensity while precisely tracking your progress through your
training program.
The Polar Protrainer NV HRM provides you with:
• A watch with an alarm and a calendar
• A wireless heart rate monitor with ECG
5
accurate continuous measurement including
the following functions
- Programmable target heart rate zone in
one beat per minute increments,
- Two programmable timers to track workout
intervals,
- Record performance information, split/lap
times and corresponding heart rates,
into 44 memory banks for later analysis,
- Average heart rate of the total exercise
period,
- Stopwatch with split/lap time counter,
- Record your recovery heart rate,
- Time spent above, within and below the
target heart rate zone,
- Electroluminescent back light,
- Target zone limit alarm (sound) together
with visual alarm (blinking display),
- Wireless button to toggle the time of
day/split time in the measurement mode,
- Wireless button to activate the HR
measurement.
For a coach or trainer, the use of the Polar
Protrainer NV HRM gives a lot of qualitative
information over the athlete’s progress.
This owner’s manual is designed to
show precisely what the Polar Protrainer NV HRM
can do and how you can use each feature to
best accomplish personal fitness and performance goals.
Before starting any exercise program, always
consult your physician. If you have a pace6
maker, consult your physician and/or the manufacturer of the pacemaker prior to using the
Polar Protrainer NV HRM.
POLAR PROTRAINER NV
HRM COMPONENTS
There are three parts to your Polar Protrainer NV
HRM:
1. The Wrist Receiver
2. The Polar Transmitter
3. The Elastic Strap
Take a moment to familiarise yourself with each
of these components carefully, noting the
features highlighted in the diagrams
below:
• The Polar
Transmitter
Lock system for
adjusting
the length
• The Elastic Strap
PROTRAINER NV
• The Wrist
Receiver
LAP
LAP
STORE/LAP
Three line display
a. Lap time
b. Total elapsed
time or time of day
c. Heart rate
7
HOW TO WEAR YOUR
POLAR TRANSMITTER
1. Attach the Polar Transmitter to the elastic
strap.
2. Adjust the strap length to fit snugly, but not
too tight.
3. With the Polar Transmitter facing outward, and
the Polar logo in the right position, as shown
in the illustration. insert the round
end of the strap lock into the
buckle to secure the strap
around your chest.
4. Center the Transmitter on your
chest below
the pectoral
muscles
(breasts) as shown
in the illustration.
5. Pull the Transmitter away
from chest stretching the belt
and moisten the conductive electrode strips.
Wearing the Polar Transmitter against your bare skin ensures a flawless
operation of the Transmitter. If you
wish to wear the Transmitter over a shirt,
moisten the shirt well under the Transmitter.
8
6. Put on the Polar Protrainer NV Wrist Receiver
as you would put on an ordinary watch.
Note: The Transmitter will switch on automatically when you’re wearing it. It will also turn itself
off when it’s not connected to your body. However, moisture can activate the Transmitter and
reduce battery life, so remember to dry it thoroughly after the exercise.
THE BASICS
Your Polar Protrainer NV Heart Rate Monitor is a
highly sophisticated computer that allows you
to get the most from exercising by monitoring
your workouts accurately and in great detail.
While the Polar Protrainer NV HRM is a state-ofthe-art instrument, it’s not complicated to use, if
you keep the following basic principles in mind:
Principle I. Two levels of operations are
available when you program your Polar
Protrainer NV HRM for workouts:
1. There are four basic selections, and
2. There are various functions under each
selection.
The diagram on next page provides a “road
map” for the basic Polar Protrainer NV HRM
programming.
9
PRESS SIGNAL
PRESS SET
SET
TIME
STORE/LAP
TIME
MEASURE
RECALL
SELECT
PRESS SIGNAL
alarm. Press SIGNAL/LIGHT button shortly
to light the background light. Press SIGNAL/
LIGHT button a little while longer to cycle
between time and date displays.
SELECT
LIGHT
SELECT
LIGHT
SET
PRESS
START/
STOP
PRESS
STORE/
LAP
PRESS SET
MEASUREMENT ON
PRE-SET
VALUES
RECALL
SET
TIMERS
PRESS SET
PRESS SET
SET
ALARM
SET
LIMITS
PRESS SET
PRESS SET
SET
DATE
SET
RECOVERY
PRESS SET
PRESS SET
TIME
SET
TIME
DISPLAY
MODE
PRESS
SIGNAL
DATE
The diagram
providing a “road
map” for the basic
Polar Protrainer NV
HRM programming.
PRESS SET
SET
Principle II. The four basic selections you can
access with your Polar Protrainer NV HRM are:
TIME/DATE - This selection lets you view and/or
set the correct time of day, the date and an
10
MEASURE - This selection allows you to activate
the heart rate measurement, recording and
stopwatch functions. (No programming can be
done within this selection).
RECALL - Use this selection to review the data
recorded during your workouts i.e. your target
heart rate zone performance feedback, the
average heart rate of the total exercise period,
the time spent below, within and above your
target heart rate zone, the recorded split/lap
times together with the corresponding heart
rates and the recovery heart rate. (No
programming can be done within this selection).
SET - You can use this selection to set your
personal target heart rate zone, the interval
timers and the recovery heart rate calculation
period. From the sport watch functions you can
choose simultaneously on display either the
time of day and the lap times OR the cumulative time of the exercise and the lap times.
Principle III. To access the basic selection
you want, cycle through the four available
selections by p r e s s i ng t he S E L E C T
button.
11
Principle IV. To use the various functions of
a basic selection, press the SET/START/
S TOP button to move from function to
function within each of the four selections.
Principle V. Once you have entered the SET
selection, using the SET/START/STOP
button (one digit flashing on display), the
SELECT button assumes a different role. Now
the SELECT button enables you to program
single digits within a function, while the SET/
START/STOP button cycles you between the
functions under SET selection. Having cycled
through the functions, using the SET/
START/STOP button, the flashing of one
single digit stops and the SELECT button
assumes it’s original role enabling you to return
to the selection cycle.
PROGRAMMING
YOUR POLAR
PROTRAINER NV HRM
Why might you use this selection ?
To set the correct time or date when you take
the Wrist Receiver into use for the first time, or
to change the time if you travel to other time
zones. You may use the alarm function to wake
you up, or as a reminder.
STEP-BY-STEP INSTRUCTIONS
FOR SETTING THE TIME
1. Time of day being displayed
on the face of the Wrist Receiver,
press the SET /START/STOP
b u t t o n . The word TIME
appears at the top of the
display, and the AM or PM
indicator is flashing.
Note: At any point you can
press SET/START/STOP
button once more to go to the
alarm setting.
PROTRAINER NV
PM
STORE/LAP
• TIME •
What does this selection do ?
In the basic mode it shows you the time of day
and the date. It also allows you to set the
correct time, the date and an alarm. You can
light up the display in the dark by pressing the
SIGNAL/LIGHT button.
12
2. Press the SELECT button to select AM or
PM.
3. When the correct choice appears on the
display, press the STORE/LAP button to
lock in your selection.
13
4. At this point, the first two digits (representing
the hours) are flashing.
STEP-BY-STEP INSTRUCTIONS
FOR SETTING THE ALARM
5. Set the correct hour by moving up with the
SE L E C T button or down with the
SIGNAL button.
1. In the time of day display,
press the SET button twice.
The letters ALM and the alarm
time, 10:00, will appear on
the display, as shown (or
any other previously set
alarm time).
6. When the correct hour is displayed, press
the STORE/LAP button to lock in your
selection.
7. The full ten minutes digit flashes now. Again,
use the SELECT button to move up, or the
SIGNAL/LIGHT button to move down.
8. When the correct number is displayed,
press the STORE/LAP button to lock in
your selection.
2. The AM or PM indicator is
flashing now.
PROTRAINER NV
AM
STORE/LAP
3. At this point, select AM or PM
as you did above, by pressing
the SELECT button.
4. Press STORE/LAP to lock in your choice.
9. The one minutes digit is flashing now. Again,
use the SELECT button to move up, or the
SIGNAL/LIGHT button to move down.
10. When the number you want is displayed,
press the STORE/LAP button to lock in
your selection. The two digits representing
seconds are zeroes.
11. At this point the AM/PM indicator will start
flashing again, and the seconds start running
from double zero. You can start over at step 2
to repeat the time setting procedure or move to
setting the alarm by pressing the SET/
START/STOP button.
14
5. At this point, the first two digits, representing
the hours, are flashing.
6. Set the correct hour by moving up with the
SELECT button or down with the SIGNAL/
LIGHT button.
7. When the correct hour is displayed, press
the STORE/LAP button to lock in your
selection.
8. The full ten minutes digit is flashing now.
Again, use the SELECT button to move up,
or the SIGNAL/LIGHT button to move
down.
15
9. When the correct number is displayed,
press the STORE/LAP button to lock in
your selection.
10. The one minutes digit is flashing now.
Again, use the SELECT button to move up,
or the SIGNAL/LIGHT button to move
down.
11. When the correct number is displayed,
press the STORE/LAP button to lock in
your choice.
12. The alarm symbol
is flashing now. To
activate the alarm, press the STORE/LAP
button and the alarm symbol stops flashing.
(To turn the alarm off later on, enter the alarm
setting mode as you did before and press the
SIGNAL/LIGHT button and the alarm symbol
disappears).
16
STEP-BY-STEP INSTRUCTIONS
FOR SETTING THE DATE
1. In the time display mode
press the SET button three
times. The date will appear as
shown.
PROTRAINER NV
2. The full ten years digit is
flashing now.
YEAR
YEAR
MONTH
MONTH
DAY
DAY
3. At this point, set the
correct digit by using the
SELECT and/or the SIGNAL/
LIGHT button.
STORE/LAP
4. Store the correct number by pressing the
STORE/LAP button.
5. The one year digit is flashing now.
13. At this point, or at any point during setting
the alarm, you can press SET to enter the
date setting mode (continue at step two of the
next section). By pressing the SET button
twice you can return to the time display.
6. Set the correct digit by using the SELECT
and/or the SIGNAL/LIGHT button.
Note: The alarm will sound for one minute, but
you can turn it off by pressing the
STORE/LAP button.
8. The month indicator is flashing now. Use the
SELECT and/or the SIGNAL/LIGHT button
to select the correct month. Lock in the
selection by pressing the STORE/LAP
button.
7. Store the correct number by pressing the
STORE/LAP button.
17
9. The full ten day digit is flashing now. Set the
correct digit by using the SELECT and/or the
SIGNAL/LIGHT button. Lock in the selection
by pressing the STORE/LAP button.
10. The single one day digit is flashing now. Set
the correct digit by using the SELECT and/or
the SIGNAL/LIGHT button. Lock in the selection by pressing the STORE/LAP button.
11. As soon as the correct date is set, press
the SET/START/STOP button to enter the
time of day display.
• SET •
Example 1. Warm up and cool down: You
could set Timer 1 to sound at 10 minutes for
your warm up period. Timer 2 at 20 minutes for
full strength exercise, and then use the 10
minute timer again for your cool down period.
Example 2. Interval Training: You could set
Timer 1 to sound at 1 minute intervals for all-out
running and Timer 2 to sound at 2 minute
intervals for rest periods between the intervals.
The Timer 1 would tell you when to go again
after the recovery period.
The flexible programmability of the target heart
rate zone in one beat per minute accuracy
allows you to monitor your workouts to great
detail securing the correct exercise intensity for
you (audio and/or visual alarm).
What does this selection do ?
You can set two different timers to better control
your workouts. You can also program your
personal target heart rate zone in one beat per
minute increments and set the recovery timer.
Further, you can choose on display simultaneously either the time of day and the lap
times OR the cumulative time of the exercise
and the lap times.
Why would you use this selection ?
The two timers allow you to segment your
exercise periods according to your particular
needs.
18
The recovery heart rate calculation allows you
to follow very concretely your way to improved
performance. As your training program takes
effect, you will start seeing a distinct improvement in your recovery rate after an exercise
routine. This means that you will reach a lower
heart rate level faster once you stop exercising.
Choosing between the time of day and
cumulative time of the total exercise, in addition
to the lap times, gives you the option to
program on display the sport watch functions
according to your own preferences.
19
STEP-BY-STEP INSTRUCTIONS
FOR SETTING THE TIMERS
If you do not program Timer 1, you will not be
able to program Timer 2 either.
1. In the time mode press the SELECT
button three times. SET appears on the
program status line (bottom of the display), and
the display cycles through TIME 1 , LIM , Recovery and SPLI or TIME.
2. At any point, you can press SET/START/
STOP button and the word TIME 1 will lock on
PROTRAINER NV
PROTRAINER NV
PROTRAINER NV
STORE/LAP
STORE/LAP
STORE/LAP
RECOVERY
RECOVERY
PROTRAINER NV
STORE/LAP
STORE/LAP
3. The tens of the minutes will now be flashing.
As in the TIME selection, use the SELECT
button to move up, or the SIGNAL/LIGHT
button to move down.
4. When the number you want is displayed,
press the STORE/LAP button to lock in
your selection.
5. The single minute’s digit flashes now. Again,
use the SELECT button to move up, or
t h e S IG N A L / L IG H T b u t t o n t o m o v e
down.
OR
PROTRAINER NV
display.
PM
Note: In case you do not wish to program the
Timers at all and wish to proceed directly to
programming your personal target heart rate
zone, please, press SET/START/STOP
button twice.
6. When the correct digit is displayed, press
STORE/LAP button to lock in your selection.
7. The first digit representing tens of seconds
flashes now. Again, use the SELECT button
to move up, or the SIGNAL/LIGHT button
to move down.
8. When the correct digit is displayed, press
the STORE/LAP button to lock in your selection.
Note: Timer 2 may also be displayed at this
point, if Timer 1 has already been set. However,
20
21
9. The last digit representing single seconds
flashes now. Again, use the SELECT button
to move up, or the SIGNAL/LIGHT button
to move down.
10. When the correct digit is displayed, press
the STORE/LAP button to lock in your
selection.
11. You have now set the Timer 1, and the first
digit flashes again. At this point, you can
access Timer 2 by pressing the SET/START/
STOP button. The phrase TIME 2 will appear
on the display. If you wish to program the Timer
2, repeat steps 3. through 10.
12. In case you do not wish to program Timer 2,
simply press t h e S E T / S T A R T / S T O P
button to exit this function. The LIM function
starts flashing. Proceed to step 3 on the next
page to set your personal target heart rate
zone.
Note: As you have set Timer 1 and Timer 2
according to instructions, Timer 1 will start at the
same time you start the stopwatch. You will hear
one beep when the time of Timer 1 is up. Timer
2 will start automatically after the beep. You will
hear two beeps when the time of Timer 2 is up.
The timers alternate until you stop the stopwatch.
STEP-BY-STEP INSTRUCTIONS
FOR SETTING TARGET HEART
RATE ZONE LIMITS
1. In the time of day mode, press SELECT
button three times. SET will appear on the
program status line (bottom of the display), and
the display will cycle through automatically
TIME1, LIM (limits), Recovery and Time Display
Mode, the latter indicated either by text SPLI
(splits) or TIME (time of day).
PROTRAINER NV
PROTRAINER NV
PROTRAINER NV
STORE/LAP
STORE/LAP
STORE/LAP
RECOVERY
RECOVERY
OR
PROTRAINER NV
PROTRAINER NV
STORE/LAP
STORE/LAP
PM
2. At any point, you can press the SET/
START/STOP button, and the option LIM will
lock on the display, while the first digit of the
upper heart rate target zone limit starts flashing.
22
23
3. Set your desired upper limit for your target
zone, digit by digit, by using the SELECT
and/ or SIGNAL/LIGHT button to move up
or down. Lock your selection by pressing the
STORE/LAP button. The next digit starts
flashing automatically. Once the upper limit has
been set, the first digit of the lower limit starts
flashing.
Note: If you are trying to enter by mistake a
lower upper limit than the lower limit is, the
upper limit value increases automatically to the
lower limit value. Repeat the same routine for
the lower limit.
Note: When setting the lower limit the first
digit’s value 0 is replaced by 21 at first. Once
you move onto programming the second digit
21 disappears from the display. Once the lower
limit has also been set, and the first digit of the
upper limit starts flashing again, exit this
function by pressing the SET/START/
STOP button. The first one of the three
recovery timer digits flashes now.
STEP-BY-STEP INSTRUCTIONS
FOR SETTING THE RECOVERY
TIMER
1. Use the SELECT or the SIGNAL/LIGHT
b u t t o n to move up or to move down in
increments of one second.
2. Lock in your selection by
pressing STORE/LAP button.
The digit representing tens of
seconds starts flashing.
PROTRAINER NV
3. Repeat steps 1. and 2.
again. Finally the digit
representing single seconds starts flashing.
RECOVERY
RECOVERY
STORE/LAP
4. Repeat once more the steps
1. and 2.
5. Exit this function by pressing
the SET/START/STOP button. The SPLI or
the TIME function starts flashing.
STEP-BY-STEP INSTRUCTIONS
FOR SETTING THE TIME DISPLAY
MODE
1. Either one of the following displays is flashing
now, depending on your earlier selection.
PROTRAINER NV
PROTRAINER NV
PM
PM
STORE/LAP
STORE/LAP
Note: Recovery time is in seconds, for example
2 min = 120 s.
24
25
If the SPLIT was activated, the top line in the
MEASURE mode shows the lap split times and
the mid line shows the total time of the exercise
period time. If the TIME was activated, the mid
line shows the time of day. The selection can
be swapped by pressing the SELECT or
SIGNAL/LIGHT button. Lock in your selection
by pressing the SET/START/STOP button.
Return to time of day mode by pressing
SELECT button once. If you want to proceed
into measurement mode, press SELECT
button twice.
• MEASURE •
What does this selection do ?
This selection allows you to measure your heart
rate continuously as well as mark split/lap
times. In addition, in this mode you will be able
to follow concretely whether you are exercising
in, above or below your pre-programmed target
heart rate zone. Also, as we learned before, you
can choose between cumulative time of exercise and time of day functions on display in this
mode. No programming can be done in this selection, but you can, however, start and stop
the sport watch and the recording as many
times as you want during the exercise (stopping in traffic lights etc.).
26
EXERCISING WITH THE POLAR
PROTRAINER NV HRM
After you have programmed in your heart rate
limits, you are ready to use your Polar Protrainer
NV HRM.
Step-by-step instructions
1. Put on the Polar Wrist Receiver and the Polar
Transmitter as described earlier.
2. If you just finished using the SET selection,
press the SELECT button twice and the
word MEASURE appears on the
selection status line. In the basic
time of day mode, press the
SELECT button once.
PROTRAINER NV
TZ
TZ
3. Your heart rate will be
shown on the bottom line of
the triple line display after six
seconds. To start the stopwatch
functions, p r e s s t h e S E T /
START/STOP button. The lap
timer on the top and the stopwatch
on the middle line of digits will be counting
(Alternatively the middle line may show the time
of day).
LAP
LAP
STORE/LAP
4. If you hear a beeping sound, you are exercising above or below your target heart rate
zone. The heart rate display shows a flashing
27
heart symbol as well as your actual heart rate
flashing on the display along with an arrow
pointing up or down, to indicate that you are
above or below your target heart rate zone. You
can turn the TZ alarm off/on by pressing the
SIGNAL/LIGHT button.
Note: For a quick start, to activate the heart rate
measurement, the stopwatch and the target
zone calculation, press the STORE/LAP
button or bring the wrist receiver close to the
transmitter for a “magic start”.
5. You can stop and start the stopwatch by
pressing SET/START/STOP button.
1. Check the lap and split time while exercising.
• Press the STORE/LAP button. The
current split/lap time is shown for 3 seconds.
The sequence number of the next lap will be
PROTRAINER NV
TZ
TZ
TZ
TZ
LAP
LAP
STORE/LAP
28
LAP
LAP
STORE/LAP
2. Temporarily stop the recording operation and
the stopwatch.
• Press SET/START/STOP button.
• To continue, press SET/START/STOP
button again.
Note: The average heart rate is calculated only
from the time the stopwatch is running.
3. Turn the sound signal off or on. Press and
hold the SIGNAL/LIGHT button for 1
second.
4. Activate the backlight for three seconds,
press the SIGNAL/LIGHT button briefly
(0,5 seconds).
During recording if you want to:
PROTRAINER NV
displayed after 3 seconds. You can take and
record up to 44 split/lap times per workout.
5. Toggle the cumulative time of exercise
display and the time of day display on the
middle row of digits, bring the receiver watch
close to the Transmitter for a few seconds. The
alternative display will be on for 5 seconds.
6. Stop recording operations completely and
start recovery calculation:
• Press the SELECT button. The stopwatch stops and RECOVERY text appears in
the display. Wait now until you hear two long
beeps informing you that the recovery calculation time is up. To review the recorded information, including the results of the recovery
heart rate calculation, continue to RECALL
mode by pressing SELECT button once.
29
• RECALL •
What does this selection do ?
This selection allows you to view
• Time spent below, in and above your target
heart rate zone,
• Average heart rate of the exercise period,
• Up to 44 split/lap times with corresponding
heart rates together with the finishing time.
• Recovery heart rate
Why might you use this selection ?
To analyse your workout intensity and duration,
collect data on changes in your average heart
rates and/or exercise time for the same type of
exercises. To collect data on changes in recovery heart rates over time or recall split/lap
times and related heart rates per workout.
STEP-BY-STEP INSTRUCTIONS
TO ANALYSE YOUR WORKOUT
PROTRAINER NV
TZ
TZ
STORE/LAP
30
1. Cycle through the selections
using the SELECT button, until
the word RECALL appears on the
program status line. You can
now view the time spent above
the target heart rate zone on
the top line, as indicated by the
upwards arrow symbol and the
letters TZ on the display. The
bottom line indicates the average
heart rate of the exercise period.
2. When you press the STORE/
LAP button, the top line will
display the time spent in the
target heart rate zone. The
bottom line remains unchanged.
3. In order to view the time
spent below the target heart
rate zone, press STORE/LAP
button again. Here again the
bottom line remains unchanged.
PROTRAINER NV
TZ
TZ
STORE/LAP
PROTRAINER NV
TZ
TZ
4. In order to view the recovery heart rate recording,
press STORE/LAP button
once again. On display you will
have now the predetermined
recovery period in seconds in
mid line as well as the decrease in heart rate during
that period in the bottom line.
STORE/LAP
PROTRAINER NV
RECOVERY
STORE/LAP
5. To view the split/lap times
together with the corresponding
heart rates, pr ess S E T /
START/STOP button. The
top line will show split/lap
time, the mid line will show
cumulative time, and the
bottom line will show the
corresponding heart rate. The
lap number will be displayed in the
lower right hand corner.
PROTRAINER NV
LAP
LAP
STORE/LAP
31
6. Press the STORE/LAP button repeatedly to cycle through all the recorded split/lap
times and heart rates.
7. Once the first lap/split time appears on
display again, press SET/START/STOP
button to return to step 1 on this list.
8. To leave the selection, press the SELECT
button (twice to go to TIME mode).
CARE AND
MAINTENANCE
and clean the Transmitter when
needed. The Transmitter and the elastic strap
can be washed with a mild soap and water
solution. However, never use alcohol or any
abrasives such as steel wool or cleaning
chemicals. They will cause permanent damage
to the electrodes.
Note: Do not stretch or bend the electrode strips
of the Polar Transmitter, especially when storing
it (more than is needed to store it in the original
container), because this could damage their
conductivity.
BATTERIES
WRIST RECEIVER
The rubber gasket seals that ensure water
resistance on the Wrist Receiver will deteriorate
over time. It is recommended that these seals
are replaced after two years of use. This is
particularly important if you are using your Polar
Protrainer NV HRM for swimming.
POLAR TRANSMITTER AND
THE ELASTIC STRAP
The Polar Transmitter is in an active mode only
when it is attached to the chest for measurement. It should not be activated when it is not
worn. However, sweat and other moisture on
the Transmitter can keep it running after it is
removed from the body. Therefore, to avoid
wasting battery energy, you should wipe dry
32
In order to ensure the water resistance of the
HRM, the batteries of the Wrist Receiver
should only be replaced by a person
authorised by Polar Electro Oy. For
details, contact your dealer or distributor.
To conserve battery life, the Wrist Receiver is
programmed to automatically return to the TIME
selection after ten minutes, when no buttons
have been pushed and no heart rate has been
received from the Transmitter. In MEASURE
mode, the receiver circuitry voltage is cut off
within 10 minutes, if no heart rate has been
received. As an indication of this the lowest line
of digits will show --, but the stopwatch keeps
on going to facilitate time measurement without
heart rate information.
33
Note: The estimated average battery life
is 2500 hours in all Polar Transmitters. The
Transmitter battery cannot be replaced, which is
why Polar recycles used transmitters with a
refund to the customer. Contact your distributor/
dealer for details.
PRECAUTIONS
Polar Protrainer NV HRM is water resistant. You
can wear it for swimming, go off a diving board
with it on, wear it in a rainstorm, or perspire
heavily while exercising without damaging it.
You should not, however, wear it underwater at
any great depth. If you go deep sea diving,
leave your Polar Protrainer NV HRM behind.
Further, do not operate the buttons of the Wrist
Receiver underwater as the pressure may
cause the Receiver to leak. Buttons should only
be pressed when the Receiver is out of water.
If your Polar Protrainer NV HRM does get wet, it
is important to dry it thoroughly before storing it
(Never put a wet Polar Protrainer NV HRM into
an athletic bag or a locker).
The Polar Protrainer NV HRM needs to “breathe”.
Never store it in any kind of “non breathing”
material, such as a plastic bag, where moisture
from humid air might become trapped. Store it
in a dry place.
The Polar Protrainer NV HRM Wrist Receiver
34
picks up transmitter signals within 3 feet/1 meter.
Therefore, when you are using your Wrist Receiver, make sure no other Transmitter is within
that range. Signals from more than one Transmitter picked up simultaneously can cause an
incorrect readout. When your Polar Transmitter
and Wrist Receiver are in use, strong electromagnetic sources such as television sets,
electric motors, vehicles, radio and TV masts
and high voltage power lines can cause erratic
heart rate reception.
This can also happen if you attempt to use the
heart rate monitor in an aircraft.
Avoid exposing your Polar Protrainer NV HRM
to extremes of hot and cold, and keep it out of
direct sunlight.
Don’t pull clothing on or off over your Polar
Protrainer NV HRM Wrist Receiver repeatedly,
as this may cause static electricity, which can
interfere with its performance, especially if very
low air humidity prevails.
TROUBLESHOOTING
What if there is some irregularity in
the operation of your Polar Protrainer
NV HRM ?
Start with pressing all the four Receiver buttons
simultaneously to reset it. Thereafter start
programming the Wrist Receiver from scratch.
35
This is called Global Clear. When a three line
display appears, press STORE/LAP button,
and a time display of 10 o’clock will appear.
Start the programming cycle here with the TIME
setting.
What if the heart symbol flashes irregularly?
Check to see if your Wrist Receiver is outside
the 3 ft/1 meter range of heart rate transmission
from the Transmitter.
Note: Global Clear clears the memory totally.
The Global Clear setting is also very useful, if
for any reason, you want to start from scratch to
enter information into the Wrist Receiver’s
memory.
Make sure the elastic strap has not loosened
during exercise.
If you are wearing the Polar Transmitter over a
shirt, make sure there is moisture to make the
needed contact with the electrodes.
What if there is no heart rate reading?
Check to see that the elastic strap is tight
enough. The strap should be adjusted with the
electrodes flat against your skin. You may have
to move the Polar Transmitter leftward to find
the best position. Make sure that the position of
the Polar logo is correct.
Check to make sure that the electrode strips
are thoroughly moistened. The Transmitter will
not function properly without moisture to make
good electrical contact.
Accumulated sweat and dirt may interfere with
clear reception of the signal from the skin to the
Transmitter. Check to see if your Transmitter
needs cleaning.
36
Check your surroundings. If you are in an
electromagnetic field created by other
equipment (such as a monitor or television set),
move away. If you are near another athlete
using a heart rate monitor, move away.
What do I do if the Monitor goes blank?
Have the batteries checked by authorised Polar
service personnel. Contact your distributor/
dealer for details.
SERVICE
Should your Polar Protrainer NV HRM need
servicing, please, follow the instructions below:
• Carefully pack the Polar Protrainer NV HRM
Wrist Receiver and the Transmitter in a
shipping carton so it will not be damaged
(original package will suit this purpose well).
37
• Enclose proof of purchase (or a photocopy)
and your daytime telephone number.
• Include a statement explaining why the unit is
being returned for repair.
• Mail postage prepaid to your dealer or
distributor. Any service procedures requiring
opening of the Wrist Receiver is strongly
recommended to be done by the distributor’s
service department. Warranty does not cover
damage or consequential damage caused
by service not authorised by Polar Electro Oy.
POLAR BOOKS AND
ACCESSORIES
POLAR BOOKS AND
BOOKLETS
•
•
•
•
•
•
•
•
•
•
38
• Yvonne Lin: Precision Sports Aerobics
• Dr. James M. Rippe: Target Your Fitness and
Weight Management Goals
• Dr. James M. Rippe: The Polar Fat Free and
Fit Forever Program
POLAR ACCESSORIES
• Polar Bike Mount for all bikes and Polar
Heart Rate Monitors
• Extra Transmitter for other family members
• Polar Heart Bra for women
• Test handle for groups and trainers
Contact your local dealer or distributor for more
details.
Roy Benson, MPE: Precision Running
Dr. Matthew Brick: Precision Multi-Sport
Edmund R. Burke, Ph.D.: Precision Cycling
Neil Craig: Scientific Heart Rate Training
Sally Edwards: The Heart Rate Monitor Book
Mark Fenton and Dave McGovern: Precision
Walking
Ute Haas, M.Sc., Tarja Suomi, M.Sc. and
Dr. Raija Laukkanen, Ph.D:. Precision
Aerobics
Dr. Peter J.G.M. Janssen: Training, Lactate,
Pulse Rate
Dr. Katriina Kukkonen-Harjula, MD and
Dr. Raija Laukkanen, Ph.D.: Precision Weight
Management
Dr. Raija Laukkanen, Ph.D.: Research Index
39
TECHNICAL
SPECIFICATIONS
LIMITED ONE
YEAR WARRANTY
Polar Heart Rate Monitor is designed to indicate
the level of physiological strain and intensity in
sports and exercise. No other use is intended or
implied. Heart rate is displayed as number of
heart beats per minute (bpm).
Polar Electro Oy warrants to the original
consumer/purchaser of this heart rate monitor
that the product will be free from defects in
material or workmanship for one year from the
date of purchase. Please, save the receipt!
• Warranty does not cover receiver battery,
damages due to misuse, abuse, accidents or
negligence of the precautions; improper maintenance, commercial use, cracked or broken
cases.
• Warranty does not cover damage or
consequential damage caused by service not
authorised by Polar Electro Oy.
• During this warranty period (one year) the
product will be either repaired or replaced (at
your distributor’s option) without a charge.
POLAR TRANSMITTER
Battery: ....................Built-in Lithium Cell
Average battery life is 2500
hours of use
Operating
temperature:............-10 to +50 °C (14 to 122 °F)
WRIST RECEIVER
40
Display: ..................16 digits + 20 symbols
Case: ......................44 x 46 x 10 mm
Operating
temperature:............-10 to +50 °C (14 to 122 °F)
Battery: ....................CR 2025, Average battery
life a minimum of 1,5 years
(2 h/day, 7 days/week)
Memory: ..................Time spent below, in and
above TZ. Average heart
rate of the total exercise.
Recovery heart rate. 44
Split/lap times with
corresponding heart rates.
Accuracy of heart
rate measurement: ..±1% or ±1 beats per
minute, whichever larger,
definition applies to steady
state conditions
Copyright © 1996
Polar Electro Oy, FIN-90440 KEMPELE, Finland
All rights reserved. No part of this manual may be used or reproduced in
any form or by any means without prior written permission
of Polar Electro Oy.
Polar logotype, Polar Pacer and Polar Beat are registered trademarks of
Polar Electro Oy.
Polar Vantage NV, Polar XTrainer Plus, Polar Accurex Plus,
Polar Protrainer XT, Polar Protrainer NV, Polar Advantage Interface,
Polar Precision Performance, Polar Interface Plus, Polar SmartEdge,
Polar Target, Polar Fitwatch, Polar Favor, Polar Heartminder and
Polar Heartwatch are trademarks of Polar Electro Oy.
0537
This CE marking shows compliance of this product with Directive
93/42/EEC.
This product is protected by one or several of the following patents:
FI 88223, BRD 4215549, FR 92.06120, GB 2257523, HK 113/1996, SG
9591671-4, US 5491474, FI 88972, FR 92.09150, GB 2258587, HK
306/1996, SG 9592117-7, US 5486818, FI 96380, US 5611346, FI 68734,
BRD 3439238, GB 2149514, HK 812/1989, US 4625733.
41
DISCLAIMER
The material in this manual is for informational
purposes only. The products it describes are
subject to change without prior notice due to
manufacturer's continuous development programs.
Polar Electro Oy makes no representations or
warranties with respect to this manual or with
respect to the products described herein.
Polar Electro Oy shall not be liable for any
damages, direct or incidental, consequential or
special, arising out of or related to the use of
this manual or the products described herein.
42