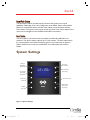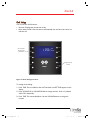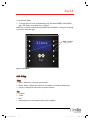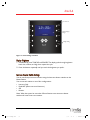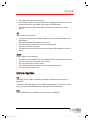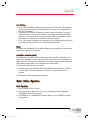
1
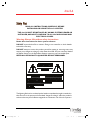
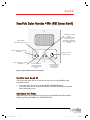
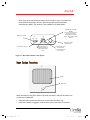
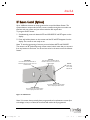
dmc3-4/dmc1CD
Owner’s Manual
#QEG
".
dmc3-4
Safety First
READ ALL INSTRUCTIONS CAREFULLY BEFORE
INSTALLING OR USING THE dmc3-4 SYSTEM
THE dmc3-4 MUST BE INSTALLED BY AN M&S SYSTEMS DEALER OR
INSTALLER, AND MUST CONFORM TO ALL LOCAL BUILDING AND
ELECTRICAL CODES.
Warning: Always follow these safety instructions.
Retain these instructions for future system reference.
DO NOT expose the dmc3-4 to moisture. Doing so can create fire or shock hazards
and void the warranty.
DO NOT attempt to service this product yourself as opening or removing covers may
expose you to dangerous voltage or other hazards and will void your warranty. Neither
the Master Station nor the Room/Patio Stations contain any user-serviceable parts.
REFER ALL SERVICING TO QUALIFIED SERVICE PERSONNEL.
The lightning flash with arrowhead symbol within an equilateral triangle is intended to
alert the user to the presence of uninsulated “dangerous voltage” within the product’s
enclosure that may be of sufficient magnitude to constitute a risk of shock to persons.
www.mssystems.com | 800.421.1587 |
#QEG
i
".
dmc3-4
The exclamation point within an equilateral triangle is intended to alert the user to the
presence of important operating and maintenance (servicing) instructions in the
literature accompanying the product.
USE ONLY M&S Systems replacement parts and have them installed by an M&S
Systems dealer or installer. Unauthorized substitutions can result in fire, electric shock,
or other hazards.
Upon completion of any service or product repair, have the M&S Systems dealer or
installer conduct a safety check to ensure the system is in proper operating condition.
Use only a damp cloth to clean the Master Station, Room /Patio Stations, Door Stations,
and speakers. Do not use liquid cleaners or aerosol cleaners.
www.mssystems.com | 800.421.1587 |
#QEG
ii
".
dmc3-4
Table of Contents
Safety First ................................................................................................................i
Table of Contents...................................................................................................iii
Introduction .............................................................................................................1
System Overview ....................................................................................................1
Master Station .................................................................................................................................1
Room/Patio Station........................................................................................................................2
Door Station....................................................................................................................................2
System Settings.......................................................................................................2
Clock Settings .................................................................................................................................3
Music Settings..................................................................................................................................4
Audio Settings .................................................................................................................................7
Display Brightness ..........................................................................................................................9
Intercom Selector Switch Settings..............................................................................................9
Intercom Operation..............................................................................................11
Master Station Operation ....................................................................................12
Radio Operation...........................................................................................................................12
Room/Patio Station Operation 4-Wire (M&S Systems Retrofit) ....................13
Turn Music Source On and Off.................................................................................................13
Adjust System Music Volume ....................................................................................................13
Select Music Source .....................................................................................................................14
Room Station/Patio Operation 3-Wire (NuTone Retrofits)............................14
Turn Music Source On and Off.................................................................................................14
Adjust System Music Volume ....................................................................................................14
Select Music Source .....................................................................................................................14
Door Station Functions ........................................................................................15
CD Player Operation (Optional).........................................................................16
RF Remote Control (Optional) ...........................................................................17
M&S Systems 2-Year Warranty ..........................................................................18
www.mssystems.com | 800.421.1587 |
#QEG
iii
".
dmc3-4
Table of Figures
Figure 1—System Settings.................................................................................................................2
Figure 2—Clock Settings: Set Time................................................................................................3
Figure 3—Preset Radio Stations......................................................................................................5
Figure 4—Scan Progressions............................................................................................................6
Figure 5—Scan Mode.........................................................................................................................7
Figure 6—Audio Settings: Music Volume ......................................................................................8
Figure 7—Tone Settings: Loudness ................................................................................................9
Figure 8—Intercom Settings...........................................................................................................10
Figure 9—Room/Patio Station 4-wire System............................................................................13
Figure 11—Door Station ................................................................................................................15
Figure 12—CD Functions ...............................................................................................................16
Figure 13—RF Remote....................................................................................................................17
www.mssystems.com | 800.421.1587 |
#QEG
iv
".
dmc3-4
Introduction
The dmc3-4 is an intercom and sound system designed for today’s home. Its compact
size and modern, elegant look complement any décor. The dmc3-4 offers more than just
sensible good looks. It gives you peace of mind as it allows you to communicate with
family members and monitor specified rooms. The dmc3-4 offers high quality sound
throughout your home from several sources, including the radio, CD player or other
connected audio sources in your home.
Please read all of the safety instructions before changing any settings on your dmc3-4.
Keep this manual in a safe place for future reference. If you lose the manual, you can
download it from the M&S Systems web site (www.mssystems.com).
System Overview
The dmc3-4 is a retrofit system designed to use your existing intercom wiring and
consists of three major components:
•
•
•
Master Station
Room/Patio Station—You can install up to 9 Room Stations in individual zones, 15
Room Stations in shared zones on a 4-wire (M&S Systems retrofit) installation and
13 Room Stations in shared zones on a 3-wire (NuTone retrofit), including 2 Patio
Stations.
Door Station—You can install up to 3 Door Stations.
Master Station
The Master Station gives you control over the system intercom and music capabilities.
System setup is established at the master. These settings include: set the clock and
establish music auto on/off times, select the system music source, save preset radio
stations, set the scan mode, and activate the RF Remote. System volume, loudness,
treble, bass, and balance (with optional amplifier) can also be controlled from the
dmc3-4 master. Intercom functionality for each Room/Patio Station is established at the
master by setting the intercom selector switches. Each room station can be set to
Intercom Only, Radio and Intercom, Off, or Monitor.
The dmc3-4 provides the ability to monitor other stations and communicate with Door
Stations. System functionality can also be established to provide Security and Home
Automation features.
www.mssystems.com | 800.421.1587
#QEG
1
".
dmc3-4
Room/Patio Station
The Room/Patio Stations provide intercom functions and system music control
capabilities. Depending on the room configuration at the Master Station, a Room/Patio
Station can communicate with or monitor other stations and communicate with the
Door Stations. The system’s music can be turned on and off, music volume adjusted, and
music sources changed from the dmc3RS and dmc4RS room stations.
Door Station
The Door Station is an exterior intercom speaker and doorbell installed at home
entrances. The dmc3-4 system supports up to 3 door stations. The door station allows
for communications from within the house to visitors. Any station with its Intercom
Selector Switches set to Intercom or Radio/INT can communicate with the Door
Station.
System Settings
Enable or
disable Music
Auto On/Off
Set clock and
Music Auto
On/Off times
Turn system
music on and off
AUTO
l2:20P
TIME
PRESET
POWER
TONE
SOURCE
Preset radio
stations
Select music source
∧∧
∧
TUNE
AM/FM
Select volume and
tone settings
LISTEN
∨
TUNE
TALK
VOLUME
∨
DOOR TALK
Change volume
and tone and
time settings
Tune radio
MODE
NEXT DISC
|
/
Figure 1—System Settings
www.mssystems.com | 800.421.1587 |
#QEG
2
".
dmc3-4
Clock Settings
You can set two clock functions:
•
•
Normal—Displays the normal time of day.
Music Auto On/Off—Sets the times to automatically turn the last music source on
and then off.
AUTO
AUTO
Set normal time
and music Auto
On/Off times
TIME
TIME
l2:20
:20P
PRESET
PRESET
POWER
POWER
SET
TIME
TONE
TONE
SOURCE
SOURCE
∧
∧∧
TUNE
TUNE
∨
LISTEN
LISTEN
TALK
TALK
DOOR
DOORTALK
TALK
∧
VOLUME
VOLUME
Change hours and
minutes
∨
Figure 2—Clock Settings: Set Time
To change clock settings:
1. Press TIME. The hour field for Normal Time blinks, and SET TIME appears on the
display.
2. Press VOLUME UP or VOLUME DOWN to change the hour. An A or P indicates
AM or PM, respectively.
3. Press TIME. The minute field blinks. Use the VOLUME buttons to change the
minutes.
www.mssystems.com | 800.421.1587 |
#QEG
3
".
dmc3-4
4. Press TIME to continue through the settings: Music Auto On, hour and minutes and
Music Auto Off, hour and minutes.
5. After you have entered Music Auto Off minutes, press TIME to return to Normal
Time display.
Note: You can enable or disable the AUTO function. The word “Auto” will appear on
the display when Auto Function is on. See Music Settings/Auto On/Off.
Music Settings
Music Source
You can select from four music sources:
•
•
•
•
AUX—Any source you connect, such as an external CD player or a stereo system
AM radio band
FM radio band
CD player (dmc1CD optional 6-Disc CD player). This source can also be used to
hook up an external audio device if the system does not include a dmc1CD player.
For CD functionality, see Master Station Operation/CD Player Operation.
To select a music source:
1. Press POWER to turn on music.
2. Press SOURCE repeatedly to cycle through AUX, AM, FM, and CD until you reach
the music source you prefer.
Music Auto On/Off
You can set the system to turn music on automatically at a predetermined time and to
turn the music off automatically at a predetermined time.
1. Set the Auto On/Off times as described under Clock Settings.
2. Press the AUTO button to toggle between On and Off. When the Auto function is
on, AUTO appears on the display.
3. Simultaneously press and release VOLS and AUTO
4. Adjust volume to desired level with VOLS and VOLT
5. Normal operation will resume after a few seconds
Radio Settings
You can tune in FM or AM radio stations, and can set up to 8 presets on each band.
www.mssystems.com | 800.421.1587 |
#QEG
4
".
dmc3-4
Tune the Radio
To tune a radio station:
1. Press POWER to turn on the music.
2. Select FM or AM. See Music Settings/Music Source for instructions.
3. Use TUNE UP or TUNE DOWN to find a station. If you press and release, within 1
second, TUNE UP or TUNE DOWN, the tuner goes into Seek Mode and finds the
next station with a strong signal. If you press and hold TUNE UP or TUNE DOWN,
the tuner goes into Scan Mode and scans all frequencies until you release the button.
Note: For the first two seconds, the tuner scans at slow speed to allow for fine
tuning. After two seconds, the tuner scans at fast speed.
Preset Radio Stations
To preset radio stations:
1. Press POWER to turn on the music.
2. Select FM or AM. See Music Settings/Music Source for instructions.
3. Use TUNE UP or TUNE DOWN to find a station. See Tune the Radio above for
seek and scan functions.
4. Simultaneously press TUNE UP and TUNE DOWN to enter Store Preset mode.
The display shows PRESET and a preset number.
1. Turn music on
FM
AUTO
TIME
POWER
|0|.
TONE
2. Select AM or
FM
PRESET
03
PRESET
3. Find a
radio station
∧∧
SOURCE
∧
LISTEN
TUNE
TUNE
∨
TALK
DOOR TALK
4. Enter Store Preset
mode
VOLUME
∨
5. Select preset number
Figure 3—Preset Radio Stations
www.mssystems.com | 800.421.1587 |
#QEG
5
".
dmc3-4
5. If you don’t want to assign a preset number, wait 5 seconds and your selected radio
station will automatically be assigned to the preset number that is displayed. If you
want to select the preset number, press the PRESET button repeatedly to cycle
through numbers1-8 until you reach the preset number you want.
6. Wait 5 seconds. The display updates to show the new station for the selected preset
number.
Note: This activity can be cancelled at any time during the process by pressing TUNE
UP and TUNE DOWN simultaneously again, and no new preset is stored.
Scan Mode
Two scan modes are available. The scan mode for the room stations is set at the
master. The two scan modes are identified below. To set your scan mode:
•
•
Scan 1—Allows the Room/Patio stations to scan through the four music sources
(AUX, AM, FM, CD). On radio bands AM and FM, Scan 1 scans through the preset
radio stations: AM 1-8 and FM 1-8. See Music Settings/Radio Settings for information
on how to preset radio stations.
Scan 2—Allows Room/Patio stations to scan through the four music sources (AUX,
AM, FM, CD.) On radio bands AM and FM, Scan 2 scans all strong stations before
moving on to the next source.
Scan 1
AUXfAM 1-8fFM 1-8fCD
Scan 2
AUX fAM Strong Stationsf FM Strong StationsfCD
Figure 4—Scan Progressions
www.mssystems.com | 800.421.1587 |
#QEG
6
".
dmc3-4
To set the Scan Mode:
1. To change the scan mode, simultaneously press and release PRESET and SOURCE
again. The display shows either Scan1 or Scan2.
Note: Exit out of scan mode by pressing PRESET and SOURCE or waiting for the display
to show the clock time again.
AUTO
SCAn1
TIME
PRESET
POWER
TONE
SOURCE
∧∧
TUNE
TUNE
∨
PRESET + SOURCE
Change Scan mode.
∧
LISTEN
TALK
VOLUME
DOOR TALK
∨
Figure 5—Scan Mode
Audio Settings
Volume
•
•
•
Music—Adjusts the volume for system music
Master Station—Adjusts the volume for the speaker on the Master Station only
Intercom—Adjusts the volume for the system intercom
Tone
•
•
•
•
Loudness
Treble
Bass
Balance (if you have the optional stereo power amplifier)
www.mssystems.com | 800.421.1587 |
#QEG
7
".
dmc3-4
To change volume and tone settings:
1. Press POWER to turn on music. The system defaults to music volume. Use
VOLUME UP and VOLUME DOWN to adjust the music volume from 0-29. All
other audio settings return to music volume after 5 seconds.
2. Press TONE. Master Volume appears. This controls the volume for the Master
Station speaker only. Use VOLUME UP and VOLUME DOWN to adjust the Master
Volume from 0-29.
Note: When music is off, use VOLUME UP and VOLUME DOWN to adjust Master
Volume.
3. Press TONE. The Loudness function appears. Press VOLUME UP to turn Loudness
on. Press VOLUME DOWN to turn Loudness off.
4. Press TONE. The Treble function appears. Use VOLUME UP and VOLUME DOWN
to adjust the treble from 0-14.
5. Press TONE. The Bass function appears. Use VOLUME UP and VOLUME DOWN
to adjust the bass from 0-14.
6. Press TONE. If you have the optional stereo power amplifier, the Balance function
appears. Use VOLUME UP and VOLUME DOWN to adjust the Balance from +10 to
–10. (Zero = equal balance.)
7. Press TONE. Intercom Volume appears. Use VOLUME UP and VOLUME DOWN
to adjust the Intercom Volume from 0-29.
Note: When music is off, press TONE to access Intercom Volume, then use
VOLUME UP or VOLUME DOWN to adjust Intercom Volume.
Turn on
music
AUTO
TIME
12:20
MUSIC Volume
PRESET
∨
TUNE
TONE
SOURCE
∧
∧
TUNE
POWER
Select setting
to change
∧
LISTEN
TALK
DOOR TALK
VOLUME
∨
Change
setting
Figure 6—Audio Settings: Music Volume
www.mssystems.com | 800.421.1587 |
#QEG
8
".
dmc3-4
Turn music on
AUTO
POWER
12:20P
TONE
TIME
Select setting to
change
ON
LOUDNESS
PRESET
SOURCE
∧∧
TUNE
TUNE
∨
∧
LISTEN
TALK
DOOR TALK
Change setting
VOLUME
∨
Figure 7—Tone Settings: Loudness
Display Brightness
DOOR
DOORTALK
TALK
1. Simultaneously press TUNE UP and POWER. The display cycles through brightness
levels: low, medium, and high, then repeats the cycle.
2. Press the buttons repeatedly until you reach the brightness you prefer.
Intercom Selector Switch Settings
You can set all major Intercom functions using the Intercom selector switches on the
Master Station.
You can set each station to one of four configurations:
•
•
•
•
Intercom Only
Radio/INT (Music source and Intercom)
Off
Monitor
Note: When the system has more than 9 Room Stations some intercom selector
switches will control two room stations.
www.mssystems.com | 800.421.1587 |
#QEG
9
".
dmc3-4
Selector switch for
Master Station
M
1
2
3
Selector
switches for
Room Stations
INTERCOM
RADIO/INT
Key to Intercom
selector switch settings
OFF
MONITOR
4
5
6
7
m&s
8
Selector switch for
Patio Station
9
P
Figure 8—Intercom Settings
Intercom
When a station is set to Intercom (Intercom only):
•
•
•
•
•
You can talk and listen from this station.
The room does not receive music.
The room cannot be monitored.
The room cannot hear other rooms that are set to Monitor.
Note: When a station is set to Intercom, the sound and activity in that room can be
heard by another room station by pressing the LISTEN button.
•
The station hears the door chime and users can talk and listen to the Door Station.
Radio and Intercom
When a station is set to Radio/INT (Music source and Intercom):
•
•
•
•
You can talk and listen from this station.
The room can receive music.
The station can monitor any other station that is set to Monitor.
Note: When music is on, the audio from a monitored room is heard in addition to
the music.
www.mssystems.com | 800.421.1587 |
#QEG
10
".
dmc3-4
•
•
The station itself cannot be monitored.
Note: When a station is set to Radio/INT, the sound and activity in that room can
be heard by another room station by pressing the LISTEN button.
•
The station hears the door chime and communicate with and listen to a door
Station.
Off
When a station is set to OFF:
•
•
•
•
•
You can communicate from a Room Station but you cannot communicate from a
Patio Station.
Other Room Stations cannot listen to the room.
The room cannot receive music or intercom-related audio.
The room cannot be monitored.
The station does not hear the door chime and cannot talk and listen to the Door
Station.
Monitor
When a station is set to Monitor:
•
•
•
•
•
Any station set to Radio/INT can continually hear all sound and activity in the room.
You can communicate with other room stations.
The room cannot hear the door chime.
You can talk to the Door Station, but will not be able to listen to it.
The room cannot receive music.
Intercom Operation
Talk
Talk allows users to talk to all stations with selector switches set to Intercom or
Radio/INT.
To initiate a Talk/Listen session, press TALK and begin talking. You can hear remote
users if you press the LISTEN button or if they press their TALK button.
Listen
Press LISTEN to listen to all stations set to Intercom or Radio/INT.
www.mssystems.com | 800.421.1587 |
#QEG
11
".
dmc3-4
Door Talk/Listen
•
•
•
Press TALK and LISTEN simultaneously to enter Door Talk mode. This allows you
to talk to the Door Stations. All other stations set to Intercom or Radio/INT can
hear the conversation.
Release the TALK and LISTEN buttons to listen to the Door Station. The Listen
mode is active for a total of 25 seconds after you release the TALK and LISTEN
buttons. You may talk again at any time by pressing TALK and LISTEN. Each time
the buttons are released, you can listen for another 25 seconds.
Door Talk mode is suspended at the end of the 25 second listening period or if you
press either the TALK button or the LISTEN button individually.
Monitor
All stations set to Radio/INT on the Master Station can continually hear the sound and
activity from a station set to Monitor.
Security/Home Automation (Optional)
This optional function can control another system that is properly connected to the
dmc3-4. For example, it may control a door release mechanism, turn on the lights, set
off an alarm, etc. This function is available from the Master Station and all remote scan
Room Stations (dmc3-4RS). It is not available from a Patio Station.
To initiate this feature from a room station:
1. Simultaneously press VOLUME UP and VOLUME DOWN and hold for at least 4
seconds. After 4 seconds, this feature is active for as long as the buttons are
pressed.
2. Release the buttons to deactivate the feature.
Master Station Operation
Radio Operation
1. Press POWER to turn on music.
2. Select either FM or AM as the music source. See Master Station Settings/Music
Settings/Music Source for instructions.
3. Use TUNE UP or TUNE DOWN to select a station, or press PRESET to select a
preset station.
www.mssystems.com | 800.421.1587 |
#QEG
12
".
dmc3-4
Room/Patio Station Operation 4-Wire (M&S Systems Retrofit)
VOLUME UP + VOLUME
DOWN
Scan music sources. Hold for
4+ seconds to activate
Security/Home Automation
function. (Not available on Patio
Station.)
TALK + LISTEN
Talk and listen to Door Station
Listen to all stations set to Intercom
or Radio/INT.
DOORTALK
LISTEN
TALK
SCAN
OFF
- MUSIC VOLUME +
Talk to all stations set to Intercom
or Radio/INT.
Press and hold to turn
off System Music. Press
to adjust System Music
volume.
Adjust room station
speaker volume.
ON
SPEAKER VOLUME
Press and hold to turn
on System Music.
Press to adjust System
Music volume.
Figure 9—Room/Patio Station 4-wire System
Turn Music Source On and Off
You can turn the Music Source on and off from any remote scan (dmc4RS model)
Room/Patio Station.
•
•
To turn the Music Source on, press the MUSIC VOLUME UP button.
To turn the Music Source off, press the MUSIC VOLUME DOWN button until the
volume level goes to zero.
Adjust System Music Volume
Adjust the system music volume from any remote scan (dmc4RS model) Room/Patio
Station by pressing VOLUME UP or VOLUME DOWN.
www.mssystems.com | 800.421.1587 |
#QEG
13
".
dmc3-4
Select Music Source
The system music source can be selected from any Room/Patio Station. The music
sources that are available vary depending on the Scan setting on the Master Station. (See
Master Station Settings/Music Settings/Scan Mode for details.)
Note: You cannot select specific tracks on the CD from a Room/Patio Station.
To scan for a music source:
1. Simultaneously press and release VOLUME UP and VOLUME DOWN to switch
music sources.
Note: If you press and hold these buttons for 4 seconds or more, you initiate the
Security/Home Automation function. (See Intercom Operation/Security/Home
Automation for details.) This function is not available on the Patio Station.
Room Station/Patio Operation 3-Wire (NuTone Retrofits)
Turn Music Source On and Off
You can turn the Music Source on and off from any remote scan (dmc3RS model)
Room/Patio Station.
•
•
To turn the Music Source on, press the MUSIC VOLUME UP button.
To turn the Music Source off, press the MUSIC VOLUME DOWN button until the
volume level goes to zero.
Adjust System Music Volume
Adjust the system music volume from any Room/Patio Station by pressing VOLUME UP
or VOLUME DOWN.
Select Music Source
The system music source can be selected from any Room/Patio Station. The music
sources that are available vary depending on the Scan setting on the Master Station. (See
Master Station Settings/Music Settings/Scan Mode for details.)
Note: You cannot select specific tracks on the CD from a Room/Patio Station.
To scan for a music source:
2. Simultaneously press and release VOLUME UP and VOLUME DOWN to switch
music sources.
www.mssystems.com | 800.421.1587 |
#QEG
14
".
dmc3-4
Note: If you press and hold these buttons for 4 seconds or more, you initiate the
Security/Home Automation function. (See Intercom Operation/Security/Home
Automation for details.) This function is not available on the Patio Station.
Talk/Listen to the door
TALK
DOOR
VOLUME UP + VOLUME
DOWN
Scan music sources. Hold for
4+ seconds to activate
Security/Home Automation
function. (Not available on Patio
Station.)
SCAN
ROOM
OFF
ON
- MUSIC VOLUME +
Press and hold to turn
off System Music. Press
to adjust System Music
volume.
Talk to all room stations
Adjust room station
speaker volume.
SPEAKER VOLUME
Press and hold to turn
on System Music.
Press to adjust System
Music volume.
Figure 10 – Room/Patio Station 3-wire System
Door Station Functions
Speaker
Door Chime
Figure 11—Door Station
When the button on the Door Station is pressed, the chime is heard on all stations set
to Intercom or Radio/INT.
•
•
All system audio (music and intercom) is muted when the chime rings.
If the Door Station is engaged in a talk or listen session, the chime is not heard.
www.mssystems.com | 800.421.1587 |
#QEG
15
".
dmc3-4
CD Player Operation (Optional)
1. Load up to 6 CDs in the CD changer.
2. Press POWER to turn on music.
3. Select CD as the music source. See Master Station Settings/Music Settings/Music Source
for instructions.
When CD is selected as the music source, the display shows the following information:
•
•
Which CD is playing, indicated by a circle around the CD number
The track that is playing, indicated by the number on the display
Note: Initially, the display shows six CD positions. If the CD player reaches a CD
position and finds no CD loaded there, that number disappears from the display.
CD Functions
AUTO
CD
l2:20
6
TIME
POWER
1
01
5
4
PRESET
TONE
2
3
SOURCE
∧
∧
∧
TUNE
NEXT DISC
Play the next disc. Press and
hold to display elapsed time
of current track. Disabled in
Random All mode.
LISTEN
∨
TUNE
TALK
VOLUME
DOOR
MODE
SELECT MODE
- Normal—Play CDs and tracks sequentially
- Repeat Song—Repeat current track
- Repeat Disc—Repeat current disc from beginning
- Random Disc—Randomly play tracks on current disc
- Random All—Randomly play tracks from all CDs
Press and hold MODE to display total length of time
and total number of tracks on current CD.
NEXT DISC
|WW
∨
X
/ ||
NEXT TRACK
Play next track. Press and hold to
fast forward through current
track. In Random Disc mode,
selects random track form current
disc. In Random All mode, selects
random tracks from all discs.
XX|
PREVIOUS TRACK
Play previous track or restarts current
track. Hold to reverse through current
track. Disabled in Random Disc and
Random All modes.
PLAY/PAUSE
Press to pause CD. Press
again to play.
Figure 12—CD Functions
www.mssystems.com | 800.421.1587 |
#QEG
16
".
dmc3-4
RF Remote Control (Optional)
Up to 4 different remotes can be programmed to control the Master Station. The
system obtains a unique code from the remote, virtually insuring that no one else can
interfere with your system and you will not interfere with anyone else.
To program the RF remote:
1. Simultaneously press and release AUTO and SOURCE. RF and SET appear on the
display.
2. Press and hold any button on the remote until the RF and SET disappear from the
display. The remote is now ready to use.
Note: To cancel programming of remote, press and release AUTO and SOURCE.
The remote is an RF (radio frequency) remote control, which means that you can use it
from any location in the house. You do not have to be in the same room as the Master
Station.
Tune Up
Tune Down
Scan radio stations when AM or FM are
selected as audio source. Scan mode is set
at Master Station.
Scan radio stations when AM or FM are
selected as audio source. Scan mode is set
at Master Station.
Source
Select audio
source: AUX,
AM, FM, CD
Volume Up
Press and hold to turn on System Music.
Press to adjust System Music volume.
Volume Down
Press and hold to turn off System Music.
Press to adjust System Music volume.
Figure 13—RF Remote
Note: If 4 remotes have previously been programmed and a replacement remote (due
to breakage or loss) is ordered, all 4 remotes will need to be reprogrammed.
www.mssystems.com | 800.421.1587 |
#QEG
17
".
dmc3-4
M&S Systems 2-Year Warranty
M&S Systems warrants its products to be free of defects for 2 years. Except for the
AirVac Gold power units. The warranty period begins on either (a) the date of purchase
or installation date of this product or (b) the date of closing on a new residence in
which this product was originally installed. The warranty extends to the original user of
the product and to each subsequent owner of the product during the term of the
warranty. M&S will repair or replace, at its option, parts and materials at no charge.
Parts supplied under this warranty may be new or rebuilt at the option of M&S Systems.
If during the warranty period the product appears to have a defect, please call our toll
free service number (800-421-1587) prior to dismantling. Dismantling the product prior
to calling our service number may void the warranty. Before returning any product to
M&S Systems, obtain a Return Authorization Number (RAN) from our service
department. M&S Systems will return the repaired product freight prepaid within the
continental United States. ANY PRODUCT RETURNED TO M&S SYSTEMS
WITHOUT A RAN NUMBER WILL BE REFUSED.
This limited warranty is in lieu of any other warranties, express or implied, including any
implied warranty of merchantability or fitness for a particular purpose or otherwise, and
of any other obligations or liability on the seller’s part. This limited warranty does not
cover damage caused by improper installation, acts of God, criminal acts, the violation
of applicable building or electrical codes or the use of non-M&S wire, cable (excluding
CAT5 and RG-6) or wall housings.
Under no circumstances shall M&S Systems be liable for consequential, incidental or
special damages arising in connection with use, or inability to use this product. In no
event shall M&S Systems liability hereunder exceed the cost of the product covered
hereby. No person is authorized to assume for us or obligate us for any other liability
in connection with the sale of this product. Some states do not allow the exclusion or
limitation of consequential, incidental or special damages, so the above limitation or
exclusion may not apply to you. This limited warranty gives you specific legal rights, and
you may also have other rights, which vary from state to state.
www.mssystems.com | 800.421.1587 |
#QEG
18
".
dmc3-4
115992-2 B
www.mssystems.com | 800.421.1587 |
#QEG
19
".