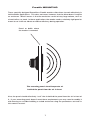
1
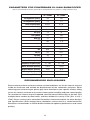
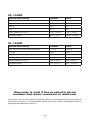
XL-104MF
XL-124MF
Marine Woofer
Application Guide
Thank you and Congratulations
Congratulations on your decision to purchase PowerBass Xtreme™ marine speakers.
You now own a speaker of uncompromising design and engineering philosophy from a
factory that truly believes in the relentless pursuit of perfection. Incorporating the highest
quality materials and state-of-the-art machinery, these speakers display the ultimate balance between high fidelity, extreme performance and long-lasting reliability.
At PowerBass USA, Inc. we are confident you will have many years of outstanding enjoyment from this great SPEAKER investment. For maximum performance we recommend
that you have your new speakers installed by an Authorized PowerBass Xtreme Dealer.
Doing so will also automatically extend your warranty to a full THREE Year Period.
To learn more about PowerBass Xtreme, please visit us on the World Wide Web at
www.powerbassusa.com
∇ WARNING ∇
Continuous exposure to sound pressure levels in excess of 100 dB can cause permanent hearing loss. PowerBass
Xtreme Speakers are capable of producing sound pressure levels well over 160 dB. Please observe all local sound
ordinances while listening to your PowerBass Xtreme system. PowerBass USA, Inc. accepts no liability for hearing
loss, bodily injury, or property damage due to the result of use or misuse of this product.
2
XL MARINE CERTIFIED WOOFER FEATURES
FreeAir Design: Optimized for use in infinite baffle applications such as a boat hull or
car trunk.
Polypropylene Injected Cone: Chosen for its strong yet lightweight body this waterproof woofer cone has UV inhibitors to minimize cracking and fading.
Powder Coated White Basket: This method of painting provides resistance to chipping, scratching and rust—while giving a uniform, durable high-quality finish. Applying
this finish allows us to use a steel basket in a marine environment that is much stronger
than plastic and can support a large motor structure without cracking.
TPO Thermoplastic Polyurethane Surround: A synthetic material known for its toughness and flexibility, the black TPO surround rejects water, sun and salt-spray while at the
same time offering superior cone-edge suspension.
Kapton Voice Coil and Treated Damper: A Kapton voice coil former gives the speaker
increased power handling while the textile damper has been specially treated to repel
moisture and maintain uniform shape.
Voice Coil Protection: Red and black tinsel lead insulation not only easily identifies
positive and negative inputs, but also prevents against corrosion thus increasing the life
of the speaker.
Additional Features: Moisture sealed basket rings for snug water tight fit, marine grade
stainless steel hardware, and gold plated connection terminals for protection against
corrosion.
3
WIRING GUIDELINES
It is highly recommended that you seek an authorized PowerBass dealer to properly
setup, wire and install your marine woofer(s) for optimum performance.
Your XL Marine Woofer is a 4-ohm Single Voice Coil subwoofer. There are multiple ways
to wire your woofer(s) depending on your amplifier and system configuration. It is important to know the limits of your amplifier to optimize its performance. It is always better
to use your subwoofer in a mono/bridged mode if your amplifier offers this capability.
Always observe the amplifiers minimum stable impedance and do not go below what is
recommended by the manufacturer!
Below are several types of wiring configurations for a 4-ohm single voice coil speaker:
Series, Parallel and Series Parallel. Note that it is possible to change the impedance or
load by how the speakers are to be wired and the quantity of the woofers used.
One Subwoofer System:
4 ohm Single Voice Coil = 4 ohm Load
AMP
One Amplifier & Two Subwoofer System:
4 ohm Single Voice Coil = 8 ohm Load
AMP
One Amplifier & Four Subwoofer System: (USE CAUTION when installing low impendance systems)
4 ohm Single Voice Coil = 1 ohm Load
AMP
One Amplifier & Four Subwoofer System:
4 ohm Single Voice Coil = 4 ohm Load
AMP
4
INSTALLATION EXPERIENCE
Installation of marine audio speakers can require extensive experience with a variety of
mechanical and electrical procedures. Although this application guide explains how to
install a PowerBass Xtreme marine woofer in a general sense, it may not show the exact
installation method for your particular situation. If you feel unsure about personally installing the speaker system, don’t attempt the installation yourself. Ask your Authorized
PowerBass audio or marine dealer about professional installation options.
GENERAL INSTALLATION TIPS
Your PowerBass XL marine woofer was specially designed for providing high-fidelity
sound out in the harsh marine environment. Despite the rugged construction, it is possible to damage your speaker if it is improperly used. Overdriving the system and causing
the sound to distort will cause permanent damage to the speaker. Playing loud music in
a marine environment can permanently damage your hearing, as well as limit your ability
to hear other marine traffic.
1. Be sure to carefully read and understand the instructions before attempting to install this product.
2. Turn off the audio system. For safety, disconnect the negative lead from the battery prior to beginning installation.
3. For easier installation, we recommend that if additional wiring is required, you run all wires prior to
mounting your speaker in place.
4. The marine environment can quickly accelerate corrosion so always use the highest quality connectors for a reliable installation and minimal signal or power loss.
5. Always use caution before you drill or cut! Be careful not to puncture gas tanks, fuel lines, hydraulic
lines or electrical wiring when working on any vessel.
6. Never run speaker wires underneath or exposed on the vessel, keeping the wiring behind cover
provides the best protection from environmental elements.
7. Avoid running any speaker wire or signal cables near the vessel’s electrical system to prevent noise
from “bleeding” into the audio system.
8. Correct speaker polarity must be observed. Speakers wired out of phase will have little bass output.
Follow the wiring directions carefully.
9. Leave a little slack in the speaker wire for easier installation, this will prevent pulling or stretching
the wire and possibly causing a connection to come loose.
10. Always protect your speakers during installation; it is a good idea to keep the speakers in their
original package until they are ready to be mounted.
5
PREPARING for INSTALLATION
NOTE: The tools listed below may be required for proper installation.
• An electric drill with drill bits
• Phillips-head and standard screwdrivers
• Wire strippers
• Crimping tool and needle-nose pliers
• Silicone sealant or closed cell weather-stripping
• Metal file
• Dust mask (when cutting into fiberglass)
• Hole saw or jig saw
• Punch or countersink tool
NOTE: The stainless steel hardware supplied with your PowerBass Xtreme marine speakers has been chosen to resist rust and corrosion. If the particular hardware supplied will
not work for your installation purposes, please be sure to use only appropriate marine
grade (stainless steel) mounting hardware.
INSTALLATION APPLICATION
Your PowerBass XL marine coaxial woofer is specifically designed for boating and water
sport applications. The XL Marine Woofer is capable of reproducing impressive levels of
bass. Whether you choose a FreeAir or a sealed enclosure, the XL Marine Woofer opens
up a whole new range of installation options for marine audio enthusiasts.
CAUTION: These speakers are designed to be water and spray resistant, they are not
designed to be submerged or to withstand high pressure water spray. Care must be exercised when washing your boat to avoid damaging your speakers.
6
FreeAir MOUNTING
These specially designed PowerBass FreeAir woofers allow them to work effectively in
infinite baffle applications. This does not mean, however, that the driver doesn’t require
an enclosure. What it means is that the enclosure can be of very large volume, such as
a boat hull or car trunk. In these applications the woofer needs a relatively rigid panel to
mount to so it will not vibrate or reduce efficiency during operation.
Panel or baffle where
the woofer is mounted
The mounting panel should separate air
behind the panel from the air in front.
Also, the panel should effectively “seal” the air behind the panel from the air in front of
it. If your mounting panel doesn’t meet these requirements you may need to modify it
with bracing or consider building a sealed enclosure using the parameters set forth in
this owner’s manual.
7
CHOOSING A SPEAKER ENCLOSURE
This speaker is designed optimally for FreeAir applications, but will work well in a sealed
enclosure (see below)
• SEALED BOX: A sealed or acoustic suspension enclosure is easy to build and typically
offers a smaller size enclosure and greater power handling. It has the most predictable
frequency and phase response; the bass response will roll off slower than that of a ported
design. Sealed boxes typically provide the best musical detail and definition. A well-designed sealed enclosure will exhibit smooth frequency response with excellent sound
quality and great low bass extension. They also exhibit relatively accurate, punchy bass
reproduction for most types of music.
If a sealed enclosure is too large to fit into a specific area of a vessel, it is possible
to decrease the recommended box volume by using 1.5 pounds per cubic feet of low
density, high heat specific box stuffing material. PowerBass recommends Fiberglass,
Dacron, Poly-Fill or long fiber wool for stuffing the enclosure. (Decreasing the box enclosure however should not exceed 20% of the recommended size.) When using any type
of box stuffing material be sure that the subwoofer’s vented pole piece is clear from any
obstructions, since covering the pole piece will result in loss of bass and can possibly
cause damage to your subwoofer.
The most important aspect of a sealed enclosure is to make sure that it is airtight and
solid. If your enclosure has any air leaks or if the panels vibrate or flex, you will experience a loss of bass output. Using glue and some type of sealant (caulk) on all seams will
ensure a solid constructed box without any air leaks.
• VENTED BOX: Not Recommended
8
BOX CONSTRUCTION (SEALED):
Building an enclosure for marine applications requires special care. The material used for
enclosure walls should be solid, dense and free of voids or warps. Your enclosure should
be made ¾” or 19mm material, Marine Grade Plywood resists warping and rot in harsh
water environments. Under no circumstances it is recommended that particle board be
used, it does not hold a screw well and tends to fall apart when wet.
Corners must be strong and air tight and should not have any air leaks or openings.
Joints should be properly filled with glue that will not crack under high stress or impact.
If the integrity of the glue seal can’t be determined, hot glue or RTV caulking should
be used to seal all seams. Fiber reinforced resin may also be used to form any difficult
shapes. However avoid making large panels with resin to eliminate any chances of box
flexing, cracking or ratting under high pressure. Bracing made of 2 x 2” or 2 x 4” should
be liberally applied either inside or outside the cabinet, depending on whether the cabinet is to be permanently installed or portable.
This principle applies to any walls of the enclosure spanning more than 18” long. Any
braces should also be liberally glued or screwed down on edge. Edge-wise drilled, and
countersunk holes through the braces can be used for #10-2 Flathead wood screws to
avoid the use of more expensive lag bolts. The majority of strength from an enclosure
comes from the glue. When using screws be sure to pre-drill holes to avoid splitting the
wood.
WARNING! The use of silicone rubber to seal in a speaker will void the Warranty! If any sealing is
needed in addition to the speaker’s gasket, use caulking cord or vinyl weather strip.
9
SPEAKER LOCATION
The sound produced by woofers is non-directional. Find the best location in your vessel.
If using an enclosure, it is important that the enclosure is properly mounted in the vessel. After determining the best mounting location(s), carefully check the areas where the
mounting hardware will be placed. The installation surface must be level and the installation must be “watertight”. No moisture or dampness should be allowed to get behind the
speaker. Use caution to make sure there are no objects behind the installation surface
that may become damaged during drilling.
WARNING: These speakers must be installed at least 3 feet (1-meter) away from any
nautical equipment (ie., compass, sonar, etc).
WIRING PROCEDURES
Once the mounting holes have been cut, run the speaker wire from the speaker mounting
locations back to the radio. If you are running wires through bulkheads, drill holes for the
cable and use a marine grade grommet to properly insulate any rough edges from the
wire insulation. Make sure the wires will clear any mechanical devices in the boat and
secure them with wire ties.
Carefully place the speaker wire (not included) in a location that is free of standing water and moving components. Be sure to observe proper polarity—most speaker wire is
marked (ie, colored wires, ribbed wire, etc). Connect the other end of the speaker wire to
the radio or amplifier in accordance with its owner’s manual.
After connecting your new PowerBass XL marine speakers to the sound system you are
ready to carry out a listening test. Please listen the first time at a low volume setting and
check to make sure everything is operating properly.
GENERAL CARE
The woofers may be cleaned with a damp cloth. Do not use any cleaners or solvents
on the grills or speaker cones, otherwise the UV inhibitors maybe affected and/or the
plastics may discolor.
10
PARAMETERS FOR POWERBASS XL104M SUBWOOFER
(Due to Constant Improvements, Specifications and Parameters are subject to change without notice.)
XL-104MF
XL-124MF
VC Impedance (ohms)
4Ω
4Ω
Test Impedance (ohms)
3.4
3.4
0.0825
0.126
38
35
Driver Displacement
Fs (Hz)
SD (sqCM)
333.3
490.9
Vas (Ltr)
29
59
Cms (µM/N)
135
160
Mms (g)
82
117
10.9
11.6
BL™
Qms
4.2
4.5
Qes
0.72
0.75
Qts
0.68
0.71
No (%)
0.3
0.32
Spl (dB)
90
91
Xmax (mm)
9.5
9.5
Voice Coil Size (inches)
2.0
2.0
Frequency Response (Hz)
35 - 500
32 - 500
Motor Structure (ounces)
120 oz
120 oz
Magnet Weight (ounces)
39 oz
39 oz
Mounting Depth (inches)
5.16” (131mm)
5.59” (142mm)
Power (RMS/Peak)
200 / 400 watts
250 / 500 watts
RECOMMENDED ENCLOSURES
Please note that these enclosure volume recommendations are for the internal airspace
inside the enclosure and include the displacement of the subwoofer and ports. When
choosing your enclosure type, please pay close attention to your specific woofer, failing
to use the correct enclosure may result in lower power handling and poor sound quality.
To calculate the internal airspace required, take the internal dimensions of the box. First
multiple these number by themselves and then divide this sum by 1728. [W x H x D) /
1728]. Please contact your authorized PowerBass Autosound dealer for other designs
and specifications. (Even though these subwoofers can be used in a vented enclosure,
PowerBass recommends an infinite baffle chamber for optimum performance and sound
quality.)
11
XL-104MF
Optimum Sealed Volume
Standard
Metric
Gross Vb Internal including woofer displacement
0.75 cu.ft
24.4 liters
F3 (-3dB)
50Hz
50Hz
Poly-Fill
Yes
Yes
QTC
0.75
0.75
Power Handling (Watts-Rms)
150 - 275 watts
150 - 275 watts
Acceptable Volumes
0.6 - 1.25 cu ft.
16.99 - 35.4 liters
XL-124MF
Optimum Sealed Volume
Standard
Metric
Gross Vb Internal including woofer displacement
1.25 cu.ft
35.4 liters
F3 (-3dB)
48Hz
48Hz
Poly-Fill
Yes
Yes
QTC
0.8
0.8
Power Handling (Watts-Rms)
200 - 350 watts
200 - 350 watts
Acceptable Volumes
1.0 - 2.5 cu ft.
28.3 - 70.8 liters
Warranty is void if the product’s serial
number has been removed or defaced.
This manual is the exclusive property of PowerBass USA, Inc. Any reproduction of this manual, or use
other than its intentions is strictly prohibited without the express consent of PowerBass USA, Inc.
©Copyright 2012 PowerBass USA, Inc.
12
POWERBASS XTREME LIMITED WARRANTY POLICY
PowerBass USA, Inc. offers limited warranty on PowerBass products under normal use
on the following terms:
PowerBass Xtreme Speakers are to be free of defects in material and workmanship
for a period of one (1) year. The warranty is extended to three (3) years for parts and
labor, if an Authorized PowerBass Xtreme Dealer completes the installation.
This warranty applies only to PowerBass products sold to consumers by Authorized
PowerBass Dealers in the United States of America. Products purchased by consumers
from a PowerBass dealer in another country are covered only by that country’s Distributor and not by PowerBass USA.
This warranty covers only the original purchaser of PowerBass product. In order to receive service, the purchaser must provide PowerBass with the receipt stating the consumer name, dealer, product and date of purchase.
Products found to be defective during the warranty period will be repaired or replaced
(with a product deemed to be equivalent) at PowerBass’s discretion and will not be liable
for incidental or consequential damages. PowerBass will not warranty this product under
the following situations:
• Speakers received with bent/cracked frames or significant water damage
• Abuse such as holes in the cone, surround or ripped spider
• Voice coil damage due to amplifier clipping or distortion
• Product that has not been installed according to this owners manual
Any implied warranties including warranties of fitness for use and merchantability are
limited in duration to the period of the express warranty set forth above. Some states do
not allow limitations on the length of an implied warranty, so this limitation may not apply.
No person is authorized to assume for PowerBass any other liability in connection with
the sale of this product.
Please call (909) 993-5399 for PowerBass Customer Service. You must obtain an RA#
(Return Authorization Number) to return any product to PowerBass. The RA number
must be prominently marked on the outside of the shipping carton or the delivery will
be refused. Please pack your return carefully; we are not responsible for items damaged
in shipping. Return the defective product along with a copy of the original dated retail
sales receipt, plus $12.00 for handling and diagnostic evaluation to:
PowerBass USA, Inc., Attn: Returns (RA#__________)
2133 S. Green Privado, Ontario, CA 91761
Residents of HI, AK and US territories will be charged for return shipping. All inquires regarding service and warranty
should be sent to the above address.
Product Disposal
Certain international, national and/or local laws and/or
regulations may apply regarding the disposal of this
product. For further detailed information, please contact the retailer where you purchased this product or
the PowerBass Importer/Distributor in your country.
Page left intentionally blank
Powerbass Xtreme (PBX) - A division of Powerbass USA, Inc.
2133 S. Green Privado - Ontario, CA 91761
Tel (909) 993-5399 Fax (909) 993-5393
Visit us on the web: www.powerbassusa.com