1
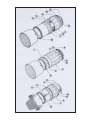
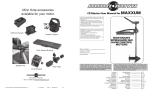
AF 19 - 35 mm F/3.5 - 4.5
(Model A10)
Thank you for purchasing this Tamron lens. Please
read this owner's manual carefully before using your
new lens. Proper care and maintenance of this lens
will result in years of enjoyable use.
DESCRIPTION OF PARTS
1.
2.
3.
4.
5.
6.
7.
8.
9.
10.
11.
12.
13.
14.
15.
16.
17.
18.
19.
Focusing ring
Focus distance scale
Focus distance index
Zooming ring
Zooming scale
Tripod socket
Tripod socket fixing screw
Zoom index
Lens mounting guide
AF/MF selector switch
Aperture / Zoom index
Aperture ring
Aperture scale
AE (minimum aperture) lock
Hood attaching index
Magnification scale
Depth-of-field scale
Infrared index
Macro selector switch
6~7 are for Model 175D only
9 is for Canon/Minolta only
10 is for Canon only
12~14 are for Nikon / Pentax only
17 is for Model 179D only
18 is for Model A10 / 179D only
19 is for Model 572D / 772D only
SPECIFICATIONS
Focal Length
Maximum Aperture
Angle of View
Lens Construction (Groups/Element)
Minimum Focus Distance
Maximum Magnification Ratio
Filter Size
Length
Diameter
Weight
A10
19-35mm
F3.5 - 4.5
97 - 63
11/13
0.5m (1.6')
1:12
77mm
67.7 (2.67")
83.2 (3.28")
317g (11.2oz)
* Length and maximum diameter indicate the values for the lens with the Nikon mount.
* Specifications and design are subject to change without notice.
MOUNTING/REMOVING THE LENS
Mounting
After removing the rear cap, place the lens in the camera mount aligning the lens mount
index line with that of the camera body (Canon/Minolta/Pentax). For Nikon models, align
the lens mount index line with the dot on the camera. Rotate the lens clockwise until it
click-locks (counter-clockwise in case of Nikon body). (For details, please refer to the instruction manual of your camera.)
Removal
Push in and hold the lens release button on the camera body while rotating the lens counter-clockwise (clockwise in case of Nikon body.)
FOCUSING
Automatic Focusing (for Nikon/Minolta/Pentax AF SLR)
When the camera is on the autofocus mode, the lens focuses automatically. During AF (Auto
Focus) operation, the focusing ring will rotate and its movement should not be hindered.
Automatic Focusing (for Canon-EOS AF SLR)
Set the AF/MF Switch on the lens to "AF" mode. Pressing the shutter release button of the
camera will activate the auto-focusing function of the camera. During AF operation, the
focusing ring will rotate and its movement should not be hindered.
Manual Focusing
When the lens is used on a Nikon/Minolta/Pentax AF camera, switch the camera to the manual focus mode. When the lens is on a Canon EOS camera, set the lens AF/MF Switch to the
"MF" mode. Turn the focusing ring while looking through the viewfinder. The correct focus
position is determined when the picture in the viewfinder becomes sharpest. In manualfocus photography, focusing should always be checked through the viewfinder even when
shooting at infinity.
* For further details, see the instruction manual of your camera.
INFRARED INDEX (Model A10 and 179D)
It is necessary to adjust the focus point when using black and white infrared film with a red
filter. This is normally done by focusing on the subject, reading the value from the distance
scale, aligning that value with the infrared index and attaching the red filter. When you
need very precise focusing, we recommend shooting a test roll.
ZOOMING
To set your lens to the desired image composition you desire, simply look through the
viewfinder and operate the zoom ring.
APERTURE CONTROL & AE SETTING
Canon / Minolta
Your camera controls the aperture depending on the shooting mode in use. Although the
aperture value varies in accordance with zooming, the camera itself reads out the change to
provide automatic compensation.
Nikon / Pentax
When shooting in programmed AE or shutter-priority AE mode, rotate the aperture ring to
the minimum position. For aperture-priority or manual mode, turn the aperture ring to the
desired setting. In case of F401/F50 series models, the aperture is set by the camera in
accordance with the given camera instructions.
LENS HOOD
A bayonet-type lens hood is provided as a standard accessory. Tamron recommends shooting with the hood attached whenever possible as the lens hood cuts out light, which is
harmful to image quality. However, please be aware of the precautions noted below when
your camera is equipped with a built-in flash. When the hood is not in use, it can be placed
on the front of the lens in reverse:
Attaching the Lens Hood Align the index mark on the hood with the corresponding
index mark on the lens. Push the hood onto the lens and then rotate it clockwise to secure.
When attaching the lens hood, hold the focusing and zoom control rings so that they are
not rotated unintentionally.
TRIPOD SOCKET (Ref. Figs. 9 & 10)
To change the camera from horizontal to vertical position or vice versa, loosen the
locking knob for the tripod-attaching base by rotating it counterclockwise, then rotate lens
and the camera about the longitudinal axis of the lens. Tighten the locking knob by rotating
it in clockwise direction until it stops. (Fig. 9)
To remove the tripod-attaching base, loosen the locking knob, pull it back slightly, and
then lift the knob to open the tripod base ring as illustrated in Fig. 10. When removing the
tripod-attaching base, hold the lens and the camera securely to prevent them from both
accidentally falling.
Fig. 9
Fig. 10
Altering camera between vertical & horizontal positions
1. Loosen lock knob by rotating knob counterclockwise.
2. Turn camera and lens so as position alignment marks meet each other.
3. Tighten lock knob by rotating knob clockwise.
Detaching tripod-attaching base
1. Loosen lock knob by rotating knob counterclockwise.
2. Pull out lock knob slightly.
3. Turn attaching ring upward while holding
locking knob.
* When detaching tripod-attaching base,
hold camera and lens securely, not to accidentally drop your valuable equipment.
CHECKING DEPTH-OF-FIELD
When you set the focus of a particular subject, there is an area in front of you and
behind your subject that will also be in focus.
The depth-of-field table shows aperture values horizontally and ranges vertically. If,
for example, the aperture is F8 and the shooting range is 5m (Focal length 400mm), the
depth-of-field value is 4.96 (m)-5.04 (m) where F8 in the horizontal column and 5m in the
vertical column intersect. If your camera has a preview mechanism, the depth-of-field effect
can be confirmed in the viewfinder. For further details, see the instruction manual of your
camera.
PRECAUTIONS IN SHOOTING
When the built-in flash on the camera is used, symptoms such as corner illumination
fall-off or vignetting at the bottom part of the image may be observed, especially at the
wider-angle range. This is due to the inherent limitation of the coverage of the built-in flash,
and/or the relative position of the flash to the edge of the lens barrel, which causes shadows on the image. Accordingly, we recommend not using the built-in flash at wider-angle
settings.
Please refer to the section of your camera's instruction manual pertaining to the use
of the built-in flash, since the angles of coverage of the flashes differ between camera models.
When you use a built-in flash, make sure to detach the lens hood.
PRECAUTIONS IN SHOOTING (con’t)
Certain camera models may indicate the maximum and minimum aperture values of
the lens in approximate numbers. This is inherent to the design of the camera and not an
indication of error.
Do not use the lens hood when you shoot with your camera's built-in flash. Even without the lens hood, an arched-shape shadow may be observed at the bottom portion of the
picture when using the built-in flash. Tamron recommends using an optional flash unit (clipon grip type) when use of flash is necessary.
"
When using the lens in the telephoto focal range, it may be necessary to use a tripod
to avoid camera shake. Using high-speed film (ISO 400 or faster) with a fast shutter speed is
also helpful to reduce the effect of camera shake.
TO ENSURE LONG-TERM SATISFACTION
Avoid touching the glass element surface. Use a photographic lens cloth or blower
brush to remove dust from the lens element surface. When not using the lens, always place
a lens cap on it for protection.
Use a lens cleaning tissue or lint cloth with a drop of cleaning solution to remove fingerprints or dirt on the glass lens surface with a rotary motion from the center to edge. Use
a silicon cloth to clean your lens barrel only.
Mildew is an enemy of your lens. Clean the lens after shooting near water or in any
humid place. If you find mildew on your lens, consult a repair shop or nearby photographic
store.
When using your equipment [camera(s) and lens(es)] in an environment where the
temperature changes from one extreme to the other, make sure to put your equipment
temporarily in a case or plastic bag for a length of time in order for the equipment to go
through a gradual temperature shift. This will reduce potential equipment troubles.