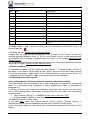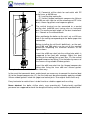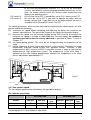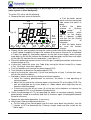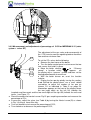
1
5.24 and 5.32 N3V
CONDENSING GAS – FIRED
WALL MOUNTED
STAINLESS STEEL BOILER
Heating only or with external tank
and Solar System
INSTRUCTIONS FOR INSTALLATION
OPERATING AND MAINTENANCE
AUSTRALIAN VERSION
For Sales and Service contact;
AGENT
Automatic Heating Pty Ltd
51 Assembly Drive, PO Box 356
Tullamarine Vic 3043 Australia
Telephone: +61 3 9330 3300 Facsimile +61 3 8318 7319
Email: [email protected] | www.automaticheating.com.au
1
WARNING
Before filling the heating system , new or existing, is necessary to check that it will be
clean and there will be not impurity and/or residual and then let in a suitable inhibitor
2
INDEX
INDEX.............................................................................................................................. 3
BOILER DIAGRAM AND LEGEND CONENSA 5.24 e 5.32 N3V .................................... 5
CHARACTERISTICS, DIMENSIONS AND TEMPLATES ............................................... 6
1 USER INSTRUCTIONS .................................................................................................... 7
1.1 General warnings....................................................................................................... 7
1.2 First start-up. ............................................................................................................. 8
1.3 Signals and diagnostics ........................................................................................... 10
1.5 Operating of the solar system .................................................................................. 11
1.5. CH pressure regulation ........................................................................................... 12
1.6 Periodical check-ups................................................................................................ 12
1.7 Antifreeze feature. ................................................................................................... 12
1.8 Definitive dismantling. .............................................................................................. 13
1.9 Problems, causes and solutions. ............................................................................ 13
2 INSTALLER INSTRUCTIONS ........................................................................................ 14
2.1 Boiler installation ..................................................................................................... 14
2.2 Installation ............................................................................................................... 15
2.3 Hydraulic connections.............................................................................................. 15
2.4 Condense drainage system. .................................................................................... 16
2.5 Gas connections. ..................................................................................................... 16
2.6 Electrical connections control board functioning and regulation .............................. 16
2.7 Thermoregulation devices and accessories............................................................. 19
2.8 Automatic high/low temperature circuit .................................................................... 21
2.9 Filling the CH circuit (for remote tank) ..................................................................... 22
2.10 Filling heating circuit ............................................................................................. 22
2.11 Filling the condense drainage system.................................................................... 23
2.12 System start-up...................................................................................................... 23
2.13 The pump. ............................................................................................................. 23
2.14 Zone system .......................................................................................................... 24
2.15 Boiler safety valve.................................................................................................. 24
2.16 Boiler draining. ....................................................................................................... 24
2.17 Safety valve tank ................................................................................................... 25
2.18 Boiler draining. ....................................................................................................... 25
2.19 Draught terminal positioning, wall outlet ................................................................ 25
2.20 Configuration type B23 open chamber and forced draft. ....................................... 26
2.21 Wall mounted coaxial air/flue ducts - type C13 ...................................................... 26
2.22 ROOF OUTLET AIR/FLUE DUCT TYPE C33 ....................................................... 27
2.23 Separate air inlet/flue outlet system. ...................................................................... 29
2.24 Chimney flue outet or tubing outlet duct type C53 – C83....................................... 30
2.25
Solar system functioning .................................................................................. 32
3
3 SERVICING INSTRUCTIONS ........................................................................................ 34
3.1 First start-up tests. ................................................................................................... 34
3.2 Settings (stand alone settings) ................................................................................ 34
3.3 Gas pressure regulation. ......................................................................................... 37
3.5 Boiler diagnostic ...................................................................................................... 40
3.6 Maintenance function............................................................................................... 40
3.7 Adjustment of nominal heating power. ..................................................................... 40
3.9 Selection of flow temperature in heating mode. (not possible on cascade systems)
...................................................................................................................................... 41
3.10 Pump anti-block function ....................................................................................... 41
3.11 Heating anti-freeze function. .................................................................................. 41
3.12 Maintenance. ......................................................................................................... 41
3.11 Maintenance of the burner and heat exchanger .................................................... 42
3.14 Problems, causes and solutions. ........................................................................... 44
3.15 Warranty ................................................................................................................ 49
4
BOILER DIAGRAM AND LEGEND MERIDIAN 5.24 e 5.32 N3V
1
35
2
34
3
33
32
4
5
31
30
6
29
7
8
28
9
27
10
26
11
25
12
3 bar
24
13
14
15 16 17 18 19 20 21 22 23
36)function mode selector
37)Sanitary temperature regulation
38)heating temperature regulation
1)Flue /air outlet ducts
2)Air combustion duct
3)Manual vent tap
4) Burner
5)Ionisation electrode
6)Expansion vessel
7)Safety thermostat
8)Flow temperature sensor
9)Fan
10)Differential pressure switch
11)Circulator
12)Three way valve
13)attack water gauge bulbous
14)by pass heating circuit
15)CH flow
16)Flow tank
17)Tank return
18)water fill
19)cool water inlet
20)safety valve
21)heating back
22)drainage tap
23)gas inlet
24)trap condense drainage
25)automatic air vent
26/gas valve
27)signal compensation silicone pipe
28)supply transformer 24V
29)wrinkled air inlet duct
30)Ignition electrode
31)Led burner
32)Ignitor
33)safety flue thermofuse
34)plug for compensation pipe
35)flue temperature sensor
39)Display
40)Manometer
41)temperature boiler tank
Fig.1
41
Particular selector functions 36) with
meaning symbol
Inverno
Estate
36 37 38 39
Reset
40
OFF
5
Spazzacamino
CHARACTERISTICS, DIMENSIONS AND TEMPLATES
58
335
58
845
850
Ø1
2
2
Ø1
vista frontale
60
16
1 2 3 4 5 6 7
65 48 42 91
450
Ø80
113
42
B
Ø60/100
69
36
35
40
145
137
236
65 68 .
135
(mod. 3.15 5.24)
280 (mod.5.32)
250
65
1)CH flow ¾\“
5)CH return 3/4“
MERIDIAN
N3V
2)Flow tank 3/4
6)Gas inlet 1/2“
HEAT INPUT
kW
26.6
33.3
5.24
5.32
HEAT OUTPUT
80°C FLOW
60°C RETURN
MJ/hr
96
120
91
65 68 71
3)Flow tank 3/4 “
7)Condense drain
HEAT OUTPUT
50°C FLOW
30°C RETURN
23.4
29.4
4)Cool inlet
MIN HEAT
INPUT
27
33
MIN HEAT
OUTPUT
Nat
Gas
Propane
Gas
Nat
Gas
Propane
Gas
5.5
6.7
9.0
5.0
6.0
7.9
Tab 1
INLET GAS
PRESSURE
5.24
5.32
Natural
1.1
1.1
Propane
2.75
FLUE
TEMPERATURE
°C
77
77
FLUE GAS
VOLUME
MAX
kg/hr
50.3
37.7
WATER
VOLUME
EXPANSION
VESSEL
WEIGHT
DRY
l
3.5
3.5
l
10
10
kg
42
42
Tab 2
5.24
5.32
Boiler Water
Volume
L
3.5
3.5
Inlet Gas Pressure kPa
NATURAL
1.1
1.1
PROPANE
2.75
6
1 USER INSTRUCTIONS
1.1 General warnings.
This instruction Booklet constitutes an integral and essential part of the product.
Make sure that it is always left near the appliance. Please, read carefully the advice
and warnings contained in this section as they provide important indications on the
boiler use.
IMPORTANT: This boiler has been design to produce water for heating and sanitary
purposes at a temperature below boiling point at atmospheric pressure, in accordance with
its technical features of performance and its power. It is strictly forbidden to use the
equipment for other purposes.
The manufacturer cannot be held responsible for any damage caused by improper or
unreasonable uses.
This gas equipment shall be used following some fundamental requirements, such
as:
•
•
•
•
•
•
do not touch the hot parts of the boiler, flue ducts, etc., which are overheated during
operation. Any contact with these parts may cause serious burns;
do not spray water or any inflammable liquids;
do not leave any object on the boiler;
do not leave any container with inflammable liquids where the boiler is installed;
do not carry out cleaning in the boiler room when it is in use (alcohol, gasoline, etc.);
in case of gas smell do not turn on switches or any device which may generate sparks;
open all doors and windows so as to let air circulate; close the gas valve, above all the
main valve of the meter; call our Technical After-Sales Service Department.
Warning. The use of any component which is electrically supplied requires the close
observance of certain fundamental rules, such as:
• do not pull the wiring or leads;
• do not leave the apparatus exposed to atmospheric agents;
• do not touch the apparatus with parts of the body which are wet or damp and/or in bare
feet;
• do not allow any children to use the boiler nor any person who is not qualified with the
necessary technical ability and knowledge in the heating system sector.
Warning: Servicing shall be carried out only by authorised personnel.
The appliance is unsuitable for use as a pool heater.
Identification of functions enabled
This boiler can heat rooms and if required can heat a remote tank. If the hot sanitary water is not
produced by remote tank, selector 37 of fig. 1 is not available. When in doubt contact Automatic
Heating After-Sales Service Department.
7
1.2 First start-up.
Before the first start-up, please check that the system is properly filled with water and that
it has pressure 1 ÷ 1.3 bar, then proceed as follows:
• open the gas valve;
• turn the selector (36) on the only DHW function or on the DHW/CH function;
• Our remote control operation (Optional RC). When the selector is in winter position
and the RC is connected, the temperature potentiometers on the boiler control board
are excluded, and it will appear "EC" (External Control) written on the display. All the
regulations can be carried out by the RC.
• Operation without remote control. With the selector on the DHW position
the CH
regulating potentiometer (38) is excluded and the temperature of the DHW is regulated
by the DHW potentiometer (37):with the selector on the DHW/CH position
the CH
regulating potentiometer is enabled to regulate the temperature in the radiators (38),
and it also keeps the DHW potentiometer functioning. Turning it clockwise makes the
temperature increase, while turning anticlockwise it decreases.
From this moment the boiler is ready to operate automatically. A led (fig.4 pos.44) on the
control panel shows that the burner is on. When the CH or DHW water potentiometers are
turned, the display indicates the temperature chosen and at the same time LED’s (50) on
the display blink according to which potentiometer is operating.
External sensor (optional)
The external temperature sensor adjusts the temperature of the boiler according to the
external temperature. Adjustment involves the possibility of choosing from curves that go
from 0.5 to 6 with 0.1 steps. With advice from the installer or heat engineer who designed
the system, the curve that behaves as closely as possible to the behaviour required in the
apartment should be selected.
The curve is adjusted:
a) on the trimmer (41) if you have not purchased the remote control (optional) which
adjusts the curve by ± 5°C and can therefore be used to easily optimise thermal
comfort. The basic operating adjustment of the curve is effected by the
installer/support service
b) Using the remote control if present see the following steps:
8
0
21
3
15
9
18
6
12
PRESS THE BUTTON IP
MORE THAN 3 SECONDS TO
ENTER IN INFO MODALITY
PRESS THE BUTTON OK FOR MOVE FROM A WINDOW TO ANOTHER TILL
ARRIVE TO THE “K REG” FUNCTION
WITH UP E DOWN BUTTONS IT’S POSSIBLE TO CHANGE THE
EXTERNAL TEMPERATURE CURVE. REFER FUNCTIONING CURVES
FIG.3
PRESS THE BUTTON OK FOR MOVE FROM A WINDOW TO ANOTHER
BUILDING SIZE PARAMETER: WITH UP AND DOWN BUTTONS IT’S
POSSIBLE TO CHANGE THE VALUE. A high value is associated with
buiding/heating system with high thermal inertia
PRESS OK BUTTON TO MOVE AT FOLLOWING WINDOW
YSELF. WITH UP AND DOWN BUTTONS
ENABLE 1 O DISABLING 0
IT’S POSSIBLE TO CHOOSE
PRESS OK BUTTON TO MOVE AT FOLLOWING WINDOW
AMBON. WITH UP AND DOWN BUTTONS IT’S POSSIBLE TO CHOOSE
ENABLE 1 O DISABLING 0
PRESS THE BUTTON OK FOR MOVE FROM A WINDOW TO ANOTHER
ENABLE ANTIFREEZE HOUSE FUNCTION. WITH UP AND DOWN
BUTTONS IT’S POSSIBLE TO CHOOSE ENABLE 1 O DISABLING 0
PRESS IP BUTTON TO EXIT FROM THE WINDOW INFO
When using an external sensor, the flow temperature is automatically calculated according
to the external temperature and the K coefficient that has been set. If you are also set the
function YSELF the curve will be controlled and in case modified by algorithm inside of
remote control in order to ensure optimal comfort and maximum energy savings.
If you put in action the YSELF function also the AMBON function must be activated.
The AMBON function is integrated in the remote control.
9
Bolier Temperatur
Cutting at 45°C at low temperature
. Fig. 3
External temperature
N.B.: in systems with zones with different temperatures, the factor available with the low
temperature room thermostat closed goes from 0.5 to 6 but the supply temperature is
limited to 45°C whereas with a high temperature room thermostat request, it goes
from 2.5 to 6 with a maximum temperature of 85°C.
1.3 Signals and diagnostics
Fig.
54
53
52
44 45
46
47
48 49
51
50
The boiler display is a complete system
with simple, intuitive information. An
explanation follows:
Key:
44) Burner start-up
45) Activation of anti-freeze function
46) Activation of service function (for
support service only)
47) Request for intervention/ resetting
48) Sanitary hot water request (if tank
present)
49) Selector switch on “Winter”
50) Heating request
51) Selector on “Summer”
52) “Reset” request
53) Used only for “Service”
54) Temperature reading/Fault code
During normal operating, the digits in 54) indicate the flow temperature value.
During normal operating and in STAND-BY, the flow temperature is also displayed in
large digits. The small digits are used by the installer or the maintenance technician for the
menus.
If there is a fault, the fault code is displayed in flashing mode in large digits with the
spanner symbol.
10
Table 4
code
fault
Type of block
F1
No start-up or no flame detected
Manual resetting is required
F2
Safety thermostat intervenes
Manual resetting is required
F5
Faulty supply sensor
It automatically resets if fault disappears
F7
Fault on flue gas sensor resistance
Fixed with automatic reset – signaling for 24 hours
F8
Faulty external probe
It automatically resets if fault disappears
F 10
Lack of water circulation on primary
It automatically resets if fault disappears
F11
Hydraulic pressure <0,5 bar into heat exchanger
It automatically resets if
F12
Faulty tank probe
It automatically resets if fault disappears
F 16
Faulty fan
It automatically resets if fault disappears
F26
Micro pressure water pasted
It automatically reset if fault disappears
F 30
Faulty solar collector probe
Maintenance technician is required
F 35
Faulty external tank
Solar system operates but the maintenance technician is
required
The boiler codes, 1 and 2, can be reset by the user by selecting selector 39) in Fig. 1 in
the reset position
If the block persists, contact the Sile Service Centre.
A block with 10 code can be caused by a lack of water in the system, or from the
circulating pump blocked or faulty. In The first case check that the system load pressure
on the boiler pressure gauge is approximately 1÷1.3 bar; in the second contact the Sile
Service Centre
For all remaining block codes that do not reset even after switching off the boiler and then
switching it on again, contact the Sile Service Centre.
1.4 Boiler shutdown.
To shut down the boiler turn the selector to the position off
and turn the gas valve off. If
the boiler is not used for long periods of time, always close the main gas supply tap and
turn off the main power supply switch. In this mode antifreeze system remains active. For
a complete turn off the power supply to disconnect from the outside boiler.
1.5 Operating of the solar system
(to be activated only if the Solar System 2 sensor kit has been installed)
The solar function can be activated in the summer and winter to integrate the sanitary hot
water. It is activated using parameter 4 whose configuration mode is described in
paragraph 3.2
If you only wish the solar mode to be activated, normally in the summer, you can select
one of these configurations. Remember that parameter P4 must always be activated by
selecting value 1 :
1. status selector (39 Fig. 5) = SUMMER or with status selector = OFF;
2. heating set point selector on minimum;
The board only works in solar mode.
In the solar only mode, any external burner start-up request (sanitary request) is
deactivated whereas the anti-legionella and anti-freeze functions remain active.
In the “solar only” mode, the solar panel icon and collector temperature are shown on the
display
11
N.B.: do not activate the solar system if the optional 2 sensor kit has not been
installed because this may cause the system to malfunction and you may
have to call the service centre to resume boiler operating
1
2
Fig. 10
Display in solar mode:
- When the solar function is activated, an
icon lights up indicating the solar system
- For 10 s after activation of the solar pump,
the temperature of the collector sensor is
displayed in large digits and the temperature of
the tank solar sensor (sanitary sensor) in small
digits.
The solar system operates when the flat collector temperature is higher than the solar tank
temperature as set in parameter 5 which defines the temperature differential between the
collector and the boiler. When exceeded, the solar system circulator comes on. This
parameter is adjusted as explained in paragraph 3.2.
If the differential is very low, between 5 and 10°C, the circulator will come on frequently to
disperse the small amount of heat that has accumulated in the panels. With a differential of
between 10 and 15°C, the circulator is activated less frequently because more time is
needed to recreate the difference in temperature between the two devices. Even higher
differentials should be avoided in the winter when solar radiation is limited and large
differences in temperature are difficult to obtain. We recommend a differential of
approximately 10-15°C which is a good compromise for the entire year. If this way, the
setting made by your authorised installer will not need adjusting.
1.5. CH pressure regulation
Periodically check that the pressure of the heating system is about 1÷1.3 bar; if pressure is
below 1 bar, when the boiler is cool, it is to be restored by cock placed in the boiler lower
part.
After the operation close the block
If pressure reaches 3.0 bar, it may activate the safety valve (fig. 1 pos. 20). In this case,
call our After-Sales Service. Please, do the same if pressure decreases frequently.
1.6 Periodical check-ups.
At the end of every heating period the boiler and its components, the external air duct (if
present), the flue pipes and the condense drainage system are to be inspected by our
authorised service centre in order to guarantee both the apparatus efficiency and the
proper systems operations.
Careful maintenance is always a good safety and money saving measure.
1.7 Antifreeze feature.
The boiler is equipped with a standard antifreeze feature which activates the pump and the
burner when the boiler temperature falls below 8°C and 6°C. It can be equipped with an
optional DHW circuit antifreeze device. The antifreeze feature is guaranteed if the boiler is
perfectly working, if it is not locked and it is electrically operated with the selector on the
DHW or DHW/CH position. Before a long absence, please check that the system is
completely emptied.
12
1.8 Definitive dismantling.
In the event of the boiler definitive dismantling, it is to be performed by qualified personnel.
Make sure that also the electrical, hydraulic and fuel supplies are disconnected
1.9 Problems, causes and solutions.
The burner ignites but immediately locks out (code 1)
The burner does not ignite
The pump is noisy
⇐ PROBLEMS
The DHW is not very hot
The heating is not sufficient
Error code 10 on the display
CAUSES
Error code 1/2/5/6/7/8/12/16 on the display
SOLUTIONS
⇓
⇓
Air in the gas circuit
Gas supply suspension or large reduction in the circuit
The boiler is blocked
•
The selector is not set correctly
•
•
The CH potentiometer is set on a too low temperature
•
•
The room thermostat is off
•
•
The room thermostat is set on a too low temperature
•
•
Not enough water in the system
• •
• •
Air in the system
•
•
The DHW selector is set on a too low temperature
•
The cold water temperature is too low
•
Too large water drawings
•
Continuous hot water drawings
•
• • • Other problems
•
Table 4
•
•
1
2
3
4
5
6
7
8
9
10
11
11
12
14
SOLUTIONS
1)
2)
3)
4)
5)
6)
7)
8)
9)
10)
11)
12)
13)
Wait for about 10 sec., then repeat ignition operations.
Turn off the gas tap and wait until gas supply returns before igniting.
Wait for 10 sec., then reset the system and turn selector 39) fig.1to correct position
Turn the selector (39 fig.1) to the correct position.
Set the CH regulation potentiometer (41 fig. 1) to 75°C.
Set the room thermostat to a higher temperature.
See point 6.
Add water using the heat system loading tap; remove air from the system(23 fig.1). De-aerate the
system. Do not exceed 1 bar pressure indicated on the water gauge (43 fig.1). If pressure should
decrease again, request service from our authorised service centre or from professionally qualified
personnel to remove air from the system or to eliminate leakage.
See point 8.
Turn the DHW selector clockwise to a higher temperature.
The water drawing is too high, decrease it.
Wait for the DHW output to stop. Consider either solutions
Consult our authorised service centre or professionally qualified personnel
13
2 INSTALLER INSTRUCTIONS
2.1 Boiler installation
2.1.1 General rules
The boiler installation is intended to be fixed and it must be carried out by professionally
qualified staff, according to the actual national and local law, following all the instructions
and rules contained in this manual. The boiler shall be installed in a room free of corrosive
steam.
After unpacking the boiler, ensure the integrity of the content: in doubt, do not use the
apparatus and refer to the supplier. Packaging components (carton, foam, plastic bags,
etc.) are potential hazards and should not be left within the reach of children.
In case of installation inside or between pieces of furniture, let sufficient space to carry out
standard maintenance; we would suggest to leave a 3 cm interspace between the boiler
case and the wall of the piece of furniture.
The boiler has been designed to produce hot water at a temperature below boiling point at
atmospheric pressure. It must be connected to a CH system which is compatible with its
power and technical features. It is strictly forbidden to use the equipment for other
purposes.
Any other use is improper and therefore dangerous. The manufacturer cannot be held
responsible for damages caused by improper or unreasonable use.
In the event of irregularities, defects or malfunctioning, deactivate the boiler and contact
the Sile Service Centre. They will provide original spare parts and will settle the boiler.
Only professionally qualified personnel are allowed to overhaul and repair the boiler. If the
above mentioned rules are not respected, we will decline any responsibility and will not
grant the validity of the warranty.
Before installing the boiler:
• Check and washes all system pipes carefully in order to remove any impurities
and residual substances which could cause malfunction of heater exchanger
primary and secondary;
• Carry out the application of sludge blanket filter in the heating circuit;
• Introduce suitable inhibitor for the preservation of possible residual suspended
matters
Check the boiler fuel gas supply: compare the writing on the packaging and the technical
characteristics plate.
In case the appliance fails to operate correctly after all checks have been carried out, refer
to the authorised service provider in your area.
2.1.2. Installation room
The boiler can be installed in any type of room, provided that:
- the requirements of Gas Code AS5601 are observed.
- it is protected against freeze
- that the flue ducts can be installed adequately.
14
Clearances shall provide provision for service access and protection from combustible
surfaces. Minimum clearances from combustible surfaces shall be 50mm at sides, 300mm
from top and 300mm from bottom.
ENSURE THAT THE AIR ENTRY IS NOT OBSTRUCTED BY ADJACENT CABINETS
OR OTHER STRUCTURES.
2.2 Installation
If our accessories are used to install the boiler, read the instructions enclosed carefully.
After choosing the suitable position to install the boiler, fit the installation template (see fig.
2). It must be oriented perpendicularly by means of a spirit or a plumb line. The template
shows the two holes which serve to fasten the boiler to the wall. They are to be drilled with
a ∅ 12 mm drill bit. Insert the supplied dowels and ensure that the hooks are fit. Mark also
the position of the hydraulic and gas connections holes on the wall. The supplied dowel
can ensure a firm hold only if inserted properly. In the event that walls do not provide the
apparatus with a steady support, take the adequate countermeasures.
2.3 Hydraulic connections
The hydraulic connections must be performed in a rational manner by following the
indications of the boiler template (fig. 2). Optional is provided the kit 10 SILE including all
the compression fittings can be used, supplied on request. The boiler safety valve drain
must conduct to a secure draining tube. In absence of this tube, the possible intervention
of the safety valve may cause flooding. We cannot be held responsible for any damage
caused by neglecting to apply this technical precaution.
The boiler can work only in two following modes:
a) only heating mode
b) heating and sanitary through remote tank
That change are the following aspects:
a) heating mode: two connections 2) and 3) (fig.1) must be plugged with two plugs packed
inside the instructions bag. So you can close two connections to possible remote tank and
the boiler working only with heating circuit. Now must inhibit the sanitary probe (41 fig. 1)
functioning. This carries out on PCB working. See table relatives Dip-Switches positions on
PCB in the chapter 2.6 of this manual. Dip-Switch 6 must be moved to ON; so the
temperature probe is defused and there not will be malfunctioning for the not wanted
sanitary activation.
b) Heating and sanitary mode combined doesn’t occur to do anything because the boiler is
prepared in this mode so by the manufactory. We remember that the sanitary probe 41) fig.
1 must be put on the pocket tank to activate the heating tank. Don’t use the eventual
thermostat tank.
15
2.4 Condensate drainage system.
The condensate produced inside the boiler must be drained. Therefore the boiler is
provided with a condensate trap. The condensate trap fitting is to be connected to a ∅ 32
mm PVC condensate drainage system. It is recommendable to install a further water trap
on the condensate drainage system before the condensate reaches the sewer. Only
plastic tubes of the standard civil condensate drainage systems are suitable to drain the
condensate towards the sewer of the house.
2.5 Gas connections.
This appliance shall be installed only by authorised persons and in accordance with the
manufacturer's installation instructions, local gas fitting regulations, municipal building
codes, electrical wiring regulations, local water supply regulations, AS 5601-2004 - Gas
Installations and any other statutory regulations.
The boiler must be installed on a flat vertical wall which is capable of supporting the weight
of the boiler.
The location must take account of the flueing method to be used and the position of the
flue terminal, with regard to the requirements of AS5601.
Refer to AS5601 for gas pipe size details.
The 5.32 N-N3V boiler has been designed to operate on Natural Gas and Propane Gas.
The 5.24 N-N3V boiler has been designed to operate on Natural Gas.
Before performing the gas connection, all the ducts of the fuel system are to be cleaned
inside in order to remove possible residual substances which could cause malfunctioning.
The apparatus duct sections must ensure a sufficient gas supply to cover the maximum
request. For the same reason check the pressures of the gas which will be used.
2.6 Electrical connections control board functioning and regulation
The electrical safety of the equipment is reached only when correctly connected to an
efficient grounding system performed according to the electrical rules in force. The
fundamental security requirement must be checked.
Warning: we cannot be held responsible for damages to people, things or animals caused
by neglecting grounding system and the above mentioned rules.
All the boiler connections are absolutely not fit as grounding. This has to be verified before
performing the boiler electrical connection.
The use of any component run by electrical power involves the strict observance of certain
fundamental rules, such as:
Do not touch the boiler with parts of the body which are wet and/or damp and/or bare;
Do not pull the wiring;
Do not leave the boiler exposed to the rain, the sun, etc., unless explicitly requested;
Children and not professionally qualified persons are not allowed to use the apparatus.
16
Professionally qualified personnel shall verify that the electric supply system is adequate to
the apparatus maximum power (140 W please see the rating plate), and that the wiring
section is suitable to the power absorption of the machine. The use of electric adapters,
extension cords or sockets are not recommended, but it is convenient to provide the
system with a double-pole switch having at least 3 mm spaced electric. Before connecting
the boiler, make sure that the power grid and main switch are off.
The boilers are equipped with feeding cable without electric plug; it must be connected to
230V-50Hz following the polarity L-N and the ground connection.
If a Remote Control is used, set a double-pole wiring line according to the actual rules
concerning electric plants.
Important: when the power switch is on, the L-N connecting terminals are fed even if the
boiler is off.
17
SSB
SE (optional)
9
18
15
21
0
12
3
6
B: blue
G : yellow
M : brown
N : black
W : white
V : green
SF
Kit 2 sonde SolarSystem
morsetti a vite esterni
wiring
SSP
Colors
key
SR
SS
Fig. 4
PS
spina
esterna
Key
CR - Remot contro (optional)
PS-Solar circuit circulator (opz)
SF – flue probe
SP –micro flow transducer pump
SSP-solar probe panel PT type 1000
TS- Safety thermostat
VD- Three way valve switch
EA – ignition electrode
RL – detection electrode
SFS thermal fuse safety flue
SS – NTC sanitary probe
TA_B - low temperature zone
room thermostat
TT- supply transformer
VG – gas valve
18
P - circulator
SE – external sensor (optional)
SR – heating NTC probe
SSB – solar tank probe (opz.)
TA_A TA_A - high temperature zone
room thermostat
V- fan
Adjustment trimmer PBC
P4: maximum fan speed
P2:minimum fan speed
P5:fan speed during ignition
P7: thermo setpoint or k factor setting with external probe present
DIP switches: the board (see Fig. 4) has 6 DIP switches which can be moved to
create the different operating options listed below:
Dipswitch
OFF
ON
1
High temperature adjustment
using trimmer
Low temperature adjustment
using trimmer
ON
2
Do not use (for R version only)
Boiler must be permanently ON
OFF
3
External sensor not activated
(not present)
External sensor activated
OFF
4
Normal use of remote control
Remote control as display
OFF
5
free
free
OFF
6
Heating boiler end remote tank
Heating only (sanitary hot water
deactivated) also DIP 2 ON
ON
RECOMMENDED
SETTINGS
N.B. This boiler has two modes functioning, only heating and heating/sanitary with
remote tank. See chapter 2.3 the different boiler configuration for optimal
functioning in the two versions.
2.7 Thermoregulation devices and accessories.
The boiler can be connected to a temperature control system and an external temperature
sensor which must be installed as specified in the instructions.
On/Off room thermostat: make the connection to the TA_A and/or TA_B terminals on the
PCB (Fig. 4) and check that the wire ends leading from the system are not energised
(clean contact). More information on operating of the high/low temperature system is found
in chapter 2.8
External sensor: it can be connected directly to the boiler electrical installation (SE
terminals, Fig. 4) and automatically adjusts the installation maximum flow temperature as
the external temperature changes. When it is connected, the position of DIP switch no. 3
must also be changed. It must be moved from OFF to ON.
With the selector off-summer-winter in Reset and moving the sanitary knob the
characteristic K value (graph in Fig. 5) of the curve appears on the display at “03”. See
Chap. 3 for methods of adjustment.
The external sensor is always on when connected, independently of the presence and
type of programmable thermostat used, or can operate in combination with the Sile
Remote Control code 907520053.
The correlation between the flow temperature TM to the system and external temperature
TE is determined by the position of the trimmer P7 on the PCB (see Fig.4) according to the
curves shown below. For the sake of convenience, you can also use the heating
19
potentiometer. In this way, you can adjust the flow temperature ±5°C by keeping the curve
slope adjusted on trimmer P7 as described in Chap. 1.
Turning knob clockwise completely till maximum, there will be a temperature rainsing
25°C. This could will be useful in the mid seasons when the external temperature is high
and the flow temperature too low to heat the house.
Here are the approximate temperatures set on trimmer P7 if it is used to adjust high or low
temperature.
High Temp
Low Temp
Sile Remote Control (optional). The following operations should be performed when the
device has been de-energised. It must be connected to the screw terminals of the serial
interface board on connector X13 of the PCB. The double-pole wire connection (preferably
shielded) is not polarised.
Make sure that the connection wires from the boiler to the RC are not energised (to avoid
damaging the boiler electronic board) and that there is no jumpering between contacts
TA_A and TA_B (Fig. 5) for room thermostats.
The temperature range for the remote control system goes from 25 to 85°C. If the system
operates at low temperatures, the required temperature/curve can be set in the remote
control and the system will operate correctly.
Operating with the remote control: the boiler only operates using the parameters set on the
RC if the boiler main switch is set to winter. If the Summer function is selected, the RC has
20
no control on the boiler functions which depend on the control panel commands. If the
boiler has to operate at low temperatures and has remote control, simply select the
required temperature directly on the remote control unit.
When operating with the remote control without other thermostats (single zone system)
jumpering must not be used on the room thermostat wires.
2.8 Automatic high/low temperature circuit
The boiler has an automatic function which has been developed to optimise performance
in systems that have circuits with different temperatures.
In circuits with two different temperatures, normally one for the radiator zone and one for
the radiant heating panels, the boiler operates at the higher temperature if there is a
simultaneous request from both circuits and at the temperature for the radiant heating
panels (lower temperature) if the request comes from the lower temperature circuit only.
Operating is controlled by two room thermostats, one for the high temperature zone
(25÷85°C) and one for the low temperature zone (25÷45°C) which must be connected to
the two dedicated wires that come out of the control panel and are specifically labelled.
The situation is summarised in the table below.
High TA
state
OFF
ON
OFF
ON
Low TA
state
OFF
OFF
ON
ON
Boiler operating
temperature °C
OFF
25÷85°C
25÷45°C
25÷85°C
Boiler pump
OFF
ON
ON
ON
However, this automatic function does not mean that the boiler can directly supply a low
temperature zone and a high temperature zone without the help of a mixer circuit.
N.B.:
a mixing system like the SILE TBA/TBA-M must be installed on mixed
circuits and a safety device must also be installed on the low temperature
circuit, i.e. a safety thermostat set at 50°C on the delivery pipe downstream
of the mixed circuit.
On systems with only one operating temperature, the room thermostat that is not required
must be left open.
E.g.:
a) if a radiator system has to be supplied, the room thermostat must be connected to
the wire which receives input from the high temperature zone and the one for the
low temperature zone must be left open (factory setting).
b) if a low temperature circuit has to be supplied, the room thermostat must be
connected to the wire which receives input from the low temperature zone and the
one for the high temperature zone must be left open.
21
An example of a hydraulic diagram for mixed temperature systems is given below. A
mixing system as SILE TBA/TBA-M, must be used. The boiler will operate at the best
temperature for optimising thermal comfort and energy performance.
16
15
1
5
60
40
20
80
100
0
120
6
14
13
2
7
3
4
12
11
9
10
1) Caldaia CONDENSA BI - BI COMPACT
2) Separatore idraulico da incasso TBA
3) Mandata termo
4) Ritorno termo
5) Corpi scaldanti
6) Mandata alta temperatura
7) Ritorno alta temperatura
8) Pannelli a pavimento
9) Mandata bassa temperatura
10) Ritorno bassa temperatura
11) Alimentazione gas metano
12) Acqua calda sanitaria
13) Acqua fredda
14) Scarico condensa
15) Aspirazione aria
16) Uscita fumi
8
Fig. 6
The remote control with mixed systems as described above must be correctly configured
in the electronic board. This is done by setting DIP switch no. 4 to ON (see. Fig. 4 Page
12) to control the sanitary hot water temperature and reset the boiler (no more than five
attempts after which the boiler must be reset) but losing the programmable thermostat
function that will be implemented by the zone thermostats.
The boiler feed temperature in the heating function is given by the boiler control panel.
In this case, use of the external sensor connected to the boiler PCB is also possible as
shown in Figure 4.
2.9 Filling the CH circuit (for remote tank)
Open the cold water shutoff cock located in the system; open the hot water try cock
on the system leave it open for the filling circuit and sanitary exchanger.
2.10 Filling heating circuit
To fill the boiler move three way valve in manual position. Turn on slowly the loading tap
(fig. 1 pos.18) to carry the pressure system, indicated in water gauge, on about 1 bar
value and turn off. Check that the vent located on circulator have cap loose, and then
operate the circulator to remove the air in the circuit how follows: turn repeatedly the
“function selector” (fig. 1 pos. 36) from the off position to the winter position until the total
purge air. Complete the purging of the boiler and system, check the charge pressure.
22
2.11 Filling the condensate drainage system.
Take off the plug on the condensate drainage system and fill it with water amounting to 1
glass so that flue gases do not come out.
Attention. Do not operate the boiler if the condense drainage system is empty. It
may cause intoxication from burnt gas.
2.12 System start-up.
Before starting up the boiler, check that the relevant actual rules have been performed.
Make sure that:
all fuel pipe connections are tight and completely sealed; first check the with the
isolation valve closed, then with the isolation valve open (while keeping the gas valve
closed). No gas presence is supposed to be indicated by the gas meter in 10 minutes;
the boiler is supplied with preset gas;
the gas flow rate is as specified in this manual (see par. 3.7);
the main switch is working correctly;
the air/flue ducts (if present) are not obstructed. Do not start up the boiler if the controls
do not satisfy the requirements.
2.13 The pump.
Our boilers are provided with pump.
After long periods of disuse residue can cause the block pump. To reset proceed as
follows: unscrew the knob, rotate with a screwdriver until open and then tighten. Be
careful not to damage the pump.
Never operate the pump without water
Graphic of the available head (dotted area) and the curves of the pump flow/head
characteristics (dotted)
CONDENSA 5.24 - 3.15
BY PASS
SBLOCCO
23
CONDENSA 5.32
III
BY PASS
II
I
T A
2.14 Zone system
In the hypothesis of a system supplied by
several zone valves, they are supposed to be
connected correctly to avoid the boiler pump
functioning when all valves are closed.
The following diagram shows how to connect
them.
Before connecting, check that the ends of the
two wires from the room thermostat are not alive.
Diagram available also with a remote control
(optional) after configuring the boiler control
board as instructions (page. 15)
M1
M2
V1
L
220/240 V.
M3
V2
TA1
N
AMB.
V3
TA2
N
L
220/240 V.
TA3
N
L
220/240 V.
WARNING: The T-A terminals lead to a low tension boiler circuit. Connect only after
careful cleaning.
LEGEND
M1M2M3
V1V2V3
Ta1Ta2Ta3
Valve switch
Zone valve
Room thermostats of the zones
2.15 Boiler safety valve.
The boiler safety valve is calibrated at 3 bar as maximum pressure.
The valve drain must be conveyed to the drainage system.
2.16 Boiler draining.
Turn the power supply off. Intercept the cold water supply. Carefully perform the drainage
(19 fig. 1).
To refill, please see the relevant paragraph.
24
2.17 Safety valve Hot Water Storage tank (where used)
The safety valve with is calibrated at 8 bar pressure.
During the heating of the contents a dribble from unloading under certain conditions is
predictable and normal.
During installation direct the unloading valve to drainage duct.
If dribble continue also with hot tank and boiler stop check the supply pressure :if this
exceeds 5 bar apply a pressure reducer and check the safety valve to have an efficient
drainage.
If they repeat several openings safety valve you should check the correct
2.18 Boiler draining.
Turn the power supply off. Intercept the cold water supply. Carefully perform the drainage.
To refill, please see the relevant paragraph
USE ONLY FLUE COMPONENTS RECCOMENDED BY AUTOMATIC HEATING
2.19 Draught terminal positioning, wall outlet
The draught terminal must be positioned and installed according to the regulations in
AS5601 Gas Safety Code. It is summarised below:
Terminal position
Under a window
Under a ventilation opening
Under eaves
Under a balcony **
Next a window
Next to a ventilation opening
With vertical or horizontal pipes or flues
***
In a building corner
In a building recess
On the ground or ground floor
Between to vertical terminals
Between to vertical terminals
On a front standing surface which has
no opening or terminals within a 3 m
range of the flue
The same, but with opening or
terminals within a 3 m range of the flue
Fig. 9
Apparatus
Distance between 16
to 35 kw
mm min.
A
1000
B
1000
C
300
D
300
E
300
F
1000
G
500
H
I
L
M
N
O
300
300
2500
1500
1000
2000
P
3.000
The draught terminals are supposed to:
Be situated on the external perimeter walls on the building:
Be positioned so that the distances indicated in the table are respected for the atmosphere
outflow section:
** Terminals under accessible balconies are to be situated in a position which allows the
entire smoke path (from the point of terminal output to their outlet) on the exterior
perimeter of the balcony not to be inferior to 2000 mm (including the height of protective
walls).
25
*** In positioning the terminals, distances must be no less than 500 mm when they are
near to materials sensible towards the action of combustible products (i.e.: plastic eaves
and gutters, wooden overhangs, etc.) unless suitable protective measures are taken.
The boiler is homologated with chimney configuration type: B23P . C13 . C33 . C43 . C53 .
C83
2.20 Configuration type B23 open chamber and forced draft.
The device can be installed inside buildings B23 mode; in this case we recommend to
comply with technical rules and regulation in force national and local.
-
- the boiler open chamber type B must not installed in rooms where take place
business, crafts or industry activities where use products that generate vapours
or volatile substances (for example acid vapour, glues, paints, solvents, fuels,
etc.), as well as powders (for example powder derived from the manufacture of
lumber, sludge, cement, etc.) that damage the apparatus components and
compromise the functioning.
With this configuration:
- the air aspiration is directly from the room where the apparatus has been
installed and so this room must be permanent aerated according to the rules in
force.
- The flue drain must be connected its own individual chimney or canalized directly
into atmosphere outside.
Must be observed the technical rules in force.
2.21 Wall mounted coaxial air/flue ducts - type C13
Please see also the specific catalogue "Air/flue Kits" - KIT AC for further
information.
Slope 5mm/m to the bottom
Fig. 9
26
The coaxial duct is made of an
inner plastic flue duct ø 60 and
of an outer white enamelled
aluminium air inlet duct ø 100
mm. It requires just one hole in
the wall. The terminal can be
oriented
towards
every
direction and it can reach a
total length of 5 m. The
maximum allowed length must
be reduced of 1 m. for every
bend which is added. The
basic kit AC includes a straight
1 m. duct. Every optional
extension is 1 m or 0.5 m long.
Ducts of an intermediate
length can be obtained by
cutting an extension of 1 m at the
required dimension.
The air/flue duct must be installed on a perfectly horizontal position since it already has a
minimum standard slant which prevents the condensate from dropping and freezing on the
ground.
The duct will be fixed following the relevant figures.
1. Cut the hole in the wall for the air/flue duct. Its minimum diameter should be sufficient
to allow the insertion of a plastic duct (as long as the wall and with ø130 mm) which will
be sealed with mortal. Cut the duct at the required length.
2. Before inserting the duct into the hole, insert the rubber sealing ring of the terminal part
(9 fig. 10) into the swage.
3. Insert the internal rubber sealing ring into the duct (9 fig. 10)
4. Push the duct outward until the rubber sealing ring comes out. Pull the duct inward and
align the ring on the wall.
6
1
2
4
9
Fig. 10
8
5
7
1
1) inlet outlet multi-directional 90° flanged bend
2)inlet duct rubber gasket
3) outlet duct rubber gasket
4) plastic inner outlet Ø60 duct
5) external inlet duct
6)taps for air/flue drawing and concentring ducts
7)air inlet grill
Slope
5mm/m
downward
9)sealing ring
8)flue outlet grill
5. Insert the gaskets (2) and (3) of fig. 10 into the bend. Push the flue ducts and the
external air inlet duct into the bend. The firm hold of every extension or bend which is
added must be warrantied by applying the necessary gaskets. Every vertical or
horizontal item must be fixed on the wall or ceiling by means of a suitable support. In
the event that a vertical extension is to be used, the terminal part of the duct should
have a horizontal outlet with a slant as previously explained.
2.22 ROOF OUTLET AIR/FLUE DUCT TYPE C33
To fit a Vertical Roof Cowl to Co-axial flue pipe, ensure the length of flue meets to Gas
Regulations and carefully fit the Cowl to both inner and outer pipes to allow combustion air
to enter the outer space of the flue and that the combustion air pipe is located in the inner
sleeve of the cowl.
27
Vista A
87
A) Concentric air/flue ducts for roof outlet with PP
outlet inner, ø 60/100 mm
B) Lead flashing roofing tile
C) Vertical flanged concentric compression fitting ø
60/100 mm with taps for air/flue drawing and PP inner
duct, silicone lip gaskets and neoprene gasket.
The vertical terminal can be connected to a coaxial
air/flue duct (ø60/100 mm) having also an horizontal
part. The maximum total length of the duct should be 4
m + 2 bends or 5 m without bends.
1245
B
1107
After positioning the boiler on the wall, cut a ø120 mm
hole in the ceiling corresponding to the boiler upper inlet
connection.
Before installing the air/flue kit definitively on the roof,
the Ø100 and Ø60 ducts can be cut at the required
dimension respecting the minimum distance as the
figure shows.
Ø60
Ø100
39
120
159
50
Ø102
Ø62
Insert the ø100 mm duct into the ceiling hole which is
supposed to be fixed with mortage. Adjust the lead
flashing to the roofing tiles or bent tiles. Fix the vertical
flanged compression fitting (C) to the boiler by means of
the screws using suitable silicone gaskets.
Insert the ø60 inner duct into the flanged compression
fitting after fixing the inner ø60 mm silicone gasket.
Then place the outer ø100 duct in the same way.
Ø60
Ø128
In the event that concentric ducts and/or bends are necessary to connect the terminal duct
(A) to the flanged compression (C), the firm hold must be guaranteed by applying suitable
silicone rubber gaskets inside the spigot and socket joints. Use original accessories only.
Every horizontal or vertical item is to be fixed to a suitable support wall or ceiling.
Never obstruct the boiler air/flue ducts, even provisionally. Professionally qualified
personnel are supposed to check the draught efficiency and the combustion product hold.
28
2.23 Separate air inlet/flue outlet system.
Type C43 Please see also the specific catalogue "Air/flue Kits" - KIT AC for further information.
Metallic sheath
Seal with silicon
or
mortar
of
Sigillare con silicone
cement
o malta di cemento
Seal with mortar of
Guaina metallica
Sigillare
con malta
cement
di cemento
Plastic sheath
Slope
5
mmverso il
Inclinare
basso di 5 mm/m.
downwar
downwar
1
2
4
Attention. The outlet flange adaptor shown must not be used.
Air inlet
Ø80
5
mm verso
Inclinare
l'alto di 5 mm/m.
Aspirazione aria
Slope
6
120
Espulsione fumi
Flue outlet
Ø80
Guaina in PVC
1) Flue outlet terminal with grill.
2) Ø80 M.F. pipe (it can be shortened if necessary or extended up to 20 m with 1 m or 0,5 m).
3) Multi-directional 90° bends Ø80 M.F.
4Air inlet terminal with grill.
6) Taps for flue/air analysis.
Specific outlet needs may be resolved by placing two separate pipes ø 80 mm, one for air
inlet and one for flue outlet up to a total length of the two pipes of m. 40.
Flue outlet pipe
(to be conneted to the
boiler)
This allows an increased installation flexibility, beside a differential orientation in any
direction. When having to cross rooms which are usually heated, the air duct may cause
condense accumulation, therefore a suitable insulation can be applied on demand.
Separate pipes
Particolare
tubi
sdoppiati
Fig 12
Air inlet pipe with adaptor
29
When having to cross
walls or barriers which
could deteriorate due to
the heat, the flue terminal
must be installed with a
suitable isolating sleeve.
The air inlet and flue outlet
ducts will be installed with
a slight downward slant to
avoid
rainwater
from
entering the boiler.
Perform
assembly
according
to
the
indications in the diagram
and make sure that each
catch is equipped with a
gasket. The length of the
air inlet and of the flue
ducts can be different.
They can be shortened or
lengthened by means of
0.5 m.
or 1 m. extensions as necessary for a total of 18 linear meters. Pay particular attention to
the catches as they must guarantee the complete sealing of air and flues.
Each piece, either horizontal or vertical, must be suitably fixed to a wall or ceiling with
proper supports or brackets.
The path and the length of the ducts should consider that the total approved loss of
capacity is 11 mm c.a. = a ~ 110 Pa.
• For each meter of either air inlet or flue outlet ø 80 mm tubing, the average loss of
charge is 0.25 mm c.a. = ~ 2.5 Pa.
• For each ø 80 mm 90° bend as previously mentioned, the average loss of capacity is
0,5 mm c.a. = ~ 5 Pa
Examples:
12 m duct ø 80
2 bends ø 80 mm 90°
x 0.25
x 0.5
=
=
3.0
1.0
4.0 mm total loss of capacity
12 m duct ø 80
3 bends ø 80
x 0.25
x 0.5
=
=
3.0
1.5
4.5 mm total loss of capacity
2.24 Chimney flue outet or tubing outlet duct type C53 – C83
•
•
•
The roof flue outlet systems can be made as follow:
chimney flue outlet operating by means of positive pressure in comparison to the boiler
installation room, external and not adjacent to the building,
tubing outlet duct operating by positive pressure in comparison with the installation
room which is located in an internal position or in a close part of the building.
These flue outlet systems are to be suitable for wet locations:
• they must be provided with a condensate drainage system which prevents the flues
from entering the room or the sewer. Stagnation must be avoided in the flue outlet
systems except for the water head in the water trap.
• frosting must be avoided: along the whole length of the chimney and of the tubing
outlet duct the temperature must not decrease under 0°C; given a design external
temperature, the flue outlet systems are supposed to be resistant to the corrosive
action of condensate in every operation condition.
The flue outlet systems must be made of material resistant to the flue maximum\
temperature.
The boiler and the chimney or the boiler and the tubing outlet duct (called flue duct) will be
fitted by using only the accessories we provide. They are to be installed following the
instructions of the previous paragraph. The flue duct is supposed:
• to have a section which is not smaller than that of the boiler flue duct connection
throughout its length
• to be located at sight, easily detachable
• to be installed so as to allow its standard thermal expansions
• to have its terminal perpendicular to the chimney without projecting inside the chimney
itself to have no interception devices.
30
Guaina metallica
Sigillare con silicone
o malta di cemento
Sigillare con malta
di cemento
Guaina in PVC
Inclinare verso
l'alto di 5 mm/m.
1
Inclinare verso il
basso di 5 mm/m.
2
4
Aspirazione aria
Ø80
120
Espulsione fumi
Ø80
6
1) Flue outlet terminal with grill.
2) Ø80 M.F. pipe (it can be shortened if necessary or extended up to 20 m with 1 m or 0,5 m).
3) Multi-directional 90° bends Ø80 M.F.
4Air inlet terminal with grill.
6) Taps for flue/air analysis.
The chimney under pressure:
• it is supposed to have circular, square or rectangular section. In these two last cases
they have to be rounded to at least 20 mm radius
• has to have no auxiliary mechanical inlet members
• can have changes of direction which do not involve counterslopes; if the angle between
the chimneys and the vertical is wider than 30°, an inspection near the greatest change
has to be done in order to allow it in both cases. If this inspection is not satisfying, a
further inspection near the slightest change is to be done
• can be provided with smokebox, which is obligatory in the event that the outlet is
vertical and that its section has no chimney cap; the smokebox has to have at least
height 0.5 mt below the flue duct and it must be provided with opening and cleanout in
order to remove any possible impurities; it has to be done in such a way as to gather
and drain condensate
• can be provided with inspection door, above all if there is no smokebox
• can be provided with chimney cap having a section which has to be no less than twice
the chimney section. The chimney cap must prevent the rain, snow or impurities from
entering. Its form is supposed to outlet flues correctly and to avoid the external outlet
and/or freezing of condensate near their outlet section.
The outlet and the possible freezing of the condensate of the outlet section must be
warrantied also by the chimney which has no cap.
The tubing duct is a flue outlet system which is partially or totally installed in internal or
closed parts of a building. Beside having all the general requirements of the outlet
systems, it has:
• to be inspectionable and allow the standard cleaning and maintenance operations
• to allow its standard thermal expansions without changing its technical characteristics
• to avoid condensate stagnating along the duct. It has to warranty a ventilation door
towards the outside between the internal perimeter surface of the inner part and the
external perimeter surface of the flue duct. This interspace is supposed to have a net
free section at least equivalent to that of the flue duct; its base and its top are to be
open; in the event that the base opening is not immediately directed towards the
outside, a linking duct between the opening and the outside can be made; the base
31
•
•
opening has to have a net section not smaller than the ventilation door and it is to be
protected by means of grilles or similar devices
in order to warranty a suitable ventilation section, with a ∅ 80 mm flue duct, it is
necessary and sufficient a building internal or closed part having an 100 x 100 mm
internal side or a ∅ 113 mm circular side
in the event that the section between the flue outlet duct and the building internal or
closed part is necessary for feeding the system components with carburant air, it has to
be open on the top, serviceable, and to be suitably dimensioned; its free section is
supposed to correspond at least to 150% of the flue duct; the section of the ventilation
door is not supposed to be reduced of more than 10% by the joints and spacers used
for fixing or truing the duct inside the closed part.
Multiple outlet systems are allowed provided that the following conditions are respected
(beside the requirements concerning the single tubing duct above mentioned):
• a minimum distance of 2 cm is to be respected between the flue duct external wall and
the closed part internal wall
• a minimum distance of 2 cm is to be respected between the external wall of the flue
outlet duct and that of any other duct
• on the top of the multiple system every single outlet system has to have a plate or other
identification devices.
• Every chimney manufacturer is able to provide the most suitable flue taking into
consideration the place, power, capacity, allowed loss of capacity and number of
boilers to install. Require the relative certificate and calculation according to regulations
in force
2.25
Solar system functioning
The solar system integrated in the boiler control board use these hardware resources to
control:
1. Relay solar pump for circulator control;
2. Collector probe (PT1000, is not the same probe usually used in the tanks. The
difference is that it is enveloped in the black sheath);
3. Lower tank probe (NTC 10K);
4. Medium tank probe or tank solar probe (NTC 10K ).
Solar system functioning can be activated in summer and also in winter as sanitary
integration. The activation is performed by 4 parameter ; its configuration mode is
described in chapter 3.2
To wish that only solar mode be activated, usually in summer, it’s possible to choose one
of these configurations, to bear in mind that 4 parameter must be always activated and
value 1 must be selected:
3. selector =SUMMER or selector = OFF;
4. heating selector at minimum;
The control board functions only in solar system.
In the solar mode only is deactivated any request of ignition external burner (sanitary
request) while antifreeze and anti-legionella stay active.
In the mode “only solar” into display are visualized the solar panel icon and the collector
temperature.
32
2
1
Display in solar mode:
- When solar function starts a solar system
icon light up .
- For 10 seconds after the solar pump
activation, are visualized the temperature
collector probe in big digits and the temperature
solar tank probe (sanitary probe) in little digits.
The solar system works when flat-plate solar collector temperature is higher than the
temperature in solar tank in the gauge set in 5 parameter , that defines the temperature
difference keeping between collector and tank. Adjust this parameter how explained in the
chapter 3.2.
If you keep a temperature difference much low, between 5 and 10°C, the circulator starts
up frequently to drain a little heat quantity accumulated in the panels . With a temperature
difference between 10 and 15°C the circulator starts up less frequently because need
more time to create the difference between two devices. During the winter avoid doing
more big temperature difference, when the solar irradiation is limited and sensible
temperature differences could be get to with difficulty. We recommend keeping a
temperature difference between 10-15°C about that is a good arrangement for all year.
Some information :
1) If the temperature in the collector probe exceed 100°C icon“1” lights up to identify a
hundreds in figures, while if the temperature exceed 200°C icon “2” lights up (see
display representation page before).
2) Management of the solar pump: - The minimum collector temperature for the pump
functioning is 20°C. Under this temperature the solar pump doesn’t start .
3) If the tank solar probe detects a temperature higher to the value set in P6 (see
chapter. 3.2 for the regulation mode)(safety temperature tank) the solar pump is
stopped (the heat request panel is stopped).The pump is reactivated when the
temperature of the tank solar probe (sanitary probe) drops below the temperature
set in P6 – 3°C.
4) For 10 seconds after the solar pump activation, are visualized the temperature
collector probe in big digits and the temperature solar tank probe (sanitary probe) in
little digits.
In case of defective probes solar collector and solar tank appears to display an error
message board.
ATTENTION: Always remember to drain properly the boiler discharges, which are the
safety valves and solar sanitary side. Provide a pipe that could bring together a range of
15l/min, to prevent the discharged water overflows and floods the room where the
apparatus is installed. Use fit components to resist 90°C temperature.
33
3 SERVICING INSTRUCTIONS
3.1 First start-up tests.
Before starting up the boiler, check that:
♦ the fuel delivery line complies with current standards;
♦ the boiler is supplied with natural gas;
♦ it is connected to a 230V-50Hz network, has L-N polarity and earth connection;
♦ the boiler start-up occurs regularly;
♦ the regular amount of CO2 in the flues is at the maximum and minimum flow rate;
♦ the maximum and minimum gas flow rates follow the standards;
♦ the main switch is working correctly;
♦ air/flue ducts terminals are not obstructed;
♦ the regulation components are working properly;
♦ the hot water production is regular and all hydraulic connections are completely sealed;
Do not start up the boiler if the controls do not satisfy the requirements.
3.2 Settings (stand-alone settings)
The wiring diagram and the layout of the electronic card are representing in fig 4.
The electric section is included into ABS control panel while the electrical connection is
included into the plastic box placed on the boiler lower side opening directly. On back
bottom there is a supply transformer.
Setpoint. The sanitary and thermo setpoints are adjusted using taps 40 and 41 on the
control panel respectively as shown in Fig. 1 and their value is shown on the
display for 5 seconds before returning to the normal display.
Boiler parameters. The taps are used to set the following parameters:
1) maximum heating power “01” –
set to 100%,
2) frequent anti cycles “02” –
set to 10%
3) thermo post-circulation “03” –
set to 30%.
4) Enabling solar control unit (0=OFF, 1= enabled ON) [to enable only if you use
the kit 2 Solar System probes optional]
This parameter enables the operation of solar integrated control unit. When it is
in position 1 the solar system is switched on and regulated by the control unit
also with the boiler selector in OFF. When set to a 0 the solar system is switch
off .
5) Differential ignition solar circulator
Adjustment range 5 : 25
This parameter adjusts the ignition of the solar circuit pump(if the parameter 4
is set to 1). The pump starts when there is the difference in degrees between
the temperature of the solar collector and the temperature of hot sanitary
water.
For example: If you have chosen a temperature differential of 10°C and and
tank + 40°C, the pump will start when the solar collector will reach 50°C. If the
solar collector temperature is less than 20 °C never will start the solar system
circulator.
6) Safety temperature tank (75-95)
Adjustment range 75 : 95
34
This is a safety parameter which blocks the solar circulator functioning when
the tank boiler is greater than the parameter. For example if we set this
parameter to 85°C, when the tank exceeds 85°C the circulator functioning will
block and thus the amount of heat to the tank.
To make these adjustments is necessary respect the following procedure:
a) to turn :
i. the sanitary knob at half way,
ii. the thermo knob at minimum,
iii. the selector from Off position to reset.
b) On the left display is possible to see a little digits relatives selected
parameter through the sanitary knob, while with bigger digits the
relative value:
c)
To modify the parameter expected: it works on the thermo knob and
after set up the value expected is necessary to memorize turning the
selector from Reset position to the chimney sweep position. And so
after the memorize the display digits goes by blinking to fixed. The
passage by a parameter to another, without effecting the memorize
procedure, doesn’t change the existent regulations.
d) From exit from this function is sufficient to put the selector in
Summer/Estate position, Winter position or Off or wait 30 seconds
from the last operation.
If use Remote control
Push key INFO (to left bottom)
for 5 seconds, to enter in
programming mode.
Aumento SAN
Aumento AMB
Then push together the keys
Diminuzione SAN
Diminuzione AMB
“ORA” and “FUNZ” for one
second and enter at menù
SAN/RIS
OK
boiler.
From here with sanitary arrow
keys selection the parameter
to modify while with right keys
Info ORA TEMP FUNZ
you
can
modified
the
parameter value. The parameter modified is memorized in 5 seconds and flashing. After
the regulations press key “INFO” (to left bottom) and Remote control take again normal
display
DISPLAY
The adjustment board contains some DIP switches which have already been mentioned
on page13, they are:
DIP switch 1:
when set to OFF, the temperature of the high temperature system is
adjusted using trimmer P7 whereas the low temperature is adjusted
using the knob on the front of the control panel, when set to ON, the
temperature of the low temperature system is adjusted using trimmer
P7 whereas the front knob adjusts the high temperature range.
DIP switch 2:
in this boiler version, it must be set to OFF (factory setting) except
when a temperature control sensor on a tank is connected
DIP switch 3:
Configuration for connecting an external sensor, to be set to ON if an
external sensor is connected.
DIP switch 4:
remote control setting. When set to OFF, the remote control operates
as a single-zone system by controlling switching on and off according
35
DIP switch 5:
DIP switch 6:
to the time and temperature reached. It is set to ON for multi-zone
systems controlled by thermostats/programmable thermostats. In this
case, the remote control checks the sanitary water temperature and
displays the operating status.
this must be set to OFF. If accidentally set to ON, it causes error F27
this must be set to OFF if you want to operate the boiler with the
remote sanitary tank. If you want to use the boiler without the tank, it
should be set to ON and DIP switch 2 to OFF
The following trimmers, which can be accessed by dismantling the control panel, are also
present and do the following:
P4 : maximum fan speed. When controlling and adjusting the boiler, the maximum fan
speed is adjusted here. The rpm will be shown on the central multifunction display.
P2 : minimum fan speed: use this trimmer, located on the PCB (see Fig. 6) to adjust the
minimum fan speed in a range of 1000-2300 rpm. For each boiler, the number of
minimum rpm which must be strictly observed is specified in Tables 7 and 8 in
Chapter 3.7.
P5 : fan speed during ignition. This must be set to approximately three-quarters of the
range
P7 : thermo setpoint or K factor setting with external sensor present. This boiler has a two
temperature (high/low) control system with separate settings Therefore, a flow
temperature at 40°C and one at 60°C is possible to meet a request from the low
temperature or high temperature system. The temperature in the main zone is
adjusted on the front heating potentiometer whereas the temperature in the other
zone is adjusted on potentiometer P7.
P7
P5
P2
P4
Fig 16
Posizione trimmer
3.2.1 Fan rotation speed
The fan rotation speed can be checked on the front boiler display.
Fan rotation speed table.
NATURAL GAS
Models
Min rpm
Max rpm
5.24
5.32
1250
1500
4700
5500
See paragraph 3.3.1 for methods of adjustment.
36
PROPANE GAS
Ignition
rpm
3700
3500
Min rpm
Max rpm
N/A
1900
N/A
5500
Ignition
rpm
N/A
3500
Gas Pressure Regulation
Models 5.24 & 5.32
Natural Gas
Model 5.24
Model 5.32
CO2 at Max Input
9.3%
9.7%
CO2 at Min Input
9.0%
9.3%
Propane Gas
Model 5.32
CO2 at Max Input
10.7%
CO2 at Min Input
9.7%
3.2.2 Display menu.
When the selector is set to Reset, three types of information on the boiler can be
displayed: they can be selected using the sanitary knob. The number that flashes on the
far right of the display shows the information to be displayed whereas the other two
numbers on the right indicate the value. They are:
Index
description
1
Sanitary hot water temperature (two figures)
2
Number of fan rpm (three figures)
3
Factor K for adjusting external curve set with trimmer P7 (two figures).
Factor K displayed is relative of low temperature with boiler in standby, while to
see displayed parameter K relative at high temperature functioning the boiler
must work with contact TA closed on high temperature.
4
Solar collector probe temperature
5
Solar tank probe temperature, measured on the bottom of boiler
3.3 Gas pressure regulation.
Maximum and minimum gas pressure regulations are performed by the manufacturer. In
the event that an adjustment of the regulations is to be performed, please follow the
indication below.
Natural Gas
Model 5.24
Model 5.32
CO2 at Max Input
9.3%
9.7%
CO2 at Min Input
9.0%
9.3%
Propane Gas
Model 5.32
CO2 at Max Input
10.7%
CO2 at Min Input
9.7%
Table 6
37
3.3.1 Measurement and adjustment of percentage of CO2. per MERIDIAN 5.24 e 5.32
(valve system + mixer Honeywell)
To set the CO2 value, do the following:
♦ Remove the front cover of the boiler;
♦ Turn the boiler control
panel and unscrew the two
54
53
side screws that hold it in
place.
♦ Move
the
boiler
selector
to
“Chimney
sweep”,
a
function
which
Fig. 15
appears on the display
with a “spanner” symbol
52
and then set the heating
potentiometer
to
51
maximum.
♦ With the boiler burner
44 45 46
47 48 49 50
on, reset the function
selector.
♦ Display the fan rpm by quickly turning the sanitary knob. Behind the control panel, use
a small slotted screwdriver to adjust the number of fan rpm on trimmer P4 as indicated
in Table 5 on page 28. Information appears on the front of the display where the two
large digits on the left 54) indicate the hundreds and thousands and the two small digits
on the right 53) indicate the units and tenths. (see Figure 17).
♦ Place the combustion control sensor in the flue gas sampling connection and measure
the percentage of CO2;
♦ If necessary, adjust the value (see Table 6) by turning the Venturi screw (B) as shown
in Fig. 16 using a 4mm Allen spanner.
♦ Turn anti-clockwise to increase the percentage of CO2;
♦ Turn clockwise to decrease the percentage of CO2;
⇒ adjust by turning the screw only 1/8 turn and waiting for at least 1 minute after every
turn for the value to stabilise;
⇒ Proceed as follows to check the setting at minimum capacity:
⇒ switch the heating potentiometer to minimum; the boiler is now operating at
minimum power
⇒ Adjust the fan rpm to the minimum power using trimmer P2 on the boiler PCB. The
rpm are displayed on the front display as shown above when adjusting the fan
speed at maximum power.
⇒ if necessary turn the off-set screw (A) of the gas valve clockwise to increase the
percentage of CO2, or anti-clockwise to decrease it;
♦ Check the percentage of CO2 by operating the boiler at maximum capacity (heating
potentiometer turned to maximum) and then at minimum again (heating potentiometer
turned to minimum)
♦ Repeat the adjustment procedure, if necessary;
♦ Seal the gas flow rate adjustment devices;
♦ Put the back of the control panel and the front cover back into position; turn the
selector to OFF to deactivate the “Chimney sweep” mode and then switch on the
boiler again
38
B
A
3.3.2 Measurement and adjustment of percentage of CO2 for MERIDIAN 3.15 (valve
system + mixer SIT)
The adjustment of the gas valve and consequently of
the CO2 have to execute regulating before maximum
flow and then minimum flow
27
♦
♦
♦
♦
To set the CO2 value, do the following:
♦ Remove the front cover of the boiler;
♦ Turn the boiler control panel and unscrew the two
side screws that hold it in place.
to “Chimney
Move the boiler selector
max ♦sweep”,
a function which
appears
on
the display with a “spanner” symbol and then set the
min heating potentiometer to maximum.
♦ With the boiler burner on, reset the function
selector.
♦ Display the fan rpm by quickly turning the sanitary
knob. Behind the control panel, use a small slotted
screwdriver to adjust the number of fan rpm on
trimmer P4 as indicated in Table 5 on page 28.
Information appears on the front of the display where
the two large digits on the left 54) indicate the
hundreds and thousands and the two small digits on the right 53) indicate the units and
tenths. (see Figure 17).
Place the combustion control sensor Fig 15 gas sampling connection and measure the
percentage of CO2;
If necessary, adjust the value (see Table 6) by turning the Venturi screw (B) as shown
in Fig. 16 using a 4mm Allen key.
Turn anti-clockwise to increase the percentage of CO2;
Turn clockwise to decrease the percentage of CO2;
39
⇒ adjust by turning the screw only 1/8 turn and waiting for at least 1 minute after every
turn for the value to stabilise;
⇒ Proceed as follows to check the setting at minimum capacity:
⇒ switch the heating potentiometer to minimum; the boiler is now operating at
minimum power
⇒ Adjust the fan rpm to the minimum power using trimmer P2 on the boiler PCB. The
rpm are displayed on the front display as shown above when adjusting the fan
speed at maximum power.
⇒ if necessary turn the off-set screw (A) of the gas valve clockwise to increase the
percentage of CO2, or anti-clockwise to decrease it;
♦ Check the percentage of CO2 by operating the boiler at maximum capacity (heating
potentiometer turned to maximum) and then at minimum again (heating potentiometer
turned to minimum)
♦ Repeat the adjustment procedure, if necessary;
♦ Seal the gas flow rate adjustment devices;
♦ Put the back of the control panel and the front cover back into position; turn the
selector to OFF to deactivate the “Chimney sweep” mode and then switch on the
boiler again
3.5 Boiler diagnostic
The boiler display informs the After-Sales Service personnel in case of malfunctioning
or lockout. The table of the lockout codes and the correspondent meanings is shown at
the paragraph 1.3 of the "Instructions for use".
3.6 Maintenance function
The chimney sweep function is active when puts functioning selector on the
relative position (the last in clockwise, see fig. 1), and contemporaneously is
active the relative indication on the display.
This function makes the boiler operate at the maximum heating power for 15 minutes. This
resets all controls; only the safety thermostat and the limit thermostat are still working: the
regulation board is set on low or high temperature. Keeping the boiler in stand-by, turn the
selector on the DHW position and press the reset switch for 10 seconds; this will activate
the function which is displayed by the simultaneous blinking of both the DHW and CH
LEDS; the technician is so enabled to check the combustion parameters. Once the checkups are finished, turn the boiler off and then on in order to deactivate the maintenance
function.
Warning: before activating the maintenance function, make sure that the radiator valves or
zone valves are open.
3.7 Adjustment of nominal heating power.
If the heating power needs to be adjusted, do the following.
To make these adjustments, you must follow this procedure:
a)
move:
i. the sanitary knob to half way,
ii. the thermo knob to minimum
40
iii. the selector from the Off position to the Reset position.
b) A number for the parameter selected with the sanitary knob is shown on the left of
the display in small digits whereas the value is displayed in large digits: maximum
heating power is adjusted with parameter 1.
c)
to modify the desired parameter: turn the thermo knob. The displayed value is a
percentage of the maximum power of the generator. Therefore, an adjustment of
80 means that the heating operates at a maximum of 80% of the nominal power.
Once the value has been set, it is stored by moving the selector from the Reset to
the chimney sweep position. When it has been stored, the display digits stop
flashing. Going from one parameter to another without storing does not modify the
existing settings.
d) To quit this function, simply move the selector to the Summer, Winter or Off
position or wait 30 seconds after the last operation.
The MERIDIAN boilers are balanced to function at 18 kW for heating for MERIDIAN 5.24
and 25 kW for MERIDIAN 5.32
3.9 Selection of flow temperature in heating mode. (not possible on cascade
systems)
It’s possible to choose between two temperature flow range on heating phase, making use
two cable available at the electric panel exit where connect a room thermostat for high
temperature zone and one for low temperature zone. All information is available at chapter
2.8
3.10 Pump anti-seize function
When the selector is in the sanitary position, the boiler has a function which starts the
pump at least once every 24 hours for a duration of 3 minutes in order to reduce the risk
that the circulator gets blocked because of prolonged inactivity.
When the selector is in the Heating position, the pump anti-block function is activated
every 3 hours.
3.11 Heating anti-freeze function.
When the selector is in the sanitary or heating position, the boiler pump is activated when
the boiler temperature drops below 8°C until the temperature rises to above 10°C. If the
water temperature continues to drop to below 6°C, the pump and burner are activated until
the temperature reaches 25°C; during this period, the boiler operates at minimum power.
Any operating request in Sanitary, Heating or Chimney sweep mode forcibly stops the
function in progress in order to perform the request.
3.12 Maintenance.
Once a year perform the following tests and controls:
• Check and clean the main burner
• Check the correct adjustment of the gas input in DHW and CH functions
• Check the pump
• Test sensor operations
• Check the correct function of the ionisation on the burner control unit
• Check the safety valve on the CH circuit
41
•
•
•
Check the soundness of the gas circuit
Check that there is no presence of water leakage from the boiler internal connections
Check that the condensing trap is free from obstructions, that there is a sufficient
quantity of water inside and that the evacuation of the condense is correct.
It Is better to avoid frequently draining of the system unless for specific alterations or
repairs.
In the areas subjected to freezing, the system should be drained when in disuse. This
operation can only be avoided with the addition of antifreeze solution.
Attention. If the boiler works with the condense trap empty the combustion smokes enter
in the room and a dangerous situation shall arise. To avoid this situation do the following :
• Check that the condensing trap contains water at least at the level that makes
impossible for the flues to exit.
• If it is not so fill the trap with water at the maximum level
• See that the safety and checking devices are not tampered or short-circuited
• Check the integrity of the boiler wiring.
• Check that the gaskets of the coaxial flue outlet system or of the separate flue outlet
system are sealed.
3.11 Maintenance of the burner and heat exchanger
The condensing boilers require a very low level of maintenance. It is sufficient to clean
every year burner and heat exchanger. These operations carry out following the
indications and pictures:
1) Remove two screws that keep blocked the front cover of the boiler
2) Pull on the front cover of the boiler
-
To remove the heat exchanger plate:
a) Unlock panel board e turn on it to lower part
b) Screw out the three screws that block the heating exchanger plate (fig. 1-2). To
avoid to knock down the gaskets block with a hand the heat exchanger when you
are screwing out the last (fig. 2)
c) Draw out gently the heat exchanger from their seats (fig. 3)
d) Pass the heat exchanger through wiring and pump (fig. 4-5).
fig.
fig.22
1
fig. 1
42
fig.
fig. 33
fig. 5
fig. 4
-
To remove the heat exchanger and the burner :
a) Screw out the four screws from the heat exchanger sides
b) take off the flue thermofuse connection
c) remove the spring clips pipe clamp
d) loose and screw out the pump brass nuts and heating flow
e) draw out the pipes from heat exchanger and then broaden the two clamps sides that
block the heat exchanger; unlock pulling down to set free it from air/flue outlet.
To service ignition system:
To remove ignition electrode remove the 2 screws hold the electrode in place. Ignition spark gap to
be 3-4mm. When replacing ensure sealing gasket is not damaged and sealing correctly. If any
doubt replace the gasket.
To replace boiler temperature detector:
To remove and replace control temperature sensor (29), disconnect cable plug, unscrew sensor
from mounting pocket. To refit follow the reverse procedure.
To replace over temperature thermostat:
To remove and replace the over temperature thermostat, ensure power is isolated and locate the
thermostat device mounted within the electrical power enclosure. Open the enclosure, remove the
mechanism and follow the capillary to the sensor fitted to the side of the heat collector on the
boiler. Slide out the sensor to remove.
To replace the Combustion Air Fan:
With the cover removed and the control panel hinged open, carefully remove the air intake duct
from the fan by removing the clip and sliding off from fan intake. Disconnect the wiring removing
the plugs. Remove the screws holding the fan assembly in place and remove.
To refit the fan, follow the reverse procedure ensuring that the fan seals and gaskets are in good
condition. If necessary, replace the gasket. Refit the air intake pipe and return the unit to operating
order.
To replace the burner management control:
Ensure Power is Isolated. Open the control panel and remove all connections from the controller.
Replace the controller checking the conformity of model. Pre-set the position of the dip switches to
the same settings as on the existing controller, and refit all control wiring and close cover.
Re-establish power supply. It is necessary to thoroughly recommission the appliance following the
steps set out in section 3 of the manual, making sure to check fan speed settings and combustion
performance.
Check the operating temperature set point and safety functions.
43
3.14 Problems, causes and solutions.
The burner ignites and then blocks (code 1 on the
display)
The burner doesn’t ignite
The boiler doesn’t reach temperature
Heating is not sufficient
The boiler does not produce DHW
DHW is not enough
DHW is not hot enough
Error code 5 or 6 on display
Error code 10 on display
Error code 2 on display
•
•
•
• •
•
•
•
•
•
•
•
•
•
•
•
•
•
•
• •
•
•
•
•
•
The C.H. sensor is interrupted (5)
The heat exchanger is dirty
The holes on the burner are obstructed
The boiler is underdimensioned
The D.H.W. sensor is interrupted
The heat exchanger is obstructed with calcium
The filter of the cocks are dirty
The burner gas input is not sufficient
The boiler output is lower than the requirements
•
•
Cause
Solutions
Detection electrode not connected or badly positioned, flawed
ceramics
Detection cable is interrupted
The burner control unit is defective
The printed control board is probably defective
Gas does not reach the burner
The burner is dirty
The gas is not compatible with the boiler (only natural gas
G20)
The pump is blocked
The CH safety water pressure switch is interrupted or gives a
wrong signal
The gas valve is defective
The room thermostat is defective
The safety thermostat or the safety water pressure switch or
limit thermostat is on
•
•
•
Problems
•
●
Table 9
44
1
2
3
4
5
6
7
8
9
10
11
12
13
14
15
16
17
18
19
20
21
22
23
SOLUTIONS
2) Check and replace defective parts
13) check the efficiency of the safety thermostat. If it
works the boiler is overheating: check water level,
expansion tank efficiency and thermal probe
3) Replace the wire
4) Replace
5)Check with selector ON the correct
visualization on the display. If it is off, replace
the small drive printed board
15)check the properly connection and replace if
necessary
16) perform the cleaning as descriptive on par. 3.16
6) check and/or drain air in the ducts
7) clean the burner
8) check
17) see point 16
9) reset the appliance
18) Check the installation project with an engineer
10) Check the exact connection and replace if 19) Check the electric connections
necessary
11) Replace the gas valve
12) Check it’s on and replace if necessary
20) clean or replace
21)clean
22) check the network and burner pressure
23) Perform combustion test
45
28
36
26
21
15
27
13
25
25
29 A
17
16
14
9
23
12
18
20
31
33
19 A
6
37
10
4
3
11
30 A
5
32
29 B
19 B
24
30 B
2
1
Filtro acqua termo
34
7
35
Filtro acqua sanitaria
22
8
38
Condensa 3.15 - 5.24 - 5.32 N3V
46
47
Legenda Esploso
N°
1
2
3
4
5
6
7
8
9
10
Code
Component description
907610203 Water gauge Ø37 scale 0-4 bar with quick coupling
Integrated selector in control board
907520516 Board B&P display amber color
907520515 Regulation board B&P DIM03-SI01
907430150 Wilo circulator RSL15/6 HE KU-CLF12
907430135 Wilo circulator RSL15/7-3 KU-CRF3
Automatic air vent valve
907100005 Safety valve 3 bar
907140010 Loading tap
907170511 Electrical fan NRG 118
907170508 Electrical fan RG 128
Mod
N°
Code
907100115
907261181
909320541
907520161
3,15 - 5,24
5,32
23
24
25
26
27
28
3,15
5,24 - 5,32
29 A
29 B
30 A
907155029
907155030
907155032
907100078
907100159
907261636
30 B
907261615
907510565 Differential pressure gauge
11
Three way valve
31
907261617
12
907540023 External E 106 ignition B&P
32
907261618
13
14
15
16
Detector and ionisation cable
907100114 Ignition cable
907100108 Detector electrode
907100109 Ignition electrode
33
34
35
36
907261267
907261268
907261269
907520160
17
907500053 Safety thermostat Mod.36T AP.100° CH.60°
37
907261616
18
907520012 probe ST06T Cod.18200306
19a
19b
20
21
907100080
907100150
907540000
907154003
907154010
22 907140011
Gas valve Sigma RP 1/2 105 mm
Gas valve VK4115V
Supply transformer
Expansion vessel 7 l
Expansion vessel 10 l
Drainage tap
907261630
3,15
5,24 - 5,32
3,15 - 5,24
5,32
48
38
907154499
Component description
Mod
Mass cable
Trap condense drainage
Heat exchanger Quickly attack O-Ring
Probe NTC 10K D.4X30.6 AISI316
Burner
Isothermic exchanger 2+1
3,15
Isothermic exchanger 3+1
5,24
Isothermic exchanger 4+1
5,32
Venturi AGM
3,15
Venturi 34 kW
5,24 - 5,32
Copper pipe gas attack - gas valve DIS.
3,15
11012
Copper pipe gas attack – gas valve DIS. 5,24 - 5,32
10563
Copper pipe thermo return - exchanger
DIS. 10565/A
Copperpipe Hidr. Group
- Pressure
gauge diff. DIS. 10566/A
Copper pipe flow heat DIS. 10762
Copper pipe flow tank DIS. 10763/A
Copper pipe tank return DIS. 10764
Heat Exchanger thermofuse 167°C with
steam long
Copper pipe gas valve - Venturi DIS.
5,24
10564
Copper pipe gas valve - Venturi DIS.
5,32
10660
Hydraulic group MF 11 N3V
3.15 Warranty
This warranty is valid provided that all the appropriate rules and standard procedures for
the installation and use have been strictly observed.
We decline responsibility for failures of the apparatus or damage to persons or things
caused by:
- transport
- installation in which the current regulations and practices of good workmanship
have not been respected
- misuse of the apparatus, improper use conditions, tampering by non-authorised
staff, or inadequate maintenance; hence by:
- scale and/or accumulation of debris in the apparatus
- absence of water in the boiler
- absence of fuel
- absence of electrical power
- inadequate high tension or electric system
- absence of grounding in the electric system
- absence of adequate draining
- exceeding the maximum working pressure or operation at low pressure
- faults in the electric or hydraulic system
- frost or fortuitous causes
- wear due to normal use
- faulty operation due to tampering of the safety or control units
- corrosion caused by:
oxygenation
stray currents
- any other phenomena (e.g.: chlorides 300 p-p-m.).
The company cannot be help responsible for faults which might appear in this installation
manual and reserves the right to introduce any necessary variation without altering the
manual essential characteristics
49