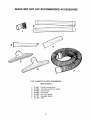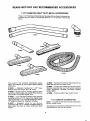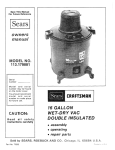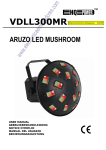
1
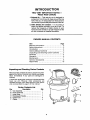
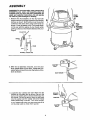
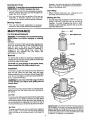
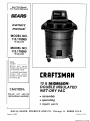
Save This Manual
For Future Reference
& A/RS
o wners
manual
MODEL NO.
1'13.178060
12 GALLON
MODEL NO.
1'13.178080
16 GALLON
Serial
number
Model
and
serial
number
may be found
on tlhe motor cover.
You should record both
model
and
serial
CRRFTSMRN
number in a safe place
for future use.
12&
DOUBLE
ULATED
WET-DR Y VA C
CAUTION:
Read
all
instructions
safety
carefully
• assembly
• operating
• repair
parts
I
Sold
by SEARS,
Part No. 73327
ROEBUCK
AND
CO.,
Chicago,
IL
60684
U.S.A.
Printed
in U.S.A,
FULL ONE YEAR WARRANTY
ON CRAFTSMAN
WET-DRY
VACS.
If within one year from date of purchase, this Craftsman Wet-Dry Vac fails due to a defect in
material or workmanship, Sears will repair it, free of charge.
WARRANTY SERVICE IS AVAILABLE BY SIMPLY RETURNING
IT TO THE NEAREST
SEARS SERVICE CENTER/DEPARTMENT
THROUGHOUT
THE UNITED STATES.
This warranty applies only while this product is in use in the United States.
This warranty gives you specific legal rights, and you may also have other rights which vary
from state to state.
SEARS, ROEBUCK
AND CO_, Dept. 698/731A,
:
Sears Tower,
Chicago,
IL 60684
ii
SAFETY INSTRUCTIONS
1. Know Your Vac
Read and understand the owners manual and
labels affixed to the vac. Learn its applications
and limitations as well as the specific potential
hazards peculiar to this vac.
2. This Vac is Double Insulated which eliminates
the need for a separate grounding system. If the
use of an extension cord is required be sure that
it is in good
condition
and meets the
requirements as listed below.
NOTE: The use of any Extension Cord will cause
some loss of power. To keep the loss to a
minimum and to prevent overheating and motor
burnout, use the table below for the MINIMUM
wire size Extension Cord, Cords in poor condition
or that are too small can pose fire and shock
hazards.
Extension Cord Length
Wire Size
0-50 Feet
50-100 Feet
No. 14
No. 12
3. WARNING: To avoid fire or explosion caused by
the igniting of vapors or dust due to the arcing of
the motor brushes:
a. Do not operate this VAC in areas with
flammable
vapors (such as lighter fluid,
cleaners,
oil-base
paints,
gasoline
or
gasahol) or explosive dust (such as coal,
magnesium, grain or gun powder) in the air.
b. Do not vacuum explosive dust, flammable
combustible liquids or hot ashes.
c. Do not use VAC as a sprayer
flammable or combustible liquid.
for
To avoid electrical or fire hazards grasp plug to
remove from wall socket. Do not pull cord.
8. To avoid dust and dirt accumulation
do not oil or
grease motor or blower bearings. These are
sealed bearings.
.
To avoid injury or damage
recommended accessories.
to vac use only
Note the cautions and warnings that appear on
the motor housing and dust drum:
DOUBLE INSULATED
GROUNDING NOT REQUIRED
WHEN SERVICING USE ONLY
IDENTICAL REPLACEMENT PARTS
WARNING: To avoid electrical shock do not expose
to rain. Store indoors.
WARNING: For your own safety, read and understand Owner's Manual. Do not pick up toxic
flammable materials, hot ashes or coals. Do not use
around explosive liquids or vapors.
11. Keep the filter in place at all times.
NOTE: Keep Filter clean.
r
WEAR
YOUR
or
any
4. WARNING:
To avoid health hazards from
wzpors or dusts, do not vacuum toxic materials.
5. Do not use VAC with torn filter. Replace filter if
torn.
6. Vac should be plugged into a 110-120 volt A/C
power outlet protected by a 15 amp fuse or
circuit breaker.
WARNING: To avoid injury from accidental
starting, unplug power cord before cleaning or
changing filter.
The operation of any utility vac can result in foreign
objects being blown into the eyes, which can result
in severe eye damage. Always wear safety goggles
complying with ANSI Z87.1 (shown on Package)
before commencing operation. Safety Goggles are
available at _ears retail or catalog stores.
INTRODUCTION
TWO VERY IMPORTANT
NOTES
Please Read Carefully
--
1. Exhaust Air -- This wet-dry vac is designed to
exhaust air from three (3) areas around the top
half of the vac. Air exhausted from these areas is
normal and improves the performance of the vac.
2. Static Shocks Are Common -- In dry areas or
when the relative humidity of the air is low. To
reduce the frequency of static shocks in your
home the best remedy is to add moisture to the
air with a console or installed humidifier.
OWNERS
MANUAL
CONTENTS
Item
Warranty Information
........................
Safety Instructions ...........................
Introduction
.................................
Owners Manual Contents ....................
Unpacking and Checking Carton Contents
Assembly ....................................
Operation ...................................
Maintenance .................................
Optional Accessories
........................
Repair Parts ................................
Unpacking
and Checking
Carton
Contents
Page
2
2
3
3
.... 3
4
6
7
8
10
A
\
Remove entire contents of carton. Check each item
against the Carton Contents List. Notify your Sears
Store immediately if any parts are damaged or
missing.
B
A hose and rectangular nozzle are included with the
bask; vac unit. However, other accessories are
available through your-Sears Store at your option
and are described on page 8 of this manual,
Carton Contents
Key
A
B
C
D
E
F
¢
List
Description
Vac Assembly .........................
Hose Assembly ........................
Hose Strap ............................
Rectangular Nozzle ....................
Caster Foot ............................
Caster ................................
Qty.
1
1
1
1
4
4
(_'--"_
$
F
ASSEMBLY
WARNING: For your own safety, never connect plug
to power source outlet until assembly steps are
complete and you have read and understand the
safety and operation Instructions. Do not operate
vac with any parts damaged or missing.
PUSH
DOWN
1. Remove the lid assembly on the vac from the
bottom section by pulling outward on the flexible
latches as shown. Both latches must be pulled
outward at the same time using both hands as
shown. It may be easier to do if you press down
on the vac with the palms of your hands while
pulling outward on the flexible latches with your
fingers.
PULL
OUT
FLEXIBLE
LOCKING
TAB
COLLECTOR
\
LID
1
HANDLE
_DRUM
FLEXIBLE
LOCKING
ZAB
CASTER ___
FOOT
2. With the lid assembly removed, turn the dust
drum upside down on the floor. Locate the four
caster feet and insert them into the bottom of the
drum as shown.
DUST DRUM
ROLLERI
3. Locate the four casters and insert them into the
sockets of the caster feet as shown. Be sure the
ball on the caster stem is forced all the way into
the socket. You will be able to hear the ballsnap
into the socket and the caster will swivel easily
when positioning is correct. Turn drum upright.
CASTER
If your casters are noisy you may put a drop of oil
on the roller shaft to make them quieter.
CASTER
FOOT
4
\
PUSH
DOWN
4.Turn
lid assembly
upright
and put the lid
assembly on the dust drum by lining up the
vacuuming opening of the top with the drain of
the dust drum and push down on both handles at
once. Make su re that the locking tabs are snapped
in p!lace to prevent the lid from coming off.
5. Put one end of the swivel hose into the vacuuming
opening directly above the drain. Take the hose
strap and loop it around the hose about one foot
from the vacuuming opening.
Then put the other end of the hose strap into the
keyhole slot just under the drain as shown.
When the vac is pulled around by the hose, the
strap between the drum and the hose will help the
vac remain easy to handle.
6. Put the nozzle on the other end of the hose and
your Vac is ready to use.
LOOP HOSE
STRAP AROUND
BEFORE
INSERTING
IN
KEY HOLE
CONNECT HERE
FOR 2-1/2" HOSE
KEY HOLE
SLOT
5
with
7. Familiarize
yourself
features of your vac.
the
controls
and
ON-OFF
SWITCH
POWER CORD
BLOWING
PORT
CORD WRAP
AREA
PORT
LID HANDLE
DUST DR
\
\
HOSE STRAP
RECTANGULAR
NOZZLE
CASTER FEET
DRAIN
CASTERS
KEYHOLE SLOT
FOR HOSE STRAP
OPERATIONS
.
• WARNING
To avoid fire or explosion caused bythe igniting
of vapors or dust due to the arcing of the motor
bruslnes do not operate this vac in areas with
flammable vapors such as lighter fluid, cleaners,
oil-base paints, gasoline, alcohol or explosive
dust such as coal, magnesium, grain or gun
powder in the air. Do not vacuum explosive
dust,, flammable or combustible
liquids or hot
ashes. Do not use this vac as a sprayer for any
flammable
or combustible
liquid. To avoid
health hazards from vapors or dusts, do not
vacuum toxic materials. To avoid electrical
shock do not expose to rain. Store vac indoors.
Unpllug power cord before changing or cleaning
filter or emptying the dust drum.
Vacuuming
.
A dry filter is necessary to pick up dry material. If
you use your vac to pick up dust when the filter is
wet the filter will clog quickly and be verydifficult
to clean.
If your filter is wet but you need to pick up dry
material you can quickly dry the filter by letting
the vac run for about ten minutes before you use it
to pick up the dry material. The clean air rushing
through the vac will dry the filter enough for dry
use after about 10 mirlutes of running time.
Vacuuming
Liquids
1. The filter must be dried after using the vac to pick
up liquids to avoid mildew and possible damage
to the filter.
2. When picking up small amounts of liquid the filter
will not become very wet. However, when picking
up several drums full of liquid the filter will
become saturated and misting will appear in the
exhaust air. At this time you should dry the filter
or change to a dry filter to eliminate the misting
and possible dripping of liquid around the lid.
Dry Materials
3. This vac is equipped with a float mechanism
which will rise automatically to cut off suction
when the liquid in the drum reaches a
1. The Filter must be in correct position at all times
to avoid leaks and possible damage to vac.
2. When using your vac to pick up very fine sawdust
or dust from drywall type material it will be
necessary for you to empty the drum and clean
the filter at more frequent intervals to maintain
peak suction at the end of the hose.
predetermined
level.
When
the
float
rises
turn
off the vac, unplug the power cord, and empty
the drum. You will know when the float rises
because suction at the end of the hose will cease
and the motor noise will become higher in pitch.
6
Draining
However,
you may use the vac to blow sawdust
off of your tools or workbench
by placing the
hose in the exhaust port.
:
;:
the Drum
WARNIING: To avoid injury from accidental starting,
unplug power cord before emptying the drum.
Cord Wrap
1. Your vac has a drain for easy emptying of liquids.
Simply unscrew the drain cap and lift slightly to
empty the drum of liquid.
1, When finished using your vac, unplug the cord
and wrap it around the motor cover.
2. You may remove the top section of the vac as
described in assembly section and dump the
contents into a proper waste disposal container.
Blowing
Moving the Vac
1. Should it become necessary to pick the vac up to
move it DO NOT pick the vac up by the lid
handles. To avoid dropping vac due to latch
release or part breakage; pick the vac up by the
lip of the dust drum.
_
Feature
1. Your vac has limited capabilities for blowing
because of the unique method of exhausting air.
MAINTENANCE
FILTER
I_"-------
NUT
MAINTENANCE
-.------ BOTTOM
PLATE
WARNING: To avoid injury from accidental starting,
unplug power cord before changing or cleaning
filter.
NOTICE:
4------FILTER
Thi_ filter is made of high quality paper designed to
stop very small particles of dust. The filter can be
used for wet or dry pick up. Handle the filter
carefully when removing to clean or installing it.
Creases in the filter pleats may occur
from
installation
but creases
will
not affect the
performance of the filter.
Removal
To remove the old filter for cleaning or replacement
remove the nut and the bottom plate from the filter
and lift the filter off the cage.
4.
CAUTION: To avoid damage to the blower wheel,
always; reinstall the filter before using the vac.
Installation
To ensure a proper seal clean the lid area where the
filter will set. Slide the new filter over the cage.
Replace plate then run nut down threads finger tight
only. Do not overtighten as this will cause deformation on"cracks in the filter.
WARNING: Do not remove the filter cage. It is there
to help prevent your fingers from getting into the
blower wheel.
FILTER
Cleaning
Your filter should be cleaned often to maintain peak
performance. Dry filter before storing or picking up
dry debris.
Dry Filter
To remove dry debris gently tap the filter against the
inside wall of your waste container and the debris
will loosen and fall. Some removal of dry debris can
be accomplished by slapping your hand on top of
the lid while the vac is off and lid is still on the drum.
IMPORTANT: Dry the filter before storing or picking
up dry debris. You may run the vac with the filter in
place to speed up drying. Check the filter for tears or
small holes. Even a small hole can cause a lot of dust
to come out of your vac. Do not use a filter with holes
or tears in it. Replace it immediately.
Wet Filter
To clean a wet filter you can run water from a garden
hose through it. Take care that the water pressure
from the hose is not strong enough to damage the
filter.
7
:SEARS WET-DRY
MAC RECOMMENDED
ACCESSORIES
4
7
2-1/2"" DIAMETER
PLASTIC
ACCESSORIES
(Pictured above)
1.
2.
3.
4.
5.
6.
7.
9-16901
9-16964
9-16902
9-16978
9-16925
9-17817
9-17818
Round Dusting Brush
Two Piece Extension Handle
Crevice Tool
Car Nozzle
Dry Floor Nozzle
Squeegee Nozzle
Hose
SEARS WET-DRY
1-1/2"
VAC RECOMMENDED
DIAMETER
HEAVY
DUTY METAL
ACCESSORIES
ACCESSORIES
These 1-1/2" Diameter Accessories can be used with any Sears Craftsman Vac
provided they are used in conjunction with the 1-1/2" Diameter Hose listed
below.
9-16903
9-16905
9-16909
9-16908
The current 1-1/2" diameter accessories shown
above are available at your nearest Sears catalog
order store.
9-1690:3 -- Extension handles for 1-1/2" hose.
Extends work area range up to 48" more.
9-16905 -- Round brush for dusting, great on stairs
and bliinds. Soft bristles pick up dirt from hard-toclean areas, convenient angled neck.
9-16909 -- 1-1/2" diameter extension hose extends
cleaning reach up to 10 Ft. Heavy Duty Plastic Hose
may be used with 1-1/2" metal accessories or with 21/2" plastic accessories. Adapters included.
i9-16907 -- 8qu_g_
nozzle for wet pick-up.
Complete with built-in, flexible squeegee blade to
wipe clean and pick up water, suds and other
liquids.
9-16906 -- Nozzle with brush for large area pick-up.
Gets dust and dirt from bare floors.
9-16904 -- Crevice tool cleans hard to reach areas.
Remove long-standing dust from behind radiators,
under appliances, beneath low-sitting objects,
behind seats.
9-16908 -- Indoor/outdoor
1-1/2" DIAMETER
type carpet nozzle.
ACCESSORY
SET
16911 -- Includes 10 foot hose, two piece extension
handle, carpet nozzle.
The above recommended accessories
and available at the time of printing.
were current
REPAIR
PARTS
PARTS
LIST FOR WET-DRY
I
VAC 113.178060
& 113.178080
I
I
I
I
I
6
I
I
17
I
'
I
I
16
I
I
h
I
10
I
I
I
I
I
I
I
L
.....
J
10
PARTS
LIST FOR WET-DRY
VACS
113.178060
& 113.178080
ALWAYS ORDER BY PART NO. - NOT BY KEY NO.
WARNING: For your safety, this vac is specially insulated. To
avoid electrical shock, fire or injury, use only parts identical to
those identified in the parts list. Reassemble exactly as original
assembly to avoid electrical hazards.
Key
No.
1
2
Pad
No.
73180
73331
73330
3
4
73326
73190
73333
5
6
73272
73329
73328
7
9426108
8
STD611010
9
10
73306
73302
Description
Switch, Toggle
Cover, Motor 16 Gallon
(Model 113.178080)
Cover, Motor 12 Gallon
(Model 113.178060)
Collector
Motor, 16 Gallon
. (Model 113.178080)
Motor, 12 Gallon
(Model 113.178060)
Wheel, Blower
Lid, 16 Gallon
(Model 113.178080)
Lid, 12 Gallon
(Model 113.178060)
Screw, Pan Hd. Type AB
No. 10 x 5/8
*Screw, Pan Hd. Type AB
No. 10xl
Float
Key
No.
Pad
No.
11
806742-4
12
13
14
15
16
17
28229-01
73102
73164
73166
73185
73191
73332
18
19
20
21
22
23
73316
73317
9-17816
20557-01
73324
73323
73327
Description
Screw, Pan Hd. Type AB
No. 10 x 1-3/4
Nozzle
Caster
Foot, Caster
Strap, Hose
Cap, Drain
Drum, Dust 16 Gallon
(Model 113.178080)
Drum, Dust 12 Gallon
(Model 113.178060)
Nut
Plate, Filter Retainer
tFilter
Nozzle, Rectangular
Adapter, Hose 2"
Hose
Owners Manual
(Not Illustrated)
Cage, Filter
*Standard
Hardware
Item - May be purchased
locally.
tStock Item - May be secured through the Hardware Department
of most Sears Retail Stores or Catalog Houses.
11
owners
manual
SERVICE
MODEL
WET-D RY VAC
Service
is available
by returning
Sears Service Center/Department
States.
this Vac to the nearest
throughout
the United
NO.
113.178060
12 GALLON
MODEL NO.
11:3.178O8O
Model and serial
of your Wet-Dry
number
Vac.
may be found
on the Motor
Cover
(
16 GALLON
HOW TO ORDER
REPAIR
PARTS
WHEN ORDERING
REPAIR
FOLLOWING
INFORMATION"
PART
NUMBER
PARTS,
ALWAYS
GIVE THE
PART DESCRI PTION
MODEL NUMBER
113.178060 OR
113.178080
NAME OF ITEM
WET-DRY
VAC
All parts listed may be ordered
from any Sears Service
Center and most Sears stores. If the parts you need are not
stocked
locally,
your
order
will
be
electronically
tr&nsmitted
to a Sears Repair Parts Distribution
Center for
handling.
Sold
by SEARS,
Part No. 73327
ROEBUCK
AND
CO.,
Form No. 8P4904-1
Chicago,
IL
60684
U.S.A.
Printed in U,S.A. 2/86