1
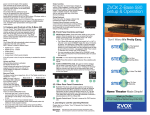
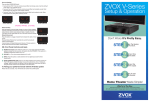
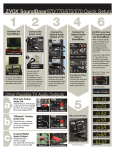
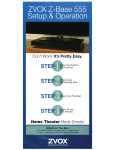
ZVOX
Hook-up instructions: ZVOX Mini
Great Sound Made Simple
Read This First! Important Safety Instructions.
READ AND HEED IMPORTANT
SAFETY WARNING ON POWER
SUPPLY.
CAUTION:
ATTENTION:
RISK OF ELECTRIC
SHOCK DRY
LOCATION USE ONLY
POUR UTILISATION A
L’INTERIEUR
IMPORTANT.
The lightning flash with arrowhead, within an equilateral triangle, is intended to
alert the user of the presence of uninsulated “dangerous voltage” within a
product’s enclosure that may be of sufficient magnitude to constitute the risk
of electric shock to persons.
Read Instructions. All safety and operating instructions should be read before
your ZVOX® Mini is operated.
Keep These Instructions. Safety instructions and operating instructions
should be kept for future reference.
Heed All Warnings. All warnings on the product or in the operating instructions should be followed.
Follow Instructions. Operate your ZVOX Mini in accordance with the instructions.
Do Not Use Near Water. Do not use your ZVOX Mini near water,
such as a bathtub, sink, swimming pool or wet basement. To
reduce the risk of fire or electric shock, do not expose this
apparatus to rain or moisture, To avoid dripping and splashing,
no objects filled with liquids, such as vases, should be placed
on your ZVOX Console.
Object Entry. Never use probes of any kind to reach into the
Mini as they may touch voltage points or short parts that could
result in a fire or electric shock.
Stable Placement. Do not place the Mini on an unstable cart,
stand, bracket or table. The Mini may fall, causing serious injury
to a child or adult and serious damage to the product.
Ventilation. The control panel and bass port of your ZVOX Mini provide
ventilation to ensure reliable operation of the system and to prevent it from
over-heating. These areas must not be blocked or covered. Do not allow a soft
surface such as carpet, bedding or a sofa to block the bass port or cover the
control panel. The Console should not be placed in a built-in installation such
as a bookcase or a rack unless proper ventilation is provided.
Heat. Your Console should be placed away from radiators, stoves, heat vents
or other heat sources.
Do Not Abuse The Power Cord. Install the Mini where no one can step on or
trip on the power cord. Never yank to disconnect the cord from an outlet.
Keep the cord away from heated surfaces. Do not pull the cord around sharp
edges or corners. Do not allow the cord to hang over the edge of a table or
counter.
Power Supply. Do not use a power supply with a higher voltage rating than the
unit supplied with your ZVOX Mini.
Power Sources. The Mini should be operated only with a 60HZ 120VAC power
source.
Do Not Overload Outlets. Don’t overload your wall outlets or power strip. This
can result in the risk of fire or electric shock.
Damage Requiring Service. Unplug your Mini and refer servicing to an
authorized service center when the following conditions occur:
• When the power supply cord or plug is damaged or frayed.
• If liquid is spilled into the unit.
• If the Mini has been exposed to rain or water.
• If the Mini does not work normally by following the operating instructions.
• If the unit has been dropped or physically damaged.
• If the unit exhibits a distinct change in performance.
The exclamation point within an equilateral triangle is
intended to alert the user of the presence of important
operating and maintenance (servicing) instructions in the
literature accompanying this product.
Lightning. Unplug your Mini during a lightning storm, or when it is left unattended and unused for long periods of time. This will prevent damage due to
lightning and power line surges.
Unplug Before Cleaning. Unplug your ZVOX Mini from wall outlet
or other power source before cleaning. Use a damp cloth for
cleaning. Do not use solvents or chemical cleaning agents.
Attachments. Do not use any adapters or attachments not recommended by
ZVOX Audio, as they may cause hazards.
Servicing. Do not attempt to service this product yourself. Do not remove the
cover. Refer all servicing to qualified service personnel.
Replacement Parts. Do not allow anyone to use replacement parts other than
those recommended by the manufacturer. Unauthorized substitutions may
result in fire, electric shock or other hazards.
Safety Check. Upon completion of any service or repair to this product, ask the
service technician to perform safety checks to determine whether the product
is in proper operating condition.
ZVOX Audio, LLC
59 Thomas Road
Swampscott, MA 01907 USA
[email protected]
www.zvoxaudio.com
1 Year Limited Warranty.
To the original purchaser, ZVOX Audio LLC will warrant the
ZVOX Mini system to be free of defects in material and
workmanship for a period of one (1) year from date of purchase. With respect to defects, ZVOX will, at its option,
replace the product or repair the defect in the product with no
charge to the original purchaser for parts or labor.
This warranty does not extend to any defect, malfunction or
failure caused by misuses, abuse, accident, faulty hookup,
defective associated equipment or use of the system with
equipment for which it is not intended.
This warranty is only valid when the system is returned to the
retailer that sold the ZVOX Mini system to the original purchaser.
This is the sole and express warranty. This warranty is in lieu
of all other warranties, expressed or implied, of merchantability, fitness for purpose or otherwise. In no event shall ZVOX
Audio be liable for incidental or consequential damages or
have any liability with respect to defects other than the
obligations set forth as stated.
To ensure warranty coverage, it is incumbent upon the original
purchaser of the ZVOX Mini system to inform the retailer of the
defect within the warranty period. The only acceptable method
of establishing warranty status is a copy of the original proof
of purchase indicating customer’s name and purchase date.
ZVOX
Great Sound Made Simple
1. Unpack Mini, AC power supply, remote control
and 2 connecting cords – one with “RCA” plugs,
and one with a “mini plug” connector.
2. Place console facing listening area, leaving 2”
of space behind it for bass port. If using the
Console with a TV, try to align the Console with
the center of the screen.
Hook-up instructions: ZVOX Mini
A few opportunities for fine-tuning.
6. IMPORTANT: Turn down the front panel volume
control all the way. Because the volume control
uses an electronic “continuous spin” system, the
knob won’t “stop” anywhere -- just turn it counter
clockwise one full rotation.
3. Connect AC power supply cord to “Power/
12VDC” port on console, then plug into AC outlet.
DO NOT plug cord into AC outlet before it is
connected to “Power” port of Console.
4. Examine audio outputs or headphone jack of
your TV, PC, CD/MP3 player, game console or
radio to determine if it uses a “mini jack” or
“RCA” connectors. Choose and connect
appropriate cord.
Mini-plug for
use with minijack input.
RCA plugs for
use with RCA
jack inputs.
5. For TV connection only: All other devices,
skip to step 6. If connected to a TV audio
output, push the “MENU” button on your remote
control, then choose “AUDIO” -- and navigate
through the menu options to choose “SPEAKER:
OFF” and “AUDIO OUT: VARIABLE” (sometimes
called “AOV” on a TV’s menu). This allows you to
control the volume of the ZVOX Mini using your
TV’s remote control.
If your TV’s audio output can’t be switched to
“VARIABLE,” simply control the volume of the
ZVOX Mini using its supplied remote control.
If your TV doesn’t have audio out jacks, connect
the ZVOX Console to the TV’s headphone jack.
Your TV’s volume control will then control the
volume of the ZVOX Console.
If your TV doesn’t have a headphone jack, or
audio outputs, then you can connect your ZVOX
Mini to the audio output of your cable box or
satellite dish. But other devices (VCR, DVD
player) will not play through the ZVOX Console,
unless they are connected through your cable
box.
7. Plug other end of audio connecting cable
into “Input 1” plug on back of ZVOX Mini.
8. Turn Power switch (located to left of power
plug) to “Standby.” Then activate TV, PC, CD/
MP3 player, radio or other audio device. In
“Standby” mode, the ZVOX Mini will automatically turn itself on when it senses a signal (red
LED above power plug will turn green). After
3 minutes without receiving an audio signal,
your ZVOX Mini will automatically shut down
its amplifier (LED will turn from green to red).
When you turn on your TV/audio source, the
ZVOX Mini will automatically turn itself on
again. The auto turn-on function takes 1-2
seconds. Note: If auto shutdown occurs when
listening at very low volume levels, you may
need to adjust the ZVOX volume control
DOWN somewhat, and turn the volume of
your TV/audio source UP. This will assure a
strong enough signal to prevent inadvertent
shutdown. If inadvertent shutdown continues
to occur, put the Power switch into the “On”
position – bypassing the auto turn-off circuit.
9. With volume control of TV/PC/Audio Device
set at about 75% of maximum, turn up the
volume of ZVOX Mini until you reach your
desired listening level, or until audible
distortion occurs. If distortion occurs, turn
ZVOX volume control down until distortion
goes away. You can use either the front-panel
volume control or the remote control.
10. Listen and enjoy. When you’re finished,
simply turn off your TV/audio source.
Questions: [email protected]
1. If your TV, CD player, PC or other audio
source plays too loudly, even with its volume
control turned only part way up, you may want
to reduce the volume level on the ZVOX Mini.
2. If you hear a consistent “hiss” or hum, try
turning UP the volume of your TV or other audio
source, and then set the ZVOX volume level
LOWER. If your TV is connected to a cable box
or satellite receiver, try turning its volume control
UP – so that when you switch from your cable
box to your DVD player, they play at about the
same level. As a rule of thumb, try setting each
device at about 75-90% of its maximum volume
level -- then turn the ZVOX Mini’s volume control
up as far as it will go without distorting.
In some circumstances, you will hear excess
hiss if your TV/audio source is turned up TOO
high. If this happens, try adjusting the TV/audio
source sound level DOWN and turn the ZVOX
Mini volume UP.
Please keep in mind that your ZVOX Mini is a
highly accurate audio system that may reveal
noise or distortion that other speakers did not
reproduce. This is not the fault of the Mini, which
is simply reproducing the signal it receives.
3. The PhaseCue control adjusts the size of the
perceived “sound stage.” Feel free to adjust it
when playing different kinds of audio. Some
people prefer slightly more, or less PhaseCue
effect. Try different settings to see what you like
best. Some people prefer higher settings for
movies, and slightly lower settings for music.
3. If you are placing the ZVOX Mini on the floor,
in a corner, or near the ceiling, you may find that
it produces too much bass – resulting in a
“muddy” sound. If this happens, turn down the
subwoofer level control until the “muddy” or
“boomy” sound goes away.
Inputs & Controls
• “Input 1” jack is for connecting audio connector
cable from TV, PC or other audio source.
• “Output (Input 2)” jack is for connection of
optional powered subwoofer, and also acts as a
second, mixing input. It will only act as an input if
another device is already connected to the “Input
1” jack. Note: overall volume of the system is
reduced somewhat when two input devices are
connected at the same time. For this reason – or if
you want to connect 3 or more devices – you may
want to consider an external input switching device
(available at Radio Shack for under $20).
• “Subwoofer Level” adjusts bass output.
• “Phase Cue” knob (on front panel) adjusts the
size of the sound stage, and the amount of virtual
surround sound. If background noices (crowds,
wind, traffic, etc.) interfere with dialog, try turning
down PhaseCue control slightly.