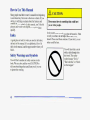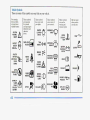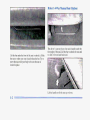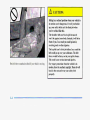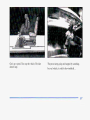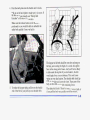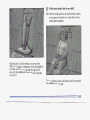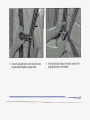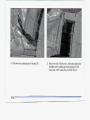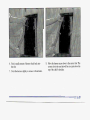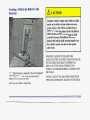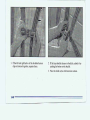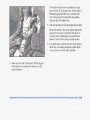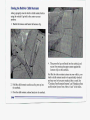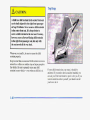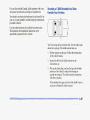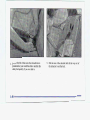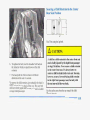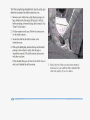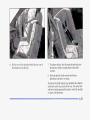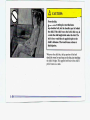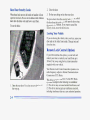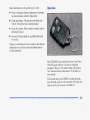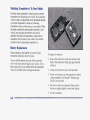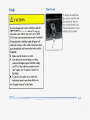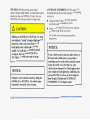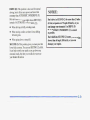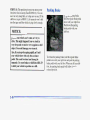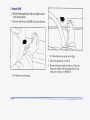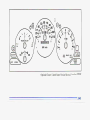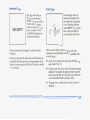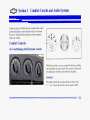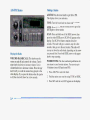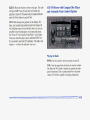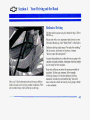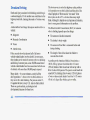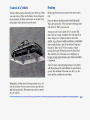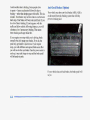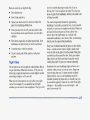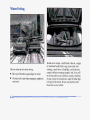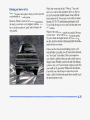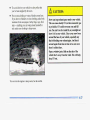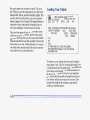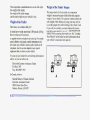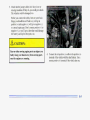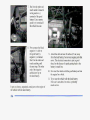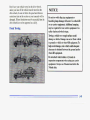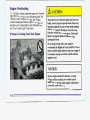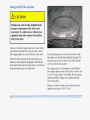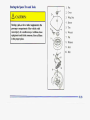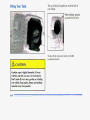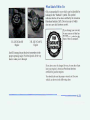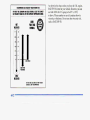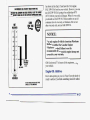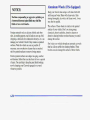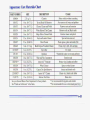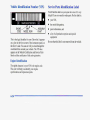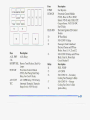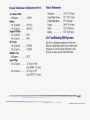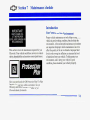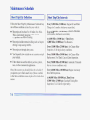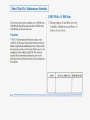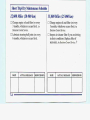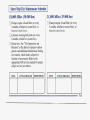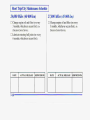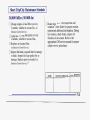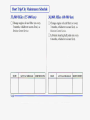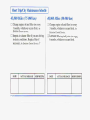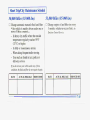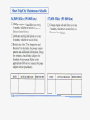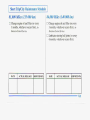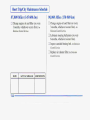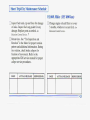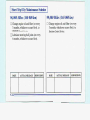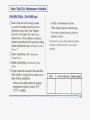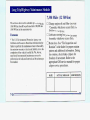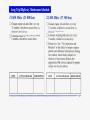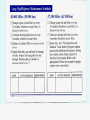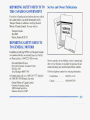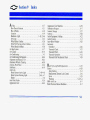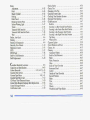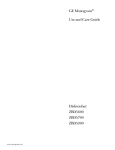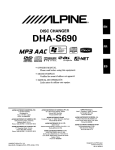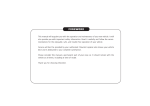
1
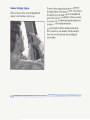
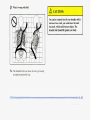
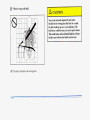
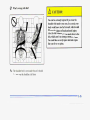
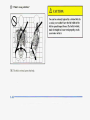
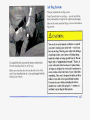
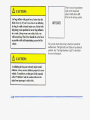
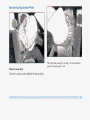
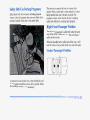
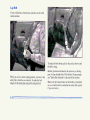
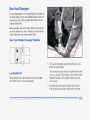
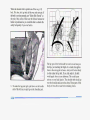
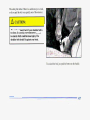
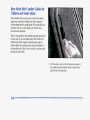
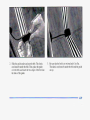
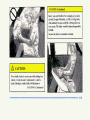
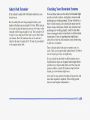
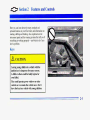
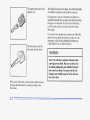
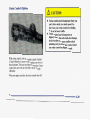
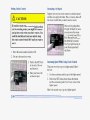
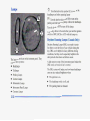
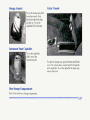
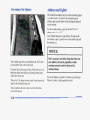
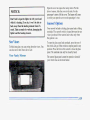
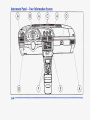
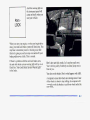
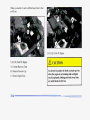
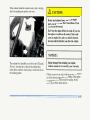
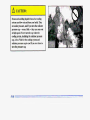
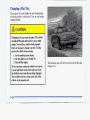
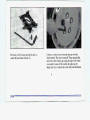
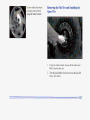
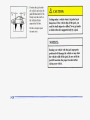
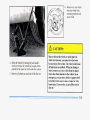
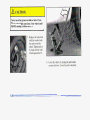
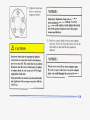
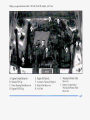
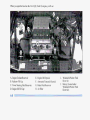
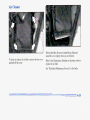
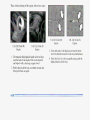
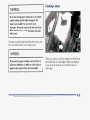
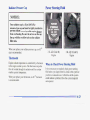
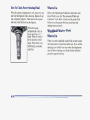
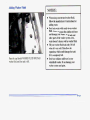
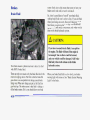
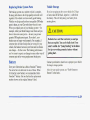
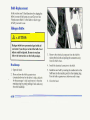
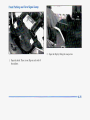
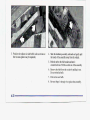
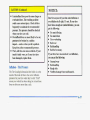
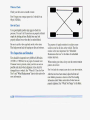
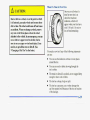
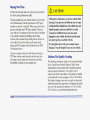
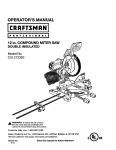
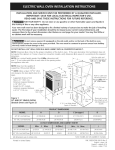
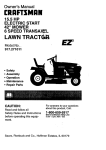
.....*.................*..............,
Index
"...*....................**..
..........~.~*.
" * 9-1
Here's. an-silpbabeticallistkg of' almost eve^ subject-in .this .mmual.. You a n me it to quickly find
something~:you.-want to read.
*
L
WE SUPPORT
~OLUNTAkkTE&lN7CIAl\j
GERTIFICAT'ION THROUGH
Na'tional lnstitutafoi
A-UT~XMOTIVE
SERVICE
EXCEL.LEMCE
I
<.
1
I
I
..
. ....
I
I
I
I
I
I
I
I
I
I
I
V
m
inP 'thatcould hurt
LOTICE:
1
:he symbols you may .find on your vehicle.
These.symbals
$re importarit
fQryau:.ari-d
your- passerrgers
whcn&er yQw
vehicle is
driven :
CAUTION
'POSSIBLE
lNJU.RY
PRO-TECT
EYES BY
9HlELDlNw
These symb.ols
These symbolsare us,ed on
warning and
indicator lights:
haye t9 dci with
your 1i @its :
WINDSHIELD Q
WlP.ER
FUSE
Q
DQOR LOCK
UNLO.CK
TURN.
SIGNALS
9
.x
CAUSTIC:
BATTERY
ACID. CQULD
.CAUSE
BURNS
WINDSHIELD
DEFROSTER
FASTEN
SEAT
.BELTS
WINDOW
DEFOGGER
REAR
fi
LIGHTER
HURN
(@)
C.OOLANT
AVOID
SPARKS:OR
FLAMES
SPARK-OR
FLAME
COULD
EXPLODE
BATTERY
9
P
BATTERY
CHARGING
.SYSTEM
a
ENGINEOIL .
.PRESSURE4-
FOG LAMPS
$0
VENTILATING
FAN
4
ANTI-LOCK
BRAKES
(@)
SPEAKER
FUEL
I
b
@A
0Sectjon 1
I
The driver's s.e.atmay have a b a and handle. under-the
front edge of-theseat. Lift the bar to-unlockl i e -seatand
:to slide:it forwadand backward.
'
Lift the bar un&r-.th.e-frontof the--$gat.to unlack: it, Slidethecse-at:to where you want it and release .the bar. Try to
move tbe.:seat:with youx b.ody to' b.e.sure.theiseat is
lacked in place.
a
FRONT (A): Raise the:-froritof the Seat'by holding the
switch.up. Hold.-.theswitch down .to lowe1 the.front of
the seat.
CENTER (€5):M Q V.the
~ seat forward or backward by
holding the-control ta the front or to:the back. Raise or
lower the-seatby holding the control up. or down
REAR (C): R&e the rear of the scat by~holdirrgthe switch
up. Hold the switch down to lowef the: rear of the seat.
Lift the-lever .to i-elease the seatback,then move the
seatback to where you want :it;Release the lever to lock
the seatback-inplace. fill-up on the lever without pushing
on the.se&tbaCk,:and the seatback will 'move forward.
When you ride.in or on anything,you go as fast.as it
goes
*
Put mmeaneon it.
Take the .simplestvehicle. Su.pposeit's just a seat on wheels.
G.et i-tup to speed. The.n stop. the vehic-le:The rider.
doesn't stop.
The pers.on keeps going. until stopped by something.
In a real vehicle; it .could.be the windshield ......
I
or.the instrument panel ..,
or the safety belts!
With safety belts, you slow down as the vehicle does.
You get more time to stop. You stop over more distance,
and your strongest bonestake the .forces..That’s why
safety belts make. such good
sense,
, .
Adults
This part is.only f o r people of:adult :size.
3. Pick up.the:latch plale and purl the belt -acrassyou..
Don’t let it get twisted.
The shoulder belt may 1o;ckif-you pull thelbeItacrQss
you very quickly. If-thishappens, let the belt go baqk
s-lightlyto &lock it. Then.pull the belt. across. y0.u
more s-lowly.
4, Push the latch plate into the buckle until it clicks.
Pull up on :the latch plate to-makemre it is secure. Lf
the belt isn’t long enough, see “Safety E’elt.
Extencier” at theend of this section.
Make-swe.the .releasebutton on the buckle is
positioned.so you would beable to unbuckle the.
sa.fety belt quickly if you e-verhad to.
5. To m.&e the lap part tight, pull down on the buckle.
end of the ’belt as you pull up .on the shoulder-belt.
To 'move it down, s.q.u.eeze.
the-releaselever and maye
the height adjuster to the desired pmition. You can move
the-adjusterup just by pushing up on the shoulder beh
guide. After you move the adjuster t.0 where you want it,
-144
..
Q:
What’s wronlg with this?
.
.. .
You can be .seriou~ly
injured if you wear th:e
shoulder belt under your arm. In a crash, your
bady wo.uld movetoa far forward, whichwauld
‘increase,the chance wf head:an:id.neck.inj.ury.
Also, the bekt would apply toto much To.r&to &e
-ribs,wh’ich.arenZ as strong asshoulder bones.
You could also severelyinjure intefnai opgtns
like your liver ~r spleen.
I
I
I
1
I
1
I
I
m-
.AirBag S,ystem
explains the .air bag system.
Your Chevrolet has .two air bags -- one: air.bag. far the
-driverand another air bag for the right fr-ontpassenger.
Here are the mrj'st importantthings-to knuw &out the air
g system:
1111s.p a t
To-unlatch the belt, ju.st.pu.shthe bu.ttm o n the-buckle.
The belt shoutd go-backout of the w.ay.
B-eforeyou..closethe-daor,be sure.the belt is out of the
way. if you .dam the doat on it, you can damage.-both.the
bdt .and your vehicle,
The best way to.protect.the fetusis to protect the
mother. When a.safety belt is worn properly, it’s more
likely that the fetus won’t be hurt in a crash. For
pregnant women, as for anyane.,the key to making
safety belts effective is wearing them properly.
Rf@t Front Pasenger position
The right front passenger’s safety belt works the same
.way as the driver’s safety belt, See-“DriverPosition,”
.earlierin .this section.
When .theshoulder.belt is pulled Q U all
~
theway, it wilf
lock. If it does, let it go back all the way and start-again.
A-pregnant woman should wear a lap-shoulder belt;.andthe lap.portion should be worn as-l.ow as po.ssible, b-elow
the rounding, throughout the.pTegnancy.
-r
----
If your vehicle has a bench seat, someone can sit in the
center position.
To make the belt shorter, -pull
its free end as shown until
the belt is snug.
When you sit in a center seating position, you have a lap
safety belt, which has no retractor. To make the belt
longer, tilt the latch plate and pullit -alongthe belt.
Buckle, position andrelease it the same way .as the lap
part o f a lap-shoulder belt. If the belt isn’t long enough,
see “Safety Belt Extender”at.the -endof this section.
Make sure the release button on tke buckle is positioned.
SO you would be able to unbuckle the safety belt quickly
if you ever had to.
Jt’s very important for re.ar seat passengers tu buckle up!
-Accidentstatistics show ,that unbelted people in the .rear
.seat are hud m ~ r often
e
in crashes than thase.who are.
wearingsafety ‘belts.
Ke~gup.as.sengerswho aren’t sa-fet-ybelted can be thrown
out of the vebick in a crash. And they can strike others
in the vehicle who are wearing safety b.elts-.
n
1 .. Pick up the latch plate-andpull the belt across you.
Dorl’t let it: gel twiste:d.
The positions next to tfie wbdgws have lap-shgulder
be.11~.
Hei-e’shaw to wear one.:pfoperly.
The shoulder be1.t may lock if you. pull .thebelt across
you very quickly; If this hap.p.eris,1et.the belt go back
slightly to: unllo,ck it. Th-enpullthe belt across you
more. slowly.
2 . Push .the latch plate.into the .buckle until it.clicks.
Pull up an the latch.plate to make sure it .is secure.
3. To make thc lap part.tight,-pull
:down on the backl-e
f
i the .belt as you pull up on the- sha~ll.derpart.
You .canbe seriousIyhur '-your:sho.u!derbelt.is
too loose. In .a crash,.you:w&Id-moveforward,
too much, which could increase injury. The
loulder belLliihould fit against your body..
2. Slide the guide under and past the belt. The elastic
cord must: be under the belt, Then, p1ac.e the gu-ide
over the belt, .and insert th-etwo edges of the belt-into
the slots of the guide.
3. Be sure that-the-beltis-not twisted.and it Iies flat.
.The elastic cord must be under the belt and the guideon tQp.
vllllUl CJ
Everyone ia a vekli.de n e d s protectio:n! That includes
infants and all children smaller than. adult size. In-fact,
thdaw in every -statein the United States and every
Canadian province .say:sthildreri-upto some :age .must.be
restrained while in a vehicle.
I
Smaller children and babies should always be
restrained in a chiid or i-nfant restriaint.The
instructions far the re&trairitwill say whether it is
the right type-and :size-€oryour child. A very
young child’s hip bones. are so small that:a
regular belt might not stay low on the hips, as it
should. Instead, the belt will .likely.beover .the
child’s abdomen. In a crash, the belt would apply
force right on the child’s abdomen, which could
cause serious or fatal injuries. So, be sure ‘that
any child small enough for one is always properly
restraine.d in a child or infant restraint.
heavy you can’t hold it.For example, ina crash
at only 25 mph (40 km/h), a 12-lb. (5.5 kg) baby
will suddenIy become a 240-lb..(I10 kg) force on
your arms. The baby would be almost impossible
to hold.
Secure the baby in an infant restraint.
Never hold a.baby in your arms while riding ina
vehicle. A baby doesn’t weigh much until a
crash. During a crash a baby will become so
CAUTION: (C.ontinued)
--
1
@
Which slots should I use for my child?
A:
With the child seated on.the child restraint cushion,
use the pair of slots that is at or just above the top
of the child's shoulders-.
With .thisbuilt-in child restraint, you can adjust the
height of the harness. -Depending-on the seated height of
the child, you can route it through the upper pair of
dots (A), the middle pair of .slots(B) or the'lower pair
of slots (C).
For the child shown here, the hmness spould go through
the middkpair of slots (B).
'1-33
0;What if the top af my chil$s:shaulders i s above
the highest p.airdf slots;?
At
A child whose.shoulder.$,are above the highest slots
shmlldn’t use~this.child.restraint. Ingtea:d,,the child
should .sit pn the vehicle’sseat ~ u s h I and 1
e
vel te”fety
belts.
1. Ldwer the-childrestraint cushion.
2. If the left and right halves of the shoulder harness
clip - a efastened'together, separate them.
3. If the lap- shoulder harness is buckled, unlatch it by
pushing the button an the buckle.
4* Pull down the seatback part of the pad (D).
1-36
5. Select one side afthe harness. Add some slack to 'the
shoulder part by pulling up on .the lap part. You'll
keep must of .this-slack until you finish Step 9.
,
.
6. Feed a s m a l l amuunt of harness slack back into
the s1o.t.
7. Twist the-harness slightly-to
remove it from the slot.
8:. Move the hamess up or.do.wnto the correct slot. The
correct slat is the one that will-beat or just-abovethe
top -ofthe child's shoulder.
10. Pull on the harness. Make sure it.is proj-erlyrouted
and isn't twisted.
- 11.. Repeat'Step 5thoU.gh 10 fix be-other.side-of
the hwhsss?Be sure b6th:sides .are adj-lastedto the
same height.
1.2. Move the gad bdck ag,ah$tthe child restmiit
seatback;,Make sure the'harnessgoes through the
slots in the pad that,match the lieight;adjkstment
slots being:used.
:13. Press the upper edge.of the pad again$ the fastener trip.
',
9. Twist the harness slightly tu route it through the
correct slot;
I
Securing a. Child in 'theBuilt-In Child
Restraint
. .
- 1
Now that fhe hamess is adjusted to the cfifiect height fbr
your child, you're ready to use the child restraigt%
hqness -(E)to secure your child,.
Don't use the vehicle's safety belts.
WARNING! FAIJXBE TO..FoLLoWTHE
MANUFACTURER'S INSTRUCTIONS ON THE USE
UF THIS CHILD IUESTM.INTSYSTEM CAN
RESULT IN YOUR CHILD STRIKING THE
VEHICLE'S INTERIOR DURING A.SUDDEN'STOP
OR CRASH.
SNUGLY ADJUST THi? B'ELTS'PROVIDEDWITH
THIS C.€iILDRESTRAINT AROUND YOUR CHILD.
1. If the left and right halves of the shoulder harness
clip -arqfastened together,separate them.
2. If the lap-shoulderhamess is buckled, u&rt&hit by
pushing the button on the buckle..
3. Place the child on the child respint.ct,whion.
.
5~
As nfastsned I
der harness 1 won’t’help
k e p the harnessrin placeon .the child7sshoulders.
If the harness isn’t.on the chiId’s.shoulders; it.
won’t be-ableto:restpain the..chiId’supper.body
in a sudden stop o,r crash. The child could be
ser’iouslyinjured.. ‘Makesure.the harness clip is
properly.fastened.
9 . On both sides of the harness, pull up on the lap part ,
a little to be sure it’s locked.
’If @eharnkss-iai’t locked, or if it hecomes too tight,
unfasten theharness clip. Then unlatch the harnes-s
by pushing the buttunon the buckle, -andlet both
sides ofthe harness go 311 the way back so they will
move freely again. Tben,.repeat Steps 4 through 8.
If -.theharness .still doesn’t lock, don’t use the child
restmint. See your dealer to have-the-built-inchild
restraint serviced.
1-44
10. Adjust ,theposition of the harness on the .child’s
shoulders by moving theclip up. or.down along .the
harness. On each side of the harness, the shoulder
partshould be centefed on the child’s shoulder.The
harness should be away from the .child3 face and
neck, but notfalling off the child’s shoulders.,
2. Unlatch the harness by gushing the button on
the buck€e.
1. Unfasten the shoulder-hasness.clip.
3. Move.one side ofthe harness oiff th-e-child’.s
shoulder,&d let the hamess go all.the way back.
4. Move the other side .of the h a n ~-off
s the child’sshoulder, and let it go all the way back.
5 . Remove the child from.the-child restraint.cushion.
1.. Buckle the hmness-:andfasten the hmes.s. clip.
I
4. Then press the leg rest firmly into .the seatback, and
secure it by pressing-theupper corners againit h e
fastener strips on the seatback
2. Fold the child restraint cushion and leg rest up into
s the seatback,
3. Press-the child restraint -cusJion.firmlyinto the seatback.
Just like the other restraint systems in yo,urvehicle, your
built-in .childrestraint needs to.be.periodicallychecked
and .may needto have parts replaced after a.crash. See
“Checking Your Restraint Systems.” and“Replacing Seat
?andRestraint System Parts After a Crash” in the-Index.
1-47
:
I
1 .
1
4. Buckle the b.elt..Make-sme the release button is;
positioned so you would be able to unbuckk the
safety belt-quickly if you ever had to.
5. Pull the-restof the shoulder belt all the way out of
the retractor to set the lock.
u
You’ll be using.the lap belt,
cii-.
TQ:tighten the belt, feed the shoulder bdt back into
the retractor -whileyou p w h down on the child
restfaint.
7. Push and pull t.he child restraint in diffkrent
directioBs to be sure i t is secure..
To remove-lhe child regtraht, just unbuckle the vehicle’s
safety belt and let it go back all the-way. The s.afety belt
will move freely again:and be ready to work. for-.aa adult
of Iarger chi1.d passen@-.
ca.n.be ba.dly injured by the right ~frcfrrtpassengerair bag:if it inflates. Never sewre a child restrairit.
En the center.fjrontseat. It’salways better to
secure a child restraint h t h e rear seat.si’ou.m.j~y,
h.owevex-,:secure.a forward-facing child restraint
in the right front passenger seat, but:onIywith
the seat m’ovedall the way back.
See the earlier-part:&out the:tup strap if therchild
restraint has .one;.
2. .But themstfaint of1 the seat. Fdllow the instructions
.for .the child restraint.
4. Run-thevehicle's safely beIt through .,oraround the
restraint. The child. restraint i.nstructions will show
you how.
5 . Buckle the belt. Make sure the release button is
positioned SO you would be.able.to unbuckle the
safety .belt quickly if you ever had-to.
6. .To tighxen the belt, pull its free end.while you push
down on the child restraint.
You’ll :be using the-Sap-shoulderbelt. See the earlier part
ab.sut .the tap strap if the child restraint has me.
If the shoulderbelt goes in front of the child’s face or
neck, put it b:ehind the child restraint.
5. Buckle the belt. Make sure the release button is
positioned so you would be ab1.e to unbuckle-the.
safety bekquickly if you ever had to.
6. Pull the rest of the -shoulderbelt all the way out of
the retractor to set the lock.
7. To tighten the belt, feed the slzornlder belt back into
the retractor while you push down.-onthe- child
restraint.
8. Push and pull the child restraint in different
directions to be sure it issecu-re.
TO remove the child restraint, just unbuckle the vehicle’s
safety belt and let it go back all the. way. The safety belt
will move.freely .again and be ready to work for an adult
or larger child passenger.
a Children who aren't buckle'd up can str,ike.other
people who are.
Chiidren who have outgruwn child.r~stra~nts-'should
wear the vehicle's safety belts.
Never doMs.
Rere’two. children are wearing; same
the: beIt. The
belt can’t properly~spread impact
the
forces.In a
crash, thetwo chileen can be crushed together
and seriously injured..A belt must .beused .by .
only-oneperson at a time.
-
&= What if a chiJdiswearing,alap-shoulaeer belt,
,
A:
but the &iId is so small that the shoulder,beltis
very dose to the child’sface or neck?
Move the child toward the center of the vehicle, but
be sure that the shoulder belt still is on the child’s
shoulder, so that in a.crash the child’s upper-body
would have the restraint that belts provide. If the
child is sitting in a rear seat outside position, see.
?Rear Safety .Belt Comfort Guides” in the Index.
If.the child is so small that the shoulder belt is still
very close.to the child’sface or neck, you might
want.to place the child in .the center seat pasition,.
the one that has on1y.a lap belt.
I
.
.jN.everdo thi:s.
Here-a,childisdting in :aseat thathas a
kqG'shcrulder belt, but the sjhoulder part is behind
.the child.If the child wears the belt ih this way; in
a crab the child might slide under
the'belt.The
belt's force wbuld then be applied right
on the.
child's abdomen. That crruld-cause seriou&.-or
fatal injuries.
.~
Wherever the child sits, the .lapportion 'of the belt
'.:
should be worn low .and snug on the hips, just touching '
the child's thighs*'.Thisapplies belt force to the-child's
.pelvic bonesin-acrash.
1-58
e Section 2
Features and Controls
Le.avingy0un.gchildren tn a vehicle with the
ignition key is.dasgg-ronsfor many reasons.
A child or others~could be. badly injured or
even killed.
They could operate..powerwindows or other
.controlsor even make.the.vehicle move.Don't
1eave:thekeys-ina vehicle.with young:children,
I NOTICE:
UnLked dwrs can b.e dangerous.
Passengers .especiallychildren can easily
open the doors and fall out. When1.a.dooris
locked9.-tIie
Wide. hanldk won’t-openit.
-1
--
From the-inside,p.ush the leverto iock the do.ocTo
unlock, pull .the lever.
PaWes-Daor Lacks
Press the power daor lock swifc.hto lock or unlock
,all doors.
2. Clme the door,
When these locks are:set, the -insidedoow handles will not
open the rear dooxs; Be .sureto:1e1adults and older children
know how the locks work and,how to cancel them.
To use the locks:
To opera door when the security locks are set, u-nl'ock
the door from the inside and then-op-enthe d0,o-rusing
the outside~door
handle. If you want to cancel the
w x r i t y locks, move the lever down.
Leaving Y;oar ViehicJ~
If you .are 1e.aving-thevehic1e;tak: your keys, .openyour
door and set the~.loeksfrom inside. Then get out and
d o s e ,the door.
If your Chevrolet h.as this optio:n, you can lock and
.unlock yourdoors-ur unlock your trunk from up to
30 feet (9 m) away using the: key chaiwtransrnitter
:suppli;e.dWMI your v e ~ c l e .
Your Remote Lock Contro-ltransmitter operates 011A
.radio frequencysubject .to Federal %:cmmunications
Commis.sion(FCC) Rules.
Thi-s devicecoInplies with P~lst:If of the:FCC RuIes.
Operation is subject to the foll-owing--two.
comli.tioris.:
( 1) This device may not cause harmful.interferenw,
.-and
(2)This device mustaccept-any interference -received,,.
includin~ginterfereme:that may caus.e undesiredopemiion.
X . .I:liserta flat o.bjc6t like a.:dinxe into the slot on the
back of the. tr.ansmittes.'Gently pry apart the front
and back.
2. Gently pry .the b.atteries out of the. transmitter.
3.. P u t the new batteries into the .tr.ansmitt.reras shown
on.thetransmitter. Use Duracd @ b.at.teries type
DL20 16,,o-r-equivalent..
4.. .Put the two halves back together. Make sure the
halves are together tightly so water wan't get in.
Et c,-l be dange- - us to drive with the t. nk lid
open bemuse carbon monoxide (CO)gas:can
come inta your vehicle. You can't .seetor:smell
C.0. It can cause unconsciousness and even death.
If you must drive with the trunk li-dopen or if
eIectri6al wiring or Other cable coaxnextions must
pass through the seal begween'the-bady and-the
trunk:lid:
@ Make sure -allwindows are shut.
a Turn the.fan-onyour heating or coding
system to its highest speed with the !setting
on VENT. That will'furce outsideair into
y:owvehicle.. See "'Comfort ControIs" in
the-Index.
If you have air outlets on or undw the
the-way.
instrumeat pa.nel-,.open-the.in all
.
,.
.,.
A
E
I
lg$. .he cord'hto.anungrounded outlet
could cause an electrical.shock.Also, the wro.ng
kind of-extension cord.coaldoverheat and cause
a fire.Yua could be seriously injured.Plug the
cord into a pmpwly grounded three-pron:g
110-volt AC out'iet, 1f:thecord won't reach, use a
heavy-duty fhree-prong,exterrsiancord rated for
at least -15a.mps.
.~~
Your automatic transaxle. may have a sh.i,ftlevepm th.e
Steering Golurnn 0.16n
.-the console between the seats.
Maximum engine speed.is lilnited on automatic
transaxle vehicles, w h m ycsu're- in PARK (P) or
NEUTRAL (N j3 to protect driveline components from
i-mprnperoperation;
There are several different positions for your shift lever.
[NOTICE:
N-OTICE:
Elease-the parking brake, ho1.d.theregular brake
peaal dawn wieh your right foot and push the parking.
bmke pedal with yaur left foot. When you lift.;yo.urleft
foat, the,parking .brake.pedal w i l l fallow it to the
11-
.reIeased.pos-iti.on..
NOTICE:
.
.
Driving with the. parkingbrake~on,cancause
your rearbrakes ta ayerheat. You may.have-to
replace them, and you could also damage~other
parts of your vehicleIf you.are towing .a trailer and ~
e
’=6fiany
~ hill,~
~
see “Towing a Trailer” in the-.ITndex.That section shows
what..tado first to keep a e trailer fmm moving.
.-
!
It Can be dangerous to get
. , ~ ucKyour
t
vehidg
the shift leveris n i t fully in PARK (PI with the
parking.brake-f i i y .set,Your veGde can roll.
Ifg you have left the:enghe-running, the.vehicle
canmove.suddenly.You or others could be
injured. To besure your v&i32le won’t move, even
when you7reon fairly level-gtbudd,ase -the-.&eps
that follow.If youlre pulling ‘atrailer, see
‘&Towing
a Trailer” in the Index,
i
Hold ifi.tbe'button on the
lever, and push.:the lever
all .the way townrd the
fro.~t
&your vehicle.
It can be d gerons to leave-yourvel :le,with
the [email protected] vehicle-ajulrl :move
suddenly if the 5.h8-tlever is not fully in PARK (P)
with the.parkingbrake firmIy s:et.And, if you
ieme the vehtde with the engine running,'itcmld
overheat md men^ catch fie. You.or.&he$s could
be iujured. Don't leave your vehicle with the
engine.running unless you haw to.
A Clir
I
Things that can burncodd touch.hotexhaust
parts under your vehicle and ignite.. Don't park
over papers, leaves, dry grass or other thingsthat
can burn.
2-23
The-driver’s windowswitch has an au~o-downfeature.
This .switchis labeled.AUTO. Tap .the rear of the switch,
and:the :drivm’.swindow will op& a. small-amount.If the
rear of <heswitch is pressed di the way dow~i,the
window will go all .theway :down.
To stop .the wi.n.dow while it is lowering, press the front
of tb-switch.To rai9-ethe windbw, p~e.ssand.hold the
front ofthe switch.
The driver’swindow controls-also i-ncludea.bC.k-.out
switbk.1.Press L0CK;DUT to stop front and rear
passengers from using their windd-w:switches.The
driver can still control all the wilrdrjws with The lock on;
Press the switch-ggaififoi; notmd. operation, When the.
orange bandlan the switch is-showing, the-passengers
can .operatetheir windows.
Press.either hm% .symbol on y.owr:steeriqg wheel to
sound the ham,.
I
2-26;
1
r-
You control the. windshield
w i p m .by turning theabznd
marked WIPER. For a
single wiping cycle, turn the
band to MIST. Hold it there.
uiltil the wipers-start, then
let go. The wipers will stop
afterow cycle. If you want
more cycks,-holdthe-b.and
on MIST longer.
Fur gteady w i h g at low speed, turn the band to LO. For
high-.speed wiping; Turn the baldfurther, to HI. To stop
the wipers, turn the bmd t~ OFF.
YQ.Uc m set the wi.per speed.Ebr a long or short delay
between: wipes. This-canbe very useful in light rain or
-snow.Turn the. band 'to choose the delay time. The
clmef-toLO, the shortet-the delay*
several swe.eps.and thm either stup orreturn t,o your
pr~~,erI
C M s e Control,(Option)
1
Tf you l e a p~u r cruise cQntro1 switch ‘onwhen
;you’re-.notusing cruise, you might hit8 Button
and :gointo.cruise when YOU don’t want to. You
could .b&-sWrtled
and even lose control. Keep.
!itch OFF untiI VOI rant to
use it,
Step lightly on the brake.:pedal;OR
.+ Theignition is. on,
i,
The.he:adlamp switch is off, and
0
The parking b.rake bs re1e.ase.d-
---
-2133
51
1111’
mi--- *’ - n
,
These-lamps80 on when you open thedoors. When
the doors are ~bserl,turn the ramps an and offrwi-th
the-Switches..
.Ywr pass-eng-er’sside mirror is. convex. A convex.
mirror’s-surfac~is curved so you can .se.emore from the
driver7s seat.
I
I
A convex mirror -can make things (like. other
vehicles) look farther away than they really are.
If you cut too sharply into the rightlame, you
could hit-a..vehicle on your right..Chmk your
inside :mirroror. glanceover y.ourshoulder before
:changinglanes;
. .
-Usethe door key to lock and unlock .theglove box.. To
open, lift the latch.
To use the storage area, fold
down the armrest. Press
the latch on the ffofit edge
and pull up. To-usethe
cupholder, flip it forward,
Instrument Panel Cuph.dder
To use this cupholder,
slide it out of the.
instrument panel.
To open the storage .area,press the buttoir -and:lift the
cover. The console. has a casserteknd CD storagebin
and-a cupholder. To-usethe cupholder €of large cups,
remove the insert..
To use. the- Lighter, just push it i n all the.way and.let go.
When it’s ready, it ‘will pap back by itself.
I NOTICE:
Don’t hold a cigarette lighter in
with your hand
while it is heating. If you do, it won’tbe able to
bac-kaway from-the.heating element when it’s.
ready. That can~makeit overheat, damaging the
lighter and the heating element.
2-40
E. Audio' System
E -Ashtrayand Lighter
G. Remote Trunk Release
H
.
Lamp Cgntrols
I
LOW
&RAKE ANTI-
already buckle-d.
turn
VOLTS
AIR BAG
You will see..this1ight.flash
for arfew semnds when you
turn your ignition ta RUN
or START..Then the,light
sho.ul4go qut. This- means
the s-yste.mi,s ready.
I
I€ the air bag readines:sBght doesn’~d o m e an when you
Staft your vehicle, os stayi on, or comes on when y0.u
are driving, your air bag System may not work properly.
Have your vehicle ~ . ~ r v i c ; ~ d ~ r i ~ h ~ - a w a y .
&eigaiticrn as
?
a check ,to show you it’s
working. Then it should
J f it stays on, or comes on.while you-aredriving,,y:ou
may have-..&
problem with the chafging s y s t e .It
~ coddl
indicate that you have a 1a:ose.drivebiltor another
electrical problem. Have it 6hec.ked right away.Driving
while -thislight is .on could drain yo.ur’.battery.
If you must drive-:-a short
distance with the light on?_be
certain-toturn aff all your.acces-sories?
.SUC~’as theyradio
and air cwdjtimer:
BRAKE
a
LOW
TRAC
... ..........
_. . .
-
LOW
COOLANT
If you keep :driving your vehicle
with this.light
on, after a while, your :ernisssion-cantralsmay not
wark-as-well, your :he1economy may not be as:
good and y : ~ w
engine may not run a~~'IFmo6thly.
This.could.kad to:costly repairs-.that.maynot be
covered-byyour warranty.
tViCE
ENGINE
SOON
J.
This light should come: on, as a:eheek.to$how you. ij.is
working, when;the.ignitionis. on and the engine IS a,ot
running. If the light doesn't come on, have it repired..
Thk li-ght will also come on during.a.malfunction in one
of two ways:
Ygu may be able to correct the-.ai.s-stansystem
linalfunctiun by consiclel'ing.the Tpllowing:
0
Reduke vehicle speed.
Did ysu just.put fuel into your vehicle?
Avoid hard accelmaticms.
r)
Avoid. gteep.uphill gr.a_de..s.
If towhg a trailer; reduce.the amount of cargo being
hauled as Soon as it -ispossible,
Did-youjust drive through a deep puddle of watex?
If s.0, y ~ u elecwical
r
system may.be wet.The ~eclndition
will usually be cdmxted when the .@IectriCalsystem
dries.aut. A few dri.ving tripsshouldt-wnthe fight-off
t .keel [riving if the .oil essure-is low.'I€
you do, pour engine k s ~ nbecome so hot that it.
catches fire, You or others cmld be b,urned.
Check your si1 as soqn as possible .andhave your
vehicle serviced,
I
LOW
OIL
SECURITY
find out how to operate.the comfort
control adaudio s,ystemsoffered with. your Chevrolet.
Be sure .to read about the particular systems supplied
with your vehicle.
LZI tms sectmn you'll
With the.se system.sjyou.can.control the hating., cooling
a-ndve;nti.lationin your vehicle. The~systefnswork-bg$jf
you keep. your windows closed whi1.e usi .thgm.?
The knob with rhe~fansymbol selects the force of air
you want. To turn the: fan. off, turn the.knob to OFF.
On very hot.dscys;-;open the windows long enmgh to
kt hot, inside i i r escape.. This reduces the.time the
compressor Bas to run, whkh should help fuel .ec.oflomy.
For quick e~oal-downm.very hot day%;use MAX with
the temperature coDtfol.aI1the way in the blue:.@ea, If
this settingis used for long.periocls of time, the:& in
your vehicle may hecometoo dry.
For normal cooling on.hot days, use A/C with the
temperature contrd i-rr the blue :area, The system wiil
bring in outside;air gmd cool it.
If p u ' i ; vehicle hx-s an engine codla-ntheatex, you-C-aixuse
k tahelp your sys6em provide w.arm.airfaster-whenit's
cold o,utside (0°F (-18°C) ox lower)..An engine.eoolant
heater warms. the coolant your .engine and heating
system use to provide heat. See ''Engine Coolant
Heat&' in the Index.
.,
Adjust thedirection of;airflowby moving thelouvered vents.
3
NOTICE.:.
i-
PUSHBUTTONS: .The four numbered pushbuttons. let
you return to your favorite stations. You Can set up to
14 stations.(seven AM and seven.FM).
3. Press :
AM-FM: Pre-ssand rele.ase the lowerknob 40 get A M ,
FMl or FM2. The.disphy shows-your 3ele on.
TUNE: Turn the 1~we.r kmb
-to choose rad stations.
SEEK: Press -theforward or reverse arrow to go to the
next higher or lower staxion.
PU.SHBUTTONS:The four numb.eredpushbuttoris let
you return tn-yourfavorite stations.. You can .setup ta
21 statians'(seven AM,.seven FM1,and seven FM2 ).
3. PresS~SETuntil the word SET appear$ on the
:display.
4.. P$e-ss.-and releaseo m of the four numbered buttms,
within.five seco;rrds.
RECALL: I'ress- thss buttan -torecall the-statim being.
played. 'If you press the button when the ignition is off,
the clodc will show Tor a few secoirds.
PWR: -Pres:s-this knobto-turnthe system on and of€.
VOL:-Turn the upper.knob c1ocCwis.e to. increase
-volume..The' fastef the VOL knob is Ytrtated, the quicker
the radio goes tu maximum. Turn it countercl.oc,kwiseto
. d a ~ e a svolumk
e
.Theknob is-capableof roTating
cmtinuously.
TUNE: Press t i s . k n o b lightly so it extends. Turn it to
choose radio Stations. Push the knob back in when
you're not using it.
SEEK: Press the. forward ar-backwafd.--im-ow
t o go to
the next higher-or.lowerstation; The s.ound will.be,
muted while seeking.
3-11
3-12
.
,
3-13
Here-you' 11find:in~~r.mation-ab.sut
.driving;on different
kinds of roads-and in:varying weather coriditiioris. We've
dso included-many other-useful tips.on driving+
Since alcohol is .curie-d in bodywater,this means that-a
warnan general1.y will remh a higher $AC level than a
man of her same body weight when each has the same
number of drinks.
The law in ,many U.S. states sets the legal limit at-.a.:BAC
:of 0.10 percent. In.a growing number of U.-S. states, ..and
throug.hout Canxila, the limit is-OB8percerit. In some
.othexi&un.tries, it’s even Iowa. The-BAC limit for all.
-commexcial-drivers.in the United States i.s0.04 percent.
.The BAC will be over 0.10.percent after .three to six
rdnnks (in one-hour). Of course, as we’ve seen, it.
depends.on how much alcohol is in the drinks, and how
quickly the pefscjri drinks-hem.
r
'Your vehiclemay hav.e anti-1
'rakes (ABS). ABS is
an advanced electronic braking system that w.illhelp
prevent a braking skid.
'If your vehicle has anti-lock:-brakes, the brake pedal will
say so.
And this warning light on
the instrument panel will
c.o.meon briefly when y0.u
start your vehicle.
ANTI LOCK
When you start your engine, or when you begin tu drive
:away, your anti-lock-brake-aystefnwill check itself. You
may hear a momen@ry motor or clicking noise while
this twt is going on, and you may even notice that your
brake pedal moves a little.This is normal.
If there’s a:pro.bdernwith the anti-lock brake system,
the anti-lock brake system warning light will stay an: aiffash. See “Anti-Lock Brake .SystemWarning Light”
in the Index.
Here’s how anti-lock works. Let’s say the mad is wet.
You’re driving safely. Suddenly an animai j-umpsout in
front of.you.
You slam on the.brakes. Here”$what hap.pens withABS A computer senses that wheels are siowing down. K’0pn-e
of the wheels.is about to-stop rolling, the-camputerwill
separately wurk-thebrakes at eq&.frg&wheel and at-the
rear wbe.ds..
The anti-lock system can changethe brake pressurefaster
than any driver c.ould The-cbmputeri s programmed to
make the most.:ofavailable tire and.mad conditions.
Remember: Anti-lackdoesn’t change the time you need
to get your foot up to the-brakepedal or always decrease
stopping distance. If you get too close to the vehicle: in
front of you,-you won’thave :time to. apply your brakes
if that vehicle suddenly slows .or stops. Always leave
enough room up ahead to stop, :even thmgh you have
anti-lock brakes.
Don’t pump.the brakes. Just.hold the brake pedal .down
and let anti-lock workfor you. You may feel thesystem
working, or you may notice Some noise,but this i s normal,
LOw
TRAC
.You.can steer .ar.ound the obstacle while braking hard,
As you.brake,. your computer keeps receiving updates on
wheel spee;d and contmls braking pressure .accordingly.
..
.
When.your anti-lock system
is adjusting brake pressure
to. help avoid a.braking.skid,
this light will come on. See
“Anti-Lock Brake System
Active Light” in the Index.
' W
In any emergency, don? give up. Keep trying to
steerand constantly s.eek:an-escaperoute or area
o,Fleess
..
&@er
.
If you have the anti-lock braking syste.m, i-ernember:It.
helps avoid only the .braking skid. If you .do n0.t have
anti-lock, then in a braking
(where..thewheels are
no longer rolling), release imugh pres.sure on the brakes
t.0 get the wheels rolling again. 'This restores steering
.c.orittd.Push thekrake pedal-ddwnstexdily when you
have to stop su.ddmly. AS lang as the wheels are ~olling,
.you will have steering control.
d
4-14
a
d
.
Night -drivingis. mare d&iig&%?u3
than day driving.
One reason is that some driver.sare likely :to be
impaired -- by alcohol or drugs, with night vision
problems or by fatigue.
0
0
0
. . , -, ... , . . .
.
It's wise to keep p u r wiping equipment in.gcmd sh,ap&
and keep your windshield washer tank filled..Replace
your wlldshield wip-er inserts when they $huw .signs.:of
?&reakng-m:misshi areas on the windshiekd, or when
-stripsof rg.bb.er s:tartto.-separatefrom the inserts.
4-16
..^. -
Wet brakes can cause accidents.They .won't work
well in.a quick stop and may cause pulling to one
side. You could lose control of the-vehicle.
After driving thmugh a large puddle of water or
a car wash, apply yourbrake pedaI.lightly. until
your .brakes work normally.
-.
Driving too. fast through larg-ewater puddles or even.
going through<s:ome-carwash-escan causc.problems, too.
The water may affect your brakes. Try to -avoidpuddles.
But if you can'tj try to slow dawn befbre you hit them.
,I
NOTICE:
0
4
:One;ofthe biggest problems with city-streetsis the
.amount of t.raffic on :them. You'll want to watch out,foos
what the other drivefs ate doing and pay-attention:to
.traffic signals..
0
D:rivi,ng on steep hills or mou-nt.ainsis differentfrom
driving.in flat pr rolling terrain.
I
Here.are some tips for -winterdriving:
Have your Chevrolet in . p o d .shape.for winter.
. .
J
YOUmay want to.-putwinter emergency supplies in
ybur truok*
4-24
Include an ice scraper, a small brush or broom, a supply
of windshield washer.fluid, wag, s0rn.e winter Outer
clothing, a small shove!, a flashlight, a red cloth and a
couple of reflective.w.arning triangles. And, if you will
be driving under severe c.onditions,incluae a small bag.
of sand, a'pi'ece.of old carpet or a ample .of burlap bags
to help provide traction. Be sure you properly secure
these items in your vehicle.
However, if the-re is ~ a n wor ice-between your tires and
the road, you can have a very slippery situation. You’ll
have a lot less traetimor “grip’’ and will ne:ed to be
very careful.
a Tie a red cloth to your vehide to aleEpdi.cethat
you've bee .;topped.-by
the snow.
e Put on: extra.clothing OF' wrap a blanket arouna y(
If you have no blankets:clr extra .&thing, makebaay
insUlat.tars from newspapers, .burlap..bags.,rag$, floor
mats --:anything you. G ~ wrap
D
:amuod yoursklfor
tuck under your clothfngto keep warm..
MAX,. LOADING &-G?!WR SAME AS VEHICLE
CAPACITY WEIGHT
:XXX
-'COLD TIR e
TIRE SIZE
SPEED
PRESSURE
.RTG
pS.[&p&
FRT;
RR,.
SPA.
IF TIRES AR:E HOT, ADD. 4PSlI28KPa
$EE~0WN.ERS-MANUAL F.OR ADDITIONAL
INFOR.MATION
.
.
MFD BY GENERAL MOTORS CORP
DATE^
GVWR
GAWR- FRT
GAWR RR
THiS VEH1.CL.E CONFORMS TO ALL APPLICABLE U.S. FERERAL MOTOR VE,HlCLE
SAFETY, BUMPER, AND. THEFT PRE'VENTIO'N
STANDARDS IN EFFECT ON THE DATE OF
MANUFACTU.RE SHOWN ABOVE.
. ...
Pulling atrailer improperly candamage your
vehicle and.result:in castlyiepairs not.iovered try
your warranty, To gull :atrtaiiler correctlyi follow
:the.advice in this pa.rt,and.see your Chevmlet
dealer for important inform.ationabout towing a
trailer with^ your vehicle.
Th :Important C O ~ S I rauon,
e .to ao with.u
the weightof the trailer,
the weight of the trai1.w tongue
-andthe total we@& 03 your v.ehic1ey.stires,
-.
,
How heavy can a trailer .safely be.?
L
A
B
m
i
Y
e
6
4-34.--
i
Y
0Section 5
Problems 011the Road
Here you'll Eind what to do about some problems .that
can occur an the road.
.Hazard Warning Flashers-
Your hazard warning flashers let you warn others. They
also let p.olice know you..havea problem. Your front and
.rear turn signal lamps will.flash on and off.
Press the switch to make your front and rear turn signal
lamps flash on and off. Your hazard warning flashers
work no matter what position your key is in, and even if
the key isn't in.
.NOTICE:
Ignoringtbesesteps:could result in :costlydamage.
to your-vehiclethat woutdnst be covered by your
warranty. Tryingto .startyour chevrolet by
pushing or pulling ft won’t work, -and..itcoulid
damage y . 0 vehicle.
~
I .NOTICE:
6. Connect the red positive (+) cable to the positive (+)
t e r m i d of the vehi.de with the dead battmy; U&ea
remole .posi.tive.(.+)terminal.if the vehicle h.as one.
7. Don’t let the other end
touch metal. Connect it
to the:p.ositive(+)
terminal of the. good
battery. U.se a remote
positive (+) .terminal if
the.vehic1e has one.
8. Now .connect the black
negative (-) c-ableto
the good.battery’s
negative (-3 terminal.
Don’t let the -other-end
touch anything until
the-next.step. Theother
end of the negative
cable doesn ’Igo to
the-dead battery.
It goes .t-o.a heavy, unpainted, rne.td.part on the engine of
the v.ehicle with the dead battery.
9. -Attachthe cable at least 18 inch&.(45.crn) away
from the dead.battery, but not near engjne:pa& that
.move.-The .ele.ctrid
c.onnection i s just as good
.there, but the chanceof sparks.g-ettingback to the
battery is.much kss.
10. ‘Now start .the vehicle with,tbe good battery and-run
the engine for-awh.ile..
11. Try to start the vehicle with the dead battery.
If it won”tstart after a few .tries, it pgobably
needs scrvic.e.
_I
I
I
A. H E % .Metal
.
EnginePat
€3.Good Batt-ery
C. Dead Battery
I
These -slotsare to%egsed when loading and %%ming;to
-car carrier equipment.
.
Engine Overheating
You will find a-coolanttemperature gageand d ,yarning-onyour‘instrument-panel:See ’
light ablaut a hot engine
“Engine Coolant Temperature Gage’’and-“Engine
Coolant TemperatureWarning Light’’ in the Index. YOU
also havea.lowcoolant light on your instrument panel. ’
‘See”‘LowCoolant Light”in the Index.
If-Steam,Is Corning.From Your .Engine
Steam horn an overheated engine canburn you
badly, even if you just open the hood. Stay,away
from the engine-ifyou see or hear Steaim coming
from it. Just turn it off and get everyoneaway
from the vehicle-untilit cools-down. Waituntil
there .isno sign of steam or coolant befure.
opening.thehaoil.
Ifyon keep driving when your engine i s
overheated, the-IiquSds in itcan catch fire. You or
others could ‘bebadly burned. Stop,your.engineif
itioverheats; and get out of the vehicle.until the
engine is cool.
~,
I NOTICE:
If your engine catches 6re &cause- you keep
driving with no coolant,your vehicle can he
badly damaged.The costly repairs wuuld not b.ecovered by yaur warranty.
When you decide it's safe to lift the hood, here's what
you'll see:
3.4 L LQ 1 (Code X) Engine
I
3:.1L LS.2 (Code M) Engine
A. Coolant Recovery Tank
B. Radiator Pressure Cap
C. E1ectri.cEngine Fans
5-14
J1 AWN:
1
-t
An electric fan under thehood can start up even
when the engine is not running andcan injure
you. Keep hands, clothingand tools away from
any underhood electric fan.
I
If the molam inside-thecoolat recovei-y tank i s boiling,
don’t do anything e.1s.euntil it cools down.
Heater and-radiator hoses, and other engine
parts, can bevery hot. Don’t touch them. If yau
do, you can be burned.
.~Dm.’trun the engine if there is leak. If you ran
.the-engine, it :couIdlose all molant. That could
-cause enginelfire,and you could be burned.
Get any leak fixed before you drive the vehicle,
.
‘
a
a
n
I NOTICE:
I
Engine damage from runningyour engine
without coolant.isn’tcovered by your warranty.
If there- seems to
.be no leak, with tk-engine an, check to
see if the .electric engine fans are running. If the engine
is overheating, :bo.&fans should be.running. If they
aren’t, your vehxcEe ,needs semice.
t
You can be burnedif .youspill coolant on. hot
engine :parts.Coolant containsethylene glycol
.and it will burn if the engineparts.-are.hot
enough. Don't spill coolanton-ahot engine.
When tbe coolant in the cadant recovery tank is: at th.e
COLD mark, slart your-vehicle,.
If the overheat warning -continues, there'sone more
:thing.youcan try. You can add the pruper coolant-mix
directly to the radiam-, but be sure the cooling system i s
cool before you :do it.
NOTIClE:
2, Then keep turning
the -pressw;recap,
Yourengine has a specific radiator fil1:procedure.
Failure to 1Follo;wthis p.cmedure-.cauldcause your
.engine to overheat and be:severely damaged.
1. you~n
.
. .. . . .. . .
he
radiator press.we cap'
when the cooling
system, including the
radiator pressure.cap and
upper radiator hose, is
no 1o.ng.erhst.
. .
.~
You.can be burned if .youspill coolant on hot
:engine parts. Coolant
contains ethylene glycol
and it will burn tf the engine parts are hot
enough. Don’t spill coolant ona hot engine.
-3. After the enghe cools, open the coolant~.air
bleed valve.
I
3.lL V6 (VIN Code M): There are two. bleed valves.
One is located on the thermostat housing. The uther is
.located.onthe.thermostat bypass tube.
4.
6. Then fill the coolant recovery tank to the COLD mark.
7. Put th.e cap .backon .the coolant-recovery tank, but
leave the radiator Dressnrecap.off.
8. Start the engine and let it run mtil you can feel the
.upper radiator hose getting hot. Watch uut for the
engine fans.
9. By this time the coolant level inside the radiator
filker neck rnay.be.lower. If the level is lawer, add'
more of the praper mix through the filler neck until
the level reaches the base of the filler neck.
5-22
10. Then r e p k e the
pre-s-sure..cap.At.my
time during this
procedure if coolant
begins’to flow$ut of the
fiiier neck, reiris.tal1 th-e
p~esssur.e-~cap
,Be sur.e
the amoiws 0.n the
pressure cap l i ~up
e
like this.
Ir’nusual for;a tire to ““blow0u.t” while you’re driving;
espxially if you maintain youf tires properly. IT tik goes
out of tt tire, it’s .much more likeLy to leik out slswly.
But-if you should ever have7-a“blowo,uf,” here.
me-afew
tips :abaut what to expect and what to do:
If a tire .go.eS flat, the-nextpart -showshow to use-your
jacking equipment to ch-arrgg.a flat tire safely.
Changing a Flat Tire.
E a tir~egoes flat, maid :further tire and.wheel -darnage
by driving slqwly to a level place. Turn on your haz.ud.
wa&g--flashers.
Changing a tire .can cause injury.
'an The vehicle
can slip aff the jackand roll overyou or other
people. You and they could be badly injured.
Find a.leve1 place.
to change.your tire. To help
. prevent the vehicle
from moving:
1..Set the parking brake @rmly. .
2. put the shift. 1ever.in
.PARK(PI.
3. Turn off the engine.
To be ;evenmore certainthe vehicle won'tmove;
you :canput blocks atthe' brit and rear of the
tire farthestaway from the m e being changed.
That would be thetire on the otherside of the
vehicle, at the'opposite end.
The-following .stepswill tell you.haw to uselhe jack .and.
change a tire.
.Removing. the Spare Tire and Tools
The equipmentyou’ll need
is in the tfunk. Pull the
.carpetingfrom-the floor of
the txunk. Turn the.center
nut on tlle cirnpct spare
cover counterclockwiseto
rem.me it. Then liftand
remove the cover.
1 .Turnthe wingnut
~
~
counterclockwise and
remove it. Then lift OBthe
spacer and Irernwe the spare
tire. See “Compact SpareTire” later in this section for
more infomation about the
compgct spare.
; .
:
’
Turn the hutholding the j;ar;;k.andwrench
counterclockwise apd remove it. Then remove thejack
and wrench.
__
The tools you'll be using include thejack (A),
socket (I31 and wheel wrench( C ) .
-
.Ethere is-a wheel covet; loosen the.nut caps witb ,the
wheel wrench. They won'tcome ~ f fThen,
.
using .theBat
-endof .thewheel wrench, pry dong the edgeof 'the wheel
cover until it comes-off. Be careful; the edge my.be
.sharp. Don'ttry to remove the cover with your'bare hands.
If y-ouvehicle has wheel
nut caps,, remove them
using the wheel wrench.
1. Using the wheel wren.ch, loosen all the-wheel nuts;
D.0n’t remove them yet,
2. Turn the jack handle. clocE 1s-eto raise the jack lifthead a few inches..
NOTICE:
6. Remove-anyrust or dirt
from.the wheel bolts,
mounting.surfaces and
spare wheel.
4. Raise the vehicle by turning the jac.k handle
clockwise. Raise the vehicle far enough .off the
ground for the spare tifi to fit unda the vehicle.
5. Remove all wheeljuts and take off the flat tire.
Rust or dirton the wheel, or on the pans to
which it i.sfastened, can make the wheel nuts
bec-ome loose :after a time. The wheel.couXd come
off and cause an accident. .When,you change a
wheel, remave any rust.or dirtfrom the.places
where the'wheel attaches: to the vehicle. In an
emergem& you can use a cloth or a paper towel
to do this; but be sure touse a scraper or wire^
brush later,.if you weed to, to get all the rust-or
dirt off.
I A CAUTION:
7. Replace the wheel. nuts
wi.th the rounded end of
the- nuts toward the
wheel. Tighten each nut
by hand until the wheel
is held against the hub.
8. Lower the vehick by turning the jack h-andie
countercl.ockwi$e, Lower-th ck ccmpletely,
NOTICE;
Improperly tightened wheel fiats.can lead ‘to
brake pulsation.and ro;tor damage, To avoid
expensive brake repairs, evenly $&@ten
the wheel
..
nuts .in-the prapier sequenceand to.the.piroper
torque.specUieation.
.
Put the bolt through .one of the wheel nut holes, instali
the rerainer over the.-bo-lt, theninstall the- wing-nuv. Put
the spacer and nut.next.to the tire in the.well. Storeithe
cover as far torward. as possible-.
The compact spare is for temporary use only, Replaw
the compact spare tire with a.fdl-&e tife as soon -asy o u
c m , See
~ ‘‘Compact:Sp.su-e”in the-Index. See the sJorxge
instructions label .to replace your compact spare into
your trunk properly.
When you install the whed cover on the.full-Sizetire,
tighten thenut caps to 5 lb-ft (7 N-m).
I
NOTICE:
‘When the G O I I I ~ Cspare
~
is installed, dan’ttake
your vehicle thromgh an automatic car wash
with
guide-rails. The compact sparecan get caughi
the rails. That:candamage $he tire and wheel,
and maybe other p-artiaf ybur veude.
-
,
m
a
Don’t use you ompact spare on other vehicles.
And don’t . m i : our compact sp&.tixe oi wheel with
other wheelsor tires. They w.on’t fit. Keep you;Spare
tire a ~ itsd wheel together.
I
1
Tire chains won’tfit .yg.urcompact spare, Using
damage.
them can damage-your vehic1e:and can
the chainstoo. DonY use tire. chains myour
compact spare.
~
spinning your wheels can destroy parts of your
v&icle,as.well as..the-tires. If you spin the-wheels,
too fa& wkii1e:Shifting your tmnsaxle back.-and.
fol‘th, you .&andestroy your transaxle.
.
.
=
Tuu can be injuredand yaur vehicle could be
damaged.$you try ,todo sertiee-work ana
vehicle withotxt knowingenough about i!.
Be sure you have suffident knowledge,
exp,erience,mid.theprdper replacement
parts and tools-before .youattempt any
vehicle maintenance$ask.
0 .Be%ure.
to use. the.
proper nuts, bolts and
other fasteners. “English” and ‘‘metric’’
fasteners can be easily codwed. If]youuse
the wrong fasteners, parts can laterbreak
or fd.l ofl. ‘Ilou could be hurt.
,
6-2
‘
'You can a1s.o write us at the follo-wingaddress for
advice. Just tell u s where you're going and:give.your
Vehicle Identification.Nuinbef (VIN).
General M.otors Overseas Distfibuti;on C:ooltporation,
North American Exp-ortSales (N.AES)
1.908Colonel S<amDrive
Oshawa, OnLario L 1H .8P7
1
When you open the hood on the 3.11, L82 (Code M) engine, you’I1 see:
A.
B.
C.
D.
Engine Coolant Reservoir
Radiator Fill Cap
Power Steering Fluid Reservoir
Engine Oil Fill Cap
E. Engine Oil Dipstick
E Autornatk Transaxle Dipstick
G. Brake.Fluid Reservoir
H. Air Filtef
I. Windshield Washer Fluid
Reservoir
J.. Battery (lacated under
Windshield Washer Fluid
Reservoir)
When you open the hood on the 3.4L LQl (Code X) engine, you’ll see:
A.
B.
C.
D.
Engine Coolant Reservoir
Radiator Fill Cap
Power Steering Fluid Reservoir.
Engine Oil Fill Cap
E. Engine Oil Dipstick
E Automatic. Transaxle Dipstick
G. Brake Fluid Reservair
H.Air Filter
1. Windshield Washer Fluid
Reservoir
J, Battery (located under
Windshield Washer Fluid
Reservoir)
B&re closing the hood,be m e -allthe filler
di5’56
properly. ,Then.justpull ‘thehood down and iclaie itf i y .
c a p s .
Engine Oil.
the LOW OIL, light on the
i.r&mment. pwe1 comeson,.it
means,you need to check
your engine oil .level
right
.away.For more infomadon,
see ~“LQw
Oil k v e i Light” in
the Index. YOUshould check
your engine ail level
regularly; this is an
added reminder.
‘
LOW
OIL
I
f
It’s a good. idea to check your engine oil .afteryuu get
fuel. ordex.t9 get an accuratemading, the oil must.be
hot and the vehicle must:be.onlevel ground..
. I n
3.1L L82 (Code M) Eggbe.
TJle engine-ad.dqstick handle-isthe yellow loop nmr
.the:front qf the engine.
Oils recommended for your vehicie can be identified ’by
looking ‘forthe “Starburst” symbol. This symbol
indicates that the oil .has.been certified b.y the .American
PeQoleum Institute (APli). Do not use-’a-nyoil which
doles r g ~ct m y this.Startwst symbol.
-3:1L L82 (CoClt=M)
Engine.
3.4L LQl (Code X)
Engine
If you change your own-oil,
be sure you.use oil that has
the Starburst symbol orrthe
front of.the oil container.
If yuu haveyour oil changed for you, be. sure.the :oilput
into your engine is Amerkan PetroleuriInstitute
certified for @soline engines.
You should ~ S C u$e.the
J
proper viscasity oil for your;
vehicle, as shown in the fol.lowing-,Chart:
fEGOMMENllEO SAE IIISCOSITY GRADE EN%INE;OILS
1
.
1
COLD.
WEATHER
DO NOT USE SAE- 20W-5U'OR ANY OTHER
GRADE OIL NOT RE@MMENDED
As.shown in the chart,if you have:the 3.4L engine.,
S.AE 1OW-30 is best far your vehiclk.However, you can
use SAE 5W-30 if $6 going to bi?colder than 60 "F
(14"G) before your next oil change. When it's very cold9
you,should use SAE SW-30. These numb.erson an oil
container show its viscosity, or thickness. Do not use
other viscosity oils, such as.SAlE20W-50.
IOMYAND eou, SL,,.IHI,SELECT WE LOWEST
E OlE FQR THE EXPECTED-TEMPERATURERANGE.
HOT
'WEATHER
I
"F
7
"C
NOTICE:
+loo: - +3n
+ 30
- 427
+,60
- tt6
+ 40
-+4
+za -
.-7
Use only engine.oil with the Ankrican Petroleum
Institute Certified For Gasoline Engines
%arburst9) symbol. Failuke to .use.&e
recommended oil canresdt in engine.damage not
covered by your warranty.
?
l
0-
.-j8
'
GM Goodwrench@oil meets allthe~requirmentsfor
your vehicle.
Engine.011 Additives
Don't add anythmg t o your oil. Your Chevrulet dealeris.
ready to advise if you thilzk something should b.e added.
1MEATWER
DO NOT USE SAE 2OW-50 OR ANY OTHER
.GRAD€ OIL NOT RIXOMMENDED
6-13,,
i
8
*
Ai.r CIea.ner
.:i,
Pull out the filter, Be sureto install the air.filter and.
install the cover tightly when you are finished.
To check.or replace the air filter, remove the four screws
.and pull .off the cover.
R.efe.r-tothe Mainten-mceSchedule t~ determine when to
replace the air filter.
See “Sched
--..
.
_,
.. .
:d Maintenance :Services” in-the Index.
NOTIC-E:
Then., without shutting .&the engine, follow these steps:
3.4L LQ1 (Code X>
Engine-
'3.lL L82 (Code M)
Engine
?,4L LQl (C0de.X)
Engine
I. Tktransaxle .fluid dipstick handle i s the. re.d loop
near .tkeb,ack of the engin.e.Pull Out the dipstick
and wipe-it with n clean rag or p-apertowel.
.2. Push. it..b x k in all the way, wait -thr-eeseconds and
then pull t
i b:ack eut again.
3. Check both Sides of the dipstick, and read the lower
level. T h e fluid level must be in the moss-hatched-xea,
-4. If the fluid level is in the accep-tablerange, pu-shthe
dipstick bac.k.in all the way.
GM Engin.e C-oolant.Supplement(sealer) (GM Part
No; 3634621) with any complkte coolarit chadge. If you
use this mixture, yaa don’t r ~ cto.add
l
nTything.eIs.e.
NOTICE:
Wh.enadding .coolantit is imporkant that.you use
DEX-CO.OL (orange-cdgred., silicate-free)
c0ulant meeting GM Specification 6277M.
If silkated coolant-is addedto the system?
premature engine, heatercore or radiator
corrosion may result. In addition, the engine
coolant will rsquire changesooner at
.3O,OOb miles (5.0 0.00-km) or 24 months
whichever occursfirst.
TM
--
Use a mixture obne-half clean wafer (preferably
distikd) and one-half DEX-COOL (oi-ange-coloxed,
: sihcate-free) antifreeze that meets GM.Specific,ation
-6277M,wkch won’t damage aluminum parts. Use
.NOTICE:
1.fyou use .animproper coolant mix, your : t ~ g i a e
could overheat and be badly damaged. The
repair c.ost.wgulifn’tbe covered by your
wawanty. .Too muchwater-in the ,mixwn .freeze
and crack the engine, radiator,. heater
core and
OtEner pax%.
I€ you have: :to add crjolaht mare than four .times a year;
h-aveyour dealer check.your cooling.system.
ITYOU use the.proper coolant, ,youdon’t have
to
add extr% inhibitors or additives whichdaim to
improve the system. These can he harmful.
-.
.. *_..
.,.
When your engine is cold, the .c.oolantlevel shouid be at
the COLD m b k or a little higher. When~yourengine is
warn, .the.levelshould be up to the. HOT mark or a.
little hi.gheu.
LOW
COOLANT
Turning the radia.torpressur;t?cap when the
engine and radiat-or-are hot can allow steam
and scalding.Ii-quidsto blow aut and burn you
badly. With the,coolant recovery tank, you wilI
almost never have to add eoolant~atthe radiatox
Never turn the radiator pressure cap- even a.
little when the engine and ra,di:atorare hot.
--
-.-
Add coolant mix at the recovery tank, but be careful not
to spill it.
YOUcan be burne-dif-; u spill a ant ’onhot
engine.p.arts. Coolant ccmtainsethylene P I ~ C O L
and it will.burn if th.eengine parts are:h,,
enough, Don’t spill coolant
on Bhof engine.
When you replace v o w
cap is recammendc
&fiatorpressure cap, a n AC@
J.1L L82 (Code M)
Engine
3.4L LQI (Code X)
Engine
When the engine
compaztrnent is.hot, the
1evelMxjuld be ‘at the.H
mark. When it’s cold, the
level should be at: the C
mark. If the. fluid is at the
ADD mark, you should
add fln.id.
K e f a to the Maintenance. Schedule to. detemine what
kiiid of fluid to use.:See “Re:commended Fluids :and.
Lubricants” in .the Index.. Always use the proper fluid.
Failure to use.the proper fluid can cause leaks and
da1nag.e hoses and seals.
-what;to Use
When you need windshield washer fluid, be sure toread
the manufacturer’s instructions befcqe use. 1%y.0.u.will :be
.operating your vehicle- in an area-where.the.temperature
m-ay fa11 below fieezihg, us:e,.a.-fl,u.id.
that has sufficient
protection against freezing.
Open the cap labeled WASHER FLUID ONLY. Add
washer .fluid until the tank is full.
'
C
.Brakes
system fixed, since a leak means that .sooner or later your
brakes won’t work well, or won’t wotk zit all.
So, it isn’t a good idea to “top off’ your brake fluid,
Adding brake fluid won’t correct a leak. If you add fluid
when your linings are worn, then-you’ll have too much
fluid when yau get new brake linings. You should add
(or remove) brake fluid, as necessary, only when work is
done .on the .brake hydraulic system.
Your brake master cyiirrder reservoir is here. It is filled
with. DOT-3 brake fluid.
Tltere are only two reasons why the brake fluid. level i n the
.reservoirmight go down. The first is that the brake fluid
-goesdown to-.n acceptable level during normal brake
.lining wear; When new linings are put in, the fluid level
goes back up. The other reason is that fluid is Ieaking out:
.of the brake system. If it is, you should have your brc&e
If you have too much brakc uid, it.cansp on
%he engine.The fluid will burn if‘th.e engineis.
hot enough.You or others could be burned,
and .yourvehicle could be damaged. Add brake
fluid only when work is .doneon the brake
hydraulic system.
When your brake flwid falls to a low level, your brake
warning light will come on, See “Brake System Warning
Light” in the .Index.
With the wrong kin.d crf.fluid,inyaar brake.
system, you-rbrakes.m.aynot:.workwell, or th.ey
may not eves work.at-ail.This could cause.a
crash. Always use the properbrake fluid.
NOTWE:
.. ..
i n this section you’ll find directions -forchang,ing.the
bulbs in.some.of the lamps on.your Chevrolet. .S:.e.e
“Replacement Bulbs” in..the.Indexto find the- type
.af:bulbyou ne.ed to use,.
1.
c
:he hoo-d.
...
a:
.
. ...
2: .Open-the:flap by 1ifting.the.snaGscrew.
6-31
3.. Position the radiator air side
Ikdfle asid'e and remove
.the two nuts (pliers-may be required).
4. Skle the'headamp assembly outboaxd and gently pull
the imide of the assembly away from the vehicle.
5. Push the tab on the bulb socket and turn it
counterclocfise. Pull the socket out,ofthe assembly.
6. Remove the bulb fmm the socketby p u k g -itout.
Do mot twistthe bulb.
.
7 . Push in the new bulb.
8. Reverse Steps 1 through 4 to replace the assembly.
.
.
Fmn.tand .RearSidemarker .Lamps
2. Pull the sidemarker lens away from thi: body.
'
3. Turn the socket counterclockwise untilit stops. Then
pull the socket and bulbfrom the assembly.
4. Pull the bulb out.of the socket. Do not twistthe bulb.
5.. Plug the new,hulb in the socket.
6. Replace the bulb and socket.
7. Replace the assembly in the vehicle, Replace the screw.
6-33
1
.3;To remove the bulb, pull it 0u.t of the .socket. D.o not
twist the-bulb.
Each new wheel should have the.same load carrying
capacity, .diameter, width, offset.and be mounted the
same way as the .oneit replaces.
In most 'gases, you w.iIl not need to h.ave your w.heels.
aligned again. However, if you .aoti.ceunusual tire we-ar
or-your-vehicle pulling csne..wayor the other, the
a l.bi ~ ~ ~ mgy
~ e . need
n t to be res.ei. If you natke your
vi=hiile vibzating-when ;driving-on~-a
smooth road,. your
wheels .mayneed to be rebdanced.
If you need to replace any of your wheels, wheel bolts.
or wheel nuts, replace them only with.new GM origiaal
equipment parts. This way, you will be Sure to .have the
ri,ght wheel, wheel bolts and wheel nuts:foi your
Chevralet model.
I
Using the wrong replacement wheels,wheel b . o h
or wheel nuts on your vehicle can lore dangerous,.
It coulda€f& the braking -and.handling of your
vehicle.,make your tires lose air -andmake you
lose control. You could havea dollision in which
you or others could be inj.ure.d.Always use.
the correct wheel, wheelbolts and wheel nuts
-forreplacement,.
6-42...
NOTICE:
The m n g wheel can also cause proMemwith
bearing life, brakecooling, speedometer/odometer
m
i , bumper height,vebicIe
calibration, headlampa
ground clearbce.arrdtire.or~
tire chain clearanceto
the body and chassis,
See “Cl.ianging.aFlat Tire’.”in the-Index for more
infurmatian.
Used Replacement.Wheels
Tire Chains
?
NOTICE:
L
Fuse
1
3
4
14
Ii
29
3.0
S'ori~ef~1s.e~
-arein the uaderhood .el.actricalcenter on the
passenger's side.of the engine compartment..
17
.Fuse
Relay
1.0
14
16
11
1-2
.13.
Vehicle Diment&ms
Wheelbase . . . . . . . . . . 10:7.5” (2730 mm)
Tread Width (Front) . . 59.1” (1913.5 .m),
. Tread Width (Rem) . . . . 59”,(1494:mm)
Length . . . . . . . . . . . . . 200.9” (5 1.04m)
. width . . . . . . . . . . . . . . . 72.5“ (1826.
Height: ............. 55..2” (14-03mm)
I
IMPORTANT-
KEEP ENGINE OIL
AT THE PROPER
LEVEL AND CHANGE AS
RECOMMENDED
.
This sec.tion covers the maintenance. required for your
Chevrolet. Your vehicle needsthese services .toretain its
safety, dependability and emission control performhnce.
Have y.ou purchased the GM Protection Plan? The Plan
supplements your new vehicle warranties. See your
Warranty and Owner Assistance liooklel, or your
‘Chevroletd e d e r for details.
Your Vehicle and the Env.ko.men%.
Proper vehicle maintenance not only helps to keep your
vehicle in good working condition, but also helps the
enviro.nment. Allrrecomended maintenance procedures
are import,ant. Improper vehicle maintenance can even
affect the quality of the air we breathe. Improper fluid
levels .or the wrong tire inflation can increase the level
of ernissi0n.s from your vehicle. To help protect our
Environment, and to keep,your vehicle in good
condition, please maintain your vehicle. properly.
L,.ng yonr..M&n@nances&gdde
..
.
..
We. at General Motors want to help you keep your vehicle
in g0o-d working conditioa.But we don’t know exactly
‘hawy ~ u ’ lclrikTe
l
it..You rnay drive very short distances
only a-few times .a week..Or you.mdy drive longdistances
all the.time in very hat, dusty weather. You rnay use yo.ur
vehiclein making deliveries. Or you may drive it to work,
to do errands or in many other ways.
Because -of all the .different ways people use their GM
vehcles, mairitenance.
vary. YOUmay even lleed
more. frequent checks abdxeplacernentsth.an you.’11 find
in the sch-edulesin this section. So-please-read this
section and notehow you drive. If you have.-any
questions on how, to keep your vehicle in good
condition, see yaw Ghevro.1e.t dealer.
This part tells you :the maintenance semices you should
have done and when you should schedule them. If you
go to your deafer for your service needs, you’ll kriow
that GM-trained.and supported service people will
perfu-rm the work wing genuine GM p.arts.
The prdper fluids and.lubricants to useme listed in
Part D, Make sure whoever servic:es.yclurvehicle us.es
thme. All paas shauld be replaced and all necessafy
repairs done.b e h e you orany.ijne else.:drives-the
vehicle.
These schedules arefor vehicles that:
4
use the recommended fuel. See “Fu-~l”
in the Index.
Every 7,506) Miles (12-500km): Engine Oil and Filter
Cllange (or e,very I2 months, wlnichever occurs first).
Chassis Lubrication (or every 12 llionths, whichever
ocrurs first).
At ’9,500 M i l e (312 500 kmt) -- Then ~EVWY
15,000 Miles (25 800 km): Tire Rotation.
Every 30,000 MiJes (50 008 km): A i r Cleaner Filter
Replacexnent. Fuel Tank, Cap and Lines Inspection.
00 Miles ($3000 km): Automatic Transaxle
S.ervice (severe conditions only).
7
DATE
ACTUAL
MILEAGE
1
I
I
I
I
DAm
ACTUAL MILEAGE
SERVICED.BY:
I
Short.Trip/Ci.ty‘MaintenanceSchedule
I
21,000 Miles (35 0010km)
0Change engine oil and filter (or every
3 mcmths-,whichever occurs first). ~n
every
3 months, whichever occurs first). Aut
Emission Control .Sewice.
Emission Control Service.
[7 Change engineoil.and filter (or
0Lubricate steering ball joints (or every
6 months;, whichever 0-ccursfirst).
El Rotate tires. See“Tire Inspection and
Rotation” in the -Index ,for proper rotation
pattern and additional information. During
tire rotation, check brake calipers
for
freedom of movement. Referto the
-appropiiate6 M service manual for proper
’
caliper s.ertriee procedures.
I
I
I
DATE
.
.ACTUALMILEAGE
1
SERVICED BY:.
DATE
ACTUAL MI[LEAGE
SERv3[CED B Y
7-9
7
. .
I
DATE
I
I
-DATE
I
7
ACTUAL'MUIEA~GE SERVICED BY:
DATE
ACTUAL MLEAGE
4&00O.Miles (70000 km)
b
U.Change engine oil and fdtm (or .every
3 months, whichever ,occurs.first). An
Emimion Control Sewice.
DATE
ACTUAL M,ILEAGE
AC.TUALMILEAGE
DATE
SERVICDZD BY:
I
L
L
.
SERVICED BY
:* :
I
I
I
I
E
I
t TriplCity MaintenanceSchedule
J
51,000.Miles (85 .O.OOkm)
I
I
I
DATE.
ACTUAL MILEAGE
SE-RVEEQ BY:
0Inspect ,fueltank, cap -sad lines for.dmage
or leaks. Inspectlfuel cap gasket for any
d;amage. Replace parts as needed..An
Em&siUn C0nt;rp.lSewice.?
I
ACTUAL MILEAGE
,Dm.
I
I
7-27'
0Change engine oil md filter (orevery
'3-months, whichever occws first). An I
I
I
I
I
Emisskm Control Sewice.
DATE
ACTUAL MILEAGE
SERV1'CED.B-Y:
DATE
ACTUAL MILEAGE
SERVIC'Ep BY:
Change engine-ail-and €ilter (or every
3 ,months,whichever occurk first). An
Emission Contml S e ~ ~ i c e .
.nLubriQatesteering ball joints (or every
. 6
months; .whichever occursfirst).
ACTUAL MILEA:GE
DATE
L
I
7-24
SERWCED BY:
Long Tripmighwa
[aintenance Schedkl1
7,500 Miles (12 500 km)
The -services.shownin this schedule up to 100,O.OOmiles.
(1%000 km) -shouldbe performed after 100,000 miles
(166 000kni) -atthe s m k intervals.
DATE
-ACTUALMILEAGE
SERVXCED BY:
7-26
-
I Long Trip/Highway Vaintenancc d k l u l e
I
DATE
I
I
ACTUAL MILEAGE. SERVICED BY:
I
:
I
-t
DATE
'
L
ACTUA.L.MILEAGE
1
SERVICED B E
r
I
DATE
-A:CTUAL.MILEAGE Q3RVJCCED.BY:
. .
.
.
DATE
ACTUAL, MILEAGE- SERVICED B Y
I
1
I
DATE
ACTUAL MILEAGE
SERVICED BY:
7-31
c
DATE
7.-3,2
:
ACTUAL MILEG'GE
SERVICED B Y
DATE
ACTUAL.MILEAGE
SERVImD BY
Inspect fuel tank, cap and lines for damage.
or leaks. .Inspect fuel cap .gasket fox .any
damage. Replac-eparts .as needed. An
Emission Control Senvice.
ACTUAL MILEAGE.
SERVICED B E
I
DATE
1
I
I
-ACTUALMILEAGE
-
SERVICED B X
.-
/!\ CAUTION:
Coolant.
Supplement
Sealer
Hydraulic i 3 rake
System
Key-Lack
Cylinders
7-41.
WSAGE
USAGE
Fuel Door Hinge
I
Maintenance Record
*
e
e
-
8-3
a
,
.
To .enhanceChevrolet’s,strong commitment to ‘customer
satisfactio.ri, Chevrdet is excited to announce the
establishment of the Chevrolet/Geo Roadside Assistance
Center. Asthe owner C T a~ 1996:ChevroleUGeo,
membership in Roadside Assistance is -free.
n
N..ewVehicle Limit.ed Warranty tw-etailpurchasers of ,
19% Chevrolet/Geo passenge? &a&. and light'duty trucks(please..seeyour selling dealer fpr details).
C.ourtesy .Transpartationincludes:
-,
0
0
0
0
0
.
Chevrolet/Geo off& Courtesy Transportation for
custcjmers needing warranty service. Gaul-tesy
Transportation wi11 be offered in conjunction withthe
coverage provided by the'BUMPER-TO-BUMPER
0
Baclc-Up'Lamp-Bulb ReplawmGnt . . . . . . . . . . . . . . . . . 6.- 5j;5
Battery .................... . . . . . . . . ............
Jlump Starting ... . . ............. . . . .............5-.2
'Replacernen't,Remote Lock Control . . . . . . . . . . . . . .Zd.6
..
Saver. .
..
. . . . . . . . . . . . . . . . . . . . . . . . . . .2.-3'5
Warni:ngb . .
. . . . . . . . . . ..<, * ............... , 5-4
....
BBIB A L L ~ L ~. .I.N
. . . . . . . . . . . . . . . . . . . . . . . . . . . . . . . . . . . 8-7
..
~
-:
:
&.-z$)
I
. ( . ? . l
.
......... . . . . . . . . .. 8.-7
.i
.
Gages
................i ..... 2-49
Fuel ......................................... 2-55
GAWR . . . . . . . . . . . . . . . . . . . . . . . . . . . . . . . . . . . . . . . . . 4-29
Gear Positians, AstomaticTraflsaxle . . . . . . . . . . . . . . . . . 2 4 4
GlUve Box ...................................
: . . . 2-36
.Gross. Axle Weight-Rating ..........................
4-29
Gross Vehicle .Weight.Rating. 1 . . . . . . . . . . . . . . . . . . . . . . 4-29
...
Guide en Franpi.s . . . . . . 1 ............................ u
I G r n .............. ............................. 4-29
.. Engine Coolant Temperature
i
.
-
HaIog&Bulbs . . . . . . . . . . . . . . . . . . . .............'6-30
Haard Warning Flashers ........... : ...............5-1
Haad Restrainti ..................... ...............1-5
Headlmps .................................
: ....... 2-32
Bulb Replzcement ............................... 6-30
HigliiLow Be& Changer ...................... 2-.27
. QnReminder . . . . . . . . . . . . . . . . . . . . . . . . . . . . . . . . .2-32
W i n g ............ i ........................... 6-53
.94
(
I
.
Weaii'ing Impaired. Cu-stomerAssistance . . . . . . . . . . . . . . 813.
heating . . . . . . . . . . . . . . . . . . . . . . . . . . . . . . . . . . . . . . . . .3-3
High-Beam .R;eadlamps . . . . . . . . . . . . . . . . . . . . . . .. . . . . 2-27
High-w?y Hypnosis ............................
. . . . 4-22
Hi1I:aridMountain Roads . . . . . . . . . . . . . . . . . . . . . . . . . 4-22
Hitches, Trailer . . . . . . . . . . . . . . . . . . . . . . . . . . . . . . . ...4-33
Hoc
Cnectllr Things Under . . . . . . . . . . . . . . . . . . . . .
6-6
WeIeasc . . . . . . . . . . . . . . . > . . . . . . . . . . . . . . . . . . . . 6-6
H ~ t t l. . . . . . . . . . . . . . . . . . . . . . . . . . . . . . . . . . . . . . . . . . 2-25
Hydmplaning . . . . . . . . . . . . . . . . . . . . . . . . . . . . . . . . . . . .4-I8
.
.I
. .
~
JJump
ack. Tire . . . . . . . . . . . . . . . . . . . . . . . . . . . . . . . . . . . . 5-25
Starting. . . . . . . . . . . . . . . . . . . . . . . . . . . . . . . . . . . . .5-. 2
..Key Lock Cyliriders Servi.ce . . . . . . . . . . . . . . . . . . . . 7-37
Key Reminder Warning . . . . . . . . . . . . . . . . . . . . . . . . . . 2-11
Keys . . . . . . . . . . . . . . . . . . . . . . . . . . . . . . . . .
. . . . 2-1
~
i
i
i
L a b e l s . . . . . . . . . . . . . . . . . . . . . . . . . . . . . . . . . . . . . . . . . .4-28
.
Certification . . . . . . . . . . . . . . . . . . . . . . . . . . . . . . . . .
4-29
-ServicePa~ts-ldentifieation. . . . . . . . . . . . . . . . . . . . . 6-54
Tire-Loading Infmrnation . . . . . . . . . . . . . . . . . . . . . . 4-28
Vehicle Identification Number . . . . . . . . . . . . . . . . . . . . 6-54
Lamps
. . . . . . . . . . . . . . . . . . . . . . . . . . . . . . . . . . . . . . . .2 - ~ 2
..
courtesy . . . . . . . . . . . . . . . . . . . . . . . . . . . . . . . . . . . .
2-33
Interior . . . . . . . . . . . . . . . . . . . . . . . . . . . . . . . . . . . . . .
2-53
On Reminder . . . . . . . . . . . . . . . . . . . . . . . . . . . . . . . . 2-32
p&k.
. . . . . . . . . . ~... . . . . .
.
1
:b
.._.
c.
A u o r n n t i c - T r ~ n s ~.............................
~~~..
2- 15
$hiiftin:g Into ................................. . . . . . . 2- 19
Shifting Bkt-.of . . . . . .
. . . . . . . . . . . . . . . . . . . . . .2--22.
. .
Vi:sgrsi SI@ .
.
...............
i
...... . .
I
.
I
1
.239