1
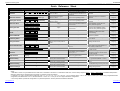
Signamax Connectivity System
_____________________________
Take the KVM Switch out of the box and begin
installation...
Signamax™ Connectivity Systems
Model:098-8280 & 098-82160
8/16-port Cascadable Rackmount KVM
Switch w/ OSD
Quick Installation Guide
Thank you for purchasing the 098-8080/098-82160 Cascadable
Rackmount KVM Switch! With our highly reliable and quality
product, user can enjoy countless benefits from using it.
Before connecting any cable to your KVM Switch, please make
sure all of your computers and their peripherals have been
powered off. Otherwise, the KVM Switch system might not be
properly set up.
Step 1. Make sure all the computers that are to be connected to
the KVM switch and their peripherals are powered off. If
not, power them off before you proceed with the
following steps.
Step 2. Connect the shared keyboard, monitor and mouse to the
console connectors on the rear of your (master) KVM
switch. Power on the KVM Switch by attaching the
power adapter cord.
Although the power of the KVM Switch is constantly fed
through the PS/2 interface, it is still necessary to have the external
power adapter cord attached in order to provide sufficient power
for both the OSD operation and the cascaded application. If the
external power is not attached, the KVM Switch can only rely on
minimal “interfaced” power supply, and the stability of the KVM
system might be compromised.
___
_____________ 098-8280/098-82160
Step 7. Power up the connected computers. After your computer is
powered up the keyboard and mouse will be recognized
and now you can begin operating the switch.
DO NOT TRY to power up the computer first before you
power up the KVM switch. Otherwise, the computer will have
difficulty recognizing your shared keyboard and mouse.
If you use only a single KVM switch in non-cascaded
application, you should ignore step 3, 4 and 5 and jump directly
from step 2 to step 6.
098-8280/098-82160
Before you install
The default setting of the 098-8080/098-82160 Rackmount KVM
Switch is appropriate for most systems. In fact, you do not have
to make any configuration before installation. It’s an out-of-the-box
installation: Just connect and set up the cable connections for the
KVM switch(es) and your computers, boot them up in correct
sequence and you can start to operate immediately!
For a quick start on installation and operation, please follow the
instructions below.
The correct boot up sequence is ……
(1) Power up your KVM switch(es) first. If you want to set
up multiple daisy-chained KVM switches, you have to power
them all up and then perform the initialization (that is,
perform a reset on the master KVM switch). Also remember
to have the shared Keyboard, monitor and mouse connected
to your master KVM switch before you power it up.
(2) After you have powered up your KVM switch (or powered up as
well as initialized your daisy-chained KVM switches), you may
then power up your connected computers …
Out-of-the-box Installation
www.signamax-us.com
If you want to daisy-chain multiple KVM Switches, go to
step 3. You can daisy-chain up to 16 levels of KVM Switches with a
maximum of 256 PCs connected.
Step 3. Use a daisy-chain cable (one that similar to the 3-in-1
combo cable) to connect the daisy-chain port of your
master KVM Switch to the console port of the second
KVM switch. Connect the power adapter cord to the
second switch to power it on.
Step 4. If you have yet another switch to be daisy-chained, just
repeat Step 3 to connect them. You can daisy-chain up
to 16 units of KVM switches.
Step 5. Initialize the daisy-chained units by performing a reset on
the master KVM switch. Press and hold down Button 1
for at least 2 seconds to reset the whole daisy-chained
switches.
DO NOT PRESS Button 1 on any slave switch since this will
initialize only the switches “downstream” from that slave switch
you perform a reset on.
You can also use the hotkey sequence: ScrLk + ScrLk + End
for daisy-chain initialization.
Step 6. (Now your KVM switch or daisy-chained KVM Switches
should have been powered-up and initialized….)
Connect each of your computers to a PC port on the rear
of the switch(es). You can use individual standard
keyboard, mouse and video cables for connection,
although the 3-in-1 combo cable is highly recommended
for your convenience.
Easy Operation
There are three methods to select a specific computer (on a
specific switch, if you have multiple daisy-chained KVM switches),
using a front-panel push button, a hotkey sequence or an OSD
Menu option.
Front-panel push buttons
The front-panel buttons let you have direct control over KVM
switch operation and channel switching. Simply press a button to
switch to its corresponding channel. See Quick Reference Sheet
Keyboard hotkeys
A keyboard hotkey sequence consists of at least three specific
keystrokes: See Quick Reference Sheet
Hotkey sequence = ScrLk + ScrLk + Command key(s)
The two consecutive ScrLk keystrokes should be pressed
within 2 seconds and the following command key(s) should also be
pressed within 2 seconds in likewise manner. Otherwise, the
hotkey sequence will not be validated.
For detailed Hotkey sequences and their corresponding
functional commands. See Quick Reference Sheet
.
OSD Menu
To activate the OSD (On Screen Display) Menu, use the hotkey
sequence:
Activate OSD = ScrLk + ScrLk + Space Bar
www.signamax-eu.com
Signamax Connectivity System
_____________________________
___
_____________ 098-8280/098-82160
Quick Reference Sheet
QUICK
Command
REFERNCE SHEET for KVM Switch Operation Commands Hotkeys/ OSD Menu / Front-Panel Buttons
Hotkeys
OSD control1
Front-panel
Description
Select PC
ScrLk + ScrLk + (a) + (b) + (y) + (z)
(ab = bank no. ; xy = channel no.)2
Cursor keys to navigate
Enter to select
Press corresponding button yz
on Switch ab for channel yz on
bank ab.
Next lower channel
ScrLk + ScrLk + ↑ (arrow up)
Cursor keys to navigate
Enter to select
Press corresponding button
Next higher channel
ScrLk + ScrLk + ↓ (arrow down)
Cursor keys to navigate
Enter to select
Press corresponding button
Next lower bank
ScrLk + ScrLk + PgUp
PgUp
Press corresponding button on
that switch
Next higher bank
ScrLk + ScrLk + PgDn
PgDn
Press corresponding button on
that switch
Autoscan Beep Sound
On/Off
ScrLk + ScrLk + B
--
--
Reflash EEPROM
ScrLk + ScrLk + R
--
--
Find PC by Name
ScrLk + ScrLk + F
--
--
--
Change PC Name
Cursor keys to navigate
Enter (Ins) to select/edit PC
name
-Button 1 (Press and hold down
for 2”)
Reset / Initialize KVM
ScrLk + ScrLk + End
--
Show OSD Menu
ScrLk + ScrLk + (Space Bar)
--
Autoscan
ScrLk + ScrLk + S
--
Last button (Press and hold
down for 2”)
Stop Autoscan
Any key
--
Press any push button
Autoscan Delay
--
OSD Remain Time
--
3
--
Password Config
Password Change
3
--
Cursor keys to navigate
Enter/Ins to select and edit
Cursor keys to navigate
Enter/Ins to select and edit
Cursor keys to navigate
Enter/Ins to select and edit
Cursor keys to navigate
Enter/Ins to select and edit
--
---
User Guide
Select the active bank (switch) and
channel
Page 21
Select the next lower connected
channel
Page 22
Select the next higher connected
channel
Select the next lower bank (switch)
when multiple switch units are
daisy-chained together
Select the next higher bank
(switch ) when multiple switch
units are daisy-chained together
Toggle on/off the beep sound for
switching confirmation while
autoscanning
Restore the EEPROM settings to
the factory default
Search the presence of a specific PC
by its name
Change the PC name
Reset the KVM Switch either for
daisy-chain setup initialization or
for switch system reboot.
Activate the OSD Menu on the
console screen
Autoscan through every connected
channel for quick screen browsing
of each channel.
Terminate Autoscan activity
Specify delay time within a range of
5 ~ 99 seconds (default = 10 sec.)
Change the OSD Menu Remain
Time
Page 22
Page 22
Page 23
Page 23
Page 23
Page 24
Page 25
Page 25
Page 25
Page 25
Page 25
Page 26
Page 26
--
Enable/disable password protection
Page 26
--
Change the password
Page 27
Notes:
1. OSD Menu control is only available when the OSD menu is activated on the screen. To activate the OSD menu, use the hotkey sequence ScrLk + ScrLk + (Space Bar). For detailed OSD operation
reference, please refer to relevant sections in Chapter 3, Operation of the User Manual.
2. Note that a, b, y and z each denotes a number key. (ab) = 01 ~ 16 ; (yz) = 01 ~ 04 or 01 ~ 08 or 01 ~ 16. For example, ScrLk + ScrLk + 03 + 09 is for bank 3 port 9. When using a single KVM Switch
configuration, the default bank no. is 01, therefore hit ScrLk + ScrLk + 01 + 12 for port 12 for a single KVM Switch configuration.
3. The factory default of password configuration is no password protection. And the password is default to 00000000.
www.signamax-us.com
www.signamax-eu.com