1
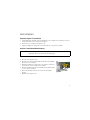
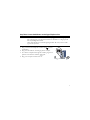
56K Pe rformance Pro Modem
Q u ic k I nst allat ion Guide
R24.0683.00
rev 1.1 7/07
Introduction
Package Contents
•
•
USRobotics 56K Performance Pro Modem
USRobotics Installation CD-ROM
•
•
Telephone cable
Quick Installation Guide
Physical Features
Item
Function
Connects the modem to your telephone.
Connects the modem to your telephone line.
System Requirements
Operating System:
•
•
Windows Vista™, Windows® XP, 2000, Me, 98, 95 OSR2, or Windows NT® 4.0
SP4
Linux® (Kernel 2.3 and higher)
Other:
•
•
CD-ROM drive
• Available PCI slot
56K Compatible analogue telephone line
1
Installation
Step One: Prepare for Installation
1. Uninstall all other modems that are installed on your computer. For instructions, refer to
the documentation for your previous modems.
2. Shut down your computer and power it off.
3. Unplug all telephone and power cords connected to your previous modems.
Step Two: Install the Modem Hardware
Warni ng : To avoid the risk of electric shock, make sure your computer and all
peripheral devices are turned off and unplugged.
1. Remove the computer’s case.
2. Remove the screw and metal filler bracket from an available
PCI slot in your computer.
3. Hold the modem by its edges. Do not touch the contacts on
the connector or the corners of the modem.
4. Rock the modem back and forth while pressing down firmly
to seat it in the connector.
5. Secure the modem with the screw from the metal filler
bracket.
6. Replace the computer case.
2
Step Three: Connect the Modem to an Analogue Telephone Line
Caution: The 56K Performance Pro Modem must be plugged in to an analogue phone
line only. Plugging your 56K Performance Pro Modem in to a digital phone
line may damage the modem.
Most office phones are wired through digital lines. Be sure you know what
type of line you have.
1. Plug one end of the telephone cord into the
jack on
the modem.
2. Plug the other end into an analogue phone wall jack.
3. To connect a telephone through the modem, plug the telephone’s cord into the modem’s
jack.
4. Plug your computer in and turn it on.
3
Step Four: Install the Modem Drivers
Windows Vista
You must be logged in as an administrator in order to properly install the new modem.
When you turn your computer on, Windows Vista automatically detects the modem and
installs a generic driver. You will need to update it with the USRobotics driver to support full V.92 features and the additional software tools for your modem.
1. Insert the USRobotics Installation CD-ROM to install the USRobotics
driver.
If the CD doesn't start automatically, click Windows Start > Computer
and double-click the CD drive.
2. If the Auto Play window appears, click Run autorun.exe. If prompted
by User Account Control, click Continue.
3. If prompted, enter the password of an administrative user and press ENTER.
4. Select your preferred language and accept the End User License Agreement.
5. Click Install Modem and follow the on-screen instructions to install the driver for the
modem.
6. If prompted by Windows Security, click Install.1
7. Click Finish to complete the installation.
Windows XP
You must be logged in as an administrator in order to properly install the new modem.
When you turn your computer on, Windows XP automatically detects the modem and
installs a generic driver. You will need to update it with the USRobotics driver to support full V.92 features and the additional software tools for your modem.
1 USRobotics has throughly tested this driver in conjunction with the supported hardware and has verified its compatibility
with Windows Vista.
4
1. Insert the USRobotics Installation CD-ROM to install the USRobotics
driver.
If the CD doesn't start automatically, click Windows Start > My Computer and double-click the CD drive.
2. Select your preferred language and accept the End User License
Agreement.
3. Click Install Modem and follow the on-screen instructions to install the driver for the
modem.
4. If a Hardware Installation warning appears, click Install this driver software anyway.2
5. Click Finish to complete the installation.
Windows 2000
You must be logged in as an administrator in order to properly install the new modem.
1. After the Found New Hardware Wizard detects the modem, insert the
USRobotics Installation CD-ROM into your CD-ROM drive.
2. Click Next.
3. Select Search for a suitable driver for my device (recommended) and
click Next.
4. Make sure that CD-ROM drives is selected and click Next.
5. Click Next. The U.S. Robotics V92 Fax PCI driver will install.
6. If a Digital Signature Not Found window appears, click Continue Anyway.3
7. Click Finish to complete the installation.
2 USRobotics has throughly tested this driver in conjunction with the supported hardware and has verified its compatibility
with Windows XP.
3 USRobotics has throughly tested this driver in conjunction with the supported hardware and has verified its compatibility
with Windows 2000.
5
Windows Me
1. After the Add New Hardware Wizard detects the modem, insert the
USRobotics Installation CD-ROM into your CD-ROM drive.
2. Select Automatic search for a better driver (Recommended) and click
Next. The U.S. Robotics V92 Fax PCI driver will install.
3. Click Finish to complete the installation.
Windows 98
1. After the Add New Hardware Wizard detects the modem, insert the
USRobotics Installation CD-ROM into your CD-ROM drive.
2. Click Next.
3. Select Search for best driver for your device (Recommended) and click
Next.
4. Make sure that CD-ROM drive is selected and click Next.
5. Click Next. The U.S. Robotics V92 Fax PCI driver will install.
6. Click Finish to complete the installation.
Windows 95
1. After the Update Device Driver Wizard or Add New Hardware Wizard
detects the modem, insert the USRobotics Installation CD-ROM into your
CD-ROM drive.
2. Click Next. The U.S. Robotics V92 Fax PCI driver will install.
3. If prompted, click Finish to complete the installation.
Windows NT
You must be logged in as an administrator in order to properly install the new modem.
1. Insert the USRobotics Installation CD-ROM into your CD-ROM drive.
2. If prompted, select your language and accept the End User License Agreement. You can close or minimize the CD-ROM window.
3. Double-click My Computer .
4. Right-click the icon for your CD-ROM drive and select Open.
5. Double-click the WinNT4 folder.
6
6. Double-click NT4Driver.
7. In the Modem Setup window, click Install.
8. Click Yes to restart your computer and complete the installation.
Linux Users
All 2.3 and higher Linux kernels contain the USRobotics Linux modem drivers. Installation of the modem under these kernels is fully automatic provided your kernel has the
Plug and Play module enabled (default).
Co ng ratul atio ns. You have successfully completed the installation procedure. Please
register your 56K Performance Pro Modem at www.usr.com/productreg/.
Additional Software Tools (optional)
For your convenience, the USRobotics Installation CD-ROM provides additional
optional software tools that complements your modem, including the following:
• Instant Update automatically notifies you of any available updates for your
modem's firmware.
• Internet Call Notification enables the V.92 feature “Modem On Hold”, which
suspends your Internet connection when the modem detects an inbound telephone
call.4 For more information on using Internet Call Notification, see the User Guide
on the USRobotics Installation CD-ROM.
• PhoneTools software lets you send and receive faxes.
To see the additional software tools for your modem, select Software on the
USRobotics Installation CD-ROM.
4 In order to use the “Modem On Hold” feature, you must subscribe to Call Waiting service with your telephone service
provider.
7
Tr o u b l e s h o o t i n g
General
This procedure addresses a number of symptoms that you might experience with
your modem:
1. Verify that the cables are connected correctly. This includes all cables connecting
the telephone line, the modem, and your computer.
2. If possible, test your modem with a different phone cord and wall jack.
3. If you still have trouble with the modem, follow these steps to determine whether it
was installed correctly:
Windows Vista
1. Click Windows Start > Control Panel.
2. Click Hardware and Sound.
3. Click Phone and Modem Options and then click the Modems tab.
You should see U.S. Robotics V92 Fax PCI and a COM port setting. If you do
not, repeat the installation procedure on page 4.
4. On the Modems tab, select the description of your new modem and click Properties.
5. Click the Diagnostics tab and then click the Query Modem button.
If you see a series of commands and responses from the modem, the installation
was successful.
If you do not see a series of commands and responses, the installation was not
successful; repeat the installation procedure on page 4.
Windows XP
1. Click Windows Start > Control Panel.
2. Click Phone and Modem Options and then click the Modems tab.
You should see U.S. Robotics V92 Fax PCI and a COM port setting. If you do
not see a description of your modem, repeat the installation procedure on
page 4.
8
3. Select the description of your new modem, and click Properties.
4. Click the Diagnostics tab and then click the Query Modem button.
If you see a series of commands and responses from the modem, the installation was
successful.
If you do not see series of commands and responses, the installation was not successful; repeat the installation procedure on page 4.
Windows 2000
1. Click Windows Start > Settings > Control Panel.
2. Double-click the Phone and Modem Options icon.
3. Click the Modems tab.
Make sure that U.S. Robotics V92 Fax PCI is selected. If you do not see a description of your modem, repeat the installation procedure on page 5.
4. Click the Properties button.
5. Click the Diagnostics tab.
6. Click the Query Modem button.
If you see a series of commands and responses from the modem, the installation was
successful.
If you do not see a series of commands and responses, the installation was not successful; repeat the installation procedure on page 5.
Windows Me, 98, and 95
1. Click Windows Start > Settings > Control Panel.
2. Double-click Modems.
In the Modems Properties tab, you should see U.S. Robotics V92 Fax PCI. If you
do not see a description of your modem, repeat the installation procedure on page 6.
3. Click the Diagnostics tab. Make sure that the correct COM port (modem) is
selected. By default, the 56K Performance Pro Modem uses COM port 5.
4. Click More Info.
If you see a series of commands and responses from the modem, the installation was
successful.
9
If you do not see a series of commands and responses, the installation was not successful; repeat the installation procedure on page 6 or page 6.
Windows NT
1. Click Windows Start > Programs > Accessories > HyperTerminal > HyperTerminal.
2. Enter a name for the connection and click OK..
3. Click File > Properties and verify that U.S. Robotics V92 Fax PCI is selected.
Click Cancel.
4. In the HyperTerminal window, type AT and press ENTER.
If AT is displayed in the HyperTerminal window as you type and OK is displayed after
you press ENTER, the installation was successful.
If AT is not displayed as you type or OK is not displayed after you press ENTER, the
installation was not successful; repeat the installation procedure page 6.
Linux
1. Reboot the computer and verify that a serial port (/dev/ttySX) is listed along with
the name U.S. Robotics V92 Fax PCI, indicating the modem is present. Write down
the serial port information for the modem (ttySX).
2. Log in to the system.
3. Check that the modem is communicating properly:
o If working in a shell environment, start a Minicom terminal session from the terminal prompt:
a) Launch a terminal (shell) session.
b) Create a symbolic link for the modem using the following commands:
cd /dev and press ENTER.
rm modem and press ENTER.
ln -s ttySX, where ttySX is the serial port for your modem, and press
ENTER.
c) Type Minicom and press ENTER.
d) If the modem initializes under Minicom, type AT and press ENTER.
10
If AT is displayed in the Minicom window as you type and OK is displayed
after you press ENTER, the installation was successful.
If AT is not displayed as you type and OK is not displayed after you press
ENTER, the installation was not successful; repeat the installation procedure.
o If using X Windows, use Minicom through a shell window or use the dial-up program (Kppp or equivalent).
a) Execute the Kppp program (or other dial-up program) from the Internet submenu.
b) Within the Kppp program, click the Setup button, then the Device tab, and
then select U.S. Robotics V92 Fax PCI from the pull-down menu.
c) Click the Modem tab, then click the Query Modem button. About 15 seconds later a window should appear with I-screen information from the
modem, indicating a successful installation.
If no information is displayed, the installation was not successful; repeat
the installation procedure.
My computer isn’t recognizing the modem.
Solution 1:
Ensure you have seated the modem completely into the PCI slot. The modem should be
perpendicular to the system board and flush against the rear of the case.
Solution 2:
1. Turn off the computer.
2. Physically remove the modem from the computer.
3. Follow "Step Two: Install the Modem Hardware" using a different PCI slot inside your
computer and repeat rest of the installation procedure.
My communications software does not recognize the modem.
Solution 1:
Your communications software may not function properly if any of the following are
true:
11
• More than one version of the software is installed on your computer.
• You are using an older version of the software.
• More than one communication software package is installed on your computer.
USRobotics highly recommends using the communications software provided with your
operating system.
Solution 2:
Make sure that your Windows Dial-Up Networking connection is using the correct
modem.
Windows Vista
1. Click Windows Start > Control Panel > Network and Internet > Network and
Sharing Center > Manage network connections.
2. Right-click the dial-up networking connection, and select Properties.
3. Make sure that your new modem is selected.
Windows XP
1. Click Windows Start > Control Panel, and double-click Network Connections.
2. Double-click the dial-up networking connection, and select Properties.
3. Make sure that your new modem is selected.
Windows 2000
1. Click Windows Start > Settings > Network and Dial-up Connections.
2. Double-click the dial-up networking connection, and select Properties.
3. Make sure that your new modem is selected.
Windows Me, 98, 95 and Windows NT
1.
2.
3.
4.
Double-click My Computer.
Double-click Dial-Up Networking.
Right-click the dial-up networking connection, and select Properties.
Make sure that your new modem is selected.
12
My modem won’t dial out or doesn’t answer incoming calls.
Solution 1:
You may have a bad phone cord connection to the modem. Try connecting your
modem to the telephone wall jack with another telephone cord.
Solution 2:
Your phone cord may be plugged in to the wrong jack. The phone cord should be
plugged into the
jack on the modem and into the telephone wall jack.
Solution 3:
You may have devices between the modem and the phone jack. There should be no line
splitters, fax machines, or other devices between the modem and the telephone wall
jack.
Solution 4:
You may have plugged the modem’s phone cord in to a digital line. Contact the department responsible for your phone system if you are unsure whether your phone line is
analogue or digital.
Solution 5:
If you phone system requires as access code to access and outside line, be sure to include
the code in the number that you are dialling.
Solution 6:
If your voice mail alters your dial tone when messages are waiting, restore the normal
dial tone by retrieving your messages before using the modem to dial out.
My modem sounds as if it is connecting to another modem, but the connection fails.
Solution:
You may have a poor connection. Try placing the call again.
13
My modem isn’t achieving a 56K Internet connection.
Solution 1:
Contact your ISP to verify that the number you are dialling supports V.90/V.92 speeds.
Solution 2:
Contact your telephone company to verify that the telephone line for your modem supports V.90/V.92 speeds.
Solution 3:
Line interference or the routing of the telephone call to your ISP may be causing a
slower connection speed. Try placing the call again.
Additional Information
For regulatory and warranty information, see the User Guide on the USRobotics
Installation CD-ROM.
For operation and configuration information, see the User Guide on the USRobotics
Installation CD-ROM. The User Guide contains detailed information on the use and
configuration of your modem.
For expanded troubleshooting and additional information:
1. See the User Guide on the USRobotics Installation CD-ROM.
2. Go to the Support section of the USRobotics Web site at www.usr.com/support/.
Many of the most common difficulties that customers experience have been addressed in
the FAQ and Troubleshooting Web pages for your modem. The support pages also contain information on the latest drivers and may contain documentation updates.
3. Submit your technical support question using an online form, or contact the USRobotics
Technical Support Department.
14
Support
You can contact the USRobotics Technical Support Department. To receive assistance, you need your serial number.
Model Number
Serial Number
5610B
www.usr.com/emailsupport
Pr in te d in Xx x x
(888) 428-9450
15