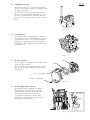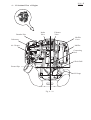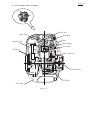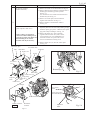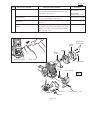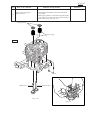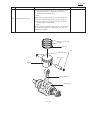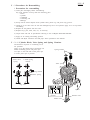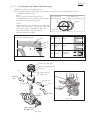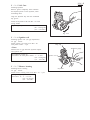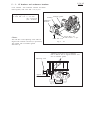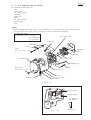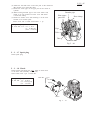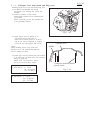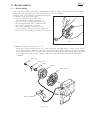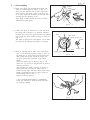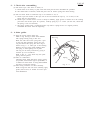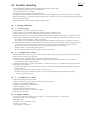
1
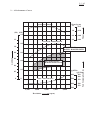
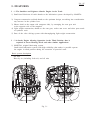
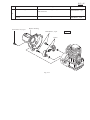
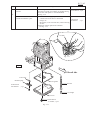
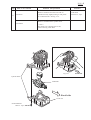
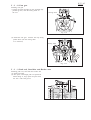
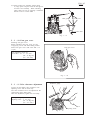
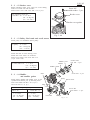
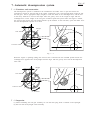
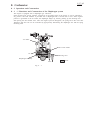
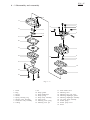
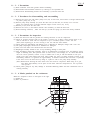
OHV Petrol Engine Service Manual
Model: EM4250, EM4251
CONTENTS - 1/2
Section
Title
1
2
2
2
2
2
-
1
2
3
4
3
3 - 1
3 - 2
4
4
4
4
4
4
-
1
2
3
4
5
4
4
4
4
4
4
4
-
6
7
8
9
10
11
12
Page
SPECIFICATIONS OF ENGINE
PERFORMANCE
Maximum Output
Continuous Rated Output
Maximum Torque and Fuel Consumption with Maximum Output
Performance Curves
FEATURES
The smallest and Lightest 4-Stroke Engine in the Trade
4-Stroke Engine allowing Operation in the Tilted Position, that is
required in Lawn Mowing Work and other similar Applications
1
2
2
2
2
3
4
4
GENERAL DESCRIPTION OF ENGINE COMPONENTS
Cylinder and Crankcase
Crankshaft and Connecting Rod
Piston
Piston Rings
Cam Gear
7
7
7
7
8
8
4
Cooling System
Lubrication System
Ignition System
Carburetor
Air Cleaner
Decompression System
Sectional View of Engine
DISASSEMBLING AND REASSEMBLING
8
8
9
9
9
9
10
12
Preparations and Suggestions
Procedures for Disassembling
Procedures for Reassembling
12
12
22
7 - 1
7 - 2
MAGNETO
Operation and Function
Basic Theory
AUTOMATIC DECOMPRESSION SYSTEM
Function and Constructions
Inspection
8 - 1
8 - 2
CARBURETOR
Operation and Construction
Disassembling and Reassembling
35
35
35
36
36
36
37
37
38
9
9
9
9
RECOIL STARTER
How to Disassemble
How to Reassemble
Check after Reassembling
Other Guides
40
40
41
42
42
5
5 - 1
5 - 2
5 - 3
6
6 - 1
6 - 2
7
8
9
-
1
1
3
3
CONTENTS - 2/2
Section
Title
10
10
10
10
10
10
10
-
1
2
3
4
5
6
11
11
11
11
-
1
2
3
4
11
TROUBLESHOOTING
Starting Difficulties
Engine Misfire
Engine Stops
Engine Overheat
Engine Knocks
Engine backfires Through Carburetor
INSTALLATION
Installing
Ventilation
Exhaust Gas Discharge
Power Transmission to Driven Machines
Page
43
43
43
44
44
44
44
44
44
45
45
45
P 1 / 45
1. SPECIFICATIONS OF ENGINE
EH025
Model No.
Air-Cooled, 4-Cycle, Single-Cylinder,
Type
Horizontal P.T.O. Shaft, OHV Gasoline Engine
Bore x Stroke
34 mm x 27 mm (1.5/16" x 1-1/16")
Piston Displacement
24.5 cm3 (1.5 cu.in.)
Compression Ratio
8.5
Continuous
0.55kW (0.75HP) / 7,000 r.p.m.
Max.
0.81kW (1.1HP) / 7,000 r.p.m.
Output
Max. Torque
Direction of Rotation
1.18N.m (0.12kgf.m) / 5,000 r.p.m.
Counterclockwise As Viewed From P.T.O. Shaft Side
Cooling System
Forced Air Cooling
Valve Arrangement
Overhead Valve
Lubrication
Splash Type
Lubricant
Capacity of Lubricant
Automobile Oil SAE #20, #30 or 10W-30 ; Class SF or higher
0.08 liters (0.02 US.gal.)
Carburetor
Fuel
Fuel Consumption Ratio
Diaphragm Type
Automobile Unleaded Gasoline
408g/kW.h (300g/HP.h) At Continuous rated output
Fuel Feed System
Fuel Tank Capacity
Gravity Type
0.5 liters (0.13 US.gal.)
Ignition System
Flywheel magneto (Solid State)
CMR6A
Spark Plug
Starting System
Recoil Starter
Air Cleaner
Semi-Wet Type
Dry Weight
2.8 kg (1.27 lbs.)
Dimensions (L x W x H)
165mm x 213mm x 225mm (6-1/2 " x 8-3/8" x 8-7/8")
Specifications are subject to change without notice.
P 2 / 45
2. PERFORMANCE
2 - 1 Maximum Output
The maximum output is the output of an engine with its throttle valve fully opened
under the condition that all the moving parts are properly broken in after the initial
break-in period. A new engine may not produce full maximum output while its
moving parts are still not broken-in.
2 - 2 Continuous Rated Output
The continuous rated output is the output of an engine at optimum controlled speed
which is most favorable from the view point of engine's life and fuel consumption.
The concept of the engine is that it can be operated also with the smaller output than
the continuous rated output, when the engine is installed on a certain equipment.
2 - 3 Maximum Torque and Fuel Consumption with Maximum Output
The maximum torque, which does not have the proportional relation with the maximum
output, is the output produced at the shaft, The fuel consumption rate is the amount
of fuel in grams consumed per horsepower-hour when the engine is working with
continuous rated output.
P 3 / 45
2 - 4 Performance Curves
(PS) (kW)
1.0
1.2
1.0
0.10
0.8
0.08
0.6
0.06
Torque
(N.m) (kg-m)
1.2
0.12
MAXIMUM TORQUE
MAXIMUM HORSEPOWER
0.8
1.0
0.6
0.6
0.4
RECOMMENDABLE
HORSEPOWER RANGE
0.4
0.2
(g/kWh)
(g/PSh)
600
450
400
500
350
0.2
0
0
FUEL CONSUMPTION
400
300
250
300
4,000
5,000
Revolution
6,000
Fuel Consumption Rate
OUTPUT
0.8
CONTINUOUS
RATED HORSEPOWER
7,000
(r.p.m.)
8,000
P 4 / 45
3. FEATURES
3 - 1 The Smallest and Lightest 4-Stroke Engine in the Trade
1) Small-sized lubricant oil tank. thanks to the lubrication system developed by MAKITA.
2) Compact construction realized thanks to the optimum design, not taking into consideration
any increase in the cylinder bore.
3) Shorter shaft at the output side (magneto side), by arranging the cam gear unit
at the opposite side of the magneto.
4) Light weight construction, thanks to the cam gear, rocker arm cover and other parts made
of synthetic resin.
5) Parts of the valve driving system with thoroughgoing light weight construction.
3 - 2 4-Stroke Engine allowing Operation in the Tilted Position, that is
required in Lawn Mowing Work and other similar Applications
1) MAKITA's original lubricating system
Small-sized lubrication system with high reliability, that makes it possible operate
the engine in tilted position during the execution of practical work.
Basic system description
Oil flow
Blow-by air (including fresh air) and oil mist
Fig 3-1
P 5 / 45
(a) Since the lubricating system operates by making use of the pressure fluctuations in the crankcase,
a lead valve is arranged at the lower part of the crankcase. Using the negative pressure that occurs
during the piston ring stroke, lubricant oil is supplied by the oil tube (located inside the oil tank, that is
arranged separated from the crankcase) to the crankshaft located in the crankcase, with the lubricant oil
passing via rotary valve that opens and shuts with an appropriate timing.
(b) At the same time, fresh air and blow-by air containing oil mist coming from the rocker arm compartment
are sucked through the two assist holes that open at the vicinity of the upper dead center of the piston.
(c) The supplied oil is diffused by the crank arm and other parts of the engine, thereby transforming in mist.
That diffused oil mist is compressed during the piston lowering stroke, and an appropriate quantity of that
compressed oil mist is pumped via interconnecting path by the lead valve, located at the lower part of
the crankcase, to the cam gear compartment and to the rocker arm compartment. Thus, it lubricates the
various parts of the engine. The remaining portion of the oil mist in excess returns to the oil tank via
bypass hole.
(d) The oil tank is provided with two pressure relief holes that are located at its left and right sides and are
interconnected with the assist holes of the cylinder unit. These pressure relief holes have the function of
keeping the inner pressure of the oil tank at an approximately constant value.
(e) Oil located inside the rocker arm compartment is sucked back to the crankcase by the strong negative
pressure that occurs inside the crankcase, passing through the two return paths that are located at the left
and right sides.
(f) The mixture consisting of the blow-by gas and a small amount of oil mist goes from the rocker arm
compartment to the oil separator located inside the air cleaner, passing through the breather pipe.
At the oil separator they are separated into blow-by gas and oil mist.
(g) The separated oil mist is recovered into the crankcase, passing through the assist hole of the cylinder unit.
Engine operation in tilted position
(a) When the engine tilts with the carburetor down
inside the rocker arm compartment, the return
path located at the carburetor side gets at the
lower position in this case. Thus, the stagnant
oil is sucked back to the crankcase
and recovered therein. At this time, the check
valve of the pressure relief hole operates and
prevents oil from lowing back, because under
such conditions the carburetor side pressure
relief hole, that is located inside the oil tank,
is beneath the oil surface.
P 6 / 45
(b) When the engine is tilted with the muffler down
In the same way as in the case in which the
engine tilts with the carburetor down, that was
described above, the return paths of the rocker
arm compartment and the pressure relief holes,
that are arranged at the left and right sides of
the output shaft, operate and return the stagnant
oil into the crankcase.
(c) Engine tilted back and forth
The breather hole located inside the rocker arm
compartment is arranged approximately at the center
of the rocker arm compartment, so as to prevent as
much as possible stagnant lubricant oil from being
gushed out at either back or forth tilting position.
As long as the volume of stagnant oil is increasing,
it passes through the return path and is recovered
in the crankcase.
Fig. 3-2
(d) Upside down tilting position
Basically, it is presumed that the engine is
not used (is not required to operate)
continuously in the upside down position,
and only the practical tilting positions
are taken into consideration as priorities.
Measures are adopted, however, so as to make
it possible to cope with sporadic upside down
positions of the engine during the work and / or
during idling.
The oil return passage tube of the muffler side is
extended up to the rocker arm compartment ceiling
side, so as to recover into the crankcase the
lubricant oil that gets stagnant while the engine
is in the upside down position.
At that time, the pressure relief hole that is
located inside the oil tank is shut by the check
ball, so as to prevent oil from back flowing from
the tank.
Fig. 3-3
As can be seen from the explanation given above, lubrication inside the cylinder is carried out with
a sufficient volume of oil, irrespective of the position of the engine. Such being the case, there is no risk
of engine seizure, wearing and other similar problems caused by improper lubrication. The volume of
oil present in the cam gear compartment and in the rocker arm compartment is limited to an appropriate
amount. Thanks to these measures, a lubrication system with small consumption of lubricant oil is attained
in this engine.
P 7 / 45
4. GENERAL DESCRIPTION OF ENGINE COMPONENTS
4 - 1 Cylinder and Crankcase
The cylinder and crankcase are aluminum
die castings split in upper and lower parts.
The cylinder block and the cylinder head
are a single piece. The valve seats are therein
and the valve guides (intake valves and exhaust
valves) as well as the valve stem seals (intake
side only) are pressure-fit. Moreover, the cylinder
bore is finished with hard chromium planting.
Fig. 4-1
4 - 2 Crankshaft and Connecting Rod
The crankshaft is made of malleable cast iron,
and the entire crank pin surface is hardened by
cementation.
The crank gear is pressure-fit at the side opposite
to the output end.
The connecting rod is a carbon steel casting, and
needle roller bearings are pressure-fit at the large
and small ends.
Connecting Rod
Crankshaft
Fig. 4-2
Piston
4 - 3 Piston
The piston is made of high silicon steel, and
measures are taken to improve its wearing
resistance.
Fig. 4-3
P 8 / 45
4 - 4 Piston Rings
The piston rings are made of special iron. The top ring is a barrel face one, the second ring is a
tapered one, and the oil rings consist of the combination of three pieces, so as the reduce the
consumption of engine oil.
(1)
(2)
(1)
Top Ring
Barrel
(2)
Second
Ring
Taper
(3)
Oil Ring
Three-Piece
Assembly
(3)
Fig. 4 - 4
4 - 5 Cam Gear
The cam gear consists of the combination
of the cam and the gear. The cam is a
sintered component, widely used in this
kind of application. The gear is made of
synthetic resin, and this material reduces
both weigh and gear noise.
Fig. 4 - 5
4 - 6 Cooling System
The engine adopts the forced air-cooled system, where cooling air is sent to the cylinder block by an
even-pitched cooling fan that works as a flywheel as well. This cooling system is provided with baffle
plates, that have the function of properly guiding the cooling air.
4 - 7 Lubrication System
The rotary parts and the sliding parts of the engine are lubricated by forcibly sending lubricant oil
to them by means of the pressure generated by the up-down movement of the piston. Moreover, an oil
compartment is provided separately with the purpose of preventing lubricant oil from flowing directly
into the cylinder. That makes it possible to operate the engine in the tilted position.
P 9 / 45
4 - 8 Ignition System
The ignition system is a TIC flywheel magneto
type one. The ignition timing is 25 degrees before
the upper dead center.
The magneto consists of the flywheel and the
ignition coil. The flywheel (that works as a fan
as well) is mounted on the crankshaft and the
ignition coil is mounted directly on the cylinder
block.
Fig 4 - 6
4 - 9 Carburetor
This engine adopts a diaphragm type carburetor.
The carburetor setting is determined by carrying
out meticulous tests, so as to obtain satisfactory
performance regarding starting and acceleration
characteristic, fuel consumption rate, output power
performance, etc.
Fig 4 - 7
Plate
4 - 10 Air Cleaner
The air cleaner of this engine uses urethane foam
(semi-wet type) element.
This air cleaner ha a compartment that separates
blow-by gas generated inside the engine from
lubricant oil.
Element
Cover, Air Cleaner
M5 Screw and Washer
Fig 4 - 8
4 - 11 Decompression System
The decompression equipment is installed
inside the gear of the cam-gear unit. The
decompression equipment opens the intake
valve before the compression top, so as
to relieve the compression pressure and to
suppress the recoiling force on the occasion
of the engine start operation.
Cam lifter
Weight
Cam
Fig 4 - 9
P 10 / 45
4 - 12 Sectional View of Engine
Breather Pipe
Intake
Valve
Exhaust
Valve
Carburetor
Muffler
Cover
Air Cleaner
Muffler
Connecting
Rod
Check Ball
Return Pipe
Oil Gauge
Fig. 4 - 10
P 11 / 45
4 - 12 Sectional View of Engine
Rocker Arm
Spark Plug
Push Rod
Piston
Ignition Coil
Piston Ring
Piston Pin
Flywheel
Cam Gear
Recoil Starter
Oil Tube
Fuel Tank
Fig. 4 - 11
P 12 / 45
5. DISASSEMBLING AND REASSEMBLING
5 - 1 Preparations and Suggestions
(1) When disassembling the engine, memorize the locations of individual parts so that they can be
reassembled correctly. If you are uncertain of identifying some parts, it is suggested that tags be
attached to them.
(2) Have boxes ready to keep disassembled parts by group.
(3) To prevent losing and misplacing, temporarily assemble each group of disassembled parts.
(4) Carefully handle disassembled parts, and clean them with washing oil if necessary.
(5) Use the correct tools in the correct way.
5 - 2 Procedures for Disassembling
Step
Parts to be removed
Engine oil drain
1
Remarks and procedures
See Fig. 5-3.
Remove oil gauge.
Fasteners
See Fig. 5-2.
Plug cover, Plug cap, Stop switch
(1) Remove plug cover from
cylinder cover. See Fig. 5-5.
(2) Remove plug cap.
(3) Disconnect lead wire of stop switch
from ignition coil. See Fig. 5-5.
* Hold lead wire with pliers and pull
it out straight. See Fig. 5-4.
Cylinder cover
Remove cylinder cover from housing
blower and recoil. See Fig. 5-5.
Plug Cover
M5x12mm : 2 pcs.
M4x16mm : 2 pcs.
(with recoil up)
Stop switch
Step 1
Oil gauge
Fig. 5-2
M5 Screw and
Washer : 2 pcs.
M4 Screw and
Washer : 2 pcs.
Fig. 5-3
Lead wire
Fig. 5-4
Fig. 5-5
P 13 / 45
Step
Parts to be removed
Remarks and procedures
Air Cleaner, Insulator,
Insulator carburetor,
Fasteners
1) Remove air cleaner cover and element. See Fig.5-6.
2) Remove fuel tube from carburetor. And then remove
breather pipe and return pipe from cylinder.
See Fig. 5-7.
It is convenient to use a small-sized screwdriver to
facilitate the job. See Fig. 5-7.
3) Remove air cleaner plate, which is fastened
together with carburetor. See Fig. 5-6.
2
4) Remove insulator and carburetor insulator.
See Fig. 5-6.
1) Remove separator plate. See Fig. 5-6.
Separator plate has to be removed by holding its edge,
instead of square pipe portion. Otherwise, the square
pipe portion may be damaged. See Fig. 5-8.
* Breather unit of the air cleaner
(plate separator, check valve)
* Under ordinary circumstances,
refrain from disassembling the air
of cleaner breather unit. Make sure
disassembling the air cleaner
breather unit only if necessary.
2) Remove the check valve plate (fastened
together with the check valve) with a smallsized screwdriver. It is recommended to pry
the hook of check valve plate with a screwdriver to facilitate the removing work.
3) Remove check valve (A) from air cleaner plate.
See Fig. 5-6.
M5 Screw: 2pcs.
Air Cleaner Plate
Plate Choke Plate
Carburetor
Choke Lever
O Ring
Element
Air Cleaner
Cover
Spacer
Breather Pipe
Return Pipe
Fig. 5-7
Return Pipe
Check Valve (A)
O Ring
Separator
Check Valve
Plate
Plate
Check Valve
Insulator
Element
Air Cleaner
Plate
Square pipe portion
Don't hold this portion.
Gasket Insulator
Gasket Carburetor
Step 2
Carburetor
Insulator
Fig. 5-6
Separator
Plate
Fig. 5-8
P 14 / 45
Step
Parts to be removed
Muffler and Muffler Cover
3
Remarks and procedures
Fasteners
Remove muffler cover from muffler by unscrewing
2 pcs. of socket head bolts M5x40 and 1 pc. of
screw M5x5. See Fig. 5-9.
Screw M5x5 ; 1 pc.
Socket head
bolts M5x40 ; 2 pcs.
Remove recoil starter from crankcase by unscrewing
Screw M14x16 ; 2 pcs.
2 pcs. of screws M4x16. See Fig. 5-9.
Remove fuel tank from housing blower.
See Fig. 5-9.
Recoil Starter
Fuel Tank
Turn the pulley clockwise by slightly hitting
the metallic rod applied to the pulley's hole, with
hammer. So, pulley can be removed from crank
shaft. See Fig. 5-10.
Pulley
Muffler
Cover
Socket head
bolts M5x40
Muffler
Muffler
Gasket
Holes of Pulley
Fig. 5-10
Screw M5x5
Pulley
Recoil Starter
Step 3
Fuel Tank
Damper
Fig. 5-9
Screw M14x16 ; 2 pcs.
P 15 / 45
Step
Parts to be removed
Remarks and procedures
Blower housing
Remove blower housing from cylinder
and crank case.
Clutch
Remove clutch from flywheel.
Fasteners
Screw M5x16; 3 pcs.
4
Screw M5 x 16; 3 pcs.
Bolt M6x23 ; 2 pcs.
Blower housing
Bolt M6x23 ; 2 pcs.
Clutch
Fig. 5-11
Step 4
P 16 / 45
Step
Parts to be removed
Remarks and procedures
Fasteners
Remove flywheel from crankshaft.
Bolt M6 w/ washer
* After taking off bolt M4 and washer,
; 1 pc.
set "Flywheel Puller" No.209-95004-07
on the threaded hole of crankshaft as illustrated
in Fig. 5-13.
And turn the handle of flywheel puller clockwise.
Flywheel
5
Ignition coil
Screw M14x20 ; 2 pcs.
Remove ignition coil from cylinder block.
Remove spark plug from cylinder block.
Spark plug
Spark Plug
Step 5
Ignition Coil
Flywheel
Puller
No.209-95004-07
Screw M14x20 ; 2 pcs.
Flywheel
Washer
Bolt M6 : 1 pc.
Fig. 5-13
Fig. 5-12
P 17 / 45
Step
Parts to be removed
Oil case
6
Oil tube and Retainer plate
Remarks and procedures
Fasteners
After taking off screws M5x18, remove oil case
from the recoil side of crankcase by slightly hitting
the oil case with plastic or wooden hammer.
See Fig. 5-14.
Screw M5x18 ; 4 pcs.
1) Pull out oil tube by prying off it with
a small-sized screwdriver as illustrated
Socket head
in Fig.5-15.
bolt M4x10
Be careful, not to lose lead valve, when removing
oil tube.
2) Remove retainer plate from crankcase.
See Fig. 5-14.
Oil tube
Fig. 5-15
Step 6
Recoil side
Lead valve
Retainer plate
Socket head
bolt M4x10
Case gasket
Oil tube
; 1 pc.
Oil weight
Oil case
Screw M5x18
w/ washer ; 4 pcs.
Fig. 5-14
; 1 pc.
P 18 / 45
Step
Parts to be removed
Remarks and procedures
Screw M5x16
Remove rocker cover from cylinder block.
w/ Washer ; 3 pcs.
see Fig. 5-16.
Screw M5x14
Remove cam gear cover from cylinder block.
w/ Washer ; 3 pcs.
see Fig. 5-16.
1) Positioning cam gear in such a way that its peak
portion points down, remove cam lifter shaft, and
then remove cam lifter. See Fig. 5-16.
2) After taking off cam gear shaft, remove cam gear.
See Fig. 5-16.
3) Remove push rod. See Fig. 5-16.
Rocker cover
Cam gear cover
7
Fasteners
Cam lifter, Cam gear and
Push rod
Take off rocker arm shaft holding it with pincers
between the intake and exhaust locker arms.
See Fig. 5-17.
And then, remove rocker arm.
Rocker arm
Rocker arm
Screw M5x16
w/ Washer ; 3 pcs.
Adjusting screw
Rocker cover
Push rod
Rocker cover gasket
Cam gear cover
gasket
Step 7
Cam gear cover
Rocker arm shaft
Screw M5x14
w/ Washer ; 3 pcs.
Cam lifter
shaft
Cam gear
Cam gear shaft
Fig. 5-16
Fig. 5-17
Cam lifter
P 19 / 45
Step
8
Parts to be removed
Crankcase
Remarks and procedures
Fasteners
Remove crankcase from the recoil side of
cylinder block by slightly hitting it with plastic
or wooden hammer. See Fig. 5-19.
Socket head
bolt M5x14 ; 8 pcs.
Remove crankshaft from cylinder block.
Crankshaft
< Note >
Be careful, not to damage the oil seal,
when removing crank shaft.
Fig.5-19
Cylinder block
Crankshaft
Recoil side
Crank case
Socket head bolt
M5x14 : 8 pcs.
Recoil side
P 20 / 45
Step
9
Parts to be removed
Remarks and procedures
Valve, Valve spring and
Spring retainer
Fasteners
Hold intake and exhaust valves from the inside
of cylinder.
Slide spring retainers out with pressing them with
your fingers. So spring retainers can be separated
from valve spring. See Fig. 5-21.
Spring retainer
Valve spring
Step 9
Spacer
Intake valve
Exhaust valve
Fig. 5-20
Fig. 5-21
P 21 / 45
Step
10
Parts to be removed
Piston and Piston ring
Remarks and procedures
Fasteners
1) Take off clips from piston pin. So, piston pin can be
removed from piston. And then, piston can be
separated from connecting rod.
< Note >
When removing piston, take care to prevent dust from
getting the needle bearing portion of connecting rod.
2) Remove 2 piston rings and an oil ring from piston
by opening their cut portions.
< Note >
When removing the above rings, take care not to widen
too much their cut portions. Otherwise, they may be
deformed, or broken.
Piston ring
Oil ring
Clip
Piston pin
Piston
Connecting rod
Crank shaft
Fig 5-22
P 22 / 45
5 - 3 Procedures for Reassembling
* Precautions for reassembling
1) Clean parts thoroughly before reassembling.
Pay most attention to keep clean the following parts.
- Piston
- Cylinder
- Crankshaft
- Connecting rod
- Bearings
2) Scrape off all carbon deposits from cylinder head, piston top, and piston ring grooves.
3) Check lip of oil seals. The oil seal with damaged lip has to be replaced. Apply oil to its lip before
assembling.
4) Replace all the gaskets with new ones.
5) Replace keys, pins, bolts, nuts, etc,. if necessary.
6) Torque bolts and nuts to specification referring to the "TORQUE SPECIFICATIONS".
7) Apply oil to rotating and sliding portions.
8) Check and adjust clearances and end plays where specified in this manual.
5 - 3 - 1 Cylinder Block, Valve Spring and Spring Retainer
The direction of piston on connecting rod is
not specified.
Apply oil to the small end of connecting rod
before assembling piston and piston pin.
Use clips on the both side of the piston pin
to secure piston pin in position.
1. Insert valve
spring.
Spring retainer
2. Slide spring
retainer.
Valve spring
Spring retainer
Valve spring.
Fig. 5-23
Spacer
Spacer mounting
position
Intake valve
Exhaust valve
P 23 / 45
5 - 3 - 2 Connecting rod, Piston and Piston ring
Installing the piston on the connecting rod
(1) After installing piston rings, apply 4-cycle engine oil on the ring portion and wait for the oil
to infiltrate around the ring.
Note 1
Cut portions of
The top ring and second ring have to be
Cut portions of
piston ring (Second ring)
so installed that their cut portions position against piston ring (Top ring)
each other as illustrated in Fig. 5-SP.
Piston
180°
Note 2
When installing a new second ring, the white mark
near the cut portion has to come on the right side
(recoil starter side) as illustrated in Fig. 5-26.
And when installing used one, install it
with the working face down.
Assemble the rings to piston
as per the illustration below.
Piston
Fig. 5-SP
(1)
Top ring
Barrel
(2)
Second
ring
Taper
(3)
Oil ring
(1)
(2)
(3)
Three-Piece
assembly
Fig. 5-25
Piston ring (Top ring)
Piston ring (Second ring)
Oil ring
Clip
The white mark on
the second ring
Flywheel
side
Piston pin
Piston
Clip
Crank
shaft
Recoil starter
side
Fig. 5-27
Apply grease on
the inner face.
Fig. 5-26
P 24 / 45
5 - 3 - 3 Cylinder block and Crankcase
Installing cylinder block and crankcase
Make sure that the liquid packing (Three Bond 1216)
is evenly applied on the crankcase's marked portion
in Fig. 5-30, before installing cylinder block.
Tightening torque of hexagonal socket head bolts
(8 pcs.) for fastening crankcase
Tightening torque :5 - 6.5 N.m
(50 - 65 kg.cm)
(3.6 - 4.7 ft.lb)
Cylinder block
Apply here three
bond 1216 evenly,
but take care, not
to apply in excess.
Fasten the bolts diagonally.
2
4
8
6
Hexagonal socket
head bolt M5 : 8 pcs.
Fig. 5-30
1
3
5
7
Fig. 5-29
P 25 / 45
5 - 3 - 4 Oil Case
Installing oil case
Tightening torque
Hexagonal socket head
Screw M5
bolt M4 x 10
3 - 4 N.m
4 - 5.5 N.m
(30 - 40 Kg.cm)
(40 - 55 Kg.cm)
(2.2 - 2.9 ft.lb.)
(2.9 - 4.0 ft.lb.)
Install the lead valve with the cutout facing
the oil pouring port.
Fasten retainer plate with hexagonal socket head
bolt M4 x 10 (1 pc.).
Fasten oil case with screws M5 with washer (4 pcs.).
Screw M5
Oil case
Oil weight
Hexagonal socket head
bolt M4 x 10 : 1 pc.
Oil tube
Retainer plate
Case gasket
Lead valve
Cutout
Crankcase
lower part
Fig. 5-31
* Assemble separately.
(Prepare a sponge for
applying oil.)
P 26 / 45
5 - 3 - 5 Oil Case
Installing flywheel
Remove grease completely from crankcase
and tapered portion of the flywheel, when
assembling them.
Align the flywheel key with the crankshaft
key groove.
Fasten the flywheel with bolt M6 x 16 with
spring washer.
Tightening torque bolt M6 x 16 ; 9 - 12 N.m
(90 - 120 kg.cm)
(6.5 - 8.8 ft.lbs.)
Fig. 5-32
5 - 3 - 6 Ignition coil
Installing ignition coil (Air gap adjustment)
Air gap : 0.3mm
Fasten ignition coil with screw M4 x 20
with plane washer : 2 pcs.
Plug cap
<Note>
Thickness gauge
Measure the air gap between flywheel magnet
and ignition coil.
The tightening torque for
screw M4 x 20 with plane washer : 2 - 4 N.m
(40 - 40 Kg.cm)
(1.4 - 2.9 ft.lb.)
Ignition coil
5 - 3 - 7 Blower housing
Installing blower housing
Air gap : 0.3mm
Fasten blower housing with screw M5 x 16 : 3 pcs.
The tightening torque for
screw M6 x 16 : 4 - 5.5 N.m
(40 - 55 Kg.cm)
(2.9 - 4.0 ft.lb.)
Flywheel
P 27 / 45
5 - 3 - 8 Cam gear
Installing cam gear
(1 )Align the mark punched on the flywheel (key
position groove) with the timing mark of
the coil.
Timing mark
Fig. 5-34
(2) Install the cam gear with the cam top facing
plumb down (use the timing mark
as a reference).
Timing mark
Fig. 5-35
5 - 3 - 9 Push rod, Cam lifter and Rocker arm
Installing push rod, cam lifter and rocker arm
(1) Install cam lifter
(2) Pass push rod through push rod path hole.
When doing so, align push rod point with
the cam lifter ball groove.
Make sure that the sufficient amount of oil.
P28 / 45
(3) Install rocker arm assembly. When doing
so, align push rod point with the ball groove
of rocker arm assembly. When installing
rocker shaft, be sure of applying a sufficient
amount of oil in rocker shaft.
Adjusting screw
Ball groove
Push rod
Cam lifter
Fig. 5 - 37
5 - 3 - 10 Cam gear cover
Installing cam gear cover
Before installing cam gear cover, be sure
of applying oil on cam lifter-sliding surface.
Fasten cam gear cover with screw M5 x 14
(3 pcs.)
Cam gear cover
The tightening torque for
screw M5 x 14 : 4 - 5.5 N.m
(40 - 55 Kg.cm)
(2.9 - 4.0 ft.lb.)
Fig. 5 - 38
5 - 3 - 11 Valve clearance adjustment
Thickness gauge
Loosen nut and adjust valve clearance with
adjusting screw with an Allen key.
The valve clearance has to be adjusted at the
compression upper dead center.
After the adjustment, tighten the nut firmly.
The tightening torque for
adjusting screw : 5 -6.5 N.m
(50 - 65 Kg.cm)
(3.6 - 4.7 ft.lb.)
Adjusting screw
Fig. 5 - 39
P 29 / 45
5 - 3 - 12 Rocker cover
Before installing rocker cover, apply oil on the sliding
surface of rocker arm and the like.
Fasten rocker cover with screw M5 x 16 (3 pcs.).
Screw M5
with washer : 3 pcs.
The tightening torque for
screw M5 x 16 : 4 -5.5 N.m
(40 - 55 Kg.cm)
(2.9 - 4.0 ft.lb.)
Rocker cover
Rocker cover gasket
Fig. 5 - 40
5 - 3 - 13 Pulley, Fuel tank and recoil starter
Install pulley on crankshaft. Fasten pulley.
The tightening torque
for pulley : 4 - 7 N.m
(40 - 70 Kg.cm)
(2.9 - 5.1 ft.lb.)
Install fuel tank on main bearing cover.
Install fuel recoil starter on crankcase.
Fasten recoil starter with screw M4 x 16
(2 pcs. lower side).
Muffler cover
The tightening torque
for screw M4 x 16 : 1 - 2 N.m
(10 - 20 Kg.cm)
(0.7 - 1.4 ft.lb.)
5 - 3 - 14 Muffler
and muffler gasket
Muffler
Muffler gasket
Screw M5 : 2 pcs.
Plate
Pulley Recoil starter
Install gasket, muffler and muffler cover on the
cylinder head exhaust port by fastening them
with socket head bolt M5 x 40 (2 pcs.)
and screw M5 x 5 (1 pc.).
Plate
The tightening torque
Socket head bolt
Screw M5 x 5
M5 x 40
7 - 8.5 N.m
(70 - 85 Kg.cm)
(5.1 - 6.1 ft.lb.)
3 - 5 N.m
(30 - 50 Kg.cm)
(2.2 - 3.6 ft.lb.)
Socket head
bolt M5 : 2 pcs.
Screw M4
with washer : 2 pcs.
Fuel tank
Damper
Fig. 5 - 41
P 30 / 45
5 - 3 - 15 Insulator and carburetor insulator
Cover insulator with carburetor insulator and fasten
them together, with screw M5 x 18 (2 pcs.).
The tightening torque
for screw M5 x 18 : 4 - 5.5 N.m
(40 - 55 Kg.cm)
(2.9 - 4.0 ft.lb.)
Insulator gasket
Insulator
Carburetor
insulator
<Note>
The end face of the adjusting screw shall be
aligned with insulator end face (no protrusion).
The angular side of insulator gasket
shall face up.
Screw M5 x 10
Screw M5 x 18
with washer : 2 pcs.
Fig. 5 - 42
Adjusting screw has to be so adjusted
that its bottom face is aligned with the end
face of insulator gasket.
Adjusting screw
Approx. 2mm
Fig. 5 - 43
P 31 / 45
5 - 3 - 16 Carburetor and air cleaner
(1) Assemble the following parts.
Plate,
Choke plate
Air cleaner element
Carburetor
Gasket cap
Spacer
Air cleaner gasket
Breather pipe
Pipe
<Note>
(a) When installing choke plate, be sure to keep choke lever at the fully closed position (lever touching
the upper lever stop.) Apply grease or silicone on choke coil plate after installing it.
The tightening torque
for screw M5 x 68 : 2 - 4 N.m
(20 - 40 Kg.cm)
(1.4 - 2.9 ft.lb.)
Air cleaner plate
Choke lever
Choke plate
Plate
Screw
M5 x 68 : 2 pcs.
Carburetor
gasket
Carburetor
Spacer
Air cleaner cover
O ring
Breather pipe
Pipe
Screw M5
with washer : 2 pcs.
Separator plate
Check valve (1)
O ring
Check valve plate
Check valve
Fig. 5 - 44
Stopper (Upper)
Stopper (Lower)
30 degrees to
40 degrees
VIEW "Z"
Fig. 5 - 45
P 32 / 45
(b) Install the fuel tank tube on the fuel joint of the carburetor.
(Be careful, not to bend the tube.)
(c) Install the return pipe on the pipe joint at the center of
cylinder.
(d) While turning breather pipe to the recoil starter side,
install it on pipe located on rocker cover and fasten
it with hose clamp.
(e) Install air cleaner cover after hooking it on the claw
located on air cleaner plate.
Breather pipe
Plate upper
part claw
Hose clamp
Fasten screw M5 x 14mm with washer : 1 pc.
The tightening torque
for screw M5 x 14 : 0.5 - 1 N.m
(5 - 10 Kg.cm)
(0.04 - 0.7 ft.lb.)
Pipe
Tube
Tube
Fig. 5 - 46
5 - 3 - 17 Spark plug
Install spark plug.
5 - 3 - 18 Clutch
Install clutch with facing the " " mark of clutch shoe
to the front side (assembly worker side).
fasten clutch with 2 pcs. of bolts M6.
Bolt M6 : 2 pcs.
The tightening torque
for bolt M6 : 7.5 - 10 N.m
(75 - 100 Kg.cm)
(5.4 - 7.2 ft.lb.)
Spring
Clutch
Fig. 5 - 47
P 33 / 45
5 - 3 - 19 Engine cover, Stop switch and Plug cover
Installing engine cover, stop switch and plug cover.
(1) In advance sub-assemble stop switch
and engine cover. Connect stop switch side
terminal.
(2) Fasten 2 terminals of stop switch.
Either fasten terminal can be connected with
coil terminal.
Fasten 2 terminals of coil. The cylinder side
is the grounding terminal.
Fig. 5 - 48
(3) Install engine cover by placing it on
engine from above, and screw its
front side on housing blower at 2 places
and its rear side on crankcase at 2 places
(screw the rear side together with recoil.)
(Note)
When installing engine cover, make sure
that there is no coil terminal disconnected
and no voltage cord bent.
(4) Install plug cover by hooking the claw located
at its lower part on engine cover first and then
fitting its upper part.
Fasten 2 pcs. of screw M5 x 12mm
and 2 pcs. of screw M6 x 16mm.
The tightening torque
for screw M5-12 : 2 - 4 N.m
(20 - 40 Kg.cm)
(1.4 - 2.9 ft.lb.)
The tightening torque
for bolt M4-16 : 1 - 2 N.m
(10 - 20 Kg.cm)
(0.7 - 1.4 ft.lb.)
Cylinder cover
Muffler
Carburetor insulator shall be
placed inside.
Fig. 5 - 49
P 34 / 45
5 - 3 - 20 Engine oil, Oil gauge
(1) Place the engine horizontally and charge oil
from oil charging port up to the threaded mouth.
The oil capacity is approximately 0.08 liter.
Use Robin genuine oil or engine oil SF or
higher.
(2) After charging oil, tighten oil gauge.
(3) Test run.
An engine that has been completely overhauled
should be thoroughly RUN-IN for good bearing
surfaces and running clearances between the parts
before being put back into service.
The RUN-IN should be done with special care,
particularly when cylinder, piston rings, valves,
etc., have been changed with new ones.
Oil gauge
Fig. 5 - 50
Upper limit
(Mouth of the oil
charging port)
- End of the reassembly -
Oil level
Fig. 5 - 51
P 35 / 45
6. MAGNETO
6 - 1 Flywheel magneto
The engine system of the EH025 is a contactless magnet T.I.C. Ignition system.
6 - 2 Ignition of magneto
When the engine does not start, has difficulty in starting or does not operate correctly, carry out the following
tests for magneto failure.
(1) Check carefully the high voltage wiring for damage and short-circuit.
(2) Check the spark.
1) Remove spark plug from cylinder and connect spark plug with plug cap and around it to cylinder
and other parts of engine. (The electrode gap of spark plug should be 0.7 to 0.8mm.)
2) Rotate flywheel by pulling recoil starter and check plug for spark and examine the
intensive of the spark.
3) If the ;lug does not spark, remove spark plug and plug cap, place the high voltage wire end a few
millimeters away from cylinder or other parts of the engine, pull recoil starter and check whether the
high voltage wire and sparks.
P 36 / 45
7. Automatic decompression system
7 - 1 Functions and construction
The decompression system is installed on the camshaft for the intake valve to open and relieve the
compression pressure at the first half of the engine compression cycle. The flyweight body located in side
the cam gear has an appropriate shape (weight) to catch the effect of the centrifugal force, and the end
of the rotary shaft has a crescent cam shape. Since the gravity force on the weight is larger than the
centrifugal force on the weight at the cam gear revolution speeds that prevail when the engine is started,
the crescent cam projects the cam profile and lifts up the follower of the cam lifter, opens the intake valve
and the decompression operates as a result.
Weight
Cam lifter
Crescent cam
Crescent cam
Rotation
Fig. 7 - 1
When the engine is operating (idling) the crescent cam is retracted into the camshaft profile because the
centrifugal force applied onto the flyweight becomes larger than the gravity force and the decompression
turns OFF.
Weight
Cam lifter
Crescent cam
Rotation
7 - 2 Inspection
(1) When assembling the cam gear assembly, be sure that the spring hook is hooked on the flyweight.
(2) Be sure that the flyweight works smoothly.
P 37 / 45
8. Carburetor
8 - 1 Operation and Construction
8 - 1 - 1 Functions and Construction of the Diaphragm system
This engine is equipped with a diaphragm type carburetor.
Since the fuel level is kept constant, irrespective of the tilting angel of the engine, it can be operated at
any position. The float chamber is provided with a diaphragm and is covered with a cover. when negative
pressure is generated in the air intake, the diaphragm bulges up, thereby pushing up the metering lever
and opening the inlet needle valve. when the negative pressure disappears, the spring forces the valve shut.
Therefore, fuel flow rate can be controlled by appropriately determining the diaphragm area and the spring
mounting load.
Air intake
Valve inlet needle
Jet
Metering lever
Diaphragm assembly
Fuel
Fuel
Fig. 8 - 1
P 38 / 45
8 - 2 Disassembly and reassembly
14
13
3
2
15
17
4
5
1
6
18
16
19
20
21
22
7
8
12
9
23
10
24
11
25
Fig. 8 - 2
1.
2.
3.
4.
5.
6.
7.
8.
Screw
Plug
Swivel
Washer
Spring retaining ring
Throttle valve assembly
Carburetor body assembly
O-Ring
9. Jet
10. Pump gasket
11. Pump diaphragm
12. Pump spring
13. Pump body assembly
14. Inlet screen
15. Metering level spring
16. Metering lever pin
17.
18.
19.
20.
21.
22.
23.
24.
25.
Inlet needle valve
Metering lever
Metering lever pin screw
Metering diaphragm gasket
Metering diaphragm assembly
Air purge body assembly
Primer pump
Primer pump cover
Screw
P 39 / 45
8 - 2 - 1 Precautions
(1) Wash carburetor with clean gasoline before assembling.
(2) Disassemble and reassemble carburetor by referring to the exploded view.
(3) Refrain from disassembling throttle valve assembly. (6) and the main unit.
8 - 2 - 2 Procedures for disassembling and reassembling
(1) Remove the screw (25) and primer pump cover (24). At that time, remove dust or foreign material stuck
on primer pump (23), if any.
(2) Remove pump body assembly (13) from the main unit (at that time, be careful, not to lose the
spring (15). Remove dust or foreign materials caught in inlet screen (14), if any.
(3) Remove jet (19) from the main unit.
(4) Remove the screw (1) and remove throttle valve assembly (6) from the main unit.
(5) When installing carburetor, , make sure that jet (9) and the spring (12) have been firmly installed.
8 - 2 - 3 Precautions for inspection
(1) Wash the main unit with the gasoline for cleaning and blow it with air compressor.
(2) Check jet for dust particles stuck on the surface, corrosion, etc. If there is dust particle stuck on jet,
wash it and blow it clean with air compressor. It jet is corroded, replace it with a new one.
(Note) when replacing jet, be sure of using a new one with the same number.
(3) Check gasket for deformation and damage. If it is deformed or damaged, change with a new one.
(4) The pump (diaphragm) should not be hardened nor damaged.
(5) Inlet valve and outlet valve should be flat and not bent.
(6) Diaphragm assembly should be free of any hardening, damage or bent plate.
(7) After assembling pump body assembly, check it for deformation of metering lever and metering spring,
height of metering lever, dust particles stuck on inlet screen, valve leakage, etc. To check main check
valve for correct operation, connect a vinyl or rubber hose to the jet side and breathe it with your
mouth. If jet stops when blown and closes when sucked, the valve is working normally. If there is any
abnormality, immerse it in gasoline for approximately 10 minutes and then blow and suck it repeatedly.
It the valve can not be fixed even by doing so, replace it with a new pump body assembly.
(Note) Refrain from blowing the main check valve unit with air compressor. When using an ir gun,
keep them approximately 30 cm apart of each other when the compressed air has a pressure
of 6 kg/cm2.
(8) Check primer pump for any hole, damage or abnormal hardening. Make sure that combination valve is
working normally.
8 - 2 - 4 Marks punched on the carburetor
Marks are stamped as shown in the figure at the right.
(1) Model No.
(2) Date of production
1
2
Fig. 8 - 3
P 40 / 45
9. Recoil starter
9 - 1 Disassembling
The recoil starter presents practically no failure under normal use. When it fails, however, or when refueling,
disassemble and reassemble it according to the following steps of procedure.
Repairing tools to be employed : Screwdrivers and pliers
(1) Remove recoil starter from engine.
(2) Pull out starter knob, hold rotary reel
with your thumb as shown in Figure 9 - 1,
when reel notch gets aligned with starter rope
out let and pull starter rope to inside of recoil
starter with a screwdriver or the like.
Next, while controlling the rotation of reel
with your thumb, wind it back to the direction of
arrow until it stops rotating, by making use of notch.
Fig. 9 - 1
(3) Remove the parts as shown in Fig. 9 - 2.
When reel is removed without proper care, spiral spring may get caught and as a result it may spring
out at once and that is dangerous. Thus, take out spiral spring by gently rotating it alternately clockwise
and counterclockwise so as to prevent spiral; spring from coming off. (If spiral; spring springs off, tighten
it according to the steps of Fig. 6.) Finally, untie starter rope tied to reel side, and the disassembly
is finished.
Set screw
Swing arm
Collar
Reel
Spiral spring
Starter knob
Fig. 9 - 2
p 41 / 45
9 - 2 Reassembling
x.
Appro
10mm
x.
pro
Ap mm
10
(1) First, pass starter rope through starter knob and
make an overhead knob as shown in Fig. 9 - 3.
Next, pass the opposite side of starter rope from
starter case to reel, make a knot in the same way
as in starter knob side and then, put the rope end
securely into rope housing in reel.
Then, apply a small amount of grease on starter
shaft and on spiral spring.
Fig. 9 - 3
(2) Check that spring is securely set in reel and form
the spring end to measure 1 to 2mm for clearance
between inner end of the spring and the reel bushing
edge so that the hook catches securely as shown in
Fig. 9 - 4.
The shape of spring inner end (approx.. 10 cm from
the end) may be adjusted with pliers, if necessary.
(3) Prior to inserting reel in starter case, wind starter
rope in the direction of arrow of Fig. 5, take out
the third turn of starter rope from reel notch and
then, install reel securely inside the starter case
for spiral spring inner end hook to get firmly
caught.
Next, hold starter rope as shown in Fig. 5 and
rotate reel 4 to 5 turns in the direction of arrow by
utilizing reel notch.
After winding reel, hold it securely to prevent it
from reverse turn and pull out starter knob to
stretch the rope tight and then, release knob slowly.
Finally, reassemble the parts in reverse order of
disassembling shown in Fig. 9 - 3.
Tighten set screw securely.
Spiral spring end
Reel
Apply grease
Reel bush
Spiral spring end
Hook
1 to 2mm
Reel
Fig. 9 - 4
* This concludes disassembling / reassembling.
Check the following to make sure that the parts
are securely installed.
Fig. 9 - 5
Starter shaft
P 42 / 45
9 - 3 Check after reassembling
(1) Pull starter rope a few times to check, if:
A. Starter knob is too heavy to pull, check that each part has been assembled as specified.
B. The ratchet fails to function, check that parts such as friction spring have been missing.
(2) Pull out starter knob to extend the rope to its extreme to see, if:
A. Starter rope still remains in the rope slot of the reel unwind the
spring may be over-stressed.
B. Starter rope is found weak to recoil or droops in halfway, apply
part and to the friction parts. If it persists, wind-up spring by 1
the spring is not over-stressed.)
C. The spring escapes with a sound and starter rope fails to spring
reassemble the starter from the beginning.
rope by 1 to 2 turns, as the
grease or mobile oil to the rotating
to 2 turns. (In this case, check that
back to its original position,
9 - 4 Other guides
(1) when the spring escapes from reel :
Make a ring having a rather small diameter
than spring housing using a thin wire.
Hook the outer end of the spring onto a part
of the ring and rewind the spring into wire
ring and rewind the spring into wire ring as
shown in Fig. 9 - 6. Then, put it into housing.
Remove the ring slowly while holding down
the spring to avoid getting out of place.
The ring can be easily removed by prying it
with the tip of a screwdriver.
Refer to Fig. 9 - 4 for which way the spiral
spring must be placed.
(2) When it is lubricated :
Lubricate starter shaft and spring with a grease
(If possible, heat-resistant type is preferable.) or
a mobile oil when starter is being disassembled
and prior to long-term storage.
(3) When swing arm does not move smoothly :
When swing arm does not move smoothly, apply
grease (Alevin No.3) or mobile oil on the part
with malfunction.
Wire ring
Spring
Fig. 9 - 6
P 43 / 45
10. Trouble shooting
The following three conditions must be fulfilled for satisfactory engine start.
1. The cylinder filled with a proper fuel- air mixture.
2. good compression in the cylinder
3. Good spark, properly timed, to ignite the mixture.
The engine can not be started unless these three conditions are fulfilled. There are also other factors which make
engine start difficult, e.g., a heavy load on the engine when it is about to start at low speed and a high back pressure
due to a long exhaust pipe.
The most common causes of engine troubles are given below. :
10 - 1 Starting difficulties
10 - 1- 1 Fuel system
(1) No gasoline in fuel tank, or the fuel cock closed.
(2) The carburetor is not choked sufficiently especially when the engine is cold.
(3) Water, dust or gum in the gasoline interfering the fuel flow to the carburetor.
(4) Inferior grade gasoline or poor quality gasoline not vaporized enough to produce the correct fuel-air mixture.
(5) The carburetor needle valve is held open by dirt or gum. This trouble can be detected as the fuel flows out of
the carburetor when the engine is idling. (Overflow)
This trouble may be remedied by lightly tapping the float chamber wit the grip of a screwdriver or the like.
(6) If the carburetor overflows, excessive fuel runs into the cylinder when starting the engine, making the fuel-air
mixture to rich to burn. If this happens, remove the spark plug, and turn the starting pulley a few turns
in order to let the rich fuel-air mixture out of the spark plug hole into the atmosphere.
Keep the choke valve open during this operation.
Dry the spark plug well, screw it into place, and try to start again.
10 - 1- 2 Compression system
If starting difficulties and loss of power are not due to the fuel system or ignition system, the followings must be
checked for possible lack of compression.
(1) Engine inside is completely dried up because of long period of storage.
(2) Loose or broken spark plug. This causes a hissing noise made by mixture gas running out of cylinder
in compression stroke during cranking.
(3) Damaged head gasket or loose cylinder head. A similar hissing noise is produced during compression stoke.
(4) Incorrect valve clearance
If the correct compression is not obtained even after removing the above, disassemble the engine and check
further as follows.:
(a) Valve stuck open due to carbon or gum on the valve stem.
(b) If the piston rings are stuck on the piston, remove the piston and connecting rod from the engine.
Clean or replacing the parts.
10 - 1- 3 Compression system
Check the followings for lack of sparks.
(1) Wire of ignition coil, spark plug or contact breaker disconnected.
(2) Ignition coil damaged and shorted.
(3) Spark plug cable wet or soaked with oil.
(4) Spark plug dirty or wet.
(5) Spark plug electrode gap incorrect.
(6) Spark plug electrodes are connected or bridged.
(7) Incorrect spark timing.
10 - 2 Engine misfires
(1)
(2)
(3)
(4)
(5)
(6)
Incorrect spark plug electrode gap. Adjust it to anywhere between 0.7 and 0.8mm.
Ignition cable worn and leaking
Sparks weak.
Ignition wire connections loose.
Water in gasoline
Insufficient compression.
P 44 / 45
10 - 3 Engine stops
(1)
(2)
(3)
(4)
(5)
(6)
Fuel tank empty. Water, dirt, gum, etc. in gasoline.
Vapor lock, i.e., gasoline evaporating in the fuel lines due to overheat around the engine.
Vapor lock in the fuel lines or carburetor due to the use of too volatile winter gas in the hot season.
Air vent hole in the fuel tank cap plugged.
Bearing parts sized due to lack of oil.
Magneto or ignition coil faulty.
10 - 4 Engine overheats
(1)
(2)
(3)
(4)
(5)
(6)
(7)
(8)
(9)
Crank case oil level low. Add oil immediately.
Spark timing incorrect.
Low grade gasoline is used, or engine is overloaded.
Cooling air circulation restricted.
Cooling air path misdirected causes loss of cooling efficiency.
Cylinder head cooling fins clogged up with dirt.
Engine operated in an enclosed space without sufficient cooling air.
Exhaust gas discharge restricted, or carbon deposits in the combustion chamber.
Engine running on low-octane gasoline detonates due to heavy load at low speed.
10 - 5 Engine knocks
(1)
(2)
(3)
(4)
(5)
(6)
(7)
Poor quality gasoline.
Engine operating under heavy loaded condition at low speed.
Carbon or lead deposits in cylinder head.
Spark timing incorrect.
Loose connecting rod bearing due to wear.
Loose piston pin due to wear.
Curses of engine overheat.
10 - 6 Engine backfires through carburetor
(1)
(2)
(3)
(4)
Water or dirt in gasoline, or low grade gasoline.
Intake valve stuck.
Valves overheated, or hot carbon particles in the combustion chamber.
Engine cold.
11. Installation
Engine life, ease of maintenance and inspection, frequency of checks and repairs, and operating cost all depend on
the way in which the engine is installed. Review the following instructions carefully for installing the engine.
11 - 1 Installing
When installing the engine, carefully examine its position, the method of connecting it to a machine, the
foundation, and the method of supporting the engine.
when determining its mounting position, in particular, make sure that gasoline and oil can be easily supplied
and checked, the spark plug can be easily checked, the air cleaner can be easily serviced, and that the oil
can be easily be discharged.
11 - 2 Ventilation
Fresh air is necessary for cooling the engine and burning the fuel.
In case that the engine is operated under a hood or in a small room, temperature rise in the engine room
can cause vapor lock, oil deterioration, increased oil consumption, loss of power, piston seizure, shorter
engine life, etc., making it impossible to operate the engine properly. It is necessary, therefore, to provide
a duct or baffle to guide cooling air to the engine to prevent recirculation of the hot air used for engine
cooling, and temperature rise of the machine. Keep the engine room temperature below 50° even in the
hottest season in the year.
P 45 / 45
11 - 3 Exhaust gas discharge
Exhaust gas is noxious. When operating the engine indoors, be sure to discharge the exhaust gage outdoor.
If a long exhaust pipe is used in such case, the internal resistance causes causing loss of engine power.
Thus, pipe inside diameter must be increased in proportion to exhaust pipe length.
Exhaust pipe : Less than 3m long, pipe inside diameter 30mm,
Less than 5m long, pipe inside diameter 33mm.
11 - 4 Power transmission to driven machines
11 - 4 - 1 Belt drive
Take the following notes into consideration.
* V- belts are preferable to flat belts.
* The driving shaft of the engine must be parallel to the driven shaft of the machine.
* The driving pulley of the engine must be in line with the driven pulley of the machine.
* Install the engine pulley as close to the engine as possible.
* If possible, span the belt horizontally.
* Disengage the load when starting the engine.
if no clutch is used, use a belt tension pulley or the like.
11 - 4 - 2 Flexible coupling
When using a flexible coupling, run out and misalignment between the drive shaft and engine shaft
must be minimized. run out and misalignment tolerance are specified by the coupling manufacturer.