1
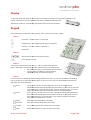
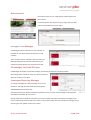
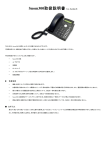
vostronpbx
user guide
SNOM300 Handsets
vostronpbx
snom300 detailed user guide
Introduction
This guide gives a brief overview of the functionality and features of your Telephone Handsets, a copy is also
available at www.vostron.com
Handset support is given on the VOSTRON support desk, please telephone 02380
111 111 and select
support from the Menu.
Table of Contents
Display ..................................................................................................................................................... 3
Keypad .................................................................................................................................................... 3
Dialling on Line 1 ..................................................................................................................................... 4
Dialling on Line 2 ..................................................................................................................................... 4
Redial ...................................................................................................................................................... 4
Directory ................................................................................................................................................. 5
Input Modes ............................................................................................................................................ 5
Terminating a call.................................................................................................................................... 6
Incoming call ........................................................................................................................................... 6
Accepting a call ....................................................................................................................................... 6
Transferring a call.................................................................................................................................... 6
Pick-Up Groups ....................................................................................................................................... 7
Voicemail................................................................................................................................................. 7
Denying/blocking a call ......................................................................................................................... 10
Adjusting the volume ............................................................................................................................ 10
Mute / Un-mute .................................................................................................................................... 10
DND Mode on/off ................................................................................................................................. 10
Handset / Handsfree / Headset ............................................................................................................ 10
Menus ................................................................................................................................................... 11
Call Forwarding ..................................................................................................................................... 11
Call Waiting ........................................................................................................................................... 12
Display Contrast .................................................................................................................................... 12
Volume Settings .................................................................................................................................... 12
Making a call from the web interface ................................................................................................... 13
© vostron limited 2007
Page 2 of 13
vostron
vostronpbx
snom300 detailed user guide
Display
In idle state,
e, the phone shows the time as well as the extension number in the top row of the display. The
second row shows the currently selected audio device. Additional information like
'Missed calls', 'DND' etc. are displayed respectively at the second row if needed.
Keypad
Under the Display, you will find an array of keys. There are four sectors to the keypad:
Sector 1
Cancel Key – Cancels actions or commands
Navigation Key – for Navigation (left, right, up and down)
Enter Key – To confirm actions, selections or
commands.
Sector 2
Volume Control (see volume control section).
Turns Speaker on or off
Sector 3
The numeric keypad with the keys 0 to 9, *, and # is used to enter digits and
letters. Depending on the operating mode, different actions can be performed:
• Entry of digits only (e.g., when dialling a phone number)
• Typing in letters and digits by pressing the keys
repeatedly (similar to a cellular phone), etc.
Sector 4
An incoming call is indicated
icated by the fast-blinking
fast
LED of the trunk line. To pick it up, press the corresponding
key. To put the call on hold, press the key again. To pick up a call on hold, as indicated by the slow-blinking
slow
LED, press the corresponding key.
Line 1
Line 2
All calls come in to Line 1 if the Telephone is not in use. Incoming calls are
indicated by the fast-blinking
fast
LED adjacent to the button. To pick a call up,
up press the
corresponding key. To put the call on hold, press the key again. To pick up a call on
hold, as indicated by the slow-blinking
slow blinking LED, press the corresponding key.
If Line 1 is busy, calls will come in to Line
L 2. A background warrning tone will beep in
the handset and the LED adjacent to the button will flash. To pick up the call press
thee corresponding key. The conversation onLine
Line 1 will be put on hold and hold
music will be played to the Line 1 caller.
Redial
Takes you to the Redial Menu (see below)
Directory
Takes you to the Directory Menu (see below)
Transfer
For Transferring Calls (see ‘Transferring a Call’ below)
Mute
Mutes the Microphone on your current conversation.
© vostron limited 2007
Page 3 of 13
vostronpbx
snom300 detailed user guide
Dialling on Line 1
There are two methods to begin a call from the idle state of the snom300. You can either dial with the handset
resting in the cradle and then pick up the handset or press speaker key to use the speakerphone or you can
pick up the handset or press speaker key and then dial the number. In the latter case, press
to indicate that
the number is complete and dialling can commence.
The snom300 shows the current communication status in the display.
Dialling on Line 2
If you have a call active on Line 1 you can establish a second call on Line 2 by pressing the L2 Key on the right
hand side on the telephone. Pressing L2 will automatically put Line1 on hold and play hold music to the caller
held on that line.
You can now dial the telephone number you wish to reach, remember to press
to complete the dial.
Redial
Press the Redial Key to redial number you have recently dialled. Use the Down-scroll key to scroll through the
numbers you have recently dialled, and then the right scroll key to select dial. When the display displays the
correct number and the word ‘Dial’, press
© vostron limited 2007
.
Page 4 of 13
vostron
vostronpbx
snom300 detailed user guide
Directory
Press the Directory Key to input your favourite numbers.
The first time you use this key, you will see <New Item> displayed
displayed on the screen, with Edit on the bottom right.
Press
to Edit (or Add) a new entry. (see Input Modes below).
After entering the name of the contact, press
, then enter the number of the contact and press
again.
The contact will be saved.
In order to
o enter subsequent contacts in directories, use the Up-Scroll
Up Scroll key to select <New Item>.
Input Modes
Depending on the context, various types of input are possible. The active input mode is indicated in the lower
right corner of the display:
NOTE: Users may accidentally change the input mode from numerical
(displaying 123) to alphanumerical (displaying abc).
abc) To rectify this, start
dialling a number and use the down key until the active input mode displays 123.
Key mapping for input:
Key
Description
Left
moves the cursor left
right
moves the cursor right
Up
backspace
Down
change edit mode
As mentioned in the table above, you may use ‘Navigation Down’ key to change the input mode. After using a
specific input mode for dialling
ing a number, the phone saves this mode as default for future use. If you discover
during dialling
ling that you want to use a different mode, press the ‘Navigation Down’ key until the right mode is
shown and continue dialling.
To Type the word ‘John’, ensuree you use the down-scroll
down scroll key to Select ‘ABC’ and press the 5 key once. Use the
Down Scroll key to select ‘abc’ and press the 6 key three times in quick succession, then the 4 key twice in
quick succession, then the 6 key twice in quick succession. If you delay the successive presses of the same key,
you can insert another character from the same numeral key. When you are happy with the word you have
typed, press
.
© vostron limited 2007
Page 5 of 13
vostron
vostronpbx
snom300 detailed user guide
Terminating a call
End calls by placing the handset on its cradle, pressing the hook switch, or pressing Cancel key. The snom300
will terminate the call and return to the idle state.
Incoming call
When your snom300 is called, it rings and displays the following screen:
Accepting a call
Picking up the handset or pressing tick key will accept the call. The snom300 is now in a call.
Key mapping:
Key
Description
L1/L2 key Hold/Resume call
Transfer
Transfer call
Speaker
Hands-free
free mode on/off
Tick
Headset mode on/off
Mute
Mute/Un-mute
mute the microphone
Volume
Change the volume
See below for further particulars.
Transferring a call
There are two ways you can transfer a call; Blind Transfer and Announced Transfer.
Blind Transfer
Blind Transfer enables you to quickly transfer a call to another handset without warning the person you are
transferring the call to.
When you wish to Blind Transfer a call to a colleague, press the Transfer Button on the Keypad and dial the
extension number of the Telephone
phone you wish to transfer the call to and press
. The call will be immediately
transferred to the extension you dialled.
dial
Announced Transfer
Announced Transfer
fer enables you to speak to person you are trying to transfer a call to before you actually
transfer the call (to establish whether they are able to accept the call).
© vostron limited 2007
Page 6 of 13
vostronpbx
snom300 detailed user guide
To make an announced transfer, pick up an available line (if Line 1 is used by the incoming call, use Line 2) by
pressing an L1 or L2 button and dial the extension number of the telephone you wish to transfer the call to
followed by
.
If the person you are trying to transfer the call to picks up the phone, you can transfer the call to them by
pressing the Transfer key followed by
. If they do not wish to accept the call, press
and then retrieve the
original caller by selecting the L1 or L2 key with a flashing amber light next to it.
Pick-Up Groups
Pick-Up groups are defined by your office administrator and enable you to pick up a call ringing on any
Telephone in your Pick-Up group.
If you hear another phone ringing and you want to collect the call on your Telephone, press
. The
call will be collected on your Telephone.
Voicemail.
To access your voicemail, dial
. You will then be presented with a series of options.
Listen to voicemail messages
Advanced options, press 1 to reply to message if left by a VOSTRON telephone in your Company.
Play previous message
Repeat current message
Delete current message
Forward message to another mailbox
Save message in a folder
Help; rewind during message playback
Exit; skip forward during message playback
Mailbox options:
Record your unavailable greeting
Record your busy greeting
Record your name (will be played to vostronpbx users when you leave them a voicemail)
You may also collect your voicemail from the VOSTRON website, your email account or by remote access (if
enabled by your system administrator).
© vostron limited 2007
Page 7 of 13
vostronpbx
snom300 detailed user guide
Web voicemail:
Go to www.vostron.com in a web browser, Select Support and
Voice control.
You will be taken to the vostronpbx log-in page, enter your web
username and password and click ‘Log In’.
Once logged in, select
Messages
The Messages section enables you to sort and listen to
messages or view faxes through the vostronpbx web
interface.
There are three options available in the initial menu, All
Messages displays both Voicemail and Faxes for your
mailbox, Voicemail displays only voicemail and Faxes.
All Messages, Voicemail OR Faxes
‘All Messages’ will display all received messages, (Voicemails and Faxes) for a desired mailbox.
By selecting either voicemail or faxes, you will be presented
with just voicemail or just faxes
Viewing and Searching Messages
To view the messages for a desired mailbox, click on your
mailbox, a new page will load, titled: Inbox messages for
123456789 (Example number only)
Select the Directory you want to view (Inbox by default, unless you have moved messages) and specify the
Start Date and End Date for your search.
Specify the Minimum / Maximum Duration if you wish to specify how long (in seconds) the messages in the
search results will be and enter either the entire or part of the number who may have left the message you are
searching for. Click update to refine your results.
© vostron limited 2007
Page 8 of 13
vostronpbx
snom300 detailed user guide
If you just want to see all results, ensure the Start Date and End Date are sufficiently far apart and leave all
other fields blank.
Playing, Viewing, Copying and Moving Messages.
Clicking on any Voicemail message will launch your computers media player and the message will play, clicking
on any Fax will launch your computers .pdf viewer and display a fax.
If you wish to move the sound file or save a copy, tick the check box of the desired message and click the
"Copy or move selected >>" button.
First select if you wish to copy or move the desired file in the first drop-down menu, then use the second dropdown to change the directory the message is in or use the third drop-down menu to move or copy the
message to another mailbox. Click the "Save" button. The message has now been copied/moved to the desired
location.
Voicemail to Email :
VOSTRON will email your email account each time you receive a voicemail, with your voicemail attached as a
.wav file. Click the voicemail to listen to it on your PC.
Voicemail – Remote Access :
If enabled by your system administrator, it is possible to dial in to your voicemail remotely. You must enter
your mailbox number and PIN number (supplied by your system administrator) to access your voicemail.
© vostron limited 2007
Page 9 of 13
vostron
vostronpbx
snom300 detailed user guide
Denying/blocking a call
When the snom300 signals an incoming call, you have the option to deny the call with
key.
Adjusting the volume
In idle state or while making a call, you can use the volume keys to increase or lower the volume of the audio
device (casing speaker, handset,
t, headset) you are currently using.
Key mapping:
Key
Description
Volume - Reduces the volume in steps.
Volume
+
Increases the volume in steps.
Tick
Sets the volume and returns to
idle state.
Cancel
Returns without setting the
volume.
Mute / Un-mute
To mute the microphone during a call, press the Mute key in Sector 4. Press Mute again to enable the
microphone again.
Do not Disturb
Accept Calls/Refuse Calls
Do Not Disturb routes calls to the ‘forward location’ for unanswered calls to
your extension. This location is defined by your system administrator and is
usually your voicemail box. If this mode is set to ‘Refuse Calls’, incoming calls
will no longer come through to your
ur telephone
tele
and you will be completely
undisturbed. If there is a mailbox set up for you, the call will be redirected to it by vostronpbx.
vostron
You can change your Do Not Disturb settings from anywhere using the vostronpbx
vostron
web interface.
Go to: vostron.com Support Actions Voice Control Login Features Telephones,
select your extension and select Accept Calls/Refuse Calls in the Do Not Disturb dropdown menu. (If you do
not know your username and password, see your system administrator).
Handset
set / Handsfree / Headset
© vostron limited 2007
Page 10 of 13
vostron
vostronpbx
snom300 detailed user guide
The snom300 supports calls made using the handset or the handsfree capability. During a call, it is possible to
switch between the two modes by pressing the Speaker key. The small speaker symbol in the right lower
display corner indicates speaker usage.
When a headset is connected and the audio output is set to headset, as
indicated by the headset symbol in the right lower
display corner, the snom300 will treat the headset as the output device for
calls. This is always over ridden by picking up the handset from the cradle.
When a connected headset is the default setting for speaking
speaking on the phone (which is normally the case in a call
centre environment),, the tick key is used to accept incoming calls.
Menus
Press the navigation
on down key in order to call up the menu. The below described menu screens are available.
Use the navigation key up/down to scroll from one menu screen to the next. Use the navigation key left/right
to display the available menu items. Confirm you selection by pressing the
key.
Key mapping:
Key
Description
Up
scrolls to the previous menu screen
Down scrolls to the next menu screen
Left
displays the previous menu item
Right
ight
displays the next menu item
Tick
Chooses the on the lower right
display corner shown menu item.
Cancel returns to the previous screen
Call Forwarding
In this menu, the options for call forwarding can be set up.
Press the Grey ‘Navigation Down’ Key once, the use the ‘Navigation Right’ key to
select ‘Off’ or ‘Always’ and press
.
Enter the number you want to forward your calls to in the ‘Always Target: 1’ window. Use the
‘Navigation Up’ key to delete incorrect entries.
ent
When you are happy with your entry, press
the Menu, press
. To exit from
.
To Turn off Call forwarding from the main menu, press the ‘Navigation Down’ key once, the Display will read
‘Call Forwarding Off’, press
© vostron limited 2007
, and call forwarding will be turned off.
Page 11 of 13
vostron
vostronpbx
snom300 detailed user guide
Call Waiting
Press the ‘Navigation Down’ key until you reach the ‘Phone Behaviour’ Menu and
use the ‘Navigation Right’ key to display ‘CWI’. Press
Right’ key to select on of off, press
. Use the ‘Navigation
to confirm your choice.
Display Contrast
Press the ‘Navigation Down’ key until you reach the ‘General Settings’ Menu and
use the ‘Navigation Right’ key to select ‘Contrast’. Press
. Use the ‘Navigation
Right’ and ‘Navigation Left’ key to increase or decrease contrast, press
to
confirm your choice.
Volume Settings
Ringer Volume: To increase/decrease the ringer volume, with handset in place, use the +/+/ volume keys to
increase orr decrease the volume in steps, press
to confirm your choice.
Handset Volume: To increase/decrease the handset volume, pick up the handset and use the +/- volume keys
to increase orr decrease the volume in steps, press
to confirm your choice.
Other Volume: Press the ‘Navigation Down’ key until you reach the ‘Volume Settings’ Menu and use the
‘Navigation Right’ key to select ‘Head’
Head’ (Headset if you have one), or ‘Speaker’. Press
to select
the audio device you wish to change the volume setting for.
A tone is played at the currently set volume. Use the +/- volume keys to increase
orr decrease the volume in steps, press
© vostron limited 2007
to confirm your choice.
Page 12 of 13
vostronpbx
snom300 detailed user guide
Making a call from the web interface
Go to www.vostron.com in a web browser, Select Support and Voice control.
You will be taken to the vostronpbx log-in page, enter your web username and password and click ‘Log In’
(refer to your administrator if you do not have your log in details).
To make a call, go to: Actions Make a call.
Select Telephone or Number from the ‘Make first call to:’ drop-down menu. Now select the Telephone you
wish to dial from OR enter the external telephone number you wish to use.
Finally, enter the telephone number you wish to call/you wish to have the call transferred to once your
handset has rung and click ‘Call’.
The telephone you specified in the ‘Telephone’ or ‘*Number’ field will ring, when the call is answered,
vostronpbx will call the number specified in the ‘*When answered, transfer to’ field. When you have finished
the call, simply hang up the phone to end the call.
© vostron limited 2007
Page 13 of 13