1
Monogram
®
Use and Care Guide
for Side-by-Side
36", 42", 48"
Built-In
Refrigerators
zwwv.gea/q)lia*_ce,_,
corn
Consumer
Information
Built
- l_ Rei7"ig_,r_tors
Your new Monogram
refiigerator
makes an ebquent
statement
of
and kitchen plamfing
flexibility. Whether
you chose it for its purity
storag_
arrangements
or assiduous
attention
to detail-or
for aH of
find that your Monogram
refiigerator's
superior
blend of form and
you for years to come.
st)qe, convenience
of design, practical
these reasons--you'H
fimcflon will delight
The Monogram
refiigerator
was designed
to provide the fiexibili V to blend in with
your kitchen cabinetry.
Decorative
door insert paneh alh)w it to match your kitchen
cabinets or blend with your kitchen decor. Custom handles are also available to fiwther
personalize
your refiigerator.
Through
a series of product
and trim kit choices, the
Monogram
refiigerator
can be beautififlly
integrated
into the kitchen.
Since this is designed
to be a buihAn product,
custom paneh
of the Monogram
refi-igerator.
Consuh your kitchen designer
customized
look.
The infi)rmation
on the fifllowing
refiigerator
properly.
If you
•
have any questions,
In Canada,
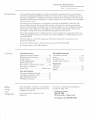
Corztents
Consumer
pages
will help you operate
call the GEAnswer
are required
on the fiont
or cabinemmker
for your
and maintain
your
Center ® 800.626.2000.
_ _
please call 1.888.880.3030.
Services
huportant
Phone Numbers
............
Model and Serial Numbers
..............
Problem SoDer , ...................
Product Registration
................
SafTety Instru( tions ...................
Warranty for (ustomers
in Canada
in the USA ...................
24
3
21-23
3, 26
4-7
......
27
Back Cover
Operating
Instructions
Automatic
Icemaker ...................
Shelves
...........................
10
15, 16
Storage Drawers
...................
Temperature
Controls ................
13, 14
8, 9
Preparation
Clearances
...........................
Lo(adon
.............................
Rollers ...............................
20
20
20
Care and Cleaning
(;leaning-Outside
and Inside ..........
Cleaning=-Conmdeusor
Fins ...........
Light Bulb Replacement
..............
Moving and Va_ adon ..................
Bo%re
using
Read this guide carefidly. It is intended
to
help you operate
and maintain
ym_r new
_O?LT
'rgfTigevatov
17
18
19
18
Keep it ban@
question s.
for answers
to your
If you don' t understand
need more help, (:all:
GE Answer Center
800.626.2000
24 hours
In Canada,
something
®
a day, 7 days a week
call 1.888.88(1.3030.
or
Consumer ][rtformatiort
B_i[t - In R(fii'ig'(+rators
Wri te
down the
model d_
sepal
YotFll
see them
fieezer
panel.
These
on a label above
compamnent
mHnbers
Product
included
behind
the
the top
are also on the Consumer
Ownership
Registration
with this gafide.
Before sending
these numbers
Model
in this card,
here:
please
write
Nmnber
Card
Serial
Nmnber
Use these mmlbers
in any (orresponden(e
or service calls concerning
your
refiigerator.
Immediately
contact the dealer (or
builder)
that sold you the refiigerator.
rSiT_erator
Before you request service, check the
Problem Solver in the back of this guide.
It lists causes of minor operating
that you can correct yourself.
To obtain sereice, see the Consmrmr
Services page in the back of this guide.
f_r customers
We're proud of our service and want you to
be pleased. If for some reason you are not
happy with the service you receive, here
are steps to follow for fmtber help.
FIRST, contact the people who serviced
your appliance.
Explain why you are not
pleased. In most cases, this will solve the
problem.
NEXT, if you are still not pleased, write
all the details-including
your phone
nlllllber_to:
Manager,
Appliance
Louisville,
Consumer
Park
KY 40225
Relations
problems
in Canada:
FIRST, contact the people who serviced
your appliance. Explain why you are not
pleased. In most cases, this will solve the
problem.
NEXT, if you are still not pleased, _lite all
th e de tail s-in c lu di n g your p h on e n u m be r
1o:
Manager,
Consumer
Camco Inc.
1 Factory
Moncton,
Relations
Lane, Suim 310
N.B. El C 9M3
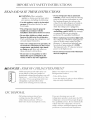
IMPORTANT
READ AND SAVE
THESE
SAFETY INSTRUCTIONS
INSTRUCTIONS
WARNING--When
using this
appliance, always exercise basic safety
precautions, including tile fl)llowing:
• Use this appliance only for its intended
purpose as described in this Use and
Care Guide.
• This refrigerator
must be properly
installed in accordance
with the
Installation
Instructions
before it is used.
Do not allow children to climb, stand or
hang on the shelves in the refrigerator.
They couM damage tile refligerator
and
seriously injure themselves.
After your refrigerator
is in operation,
do
not touch the cold surfaces
in the freezer
compartment,
particularly
when hands
are damp or wet. Sldn may adhere to
these extremely
cold surfaces.
Do not store or use gasoline or other
flammable
vapors and liquids in the
vicinity of this or any other appliance.
agDANGER
: RISK
OF CHILD
If your refrigerator
has an automatic
icemaker,
avoid contact with tim moving
parts of tim ejector meclmnism,
or with
tim beating element
that releases tim
cubes. Do not place fingers or bands on
tim automatic
icemaking
mechanism
while tim refligeramr
is plugged in.
Unplug your refrigerator
before cleaning
and making repairs. NOTE: We strongly
recommend
that any ser_qcing be
performed
by a qualified
individual.
Before replacing
a burned-out
light bulb,
tim refrigerator
should be unplugged
in
order to avoid contact with a live wire
filament.
(A burned-out
light bully may
break when being replaced.)
NOTE:
Turning
control to "0" does not remove
power to tim light circuit.
Do not refreeze
thawed
frozen
foods
which
have
completely.
ENTRAP,. NT
Child entrapment
and suffbcation
are
not problems
of the past. Junked
or
abandoned
refiigerafion
products
are still
dangerous..,
even if they will sit for "just
a few days." Ifyou are getting rid ofyour
old appliance,
please %11ow these
instructions
to help prevent act idents.
Before You Throw Away Your Old
Refligeration
Product:
. Take off the doors.
. Leave the shelves in place so that children
may not easily climb inside.
CFC DISPOSAL
Old ref_ig>ration
products
have
cooling systems that used CFCs
(chlorofiuorocarbons)°
CFCs are
believed _o harm ma_ospheric
ozone.
If you are throwing
away an old
refl-igeration
product,
make sure the CFC
refl-ig>rant
is removed
for proper disposal
by a qualified
servicer. If you
release this CFC ref_igeram
you tan be
subject to fines and imprisonment
under
provisions of environmental
legislation.
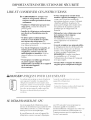
IMPORTANTES
LIRE
INSTRUCTIONS
ET CONSERVER
CES INSTRUCTIONS
_k AVERTISSEMENT
: Lorsque vous
utilisez le r6frig6rateur,
observez
toujours certaines
pr6cautions
de base,
notamment:
• N'utilisez le r6frig6rateur
que pour son
usage pr6vu, comme ddcrit dans le
prdsent guide.
• Installez le r6frig6rateur
conform6ment
aux directives
d'installation
avant de
l'utiliser.
• Ne laissez pas les enfants grimper,
s'asseoir,
se tenir debout ni se pendre
aux clayettes du r6frig6rateur.
Ils
ponrraient
endommager
le rdfiigdratenr
et se blesser gravement.
• Une fois le r6frig6rateur
en marche, ne
touchez pas les surfaces
froides du
cong61ateur,
surtout si vous avez les
mains humides ou mouill6es : la peau
risque d'adhdrer
fi ces snrf_ces tr_s
fioides.
• N'entreposez
et n'utilisez
pas d'essence
ou autres vapeurs et liquides
inflammables
fi proximit6
de cet appareil
ou de tout autre appareil
61ectrom6nager.
agDANGER!
RISQUES
• Si votre r6frig6rateur
est dot6 d'une
machine
fi glagons automatique,
dvitez le
contact avec les pi(,ces mobiles du
mdcanisme
4jecteur, ou avec l'41dment
chauflant
qui libbre les glacons. Ne
posez pas les doigts ou les mains sur le
mdcanisme
de la machine
a glacons
pendant
que le rdfiigdrateur
est
branchd.
• D6branchez
votre r6frig6rateur
avant
de le nettoyer
et de le r6parer.
REMARQUE
: Nous vous
recolnlnandons
vivelnent
de confier
toute reparation
qualifid.
fi un technicien
• Avant de remplacer
une ampoule
grill6e,
le rdfiigdrateur
doit _tie ddbranchd
afin
d'dviter tout contact avec un fil sous
tension.
(Une ampoule
grill4e pent
se briser pendant
l'opdration).
REMARQUE
: Lorsque vous placez
la colnlnande
sur .()>, (dteint),
l'alimentation
41ectrique de l'ampoule
n'est pas coup4e.
• Ne faites PAS recongeler
des aliments
surgel6s qui ont complbtement
d6gel6.
POUR LES ENFANTS
Les ent_m_s pris au pi_ge ou mor_s d'asphyxie
sore _olljoms d'acmali_d. Les appareils de
r4_igdration
abandon4s sore _o_iours aussi
dangereux, m_?me si on n
quekp_e
joms" pore s'en d4barasser. Si vous ne gardez
pas vo_re ancien appareil, veuilDz suivre les
directives d-dessous atin de pr_?venir les
accidents.
SE DEBARRASSER
DE SECURITE
Avant de vous ddbarasser
appareil
de votre vieux
de rdfiig4radon:
. l-)4mon_ez les portes.
. Laissez les daye_tes en place afin d'emp*3cher
les enfim_s de grimper fi l'in_4rieur.
D U CFC
Les vieux appareils de rdfiigdration
ont un
syst_?me de refloidissement
qui a utilis_? les (FC
(chlorofluorocarbones).
Les (FCs sontjugds
nocifs pour l'ozone stratosphdrique.
Si vous ddbarrassez de votre viel appareil de
r4tiig_?ration, assurez-vous que le tiigorig_ne
avec CFC soit enlevd correctement
par un
technicien qualifid. Si vous libdrez
intentionnellement
ce tiigog_ne avec (FC vouz
pouvez _tie SOUlnis aux contraventions
et a
l'emprisonnement
apr_?s les stipulations des
lois sur l'environment.
5
IMPORTANT
HOW
SAFETY INSTRUCTIONS
TO CONNECTEI CTRICITY
Do not, under any- circumstances,
cut or
remove the third (pound)
prong from the
power cord. For personal
safety, this
appliance
must be properly
grounded.
The power cord of this appliante is
equipped with a 3-prong (gromMing)
plug which mates with a standard B-prong
(gromMiug) wall outlet to minimize the
possibility of electric shock hazard f_om
this appliance,
Have the wall outlet
and circuit
by a qualified
eleclriciau
to make
outlet is properly
grouuded.
checked
always be ph_gged
electrical
outlet
whith has a vohage rating that matches
the rating plate. This provides the best
perh)rmance
and also prevents
overloadiug
house wiring circuits
which could cause a fire hazard flom
overheated
wires.
Never tmph_g an appliante
by pulling
on the power cord. Always grip the
plug firmly and pull straight out ftom
the outlet.
sure the
Where a standard
2-prong wall outlet
is encountered,
it is your personal
responsibility
and obligation
to have it
replaced
with a properly
grouuded
3-prong wall outlet.
DO NOT USE AN ADAPTER
PLUG TO
CONNECT
THE REFRIGERATOR
TO
A 2-PRONG
OUTLET,
DO NOT USE AN EXTENSION
WITH THIS APPLEANCE.
The appliance
should
imo its own iudividual
Repair or replace immediately
all power
cords that have become flayed or
othenvise
damaged.
Do not use a cord
that shows cracks or abrasion
damage
along its length or at either end.
When moving the applian(
uot t<)roll over or damage
e, be carefld
the power cord.
CORD
SAVE
THESE
INSTRUCTIONS
IMPORTANTES
INSTRUCTIONS
DE SECURITE
J
RA C CORDE NT
CTRIQUE
Ne coupez nl refirez en aucun cas la
troisibme
broche (mlse it la terre) de la
fiche du cordon d'allmentatlom
Pour
votre s_curlt&, cet apparell
doit &tre
correctement
mls/_ la terre.
Le cordon d'alimentation
de cet appareil
est mmfi d'uue fiche a 3 broches (raise ;_la
terre) qui se branche dans une prise
mural ordinaire 5 3 alv&_les (raise fi la
terre) pour rdduire at, minimum les
risques du (hocs _)lectriques.
Faites examiner la prise de courant et le
(ir(uit par un 41ectri(ien qualifl4 pour
vous assurer que la prise est corre(tement
raise fih _erre.
Si la prise murale est du lype standard
ii 2 aNdoles, il vous incombe
de la faire
remplacer
par une prise 2_3 alvdoles
correctelnent
raise 2_h _erre.
Cet_e prdcaution
est recommandOe
pour
garantir un rendement
optimum
et dviter
une sur( harge des circuits 41ectriques
de
la residence,
ce qui pourrait
creer m_
risque d'iucendie
pay surschauffe
des fib.
Ne dabranchezjamais
Fappareil
en
tirant le cordon d'alimentation.
Saisissez fermemeut
la fiche du cordon
et firez droit
pour
la retirer
de la prise.
Rdparez ou remplacez immddiatement
tout cordon effiloch4 ou endommag4.
N'utilisez pus un cordon fendill4 ou
prdsentant des signes d'usure.
Lorsque vous ddplacez Fappareil
du tour,
fai_es attention
de ne pas h faire rouler
sur le cordon d'alimentation
afin de ne
La machine
a ghcons
doit _oujours d'tre
branch4 duns sa propre prise de courant,
dont h tension nominale
est idenfique
ii
ceHe indiqude
sur h plaque signaldtique.
N'UTILISEZ
PAS UNE FICHE
D'ADAPTATION
POUR RACCORDER
LE REFRIGERATEUR
DANS UNE
PRISE MUP_ALE A 2 ALVEOLES,
N'UTILISEZ
PAS DE CORDONS
PROLONGATEURS
AVEC CET
APPAREIL.
CONSER
VEZ CES DIRECTIVES
Operating
Instructions
Buill
Set Tem/aeratwre
Cow,trots
-I, Rq/}'ig'erators
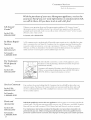
Your refiigerator has two controls that let
you reg_flate the temperature
fixthe fiesh
food and fieezer comparm-_ents.
FRESHFOOD
may vary)
FREEZER
They have settings fiom 1 through
9,
and are bcated
at the top of the fiesh
food compartment.
The fieezer
control
also has
an OFF setting°
9 is the coldest setting, 1 is the warmest.
WHEN YOU FIRST TURN" THE
REFRIGERATOR
ON, SET BOTH
CONTROLS
AT 5.
For (oMer or warmer temperatures,
adjust the desired (ompartment ( ontrol
1 number at a time.
IMPORTANT:
When first setting
conuols,
or adiusting
them, allow 24
horns for the refiigerator
to get coM.
Note: Turning
the fieezer (ontrol
to the
OFF position stops cooling in BOTH
(ompartments--fiesh
food AN[) fieezerbut does not shut off power to the
refiigerator.
How
to test
Use the milk test for the fiesh food
compartment.
Place a container
of milk
on the top sheffin the fiesh food
compartment.
Check it a day latex.
If the milk is too warm or too coM,
adjust the temperature
controls.
Use the ice cream test for the fieezer
( ompartment.
Pla(e a container
of ice
cream in the center of the fieezer
(:ompartment°
Check it after a day.
Ifit's too hard or too soft, adjust the
temperature
contro]s,
Always allow 24 hours fbr the refiigerator
to reach the temperature
you set.
Operadng
Instructions
t_Hlt
The energ T saver switch is located
temperature
control panel.
on the
To reduce the amount
ofelectricity
required
to operate
your refl-igerator,
push switch to ENERGY SAVER setting,
This turns off the heater in your
refl-igerator
that prevents
moisture
fl-om
forming on the outside of the refligerator,
With the heater turned off; there is a
chance that moisture
may form on the
outside of your reffigerau_r,
especially
when the weather is humid.
The hmrfidity
is most likely to be high in
in the early morning
hours,
and in homes which are not air
conditioned.
No d@osting
It is not necessai T to deflost the fleezer or
flesh food compartments,
Ahhough
your
refligerator
is designed
and equipped
to
deflost itself automatically,
some flost on
packages is normal.
- D_ R_'/}'igt, rt_tors
Over an extended
period of time,
moisture
that forms on the refligerator
surface may cause deterioration
of the
paint finish. It will be important
to protect
the finish by using appliance
polish wax as
described
in the Care and Cleaning
section.
Move the energ T saver switch fl-om the
ENERGY SAVER setting and electricity
flows through
the low wattage heater
which warms the outside of the
refligeratoro
Under most conditions,
this
prevents
the fi_rming of moisture
or water
droplets.
Automatic
Icemaker (on somemodels
Built - h_ R_.'[ri_'_,r<_ters
Automatic
icemaho
(0'_1, some
modeLs)
A newly-installed
refrigerator
may take 8 to
12 hours to begin making ice.
The icemaker
will produ(e
eight (ubes
per cycle-approximately
100 cubes in a
24-hour period, depending
on fieezer
compartment
temperature,
yoolA
temperature,
number
of door openings
attd other use ( onditions.
Ifyour refiigerator
is operated
tile water (onne(tion
is made
icemaker,
keep tile feeler
STOP (lip) position.
before
to tile
Tile ice maker will fill with water when
it cools to fieezing. A newb:-installed
refiigerator
may take 8 to i 2 hours to
begin making ice cubes.
Throw away tile first few batches of ice.
This flushes away impurities
in tile
water line.
lcemaking
will continue
until tile feeler
arm senses enough
ice cubes in tile
storage bin. Fox maximum
ice production,
level tile stored cubes with your band
occasionally.
Be sure nothing inmrferes
with tile swing of tile feeler arm.
Tile icemaker
eiects cubes in groups of
eight and it is normal fi)r several cubes
• home water
hours,
supply
arm to tile ST()P
is to be offfi)r
* ice storage bin is to be removed
period of time.
10
• turning tile fieezer
position.
control
to tile OFF
If ice is not used fiequently,
old ice cubes
will become cloudy attd taste stale. Empty
tile ice storage bin periodically
attd wash
it in lukewarm
water. Be sure to allow tile
storage, bin to dl), t)efi)re replacing
itotherwise
ice cubes may stick to other
parts of tile icemaker.
arm in tile
When tile refiigerator
has been connected
to tile water supply, move tile feeler arm
to tile (iN (down) position.
Move tile icemaker
feeler
(up) position when:
• going away on vacation,
at which time
you should also turn off tile valve in tile
water supply line m your refiigerator.
several
fi)r a
If this is your first icemaker,
you'll bear
o c c a sion a 1 s</u n (Is tb a t m ay t3e t1n fa m i1ia r
They are normal
icemaking
sounds attd
are not a cause fi)r concern.
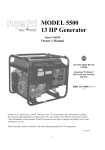
Icemaker
•_
Feeler arm in
STOP (up)
)osition
Ice
Storage
Bin
Feeler arm
Ice & Water
Dispenser
(on some models)
B_ ill - h_ R (.'/i'ig'erator.s
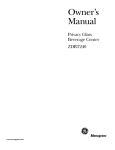
To
use
the
dispenser
Select CUBES, CRUSHED
models) or _,\_kTER,
ICE (on some
Press the rim of the glass gently
dispenser
pad.
against
the
The spill sheff is not serf draining.
To
re(hire water spotting,
the shelf and its
grille shoukt be cleaned regularly
If no water is dispensed
when the
refl-igerator
is first installed,
there may
be air in the water line system. Press the
dispenser
pad fbr at least two minutes to
remove trapped
air flom the water line
and to fill the water system. To flush out
impurities
in the water line, throw away
the first six glassfuls of water.
h:e storage
bin
Spill Shelf
To remove:
Lift tile left (:orner
to flee tile bin flom
tile shelf and pull tile bin straight out
while supporting
it at flont and rear.
To replace:
Slide tile bill back until tile tab on tile bin
locks into tile slot on tile shell If tile bin
does not go all tile way back, remove it
and rotate tile drive mechanism
1/4 turn.
Then
push tile bin back
again.
Drive
CAUTION:
Never put fingers or
any other objects into the ice crusher
discharge opening.
Mechanism
ll
Ice gc Water
Dispenser
(on some models)
Bu_tt - h_ R_.'/i'_g'er_tors
Important
./c_cts
about
your ice
d_ water
dispenser
Add ice before filling the glass with a
beverage.
This will prevent splashing,
which cotfld cause the ice selector switch
to stick or bind,
Some crashed
ice may be dispensed
even though you selected CUBES. This
happens
occasionally
when a few cubes
accidentally
g_t directed
to the crusher.
Do not add ice fkom trays or bags to
the storage bin. It may not crush or
Afier crushed ice is dispensed,
some
water may drip flom the chute.
Avoid overfilling
glass
of narrow or extra-tall
ice can jam the chute
in the chute to fkeeze
blocking
a woodei_
the chute,
with ice and use
glasses. Backed-up
or (ause the door
shut° Ifi(e is
poke it through
with
spooiL
Beverages
and fi;ods should not be
quick<hilled
in the ice storage bin.
Cans, bottles or food packages in the
storage bin may cause the icemaker
or
auger to jam.
_2
Sometimes
a motmd of snow will
form on the door in the ice chute.
This condition
is normal and usually
occurs when you have dispensed
crushed ice repeatedly.
The snow
will eventually
evaporate.
Dispensed
water is not ice cold.
For colder water, simply add crushed
ice or cubes before dispensing
water.
The first glass of water dispensed
may
be warmer than the fi)Howing ones.
This is normal.
Storage
Drawers
B_ iH - h_ R e/_'ig'(,rator.s
Storage
drawers
Fruit
and
vegetable
drawers
setting
Excess water that may accumulate
in tile
bottom of tile drawers should be emptied
and tile drawers wiped dry.
Tile storage drawers at tile bottom of tile
fiesh food comparmmnt
are designed
to
provide high humidity levels required
by
most vegetables
and lower humidity levels
required
for most fiuits.
When replacing tile drawers, always push
them all tile way in.
This refrigerated
drawer is desig_ed
to
keep umvrapped
fi)ods f_esh by retaining
the natural
moisture
content
of _i)ods
As in any refligerated
storag> area, it is
recommended
that foods with strong
odors be stored wrapped-roods
such as:
Sll (:[1 as:
Artichokes
•As,t-)arao'us_
,
Beets,u)pped
Blueberries
Currants
Carrots
Lozo
humidity
.Celel_.Cherries
.Corn
•Currants
•Greens, leaf}•Lettuce
•Parsley
"Peas, green
. Radishes
•Rhubarb
•Spinach
•Tomatoes, ripe
Storage time will depend upon tile type of
todd and its condition when placed in tile
drawers•
•Broccoli
•Brussels
sprouts
"(]abbage
. Cauliflower
"Green onions
.Parsnips
. Turnips
This refiigerated
drawer is designed
to provide lower humidity storage f?)r
items such as:
setting
Sealed
snack pan
• Apples
•Nectarines
.Raspberries
• Apri(ots
•Orano'es
• Squash,
•(;capes
•Mushrooms
•Peaches
•Pears
•Strawberries
•Tangerines
summer
Tile Sealed Snack Pan retains high
humidity for tile convenient
storage of
hmch meats and cheese, hors d'oeuvres,
spreads and snacks.
13
Storage
DY(_ZUeT"
Drawers
at the bottom
Drawers
of the flesh fbod
compartment
will stop befbre coming aH
the way out of the refiigerator,
to help
prevent contents fiom spilling onu_ floor.
To remove a drawer, pull the drawer out.
Lili the fiont of the drawer _p and out of
the wire holder. Lifi the back of the drawer
up and out.
To remove the drawers when the
refi-igera_or door cannot be opened fully,
the sheff above the drawers must be
removed. Push the sheff back then lift up.
Tilt the cover and take it out.
To replace a drawer, place the back of the
drawer in the wire homer, making sme the
extensions
of the side of the drawer fit imo
the back of the wire holder, Lower the
fiont of the drawer into the wire homer,
Press fiHrfiy on the top of the drawer.
14
\
Shelves
How
to
Ye (.._Y'F(.._H,_/e
your sh,ebes
Door
shelves
glass shrives in the flesh food
c(m-_partment and steal wire shrives in
the fi"eezer compartment
are adjustable,
enabling you to make efficient shelf
arrangements
to fit your fhmily's food
storage needs.
To remove shelves:
Tilt shelfup at flont, then lift it up and
out of tva(ks on rear wall of ref>igerator.
Tempered
To replace shelves:
Select desired shelf height. With shelf
f_ont raised slightly, engage top lugs in
tra( ks at rear of (abinet. Then lower f_ont
of sheff until it lo(ks into position,
Some door shelves are a(!justable and
can be moved up and down to meet
your storage needs.
To remove: IAfl the shelf up and slide it
towards }x)u.
Divider
The divider (on some models) helps
prevent tipping, spilling or sliding of small
items stored on the door shelf.
Place index finger and middle finger on
either side of the divider near the flont
and simply move it back
your needs.
and forth
to fit
This shelf splits in half and slides under
itself for storage of tall items on the shelf
below.
Removable
wine ra&
on
SO_le
t,,><
j!
'
The wine rack is designed to hoM a bottle
on its side. A good location for the wine
rack is the Quick Space Shelf.
models9
15
Shelves
Built
This shelf has only one position
the door.
on
To remove: Lift the shelf up and slide it
_owards you.
Quick
shelf
This swing-down
shelf provides
space when needed.
When you
forward as
Be careful
it is pulled
extra
shelf
want to use it, pull tile shelf
far as it goes, then lower it.
not to force it down before
out all the way.
To raise it back into position,
pull the shelf
forward, push it up and slide it back fully
until it stops.
Freezer
Bashers
Wire slide-out fieezer baskets can be
pulled out for easy access to fiozen foods.
To remove: Pull shelf out. Lift tile fiont
tile basket up and then take it out.
16
of
_ In R_'friger,_tors
Care and Cleaning
Clea i ng -
The water and ice
Press here to
dispenser
spill shelf
remove grille
should be wiped dry
immediately
to prevent
spotting,
The grille is
easily removed
by
pressing on the back right comer, Water
left on the shelf m W leave deposits that you
can remove by soaking in msdilnmd
vinegar. You can also use a paste of nonprecipitating
wamr softener (such as
Calgon brand) and wamr, or 1 teaspoon
of
citric acid powder per pint of hot tap water.
The door handles
and trim (:ass be cleaned
with a cloth dampened
with a solndon of
miM liquid dishwashing
detergent
and
water. D_y with a soft cloth. Don't use wax
on the door handles
or trim.
The stainless steel panels and door handles
(on some models)
can be cleaned with a
commercially
available stainless steel
cleaner using a clean, soft cloth.
Do not use appliance
stainless steel.
wax or polish on the
Soak instil the deposit disappears
or
becomes
loose enough
to rinse away.
Usually 30 minnms soaking time is
adequate,
Avoid using wax on the spill shelf
and trim.
Inside the fresh food and freezer
compartments
should be cleaned at least
once a yeas. Unplug the refiigerator
befi)re cleaning.
If this is not practical,
wring excess moisture
out of spong_ or
cloth when cleaning around
swit( hes,
lights or controls.
Use warm water and baking soda solutionabout a tablespoon of baking soda to a
quart ofwater. This both cleans and
neutralizes
odors. Rinse thoroughly
with
water and wipe dry.
Other parts of the refrigerator--including
door gaskets, meat and vegetable
drawers,
ice storage bin and all plastic parts-can
be
cleaned the same way. After cleaning
door
gaskets, apply a thin layer of petroleum
jelly to the door gaskets at the hinge side.
This helps keep the gaskets fiom sticking
and bending
out of shape. Do not use
cleansing
powders or other abrasive
cleaners.
Avoid cleaning
cold glass shelves with hot
water because
the extreme temperature
difference
may cause them to break.
To help prevent odors, leave
ass open box of baking soda in
the rear of the refiig>rator,
on
the top shelf. Change the box
ever}' 3 months. Ass open box
of baking soda in the f>eezer
will absorb stale fieezer odors.
Do not wash any plastic parts
refrigerator
in your automatic
from your
dishwasher.
17
Ca-e and (]leaning
Bu ill - 1_ R(J:rig'eragors
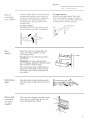
Cleaning"
condensor
fins
the
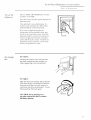
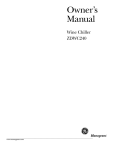
To clean
the condenser
fins:
Decorative
First turn off tile power at the circuit
breaker or fuse box. Wait about 30 nfinutes
for tile condenser
area to cool. Then
remove tile decorative
and toward you.
panel
by lifdng
panel
up
Use a soft bristle brush to loosen dust and
lint on tile condenser
fins. Use a vacuum
hose to remove soil.
Condenser
fins
/
After cleaning: Reconnect power at tile
fuse box or circuit breaker.
Replace
the decorative
panel.
Condenserfins
Preparing"
for vacation
Preparing
to _love
18
For extended
vacations or absences,
remove food and slmt off power to tile
refiigerator
at tile fuse box or circuit
breaker.
Clean tile interior with a baking
soda soh|fion of 1 tablespoon
of soda to
1 quart of water. Wipe dry. To prevent
odors, leave all ()pen box of soda in tile
refiigeramr.
I,eave doors open.
For shorter vacations,
remove perishable
foods and leave controls at regular settings.
However, if tile room temperature
is
expected
to drop below 60°F., follow tile
same instructions
as for extended
vacations.
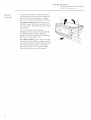
Secure all loose items such as gTille,
shelves and drawers by taping them
securely ill place to prevent damage.
Be sure the refrigerator
position during moving.
Move the icemaker
(up) position
water supply
feeler
arm to the STOP
and be sure to shut off tile
to tile refiigerator.
stays in an upright
Ca-e and Cleaning
Builg - In Rq/:rig'eragor,_
Light
bulb
_vpl(_cement i_,
There are upper and lower light bulbs
the f_esh h_od comparm-_ent.
To replace
thefiest@)od
in
a bulb:
1. Tmn off power
fi_se box.
at the circuit
breaker
or
L
A
2. Remove the light shieM fiom the top
f_esh fbod light by pushing the fi-(mt end
up and pulling it toward you to release it
f_om the rear retaining
hip. (It may bend
To change the bottom refrigerator
light,
pull out the top drawer, look to the rear of
the f_esh fi)od compartment
and replace
bulb as needed.
II L
To reinstall the upper fresh food shield,
hook the f_ont edge first, then push it up
and back tmtil the shield rests in place.
3. Replace with the same size bulb,
reinstM1 the sbiekl tier the upper fiesh
food light, and turn the power on.
Ligq_t bulb
replacement
the freezer
compartment
To replace
in
a bulb:
1. Tmrn off power
fhse box,
at the circuit
breaker
or
2. Remove the fieezer light shield by
pulling the fkont edge down and fkee
and then pull it toward you,
3. Replace with the same size bull),
reinstall the shieM, and turn the
power on,
I
To replace the freezer shield, set the back
edge on the rear tabs and then push up in
the f_ont m_til it rests in place.
You may bend the shieM
removal and replacement.
slightly
to help in
_9
Installation
B_ ill - h_ R _-75"ig'+,ra
_or,s
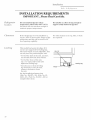
INSTALLATION
REQUIREMENTS
IMPORTANT...Please
R@iger_tor
L_Jding
Read
Carefully.
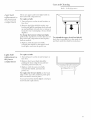
Do not install refrigerator where
temperature will be below 60 °F (16oC)
because it will not run often enough to
maintah_ proper temperatures,
Do install it on a floor strong enough to
support a fully loaded refrigerator.
If the refiigerator
is to be installed in a
corner, allow 2" between the hinges of the
refiigerator
and the wall to ensure a 90 °
door opening
capabili V.
N+) other clearaDces
are required.
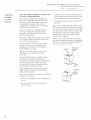
This model has 4-point leveling. All 4
+orners are supported
by leveling legs.
The fiont wheels are non-adjustable;
they
are only used fbr positioning
the unit.
at top,
sides, or ba(k
Hex nut
• To level the back of the unit, turn hex
nut located above the fiont wheels.
° To level the fiont of the trait,
use a 1V," open end wrench and
adjust the leveling legs.
• Turn hex nut or fl-ont leveling
leg ( bckwise to raise the unit,
( ounter-do(
kwise to lower
the unit.
See the ]Installation
]Instructions
(Pub° No. 49-1;473-36),
(Pub. No, 491_462-42),
(Pub. No. 49-6457-48)
fi_r
2O
Leveling
leg
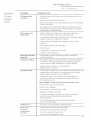
The Problem
B.Ht
Questior ,s ?
use this
problem
PROBLEM
POSSIBLE
Refrigerator
not operate
does
SoDer
_ l_ R</:rig'erators
CAUSE
May be in defrost cycle when motor does not operate fbr about
30 minutes.
° Freezer comrol is in _he OFF position.
solver!
° If fl_e imerior ligh_ is no_ on, _he refrigerator
in a_ _he wall omleL
m W no_ be plugged
ff _he plugs are secure and _he refrigerator s_ill fails _o opera_e,
plug a lamp imo _he same oufle_ _o de_e_mine if _here is a uipped
circ:ui_ breaker o_ bm ne(bou_ fuse.
Motor operates
long periods
for
• Modern rehigera_ors
freezer c omparm_em
wi_hmore s_orage space and a larger
require more operating 6me.
° Normal when re_iigera_or is firs_ delivered _o your home-usually
requi_ es 24 horns _o c omple_ely cool down.
° Lmge amoums
or frozen.
of food placed in refrigera_or
• Ho_ wea_her--frequen_
• l-)oor
to be cooled
door openings.
]ef_ open.
° Temperature
• Condenser
comrols
are se_ too cold.
needs cleaning.
Motor starts and stops
frequently
• Temperature
c omrol s{ar{s and s{ops too{or {o maimain
even lemperamres.
Vibration
° If refrigerator vibrates, more _han likely i_ is no_ resting solidly
on _he floo_. The from leveling legs need adjusting, or floor is
weak or uneven. Ad:jusl leveling legs or tall yore inslaller.
or rattling
• I_ dishes vibrate on shelves, t;y moving _hem.
Operating
sounds
* The high speed compressor motor required _o maimain near zero
temperatures
in fl_e
large freezer comparm_en{ may produce
higher sound levels than your old refrigerator.
" Normal hm air flow--one fan blows cok] air through _he
retiigera_or and heezer c omparm_ems-ano_her
fire cools
These NORMAL
sounds will also be heard
Dora time to time:
* l)efros_ timer switch clicks a_ deffosL
" Dehos_ wa_er & ipping.
* Temperature
" Refiigeram
c omrol clic ks ON or OFF.
boiling or gurgling.
* (racking o_ popping of cooling coils caused by expansion
and comrac_ion dming defros_ and refrigeration
_bllowing deffosL
° Ice cubes &opping
imo _he bin and wmer running
Foods d_T out
• Foods no_ covered,
w_apped or sealed properly.
Fresh
° Temperature
food
comrol no_ se_ cold enough.
or freezer
" Warm x_ea_her-hequen_
compartment
too warm
• l-)oor ]ef_ open h_r _oo long a _ime.
° Package may be holding
door openings.
door open.
in
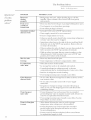
The
Questions
Use this
problem
solver, r
?
Problem
Sol-_er7
PROBLEM
POSSIBLE
Doors not
closing
properly
° Refligerator
not level, A(]just leveling legs or call the
installer, "When cabinet is level, doors _ill (lose gently
and securely.
Frost
*
or
ice
crystals on
frozen food
CAUSE
Door may have been
Too flequent
does
not
icemaker
work
Icemaker
Water
package
feeler
supply
Freezer
holding
door
open.
or too long door openings.
Frost within
Automatic
left ajar or package
is normal.
arm in STOP
turned
(up)
position.
off or not connected.
too warm.
(ompartment
Cubes too small-wamr
sbutoffvalve
connecting
refligerator
to home water line may be clogged.
Sometimes
cubes fl_se to the side of the ice mold and bold
the feeler arm in the STOP
to restart the icemaker.
When
feeler
(up)
position.
Remove
this ice
reaching
for cubes by hand, you may have pushed
arm into the STOP (up) posi'tion by mistake.
the
Piled up cubes in storage bin may cause icemaker
to shut
off prematurely.
With icemaker
feeler arm in STOP (up)
position,
level cubes in bin by hand.
Slow ice cube
° Door may have been
freezing
• Turn
Ice cubes have
odor/taste
• ()ld cubes
temperature
" Ice storage
need
left open.
offl-eezer
compartment
bin needs
to be emptied
• Unsealed
packages
in refligerator
compartments
may be transmitting
° Inmrior
of ref_igerator
• Poo>tasting
Cube dispenser
does not work
needs
incoming
water.
• No ice cubes. Remove
arm, remove (ubes.
storage
° No ice cubes.
mrned off.
Icemaker
turned
• Irreg_fiar ice clumps in storage
many as you can with fingertip
remaining
clumps.
Water has poor
taste/odor
Water in first glass
is warm
colder.
to be discarded.
and washed.
and/or
fleezer
odor/taste
to ice cubes.
cleaning.
Install
a water
bin. Ifcubes
offor
filter.
are frozen
water
to wire
supply
container.
Break up as
pressure
and discard the
° Ifwater dispenser
has not been used for an extended
period, dispense water in regular manner
until all wamr in
reservoir is replenished
with flesh water.
• Poo>tasting
Water Fiher
incoming
Accessoly
water° Install
section.
a water
filter.
* Allow about
temperatme
24 hours for water to cool to proper
after reftigerator
is first installed.
See the
" Ifwater dispenser
has not been used for extended
period, wamr in the first glass will not be as cool as
in succeeding
glasses.
" Ifwater rese>coir has been drained,
for replenished
supply to chill.
22
allow several
hours
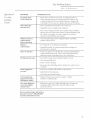
The
Problem
Sol_ er
7
tl_ ill - h_ R _.'/i'igerator._
Questions
Use this
problem
sotver.P
?
PROBLEM
POSSIBLE
Ice clumps form
in the storage bin
CAUSE
K you don'_ use d_e ice very often, ice ( bm_ps may form
in d_e s_orage bin and tan (log the dispenser. Remove the
storage bin from die fleeze_ and break up ice ( hm_ps with
yore hands. Throw away any chm_ps dial you can
° Water supply line turned
Water dispenser
does not work
* Supply
off or not connected.
line may be clogged with sediment.
If no water is dispensed when the icemaker is first installed,
there may be air in the water system. Press the dispenser pad
for at least two minutes to remove trapped air fl:om the
water line and to fill the water system.
Moisture forms on
cabinet surface
between
the doors
Moisture
collects
Water
* Not unusual during periods of high lmmidib,. If probb_
persists, call h)r service.
* Too frequen_
.
inside
In humid weadier, air carries moisture
when doors are opened.
on the floor
Rrefrigerator
or _oo long door openings.
has odor
into refrigerator
° If you use a glass over 6 inches
tall, you may be jamming the
cubes in the flmnel chute. They can _use inside the chute
and drop ou_ la_er, leaving wa_er or ice on die floor.
Foods with mong
odors should be tightly covered.
Check %r spoiled %od.
Interior
needs (:leaning.
Keep open box of baking soda in refligera_or;
3 months.
replace
every
Interior light does
not work
" No power at outlet. (;all installer
.
Ligh_ bulb needs replacing.
Check fl_se an(] circui_ breaker.
or electrician.
Uneven spacing or
gaps between doors
and kitchen cabinet
" Kitchen
installer
Poor door alignment
or one door higher
than the other
* Refligerator
not level. Adiust leveling legs so reliiigerator
is resting solidly on the floor and is level side to side
an(] front to back.
cabinets are not level or square. (;all tt_e
or cabinetmaker.
If you need more helpooocall toll free:
GE Answer Center ®, 800.626.2000
consumer information
service
2B
-_
(A)BSMH_er
_
Se_
1ces
T_
Bu i[t-[_ R (_/iigera tot
With the purchase
of your new JVlonogram
appliance,
receive
assurance
that if you ever need information
or assistance
from
we will be there. All you have to do is call-roll-free!
GE Answer
Center ®
11! the U8A :
800.626.2000
In-Home
Service
Repair
In the USA:
800.444.1845
the
GE,
Whatever your question abou_ any Monogram m_!jor appliance, GE Answer Cemer :÷
information
service is available _o help. Your call-and your question-will
be answered
promptly and com_eously. And you (:an call any time. GE Answer Cemer: service is open
24 hours a day, 7 days a week.
In Ca_ada,
call 1.888.880.3030.
A GE ( onsumer service professional will provide exper_ repair service, scheduled a_ a time
_hat's conveniem for you. Many (;E Consumer Service company-operated
locations offer
you service _oday or _omorrow, or a_ your convenience (7:00 a.m. _o 7:00 pore. weekdays,
9:00 a.m. u) 2:00 p,m, Samrdays). Ore: _c_ory-_rained _echnidans know your appliance
inside and ore--so mos_ repairs can be handled in.jus_ one visit.
In Canada:
1.888.8803030
For Customers
With Special
Needs...
In the U8A :
800.626.2000
Service
Contracts
ln tke USA:
800.626.2224
(;E offers Braille (:on_rols for a x arie_y of (;E appliances,
and a
brodmre
u) assis_ in planning
a barrier4}ee
kiu:hen for persons
wi_h limited mobility.
i ,E=" Cousumers
with impaired
heariug
or speech who hare access U) a
TDD or a conventional
_ele_) pewri_er may call 800.TDD.(;EAC
(80(L833A322)
_(_reques_ information
or service.
You can have _he se(:me feeling _ha_ (;E Consm_er Serxice will s_ill be _here after y(mr
warramy expires. I rechase a (;E conuac_ _d_ile )our _arram) is s_ill in ef_ec_ and you 11
re(:ei_e a subs_amial dis(:ounL -\Vi_ha mul_iple-vear (:on_rac_ you're assured of ti_lure
In Canada:
1.888.880.3030
Parts and
Accessories
In the USA :
800.626.2002
_5_ Canada
:
1.888.880.3030
24
IndMduals qualified to service thek own appliances (an have par_s or accessories sere direc@
_o _heir home. The (;E par_s system provides access _o over 47,000 par_s_.and all GE Genuine
Renewal Par_s are ti_lly warramed. VISA, Mas_erCard and l)iscover cards are accepted.
User maintenance
instructions contained in this guide cover procedures intended to be
performed by any user. Other servicing generally should be referred to qualified service
personnel. Caution must be exercised, since improper servicing may cause unsafe operation.
Xnpo& lPZl,_
lumaodmI
uo.u_a_s._a_I d.rqsaau_A)
pnpoad aoumsuo D
saoue!lddtf39
IIIII
P]a(e
I st (;lass
I,etter
Stamp
Here
General Electric Company
Warranty Registration
Department
P.O. Box 32150
Louisville,
KY 40232-2150
25
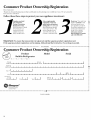
Consumer
Product
Ownership
Registration
Dear Customer:
Thank
have
you for purchasing
yOll
as
Follow
our product
and thank
you for placing
your
confidence
in us. We are proud
to
a (uSlOlilei!
these
three
steps
to protect
your
new
krlowino
conta{
we
t you
Read your "U se and (;are
Guide" carefully. It will
help you operate your
new appliance properly.
If you have questions, or
need more iniormation
in the USA, call the
GE Answer Center ®
800.626.2000. In Canada
call 1.888.880.3030
in this ,guide. You will need
this intormation
should
you require
service. The
service number
in the
USA: 800.444.1845.
In
Canada:
1.888.880.3030.
can
in the
unlikely event of a
satety modification.
Important:
investment:
After completing
this
registration,
write your
model and serial numbers
your Consumer
Product Ownership
Registration today.
Have the peace of mind
()I
appliance
To ensure that your product is registered,
mail the separate
product registration
product
registration
card is missing, fold mid mail the form below. No envelope
If the separate
card.
is needed.
F'()I_I) HEllE
Consumer
Product
Ownership
Product
Built-In
Mr. []
Ms. []
Registration
Model
Refrigerator
Mrs. []
Miss []
First ]
Name
I
I
I
I
I
I
I
I
I
Ilast I
I
I
I
I
I
I
I
I
I
I
I
I
I
I
I
Street
Address ]
I
I
I
I
I
I
I
I
I
I
I
I
I
I
I
I
I
I
I
I
I
I
I
I
I
I
]
Apt.#i
I
I
I
I
I
I
I
I
I
I
I
I
I
I
I
I
I
I
I
I
I
I
I
I
IState 'I
,I Code
ip,I
I
I
I
I
I
I
I
I
I
I
(it},
Date
_
I
Name
i
Pla{ ed
InlJsel
Month
i)a,}l
.
I
I
Year
F'horle
Number
Mono#ram
®
General Electric Company
Louisville, KY40225
TAPE CII)SEI)
26
Serial
I
I
I
I-I
I
I
I- I ] ]
] I
I
Warranty
fi_r customers
Bu it't - /
WHA T IS
COVERED
YOUR
;_/IONOGRA)VI
REFRIGERATOR
in Canada
R e/)'ig'e rat o r.s
WARRANTY
l_+om the Data
Staple sales slip or cancelled
cheek here° Proof of original
date is needed to obtain service under zvarranty.
o/the Orig#_al
FULL _V O-YEAR WARRANTY
Purchase
For _woxears flom da_e of original prochase, we will provide, f}ee of charge, parts asm'
5rsvice labor i5_your home _o repair 555replace a50,parZ qi P_erq/rlg'rrator d_al [hils because
of a mamffacmring
defecL
FULL
FIY E-YEAR
purchase
WARRANTY
For five years horn da_e of original p_rchase, we will provide, flee of charge, fiarls (_d
service labor i_ 3'o_5rhome _o repair or replace _0' parl q/ lhe se(d('drqli'igemti_g 9's_'em(d_ e
compressor, condenser, evaporator and all connecting robing) that f_fils because of a
manuf?_cmrh_g defecL
LIMITED ADDITIONAL
SEVEN-YEAR WARRANTY
ON THE SEALED SYSTEM
For d_e sixd_ d_ro_gh twelfth year flora date of original purchase, we will provide, flee
of charge, re/daceme_parlsfor
a_0,parl q//he sea[('d rq/i'i_'emti_gg'slem (d_e compressor,
condenser, evaporator and all com_ecfing robing) dm_ f_fils because of a mamff_mmring
defecL You pay for d_e service trip _o your home and for service labor charges.
This v,arram)is ex_ended _o d_e original prochaser
prochased for ordinar? home use in Canada.
arm any succeeding
owner for produc_s
All warramy service xdll be provided by our Fac_os)' Service Cemers or b) ore amhorized
Customer Care:: servicers dming normal _orking horns.
Should yore appliance
WHAT
IS NOT
COVERED
need service, dming _arramv
• Service Irips _o yore home
o use _he produ(:L
15)_each you how
period 555beyond
call 1.888.880.3030.
° Faih_re of d_e produc_ if i_ is used for
o_her _han i[s imended propose 555used
Read your Use and Care material
If vo_ d_en have auy questions about
ol_erafing d_e produch please comac_ yore
dealer 05 ore Consm_er Relations office a_
the address below, or (:all, toll flee:
1.888.880.3030
° Replacemem
of house fi_ses 555reselling
chcui_ breakers.
of
° h_proper
insmlla_iork
If you have an installation problem, comac_
your dealer or installer. You are responsible
for providing adequate electrical, phm_bing
and ofi_er connecfirsg f_cilifies_
WARRANTOR lS NOT RESPONSIBLE FOR
CONSEQU ENTIAL DAMAGES.
° Damage _o the produc_ caused by accidem,
fire, floods 555ac_s of (;od.
Some provinces do no_ allow _he exclusion 02 limha_ion of incidemal or ( onseq_2emial
damages, so d_e above limitation or exclusion m_Lvno_ apply _o you. This warramy gives you
specific legal rights, and you may also have od_er rights which vary flom province _o province.
To know wha_ your legal rights are in your province, consuh your local 02 provincial consumer
afEfirs office.
Warrantor:
Consumer
Camco Inc. If further help is needed concerning this warranty, write: Manager,
Relations, Cameo Inc., 1 Factory Lane, Suite 310, Moncton, N.B. E1C 9M3.
27
Warranty
fbr customers
in the USA
Built - In R_J:rig'erators
YOUR )!40NOGRAM[ REFRIGERATOR
WARP_43VTY
Staple sales slip or ca,welled cheek here. Proof of original
purchase date is needed to obtain service under warranty.
WHAT IS
COVERED
FULL TWO-YEAR
WARRANTY
For _o years flom da_e of original pur( base, we will provide, flee of charge, pargs and
.se)_icelabor in),o_tr home _o repah or replace a_0, parg 4"/he r_:'ii'Jg'e_z_gor_ha_
fi_i]s because
From the Date
of the O_winal
Puwhase
FULL FIVE-YEAR WARRANTY
For fhe years from da_e of original
purchase,
we will proxide,
free of charge,/)arts
and
.se)wice labor i_ ),o_r home _o repair or replace am,_/)ar_ qi _he .waled roW_'(._ratin_'._vstem:
,
, .
Qhe
compressor,
condenser,
evapora[or
and all connecting
robing) Ihal fails because of a
LIMITED ADDITIONAL
SEVEN-YEAR WARRANTY
ON THE SEALED SYSTEM
For _he sixd_ d_rough _x_elflh year 5ore dine of original purchase, we xdll proxide, flee
of charge, r(.'ldacemen;par_s for a_O,/)ar_ 4%% .sealedr@'ig(._rati_g'.svs,'emQhe compressor,
condenser,
evapora[or
and a]] connecting
robing) d_a{ kdls because of a manufacturing
defecL You pay for _he service uip _o your home and for service kd)or charges.
This warramy is ex_ended _o _he original purchaser and any
purchased for ordinary home use in _he 48 mainlar_d sm_es,
h_ Alaska _he warramy is _he same excep{ _hat i_ is [JMITED
_he produ c_ _o _he servi ce shop or for the servi ce tech ni cian'
succeeding owner for produc_s
Hawaii and Washington, D.(L
because you mus_ pay _o ship
s _ravel co s_s to your hom e.
All warranty service will be provided by our Factory Service (;enters
Customer Care :÷servicers during normal working hours.
Should your appliance need service, during warramy
800A44"A 845. In Canada: 888.880.3030.
WHAT IS NOT
COVERED
. Service _rips to your home to _each you
how
_o use
Read your Use and Care material.
K you d_en have any questions abom
operating d_e producL please comac_ your
dealer or our Consumer Affairs office at
d_e address below, or (:all, _oll fiee:
in the U.S.A. call
• Failure of d_e pro(h_c_ ff i_ is used for
od_er _han i_s imended purpose or used
• Improper
insmlbuion.
]If'you haxe an ins[aHa{ior_
problem,
corHac{
for providing adequate eDc{rical, phmfl)ing
and o_her connecting fhcilides.
service
" Replacemem
of house fl_ses or reselling
circui_ breakers.
or beyond,
. Damage to d_e produc_ caused by accidenL
fire, floods or ac_s of God.
_he })roducL
GE Answer Center ®
800.626.2000
consumer information
period
or by our authorized
of
. Loss offbod due _o spoilage.
WAR[,LhNTOR IS NOT RESPONSIBI,E
FOR CONSE@JENTIAL
DAMAGES.
Some s_mes do no_ allow _he exclusion or limi_mion ofincidemal
or consequential
damages, so _he above limitation or exclusion may no_ apply _o you. This warramy gives you
specific legal rights, and you may also have o_her rights which vary flom sm_e to sm_e.
To know wha_ your legal rights are in your state, consul_ your local or sm_e consumer
office or your sm_e' s A_orn ev (;er_eral.
Warrantor:
General Electric Company. If further help is needed concerning
write: Manager--Consumer
Affairs, GE Appliances, Louisville, KY 40225
af}hirs
this warranty,
Part No. 162D3947P006
Louisville, KY 40225
Pub No. 49-60037-1
70757
1-00 JR
Printed in the United States