1
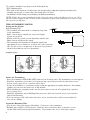
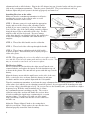
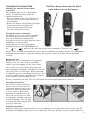
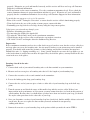
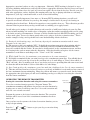
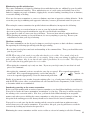
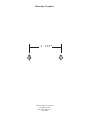
Radio Fence Plus
Remote Trainer
Owners Manual
THE RADIO FENCE PLUS REMOTE TRAINER SYSTEM
Radio Fence PLUS is an electronic training system that incorporates two distinct functions into one
complete system. The Radio Fence PLUS system can be used to contain your dog within your yard and
can also be used as a remote training system. For example, the remote trainer can help teach your dog
not to dig holes in your garden while the containment system will keep your dog safely in your yard out of
harms way.
Our goal is to provide you with a training system that will not only help train your pet, but keep him safe as
well. The busy lives we lead can complicate pet ownership. We are committed to making responsible pet
ownership simpler.
In the following pages we will cover operation and training using first, the containment system, and then the
remote trainer. We urge you to read the entire manual before beginning. Then use the manual to refresh
your memory on the best techniques to successfully train your pet.
Introduction to Both Systems
The containment transmitter is both a very low frequency
radio transmitter, and a high frequency radio receiver,
which plugs into a standard electrical outlet. The signal
is carried by the boundary wire, which serves as an
antenna. The range of the signal (i.e. the distance from
the boundary wire to where the receiver collar is first
activated) can be adjusted from a few feet up to thirty
feet by the signal range adjustment knob. The hand held
remote transmitter sends a signal to the containment
transmitter, which then switches to the remote training
mode. While in remote training mode, the containment
transmitter sends a signal through the boundary wire
to the dog’s receiver collar and delivers the appropriate
correction to the dog. The receiver collar must be within
the containment area and the remote transmitter must be
within 200 feet of the containment transmitter for the entire system to operate correctly.
NOTE: The signal range adjustment knob controls only the width of the signal field. It does not in any way change
the electronic correction felt by your dog.
Components:
• Containment transmitter
• Receiver collar
• Remote training transmitter
• Extra probes
• Batteries
• Owners manual
• Neon test light
• Training/Installation video
Range Adjuster
Required but may be sold separately
• 50 Boundary flags
• 500ft. of boundary wire
• Wire nuts, or wire fasteners.
Use only PetSafe® Pet Containment System Wire.
1
To complete installation you may need the following items:
• Wire stripping pliers
• Wire nuts or wire fasteners, electrical tape and waterproofing compound (splicing boundary wire)
• Straight edged spade or a lawn-edger (for cutting groove in yard)
• Grounding rod and clamp (for grounding containment transmitter)
NOTE: PetSafe has a team of trained professionals all over the country ready to install your fence for you. Please
call our Customer Support at 800-732-2677 for more information on professional installation or for answers to any
other questions you may have.
THE CONTAINMENT SYSTEM
Laying out the System
Transmitter
Basic Planning Tips:
• The boundary wire must make a continuous loop back
to the transmitter.
• Make a layout that is suitable for your yard. Sample
layouts are provided.
• Always round the corners of your boundary with the wire.
Sharp corners will distort the signal.
• The transmitter will transmit an adjustable signal from
approximately two to thirty feet on either side of the boundary
wire. Be sure to leave enough area so that your dog can move
about freely within the safe area boundaries.
Twisted Wire
Sample Layouts:
BASIC LOOP WITH GARDEN
FRONT OR BACK ACCESS
Locate the Transmitter
• Place the transmitter INDOORS ONLY and near an electrical outlet. The transmitter is not waterproof.
• Install the transmitter at least three feet from any large metal objects such as breaker boxes, water
heaters, metal garage doors, or washer and/or dryer.
• Secure the transmitter to a stationary surface using the appropriate mounting hardware. A mounting
template is located on the back cover of this manual.
• When installing the transmitter make sure the wire twists are not cut off or pinched by a window,
door or garage door.
• Install the transmitter only in buildings that meet state and local electrical codes, to prevent fires
and electrical hazards.
• If it is necessary to drill a hole make sure there are no electrical wires, nails or screws inside the
area you are drilling.
Layout the Boundary Wire
• Lay the wire along your proposed boundary. Connect it to the transmitter.
• Running wire parallel to electrical wires, telephone wires, television cables or antenna, or near
satellite dishes will result in signal interference. If you must cross, do so at 90 degree angles.
2
• Twisting the boundary wires will cancel the signal in a specific area. This will allow your pet to run
over this area. Current in the wires must be traveling in the opposite directions to cancel the signal.
Make at least ten twists per foot, up to 100 feet maximum, to cancel the signal in the twisted wires.
Connecting Wire to the Transmitter
• Strip the ends of the boundary wire approximately
1/2 inch.
• Connect the boundary wire to the boundary wire
terminals.
• Turn the Boundary Width Control to the number
10 setting. This will set the boundary warning zone
at the maximum width. The smaller the number
setting, the more narrow the boundary warning zone
will be.
• Plug the AC power adapter into the power jack on
the transmitter and into an electrical outlet.
• The power indicator and loop connection indicator
lights should be on.
Apply waterproofing compound and
Grounding your Transmitter
wrap with electrical tape.
Proper grounding is necessary to reduce the chance of
lightning damage to your transmitter. Connect a wire
between the transmitter and a ground rod buried at least 3 ft. into the ground. You may use an existing
ground rod. Ground rods with clamps and 14 to 18 gauge wire may be obtained at most electrical supply
stores. Locate the transmitter as close as possible to the ground rod.
Splicing the Wire
If you need more than 500 feet of wire, splice the wire together with wire nuts or shrink tubing.
Note the location of all splices on the layout you drew for future reference. Most wire breaks occur near or at the
splices.
Begin by stripping the ends of the wires to be spliced. Insert the stripped ends into the wire nut and twist.
Pull on the wires to make sure you have a strong splice connection. Apply waterproofing compound (like
silicone caulk) in and around the wire
nut. After the compound dries, you
may also wrap the wires and the wire
Ground Terminal (black)
nuts with electrical tape to prevent
them from pulling loose and to
protect from moisture. If your splice
Boundary wire terminals
or the connection pulls loose, the
(red)
entire system will fail. Make sure of a
good connection.
Range adjuster
TESTING THE
BOUNDARY WIRE
The Containment Transmitter
For testing purposes, the mode
should be in the BEEP/SHOCK
position. Connect the ends of
the wire to the two red boundary
terminals on the containment
transmitter. Turn the signal range
Power indicator
Loop indicator
3
adjustment knob to full clockwise. Plug in the AC adapter into any electrical outlet and into the power
jack on the containment transmitter. Turn the power switch ON. The power indicator and loop
indicator lights will glow if system is hooked up properly and turned on.
Attaching Receiver to the collar
Make sure that the containment transmitter is off before
attaching the receiver to the collar in order to avoid
accidental activation of the receiver.
STEP 1: Measure your pet’s neck, mark the appropriate
length, and cut off the excess collar, allowing room for
growth (if you own a young dog or he has a thick winter
coat). Seal the edge of the cut by taking a match or lighter
along the frayed edge to melt and seal the edge. Do this
with the collar off your dog's neck. If you are using a
collar other than the one supplied with the kit, punch holes
in the collar using the collar that came with the kit as a
template.
Important Note: Slide buckle also
prevents collar from becoming
loose around your dog's neck.
Important Note: Ribs must be
facing up, otherwise collar will slip
if it is not properly threaded.
STEP 2: Thread the slide buckle onto the collar first.
STEP 3: Thread end of the collar up through the buckle.
STEP 4: Thread excess collar through the slide buckle
to hold it in place. This will allow you to adjust your pet’s
collar as he grows.
NOTE: When attaching the receiver to the collar be sure to place a washer
over each hole. Then insert the contact probe and screw into the receiver. You
may use a wrench to secure but be sure to not over-tighten.
The Receiver Collar
Insert a coin into the slot just below the white arrow. Turn the coin
counterclockwise, and remove the battery. Peel the insulation tape off
as shown in the picture. The unit will not operate with this tape over the
battery.
Align the battery arrow with the small arrow on the side of the case.
Place a coin in the slot, as shown. Push the battery in and turn
clockwise until the arrow symbol aligns with the lock symbol.
Turn the containment transmitter on and turn the range adjustment knob to about position "5". Hold the
collar at knee level with the receiver hanging toward the ground. As you approach the boundary wire with
the receiver collar, it should begin to beep. As you get closer to the boundary wire, you should hear a higher
frequency beep. Walk the entire boundary wire to ensure
the containment system is working correctly. The receiver
collar has safety time out that will disable the receiver when
it has been within the signal range continuously for a certain
amount of time. You will need to walk out of the signal
range periodically to make sure that the receiver collar does
not time out.
Adjust the "Range Adjuster" knob to the setting that is
right for your layout. Check again to be sure that the fence
functions properly around the entire boundary.
4
THE REMOTE TRANSMITTER
Installing the batteries in the remote
transmitter
The transmitter takes one (1) 9-Volt alkaline
battery. To install the battery, follow the
instructions listed below:
• Place your finger on top of the "Pull" area of
the battery door, located on the backside of
the transmitter.
• Remove the battery door by lifting your finger.
• Connect the battery and replace the
battery door by placing the bottom
side of the battery door in first.
Pull Area battery door must be lifted
up in order to insert the battery.
Testing the remote transmitter
The light at the top of the remote transmitter
should light up when any button is pressed.
Also, the containment transmitter will
beep when it receives the signal from the remote
transmitter. For initial testing,
stand within ten feet of the containment
transmitter and press the "PROGRAM" and
the "
+
" buttons at the same time on the remote transmitter. Then press the "
"
button. If the containment transmitter beeps, the remote transmitter is working correctly. The containment
transmitter must be turned on with the boundary wire properly connected, and the antenna positioned
vertically.
Burying the wire
Burying the wire is recommended to help prevent
damage to the wire and to help avoid possible
injuries to persons tripping over the exposed wire.
Cut a trench one to three inches deep along your
previously planned boundary. This may be done with
a flat edge spade or a lawn edger. With a paint stick
or equivalent, press the wire firmly into the grove. You
may also consider renting a machine that is designed
to cut a shallow trench and bury the wire.
Be sure to maintain some slack. The wire will expand and contract with temperature variations.
Crossing hard surfaces
If you have to cross a hard surface,
such as concrete, lay the wire in a
convenient expansion joint or use a
circular saw with a masonry blade
to create a groove. Again with a
paint stick or equivalent place the
wire in the groove and cover with
an appropriate patching compound.
Your local hardware store can help
you choose the right compound for
your type of driveway.
Setting the boundary
Adjust the signal range adjustment knob to set the warning zone at a range that is best for your yard. We
recommend a minimum range of five feet on either side of the wire. It is best to have as wide a signal area
5
as possible while still giving your pet a sufficient "safe zone" (the area in yard that he can roam freely
without getting the warning or correction).
For initial testing and training it is recommended that the range switch be set to "Low" and the mode
switch is set to "Beep/Shock".
To test the location of the warning zone, hold the collar at knee level in the same manner the collar will
be on your pet. Walk towards the boundary wire and listen for the warning tone. The location at which
the warning tone begins indicates the boundary of the "Safe Zone" and the "Warning Zone" for your pet.
Adjust the Range Adjuster knob to set the range of the "Warning Zone".
The containment transmitter also has the feature that allows you to select the type of correction your
dog will receive when he enters the "Warning Zone".
The switch to these settings is located on the side of the
containment transmitter.
The recommended setting to be used, at least until the dog
is fully trained, is the "Beep/Shock" setting. This setting
will give the dog a warning beep, from the receiver collar,
first as he approaches the "Warning Zone". If the dog
continues into the "Correction Zone", then he will receive
a correction with beeping from the receiver collar. This
setting allows the dog to learn to associate the warning beep
with the unwanted behavior of trying to leave the yard.
The "Beep Only" setting only gives the dog a warning beep
only when he enters the "Warning Zone". No correction is given in this mode.
The "Shock Only" setting gives the dog a correction with beeping only when he enters the "Warning
Zone". No warning beep will be given before the correction when beeping begins.
Regardless of which setting the Containment transmitter is in, the dog will receive the correction desired
when the remote trainer is being used.
Grounding the containment transmitter
Proper grounding is necessary to reduce the chance of lightning damage to the containment transmitter.
To do this, connect a wire from the containment transmitter to the ground rod buried at least 3 ft.
into the ground. You may use an existing ground rod. A ground rod (with clamps) and 14 to 18 gauge
wire may be obtained at most electrical supply or hardware stores. Be sure to locate the containment
transmitter as close as possible to the ground rod.
TROUBLESHOOTING THE PLUS SYSTEM
The short loop test
If the PLUS System appears to be malfunctioning in some way, try testing the system using the following
"short loop" test:
• Disconnect the boundary wire and ground wire from the containment transmitter. Then, connect a
ten-foot piece of wire to these same boundary wire terminals and spread it out in a circle. Set the
"Range" switch to "LOW".
• Turn the signal range adjustment knob to the complete clockwise position. Is the power light on? If
not, check the AC adapter and power jack connector. If adapter and jack are not functioning, call
Customer Support for additional information.
• Disconnect one end of the wire. Does the wire break alarm beep? If not, call Customer Support for
additional information. If the alarm does beep, then the containment transmitter is functioning properly.
• Approach the short loop boundary wire with the receiver collar. Does the receiver beep? If not, check
the battery(s) for proper installation and that it is still good. If it does beep, the receiver is functioning
6
properly. If batteries are good and installed correctly, and the receiver still does not beep, call Customer
Support for additional information.
• Press any button on the remote transmitter. Does the containment transmitter beep? If not, check the
remote transmitter battery for proper installation and that it is good. If batteries are good and installed
properly, but the containment transmitter does not beep, call Customer Support for more information.
If your dog does not appear to receive or feel the correction
• Refer to the section "Testing the Correction" to ensure that the receiver collar is functioning properly.
• Trim dog's hair in the area of the probes to insure proper contact with skin.
• If trimming your dog's hair does not help, then try using the long contact probes.
If dog ignores correction and runs through system
• Reinforce all training procedures.
• Try increasing the width of the signal field.
• Try using the "Shock Only" mode on the containment transmitter.
• Check batteries in the receiver collar, weak batteries can weaken correction.
• Call 1-800-732-2677 and inquire about the Stubborn Dog Receiver.
Inspect wire
If the containment transmitter and receiver collar check out good on above tests, but the receiver collar does
not beep when on or near the boundary wire, the wire may be broken or your system may not be installed
properly. You should walk around the perimeter of the boundary and check for activities that may have
disturbed the wire (i.e. digging, trenching, etc.). Some "partial" breaks do not cause the loop light to go out
or the break alarm to activate but can effect the signal. Also, check all the splices, as many breaks in the wire
occur in the area of the splices.
Locating a break in the wire
Option 1:
1. Connect both ends of your twisted boundary wire to the first terminal on your transmitter.
2. Measure and cut a new piece of boundary wire that is 1/2 the length of your boundary loop.
3. Connect the new wire to the second terminal on the transmitter.
4. Locate the halfway point along your boundary loop.
6. Connect the free end of your new piece of wire to either side of your boundary loop at the half way
point.
7. Turn the system on and check the range of this smaller loop with the receiver collar. If there is no
improvement in the performance of your system, you may assume that there is a break in this portion of
your boundary. Because there is a small chance you have more than one break in your loop, you should
also try the same procedure for the other side of your loop.
8. Once you determine a section of your boundary loop has a break in it, find the middle of that section and
cut the wire. Be sure to re-splice the first cut that you made and make it waterproof by
caulking with silicone.
9. Connect the new wire to your boundary loop at the point at which you made the cut in STEP 9.
7
10. Turn the system on and check the range of this smaller loop with the receiver collar.
11. Repeat STEPS 8 - 11 until you find the damaged section of wire.
12. Replace damaged wire with new wire. Remember that all the wire in your boundary loop must be the
exact same size and type.
Option 2:
Call Customer Support and inquire about the "Wire Break Locator" accessory that is available for sale.
Placing the receiver collar on your dog
Make sure the receiver is positioned directly against your pet’s throat
so that the contact probes touch the skin but are not so tight as to be
uncomfortable. When the collar is properly positioned you should be
able to squeeze one finger between the contact probes and your pet’s
skin.
NOTE: Do not leave the receiver collar on too tight or for too long! Doing
so can cause Pressure Necrosis, a condition where the skin deteriorates. Check
and clean your pet's neck regularly. If a rash or sore forms, take the receiver
collar off for a few days. When replacing it, make sure that it is not too tight
and to keep your pet’s neck clean. If this condition persists - contact your
Veterinarian.
Testing the Correction
Locate the test light included with your system.
Attach the test light to receiver collar contact
probes. Carry the receiver collar, at knee level,
with probes and light facing up, to the boundary
wire. When beep changes from high tone to
low tone, the test light should light. If not, call
Customer Support for more information.
TRAINING YOUR DOG TO THE
CONTAINMENT BOUNDARY
Important notes before beginning training
• Even though your dog may appear trained after one or two
days, it is important to continue the training for the entire
fourteen-day period.
• During the training period, your pet should be contained
by other means and only be allowed in your yard on a
leash. It should not be allowed to freely cross the boundary
at any time.
• Training can be very tiring for your pet so limit training
periods to 10 or 15 minutes at a time.
• Be sure all family members participate in the training so
that your pet doesn’t relate the training to only one person.
• If your pet acts "hesitant" during any part of the training
process, remove the receiver collar and resume training the
next day.
8
Boundary training flags
Place the boundary flags so that they are ten feet apart and at the point where the warning tone starts. These
flags serve as a temporary visual boundary for you and your pet. The flags will later be removed when your
pet has become familiar with the "safe zone".
Boundary Training
Day 1
STEP 1: Hold the receiver collar in one hand and, using a leash attached to another collar on your dog's neck,
walk your pet to the boundary. Shake a boundary flag and give your pet a strong "NO" command. Be sure to
allow your dog to hear the beeping from the receiver as you shake the flag.
STEP 2: Lead your dog back into the yard and praise and play with him for 10 to 15 seconds.
STEP 3: Repeat steps 1 and 2 around the entire boundary.
STEP 4: After a short rest/play period, place the receiver
collar on your dog. Attach the leash to the other collar
on your pet.
STEP 5: Let your pet experience a correction by
walking into the signal field on his own. Then,
immediately lead him back into the "safe zone" and
praise him. Do not encourage the pet to cross the
boundaries, as this will confuse him. If your pet will not
venture into the signal field on its own, have someone
else cross the boundary and allow the pet to follow.
STEP 6: Repeat step 5 again around the perimeter
boundaries. Your pet should receive a correction only
when it willingly attempts to cross the boundaries.
Additional corrections are not necessary unless your pet
willingly attempts to approach the boundary.
STEP 7: Remove the receiver collar. DO NOT leave your
pet alone with the receiver collar until fully trained.
Caution: During the first week of training, you must contain your dog by other means until he is fully trained. Letting
your dog roam freely in the initial stages of training without constant supervision will only confuse him.
Days 2 through 14
Repeat steps 4 through 7 at least once per day.
Days 15-30
When your dog shows acceptable learning progress, remove the training leash and allow your dog to roam freely
in the "safe zone".
After 30 days from the start of training, remove every other boundary flag. Repeat every other day until the flags
are completely removed.
Imaginary gate training
Be sure that several members of your family take turns training during this process so that your dog does not
identify leaving the yard with just one person.
9
Eventually your pet learns that it must be wearing a leash and must hear the COME command to venture
outside the boundaries.
Be sure that you always lead your dog out only at this one spot in the yard, only with the leash on and only
when you have given the COME command.
1. Remove the receiver collar and replace with a standard collar and a leash.
2. Walk your pet out to a specific place in your yard, preferably the end of your driveway.
3. Tell your dog to sit and stay at a point just outside where it normally would receive the warning tone.
4. Walk across the boundary and out of the yard.
5. Tell your dog to COME to you.
6. If he refuses to cross the boundary and move toward you, help him through by pulling the leash gently
but firmly.
7. Once he does successfully come to you - praise him physically and verbally.
Perform regular maintenance checks of receiver and your dog.
Perform each of the following maintenance checks:
• Check the remote transmitter and the receiver collar batteries MONTHLY.
• Check the contact probes for tightness WEEKLY to avoid losing the receiver.
• Check your pet’s throat area for any irritation and wash neck DAILY.
• Walk the perimeter and test your pet's "memory" of the boundary MONTHLY.
Frequently asked questions
Q: What is the maximum area the "PLUS" containment system can enclose?
A: You can connect up to 1200 feet of wire to the containment transmitter. This is enough wire to enclose
approximately 2 acres.
Q: Will the correction hurt my pet?
A: The correction is safe and harmless. It is effective enough to get your dog's attention. The correction
produces less energy than that produced by a static shock from carpeting.
Q: How deep do I have to bury the wire?
A: Approximately one to three inches. You do not have to bury it for it to function properly. The only
reason for burying is so you don’t accidentally trip over it or cut it.
Q: What size or type pet can this system be used on?
A: The pet must be trainable and able to comfortably wear the receiver. Any breed can be contained,
however it is recommend that the dog be at least eight pounds and be at least 6 months in age.
Q: Can the receiver be placed on my pet’s present collar?
A: Yes. However, you must be able and willing to "punch" two holes in the collar so that the contact probes
can be properly inserted.
Q: How often do I have to replace the battery in the receiver collar?
10
A: This will vary depending on how often your dog tests the boundary and how often you use the remote
trainer to train your dog. In most cases the battery will last at least three months and in some cases up to six
months.
Q: How long will it take me to install it?
A: This is dependent on layout, soil conditions, tools, amount of wire buried etc. A typical installation can
be completed in one day.
Accessories for use with the Containment Fence
PetSafe offers for sale accessories to your new Radio Fence PLUS System. Call 1-800-732-2677 to order
any of the following:
• Correction reducers for lowering correction level. Each resistor reduces correction by 20%.
• Replacement contact probes.
• Surge Protection Kit for storm prone areas (helps protect containment transmitter from lightning).
• Wire Break Locator Kit - for those really hard to find boundary wire breaks.
PREPARING TO USE THE PLUS REMOTE TRANSMITTER
Once you have installed the containment system portion of the PLUS System and your dog has been
successfully trained to stay within the designated boundaries, you will want to begin use of the hand-held
remote transmitter portion of the PLUS System.
IT IS IMPORTANT THAT THE FOLLOWING SECTION BE READ IN IT'S ENTIRETY PRIOR
TO BEGINNING USE OF OR TRAINING WITH THE HAND-HELD REMOTE TRANSMITTER
PORTION OF THE PLUS SYSTEM.
Training with the PLUS system can be very effective. Patient and consistent training using the PLUS
system can produce a well-disciplined dog that will be safely contained in your yard.
This section will help you understand the most important points of using this electronic training tool (i.e.,
the Radio Fence PLUS Remote Trainer System) on one dog by providing you with the most commonly
asked questions and the answers to each.
QUESTIONS AND ANSWERS
Q: What materials should I review before I continue training my dog with the PLUS System?
A: Be sure that you read this section and all other sections of this manual in their entirety before you
make any attempt to train your pet with the PLUS remote transmitter.
Q: What training, if any, should my dog know before I begin obedience training with my "PLUS" system?
A: Training with the PLUS system operates using the same three basic principles used in all canine
training and behavior modification: correction, redirection and reward. Therefore it is extremely
helpful, if not imperative, that your dog understands the basics of obedience training (e.g., "Sit" "Stay"
and "Heel") before more sophisticated electronic training begins. If you need more information about
obedience training contact the PetSafe Customer Service Staff at 1-800-732-2677.
Q: What is more important during training with the PLUS system: correcting, redirecting, or rewarding my dog?
A: Some pet owners put the emphasis on correction, however reward and redirection are more important
and are much easier concepts to understand and apply. During training you need to constantly and
consistently give your dog a deserved reward, preferably praise and petting, for behavior that meets your
training objectives. Timing is critical. Your dog must be able to make the connection between the reward
and the appropriate behavior. Offer reward or praise within a couple of seconds after the correct response.
Gratuitous reward is not recommended. You must reward your dog only when he is behaving properly.
11
Appropriate emotional outlets are also very important. Obviously, PLUS training is designed to stop a
dog from exhibiting misbehaviors, and help direct him to appropriate behaviors that his owner can reward
him for. If a dog cannot leave the yard, no reward can replace the freedom he has lost. Provide your dog
with other appropriate outlets. Activities like running with your dog or playing with him are extremely
important to your dog’s emotional health, as well as successful training.
Redirection is equally important, if not more so. In many PLUS training situations, you will need
to provide an alternate behavior for your dog. An example of redirection is if your pet is chewing on
something that he should not. Redirect his attention to an acceptable chew toy. This redirection provides
a known behavior pattern that your dog can fall back on, enabling you to apply reward.
Overall, what you’re trying to do with redirection and reward is to build better behavior in your dog. But
when you build anything, it is useful to have a blueprint; a plan that outlines specifically what you are going
to do under an array of circumstances. Because of all the variables involved with PLUS training, you need
to have such a plan. You need to know exactly what you’re going to do before a situation arises. This is
another example of why your dog should have some understanding of basic obedience.
Q: During the initial training stages, can I train my dog using the containment transmitter and the remote
transmitter at the same time?
A: The answer to this is an emphatic "NO". Probably the most important point about training with the
PLUS system is that your dog should become comfortable with the containment transmitter first and
that you’re satisfied with the results. Be sure that he is fully trained on the containment system, and that
he is staying in the yard no matter what the distraction. Only then should you begin to use the remote
transmitter to train him on such things as the "Come" or the "Sit" command.
Q: Which should I use first, the containment system transmitter or the remote transmitter?
A: It is highly recommended that you train your dog to the containment system first. You will find that it
is much easier to teach your dog to stay in the yard than it is to do such things as "Come" when called or
"Heel" off-leash. Also, by training your dog to stay in the yard you are providing him with some new found
freedom that will in turn make it easier to train him to do other things.
Q: Once I train my dog to the containment system, how much time should pass before I use the remote transmitter?
A: This time will vary from breed to breed, however a good rule of thumb is to wait until you have removed
the last containment system training flag. Many dog owners will want to get started sooner, but by letting
the appropriate time period pass you will avoid confusing your dog as to why he is receiving the correction
from the remote transmitter.
OPERATING THE REMOTE TRANSMITTER
Setting the correction duration and using the remote transmitter
To set the correction duration, press the "Program" button. The
containment transmitter will indicate the present correction duration by
beeping once or twice. It will beep once for a 1/2 second correction and
twice for a one second correction.
Correction
with tone
Warning
tone only
Program the system to the desired correction duration. The correction
duration will be stored even if the containment transmitter has been
turned off.
Once you have set the system to the desired correction duration, you are
ready to begin training.
Press the "
+
with a warning tone.
12
" button to give your dog a correction along
Program
Correction Level
Once your dog starts to associate the warning tone with the correction, you can press the "
warn your dog that if the behavior does not change, he will receive a correction.
" button to
Note: Remote will only work with receiver collar inside the containment area.
Battery Maintenance
Be sure to check the batteries monthly, depending on the frequency of use. The LED on the handheld
remote transmitter will glow dimly or not at all when the battery becomes weak or dead. Replace with a
fresh 9-Volt alkaline battery when necessary.
TRAINING WITH THE PLUS REMOTE TRANSMITTER
Introduction
Almost all behaviors exhibited by your dog are normal dog behaviors. When a dog barks at the mailman,
runs after a jogger, jumps on a visitor, or digs a hole in the backyard, he is simply acting like a dog.
Unfortunately, these normal behaviors can sometimes become excessive or occur at the wrong time. In
many cases, these problem behaviors may even result in damage to your property, accidental injury to
others, or even result in harm to your dog.
Dog-training books describe numerous techniques for correcting these unwanted behaviors. Most work
only when the owner is within grabbing distance of the dog, or they don’t work at all. Dog owners that
have a problem dog and can not find a technique that works, all ask one common question, "How do I
stop my dog from misbehaving when he is too far away to correct him?"
The PLUS Remote Transmitter was created to help dog owners deter unwanted behaviors within the
containment boundary. Note that the remote transmitter must be within 200 feet of the containment
transmitter. It can be used to control any misbehavior that you see your dog exhibiting, and it can also
be used to teach your dog to respond to obedience commands when he is off his leash. Like any other
training technique or training tool, the PLUS Remote Transmitter must used consistently. Thus, please
read this entire manual before use of this product.
How dogs learn
The remote transmitter works by taking advantage of how your dog naturally learns. Even though each
dog is unique and different, they all learn the same way. When a dog hears or sees something, they
behave either by reacting towards it or by reacting away from it. This has been termed the "Flight or
Fight Response".
A dog also learns by determining which of their behavioral responses is the most appropriate by the
consequence they receive in return. If a dog receives a negative consequence, it will eventually learn to
avoid the behavior that caused the consequence. In turn, if a dog receives a positive consequence, it will
continue to exhibit that particular behavior.
Dogs are also situational learners. That is, once they learn to avoid exhibiting a particular behavior in one
situation, they will have to learn that this same behavior should be avoided in other situations. The same
holds true for behaviors that result in a positive consequence.
"Situational learning" and the "Flight or Fight" response are among the many reasons why dogs can not
be trained overnight. These and other basic rules of dog learning are factors that must be considered
when attempting to alter any dog behavior.
13
What to expect during training
Your dog does not have to squeal, yelp, or jump in response to the receiving the correction. If he does,
do not be alarmed. His first few reactions to the correction will always be his most intense. After the first
few corrections, his reaction should lessen. He should eventually just stop the misbehavior and remain
calm. If his reactions do not lessen after receiving five corrections, you probably are using too high of a
correction level.
The correction produced by the receiver collar is not painful to your dog. It is startling, but not painful.
The fact that a dog’s outward expressions cease is how we know the correction is not painful. If pain
were involved, these outward expressions would continue. To help you understand what your dog is
experiencing during an electronic correction, relate it to when you walk across carpet then touch your
television and receive a static shock. You pull back and yell. Not from pain, but from being startled.
Once your dog is experienced with receiving the correction, he will simply stop the misbehavior in
response to receiving it or the warning tone. This will probably occur within the first week of training.
At this point, many dog owners feel that the problem has been solved. In some cases, this may be true,
but in most cases, the training still is not complete. Most, if not all dogs, will test this new learning
experience, i.e., they will increase their attempts to get away with a particular behavior. If you in any way
change the way you respond to your dog, he may interpret this as getting away with the behavior. If you
remain consistent, your dog will test for less than a week.
Once he is through with this testing or rebellious period, you must continue to place the receiver collar on
him in every situation that you expect him to misbehave. Remember, dogs are situational learners, and
there will be occasions where a specific situation might change. When he sees a new distraction, he may
misbehave for the first time in weeks. If he is not wearing the receiver collar, and you do not have the
remote transmitter available, he will get away with the misbehavior and his training will suffer a setback.
If he is wearing the receiver collar and you correct immediately, any setback will be prevented.
General training tips
No matter what type of training you will be completing
with the remote transmitter you should always keep the
following in mind:
• Eliminate one misbehavior or teach one obedience
command at a time. If you attempt to work on
more than one at a time, you run the risk of your
dog not being able to associate the correction with any
misbehavior.
• If your dog reacts to the warning tone, or the correction,
by hiding or acting fearful, do not panic. Your
best response is to redirect your dog to a simple and
appropriate behavior, such as the "sit" command. Do
not attempt to bribe your dog out of any inappropriate
behavior, doing so will reward the misbehavior.
• Be consistent. Correct your dog every time he
misbehaves. If you apply the correction 70% to 100%
of the time, you may never achieve desired results. If you correct your dog every time he misbehaves,
you may have to apply the correction only 10 to 15 consecutive times.
• If there is one situation in which your dog misbehaves repeatedly, set-up this situation instead of waiting
for it to happen. By setting up situations, you dramatically increase your chances of success.
• Do not over correct your dog. Use as few corrections as possible to train your pet.
• Restrict your dog from situations in which he has a history of misbehaving, unless you are there to
supervise him and are prepared to use the hand-held remote transmitter.
14
Eliminating specific misbehaviors
The remote transmitter is designed to eliminate those misbehaviors that are exhibited by your dog while
within the containment boundary. These misbehaviors are of a wide variety and include, but are not
limited to jumping on people or furniture, digging holes, excessive barking, scratching doors or furniture,
or excessive licking or chewing.
Never use the remote transmitter to correct or eliminate any form of aggressive or biting behavior. In the
event that your dog is exhibiting such aggressive behaviors, contact a professional trainer in your area.
When using the remote transmitter for specific behavior modification, incorporate the following:
•
•
•
•
Press the warning or correction button as soon as your dog begins the misbehavior.
As soon as your dog stops the misbehavior, stop the correction and reward him.
Be prepared to warn or correct your dog at all times. You never know when he might misbehave.
When pressing the warning or correction button, do not say anything to your dog. Reserve your
verbalization for when your dog is behaving.
Obedience training
The remote transmitter can also be used to improve your dog's responses to basic obedience commands.
Incorporating the following tips will help with this type training:
• Be sure that your dog has some basic understanding of the command first. Thus, you should first train
your dog on a leash.
NOTE: When using a leash, attach it to a collar other than the receiver collar. Never attach a leash to the
receiver collar or pull the receiver collar while it is on your dog. Doing so may cause damage by pulling the contact
probes against his throat. Also, be sure that this other collar is placed above the receiver collar. This will prevent
the other collar from being pulled against the receiver collar.
• When giving the command, say it only one time. If you use your dog’s name, be sure that it is used
prior to the command.
• After giving the command, wait two seconds for your dog to respond. If he responds appropriately,
reward him. If he responds inappropriately, correct him using the "
+
" button. As
soon as he responds appropriately, release the button and praise him.
Finally, if you intend to use another electronic training collar (e.g., a bark control collar) in combination
with the PLUS receiver collar, you should first call our Customer Service Department (1-800-732-2677)
to determine which are recommended.
Introducing your dog to the remote transmitter
Before you begin training with an activated remote transmitter, you should first familiarize your dog to it.
Your goal is to make the remote transmitter "meaningless" to your dog. This way, he will not associate
the warning or the correction with it. If he does, you run the risk of him behaving in an acceptable
manner only when you are holding the remote transmitter or only when you are pointing it at him. At
this point in the training process the battery should not be inserted in the remote transmitter.
Your goal is to teach your dog that the warning and the correction result from an unknown source
and not from you or the remote transmitter. If you achieve this goal, your dog will learn to avoid the
correction by avoiding any behavior that precedes it.
Eliminating the remote transmitter and the receiver collar as a factor in learning is called the "Dummy
15
Equipment Effect". To achieve this, spend a few minutes each day, for three days, completing the
following before actual training begins.
Creating the "Dummy Equipment Effect"
Remember at this point in the training process the battery
should not be inserted in the remote transmitter. Choose a
food reward that your dog finds very desirable and that he
will accept every time. The size of this food reward should
be small (about the size of a pencil eraser) since your dog will
be receiving quite a number of these during the introductory
phase.
Show your dog the remote transmitter and let him smell it.
As soon as he does, give him one food reward. Repeat this 3
to 5 times, being sure to make the situation a little different
each time.
Also, be sure that you also point the remote transmitter at
him numerous times throughout the day. Each time you
point it, push the buttons. Each time you complete this,
follow it with a food reward. Once again, the batteries
should not be in the remote transmitter during this procedure.
Complete this exercise numerous times each day for three consecutive days. Continue the food reward
when you point the remote transmitter at him. Try and carry the remote transmitter with you the entire
day. You must get used to having the remote transmitter with you when your dog is wearing the collar.
The belt clip on the remote transmitter will help achieve convenient access. The batteries should not be
placed in either the remote transmitter until day four of training. The first day that your should start
training with an activated remote transmitter.
The first training situation
Be sure you have fresh batteries in both the receiver collar and the remote transmitter. Carefully choose
the first situation in which the remote transmitter is going to be used. This situation should be one
in which your dog will easily learn, i.e., one with few distractions. Your dog must learn that one of
his behaviors will potentially produce a warning or a correction. If you first train in a situation with
distractions, your dog may not associate the warning tone or the correction with his behavior, but with
something else. For example, if your dog receives the correction when he is jumping on, and looking
at a visitor to your home, he may perceive the visitor as being the cause of the correction, instead of his
inappropriate jumping behavior.
The initial training situation should also be one in which you will be relatively close to your dog when
he receives his first few corrections. This allows you to observe your dog’s first few reactions to the
correction, determine if the remote transmitter is functioning properly, and if he actually does receive the
correction.
Train your dog only in this initial situation until he has learned what the consequence is. Only then
should you move on to the next situation or problem behavior. This will help ensure that your dog
understands that there is one particular behavior he must avoid, no matter what the reason for his
displaying the behavior. Over time, he will learn that there are several behaviors that he must avoid.
Setting the correction level
Before you correct your dog for the first time, be sure you have set the correction level to the lowest level.
16
Smaller dogs generally require the lower correction. Larger dogs or dogs that are historically stubborn
sometimes require a higher correction level. No matter the size or temperament of your dog, you should
start with the lowest correction level.
If your dog does not show any signs of feeling the lowest correction, try increasing to the highest
correction level.
Using the warning and the correction buttons
If the warning button is utilized, it should always be used prior to using the correction button. You
should always allow at least 2 seconds to pass between the use of these two buttons, allowing your dog
time to stop an inappropriate behavior and begin an appropriate one.
The warning can be used in various situations. It may be used to stop a behavior that you find acceptable
in one situation but unacceptable in another. For example, when your dog barks at strangers, you
probably find this acceptable and would reward him. However, if his barking becomes excessive, you
might find this unacceptable and would warn him.
Lack of proper response to an obedience command is another situation where the warning would be
utilized. For example, if your dog is running after a squirrel and does not hear you give the "come"
command, the warning would be used to warn him to stop and return to you.
The correction button is used to correct or stop an unwanted behavior. The proper time to use this
button is when your dog is misbehaving. This correction should never be given after your dog has
stopped misbehaving.
Commonly asked questions and answers
Q: Once my dog is fully trained to the containment boundary, can I give him a correction via the remote
transmitter at the same time he is receiving the correction from the containment transmitter?
A: Yes, but realize that the receiver collar does not differentiate which mode the system is in. Either way,
the dog will receive a correction for being too close to the boundary or for a bad behavior if you so desire.
Q: Can I use the remote transmitter to train my dog outside the containment area?
A: No. The receiver collar must be within the fence boundary and the remote transmitter must be within
200 feet from the containment transmitter. The remote transmitter can be taken outside and be effective
from outside the containment area, so long as it is within 200 feet of the containment transmitter.
Q: Is there another receiver available from PetSafe that I can use to train my dog outside the containment area?
A: Yes, you may purchase a receiver that can be used outside the containment area by calling the PetSafe
Customer Service Department at 1-800-732-2677.
Q: When I begin to use the remote transmitter within the containment area, are there certain things I should know
or work on first?
A: Understand that when you attempt remote training within the containment area your dog may
demonstrate some "confusion" at first. After all, he is now being corrected within an area in which he
has grown to know as a "safe area" - an area in which he can roam free and an area that has been free of
correction.
Thus, it is best that the first time your dog receives a remote correction within the containment area he
is on leash and is being corrected for a behavior that he already knows is inappropriate. A good starting
point is to work with him on obedience commands that you have already established in other areas such
as the local park or in other areas of your neighborhood.
17
Once he begins to look comfortable and is demonstrating an understanding of how to avoid the remote
corrections, you can then move on to using the remote trainer for modifying such behaviors as keeping
him out of garden, preventing him digging holes, or to teaching him to stop barking on command.
Q: If my dog becomes confused when I correct him with the remote transmitter within the containment area, what
should I do?
A: If this or any other unexpected behavior happens, your best choice is to keep your response simple one that asks your dog to do something basic. Pick something your dog has done a thousand times before,
such as the "Sit" and "Stay" command. Reliance on an old habit can bring a misbehaving dog - even a
frightened or frazzled dog - back into the comfort zone. This will enable you to reward your dog or to
regroup should this become necessary.
Q: Other than acting confused in response to receiving the correction from either the containment or the remote
transmitter - what else might I expect to see him do?
A: Every dog has his own unique personality and thus will have his own way of responding to an
electronic correction. Some of the more common ways a dog may inappropriately respond to the first few
electronic corrections include hiding under a bush or table or
running into the garage. It is important that no matter which
reaction your dog chooses that you always respond the same
way. As was described earlier, keep your response simple and
direct your dog to a behavior that he already is comfortable
with, such as the "Sit" or "Stay" commands.
Q: If I have supervised my dog receiving the first correction from
the containment transmitter, do I have to provide the same on-leash
supervision with the remote transmitter?
A: Yes, it is always a good idea to have your dog on a leash the
first time he receives a correction from either. It is also a good
idea for you to supply this same on-leash supervision anytime
you use the remote transmitter in a new situation. For example,
if your dog has successfully learned to respond to the remote
transmitter in your yard, your should still have him on a leash the
first time he receives the correction inside your home.
Q: Is there one general rule or tip I should keep in mind when
training my dog with the PLUS system?
A: Perhaps the one general rule most essential for training with the PLUS system is work on only
one behavior at a time. For example, train your dog to yard boundaries first and once this training is
complete then, and only then, begin to use a remote transmitter to improve obedience commands.
Also, always give the correction at the "same time." That is, do so only when your dog is actually
misbehaving, not before the misbehavior occurs or after the misbehavior has stopped. This is important
because it gives your dog a chance to learn and to understand what causes the correction in the first place.
Moreover, it is critical not to correct out of frustration or as the result of misguided humor. As an owner,
you need to be as disciplined as you want your dog to be.
CONCLUSION
This section of the manual is intended to help those dog owners using the PLUS system by providing some
information that has some foundation in training philosophy. Before you use the PLUS system be sure you
completely understand how to operate and train with the equipment before placing it on your best friend.
18
REMINDERS
It is important that you review the following before using the remote transmitter. They will help protect
both you and your dog.
• Read this training manual in its entirety before attempting to train you dog with the remote transmitter.
• Take a few days to create the "Dummy Equipment Effect".
• When your dog first experiences the correction, be sure that it is in a situation that contains few
distractions.
• The first few times your dog receives the correction be present to observe his response.
• Train in one situation or work on one behavior at a time.
CAUTION NOTES
• Always have the collar on your dog, and the remote transmitter in your possession, when you and your
dog are in potentially troublesome situations.
• Your dog may "test" the receiver collar - be consistent when this occurs.
• Do not attach the receiver to a metal choker collar.
• Do not attach a leash to the receiver collar.
• Do not use remote transmitter in an attempt to correct or eliminate any form of aggressive
or biting behavior.
CLOSING STATEMENT
At PetSafe, we believe that every dog should receive basic obedience training. This training helps the
owner develop a relationship with their dog and also helps their dog understand its position in the "pack"
or what is also known as your family.
If you would like more information on the topic of obedience training, call us at 1-800-732-2677.
We also can refer you to an obedience trainer that is certified by Animal Behavior and Training Associates
(ABTA).
REPAIR AND RETURN PROCEDURE
If you have any problems with the operation or training of this system, please contact the PetSafe
Customer Service Department at 1-800-732-2677 or visit the PetSafe website at www.petsafe.net. Our
trained staff is available to answer any questions you may have.
If instructed to do so, send your product with a brief description back to the address below complete with
a legible return address. We recommend you ship your return via a carrier that offers tracking capabilities.
You must pay the shipping or freight charges to us. We will then pay the freight charges back to you.
Your product will be repaired or replaced immediately and shipped back to you. There is a nominal labor
charge for out of warranty products but all parts are free during the warranty period. If you have had your
system for more than one year, call Customer Service at 1-800-732-2677 to determine the labor charge.
Please remove the collar, probes and batteries from the receiver before shipping it to:
RSC, Service Warehouse, 10427 Electric Ave., Knoxville, TN 37932
OTHER PETSAFE PRODUCTS
If you would like more information about using any PetSafe electronic training system, call the PetSafe
Customer Service Department at 1-800-732-2677 or visit the PetSafe website at www.petsafe.net.
19
PLUS system receiver for use outside the containment area with the PLUS remote transmitter.
Pet Doors
Bark Control Collars
Scat-Mats
Wireless Indoor and Outdoor Containment
This product is to be used only on healthy dogs. If you have doubts about the health of your dog, contact
you veterinarian. Also, this product is not to be use on vicious animals or guard dogs. If you feel your dog
may pose a threat to others, DO NOT USE THIS SYSTEM.
Do not let children operate this system.
This product has been designed as a training aid to help teach your pet to remain within the established
boundary. It will not work without proper training and is not to be considered a solid barrier
Radio Systems Corporation shall NOT be liable for any property damage, economic loss or any
consequential damages sustained as a result of an animal crossing the boundary.
NOTE ABOUT THE RADIO FENCE PLUS REMOTE TRAINER SYSTEM:
This equipment has been tested and found to comply with the limits for a Class B digital device, pursuant
to Part 15 of the FCC Rules. These limits are designed to provide reasonable protection against harmful
interference when the equipment is operated in a residential environment. This equipment generates, uses,
and can radiate radio frequency energy and, if not installed and used in accordance with the instruction
manual, may cause harmful interference to radio communications. However, there is no guarantee that
interference will not occur in a practical installation. If this equipment does cause harmful interference to
radio or television reception, which can be determined by turning the equipment off and on, the user is
encouraged to try to correct the interference by one or more of the following measures:
• Reorient or relocate the receiving antenna.
• Increase the separation between the equipment and receiver.
• Connect the equipment into an outlet on a circuit different from that to which the receiver is connected.
• Consult the dealer or an experienced radio/tv technician for help
Unauthorized changes or modifications to the equipment, not approved by PetSafe, could result in not
meeting compliance with FCC regulations and could void the user’s authority to operate the equipment
FCC ID# KE3PPT101 and KE3TC100
20
Mounting Template
3.150"
Radio Systems Corporation
10427 Electric Ave.
Knoxville, TN 37932
400-409/2