1
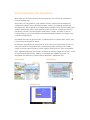
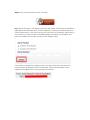
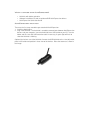
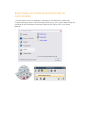
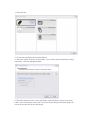
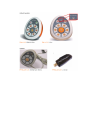
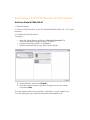
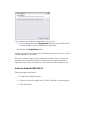
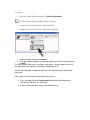
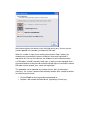
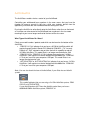
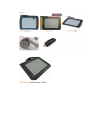
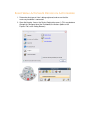
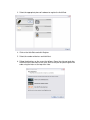
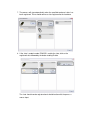
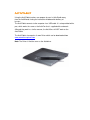
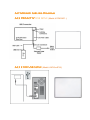
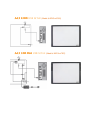
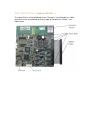
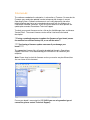
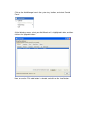
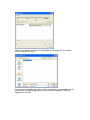
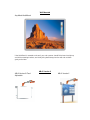
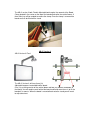
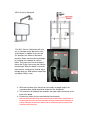
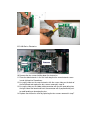
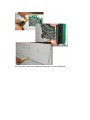
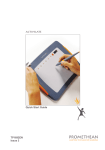
Module 7 Support & Software ActivSoftware (PC and MAC) What makes the ACTIVClassroom even more powerful is the inclusion of Promethean’s Premier Software suite. ActivInspire is a cross-platform, single software solution, combining the functionality of award-winning ActivPrimary and ActivStudio while seamlessly integrating ActiVote and ActivExpression. ActivInspire offers straightforward navigation and an innovative toolbar that updates automatically with the most frequently and last used tools. Improving on existing functionality, teachers can now integrate media players, images, and audio, as well as existing resources, even if from different interactive whiteboard software or programs such as Microsoft PowerPoint™. ActivStudio released prior to ActivInspire, is loaded with tons of software tools, utilities, and has thousands of included Resources. ActivPrimary released prior to ActivInspire but at the same time as ActivStudio, possesses many of the features of ActivStudio but is targeted for younger audiences with a bolder, simpler, and more colorful interface. It helps meet the needs of the K-5 levels of education. Note: September 2010 they will therefore no longer be providing support for versions 1 and 2 of ActivStudio and ActivPrimary software. In the longer term support for version 3 of ActivStudio and ActivPrimary software will be withdrawn in September 2011. ActivInspire ActivStudio ActivPrimary Downloading & Installing ActivInspire The ActivBoard 100, 300 and 300 Pro ranges are not shipped with a software or driver CD / DVD unless specifically required at the time of order. In order to use your board for the first time, you are required to download ActivInspire and the Activdriver to enable you to use your board. To do this, follow the steps below: Note: You will need to log in to Promethean Planet prior to downloading. If you are not a registered user, click on the ‘Register’ option at the top of the webpage. Registration is free of charge. Step 1: Go to www.prometheanplanet.com and hover mouse over ‘Support’, select ‘ActivInspire, and click on the download link. Step 2: Select the language of ActivInspire which you wish to download: Step 3: Click on the ‘Download Version 1.4 button’ Note: Also on this page, is the option to enter your ActivStudio / ActivPrimary or ActivBoard 300/ 300 Pro Serial Number, which if valid will produce a serial key to unlock Professional Edition of ActivInspire. If you are an existing user, with either an ActivStudio / ActivPrimary 3 serial number, or a new user with an ActivBoard 300, enter choose relevant option, and enter your product serial number, and click on the ‘Validate’ button: Once number is validated you should receive a message similar to the one below, this number will then be entered into the ‘Serial Number’ field of the Promethean License agreement that appears the first time you open the software. Step 4: At the next screen, answer the questions on the questionnaire and click on ‘Submit’: Step 5: After the form, the next page should start the download of ActivInspire automatically. Choose the location you wish to download ActivInspire to on your computer, and click on ‘Save’. Also on this page is the option to download a resource pack (.as4a file extension) to use with ActivInspire. If you wish to download a resource pack, simply click on the link, and choose the destination where you wish to save the resource pack to: Step 6: Once you have downloaded ActivInspire, open up the installer package on your computer by double clicking on it, and follow the onscreen wizard. On a Windows machine you have to option to do either a ‘Full’, ‘Custom’, or ‘Network’ installation. Choose the installation that is most appropriate for your setup. If you are using a Mac, when you open the package, you will have separate installers for ActivInspire and ActivManager (Driver) – both elements must be installed in order to use ActivInspire with your ActivBoard. If you have a Professional Edition serial number, when you launch ActivInspire for the first time, you will be asked to enter this 20 digit number. Once you have entered it, Professional Edition will then be unlocked on the computer. Further Information: When using ActivInspire for the first time, you will be asked which version you should use. If using the ActivBoard 100 series, you are entitled to use the Personal edition, or the trial version of ActivInspire Professional. If you are an ActivBoard 300 or ActivBoard 300 Pro user, you are entitled to a free update to Professional edition – as mentioned above – simply enter the serial number obtained in step 3. Importing Resource Pack into ActivInspire Step1: Launch ActivInspire Step2: Click on ‘File’ -> ‘Import’ Step3: Select either ‘Resource Pac to My Resources…’ or ‘Resource pack to Shared Resources…’ depending on your preference. Step4: Browse to the location of your resource pack (.as4a file), and select it. Step 5: Click ‘Open’ – the contents of the resource pack will then be imported into your selected resource library. ActivExpression ActivExpression is the next, exciting development in real-time, learner-response technology. Use ActivExpression to find out what your students think. Save those responses and you have a record of what your students thought at a given time. Each student can: Input their thoughts as text, which can be displayed to everyone via a projected image Input numbers -the answers can be reviewed in a number of ways Answer multiple choice questions Answer true/false and yes/no questions Sort lists -in numerical or alphabetical order Gauge how much students agree or disagree; find out how confident they are about a topic… and this is only the starting point for the ways in which you can use ActivExpression. What is supplied with ActivExpression? • • • ActivHub with holder and cable Software installation CD and set-up/demo DVD ActivExpression devices ActivExpression Quick Start Guide ActivExpression: first steps These are the first steps needed to get started with ActivExpression. 1. Install the ActivInspire 2. Plug in the ActivHub -The ActivHub is needed to communicate between ActivExpression devices and your computer. Insert the ActivHub into a USB socket on your PC. Use the holder and the 1.8m (6ft) USB extension cable if necessary. A green light will flash to show the ActivHub is working. Optional tips for best use of the ActivHub Connect the USB ActivHub to the 1.8m (6ft) cable, place in the holder and position in clear view of the devices. Raise the antenna as shown in the image. Registering ActivExpression devices in ActivInspire 1. Ensure that the necessary hardware is connected (2.4 GHz ActivHub, model AH2). 2. Open ActivInspire. Access the Device Registration menu () (This may be done through the Configure tab of the Dashboard, the Actions option on the Express Poll, or the Voting Browser). 3. Select the hub. 4. Click on the ActivExpression and click Register. 5. Select the number of devices and click Next. If users will be renaming the devices during registration, select the appropriate option. 6. Follow the directions on the screen that follows: Power the devices up, press the menu button, and use the hotkeys next to the LCD screen to input the given PIN code. (Note: this may be easiest with the devices distributed) 7. The process will stop automatically when the specified number of devices has been registered. The expressions should now appear registered to the hub. The ActivExpressions should now be registered and should function using the Expresspoll or prepared questions. ActiVote Promethean’s ActiVote solution allows an instructor to receive instant feedback and assessment with the press of a button. The hand-held keypads turn all students into active participants. The voting solution promotes group participation by stimulating group feedback during discussion or debate scenarios, spontaneous opinion gathering, and formal tests. Any question, with up to six possible answers, can be presented to the group via our ActivStudio software. Responses are recorded and results are displayed in various formats. What Type of ActiVote Do I Have? Check your model number / product code which can be found on the bottom of the ActiVote handsets. • • “PRM-AV2-01” this indicates that you have a 915 MHz ActiVote which will register through ProActiv Boards AC2 (Model # PRM-AB2…) 78” size only. ProActiv 87” & 95” electronics do not have the built in capability to register 915 MHz ActiVotes. These votes are not longer manufactured or sold. “PRM-AV3-01” this indicates that you have a 2.4 GHz ActiVote which will register to a device labeled ActivHub Model # PRM-AH2-01 that you insert into your PC USB port. Note: You can also check the face of the ActiVote, if your vote has an ActivAir symbol. This symbol indicates that you are using a 2.4 GHz ActiVote system, PRMAV3-01. If your ActiVote does NOT have the ActivAir symbol then you have a 866MHz/915MHz ActiVote system, PRM-AV2-02. Registering ActiVote Devices in ActivInspire 1. Start ActivInspire. 2. Connect an ActivHub AH1 or your RF Enabled ActivBoard (50” / 60” / 78”) to your computer. 3. Distribute the ActiVote devices. To register: 1. Open the Voting Browser and click on Device Registration The ‘Device Registration’ Dialog Box opens. It shows: • A picture of an ActivHub AH1 or ActivBoard. • ActiVote and ActivSlate devices under Device Groups. 2. Select ActiVotes and click on Register. 3. Enter the number of devices you want to register (or use the arrows) and click on Next. The next window shows clear instructions, with photos, so your students can finish the registration (you might like to practice the procedure first!). If the students are finishing the registration, they have to: a) Press and hold the central Registration button on the ActiVote devices. The top red light flashes, followed by the green light. b) Release the Registration button. ActivInspire registers the devices to the ActivHub one by one. You can see the number updated in the window. When this number is equal to the number you entered in Step 3. above, the window closes automatically, because all devices have been registered. If registration fails for any of the devices, the window must be closed manually. Before you begin registration: 1. Distribute the ActiVote devices. 2. Connect an ActivHub model AH2 (2.4GHz ActivHub) to your computer. 3. Start ActivInspire. To register: 1. Open the Voting Browser and click on Device Registration The 'Device Registration' Dialog Box opens. It shows: • A picture of an ActivHub AH2 (2.4GHz ActivHub). • ActiVote and ActivSlate devices under Device Groups. 2. Select ActiVotes and click on Register 3. Enter the number of devices you want to register (or use the arrows) and click on Next. The next window shows clear instructions, with photos, so your students can finish the registration (you might like to practice the procedure first!). A three letter PIN code is displayed, which must be entered on each device to be registered. If the students are finishing the registration, they have to: a. Press and hold the central Registration button on the ActiVote devices, until both the top lights are illuminated. b. Enter the PIN code, pressing the ActiVote device keys. ActivInspire registers the devices to the ActivHub one by one. You can see the number updated in the window, just below the PIN code. When this number is equal to the number you entered in Step 3. above, the window closes automatically, because all devices have been registered. If registration fails for any of the devices, the window has to be closed manually. If a PIN code is entered incorrectly, both steps a. and b. must be repeated, that is, the central button must be pressed and held until both lights are on and the correct PIN code must be entered, for a successful registration. This procedure can be repeated any number of times, but it should not be necessary - the system is proven to be extremely reliable. After a couple of failures for a device you can either: • • Click on Finish to close the window and proceed, or Replace it with another ActiVote device, registering it if necessary. ActivSlates The ActivSlates enables wireless control of your ActivBoard. Controlling your whiteboard from anywhere in the room means that you have the freedom to immerse yourself in the class, while your students benefit from the opportunity to interact with the ActivBoard without leaving their seats! By using the ActivPen to write directly onto the ActivSlates rather than on the board an instructor can take control of the ActivBoard from anywhere in the classroom meaning that you are no longer confined to the front of the classroom. What Type of ActivSlates Do I Have? Check your model number / product code which can be found on the bottom of the ActivSlate. • “PRM-RS1-01” this indicates that you have a 915 MHz ActivSlate which will register through ProActiv Boards AC2 (Model # PRM-AB2…) 78” size only. ProActiv 87” & 95” electronics do not have the built in capability to register 915 MHz ActivSlate. This model Slate is no longer manufactured or sold. • “PRM-RS2-02” or “PRM-RS3-01” this indicates that you have a 2.4 GHz ActivSlate. It will register to a device labeled ActivHub Model No. “PRM-AH201” that you insert into your computers USB port. This model Slate is no longer manufactured or sold. • “ACTIVSLATE50” or “ACTIVSLATE60” this indicates that you have a 2.4 GHz ActivSlate. It will register to a device labeled ActivHub Model No. “PRM-AH201” that you insert into your computers USB port. Note: You can also check the face of the ActivSlate, if your Slate has an ActivAir symbol. This symbol indicates that you are using a 2.4 GHz ActivSlate system, PRMRS2-02 or ACTIVSLATE50. If your ActivSlate does NOT have the ActivAir symbol then you have a 866MHz/915MHz ActivSlate system, PRM-RS1-01. PRM-RS3-01 (ActivSlate 60) 2.4 GHz Registering ActivSlate Devices in ActivInspire 1. Determine what type of slate is being registered, and ensure that the necessary hardware is connected. 2. Open ActivInspire. Access the Device Registration menu () (This may be done through the Configure tab of the Dashboard, the Actions option on the Express Poll, or the Voting Browser). 3. Select the appropriate piece of hardware to register the ActivSlate. 4. Click on the ActivSlate and click Register. 5. Select the number of devices and click Next. 6. Follow the directions on the screen that follows: Power the slate up, touch the ActivPen to the flame icon on the slate, and use the pen to input the given PIN code using the letters at the top of the slate. 7. The process will stop automatically when the specified number of slates has been registered. There should now be a slate registered to the hardware. 8. If the slate is model number PRM-RS1, enable the slate; click on the registered slate followed by the button reading Enable. The slate should now be registered and should function with the pen as a mouse input. ActivTablet Using the ActivTablet teachers can prepare lessons in ActivStudio away from the ActivBoard, freeing the interactive whiteboard for delivery of lessons. The ActivTablet connects to the computer via a USB cable. It is also provided with a pen, which works the same as the ActivPen that is supplied with our boards. Although they work in a similar manner, the ActivPens will NOT work on the ActivTablet. The ActivTablet also requires its own Driver which can be downloaded from www.prometheanplanet.com Note: The Driver is Not the same as the Activdriver. ActivBoard Cabling Diagram AC2 PROACTIV USB Setup AC3 E100 USB Setup (Model # PRM-AB2…) (Model # ABV3xxE100) AC3 S300 USB Setup (Model # ABV3xxS300) AC3 300 Pro USB Setup (Model # ABV3xxPRO) AC2 Electronics (Model # PRM-AB2…) The actual “Brains” of the ActivBoard are the “Electronics” circuit board that is held in place by 4 screws and attached to the main body of the board via a 50 pin, 1 inch ribbon cable. AC3 E100 Electronics (Model # ABV3xxE100) AC3 S300 & 300 Pro Electronics (Model # ABV3xxS300 & ABV3xxPro) Firmware The software encoded on the electronics is referred to as Firmware. On occasion the Firmware may need to be updated in order to keep up with changes in current Operating Systems. Software enhancements are usually done only after other troubleshooting steps have not succeeded and normally with the guidance of a Promethean Certified Technician. If you are unsure whether or not to perform the update please contact Promethean Technical Support. To check your current firmware version, click on the ActivManager icon, and choose 'Control Panel'. The current firmware version will be listed next to the board description. The appropriate firmware files will need to be obtained through a Promethean Support Technician. Once obtained copy the firmware files to a folder on your computer. Note: Please keep in mind the firmware version you receive may be different than the one shown in this document. Ensure your board is connected via USB (N.B If you are using another type of connection, please contact Technical Support) Click on the ActivManager icon in the system tray / toolbar, and select ‘Control Panel’: At the following screen, select your ActivBoard so it is highlighted in blue, and then click on the ‘Upgrade’ button: Now, ensure the ‘File’ radio button is selected, and click on the ‘Load’ button: Browse to the location to where you downloaded and extracted the file to earlier, select it, and click on ‘Open’: If you receive the following message, it means your board is not compatible with the firmware you are trying to upgrade it to. Please contact Promethean Technical Support for assistance. If the firmware that you have chosen is correct, you will now return to the ActivManager screen, where the ‘Upgrade’ button will now be selectable. Click on the ‘Upgrade’ button: You will then receive a message asking if you wish to change the firmware on the selected device, click ‘Yes’: The firmware update will then take place. Once it has finished, you will be prompted to reset the power to your ActivBoard. Once this has been done, the firmware update will be complete. Warning: It is very important that this process is not interrupted once the upgrade begins. The failure to complete this upgrade once started, could result in irrevocable damage to your ActivBoard. Do not move your PC (so that the connection is not lost) or press any of the Keyboard keys (so that the data writing of the firmware is not interrupted). Replacing Electronics In some instances where either, updating the firmware version or other troubleshooting techniques does not resolve a support issue, you may need to replace the actual electronics on the board. For this process you will need someone to help you lift the ActivBoard (From its wall-mounted position), a Phillips head screwdriver and in some cases a small pliers or hex driver. Note: The Promethean ActivBoard weight varies depending on size and model. Due to the size and awkward nature of the ActivBoard, Promethean requires that the actual ActivBoard be lifted and, or carried by at least two persons to reduce the risk of personal injury or damage to the product. 1. Disconnect the ActivBoard from your Computer 2. Power off the ActivBoard if powered and power off projector. 3. Identify how the board is mounted, Wall Mounted, AB+2 version 2 or 3 (Fixed or Adjustable). Use the guides below in reference to your installation. Please keep in mind the boards displayed below may be different from what you have installed. Wall Mounted Any Model ActivBoard If the ActivBoard is mounted on the wall, you, and a partner should lift the board straight up and off the mounting brackets; and slowly bring board away from the wall and set down gently on the floor. AB+2 Version 2 AB+2 Version 2 Fixed Adjustable AB+2 Version 2 The AB+2 version 2 both Fixed & Adjustable both require the removal of the Board Clamp located in the center on the top of the board attached to the vertical boom. A 6mm Allen key will be needed to remove the clamp. Once the clamp is removed the board can then be lifted off the stand. AB+2 Version 3 AB+2 Version 3 Fixed The AB+2 Version 3 will have three (3x) Adjustable bumpers located behind the board. One (1x) on the top center of the vertical boom and two (2x) towards the bottom of the board. You will need to reach behind the board and hand screw these in to lift the board off its mounts. When the board is mounted back onto the stand you will need to adjust back out. AB+2 Version 3 Adjustable The AB+2 Version 3 Adjustable will have one (1x) bumper on the top center of the vertical boom. In addition may have two (2x) brackets that slide over the board brackets. Before removing the board begin by screwing in the bumper on vertical boom. Then from each side of the board loosen the Philips head screw and slide the bracket back. When the board is mounted back onto the stand you will need to adjust bumper back out. Slide bracket into position and tighten Philips screw. 4. While one member of the two person team holds the board upright, the second member should proceed to the back of the ActivBoard. 5. The electronics of the board are located in the upper right-hand corner of the back of the board. 6. Remove any cables that are connected to the electronics. 7. After removing the cables take your Phillips screwdriver and remove the four screws holding the electronics cover in place. 8. Once the cover is removed you will see the electronics. To the right side of the electronics you will see the 1 inch ribbon cable that connects the electronics to the board. 9. Hold onto the Right end of the ribbon cable by the black plastic connector and lift the right end of the ribbon cable from the board. The left end DOES NOT come off. AC2 Electronics AC3 300 Series Electronics 10. Remove the four screws holding down the electronics. 11. Place the old electronics in the anti-static bag that the new electronics came in and ship back to Promethean. 12. Line up the holes on the new electronics with the screws holes on the back of the ActivBoard and replace the four screws removed in step 10. 13. Line up the holes on the ribbon cable connector with the pins protruding from the right side of the board and insert the connector with a perpendicular push to avoid bending or damaging the pins. 14. Replace the electronics cover by replacing the four screws removed in step 7 You have now successfully replaced the electronics of your ActivBoard. Driver updates The Activdriver controls the communication of the OS and the ActivBoard. In order to keep up with changes in the current Operating systems, and the ever changing needs of our customers the Activdriver is frequently updated. The most current version of the Activdriver for both Mac and PC can be found at the Promethean Planet Website. Link: www.prometheanplanet.com (Click “Support” & select “Updates”) Please note, if the customer is not having any problems, it is not necessary to update the driver. Who Should I Call For Support If you are the support personnel at your establishment then your first call might be to the reseller from whom you purchased your Promethean Product. If you are a reseller helping one of your customers then you should call the Promethean Support line. Be prepared to give not only your information, but the information of the customer that you are helping. The Support numbers are below: Web Support: www.prometheankb.com (Click “Contact Technical Support” link)