1
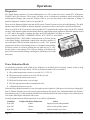
Electronic Control System
Operation Manual for
6LY3 Series Engines
ELECTRONIC
CONTROL
SYSTEM
MANOPLYm01
Revision 3.0
Notice to Boat Manufacturer, Installer, and Consumer
Throughout this manual, warnings are used to alert the installer/operator to special instructions concerning a
particular service or operation that may be hazardous if performed incorrectly or carelessly. Observe these
alerts carefully!
These “safety alerts” alone cannot eliminate the hazards that they signal. Strict compliance to these special
instructions when performing installation, operation, and maintenance plus “common sense” operation are the
most effective accident prevention measures.
Warning
This device should not be used as a navigational aid to prevent collision, grounding, boat damage, or personal
injury. When the boat is moving, water depth may change too quickly to allow time for you to react. Always
operate the boat at very slow speeds if you suspect shallow water or submerged objects.
RECREATIONAL CRAFT DIRECTIVE 94/25/EC
This product has been designed to be compliant with the above Directive.
Maximum performance, and compliance with the EMC Directive, can only be ensured by correct installation.
It is strongly recommended that the installation conforms with the following standards:
APPLICABLE STANDARDS
a) ISO 8846 Small Craft-Electrical Devices
Protection against ignition of surrounding flammable gases.
b) ISO = International Standards Organization
This device meets or exceeds the applicable ABYC, ISO, and USCG safe boating rules, regulations, standards,
and guidelines.
SAFE BOATING ON THE WEB
U.S. Coast Guard
www.uscg.mil
U.S. Power Squadron www.usps.org
NMEA 2000® is a registered trademark of the National Marine Electronics Association.
Disassembly and repair of this electronic unit should only be performed by authorized service personnel. Any
modification of the serial number or attempt to repair the original equipment or accessories by unauthorized
individuals will void the warranty. Handling and/or opening this unit may result in exposure to lead, in the form
of solder.
The information contained in this manual is believed to be accurate at the time of going to print but no responsibility, direct or consequential, can be accepted for
damage resulting from the use of this information. The manufacturers reserve the right to make changes, without notice, to any of its products.
Contents
System Overview.......................................................................................................................................... 4
Helm Components...................................................................................................................................................4
Start Up......................................................................................................................................................... 5
Redundant (Back Up) Throttle. ................................................................................................................... 5
Shift & Throttle Control Head Functions................................................................................................................8
Control Head Operation .........................................................................................................................................8
Operation...................................................................................................................................................... 9
Identification...........................................................................................................................................................9
Select/Change Station.............................................................................................................................................9
Indicator Dimming Feature.....................................................................................................................................9
Shift Disconnect (SD)...........................................................................................................................................10
Split Range Throttle (SRT)...................................................................................................................................10
Sync Operations....................................................................................................................................................11
Cruise Sync (CS) ...........................................................................................................................................11
Power Train Sync (PTS).................................................................................................................................11
System Alarms......................................................................................................................................................12
Optional Trolling Mode.........................................................................................................................................13
i5601E Digital Display Alarms/Diagnostic Code Screens ...................................................................................14
Engine Alarms.......................................................................................................................................................15
Engine Diagnostic Codes......................................................................................................................................15
Maintenance Warning............................................................................................................................................15
Diagnostics............................................................................................................................................................16
Power Reduction Mode.........................................................................................................................................16
Appendix A: i5601E Digital Display Setup.............................................................................................. 17
Display Settings..................................................................................................................................... 18
Menus..................................................................................................................................................... 18
User Settings and Factory Settings........................................................................................................................19
“Unlocking” the Hot Keys....................................................................................................................................19
Quad Screen Parameters........................................................................................................................................20
Appendix B: i5601E Menu Navigation ................................................................................................... 21
Appendix C: Default Settings .................................................................................................................. 22
Appendix D: Fuses..................................................................................................................................... 23
Appendix E: Trouble Codes...................................................................................................................... 24
Appendix F: Network Status.................................................................................................................... 25
Appendix G: Station Select Protection.................................................................................................... 26
Electronic Control System: Operation Manual for 6LY3 Series Engines
Page System Overview
Although the scope of this document relates to both single and dual engines,
the instructions within depict the more widely used dual engine configuration.
Helm Components
This dual engine electronic control system consists of the following helm equipment:
• Two Yanmar i5601E Digital Displays (one, if single engine)
• Dual Shift & Throttle Control Head (single shift & throttle control head, if single engine)
Yanmar i5601E Digital Display
Note: Displays “Single”
if single engine
configuration.
The i5601E displays real-time data as well as warnings or alarms for any engine abnormality. Diagnostic codes
will be stored for future reference by a Yanmar technician.
Shift & Throttle Control Head
CH67601: Trolling Switch
(optional)
The Shift & Throttle Control Head selects the gear positions and the throttle settings. The Control Head has
several lights that confirm modes of operation and display warnings, if present. Buttons enable engine RPM
synchronization and shift disconnect as well as setting the brightness of the lights.
Other control configurations with similar functions may be used.
Page Electronic Control System: Operation Manual for 6LY3 Series Engines
Start Up
Your electronic engine control system was configured at the factory with the default settings needed to initially
start the system. See Appendix C.
1. Connect the battery terminals and turn the master battery switches to the “ON” position. Turn the engine
control breaker switches on at the main breaker panel.
Before starting the engines for the first time, take a moment to familiarize yourself with the shift and throttle
controls and ignition switch. With the engines not running, move the control levers over the full range until
you are familiar with the feel. Note that the detent pressure and drag can be adjusted using the adjusting screw
on the front surface of the control head. The top screw sets the detent pressure; the lower screw sets the drag.
Next, look at the ignition switch panels. The ignition switch may be a “rocker” type or conventional key type
switch. On either type there are three positions: OFF – ON – START. Normal engine shut down is achieved
by moving this switch to the OFF position.
Next to the ignition switch is an EMERGENCY STOP switch. Moving the rocker switch to the off position
(or turning the key to off) WILL result in the engine shutting down.
WARNING
In normal operating mode, the engine is started and stopped with either the key switch, or the off-onstart rocker switch. When you switch to the OFF position, the engine can take up to about 5 seconds to
stop running, allowing the engine to store certain information and make adjustments for easier restart.
In an emergency situation, you can use the Emergency Stop switch to kill all power to the engine. This
will allow you to stop at once, but will not store data and make adjustments for an easy restart. A DTC
(Diagnostic Trouble Code) will be generated and stored in the system indicating that the Emergency Stop
was activated. You will notice the next time you start, that the engine will crank over for an unusually long
time. This is normal for the engine to regain its memory and functions.
The Emergency Stop should only be used in an emergency.
2. Place the control levers in neutral and turn the PORT ignition switch to the On position -- but do not start the
engine. The green control head light will illuminate.
a. Check to see if the green light on the control head is solid or flashing. If solid, proceed to the next step.
If flashing, push the Select button to select the head. Position the control lever to neutral and the yellow
light will now come on.
b. Start the port engine.
c. Turn on the starboard ignition systems.
d. After a two-second wait, start the starboard engine.
Redundant (Back-up) Throttle
In the unlikely event that the throttle signal is lost between the helm mounted shift/throttle control head and the
engine, the system is designed to revert to the redundant or back-up throttle. First, the engine would reduce rpms
to idle speed, the digital display would show “Throttle Error,” and a small red indicator light would flash at the
key panel (or switch panel). Near the red light is a small potentiometer (looks like a volume control knob). Turn
the knob all the way to counter-clockwise in order to take control of the throttle. Then turn the knob SLOWLY
clockwise - the light will glow solid. You will have control of the throttle, however, you will NOT have shift
control. At this point you must shut the engine off and restart, to return throttle control back to the shift/throttle
control head. See transmission instructions for manual shifting.
Electronic Control System: Operation Manual for 6LY3 Series Engines
Page Start Up
When powered-up, the i5601E Digital Displays will initially display an introductory screen showing the software
revision level. They will then display one of the following four screens:
These screens show all of the key engine data and can be accessed by pushing a single button. The right-most
button allows the contrast and brightness to be set.
Page Electronic Control System: Operation Manual for 6LY3 Series Engines
Start Up
In the unlikely event that an engine fault occurs, a warning box appears in the
display showing the cause of the fault, and the action to take, "Press Any Key
To Continue."
Pressing any key acknowledges the alarm and immediately switches the display to the Alarms screen. The
i5601E continues to beep until all alarm conditions (engine faults) have cleared. Unacknowledged alarms are
shown as flashing boxes. Press any key to acknowledge alarm boxes that may still be flashing, and they will then
change to a steady highlighted state.
Alarm blocks remain highlighted as long as the alarm condition (engine fault) remains and will automatically
reset to an un-highlighted state after the alarm condition has passed.
Engine Diagnostic Code Summary Screen
Note: The i5601E is an extremely versitle display. The four-left keys can be reconfigured to allow the user to
display whatever screens he or she desires. For additional operational details, refer to Appenbdix A and the
technical manual.
Electronic Control System: Operation Manual for 6LY3 Series Engines
Page Start Up
Shift & Throttle Control Head Functions
The Shift and Throttle Control Head comes with a dual function, single lever control. A single lever control
initiates both shifting and throttle for a single engine.
Control Head Operation
WARNING
The boat will start to move during the next steps.
Be very cautious when first engaging the gears to establish that forward is truly forward
and reverse is truly reverse. A quick in-and-out of gear test is recommended.
Ensure that the boat is clear of all obstacles forward and aft before conducting this test.
1. With the engine running and the control head(s) in neutral, the green and yellow control head lights should
be illuminated.
2. Press the Neutral button(s) on the control head. The Neutral control head light(s) should flash.
3. Advancing the control lever(s) to the forward detent (that is, the position identified by a “click” feel) puts the
boat in forward idle. Pushing the lever further forward increases the throttle setting. The same is true in the
reverse direction.
Note that the detent pressure and drag can be
adjusted using the adjusting screw on the front
surface of the control head.
4. Return the control handle(s) to the neutral position.
5. Press the Neutral control head button(s). The neutral light(s) will stop flashing and remain continuously lit.
Page Electronic Control System: Operation Manual for 6LY3 Series Engines
Operations
Control Head Operation
The boat will start to move during the next steps. Be very cautious when first
engaging the gears to establish that forward is truly forward and reverse is
truly reverse. A quick in-and-out of gear test is recommended. Ensure that
the boat is clear of all obstacles forward and aft before conducting this test.
Warning
Identification
Engine Trim Control:
in the handle (optional)
Lever Position Indicators:
Adjustable Lever Feel
Starboard
Port
Shift
Detent
Throttle
Friction
Select/change Station:
NOTE: Station Protection may be turned on, see Appendix G.
A lit green SELECT lamp indicates a station is active.
• On single station boats, station selection is automatic.
• For mutli-station boats, choose a station and then press SELECT
button with levers in neutral.
to Change Stations:
• Move
to new station and press select button. (Green lamp
flashes.)
• Match
control handle positions with those of active station.
(Green lamp goes steady when levers match and this station is
now in control.)
Indicator Dimming Feature:
Push select button and the lamps will dim. There are four degrees
of brightness from which to choose.
NOTe: Indicator Dimming is only accessible from the active control
station. (Green lamp on steady.)
Electronic Control System: Operation Manual for 6LY3 Series Engines
Page Operations
NOTE: The flashing yellow N (Neutral) lamp
can indicate status of either Shift Disconnect (SD) or Split
Range Throttle (SRT). Please exercise caution when engaging/disengaging either of these modes! A steadyon Neutral lamp ALWAYS indicates engine is in NEUTRAL.
Shift Disconnect (SD):
Flashing yellow N (Neutral) lamp indicates SD engaged for this
engine.
Allows throttle control without gear engagement.
TO ENGAGE Shift Disconnect:
• Move engine’s lever to the “Neutral” position.
• Press the N (Neutral) button next to this lever. (Yellow lamp
flashes.)
To Disengage Shift Disconnect:
• Return engine’s lever to the “Neutral” position.
• Press N (Neutral) button next to this lever. The yellow
N (Neutral) lamp will go out - SD is disengaged and
the engine and transmission will now respond to lever
commands.
Split Range Throttle (SRT):
Flashing yellow N (Neutral) lamp - SRT engaged for this
engine.
Provides greater throttle sensitivity: moving an
engine’s control lever to “Full Forward” will only produce the
maximum percentage of WOT (Wide Open Throttle selected
at set-up - default Throttle Limit is 25%)
TO ENGAGE Split Range Throttle:
• Move engine’s lever to Forward Idle position.
• Press N (Neutral) button next to this lever. (Yellow lamp
flashes.)
TO DISENGAGE Split Range Throttle:
• Move engine’s lever to Forward Idle or Reverse Idle
• Press N (Neutral) button next to engine lever. The yellow N
(Neutral) lamp will go steady - SRT is disengaged.
Page 10
Electronic Control System: Operation Manual for 6LY3 Series Engines
Operations
Sync Operations:
note: Your system ships with Cruise Sync set as the default.
Power Train Sync may be selected using the i5601E display.
Cruise Sync (CS): Default
Automatically synchronizes engine RPMs when levers are
close together and above 20% forward throttle.
A lit red SYNC lamp indicates sync is enabled.
To Enable CS:
• Press SYNC button. (Red lamp flashes.)
• Match control handle positions within 10% of each other.
(Red lamp goes steady when levers match — CS is now
enabled.)
CS Automatic Engagement:
• When levers are moved within 10% of each other and over
20% forward throttle.
CS Automatic Disengagement:
• When levers are moved more than 10% apart or under 20%
forward throttle.
To Disable CS:
• Press SYNC button. (Red lamp flashes.)
• Match control handle positions within 10% of each other.
(Red lamp goes off when levers match — cruise sync is
now off.)
Power Train Sync (PTS):
Automatically synchronizes engines and transmissions; the port
lever controls throttle and shift of both engines across the entire
control range.
A lit red SYNC lamp indicates sync is engaged.
To Engage PTS:
Note: Starboard lever may be
chosen as master control using
the i5601E
• Press SYNC button. (Red lamp flashes.)
• Match control handle positions within 10% of each other. (Red
lamp goes steady when levers match — power trains are now
in sync.)
To Disengage PTS:
• Press SYNC button. (Red lamp flashes.)
• Match control handle positions within 10% of each other. (Red
lamp goes off when levers match — power train sync is now
disengaged.)
Electronic Control System: Operation Manual for 6LY3 Series Engines
Page 11
Operations
System Alarms
Critical Alarms
Continuous flashing both lights on either side of the
control indicates a Critical Alarm. System will do a “Safe
Shut Down,” and must be serviced before further use.
When a critical alarm occurs, the system will automatically
go to the selected “Fail Safe Response” mode. The system
MUST be shut down and restarted for most critical alarms.
Some functions may operate for a time after restart. See
display on Control Unit to determine cause of alarm.
If the alarm is caused by the Throttle Actuator hitting
“Stop” - Wide Open Throttle (WOT) - the alarm will go
away when the throttle is pulled back. However, as with
ALL Critical Alarms, the system must be serviced before
further use.
Non-Critical Alarms
Intermittent flashing of both lights on either side the
control (five seconds flash, normal for fifteen seconds, then
repeating), indicates a Non-Critical Alarm. Acknowledge
by a power up cycle or pressing the ENTER button on the
Control Unit. Continue to operate and have the system
checked as soon as possible.
Page 12
Electronic Control System: Operation Manual for 6LY3 Series Engines
Operations
Optional Trolling Mode
Note: The Trolling Mode must be calibrated before trolling will operate properly. See Installation Manual.
The Trolling mode option allows the boat operator to slow the forward and aft speed of the boat for fishing.
Trolling mode is achieved by the ECU electronically adjusting pressure bypass valves in the gearbox, allowing
the clutches to slip.
When trolling is selected on the Control Head or by pressing the separate trolling switch and the control lever(s)
is moved forward, the boat will start to move at the slowest speed. As the lever approaches 60% throttle, the
boat will be close to its non-trolling idle speed. Moving the lever(s) further forward will cause the transmission
to lock out trolling and advance the throttle. The factory set defaults will limit throttle to 40%.
The trolling defaults -- as shown in Appendix C -- can be set to a variety of operating modes. Contact your
dealer for details, or see technical manual.
How to Enter Trolling Mode:
1. Move the Control Head lever(s) to the “Neutral” position.
2. Start the engine(s) if necessary. The system must see RPM in order to permit trolling mode to be entered.
3. Press the separate trolling switch. This places the system in trolling mode.
4. When you move the Control Head lever(s) in either the forward or reverse direction, the engine RPM will
remain steady, but the boat should move in the selected direction.
5. To take the boat out of the trolling mode, return the Control Head lever(s) to the “Neutral” position and press
the Trolling switch.
CH67601 Trolling Switch
(optional)
Control Lever Range of Operation
Tro
llin
g
60%
...
....
.. ...
.
....
....
....
.
.
.
..
...
....
.
.
.
...
....
....
.
.... Th
ro
ttl
e
40%
40% Throttle
Full Lock-up
Note: While engaged in Trolling mode, Split Range Throttle (SRT) is not operational.
Electronic Control System: Operation Manual for 6LY3 Series Engines
Page 13
Operations
i5601E Digital Display Alarms/Engine Diagnostic Codes
Performs the function indicated by a pop-up menu,
if present.
With no pop-up menu showing, briefly press to
display the Lighting & Contrast menu.
With no pop-up menu showing, press and HOLD
to display the MAIN MENU.
Buttons
Down Arrow moves menu selection down
Up Arrow moves menu selection up
Right Arrow acts on current menu item
Back Moves back to previous menu
Engine Alarms/Diagnostic Codes
The ALARMs / DIAGs Screen Menu allows user to go to the Alarm or Diag Code Screen. This is very useful
in the HOT KEY Mode, as a dedicated hot key is not required to view these screens. User can hold Right most
key down go into the menu mode and then via this menu access the desired screen.
Page 14
Electronic Control System: Operation Manual for 6LY3 Series Engines
Operations
Engine Alarms
The Alarm Screen will display the status of 20 defined alarms. A
flashing black background indicates unacknowledged alarm; a solid
black background indicates an acknowledged still in alarm state
status.
Engine Diagnostic Codes
This screen displays the diagnostic code information. The title bar
indicates the number of diagnostic items.
Maintenance Warning
Based on startup issues, the maintenance timer will activate between 50 and 60 hours of operation. A maintenance
warning will be displayed on the digital display screen. To acknowledge this warning, press and hold the #5
(right most) button on the i5601E digital display for a few seconds until the main menu is displayed. Use the
down arrow button to move the cursor to “Calibration.” Press the right arrow button, then go to “User Setting”
menu. The arrow should be at the “Reset Maint. Time” selection. Press the right arrow key to reset. The warning
will go away. After an additional 250 hours of operation the maintenance warning will be displayed again, and
every 250 hours thereafter. This a reminder that periodic maintenance must be performed at these intervals.
Electronic Control System: Operation Manual for 6LY3 Series Engines
Page 15
Operations
Diagnostics
The digital display indicates if certain malfunctions occur. The system also stores certain DTC (Diagnostic
Trouble Codes) for reference. These codes will help you or a technician to determine which subsystem has
malfunctioned. Display and record all Trouble Codes so you can relay them to the technician. A listing of
possible Diagnostic Trouble Codes are in Appendix E.
There are also diagnostic lights built into the Electronic Control System to assist in troubleshooting. The shift/
throttle control head will flash to indicate improper operation (see the section on the control head function).
There is an i8320 or i8325 electronic control module (ECU mounted in the engine room). On the ECU module
are three LED indicator lights which normally flash to acknowledge proper operation. When the ignition switch
is “ON” and/or the engine is running, the three small LED indicators will flash at various
rates to indicate engine communication, ecu status, and nmea
communication. THE NMEA communication is the data stream
to the digital display, shift/throttle control head, and other modules. If
any of the three LEDs fail to flash while the key is in the “ON” position
(engine does not have to be running), there is a communication problem.
For safety reasons, it is best to perform this test while the key is “ON”
but the engine is not running. The LED not flashing will indicate the
part of the system malfunctioning, and diagnosis should proceed in that
subsystem.
Power Reduction Mode
An automatic protection mode called Power Reduction is included in the electronic control system to help
protect the engine from major failure. The Power Reduction mode will be activated if:
A.The coolant temperature reaches or exceeds 110° C (230° F).
B.The boost pressure reaches or exceeds 250 kPa (36 psi).
C.An Engine speed sensors error occurs.
D.The Rack Position sensor is out of range.
E.The fuel injection timer shows an abnormal value.
F. A Throttle Position error occurs.
When the Power Reduction mode is active, the engine speed is limited to 1,800 rpm or less for items A through E.
Item F (Throttle Position error) will result in rpm returning to idle speed. [See “Redundant (Back-up) Throttle”
description on page 5]. If the condition falls back below the threshold or the fault no longer exists, normal power
will resume after engine shut-down and re-start.
On multi-engine boats the following actions occur on Power Reduction.
Condition
Sync OFF
Engine with Power Reduction
Either
Action
Engines operate independently
Sync ON
Master Slave slowly matches master
Sync ON
Slave Master normal, slave slows
Page 16
Electronic Control System: Operation Manual for 6LY3 Series Engines
Appendix A
i5601E Digital Display Setup
The i5601E was set up at the factory with the keys assigned and locked as shown on page 6 of this manual. This
mode is the default mode and allows start up and operation of the engine. It serves many applications quite well.
The i5601E Digital Display unit has many additional features and capabilities. This section of the book shows
the use of some of these features.
Changing the basic set up is typically accomplished in one of two ways.
1. Go to the systems menu and alter basic selections
2. Enable the right arrow key on the basic screens to allow changing of the data shown in the default
displays.
To enter the Main Menu press and hold key 5 until the menu appears.
To move around the menus use the softkeys at the bottom of the screen.
The function of a particular softkey changes from screen to screen to
whatever is most appropriate for the given screen.
Keys 1 2 34 5
NOTE: Any changes to the setup menus may require reconfiguring the i5601E HOT KEY SETUP.
Electronic Control System: Operation Manual for 6LY3 Series Engines
Page 17
Appendix A
Display Settings
The Monitor Settings Menu allows setting of parameters that are specific to the display unit. Some settings such
as Language and Lighting will be communicated to the other displays.
Display Description
MENU HOT KEYS LOCK
UNITS
LANGUAGE
TACH RNG 0-5000
SPEED
DEPTH OFFSET
DEFAULT MONITOR
BEEPER ON
ABOUT
Function
Controls the actions of the keys
Sets a variety of units to suit the operator
Sets the language the unit will display
Sets the tach range
Allows adjustments to speed readings if available
Allows adjustments to depth readings if available
Returns the unit to the default settings
Turns the key beeper on and off
Supplies information about the display
Menus
This menu controls the key functions. There are three choices.
1. When the Pop-Up Menus feature is selected (drawing at right), the unit
functions like a typical computer. A key push brings up a menu and you
then use the keys to make a series of selections. This is the mode that allows
new screen set ups to be selected and any screen to be accessed.
2. The Hot Key Locked selection allows keys 1, 2, 3, and 4 to be assigned as
favorite screens. Pushing the key immediately brings up the selected screen.
This mode will not display the right arrow over key 5. Thus the screens are
locked when this is selected. This is the factory default setting.
3. The Hot Key selection allows keys 1, 2, 3, and 4 to be assigned as favorite
screens. Pushing the key immediately brings up the selected screen. This
mode will display the right arrow above key 5. That arrow allows the user
to select various data inputs in the various sections of the screen.
Page 18
Electronic Control System: Operation Manual for 6LY3 Series Engines
Appendix A
User Settings and Factory Settings
• The user setting allows for reset of the maintenance timer.
• The factory settings require a password to change.
“Unlocking” the Hot Keys
This is a popular way to expand the use of the i5601E. The default hot keys will remain active but you can select
other data parameters in the various display areas. A right arrow becomes visible over key 5. Pushing that key
then allows for selection of a number of data types in the various boxes.
To unlock the hot keys and allow for additional data selections go to the Main menu as described on pages 17
and 18. Then select HOT KEYS. Exit the menu back to the normal operating screens. You will see a right hand
arrow above key 5 when any key is pressed.
The Right Arrow button allows the choice of an individual gauge. The choices available are shown on page 20.
The choices are presented in alphabetical order.
Example using a quad screen:
1
2
3
4
Hot Keys
5
1
2
3
4
5
Block Keys
Each button cycles the related block
through the list on the next page.
Note: Data in NMEA 2000® format may be added to the CANBus system from a compatible device which
feeds the optional parameters listed above. The i5601E display has the capability of displaying additional
Electronic Control System: Operation Manual for 6LY3 Series Engines
Page 19
Appendix A
Quad Screen Parameters
These data choices can be placed in any box of a quad screen or in the two small boxes of an engine data screen:
The screen headings that are included in a standard (default) set-up are noted in bold.
Screen Heading
Battery
Bearing
COG
Coolant
Depth
Fuel Rate
Fuel Tank 1
Fuel Tank 2
Fuel Tank 3
Fuel Tank 4
Gear
Heading
Hours
Load
Network
Oil Pressure
Oil Temperature
RPM
Rudder
Sea Temp
SOG
Speed (SOW)
Tab Port
Tab Stbd
Trim Port
Trim Stbd
Throttle
Torque
Turbo
Waste
Water
WP Dist
XTE graph
XTE value
Page 20
Function
Battery Voltage
Bearing to Waypoint
Course Over Ground
Engine Coolant Temperature
Depth of the water
Fuel level if single engine
Fuel level in Tank 1
Fuel level in Tank 2
Fuel level in Tank 3
Fuel level in Tank 4
Indicates the selected gear
Current vessel heading
Actual Engine Hours
Percent load on engine
Network voltage
Engine Oil Pressure
Engine Oil Temperature
Engine Revolutions Per Minute
Rudder Angle
Sea Water Temperature
Speed Over Ground
Speed through the water
Position of the Port Trim Tab
Position of the Starboard Trim Tab
Port Engine Trim
Starboard Engine Trim
The percent of throttle currently selected
The percent torque the engine is developing
The amount of turbo boost pressure
The amount of waste in the holding tank
The amount of water in the water tank
The distance to the selected waypoint
The cross track error from a best source
The cross track error from a best source
Typical Data Source
Engine
GPS
GPS
Engine
Sonar
Sender
Sender
Sender
Sender
Sender
Engine
Compass
Engine
Engine
Engine
Engine
Engine
Engine
Sender
Sender
GPS
Sender
Sender
Sender
Sender
Sender
Engine
Engine
Engine
Sender
Sender
GPS
GPS
GPS
Electronic Control System: Operation Manual for 6LY3 Series Engines
Appendix B
i5601E Menu Navigation
Performs the function indicated by a pop-up menu,
if present.
With no pop-up menu showing, briefly press to
display the Lighting & Contrast menu.
With no pop-up menu showing, press and HOLD
to display the MAIN MENU.
ALARMs / DIAGs
MAIN MENU
Diag Codes
Alarms
ALARMs / DIAGs
Network Status
MONITOR SETTINGS
CALIBRATION
Network Nodes
MONITOR SETTINGS
FACTORY SETTINGS
HOT KEYS LOCK
Units Menu
Password Protected
Language Menu
USER SETTINGS
Tach Range 0-3000
Reset Maint. Time
SPEED
Docking Mode
Depth Offset
Default Monitor
Fwd Throt Curv
1
Beeper ON
Rev Throt Curv
1
About
Split Range
Prog Shift Delay
Station Protect
CALIBRATION
0.0
N
USER SETTINGS
TROLLING
TROLLING
Troll Mode
FACTORY SETTINGS
Eng Display:
PORT
SPLIT
Lever
40 %
Max Throttle
50 %
VALVE CAL
Set Idle rpm
Sync:
Pwr Train
Lead Eng:
T Engage Dly
Port
0.0
Setup TROLL Valve
Fixed Shift Dly:
Buttons
SETUP TROLL VALVE
RPM ENGAGE
Trans Type
450
ZF
0.0
SYSTEM SELECT
“Down” Arrow moves menu selection down
“Up” Arrow moves menu selection up
“Right” Arrow acts on current menu item
“Back” Moves back to previous menu
Electronic Control System: Operation Manual for 6LY3 Series Engines
Page 21
Appendix C
Default Settings
For single engine configuration, the engine interface part number is i8320 (no trolling) or i8325 (with trolling).
The settings are the same as the dual engine configuration below.
Without Trolling
Engine Interface part number
i8320P
i8320S
Idle RPM700700
Sync
Cruise
Cruise
Lead Engine
Port
Port
Split Range Throttle
25%
25%
Forward Throttle Curve
F5
F5
Reverse Throttle Curve
R1 R1
Programmable Shift Delay7.27.2
Fixed Shift Delay
0.2
0.2
Station Select Protection
Off
Off
With Trolling
Engine Interface part number
i8325P
i8325S
Idle RPM700700
Sync
Cruise
Cruise
Lead Engine
Port
Port*
Troll Trans Type
ZF
ZF
Troll Engage RPM
850850
Split Range Throttle
25%
25%
Forward Throttle Curve
F5
F5
Reverse Throttle Curve
R1 R1
Programmable Shift Delay7.27.2
Fixed Shift Delay
0.2
0.2
Station Select Protection
Off
Off
Troll Mode**
Split
Split
Troll Lever Travel
60%
60%
Maximum Throttle in Troll Mode
40%40%
Troll Throttle Engage Delay
0.2 0.2
Note: A system reset may be needed for some changes to take effect.
*Only shows when Sync is set to Power Train
**Troll Mode functions are not displayed until Troll Mode is selected.
Page 22
Electronic Control System: Operation Manual for 6LY3 Series Engines
Appendix D
Fuses
There is a fuse on the back of both the lower station and upper Station Ignition Switch Panels. It is a 5 amp fuse,
designation AGC SA.
Electronic Control System: Operation Manual for 6LY3 Series Engines
Page 23
Appendix E
Diagnostic Trouble Code Descriptions
NOTE: On the digital display the DTC “Y” code will be shown along with additional information for that
code. This information will further define the fault. Please make note of all the information details with the
Y code before notifying your Yanmar service technician.
DTC “Y” CODE
System Description
Y0010
Camshaft Position Sensor
Y0011
Engine Overspeed
Y0012
Crankshaft Position Sensor
Y0014
Coolant Temperature Sensor
Y0015
Intake Air Temperature Sensor
Y0016
Turbo Boost Pressure
Y0018
Oil Pressure Sensor
Y0019
Oil Temperature Sensor
Y0020
Fuel Temperature Sensor
Y0025
Throttle Position Sensor
Y0033
System Voltage
Y0048
Communication Link
Y0059
Redundant Throttle
Y0070-Y0073
Rack Position Control
Y0074
Injection Timing Control
Y0088
Control Module Error
Y0098
Voltage Supply
Y0099
ECU Temperature
Page 24
Electronic Control System: Operation Manual for 6LY3 Series Engines
Appendix F
Network Status
The i5601E has several screens to help technicians diagnose errors on the NMEA 2000® Data Bus. See i5601E
Operation on page 17 and Menu Navigation on page 21 to locate this screen.
Network Status Display
Accesses the Network Status Display Screen. The purpose of the display is to show details of the Network and
allow determination of Network Problems. (The values are constantly monitored and do not rely on the screen
being displayed.)
Bus Load:
Peak Load:
Frames/Sec:
Total Frames:
Error Frames/Sec:
Errors Total:
Bus Off
Bus Voltage:
Current bus load over 1 sec
Peak Load since last Reset
Current frames transferred over 1 sec
Total number of frames received since last Reset
Error frames over 1 sec
Total Number of errors received since last Reset
If YES, indicates unit is not Transmitting on Bus
Measured Value of Bus Supply
Buttons:
“Reset” – Resets the various parameters that have accumulated values
“Back” – Moves back to previous menu
Network Nodes Display
The Network Units Display shows Yanmar and Teleflex units that have claimed an address on the bus. From
the information in the claimed message name (Device Class, Function, and Instance Fields) the type of Model
number of the unit will be determined. (The specific model may not be indicated, but it will give a general
model of the type of the unit.) i.e. i813x.
The information displayed consists of:
• Node Address
• Manufacturer’s Code - (All mfg’s codes will be shown, but only Yanmar
and Teleflex units will show the mfg’s name)
• Manufacturers Model Info - On some units the ending letter signifies the
following: P - Port
S - Starboard
C - Center Engine
Buttons:
“Down” Arrow – Scrolls screen down.
“Up” Arrow – Selects Node Detail Screen
“Back” – Moves back to previous menu
Electronic Control System: Operation Manual for 6LY3 Series Engines
Page 25
Appendix G
Station Select Protection
Station Select Protection prevents accidental switching between control stations on multi-stationed boats. If
turned on, a change of control stations requires that control head buttons be pressed in a specific sequence SELECT, SELECT, NEUTRAL, SELECT to change stations.
The menu options are:
• Station Select Protection Off (N) (Default Setting).
• Station Select Protection On (Y).
NOTE: If the status of Station Protection is in question, it may be checked through the i5601E Digital
Display. Sequence: “Main Menu - Calibration,” “Calibration,” “User Settings.” “Station Protect” is the last
option under “User Settings.” OR try to set the second station - if Station Protection is on (Y) Station Select
will not engage.
Operation
To change stations this is the button sequence:
• Go to the station you wish to make active.
• Press the Select button.
• Press the Select button again.
• Press the Neutral or ‘N’ button.
• Press the Select button.
• The station will go active (green light on solid) if the handles are
matched with the originally active station.
• If the green light flashes
, match the handles with the originally
active station and the green light will go solid.
WARNING
Until the green light is on solid, the original active station retains control of the boat.
Page 26
Electronic Control System: Operation Manual for 6LY3 Series Engines
Yanmar Marine International B.V.
P.O. Box 30112, 1303AC Almere, The Netherlands
Brugplein 11, 1332 BS Almere-De Vaart, The Netherlands
Phone: +31 36-5493200
Fax:
+31 36-5493209
Yanmar Co., Ltd
Head Office
1-32, Chayamachi, Kita-Ku, Osaka 530-8311, Japan
Yanmar Marine USA Corporation
101 International Parkway, Adairsville, GA 30103, USA
Phone: +1 770-877-9894
Fax:
+1 770-877-7565
Yanmar Asia (Singapore) Corporation Pte Ltd.
4 Tuas Lane. Singapore 638613
Phone: +65 6861-3855
Fax:
+65 6862-5195
Dealer Network: www.yanmarmarine.com