1
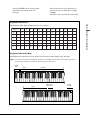
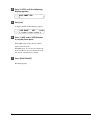
B
Advanced (B) スミ Pantone 282C
English
Mark III Series
DGC1B
(B)
Advanced Operation Manual
Table of Contents
English
Advanced Playback
Chapter 1
Storing and Managing
Songs on Disks
Using Memory Disks ......................................... 1
Specifying a Memory Disk ................................ 2
Copying Songs ................................................... 2
Copying the Entire Contents of a Disk (Disk
Copy) .................................................................. 4
Deleting Songs .................................................. 5
Rearranging the Song Order (Song Sort) ........ 6
Changing the Counter Display ......................... 7
Chapter 2
Chain Play — Playing Back
Memory Disks in a Group
Registering a Group .......................................... 9
Chain-Playing Disks in a Group ...................... 10
Canceling Group Functions ............................ 11
Chapter 3
Timer Play
Creating a Program ........................................ 13
Timer Play Examples ....................................... 15
Recording
Chapter 4
Formatting & Titling Disks
Formatting Disks ............................................. 17
Titling Disks ..................................................... 18
Re-Recording One Part ................................... 33
Recording a Pedal Count-In ........................... 34
Playback with a Pedal Count-In ..................... 35
Chapter 5
Chapter 7
Basic Recording
The [REC] Button ............................................. 20
Recording a Song ............................................ 21
Setting the Type of Time Display ................... 22
Song Titling and Title Editing ........................ 22
Recording with the Metronome .................... 24
Changing the Default Song Tempo ............... 26
MDR (MIDI Data Recording) Mode ................ 27
Ensemble Songs .............................................. 36
Ensemble Song Display ................................... 36
Recording Ensemble Tracks ............................ 37
Overdubbing a Track ...................................... 39
Quantizing Notes ............................................ 40
Chapter 8
Chapter 6
Recording L/R Songs
L/R Songs ......................................................... 29
Recording the Left and Right Parts
Separately ........................................................ 29
Recording the Left and Right Parts Together
(Setting a Split Point) ...................................... 31
Re-Recording Both Parts Simultaneously ...... 32
Recording Ensemble
Songs
Editing Tracks
Editing a Track’s Voice & Volume ................... 42
Mixing Two Tracks .......................................... 43
Moving a Track ................................................ 44
Copying a Track ............................................... 45
Deleting a Track .............................................. 46
Transposing a Track ........................................ 47
Editing the Piano Track Assignments ............ 48
i
Advanced Operations
Chapter 9
Song and Disk Formats
and Compatibility
Song Format .................................................... 50
Disk Types ........................................................ 51
Converting Song Format ................................ 52
Converting Disk Type ...................................... 53
Chapter 10 The Disklavier & MIDI
Start/Stop Control of a MIDI Instrument
with the Disklavier .......................................... 54
Sending the Keyboard Data to a MIDI
Instrument ....................................................... 55
Receiving Data from a MIDI Sequencer ......... 58
Controlling the Disklavier in Real Time ......... 59
Sending Song Data to a MIDI Instrument ..... 60
Playing Back Import Files ................................ 61
Synchronization Using the MTC ..................... 62
Summary of the MIDI Out Parameter in
a MIDI Setup .................................................... 68
Chapter 11 The Disklavier & Personal
Computers
Connecting to a Personal Computer ............. 70
Setting the HOST SELECT Switch .................... 72
Playing Back Songs Created in a Computer .. 72
Recording Songs to a Computer (Sequencer) . 73
Playing Back More than 16 Channels ............ 74
Temporarily Deactivating the Internal Tone
Generators ....................................................... 75
Summary of the MIDI Out Parameter in a
Computer Setup .............................................. 76
Chapter 12 Resetting Your Disklavier
Resetting Your Disklavier ............................... 78
Restoring Demo Songs ................................... 80
Chapter 13 Troubleshooting ............... 81
Chapter 14 Display Error Messages .. 84
Chapter 15 Glossary .............................. 86
Chapter 16 Specifications .................... 90
Appendix
MIDI Data Format .............................................................................................................. Appendix 1
MIDI Implementation Chart .................................................................................. Inside back cover
ii
Chapter 1
Storing and Managing Songs
on Disks
Memory Disks are ideal for storing many songs, especially when you want to program your Disklavier to
automatically play back many songs with the Chain Play or Timer Play features.
Chapter 1: Storing and Managing Songs on Disks
☛ See Chapter 2 “Chain Play — Playing Back Memory Disks in a Group” and Chapter 3 “Timer Play” for details.
The first section of this chapter describes Memory Disks and how to specify a disk. The following
sections describe how to copy songs and other file management utilities.
☛ To record songs to the Memory Disk, see Chapter 5 “Basic Recording”.
Using Memory Disks
Memory Disks use the Disklavier flash memory
to record and play back songs. Each Memory
Disk has a memory capacity of approximately
1.44MB.
English
You can use the Disklavier’s internal Memory Disks to store songs.
You can also re-format Memory Disks when you
want to erase all data in the disk or when you
want to convert an SMF type disk to an E-SEQ
type disk.
☛ See “Formatting Disks” on page 17.
Since Memory Disks have a total of 64 megabytes
of memory, you can copy to the Memory Disks
PianoSoft songs or your favorite recordings, or
record your own songs to create your own library
of Disklavier songs.
The Memory Disks are formatted in the SMF
(Standard MIDI File) disk format, giving you the
most versatility, as both SMF and E-SEQ songs
can be recorded to the Memory Disk. They can,
however, be re-formatted as E-SEQ type disks.
Similarly, re-formatted E-SEQ type Memory
Disks can be formatted back to SMF type disks.
Note: When you reset the Disklavier, the entire
content of Memory Disks will be deleted, and
the Memory Disks will return to their initial
factory settings (SMF format, sample song
included). See Chapter 12 “Resetting Your
Disklavier” for details.
1
Specifying a Memory
Disk
The procedure for specifying a Memory Disk is
essentially the same as specifying the floppy disk
or CD, as described in “Specifying a Disk” on
page 19 in the Basic Operation Manual.
Press the [SELECT] buttons and
specify a disk.
SELECT
Copying Songs
You can copy songs stored on a disk to another
one song at a time or all songs at once.
Songs stored on a floppy disk can be copied to the
same floppy disk, to another floppy disk or to a
Memory Disk.
Songs stored on a Memory Disk can be copied to
another Memory Disk or to a floppy disk.
Note: Copy-protected songs, such as PianoSoft
songs, cannot be copied to a floppy disk, but
can be copied to a Memory Disk.
The DRIVE indicator toggles the floppy
disk, CD, and Memory Disks 0 to 9 and A
to F.
Note: “Fd” and “Cd” appear only when a
floppy disk or CD is inserted in their
respective drives.
The disk you specify also flashes in the
bottom row of the display.
2DD
2DD
2HD
2HD
Memory
Disk
1
Specify a disk.
2
Press [FUNC.].
Memory
Disk
Flashes
The FUNC. indicator lights and the
Function menu appears.
Note: “x” indicates Memory Disks that are
unformatted or contain no songs.
3
With the c cursor next to the Disk
option, press [ENTER].
The Disk menu appears.
4
2
Press [>] to position the c cursor
next to the Song Copy option,
then press [ENTER].
process is complete.
If the destination disk is Other Disk, the
following display appears.
A display similar to the following appears.
5a
Insert a formatted floppy disk in the disk
drive. Song copy begins.
TO COPY ALL SONGS
Press [ ] until the following
display appears.
Press [>] then use the [–/NO] and
[+/YES] buttons to select the
destination disk.
5b
The copy process may take several seconds
depending on the size of the song files.
If the song files you want to copy are too
large, if you are copying too many songs, or
if the destination disk becomes full, the
following display appears and song copy is
canceled.
TO COPY ONE SONG
Use the [–/NO] and [+/YES]
buttons to select the song you
want to copy.
7
Then press [>] and use the [–/NO]
and [+/YES] buttons to select the
destination disk: Same Disk,
Memory [0] - [F], or Other Disk.
6
When the copy process is
complete, the following display
appears.
Press any button to return to the
normal display.
Press [ENTER].
If the destination disk is Same Disk (for
floppy disks only) or a Memory Disk, the
following display appears.
The song number indicator counts down
from 99 and a bar graph on the display
marks the progress. When the song number
indicator reaches 00 and the squares on the
bar graph are completely filled, the copy
3
Chapter 1: Storing and Managing Songs on Disks
Note: Make sure that the destination disk is
formatted and its erasure protection tab
is set to “unprotected.” See “Formatting
Disks” on page 17 and “Floppy Disk
Accidental Erasure Protection” on page
18. If the destination disk has not been
formatted in the Disklavier, the
message “UNFORMATTED DISK”
appears. In this case, cancel the song
copy process and format the disk.
English
When the source disk is a floppy disk, the
parameter next to the arrow shows
“Memory [X]”; when the source disk is a
Memory Disk, the parameter shows “Other
Disk.”
Copying the Entire
Contents of a Disk
(Disk Copy)
5
Use the [–/NO] and [+/YES]
buttons to select the destination
disk.
You can copy the entire contents of a disk to
another disk.
6
Press [ENTER].
Note: The contents of the destination disk will be
erased.
Note: You cannot copy a disk that contains copyprotected songs such as PianoSoft songs.
1
Specify a disk.
Note: If you are copying to a floppy disk, its
erasure protection tab must be set to
“unprotected”. See “Floppy Disk
Accidental Erasure Protection” on page
18.
2
Press [FUNC.].
The FUNC. indicator lights and the
Function menu appears.
3
With the c cursor next to the Disk
option, press [ENTER].
The Disk menu appears.
4
Press [>] until the c cursor is next
to the Disk Copy option, then
press [ENTER].
A display similar to the following appears.
4
Disk copy of the source disk begins.
If the destination disk is a floppy disk, the
following display appears. Eject the source
disk if the source disk is a floppy disk, then
insert a formatted destination disk.
Note1: Make sure that the destination disk is
formatted and its erasure protection tab
is set to “unprotected”. See “Formatting
Disks” and “Floppy Disk Accidental
Erasure Protection” on pages 17 and
18. If the destination disk has not been
formatted in the Disklavier, the
message “UNFORMATTED DISK”
appears. In this case, cancel the song
copy process and format the disk.
Note2: If the destination disk differs from what
was specified, the message “WRONG
DESTINATION DISK. INSERT 2DD
DISK” or similar appears. Insert the
correct destination disk to continue, or
press [STOP] to cancel disk copy.
Note3: If the destination disk contains songs,
the message “DELETE SONGS ON
DEST. SURE?” appears. Press [+/YES]
if it is okay to erase the contents of the
destination disk and continue, or
[–/NO] to cancel disk copy.
Note4: When copying between the same
medium (ex. from 2HD to 2HD), the
contents are copied from track to track.
When copying between different media
(ex. from 2DD to 2HD), the contents
are copied from file to file.
The copy process may take several seconds
depending on the size of the disk content.
If the disk content is too large or if the
destination disk becomes full, the following
display appears and disk copy is canceled.
Deleting Songs
You can delete songs stored on a disk one song at
a time or all songs at once.
7
1
Specify a disk.
Note: If you are deleting songs from a floppy
disk, be sure that the accidental erasure
protection tab is set to “unprotected.”
2
Press [FUNC.].
The FUNC. indicator lights and the
Function menu appears.
3
With the c cursor next to the Disk
option, press [ENTER].
The Disk menu appears.
4
Press [>] until the c cursor is next
to the Song Delete option, then
press [ENTER].
The following display appears.
5a
TO DELETE ALL SONGS
Press [ ] until the following
display appears, then press
[ENTER].
5
Chapter 1: Storing and Managing Songs on Disks
When the copy process is
complete, the following display
appears. Press any button to
return to the normal display.
English
If you want to delete all songs on a disk, it may be
quicker to re-format the disk. See “Formatting
Disks” on page 17.
The following display appears.
5b
Rearranging the Song
Order (Song Sort)
You can rearrange the order of songs on a disk.
TO DELETE ONE SONG
Use the [–/NO] and [+/YES]
buttons to select the song that
you want to delete.
1
Specify a disk.
2
Press [FUNC.].
Then press [ENTER].
The FUNC. indicator lights and the
Function menu appears.
A display similar to the following appears.
6
Press [+/YES] to delete the song,
[–/NO] if you do not want to
delete the song.
Note: Once deleted, songs cannot be
retrieved, so take care in selecting
which songs to delete.
3
The Disk menu appears.
4
Note: You cannot delete copy-protected songs
in a floppy disk. However, you can
delete copy-protected songs in a
Memory Disk.
When a song is deleted, subsequent songs
are renumbered. For example, if you have
six songs on a disk, and song No. 4 is
deleted, song No. 5 becomes song No. 4
and song No. 6 becomes song No. 5, and so
on.
With the c cursor next to the Disk
option, press [ENTER].
Press [>] until the c cursor is next
to the Song Sort option, then
press [ENTER].
The following display appears.
5
Use the [–/NO] and [+/YES]
buttons to select the song that
you want to move.
6
When you have selected a song,
press [>], then use the [–/NO] and
[+/YES] buttons to select the
destination.
Songs on a disk
Song 1 Song 2 Song 3 Song 4 Song 5 Song 6
Song No. 4 deleted
Song 1 Song 2 Song 3 Song 4 Song 5
In this example, song No. 3 is being moved
to song No. 5.
6
7
Press [ENTER].
Changing the Counter
Display
The following display appears.
The counter display of a song can be changed
from “measures and beats” (metronome) to
“minutes and seconds” or vice versa.
8
1
Specify a disk.
2
Press [FUNC.].
Press [–/NO] to save all the song
sort data.
During the sorting process, the selected
song is changed to its new song number and
all the other songs on the disk are
rearranged. For example, the example
below shows a disk that contains six songs.
If you make song No.6 the first song on the
disk (No.1 ), songs 1 to 5 are renumbered
as songs 2 to 6.
The FUNC. indicator lights and the
Function menu appears.
3
With the c cursor next to the Disk
option, press [ENTER].
The Disk menu appears.
Songs on a disk
Song 1 Song 2 Song 3 Song 4 Song 5 Song 6
4
Song 1 Song 2 Song 3 Song 4 Song 5 Song 6
Song No. 6 moved to No. 1
Note: You cannot sort copy-protected songs
such as PianoSoft songs on a prerecorded disk.
9
When sorting is complete, the
following display appears. Press
any button to return to the
normal display.
Press [>] until the c cursor is next
to the Counter option, then press
[ENTER].
The following display appears.
5
Use the [–/NO] and [+/YES]
buttons to select the song whose
time display you want to change.
7
Chapter 1: Storing and Managing Songs on Disks
Press [+/YES] if you want to sort more
songs.
Note: If the format is changed from minutes and
seconds to measures and betas, the metronome
beat will not match the timing of the song.
English
Note: At this point of the procedure, the
Disklavier has not saved the sorted
song data to disk — it is asking if you
want to sort some more songs before
saving the sorted song data and exiting
the song sort function.
6
When you have selected a song,
press [>], then use the [–/NO] and
[+/YES] buttons to select the time
display.
TIME: minutes and seconds display
METRONOME: measures and beats
display
7
Press [ENTER].
Note: You cannot change the time display of
copy-protected songs.
8
8
When the following display
appears, press any button to
return to the normal display.
Chapter 2
Chain Play — Playing Back
Memory Disks in a Group
1
2
3
4
Grp1
5
6
7
Grp2
Grp6
8
9
A
Grp3
Grp7
b
C
d
Grp4
Grp8
E
F
Grp5
Grp9
You can have up to 9 groups (1 to 9). Each group can contain a maximum of 16 Memory Disks freely
combined to suit your needs. A disk can be part of more than one group, and the content of a group can be
changed easily at any time.
Note: Floppy disks and CDs cannot be included in a group.
Registering a Group
1
2
Hold down [FUNC.] and press
[STANDBY / ON].
Press [>] until the c cursor is next
to the Chain Play option, then
press [ENTER].
A display similar to the following appears.
The setup menu appears.
3
Use the [–/NO] and [+/YES]
buttons to select a group number.
9
Chapter 2: Chain Play — Playing Back Memory Disks in a Group
0
English
The 16 Memory Disks of the Disklavier are numbered from 0 to 9 and A to F. You can specify and play
back one disk, or specify several disks to be played back sequentially. To play several disks, what you
actually do is form a group of Memory Disks. Grouping disks enables you to control multiple disks in
group units. For example, you may have your favorite classical music on disks number 0, 5, 7, and A. By
grouping these four disks under Grp1, all you need to do to play back all your classical songs is set
playback to Grp1. You do not need to make settings for the next disk after each disk has finished.
4
Use [<] and [>] to move the
cursor to a disk number, then use
the [–/NO] and [+/YES] buttons to
select or unselect it.
Flashes
• The position of the cursor is indicated by
the flashing disk number.
• Pressing both [+/YES] and [–/NO]
simultaneously selects all disks.
• “x” indicates disks that you included in
the group but that contain no songs or are
unformatted.
• “_” indicates disks that you did not
include in the group.
5
One of the advantages of the group feature is its
ability to automatically play back disks in a group
consecutively without the need to make settings
after each Memory Disk has finished playing.
This is called Memory Disk Chain Play. Chain
Play can also be set to start from any disk within
the group.
Note: Chain Play is not valid for floppy disks and
CDs.
Note: Prolonged playing may cause your piano to
overheat. Insert sufficient breaks between
continuous song playback.
1
Press [ENTER].
The group is set, and the display returns to
the setup menu.
6
Chain-Playing Disks in
a Group
With the cursor at the End option,
press [ENTER] to restart the
Control Unit.
This is the same as turning off the Control
Unit and then turning it back on.
The standard disk title display appears.
Register or select a group.
☛ See “Registering a Group” on page 9.
2
Press the [SELECT] buttons and
specify the disk from which you
want to begin Memory Disk Chain
Play.
The disk you select flashes.
Flashes
The group number you chose in step 1, and
its contents, are shown on the bottom line
of the display. If [- - - -] is shown instead of
a group number, you have not chosen a
group correctly.
•
“x” indicates disks that are included in the
group but that contain no songs or are
unformatted.
•
“_” indicates disks that are not included in
the group.
You can set playback to start from any disk
in the group that contain songs.
10
Canceling Group
Functions
Disks are played back from left to right in
the display. The chain will not repeat
unless the “All Repeat” setting is made (see
Chapter 7 “Repeat Playback” in the Basic
Operation Manual for details). Disks
represented by “x” and “_” are skipped.
You can choose to manage your disks in disk units
instead of group units by setting Memory Disk
Chain Play to OFF and selecting a target disk in
the Memory Disk selection display. For example,
if you want to play disk 7 only, you should set
Memory Disk Chain Play to OFF, and select disk
7 using the [SELECT] buttons.
1
You can also press [ENTER] or [STOP] to
engage Standby mode.
Hold down [FUNC.] and press
[STANDBY / ON].
The setup menu appears.
When playback of the last song on the
selected disk finishes, the next disk in the
group that contains songs is automatically
played back.
2
Press [>] to move the c cursor to
the Chain Play option, then press
[ENTER].
A display similar to the following appears.
3
Press [–/NO] or [+/YES] until OFF
appears.
4
Press [ENTER].
The group is switched off, and the display
returns to the setup menu.
11
Chapter 2: Chain Play — Playing Back Memory Disks in a Group
Press [PLAY/PAUSE] to begin
Chain Play from the specified disk.
English
3
In the above display, “A” is selected.
Therefore, playback begins from disk A and
continues to the end of disk F, then stops.
5
With the cursor at the End option,
press [ENTER] to restart the
Control Unit.
This is the same as turning off the Control
Unit and then turning it back on.
The standard disk title display appears.
The disk title display shows [- - - -] to
indicate that no group is selected.
12
Chapter 3
Timer Play
You can program your Disklavier to play back groups of disks at various specified times. All you need to
do is register up to a maximum of 99 timer settings, and your Disklavier will perform them unattended.
This function is called Timer Play.
English
The “Timer Play Examples” section provides some examples of programmed playback.
Chapter 3: Timer Play
Important: The Control Unit must be turned on in advance in order for Timer Play to function. Timer Play cannot
turn on/off the Control Unit.
Note: Prolonged playback may cause your piano to overheat. Insert sufficient breaks between continuous song
playback.
Creating a Program
This section takes you through the steps for
creating a Timer Play program. Understanding the
parameters of Timer Play will enable you to create
music programs suited to your needs.
1
Hold down [FUNC.] and press
[STANDBY / ON].
The setup menu appears.
2
Press [>] until the c cursor is next
to the Timer Play option and press
[ENTER].
The following display appears.
1
3
4
5
6
2
7
The five parameters on the lower row
constitute a program. You can create up to
99 programs.
Item
1) Timer
switch
2) Sort
Option Description
ON, OFF Enables Timer Play.
Pressing [ENTER] sorts the
programs in chronological
order.
3) Program 01 - 99 Indicates the number of a
number
program. Only program
numbers with programs are
displayed.
4) 5) Time 24-hour Indicates the time at which a
function is to be performed.
format
##:## temporarily sets the
same time as the previous
program.
6) Function - - - -,
The function to be performed
at the specified time. - - - PLAY,
omits the program.
STOP
7) Grp
#### means no particular song
####,
selection Grp1 - 9 is specified; the previous
program’s selection is valid.
The difference between
selecting the same group
number as the previous
program and selecting #### is
that, in the former, playback
begins at the beginning of the
group, and in the latter,
playback begins with the song
that is selected when that
program is enabled.
13
3
4
Use [<] and [>] to move the
cursor sideways to each
parameter and the [–/NO] and
[+/YES] buttons to set a value.
Press [ ] to enter the next
program.
The next program appears with ##:## for
the time parameter and - - - - for the
function parameter. The cursor appears at
the function parameter.
5
Press [<] to go to the time
parameter.
##:## automatically changes to the time
setting of the preceding program.
6
Use the [–/NO] and [+/YES]
buttons to set a time.
9
Repeat steps 4 to 8 to set as many
programs as necessary.
Pressing [ ] and [ ] scrolls the display
vertically through the programs.
10
Press [ENTER] after you set all
parameters for the programs you
need.
The programs are sorted in chronological
order, and the display returns to the setup
menu.
Each program is activated at the specified
time.
Important: The Control Unit must be turned
on in advance in order for Timer
Play to function. Timer Play
cannot turn on/off the Control
Unit.
Error Check
When you set a program and go to the next
program, the Disklavier automatically checks for
other programs that are set to occur at the same
time.
For example, in the following display, Grp7 and
Grp1 are both set to start playback at 8:00.
7
Press [>] to go to the function
parameter, and use the [–/NO]
and [+/YES] buttons to select
either PLAY or STOP.
When PLAY is selected, ####
automatically appears as the Grp parameter.
8
14
Press the [>] to go to the Grp
parameter, and use the [–/NO]
and [+/YES] buttons to set a
group.
When [ ] is pressed to proceed to program 3,
the following message appears.
In this case, press any key and set program 2 to
different time.
Timer Play Examples
Example 2
Location: Cocktail bar
With a little creativity, you can use Timer Play in
a variety of ways. You can also set Timer Play in
conjunction with Repeat playback.
Note: Prolonged playback may cause your piano to
overheat. Insert sufficient breaks between
continuous song playback.
Switch ON
PLAY
16:00
Switch OFF
PLAY
8:00
10:00
12:00
PLAY
14:00
16:00
18:00
18:00
19:00
PLAY
20:00
STOP
21:00
PLAY
22:00
STOP
23:00
24:00
The Disklavier above is set to play songs
continuously from 5:00 p.m. to 11:00 p.m., with
interruptions for live performances at 7:00 p.m.
and 9:00 p.m. for 30 minutes each.
Memory Disk 1 - 4 ..................... Grp1
Memory Disk 5 - A ..................... Grp2
Memory Disk b, d, F ................... Grp3
Switch ON
17:00
Switch OFF
STOP
STOP
20:00
22:00
The Disklavier above is set to play at 7:00 a.m.,
12:00 p.m. and 5:00 p.m., and set to stop at 9:00
p.m. At each of the specified time, it plays a group
of songs until all the disks in the group are played
back. The Disklavier will stop playing at 9:00
p.m. even if Grp3 is still playing.
Grp1 is played back at 5:00 p.m. and stopped at
7:00 p.m. At 7:30 p.m., playback of Grp1 picks up
where it last left off. It stops again at 9:00 p.m.,
and at 9:30 p.m., it starts playback again from
where it left off.
Only one group is registered, but since it contains
many disks, and is set to RND playback, it will
last through the evening.
15
Chapter 3: Timer Play
Location: Hotel lobby
06:50
Turn on Control Unit (manually)
07:00
01:[07:00 > PLAY > Grp1]
12:00
02:[12:00 > PLAY > Grp2]
17:00
03:[17:00 > PLAY > Grp3]
21:00
04:[21:00 > STOP]
21:30
Turn off (manually)
6:00
Turn on Control Unit (manually)
01:[17:00 > PLAY > Grp1]
02:[19:00 > STOP]
03:[19:30 > PLAY > ####]
04:[21:00 > STOP]
05:[21:30 > PLAY > ####]
06:[23:00 > STOP]
Turn off (manually)
Memory Disks 1 - 6 .................... Grp1
Example 1
PLAY
16:50
17:00
19:00
19:30
21:00
21:30
23:00
23:05
English
This section gives you just a few simple ideas of
how you can use Timer Play.
Repeat = RND
Example 3
Location: store
07:55
08:00
10:00
12:00
13:00
15:00
17:00
17:15
Turn on Control Unit (manually)
Opening (1 song)
01:[08:00 > PLAY > Grp1]
Time (1 song)
02:[10:00 > PLAY > Grp2]
Lunch (continuous)
03:[12:00 > PLAY > Grp3]
Lunch end
04:[13:00 > STOP]
Time (1 song)
05:[15:00 > PLAY > Grp2]
Closing (3 songs)
06:[17:00 > PLAY > Grp4]
Turn off (manually)
Memory Disk 1: 1 song for opening of store ........................................... Grp1
Memory Disk 2: 1 song to be played on the hour .................................... Grp2
Memory Disk 3: several songs for continuous play during lunch ............ Grp3
Memory Disk 4: continuation of disk 3 .................................................... Grp3
Memory Disk 5: 3 songs for closing of store ........................................... Grp4
Switch OFF
Switch ON
PLAY
7:00 8:00
PLAY
10:00
PLAY STOP
12:00
14:00
PLAY
PLAY
16:00
18:00
The Disklavier above is turned on at 7:55 a.m., and Timer Play starts at 8:00 a.m. with the opening of the
store. Songs are set to be played at 8:00 a.m. for the opening of the store, at 10:00 a.m. and 3:00 p.m. to
signify the time, during lunch, and at 5:00 p.m. for the closing of the store.
16
Chapter 4
Formatting & Titling Disks
3
Note: Formatting a disk erases all the data
previously stored on the disk, so always make
sure the disk you are going to format does not
contain songs you want to keep.
1
Press the [SELECT] buttons and
specify the disk to format.
The Disk menu appears.
4
If the disk contains songs, it might be worth
checking them to see if there are any you
want to keep.
2
Press [FUNC.].
The FUNC. indicator lights and the
Function menu appears.
With the c cursor next to the
Format option, press [ENTER].
The following display appears.
Note: If you are formatting a floppy disk,
make sure that the floppy disk’s erasure
protection tab is set to “unprotected”.
If the disk has not been formatted, the
following display appears.
With the c cursor next to the Disk
option, press [ENTER].
5
Use the [–/NO] and [+/YES] to
select a disk type: SMF Type Disk
or E-SEQ Type Disk. Then press
[ENTER].
SMF type disk is recommended if you are
not going to be using this disk with other
Disklavier models. For more information
on disk types, see “Disk Types” on page 51.
A display similar to the following appears.
17
Chapter 4: Formatting & Titling Disks
Formatting Disks
English
This chapter describes how to format and title disks. New floppy disks must be formatted before you can
use them to record songs with the Disklavier. Memory Disks are pre-formatted, but you may want to reformat them when you want to erase all data on them at once. Titling disks enables you to manage disk
contents easily.
6
Press [+/YES] to start the disk
formatting process.
If you do not want to continue with the
formatting process, press [–/NO].
7
Formatting is complete when the
following display appears.
Titling Disks
You can give your own disks titles that will scroll
across the display when the disk is inserted into
the disk drive.
1
Specify a disk.
2
Press [REC].
The REC indicator lights and the
PLAY/PAUSE indicator flashes.
Press any button to return to the normal
display.
3
Floppy Disk Accidental
Erasure Protection
Floppy disks have an erasure protection tab
located on the reverse side of the disk in the
bottom right-hand corner. When formatting a
disk, make sure that its erasure protection tab is
set to “unprotected”.
Select song No. 1, then press the
[SONG SELECT ] again to
display the disk title.
The song number disappears and the
display cursor appears at the position of the
first character in the title, as shown. If the
disk already has a title, it will be shown on
the display.
Protected
4
Use [<] and [>] to position the
cursor within the title.
5
Use the keyboard or the [–/NO]
and [+/YES] buttons to select
characters.
When the tab window is open,
formatting and recording are
not possible.
Unprotected
To enter characters using the keyboard, see
“Keyboard Character Map” on the next
page.
Pressing [ENTER] or the sustain (right)
pedal moves the cursor to the next
character.
Only 16 characters can be displayed at a
time. To see the rest of the title, use [<]
and [>].
Disk titles can be up to 64 characters long.
When the tab window is closed,
formatting and recording are
possible.
6
18
Press [STOP].
Keyboard Characters
The following table shows which characters are available.
Space
A
B
C
D
E
F
G
H
I
J
K
L
M
P
Q
R
S
T
U
V
W
X
Y
Z
a
b
c
d
e
f
g
h
i
j
k
l
m
n
o
p
q
r
s
t
u
v
w
x
y
z
!
“
#
$
%
&
’
(
)
*
+
,
–
.
/
:
;
<
=
>
?
0
1
2
3
4
5
6
7
8
9
Chapter 4: Formatting & Titling Disks
O
English
N
Keyboard Character Map
The Disklavier keyboard can also be used to enter characters when titling songs and disks.
Note: Not all characters that the Disklavier provides are available from the keyboard. Certain punctuation
must be input from the Control Unit. See the character table above.
Cursor
back
Space
Numbers
1
1
2
3
4
5 6 7
8
2
3 4
5
6
7 8
9
0
–
·
a bc d e f
9 10 11 12 13 14 15 16 17 18 19 20 21 22 23 24 25 26 27 28 29 30 31 32 33 34 35 36 37 38 39 40 41 42 43 44 45
Upper case/
Lower case
Letters
f g h i j k l m n o p q
Cursor
forward
r s t u v w x y z
11 45 46 47 48 49 50 51 52 53 54 55 56 57 58 59 60 61 62 63 64 65 66 67 68 69 70 71 72 73 74 75 76 77 78 79 80 81 82 83 84 85 86 87 88
19
Chapter 5
Basic Recording
This chapter describes the basic procedure for recording a song, as well as other general recording
functions such as song titling, metronome recording, and changing song tempo.
The procedure below only explains the very basics of song recording.
☛ For more details on recording songs, see Chapter 6 “Recording L/R Songs” and Chapter 7 “Recording Ensemble
Songs”.
Note: You cannot record songs to a CD.
The [REC] Button
The [REC] button functions as a toggle switch so that all recording functions, including quantizing and
overdubbing, are available for the recording of all tracks. This allows the recording procedures of L/R
tracks, rhythm tracks, and other accompanying tracks to follow the same basic flow.
The button toggles the Record Standby mode, Title Editing mode, Re-recording mode, and Recording
Setting mode, as shown below.
Record Standby Mode
Title Editing Mode
Re-recording Mode
This display appears when you have
the option of playing back a monitor
piano part when recording or rerecording a piano part.
Record Setting Mode
The Quantize parameter appears
only when recording with a
metronome.
20
Recording a Song
4
You can record your song onto Memory Disks or
a floppy disk.
Recording will start as soon as you touch a
key or press a pedal.
A very basic description of the song recording
procedure is described below.
Specify a disk.
☛ Unformatted disks must be formatted before
use with the Disklavier. See “Formatting
Disks” on page 17.
When you finish playing your
song, press [STOP].
The following displays appear.
Press [REC].
The REC indicator lights, the
PLAY/PAUSE indicator flashes, and the
following display appears.
If the disk already contains songs, a new
song number will be created. For example,
if the last song to be recorded was No. 6,
the new recording will be song No. 7.
☛ You can title your new song either now or
after recording. See “Song Titling and Title
Editing” on page 22.
☛ If you want to record a song using the
metronome, see “Recording with the
Metronome” on page 24.
3
5
Chapter 5: Basic Recording
Note: If you are recording to a floppy disk,
make sure that the disks’s erasure
protection tab is set to “unprotected.”
2
English
1
Start playing your song and
recording will begin.
Note: Do not attempt to eject or insert disks
while the above messages are
displayed.
Your new song is saved to disk.
Remaining Disk Space
If the [REC] button is pressed and the amount of
free disk space is less than 10%, the characters
“DSK” flash on the display, as shown below. If
your next recording is quite long, it may be better
to use a new disk. If you run out of disk space
while recording, your song data will not be
recorded.
Press [PLAY/PAUSE].
The PLAY/PAUSE indicator stops flashing,
and the following display appears.
The Disklavier is now ready for you to
play.
Flashes
During recording, the remaining disk space is
displayed as a percentage.
The percentage will decrease as more data is
recorded.
21
Setting the Type of
Time Display
Song Titling and Title
Editing
Song time is indicated in one of two formats:
minutes and seconds or measures and beats.
The format used depends on whether or not you
use the metronome for recording.
Songs can be titled before or after recording, and
the title can be edited at any time.
Songs recorded without the metronome will be in
minutes and seconds.
Songs recorded with the metronome will be in
measures and beats.
1
Specify a disk.
2
Press [REC].
☛ Songs recorded in measures and beats can be
converted to minutes and seconds. See “Changing
the Counter Display” on page 7.
The REC indicator lights and the
PLAY/PAUSE indicator flashes. The
following display appears.
If you are titling or editing the title of an
existing song, use the [SONG SELECT]
buttons to select the song before
proceeding. Make sure that the correct song
number is selected.
3
Press [REC] again.
The display cursor appears at the position
of the first character in the title, as shown
below.
4
Use [<] and [>] to position the
cursor within the title.
5
Use the keyboard or [–/NO] and
[+/YES] buttons to select
characters.
To enter characters using the keyboard, see
“Keyboard Character Map” on the next
page.
22
Only 16 characters can be displayed at a
time. To see the rest of the title, use [<]
and [>].
Disk titles can be up to 64 characters long.
Pressing [ENTER] or the sustain (right)
pedal moves the cursor to the next
character.
Keyboard Characters
English
The following table shows which characters are available.
Space
A
B
C
D
E
F
G
H
I
J
K
L
M
O
P
Q
R
S
T
U
V
W
X
Y
Z
a
b
c
d
e
f
g
h
i
j
k
l
m
n
o
p
q
r
s
t
u
v
w
x
y
z
!
“
#
$
%
&
’
(
)
*
+
,
–
.
/
:
;
<
=
>
?
0
1
2
3
4
5
6
7
8
9
Chapter 5: Basic Recording
N
Keyboard Character Map
The Disklavier keyboard can also be used to enter characters when titling songs and disks.
Note: Not all characters that the Disklavier provides are available from the keyboard. Certain punctuation
must be input from the Control Unit. See the character table above.
Cursor
back
Space
Numbers
1
1
2
3
4
5 6 7
8
2
3 4
5
6
7 8
9
0
–
·
a bc d e f
9 10 11 12 13 14 15 16 17 18 19 20 21 22 23 24 25 26 27 28 29 30 31 32 33 34 35 36 37 38 39 40 41 42 43 44 45
Upper case/
Lower case
Letters
f g h i j k l m n o p q
Cursor
forward
r s t u v w x y z
11 45 46 47 48 49 50 51 52 53 54 55 56 57 58 59 60 61 62 63 64 65 66 67 68 69 70 71 72 73 74 75 76 77 78 79 80 81 82 83 84 85 86 87 88
23
6a
6b
If you are titling a new song,
press [PLAY/PAUSE].
Recording with the
Metronome
Recording begins.
When you finish playing your song, press
[STOP].
You can use the metronome to record songs.
If you are titling or editing an
existing song, press [STOP].
All metronome parameters are reset when the
Disklavier is switched off.
Songs recorded with the metronome will be in the
measures and beats format.
The following display appears.
1
The METRONOME indicator lights and
the following display appears.
The following table gives a description of
each of the options.
Option
SAVE
NEW
CANCEL
7
Description
The song is saved with the
new title under the current
song number.
The song with the new title is
saved under a new song
number. The song with the
original title is kept under the
previous song number.
The song with the modified
title is not saved.
Press [METRONOME].
The display continues with the following.
The table below shows which metronome
parameters can be set.
Parameter Range
Default
Notes
Click
ON/OFF
ON
If set to off, the
volume indicators still
flash
Tempo
SMF songs: 117
30 - 400 bpm
E-SEQ songs:
30 to 280 bpm
Use [<] and [>] to select an
option, then press [ENTER].
Time
1/4, 2/4, 3/4,
Signature 4/4, 5/4, 6/4,
7/4, 8/4, 9/4
Pedal
Count
24
ON/OFF
1 beat = 1 quarter
note (crotchet)
See “Song Format”
on page 50.
4/4
OFF
See “Recording a
Pedal Count-In” on
page 34.
2
Use [<] and [>] to select a
parameter: click, tempo, time
signature, volume, or pedal count.
4
Press [REC] to engage the Record
Standby mode.
With each beat of the metronome, a short
click is produced. This click can be turned
on and off as desired. Also, the Volume
LED indicators flash. On the first beat of
each measure, all the indicators flash and
on the remaining beats, the left half and
right half of the indicators flash alternately.
1st beat
2nd beat
3rd beat
-10
-8
-6
-4
-2
0
-10
-8
-6
-4
-2
0
-10
-8
-6
-4
-2
0
The metronome starts and recording begins
immediately.
The LED volume indicators flash to show
the beat and the beat indicator starts
counting (001 – 1). The display will cycle
as shown below in the first measure.
The display will return to the normal
recording display as soon as you start
playing.
If recording is paused, the metronome will
pause, and begin again when recording is
resumed.
...
...
25
Chapter 5: Basic Recording
Use the [–/NO] and [+/YES]
buttons to set the selected
parameter.
Press [PLAY/PAUSE].
English
3
5
Changing the Default
Song Tempo
This function allows you to change the default
tempo of a song and save the change to disk. It
should not be confused with the playback tempo
function described in Chapter 6 “Basic Playback” in
the Basic Operation Manual, in which tempo
changes are lost when the Disklavier is turned off.
For minutes and seconds, the current song
tempo is shown as “000%.”
If the song’s tempo has already been
changed, the new value is shown on the
display.
5
The tempo of a song can be changed many times.
This function can be used when recording a very
complex song that is difficult to play at a fast
tempo. First, record the song at a tempo you can
manage, then change the tempo afterwards. For
example, you could record a difficult left-hand
part at a slow tempo, use this function to change
the tempo, then record the right-hand part at the
normal tempo.
If a song’s time format is minutes and seconds,
tempo changes are specified as a percentage of the
original tempo.
If a song’s time format is measures and beats,
tempo changes are specified in beats per minute.
Use the [–/NO] and [+/YES]
buttons to change the tempo.
[–/NO] button decreases the tempo, and
[+/YES] increases the tempo.
For measure and beats, the tempo range is
from 30 to 400 bpm for SMF songs (30 to
280 bpm for E-SEQ songs).
For minutes and seconds, the tempo range
is from –75% to +242% for SMF songs
(–75% to +140% for E-SEQ songs).
6
Press [STOP] to save the tempo
change.
The following display appears.
1
Specify a disk.
2
Press [REC].
3
Select the song that you want to
change using the [SONG SELECT]
buttons.
The following table gives a description of
each of the options.
Option
SAVE
NEW
4
Press [METRONOME].
For measures and beats, the current song
tempo (bpm) is shown.
26
CANCEL
Description
The song is saved at its new
tempo under the current song
title.
The song is saved at its new
tempo under a new song
number. The original song is
kept under the previous song
number.
The song with a new tempo is
discarded. The original song is
kept under the previous song
number.
7
Use [<] and [>] to select an
option, then press [ENTER].
To change the tempo again or to reset the
original tempo, repeat steps 1 to 6.
MDR (MIDI Data
Recording) Mode
During playback of the song, input from the
Disklavier will not be recorded.
1
Specify a disk.
2
Press [REC].
The REC indicator lights, the
PLAY/PAUSE indicator flashes, and the
following display appears.
3
Press [>] or [VOICE].
The following display appears.
27
Chapter 5: Basic Recording
Note: MIDI instruments can be connected to either
the MIDI IN connector or the TO HOST
connector on the Disklavier. However, for
proper results, it is recommended that you set
the HOST SELECT switch to MIDI when
connecting your MIDI instrument to the MIDI
IN connector, and to PC1, PC2, or MAC
(depending on your computer type) when
connecting your MIDI instrument to the TO
HOST connector. See “Setting the HOST
SELECT Switch” on page 72 for details.
English
A song sent to the Disklavier by an external
device through the MIDI IN or TO HOST
connector can be recorded onto a Memory Disk or
a floppy disk. During recording, the Disklavier
will play the piano parts on the tracks that are set
for the Disklavier.
4
Press [+/YES] until the following
display appears.
5
Press [>].
A display similar to the following appears.
6
Press [–/NO] and [+/YES] buttons
to set the piano parts.
For E-SEQ songs, L=01 (fixed), and R=
can be set to ## or 02.
For SMF songs, L= can be set to tracks 01
to 16, and R= can be set to tracks 01 to 16
not already selected for L= and ##.
7
Press [PLAY/PAUSE].
Recording begins.
28
Chapter 6
Recording L/R Songs
In an L/R song, the left-hand piano part is stored
on track 1 and the right-hand piano part is stored
on track 2. Track 1 uses MIDI channel 1, and
track 2 uses MIDI channel 2.
L/R songs can be recorded in one of two ways: by
recording your left- and right-hand parts
separately or by setting a split point on the
keyboard before recording.
L/R songs can also be recorded with a pedal
count-in. A four-handed piano composition can be
recorded as an L/R song.
You can record your song onto Memory Disks or
a floppy disk.
Note: You cannot record songs to a CD.
Recording the Left and
Right Parts Separately
When recording an L/R song, the left- and righthand parts can be recorded separately. Either part
can be recorded first, and the pedals can be
recorded with either part (the default setting is the
part recorded first).
While you record the second part, the first part
will play back for monitoring. This playback
monitor function can be turned off if not required.
If the left-hand or right-hand part is difficult to
play at normal speed, the first part can be
recorded at a slow tempo, and then the tempo
changed afterwards to record the second part at
the normal song speed.
☛ See “Changing the Default Song Tempo” on page
26.
Recording the First Part
1
Specify a disk.
2
Press [REC] to engage the Record
Standby mode.
The REC indicator lights and the
PLAY/PAUSE indicator flashes.
A new song number is created for the new
recording. For example, if the last song to
be recorded was No. 6, then the new song
will be No. 7.
29
Chapter 6: Recording L/R Songs
L/R Songs
English
This chapter describes how to record an L/R song. With L/R songs, you can operate the left-hand part and
right-hand part independent of each other.
☛ You can title your new recording either now
or after recording. See “Song Titling and
Title Editing” on page 22.
6
☛ If you want to record your L/R song using
the metronome, see “Recording with the
Metronome” on page 24.
☛ If you want to record a pedal count-in, see
“Recording a Pedal Count-In” on page 34.
3
Press a [PART] button to select the
part that you want to record first.
This function will record the left-hand part
first, unless you specify otherwise.
To record the right-hand part first, press
[PART L] to unselect the left-hand part,
then press [PART R].
The first L/R part is saved to disk.
Recording the Second Part
1
2
☛ If you want to change the song’s tempo
before recording the second part, see
“Changing the Default Song Tempo” on
page 26.
Press [PLAY/PAUSE].
The PLAY/PAUSE indicator stops flashing,
and the following display appears.
3
This Disklavier is now ready for you to
play the first part.
Press a [PART] button to select the
next part for recording.
The PART indicator of the selected part
lights red.
☛ If you do not want to monitor the first part
or you want to re-record the pedal part, see
step 4 of “Re-Recording One Part” on page
33.
Recording begins when you start
playing.
As soon as you play the keyboard or press a
pedal, recording starts.
Press [SONG SELECT ] to select
the song number of the previous
recording.
A new song number is always created for a
new recording. Therefore, you must return
to the previous song number when
recording the second part of an L/R song.
The PART indicator of the selected part
lights red.
5
Press [REC] to engage the Record
Standby mode.
The REC indicator lights and the
PLAY/PAUSE indicator flashes.
☛ For existing songs, you must select the
track. See “Recording Ensemble Tracks” on
page 37.
4
When you finish playing the first
part, press [STOP].
4
Press [PLAY/PAUSE] to start
recording.
Playback of the first part starts
immediately, so be sure that you are ready
to play the second part along with it.
30
5
When you finish playing the
second part, press [STOP].
The following display appears.
NEW
CANCEL
6
Description
The second part is saved with
the first part under the current
song number.
The second part is saved under
a new song number. The first
part is kept under the previous
song number.
The second part is discarded.
The first part is kept under the
previous song number.
1
Specify a disk.
Note: If you are recording to a floppy disk,
make sure that the disk’s erasure
protection tab is set to “unprotected.”
2
Use [<] and [>] to select an
option, then press [ENTER].
Press [REC] to engage the Record
Standby mode.
The REC indicator lights and the
PLAY/PAUSE indicator flashes.
The second L/R part is saved as indicated
or canceled.
A new song number is created for the new
recording. For example, if the last song to
be recorded was No. 6, then the new song
will be No. 7.
☛ You can title your new recording either now
or after recording. In either case, see “Song
Titling and Title Editing” on page 22.
☛ If you want to record your L/R song using
the metronome, see “Recording with the
Metronome” on page 24.
☛ If you want to record a pedal count-in, see
“Recording a Pedal Count-In” on page 34.
3
Press both [PART L] and [PART R]
buttons so that both indicators
light red.
31
Chapter 6: Recording L/R Songs
Option
SAVE
You can also record an L/R song by playing the
left- and right-hand parts simultaneously. In this
case, a keyboard split point is set, and the notes
played on the left-hand side of the split point are
saved as the left-hand part, and notes played on
the right-hand side of the split point are saved as
the right-hand part.
English
The following table gives a description of
each of the options.
Recording the Left and
Right Parts Together
(Setting a Split Point)
The following display appears.
Re-Recording Both
Parts Simultaneously
The above display shows that the default
keyboard split point is note C3, or middle
C. In this case, note C3 and notes below are
saved as the left-hand part and note C 3 and
above are saved as the right-hand part, as
shown in the following figure.
To re-record both parts of an L/R song, follow the
procedure below.
Left-hand part
4
C3
1
Specify a disk.
2
Press [REC].
Right-hand part
To change the split point, press a
key on the keyboard or use the
[–/NO] and [+/YES] buttons to
select a different key.
–/NO
The REC indicator lights and the
PLAY/PAUSE indicator flashes.
3
Use the [SONG SELECT] buttons to
select the L/R song that you want
to re-record.
4
Press both [PART L] and [PART R]
buttons so that both indicators
light red.
+/YES
The split point can be set from note A1 to
note C7.
5
Press [PLAY/PAUSE].
The Disklavier is now ready for you to
play.
6
The following display appears.
5
Start playing your song with the
left- and right-hand parts and the
pedal part simultaneously.
To change the split point, press a
key on the keyboard or use the
[–/NO] and [+/YES] buttons to
select a different key.
–/NO
+/YES
As soon as you play the keyboard or press a
pedal, recording will start.
The split point can be set from note A1 to
note C7.
6
7
When you finish playing your
song, press [STOP].
Your new L/R song is saved to disk.
32
Press [PLAY/PAUSE].
The Disklavier is now ready for you to
play.
7
Start playing your song with the
left- and right-hand parts and the
pedal part simultaneously.
As soon as you play the keyboard or press a
pedal, recording will start.
Re-Recording One Part
1
Specify a disk.
2
Press [REC].
English
The REC indicator lights and the
PLAY/PAUSE indicator flashes.
8
When you finish playing your
song, press [STOP].
When [STOP] is pressed, the following
display appears.
Both PART indicators light green.
4
The following table gives a description of
each of the options.
Option
SAVE
NEW
CANCEL
9
Description
The new recording is saved
under the current song number.
The new recording is saved
under a new song number. The
existing song is kept under the
current song number.
The new recording is
discarded. The existing song is
kept under the current song
number.
Use [<] and [>] to select an
option, then press [ENTER].
Use the [SONG SELECT] buttons to
select the L/R song that you want
to re-record.
Use the [PART] buttons to select
the part that you want to rerecord.
The PART indicator of the selected part
lights red.
5
Press [REC] until the following
display appears.
There are two options available on this
display: Pedal Record on/off and Monitor
Piano on/off.
Parameter
Pedal
Record
Option
OFF
ON
OFF
The re-recording is saved as indicated or
canceled.
Monitor
Piano
ON
Notes
The existing pedal data
is kept.
New pedal data is
recorded, replacing the
existing data.
While one piano part is
being re-recorded, the
other part is not played
back by the piano.
While one piano part is
being re-recorded, the
other part is played
back.
33
Chapter 6: Recording L/R Songs
3
6
Use [<] and [>] to select an
option.
7
Use the [–/NO] and [+/YES]
buttons to set the option.
8
To start recording, press
[PLAY/PAUSE].
Recording will start immediately, so be sure
that you are ready to play the part.
9
When you finish playing, press
[STOP].
The following display appears.
When recording a song, you can also record a
“count-in” preceding the song to indicate the
tempo and the initial downbeat of the song, as a
band leader would do. This is useful when, for
example, you want to play a four-hand duet by
yourself or enjoy ensemble playing using other
instruments along with a song being played back
on the Disklavier.
Count-in beats are recorded using the sustain
pedal. Each press of the sustain pedal is recorded
as a count-in beat. Later when you play back the
recorded song, the metronome beeps and the LED
volume indicators flash the number of times you
pressed the sustain pedal to indicate the count-in
beats.
The following table gives a description of
each of the options.
1
Specify a disk.
Option
SAVE
2
Select the part that you want to
record — usually left or right —
then press [REC] to engage the
Record Standby mode.
3
Press [PLAY/PAUSE].
NEW
CANCEL
10
Recording a Pedal
Count-In
Description
The re-recorded part is saved
with the other existing part
under the current song number.
The re-recorded part is saved
under a new song number. The
existing parts are kept under
the current song number.
The re-recorded part is
discarded. The existing parts
are kept under the current song
number.
Use [<] and [>] to select an
option, then press [ENTER].
The Disklavier is now ready for you to start
playing.
4
Count yourself in by pressing the
sustain pedal, then start playing
the keyboard.
The re-recording is saved as indicated or
canceled.
A pedal count-in can be any number of
beats. Press the sustain pedal as many times
as necessary; each press will be recorded as
a count-in beat.
34
Once you begin recording your song,
subsequent sustain pedal presses will not be
recorded as count-in beats.
Playback with a Pedal
Count-In
English
When a song recorded with a pedal count-in is
played back, you can set the count-in to precede
the song. Specifically, the metronome beeps and
the LED volume indicators flash to indicate the
count-in beats. As the default setting is “OFF”,
you need to set it to “ON” when you want the
count-in to be played back.
Chapter 6: Recording L/R Songs
1
Press [METRONOME], and then
[>] until the following display
appears.
2
Press [+/YES] to set the Pedal
Count parameter to ON.
3
Press [METRONOME] to return to
the normal display.
4
Press [PLAY/PAUSE] to begin
playback.
The metronome starts and the LED volume
indicators flash to show the count-in beat.
35