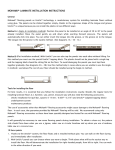
1
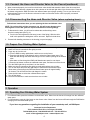
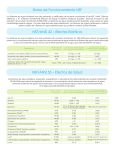
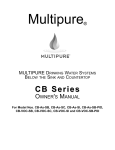
Multipure
®
Aquadome Drinking Water System
For Countertop Use Only
MODel NO. MPAD
Owner’s Manual
Please retain this manual for future reference.
Multipure l P.O. Box 34630 l las Vegas, NV 89133-4630
Phone 702.360.8880 l Toll-Free 800.622.9206
www.multipure.com l [email protected]
Multipure Drinking Water Systems
Thank you for selecting a Multipure Drinking Water System to meet your need for quality drinking water. You have
acquired one of the finest drinking water treatment devices available for the reduction of a wide array of contaminants.
We are confident that your Multipure System will make a difference in your life. Thank you for your business.
Table of Contents
About
3
Before You Begin
3
Specifications
3
Installation Overview and Part Numbers
4
1.
2.
Installation
1.1: Inspect Your Drinking Water System
1.2: Connect the Hose to the Housing
1.3: Connect the Hose and Diverter Valve to the Faucet
1.4: Disconnecting the Hose and Diverter Valve
(when replacing hose)
1.5: Prepare Your Drinking Water System
Operation
2.1: Operating Your Drinking Water System
4
5
5-6
6
6
6
3.
Maintenance
3.1: Regarding Filter Capacity
7
3.2: Removing the Old Filter
7
3.3: Installing the New Filter
7
3.4: Drinking Water System Will Be Unused for More than 10 Days 8
3.5: Flushing / Disinfecting the System
8
4.
Additional Information
4.1: Warranty
4.2: Performance Certifications
4.3: Performance Data Sheet
4.4: California Certification
4.5: Troubleshooting
4.6: Frequently Asked Questions
8
9
10-12
13
14
15
2
About the Aquadome Drinking Water System
•
•
•
The Multipure Aquadome Drinking Water System (Model# MPAD) is designed for use on the countertop next to the sink.
It connects to the existing faucet with a diverter valve that allows free selection between filtered and unfiltered water.
The Aquadome includes all the accessories and fittings required for installation.
If installation or operation assistance is required, please contact your Multipure Independent Distributor. If the
Independent Distributor is unavailable, please contact Multipure Customer Service at 1.800.622.9206.
Before You Begin
Multipure Drinking Water Systems (DWS) have been extensively tested and certified by NSF International to provide the
highest level of assurance that the device will perform as claimed. Please read this manual before proceeding with the
installation and use of your system. Installation, operation, and maintenance requirements are essential to the performance
of your system – failure to follow any instructions or operating parameters contained herein may lead to product damage or
product failure.
•
•
•
•
•
•
•
Replacement filters can be purchased directly from Multipure. For the latest prices, please visit our website at
http://www.multipure.com/store/.
Actual filter life depends on the amount of water used and the level of impurities in the water. See 3.1: Regarding Filter
Capacity for additional details.
Multipure Drinking Water Systems are not intended for use with microbiologically unsafe water or non-municipally-treated
water. Systems certified for cyst reduction may be used on disinfected waters that may contain filterable cysts. See 4.6:
Frequently Asked Questions for additional details.
Do not allow water to freeze in the system. If the system is exposed to freezing temperatures, drain water from the
system and remove the filter. Allow the filter to thaw before replacing and reusing.
Do not allow water to sit in the system for extended periods of time (e.g., 10 days or more) without use. See 3.4: If Your
Drinking Water System Will Be Unused for More than 10 Days for additional details.
To dispose of the used filter, remove it from the housing and place in normal refuse. Filters disposed in a normal landfill
will not release any chemical contaminants and may continue to adsorb additional contaminants in the landfill.
Check for compliance with any state or local laws and regulations before use.
Specifications
3
Installation Overview & Part Numbers
Part Numbers
1
6
1.
2.
3.
4.
5.
6.
7.
2
3
800-50-3201
CB6AD
MC357
800-51-3201
MC6500ASBl
MC008
MC700
5
4
Housing Top
Filter Cartridge
Black Gasket
Housing Bottom
Hose and Diverter Valve
Hand Tool
4 Standard Adapters*
(shown on page 5)
* Adapters are not included as part of the NSF Unit
Certification.
I. Installation
1.1: Inspect Your Drinking Water System
NOTe: The filter cartridge is factory-installed inside the unit housing. The Aqua Dome unit is for countertop use only.
1. Inspect your DWS to confirm that it has been received in
good condition and that all parts are included.
2. Determine a countertop location for system placement,
factoring in distance to the faucet for diverter valve and
hose connection.
housing top
3. Inspect the system housing to confirm that the housing
top and bottom are securely connected.
a.
b.
With the system sitting upright, slide the hand tool
over the top so that the ridges on the tool fit into the
grooves on the housing top.
While holding the system base in place, firmly turn
the hand tool clockwise to tighten the housing top.
hand tool
housing
base
4
1.2: Connect the Hose to the Housing
NOTe: The Aqua Dome comes with a diverter valve and hose that connects the
drinking water system to your faucet.
1.
2.
3.
4.
On the diverter valve and hose, locate the two stems at the end of the hose
opposite the diverter valve. Identify the large stem (Inlet Stem) and small stem
(Outlet Stem).
On the DWS, locate the two ports on the bottom rear of the system housing.
Identify the lower, large port (Inlet Port) and upper, small port (Outlet Port).
Insert the Inlet Stem into the Inlet Port by slowly pushing the stem straight into the
port as far as possible. Confirm the connection by pushing the stem in again.
Insert the Outlet Stem into the Outlet Port by slowly pushing the stem straight into
the port as far as possible. Confirm the connection by pushing the stem in again.
Small stem
Outlet
Inlet
large stem
1.3: Connect the Hose and Diverter Valve to the Faucet
1.
2.
Remove the aerator or screen (if present) from the end of the faucet. If facing the open end of
the spout, rotate the aerator counter-clockwise to loosen and remove.
Attach the diverter valve directly to the faucet spout. If the threads of the diverter valve do not
match the threads of the faucet, use one of the included faucet adapters to connect the diverter
valve and faucet. If facing the open end of the spout, rotate the diverter valve and/or adapter
clockwise to tighten.
NOTE: When using a faucet adapter, the rubber washer in the adapter always faces up toward
the faucet.
a. If Your Faucet Has an Outside Thread (male connector):
For many faucets with an outside thread, the diverter valve can attach directly to the faucet.
If the diverter valve is too small to attach to the faucet, attach the inside thread (female
connector) adapter, part# MC106, to the faucet, and then attach the diverter valve to the
adapter.
b. If Your Faucet Has an Inside Thread (female connector):
The diverter valve cannot directly connect to a faucet with a female connector. Attach one of the outside thread
(male connector) adapters, part# MC107 or part# MC108, to the faucet, and then attach the diverter valve to the
adapter. MC107 is designed to fit larger faucets, and MC108 is designed to fit smaller faucets.
c. If Your Faucet Requires More Room for the Diverter Valve Connection:
Some faucets, particularly sprayer hose faucets, require additional room for the diverter valve connection. If this
applies, attach the long adapter, part# MC257, to the opening of the faucet spout/sprayer, and then attach the
diverter valve to the adapter. The DWS may need to be repositioned on the sink to allow enough room for sprayer
faucet use.
d. If the Adapters Do Not Fit Your Faucet:
Although the adapters included with your DWS allow connections with many standard faucets, they do not cover
every type of available faucet connection. If none of the adapters allow the diverter valve to connect to your faucet,
please contact Multipure Customer Service at 1.800.622.9206, ext. 175, to request either part# MC109 or part#
MC719 as possible adapter solutions.
existing
Faucet
*MC106
*MC107
Swivel
Bypass
lever
Attachment
Ring
*MC108
Hose
*MC257
Diverter Valve
Diverter Valve Attachment
Diverter Valve Attachment
with adapter
* Adapters are not included as part of the NSF Unit Certification.
5
*MC700 - Adapters (choose one)
Many installations do not
require an adapter
1.3: Connect the Hose and Diverter Valve to the Faucet (continued)
3. When connected properly, the hose from the diverter valve should lead toward the back of the faucet and sink.
4. The diverter valve features a bypass lever with a button on the left and right sides of the diverter valve. Press the
left button to bypass the DWS and select the unfiltered water spout (larger opening). Turn on your faucet to let
unfiltered water flow out of the diverter valve and to make sure that the diverter valve is properly connected.
5. Turn off the faucet.
1.4: Disconnecting the Hose and Diverter Valve (when replacing hose)
Follow these instructions when you are replacing the hose and diverter valve.
NOTE: Do not forcefully pull the connectors out, this will cause damage to the
housing base. Ensure the system is depressurized before removing fittings.
1.
To disconnect the hose, you will need to release the small and large stem
from the housing base (see Fig. A).
a. Push in the collet against the tube stop (center of the fitting). With the collet
held in this position the tubing/stem can be removed. Repeat for both tubes.
2.
Remove tubing
Fig. A
Proceed with installing new hose to the housing (on previous page).
1.5: Prepare Your Drinking Water System
1.
2.
3.
Using a paper towel or cloth, dry off all connections and the DWS housing.
Make sure that all connections are tightly secured.
Purge any air from the unit.
a. Turn the DWS housing upside down, and then turn on the faucet.
b. Press the right button on the diverter valve to select the filtered water spout. The
water will flow through the DWS and emerge from the smaller opening on the diverter
valve.
c. Allow water to flow through the DWS and filtered water spout for one minute.
d. Press the left button to select the unfiltered water spout, and then turn off the faucet.
4. Turn the DWS right side up and place it on the counter.
5. Make sure that all connections are tightly secured and that there are no leaks.
6. Turn on the faucet and press the right button to selected the filtered water spout.
7. Allow water to flow through the DWS and filtered water spout for approximately
30 minutes. This will flush the filter and charge the carbon.
8. Press the left button to select the unfiltered water spout.
9. Turn off the faucet.
10. Check all connections to make sure that there are no leaks.
bypass
lever
unfiltered
water
filtered
water
aerator
2. Operation
2.1: Operating Your Drinking Water System
1. For unfiltered water, press the left button on the diverter valve. Water from the faucet will emerge from the unfiltered
water spout.
2. For filtered water, press the right button on the diverter valve. Water from the faucet will flow through the DWS before
emerging from the filtered water spout.
If you have any questions regarding the installation of your countertop unit, call Multipure:
Customer Service Department
7251 Cathedral Rock Drive, Las Vegas, NV 89128
702.360.8880 phone * 800.622.9206 toll-free * 702.360.8575 fax
email: [email protected] * www.multipure.com
6
3. Maintenance
3.1: Regarding Filter Capacity
1. exact filter capacity varies in proportion to the amount of water used and the level of impurities in the water being
processed. For contaminants reduced through physiochemical adsorption, the filter capacity is 750 gallons. For
contaminants reduced through mechanical filtration, capacity claims are inapplicable due to broad variations in the
quality and quantity of physical matter in the drinking water. excessive physical matter will cause the DWS to clog,
diminishing flow rate but reducing the contaminants from the resultant water stream.
2. For optimum performance and to maintain the lifetime warranty on your system housing, it is essential that the filter be
replaced when the first of the following occurs: a. annually, b. when the system reaches its rated capacity, c. when the
flow rate diminishes, or d. when the filter becomes saturated with bad tastes and/or odors.
3.2: Removing the Old Filter
1. Before opening the DWS housing, place the system either on a folded
towel, in a basin or other container, or in the sink.
2. With the faucet off, press the right button on the diverter valve to select the
filtered water spout and flush water out of the DWS.
3. When the flow of water stops, press the left button on the diverter valve to
stop the filtered water spout.
4. With the system sitting upright, slide the hand tool over the top so that the
ridges on the tool fit into the grooves on the housing top.
5. Holding the base steady, use the hand tool to turn the DWS counterclockwise to loosen.
6. Once the top is loose, you can complete rotating it counter-clockwise by
hand.
7. Once unscrewed, lift the housing top off of the base, leaving the black
gasket on the bottom of the base.
8. Remove the old filter cartridge from the base by pulling it upward and
slightly twisting until it is released from the base.
9. Dispose of the old filter in your waste container.
10. Rinse out the inside of the system housing, hand washing if necessary.
bypass
lever
3.3: Installing the New Filter
1. If you have not done so already, remove the plastic wrapper and instruction
wrap from around the new filter.
2. Insert the new filter in the center port of the housing base, twisting slightly.
Push straight down on the filter to ensure that it is firmly in place.
3. Place the housing top over the filter and back onto the base. Turn it
clockwise to tighten.
4. If necessary, use the hand tool to further tighten the housing top to the
base, turning it clockwise while holding the base steady.
5. Proceed to 1.5: Preparing Your Drinking Water System to complete the
installation.
7
Flush
without
filtered
water
aerator
3.4: If Your Drinking Water System Will Be Unused for More than 10 Days
To prevent the water sitting in the system from stagnating and becoming contaminated, flush the system and remove the
filter if it will be unused for more than 10 days.
1. With the faucet off, press the right button on the diverter valve to select the filtered water spout and allow water to
flow out of the DWS.
2. When the water flow stops, press the left button on the diverter valve.
3. Unscrew the housing top from the DWS by rotating it counter-clockwise.
4. With the housing top removed, pull out the filter cartridge and set it on a cloth or paper towel to dry.
5. Pour out any remaining water from the bottom half of the system housing.
6. Reconnect the top half of the system housing by rotating it clockwise.
7. To resume normal use of the DWS, proceed to 1.5 Prepare Your Drinking Water System.
3.5: Flushing / Disinfecting the System
If your DWS is left unused for more than 10 days with the filter and water inside, the stagnant water and system may
become contaminated. Before it can be reused, the system must be flushed and disinfected, and the filter must be
replaced.
1. With the faucet off, press the right button on the diverter valve to select the filtered water spout and allow water to
flow out of the DWS.
2. When the flow of water stops, press the left button on the diverter valve.
3. Unscrew the housing top from the DWS by rotating it counter-clockwise.
4. With the housing top removed, pull out the filter cartridge and dispose of it in your refuse.
5. Clean and rinse out the inside of the system housing.
6. Add 5 to 7 drops of bleach to the bottom half of the housing.
7. Reconnect the top half of the housing without a replacement filter installed.
8. Turn the DWS housing upside down, and then turn on the faucet.
9. Press the right button on the diverter valve to select the filtered water spout and allow the water and bleach to fill up
the DWS.
10. Once water begins to flow, press the left button to stop the filtered water spout.
11. Turn off the faucet.
12. Turn the DWS housing right side up and let the unit soak for at least 30 minutes.
13. After 30 minutes, with the faucet off, press the right button on the diverter valve to select the filtered water spout and
flush the water and bleach out of the system.
14. When the flow of water stops, open, clean, and rinse out the inside of the system housing.
15. Proceed to 3.3: Installing the New Filter to install the new filter and initialize the system.
4. Additional Information
4.1: Warranty
•
•
Multipure 90-Day Guarantee: Multipure is confident in the performance of its Drinking Water Systems (DWS). If you
should find this Drinking Water System unsatisfactory, let us know within 90 days of purchase for a prompt exchange
or refund.
Multipure Warranty: Multipure Corporation warrants to the original retail customer its DWS and components to be
free of defects in material and workmanship for use under normal care, and will repair or replace any system at no
charge (excluding transportation to Multipure Corporate Headquarters) to the customer during the warranty period.
The DWS housing is warranted for a lifetime (provided the filter has been changed at least once per year); all exterior
hoses and attachments to the DWS are also warranted for defects in material and workmanship for one (1) year.
Multipure Solid Carbon Block Filters are warranted for defects in material and workmanship for use under normal care.
The capacity of the filter cartridge depends upon the amount of impurities in the water to be processed.
except as otherwise expressly provided above, Multipure Corporation makes no warranties, express or implied, arising
by law or otherwise, including without limitation the implied warranties of merchantability and fitness for a particular purpose, to any person. This limited warranted may not be altered, varied, or extended except by a written instrument executed by Multipure Corporation. The remedy of repair or replacement as provided under this limited warranty is exclusive.
In no event shall Multipure Corporation be liable for any consequential or incidental damages to any person whether
occasioned by negligence of the manufacturer, including without limitation damages of loss of use, cost of substitution,
property damage, or other monetary loss.
Warranty is valid only if the DWS is operated within conditions listed herein. The warranty begins from the date of
purchase
8
4.2: Performance Certifications
Multipure Drinking Water Systems
Product Performance Tested and Certified
Multipure Drinking Water Systems have been tested and certified by NSF International to comply with
NSF/ANSI Standards 42 and 53 for the reduction of specific contaminants being considered as established or
potential health hazards.
Standard 42, Aesthetic Effects
Standard 53, Health Effects
System tested and certified by NSF International against
NSF/ANSI Standard 42 for the reduction of:
Chloramine
Chlorine taste and odor
Nominal Particulate reduction, class I
System tested and certified by NSF International against
NSF/ANSI Standard 53 for the reduction of:
Asbestos
Chlordane
Cyst
lead
Mercury
MTBe
PCB
Toxaphene
Turbidity
Radon
VOC (listed below)
Standard 401, Emerging Contaminants
Claims of capacity are not applicable to
contaminants reduced by mechanical
filtration because of broad variations in
the quality and quantity of
physical matter in your drinking water.
System tested and certified by NSF International against
NSF/ANSI Standard 401 for the reduction of:
Atenolol
Carbamazepine
DeeT
linuron
Meprobamate
Metolachlor
Trimethoprim
TCeP
TCPP
Bisphenol A
estrone
Ibuprofen
Naproxen
Nonyl phenol
Phenytoin
Filter Model CB6AD
Volatile Organic Chemicals (VOC) includes:
Disinfection By-Products
chloropicrin
haloacetonitriles (HAN):
bromochloroacetonitrile
dibromoacetonitrile
dichloroacetonitrile
trichloroacetonitrile
haloketones (HK):
1,1-dichloro-2-Propanone
1,1-trichloro-2-Propanone
trihalomethanes (THMs; TTHMs):
bromodichloromethane
bromoform
chloroform
dibromochloromethane
tribromoacetic acid
Chemicals
benzene
carbon tetrachloride
chlorobenzene
1,2-dichloroethane
1,1-dichloroethylene
cis-1,2-dichloroethylene
1,2-dichloropropane
cis-1,3-dichloropropylene
ethylbenzene
hexachlorobutadiene
hexachlorocyclopentadiene
simazine
styrene
1,1,2,2-tetrachloroethane
tetrachloroethylene
toluene
trans-1,2-dichloroethylene
1,2,4-trichlorobenzene
1,1,1-trichloroethane
1,1,2-trichloroethane
trichloroethylene
xylenes (total)
9
Herbicides
alachlor
atrazine
2,4-D
dinoseb
pentachlorophenol
2,4,5-TP (silvex)
Pesticides
carbofuran
dibromochloropropane (DBCP)
o-dichlorobenzene
p-dichlorobenzene
endrin
ethylene dibromide (eDB)
heptachlor
heptachlor epoxide
lindane
methoxychlor
4.3:
Performance D a t e S h e e t
Performance Data Sheet
Multipure Drinking Water Systems have been tested and certified under NSF/ANSI Standard Nos. 53 as
shown below. The concentration of the indicated substances in water entering the system was reduced to a
concentration less than or equal to the permissible limit for water leaving the system, as specified in
NSF/ANSI 53, Health effects.
For Model No. MPAD
**Percent reduction reflects actual performance of Multipure product as specifically tested (at 200% of capacity, i.e. 1500
gallons). Percent reduction shown for VOCs* reflects the allowable claims for Volatile Organic Chemicals/Compounds
as per Tables. Chloroform was used as a surrogate for VOC reduction claims: the Multipure Systems’ actual reduction
rate of Chloroform was >99.8% as tested (at 200% of capacity).
10
4.3: Performance Data Sheet
(continued)
11
4.3: Performance Data Sheet
(continued)
NSF/ANSI 42 - Aesthetic Effects
The System has been tested according to NSF/ANSI Standard 42 for the reduction of the following substances. The concentration of the indicated substances in water entering the system was reduced to a concentration less than or equal to
the permissible limit for water leaving the system.
Note: This addresses the U.S. environmental Protection Agency (ePA) Primary and Secondary Drinking Water Regulations in effect at its time of publication, they relate to Multipure’s performance in conformance to the industry performance criteria. These regulations are continually being updated at the
Federal level. Accordingly, this list of MCls will be reviewed and amended when appropriate. Please see sales brochure for list of product certifications.
NSF/ANSI 401 - Emerging Contamiants
This system has been tested according to NSF/ANSI 401 for reduction
of the substances listed below. The concentration of the indicated substances in water entering the system was reduced to a concentration
less than or equal to the permissible limit for water leaving the system,
as specified in the NSF/ANSI 401.
12
NOTES:
1. Multipure Drinking Water Systems have been
certified, as indicated, by NSF International for
compliance to NSF/ANSI Standard Nos. 42, 53 & 401.
2. The Multipure Drinking Water Systems have been
certified by the State of California Department of
Public Health for the reduction of specific
contaminants listed herein.
3. Chloroform was used as a surrogate for claims of
reduction of VOCs. Multipure Systems tested at
>99.8% actual reduction of Chloroform. Percent
reduction shown herein reflects the allowable claims
for VOCs as per tables in the Standard.
4. Do not use with water that is microbiologically
unsafe or of unknown quality without adequate
disinfection before or after the system.
Systems certified for cyst reduction may be used
on disinfected water that may contain filterable
cysts.
5. Filter life will vary in proportion to the amount of water
used and the level of impurities in the water being
processed. For optimum performance, it is essential
that the filter be replaced on a regularly scheduled
basis as follows: (a) annually; (b) when the unit’s rated
capacity has been reached; (c) the flow rate
diminishes; or (d) the filter becomes saturated with
bad tastes and odors.
6. Multipure Drinking Water System Housings are
warranted for a lifetime (provided that filter has been
changed at least once per year). All exterior hoses
and attachments to the System are warranted for one
year. Please see the Owner’s Manual for complete
product guarantee and warranty information.
7. Please see the Owner’s Manual for installation
instructions and operating procedures.
8. In compliance with New York law, it is recommended
that before purchasing a water treatment system, NY
residents have their water supply tested to determine
their actual water treatment needs. Please compare
the capabilities of the Multipure unit with your actual
water treatment needs.
9. While testing was performed under standard
laboratory conditions, actual performance may vary.
10. The list of substances which the treatment device
reduces does not necessarily mean that these
substances are present in your tap water.
4.4: California Certification Department of Public Health
State of California
Department of Public Health
Water Treatment Device
Certificate Number
05 - 1736
Date Issued: October 20, 2010
Trademark/Model Designation
Multi-Pure MPAD
Replacement Elements
CB6AD
Multi-Pure MPADC
CBTAD
Manufacturer: Multi-Pure Drinking Water Systems
The water treatment device(s) listed on this certificate have met the testing requirements pursuant to Section
116830 of the Health and Safety Code for the following health related contaminants:
Microbiological Contaminants and Turbidity
Cysts
Turbidity
Inorganic/Radiological Contaminants
Asbestos
Lead
Mercury
Organic Contaminants
Chlordane
MTBE
PCB
Toxaphene
VOCs
Rated Service Capacity: 750 gals
Rated Service Flow: 0.75 gpm
Conditions of Certification:
Do not use where water is microbiologically unsafe or with water of unknown quality, except that systems certified
for cyst reduction may be used on disinfected waters that may contain filterable cysts.
13
4.5:
Tr o u b l e s h o o t i n g
14
4.6: Frequently Asked Questions
15
For instructions in Spanish, please see Spanish Manual
Be sure to replace your filter at least once a year or sooner, if needed.
Date of Installation:________________________________________
Fecha de Instalación
Unit Model Number:_______________________________________
Tipo de Unidad
Filter Type:______________________________________________
Tipo de Filtro
Dates of Filter Change / Fechas de Cambio del Filtro
To order a Replacement Filter
Call 800.622.9208
or
www.multipure.com/rf.html
Multipure
las Vegas Technology Center
7251 Cathedral Rock Drive
las Vegas, NV 89128
800.622.9206
email: [email protected]
www.multipure.com
F508AD/1502