1
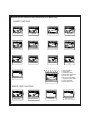
Remote Vehicle Control System
CA 680
Owner's Manual
Deluxe Vehicle Security and Remote
Start System with Two Way
Confirming Dot Matrix Remote
Control
IMPORTANT NOTE: The operation of the Security and Convenience System as described in this manual is
applicable to most vehicles. However, due to the configuration of some vehicles, some functions AND/OR SAFETY
PRECAUTIONS may not apply. Please see your installing dealer for more information.
Table of Contents
Using Your Remote Control .......................................................... 3
Arming the security system
Pre-arm mode
Disarming the security system
Disabling/Enabling confirmation chirps
Attempted intrusion identification
Two stage door unlock*
Activating the trunk release feature*
Using Your Remote Control, continued .................................... 4
Turning on the vehicle’s headlights*
Activating optional AUX 1*
Activating optional AUX 2*
Activating optional AUX 3*
Activating optional AUX 4*
Using the progressive car finder feature
Using the personal protection alarm
Using the transmitter flashlight feature
Using Your Remote Vehicle Starter ............................... 5
Remote starting your vehicle
Entering your vehicle while it is running via remote vehicle start
Using the safety (red handled) control switch
Preheating or Precooling the vehicle’s interior
Turning on the rear window defroster (optional)*
Using the “quick-stop” feature
Using Your Remote Vehicle Starter, continued ...................... 6
Operating the 2 / 4 hour start up timer mode
Operating the temperature start mode
Using Your Remote Vehicle Starter, continued ...................... 7
Operating the daily start timer
Remote start safety features
Using valet mode
Using the optional Turbo Timer feature*
Additional Dot Matrix Remote Control Features ..................... 8
Additional Dot Matrix Remote Control Features, Continued .. 9
Dot Matrix Remote Control Options Menu ............................ 10
Dot Matrix Remote Control Icons and their Indications ...... 11
Optional Song Bird Feature* ................................................... 12
Replacing remote control batteries
Emergency Override Procedure ............................................ 13
2
*
May require additional installation labor, components and installation cost
Using Your Remote Control
Arming the Security System
To arm the system, exit the vehicle, close all doors, then press the LOCK icon button on the remote
control. The system will sound twice and the parking lights will flash twice, indicating the system is
armed. The doors will also lock at this time (if equipped and connected). The status indicator (blue
warning light on the dash) will blink steadily, once per second. To arm the system silently, press and
hold the LOCK icon button for 1 second. The parking lights will flash 2 times, indicating the system is
armed, has locked the doors (if equipped and connected) and activated the starter disable feature. The
status indicator (blue warning light on the dash) will blink steadily, once per second.
Pre-arm Mode
If the horn system sounds and the parking lights flash only once, this indicates that the vehicle’s
interior light is on or an entrance is left open. Check to see that all doors hood and trunk are closed
properly. Once all entrances are secured (and the interior light is off), this system will sound/flash
again. The system is now fully armed. (If the entrance is not secured within 4 minutes, the system will
arm and ignore the unsecured entrance until it is closed.)
Disarming the Security System
To disarm the system press the UNLOCK icon button. The system will sound and the parking lights
will flash once, and the doors will unlock (if equipped and connected). To disarm the system silently,
press and hold the UNLOCK icon button for 1 second. The parking lights will flash, indicating the
system is disarmed and has unlocked the doors (if equipped and connected).
Disabling/Enabling Confirmation Chirps
1. Turn the ignition key ON then OFF.
2. Within 10 seconds push and release the valet/override button 3 times.
3. The system will sound 2 times to disable confirmation chirps or 1 time to enable confirmation
chirps.
Attempted Intrusion Identification
This system will inform you if an intrusion attempt has occurred while you were away from the vehicle. If
an intrusion attempt occurred, the system will sound 4 times and the parking lights will flash 3 times
when disarming the system. Enter the vehicle an observe the dash mounted status LED to Identify
which zone was triggered.
1. Shock Sensor- 1 flash, pause 1 flash, etc.
2. Hood or Trunk Pin switch- 2 flashes, pause 2 flashes, etc.
3. Door Entry- 3 flashes, pause 3 flashes, etc.
The intrusion warning indicators are stored in the system’s memory and will be erased when the ignition
key is turned on.
Two Stage Door Unlock (Optional)
If this feature is enabled on your system, pressing the UNLOCK icon button one time on the remote
control will unlock only the driver’s door. Press disarm again to unlock the remaining doors.
Activating the Trunk Release Feature (Optional)
If this feature is enabled on your system, pressing and holding the TRUNK icon button on the remote
control for 2 seconds will open the vehicle’s trunk or hatch.
*Throughout this manual, ‘press’ refers to pressing for less than 1 second; ‘press and hold’ refers to pressing for more
than 2 seconds.
3
Using Your Remote Control, continued
Turning on the Vehicle’s Headlights (Optional)
If this feature is enabled on your system, pressing and holding the LOCK icon button on the remote
control for 2 seconds will turn on the vehicle’s headlights for 30 seconds.
Activating Optional AUX 1 (Optional)
If this feature is enabled on your system, pressing and holding the LOCK icon button and the TRUNK
icon button on the remote control simultaneously will activate an optional feature. This feature can be
programmed for a wide range of functions like power window or sunroof automation, please consult
your installing dealer to determine functionality of your system.
Activating Optional AUX 2 (Optional)
If this feature is enabled on your system, pressing and holding the OPTION button on the remote
control will activate an optional feature. AUX 2 is generally used to turn on the rear window defroster
after the vehicle has been remote started, but can also be programmed for a wide range of functions,
please consult your installing dealer to determine functionality of your system.
Activating Optional AUX 3 (Optional)
If this feature is enabled on your system, pressing and holding the LOCK icon button and the OPTION
button on the remote control simultaneously will activate an optional feature. This feature can be
programmed for a wide range of functions like power window or sunroof automation, please consult
your installing dealer to determine functionality of your system.
Activating Optional AUX 4 (Optional)
If this feature is enabled on your system, pressing and holding the UNLOCK icon button and the
OPTION button on the remote control simultaneously will activate an optional feature. This feature
can be programmed for a wide range of functions like power window or sunroof automation, please
consult your installing dealer to determine functionality of your system.
Using the Progressive Car Finder Feature
2-way Dot Matrix Remote Control:
Press the LOCK icon button and the UNLOCK icon button on the remote control to locate your vehicle.
The system will sound 5 times at low volume increasing in volume each of 3 times the button is
pressed.
1-way Six Button Remote Control:
Press the “ * “ icon button on the remote control to locate your vehicle. The system will sound 5
times at low volume increasing in volume each of 3 times the button is pressed.
Using the Personal Protection Alarm (Panic)
2-way Dot Matrix Remote Control:
Press and hold the LOCK icon button and the UNLOCK icon button on the remote control for 2
seconds to activate the personal protection alarm. The system will sound for 30 seconds. Pressing
any button on the remote control will turn the personal protection alarm off.
1-Way Six Button Remote Control:
Press and hold the “ * “ icon button on the remote control for 2 seconds to activate the personal
protection alarm. The system will sound for 30 seconds. Pressing any button on the remote control
will turn the personal protection alarm off.
Using the Transmitter Flashlight Feature
The (1) 6 button (non-confirming) remote control included with your system has a flashlight bulb built
into the top of the remote control. Pressing and holding the LIGHT icon button on the remote control
will activate the flashlight until the button is released.
4
Using Your Remote Vehicle Starter
Remote Starting Your Vehicle
To activate the remote vehicle start function, press and release the OPTION button on the remote control
two (2) times within 2 seconds. The system will sound, the parking lights will flash 1 time and the system
will check the vehicle to ensure it is safe to start, if all safety parameters are correct, the vehicle will start
within 5 seconds (diesel vehicles will take longer). The vehicle’s parking lights will turn on (or flash
depending on system settings) as a visual indication that the vehicle has started and is running. Press
and release the OPTION button on the remote control two (2) times within 2 seconds again to turn the
vehicle off.
If your vehicle stalls or does not start, the system will pause 5 seconds, then try 2 more times to start the
vehicle (a total of 3 attempts). The system will pause 5 seconds between each start attempt. If the vehicle
does not start after the fourth attempt, the system will abort the remote vehicle start process.
Entering the Vehicle while it is running via Remote Vehicle Start
1. Unlock the vehicle’s doors.
2. Enter the vehicle. DO NOT PRESS THE BRAKE PEDAL!
3. Insert the key into the ignition switch and turn to the ON or RUN position.
4. Press the brake pedal. The remote vehicle starter will disengage and the vehicle will operate normally.
Using the Safety (Red Handled) Control Switch
The safety (red handled) control switch allows you to temporarily disable the remote vehicle starter feature,
this is especially helpful when having your vehicle serviced or valet parked. To disable the remote start,
move the safety (red handled) control switch to the OFF position.
Preheating or Precooling the Vehicle’s interior
Before exiting the vehicle, set the temperature controls to the desired setting and operation. After the
system starts the vehicle, the heater or air conditioning will activate and heat or cool the vehicle’s interior to
your setting.
Turning on the Rear Window Defroster (Optional)
While the vehicle is running via remote vehicle start, press and hold the OPTION button on the remote
control for 2 seconds. The rear window defroster will turn on for 10 minutes or the vehicles preset time
limit.
Using the “Quick-stop” Feature
If you want to make a short stop and keep your vehicle running (to keep the interior warm or cool), the
quick-stop feature allows you to do this while keeping your vehicle secure and your keys with you.
To engage quick stop:
1. Stop the vehicle and place the transmission in PARK.
2. With your foot off the brake pedal, press and release the OPTION button on
the remote control two (2) times within 2 seconds. The parking lights will turn
on indicating the vehicle is now running via remote vehicle start.
3. Remove the keys from the ignition and exit the vehicle. Press the LOCK icon
button on the remote control to lock the vehicle’s doors if desired.
Note: Do not leave children or animals unattended in the vehicle when using the
quick-stop feature.
5
Using Your Remote Vehicle Starter, continued
Operating the 2 / 4 Hour Start Up Timer Mode
The system has the ability to start the vehicle every 2 or 4 hours over a 48 hour period. This feature is
especially useful in cold climates where the only means to keep the engine and engine fluids warm is
to periodically start the engine.
WARNING!
Be certain that the vehicle is outdoors before using this or any remote starting device. A running
engine produces dangerous carbon monoxide fumes which can be harmful or fatal if prolonged
exposure occurs. DO NOT remote start the vehicle if is garaged.
Selecting between 2 and 4 hour start up: (default 4 hour)
1. Begin with the safety (red handled) control switch in the ON position.
2. Turn the ignition switch ON then OFF.
3. Within 10 seconds move the safety (red handled) control switch OFF, ON, OFF, ON
(2 switch cycles) to select a 2 hour start timer. After 10 seconds the parking lights
will flash and the system will sound 2 times indicating that the 2 hour start timer is selected.
Or
3a. Within 10 seconds move the safety (red handled) control switch OFF, ON, OFF, ON,
OFF, ON, OFF, ON (4 switch cycles) to select a 2 hour start timer. After 10 seconds the
parking lights will flash and the system will sound 4 times indicating that the 4 hour start
timer is selected.
To begin the 2 / 4 hour start up timer mode:
1. Turn the ignition key ON then OFF.
2. Within 10 seconds press the OPTION button on the remote control four (4) times.
The parking lights will flash and the system will sound 4 times indicating the 2 / 4 hour start
up timer mode has been activated. The vehicle will start every 2 or 4 hours and run
for the preset time limit (5, 10, 15 or 20 minutes) and then shutdown. This will continue
for 48 hours unless the 2 / 4 hour start up timer is cancelled.
To begin the 2 / 4 hour start up timer mode from the remote control:
1. Activate the remote vehicle start feature using the remote control.
2. Shutdown the remote vehicle starter using the remote control (press the OPTION
button 2 times).
3. Within 10 seconds press OPTION button on the remote control 4 times.
The parking lights will flash and the system will sound 4 times indicating the 2 / 4 hour start
up timer mode has been activated. The vehicle will start every 2 or 4 hours and run for the preset
time limit (5, 10, 15 or 20 minutes) and then shutdown. This will continue for 48 hours unless the
2 / 4 hour start up timer is cancelled.
To cancel the 2 /4 hour start up timer mode:
1. Start the vehicle using the ignition key, then press the brake pedal.
Or
2. Activate the remote vehicle start feature using the remote control.
Operating the Temperature Start Mode
The system has the ability to start the vehicle when the temperature reaches 0 degrees. To toggle this
feature on/off using the remote control press the UNLOCK and OPTION buttons simultaneously for 1
second.
Note: This feature must be turned ON in options programming. Check with your installing dealer to
insure this feature is set to the ON position.
6
Using Your Remote Vehicle Starter, continued
Operating the Daily Start Timer
The system has the ability to start your vehicle based on a 24-hour countdown timer. To activate this
feature, using the remote control press the LOCK and OPTION buttons simultaneously for 1 second. The
system will begin counting down from 24 hours, and start the vehicle when it reaches zero. This timer will
only activate 1 time and will need to be reactivated for each 24 hour period.
Remote Start Safety Features
For safety and security reasons, the system will shutdown or prevent the remote vehicle starter from
activating if any of the following occur:
1.
2.
3.
4.
The
The
The
The
vehicle hood is open.
brake pedal is pressed prior to turning the ignition key to the ON position.
engine reaches 3 times its normal idle speed.
safety (red handled) control switch is turned to the OFF position.
Using Valet Mode
To engage valet mode:
1.
2.
3.
Turn the ignition key to the ON position.
Press and hold the emergency override button.
The blue dashboard mounted LED will light solid indicating that the system is in
valet mode.
When valet mode is activated the dash mounted status LED will light solid, and all security functions will
be disabled.
To disengage valet Mode:
1.
2.
3.
Turn the ignition key to the ON position.
Press and release the emergency override button.
The blue dashboard mounted LED will turn off indicating that the system has
exited valet mode.
When the valet mode has been deactivated the dash mounted status LED will turn off and all security
functions will be enabled the next time the system is armed.
Using the Optional Turbo Timer Feature
To engage the turbo timer feature:
1.
2.
3.
4.
With the vehicle running via the ignition key, and your foot off of the brake pedal.
Engage the vehicle’s parking brake.
The vehicle’s parking lights will turn on to verify the turbo timer feature has been activated.
Turn the ignition key OFF, the vehicle will continue to run for an additional 5 minutes.
To disengage the turbo timer feature:
1. Press the vehicle’s brake pedal.
Or
2. Turn the safety (red handled) control switch to the OFF position.
7
Additional Dot Matrix Remote Control Functions
Dot Matrix Remote Control Display Illumination
Press and release the “F” button on the LCD remote control one time. The display will illuminate for 10
seconds.
Dot Matrix Remote Control Vibrate or Tones
Press an release the “F” button and the UNLOCK icon button on the LCD remote control simultaneously
one time to toggle between beep tones and vibrate mode. The LCD remote control will either beep or
vibrate to indicate which mode is selected.
Page Call Out
From within the vehicle, press and hold the emergency override button for 4 seconds, the LCD remote
control will emit a beep tone to indicate that someone is calling you to the vehicle.
Countdown Timer
The Dot Matrix remote control is equipped with a countdown timer for situations where an alert tone may
be needed to remind you of something important. The countdown timer allows you to set the timer up to
19 hours and 59 minutes. Refer to page 10 for programming.
Parking Meter Timer
The Dot Matrix remote control is equipped with a parking meter timer that allows you to set a countdown
timer for 10, 20, 30, 60, 90 or 120 minutes. The LCD remote control will emit a beep tone when the timer
expires. Press ”F” and OPTION simultaneusly to select desired time.
Alarm Clock
The Dot Matrix remote control is equipped with a built in alarm clock that can be set to beep at a certain
time each day. The alarm clock must be set, and the feature turned on. Refer to page 10 for
programming.
Bypassing The Shock Sensor
There are 3 additional modes of operation in which your system will react to the shock sensor, FULL
TRIGGER ONLY, ALL OFF, or CITY MODE.
Press LOCK once to arm the system.
Pressing LOCK again within 2 seconds will set the system to FULL TRIGGER ONLY in which the system
will ignore the light touch setting.
Pressing LOCK again within 2 seconds will set the system to ALL OFF. In this mode the system will not
react to the shock sensor and the 2-way LCD remote will display the shock sensor icon.
Pressing LOCK again within 2 seconds will set the system to CITY MODE. In this mode the light touch
horn output is extended to a full 10 seconds and full trigger horn output is shortend to 15 seconds, no
icon is displayed.
8
NOTE: The system will only change the shock sensor setting for one arm cycle and will be defaulted back to
normal operation the next time the system is armed.
Additional Dot Matrix Remote Control Functions, cont.
Check Vehicle Status
Press the LOCK icon button, TRUNK icon button and OPTION button simultaneously for 1 second. The Dot
Matrix remote control will display the system’s current status.
Check Temperature
Press the TRUNK icon button and OPTION button simultaneously for 1 second. The LCD remote control will
display the vehicle’s interior temperature.
Trigger History
This feature allows you to review the last four triggers to the system from the Dot Matrix remote control. See
the Dot Matrix Remote Control Options Menu on page 10.
Language Set
The Dot Matrix Remote allows the user to select from three different languages for the on screen text, English
(default), French and Spanish. See the Dot Matrix Remote Control Options Menu on page 10.
Homepage Select
This feature lets the user select between a text or icon display to indicate vehicle status. See the Dot Matrix
Remote Control Options Menu on page 10.
Homepage Option Set
This feature allows you to select between displaying the clock or personalized text on the screen. See the Dot
Matrix Remote Control Options Menu on page 10.
Set Name for Channel
The systems AUX outputs, refered to as chanels on the remote control can be customized with personal text
to describe the feature that it may be being used for. See the Dot Matrix Remote Control Options Menu on
page 10.
Battery Save Mode
Press the LOCK icon button and “F” button simultaneously. Note that in this mode the remote will not send or
receive vehicle status unless you press a button on the remote.
9
Additional Dot Matrix Remote Control Functions, cont.
Dot Matrix Remote Control Options Menu
Accessing the Options Menu
1. Press and hold the “F” button for 3 seconds.
2. Use the TRUNK or OPTION button to scroll up and down through the the menu.
3. Press the “F” button to select the setting to change.
4. Use the LOCK/UNLOCK buttons to move the cursor left and right (where needed). Use the TRUNK/OPTION
buttons to change up/down alpha/numeric symbols.
5. Press “F” to keep setting and back out to previous menu.
6. Press and hold “F” for 3 seconds to exit options menu.
Selectable Features in the Options Menu
12-1
Trigger History
Records the previous four triggers
12-2
Time Set
12-3
Alarm Clock
12-4
Countdown Timer
12-5
Vibrate/Tone
12-6
Alarm Clock Music
12-7
Temperature Set
Celsius, Fahrenheit
12-8
Language Set
12-9
Homepage Select
12-10
Homepage Option Set
English, French, Spanish
Text Mode, Icon Mode
Clock, Personalized Text
12-11
Set Name for Channel
Personalize AUX Outputs 1-4/Channels 4-7
12-12
Set to Default
NOTE: Personalized sections in the Options menu allow you to change the text that appears on the screen.
10
Optional Screen Icons and their Indications (Icon Mode only)
SECURITY FUNCTIONS
ARM
IGNITION TRIGGER
SILENT ARM
VALET MODE
DISARM
TRUNK OUTPUT/TRIGGER
DOOR OPEN/TRIGGER
HOOD TRIGGER
CALL
2
SENSOR TRIGGER
SENSOR BYPASS
SENSOR 2 TRIGGER
1
2
3
4
5
6
CALL
7
8
9
CH4
CHANNEL OUTPUT 1-4
1. TRANSMIT/RECEIVE
2. VIBRATE MODE
3. ALARM CLOCK MODE
4. COUNT DOWN TIMER MODE
5. BATTERY SAVE MODE
6. DAILY START TIMER MODE
7. TEMPERATURE START MODE
8. BATTERY INDICATOR
9. CLOCK/TIMER DISPLAY
REMOTE START FUNCTIONS
INHIBIT
REMOTE START
11
REMOTE START INHIBIT
SAFETY SW
SAFTY SWITCH
BRAKE
BRAKE SHUTDOWN
Optional Song Bird Feature
The optional Song Bird feature (Code Alarm SB1 accessory Speaker and labor required) allows you to
program songs and tones to your system (i.e. Setting a different tone for Lock activation and unlock
activation).
Turning Song Bird On: Press and release the TRUNK icon button on the remote control, then press and
hold the LOCK icon button on the remote control within 2 seconds. The speaker will give notification that
Song Bird has be turned ON.
Turning Song Bird Off: Press and release the TRUNK icon button on the remote control, then press
and hold the UNLOCK icon button on the remote control within 2 seconds. The speaker will give
notification that Song Bird has be turned OFF.
Setting Song Bird Tones: Activate the function you wish to program a Song Bird tone to. Within 3
seconds, press and release the TRUNK icon button on the remote control, then press the OPTION
button on the remote control within 2 seconds. Press the LOCK icon button on the remote control or
UNLOCK icon button on the remote control to scroll through the different tones.
While in this mode the TRUNK icon button on the remote control will change the length or version of
the tone (if applicable).
Press the OPTION button on the remote control to select the desired tone and exit programming.
Please see your sales associate for details on Song Bird or any other Code Alarm accessory.
Replacing Remote Control Batteries
2-way Dot Matrix Remote Control:
The AAA alkaline battery inside the 2-way LCD remote control should last approximately 1 year under
normal use. When the batteries become weak you will notice the remote control range (the distance
from the vehicle the remote control will work) deteriorate and the BATTERY icon on the LCD remote
control will show.
1.
2.
3.
4.
5.
Slide the small release tab on the back of the remote control to the unlock position.
Gently slide the battery cover off of the remote control.
Remove the old AAA battery, observing the +/- symbols on the battery,
and replace with a new AAA battery.
Gently slide the battery cover on to the back of the remote control and lock the release tab in
place.
Test operation of the remote control.
1-Way Six Button Remote Control:
The two (2) 3 volt lithium batteries (model CR2025 or Code Alram accessory battery 6BA) inside each
remote control should last approximately 1 year under normal use. When the batteries become weak
you will notice the remote control range (the distance from the vehicle the remote control will work)
deteriorate and the small LED on the remote control will dim. To replace the remote control batteries:
1.
2.
3.
4.
5.
Using a small (#1) phillips screwdriver, remove the screw on the back of the remote control.
Gently unsnap the halves of the remote control apart.
Slide the 2 lithium batteries out of the circuit board, observing the +/- symbols on the batteries
and replace with new lithium 3 volt batteries (model CR2025 or Code Alram accessory
battery 6BA).
Gently snap the halves of the remote control back together and reinstall the phillips screw
on the back of the remote control.
Test operation of the remote control.
12
Emergency Override Procedure
If your transmitter is lost or disabled, it will be necessary use the emergency override button
to turn the security system off. There are two types of emergency override procedures.
Check with your installing dealer to find out what has been activated on your system.
Standard Emergency Override Procedure
1.
Enter the vehicle (the security system will trigger.
2.
Turn the ignition key to the ON position.
3.
Press and release the emergency override button (The security system will turn off).
Note: If the automatic arming feature is enabled on your system. The security system will re-arm
the next time the ignition key is turn off and the vehicle’s doors are closed.
Coded Override Procedure
The system has an optional override mode that allows you to program a 2-digit personal
code using the emergency override button offering a higher level of security. This feature
must be enabled by your installing dealer, the default override code is 11.
1.
Enter the vehicle (the security system will trigger).
2.
Turn the ignition switch to the ON position.
3.
Within 5 seconds press the emergency override button the number of times
corresponding to the first digit of your personal code (Default digit is 1).
4.
Within 5 seconds turn the ignition key OFF, then ON.
5.
Within 5 seconds press the emergency override button the number of times
corresponding to the second digit of your personal code (Default digit is 1).
6.
Within 5 seconds turn the ignition key OFF, then ON.
7.
If entered correctly the security system will turn off.
8.
Turn the ignition key to the OFF position.
Programming Your Personal Override Code
1.
Make sure the security system is disarmed.
2.
Turn the ignition key to the ON position.
3.
Within 10 seconds press and release the override button 3 times.
4.
Within 10 seconds turn the ignition key OFF then ON 3 times (The horn will honk
and the lights will flash 1 time).
5.
Within 10 seconds press and release the override button the number of times
corresponding with the first digit of your personal code (1-9).
6.
Within 10 seconds turn the ignition key OFF then ON.
7.
Within 10 seconds press and release the override button the number of times
corresponding with the second digit of you personal code (1-9).
8.
Within 5 seconds turn the ignition key OFF.
9.
You will notice the LED flash a number of times corresponding with the code you
entered.
Note: If 15 seconds of inactivity pass the system will abort programming.
13
Note: Do not lose your “Personal Override Code”. Reprogramming a new code
without the original code can only be performed by an authorized dealer.
14
FCC COMPLIANCE
This device complies with Part 15 of the FCC rules and with RSS-210 of Industry
Canada. Operation is subject to the following two conditions:
1. This device may not cause harmful interference, and
2. This device must accept any interference received, including any interference that
may cause undesired operation.
Warning!
Changes or modifications not expressly approved by the party responsible for
compliance could void the user’s authority to operate the equipment.