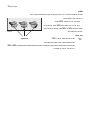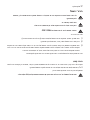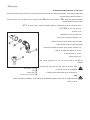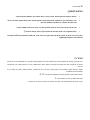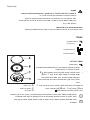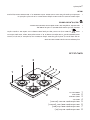
1
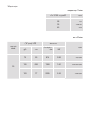
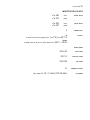
operating instructions IL Gas hob EHT 60418 2 electrolux electrolux 3 Welcome to the world of Electrolux Thank you for choosing a first class product from Electrolux, which hopefully will provide you with lots of pleasure in the future. The Electrolux ambition is to offer a wide variety of quality products that make your life more comfortable. You find some examples on the cover in this manual. Please take a few minutes to study this manual so that you can take advantage of the benefits of your new machine. We promise that it will provide a superior User Experience delivering Ease-ofMind. Good luck! 4 electrolux Contents Instructions for the User Important Safety Information 5 Description of the Hob 7 Operation 8 Maintenance and Cleaning 10 Something Not Working? 12 Service and original spare parts 22 Instructions for the Installer Engineers Technical Data 13 Gas Connection 16 Electrical Connection 17 Commissioning 18 Building In 19 Possibilities for Insertion 21 Guide to Use the instructions The following symbols will be found in the text to guide you throughout the Instructions: Safety Instructions ) Step by step instructions for an operation Hints and Tips Environmental Information This appliance is manufactured according to the following EEC directives: 2006/95 EEC - 2004/108 EEC - 90/396 EEC, current edition. MANUFACTURER: ELECTROLUX ITALIA S.p.A. C.so Lino Zanussi, 30 – 33080 Porcia - PN (ITALY) electrolux 5 ENGLISH Important Safety Information These warnings are provided in the interest of safety. You must read them carefully before installing or using the appliance. It is most important that this instruction book should be retained with the appliance for future reference. Should the appliance be sold or transferred, always ensure that the book is left with the appliance in order that the new owner can get to know the functions of the appliance and the relevant warnings. These instructions are only valid for countries whose identification symbols are shown on the cover of this instruction booklet and on the appliance itself. During Operation • • • • • • • • • • • • This appliance has been designed for non professional purpose in private houses only. It is meant to cook edible foodstuff only and MUST NOT be used for any other purposes. It is dangerous to alter the specification in any way. For hygiene and safety reasons, this appliance should be kept clean at all times. A build-up of fats or other foodstuff could result in a fire. Do not use this hob if it is in contact with water. Do not operate the hob with wet hands. Never leave the hob unattended when cooking with oil and fats. Unstable or misshapen pans should not be used on the hob as unstable pans can cause an accident by tipping or spillage. Never use plastic or aluminium foil dishes on the hob. Perishable food, plastic items and areosols may be affected by heat and should not be stored above or below the hob unit. Under no circumstances should you attempt to repair the appliance yourself. Repairs carried out by unexperienced persons may cause injury or serious malfunctioning. Refer to your local Service Centre. Always insist on genuine spare parts. Ensure that all control knobs are in the OFF position when not in use. Should you connect any electrical tool to a plug near this cooking appliance, ensure that electric cables are not in contact with it and keep them far enough from the heated parts of this appliance. If the appliance is out of order, disconnect it from the electric supply. People Safety • • This appliance is not intended for use by children or other persons whose physical, sensory or mental capabilities or lack of experience and knowledge prevents them from using the appliance safely without supervision or instruction by a responsible person to ensure that they can use the appliance safely. This appliance has been designed to be operated by adults and children under supervision. Young children MUST NOT be allowed to tamper with the controls or play near or with the oven. 6 electrolux • • • Accessible parts of this appliance may become hot when it is in use. Children should be KEPT AWAY until it has cooled. The residual heat indicator comes on when the cooking zone is switched on. Children should be kept away until it switches off. Children can also injure themselves by pulling pans or pots off the hob. About Installation, Cleaning and Manteinance • • • • • • • • • • • • • • It is mandatory that all operations required for the installation are carried out by a qualified or competent person, in accordance with existing rules and regulations in force in the country where the appliance is used. Ensure a good ventilation around the appliance. A poor air supply could cause lack of oxygen. Ensure that the gas and electrical supply complies with the type stated on the identification label, placed near the gas supply pipe. This appliance is not connected to a combustion products evacuation device. It must be installed and connected in accordance with current installation regulations. Particular attention shall be given to the relevant requirements regarding ventilation. The use of a gas cooking appliance results in the production of heat and moisture in the room in which it is installed. Ensure that the kitchen is well ventilated: keep natural ventilation holes open or install a mechanical ventilation device (mechanical extractor hood). Prolonged intensive use of the appliance may call for additional ventilation, for example opening of a window, or more effective ventilation, for example increasing the level of mechanical ventilation where present. Once you removed all packaging from the appliance, ensure that it is not damaged and the electric cable is in perfect conditions. Otherwise, contact your dealer before proceeding with the installation. Disconnect the appliance from the electrical supply, before carrying out any cleaning or manteinance work. This appliance cannot be cleaned with steam or with a steam cleaning machine. Never use the hob as a working space. Do not store things on the hob. Never use plastic or aluminium foil dishes on the glass hob, as they could melt on the hob, thus damaging it. Anyway,If anything of this nature accidentally comes into contact with the glass surface it must be scraped off immediately while stlll hot and wiped away to avoid damage to the surface. In the same way, remove sugar or food residues with hich sugar content, which may have split from saucepans by using a scraper for glass hobs. Unstable or misshapen pans should not be used on the hob as unstable pans can cause an accident by tipping or spillage. The glass hob is shockproof, but not unbreakable! Hard or pointed objects falling from a height can damage the hob. If scratches or cracks are noticed, disconnect the appliance from the electrical supply to avoid the risk of electric shock and call you nearest Service Force Centre. Never use scratching sponges, abrasive products or chemically powerful detergents. Use only cleaning agents specific for glass hobs. The manufacturer disclaims any responsability should all the safety measures not be carried out. electrolux 7 Service • Under no circumstances should you attempt to repair the appliance yourself. Repairs carried out by unexperienced persons may cause injury or serious malfunctioning. Refer to your local Service Centre. Always insist on genuine spare parts. Environmental Information • • After installation, please dispose of the packaging with due regard to safety and the environment. When disposing of an old appliance, make it unusable, by cutting off the cable. • The symbol on the product or on its packaging indicates that this product may not be treated as household waste. Instead it shall be handed over to the applicable collection point for the recycling of electrical and electronic equipment. By ensuring this product is disposed of correctly, you will help prevent potential negative consequences for the environment and human health, which could otherwise be caused by inappropriate waste handling of this product. For more detailed information about recycling of this product, please contact your local city office, your household waste disposal service or the shop where you purchased the product. Description of the Hob 3 3 5 1 6 7 8 4 1. 2. 3. 4. 5. 6. 7. 8. Hob Top Rapid Burner Semi-rapid Burner Auxiliary Burner Control knob for back right burner (semi-rapid) Control knob for back left burner (semi-rapid) Control knob for front left burner (rapid) Control knob for front right burner (auxiliary) 2 8 electrolux INSTALLATION Any gas installation must be carried out by qualified personnel, and in accordance with existing rules and regulations. The relevant instructions are to be found in the second section of this manual. Please, ensure that, once the hob is installed, it is easily accessible for the engineer in the event of a breakdown. The manufacturer will not accept liability, should the above instructions or any of the other safety instructions incorporated in this book be ignored. WHEN THE HOB IS FIRST INSTALLED Once the hob has been installed, it is important to remove any protective materials, which were put on in the factory. Operation ) The symbols mean: = no gas supply = maximum gas supply = minimum gas supply Hob Burners a burner: )TurnTothelightrelevant knob anticlockwise to maximum z z position and push down the knob to ignite. After lighting the flame, keep the knob pushed down for about 5 seconds. This will allow the "thermocouple" (Fig. 1 - lett. D) to be heated and the safety device to be switched off, otherwise the gas supply would be interrupted. Then, check the flame is regular and adjust it as required. If you cannot light the flame even after several attempts, check the "cap" (Fig. 1 - lett. A) and “crown” (Fig. 1 lett. B) are in the correct position. To put the flame out, turn the knob to the symbol . A - Burner cap B - Burner crown C - Ignition electrode D - Thermocouple Fig. 1 In the absence of electricity, ignition can occur without the electrical device; in this case approach the burner with a flame, push the relevant knob down and turn it anti-clockwise until it reaches the"maximum" position. When switching on the mains, after installation or a power cut, it is quite normal for the spark generator to be activated automatically. electrolux 9 Do not keep the control knob pressed for more than 15 seconds. If the burner does not light even after 15 seconds, release the control knob, turn it the "off" position and wait for at least one minute before trying to light the burner again. If the burner accidentally goes out, turn the control knob to the "off" position and wait for at least 1 minute before trying to light the burner again. Using the hob correctly To ensure maximum burner efficiency, it is strongly recommended that you use only pots and pans with a flat bottom fitting the size of the burner used, so that flame will not spread beyond the bottom of the vessel (see the table beside). Burner Large (rapid) Medium (semi-rapid) Small (auxiliary) minimum diameter 160 mm 120 mm 80 mm maximum diameter 260 mm 220 mm 160 mm As soon as a liquid starts boiling, turn down the flame so that it will barely keep the liquid simmering. Use only pans or pots with flat bottom. If you use a saucepan which is smaller than the recommended size, the flame will spread beyond the bottom of the vessel, causing the handle to overheat. Carefully supervise cooking with fat or oil, since these types of foodstuff can result in a fire, if over-heated. Prolonged cooking with potstones, earthenware pans or cast-iron plates is inadvisable. Also, do not use aluminium foil to protect the top during use. Make sure pots do not protrude over the edges of the cooktop and that they are centrally positioned on the rings in order to obtain lower gas consumption. Do not place unstable or deformed pots on the rings: they could tip over or spill their contents, causing accidents. Pots must not enter the control zone. If the control knobs become difficult to turn, please contact your local Service Force Centre. 10 electrolux Maintenance and Cleaning Before any maintenance or cleaning can be carried out, you must DISCONNECT the hob from the electricity supply. The hob is best cleaned whilst it is still warm, as spillage can be removed more easily than if it is left to cool. This appliance cannot be cleaned with steam or with a steam cleaning machine. The pan supports To ensure a better cleaning, pan supports can be removed from the hob (Fig. 2). Pay attention when placing the pan supports back on their position, in order to avoid scratching the glass hob top. The pan supports are not dishwasher proof; they must be washed by hand. Take care when drying them as the enamelling process occasionally leaves rough edges. If necessary, remove stubborn stains using a paste cleaner. After cleaning, make sure that the pan supports are correctly positioned. Fig. 2 The hob top Regularly wipe over the hob top using a soft clothwell wrung out in warm water to which a little wasingup liquid has been added. Avoid the use of thefollowing: - household detergent and bleaches; - impregnated pads unsuitable for non-sticksaucepans; - steel wool pads; - bath/sink stain removers. If scratches or cracks are noticed, disconnect the appliance from the electrical supply to avoid the risk of electric shock and call your nearest Service Force Centre. Keep all objects and materials which can melt away from the cooking surface, e.g. plastics, aluminium foil. electrolux 11 The burners The burner caps and crowns can be removed for cleaning. Wash the burners taps and crowns using hot soapy water, and remove marks with a mild paste cleaner. A well moistened soap impregnated steel wool pad can be used with caution, if the marks are particularly difficult to remove. After cleaning, be sure to wipe dry with a soft cloth. Ignition electrode The electric ignition is obtained through a ceramic "electrode" and a metal electrode (Fig. 1 - letter C). Keep these components well clean, to avoid difficult lighting, and check that the burner crown holes are not obstructed. Periodic maintenance Periodically ask your local Service Centre to check the conditions of the gas supply pipe and the pressure adjuster, if fitted. 12 electrolux Something Not Working? If the hob is not working correctly, please carry out the following checks before contacting your local Electrolux Service Force Centre. SYMPTOM There is no spark when lighting the gas. SOLUTION The gas ring burns unevenly. Check that the unit is plugged in and the electrical supply is switched on. Check that the general safety switch has not tripped (if fitted). Check the burner cap and crown have been replaced correctly, e.g. after cleaning. Check the main jet is not blocked and the burner crown is clear of food particles. Check the burner cap and crown have been replaced correctly, e.g. after cleaning. electrolux 13 Engineer technical data OVERALL DIMENSIONS Width: Depth: 580 mm 510 mm CUT OUT DIMENSIONS Width: Depth: 550 mm 470 mm APPLIANCE CLASS 3 SUPPLY CONNECTIONS Gas: RC 1/2 inch (1/2 inch male) Rear right hand corner Electric: 230 V ~ 50 Hz supply, 3 core flexible cable with non rewireable plug. HEAT INPUT Rapid Burner 2.45 kW Semi-Rapid Burner 1.6 kW Auxiliary Burner 0.95 kW APPLIANCE CATEGORY I3 GAS SUPPLY LPG 30 mbar (1 mbar = 10 mm water coloumn) 14 electrolux Table 1 : By-pass diameters Burner Ø By-pass in 1/100 mm. Auxiliary 28 Semi-rapid Rapid 35 45 Table 2 : Injectors NOMINAL POWER BURNER kW kCal/h LPG (Butane “A”) nozzle FEEDING PRESSURE g/h mbar Auxiliary burner 0,95 814 50 75 Semi-rapid burner 1,60 1368 066 126 2,45 2095 77 193 Rapid burner 30 electrolux 15 Instruction for the Installer z z z z The following instructions about installation and maintenance must be carried out by qualified personnel in compliance with the regulation in force. The appliance must be electrically disconnected before all interventions. If any electric supply to the appliance is required to carry out the work, ensure all the necessary precautions are followed. The side walls of the unit in which the hob is going to be installed, must not exceed the height of the working top. Avoid installing the appliance in the proximity of inflammable materials (e.g. curtains, tea towels etc.). THE MANUFACTURER WILL NOT ACCEPT LIABILITY, SHOULD ANY OF THE OTHER SAFETY INSTRUCTIONS INCORPORATED IN THIS BOOKLET OR THE REGULATION IN FORCE BE IGNORED. 16 electrolux Gas Connection Choose fixed connections or use a flexible pipe instainless steel in compliance with the regulation in force. If using flexible metallic pipes, be careful they do not come in contact with mobile parts or they are not squeezed. Use the same attention when the hob is combinated with an oven. IMPORTANT - To ensure a correct operation, a saving of energy and the long life of the appliance, the voltage pressure of the appliance must correspond to the recommended values. The adjustable connection has to be fixed to the comprehensive ramp by means of a threaded nut G 1/2". Interpose the sealing between the components as shown in Fig. 3. Screw the parts without forcing, adjust the connection in the required direction and tighten everything. Connection using flexible non metal pipes When the connection can be easily inspected in its full extent, there is the chance to use a flexible pipe according to the rules in force. The flexible pipe must be tightly fixed using clamps according to the rules in force. Use the rubber pipe holder «D». Always insert the gasket «B» (Fig.3). Then proceed with the gas connection. The flexible pipe should be made ready for use in such a way that: - nowhere it can reach overtemperature, other than room temperature, higher than 30°C; - it is no longer than 1500 mm; - it shows no throttles; - it is not subject to traction or torsion; - it doesn't get in touch with cutting edges or corners; - it can be easily inspected in order to check its condition. The control of preservation of the flexible pipe consistsin checking that: - it doesn't show cracks, cuts, marks of burnings bothon the end parts and on its full extent; - the material is not hardened, but shows its normal D elasticity; - the fastening clamps are not rusted; - expiry term is not due. If one or more abnormalities are seen, do not repair the A) Ramp with ending nut Fig. 3 pipe, but replace it. B) Seal C) Adjustable connection D) Rubber pipe holder for liquid gas electrolux 17 It is important to install the elbow correctly, with the shoulder on the end of the thread, fitted to the hob connecting pipe. Failure to ensure the correct assembly will cause leakage of gas. IMPORTANT Once installation is complete, check the perfectseal of every pipe fitting, using a soapy solution, never a flame. Electrical Connection Any electrical work required to install this appliance should be carried out by a qualified electrician or competent person, in accordance with the current regulations. THIS APPLIANCE MUST BE EARTHED. The manufacturer declines any liability should these safety measures not be observed. This appliance is designed to be connected to a 230 V ~ 50Hz AC electrical supply. Before the appliance is connected: 1) check that the main fuse and the domestic installation can support the load (see the rating label); 2) check that the power supply is properly earthed in compliance with the current rules; 3) check the socket or the double pole switch used for the electrical connection can be easily reached with the appliance built in the forniture unit. Before switching on, make sure the electricity supply voltage is the same as that indicated on the appliance rating plate. The rating plate is located on the bottom of the hob. A copy is attached on the back cover of this book. The appliance is supplied with a 3 core flexible supply cord incorporating a plug. Connect the plug to an adequate socket. Permanent connection In the case of a permanent connection, it is necessary that you install a double pole switch between the appliance and the electricity supply (mains), with a minimum gap of 3 mm between the switch contacts and of a type suitable for the required load in compliance with the current electric regulations. The switch must not break the yellow and green earth cable at any point. Ensure that the hob supply cord does not come into contact with surfaces with temperatures higher than 50 deg. C. 18 electrolux Commissioning When the hob has been fully installed it will be necessary to check the minimum flame setting. To do this, follow the procedure below. - Turn the gas tap to the MAX position and ignite. - Set the gas tap to the MIN flame position then turn the control knob from MIN to MAX several times. If the flame is unstable or is extinguished follow the procedure below. Fig. 4 Procedure: ) Re-ignite the burner and set to MIN. By-pass screw Remove the control knob, insert a thin bladed screwdriver down the centre of the gas tap control shaft and turn the adjustment screw until the flame is steady and does not extinguish, when the knob is turned from MIN to MAX. Repeat this procedure for all burners. electrolux 19 Building In SR 51 0 0 58 Fig. 5 A SR R A = Auxiliary burner SR = Semi-rapid burner R = Rapid burner Dimensions are given in millimeters The hob can be inserted in a built-in kitchen unit whose depth is between 550 mm and 600 mm. The hobs dimensions are shown in Fig. 5. The edge of the cut out must have a minimum distance from the rear wall of 55 mm. If there are side walls, or sides of the furniture unit near the hob, the cut out edges must have a minimum distance of 150 mm. Hanging forniture units or hoods must be placed at 650 mm minimum from the hob. Fig. 6 20 electrolux Fitting the hob to the worktop Before fitting the hob into the cut out, an adhesive seal must be fitted to the underside outside edge of the hob. It is essential that no gaps are left in this seal in order to prevent spillage near the hob seeping into the cabinet below. 1) Remove the pan supports, the burners caps and crowns and turn the hob upside down, taking care the ignition candles are not damaged in this operation. Fig. 7 2) Place the relevant sealing all around the glass top edge, taking care that the sealings meet without overlapping (Fig. 7). A 3) Place the hob in the cut out, taking care of its centring. 4) Fix the hob with the supplied fixing clamps (Fig. 8). A) Sealing gasket Fig. 8 electrolux 21 Possibilities for Insertion Kitchen unit with door Proper arrangements must be taken in designing the forniture unit, in order to avoid any contact with the bottom of the hob which can be heated when it is operated. The recommended solution is shown in Fig. 9. The panel fitted under the hob should be easily removable to allow an easy access if a technical assistance intervention is needed. Kitchen unit with oven The hob recess dimensions must comply the indication given in Figs. 6 and must be provided with brackets to allow a continuous supply of air. To avoid overhating, the building in should be carried out as shown in Figs. 10 and 11. The hob's electric connection and the oven's one must be carried out separately, both for safety reasons and to allow the oven to be easily taken off the unit. Fig. 10 FO 0938 a) Removable panel b) Space possibly useful for connections Fig. 11 FO 0939 Fig. 9 22 electrolux Service and original spare parts This machine, before leaving the factory, has been tested and studied by many experts and specialists, in order to give you the best results. Any repair work which needs to be carried out should be done with the utmost care and attention. For this reason we recommend that for any problem you contact the dealer who sold it to you, or our nearest authorized Service Centre, specifying the nature of the problem, the appliance model (Mod.), the product number (Prod. No.) and the serial number (Ser. No.) marked on the identification plate. Original spareparts, certified by the product manufacturer and carrying this symbol are only available at our Service Centre and authorized spareparts shops. electrolux 23 r.A 01/09 39712-0801 23אלקטרולוקס אלקטרולוקס 22 שירות וחלקי חילוף מקוריים מכשיר זה עבר בדיקות מדוקדקות על ידי המומחים במפעל ,וזאת על מנת להעניק לכם את התוצאות הטובות ביותר. כל פעולת תיקון יש לבצע בתשומת לב ובזהירות רבה. לכן אנו ממליצים שעם כל בעיה העלולה להתעורר תצרו קשר עם הספק ממנו רכשתם את המכשיר ,או עם מרכז השירות שלנו הקרוב למקום מגוריכם ,וציינו את מהות הבעיה ,דגם המכשיר ( ,)Mod.מספר המוצר ()Prod. N. והמספר הסידורי ( )Ser. N.המסומנים על לוחית הנתונים. חלקי חילוף מקוריים ,מאושרים על ידי היצרן ונושאים סמל זה ניתן להשיג רק במרכז השירות שלנו ואצל חנויות חלקי חילוף מאושרות. 21אלקטרולוקס אפשרויות הרכבה יחידת מטבח עם דלת יש לתכנן נכון את ארון המטבח כך שלא יהיה מגע עם החלק התחתון של הכיריים העלול להתחמם בזמן הפעולה .הפתרון המומלץ מתואר באיור .9הלוח מתחת לכיריים יהיה מותקן כך שניתן יהיה להסירו בקלות כדי לאפשר גישה קלה כאשר נדרש תיקון. יחידת מטבח עם תנור מידות גומחת הכיריים צריכות להיות בהתאם למצוין באיור 6ומצוידות במסגרות תומכות על מנת לאפשר אספקת אוויר. כדי למנוע התחממות יתר ,יש לבצע את ההתקנה כמתואר באיורים 10ו.11 - חיבור החשמל של הכיריים והתנור יהיו נפרדים ,זאת מטעמי בטיחות וגם כדי לאפשר הפרדה בין היחידות. איור 10 )aלוח ניתן להסרה )bמרווח שימושי עבור חיבורים אפשריים איור 9 איור 11 FO 0938 FO 0939 אלקטרולוקס 20 הרכבת הכיריים על משטח העבודה לפני קיבוע הכיריים במקומם יש להתאים אטם נדבק על הצד החיצוני של שולי הכיריים .וודאו שאין רווחים באטם כדי למנוע חדירת נוזלים לתוך הארון מתחת לכיריים. )1הסירו את השבכות ,כיפות המבערים והכתרים והניחו את הכיריים במהופך ,שימו לב לא לפגוע תוך כדי כך בנרות ההצתה. )2מקמו את האטם המתאים סביב שולי כיסוי הזכוכית, שימו לב שאין חפיפה בין האטמים (איור .)7 איור 7 )3הניחו את הכיריים בחתך ושימו לב למקמם במרכז. A )4קבעו את הכיריים באמצעות מהדקי הקיבוע המסופקים (איור .)8 )Aאטם איור 8 19אלקטרולוקס הרכבה SR �� � �� � איור 5 A - Aמבער עזר = SRמבער חצי-מהיר = Rמבער מהיר SR R המידות ניתנות במילימטרים. ניתן לשלב את הכיריים ביחידת מטבח מובנית שעומקה בין 550מ"מ ל 600 -מ"מ .מידות הכיריים מתוארות באיור .5 המרווח של שפת החתך מהקיר האחורי יהיה 55מ"מ לפחות. אם ישנם קירות צדדיים ,או צדי יחידת הריהוט בקרבת הכיריים ,הרווח של שפת החתך יהיה לפחות 150מ"מ. יחידות ריהוט התלויות על הקיר וקולטי אדים יש למקם במרחק של 650מ"מ לפחות מהכיריים. איור 6 אלקטרולוקס 18 כוונון לאחר סיום ההתקנה של הכיריים יהיה צורך לבדוק את הקביעה של הלהבה הנמוכה ביותר. כדי לעשות זאת יש לפעול כלהלן. - סובבו את ברז הגז לעמדת MAXוהציתו. קבעו את ברז הגז למצב להבה MINולאחר מכן סובבו אתכפתור הבקרה מ MIN -ל MAX -מספר פעמים .אם הלהבה אינה יציבה או כובה פעלו כלהן. איור 4 שלבי פעולה: הציתו שוב את המבער וקבעו ל.MIN - בורג מעקף הסירואתכפתורהבקרה,החדירומברגדקלתוךמרכזידית הבקרה של ברז הגז וסובבו את בורג הכוונון עד אשר הלהבה יציבה ואינה כובה כאשר מעבירים את הכפתור מ MIN -ל.MAX - חזרו על הליך זה עבור כל המבערים. 17אלקטרולוקס חיבורי חשמל כל חיבור חשמל המתחייב מהתקנת הכיריים יבוצע על ידי חשמלאי מוסמך או אדם המוכשר לכך ,ובהתאם לחוקים שבתוקף. חובה להאריק מכשיר זה. היצרן מסיר מעליו כל אחריות במקרה של אי נקיטת אמצעי זהירות אלה. המכשיר מתאים לחיבור לרשת חשמל של .230 V 50Hz לפני חיבור הכיריים: )1וודאו שהנתיך המיועד וההתקנה הביתית מסוגלים לעמוד בעומס (עיינו בלוחית הנתונים הטכניים); )2בידקו אם חיבור החשמל מוארק כראוי ,בהתאם לחוקים שבתוקף; )3וודאו שהשקע או המפסק הדו-קוטבי המיועדים לחיבור החשמל של הכיריים יהיו נגישים בקלות כאשר הכיריים מותקנים במקומם ביחידת המטבח .לפני ההפעלה יש לוודא שמתח אספקת החשמל תואם לנתונים שבתווית נתוני הכיריים .תווית הנתונים ממוקמת בתחתית הכיריים .העתק נתונים אלה מופיע גם על גבי העטיפה בגב חוברת זו. הכיריים מסופקים עם כבל חשמל תלת-גידי גמיש ותקע מתאים .חברו את התקע לשקע מתאים. חיבור קבוע במקרה של חיבור קבוע ,חשוב שהכיריים יהיו מחוברים לרשת באמצעות מפסק דו-קוטבי ,שהמרווח בין הקטבים יהיה לפחות 3מ"מ ,ומתאים לעומס הנדרש בעת הפעלת הכיריים ובהתאם לתקנות החשמל שבתוקף. המפסק לא ינתק את חיבור ההארקה הצהוב והירוק. וודאו שכבל החשמל של הכיריים לא יבוא במגע עם משטחים שחומם עולה על 50מעלות צלס. אלקטרולוקס 16 חיבור על ידי צינורות גמישים לא מתכתיים לאחר שבודקים את החיבור ניתן להשתמש בצינור גמיש בהתאם לחוקים שבתוקף .הצינור הגמיש חייב להיות מקובע בחוזקה על ידי מהדקים בהתאם לחוקים שבתוקף. השתמשו במחזיק צינור מגומי « .»Dיש להכניס תמיד אטם «( »Bאיור .)3לאחר מכן יש לבצע את חיבור הגז .את הצינור הגמיש יש להכין לשימוש באופן ש: בשום נקודה לא יוכל להגיע להתחממות יתר מעבר לטמפרטורת החדר ,כלומר ,גבוהה מ;30°C - הוא אינו ארוך יותר מ 1500 -מ"מ; -אין בו קיפולים; י הוא אינו נתון לגרירה או לפיתולים; אינו בא במגע עם קצוות חדים או פינות;ניתן לבדוק אותו בקלות על מנת לוודא את תקינותו.ההשגחה על תקינות הצינור כוללת בדיקה ש: אין בו סדקים ,חתכים ,סימני שריפה על הקצוות וגם לכל אורכו; החומר לא התקשה אלא שומר על גמישותו; -מהדקי הקיבוע אינם חלודים; D עדיין לא פג תוקפם.אם מובחנת אי-תקינות אחת או יותר ,אין לתקן את הצינור אלא להחליפו. חשוב להתקין את הברך נכון ,עם הכתף על קצה התבריג, מותאמת לצינור החיבור של הכיריים. אי הקפדה על הרכבה נכונה עלולה לגרום לדליפת גז. חשוב )A )B )C )D צינור עם אום קצה אטם מחבר מתכוונן מחזיק צינור גומי לגז נוזלי עם סיום ההתקנה יש לבדוק את האטימה המוחלטת של כל מתאמי הצינור ,באמצעות תמיסת סבון ,ולעולם לא על ידי להבה. י איור 3 15אלקטרולוקס הוראות למתקין • הוראות ההתקנה והתחזוקה הבאות יבוצעו רק על ידי אדם המוסמך לכך ובהתאם לחוקים שבתוקף. • לפני ביצוע פעולת ניקוי או תחזוקה יש לנתק את המכשיר משקע החשמל .אם נדרשת אספקת חשמל לכיריים על מנת לבצע את הפעולה ,וודאו שננקטו כל אמצעי הבטיחות. • הקירות הצדיים של היחידה אשר בה עומדים להתקין את הכיריים לא יחרגו מגובה משטח העבודה. • הימנעו מהתקנת הכיריים בקרבת חומרים מתלקחים (כגון וילונות ,מגבות מטבח וכו'). היצרן לא יהיה אחראי בגין נזקים שייגרמו עקב אי מילוי אחר הוראות הבטיחות הכלולות בחוברת זאת או אחר התקנות שבתוקף. חיבור גז בחרו במחברים קבועים או השתמשו בצינור גמיש מפלדת אל חלד בהתאם לתקנות שבתוקף .אם משתמשים בצינורות גמישים מתכתיים יש להקפיד שלא יבואו במגע עם חלקים נעים ושלא יילחצו .אותם אמצעי זהירות יש לנקוט כאשר הכיריים משולבות עם תנור. חשוב -על מנת להבטיח פעולה נכונה ,חסכון באנרגיה ואריכות חיים של המכשיר ,המתח החשמלי והלחץ של המכשיר חייב להתאים לערכים המומלצים. יש לחבר את המחבר המתכוונן אל צינור באמצעות אום מתוברג ".G 1/2 מקמו את האטם בין הרכיבים כמתואר באיור .3 הבריגו את החלקים ללא הפעלת כוח ,כווננו את המחבר לכיוון הנדרש וחזקו את כל החלקים. אלקטרולוקס 14 טבלה :1קוטר מעקפים מבער עז ר חצי-מהיר מהיר Øמעקף ב 1/100 -מ"מ. 28 35 45 טבלה :2דיזות ( LPGבוטאן “)”A כוח נומינאלי kW קילוקלוריות/ שעה נחיר g/h מבער עזר 0.95 814 50 75 מבער חצי-מהיר 1.60 1368 066 126 מבער מהיר 2.45 2095 77 193 מבער לחץ מבער mbar 30 13אלקטרולוקס נתונים טכניים לטכנאי מידות כלליות רוחב: עומק: 580מ"מ 510מ"מ מידות החתך רוחב: עומק: 550מ"מ 470מ"מ סיווג המכשיר 3 חיבורים גז: RC 1/2אינץ' ( 1/2אינץ' זכר) ממוקם בפינה הימנית אחורית חשמל: ,230 V ~ 50 Hzכבל חשמל תלת-גיגי גמיש עם ותקע מתאים. הספק חימום מבער מהיר kW 2.45 מבער חצי-מהיר kW 1.6 מבער עזר kW 0.95 קטגוריית המכשיר I3 אספקת גז 10 = 1 mbar( LPG 30 mbarמ"מ עמוד מים) אלקטרולוקס 12 משהו לא עובד? אם הכיריים אינם פועלים כהלכה ,אנא בידקו תחילה את הנקודות הבאות לפני יצירת קשר עם מרכז השירות המקומי של : Electrolux תופעה אין ניצוץ בזמן הדלקת המבער. פתרון וודאו שהכיריים מחוברים לחשמל והמכשיר מופעל. וודאו שמתג הבטיחות הראשי תקין (אם הותקן). וודאו שכיפת המבער והכתר הוחזרו למקומם כראוי לאחר הניקוי. הלהבה לא אחידה. וודאו שפתח יציאת הגז הראשי אינו חסום ושכתר המבער נקי משאריות מזון. וודאו שכיפת המבער והכתר הוחזרו למקומם כראוי לאחר הניקוי. 11אלקטרולוקס המבערים ניתן להסיר את המבערים ואת הכתרים לצורך ניקוי. שיטפו את כיפות המבערים והכתרים במי סבון חמים ולאחר מכן הסירו את הלכלוך והכתמים עם משחת ניקוי .אם שאריות הלכלוך והכתמים קשים להסרה במיוחד ,ניתן להשתמש בזהירות בצמר פלדה טבול במי סבון. לאחר הניקוי יש לנגב היטב עם מטלית רכה. אלקטרודת הצתה ההצתה האלקטרונית מתבצעת באמצעות אלקטרודה קראמית ואלקטרודה ממתכת (איור - 1אות .) Cשימרו על ניקיון שני הרכיבים האלה על מנת להימנע מבעיות וקשיים בהצתה .יש לבדוק מדי פעם את חרירי הגז בכתר המבער ולוודא שאינם סתומים. תחזוקה תקופתית פנו מזמן לזמן אל מרכז השירות המקומי לשם בדיקת מצב צינור אספקת הגז ומתאם הלחץ ,אם מותקן. אלקטרולוקס 10 תחזוקה וניקוי לפני ביצוע פעולות ניקוי יש לנתק את הכיריים מאספקת חשמל. הניקוי יהיה טוב יותר כשהכיריים עדיין חמות ,כיוון שקל יותר להסיר את שאריות המזון שגלש לפני שמניחים להן להתקרר. אין לנקות מכשיר זה בקיטור. שבכות ניתן להסיר את השבכות כדי לנקות אותן טוב יותר (איור .)2 יש לשים לב לא לשרוט את משטח הזכוכית של הכיריים כאשר מחזירים את השבכות למקומן. את השבכותלא ניתן להדיח במדיח הכלים :יש לרחוץ אותן ביד .יש להיזהר בעת ניגוב השבכות, תהליך הציפוי באמייל עלול ליצור פינות חדות .אם נשארו כתמים עקשניים יש להסירם עם משחת ניקוי. לאחר הניקוי ,וודאו שהשבכות מוחזרות היטב למקומן. משטח הכיריים איור 2 יש לנגב בקביעות את משטח הכיריים באמצעות מטלית רכה ספוגה במים פושרים עם תמיסת סבון. אין להשתמש בחומרים הבאים: תכשירי ניקוי ביתיים וחומרי הלבנה; כריות ניקוי לחות שאינן מתאימות לסירים עם ציפוי נגד הדבקות; כריות צמר פלדה; מסירי כתמים לאמבט/לכיור. אם מבחינים בשריטות או סדקים ,נתקו את המכשיר מאספקת החשמל על מנת להימנע מהלם חשמלי וצרו קשר עם מרכז השירות הקרוב למקום מגוריכם. יש להרחיק מהכיריים את כל החפצים והחומרים העלולים להימס ,כגון כלי פלסטיק ,רדיד אלומיניום. 9אלקטרולוקס אל תלחצו על כפתור הבקרה יותר מ 15 -שניות ברציפות. אם הלהבה אינה ניצתת לאחר 15שניות ,שחררו את הכפתור ,סובבו אותו למצב "( "OFFכבוי) והמתינו לפחות דקה אחת לפני ניסיון נוסף להצית את המבער. אם המבער כבה במקרה ,סובבו את כפתור הבקרה לכוון מצב "( "OFFכבוי) והמתינו לפחות דקה אחת לפני ניסיון נוסף להצית את המבער. שימוש נכון בכיריים כדי להבטיח שימוש חסכוני ויעיל ,מומלץ להשתמש רק בסירים ומחבתות עם תחתית שטוחה ובקוטר המתאים למבער, כך שהלהבה לא תתפשט מעבר לתחתית הכלי (עיינו בטבלה). מבער גדול (מהיר) בינוני (חצי-מהיר) קטן (עזר) מינימום קוטר מכסימום קוטר 160מ" מ 120מ"מ 80מ"מ 260מ"מ 220מ"מ 160מ"מ מיד כאשר נוזל מתחיל לרתוח יש להנמיך את הלהבה כדי לשמור על סף רתיחה מתמשכת. יש להשתמש במחבתות וסירים בעלי תחתית ישרה בלבד. אם משתמשים בסיר שמידותיו קטנות מהגודל המומלץ ,הלהבה תתפשט מעבר לתחתית הסיר ותגרום לידית להתחמם. השגיחו בקפידה כאשר אתם מבשלים עם שומן או שמן ,מאחר שבישול כזה עלול להסתיים בשרפה כאשר נגרם חימום יתר. בישול ארוך בכלי חרס או מברזל יציקה אינו מומלץ .כמו כן אין לכסות את הסירים או המחבתות בנייר אלומיניום בעת הבישול. וודאו שהסירים אינם חורגים משפת משטח הבישול והם ממוקמים כאשר הטבעות במרכזם ,וזאת כדי לחסוך בצריכת הגז. אין להניח סירים לא יציבים או מעוותים על הכיריים :הם עלולים להתהפך או לשפוך את תוכנם ולגרום לתאונות. אסור שהסירים יחרגו אל תוך איזור הבקרה. כשאתם מתקשים לסובב את כפתורי הבקרה ,פנו למרכז השירות המקומי. אלקטרולוקס 8 התקנה כל התקנת גז לא תעשה אלא על ידי צוות מוסמך ,ובהתאם לחוקים ולתקנות הקיימים. ההוראות הרלוונטיות נמצאות בחלק השני של מדריך זה. לאחר התקנת הכיריים ,ודאו שהוא יהיה נגיש בקלות לטכנאי במקרה של תקלה. היצרן מסיר מעצמו כל אחריות אם לא יישמרו הנחיות אלה או כל הנחיות בטיחות אחרות הכלולות במדריך זה. כאשר מתקינים את הכיריים לראשונה לאחר התקנת הכיריים יש להקפיד להסיר מהן את כל חומרי ההגנה שהוצמדו להן במפעל. הפעלה משמעות הסמלים: = אין הזנת גז = להבה מכסימלית = להבה מינימאלית מבערי הכיריים • • הצתת מבער: סובבו את הכפתור המתאים נגד כיוון השעון למצב להבה מכסימלית ולחצו על הכפתור כדי לגרום להצתה. לאחר ההצתה ,המשיכו ללחוץ על כפתור ההצתה למשך כ5 - שניות נוספות .זה יאפשר לצמד התרמי (איור - 1אות )D להתחמם ,ומנגנון הבטיחות יכבה ,שאם לא כן אספקת הגז תנותק .לאחר מכן ,וודאו שהלהבה יציבה וכוונו את הלהבה לגובה הרצוי. אם המבער לא הוצת לאחר מספר ניסיונות ,בידקו אם הכיפה (איור - 1 אות ) Aוהכתר (איור - 1אות ) Bמונחים בצורה נכונה. לכיבוי הלהבה ,סובבו את הכפתור לסמל . - Aכיפת המבער - Bכתר המבער - Cאלקטרודת הצתה - Dצמד תרמי איור 1 אם אין אספקת חשמל יכולה ההצתה להתבצע ללא ההתקן האלקטרוני; במקרה כזה יש לקרב למבער להבה ,ללחוץ על הכפתור המתאים ולסובב אותו בניגוד לכיוון השעון עד למצב להבה מכסימלית. כאשר מתחדשת אספקת החשמל ,לאחר התקנה או לאחר הפסקת חשמל ,מחולל הניצוץ יופעל אוטומטית. 7אלקטרולוקס שירות • בשום מקרה אין לנסות לתקן את התנור בכוחות עצמכם .תיקונים המבוצעים על ידי אנשים שאינם מיומנים עלולים לגרום תקלות חמורות או פציעה .פנו למרכז השירות לקבלת הוראות נוספות .דירשו תמיד חלקי חילוף מקוריים. מידע על איכות הסביבה • • לאחר ההתקנה ,יש לסלק את חומרי האריזה באופן בטיחותי ובהתחשב באיכות הסביבה. בעת סילוק תנור ישן יש להפכו לבלתי-שמיש על ידי חיתוך כבל החשמל שלו. • על המוצר או על אריזתו מציין שלא ניתן לטפל במוצר כבפסולת ביתית .במקום זאת יש להעבירו לנקודת הסמל האיסוף המתאימה למיחזור רכיבים אלקטרוניים וחשמליים .על ידי הבטחת סילוק המוצר כהלכה ,תעזרו למנוע נזק סביבתי ובריאותי העלול להיגרם ע"י סילוק לא תקין של המוצר .לקבלת מידע מפורט יותר על סילוק מוצר זה ,פנה לעירייה ,לשירות סילוק הפסולת הביתית או לחנות שממנה רכשת את המוצר. תיאור הכיריים 3 8 .1 .2 .3 .4 .5 .6 .7 .8 7 6 3 5 1 4 משטח הכיריים מבער מהיר מבער חצי-מהיר מבער עזר כפתור בקרה למבער ימני אחורי (חצי-מהיר) כפתור בקרה למבער שמאלי אחורי (חצי-מהיר) כפתור בקרה למבער שמאלי קדמי (מהיר) כפתור בקרה למבער ימני קדמי (עזר) 2 אלקטרולוקס 6 • • • חלקים נגישים של מכשיר זה עלולים להתחמם במהלך השימוש בו .יש להרחיקילדים עד אשר המכשיר הצטנן. כאשר מפעילים את משטח הבישול נדלק מחוון החום השיורי .יש להרחיק ילדים עד אשר הוא כבה. ילדים עלולים להיפצע גם אם יימשכו מחבתות או סירים מעל הכיריים. על התקנה ,ניקוי ותחזוקה • • • • • • • • • • • • • • כל פעולות ההתקנה יבוצעו על ידי טכנאי מוסמך ,לפי הכללים והתקנות הקיימים אשר בתוקף במדינה בה משתמשים במכשיר. וודאו שמתקיים אוורור טוב סביב המכשיר .אספקה דלה של אוויר עלולה לגרום למחסור בחמצן. וודאו שאספקת הגז והחשמל תואמת לנתונים המצוינים על תווית הנתונים הממוקמת ליד צינור הזנת הגז. מכשיר זה אינו מחובר להתקן פינוי למוצרי בעירה .חובה להתקינו ולחברו בהתאם לתקנות ההתקנה שבתוקף .יש לשים לב במיוחד לדרישות הרלוונטיות הנוגעות לאוורור. שימוש במכשיר בישול על גז גורם להפקת חום ולחות בחדר בו הוא מותקן .וודאו שהחדר מאוורר היטב .שמרו על פתחי אוורור טבעי פתוחים או התקינו מתקן אוורור מכאני (קולט אדים מכאני). שימוש מוגבר ומתמשך במכשיר יצריך אוורור נוסף ,כגון פתיחה של חלון ,או אוורור יעיל יותר ,כגון העלאת דרגת האוורור המכאני ,אם קיים. לאחר שהסרת את כל האריזות מהמכשיר ,וודאו שאינו ניזוק ושהכבל החשמלי ללא פגם .אם מתגלה פגם ,יש לפנות לנציג החברה לפני המשך ההתקנה. יש לנתק את המכשיר מאספקת החשמל לפני ביצוע כל ניקוי או טיפול. אין לנקות מכשיר זה בניקוי קיטור. אין להשתמש בכיריים כבמשטח עבודה .אין להשתמש בכיריים כבמקום אחסון. אין להשתמש בכלי פלסטיק או רדיד אלומיניום על כיריים זכוכית כיוון שהם עלולים להימס על הכיריים ולגרום נזק .בכל מקרה ,אם קורה וכלים כאלה באים במגע עם משטח הזכוכית יש לגרד אותו מיד כל עוד הוא חם ולנגב אותו על מנת למנוע נזק לפני השטח .באותו אופן יש להסיר שאריות סוכר או מזון עתיר סוכר באמצעות מגרדת מיוחדת לכיריים מזכוכית. אין להשתמש במחבתות לא יציבות או שצורתן מעוותת על הכיריים כיוון שהן עלולות להתהפך ולגרום למזון להישפך ולגרום לתאונה. כיריים מזכוכית עמידים בפני זעזועים ,אך לא בלתי שבירים! חפצים קשים או חדים הנופלים מגובה עלולים לגרום נזק לכיריים .אם מבחינים בשריטות או סדקים ,נתקו את המכשיר מאספקת החשמל על מנת להימנע מהלם חשמלי וצרו קשר עם מרכז השירות הקרוב למקום מגוריכם. אין להשתמש בכריות ניקוי שורטות ,מוצרים שוחקים או ממיסים כימיים חזקים .השתמשו רק בתכשירי ניקוי מיוחדים לכיריים מזכוכית. היצרן מסיר מעליו כל אחריות במקרה של אי נקיטת אמצעי זהירות אלה. 5אלקטרולוקס עברית מידע בטיחות חשוב מטרת אזהרות אלה היא לשמור על הבטיחות .לכן יש לקרוא אותן בקפידה לפני חיבור המכשיר או השימוש בו. חשוב מאד לשמור ספר הוראות זה בקרבת המכשיר כדי שניתן יהיה לעיין בו בעתיד .אם המכשיר יימכר או יועבר לרשות מישהו אחר ,וודאו שספר ההוראות מוצמד למכשיר כך שהבעלים החדשים יוכלו להכיר את הפונקציות של המכשיר ולהיות מודעים לאזהרות הנוגעות. הוראות אלה תקפות רק עבור המדינות אשר סמלי הזיהוי שלהן מופיעים על שער חוברת הוראות זו ועל המכשיר עצמו. במהלך הפעולה • • • • • • • • • • • • מכשיר זה תוכנן לשימוש לא מקצועי ביתי בלבד .הוא מיועד לבישול דברי מאכל בלבד ואין להשתמש בו לכל מטרה אחרת. זה מסוכן לבצע כל שינוי שהוא במפרט הטכני. מסיבות היגייניות ובטיחותיות יש לשמור על ניקיון הכיריים .הצטברות שומנים או ושאריות מזון עלולים לגרום להתלקחות. אין להשתמש בכיריים כאשר הם במגע עם מים .אין להפעיל את הכיריים בידיים רטובות. אין להשאיר את הכיריים ללא השגחה כאשר מבשלים עם שמן ושומנים. אין להשתמש במחבתות לא יציבות או שצורתן מעוותת על הכיריים כיוון שהן עלולות להתהפך ולגרום למזון להישפך ולגרום לתאונה. אין להניח על הכיריים כלי פלסטיק או נייר אלומיניום. אין לאחסן מתחת הכיריים או מעליהם מזון המתקלקל מהר ,פריטי פלסטיק ותרסיסים כיוון שהם עלולים להיפגע מהחום. בשום מקרה אל תנסו לתקן את התנור בעצמכם .תיקונים המבוצעים על ידי אנשים שאינם מיומנים עלולים לגרום תקלות חמורות או פציעה .פנו למרכז השירות לקבלת שירות תיקונים .יש לדרוש תמיד חלקי חילוף מקוריים. וודאו שכל הכפתורים במצב ( OFFכבוי) כאשר הכיריים אינן בשימוש. אם מחברים מכשיר חשמלי נוסף לשקע בקרבת הכיריים ,ודאו שכבלים החשמל לא יבואו במגע עם חלקי הכיריים המתחממים. אם המכשיר מתקלקל ,נתקו אותו מאספקת החשמל. בטיחות אנשים • • מכשיר זה אינו מיועד לשימוש על ידי ילדים או אנשים אחרים שיכולותיהם הפיזיות ,החושיות והשכליות או חוסר ניסיון וידע מונעים מהם להשתמש במכשיר בבטיחות ללא השגחה או הנחיה על ידי אדם אחראי וזאת על מנת להבטיח שהם משתמשים במכשיר באופן בטיחותי. מכשיר זה נועד להפעלה על ידי מבוגרים וילדים תחת השגחה .אין לאפשרלילדים צעירים לטפל בכפתורי הבקרה או לשחק עם התנור או בקרבתו. אלקטרולוקס 4 תוכן העניינים הוראות למשתמש מידע בטיחות חשוב תיאור הכיריים הפעלה תחזוקה וניקוי 5 7 8 10 משהו לא עובד? 12 שירות וחלקי חילוף מקוריים 22 הוראות למתקין נתונים טכניים לטכנאי חיבור גז חיבור חשמלי התאמה לסוגי גז שונים התקנה אפשרויות הרכבה מדריך לשימוש בהוראות למשתמש הסמלים להלן יימצאו בטקסט על מנת להנחות אותך דרך ההוראות: הוראות בטיחות הוראות הפעלה -שלב אחרי שלב עצות וטיפים מידע על איכות הסביבה מכשיר זה מיוצר בהתאם להנחיות EECהבאות: ,2006/95 EEC - 2004/108 EEC - 90/396 EEC מהדורה מעודכנת. יצרן: .ELECTROLUX ITALIA S.p.A ( C.so Lino Zanussi, 30 - 33080 Porcia - PNאיטליה) 13 15 17 18 19 21 3אלקטרולוקס ברוכים הבאים לעולם של Electrolux תודה שבחרתם מוצר מעולה מבית ,Electroluxואנו מקווים שיעניק לכם הנאה רבה בעתיד. חברת Electroluxשואפת להציע לכם מגוון רחב של מוצרים שיעשו את חייכם נוחים יותר. תוכלו למצוא מספר דוגמאות על גבי עטיפת מדריך זה .אנא הקדישו מספר דקות ללמוד מדריך זה כדי לאפשר לכם ליהנות מיתרונותיו של המכשיר החדש שלכם. אנו מבטיחים לכם חוויית משתמש ממדרגה ראשונה ושקט נפשי. בהצלחה! אלקטרולוקס 2 הוראות הפעלה IL כיריים גז EHT 60418 39712-0801 R.A.