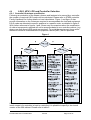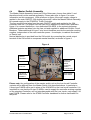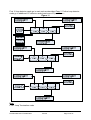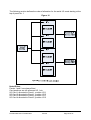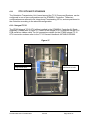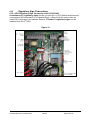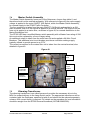
1
ST900 Family Controller Configuration
Siemens Traffic Controls,
Sopers Lane,
Poole,
Dorset,
BH17 7ER
Document Authorisation
Role
Name
Prepared
Stephen Thorpe
by:
Reviewed
Colin Whipps
by:
Authorised
Colin Whipps
by:
Document record
Issue
Number
001
002
003
004
Function
Signed
Project Support Engineer
Technical Support Manager
Technical Support Manager
Date
Comment/Revision Details
12/09/07
06/06/08
03/02/10
07/06/10
Initial release
Update draft 001
TS005210
General Corrections and updates. Updates and
TS005031 (Tactile Upgrade)
TS005048 (250V Tapped Transformer)
TS005118 (Gemini Battery Orientation)
TS005411 (ELV Audible Unit)
TS005859 (LED Upgrade)
TS005969 Lower fusing LV controller (ST900 LED)
TS006646 WiMag
TS006685 30A Modification Kit correction
TS006700 Sect 7.2.3 MDU Controller Fuse change from 10A to 16A
TS006700 Update for SLD4
005
006
007
01/01/11
17/01/11
10/07/12
008
03/10/12
Important Note:
When viewing this document electronically, please be aware that access to any of the related documents,
via the hyperlinks provided, requires server logon.
If you experience problems with any of the links in this Controller Configuration document please contact
Technical Support.
This document is held electronically.
This is an unpublished work, the copyright of which vests in Siemens Plc. All rights reserved.
The information contained herein is the property of Siemens Plc. and is supplied without liability for
errors or omissions. No part may be reproduced or used except as authorised by contract or other
written permission. The copyright and the foregoing restriction on reproduction and use extend to all
media in which the information may be embodied.
Part Number 667-CC-32900-000
Issue 8
Page 1 of 67
Contents
1
General ...........................................................................................................................4
2
Abbreviations and definitions ..........................................................................................4
3
Product Related Documentation .....................................................................................5
4
4.1
4.2
General Parts List ...........................................................................................................6
ST900ELV Configuration Parts....................................................................................6
ST900 Configuration Parts...........................................................................................7
5
5.1
5.2
5.3
System overview of the ST900 Family............................................................................8
ST900 ELV overview .....................................................................................................8
ST900 overview .............................................................................................................8
ST900 LED Overview ....................................................................................................8
6
6.1
6.2
6.2.1
6.2.2
6.2.3
6.2.4
6.3
6.4
6.5
6.6
6.7
6.7.1
6.7.2
6.8
6.9
6.10
6.11
6.11.1
6.11.2
6.12
6.13
6.14
6.14.1
6.14.2
6.15
6.15.1
6.15.2
6.16
6.16.1
6.16.2
6.16.3
6.17
6.18
6.19
6.20
ST900 ELV Hardware Allocation and Connectivity ........................................................9
ST900ELV Outercase Selection...................................................................................9
LSLS, HPU, LPU and Controller Selection .................................................................10
Controller Outercase specification..................................................................................10
LSLS Positioning.............................................................................................................11
HPU Load Distribution and LSLS Connections ..............................................................12
Low Power Unit ...............................................................................................................12
Cabinet Back panels.....................................................................................................13
Master Switch Assembly..............................................................................................14
Mains Transformer........................................................................................................15
Manual Panel .................................................................................................................16
Detector Cards and Detector Backplane ....................................................................16
SLD4 Detector PCBS 667/1/45200/001 and Backplane Kit 667/1/32910/000 ...............16
SLD4 Single Detector Backplanes 667/1/15990/003 and Detector Cards.....................21
Serial I/O cards (4-O/P 667/1/32995/002 and 16-O/P 667/1/32995/001).....................22
Gemini Unit 667/1/32600/ETC.......................................................................................24
WiMag 667/1/47200/000 ................................................................................................25
TC12 OTU 667/1/27000/000...........................................................................................28
Integral TC12 ..................................................................................................................28
Freestanding TC12 .........................................................................................................29
Loop termination PCBs (part of Intelligent Detector BP kit 667/1/32910/000)........30
Audible Driver Module 667/1/32955/000......................................................................31
Tactile Driver .................................................................................................................32
Non Switched Tactiles 667/7/17390/048 ........................................................................32
Switched Tactiles 667/7/17390/148 (non-integrated) or 667/17390/248 (integrated) ....32
Regulatory Sign Connections......................................................................................33
HPU Regulatory Sign Connections 667/1/33070/000 ....................................................33
Additional Regulatory Sign Kit 667/1/33070/000 ............................................................34
Detector Power and Ancillary Power ..........................................................................36
HPU Derived Power for Detectors ..................................................................................36
Two Amp Ancillary Power Supply 667/1/33075/000 2amps DC RMS ...........................37
6 Amp Ancillary Power Supply 667/1/33074/000 6amps DC RMS ................................37
SDE/SA PCB Kit of Parts 667/27005/000.....................................................................39
Sietag .............................................................................................................................39
Siecom -Bluetooth ........................................................................................................39
Solar Cell KOP 667/1/10039/024...................................................................................39
Part Number 667-CC-32900-000
Issue 8
Page 2 of 67
7
7.1
7.2
7.2.1
7.2.2
7.2.3
7.3
7.4
7.5
7.6
7.7
7.7.1
7.7.2
7.8
7.9
7.10
7.11
7.11.1
7.11.2
7.12
7.13
7.14
7.15
7.16
7.16.1
7.16.2
7.16.3
7.17
7.18
7.19
7.20
ST900 LV Rules for Hardware Allocation .......................................................................40
ST900 Outercase Selection..........................................................................................40
ST900 Rack Assembly..................................................................................................42
Lamp Switch Cards.........................................................................................................42
Mains Distribution Unit (MDU) ........................................................................................43
ST900 LED Mains Distribution Unit (MDU).....................................................................43
Termination Panel .........................................................................................................44
Master Switch Assembly..............................................................................................45
Dimming Transformer ..................................................................................................45
Manual Panel .................................................................................................................47
Intelligent Detector Back Planes and Detector Cards...............................................47
Intelligent Detector Backplanes ......................................................................................47
Single Detector Backplanes - 667/1/15990/003 .............................................................50
Serial I/O Cards 667/1/32995/001(4 O/P) 667/32995/002(16 O/P) ..............................51
Gemini2 ...........................................................................................................................53
WiMag 667/1/47200/000 ................................................................................................54
TC 12 OTU......................................................................................................................57
Integral TC12 OTU..........................................................................................................57
Free Standing TC12 OTU ...............................................................................................58
Loop termination PCBs ................................................................................................59
Audible Supply Kit – 667/1/27006/000.........................................................................63
Tactile Driver from Audible Supply Kit 667/1/27006/000...........................................64
Regulatory Sign Kit.......................................................................................................64
Detector Power..............................................................................................................65
24V (160VA) Supply Kit – 667/1/20292/008 ...................................................................65
48V (50VA) Wait Drive Kit – 667/1/21029/003 ...............................................................65
48V (160VA) Wait Drive Kit – 667/1/21029/001 .............................................................65
SDE/SA PCB Kit 667/1/27005/000 ................................................................................67
Sietag .............................................................................................................................67
Siecom ...........................................................................................................................67
Solar Cell........................................................................................................................67
8
Contacts within Technical Support .................................................................................67
Part Number 667-CC-32900-000
Issue 8
Page 3 of 67
1
General
Purpose and scope of the ST900 Family Controller Configuration
This ST900 Family Controller Configuration document is designed as a general process
to provide assistance to field representative when configuring controllers. Additionally, the
document will assist in the manufacture of controllers. This document will assist with final
build and subsequent confirmation of build, when delivered to field services.
The ST900 Family comprises of three basic units, the ST900ELV, ST900 and the
ST900LED.
2 Abbreviations and definitions
Table 1
Abbreviation
ELV
LV
I/O
LT
LED
CPU
LSLS
LSC
IOC
IDB
HPU
PCB
PLD
OTU
TC12
RMS
OMU
MOVA
SDE/SA
DFM
EWD
MCB
HFF
POE
PSU
Definition
Extra low voltage
Low voltage
Input / Output
Loop termination
Light Emitting Diode
Central processor unit
Lamp switch low power serial (ELV controller only)
Lamp switch card
Input output card
Intelligent detector backplane
High power unit (ELV controller only)
Printed circuit board
Programmable logic device
Outstation Transmission Unit
Tele command 12
Remote monitoring system
OTU station monitoring unit
Microprocessor Optimised Vehicle Actuation
Speed discrimination equipment / Speed assessment
Detector fault monitor
Electronic wireless device
Mini Circuit Breaker
Hardware fail flash
Power Over Ethernet
Power Supply Unit
Part Number 667-CC-32900-000
Issue 8
Page 4 of 67
3
Product Related Documentation
Table 2
Document Number
667/HB/32900/000
667/HH/32900/000
667/DA/32900/000
667/SU/32900/000
667/SU/33900/000
667/DZ/32900/000
667/DZ/33900/000
667/HB/32921/007
667/HB/45025/000
667/HB/47200/000
667/HB/45200/000
Tile
ST900 Family General Handbook
ST900 Family Handset Handbook
ST900ELV UK Power Circuit Diagram
ST900ELV Firmware and Software Configuration
ST900 Firmware and Software Configuration
ST900ELV Family Tree
ST900 Family Tree
Handbook Supplement for Monitoring Helios (CLS) NLM
signals
Isolators and Feeder Pillars General Handbook
WiMag Detection System General Handbook
SLD4 Handbook
Part Number 667-CC-32900-000
Issue 8
Page 5 of 67
4 General Parts List
4.1
ST900ELV Configuration Parts
Table 3
Part Number
667/1/32900/020
667/1/32900/040
667/1/32900/021
667/1/32900/041
667/1/32900/520
667/1/32900/521
667/1/32943/001
667/1/32960/001
667/1/33905/312
667/1/32995/002
667/1/32995/001
667/1/27005/000
667/1/32910/000
667/1/33002/000
667/1/33075/000
667/1/33074/000
667/1/32980/040
667/1/33070/000
667/1/33071000
667/1/32900/000
667/1/32900/001
667/1/33072/000
667/1/27056/001
667/1/27110/000
667/1/32900/920
667/1/32900/921
667/1/32900/922
667/1/32900/923
667/1/32900/925
667/1/32945/000
667/1/27057/000
667/1/45200/001
667/2/20234/000
667/1/32900/000
667/1/32900/001
667/1/33080/999
667/1/27004/000
667/6/32986/500
667/1/32980/500
667/1/47200/000
667/1/47210/100
667/1/47260/100
Description
ST900 ELV Cabinet UK 20A Single LSLS - Grey
ST900 ELV Cabinet UK 40A Single LSLS - Grey
ST900 ELV Cabinet UK 20A Single LSLS - Black
ST900 ELV Cabinet UK 40A Single LSLS - Black
ST900 ELV Cabinet UK 20A Low Inrush - Grey
ST900 ELV Cabinet UK 20A Low Inrush - Black
ELV Lamp switch (LSLS) kit
ELV Lamp switch (LSLS) backplane kit
8 Phase UK Home RLM LV CLS
ST900 I/O card kit (4 outputs)
ST900 I/O card kit (16 outputs)
SDE Facility kit
ST900 Intelligent detector backplane kit
ELV detector 6U rack expansion kit
ST900 ELV 24 V detector supply Kit (2A)
ST900 ELV 24 V detector supply Kit (6A)
ELV 20A to 40A upgrade kit (LONG LEAD TIME ITEM)
ELV Regulatory Sign expansion kit
ELV Audible supply kit
Expansion cabinet kit - Grey (not currently available)
Expansion cabinet kit - Black (not currently available)
Cabinet mounted cut-out connection kit
Manual Panel Full Kit
Manual Panel RS232 kit
ST900 ELV cuckoo Kit - T200 (not currently available)
ST900 ELV cuckoo Kit - T400 (not currently available)
ST900 ELV cuckoo Kit - T800 (not currently available)
ST900 ELV cuckoo Kit - Microsense (not currently available)
ST900 ELV cuckoo Kit - Peek (not currently available)
ST900 ELV additional LSLS rack wiring kit
ST800/ST900 Controller Configuration PROM kit
SLD4 Detector PCB
Screw Lock Key
Miscellaneous Equipment Cabinet (Grey)
Miscellaneous Equipment Cabinet (Black)
Master Switch Assembly for Miscellaneous Equipment Cabinet
Integral OTU kit
Low Inrush Transformer with bracket
Low Inrush Transformer
WiMag Detection System
WiMag Standard Interface Card with WiMag Backplane
WiMag 3U 19’’ Communications Rack Assembly
Part Number 667-CC-32900-000
Issue 8
Page 6 of 67
4.2
ST900 Configuration Parts
Table 4
Part Number
667/1/33900/010
667/1/33900/020
667/1/33900/011
667/1/33900/021
667/1/33900/018
667/1/33900/019
667/1/33900/028
667/1/33900/029
667/1/33900/900
667/1/33900/901
667/1/27072/001
667/1/27002/000
667/1/27008/001
667/1/32995/002
667/1/32995/001
667/1/27005/000
667/1/32910/000
667/1/27084/001
667/1/27084/003
667/1/27130/900
667/7/25171/000
667/1/32900/000
667/1/32900/001
667/1/45200/001
667/1/27056/001
667/1/27110/000
667/1/33900/910
667/1/33900/911
667/1/33900/913
667/1/33900/915
667/1/27057/000
667/1/33073/000
667/2/20234/000
6671/27690/000
667/1/32900/000
667/1/32900/001
667/1/33080/999
667/1/27004/000
667/1/20690/000
667/1/20690/001
667/1/20292/008
667/1/27006/000
667/1/27004/000
667/1/27121/000
667/1/47200/000
667/1/47260/000
Description
ST900 Cabinet UK 1.5KVA 8ph wired 8ph - Grey
ST900 Cabinet UK 2KVA 24ph wired 32ph - Grey
ST900 Cabinet UK 1.5KVA 8ph wired 8ph - Black
ST900 Cabinet UK 2KVA 24ph wired 32ph - Black
ST900 LED Cabinet UK 500VA 8ph wired 8ph Grey
ST900 LED Cabinet UK 500VA 8ph wired 8ph Black
ST900 LED Cabinet UK 500VA 24ph wired 32ph Grey
ST900 LED Cabinet UK 500VA 24ph wired 32ph Black
ST900 Rack UK 8 Phase wired 8 phase (not currently available)
ST900 Rack UK 24 Phase wired 32 phase (not currently available)
Phase Driver Cableform
Lamp Switch Kit UK
16 - 32 phase controller upgrade kit
ST900 I/O card kit (4 outputs)
ST900 I/O card kit (16 outputs)
SDE Facility kit
ST900 Intelligent detector backplane kit
1.5 kVA Dimming Facility
3.0 kVA Dimming Facility
ST900 30A Mod Kit (LONG LEAD TIME ITEM)
Current Monitoring Torroid
Expansion cabinet kit - Grey (not currently available)
Expansion cabinet kit - Black (not currently available)
SLD4 Detector PCB
Manual Panel Full Kit
Manual Panel RS232 kit
ST900 cuckoo Kit - T200 (not currently available)
ST900 cuckoo Kit - T400 (not currently available)
ST900 cuckoo Kit - Microsense (not currently available)
ST900 cuckoo Kit - Peek (not currently available)
ST800/ST900 Controller Configuration PROM kit
ST900 Isolator locking kit
Screw Lock Key
Second Termination Panel
Miscellaneous Equipment Cabinet (Grey)
Miscellaneous Equipment Cabinet (Black)
Master Switch Assembly for Miscellaneous Equipment Cabinet
Integral OTU kit
19” Detector Rack
11” Detector Rack
Ancillary Power Supply – 24V AGD Supply Kit
Audio Supply Kit
Integral OTU kit
OTU Supply Kit
WiMag Detection System
WiMag 3U 19’’ Communications Rack Assembly
Part Number 667-CC-32900-000
Issue 8
Page 7 of 67
5
System overview of the ST900 Family
5.1
ST900 ELV overview
The ST900 ELV Controller outputs -48V rectified AC to street equipment and can be
supplied in either a single-door Outercase, with a Rack Assembly and equipment
mounting frame, or as a free-standing Rack Assembly (Rack Assembly is not currently
available in the UK).
The ELV Outercase offers an enhanced controller rack, accommodating the CPU and
power supplies, with space for up to 16 x 4 channel detector cards, or 12 x 4 channel
detector cards and a semi-integral OMU, UTMC OTU or MOVA unit. ELV Lamp Switch
cards (LSLS) are located within the cabinet. Very large intersections may have additional
Lamp Switch, I/O and Intelligent Detector Backplane cards, located in an adjacent
cabinet for ease of installation and maintenance. Depending on the controller
configuration, a maximum of 240 digital inputs or up to 96 digital outputs can be provided
up to a maximum of 248 I/O lines in total.
The ST900 ELV Controller is designed so that there are no on-street voltages that
exceed the nominal ELV limit of 50V. This offers increased electrical safety for engineers
working on and around the intersection and improved lamp monitoring of very low power
LED traffic and pedestrian signals. Another major benefit is simplified cabling in the
controller. The standard option offers a 20A maximum lamp load; a heavy current 40A
version is available.
5.2
ST900 overview
The ST900 is a mains driven 230V Controller that can be supplied either in a single-door
Outercase, with a Rack Assembly and equipment mounting frame, or as a free-standing
Rack Assembly. The Rack Assembly houses a power supply, CPU and Lamp Switch
cards. The ST900 uses the same Lamp Switch cards as the ST800 controller but
incorporates a new high speed serial bus architecture allowing more flexible physical
location of new I/O cards and Intelligent Detector Backplanes.
Depending on the controller configuration, a maximum of 240 digital inputs or up to 96
digital outputs can be provided up to a maximum of 248 I/O lines in total. The maximum
total number of I/O cards and Backplane controller cards in a system cannot exceed 15.
5.3
ST900 LED Overview
The ST900LED Controller is very similar to the ST900, but has been upgraded to lamp
monitor ‘Helios CLS (NLM)’ LED Traffic Signals. It has a low inrush design, lower fuse
ratings and a small 500VA dimming transformer. The ST900LED is supplied in a large
single cabinet. Further information is available in Handbook 667/HB/32900/000 and the
Handbook Supplement for Monitoring Helios (CLS) NLM signals 667/HB/32921/007.
Part Number 667-CC-32900-000
Issue 8
Page 8 of 67
6
ST900 ELV Hardware Allocation and Connectivity
6.1
ST900ELV Outercase Selection
With reference to table 5 the ST900ELV can be specified as two base options; the
ST900ELV with 20A load capability or the ST900ELV with 40A capability. Please refer to
Handbook 667/HB/32900/000 for full Outercase specifications. With knowledge of the
potential load requirement and with reference to paragraph 6.2 the basic functional
cabinet can be selected from table 5. The Outercases listed in Table 5 are equipped, at
order time for onward configuration, with the following major items;
•
•
•
•
•
•
•
Appropriate number of HPU PCBs.
LPU
Appropriate number of Mains Transformers.
Master Switch Assembly
Back Panel
LSLS Backplane Kits and associated LSLS cards
Back panels
The basic functional units for the controller are contained within the ST900ELV Controller
6U Rack Assembly. This unit can be ordered as a standalone (Cuckoo) unit and fitted to
a controller cabinet. More often the unit will be ordered as part of a fully functioning
controller. The relationship between choice of Outercase, number HPU PCBs and
number of LSLS cards is explained below.
Table 5
Part Number
Description
667/1/32900/020 ST900 ELV Cabinet UK 20A Single LSLS - Grey
667/1/32900/040 ST900 ELV Cabinet UK 40A Single LSLS - Grey
667/1/32900/021 ST900 ELV Cabinet UK 20A Single LSLS - Black
667/1/32900/041 ST900 ELV Cabinet UK 40A Single LSLS - Black
667/1/33900/900 ST900 Rack UK 8 Phase wired 8 phase (not currently available)
667/1/33900/901 ST900 Rack UK 24 Phase wired 32 phase (not currently available)
667/1/32900/520 ST900 ELV Cabinet UK 20A Low Inrush - Grey
667/1/32900/521 ST900 ELV Cabinet UK 20A Low Inrush - Black
Part Number 667-CC-32900-000
Issue 8
Page 9 of 67
6.2
LSLS, HPU, LPU and Controller Selection
6.2.1 Controller Outercase specification
Following an evaluation of the stream, phases and lanterns to be served by a controller
the number of required LSLS cards can be calculated. Please refer to ST900 controller
Family Handbook for further details on load calculations. Figure 1 and figure 2 also
provide information on the Outercase required to accommodate the load and equipment.
LSLS cards are allocated to specific positions in a specific order, as detailed in figure 2.
With further reference to figures 1 and 2 there may be occasions when the combination
of cabinet components required will not be accommodated in one controller cabinet, (e.g.
when more than three LSLS cards are required). To avoid the requirement for an entire
additional controller a Miscellaneous Equipment Cabinet (MEC) can be specified.
Figure 1
On those occasions when a customer has a specific requirement to ensure that the
inrush current of a controller is kept to a minimum it is possible to specify a low inrush
version of the 20A cabinet. Please refer to table 5
.
Part Number 667-CC-32900-000
Issue 8
Page 10 of 67
6.2.2 LSLS Positioning
Each LSLS card connects into an LSLS Backplane PCB. The configuration tool IC4 will
allocate the positioning of the phase output identification label. Figure 2 is a
representation of the back panel in the ST900ELV. The first LSLS card Serial Link socket
is connected to PL1 Serial Link Socket on the CPU Daughter card. The Serial link OUT
socket is connected into the second LSLS IN Serial Link socket. The remaining LSLS
cards are connected into the Serial Link in the same manner.
The position of the LSLS PCBs/LSLS Backplane cards as follows;
LSLS Backplane PCB 1 will always be fitted in the top right of the first cabinet. LSLS card
4 will occupy the same position in the second cabinet. LSLS 2 will occupy the position
immediately below LSLS 1 on the right hand side of the first cabinet. LSLS 5 will occupy
the same position in the second cabinet. LSLS 3 will occupy a position on the upper left
corner of the first cabinet and LSLS 6 will occupy the same position in the second
cabinet.
Figure 2
Part Number 667-CC-32900-000
Issue 8
Page 11 of 67
6.2.3 HPU Load Distribution and LSLS Connections
With reference to the flow chart in figure 1 it can be seen that a combination of HPU and
LSLS cards may be configured to a controller, chosen from table 5. To ensure that the
lamp load is distributed evenly and ensure maximum power supply flexibility is
maintained under varying circumstances, the following connection scheme should be
followed.
In order that the load may be redistributed, at final configuration, LSLS 3 is connected to
HPU 1. The addition loom length required for this connection will allow the LSLS 3
connection to be removed from HPU 1 PL6 and connected to HPU 2, if required.
Table 6
Cabinet Type
Number
of HPU
Fitted
Number Connection scheme
of LSLS
Fitted
Single Cabinet
20A Version
One
One
Connect HPU 1 PL4 to LSLS 1 backplane PL3
Single Cabinet
20A Version
One
Two
Connect HPU 1 PL4 to LSLS 1 backplane PL3
Single Cabinet
20A Version
One
Connect HPU 1 PL6 to LSLS 2 backplane PL3
Three
Connect HPU 1 PL4 to LSLS 1 backplane PL3
Connect HPU 1 PL6 to LSLS 2 backplane PL3
Connect HPU 1 PL7 to LSLS 3 backplane PL3
Single Cabinet
40A Version
Two
Single Cabinet
40A Version
Two
Two
Connect HPU 1 PL4 to LSLS 1 backplane PL3
Connect HPU 2 PL4 to LSLS 2 backplane PL3
Three
Connect HPU 1 PL4 to LSLS 1 backplane PL3
Connect HPU 2 PL4 to LSLS 2 backplane PL3
Connect HPU 1 PL6 to LSLS 3 backplane PL3
Regularity Sign Monitoring
With reference to paragraph 6.15 below, Regularity Sign monitoring is performed (if
required) by LSLS external monitor input channels. It is important that the HPU regularity
sign monitoring connection is made to the same LSLS backplane as the HPU power
supply connection.
Output channels are configured using the appropriate software configuration tools (IC4).
On those occasion when more than 8 regularity signs are required but a second HPU is
not specified please refer to paragraph 6.15.
6.2.4 Low Power Unit
The LPU (Logic Power Unit) is powered by the Mains 230V AC supply and is contained
within the Rack Assembly. A switch-mode power supply mounted in the LPU produces
+5V and +24V DC supplies used by PCBs within the cabinet.
Part Number 667-CC-32900-000
Issue 8
Page 12 of 67
6.3
Cabinet Back panels
Two back panels will be positioned centrally at the rear of the ST900ELV cabinet, one
above the other. These items do not have to be ordered separately as they are contained
within the cabinet chosen from table 5. Stencil graphic aid the positioning of several
components.
Figure 3
Part Number 667-CC-32900-000
Issue 8
Page 13 of 67
6.4
Master Switch Assembly
The Master Switch Assembly forms part of the Outercase, chosen from table 5, and
therefore should not be ordered separately. Please also refer to figure 1 for more
information on this component. With reference to figure 4 the main supply voltage is
applied to the main ON/OFF 63A double pole switch, within the Master Switch Assembly,
for onward supply to the ST900ELV Traffic Controller.
The live connection is taken from the main ON/OFF switch and applied to the 30A
controller fuse unit. The output from the fuse unit is applied to a mains filter, detailed in
figure 4, for onward distribution, via a dedicated 20A MCB, to the mains transformer.
Additional outputs are taken from the fuse unit and supplied to additional 6A Mini Circuit
Breakers. These additional 6A type C mini circuit breakers provide the controller working
supplies, independent of the main controller power - for example, to cabinet illumination
or Gemini unit.
Neutral distribution is provided from the 63A switch by connecting the neutral output
terminal of the 63A switch to a separate neutral terminal, as shown in figure 4.
Figure 4
Neutral
Terminal
Mains Filter
and 20A
MCB
supplying
Mains
Transformer
Controller
fuse unit
6A type C
Mini Circuit
Breakers
63A Double
Pole Switch
Please note, the configuration of the master switch unit on the Low Inrush Controller
variants will be different from the Master Switch Unit described above. In particular a
6 Amp type D MCB will be set in place of the 20A MCB on the Low Inrush controller. It is
important to note that the 6A type C MCBs, used to supply the controller working supplies
on the standard Controller, are not interchangeable with the Low Inrush, main supply, 6A
type D MCB. Please refer to the ST900 Controller handbook for further clarification on
this point.
Part Number 667-CC-32900-000
Issue 8
Page 14 of 67
6.5
Mains Transformer
The appropriate transformer is contained with the Outer case specified in table 5 and
should not be ordered separately. The mains transformers will occupy a position in the
bottom left hand corner of the controller. Please refer to figure 5, which shows one
transformer fitted to the ST900ELV cabinet. On those occasions when a 20A variant of
the controller is chosen one transformer and one HPU will be provided to supply the
appropriate load. When a 40A Outercase is specified an additional transformer and HPU
PCB will installed along side the first transformer and HPU PCB. Individual leads from the
transformer will be connected to SKT 3 on the high power to the HPU PCB. A connection
from the transformer will be connected into PL5 on the HPU will be made. On those
occasions when a 40A Outercase is specified the corresponding connection from the
second transformer will be connected to the corresponding connections on the second
HPU PCB. If a 40A controller has been specified and therefore a second HPU PCB is
fitted a four way relay connection cable will be inserted between PL1 on the first HPU
PCB and PL2 on the second HPU PCB.
The input voltage to the Dimming Transformer can be selected by connecting the input
supply leads to the appropriate terminals. Please refer to the ST900 General Handbook
(667/HB/33900/000). Please note that a low Inrush version of the ST900 controller is
available. Please refer to table 5.
Figure 5
HPU
PL5
HPU
SKT 3
Mains
Transformer
Part Number 667-CC-32900-000
Issue 8
Bright
Dim
Common
Earth
Figure 6
HPU PCB SKT 3
Page 15 of 67
6.6
Manual Panel
The Manual Panel is contained within a secure compartment in the top left hand corner of
the controller cabinet. Access to the manual panel may be gained via the manual panel
access door or by opening the controller cabinet main door. The manual panel forms part
of the Outercase, chosen from Table 5, and therefore should not be specified separately.
The 34 way ribbon cable from manual panel connects into socket X2 on the CPU PCB.
Figure 7
6.7
Detector Cards and Detector Backplane
6.7.1 SLD4 Detector PCBS 667/1/45200/001 and Backplane Kit 667/1/32910/000
Intelligent Detector Backplanes and Detector Cards do not form part of the base
Controller Cabinet and therefore should be specified separately. Figure 12 provides a
listing of required components
Optimising the positions of Detector card and Intelligent Detector Backplanes within the
ST900ELV is an involved but necessary procedure. The four separate cases, detailed in
figures 8 to 11, define the order of allocation for the intelligent detector backplanes in the
6U Rack, and therefore the positioning of the Detector cards. It also identifies the
connection of the twisted ribbon cable, which connects the detector loop termination
board to its appropriate intelligent detector backplane connector. The position in the rack
of the intelligent detector backplanes is depends on the number of loop detector cards
required and whether a Gemini unit is required.
Part Number 667-CC-32900-000
Issue 8
Page 16 of 67
Figure 8
Case 1 – Up to 8 Loop detector PCBs, or up to 4 Loop detector cards and a Gemini unit
Case 2 – Up to 16 Loop detector cards, or up to 12 Loop detector cards and a Gemini
unit
Figure 9
Loop detector cards 1-4 plug in
to intelligent backplane
connected to LTB 1
Loop detector cards 9-12 plug in
to intelligent backplane
connected to LTB 3
Additional detector rack
divider kit
667/1/33002/000
1
Rack viewed
From the front
2
3
4 9 10 11 12
LTB 1
5
6
7
LTB 3
Loop Detector
Card Numbering
8 13 14 15 16
LTB 2
Loop detector cards 5-8 plug in
to intelligent backplane
connected to LTB 2
LTB 4
If Gemini fitted, it
will go here
Loop detector cards 13-16 plug
in to intelligent backplane
connected to LTB 4
Note
LTB = Loop Termination PCB
Part Number 667-CC-32900-000
Issue 8
Page 17 of 67
Case 3 – More than 16 Loop detector cards (No Gemini Fitted)
First 16 loop detector cards go in main rack as described in Case 2. Further loop detector
cards go in additional 19” detector racks (Maximum 3 in each) as follows –
Figure 10
Loop detector cards 17-20 plug
in to intelligent backplane
connected to LTB 5
Loop detector cards 21-24 plug
in to intelligent backplane
connected to LTB 6
17 18 19 20 21 22 23 24 25 26 27 28
1st detector
rack is below
the controller
6U rack
LTB 5
LTB 6
Loop Detector
Card Numbering
LTB 7
See drawing 667/GA/27087/000
OTU or Det rack
3rd Position
Loop detector cards 25-28 plug
in to intelligent backplane
connected to LTB 7
6U Controller rack
st
1 Detector rack
2nd Detector rack
Loop detector cards 29-32 plug
in to intelligent backplane
connected to LTB 8
2nd detector rack
is below the 1st
detector rack &
controller 6U rack
Loop detector cards 33-36 plug
in to intelligent backplane
connected to LTB 9
29 30 31 32 33 34 35 36 37 38 39 40
LTB 8
LTB 9
Loop Detector
Card Numbering
LTB 10
Loop detector cards 37-40 plug
in to intelligent backplane
connected to LTB 10
Loop detector cards 41-44 plug
in to intelligent backplane
connected to LTB 11
Loop detector cards 45-48 plug
in to intelligent backplane
connected to LTB 12
Loop Detector
Card Numbering
41 42 43 44 45 46 47 48
3rd detector rack
is above the
controller 6U rack
LTB 11
LTB 12
Note
LTB = Loop Termination cards
Case 4 – More than 12 Loop detector cards and a Gemini unit
Part Number 667-CC-32900-000
Issue 8
Page 18 of 67
First 12 loop detector cards go in main rack as described Case 2. Further loop detector
cards go in additional 19” detector racks (maximum of 3) as follows –
Figure 11
Note
LTB = Loop Termination cards
Part Number 667-CC-32900-000
Issue 8
Page 19 of 67
Figure 12
Communications between CPU PCB and Intelligent Detector Backplanes are carried out
via fast serial link, over Cat5/RJ45 cable. With reference to figure 13, the fast serial link is
connected from PL2 on the CPU Daughter Board to the Serial IN socket on the first
Intelligent Detector Backplane. The serial link is connected from the first Intelligent
Detector Backplane OUT socket into the second Intelligent Detector Backplane IN
socket. The remaining Intelligent Detector backplanes are connected into the serial link in
the same manner.
With further reference to figure 13, power is provided to the Intelligent Detector
Backplanes from the Detector Power Terminal Blocks, on the Backplane Rack Assembly.
Orange wire will be used for the positive connection and Grey for negative connection.
Additional power can be provided for Intelligent Detector Backplanes utilisation, please
refer to paragraph 6.16. Loop activation signals are passed to the Intelligent Detector
Backplanes from the Loop Terminal PCB via PL8. Refer to paragraph 6.12 for
information on Loop Termination PCBs.
Part Number 667-CC-32900-000
Issue 8
Page 20 of 67
Serial I/O
Address
Switch
Figure 13
Detector
Power IN
Fast
Serial Link
to next
Intelligent
Detector
Backplane
Detector
Power OUT
to next
Intelligent
Detector
Backplane
Connection
from Loop
Termination
PCB PL8
Fast
Serial Link
from I/O
card
6.7.2 SLD4 Single Detector Backplanes 667/1/15990/003 and Detector Cards
Single Detector Backplane do not form part of the Outercase, chosen form table 5, and
therefore should be specified separately; if they be preferred over Intelligent Detector
Backplanes. The optimisation of the Single Detector Backplane follows the same
sequence of positioning as that detailed in section 6.7.1 above. The Single Detector
Backplanes occupy the position shown for Intelligent Detector Backplane. Power for the
Single Detector Backplanes is obtained from detector power kit, as detailed in paragraph
6.16. Please refer to figure 14 for the Single Detector Backplane connection scheme.
1
2
Figure 14
3
4
Loop
Activation
Input
Signals
5
6
7
8
Loop
Activation
Output
Signals
O/P Common
24V +DC
24V –DC
Earth
9
10
11
12
13
14
15
16
17
18
19
20
21
22
23
24
AC
Input
nc
nc
Part Number 667-CC-32900-000
Issue 8
Page 21 of 67
6.8
Serial I/O cards (4-O/P 667/1/32995/002 and 16-O/P
667/1/32995/001)
Input Output facilities are provided on the ST900ELV by specifying the required number
of Serial Input Output Kits. Four Input/Output cards may be specified, which should be
attached to the Back Panel, as indicated in figures 15 and 16. Figure 16 shows stencil
indications on the Back Panel to aid positioning.
Figure 15
Additional
Inputs
Additional
Outputs
Fast
Serial Link
OUT
Fast
Serial Link
IN
Serial I/O
Address
Switch
The Input Output cards communicate with the Processor CPU PCB via the RJ45/Cat5
fast serial link. PL4 on the CPU Daughter Board is connected to the Serial IN connection
of the first I/O card. The Serial OUT socket on the first Input Output card is connected to
the Serial IN socket on the second I/O card. The third and fourth I/O PCBs are connected
into the Serial link in the same manner. The Input Output card obtains its logic power
supply via the Serial Link.
Once connected into the fast serial link the CPU PCB indentifies the I/O by the
appropriate address, set on the I/O card, refer to figure 15. Controller special instructions
will provide details on assigned inputs and outputs.
Part Number 667-CC-32900-000
Issue 8
Page 22 of 67
The following section defines the order of allocation for the serial I/O cards starting at the
top of panel No. 1
Figure 16
Notes/Rules:
Panels 1 and 2 are always fitted
Card positions are silk screened I/O 1 etc
I/O Card 1 allocated to Panel 1, position I/O 1
I/O Card 2 allocated to Panel 1, position I/O 2
I/O Card 3 allocated to Panel 2, position I/O 1
I/O Card 4 allocated to Panel 2, position I/O 2
Part Number 667-CC-32900-000
Issue 8
Page 23 of 67
6.9
Gemini Unit 667/1/32600/ETC
This unit is not included in the Outercase ordered from table 5 and therefore must be
specified separately. Please refer to the family tree document for the Gemini unit
(667/1/32600/ETC) when specifying the make up of the Gemini unit. Paragraph 6.7
explains the location the Gemini unit can take within the ST900ELV cabinet. The Gemini
unit communicates with the ST900ELV CPU PCB through a serial interface. To establish
this interface connect MCE0141 (667/1/26579/000) to PL4 on Gemini to the RS232 port
25 way D on ST900ELV CPU. With reference to paragraph 6.4, power for the Gemini unit
can be provided by utilising one of the mini circuit breakers within the Master Switch
Assembly. One mini circuit breaker will be installed for the Gemini; however, a second
and third kit may be fitted using kit of parts 667/1/27121/000. Positions for these
additional power facilities are shown on 667/GA/27121/000.
Note: These two additional kits can only be fitted if the 300mA RCD unit is not required.
To provide Lamp Supply monitoring on the Gemini the ‘High V’ Input 2 can be utilised. An
electro-mechanical relay switched from an I/O card output (via Special Conditioning)
provides the lamp supply loss indication into the Gemini unit. Full installation details can
be obtained from drawing 667/GA/32612/000.
If wired at the factory, the wires for connection to an I/O card output will be brought within
reach of the I/O card outputs but left unconnected. The correct output will need to be
identified for each installation, and the wires connected to the output N.O. (violet wire)
and output COM (grey wire). Consult the configuration’s Special Instructions for details
of how to activate the Special Conditioning code to drive the ‘supply monitor’ relay.
Warning! It is important that the Gemini Last Gasp Dial Battery, within the Gemini Power
Supply Unit, is orientated correctly; the battery terminal must be facing up. If the unit is to
be mounted in such a way that the battery terminals are not facing up then it is necessary
to implement certain modifications to ensure that the battery is not operating upside
down. Please refer to document 667/HB/32600/000 for the necessary modifications.
Part Number 667-CC-32900-000
Issue 8
Page 24 of 67
6.10
WiMag 667/1/47200/000
WiMag is not included in the Outercase ordered from table 5 and therefore must be
specified separately. The following configuration procedure details a basic controller
WiMag installation. Full system installation details should be sought from the WiMag
Detection System General Handbook
With reference to figure 17, the cabinet mounted equipment required as part of the
WiMag installation is mounted to the 19” WiMag Communications Rack Assembly. This
unit will be installed below the 6U Rack Unit, housing the main controller function PCBs.
The WiMag Communications Rack Assembly will hold up to three standard Interface
Cards, servicing 20 WiMag sensors each. Each of the standard interface cards plugs into
an individual backplane PCB. Sufficient space is available behind the centre section of
the WiMag Communications Rack Assembly to house the necessary 4/8 port Power Over
Ethernet (POE) Switch. A Power Supply Unit will be installed on the right hand side of the
WiMag Communications Rack Assembly. The standard WiMag Communications Rack
Assembly is supplied with one standard interface Card, and associated backplane.
Additional Standard Interface Cards should be ordered at controller configuration time.
The appropriate POE unit should also be ordered at controller configuration time.
Figure 17
Figure 18
Part Number 667-CC-32900-000
Issue 8
Page 25 of 67
The selected POE device should be installed prior to the installation of the WiMag
Communication Rack being installed in the controller. The POE is secured into the
WiMag Communications Rack on the DIN rail, as illustrated in figures 19, 20 and 21.
Figure 19
Connect a non-POE Ethernet port to the user maintenance Ethernet port using a
supplied Ethernet cable.
Figure 20
Figure 21
48V DC Power is provided to the Power Over Ethernet switch form the WiMag
Communications Rack Power Supply. The Grey wire from the PSU will be connect to the
+VE terminal and the white return wire will be connected to the –VE terminal of the POE
switch.
Figure 22
The backplane is used to provide power to the interface card. Backplanes are
connected together using Ethernet cable. The first Backplane is connected to the
Part Number 667-CC-32900-000
Issue 8
Page 26 of 67
PHS (PL2 or PL4) PCB at the controller’s Processor PCB. On those occasions when
the Ethernet ports on the PHS PCB are occupied an output port on an Intelligent
Detector Backplane will be utilised. Please refer to figures 23 and 24.
Figure 23
Figure 24
The Standard Interface Cards are connected from the front Ethernet port to the
appropriate ports on the POE switch.
The WiMag Communications Rack Assembly will be provided with unfiltered mains from
the controller Master Switch Unit. Live is to be taken from the 6amp auxiliary miniature
circuit breaker, marked as ‘AUX1 MCB’, Neutral from the neutral block and Earth from
any main earthing stud.
Figure 25
Figure 26
The instructions above details the basis configuration procedure for the WiMag system
into a ST900 ELV Controller The final configuration and commissioning of the Standard
Interface outputs and the interface with street installed equipment should be sought from
the WiMag Detection System General Handbook.
Part Number 667-CC-32900-000
Issue 8
Page 27 of 67
6.11
TC12 OTU 667/1/27000/000
The Outstation Transmission Unit, based around the TC12 Command Systems, can be
configured in one of two configurations on the ST900ELV Controller. These two
configurations are referred to as Integral and Freestanding OTUs, and are positioned in
the controller according to the selected configuration.
6.11.1 Integral TC12
The ST800 Integral TC12 OTU will be installed in the ST900ELV Controller 6U Rack
Assembly. Please refer to figure 27. Power to the Integral OTU is obtained via the CPU
PCB serial bus ribbon cable. For full connections details for the ST800 Integral TC12
OTU connection scheme refer to the TC12 General Handbook 667/HB/43100/000.
Figure 27
CPU PCB
Integral Tele
Command 12 PCB
Logic Power Unit
Part Number 667-CC-32900-000
Issue 8
Page 28 of 67
6.11.2 Freestanding TC12
The TC12 can be configured in the ST900ELV as a stand alone module installed above
the 6U Rack Assembly. Figure 28 show the position of the free standing TC12 module.
Further information on the TC12 system should be sought from TC12 General Handbook
667/HB/43100/000
Figure 28
5U sized Free
standing OTU
6U Rack
Assembly
19" Swing Frame
Part Number 667-CC-32900-000
Issue 8
Page 29 of 67
6.12
Loop termination PCBs (part of Intelligent Detector BP kit
667/1/32910/000)
The following section defines the order of allocation for the detector loop termination PCB
starting at the bottom left of panel No. 2. These boards are directly connected to the
intelligent detector backplanes via a twisted pair ribbon cable Please note the Loop
termination PCB is part of the intelligent Detector Backplane Kit and therefore it is not
required to order this item separately.
Figure 29
Notes/Rules:
Panels 1 and 2 are always fitted
Loop Termination PCBs MUST be in the same cabinet as the Detector cards and
intelligent backplanes connected to them i.e. it is NOT permissible to take the twisted
ribbon cable joining the backplane to Loop Termination PCBs from one cabinet to
another
PCB positions are silk screened LT1 etc
Loop Termination Board 1 allocated to Panel 2, position LT1
Loop Termination Board 2 allocated to Panel 2, position LT2
Loop Termination PCB 3 allocated to Panel 2, position LT3
Loop Termination PCB 4 allocated to Panel 2, position LT4
Loop Termination PCB 5 allocated to Panel 2, position LT5
Part Number 667-CC-32900-000
Issue 8
Page 30 of 67
Loop Termination PCB 6 allocated to Panel 2, position LT6
Loop Termination PCB 7 allocated to Panel 1, position LT1
Loop Termination PCB 8 allocated to Panel 1, position LT2
Loop Termination PCB 9 allocated to Panel 1, position LT3
Loop Termination PCB 10 allocated to Panel 1, position LT4
Loop Termination PCB 11 allocated to Panel 1, position LT5
Loop Termination PCB 12 allocated to Panel 1, position LT6
6.13
Audible Driver Module 667/1/32955/000
To provide drive for audible indicators an Audible Driver Kit of parts can be ordered. With
Reference to figure 30, the module is powered from the green phase of the relevant
pedestrian phase output of the LSLS card. A 12V DC output drives the appropriate
audible unit. The module can be connected to an I/O card to allow operation to be
inhibited and to allow switching between Loud and Quiet sound levels.
Output connection for the Audible units can be taken from the appropriate Loud/Quiet
connections, indicated in figure 30. The appropriate Power Present (PP) LED on the
module illuminates when the Loud/Quite audible is being driven. Each Audible Driver
Module can drive up to 8 audible units. It is recommended that all audible units
connected to an Audible Driver Module are the same type. If there is a requirement to
switch between loud and quite a minor modification to the Audible Driver Module is
necessary. Full detail of these additional requirements should be sought from the ST900
ELV General Handbook (667/HB/32900/000).
Figure 30
Quite PP LED
Quite Audible +ve
Part Number 667-CC-32900-000
Issue 8
Audible -ve
Loud PP LED
Loud Audible +ve
Page 31 of 67
6.14
Tactile Driver
6.14.1 Non Switched Tactiles 667/7/17390/048
Non Switched tactiles are driven from the green man output of the appropriate pedestrian
phase and rotate whenever the pedestrian green is illuminated. Figure 31 illustrates the
necessary connections for non-switched tactiles.
Figure 31
Normally Open
Common
Com
AUD
J
M
M+
Lamp
Returns)
TACT O/P
Blue to TACT
Brown to Return
Yell/Green not used
Common not
d
Link J to AUD
if not using
with controller
6.14.2 Switched Tactiles 667/7/17390/148 (non-integrated) or 667/17390/248
(integrated)
Switched tactiles are also driven from the green man output of the appropriate pedestrian
phase but can be activated when required by the I/O output.
There are several mounting options for the tactile controller module. When using tactiles,
with integrated motor and drive module, the assembly can be mounted in the pedestrian
indicator. When using tactiles with separate motor and drive module, the drive module
can be mounted inside the nearest Helios signal head (the recommended
position for mounting the tactile controller is at the top of the Amber aspect
case – see Helios General Handbook 667/HB/30000/000). The drive module
can be mounted inside the traffic controller cabinet. Please refer to the ST900 Handbook
(667/HB/32900/000/) when installing tactiles in parallel. Separate returns must be used
between I/O card and tactiles.
Output
Figure 32
TACT O/P
Normally Open
Leave fault
o/p open
circuit
Part Number 667-CC-32900-000
Fault Output
+ - + Enable Link
(Lamp Returns)
Green man Output
Common
Input
I
Input
Common
If not using I/O card link Enable
+ and Enable – with link wire
Issue 8
Page 32 of 67
6.15
Regulatory Sign Connections
6.15.1 HPU Regulatory Sign Connections 667/1/33070/000
A maximum of 8 regulatory signs can be run from the 1st HPU Socket and these are
connected to SK1 terminals 9 to 16 labelled Reg1 to Reg 8 with the returns also on
socket SK1 terminals 1 to 8 labelled Returns. A further 8 regulatory signs can be
supplied from the 2nd HPU.
Figure 33
Part Number 667-CC-32900-000
Issue 8
Page 33 of 67
6.15.2 Additional Regulatory Sign Kit 667/1/33070/000
If the 2nd HPU PCB is not specified and there is a requirement to power more than 8
regulatory signs an expansion kit (667/1/33070/000) is available to support an additional
12 regulatory signs.
With reference to figures 35 and 36, the expansion kit is positioned above the HPU on
the left hand side of the cabinet. Additional information on the exact position can be
sought from diagram 667/GA/33070/000 Sheet 1. Please Note! The Additional
Regulatory Sign Kit contains both transformer and associated PCB. When
specifying multiple kits care should be taken to ensure that there is sufficient
space within the specified cabinet for the required items.
With reference to figure 34, the AC input for the ancillary power supply should be
obtained from the master switch unit (Live connected to MCB SW1 and Neutral
connected to Terminal N3). The step down transformer will be configured with
conventional power supply leads to allow this connection. The AC output from the
transformer is applied to a terminal strip TB2, as detailed in the figure below. Please refer
to 667/GA/33070/000 Sheet 2 for a detailed connection scheme and earth arrangement.
Figure 34
SW1
N3
Part Number 667-CC-32900-000
Issue 8
Mains Power provided
from the Master Switch
Unit
Live
+ VE
Neutral - VE
Page 34 of 67
Figure 35
Figure 36
PL1
PL2
Terminal Strip TB2
Lamp monitoring is performed (if required) by LSLS backplane external monitor input
channels. PL1 and PL2 on the Additional Regulatory Sign Kit PCB are four way Molex
style connectors. These current outputs are wired to the LSLS backplane module
external (torroid) inputs, using two twisted pair and provide monitoring signals, if required.
An indication of the connections point is provided in the figure 37 immediately below. The
full connection scheme should be sought from drawing 667/GA33070/000 sheet 2
Figure 37
LSLS
backplane
monitoring
connection, to
regularity sign
expansion kit
PCB.
Please Note Instructions and specific precautions for making the LSLS backplane torroid
connections are detailed the Siemens Type 900 ELV Installation Commissioning and
Maintenance Handbook, 667/HE/32900/000, Paragraph 4.19. Output terminals are
configured using the appropriate software configuration tools (IC4). Please refer to
paragraph 6.15 for information on HPU regularity sign monitoring.
Part Number 667-CC-32900-000
Issue 8
Page 35 of 67
6.16
Detector Power and Ancillary Power
6.16.1 HPU Derived Power for Detectors
The -24v DC detector power supply should be obtained from the 12 way terminal block
on the side panel next to the HPU. This terminal block is marked as DET COM (+)
(Orange wire) and DET SUP (-) (Grey wire) and the power is supplied to these terminals
from the 2.8 amps DC RMS supply from 1st HPU Socket SK2 terminals DET COM (+)
and DET SUP (-) and if fitted a further 2.8 amps DC RMS from 2nd HPU
(667/1/33040/001). Connect the Orange wire to terminals DET COM (+) and the Grey
wire to DET SUP (-). Then connect the Orange wire to SK7 IN + and the Grey wire to
SK7 IN – on the Intelligent detector
Figure 38
Figure 39
Part Number 667-CC-32900-000
Issue 8
Page 36 of 67
6.16.2 Two Amp Ancillary Power Supply 667/1/33075/000 2amps DC RMS
On those occasions when additional -24 AC power is required, and a second HPU has
not been specified, an additional 2 Amp DC RMS power supply can be provided. This
should be positioned above the HPU on the left hand panel. Additional information on this
exact position may be sought from drawing 667/GA/33075/ETC.
With reference to the figures immediately below the AC input for the ancillary power
supply should be obtained from the MCB on the master switch unit (Live connected to
MCB SW1, Neutral connected to Terminal N3). The step down transformer will be
supplied with conventional power supply leads, to allow this connection.
The AC output from the transformer is rectified and applied to a terminal block, as
detailed in the figure below. Orange coloured wire will be used to connect the DET COM
+ output from the rectifier to the terminal block. Slate wire will be used to connect DET
SUP -24V from the rectifier to the terminal block. Please refer to 667/GA/33075/ETC for a
detailed connection scheme and earth arrangement.
Please Note! 2 Amp power supplies contain both transformer and associated
rectifier. When specifying multiple power supplies care should be taken to ensure
that there is sufficient space within the specified cabinet for the required items.
Please note! If it is anticipated that multiple 2 Amp power supplies will be required,
to service the configured load, AC input for the additional powers supplies should
be provided by configuring the ST900ELV controller with additional MCB.
Figure 40
Figure 41
Output from Step
Down transformer
DET COM +
Orange
DET COM +
Orange
DET SUP – 24VAC
Slate
DET SUP –
24VAC Slate
Figure 42
N3
SW1
Mains Power provided
from the Master Switch
Unit MCB
Live
+ VE
Neutral - VE
6.16.3 6 Amp Ancillary Power Supply 667/1/33074/000 6amps DC RMS
Part Number 667-CC-32900-000
Issue 8
Page 37 of 67
On those occasions when additional -24 AC power is required, and a second HPU has
not been specified, an additional 6 Amp DC RMS power supplies can be provided. This
should be positioned above the HPU on the left hand panel. Additional information on this
exact position may be sought from drawing 667/GA/33074/ETC.
With reference to the figures immediately below, the AC input for the ancillary power
supply should be obtained from the MCB Supply on the master switch unit (Live
connected to MCB SW1 and Neutral connected to Terminal N3). The step down
transformer will be supplied with conventional power supply leads to allow this
connection.
The AC output from the transformer is rectified and applied to a terminal block, as
detailed in the figure below. Orange wire will be used to connect the DET COM + output
from the rectifier to the terminal block. Slate coloured wire will be used to connect DET
SUP – 24V from the rectifier to the terminal block. Please refer to 667/GA/33074/ETC for
a detailed connection scheme and earth arrangement.
Please Note! 6 amp power supplies contain both transformer and associated
rectifier. When specifying multiple power supplies care should be taken to ensure
that there is sufficient space within the specified cabinet for the required items.
Please note! If it is anticipated that multiple 6 Amp power supplies will be required,
to service the configured load, AC input for the additional powers supplies should
be provided by configuring the ST900ELV controller with additional MCB.
Figure 43
Figure 44
Output from Step
Down transformer
DET COM +
Orange
DET COM + Orange
DET SUP – 24VAC
Slate
DET SUP – 24VAC
Slate
Figure 45
SW1
Mains Power provided
from the Master Switch
Unit MCB
N3
Live
+ VE
Neutral - VE
Part Number 667-CC-32900-000
Issue 8
Page 38 of 67
6.17
SDE/SA PCB Kit of Parts 667/27005/000
SDE/SA is an integral facility in the ST900 Family. Unless a Soundmark interface is
needed the SDE/SA PCB kit is NOT required.
Fit S.D.E. / SA PCB as required. Fit cableforms to S.D.E. / SA PCB and connect Slate
wire to +24volt & the White wire to the 0volts on the 2 way terminal block on the rear of
the controller rack next to the LPU connector.
Cableform terminal blocks to be fitted on the controller side panel. See drawing
667/1/33003/000 or to the back panel 667/2/33011/000 as detailed in the build request.
IMPORTANT NOTE:• The 24 volt supply to the SDE/SA PCB MUST be connected
• When using an SDE/SA PCB the loop assessors MUST be connected to single
detector backplanes 667/1/15990/003 and also use detector termination KOP’s
667/1/15854/000.
• To provide power to the SADE/SE PCB install power adapter 667/1/33006/000
as detailed in drawing 667/1/33006/ETC. Additional information should be sought
from document 667/HE/32900/000.
6.18
Sietag
Sietag is not currently supported directly on the ST900 controller family.
6.19
Siecom -Bluetooth
The following Siecom Bluetooth Antenna Assembly (EWD) kits are available –
SAP Part Number
Colour
Baud Rate
667/1/30848/012
Black
1200
667/1/30848/096
Black
9600
667/1/30848/192
Black
19200
667/1/30849/012
Grey
1200
667/1/30849/096
Grey
9600
667/1/30849/192
Grey
19200
Fit as required using drawing 667/CF/30840/000 for mounting details.
Note
The ST900 should only be fitted with the 19200 baud rate EWD’s.
6.20
Solar Cell KOP 667/1/10039/024
With reference to figure 38 the -24 power supply and activation signal are provided by the
HPU PCB, at SKT 2.
Part Number 667-CC-32900-000
Issue 8
Page 39 of 67
7
ST900 LV Rules for Hardware Allocation
ST900 Outercase Selection
7.1
With reference to table 6 the ST900 is supplied in a single door Outercase. The main
functional PCBs are housed in a Rack Assembly. The Rack Assembly forms the base
functional unit for the whole controller and can be ordered as a stand alone item, known
as a Cuckoo Unit. A Cuckoo Unit may fit into a third party cabinet. More often the Rack
Assembly will be ordered as part of a fully functioning Outercase, in which case it will be
mounted centrally in the 19” Swing Frame. With knowledge of the potential load
requirement, lantern configuration, and reference to paragraphs below, the Outercase
can be selected from table 6. The Outercases listed in Table 6 are equipped, at order
time for onward configuration, with the following major items. The 30A modification kit is
also listed in table 6.
•
•
•
•
•
•
•
Mains Transformer.
Master Switch Assembly
Termination Panels
One Lamp Switch Card
Mains Distribution Unit (MDU)
19” Swing Frame with Rack Assembly
Manual Panel
Table 6
Part Number
667/1/33900/010
667/1/33900/020
667/1/33900/011
667/1/33900/021
667/1/27130/900
667/1/33900/900
667/1/33900/901
667/1/33900/018
667/1/33900/028
667/1/33900/019
667/1/33900/029
Description
ST900 Cabinet UK 1.5KVA 8ph wired 8ph - Grey
ST900 Cabinet UK 2KVA 24ph wired 32ph - Grey
ST900 Cabinet UK 1.5KVA 8ph wired 8ph - Black
ST900 Cabinet UK 2KVA 24ph wired 32ph - Black
ST900 30A(3KVA) Mod Kit (LONG LEAD TIME ITEM)
ST900 Rack UK 8 Phase wired 8 phase (not currently available)
ST900 Rack UK 24 Phase wired 32 phase (not currently available)
ST900 LED CAB UK 500VA 8PH - Grey
ST900 LED CAB UK 500VA 24/32PH - Grey
ST900 LED CAB UK 500VA 8PH - Black
ST900 LED CAB UK 500VA 24/32PH - Black
The relationship between choice of Outercase, MDU and number Lamp Switch Cards is
set out below.
Note: The ST900 LED variants have been modified but maintain the same part numbers
All LED variants now have reduced value of fusing on Power distribution and MDU and a
500VA dimming transformer. All future orders will be to the new specification.
Part Number 667-CC-32900-000
Issue 8
Page 40of 67
Figure 46
19” Swing
Frame
Manual Panel
Lamp Switch
PCB
CPU PCB
Mains
Distribution
Unit
Gemini Unit
Detector PCB
Note SLD4
Detector PCB
are a direct
replacement
for the ST4S
shown
Warning! Figure 46 shows a Gemini unit, full configuration details of which are detailed
later in this document. It is important that the Gemini Last Gasp Dial Battery, within the
Gemini Power Supply Unit, is orientated correctly; the battery terminal must be facing up.
If the unit is to be mounted in such a way that the battery terminals are not facing up then
it is necessary to implement certain modifications to ensure that the battery is not
operating upside down. Please refer to document 667/HB/32600/000 for the necessary
modifications
Part Number 667-CC-32900-000
Issue 8
Page 41of 67
7.2
ST900 Rack Assembly
The ST900 is configured with a 19 inch swing frame to which the Rack Assembly is
mounted. With reference to figure 47 the Lamp Swing cards and MDU are mounted
within the Rack Assembly along with the CPU PCB and, where specified, Integral TC12
PCB.
7.2.1 Lamp Switch Cards
The Lamp Switch card provides the necessary phase output drive for the signal lanterns.
Termination strips, mounted to the Termination Panel, are shown in figure 47.These
terminal strips give access to the Lamp Switch card phase drive outputs. Each Lamps
Switch card is capable of driving 8 distinct phases. The numbers of Lamps Switch cards
required will be determined by both junction configuration and phase loading.
Configuration is carried out using the IC4 configuration tool. Further explanations of the
relationship between required number of phases and phase loading is available in the
ST900 Hand Book (667/HB/33900/000). The maximum number of Lamps Switch cards
that can be specified in the ST900 is four, providing a potential to drive 32 separate
phase drives. A predetermined number of Lamp Switch cards will be provided with the
1.5KVA Outercase and the 2.0KVA Outercase. Additional Lamps Switch Cards should be
specified where necessary. With reference to figure 47 the Lamps Switch cards occupy
specific position within the Rack Assembly.
Please note that the selection of the Outercase from table 6, in addition to determining
the available current, also determines type of Lamp Switch Card fitted to the controller.
Lamp Switch Cards in LED controllers are specifically design to operate in conjunction
with and monitor LED CLS NLM signal heads. Controllers without the LED designation
operate and monitor LED signal heads equipped with LMF modules. Further information
on controller selection should be sought from the ST900 Controller Handbook.
Part Number 667-CC-32900-000
Issue 8
Page 42of 67
Figure 47
Terminal
Strips
CPU PCB
7.2.2 Mains Distribution Unit (MDU)
The MDU need not be ordered separately as it is contained within the Outercase,
specified from table 6. However, if there is an additional power requirement then a 30A
modification kit can be specified (667/1/27130/900). Please refer to table 6 and section
7.6. This kit contains an MDU that has been increased in load capability to accommodate
the additional current requirement. It is normal convention, when a controller with 30A
capability is required, to order a 1.5KVA controller and go on to order the 30A
Modification kit.
7.2.3 ST900 LED Mains Distribution Unit (MDU)
The ST900 LED controllers have a modified MDU and Master switch Assembly.
The 30A modification kit must not be ordered for these variants. The Rating of the
Master fuse on these controllers is 20A and the controller fuse on the MDU is 16A. This
variant is supplied with a 500VA dimming transformer. Only one dimming tap is available
of 154V see 667/HB/33900/000 for further details.
All variants of MDU contain the dim/bright, A, B and SSR relays and the logic power
supply, providing +5V DC and +24V DC to the cards in the rack.
Incorporated into the MDU are two 5A power outlet sockets, for use with test equipment.
A 10A regulatory fuse is provided at the MDU to provide separate power supply for sign
equipment.
Part Number 667-CC-32900-000
Issue 8
Page 43of 67
7.3
Termination Panel
With reference to table 6 and figure 48, one Termination Panels will be fitted to the
1.5KVA Outercase and two Termination Panels will be fitted to the 2.0KVA Outercase.
The Termination Panels will be positioned centrally at the rear of the cabinet, one above
the other, when two are fitted, and one at the bottom when one is fitted. These items do
not have to be ordered separately as they are contained within the cabinet, chosen from
table 6. Certain large items have designated position within the controller, other are
subject to optimisation and therefore may be configured in slightly different positions. The
Termination Panels have stencil graphics to assist in this optimisation.
TBG12
TBF12
NEUTRAL
TBF6
REG SIGNS
TBG1
TBG6
TBB12
SOLAR CELL I/P
TBD12
SOLAR SUPPLY
TBB6
TBD6
TBA12
TBB1
TBD1
TBC12
TBA6
TBC6
TBC1
TBA1
Figure 48
Rotated View
TBK12
TBK6
TBK1
TBJ12
TBJ6
TBJ1
TBH12
TBH6
TBH1
LT4
TBN12
TBN6
TBN1
TBM12
TBM6
TBM1
TBL12
TBL6
LT2
TBL1
LT4
I/O 2
TBT12
TBT6
TBT1
TBR12
I/O 1
I/O 2
TBR6
TBR1
TBP12
TBP6
TBP1
I/O 1
LT2
LT1
TBX12
TBZ12
TBZ6
TBZ1
TBY12
TBY6
TBY1
0V
TBX6
TBX1
TBW12
TBW6
TBW1
TBV12
TBV6
TBE6
24V
TBE12
LT5
Issue 8
LT3
LT5
TBE1
LT3
TBV1
LT1
Part Number 667-CC-32900-000
Page 44of 67
7.4
Master Switch Assembly
The Master Switch Assembly forms part of the Outercase, chosen from table 6, and
therefore should not be ordered separately. With reference to figure 49 the mains supply
voltage is applied to the main ON/OFF 63A Switch, within the Master Switch Assembly,
for onward supply to the ST900 Traffic Controller.
The live connection is taken from the main ON/OFF 63A Switch and applied to a 45A
main controller fuse unit; the neutral is applied to a neutral terminal. The output from the
fuse unit is applied to a mains filter, as shown in figure 49, for onward distribution to the
Mains Distribution Unit.
The ST900 LED has a modified Master switch assembly with a Master fuse rating of 20A
this must not be replaced by a fuse of larger rating.
An additional output is taken from the main fuse unit and supplied a 6A Mini Circuit
Breakers. This additional mini circuit breaker provides a controller working supply,
typically utilised to provide power to an OTU.
The neutral connection for the mains filter unit is taken from the neutral terminal, also
detailed in figure 49.
Figure 49
Mains
Filter
6A Mini
Circuit
Breaker
Main
Controller
Fuse unit
Neutral
Terminal
63A Mains
ON/OFF
switch
7.5
Dimming Transformer
The dimming transformer is so called because it provides the necessary drive to the
MDU for onward delivery to the Lamp Switch cards. The appropriate transformer will be
contained with the Outercase, specified in table 6 and should not be ordered separately,
unless a 30A current facility is required. Full details on the procedure for load calculation
should be sought form the ST900 General Handbook (667/HB/33900/000).
Part Number 667-CC-32900-000
Issue 8
Page 45of 67
On those occasions when a 1.5KVA ST900 Outercase is specified the appropriate
transformer will be configured. Similarly when a 2.0KVA Outercase is specified the
necessary dimming transformer will be configured to the controller.
If additional power is required a modification kit (ST900 30A MOD Kit, 667/1/27130/900)
may be specified to increase the power rating. Specific items are contained with this
modification kit to accommodate the additional current requirement, items such as a
3.0KVA transformer and higher rated Mains Distribution Unit.
The ST900 LED has a single variant of dimming transformer rated at 500VA
The Dimming Transformers will occupy a position in the bottom left hand corner of the
controller. Figure 50 shows the transformer fitted to the ST900 cabinet.
The input voltage to the Dimming Transformer can be selected by connecting the input
supply leads to the appropriate terminals. Please refer to the ST900 General Handbook
(667/HB/33900/000).
Figure 50
Part Number 667-CC-32900-000
Issue 8
Page 46of 67
7.6
Manual Panel
The Manual Panel is contained within a secure compartment in the top left hand corner of
the controller cabinet. Access to the manual panel may be gained via the manual panel
access door or by opening the controller cabinet main door. The manual panel forms part
of the Outercase, chosen from Table 6, and therefore should not be specified separately.
The 34 way ribbon cable from manual panel connects into socket X2 on the CPU PCB.
The detector fault monitoring LED indicator is repeated from the manual panel to the
outer case by the use of a lens. The lens kit, part number is 667/1/27104/000 and should
be ordered separately, if the unit is required.
Instruction on the fitting of the DFM Lens kit should be sought from drawing No.
667/CH/27104/000.
Figure 51
7.7
Intelligent Detector Back Planes and Detector Cards
7.7.1 Intelligent Detector Backplanes
Intelligent Detector Backplanes and Detector Cards do not form part of the base
Controller Cabinet and therefore should be specified separately. Figure 54 provides a
listing of required components.
With reference to figure 52 the area above the Rack Assembly in the 19” Swing Frame is
designated as the area for fitting an OTU. The OTU may be a 3U sized Gemini unit or 5U
Freestanding OTU. With further reference to figure 54, Gemini units will be fitted on the
right hand side of a 19” Rack Kit, viewed from the front of the 19” Swing Frame. If a
Freestanding 5U OTU is specified it will occupy the whole space above the Rack
Assembly
The first Intelligent Detector Backplane will be fitted to a 19” Rack Kit, which will be fitted
below the Rack Assembly. The second and third Intelligent Detector Rack Kits will be
fitted to the same 19” Detector Rack Kit. If more than three Intelligent Detector
Backplanes are to be specified a second 19” Detector Rack kit should be specified and
fitted below the first 19” Detector Rack Kit. The Intelligent Detector Backplane will be
fitted to this second 19” Rack kit.
Part Number 667-CC-32900-000
Issue 8
Page 47of 67
In the interests of efficient use of cabinet space it may be decided to fit the first two
Intelligent Detector Backplanes along side the Gemini Unit. This will allow the third, fourth
and fifth Intelligent Detector Backplanes to be fitted in a second 19” Rack Kit, which will
be place below the Rask Assembly.
It should be recognised that if a 3U sized Gemini or 5U OTU are not initially specified,
and the space designated for fitting these units above the Rack Assembly is utilised for
the placement of Intelligent Detector Back Planes, it will be necessary to reposition the
19” Rack Kit to the area below the Rack Assembly; so that the Gemini/5U OTU can be
placed in their correct position above the Rack Assembly.
Figure 52
Communications between CPU PCB and Intelligent Detector Backplanes are carried out
via fast serial link, over Cat5 cable/RJ45 connector. The fast serial link communication
Part Number 667-CC-32900-000
Issue 8
Page 48of 67
protocol relies on addressing techniques to ensure the appropriate information is
delivered to the intended component. This means that the order in which the components
are connected to the link is not imperative to successful communications. However, to
main consistence of build configuration the following sequence of connections should be
made. With reference to figure 53, the fast serial link is connected from PL2 on the CPU
Daughter Board to the Serial IN socket on the first Intelligent Detector Backplane. The
serial link is connected from the first Intelligent Detector Backplane OUT socket into the
second Intelligent Detector Backplane IN socket. This sequence of connections between
Intelligent Detector Backplanes until the final Intelligent Detector Backplane is connected
into the serial link.
With reference to figure 53, power is provided to the Intelligent Detector Backplanes from
the Detector Power Supply Kit. Additional power can be provided for Intelligent Detector
Backplanes, refer to paragraph 7.16
Loop activation signals are passed to the Intelligent Detector Backplanes from the Loop
Terminal PCB via PL8. Refer to paragraph 7.12 for information on Loop Termination
PCBs.
Figure 53
Serial I/O
Address
Switch
Detector
Power IN
Fast
Serial Link
to next
Intelligent
Detector
Backplane
Detector
Power OUT
to next
Intelligent
Detector
Backplane
Connection
from Loop
Termination
PCB PL8
Fast
Serial Link
from I/O
card
Note
LTB = Loop Termination Board
Part Number 667-CC-32900-000
Issue 8
Page 49of 67
Figure 54
7.7.2 Single Detector Backplanes - 667/1/15990/003
If preferred, Single Detector Back plane may be fitted to the ST900. Single Detector
Backplane do not form part of the Outercase, chosen form table 6, and therefore should
be specified separately, The optimisation of the Single Detector Backplane follows the
same sequence of positioning as that detailed in section 7.7.1. Power for the Single
Detector Backplanes is obtained from Detector Power Supply Kit, as detailed in
paragraph 7.16. Please refer to figure 55 for the Single Detector Backplane connection
scheme.
1
Figure 55
2
Loop
Activation
Input
Signals
3
4
5
6
7
8
Loop
Activation
Output
Signals
O/P Common
24V +DC
24V –DC
Earth
9
10
11
12
13
14
15
16
17
18
19
20
21
22
23
24
nc
nc
Part Number 667-CC-32900-000
Issue 8
Page 50of 67
AC
Input
7.8
Serial I/O Cards 667/1/32995/001(4 O/P) 667/32995/002(16 O/P)
The Serial Input/Output (I/O) Kits do not form part of the Outercase selected from table 6
and therefore should be ordered separately. Two types of I/O cards are available one
with 4 outputs/16 inputs and one with 16 outputs/16 inputs. Four I/O cards can be
configured to the ST900. Figure 57 sets out stencil indications on the Terminal Panel to
aid positioning optimisation.
Figure 56
Additional
Inputs
Additional
Outputs
Fast
Serial Link
OUT
Fast
Serial Link
IN
Serial I/O
Address
Switch
The I/O cards communicate with the CPU PCB via the RJ45 Cable/Cat5 connector, as a
fast serial link. The fast serial link communication protocol relies on addressing
techniques to ensure the appropriate information is delivered to the intended component.
This means that the order in which the components are connected to the fast serial link is
not imperative to successful communications. However, to maintain consistency of build
configuration the following sequence of connections should be made. PL2 on the CPU
Daughter Board is connected to the Serial IN connection of the first Intelligent Detector
Backplane. The OUT socket on the first Intelligent Detector Back plane will be connected
into the IN of the second Intelligent Detector Backplane. This sequence of connections
will be continued up to the last Intelligent Detector Backplane. PL4 on CPU Daughter
Board is connected the IN socket of the first I/O card. The OUT socket of the first I/O card
is connected to the IN socket of the second I/O card. This sequence of connection will be
continued to the last I/O card.
The Input Output card obtains its logic power supply via the fast serial link.
As stated above, once connected into the fast serial link the CPU PCB indentifies the I/O
by the appropriate address. The address is set on the I/O PCB, refer to figure 56.
Controller special instructions will provide details on assigned inputs and outputs.
Part Number 667-CC-32900-000
Issue 8
Page 51of 67
Figure 57 show the positioning of the l/O cards when Loop Termination Boards are not
fitted. Paragraph7.12; figure 69 to 71 illustrate the mutual optimisation that must be
carried out when allocating space to both I/O card and Loop Termination PCBs.
Figure 57
Panels 1 and 2 illustrated without Loop Termination Board Silk screen, detailing
the I/O sequence of allocation.
Panel 1 is always fitted
Card positions are silk screened I/O 1 etc
I/O Card 1 allocated to Panel 1, position I/O 1
I/O Card 2 Allocated to Panel 1, position I/O 2
I/O Card 3 allocated to Panel 2, position I/O 1
I/O Card 4 Allocated to Panel 2, position I/O 2
Part Number 667-CC-32900-000
Issue 8
Page 52of 67
2
7.9
Gemini
The ST900 Outercase is configured with a 19” Swing Frame and a Rack Assembly. With
reference to figure 52 the area above the Rack Assembly is set aside for 3U sized
Gemini unit or the 5U sized OTU. When a 3U sized Gemini is specified it will be fitted on
the right hand side of the 19” Rack Kit, as seen from the front of the 19” Swing Frame.
One OTU Supply Kit is fitted as standard to the Master Switch Assembly, to provide
power for the Gemini Unit or 5U OTU. A second kit may be fitted using part number
667/1/27121/000. The position of the kit is shown on 667/GA/27121/000. The Gemini unit
has several applications and therefore full information on the required configuration
should be sought from Document 667/1/21238/000. With reference to figure 58, power
for the Gemini unit should be applied to PL1.
Figure 58
Mains
Connection to
Gemini2 Unit
PL1
Warning! It is important that the Gemini Last Gasp Dial Battery, within the Gemini Power
Supply Unit, is orientated correctly; the battery terminal must be facing up. If the unit is to
be mounted in such a way that the battery terminals are not facing up then it is necessary
to implement certain modifications to ensure that the battery is not operating upside
down. Please refer to document 667/HB/32600/000 for the necessary modifications.
Part Number 667-CC-32900-000
Issue 8
Page 53of 67
7.10
WiMag 667/1/47200/000
WiMag is not included in the Outercase ordered from table 6 and therefore must be
specified separately. The following configuration procedure details a basic controller
WiMag installation. Full system installation details should be sought from the WiMag
Detection System General Handbook
With reference to figure 59, the cabinet mounted equipment required as part of the
WiMag installation is mounted to the 19” WiMag Communications Rack Assembly. This
unit will be installed below the ST900 Rack Assembly, housing the main controller
function PCBs. The WiMag Communications Rack Assembly will hold up to three
Standard Interface Cards, servicing 20 WiMag sensors each. Each of the Standard
Interface cards plugs into an individual backplane PCB. Sufficient space is available
behind the centre section of the WiMag Communications Rack Assembly to house the
necessary 4/8 port Power Over Ethernet (POE) Switch. A Power Supply Unit will be
installed on the right hand side of the WiMag Communications Rack Assembly. The
standard WiMag Communications Rack Assembly is supplied with one Standard
Interface Card, and associated backplane. Additional Standard Interface Cards should be
ordered at controller configuration time. The appropriate POE unit should also be ordered
at controller configuration time.
Figure 59
The selected POE device should be installed prior to the installation of the WiMag
Communication Rack being installed in the controller. The POE is secured into the
WiMag Communications Rack on the DIN rail, as illustrated in figures 60, 61 and 62.
Part Number 667-CC-32900-000
Issue 8
Page 54of 67
Figure 60
Connect a non-POE Ethernet port to the user maintenance Ethernet port using a
supplied Ethernet cable.
Figure 61
Figure 62
48V DC Power is provided to the Power Over Ethernet switch form the WiMag
Communications Rack Power Supply. The Grey wire from the PSU will be connect to the
+VE terminal and the white return wire will be connected to the –VE terminal of the POE
switch.
Figure 63
The backplane is used to provide power to the interface card. Backplanes are
connected together using Ethernet cable. The first Backplane is connected to the
PHS (PL2 or PL4) PCB at the controller’s Processor PCB. On those occasions when
Part Number 667-CC-32900-000
Issue 8
Page 55of 67
the Ethernet ports on the PHS PCB occupied an output port on an Intelligent Detector
Backplane will be utilised. Please refer to figures 64 and 65.
Figure 64
Figure 65
The Standard Interface Cards are connected from the front Ethernet port to the
appropriate ports on the POE switch.
The WiMag Communications Rack Assembly will be provided with unfiltered mains from
the controller Master Switch Unit. Live is to be taken from the 6amp auxiliary miniature
circuit breaker, marked as ‘AUX1 MCB’, Neutral from the neutral block and Earth from
any main earthing stud.
Figure 66
The instructions above details the basis configuration procedure for the WiMag system
into a ST900 ELV Controller The final configuration and commissioning of the Standard
Interface outputs and the interface with street installed equipment should be sought from
the WiMag Detection System General Handbook.
Part Number 667-CC-32900-000
Issue 8
Page 56of 67
7.11
TC 12 OTU
The TC12 can be configured as one of two methods on the ST900. The two
configurations are referred to as the Integral OTU and the Freestanding OTU. Their
position in the controller will vary according to the type of TC12 required.
7.11.1 Integral TC12 OTU
With reference to figure 67, the ST900 Outercase is configured with a 19” Swing Frame.
The Integral TC12 OTU will be fitted in the Rack Assembly. Full details on the Integral
TC12 OTU should be sought from the Telecommand 12 general Handbook
667/HB/43100/000.
Figure 67
Integral Tele
Command 12
Communication
Facility
Please note,
SLD4 Detector
PCBs are an
exact replacement
for ST4S Shown
Part Number 667-CC-32900-000
Issue 8
Page 57of 67
7.11.2 Free Standing TC12 OTU
The Freestanding TC12 OTU will be installed in the area above the Rack assembly
Please refer to figure 68,
One OTU Supply Kit is fitted as standard to the Master Switch Assembly to provide
power for the Gemini Unit or 5U OTU. A second kit may be fitted using 667/1/27121/000
in position shown on 667/GA/27121/000.
For full connections and configuration details for the TC12 OTU connection scheme refer
to the TC12 General Handbook 667/HB/43100/000.
Figure 68
Free Standing
Tele Command 12
Communication
Facility
Please note,
SLD4 Detector
PCBs are an
exact replacement
for ST4S Shown
Part Number 667-CC-32900-000
Issue 8
Page 58of 67
7.12
Loop termination PCBs
The Loop Termination PCBs are contained within the Intelligent Detector Backplane Kits.
Positions set aside for the Loop Termination PCBs and I/O cards coincide to some
degree and therefore this conflict requires that attention be paid to optimisation of these
components. Figure 69 show the positioning of the loop termination PCBs when one
serial I/O cards is fitted. Figures 70 and 71 detail the sequence of Loop Termination
allocation when three and four I/O cards are fitted.
Figure 69
Panels 1 is always fitted
PCB positions are silk screened LT 1 etc
Loop Termination PCB 1 allocated to Panel 1, position LT1
Loop Termination PCB 2 allocated to Panel 1, position LT2
Loop Termination PCB 3 allocated to Panel 1, position LT4
Loop Termination PCB 4 allocated to Panel 1, position LT5
Loop Termination PCB 5 allocated to Panel 2, position LT1
Loop Termination PCB 6 allocated to Panel 2, position LT2
Loop Termination PCB 7 allocated to Panel 2, position LT4
Loop Termination PCB 8 allocated to Panel 2, position LT5
Loop Termination PCB 9 allocated to Panel 2, position LT3
Loop Termination PCB 10 allocated to Panel 1, position LT3
Part Number 667-CC-32900-000
Issue 8
Page 59of 67
Figure 70 show the positioning of the loop termination PCB when serial I/O cards one,
two and three are fitted
Figure 70
I/O Card 3
6
LT5
Panel silk
screen
labelling
Panel No. 2
(Optional fit)
7
3
4
5
LT3
LT1
LT2
LT4
I/O Card 1
Panel No. 1
(Always fitted)
2
LT5
8
LT3
I/O Card 2
1
LT4
Figure 3 LV Cabinet Loop termination board allocations with
serial I/O 1 and 2 cards fitted
Allocation Sequence Rules:
Panels 1 is always fitted
PCB positions are silk screened LT 1 etc. With reference to Figure 70 the Loop
Termination Boards Should be allocated in the following order;
Loop Termination PCB 1 allocated to Panel 1, position LT4
Loop Termination PCB 2 allocated to Panel 1, position LT5
Loop Termination PCB 3 allocated to Panel 2, position LT1
Loop Termination PCB 4 allocated to Panel 2, position LT2
Loop Termination PCB 5 allocated to Panel 2, position LT4
Loop Termination PCB 6 allocated to Panel 2, position LT5
Loop Termination PCB 7 allocated to Panel 2, position LT3
Loop Termination PCB 8 allocated to Panel 1, position LT3
Positions LT1 and LT2 on Panel 1 can NOT be used.
Part Number 667-CC-32900-000
Issue 8
Page 60of 67
Figure 71 show the positioning of the loop termination PCBs when serial I/O cards one,
two, three and four are fitted.
Figure 71
I/O Card 3
4
LT5
5
Panel silk
screen
labelling
Panel No. 2
(Optional fit)
I/O Card 4
LT3
3
LT4
I/O Card 1
Panel No. 1
(Always fitted)
2
LT5
6
LT3
I/O Card 2
1
LT4
Figure 4 LV Cabinet Loop termination board allocations with
serial I/O 1 to 4 cards fitted
Allocation Sequence Rules:
Panels 1 is always fitted
Board positions are silk screened LT 1 etc
Loop Termination PCB 1 allocated to Panel 1, position LT4
Loop Termination PCB 2 allocated to Panel 1, position LT5
Loop Termination PCB 3 allocated to Panel 2, position LT4
Loop Termination PCB 4 allocated to Panel 2, position LT5
Loop Termination PCB 5 allocated to Panel 2, position LT3
Loop Termination PCB6 allocated to Panel 1, position LT3
Part Number 667-CC-32900-000
Issue 8
Page 61of 67
Flow chart LV Controller I/O and Loop termination PAC Allocation Rules
Figure 72
Part Number 667-CC-32900-000
Issue 8
Page 62of 67
Figure 73 shows a Loop Termination PCB. PL2 on the Loop Termination PCB should be
connected to the associated Intelligent Detector Backplane.
Figure 73
7.13
Audible Supply Kit – 667/1/27006/000
With reference to figure 74 an additional mounting panel is provided on the left hand side
of the ST900 controller. This mounting panel will be utilised for mounting 48V (160VA)
Wait Drive Kits, 48V (50VA) Wait Drive Kits, 24V (160VA) Supply Kits and Audible Supply
Kits.
The Audible Drive Kit contains a 48V (1500VA) transformer. The output from the
transformer is rectified and made available at a terminal block. The terminal block forms
part of the Audible kit and is attached to the left hand side panel providing three outputs.
If more than three Audible outputs are required it is possible to order individual ancillary
items (terminal block etc) from the kit to provide an additional three outputs. If more than
three additional outputs are required an additional full kit must be ordered. The position of
the transformer in the Audible Supply kit is linked to the optimisation of the other supply
kits positions. The sequence of kit positioning is set out in paragraph 7.16. Drawing
667/GA/27006/000 details the full wiring scheme. The Audible kit may occupy any spare
position on the left hand mounting plate however the rectifier component and terminal
block should be mounted in the same row as the transformer. Input Supply for the
Audible Kit is provided from the pedestrian green phase. Please note the negative input
supply wire should not be connected to the common input of any other equipment.
Part Number 667-CC-32900-000
Issue 8
Page 63of 67
Terminal
Block
providing
Audible
Figure 74
Audible
supply kit
rectifier and
t
f
7.14
Tactile Driver from Audible Supply Kit 667/1/27006/000
Tactiles are driven from the Audible Supply Kit as detailed in Drawing 667/GA/27006/000.
The same restrictions of number of outputs exist for Tactile as that for Audibles
7.15
Regulatory Sign Kit
The Mains Distribution Unit provides the power supply output for regulatory signs. The
outputs to power the signs are provide at the bottom right of the Termination Panel.
The controller comes equipped and wired with a lamp monitoring sensor as standard,
which can monitor up to seven regulatory signs. If the junction contains more than
seven signs in total additional current monitoring sensors must be fitted. The
feeds to the signs must be split so that no more than seven signs are monitored through
one sensor.
The red wire from the sensors should be connected to the ‘Sens’ inputs at the rear of
the first Lamp Switch card Sens33 is the first monitoring channel, Sens34 is the second
etc. If more than 28 signs are present, additional sensors may be added to the second
Lamp Switch card (if fitted).
The white wires should be joined together and connected to the ‘COMMON’ input
Part Number 667-CC-32900-000
Issue 8
Page 64of 67
7.16
Detector Power
Detector Power General
With reference to figure 75 an additional mounting panel is provided on the left hand side
of the ST900 controller. This mounting panel will be utilised for mounting 48V (160VA)
Wait Drive Kits, 48V (50VA) Wait Drive Kits, 24V (160VA) Supply Kits and Audible Supply
Kits.
7.16.1 24V (160VA) Supply Kit – 667/1/20292/008
All detectors will be powered from 24v (160VA) Supply kit. With reference to figure 75 the
transformer, part of the 24V (160VA) Supply Kit, will be mounted to position 13. The
rectifier and terminal block will be mounted on the left hand side of the left hand mounting
plate. Figure 75 also shows the sequence in which additional 24V (160VA). Supply Kits
will be positioned. Additional reference should be made to drawing 667/GA/27067/000.
The first position to be utilised should be position 13, followed by position 14 and 15 etc.
The transformer supplied in the kit will be configured with conventional mains leads. Main
input for the Supply Kit should be obtained from the Mains Switch Assembly, as
described on drawing 667/GA/20292/008. The output voltage from the Supply Kit should
be connected to the Intelligent Detector Backplane as shown in paragraph 7 of this
document and drawing 667/GA/20292/008.
7.16.2 48V (50VA) Wait Drive Kit – 667/1/21029/003
The 48V (50VA) may be specified to provide power to Wait Drives. The rectifier and
terminal block will be mounted on the left hand side of the left hand mounting plate.
Figure 75 shows the sequence in which additional 48V (50VA) Supply Kits will be
positioned. Main input for the Supply Kit should be obtained from the Mains Switch
Assembly. Additional reference should be made to drawing 667/GA/27067/000. The first
position to be utilised should be position 4, followed by position 5 and 6 etc. The position
of the 48V (50VA) transformers should be optimised while also optimising the position of
the 48V (160VA).
7.16.3 48V (160VA) Wait Drive Kit – 667/1/21029/001
The 48V (160VA) may be specified to provide power to Wait Drives. The rectifier and
terminal block will be mounted on the left hand side of the left hand mounting plate.
Figure 75 show the sequence in which additional 48V (160VA) Supply Kits will be
positioned. Main input for the Supply Kit should be obtained from the Mains Switch
Assembly. Additional reference should be made to drawing 667/GA/27067/000. The first
position to be utilised should be position 1, followed by position 2 and 3 etc. The position
of the 48V (160VA) transformers should be optimised while also optimising the position of
the 48V (50VA).
Part Number 667-CC-32900-000
Issue 8
Page 65of 67
Figure 75
Left Hand Mounting Panel
12
10
11
8
9
7
5
4
Rectifiers
Transformers
6
3
15
Part Number 667-CC-32900-000
2
14
Issue 8
1
13
Page 66of 67
7.17
SDE/SA PCB Kit 667/1/27005/000
SDE/SA is an integral facility in the ST900 Family. Unless a Soundmark interface is
needed the SDE/SA PCB kit is NOT required.
Fit S.D.E. / SA PCB as required. Fit cableforms to S.D.E. / SA PCB and connect Slate
wire to 1TBE 1-5 & White wire to 1 TBE 6-12 as required.
Terminal Blocks to accommodate these connections should be fitted to the additional rear
panel, locations 1TBH - 1TBJ - 1TBL - 1TBM
7.18
Sietag
Sietag is not currently supported directly on the ST900 controller family
7.19
Siecom
The following Siecom Bluetooth Antenna Assembly (EWD) kits are available –
SAP Part Number
Colour
Baud Rate
667/1/30848/012
Black
1200
667/1/30848/096
Black
9600
667/1/30848/192
Black
19200
667/1/30849/012
Grey
1200
667/1/30849/096
Grey
9600
667/1/30849/192
Grey
19200
Fit as required using drawing 667/CF/30840/000 for mounting details.
Note
The ST900 should only be fitted with the 19200 baud rate EW
7.20
Solar Cell
The Mains Distribution Unit provides the power supply output for Solar Cell. The output to
power is provided at the bottom right of the Termination Panel.
8 Contacts within Technical Support
For any support related questions, queries or problems please contact the Technical
Support Department, Siemens Mobility, Traffic Solutions, Sopers Lane, Poole, BH17
1ER.
Departmental contacts are as follow:
Mike Tonkin
Steve Thorpe
Colin Whipps
– Project Support Manager – (01202) 782108 – [email protected]
– Project Support Engineer – (01202) 782713 – [email protected]
– Technical Support Manager – (01202)782875 – [email protected]
Part Number 667-CC-32900-000
Issue 8
Page 67of 67