1
SPECIAL MESSAGE SECTION
This product utilizes batteries or an external power supply (adapter).
DO NOT connect this product to any power supply or adapter other
than one described in the manual, on the name plate, or specifically
recommended by Yamaha.
WARNING: Do not place this product in a position where anyone
could walk on, trip over ,or roll anything over power or connecting
cords of any kind. The use of an extension cord is not recommended! IF you must use an extension cord, the minimum wire size
for a 25' cord (or less ) is 18 AWG. NOTE: The smaller the AWG
number ,the larger the current handling capacity. For longer extension cords, consult a local electrician.
This product should be used only with the components supplied or;
a cart, rack, or stand that is recommended by Yamaha. If a cart, etc.,
is used, please observe all safety markings and instructions that
accompany the accessory product.
SPECIFICATIONS SUBJECT TO CHANGE:
The information contained in this manual is believed to be correct at
the time of printing. However, Yamaha reserves the right to change
or modify any of the specifications without notice or obligation to
update existing units.
This product, either alone or in combination with an amplifier and
headphones or speaker/s, may be capable of producing sound levels that could cause permanent hearing loss. DO NOT operate for
long periods of time at a high volume level or at a level that is
uncomfortable. If you experience any hearing loss or ringing in the
ears, you should consult an audiologist.
IMPORTANT: The louder the sound, the shorter the time period
before damage occurs.
Some Yamaha products may have benches and / or accessory
mounting fixtures that are either supplied with the product or as
optional accessories. Some of these items are designed to be
dealer assembled or installed. Please make sure that benches are
stable and any optional fixtures (where applicable) are well secured
BEFORE using.
Benches supplied by Yamaha are designed for seating only. No
other uses are recommended.
NOTICE:
Service charges incurred due to a lack of knowledge relating to how
a function or effect works (when the unit is operating as designed)
are not covered by the manufacturer’s warranty, and are therefore
the owners responsibility. Please study this manual carefully and
consult your dealer before requesting service.
Battery Notice:
This product MAY contain a small non-rechargeable battery which (if
applicable) is soldered in place. The average life span of this type of
battery is approximately five years. When replacement becomes
necessary, contact a qualified service representative to perform the
replacement.
This product may also use “household” type batteries. Some of
these may be rechargeable. Make sure that the battery being
charged is a rechargeable type and that the charger is intended for
the battery being charged.
When installing batteries, do not mix batteries with new, or with batteries of a different type. Batteries MUST be installed correctly. Mismatches or incorrect installation may result in overheating and
battery case rupture.
Warning:
Do not attempt to disassemble, or incinerate any battery. Keep all
batteries away from children. Dispose of used batteries promptly
and as regulated by the laws in your area. Note: Check with any
retailer of household type batteries in your area for battery disposal
information.
Disposal Notice:
Should this product become damaged beyond repair, or for some
reason its useful life is considered to be at an end, please observe
all local, state, and federal regulations that relate to the disposal of
products that contain lead, batteries, plastics, etc. If your dealer is
unable to assist you, please contact Yamaha directly.
NAME PLATE LOCATION:
The name plate is located on the bottom of the product. The model
number, serial number, power requirements, etc., are located on this
plate. You should record the model number, serial number, and the
date of purchase in the spaces provided below and retain this manual as a permanent record of your purchase.
Model
Serial No.
Purchase Date
ENVIRONMENTAL ISSUES:
Yamaha strives to produce products that are both user safe and
environmentally friendly. We sincerely believe that our products and
the production methods used to produce them, meet these goals. In
keeping with both the letter and the spirit of the law, we want you to
be aware of the following:
PLEASE KEEP THIS MANUAL
92-BP (bottom)
2
FCC INFORMATION (U.S.A.)
1. IMPORTANT NOTICE: DO NOT
MODIFY THIS UNIT!
This product, when installed as indicated in
the instructions contained in this manual,
meets FCC requirements. Modifications
not expressly approved by Yamaha may
void your authority, granted by the FCC, to
use the product.
2. IMPORTANT: When connecting this
product to accessories and/or another
product use only high quality shielded
cables. Cable/s supplied with this product
MUST be used. Follow all installation
instructions. Failure to follow instructions
could void your FCC authorization to use
this product in the USA.
3. NOTE: This product has been tested and
found to comply with the requirements
listed in FCC Regulations, Part 15 for Class
“B” digital devices. Compliance with these
requirements provides a reasonable level
of assurance that your use of this product
in a residential environment will not result
in harmful interference with other electronic
devices. This equipment generates/uses
radio frequencies and, if not installed and
used according to the instructions found in
the users manual, may cause interference
harmful to the operation of other electronic
devices. Compliance with FCC regulations
does not guarantee that interference will
not occur in all installations. If this product
is found to be the source of interference,
which can be determined by turning the
unit “OFF” and “ON”, please try to eliminate
the problem by using one of the following
measures:
Relocate either this product or the device
that is being affected by the interference.
Utilize power outlets that are on different
branch (circuit breaker or fuse) circuits or
install AC line filter/s.
In the case of radio or TV interference, relocate/reorient the antenna. If the antenna
lead-in is 300 ohm ribbon lead, change the
lead-in to co-axial type cable.
If these corrective measures do not produce satisfactory results, please contact
the local retailer authorized to distribute
this type of product. If you can not locate
the appropriate retailer, please contact
Yamaha Corporation of America, Electronic
Service Division, 6600 Orangethorpe Ave,
Buena Park, CA90620
The above statements apply ONLY to those
products distributed by Yamaha Corporation of America or its subsidiaries.
* This applies only to products distributed by YAMAHA CORPORATION OF AMERICA.
(class B)
ADVARSEL!
Lithiumbatteri—Eksplosionsfare ved fejlagtig håndtering. Udskiftning må kun ske med batteri af samme fabrikat og type. Levér det brugte batteri tilbage til leverandoren.
VARNING
Explosionsfara vid felaktigt batteribyte. Använd samma batterityp eller en ekvivalent typ som
rekommenderas av apparattillverkaren. Kassera använt batteri enligt fabrikantens instruktion.
VAROITUS
Paristo voi räjähtää, jos se on virheellisesti asennettu. Vaihda paristo ainoastaan laitevalmistajan suosittelemaan tyyppiin. Hävitä käytetty paristo valmistajan ohjeiden mukaisesti.
(lithium caution)
NEDERLAND / THE NETHERLANDS
• Dit apparaat bevat een lithium batterij voor geheugen back-up.
• This apparatus contains a lithium battery for memory back-up.
• Raadpleeg uw leverancier over de verwijdering van de batterij op het moment dat u het
apparaat ann het einde van de levensduur afdankt of de volgende Yamaha Service Afdeiing:
Yamaha Music Nederland Service Afdeiing
Kanaalweg 18-G, 3526 KL UTRECHT
Tel. 030-2828425
• For the removal of the battery at the moment of the disposal at the end of the service life
please consult your retailer or Yamaha Service Center as follows:
Yamaha Music Nederland Service Center
Address : Kanaalweg 18-G, 3526 KL UTRECHT
Tel
: 030-2828425
• Gooi de batterij niet weg, maar lever hem in als KCA.
• Do not throw away the battery. Instead, hand it in as small chemical waste.
(lithium disposal)
3
PRECAUTIONS
PLEASE READ CAREFULLY BEFORE PROCEEDING
* Please keep these precautions in a safe place for future reference.
WARNING
Always follow the basic precautions listed below to avoid the possibility of serious injury or even death from electrical shock,
short-circuiting, damages, fire or other hazards. These precautions include, but are not limited to, the following:
• Do not open the instrument or attempt to disassemble the internal parts or
modify them in any way. The instrument contains no user-serviceable
parts. If it should appear to be malfunctioning, discontinue use immediately and have it inspected by qualified Yamaha service personnel.
• Do not expose the instrument to rain, use it near water or in damp or wet
conditions, or place containers on it containing liquids which might spill
into any openings.
• If the AC adaptor cord or plug becomes frayed or damaged, or if there is a
sudden loss of sound during use of the instrument, or if any unusual
smells or smoke should appear to be caused by it, immediately turn off the
power switch, disconnect the adaptor plug from the outlet, and have the
instrument inspected by qualified Yamaha service personnel.
• Use the specified adaptor (PA-3B or an equivalent recommended by
Yamaha) only. Using the wrong adaptor can result in damage to the instrument or overheating.
• Before cleaning the instrument, always remove the electric plug from the
outlet. Never insert or remove an electric plug with wet hands.
• Check the electric plug periodically and remove any dirt or dust which may
have accumulated on it.
CAUTION
Always follow the basic precautions listed below to avoid the possibility of physical injury to you or others, or damage to the
instrument or other property. These precautions include, but are not limited to, the following:
• Do not place the AC adaptor cord near heat sources such as heaters or
radiators, and do not excessively bend or otherwise damage the cord,
place heavy objects on it, or place it in a position where anyone could walk
on, trip over, or roll anything over it.
• When removing the electric plug from the instrument or an outlet, always
hold the plug itself and not the cord.
• Do not connect the instrument to an electrical outlet using a multiple-connector. Doing so can result in lower sound quality, or possibly cause overheating in the outlet.
• Unplug the AC power adaptor when not using the instrument, or during
electrical storms.
• Before connecting the instrument to other electronic components, turn off
the power for all components. Before turning the power on or off for all
components, set all volume levels to minimum. Also, be sure to set the
volumes of all components at their minimum levels and gradually raise the
volume controls while playing the instrument to set the desired listening
level.
• Do not expose the instrument to excessive dust or vibrations, or extreme
cold or heat (such as in direct sunlight, near a heater, or in a car during the
day) to prevent the possibility of panel disfiguration or damage to the internal components.
• Do not use the instrument near other electrical products such as televisions, radios, or speakers, since this might cause interference which can
affect proper operation of the other products.
• Do not place the instrument in an unstable position where it might accidentally fall over.
• Before moving the instrument, remove all connected adaptor and other
cables.
• When cleaning the instrument, use a soft, dry cloth. Do not use paint thinners, solvents, cleaning fluids, or chemical-impregnated wiping cloths.
Also, do not place vinyl, plastic or rubber objects on the instrument, since
this might discolor the panel or keyboard.
4
(3)-6
• Do not rest your weight on, or place heavy objects on the instrument, and
do not use excessive force on the buttons, switches or connectors.
• Do not operate the instrument for a long period of time at a high or uncomfortable volume level, since this can cause permanent hearing loss. If you
experience any hearing loss or ringing in the ears, consult a physician.
■ REPLACING THE BACKUP BATTERY
• This instrument contains a non rechargeable internal backup battery which
permits internal data to remain stored even when the power is off. When
the backup battery needs replacing, the message "Err1" appears in the display. When this happens, immediately back up your data (using an external
device such as the floppy disk-based Yamaha MIDI Data Filer MDF3), then
have qualified Yamaha service personnel replace the backup battery.
• Do not attempt to replace the backup battery yourself, in order to prevent
the possible serious hazards. Always have qualified Yamaha service personnel replace the backup battery.
• Never place the backup battery in a location that a child can reach, since a
child might accidentally swallow the battery. If this should happen, consult
a physician immediately.
■ SAVING USER DATA
• Save all data to an external device such as the Yamaha MIDI Data Filer
MDF3, in order to help prevent the loss of important data due to a malfunction or user operating error.
Yamaha cannot be held responsible for damage caused by improper use
or modifications to the instrument, or data that is lost or destroyed.
Always turn the power off when the instrument is not in use.
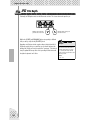
Congratulations and thank you for purchasing the Yamaha AN200 Desktop
Control Synthesizer!
The AN200 is a combination tone generator and sequencer that puts an enormous amount of
sonic power and real-time performance control in an exceptionally compact and easy-to-use “desktop”
package. As one of the Loopfactory group of instruments, it’s an amazingly high-quality and versatile
tool for loop-based music production. Use it on your gigs, as part of your DJ setup — or as your
secret weapon in your studio arsenal.
With eighteen knobs and umpteen switches, many of them “dedicated” — meaning that a control does specifically and ONLY what its name indicates — the AN200 is a synthesizer control freak’s
dream.
Powering the incredibly rich and huge analog-like Voices of the AN200 is the Analog Physical
Modeling synthesis system. It not only features the same familiar oscillator, filter and other soundshaping controls found on traditional analog synthesizers — it gives you the full spectrum of warm, fat,
and punchy sounds that made those legendary instruments famous.
Play the exceptionally high-quality analog-style Voices of the AN200 with full 5-note polyphony
— from the built-in keyboard or from a MIDI device. Use the built-in 16-step sequencer to create your
own synth and rhythm sequences. And power up the full-featured AN200 Editor on your computer —
to tap into ALL the amazing sonic power the AN200 has to offer.
There’s a lot of important, helpful information in these pages. So read through this manual
carefully — and get the most out of your sophisticated new AN200.
● Packing List
The following items have been included with your AN200. Check to see that you have everything listed here.
• Owner's Manual
• CD-ROM
• AC Power Adaptor*
* Power supply recommendation may vary from country to country. Please check with
your nearest Yamaha dealer for further details.
* The company names and product names in this Owner’s Manual are the trademarks or registered trademarks of
their respective companies.
* The screens as illustrated in this owner’s manual are for instructional purposes only, and may appear somewhat
different from the ones of your instrument.
5
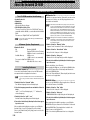
Contents
Contents ............................................................ 6
How to Use This Manual .................................. 8
Panel Controls .................................................. 9
Quick Start Guide ........................................... 11
Parameter Structure ....................................... 12
Tone Generator Signal Flow &
Effect Block Diagram .............................. 13
Chapter 1
Chapter 8
Pattern Playback ....................35
Tip 25
Tip 26
Tip 27
Tip 28
Tip 29
Tip 30
Tip 31
Adjusting the Gate Time....................................35
Transposing the key ...........................................36
Swing .................................................................37
Muting tracks .....................................................37
Muting notes during playback ...........................38
Mixer controls — Pan and Volume ...................39
Assigning Patterns to the keyboard buttons.......40
Pattern Basics ........................ 15
Tip 1
Tip 2
Tip 3
Tip 4
Tip 5
Tip 6
Tip 7
Playing a Pattern ............................................... 15
Exploring other Patterns.................................... 15
Switching Patterns on the fly ............................ 16
Playing it backwards ......................................... 17
Changing the bpm ............................................. 17
Messing with the Beat....................................... 18
Double time, half time....................................... 18
Chapter 9
LFO Modulation........................ 41
Tip 32
Tip 33
Tip 34
Tip 35
Modulating the volume......................................41
Modulating the Filter .........................................42
Modulating the pitch..........................................42
Changing the LFO wave ....................................43
Chapter 10
Chapter 2
Song Playback......................... 19
Tip 8
Playing a Song................................................... 19
Chapter 3
EG Basics ............................... 46
Tip 36
Tip 37
Tip 38
Tip 39
Shaping the sound with EG ...............................46
Using EG to control the Filter (FEG) ................49
More about FEG Depth......................................50
Going negative — with FEG Depth ..................51
The Keyboard..........................20
Tip 9
Tip 10
Tip 11
Tip 12
Playing the keyboard......................................... 20
Changing octaves .............................................. 20
Playing the Rhythm track.................................. 21
Velocity ............................................................. 21
Chapter 4
Scene Basics ...........................22
Tip 13
Tip 14
Switching Scenes .............................................. 22
Morphing........................................................... 22
Chapter 11
Advanced Sound Shaping
Controls ................................. 52
Tip 40
Tip 41
Tip 42
Tip 43
Tip 44
Tip 45
Tip 46
Tip 47
Chapter 5
Portamento — the famous gliding pitch effect..52
Metallic sounds and more — with FM Depth ...53
Balancing the waves — VCO 1 and 2 ...............54
Noise Level ........................................................55
Making waves — VCO 1 and VCO 2 ...............55
Fat, phatter and phattest!....................................57
Sync Mode and Sync Pitch ................................58
Creating your own original Scenes —
and saving them .................................................59
Effects.................................... 23
Tip 15
Tip 16
Tip 17
What is an Effect? ............................................. 23
Playing with the Effects .................................... 24
Distortion........................................................... 26
Chapter 12
Free EG .................................. 60
Tip 48
Tip 49
Free EG ..............................................................60
Changing the Length of your Free EG tracks ....62
Chapter 6
Filter (VCF) .............................. 27
Tip 18
Tip 19
Tip 20
Cutoff and Resonance ....................................... 27
Wild, wild filter sweeps — VCF Types............ 28
FEG Depth ........................................................ 30
Chapter 7
Nuts and Bolts ........................ 31
6
Tip 21
Tip 22
Tip 23
Tip 24
Show Value ....................................................... 31
Original Value................................................... 32
Panic! (or “Uh-oh...What do I do now?”) ......... 33
Factory Reset..................................................... 34
Chapter 13
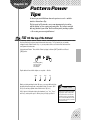
Pattern Power Tips................. 63
Tip 50
Tip 51
Tip 52
Tip 53
Tip 54
Tip 55
Hit the top of the Pattern! ..................................63
Shake, Retrigger, and Roll!................................64
Selecting a Voice (Copy Voice) ........................65
Starting a Pattern on a different note .................65
Transposing the pitch of a Pattern .....................66
Copying a Pattern (Sequence)............................67
Contents
Chapter 14
Chapter 19
Pattern Recording ...................68
Master Class 2 —
Advanced Music Production ... 103
Tip 56
Tip 57
Tip 58
Tip 59
Tip 60
Erasing a Pattern — and starting from scratch.. 68
Setting the Metronome lead-in.......................... 69
Recording a Pattern in real time........................ 70
Step Recording .................................................. 72
Storing your new Pattern................................... 79
Chapter 15
Song Recording ....................... 81
Tip 61
Tip 62
Tip 63
Tip 64
Tip 65
Tip 66
Tip 67
Erasing a Song — and starting from scratch..... 81
Creating a Song ................................................. 82
Setting the BPM (tempo) for your new Song.... 84
More Song editing features ............................... 85
Adding Patterns to your Song — Insert Pattern 87
Taking Patterns out of your Song —
Delete Pattern .................................................... 88
Storing your new Song...................................... 89
Chapter 16
Speed Tips for Power Users .... 90
Tip 68
Tip 69
Tip 70
Using [SHIFT] with the [DATA] knob —
for leaps and bounds! ........................................ 90
Using [SHIFT] to “hold” a setting .................... 91
Gang-editing a group of Steps........................... 91
Chapter 17
Real World Tips .......................92
Tip 71
Tip 72
Tip 73
Tip 74
Tip 75
Tip 76
Tip 77
Tip 78
Tip 86
Tip 87
Tip 88
Tip 89
Tip 90
Tip 91
Tip 92
Playing the AN200 as a synthesizer ................103
Recording to a sequencer.................................104
Recording AN200 knob moves to a sequencer105
Editing the AN200 from a computer ...............106
MIDI sequencer controls —
Start, Continue, Stop........................................107
Saving Patterns and Songs to a MIDI data
filer...................................................................108
Loading back your saved Patterns and Songs..109
Appendix
Function Index...............................................110
About the Included CD-ROM ........................112
Specifications ................................................114
Error Messages .............................................114
Troubleshooting ............................................115
Analog Physical Modeling Synthesis
and the AN200 ........................................116
MIDI Data Format...........................................118
MIDI Implementation Chart...........................139
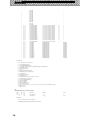
Rhythm Track Instrument List .....................140
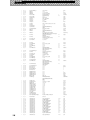
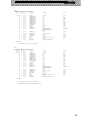
Pattern List.....................................................141
Adjusting the Gate Time with the [DATA]
knob................................................................... 92
Adjusting the pitch with the [DATA] knob ...... 92
Changing the pitch with the keyboard .............. 93
Stutter fill-in 1 ................................................... 94
Stutter fill-in 2 ................................................... 94
Stutter fill-in 3 ................................................... 95
Assigning Patterns for your gig......................... 95
Chord progressions with Pattern Assign ........... 95
Chapter 18
Master Class 1 — Onstage........96
Tip 79
Tip 80
Tip 81
Tip 82
Tip 83
Tip 84
Tip 85
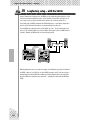
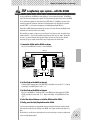
Sync the AN200 to your sequencer................... 96
Changing the MIDI channels ............................ 97
Loopfactory setup — with the SU200 .............. 98
Loopfactory sync system — with the DX200... 99
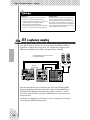
Loopfactory sampling ..................................... 100
Full DJ system — turntable and all! ............... 101
Loopfactory megasetup — with MIDI Thru... 101
7
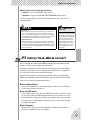
How to Use This Manual
How to USE a manual? Sounds a bit obvious, we admit. (“Open it and read it.”) But here goes:
1
Go straight to the Quick Start Guide.
This tells you simply and in no uncertain terms how to set up your new AN200 and get sound out of it.
2
Work through the 92 Tips.
These are practical, no-nonsense applications that get you actually USING the machine.
If this is your first tone generator or synthesizer, fire up the AN200, open up the manual to Tip 1, and go
from there. Think of it as a game — the more tips you complete, the better you know the machine, and
the sooner you can reach your goal of becoming a true synth wizard. Pay particularly close attention to
the Power Hints scattered throughout — they’re great for further exploration.
If you have years of experience with analog synthesizers, and know all about cutoff frequency, resonance, pulse waves, amplitude modulation, LFOs, VCOs, EGs, and MIDI — and you even dream in hexadecimal — skim through the tips anyway. There’s bound to be some interesting and helpful stuff here,
no matter what your level of expertise. If you need some pertinent info quickly, check the Tech Talk
boxes.
3
Refer to the Appendix when necessary.
Lots of helpful, convenient information in this section, too. If something doesn’t work as expected, go to
Troubleshooting (page 115). If you want a clear, concise explanation of how the synthesizer of the
AN200 works, see Analog Physical Modeling Synthesis and the AN200 (page 116). If you’re not sure
where to go for help but you’ve got a key word in mind, check the Contents (page 6) or look through the
Function Index (page 110).
Have fun!
8
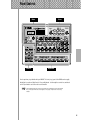
Panel Controls
Main
Control
Voice
Keyboard
Here’s a quick way to get familiar with your AN200! The front (or top) panel of the AN200 can be roughly
divided into four sections: Main, Control, Voice, and Keyboard. Look through the controls here, and check
out the Tips related to each of them for more information.
The Tip references by each control are not meant to be comprehensive. They either give the
first (or main) Tip in which the control appears, or the group of Tips that are most closely
related.
9
Panel Controls
Main
These are the fundamental controls of the AN200 — for
changing modes, adjusting values, exiting from functions, and so on.
Display and indicators
[SONG] .................................. Tips 8, 62
[PATTERN] .....................................Tip 1
[DATA] knob ............................ Tips 2, 68
[SHOW VALUE] ....................... Tips 21, 22
[STORE]........................... Tips 47, 60, 67
[EXIT]......................................... Tip 23
Control
For the most part, these buttons are related to the Patterns — especially for controlling record and playback
operations.
Start/Stop ......................................Tip 1
[TAP] ...........................................Tip 5
Record ....................... Tips 48, 50, 58, 59
[SWING] ................................ Tips 6, 27
[REVERSE].............................. Tips 4, 25
[SHIFT]................................. Tips 68, 69
[OCT <<] ............................... Tips 10, 62
[OCT >>] ............................... Tips 10, 62
[KEYBOARD] ........................... Tips 9, 26
[PATTERN SELECT]........... Tips 3, 31, 77, 78
[SYNTH TRACK]............................. Tip 28
[RHYTHM TRACK] .......................... Tip 28
10
Voice
These controls are for editing and changing the sound of
the Voices.
[SCENE] ................................Tips 13, 14
[FREE EG] ..............................Tips 48, 49
[VOLUME]
[LFO]................................. Tips 32 — 35
[EG] .................................. Tips 36 — 39
[DIST]......................................... Tip 17
[COMMON]................................... Tip 45
[VCO 1] ....................................... Tip 44
[SYNC]........................................ Tip 46
[VCO 2] ....................................... Tip 44
[EFFECT/MIXER] ................. Tips 15, 16, 30
[PORTAMENTO] ............................. Tip 40
[FM DEPTH] ................................. Tip 41
[NOISE LEVEL] .............................. Tip 43
[VCF]................................. Tips 18 — 20
Keyboard
The Keyboard section has several main uses:
• Playing the Voices................... Tips 9, 86
• Selecting Patterns ...... Tips 2, 3, 31, 77, 78
• Controlling the Sequence Steps
..................................... Tips 29, 58, 59
• Selecting functions and operations
. Tips 28, 51 – 57, 59, 61, 65, 66, 79, 80, 85, 90 – 92
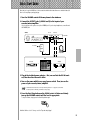
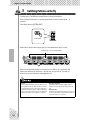
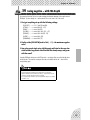
Quick Start Guide
Once that you’ve got the AN200 out of the box and checked that all included items were indeed included, it’s
time to set everything up and get playing.
1 Turn the VOLUME control all the way down to the minimum.
2 Connect the OUTPUT jacks (L/MONO and R) to the inputs of your
recorder/mixer/amplifier.
If you’re using a mono system, use only the L/MONO jack. If you’re using headphones, connect them to
the PHONES jack.
AN200
DC IN
OUTPUT
PHONES
AC outlet
AC
Adaptor
Headphones
Mixer
Recorder
Amplifer
or
or
3 Plug in the included power adaptor — first, one end into the DC IN terminal, then the other into an AC outlet.
4 Turn on the power with the rear panel power switch. Then, turn on the
power of your recorder/mixer/amplifier.
The AN200 takes a little time to “warm up” after being turned on – roughly 20 seconds. After
the startup routine is finished, your AN200 is ready to play.
5 Press the Start/Stop button on the AN200 to start a Pattern and slowly
turn up the VOLUME control until the level is appropriate.
To stop the Pattern, simply press the Start/Stop button again.
And that’s all there is to it. Now go on to the Tips and start playing!
11
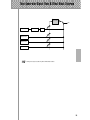
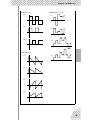
Parameter Structure
This diagram shows the structure and hierarchy of the Songs, Patterns and Voices of the AN200. As you
work with the AN200 and explore its various functions and features, refer back to this diagram to see how all
the pieces of the puzzle fit together.
Pattern Select Setup
User Pattern 128
256 Preset Patterns
128 User Patterns
Preset Pattern 1
Sequence
Synth
Track
Step
16
1
Synth
Voice
LFO
EG
etc.
Rhythm
Track 1
Rhythm
Track 2
Step
16
1
Step
16
1
Rhythm
Track 3
Step
16
1
Rhythm
Voice 1
Rhythm
Voice 2
Rhythm
Voice 3
Cutoff
Resonance
Cutoff
Resonance
Cutoff
Resonance
System
BPM
Beat
Swing
Gate Time
Reverse
Free EG
Pan
Effect
Wet
Type
Param
Vol
Song 10
10 User Songs
Song 1
Measure 1
12
Measure 2
Measure 256
Pattern No.
Pattern No.
Pattern No.
Pitch Offset
Beat
Swing
Gate Time
Reverse
Track Mute
Pitch Offset
Beat
Swing
Gate Time
Reverse
Track Mute
Pitch Offset
Beat
Swing
Gate Time
Reverse
Track Mute
Tone Generator Signal Flow & Effect Block Diagram
Effect section
Out
Synth track
Distortion
EQ
Rhythm track 1
Rhythm track 2
Rhythm track 3
The EQ processing is accessible only with the AN200 Editor software.
13
This is NOT an owner’s manual!
At least not an ordinary one. But, then again, the AN200 is no ordinary
instrument. It’s packed with exciting, powerful, yet easy-to-use features that
give you complete, hands-on sonic control — plus tons of dynamic real-time
functions that can bring an extra edge to your live performances!
With all the digital power under this small hood, the AN200 is a stunning
new instrument of the future. Yet it also brings you the very best of the old
analog world — just look at all those knobs for twisting and tweaking your
sound!
We know you don’t like reading manuals. But you owe it to yourself to look
through this collection of hot tips. They show you how to get the most out of
your new AN200 in the shortest time possible.
It’s like having an expert programmer take you by the hand and show you
the ropes, sharing all the tricks and techniques you need to be a master on
the instrument yourself. These tips take you from the bare-bones basics, to
advanced power tips that get you pumping out fat sounds and happening
tracks — in no time flat!
So jump in …
14
Chapter 1
Pattern Basics
Start your synthesizer apprenticeship right here. In this section, you’ll learn
about playing Patterns, and how to use some of the AN200’s powerful tools to
change the sound as it’s playing.
1
Playing a Pattern
Here’s where all the fun starts — with the pre-programmed Patterns.
Just press the Start/Stop button, and listen to the Pattern play. The Pattern repeats (loops) until you press
the button again to stop it.
● What exactly are Patterns?
The Patterns are the basic musical building blocks of the AN200 — they provide an instrument sound (also called a “Voice”), plus a looping phrase using
that Voice.
These pre-recorded Patterns give you the rhythmic and melodic foundation you
need for laying down tracks — in your own recording or in performance. Keep
in mind that you can create your own Patterns as well. (See page 68.)
2
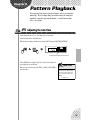
Pattern Mode
Select the Pattern mode by pressing the
[PATTERN] button. The letter “P” in the display indicates the Pattern mode.
Exploring other Patterns
The AN200 features a total of 256 specially pre-programmed Patterns. Try some of these out now.
Use the [DATA] knob to select a different Pattern. Notice how the Pattern number in the display changes.
Then press the Start/Stop button to play the Pattern.
You can also change Patterns during playback! Turn the [DATA] knob while the
Pattern is playing — the new Pattern starts playing immediately after the previous one is finished.
Keep in mind that you cannot select Voices
separate from the Patterns. If you want to
hear a certain Voice, select the Pattern containing that Voice. You can copy that Voice
to a different Pattern; see Tip 52.
15
Chapter 1 Pattern Basics
3
Switching Patterns on the fly
Try mixing it up now. The AN200 lets you change Patterns as easily as pressing a button...
Thanks to the Pattern Select function, you can chain together Patterns in real time from the keyboard — as
you perform.
Select a Pattern, then press [PATTERN SELECT].
The button lights.
Start the Pattern. While the Pattern is playing, press one of the keyboard buttons (except 1, 4, and 8).
Avoid these keys — they won’t change the Pattern.
Notice how a new Pattern starts playing as soon as the previous one is finished. This is a great way to string
together various Patterns in a live performance — and create your own songs on the fly. If you want, you
can use the keys to select a Pattern before starting playback as well.
• Repeats
Unless you want the same Pattern to repeat several times, don’t press a
keyboard button more than once. On the other hand, you can quickly
program the Pattern sequence for an entire song if you want, without
having wait for each Pattern to play back. The AN200 remembers all the
buttons you press and how many times you press them, and automatically plays back the Patterns as you programmed — repeats and all.
16
• Other octaves, more Patterns
Before starting the Pattern, use the [OCT <<]/[OCT >>] buttons to
change the octave range of the keys. That’ll let you select other Patterns!
• Assign them yourself
The Pattern-to-key assignments have been made for you. However, you
can make your own assignments, and put the Patterns you want to use
close together for easy access. (See page 40.)
Chapter 1 Pattern Basics
4
Playing it backwards
The Reverse function lets you completely turn the Pattern around, and play all the notes backwards.
Before you start the Pattern (or during playback, if you want), simply press the [REVERSE] button.
5
Changing the bpm
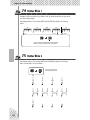
Now, that you’ve got a Pattern playing, try changing its speed. (This is also called “bpm” — beats per
minute.) The AN200 gives you two ways to do this — tapping out the speed manually, or using the [DATA]
knob to adjust it.
1 Tap the [TAP] button three or four times at the desired speed.
1
2
3
The new bpm is shown in the display. The [TAP] button and BPM lamp flash in time.
2 If you want, adjust the bpm by turning the [DATA]
knob.
BPM
3 Press the Start/Stop button to start the Pattern at the
new bpm.
You can also change the bpm while the Pattern is playing. To do this, simply
start the Pattern before step #1 above.
Determines the speed or tempo of a Pattern.
Operation
Use [TAP] button to tap tempo; then adjust
with [DATA] knob. Or hold down [SHIFT]
and press [TAP/BPM]; then use [DATA]
knob.
Range
20.0 — 300.0 bpm
17
Chapter 1 Pattern Basics
6
Messing with the Beat
There’s more than one way to mess with the rhythm. Actually, the AN200 gives you a truckload of ways you
can disturb and deconstruct your beats. One of these is the (appropriately named) Beat function.
You’ll be meeting up with this control again when you record your own Patterns. But let’s see how you can
use it now to change the feel of a Pattern while it’s actually playing...
1 Select a Pattern and start it by pressing the Start/Stop button.
2 While the Pattern is running, hold down [SHIFT] and press [SWING]
(BEAT).
Now, you’ve got Beat called up and ready, so turn the [DATA] knob to
change the setting.
You can tell from the lit number buttons how the Pattern is affected. When
set to “16,” all 16 step buttons are lit and all 16 steps play back normally.
Change the setting to “12,” and Steps 13 - 16 drop out. Notice how the
Pattern not only slows down but “feels” different, too. Change Beat to “8,”
and you’ve only got Steps 1 - 8 happening. That’s half of the original 16step Pattern, and naturally, it plays back at half the speed.
7
Beat
Determines the number of steps in the
selected Pattern for playback: 16, 12, or 8.
To set, hold [SHIFT] and press [SWING], then
use the [DATA] knob.
Range
16, 12, 8 steps
Double time, half time
Here’s a dramatic way to instantly double the speed of a Pattern — or slow it down by one-half.
Simply hold down [SHIFT] and press the [OCT <<] button — just before the beginning of the Pattern — to
slow down the bpm by one-half. The first half of the Pattern plays at the new speed, before returning to the
original speed.
To double the bpm, hold down [SHIFT] and press the [OCT >>] button just before the top of the Pattern. The
Pattern plays back twice at the new speed, then returns to normal.
18
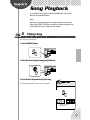
Chapter 2
Song Playback
As we said before, the Patterns are the basic building blocks of the AN200.
But what can you build with them?
Songs!
Our team of expert programmers has created a few Songs using the various
Patterns of the AN200. Check these out and hear just how powerful and versatile the AN200 can be for recording your own material.
8
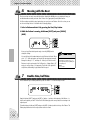
Playing a Song
Let’s select a Song now and play it.
1 Press the [SONG] button.
2 Select the desired Song by turning the [DATA] knob.
3 Press the Start/Stop button to play the Song.
For more about Songs and how to create your own, see page 81.
Song Mode
Pressing the [SONG] button selects the Song
mode.
The letter “S” indicates
the Song mode.
19
Chapter 3
The Keyboard
Small and compact as it is, the AN200 also features a one-octave keyboard for
playing and recording the sounds of the instrument.
9
Playing the keyboard
The built-in keyboard is small — just one octave — but it lets you use all the features of the AN200 without
having to connect a separate keyboard. Try it out now.
1 Press [KEYBOARD].
2 Play the keyboard.
The button lights.
The buttons give you a full octave, from C to C. Keep in
mind that buttons 1, 4, and 8 don’t make any sound here —
they’re not part of the scale.
Db (C#)
C
10
D
Eb (D#)
E
Gb (F#)
F
Ab (G#)
G
A
Bb (A#)
B
C
Changing octaves
Naturally, one octave doesn’t cover a whole lot of ground. That’s why we’ve included convenient Octave buttons, so you can shift the octave range of the keyboard up or down as needed — quickly and easily.
1 While the [KEYBOARD] button is lit, press [OCT >>].
Octave
Determines the octave range of the built-in
keyboard. Press [OCT <<] or [OCT >>] to
change. ([DATA] knob can also be used after
pressing one of these buttons.) Press both
buttons simultaneously to restore normal
range. Some notes may not sound for the
maximum values.
The display shows “C 4,” indicating the octave. (“C 3” is normal.) Play
the keyboard and listen to the sound. Try some other octave settings,
pressing [OCT <<] and [OCT >>] as desired to shift the octave.
20
Range
C-2 — C3 (normal) — C8
Chapter 3 The Keyboard
11
Playing the Rhythm track
The AN200 also has a special Rhythm track (actually there are three.) that let you play and record drum, percussion, bass and other sounds — giving you the power to easily create your own ultra-hip beats. Naturally,
you can play all these sounds straight from the built-in keyboard...
1 With the [KEYBOARD] button lit, press [RHYTHM TRACK].
The button lights.
Press the button repeatedly to switch among the three Rhythm tracks: 1, 2, and 3.
2 Play the keyboard.
Remember — you can use the [OCT <<]/[OCT >>] buttons to change the range, and call up a whole different set of sounds. For more details on how to use the Rhythm tracks, see page 140.
12
Velocity
All the keys of the built-in keyboard play at a fixed volume — no matter how hard or how soft you play them.
However, you can set this fixed volume yourself, and make the sound as soft or as loud as you need it.
This Velocity setting also controls how loud the sounds are, when you record your own Patterns in Realtime recording (page 70).
1 Hold down [SHIFT] and press button [16], repeatedly
if necessary, until “<EL” appears in the display.
Velocity
Determines the default Velocity setting for the
built-in keyboard of the AN200. This affects
the loudness of the Synth and Rhythm track
sounds, when played from the keyboard. It
also affects the loudness of Real-time
recorded tracks, when the built-in keyboard is
used to record notes.
Velocity is set in the Utility parameters. Hold
down [SHIFT] and press button [16], repeatedly if necessary, until “<EL” appears in the
display. Use the [DATA] knob to change the
value.
Range
1 — 127
2 Use the [DATA] knob to change the value.
Make sure the [KEYBOARD] button is lit, and try out different settings.
21
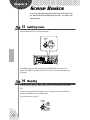
Chapter 4
Scene Basics
Scene is one of the most powerful and exciting features of the AN200. It lets
you “morph” between two completely different sounds — in real time, as the
Pattern is playing.
13
Switching Scenes
Here we’ll switch between Scenes, for instant sound changes.
Select a Pattern and start it up. While it’s playing, press the SCENE [2] button. Hear how the sound
changes? Press SCENE [1] to go back to the first sound. Try to do this on the beat, alternating between the
two in rhythm.
14
Morphing
Let’s try something more subtle now! While playing back a Pattern, turn the [SCENE] knob slowly, back and
forth.
Notice how the sound gradually “morphs” between 1 and 2 — in real time as you work the knob! Do this in
sync with the rhythm and create your own shifting textures!
For more details on Scene, see page 59.
22
Chapter 5
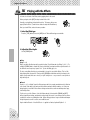
Effects
The effects of the AN200 are more than just icing on the cake — they’re powerful tools you can use to completely transform the sound, and put your tracks
over the top.
15
What is an Effect?
The Effects are the last element in the sound chain — they are the last bit of processing done to the sound
before you hear it.
These real-time Effects — Delay, Flanger, Phaser, Overdrive/Amp — let you mangle the sound in wild and
exciting ways. Although it’s not in the Effect section, there’s also a Distortion effect that lets you add anything from a warm grunge to a full-on metallic assault.
The Effect controls are exceptionally simple and easy to use. Pressing the [TYPE] button changes the Effect
type, while the [PARAM] and [WET] knobs let you adjust the sound and depth of the Effect.
Changes the Effect
type (Delay, Flanger,
Phaser, Overdrive/
Amp).
Changes the depth or degree of the Effect.
When set to the minimum (all the way left),
the Effect sound cannot be heard.
Changes the sound of the Effect. (Each
effect lets you control a different key
parameter.)
[WET] knob
Range
0 — 127 (Same for all Effect types.)
23
Chapter 5 Effects
16
Playing with the Effects
Let’s take a look at each of the Effects, and try applying them to the sound.
Before you begin, set the [WET] knob up to about 2:00 or 3:00.
Generally, you should keep the knob at this position. This ensures that you can
properly hear the Effect. (Tweak it later as needed to adjust the Effect balance.)
Now, try out each Effect, and use the same procedure:
1 Select the Effect type.
Press the [TYPE] button, then use the [DATA] knob. Thirteen different types are available.
2 Adjust the Effect depth.
Use the [PARAM] knob.
● Delay
(Delay 1 — 3)
Delay is a popular effect that repeats the sound in rhythm. Play a Pattern and select Delay 1 (dLY1). Try
setting the [PARAM] knob to around 3:00. Hear how the Delay sound pulses with the original sound to create a different, more complex yet “spacier” feel. Try the other Delay types, too.
The key to using Delay effectively (no pun intended) is to keep it in sync with the Pattern. This is a little
tricky and may take some practice. Slowly work the [PARAM] knob and listen carefully for changes in the
rhythm. Keep in mind, there are no “wrong” or “right” settings here — use your ears to come up with settings that feel good.
● Reverb
Reverb (r<rb) is a “hidden” type in the Delay category and it lets you apply an ambient wash of reflections
to the sound. Used subtly, it can make your tracks warmer and more natural sounding — as if they were
being played in a concert hall. More extreme settings can drench the sound in reverb and produce spacy,
other-worldly effects.
Try this out on one of the Patterns. Select the Pattern and play it, then tweak the [PARAM] and [WET]
knobs, trying different settings, and hearing how they change the sound. Lower settings result in a shorter
reverb time as well as an overall brighter sound. Higher settings produce a longer reverb time and dampen
the high frequencies as well for a softer, more muffled sound.
Keep in mind that Reverb — like all the Effects — is applied to all tracks, Synth and Rhythm 1 - 3.
24
Chapter 5 Effects
● Flanger
(Flanger 1, 2)
This modulation-based Effect produces a “swishing” or “tunneling” sound. Play a Pattern and select Flanger
1 (FLG1).
Take the [PARAM] knob from minimum to maximum, and notice how the sound grows from a subtle sweeping, metallic sound — like a jet airplane taking off — to a virtually pitch-less sonic meltdown.
● Chorus
Chorus is another modulation effect (“hidden” in the Flanger category) that adds a subtle warmth and depth
to the sound — although you can go for some extreme effects, too.
Try Chorus (CHor) out on a Pattern. Play around with the [PARAM] knob, trying different settings — and
listen for the changes.
Start out with [PARAM] set to 7:00 (minimum). This is no Chorus modulation at all. Now, bring it up slowly
to 8:00, then around 9:00. Hear the modulation working? Doesn’t the sound seem more animated? Even
fatter?
Try higher settings, as well — going to 12:00, then slowly up to 3:00 and beyond. Notice how the pitch
wavers in strange ways — and hear how the sound even brightens up for the highest values.
● Phaser
(Phaser 1 - 3)
Another modulation Effect, Phaser is similar to Flanger, but much more subtle.
It’s perfect for adding some warm animation and movement to the sound.
Play a Pattern and select (PHS1). Set the [PARAM] knob to the minimum (0)
and gradually turn it up — and listen to how the modulation enhances the
sound. Go on to the other Phaser types as well, for more sonic variations.
● Overdrive/Amp
(Amp 1 - 3)
This Effect simulates the overdriven sound of a guitar amp, and lets you apply
varying degrees of distortion to the sound. Start a Pattern and try Amp 1
(AmP1), and tweak the [PARAM] knob. Notice how minimum values produce
a warm, edgy “bite,” while maximum values deliver a full, heavy metal
onslaught.
Try all three Overdrive/Amp types — the differences may not be dramatic, but
they give you a variety of warm and crunch-laden distortion effects to work
with. Some of the Patterns sound especially good with a little grunge...
Effect
Effect Type
Allows you to select one of thirteen Effect
types for processing the sound of the tracks
(Synth and Rhythm 1 - 3). Press the [TYPE]
button, then use the [DATA] knob.
Settings
Delay 1 - 3, Reverb, Flanger 1 and 2, Chorus, Phaser 1 - 3, Overdrive/Amp 1 - 3
Parameter (PARAM)
In general, this allows you to control the
depth of the Effect. (The actual parameter
differs depending on the selected Effect
type.) Use the [PARAM] knob to adjust.
Range
0 — 127
Wet
Allows you to control the volume of the Effect
— in other words, the wet/dry balance. Use
the [WET] knob to adjust.
Range
0 — 127
25
Chapter 5 Effects
17
Distortion
The last tip introduced you to a distortion effect, the Overdrive/Amp types. Here’s yet another way to dirty
up the sound — Distortion.
Although not strictly part of the Effect section, Distortion is a strong effect in its own right. Compared to the
warm Overdrive/Amp Effect types, it has more edge and bite. When applied to many of the AN200’s Voices,
it is capable of creating very convincing guitar-like distortion effects.
1 Press the DIST [SWITCH] button. (The lamp turns on.)
2 Adjust the balance with the [DATA] knob.
This lets you mix the “dry” no-Distortion sound with the “wet” Distortiononly sound. Try different settings and hear how they change the sound.
Notice how a fully wet “U63” results in a very brittle, edgy sound.
Distortion
Allows you to apply a distortion effect to the
Synth track. (Note that this does not affect
any of the Rhythm tracks.) Press the DIST
[SWITCH] button to turn Distortion on, then
use the [DATA] knob to adjust the dry/wet
balance. A value of “d63” has only the original, unprocessed sound, while a value of
“U63” has only the Distortion-processed
sound.
Range
d63 (dry) — d=U (dry = wet) — U63
(wet)
26
Chapter 6
Filter (VCF)
The VCF or Filter section is one of the most powerful and dynamic on the
entire instrument. Used in the right way, the VCF controls are capable of
transforming sterile, boring sounds into something really dynamic and exciting. Try out the following Tips and see what we mean...
18
Cutoff and Resonance
For your Filter explorations, here’s the best place to start.
These two Filter controls work interdependently — changing one of them affects the sound of the other.
Turn [CUTOFF] to the left and the sound becomes darker or “muffled.” Turn it to the right and the sound
becomes brighter. Turn [RESONANCE] to the right and the Filter peak becomes sharper and more pronounced. Turn it to the left and hear how the Filter flattens out.
Darker
Brighter
Flatter
More pronounced
Also keep in mind that the overall effect of Cutoff and Resonance is controlled by FEG Depth (Tip 20 below).
If FEG Depth is set too high or too low, you may hear little or no change in the sound — no matter how furiously you twist the [CUTOFF] and [RESONANCE] knobs.
Cutoff
Resonance
Determines the frequency at which the Filter effect starts. The higher
the value, the higher the frequency.
Determines the emphasis of the resonant peak of the Filter (at the Cutoff
frequency).
Volume
Volume
Cutoff frequency
Resonance
Frequency (pitch)
Frequency (pitch)
Range
0 — 127
Range
Synth track : -12 — 102
Rhythm track 1-3 : -64 — 63
27
Chapter 6 Filter (VCF)
19
Wild, wild filter sweeps — VCF Types
The enormous power and versatility of the Filter section continues with the VCF Types. These hidden variations put some really heavy-duty sonic fireworks at your fingertips — just what you need to blow the crowd
away.
Try these settings out for size...
1 Call up a Pattern and press the Start/Stop button. Start out by setting
both [RESONANCE] and [FEG DEPTH] to around 1:00.
2 Simultaneously hold down [SHIFT] and turn the [CUTOFF] knob.
Keep your eyes on the display as you do this — the setting will change! For starters, select “12db” —
which should be around 11:00.
In this shifted condition, the [CUTOFF] knob becomes the VCF Type selector. (That’s why “TYPE” is
printed in black below the knob.)
3 Now, take your finger from the [SHIFT] button, and the knob reverts to its
original identity as the Cutoff control.
Turn it very slowly — especially between 8:00 and 1:00 — as you listen to the gradual changes in the
sound.
4 Not wild enough for you? Let’s move onto another type then...
Hold down [SHIFT] again and turn the [CUTOFF] knob to around 12:00, so that “bPF” is called up in the
display.
Is that any wilder? Still too tame? Let go of [SHIFT] and try tweaking the [CUTOFF] knob between 8:00
and 2:00.
5 Let’s try one more. Hold [SHIFT] and set the [CUTOFF] knob to around
2:00, so that the “HPF” type is selected.
Things can get kind of crazy here, too. Tweak the [CUTOFF] knob some more — especially between
12:00 and 3:00 — and hear what kind of madness you can generate.
Don’t forget the [RESONANCE] and [FEG DEPTH] knobs! Work with them too as you tweak the
[CUTOFF] knob. There’s a lot of sonic variation to be had in just these three controls.
28
Chapter 6 Filter (VCF)
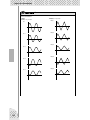
VCF Type
Determines the filter type used for the VCF section. The filter passes only
a specified range of frequencies while cutting off the rest. There are several completely different types, as well as a variety of filter slopes (see
below).
range, with a cutoff curve of 12dB/octave.
Level
Cutoff range Range passed Cutoff range
Settings
24db (Low Pass Filter 24dB/octave), 18db (LPF 18dB/octave),
12db (LPF 12dB/octave), bPF (Band Pass Filter), HPF (High Pass
Filter), bEF (Band Eliminate Filter)
Center frequency
24db, 18db, 12db
The Low Pass Filter passes only those frequencies below the specified
cutoff point. Cutoff curves of 24dB/octave, 18dB/octave and 12dB/
octave can be selected.
Level
Cutoff range
12dB/oct
18dB/oct
24dB/oct
Cutoff frequency
Frequency
HPF
The High Pass Filter passes only those frequencies above the specified
cutoff point, with a cutoff curve of 12dB/octave.
Level
Cutoff range
Range passed
Frequency
Cutoff frequency
BPF
The Band Pass Filter passes only those frequencies in the specified
Frequency
BEF
The Band Eliminate Filter passes only those frequencies outside the
specified frequency range. The Resonance setting (see page 27) determines the eliminate range.
Level
Range passed
Cutoff range
Range passed
29
Chapter 6 Filter (VCF)
20
FEG Depth
Technically, the FEG Depth controls how the Filter works over time. This is even shown on the panel for you:
Indicates a “dip” in the filter,
just at the start of each note.
Indicates a filter “peak,” just at
the start of the note.
With the the [CUTOFF] and [RESONANCE] knobs set respectively to 9:00 and
3:00 (see above), slowly turn the [FEG DEPTH] knob.
Depending on the Pattern selected, negative settings (setting the knob left of
12:00) may result in little or no sound. But once you turn the knob past the
halfway point (12:00), you’ll start to hear the filter “opening up.” Turn the knob
slowly for gradual filter sweep effects. Also try working the knob in time with
the rhythm for dynamic “wah” effects.
FEG Depth
Determines the degree or depth of the filter
effect over time. Positive values result in a
normal EG; negative values use a “reverse”
EG — producing a filter sweep effect that
dips and comes back up, rather than one that
peaks and goes down.
Range
-128 — 127
30
Chapter 7
Nuts and Bolts
Let’s take a break from the fun and games for a moment. Check out the following functions and familiarize yourself with them — they’re very useful,
convenient tools you’ll need as you work with the AN200.
21
Show Value
Sometimes you’ll want to see what value a knob or button has been set to. Remember that when you call up
different Patterns, the knobs won’t correspond to the settings, so just looking at the knobs won’t help. And
if you turn the knob or press the button, you’re likely to change the setting. What’s a poor knob twister to
do?
Use the Show Value function. This convenient tool lets you see virtually any of the Voice-related settings —
without disturbing or changing them.
1 While you’re editing the Voice of a Pattern, press the [SHOW VALUE] button.
2 Simply turn the knob of the parameter whose value you’d like to see.
For example, to see the Portamento Time value that’s been set for the Voice, turn the [PORTAMENTO]
knob.
Display flashes and indicates the currently set
value for the parameter
(in this case, Portamento).
Naturally, Show Value can be used with all Voice-related buttons as well. For example, to see the current
setting of the VCO 1 Wave, press the VCO 1 [WAVE] button.
LED next to button flashes to indicate current setting.
For buttons that have multiple parameters (such as LFO [DETAIL] or FREE EG [MODE]), press the button
repeatedly to call up the desired parameter.
31
Chapter 7 Nuts and Bolts
3 Press the [EXIT] button to return to normal operation.
All of the indicated controls
can be used with the Show
Value function. (Original Value,
too. — See Tip 22 below.)
Show Value
Allows you to check the current value or setting of a Voice-related parameter, without
changing the value or setting. Press the
[SHOW VALUE] button, then turn the appropriate knob or press the appropriate button.
The current value/setting is displayed. While
Show Value is active, the Voice cannot be
played and the Pattern controls cannot be
used. Press the [EXIT] button to return to
normal operation.
• Trade Secrets
Use Show Value to pick the brains of our programmers. Do you have a favorite Voice and
would like to find out its settings? Just call up Show Value and take a peek behind the curtain.
22
Original Value
If you tweak and turn the knobs on a Voice for any length of time, you’re going to come up with a Voice
that’s VERY different from the one you started out with. And at some point in the editing process, you might
wish you could take a peek at the original settings — without erasing your new ones, of course — just to
see how far you’ve strayed.
This is where the Original Value function can help. Similar to Show Value (in Tip 21 above), Original Value
lets you view any of the originally programmed Voice-related settings — simply by turning a knob or pressing a button.
1 While you’re editing the Voice of a Pattern, hold down [SHIFT] and press
the [ORIGINAL VALUE] button.
2 Turn the knob or press the button of the parameter whose value or setting you’d like to see.
For example, to see the original Cutoff value that’s been set for the Voice, turn the [CUTOFF] knob.
Display flashes and indicates the
originally set value for the parameter (in this case, Cutoff).
Original Value can be used with all the same knobs and buttons as Show Value. For details, see Tip 21
above.
3 Press the [EXIT] button to return to normal operation.
32
Chapter 7 Nuts and Bolts
● What’s the difference between Original Value and Show Value?
• Show Value — Lets you view the CURRENT settings of the Voice.
• Original Value — Lets you view the ORIGINAL PRESET PROGRAMMED settings of the Voice.
If you haven’t done any editing to a Voice, both of these will display the same values — those of the currently selected Pattern.
• Closer to home
While you’re editing a Voice, you may find yourself way off course — somewhere in outer
space! You can use Original Value to retrace some of your steps and come back closer to
Earth. For example, call up Original Value and check one of the settings — say, FEG DEPTH —
then press [EXIT] and adjust the [FEG DEPTH] knob to bring the value closer to the original.
Keep doing this with other parameters as well, until you get the sound you want.
• Current and original values
Want to easily see how far your edited values are from the original? Just switch between
Show Value and Original Value. To alternate between the two functions, simply press the
appropriate button(s): [SHOW VALUE] for Show, [SHIFT] and [ORIGINAL VALUE] for Original.
No need to exit beforehand — just toggle between the two, turning the knob each time you
switch to check the settings.
23
Original Value
Allows you to check the originally programmed value or setting of a Voice-related
parameter, without changing the value or setting. Hold [SHIFT] and press the [ORIGINAL
VALUE] button, then turn the appropriate
knob or press the appropriate button. The
original value/setting is displayed. While
Original Value is active, the Voice cannot be
played and the Pattern controls cannot be
used. Press the [EXIT] button to return to
normal operation.
Panic! (or “Uh-oh...What do I do now?”)
As you’ve undoubtedly discovered by now, the AN200 is a wonderfully deep and extraordinarily versatile
synthesizer. Sonically, it can take you places you’ve never dreamed of.
Unfortunately, that can be part of the problem. While you’re tweaking a Voice, you may end up drifting in a
synthesized never-never land, or come across nothing but silence or muffled noises, or — maybe worst of
all — meet up face to face with a monster sound that can’t be tamed.
Until you know exactly how the controls work and how they affect the sound, you’ll ocassionally find the
AN200 to be an unpredictable, sometimes uncontrollable beast. Before you unplug it and try to stuff it back
in its box, try these common-sense workarounds and solutions.
● Select a different Pattern.
Or select the same Pattern again. Yes, this will automatically erase any edits you’ve made. But at least
you can come back to square one and start over.
● Press the [EXIT] button.
This won’t always work as you expect. Keep in mind, [EXIT] is mainly used to leave a function or operation. Use it when you find yourself inadvertently doing something you don’t really want to do — such as
deleting a Pattern from a Song (page 88) or clearing a sequence (page 68). Also use it to get out of situations where there is no sound or many buttons just don’t seem to work — such as in Show Value (page
31) or Original Value (page 32).
● Turn off the power.
When all else fails... Actually, we don’t recommend doing this, especially if you’ve got speakers connected. But it IS a quick and sure way to reset everything.
33
Chapter 7 Nuts and Bolts
● Do a Factory Reset operation. (See Tip 24.)
Use this only if you suspect something is actually wrong with the AN200. (For the most part, many of
the confusing things about the instrument may just be things that you don’t quite understand yet.)
Remember, this will COMPLETELY ERASE any original work you’ve done or saved — so be careful!
● Check the Troubleshooting section (page 115).
We mean it. The next time you find yourself scratching your head (or tearing your hair out), save yourself a whole lot of grief and read through this section. It’ll make you feel better.
24
Factory Reset
If the AN200 freezes in an operation, crashes, or otherwise behaves erratically, the Factory Reset operation
can usually be counted on to bring things back to normal.
Factory Reset is also used to restore all the factory-programmed Pattern and Song data. For example, if
you’ve created your own Pattern and Song data (and saved it, of course) but want to use the original Patterns and Songs of the AN200, just perform a Factory Reset.
This operation automatically erases any and all of your original Patterns and Songs. If possible,
make sure to save any important data (page 108) before using Factory Reset.
1 Turn the power off.
2 Simultaneously hold down the [SHOW VALUE], [PATTERN] and [EXIT] buttons, and turn on the power again.
34
Chapter 8
Pattern Playback
We’re going to pick up where we left off in Chapter 1, and give you some more
Pattern Tips. These are simple things you can do to change the sound, pitch,
rhythmic feel, and other aspects of the Patterns — even the Patterns themselves — in real time.
25
Adjusting the Gate Time
Try this simple, fast and cool tool — and change the feel of your tracks.
Select and start a Pattern. Any Pattern will do.
While the Pattern is playing, simultaneously hold down [SHIFT] and press [GATE TIME] ([REVERSE]).
The lamp flashes to indicate Gate Time is active.
Turn the [DATA] knob to change the Gate Time. Notice how the length of the
notes changes as you work the knob.
When you’re done, don’t forget to press [EXIT] (or [SHIFT] + [GATE TIME]) to
leave the function.
Gate Time
Determines the length of each note. The
higher the value, the longer the gate time.
Shorter values produce a clipped sound,
longer ones produce a sustained sound.
Range
1 — 100 (normal) — 200
35
Chapter 8 Pattern Playback
26
Transposing the key
The Transpose function lets you change the pitch or key of the Pattern as it plays back. With this, you can
change chords on the fly, and create your own chord progressions — instantly, as you perform.
Let’s try it out. Select a Pattern and start it up. Now, hold down [SHIFT] and press [KEYBOARD].
The button flashes.
As the Pattern plays, try pressing various keys. For example, press [12] — and hear how the key changes.
Press [9], and you’re back to the original pitch. (Remember that buttons 1, 4, and 8 don’t have any effect
here.)
The trick to using this effectively is hitting the pitch changes right on the beat. To get the hang of it, try this
simple example — counting “one, two, three, four” with the Pattern — and stay in time with the rhythm.
one
two
three
four
ONE
two
three
four
ONE
two
three
four
ONE
two
three
four
Try changing pitch on other beats in the Pattern as well — for example, not just on the “one,” but hitting the
“one” and “three” both. Or on all four beats, for some unusual, “busy” changes. And did you know that you
can use the [OCT <<]/[OCT >>] buttons, too? This next example may take a little practice...
one
two
THREE
four
ONE
two
three
four
ONE
two
THREE
four
ONE
two
three
four
Notice that the octave doesn’t actually change until you hit the number button
on the keyboard.
Experiment with other Patterns as well. And when you’re done, don’t forget to
press the [EXIT] button to leave the function.
Transpose
Determines the key of Pattern playback. To
enable, hold down [SHIFT] and press [KEYBOARD], then press appropriate buttons on
keyboard. Use [OCT <<]/[OCT >>] to change
octave. The number of semitones that the
pitch has been transposed is indicated in the
display.
Range
-24 — 24
36
Chapter 8 Pattern Playback
27
Swing
Here’s an instant way to change the rhythmic feel of a Pattern. Play it straight,
or give it some swing.
Call up a Pattern and start it up. While it’s playing, press the [SWING] button
and turn the [DATA] knob.
Try a setting of about 65 - 70 and notice how the Pattern takes on a “bouncy”
feel. Experiment with different settings and different Patterns. Judicious use
of Swing can make the Patterns sound less mechanical — and give your tracks
a more “human,” natural feel.
• The Swing effect differs depending on the selected Pattern. For certain Patterns with few
notes (such as only quarter notes), Swing may have little to no effect.
Swing
Determines the amount of swing or triplet
feel in Pattern playback. (Does not change
the actual recorded data.) While a Pattern is
playing, press the [SWING] button and turn
the [DATA] knob to change the value.
Range
50 (straight) — 83 (maximum swing)
• When the Beat parameter (page 18) is set to “12,” Swing has no effect on the Pattern.
28
Muting tracks
The Patterns of the AN200 contain and play back up to four separate tracks — the Synth track and three
Rhythm tracks. The convenient Track Mute feature lets you selectively mute these tracks — even during
playback.
Track Mute actually has two main applications: one in recording, the other in live performance. When
recording several tracks to a Pattern (page 70), it’s often useful to hear only one or two of your previously
recorded tracks — and Track Mute is ideal for this.
However, where Track Mute REALLY shines is in live performance. Pro DJs and dance music artists can
whip the crowd into a frenzy by dropping parts out and bringing parts in. For example, bringing everything
down to the drums is a great dynamic trick that keeps the dancers grooving. From there, you can gradually
build things up, adding track by track until you have the whole mix cooking. Or bring everything in all at
once, and watch the crowd explode.
1 Call up and start one of the Patterns.
2 Let’s start by muting the Synth track. While holding down [SHIFT], press
[1] on the keyboard.
37
Chapter 8 Pattern Playback
Notice how buttons [1], [2], [3], and [4] light while you hold down [SHIFT]
— this means all four tracks are on. Button [1] corresponds to the Synth
track; when you press this, the Synth track cuts out. To bring the Synth
track back in, simply hold down [SHIFT] and press [1] again.
3 Now, do the same with Rhythm tracks 1, 2, and 3 —
which are assigned to buttons [2], [3], and [4], respectively.
While the Pattern is playing, try muting and unmuting the tracks in time
with the rhythm. The lighted buttons let you see at a glance which tracks
are active — a great help when doing this live.
Track Mute
Allows selective muting of the four tracks:
Synth and Rhythm 1 - 3. Two methods are
available:
Method 1
Holding down [SHIFT] and pressing number buttons [1], [2], [3], and [4].
Method 2
Holding down [SHIFT] and pressing
[SYNTH TRACK] or [RHYTHM TRACK].
In Method 2, [RHYTHM TRACK] is an eightway toggle switch. Each button press (as
you hold down [SHIFT]) steps through all
Track Mute settings.
For both methods, the LED next to the track
number lights to indicate that the track is on.
29
Muting notes during playback
Here’s a Tip that’s useful both in live performance AND in creating Patterns. It’s called Step Mute and it lets
you modify an existing Pattern by taking out specific notes — while the Pattern is playing.
Step Mute is another great way to change the rhythmic feel and melodic content of a Pattern — without permanently changing the original data. Let’s try it out...
1 Select a Pattern and start it up.
2 Make sure the Synth track is on (press [SYNTH TRACK] if necessary), then
press one of the keyboard buttons.
The button lamp turns off, indicating the note is
muted.
Hear how the selected note drops out? You can press the same button again to put the note back in. Try
pressing some other buttons and listen to how their presence or absence affects the feel of the Pattern.
3 Do the same with the Rhythm Tracks as well.
Press [RHYTHM TRACK] repeatedly to select the desired Rhythm Track: 1, 2, or 3. Then, press the keyboard buttons — just as you did in Step 2 above.
38
Chapter 8 Pattern Playback
• Adding and subtracting beats
Did you notice that you can add sounds, too? This is especially effective in the Rhythm tracks.
If the selected Rhythm track has some unlit buttons — meaning there are spaces in the track
— try pressing some of those buttons to add more drum/percussion hits to the track. Or try
taking some of the lit buttons’ sounds out, and hear what kind of rhythm you come up with.
• Save your edits
If you like the new Pattern you’ve created, store it. (See page 79.) All Step Mute settings are
saved along with the stored Pattern; yet the original data is not changed.
30
Step Mute
Allows you to mute and unmute specific
steps in a Pattern during playback. Select
and start a Pattern, then select the track you
wish to control: Synth or Rhythm 1, 2, or 3.
Then, press the desired buttons to mute/
unmute the steps.
Mixer controls — Pan and Volume
Try these bread-and-butter controls out, and change the mix of the Patterns. Pan and Volume only affect the
Synth track — the Rhythm tracks remain unchanged.
1 Select a Pattern and start it.
2 Let’s try changing the Pan position first.
Hold down the [SHIFT] button, and turn the [PARAM] (PAN) knob.
Pan
Determines the position of the Synth track
sound in the stereo image. Hold down
[SHIFT], and turn the [PARAM] (PAN) knob
to adjust.
Notice how the Synth track sound moves from left to right and back again
as you turn the knob? (We assume you’re listening to this with stereo
headphones or on a stereo speaker system...)
Range
L63 (full left) — Cntr (center) —
r63 (full right)
3 Now, work with the Volume.
Hold down the [SHIFT] button, and turn the [WET] (VOL) knob.
Volume
Determines the volume of the Synth track.
Hold down [SHIFT], and turn the [WET]
(VOL) knob to adjust.
Range
0 — 127
Hear how the Synth sound fades in and out as you tweak the knob?
Remember, this only affects the Synth track — unlike the master [VOLUME]
knob, which controls the overall sound of the AN200.
39
Chapter 8 Pattern Playback
31
Assigning Patterns to the keyboard buttons
Remember in Tip 3 how you selected Patterns on the fly, as they were playing? Here’s where you can set
which Patterns are triggered by which keyboard buttons. Any Pattern — even the User Patterns — can go
to any button. Plus, you can use a key range of three octaves, from C2 to B4 — that’s 36 different Pattern
Select locations.
1 Hold down [SHIFT] and press [PATTERN SELECT].
2 Use the [OCT <<]/[OCT >>] buttons to select the
desired octave range.
The button flashes. All keyboard buttons turn off.
3 Press the desired keyboard button. (Remember, [1],
[4], and [8] can’t be used.)
4 Select the Pattern with the [DATA] knob. Your original User Patterns are
fair game as well.
5 Repeat Steps 2 - 4 as often as you want, until you’ve made all the desired
Pattern-to-key assignments.
Once you’re finished, press [EXIT] (or [SHIFT] and [PATTERN SELECT] again) to leave the function.
Now, try using Pattern Select to play the newly assigned Patterns. (Need a
refresher course? See Tip 3 again.)
Pattern Select Assign
● Storing Pattern Select assignments
There’s no need to store! All your Pattern Select Assign settings are stored
automatically as you make them.
40
Determines the Pattern-to-key assignment
for Pattern Select. Hold down [SHIFT] and
press [PATTERN SELECT]. Select octave
range, then press desired keyboard button
and use [DATA] knob to select Pattern. Pattern assignments are stored automatically.
Chapter 9
LFO Modulation
Here’s another crucial cornerstone in synthesizer sound — the LFO.
Although LFO modulation can be used to make the sound warmer and more
natural, its strong forte is in creating wild and extreme special effects.
Explore the following Tips and you’ll soon build up a huge arsenal of powerful tools for mangling the sound in awesome ways.
32
Modulating the volume
Get to know your LFO.
This Tip takes you through the basics in setting up and using the LFO. It also introduces you to one of the
more popular LFO applications — modulating volume. Used with some of the other sound shaping controls
on the AN200, this is responsible for the machine gun effects, helicopter-like sounds and a slew of other
industrial noises you hear in a lot of techno, electronica and dance music today.
1 Call up a Pattern.
2 Press [DETAIL], several times if necessary, until “Amd”
(Amplitude Modulation Depth) appears briefly in the
display.
3 Use the [DATA] knob to set the value to “63.”
This is the Amplitude Modulation Depth setting — “amplitude” meaning
“volume.” Setting Amplitude Modulation Depth to 63 puts the LFO in maximum control over the volume of the sound.
4 Press [KEYBOARD] to use the keyboard, and hold
down one of the keys.
Hear how the the sound wavers in and out, in a tremolo effect?
5 As the note sounds, tweak the LFO [SPEED] knob —
and hear how the modulation alternately speeds up
and slows down.
Amplitude Modulation Depth
Determines the amplitude (volume) depth for
the LFO. A value of “63” results in no volume change. To set, press [DETAIL] repeatedly (until “Amd” appears), and use [DATA]
knob to set value. (Pressing [DETAIL]
repeatedly steps through the other LFO Detail
parameters; see page 42.)
Range
-64 (maximum negative) — 0 (no change)
— 63 (maximum positive)
Speed
Determines the speed of the LFO modulation.
Range
Stop (no modulation), 1 — 255
41
Chapter 9 LFO Modulation
33
Modulating the Filter
Now, let’s apply the LFO to the Filter — and create some interesting wah-wah effects.
1 Press [DETAIL] until “Fmd” (Filter Modulation Depth) appears briefly in
the display.
2 Use the [DATA] knob to set the value to around “-34.”
This is the Filter Modulation Depth setting. Setting Filter Depth to -34 gives the LFO some control over
the timbre or tonal quality of the sound.
3 Press [KEYBOARD] to use the keyboard, and hold down one of the keys.
Can you hear the wah-wah sound? Try tweaking the [DATA] knob in the range of -64 to -24 and listen to
the changes in Filter modulation. Also try tweaking the sound at the positive end of the spectrum (16 to
46) as well, and listen for the difference.
Filter Modulation Depth
If you’ve come to this Tip directly from Tip 32 above, you’re hearing the LFO applied to both
Amplitude and Filter. To hear the Filter effect all alone by itself, set Amplitude back to normal
(0).
For more fun:
Try tweaking the VCF controls. Naturally, if the LFO is being applied to the Filter, any changes you make to the Filter section will affect the LFO-modulated
sound as well.
34
Determines the Filter modulation depth for
the LFO. A value of “0” results in no Filter
change. Values toward -64 produce a negative Filter depth; values toward 63 produce a
positive depth. To set, press [DETAIL]
repeatedly (until “Fmd” appears), and use
[DATA] knob.
Range
-64 (maximum negative) — 0 (no change)
— 63 (maximum positive)
Modulating the pitch
Try using the LFO to warp the pitch — and discover some more awesome modulation effects.
1 Press [DETAIL] until “Pmd1” (Pitch Modulation Depth 1) appears briefly in
the display.
2 Use the [DATA] knob to set the value to around “0.”
This is Pitch Modulation Depth 1 (for VCO 1). Start out with this minimum value.
3 Press [KEYBOARD] to use the keyboard, and hold down one of the keys.
As the sound sustains, slowly turn the knob counter-clockwise, and bring the value down toward
“-127.” Notice how the pitch becomes less and less distinct the further you get from “0.” (This is true
for positive values as well.) For some Voices, the pitch may stay distinct but change radically — over an
octave or more!
Try experimenting with different LFO Speed settings, and also try holding down more than one note.
42
Chapter 9 LFO Modulation
Pitch Modulation Depth 1, 2
If you’ve come to this Tip directly from the other LFO Tips above, you may want to hear the Pitch
modulation by itself. To do this, set both Amplitude and Filter back to normal (0).
• Double up
Once you start working with VCO 2 (in Tip 57), experiment with the two independent Pitch
Modulation Depth settings (PMD1 and PMD2) for even more interesting textures and pitch
changes.
35
Determines the two Pitch Modulation Depth
settings for the LFO. Setting 1 (“Pmd1”)
affects VCO 1, while setting 2 (“Pmd2”)
affects VCO 2. A value of “0” results in no
Pitch change. To set, press [DETAIL] (until
“Pmd1” or “Pmd2” appears), and use
[DATA] knob.
Range
-127 (maximum negative) —
0 (no change) — 127 (maximum positive)
Changing the LFO wave
The LFO uses one of 21 different waveforms to modulate the sound. The particular wave you select has a
huge effect on the final sound. Try out some of these and see what kind of chaos you can create.
1 Press [DETAIL] until “UA<E” (Wave) appears briefly in
the display.
2 Use the [DATA] knob to set the Wave to “trGL” (Triangle).
This selects the Triangle wave. Try some of the other Wave settings and
hear how they change the sound.
• Sample and hold
Use the Sample-and-hold waves (“S-H” 1 - 4) mainly for Pitch modulation effects. Unlike the
other Wave settings, these generate random fluctuations. They’re less suited to modulating
the Amplitude or Filter, since the random differences may be less apparent. Especially with
Amplitude, they may result in unwanted dropouts in the sound. However, they can be very
effective with Pitch, particularly in creating “electronic” sounds and sci-fi effects.
43
Chapter 9 LFO Modulation
Wave
Determines the LFO waveform.
Settings
● Sine (SinE), 2, 3, 4, 5
● Triangle (trGL), 2, 3, 4, 5
Triangle
Sine
Triangle 2
Sine 2
Triangle 3
Sine 3
Triangle 4
Sine 4
Triangle 5
Sine 5
44
Chapter 9 LFO Modulation
● Square (Squr), 2, 3
Square
● Sample-and-hold 1 (S-H1), 2, 3, 4
S-H 1
Square 2
S-H 2
Square 3
S-H 3
● Saw 1 (SAU1), 2, 3, 4
Saw 1
S-H 4
Saw 2
Saw 3
Saw 4
45
Chapter 10
EG Basics
Shape the volume, shape the tone. Use the EG (Envelope Generator) section
to control how your sound moves, grows and evolves.
36
Shaping the sound with EG
One of the most important aspects in analog synthesizer sound is how that sound is controlled over time.
The AN200 gives you some very powerful and flexible ways to do this. One of them is the EG section.
EG stands for Envelope Generator — “envelope” here being the control that shapes the sound as it evolves
over time. The EG effectively tells the synthesizer when to bring the volume up or down.
Like most analog synthesizers, the AN200 has four EG controls: Attack, Decay, Sustain, and Release. The
AN200 also lets you use the EG to control the filter — to shape the tone in time.
Let’s take a look at how these work — and hear them in action.
1 Call up a Pattern, and press [KEYBOARD] to enable
the keyboard buttons.
2 Press the [SELECT] button in the EG section so that
the AEG lamp lights.
Indicates AEG
is selected.
Doing this lets you control only the AEG (Amplitude EG), which affects the volume.
3 As you play the buttons, turn the [ATTACK] knob. Try setting it to around
12:00 and tap the buttons repeatedly.
Notice how the attack of the sound is a little slow? Now, set the knob to its minimum (7:00), and hear
how the attack is instantaneous. Next, try setting the knob to around 2:00 and hear how the sound very
slowly grows louder as you hold the key.
4 Let’s try the [SUSTAIN] knob now.
Keep in mind that Sustain is the ONLY level control in the bunch — the rest of the knobs control time or
rate.
Start with [SUSTAIN] set to around 9:00 (a value of 15 - 20). Then play and hold down a note. Do the
same with successively higher settings as well — 12:00 (64), 2:00 (95), and 5:00 (127).
Hear how the sustain or “held” sound of the Voice gets louder with each setting above? For the 5:00 setting, the volume reaches maximum and stays there as long as you hold the note.
46
Chapter 10 EG Basics
5 Next, play with the [DECAY] knob and hear how that affects the sound.
Make sure to reset [SUSTAIN] to around 10:00 or 11:00 — if Sustain is too high, Decay won’t work!
Experiment with the [DECAY] knob. Depending on the Voice and the other EG settings, a short Decay
value (knob around 9:00) may result in a weak, percussive sound. Try adjusting the knob around 11:00
or 12:00 and then slowly move upwards from that as you repeatedly play the key.
6 Now, on to the [RELEASE] knob.
Start by resetting [ATTACK] to 7:00, [DECAY] to 11:00, and [SUSTAIN] to 1:00. Then experiment with
different [RELEASE] knob settings, such as 1:00, 3:00 and 5:00.
Notice that the sound sustains — longer and longer for each setting — after you release the note.
Before you go on to Step 7 below, bring [RELEASE] back to around 1:00, and leave the other knobs
unchanged.
7 To make things more interesting, press [SELECT] to turn on the FEG controls, and use the EG knobs to play around with the filter. (We’ll do more
exploring with the filter in the next tip, too.)
Indicates FEG
is selected.
Play around with the four EG knobs and hear what kinds of sonic mayhem you can create.
Work with the VCF section controls (page 27), too — they have a huge effect on the overall sound and
behavior of the EG. We’ll warn you, though — the results can be complex and unpredicatable. But we
guarantee you’ll discover a whole truckload of sounds you never thought possible.
● What is an EG? What does it do?
To explain by example, let’s take a look at an acoustic instrument — the piano.
The piano doesn’t actually have any EGs inside, but the basic principle is the
same.
DECAY
ATTACK
SUSTAIN
RELEASE
When you hit a key on the piano, the sound starts sharply (Attack), but goes
down soon (Decay) to a softer level (Sustain) as the note is held, and quickly
dies out to complete silence (Release) when you lift your finger from the key.
47
Chapter 10 EG Basics
• Tweak them together
When you start out tweaking the EG, you may want to set [SELECT] to both FEG and AEG.
This eliminates a lot of confusion about which EG is doing what. For example, if you have separate settings and the FEG opens up long after the AEG has already shut down, you’ll probably
not hear much of the sound. Similarly, if the AEG takes its sweet time to unfold — by which
time the FEG has already come and gone — the sound may never come through.
• Tweak them separately
Adjusting both FEG and AEG together (see hint above) is convenient and easy — but it also
results in relatively boring, static Voices. To make really interesting, organic sounds with shifting textures, the trick is to adjust the Filter and Amplitude EGs separately, yet make sure that
they coincide with each other often enough to keep the sound from dropping out entirely.
There are no diagrams to help you with this — you’ll have to use your ears!
EG Select — FEG and AEG
Determines the EG settings for the filter
(FEG) and amplitude or volume (AEG).
Press [SELECT] to enable FEG, AEG or both
(ALL), then use the EG controls (see below)
to change the EG settings.
Settings
FEG
AEG
ALL (both FEG and AEG)
EG Controls
Attack
Determines the time it takes for the sound to
reach full volume when a note is played.
Decay
Determines the time it takes for the sound
volume to reach the Sustain level. This is
similar to the natural decay heard in acoustic
instruments.
Sustain
Determines the level of the sound for when a
note is held. If this is at or near minimum,
the sound will die out as the note is held. If
this is at or near maximum, Decay will have
no effect and the sound will remain at maximum level as long as the note is held.
Release
Determines the time it takes for the sound to
reach minimum volume (or silence) after a
note is released. If Sustain is set too low, this
may have little to no effect on the sound.
Range
0 — 127 (for each knob)
48
Chapter 10 EG Basics
37
Using EG to control the Filter (FEG)
In Tip 36 above, we introduced you to the EG and showed you how it works with volume (Amplitude). Now,
let’s take a look at what the EG can do with the Filter.
These specific FEG setting examples will get you started, and give you a definite feel for how to use EG to
change the tonal quality of the sound. In the process, you’ll learn more about how the Filter works, too —
and how you can get it to work for you.
Try out these settings, experiment with them, go wild, go mad! There’s so much you can do with these controls, so many sonic possibilities — this barely scratches the surface.
1 Select a Pattern, then select FEG.
Press the [SELECT] button repeatedly until FEG is lit.
Indicates FEG
is selected.
2 Start by setting a slow Attack on the Filter.
Set [ATTACK] to around 12:00 (value of 65).
3 Play around with the [CUTOFF] knob as you play the keys.
Tweak the knob slowly in the range of 10:00 - 5:00 (30 - 127) as you play single notes in succession.
Listen to how the sound changes. Finally, set the knob to around 8:00 or 9:00 (1 - 15).
4 Now, experiment with the [SUSTAIN] knob.
Try tweaking this to different settings as you play the keys. Make sure you hold the key or keys down —
the sound will change as you hold. Before you go on to the next steps, set this to around 11:00 (50).
5 Before we try out the [RELEASE] knob with the Filter, we’ll need to stretch
out the volume a bit.
Press [SELECT] to call up AEG, then set the AEG’s [RELEASE] to about 2:00 (90 - 95).
6 Now, go back to the FEG (press [SELECT]), and work with the FEG’s
[RELEASE] knob.
Play a series of single notes, and tweak the knob between 11:00 and 4:00 (45 and 120).
Notice how the FEG Release setting determines how much of the sound is heard after key is released. If
the Filter Release is too short, little or none of the sound will come through.
Finally, set this to around 12:00 or 1:00 (65 - 80).
49
Chapter 10 EG Basics
7 Just for good measure, play around with the [DECAY] knob a bit.
As with the other controls, tweak this to various settings as you play the keys. Finally, set this to around
1:00 or 2:00 (80 - 90).
8 You’re on your own now!
With the above settings as a starting point, go back to each of the EG knobs and play around with them
some more. Take a crack at using other controls as well — and hear how they change the sound. And
while you’re at it, go on to Tip 38 below — for further FEG explorations.
38
More about FEG Depth
In Tip 37, you learned about the FEG Depth control. Let’s take a closer look (and listen) to it in this Tip —
and the next.
1 If possible, continue with the sound you’ve created in Tip 37 above.
Select a Pattern, and tweak the controls to the basic settings shown below.
FEG
AEG
2 Now, play around with the [FEG DEPTH] knob.
First, set it to around 12:00 and slowly turn it clockwise while you play the keys. Listen for the sound
changes — some of them will probably be quite subtle.
Tweak the knob the other way, and hear how the sound drops out for the negative values (7:00 - 12:00).
Don’t worry about this — we’ll see in Tip 39 below how to effectively use the negative settings.
Finally, set the knob to about 2:00 (50). Experiment with the [RESONANCE] knob, too. Try out a variety
of settings — especially around 1:00 - 4:00 — and hear how they alter the tone.
50
Chapter 10 EG Basics
39
Going negative — with FEG Depth
As we promised in the last Tip, here’s a sound-creating pointer that takes advantage of the negative values of
FEG Depth. Try these settings out — and hear what it’s like on the “minus” side of the sound.
1 First, get everything set up with the following settings:
EG [SELECT]........... to “ALL” (both FEG and AEG)
[ATTACK] ................ to around 2:00 (90 - 100)
[DECAY].................. to around 1:00 (80)
[SUSTAIN] .............. to around 3:00 - 4:00 (100 - 120)
[RELEASE].............. to around 1:00 - 2:00 (80 - 90)
[CUTOFF] ................ to around 2:00 (100)
[RESONANCE] ........ to around 2:00 (70)
2 Finally, set the [FEG DEPTH] knob to 7:00 (-128) — the maximum negative
value.
3 Now, play several single notes, slightly apart, and listen for the very slow
attack and the long sustain. Hear how the filter slowly sweeps and grows
with the sound?
A negative FEG Depth setting reverses the FEG operation — producing a filter sweep effect that dips down
instead of peaks. This means the sound gets softer and more muffled, until the end — when the filter
sweeps back up again.
Try these, too
• Experiment with higher Cutoff and Resonance settings than the ones shown above.
• Adjust the FM Depth, Sync Pitch, and Noise Level settings — to give the Filter some richer
harmonics to work with, and make the sound more interesting.
• For even greater degrees of weirdness, try some long Portamento settings, too (for example,
around 90 - 110).
51
Chapter 11
Advanced Sound
Shaping Controls
By this point, you’re well on your way to becoming a master synthesizer programmer. You’ve learned about the Patterns, the Scenes, Effects, the Filter,
LFO, EG, and so on — but your education’s not over yet. The AN200 has
actually got quite few more sonic tricks up its sleeve. Let’s try some of them
out now...
40
Portamento — the famous gliding pitch effect.
You’ve heard the sound before. Although singers and instrumentalists use it to bend up or down to a central
pitch, Portamento is one of the defining features of analog synthesizers and electronic music.
Portamento packs enormous power. On the one hand, it lets you add subtle sliding “grace notes.” On the
other, it can completely subvert the pitch and give you atonal glides. Ultimately, the effect is dependent on
what notes you play and how far apart you space them. Try it out and see what madness you can come up
with.
1 Call up a Pattern, and set the [PORTAMENTO] knob to about 10:00
(around 25 in the display).
2 Enable the keyboard with [KEYBOARD], then play notes [9] and [16] alternately.
3 Try other settings, too, and hear how the Portamento
effect changes.
Bring Portamento up to about 12:00 (64), then 2:00 (95), and finally the
maximum of 5:00 (127).
Experiment. Try the effect out on some of your other favorite Voices. Also
try tweaking Portamento while the Pattern is playing — and listen to the
resulting sonic mayhem.
52
Portamento
Determines the Portamento time, or how
long it takes to glide the pitch from one note
to the next. Higher values result in a longer
pitch glide time.
Range
0 — 127
Chapter 11 Advanced Sound Shaping Controls
41
Metallic sounds and more — with FM Depth
Like the vintage synthesizers of the past, the AN200 is absolutely loaded with modulation options — giving
you the power to mangle the sound in wild and unique ways. Yet it also gives you some intriguing digital
twists — like FM Depth.
Depending on the other Voice settings, FM Depth can be very subtle, adding harmonics or changing the
pitch — almost imperceptibly at times. It can also create harsh, metallic, non-pitched sounds — perfect
when you want to add some industrial edge or noise percussion to your tracks.
1 To start out, select a Pattern.
Try to select a Pattern with a soft, warm Voice that lets you hear some of the more subtle qualities of FM
Depth.
2 Turn the [VCO 1/2] knob all the way left.
This lets you hear only VCO 1 — important because FM Depth only modulates VCO 1.
3 Set the [FM DEPTH] knob to 12:00 (around 0).
This is center or zero for FM Depth — turn the knob in either direction from this point to change the
sound.
Turn it very slowly as you play the keyboard and hear how the Voice changes.
Try this out with a variety of Voices. Depending on the other Voice settings, FM Depth changes can be
very subtle — or extreme and harsh.
• Fine tuning
Since the sound and pitch can radically shift with even the slightest knob tweak, you may want
to use the [DATA] knob instead. This lets you control FM Depth much more slowly. Make sure
you turn [FM DEPTH] first, so that FM Depth is called up for the [DATA] knob.
• In sync — and out
Experiment with various Sync Mode (page 58) and Sync Pitch settings, too. These work
together with FM Depth in modulating VCO 1, and can dramatically alter the character of the
sound.
FM Depth
Determines the amount of modulation created by the FM function. The further the
value is from midpoint (64), the greater the
modulation depth. Some settings can result
in a metallic sound with no discernable pitch;
some settings completely change the pitch.
Range
-64 — 63
53
Chapter 11 Advanced Sound Shaping Controls
42
Balancing the waves — VCO 1 and 2
One of the easiest knobs on the AN200 to understand, VCO 1/2 is a simple balance control. It lets you adjust
the relative volume of the two oscillators, VCO 1 and VCO 2. However, the simplicity is deceiving — there’s
a whole lot of power here, too.
Along with the VCO 1 and VCO 2 Wave controls (see Tip 56), this is where you lay the very foundation of the
sound — upon which everything else on the AN200 is built.
1 Select and play a Pattern.
2 Turn the [VCO 1/2] knob all the way left and play the
keyboard.
Now, you’re hearing only VCO 1.
3 Next, turn [VCO 1/2] all the way in the other direction — so that only VCO
2 sounds this time.
Play around with this knob as you hold down a note, and listen to how the two waves blend together.
Notice that the knob features a convenient center detent, letting you easily feel your way back to zero —
which is a 50-50 mix of the two VCOs.
• Soloing VCO 1
Crafting an original Voice from scratch? Soloing VCO 1 (7:00 position) is one of the best ways
to start. Listening only to VCO 1 makes it easier to set the VCO 1 Wave (page 56). It’s essential for FM Depth (page 53) as well, since that function affects only VCO 1. Plus, if you’ve set
the Sync Mode (page 58) to “VCO1 M>S” or “VCO2 > 1,” soloing VCO 1 lets you clearly hear
the modulation that’s happening.
54
VCO 1/2 Balance
This determines the volume balance of the
two oscillators, VCO 1 and VCO 2.
Range
-64 (VCO 1 only) — 0 (equal balance) —
63 (VCO 2 only)
Chapter 11 Advanced Sound Shaping Controls
43
Noise Level
Here’s another nifty little knob. This one’s great for throwing some grunge and
bite into the basic wave — letting you dirty up the Voice with some noise.
Why add noise? Why not use the Distortion effect? And what good is “dirt” in
the sound, anyway? (We could hear those questions coming...)
Well, besides the obvious Lo-fi and Industrial music applications — such as
making noise percussion — noise is great for adding harmonic content all
along the frequency spectrum. And that harmonic content added at the beginning of the signal flow makes the sound more interesting when you work with
the filter (VCF) section later on. Much more interesting, in fact.
Use it judiciously, however — too much noise can mask the basic pitch and
character of the sound.
Try selecting a Pattern with a relatively “pure” and soft Voice. Then, work the
[NOISE LEVEL] knob to hear how different degrees of noise affect the sound.
Noise Level
Determines the level of the noise signal
added to the VCOs.
Range
0 — 127
44
Making waves — VCO 1 and VCO 2
Here’s where the sound begins. All of the awesome, amazing sonic stuff on the AN200 starts with the waves
— generated by VCOs 1 and 2.
The AN200 gives you a wide variety of waveforms — not to mention enormous flexibility in combining,
modulating, and processing them.
The subject of waves can be fairly complicated, and you undoubtedly don’t want to read about it. As always,
use your ears! Give a listen to the various waves here and experiment with them. Try them out with the processing sections — especially VCF — and hear how they sound. That’s the best and only way to start creating your own Voices.
■ VCO 1 • • • • • • • • • • • • • • • • • • • • • • • • • • • • • • • • • • • • • • • • • • • • • • • • • • • •
1 Select a Pattern.
2 Solo VCO 1 by turning the [VCO 1/2] knob all the way
left.
3 Set Sync Mode to OFF by pressing [MODE].
4 Press the VCO 1 [WAVE] button repeatedly to select different waves.
Better yet, press [WAVE] and turn the [DATA] knob. That lets you access ALL of the waveforms —
including the “hidden” waves.
The actual waves that are available differ depending on the Sync Mode setting. After trying the waves
that are available when Sync Mode is set to “OFF,” select one of the other two modes, then try out the
new group of waves. (See Tech Talk below and the Wave List on page 56 for details.)
55
Chapter 11 Advanced Sound Shaping Controls
■ VCO 2 • • • • • • • • • • • • • • • • • • • • • • • • • • • • • • • • • • • • • • • • • • • • • • • • • • • •
1 Make sure the same Pattern you selected above is still called up.
2 Solo VCO 2 by turning the [VCO 1/2] knob all the way
right.
3 Press the VCO 2 [WAVE] button and use the [DATA]
knob to select the waves.
Unlike with VCO 1, there is only one “hidden” wave in the VCO 2 section (Saw 2), and the
available waves are the same, no matter what the Sync Mode setting is.
In vintage analog synthesizers, the basic waves were generated by “oscillators.” The AN200
does it a bit differently — yet the sound is exactly the same. That’s why we’ve kept the name
“VCO”: Voltage Controlled Oscillator.
VCO 1, VCO 2 Wave
Determines the waveform for the VCO 1 or VCO 2 oscillator. Press the
[WAVE] button (in VCO 1 or VCO 2) repeatedly; use [DATA] knob to select
“hidden” waves (indicated by asterisks below).
VCO 1 Wave
Settings
(Available waves depend on Sync Mode setting; page 58. Asterisks (*)
indicate “hidden” waves, selectable by [DATA] knob.)
When Sync Mode is off:
Saw ( SAU)
* Saw 2 ( SAU2)
Pulse ( PuLS)
Mix ( mi$)
Multi Saw ( m.SAU)
When SYNC is on (“VCO 1 M>S” or “VCO 2 > 1”):
Saw ( SAU)
Pulse ( PuLS)
Inner1 (inr1)
* Inner2 (inr2)
* Inner3 (inr3)
Square ( Squ)
* Noise ( niSE)
56
VCO 2 Wave
Settings
(Asterisks (*) indicate “hidden” waves, selectable by [DATA] knob.)
Saw ( SAU)
* Saw 2 ( SAU2)
Pulse ( PuLS)
Mix ( mi$)
Triangle ( tri)
Sine ( SinE)
Chapter 11 Advanced Sound Shaping Controls
45
Fat, phatter and phattest!
How phat do you want to get?
The Key Assign settings let you switch the AN200 between Poly and Mono operation. And, with Unison,
they bring back the humongously phat sounds of vintage synthesizers — letting you beef up the Voices the
old analog way.
1 Call up a Pattern and press [KEYBOARD].
Try to select a Pattern that has a fairly big and fat Voice. Let’s see where we can take it.
2 Right now, POLY should be lit. If not, press [KEY
ASGN] until it is lit, and “PoLY“ is shown in the display.
With the Poly setting, you can play and hold full chords — up to five notes
at the same time.
3 Press [KEY ASGN] again to call up Legato (LGto).
Legato is one of the Mono settings, meaning you can’t play chords here — just one-note lines. But that’s
just fine, because Legato is ideal for leads and solos as well as bass lines.
Play some notes and listen for the effect. Try holding down one note with your left hand while you
quickly play and release others with your right.
Notice how the notes trade off with each other? This is great for rapid trills — yet it keeps the EG consistent throughout, as long as you hold the first note down. Try playing melodies in a smooth, legato style,
too — not releasing one note until you’ve pressed the next.
4 Use the [DATA] knob to call up the “hidden” Mono
(mono) setting.
Play some notes. Try playing them smoothly in legato like you did above.
Notice how each note has a sharp attack, no matter how smoothly you try
to play?
Mono is similar to Legato in that you can play only one note at a time. However, the EG is retriggered, or started from the top, for each new note you
play — whether you play in legato or not.
5 Let’s give the sound some serious attitude now! Call
up the Unison (unSn) setting, with [KEY ASGN] or the
[DATA] knob.
Unison is the same as Legato, except for one very important difference —
it’s incredibly phat. Unison takes maximum advantage of the AN200’s
polyphony by ganging four of the “notes” together in one huge, fat monophonic layer.
Key Assign
Determines how the Voices respond to the
keyboard (or MIDI), and how they use the
available five-note polyphony. To set, press
[KEY ASGN] and use the [DATA] knob.
Settings
Poly (PoLY)
Plays Voices with full five-note polyphony.
Legato (LGto)
Plays Voices monophonically, maximum
one note at a time. Successively played
notes do not retrigger the PEG, FEG, or
AEG — resulting in a smoother note-tonote sound.
Mono (mono)
Plays Voices monophonically, maximum
one note at a time. PEG, FEG, and AEG
are retriggered for each new note played.
Unison (unSn)
Plays four polyphonic notes in unison, or
a one-note layer. In other words, the
response to the keyboard is monophonic, but the number of notes actually
sounding is polyphonic.
57
Chapter 11 Advanced Sound Shaping Controls
46
Sync Mode and Sync Pitch
Here are two more important additions to your arsenal of sound-shaping power tools. Try them out and
hear how they change the pitch and brighten the sound.
1 Call up a Pattern and start it up.
2 Set the [VCO 1/2] knob all the way left, so that you hear only VCO 1.
3 Press the [SYNC MODE] button to select VCO M>S (<.m-5).
4 Work the [SYNC PITCH] knob, especially between 11:00 and 4:00.
Notice how the basic pitch and the harmonics shift radically as you tweak the knob.
5 Change the SYNC MODE setting to VCO 2>1 and play with SYNC PITCH
again.
• Other waves
Try selecting different waveform for VCO 1, then with Sync Mode set to one of the “on” settings, tweak Sync Pitch. The Noise wave in particular is a good candidate for creating unique
non-pitched effects in which the harmonics are shifted.
• Bring in the highs
When using Sync Mode and Sync Pitch to craft a Voice, make sure to adjust the VCF controls
to appropriate settings, so that you can hear all of the high harmonics being generated.
Remember, you can always back off on the knobs later if the sound is too “edgy.”
Sync Mode
Sync Pitch
The AN200 tone generator has two oscillator sections: VCO 1 (which actually contains two oscillators), and VCO 2 (which has one). Sync Mode determines how the oscillators are synchronized —
one being a controlling “master,” the other a “slave.” The master oscillator determines the overall
pitch of the sound, and the slave oscillator controls the tone by adding harmonics.
Determines the pitch of the “slave” oscillator
in semitones, available only when Sync Mode
(above) is set to on. This lets you create a
difference in pitch between master and slave
oscillators and control the resulting harmonic
interval. At the “0” setting, the pitch is the
same as the master oscillator. Higher values
increase the interval for a more clangorous
sound. To properly hear the effect, make
sure the VCO 1 level is set high enough (see
page 54).
When set to “OFF,” there is no synchronization. When set to “VCO 1 M>S,” the two VCO 1 oscillators are separated inside of the VCO1 and synchronized, with one designated as the controlling
“master” and the other the “slave.” When this is set to “VCO 2>1,” the VCO 1 oscillators are synchronized to VCO 2, with the VCO 2 designated as the “master.”
To set, press [SYNC MODE].
Settings
OFF
Results in no synchronization.
VCO 1 M>S (VCO 1 master into slave)
The two VCO 1 oscillators are separated inside of the VCO1 and synchronized, one controlling
the other. This allows you to use Sync Pitch (below) to control the master/slave sound, yet
still have another oscillator (VCO 2) remaining.
VCO 2 > 1 (VCO 2 into VCO 1)
The two VCO 1 oscillators are synchronized to VCO 2, with the VCO 2 designated as the “master.”
58
Range
-64 — 63
Chapter 11 Advanced Sound Shaping Controls
47
Creating your own original Scenes — and saving
them
The exciting and powerful Scene feature lets you create and use two different Voices within a single Pattern.
Most importantly, it lets you instantly switch between them or gradually “morph” from one to the other — all
in real time.
You tried out some preset Scenes in Tip 23, and heard just how effective, dynamic, and ultimately hip the
function can be. Now, it’s time for you to create a Scene or two of your own.
1 Press SCENE button [1]. This is the Scene you’ll be
working on first.
2 Work the controls and get the sound you want for
Scene 1. Any and all of the Synth knobs can be used.
Only button [1] is lit.
• Only the Voice-related panel knobs can be used for recording to the Scenes; button switch
settings (such as LFO Detail and Key Assign) are ignored.
• Octave cannot be changed for the Scenes. In other words, both Scenes will always be
kept at the same octave setting.
• Remember that you’ll need to store your first Scene before you can create the second
Scene. Switching or morphing to a new scene automatically and irrevocably erases any
changes you’ve made.
3 While holding down [STORE], press SCENE button [1].
Scene 1 has just been stored. Now let’s go on to Scene 2.
Make sure keep holding [STORE] until you’ve pressed SCENE button [1] or [2]. Otherwise,
the AN200 will switch to the Store Pattern operation (page 79).
Indicates new settings have
been stored to Scene 1.
4 Do the same operation for Scene 2 — repeating Steps
1 - 3 above with SCENE button [2] this time.
Scene Recording
Allows you to program two different synth
sounds as Scenes, and use the SCENE controls to switch or crossfade between them.
Press SCENE [1] to select Scene 1, and
change the sound as desired. Store Scene 1
by holding down [STORE] and pressing
SCENE [1]. Repeat the operation for Scene 2,
using SCENE [2]. When finished, store the
Pattern (page 79).
59
Chapter 12
Free EG
Here’s another ultra-cool power tool for the control freak in you. The AN200
is packed with an endless supply of sonic mayhem and wild, shifting synthesizer textures, but you can keep it all under control — with Free EG.
48
Free EG
The AN200 has so many real-time control features, it’s hard to get a grip on them all. Feel you need an extra
pair of hands? Or maybe an extra two? No problem. Just use the amazing Free EG feature. The AN200 is
packed with a lot of powerful recording functions — but none are quite as impressive as this.
Free EG gives you up to four tracks for recording your knob moves — letting you incorporate real-time
sound changes and knob moves as a part of the Pattern. So every time you play the Pattern, your knob
changes play right along with it — just as you recorded them.
We call this “Free EG” because it allows you to create unique, complex, continuous parameter changes that
would be impossible to achieve with conventional EGs.
1 Call up the desired Pattern, and press the red Record
button.
You may want to set the Length (Tip 63 below) in this step. Do it BEFORE pressing the
Record button, however; Length cannot be set during Free EG recording.
Indicates recording is in standby.
2 Select the Free EG track you want to record.
Press the appropriate FREE EG button, [1] - [4]. The button lights to indicate the track is ready for
recording.
Normally, [1] will be lit — so if you want to record to Track 1, you don’t have to do anything here. If any
track buttons you DON’T want to record to are lit, press them to turn them off.
Remember, you can record to more than one track simultaneously by pressing the appropriate buttons.
(See Power Hints below.)
60
Chapter 12 Free EG
3 Start the Pattern, and make your moves.
Press the Start/Stop button.
The metronome clicks to lead you into the recording, so you can start your
knob moves right with the start of the Pattern.
Remember the rule: One knob, one track. Once you record a certain knob,
no other knob can be recorded to the track (unless you start the whole Free
EG recording again). Any tweaking of other knobs is ignored.
The display number indicates the current measure number. If you’ve set Length (see Tip 63
below) to “2,” the Pattern loops two times for recording, and the display changes accordingly.
4 To stop recording, press the Start/Stop button.
If you want to re-record the track or record moves to other tracks, go back
to Step 2 above and start all over again.
5 To hear your Free EG recording, make sure that the
appropriate track buttons are on, then press the
Start/Stop button to play the Pattern.
Remember to save your newly edited Pattern! (See Tip 60.) All your Free
EG track recordings will be saved right along with it.
• Recording to more than one track at a time
Press the appropriate Free EG Track buttons. During recording, the AN200 automatically
assigns each knob you move to the next available track. For example, let’s say you’re recording to Tracks 1 and 2. You move the CUTOFF knob first, and that’s recorded to Track 1. Then,
while tweaking Cutoff, you move [FEG DEPTH] — which records to Track 2.
• Take your time and let the Pattern loop!
In a variation of the above hint, you can set all the tracks to record, then tweak each one separately as the Pattern loops. Each of your moves is properly recorded to a separate track, and
you can hear the effect of your last knob tweak as you record the next.
• Use the four tracks to your advantage
Record your tweaking of one certain knob to all four tracks, then choose the best “take” from
the four. Just make sure to turn off each button after you record to it — so it doesn’t play back
and disturb your recording of the next button. Listen to each track in turn by turning the
appropriate button on.
• Change the way your Free EG tracks play back
The Type parameter (see Tech Talk below) gives you four different ways to loop the Free EG
tracks. Try these out when playing your Pattern and hear the interesting things they do to your
tracks.
Free EG — Type and Trigger
Type
Determines the type of loop for Free EG playback. Press the [MODE] button repeatedly
until “tYPE” appears, then use the [DATA]
knob to change the setting.
Settings
oFF
No loop.
FUd (Forward)
Free EG sequence loops from start to
end.
FUdH (Forward Half)
Free EG sequence loops from the middle
to the end.
ALt (Alternate)
Free EG sequence loops from start to
end, then end to start.
ALtH (Alternate Half)
Free EG sequence loops from middle to
end, then end to middle.
Trigger (“triG”)
Determines how playback of the Free EG
tracks is triggered. Normally, this should be
set to Free (“FrEE”), so that the tracks play
back when the Pattern is started. Setting this
to MIDI (“midi”) lets you start Free EG
playback from a connected MIDI keyboard or
sequencer.
Press the [MODE] button repeatedly until
“triG” appears, then use the DATA knob to
change the setting.
Settings
FrEE (Free)
Triggers playback of the Free EG tracks
from a random start point, when a Note
On message is received from a connected MIDI device, or when a key on the
AN200 is played, or when the Pattern is
started.
midi (MIDI in Notes)
Triggers playback of the Free EG tracks
from the start, when a Note On message
is received from a connected MIDI
device, or when a key on the AN200 is
played.
ALL (All Notes)
Triggers playback of the Free EG tracks
from the start, when a Note On message
is received from a connected MIDI
device, or when a key on the AN200 is
played, or at the first recorded note of
the Pattern (which may or may not be
the start of the Pattern).
Strt (Sequencer Start)
Triggers playback of the Free EG tracks
from the start, only when the Pattern is
started.
61
Chapter 12 Free EG
49
Changing the Length of your Free EG tracks
The flexible little Length feature works both ways — both in recording and playback. It lets you set how long
(in measures) your Free EG moves are recorded for, and it lets you separately set how long it takes for them
to play back.
Set Length before recording any Free EG tracks. Specifically, set it BEFORE you press the red Record button
(but after you’ve selected the Pattern) in Step 1 of Tip 48 above.
Press the [LENGTH] button repeatedly to step through the settings. (Or press [LENGTH] and use the [DATA]
knob.) The number in the display indicates the Length in measures.
If you want to record your knob moves over two measures (two repeats of the Pattern), set this to “2.” If
you want your tweaking to stretch over eight measures, set it to “8.”
Once your tracks have been recorded, you can set Length again just before playback. This controls how
long all four tracks take to play.
• Take your time
Want to make some really slow changes? How about a gradual filter sweep that builds to a climax over several measures? Set a low Length for recording (for example, “0.5”), then before
you play back the Pattern, set a high Length, such as “8.”
• Make it snappy
For really fast changes, just do the opposite of the above. Set a high Length for recording and
a low Length for playback. Keep in mind that each track can be recorded with a separate
Length.
Free EG Length
Determines the time of the Free EG — for
both recording and playback. Each track can
be set independently for recording; however,
the playback setting affects all tracks
together. Since Free EG is based in measures, changing the playback bpm (tempo)
automatically changes the actual time of the
Free EG as well. To set, press [LENGTH]
repeatedly.
Settings
0.5, 1, 1.5, 2, 3, 4, 6, 8 (measures)
62
Chapter 13
Pattern Power
Tips
It’s time to put your AN200 know-how and experience to work — and delve
into these Pattern Power Tips.
The first couple of Tips introduce you to some important tools for working
with the Patterns, such as copying and erasing data. They’re basic nuts-andbolts stuff, but don’t ignore them. You’ll need them for the fun things to follow
— like creating your own original Patterns!
50
Hit the top of the Pattern!
Here’s an effect that’s long been a staple in dance and techno music. The Top function lets you instantly
retrigger the entire Pattern from the top — so you can produce all those cool stutter effects and create awesome dynamic hits and accents.
Select and start a Pattern. Then, while the Pattern is playing, hold down [SHIFT] and hit the red Record
([TOP]) button.
Keep holding [SHIFT]
while you hit (press
and release) the
Record button.
Play the button in time with the rhythm, on every beat — like this:
ONE
two
three
four
Watch your timing and keep the beat! Of course, you can get different effects
by playing the button way ahead or way behind the beat, if you want. (We’ll
show you some fancy rhythmic tricks with this in later Tips, too!)
Top
Still, it’s best to hit the button right on the downbeats (“one,” “two,” “three,”
and “four”), and stay in the groove. When you’ve got it right, you’ll feel it.
Instantly returns to beginning (top) of Pattern
during playback. Ideal for creating “stutter”
effects, partial measures, hits, and accents.
While Pattern is playing, hold down [SHIFT]
and press red Record (TOP) button. Release
button and repeat for each time you want Pattern to start from the top.
63
Chapter 13 Pattern Power Tips
51
Shake, Retrigger, and Roll!
In Tip 50, you saw how to use the Top function to play your own stutter hits. Here’s a nifty variation on that
function — it’s called Retrigger & Roll.
Retrigger & Roll does just as its name suggests. It retriggers notes of the Synth track, and repeats them —
like a drum roll.
Select a Pattern and start it up. As the Pattern’s running, hold down [SHIFT] and simultaneously press and
hold the Start/Stop button.
Hear the “roll”? And did you notice how the Rhythm tracks keep chugging along, while the Synth track
spins its wheels?
Try this function at various points in the Pattern — the top, the end, the middle — and listen to what happens. Just keep holding down [SHIFT], and press/hold the Start/Stop button at different points in playback.
Keep in mind, Retrigger & Roll differs from Top in three important ways:
1) It only affects the Synth track.
2) It grabs and hits only a few notes — depending where in the Pattern you
press the button.
3) It automatically repeats the hits for you while you hold the button down.
You’ll find that Retrigger & Roll is a slick way to break the rhythm up a bit,
without losing the flow. It’s also great for throwing hip, “what-was-THAT?”
glitches and stutters into your tracks.
Retrigger & Roll has three different settings. To change the setting:
1) Keep the Roll going (simultaneously hold down [SHIFT] and Start/Stop
button).
2) Grab the DATA knob. Make sure you keep holding [SHIFT] and Start/
Stop — and turn the knob to change the setting.
Retrigger & Roll
During Pattern playback, this stops the Synth
track at the point of execution and loops one,
two, or four notes (depending on the Roll
type below). The Rhythm tracks are not
affected. While a Pattern is playing, simultaneously hold [SHIFT] and press/hold the
Start/Stop button.
Roll Types
Determines how many notes are used for
Retrigger & Roll — one, two, or four. The
more notes used, the slower the roll effect.
While the Pattern is playing and while holding
down both [SHIFT] and the Start/Stop button,
use the DATA knob to change the setting.
Settings
Lo (Lo)
One note or step (corresponds to 16th
notes).
mid (Mid)
Two notes (corresponds to two 16th
notes, or half of a beat). However, when
Beat (page 18) is set to “12,” this
becomes three notes.
Hi (Hi)
Four notes (corresponds to a full beat in
a measure).
While the Pattern is cycling, hear how the different settings affect the sound.
And try changing the settings in time with the Pattern as well. There are a lot of
cool rhythmic tricks you can create — just by hitting different settings on the
beat.
64
Roll Types (in Utility)
The default Roll setting can also be changed
from the Utility parameters. Hold down
[SHIFT] and press button [16], repeatedly if
necessary, until “roLL” appears in the display. Use the [DATA] knob to change the setting. (Settings are same as above.)
Chapter 13 Pattern Power Tips
52
Selecting a Voice (Copy Voice)
One important step you can take in creating a Pattern is to select the Voice you’ll be using for it.
Keep in mind that each Pattern includes a Voice, and that strictly speaking, Voices CANNOT be selected separate from their Patterns. However, this function lets you select a Voice that you like from one Pattern, and
copy it to another Pattern.
1 First, select the source Pattern — the one that has the Voice you like.
2 Simultaneously hold down [SHIFT] and press [12]
(COPY SEQ/VOICE).
You may have to press the button more than once to call up the “CPY.<”
display.
3 Next, select the destination Pattern.
This is the Pattern you’ll be copying the Voice to. Use the DATA knob.
4 Copy the Voice.
The [12] button should be flashing. Press it once again (the button stops
flashing and stays lit). At the “Y£n” (“Yes or no?”) prompt, press it a third
time to actually copy the Voice to the selected Pattern number, or press
[EXIT] to cancel.
53
Copy Voice
Allows you to copy a Voice from one Pattern
to another. Select the source Pattern, then
use [SHIFT] and [12] to call up “CPY.<”
(Copy Voice). Select the destination Pattern,
and press [12] twice to execute.
Starting a Pattern on a different note
Here’s an interesting way to change the character of a Pattern — without actually changing any of the notes!
The Move Note function simply lets you start playback from any individual step in the Pattern.
For example, in a 16-step Pattern, selecting a value of “-4” moves the Pattern “back” four steps — making
Step 5 the starting point of the Pattern.
1 While the Pattern is stopped, simultaneously hold
down [SHIFT] and press [13] (MOVE/PITCH).
You may have to press the button more than once to call up the “mo<E”
(Move Note) display.
2 If you want, select the particular track (Synth or
Rhythm) you want to move.
Each track can be set independently — just hold down [SHIFT] and press
the appropriate number button [1], [2], [3], or [4].
3 Release [SHIFT] and press [13] once again (the button
stops flashing and stays lit).
At the “Y£n” (“Yes or no?”) prompt, press it a third time to actually change
the value, or press [EXIT] to cancel.
4 Start the Pattern to hear the changes you’ve made.
• Keep in mind that any changes you make to the Pattern with this function are cumulative.
For example, if you change the setting by -4, then make a second setting of -3, the actual
value (compared to the original Pattern) will be -7.
• This CANNOT be used while the Pattern is playing back.
Move Step
Determines the starting step of the Pattern,
shifting the Pattern back or forward by the
specified number of steps. All steps of the
Pattern play as normal; only the starting point
changes. Use [SHIFT] and [13] to call up
“mo<E” (Move Step). If desired, select the
track to be moved; hold down [SHIFT] and
press the appropriate number button [1], [2],
[3], or [4]. (Skipping this step automatically
selects all tracks.) Use the DATA knob to
change the value and press [13] twice to execute.
Range
-15 — 0 — 15 (steps)
65
Chapter 13 Pattern Power Tips
54
Transposing the pitch of a Pattern
Try this cool editing tool on your tracks. The Transpose Pattern function lets you change the overall key
(pitch) of a Pattern — including the Rhythm tracks. Shift the pitch way up, or bring it way down — there’s
a lot of range here to work with.
1 While the Pattern is stopped, simultaneously hold down [SHIFT] and
press [13] (MOVE/PITCH).
You may have to press the button more than once to call up the “PtCH” (Transpose Pattern) display.
2 If you want, select the particular track (Synth or Rhythm) you want to
transpose.
Each track can be set independently — just hold down [SHIFT] and press the appropriate number button
[1], [2], [3], or [4].
3 Set the pitch change of the tracks by using the [DATA] knob.
The pitch change value is in semitones. (There are 12 semitones in an octave.) For example, if the original Pattern is in the key of C, a setting of “5” would change the key to F.
Keep in mind that this changes the pitch of the Rhythm tracks as well as the Synth track.
4 Transpose the Pattern.
Press [13] (the button stops flashing and stays lit). At the “Y£n” (“Yes or
no?”) prompt, press it again to actually change the value, or press [EXIT] to
cancel.
5 Start the Pattern to hear the changes you’ve made.
• Keep in mind that any changes you make to the Pattern with this function are cumulative.
For example, if you change the setting by -4, then make a second setting of -3, the actual
value (compared to the original Pattern) will be -7.
• This CANNOT be used while the Pattern is playing back.
66
Transpose Pattern
Determines the overall key of the Pattern,
shifting all notes in all tracks of the Pattern up
or down in pitch by the specified number of
semitones. Use [SHIFT] and [13] to call up
“PtCH” (Transpose Pattern). If desired,
select the track to be transposed; hold down
[SHIFT] and press the appropriate number
button [1], [2], [3], or [4]. (Skipping this
step automatically selects all tracks.) Use the
DATA knob to change the value and press
[13] twice to execute.
Range
-24 — 0 — 24 (semitones)
Chapter 13 Pattern Power Tips
55
Copying a Pattern (Sequence)
Earlier in this section, in Tip 52, you learned how to copy a Voice from one Pattern to another. Here you’ll
learn how to copy a Sequence (the Pattern’s notes) from one Pattern to another.
1 First, select the source Pattern — the one that has the Sequence you like.
The word “Sequence” is used here to describe the recorded notes or steps of a Pattern.
(“Pattern” actually is a blanket term that refers not only to the recorded notes, but the Voice,
the Scenes, and the Free EG settings as well.)
2 Simultaneously hold down [SHIFT] and press [12] (COPY SEQ/VOICE).
You may have to press the button more than once to call up the “CPY.S” (Copy Sequence) display.
3 Next, select the destination Pattern.
This is the Pattern you’ll be copying the Sequence to. Use the DATA knob.
Copy Sequence
4 Copy the Sequence.
The [12] button should be flashing. Press it once again (the button stops
flashing and stays lit). At the “Y£n” (“Yes or no?”) prompt, press it a third
time to actually copy the Sequence to the selected Pattern number, or press
[EXIT] to cancel.
Allows you to copy a Sequence from one Pattern to another. Select the source Pattern,
then use [SHIFT] and [12] to call up “CPY.S”
(Copy Sequence). Select the destination Pattern, and press [12] twice to execute.
67
Chapter 14
Pattern Recording
By this point, you’ve built up a lot of experience twisting and tweaking the
Voices, and playing around with the Patterns. Now it’s time to strike out on
your own — and create some Patterns yourself. Let’s get started...
56
Erasing a Pattern — and starting from scratch
The first thing you’ll need to do when you make your own Pattern is to make room for it on the AN200. To
do that, you’ll have to erase or clear one of the factory preset Patterns.
Don’t worry, you won’t be permanently erasing this Pattern. All this operation does is give you a blank slate
on which to create your own Pattern. You can restore the original Pattern by simply re-selecting it (with the
[DATA] knob), or by turning the AN200 off and back on again.
1 Select the Pattern to be cleared.
2 Simultaneously hold down [SHIFT] and press [11] (CLEAR SEQ).
The button flashes, and “CLr” (Clear) briefly appears in the display.
We’ve labeled this function “CLEAR SEQ” (Clear Sequence) on the panel to distinguish it
from the DEL PTN (Delete Pattern) function, at button [10].
Clear Sequence — Deletes the note data from a Pattern.
Delete Pattern — Deletes the Pattern number from a Song (see Tip 89).
3 Release [SHIFT] and press [11] once again.
The button stops flashing and stays lit; the display prompts you by asking “Yes or no?” (“Y£n”). Press
it a third time to actually clear the Pattern, or press [EXIT] to cancel.
• Tweak an existing Pattern
Naturally, if there’s a preset Pattern you like and simply needs a bit of tweaking to fit your
specifications, you don’t need to completely clear the Pattern — just edit it, using the tools
described in Tip 59, Step Recording.
68
Clear Sequence (Pattern)
Allows you to clear the note data of a Pattern.
Select the Pattern, then use [SHIFT] and [11]
to call up “CLr” (Clear). Press [12] twice to
execute.
Chapter 14 Pattern Recording
57
Setting the Metronome lead-in
When you record your parts in real time, you’ll need a rhythmic guide — a metronome click — to lead you
into the recording, and keep you in time. Here, you can set the length of the Metronome lead-in — in other
words, how long the Metronome clicks before Real-time recording actually starts.
1 Simultaneously hold down [SHIFT] and press [16] (UTILITY SETUP).
You may have to press the button more than once to call up the “mtro” display.
2 Use the DATA knob to change the setting.
For a one-measure lead-in before recording starts, set this to “on1.” For a
two-measure lead-in, set this to “on2.”
You can also turn the Metronome off here, by setting this to “oFF” — in
which case, recording starts immediately (without a lead-in), as soon as
you press the Start/Stop button.
When done, press [EXIT] to return to normal operation.
Metronome
Determines the length of the Metronome
lead-in for Real-time recording. To turn the
Metronome (and the lead-in) off, set this to
“oFF.” Set this to “on1” for a one-measure
lead-in, and “on2” for two measures.
Metronome is set in the Utility parameters.
Hold down [SHIFT] and press button [16],
repeatedly if necessary, until “mtro”
appears in the display. Use the [DATA] knob
to change the setting.
Settings
oFF
No lead-in metronome click.
on1
A one-measure lead-in before recording.
on2
A two-measure lead-in before recording.
69
Chapter 14 Pattern Recording
58
Recording a Pattern in real time
Up until this point, you’ve been working with the preset Patterns of the AN200. Now, here’s your chance to
create some Pattern magic yourself — by recording your own original Patterns.
We’ll give you the basic procedure to get you started. You supply the creative ideas and talent. And the
AN200 will provide the sonic horsepower you need to produce some truly hip and happening tracks.
1 Select a blank Pattern — a clean slate for recording your own notes.
(Have you cleared a Pattern for this yet? If not, go back to Tip 56 and do
it now.)
2 Make the Beat setting for the new Pattern: 16, 12, or
8.
Hold down [SHIFT] and press [SWING] (BEAT). Then, turn the DATA knob
to change the setting.
You should make this setting BEFORE recording, since it determines the number of steps you’ll have
available in the Pattern.
A setting of “16” gives you sixteen steps or spaces you can record notes to; a setting of “8” is obviously
half that — eight steps. The “12” setting gives you twelve steps, of course, but also lets you create a
triplet feel — count: “ONE, two, three, TWO, two, three,” etc.
3 Select the track for recording — Synth or one of the
three Rhythm tracks. Press [SYNTH TRACK] for Synth,
or [RHYTHM TRACK] (repeatedly) for Rhythm tracks 1,
2, or 3.
4 Set a comfortable bpm for recording.
Hold [SHIFT] and press the [TAP] button, then use the [DATA] knob.
Keep in mind, you can always change the bpm later. Right now, it’s important to set the bpm so that it’s fast enough to capture the feel you’re after,
yet slow enough to let you easily enter the notes. (Make sure to press [EXIT] when you’re done.)
5 Press [KEYBOARD] to enable the AN200’s keyboard.
Did you know you can use a MIDI keyboard to record the notes? If you’ve
got one, see Tip 86 for info on setting it up.
6 Enable recording — press the red Record button.
70
Chapter 14 Pattern Recording
7 Start recording.
Now, let’s get down to business. Press the Start/Stop button. While listening to the metronome, play the
keys on the keyboard.
The AN200 has a nifty “Loop Recording” feature that immediately and automatically plays each note you
record as the Pattern repeats (loops). This lets you hear the Pattern as you’re recording — making it
much easier to “feel” your way to a great recording.
What’s more, the AN200 automatically corrects the timing of the notes you play. This may not always
give you the results you expect — but it will ensure that ALL your notes play back in perfect sync with
the rhythm.
8 Delete your mistakes or unwanted notes.
We know, you probably didn’t make any any mistakes. But just in case you want to know, here’s how you
can patch up your tracks.
While the Pattern is still recording, simultaneously hold down [SHIFT] and press one of the Step buttons.
(Again, avoid Step buttons [1], [4], and [8] — they won’t have any effect.) Listen closely to the playback
and press the appropriate Step button at the right time — right as the note plays. You can erase more
than one note by continuing to hold down [SHIFT] and the Step button — for as long as you want to
erase. Since it may be difficult to precisely erase the offending notes, try slowing down the bpm (page
17) during recording.
9 Stop recording.
Press the Start/Stop button.
10 Finally, save your precious work to the AN200’s internal memory — with
the Store function.
(Actually, you’ll have to see page 79 for info on storing Patterns — we’re
running out of space here... Besides, the Store function deserves it’s own
Tip.)
Real-time Recording
Allows you to record the notes to a Pattern in
real time, as opposed to entering them oneby-one (in Step recording; see page 72).
• Lay down the drums
Generally, it’s a good idea to record your Rhythm track first. In fact, you may want to record
just a very simple drum pattern to start with, and build up from there. You can later embellish
that basic track, or even erase it and come up with an entirely new drum part — once your
other tracks start to take shape.
• Loop Recording
Take advantage of the Loop Recording feature and play just one note or sound at a time. For
example, when building a Rhythm track, start out with just a kick drum sound (select octave
C2 with [OCT <<], and press [9]) — and play it on the “one” and “three” beats. With the kick
looping, play button [3] for a snare drum. Then, go back to octave C3 and use buttons [14]
and [7] to add a rapid-fire hi-hat pattern.
Get the idea? Keep building your tracks part by part in this way until you’ve got just what you
want.
• MIDI keys
Have you bought yourself a MIDI keyboard yet? One that’s at least five octaves long, has
touch sensitive keys, and features Pitch Bend and Modulation wheels? If you haven’t, you’re
missing out on a very easy and powerful way to record! Just hook one up (see Tip 86) — and
lay down your best keyboard licks.
Select a blank Pattern and set the Beat
(below). Select a track with [SYNTH TRACK]
and [RHYTHM TRACK], and press [KEYBOARD]. Press red Record button to enable
recording, then press Start/Stop button to
start, and play the keyboard.
Beat
Determines the number of steps for the Pattern. Hold down [SHIFT] and press [SWING],
and use the DATA knob to change.
Settings
16, 12, 8 steps
71
Chapter 14 Pattern Recording
59
Step Recording
In Tip 58, you learned how to record a Pattern in real time, by playing the notes on the keyboard as the Pattern was looping. Now, you’ll learn a completely different method — Step recording.
Real-time recording is like using a tape recorder — whatever you play is recorded as you play it. Step
recording, on the other hand, allows you to enter each note individually — like writing down the notes on a
sheet of music paper.
With Step recording, you not only enter the note itself (Pitch), but its length (Gate Time) and its loudness
(Velocity) as well.
Step recording is ideal for precision — making the placement, rhythmic value, and velocity of each note
exact and consistent. This is great for recording individual drum parts in a rhythm pattern, or single notes in
a syncopated synth bass part. Step also gives you precise control in recording fast or complex passages
that would be difficult or impossible to record in real time.
Last but not least, use Step Recording to edit Patterns. This is a great way to customize existing Patterns
and tweak them to fit your needs — or twist them into completely new tracks.
There’s a lot to be learned here, so take a deep breath — and dive in!
■ Setting Up• • • • • • • • • • • • • • • • • • • • • • • • • • • • • • • • • • • • • • • • • • • • • • • • •
The first three steps below show you how to set up a Pattern for Step Recording.
1 Select a Pattern and clear it.
Call up a Pattern that has the Voice you want to use for your new, original
Pattern. Clear the Pattern by holding down [SHIFT] and pressing [11], then
pressing only [11] twice again.
Remember that the Pattern isn’t really erased — you can get it back by simply turning the AN200 off and back on again.
2 Make the Beat setting for the new Pattern: 16, 12, or
8.
Hold down [SHIFT] and press [SWING] (BEAT). Then, turn the DATA knob
to change the setting.
You should make this setting BEFORE recording, since it determines the
number of steps you’ll have available in the Pattern.
3 Here, you’ll be recording the Synth part, so select the
Synth track.
Press [SYNTH TRACK] (the button lights).
By the way, you can also step-record the Rhythm tracks — but we’ll show you
how to do that a little later on.
72
1
2
Chapter 14 Pattern Recording
■ Entering the Notes • • • • • • • • • • • • • • • • • • • • • • • • • • • • • • • • • • • • • • • • • •
In this section, you’ll be entering the notes (pitches) for each of the sixteen steps. We’re going to show you
a quick way to do this. The results here may not be very musical — but they’ll get you started fast and point
you in the right direction.
4 Turn all the Steps on.
In this condition, all the buttons are probably off. (Remember? You cleared the Pattern...) Go down the
line, and press each button so that they are all lit.
Why do this? Generally, when you’re recording the Synth track, it’ll be easier to create a Pattern if all
Steps 1 - 16 are on. This will create a busy Pattern, but you can always take out notes later.
5 While holding down [SHIFT], press [STEP 1-8].
Do this repeatedly, if necessary, to select Pitch entry.
This operation actually accomplishes two things:
1) It selects Steps 1 - 8 for recording.
2) It selects the event type (in this case, Pitch).
Also, notice the flashing [1] button. This indicates that Step 1 is ready for recording.
6 Now, with the PITCH indicator selected, use the knobs above the buttons
to set the Pitch for each Step, 1 - 8.
Each knob corresponds to the Step directly below it. For example, the PORTAMENTO knob controls
entry for Step 1, the VCO 1/2 knob for Step 2, and so on.
Set the knobs (roughly) to the positions indicated above. No, you don’t have to be exact. In fact, you can
set these any way you want. We just figured that twiddling them around 11:00 to 1:00 is easy to do. You
won’t wind up with an earthshakingly memorable melody, but it should at least give you a listenable set
of pitches to work with.
Notice that when you tweak a knob, the corresponding Step button flashes.
7 Now, let’s work with Steps 9 - 16.
Press button [9].
We just showed you the fast way to select Steps 9 - 16 for editing:
1) Edit Steps 1 - 8 first, then
2) Press button [9] to edit the same parameter for Steps 9 -16.
An alternate way is to hold [SHIFT] and press [STEP 9-16], repeatedly if
necessary (like you did in instruction Step 5 above).
73
Chapter 14 Pattern Recording
Enter the notes for these Steps in the same way as you did with Steps 1 - 8 above, but use the setting
guide below:
Again, this is ONLY a guide — make your own settings, if you want.
8 Finally, press the Start/Stop button — and hear your new masterpiece.
■ Gate Time • • • • • • • • • • • • • • • • • • • • • • • • • • • • • • • • • • • • • • • • • • • • • • • • •
In the next few steps, let’s work with Gate Time and lengthen some of the notes.
9 Hold down [SHIFT] and press [STEP 1-8], until the GATE TIME indicator is
lit.
10 Set the knobs as shown.
Set knobs [1] and [5] to around 12:00. (The display value should be around 200.)
Set knobs [2], [3], [4], [6], [7], and [8] to around 9:00. (The display value should be around 70 - 75.)
11 Do the same again for Steps 9 - 16.
Press any one of the bottom row buttons (this automatically selects Steps 9 - 16 for editing the same
parameter, Gate Time), then set the knobs to roughly the same positions as shown above.
12 Press the Start/Stop button to hear your stunning new arrangement.
■ Velocity• • • • • • • • • • • • • • • • • • • • • • • • • • • • • • • • • • • • • • • • • • • • • • • • • • •
No matter what unnatural, machine-like melody you’ve programmed above, you can make it sound much
better by putting in a few choice accents — with Velocity.
13 Hold down [SHIFT] and press [STEP 1-8], until VELOCITY is selected.
14 Maybe you’ve noticed that you can change any and all of the events
while the Pattern is running. If you HAVEN’T noticed this, press the Start/
Stop button to play the Pattern, and make the changes below.
74
Chapter 14 Pattern Recording
15 Set the knobs as shown.
Set knobs [1] and [5] to around 2:00. (The display value should be around 90 - 100.)
Set knobs [2], [3], [4], [6], [7], and [8] to around 11:00. (The display value should be around 40 - 50.)
Or, make your own settings. After all, you’ve mastered the process now. Plus, since you can hear what
you’re doing — AS you’re doing it — you can come up with some amazing ideas of your own.
■ Step Mute • • • • • • • • • • • • • • • • • • • • • • • • • • • • • • • • • • • • • • • • • • • • • • • • •
We’ve covered this function before (in Tip 29), but let’s check it out again. It’s a handy editing tool that helps
you create great sounding tracks.
16 Is the Pattern still going? If not press the Start/Stop button again.
17 Press some of the Step buttons to mute certain Steps. Try out the examples below, then experiment with your own settings.
Press buttons [5], [7], [11], and [13]. Listen to the sound of the Pattern as these Steps drop out.
Now, turn them all back on and mute these: [6], [7], [12], [14], and [16].
You’ve got your basic Synth track — now, continue crafting and adding to the Pattern by working on the
Rhythm tracks below.
• Fine tuning
Here’s a smart and easy way to work! Use the “Step” knobs (above
each Step button) to select the Step and make a rough, ‘round about’
setting, then use the DATA knob to tweak and fine-tune the setting.
• Swing
Don’t forget to use Swing. It might not be right for all of your Patterns,
but it doesn’t hurt to try it out. A little Swing may be just what the doctor ordered... Remember, the Swing setting affects all tracks equally.
(See page 37.)
• Other tools
Feel like hearing a different Voice? Call up the Copy Voice function
(page 65), and dial in a new Voice for your Pattern. Pattern Move (page
65) and Pattern Pitch (page 66) are also useful tools you can apply to
your tracks.
• Copy Pattern
If you’ve crafted a really hip Pattern, and you’d like to make a few more
variations — use the Copy Sequence operation (page 67). Once you
have some copies of the Pattern, you can tweak them and change them
around, until you’ve got a whole palette of similar beats and riffs to
work with — for live performance (page 95), or for Song recording
(page 82).
• Mix your methods
Real-time and Step recording are two separate methods — but they can
also be used together. Not at the same time, of course, but in tandem.
For example, you could record a basic beat to Rhythm Track 1 with
Step, then use Real-time to improvise a bass line on the Synth Track.
Or you could combine both methods on a single track — recording a
basic part with Real-time, then using Step to edit it. Which method you
use and how you use it depends partly on the type of music you wish to
create and partly on your own personal preference.
75
Chapter 14 Pattern Recording
Rhythm Tracks
The AN200 is filled to the brim with an enormous variety of drum, percussion, and special effects sounds.
Put these to good use with the Step Recording features — and create your own awesome beats and smokin’
rhythms.
■ The Basics — Rhythm Track 1 • • • • • • • • • • • • • • • • • • • • • • • • • • • • • • • • • •
In the next few steps, we’ll walk you through the basics — and give you a quick way to edit. Get these steps
down, and you’ll be whizzing through the tracks in no time.
18 Turn on the Steps you want to record.
Press the buttons shown to turn them on.
19 Select the Instrument Select parameter.
While holding down [SHIFT], press [STEP 1-8]. Do this repeatedly, if necessary, to call up Instrument
Select. (The “INST SEL” indicator lights.)
Instrument Select is only available for the Rhythm tracks. As you may recall from Tip 11, the Rhythm
tracks contain a huge variety of bass, drum, percussion and other sounds — each assigned to a different
key. Instrument Select is the place you go to choose these sounds for Step recording.
Notice that a cryptic name appears in the display. This indicates the
selected sound. For example, the display below indicates that Snare Drum
#14 is called up.
For a complete list of the sounds and their display abbreviations, see page 140.
20 Enter a bass drum sound for all the steps.
Press button [1], then hold down [SHIFT] and turn the [PORTAMENTO] knob to select “bd05.” All
steps 1 - 16 are instantly and automatically set to the same value.
Remember, you can use the [DATA] knob instead for finer control. Just press the appropriate number
button, then tweak the [DATA] knob to dial up the desired sound.
Press the Start/Stop button to hear the new track — a bass drum pulse that will be the foundation of this
new rhythm.
In the Fast Lane — Working Smart
Once you get to know your way around the controls, you can Step Record
your tracks fairly quickly. The trick is in getting the system down to a routine. So, here’s the routine!
1) Select the desired track.
Press [SYNTH TRACK] or [RHYTHM TRACK].
2) Turn on the desired Steps.
Press the appropriate Step buttons, so that they light.
3) Call up the desired parameter.
Hold [SHIFT] and press [STEP 1-8] to call up Instrument Select, Pitch,
Gate Time, or Velocity.
4) Press the desired number button and change the value.
Use the knob directly above it, or use the [DATA] knob.
76
While editing you may want to turn other Steps on or off. To do this
quickly and return to editing:
1) Press [EXIT] (to leave the current parameter).
2) Turn the desired Steps on or off.
3) Press [STEP 1-8] or [STEP 9-16] (to return to current parameter).
And remember — at any point in the operation, you can:
• Select a different track.
Press [SYNTH TRACK] or [RHYTHM TRACK].
• Play the Pattern to hear your edits.
Press the Start/Stop button.
• Mute or un-mute individual tracks.
Hold [SHIFT] and press [1], [2], [3], or [4].
Chapter 14 Pattern Recording
■ Overdubbing the Hi-hat — Rhythm Track 2 • • • • • • • • • • • • • • • • • • • • • • • • •
Now, let’s flesh out the rhythm a bit with some hi-hat parts — and add a turntable scratch at the end.
21 Using the “In the Fast Lane” box above as a guide, go on to Rhythm
Track 2, and make the settings as described here.
Turn the indicated buttons on and set them to the instruments shown.
While you’re programming the instruments, let the Pattern play. Hearing the sounds as you
enter them is a great help in constructing hip tracks.
■ Snare and Ethnic Spice — Rhythm Track 3 • • • • • • • • • • • • • • • • • • • • • • • • •
For the final mix, we’ll record a snare backbeat — and throw in some Indian tabla and other percussion for
good measure.
22 Have you got the hang of the things by now? Use “In the Fast Lane” above as a
cheat sheet if necessary, and program Rhythm Track 3 as shown.
77
Chapter 14 Pattern Recording
■ Fine Tuning Your Tracks — Pitch, Gate Time, and Velocity • • • • • • • • • • • • • •
Before you run off, remember that the Rhythm Tracks can be edited some more with the Pitch, Gate Time,
and Velocity parameters.
23 We won’t tell you exactly what to do — you can explore these on your
own. However, here are some guidelines and paths to follow:
● Pitch
Yes, the drum and percussion sounds can be pitch-changed. So can all the scratches and sound
effects. Everything’s fair game and nothing’s safe. This is your chance to go wild with the rhythm!
● Gate Time
Experiment with the length of each note — clipping some here, extending some there. Typical uses
include stretching out the sound of a cymbal, so you hear the full decay, or cutting off the sustain of a
tom sound, for a short, sharp chop.
● Velocity
Accentuate the positive. Bring out certain important instruments in the mix by boosting their velocities. Similarly, turn the velocity down for instruments that seem too loud.
24 Last and certainly not least — save your work.
Now that you have the slamming basic track for your new Grammy-winning, Platinum-selling Techno/
Dance hit — you’d better save it. (For information on saving, see Tip 60.)
And that’s it! Unless of course you want to go back and re-edit everything to your own exacting specifications. After all, you’re the boss.
Rhythm Tracks
• Start with the beat
When you record a Pattern, it’s best to start out with the Rhythm tracks. In fact, you might
want to record just a temporary rhythm “scratch track” (for example, bass drum and snare) to
Rhythm Track 1, and build the rest of the Pattern on top of that — erasing or modifying the
scratch track later.
Of course, it’s all up to you! Depending on what style of music you record and your own personal preferences, you may want to start with the Synth track instead.
• Play with Gate Time
Remember Gate Time can also be a “global” effect. Playing back the rhythm you’ve just programmed, mute the Synth track and experiment with different Gate Time settings. (Hold
[SHIFT] and press [REVERSE]; use [DATA] knob to change.) Try settings of 30, 50, and 200
on all three Rhythm tracks — and hear what happens!
• Swing
For an instant hip-hop approach, try changing the Swing! While the Pattern is playing, press
[SWING] and use the [DATA] knob to set the value to 65 or 70.
78
Step Recording
Allows you to enter the notes to a Pattern in
one-by-one, as opposed to recording them in
real time (in Real-time Recording; see page
70).
1. Clear a Pattern and set the Beat (hold
[SHIFT] and press [SWING]).
2. Select a track with [SYNTH TRACK] and
[RHYTHM TRACK].
3. Turn all desired Steps on by pressing each
Step button.
4. Simultaneously hold [SHIFT] and press
[STEP 1-8] to select Steps 1 - 8 for editing;
press repeatedly to toggle through event
types. (Use [STEP 9-16] in the same way
to select and edit Steps 9 - 16. Or simply
press button [9] after editing Steps 1 - 8.)
5. With event type selected, use knobs above
the Step buttons (and the DATA knob) to
adjust value.
6. Turn steps on/off by pressing [EXIT] (to
leave editing), then pressing appropriate
Step button.
7. Press Start/Stop button to play back. (Can
be done at any point in procedure.)
Chapter 14 Pattern Recording
Event Parameters — Synth and Rhythm Tracks
Pitch
Determines the pitch of the selected note. For the Synth track, this is
expressed as note names; for the Rhythm tracks, it is expressed as number of semitone steps. (The small “o” in the note name display designates
accidentals. For example, “
” corresponds to G#.)
Range
C-2 — G8 (-64 — 24 for Rhythm tracks)
Gate Time
Determines the length of the selected note. The higher the value, the
longer the note length. For sounds that have a short decay, higher values
may have little to no effect.
Velocity
Determines the volume of the selected note. Use this parameter especially
to create accents in the Pattern.
Range
0 — 127
Instrument Select
Determines the instrument sound for the selected note. This parameter is
available only for the Rhythm tracks.
Range
(Refer to list on page 140.)
Range
1 — 1600
60
Storing your new Pattern
Now that you’ve created a new Pattern, you’ll want to save it for future recall. The Store function lets you do
this quickly and easily. And remember, any and all changes you’ve made to the accompanying Voice —
including your knob and button settings, Free EG moves, and Effect edits — are stored with the Pattern, too.
The AN200 gives you 128 User memory spaces for saving your original Patterns.
Once you’ve created a Pattern (or Voice) you want to save, DO NOT select another Pattern until
you’ve stored it. Selecting another Pattern (or Song) automatically wipes clean any changes or
edits you’ve made!
■ Turn Memory Protect Off • • • • • • • • • • • • • • • • • • • • • • • • • • • • • • • • • • • • • •
Before you store, make sure the Memory Protect function is off. If it is on, you won’t be able to store your
Pattern.
1 Simultaneously hold down [SHIFT] and press [16]
(UTILITY SETUP).
You may have to press the button more than once to call up the “Prot”
(Memory Protect) display below.
2 If Memory Protect is set to on, use the DATA knob to change it to off
(“oFF”).
Unless you’ve changed the setting yourself, Memory Protect will probably be off.
79
Chapter 14 Pattern Recording
■ Store the Pattern • • • • • • • • • • • • • • • • • • • • • • • • • • • • • • • • • • • • • • • • • • • •
Storing your original Pattern is as easy as 1-2-3.
1 First, make sure your new Pattern is selected and that
Memory Protect is off. Then, press [STORE]. (“P.Str”
briefly appears to indicate the Store operation.)
2 Select the desired User Pattern number (1 - 128) with
the DATA knob.
3 Press [STORE] again to actually store the Pattern, or press [EXIT] to cancel.
■ Selecting User Patterns • • • • • • • • • • • • • • • • • • • • • • • • • • • • • • • • • • • • • • •
Now that your Pattern is properly saved to memory, you can call it up any time you want. Select it the same
way you select the preset Patterns — pressing [PATTERN] and using the DATA knob. The User Patterns
come after preset Pattern 256.
For a quick way to select User Patterns, hold down [SHIFT] and press the [PATTERN] button. This toggles between the Preset Patterns and the User Patterns.
• Save your Patterns in bulk
If you have a sequencer or MIDI data filer, you can use the AN200’s Bulk Send function (page
108) to save your valuable Pattern and Voice data in multiple “banks” of 128 Patterns. Load
each bank of 128 back to the AN200 when you need it — or share your banks with your
AN200-equipped friends and bandmates. Keep in mind too that you can use Bulk Send with
the computer-based AN200 Editor (page 106) to further edit your Voices.
• Make it a habit
Did we mention that you should save? Save, save, and keep saving! Even if you’re still working on a Pattern or Voice and don’t consider it finished, save it anyway.
Why? Doing this gives you an archive of the changes you’ve made along the way — in case
you want to call one of them up again. You can always delete those archive Patterns later
(page 68) if you need extra memory space. Or, if you’re a “pack rat,” you can use Bulk Send
(see hint above) to save every single thing you’ve ever created.
Memory Protect
Determines whether you can store Patterns
to memory or not. Set this to ON when you
want to avoid inadvertently erasing or replacing any previously stored User Patterns.
Hold down [SHIFT] and press [16] until
“Prot” (Protect) appears briefly in the display. Use the DATA knob to change the setting.
Settings
Off (“oFF”), On (“on”)
Store Pattern
Allows you to save Pattern and Voice data to
one of 128 User memory locations.
With the new Pattern still active and Memory
Protect off, press [STORE]. Select the
desired User number with the DATA knob,
and press [STORE] again to execute, or press
[EXIT] to cancel.
80
Chapter 15
Song Recording
You’ve got a humongous selection of Patterns at your disposal. It’s time now
to put them together and make some Songs.
61
Erasing a Song — and starting from scratch
The first thing you’ll need to do when you create your own Song is to make room for it on the AN200. To do
that, you’ll have to erase or clear one of the existing Songs.
1 Make sure the Song mode is selected.
Press the [SONG] button.
Indicates Song
mode is active.
2 Select the Song to be cleared.
Make sure that it’s a Song you don’t mind getting rid of. Actually, this
doesn’t really erase the Song right away. The Song data still stays in memory — until you save your new Song to that number.
3 Simultaneously hold down [SHIFT] and press [9]
(CLEAR SONG).
4 Clear the Song.
Release [SHIFT] and press [9] once again (the button stops flashing and
stays lit). At the “Y£n” (“Yes or no?”) prompt, press it a third time to actually clear the Song, or press [EXIT] to cancel.
• Don’t erase... Edit a Song!
Remember, you don’t need to put a Song together from scratch. If there’s a preset Song you
like and simply needs a little customizing to make it your own, just call it up and edit it instead.
Take Patterns out, put new Patterns in, and perform a variety of transformations on the Pattern
data — the info starts on page 84.
Clear Song
Allows you to clear Pattern assignments and
other edits of a Song. (Remember, this does
NOT affect the actual data of any Patterns.)
Select the Song, then use [SHIFT] and [9] to
call up “CLr” (Clear). Press [9] twice to
execute.
81
Chapter 15 Song Recording
62
Creating a Song
Finally, we come to the culminating feature of the AN200. This is the place where you bring together all the
Voices, Scenes, Free EG moves and Patterns you’ve made — and use them to create your own original
Songs.
1 Call up the Song mode and clear a Song.
Give yourself a blank slate for putting together your own Song. (Have you tried clearing a Song yet? If
not, go back to Tip 61 and do it now.)
2 Call up the Song Edit mode.
You’ll need to enter the Song Edit mode to do any Song recording or editing. To do this, simultaneously hold down [SHIFT] and press the [SONG]
button.
The PATTERN indicator should flash. If PATTERN is NOT flashing, press
[PATTERN SELECT] to get it flashing and enable Pattern number entry.
3 Select the measure to which you want to record.
Simultaneously hold down [SHIFT] and use the [OCT <<]/[OCT >>] ([BWD]/[FWD]) buttons to move forward or backward in the Song, measure-by-measure.
Also, try this alternate method below — and move more quickly and easily through the measures.
1) Hold down [SHIFT] and press either of the [BWD]/[FWD] buttons.
2) Then, release the buttons, and use the [DATA] knob.
In this condition, turning the [DATA] knob steps through the measures. For even speedier selection, hold
down [SHIFT] while turning the [DATA] knob — and jump through the Song ten measures at a click.
4 Press the Start/Stop button.
Doing this loops the currently selected Pattern at the currently selected measure. This allows you to hear
your Song edits in the steps below — in real time.
If you want, you can stop playback by pressing the Start/Stop button before going on to Step 5 below.
Or keep it going and continue editing while the Pattern loops.
5 Select the Pattern number to be assigned (to the measure selected
above).
Use the DATA knob. Any of the Patterns can be selected — Preset or User. Remember that you can easily switch between the Preset Patterns and the User Patterns by holding down [SHIFT] and pressing the
[PATTERN] button. (See page 80.)
You may also want to record an initial BPM setting at the first measure of your Song. This
determines the basic tempo for the entire Song. For more information, see Tip 63.)
82
Chapter 15 Song Recording
6 Keep assigning Patterns in this way, repeating Steps 3 - 5 above, until
you’ve created a new Song.
In most cases, you’ll want to repeat a Pattern over several measures, rather than having a different Pattern every measure. To do this, first set the Pattern you want to repeat. Then, in the following measures,
turn the DATA knob counter-clockwise until “----” appears in the display.
This setting selects no new Pattern, and keeps the previous Pattern playing through the measures
assigned this way.
By the way, if you’re creating a Song from scratch, you may not need to enter “----” at all. Just skip
over the measures that you want to stay the same — the AN200 automatically repeats the last Pattern,
until the next new entry.
7 To end the Song, record the “End” mark.
Select the measure FOLLOWING the final measure in the Song, then turn the DATA knob counter-clockwise until “End” appears in the display.
For example, if you recorded the “End” mark to measure 33, the Song plays up through measure 32, then
stops.
8 Press [EXIT] (or the [SONG] button) to leave Song editing.
9 Play back your new Song by pressing the Start/Stop button.
However, you’ll have to use the [BWD]/[FWD] buttons ([SHIFT] + [OCT <<]/[OCT >>] buttons) to select
the starting measure. Make sure to return to the beginning measure — if you want to hear the Song all
the way through.
10 Last and most important — don’t forget to store your new Song.
Go on to Tip 67 right now and save your latest masterwork.
• Recording other data
In addition to Pattern numbers, a variety of other data types can be recorded to the measures
of a Song — such as BPM, Gate Time, Swing, and Reverse. (See page 85.) These let you
change various playback characteristics of the Patterns to suit your Song — without actually
having to change the Pattern data itself!
Song Edit Mode
Call up this mode for recording and editing
Songs. Hold down [SHIFT] and press
[SONG]. (The “S” in the display indicates the
Song mode.)
Measure Select
Determines the measure for recording, editing, and playback. Hold down [SHIFT] and
use the [OCT <<]/[OCT >>] buttons.
83
Chapter 15 Song Recording
63
Setting the BPM (tempo) for your new Song
In addition to the Patterns, a variety of other settings can be programmed into your Song. One of these is
BPM. It lets you set the playback speed or tempo — for each and every measure, if you want.
Normally, you’ll use this at the start of the Song (see Tip 62, Steps 3 - 5) to make sure the entire Song plays
back at the proper tempo. However, it can also be used to change tempo in middle of the a Song as well.
Work through these steps, and master the procedure. You’ll be using the same method in Tip 64 to program
other settings, too.
1 Enter the Song Edit mode.
Hold down [SHIFT] and press the [SONG] button.
2 Select the desired measure.
Hold down [SHIFT] and use the [OCT <<]/[OCT >>] buttons.
3 Play back the Pattern.
Press the Start/Stop button to loop the Pattern at the selected measure.
4 Call up the BPM setting.
Hold down [SHIFT] and press [BPM] ([TAP]).
5 Set the desired BPM value with the DATA knob.
6 Repeat Steps 2 - 5 above as often as you want, for as
many measures as needed.
In most cases, you’ll want to keep the same BPM setting over several measures, or even over the entire
Song. To do this, enter the “----” setting for as many measures as needed. Or, if you’re programming
the Song from scratch, just skip over the measures that you want to stay the same — the AN200 automatically maintains the last setting, until the next new entry.
• Fine tempo changes
The BPM value has an extremely fine resolution of 1/10 beats per minute — for precise control
over the tempo. Use this to set up very gradual speed changes.
• Speed up, slow down
If your Song fits the conventional verse/chorus structure, you might want to play around with
changing the BPM at the beginning of each section. For example, some artists make their choruses slightly faster than the verses, to generate more excitement each time the chorus
comes. Other songs might benefit from the completely opposite approach — slowing down
the chorus to make it sound more dramatic.
Whichever approach you take, make sure to keep the changes consistent from section to section, and keep them small — you want your listeners to FEEL the changes, not consciously
HEAR them.
84
Song Edit — BPM (Tempo)
Determines the speed of Pattern playback (in
beats per minute, or bpm), for the selected
measure. First, select the measure by holding down [SHIFT] and using the [OCT <<]/
[OCT >>] buttons. Then, hold down [SHIFT]
and press [BPM] ([TAP]), and use the DATA
knob to set the value.
Range
20.0 — 300.0 bpm
A setting of “----” maintains the previous measure’s value (no change).
Chapter 15 Song Recording
64
More Song editing features
In Tips 62 and 63 above, you learned how to enter Pattern numbers and BPM values to the measures of your
Song. But that’s not all you can do. In this Tip, we’ll show you how to use the rest of the powerful Song
editing features in your tunes.
By the way, we’ll keep these instructions to the bare-bones minimum. Read about these cool tools, then try
using them in your own Songs and see what you come up with.
Remember, the basic method is the same for all:
1) Enter the Song Edit mode.
(In the Song mode, hold down [SHIFT] and press the [SONG] button.)
2) Select the desired measure.
(Hold down [SHIFT] and use the [OCT <<]/[OCT >>] buttons.)
3) Play back the Pattern.
(Press the Start/Stop button.)
4) Select the event type you want to edit.
(See instructions for each event below.)
5) Set the value.
(Use the DATA knob. In the case of Track Mute below, follow the relevant instructions.)
Naturally, repeat Steps 2 - 5 as often as needed. Press [EXIT] when you’re done editing. And don’t forget to
store your new creation. (See page 89.)
Pattern
(Described in Tip 62 above.)
To select:
Press the [PATTERN SELECT] button.
Pitch Offset
Just as with the similar Pattern control (Transpose; on page 36), this lets you change the playback pitch.
By making different settings throughout various measures in the Song, you can program your own chord
progressions, and have the Patterns change key.
To select:
Hold down [SHIFT] and press the [KEYBOARD] button.
Both the [KEYBOARD] button and the PITCH lamp flash, indicating Pitch Offset is selected.
BPM
(Described in Tip 63 above.)
To select:
Hold down [SHIFT] and press the [TAP] button.
Beat
This lets you change the total number of steps in the Pattern at the selected measure. (For details, see
Tip 6.) One use of this would be to create a half-bar Pattern. For example, if you’ve entered a 16-step
Pattern at the measure, setting this to “8” would effectively cut the Pattern in half. If you’re only aiming
for a brief change, remember to reset the Beat in the next measure or so!
To select:
Hold down [SHIFT] and press the [BEAT] ([SWING]) button.
Both the [SWING] button and the BEAT lamp flash, indicating Beat is selected.
85
Chapter 15 Song Recording
Swing
This lets you introduce a swing feel to the Pattern at the selected measure. (See Tip 27 for more information.)
To select:
Press the [SWING] button.
The [SWING] button lights, indicating Swing is selected.
Gate Time
This lets you control the length of the notes for the Pattern at the selected
measure. (See Tip 25 for more information.) You could use this to create
tracks in which the notes grow progressively longer as the Pattern cycles
— by programming successively higher Gate Time values in the measures.
Or have the notes become more and more clipped (staccato) — by making
Gate Time lower and lower in successive measures.
To select:
Hold down [SHIFT] and press the [GATE TIME] ([REVERSE]) button.
Both the [REVERSE] button and the GATE TIME lamp flash, indicating Gate Time
is selected.
Reverse
By setting this to Reverse (“bAC)”), you can have the Pattern at the
selected measure play backwards. (See Tip 25 for more information.)
Alternate between forward and reverse Patterns for special effects. Or program three forward, one reverse — for an interesting four-bar phrase.
To select:
Press the [REVERSE] button.
Song Edit — Event Select
This lets you select the particular event to be
recorded or edited in a Song. Eight event
types are available: Pattern Select, Pitch Offset, BPM (page 84), Beat, Swing, Gate Time,
Reverse, and Track Mute. To select, make
sure Song Edit mode is active ([SHIFT] +
[SONG]), then press the appropriate button
(using [SHIFT] if necessary). Alternately,
hold down [SHIFT] and press [SONG] repeatedly to toggle through all eight event types.
Pattern Select
Press [PATTERN SELECT].
Range
P.001 — P.256 (Preset Patterns)
U.001 — U.128 (User Patterns)
Pitch Offset
Hold [SHIFT] and press [KEYBOARD].
Range
-24 — 0 (no change) — 24 semitones
The [REVERSE] button lights, indicating Reverse is selected.
Track Mute
Add some texture to your Song with this function. By recording Track Mute
events you can have tracks drop in and out of your arrangements, for exciting dynamic changes.
To select and edit:
Hold down [SHIFT] and press either the [SYNTH TRACK] or [RHYTHM TRACK]
button. Then, press the appropriate Step button: [1] for the Synth track, and
[2], [3], and [4] for the Rhythm tracks. The status for each track is shown in the
display.
BPM
Hold [SHIFT] and press [TAP].
Range
20.0 — 300.0 bpm
Beat
Hold [SHIFT] and press [SWING].
Range
16, 12, 8 steps
Swing
Press [SWING].
Range
50 — 83
Gate Time
Hold [SHIFT] and press [REVERSE].
Indicates Synth track
is on.
Indicates Rhythm track 1
is muted.
Range
1 — 200
Reverse
Press [REVERSE].
Settings
Forward (For)
Reverse (bAC))
• Easier way
Keep in mind — there is an alternate way to select the various event types. You may find it
easier to remember — AND easier to use! Simply hold down [SHIFT] and press [SONG]
repeatedly. This toggles through all of the event settings in order: Pattern Select, Pitch Offset,
BPM (Tempo), Beat, Swing, Gate Time, Reverse, and Track Mute.
86
Track Mute
Hold [SHIFT] and press the [SYNTH TRACK]
button or the [RHYTHM TRACK] button.
Then, press [1], [2], [3], or [4] (for Synth
track and Rhythm tracks 1 - 3). The mute on/
off status for each track is shown in the display.
Chapter 15 Song Recording
65
Adding Patterns to your Song — Insert Pattern
Naturally, you can add Patterns to your existing Songs — by using the Insert Pattern function. This puts a
new Pattern in the Song at the measure you specify.
It doesn’t matter whether you’re in the Song mode or the Song Edit mode — you can insert a Pattern from
either.
1 First, select the measure you want to insert the Pattern to, by holding
[SHIFT] and using the [OCT <<]/[OCT >>] buttons.
2 Call up the Insert Pattern function.
Hold down [SHIFT] and press [10] (INS/DEL PTN). You may have to press
the button more than once to call up the “inS” (Insert Pattern) display.
3 Next, select the Pattern you want to add to your Song.
Use the DATA knob.
4 Insert the selected Pattern.
The [10] button should be flashing. Press it once again (the button stops flashing and stays lit). At the
“Y£n” (“Yes or no?”) prompt, press it a third time to actually insert the Pattern to the selected measure,
or press [EXIT] to cancel.
Take a look at the illustration below and see what happens when you insert a Pattern.
Measure 1
Measure 2
Measure 3
Measure 4
Pattern 012
Pattern 012
Pattern 013
Pattern 014
Pattern 144
Here, Pattern 144 is inserted to
Measure 3, and all following Patterns are moved over to make
space for the new Pattern.
Measure 1
Measure 2
Measure 3
Measure 4
Measure 5
Pattern 012
Pattern 012
Pattern 144
Pattern 013
Pattern 014
Don’t forget to store your newly edited Song, or you’ll lose any edits you’ve made once you turn the power
off or select another Song or Pattern.
• Replacing a Pattern
If you want to replace a Pattern — in other words, erasing one and putting a new one in its
place — you’ll need to use Delete Pattern (page 88) to delete the Pattern first. Then, use Insert
Pattern to put the new one in.
Insert Pattern
Allows you insert a Pattern to any measure
within an existing Song. All subsequent Patterns/measures are displaced.
With Song (or Song Edit) mode active, hold
[SHIFT] and use [OCT <<]/[OCT >>] buttons
to select desired measure. Hold [SHIFT] and
press [10] to call up “inS” (Insert), select
the desired Pattern number with the DATA
knob, and press [10] twice to execute.
87
Chapter 15 Song Recording
66
Taking Patterns out of your Song — Delete Pattern
If you’ve made a mistake in creating your Song, you can always clear it (page 81) and start over. Or you can
use Delete Pattern to erase the offending entry, and keep the other Patterns intact.
Delete Pattern lets you take Patterns out of specific measures in your existing Songs. Keep in mind, however, it makes your Song shorter by one measure AND it doesn’t leave an empty space — any Patterns that
follow the deleted one move back to fill the vacated measure.
Delete Pattern can be used in either the Song mode or the Song Edit mode.
1 First, select the measure that contains the Pattern you want to delete.
Hold [SHIFT] and use the [OCT <<]/[OCT >>] buttons.
2 Call up the Delete Pattern function.
Hold down [SHIFT] and press [10] (INS/DEL PTN). You may have to press
the button more than once to call up the “dEL” (Delete Pattern) display.
3 Delete the Pattern.
The [10] button should be flashing. Press it once again (the button stops flashing and stays lit). At the
“Y£n” (“Yes or no?”) prompt, press it a third time to actually delete the Pattern from the selected measure, or press [EXIT] to cancel.
Here’s an example of what happens when you use Pattern Delete. In the illustration below, we’ll delete
Pattern 013 at Measure 3.
Measure 1
Measure 2
Measure 3
Measure 4
Pattern 012
Pattern 012
Pattern 013
Pattern 014
Here, Pattern 013 is deleted from
Measure 3, and Pattern 014 moves
over to take its place.
Measure 1
Measure 2
Measure 3
Pattern 012
Pattern 012
Pattern 014
Don’t forget to store your newly edited Song, or you’ll lose any edits you’ve
made once you turn the power off or select another Song or Pattern.
Delete Pattern
Allows you delete a Pattern from any measure within an existing Song. All subsequent
Patterns/measures move back to fill the
vacant measure.
With Song (or Song Edit) mode active, hold
[SHIFT] and use [OCT <<]/[OCT >>] buttons
to select desired measure. Hold [SHIFT] and
press [10] to call up “dEL” (Delete), and
press [10] twice to execute.
88
Chapter 15 Song Recording
67
Storing your new Song
Now that you’ve created and arranged a new Song, you’ll want to save it for future recall. The AN200 gives
you a total of 10 memory spaces for saving your original Songs.
Once you’ve created a Song you want to save, DO NOT select another Song and DO NOT leave
the Song mode until you’ve stored it. Selecting another Song (or Pattern) automatically wipes
clean any changes or edits you’ve made!
Delete Pattern can be used in either the Song mode or the Song Edit mode.
1 Make sure Memory Protect is turned off.
Hold down [SHIFT] and press [16] until the “Prot” (Protect) display is shown. Then, set Memory Protect to OFF with the DATA knob.
Press the [EXIT] button to leave Memory Protect.
2 With your new Song still up and waiting, press
[STORE].
“S.Str” briefly appears to indicate Store operation.
3 Select the desired Song number (01 - 10) with the
DATA knob.
4 Press [STORE] again to actually store the Pattern, or press [EXIT] to cancel.
• Keep on saving
Save ALL of your Songs — memory is cheap! If you have a sequencer or MIDI data filer, you
can use the AN200’s Bulk Send function (page 108) to save your valuable Song data in multiple “banks” of 10 Songs to disk — and build up a whole library of tunes.
However, make sure to save any relevant Pattern data with the Songs and load them together.
If you don’t do this, your Songs and Patterns may not match each other!
• Song backup
You may want to use Store to save different versions of your Song — even as you’re working
on it. This gives you an archive of the changes you’ve made along the way — in case you want
to call one of them up again. You can erase the unneeded versions later if you want.
Store Song
Allows you to save Song data to one of 10
Song memory locations.
With the new Song still active and Memory
Protect off, press [STORE]. Select the
desired Song number with the DATA knob,
and press [STORE] again to execute, or press
[EXIT] to cancel.
89
Chapter 16
Speed Tips for
Power Users
Work smarter, not harder!
In this section, we’ll show you some nifty ways to put your editing in high gear
— so you can get MORE out of your AN200 in LESS time.
68
Using [SHIFT] with the [DATA] knob — for leaps
and bounds!
The [DATA] knob is really useful for narrowing in on a value and fine-tuning the parameter settings. However, if you’re in a hurry and want to quickly jump through the available values, it can be cumbersome.
Not when you use the [SHIFT] button, however. To speed up the [DATA] knob, hold down [SHIFT] while you
turn it.
Use this operation especially:
• For selecting Patterns
This speed operation lets you jump 10 Patterns for every click of the [DATA] knob.
• For setting the BPM
Holding [SHIFT] lets you go 10 times faster through the BPM values (1 bpm/click).
• For Instrument Select (in Step Recording, Rhythm Track)
Jump among the instrument selections, then take your finger off [SHIFT] and narrow your selection
down.
Actually, this [SHIFT]-[DATA] knob shortcut is useful for just about ANY value-changing operation. Use it
for the synth-related knobs, and use it to jump around on playback controls, such as Gate Time and Transpose.
90
Chapter 16 Speed Tips for Power Users
69
Using [SHIFT] to “hold” a setting
Editing on the AN200 is quick and easy — you press a button or turn a knob, and the setting/value changes.
However, convenient as it is, there are times when you want to select a parameter without changing it.
Here’s an example. Let’s say you’ve selected the “hidden” Reverb Effect in your editing session, and you go
on to edit something else. Wanting to come back to edit Reverb again, you press the EFFECT [TYPE] button.
Whoops... You’ve just changed the Effect Type to Flanger!
To get around this, use [SHIFT]. Hold down [SHIFT], then press EFFECT [TYPE]. Doing this calls up the current Effect Type — without changing it.
Use this operation with ALL of the Voice “button” settings — such as LFO Detail, EG Select, Key Assign, and
so on.
70
Gang-editing a group of Steps
No, we’re not advocating the use of violence here... This convenient Step Recording shortcut lets you
change the setting for up to 16 Steps — instantly and all at the same time.
1 In Step Recording, select the desired parameter for editing: Pitch, Gate
Time, or Velocity. (Or Instrument Select, if you’re working on a Rhythm
track.)
2 Select the Step row you want to start the group from.
For example, if you want to group Steps 5 -16 for editing, select row 1 - 8 (by pressing any button in this
row). If you want to group-edit Steps 11 - 16, select row 9 - 16.
3 Hold down [SHIFT] and turn the knob corresponding
to the first step in the group.
If you’ve selected the top row (1 - 8) in Step #2 above, this will instantly
and automatically set all Steps 5 - 16 to the same value. If you’ve
selected the bottom row (9 - 16), turning the NOISE LEVEL knob will set
Steps 13 - 16 to the same value.
Typical uses of this include:
• Setting all Steps to the same instrument (in the Rhythm tracks).
• Setting all Steps to the same Velocity or Gate Time, then slightly tweaking individual Steps for variation.
• For when several Steps have the same value — you can set all Steps at once, then go back and change
only the Steps you want to have different values.
91
Chapter 17
Real World Tips
This chapter is a grab bag full of various practical tips that solidify your programming chops and put you on the way to truly mastering the instrument.
You’ve seen all these features before. Now, try them out in these real-world
examples — and explore some new, uncharted sound-shaping paths on your
own.
71
Adjusting the Gate Time with the [DATA] knob
Gate Time is a simple, yet effective way to change both the sound and feel of a Pattern. Try this tip in real
time, as the Pattern is playing — for dramatic, dynamic shifts.
1 Select and play a Pattern.
2 Call up Gate Time.
Hold [SHIFT] and press [GATE TIME] ([REVERSE]).
3 Tweak the [DATA] knob slowly to the left.
Very gradually, start turning Gate Time down — from 100, down to 40, 20, then even 10 or 1.
Hear what this does to all the tracks? Hear how everything — including the drums — is clipped, creating a tight, muted sound and producing a drop in dynamics.
4 Now, as quickly as you can, bring Gate Time back up to 60, 80 or 100 — or
more.
Hold [SHIFT] while you turn the [DATA] knob — that lets you jump through the values, and instantaneously bring the dynamics back up. Try to do it right before the first beat of a measure — and kick
everything back in on the “one.”
72
Adjusting the pitch with the [DATA] knob
Let’s do some more work with the [DATA] knob. This time we’ll play around with the pitch — using the
Transpose function.
1 Select and play a Pattern.
2 Call up Transpose.
Hold [SHIFT] and press [TRANSPOSE] ([KEYBOARD]).
3 While the Pattern is playing, use the [DATA] knob to
bring the pitch up and down.
For wild pitch changes, hold down [SHIFT] while you work the knob. Try alternating on beat between two
widely different values (for example, “-20” and “30”). Try also whipping the pitch way up in 60s
range, then bringing down to the 40s. Try random pitch changes, too, as the Pattern cycles. Lots of fun
stuff here!
92
Chapter 17 Real World Tips
73
Changing the pitch with the keyboard
As you saw in Tip 26, you can use the keyboard of the AN200 to change pitch and even create chord progressions on the fly. But you can get really wild and crazy with this feature, too — and come up with some
truly mad techno mayhem.
1 Select and play a Pattern.
2 Call up Transpose.
Hold [SHIFT] and press [TRANSPOSE] ([KEYBOARD]).
3 Now, “play” the pitch changes from the keyboard.
Try out these specific exercises and see where they take you!
• Starting with button [9] (low C on the keyboard), go up chromatically — pressing each successive key
in turn. Try it in rhythm, pressing a different key every other beat, like this:
ONE
two THREE four
ONE
two THREE four
ONE
two THREE four
ONE
two THREE four
ONE
two THREE four
ONE
two THREE four
Count “ONE-two-THREE-four,” hitting the buttons on “ONE” and “THREE.”
• Use the [OCT <<]/[OCT >>] buttons, too! Try selecting different octaves on the fly, and pressing various keys.
• Can you play a two-finger trill? (A trill is two notes played alternately — very quickly.) If you can’t do
it with one hand, try two. For example, alternate between buttons [10] and [12] (D and F), like this:
ONE
AND
TWO
AND
THREE
AND
FOUR
AND
Here, you play two keys on every beat — count “ONE-AND-TWO-AND-THREE-AND-FOUR-AND,” and hit
each count!
93
Chapter 17 Real World Tips
74
Stutter fill-in 1
Remember in Tip 50 how you hit the top of a Pattern? In this Tip, and the two that follow, let’s try some specific “stutter” rhythm examples.
Select and play a Pattern. Then, hold down [SHIFT] and hit the [TOP] (Record) button in the following
rhythm.
ONE
TWO
THREE
Start !
FOUR
ONE
Hit it here...
... and here !
Use your left hand to hold down [SHIFT], while your right hand
hits [TOP]. This gives you greater control over the rhythm!
75
Stutter fill-in 2
Select and play a Pattern. Then, hold down [SHIFT] and hit the [TOP] (Record) button in the following
rhythm. Use both hands. This one’s a bit tricky...
Count as shown, and hit each
count indicated by the arrows.
ONE
ONE
ONE
94
TWO
AND
TWO
THREE
AND
THREE
FOUR
AND
FOUR
AND
Chapter 17 Real World Tips
76
Stutter fill-in 3
Select and play a Pattern. Then, hold down [SHIFT] and hit the [TOP] (Record) button in the following
rhythm. Use both hands on this one too. This could take a little practice before you nail it...
ONE
Start !
77
TWO
Hit it here...
THREE
... and here !
... and
here !
FOUR
... and
here !
ONE
... and
here !
... and here !
Assigning Patterns for your gig
When you perform live, you need to think quick and move fast. So keep things simple — and use this tip to
help you streamline your onstage work.
You saw in Tips 3 and 31 how you can use the Pattern Select feature to instantly switch Patterns as you perform. If you’ve got a lot of Patterns to trigger during a performance, it makes sense to lay them out in the
order you’ll use them. That’s what Pattern Assign is for.
First, make a list of the Patterns you’ll need, in the order you’ll use them. Then, go down the list and assign
the appropriate Pattern to each number button. (Remember how? Hold down [SHIFT] and press [PATTERN
ASSIGN], then press a number button and use the [DATA] knob to select the Pattern.)
78
Chord progressions with Pattern Assign
If you work with chord progressions, you can create copies of a Pattern select setup to different pitches, and
play those Patterns from the keys.
Use the Copy Sequence function (page 67) to copy a Pattern several times. Then, edit each Pattern copy as
needed with the Pitch function (page 66). Finally, use Pattern Assign (page 40) to assign the Patterns to the
appropriate keys.
Keep things simple and logical. Assign a Pattern to the matching key. In other words, if your Pattern is in
the key of C, assign it to button [9]. If the Pattern’s in F, assign it to [12]. A Pattern in G would go to button
[13], and so on.
95
Chapter 18
Master Class 1 —
Onstage
Now that you’ve got the hang of the instrument, it’s time to start strutting your
AN200 chops onstage. There are a lot of truly amazing things you can do with
the AN200 — especially once you put it together with some other MIDI gear.
Here are some ideas to get you started...
79
Sync the AN200 to your sequencer
The sophisticated sync features of the AN200 let you lock it in step with the rhythm of just about any other
MIDI device, such as a computer, rhythm machine or external sequencer. No drift, no glitching, no slipping
out of sync — the two machines stay perfectly in the same groove.
This is great for live situations. For example, you could use a computer or sequencer for your main tracks
and fly in some AN200 Patterns as you perform — while everything stays in perfect sync.
In this application, the sequencer is the “master,” or controlling device, and the AN200 is the “slave.”
1 Set up the AN200 and the sequencer.
Connect the two as shown with a standard MIDI cable.
Speaker
Speaker
MIDI clock
OUTPUT
MIDI IN
AN200
MIDI OUT
OUTPUT
External sequencer
(RM1x, etc.)
INPUT
Amplifier
Mixer
2 Call up the Clock setting on the AN200.
Hold down [SHIFT] and press button [14] (MIDI SETUP), repeatedly if necessary, until “CLo)” appears
in the display.
3 Set Clock to “External.”
Turn the [DATA] knob until “E$t” is shown.
96
Chapter 18 Master Class 1 — Onstage
4 Start song or sequence playback on the other device.
When you start and stop playback on the connected MIDI device, the Pattern or Song on the AN200 starts and stops at the same time. Naturally,
you can change the bpm on the other device, and the AN200 will instantly
and automatically follow right along.
If you want, you can use the AN200 as the master device. Just make sure
the Clock on the AN200 is set to “Internal” — otherwise, you won’t be able
to start the Patterns or Songs from the AN200, nor control the other device.
For settings on the other device, refer to the relevant owner’s manual. (For
an example showing the AN200 as the master, see Tip 82.)
Clock
Sets the AN200 to either send or receive MIDI
clock messages. This determines whether
the AN200 functions as the master or slave in
MIDI sync applications. When using the
AN200 alone or to control a connected
device, set this to Internal (“int”). When
controlling the AN200 from a connected
device, set this to External (“E$t”). Keep in
mind, the Patterns or Songs cannot be
started from the AN200 if this is set to External.
Hold down [SHIFT] and press button [14]
(MIDI SETUP), repeatedly if necessary, until
“CLo)” appears in the display, then use the
[DATA] knob to make the desired setting.
Settings
int (Internal)
Sends MIDI clock messages, for controlling the sync of another device.
E$t (External)
Receives MIDI clock messages, for syncing to another device.
80
Changing the MIDI channels
In general, you won’t need to fool with these settings. But they’re here if you ever DO need them.
The four tracks of the AN200 — Synth and Rhythm 1 - 3 — are fixed to receive
data over MIDI Channels 1 through 4, respectively. To match the tracks to a
controlling MIDI keyboard or sequencer, you may have to change these settings. Each track also features an “off” setting, so you can disable a track’s
MIDI reception if you want.
Here, we’ll show you how to change the MIDI Receive Channel for the Synth
track. The Rhythm tracks can be changed in the same way.
1 Hold down [SHIFT] and press button [14] (MIDI
SETUP), repeatedly if necessary, until “SY.u1” appears
in the display.
2 Change the channel with the [DATA] knob.
MIDI Receive Channel — Synth
Track, Rhythm Tracks 1 - 3
Determines the MIDI channel over which the
appropriate track receives MIDI data. Make
sure the Receive Channel of the desired track
matches the Transmit Channel setting on the
controlling keyboard or sequencer.
Hold down [SHIFT] and press button [14],
repeatedly if necessary, until the desired setting is shown:
“SY.u1” — Synth Track (set to default of
Channel 1)
“r1.u2” — Rhythm Track 1 (set to default
of Channel 2)
“r1.u3” — Rhythm Track 1 (set to default
of Channel 3)
“r1.u4” — Rhythm Track 1 (set to default
of Channel 4)
Use the [DATA] knob to change the value.
The “----” setting corresponds to “off.”
Settings
1 — 16, “----” (off)
97
Chapter 18 Master Class 1 — Onstage
81
Loopfactory setup — with the SU200
As part of Yamaha’s new Loopfactory series, the AN200 is not just a great analog-style synthesizer — it also
excels in loop-based music production systems. In this Tip and the ones that follow, we’ll take a look at
some of ways you can use the powerful and versatile Loopfactory line to shake up the dance floor.
In this simple setup, the AN200 is paired with the SU200 Sampling Unit — a small phrase sampler with a
special Loop Track feature that time-stretches your samples and keeps them all in sync.
Here, the AN200 is the controlling “master” and the SU200 is the “slave.” (For more about masters and
slaves, see Tips 79 and 82.) Make sure you set the SU200 to External Sync for this one (MIDI Clock in the
Job mode). Naturally, the AN200 must be set to Internal Sync (page 96).
Speaker
Speaker
Amplifier
MIDI clock
OUTPUT
MIDI OUT
MIDI IN
LINE
INPUT
AN200
SU200
AUDIO IN
With this playback sync system, you can have the samples on the SU200 sync up perfectly to the Patterns of
the AN200 — thanks to Loop Track Play. Use the the AN200 as a master “switch” for the whole system —
starting the Patterns and the SU200 tracks simultaneously with the Start/Stop button. And as an added
bonus, the SU200 serves double duty as an audio mixer — outputting the sound of both the AN200 and
SU200.
98
Chapter 18 Master Class 1 — Onstage
82
Loopfactory sync system — with the DX200
In case you didn’t know, the AN200 has a sister synthesizer — almost a twin sister, actually. The DX200 has
many of the same sound-shaping controls, plus all of the Pattern and Song features that are found on the AN200.
Yet, as similar as these siblings are, their actual sound is VERY different. The DX200 is a recreation of the
enormously popular DX7 synthesizer, and features a full implementation of the FM Synthesis system that
powered the DX7 — not to mention a stunning array of incredibly dynamic digital FM Voices.
Side by side in a MIDI sequencing environment, these two give you the best of the analog and digital worlds,
and provide an enormous amount of sonic versatility.
But even without a computer or sequencer, you can still get a lot out of these two units, especially in live performance situations — just hook them together and sync them up. With one as the “master” and the other
the “slave,” you can have them play their respective Patterns in perfect sync with each other. Add a DJ
mixer, and you’ve got a compact yet powerful DJ setup for laying down some slammin’ beats.
1 Connect the AN200 and the DX200 as shown.
Here, we’ll use the AN200 as the “master,” to control the DX200.
MIDI clock
MIDI OUT
OUTPUT
INPUT
OUTPUT
MIDI IN
DJ
Mixer
Slave
DX200
MIDI clock master
AN200
Amplifier
Speaker
Speaker
2 Set the Clock on the AN200 to Internal.
Hold down [SHIFT] and press button [14] (MIDI SETUP), repeatedly if necessary, until “CLo)” appears
in the display. Use the [DATA] knob to select “int.”
3 Set the Clock on the DX200 to External.
Move over to the DX200 now. Hold down [SHIFT] on the DX200’s panel and press button [14] (MIDI
SETUP), repeatedly if necessary, until “CLo)” appears in the display. Use the [DATA] knob to select
“E$t.”
4 Select the desired Patterns on both the AN200 and the DX200.
5 Finally, press the Start/Stop button on the AN200.
If you’ve hooked everything up correctly and made the proper settings, both machines should go through
their motions the instant you press Start/Stop on the AN200. Press it again, and they’ll stop together on a
dime.
Work the fader on your DJ mixer to switch between the two units as they play, to mix up your rhythms and
create some truly happening tracks.
99
Chapter 18 Master Class 1 — Onstage
• Syncing Songs
Naturally, you can also play Songs on both machines in perfect sync
with each other. For best results, you should make sure that:
*
*
*
*
The Songs on both the AN200 and the DX200 are of the same length.
The Patterns on both machines work well with each other.
Both Songs have the same Beat settings throughout.
Both Songs don’t deviate too much from each other in the Swing settings, either — unless you’re aiming for some special, weird effects.
83
• Bulk Send your music
To help out in the Power Hint above, try using the Bulk Send function
(page 108) to transfer Songs between the AN200 and DX200. For
example, program a Song on the AN200, then transfer just the Song
data to the DX200. Keep in mind, this will keep your Songs in sync —
however, the Patterns on the respective machines could be wildly different. If you want to keep everything consistent on both devices, Bulk
Send ALL the data from one machine to the other.
Loopfactory sampling
Here’s a nifty little variation on Tip 81 above. First, hook up the outputs of the AN200 and the SU200 to an
external mixer — to pump the sounds out to the crowd. Then, use the Aux Send on the mixer to feed the
AN200 sound to the sampling input on the SU200 — and sample the Patterns of the AN200.
Speaker
Speaker
To sample the AN200, route the mixer’s Aux Send
to the SU200’s LINE INPUT.
Amplifier
MIDI clock
OUTPUT
MIDI OUT
MIDI
IN
OUTPUT
LINE
INPUT
AUX
SEND
INPUT
AN200
SU200
Mixer
Things can get a little wild and wooly here. Naturally, this system lets you sync the SU200 to the AN200.
However, the sampling function really makes this setup special. Sample some different AN200 Patterns to
the SU200 and have the AN200 play one Pattern while you fly in samples of other Patterns — in perfect
sync, of course. And use the real-time control features on BOTH machines to mess up your beats on the fly
and create some chaos.
Be smart and do your sampling before you take the stage, so you have everything all set up. Or live dangerously, and sample your AN200 beats while you perform.
100
Chapter 18 Master Class 1 — Onstage
84
Full DJ system — turntable and all!
Bring the Loopfactory into your DJ setup — for the best of the analog and digital worlds. This builds on the
setup in Tip 83 above by adding a turntable and/or CD player. (Make sure your turntable has line-level outputs, or that your mixer can boost phono signals.)
Speaker
Speaker
To sample, route the Aux Send to the SU200’s LINE
INPUT, and use the appropriate channel(s) on the
mixer.
Amplifier
MIDI clock
OUTPUT
TAP
MIDI OUT
MIDI
IN
OUTPUT
LINE
INPUT
AUX
SEND
INPUT
AN200
Mixer
SU200
LINE OUT
Turntable with line out or
CD player
Use the Tap feature on the AN200 to sync both the AN200 and SU200 to your turntable beats. This is tricky
to pull off — but if you get it in the groove, it can be pretty powerful stuff.
Do some sampling here, too. Sample your vinyl or CD beats to the SU200, and mix them in as you play.
And sample the AN200, like you did in Tip 83. Have the AN200 play its Patterns while you fly in your new
samples — without missing a beat.
85
Loopfactory megasetup — with MIDI Thru
Here’s where you can take the Loopfactory to the max. Start the system with the RM1x Sequence Remixer,
a mixer (you’ll need at least eight input channels), and your AN200. Then bring the DX200 and SU200 into
the fracas, and get things really smoking.
Use your sequencer data on the RM1x to play the Voices of the AN200 and DX200 (NOT the Patterns). This
way you can take advantage of the special characteristics of each of these synthesizers — playing the analog
sound of the AN200 in 5-note polyphony, and the FM synthesis sounds of the DX200 in 16-note polyphony.
Plus, with the SU200 locked in sync, you can play the samples on that unit using the Loop Track feature —
and keep everything right in the pocket.
101
Chapter 18 Master Class 1 — Onstage
MIDI clock
MIDI OUT
MIDI center
RM1x
OUTPUT
MIDI clock
MIDI IN
MIDI OUT
OUTPUT
AN200
MIDI Thru set to “on.”
MIDI clock
MIDI IN
MIDI OUT
MIDI IN
OUTPUT
DX200
MIDI Thru set to “on.”
INPUT
OUTPUT
SU200
INPUT
Amplifier
Speaker
Speaker
Mixer
In this system, all the MIDI devices are connected in “daisy-chain” fashion.
This setup trick can help when you find yourself with too many synthesizers —
and not enough ways to connect them.
The key to making this work is the AN200’s MIDI Thru function (see Tech Talk
box below). MIDI Thru lets you change how the MIDI OUT terminal behaves,
allowing you to chain together an additional tone generator or two to the
AN200 — and have a connected computer or sequencer control the whole lot.
Make sure that you set MIDI Thru to “on” for BOTH the AN200 and the DX200.
In this condition, any data sent to and received via the AN200’s MIDI IN terminal, is immediately and directly relayed to the MIDI OUT terminal — allowing
the DX200 and SU200 to be controlled by the RM1x.
• Sampling madness
For additional sonic mayhem, route the Aux Send on the mixer back to the SU200 input (as in
Tips 83 and 84), and sample the Patterns of the AN200 and DX200.
• The more, the merrier
Naturally, if you have other synthesizers with MIDI THRU terminals, you can extend the chain
and have them join in on the fun. However, be careful not to “daisy-chain” too many devices in
this way — otherwise a MIDI delay may result.
• More instruments, more parts
If you’re careful in setting the MIDI channels on all the connected devices, you can play several
different, independent sounds on each device. For example, if you’ve connected a DX200 to
the MIDI Thru (OUT) terminal, you should set the MIDI Receive Channels (page 97) on the
DX200 to values different than the AN200. If the AN200 is set to receive over Channels 1, 2, 3,
and 4, set the DX200 to receive over 5, 6, 7, and 8.
102
MIDI Thru
Determines whether the MIDI OUT terminal
on the rear panel of the AN200 functions as a
true MIDI Out, or is switched to function as
MIDI Thru. When this is set to “on,” any
MIDI data received at MIDI IN is passed on
without change to the MIDI OUT terminal.
This allows you to connect other MIDI
devices in“daisy-chain” fashion, and have the
first device in the chain feed data to the others.
Hold down [SHIFT] and press button [14]
(MIDI SETUP), repeatedly if necessary, until
“tHru” appears in the display. Use the
[DATA] knob to change the setting.
Settings
On (on)
Enables MIDI Thru operation (for the
MIDI OUT terminal).
Off (oFF)
Enables MIDI Out operation (for the MIDI
OUT terminal).
Chapter 19
Master Class 2 —
Advanced Music
Production
Take your skills up to the next level. Explore these advanced operations and applications — and get the absolute most out of your AN200 in your home studio.
86
Playing the AN200 as a synthesizer
The AN200 is an extremely powerful and versatile synthesizer, with truly vintage analog-like sound. And one
of the best ways to harness that power is to hook up a MIDI keyboard. Do this, and explore the wealth of
Voices and the full 5-note polyphony of the AN200.
Setting up the keyboard couldn’t be easier — just plug it in, and connect the MIDI OUT on the keyboard to
the MIDI IN on the AN200.
AN200
MIDI keyboard
MIDI IN
MIDI OUT
To check that everything’s set up properly, play the keyboard — you should hear the synth sound of the
AN200. (If you don’t, see “X-tra Details” below.)
• MIDI Channels
More than likely, your MIDI keyboard is probably set to send data over
channel 1 — which will let you play and record the Synth track.
Rhythm Track 1 — MIDI channel 2
Rhythm Track 2 — MIDI channel 3
Rhythm Track 3 — MIDI channel 4
However, if you want to play or record any of the Rhythm tracks, you’ll
have to change the channel on the keyboard to match the appropriate
track:
You can also change these assignments on the AN200 — see Tip 80.
For instructions on changing the MIDI channel of the keyboard, refer to
the owner’s manual of that instrument.
• What keyboard should I get?
Naturally, any MIDI keyboard will do the job for you. As long as it’s got
keys (preferably both black and white) and a MIDI OUT terminal, you’re
in business.
However, to get the most out of your extraordinarily versatile AN200,
you’ll need an equally versatile MIDI keyboard. Here’s what you should
look for:
* After Touch — Another expression control, After Touch lets you
change the sound (most commonly LFO modulation; Tips 32 — 35)
by pressing down hard on the keys after you play them. A really
good keyboard will let you change the MIDI Control Change assignment on this, so you can control anything you want — such as Cutoff
or Effect Depth (Wet). (For details on MIDI Control Change messages, refer to the MIDI Data Format section in the Appendix.)
* Five-octave (61-key) keyboard — There are some very good desktop keyboards (such as the Yamaha CBX-K1) that have fewer keys,
but you’ll probably want at least five octaves to play with... so you
can use both hands.
* Pitch Bend and Modulation wheels — Most keyboards have these.
Pitch Bend lets you bend the pitch (obviously). The Modulation
wheel usually affects the LFO, but on a good keyboard this too can be
changed.
* Velocity sensitivity — This feature lets you control the dynamics of
the sound by how softly or strongly you play the keyboard. Plus, it
also affects the FEG, so you can add some filter bite just by playing
harder. If you want expressive sounding tracks, there’s really no substitute for this.
* Extra (assignable) MIDI controllers — This is a luxury item. If you
can afford it, go for it. Some keyboards (such as the Yamaha CS2x)
give you an extra set of knobs or faders that you can assign to many
of the AN200’s controls. (For more about MIDI controllers, refer to
the MIDI Data Format section in the Appendix.)
103
Chapter 19 Master Class 2 — Advanced Music Production
87
Recording to a sequencer
As a “desktop” synthesizer, the AN200 is absolutely perfect for computer recording applications. In fact, if
you DON’T have a computer or a hardware sequencer, you’re leaving a good portion of the AN200’s incredible potential untapped.
You’ve already worked with the step sequencer on the AN200 itself for recording Patterns and Songs. However, with a separate sequencer or a computer, you can take advantage of even greater recording power and
editing flexibility. Use one of the example setups below to record songs to a sequencer and play them back
with the sounds of the AN200.
MIDI
OUT
MIDI
IN
MIDI
OUT
MIDI
IN
MIDI keyboard
Computer
with MIDI interface
MIDI
OUT
MIDI
IN
AN200
MIDI
OUT
MIDI
IN
MIDI keyboard
RM1x
AN200
In the top example, the computer has a MIDI interface and is running sequencing software, such as
XGworks lite — which you can find in the included CD-ROM. In the bottom example, the RM1x Sequence
Remixer is used for recording.
A few important points:
• Make sure all MIDI connections are correct — the INs go to the OUTs, and the OUTs to the INs.
• Set the MIDI keyboard to match the receive channel of the AN200. (This may be controllable from the
computer. You can also change the receive setting on the AN200; see page 97.)
• Make sure that MIDI Thru (or MIDI Echo) on the computer or sequencer is set to “on.” This lets you
hear the sound of the AN200 as you play the keyboard.
• Since the Synth Voices of the AN200 play on Channel 1, make sure that any recorded tracks on the
sequencer are set to play via MIDI Channel 1.
• Remember that the AN200 has Rhythm tracks, and that you can use these in recording, too. Just be
careful to make the correct channel settings. (The Rhythm tracks normally receive on Channels 2, 3,
and 4. If you want to change these, see Tip 80.)
Other settings may be necessary as well; refer to the relevant owner’s manuals.
104
Chapter 19 Master Class 2 — Advanced Music Production
88
Recording AN200 knob moves to a sequencer
Have you got an external sequencer or computer? And are you using the AN200 as a synthesizer (as we
covered in Tip 86) to play back your sequencer tracks? If so, here’s a power-user Tip for you that will give
you undreamed-of control over the sound.
Here, you’ll learn how to record all your knob moves and button presses to your sequencer. Which means
when you play back your song, all the changes you make to the Voice automatically play back, too. It’s like
having an second Free EG function (page 60) — but with an unlimited amount of tracks to work with.
The following procedure is a bit complicated — in that many of the instructions depend on the settings and
capabilities of your particular sequencer, and how familiar you are with them. If you find yourself in deep
water, refer to the relevant owner’s manual.
1 Connect the AN200 and the external sequencer as shown.
AN200
Computer
MIDI
IN
MIDI
OUT
MIDI
OUT
MIDI
IN
Sequence
software
2 Set up the sequencer appropriately for receiving the control data and for
playing the AN200.
Specifically, make sure that:
• All MIDI channel settings are correct. The tracks for playing the AN200 should be set to the same
MIDI channel as the Synth track. By default, the Synth track is set to receive over Channel 1, though
this can be changed on the AN200 (see page 97).
• The track or tracks having note data are properly set to play, and that a new track (for the knob moves)
is set to record.
3 While listening to the playback, tweak the knobs of
the AN200.
If everything’s been set up properly, every move you make will be recorded
as Control Change data. (For information on the parameters and their corresponding Control Change numbers, refer to the MIDI Data Format.)
The AN200 also lets you choose between having a full parameter set for
control, or a limited one. (See Tech Talk below.)
4 Stop the song and play it back to hear your recorded
changes.
Go on to record more knob moves to additional tracks on the sequencer, if
you want.
• Any function called “MIDI Thru” or “MIDI Echo” on the sequencer is set to “off.” If the
sequencer’s MIDI Thru is on, you could get unwanted double data.
• If you’re recording the same knob to different tracks, you may want to mute previous
tracks as you go along. Also, be aware that too many knob moves and button presses
could clog the data flow and result in glitches or undesirable changes in the sound.
Control Change In/Out
Determines whether the AN200 uses a limited
set of parameters for sending and receiving
Control Change data, or a full set. (For details
on available parameters and their assignments, refer to the MIDI Data Format.)
Hold down [SHIFT] and press button [14]
(MIDI SETUP), repeatedly if necessary, until
“CCio” appears in the display. Use the
[DATA] knob to change the setting.
Settings
norm (Normal)
Enables Control Change in/out for the
limited parameter set.
ALL (All)
Enables Control Change in/out for the full
parameter set.
105
Chapter 19 Master Class 2 — Advanced Music Production
89
Editing the AN200 from a computer
If you’ve worked through most or all of the Tips in this book, you can rightfully consider yourself a master
programmer and expert user of the AN200.
Well, almost.
Actually, we hate to break it to you — but you’ve only scratched the surface of the enormous sound-shaping
potential of the AN200...
This instrument is deep — much, much deeper than just what’s available on the front panel. However, you
can have all that editing power and depth right at your fingertips — with the AN200 Editor.
The AN200 Editor is special software that works on your Macintosh or PC-compatible computer. It allows
you to directly edit all of the AN200 Voice settings and parameters — right from your computer. It’s also
extraordinarily intuitive, with a virtual front panel that gives you at-a-glance, full control over your AN200.
AN200
Computer
MIDI
IN
MIDI
OUT
MIDI
OUT
MIDI
IN
MIDI
interface
AN200 Editor
All the necessary software is contained in the included CD-ROM. For more information on installing the
software to your particular computer, refer to page 112.
106
Chapter 19 Master Class 2 — Advanced Music Production
90
MIDI sequencer controls — Start, Continue, Stop
This function gives you detailed control over how the AN200 handles MIDI
sequencer control messages — Start, Continue, and Stop.
The major use for this minor function is to keep the AN200 from starting its
own Patterns (or from starting a connected sequencer). This comes in handy
when using the AN200 strictly as a tone generator in a larger MIDI system.
For example, if you are using the song data on a sequencer to play the AN200’s
Voices, you wouldn’t want the Patterns to play when you clicked PLAY. Similarly, there may be times when you want to play a Pattern on the AN200, yet
want to avoid starting the sequencer at the same time.
1 With the AN200 properly connected in a MIDI system,
call up the MIDI Control setting on the AN200.
Hold down [SHIFT] and press button [14] (MIDI SETUP), repeatedly if necessary, until “m.CtL” appears in the display.
2 Use the [DATA] knob to make the desired setting: On,
Out, In, or Off.
See “Tech Talk” below for details on the settings.
MIDI Control
Determines whether or not the AN200
receives and/or sends sequencer control
(System Real Time) messages. The Start
message (FA hexadecimal) tells a MIDI device
to go to the beginning of its song and start
playing. Continue (FB hexadecimal) is similar
to Start, except that the device will play from
the current location — not necessarily the
beginning. The Stop message (FC hexadecimal) tells the device to stop playing the song.
Hold down [SHIFT] and press button [14]
(MIDI SETUP), repeatedly if necessary, until
“m.CtL” appears in the display, then use the
[DATA] knob to make the desired setting.
Settings
on
Messages both sent and received; full
control both directions.
out
Messages sent, but not received; AN200
starts and stops connected device, but
cannot be remotely controlled .
in
Messages received, but not sent; AN200
can be remotely controlled, but will not
affect connected device.
oFF
Messages neither sent nor received; no
control either direction.
107
Chapter 19 Master Class 2 — Advanced Music Production
91
Saving Patterns and Songs to a MIDI data filer
Another fantastic thing about MIDI is all the data storage options it gives you. With the use of a MIDI data
filer (such as the Yamaha MDF3) or MIDI sequencing software (such as the included XGworks lite), you can
save all your valuable Song and User Pattern data for future recall — any time you need it. Plus, you can
amass a whole library’s worth of Songs and Patterns on just a few floppy disks.
The technological magic that makes this possible goes by the mundane name of “Bulk Send.” In this Tip,
you’ll learn how to use Bulk Send to save your precious data. Then in Tip 92 below, you’ll learn how to load
it all back to the AN200.
1 Set up the AN200 and the recording device.
Connect the two as shown with a standard MIDI cable.
AN200
Send and save your
Song/Pattern data to
the connected device.
MIDI OUT
MIDI IN
Yamaha MDF3, or computer
with MIDI interface
Setting up the other device for recording data may involve some additional steps; refer to the relevant
owner’s manual for details.
2 Call up the Bulk Send setting on the AN200.
Hold down [SHIFT] and press button [15] (MIDI BULK).
Bulk Send
3 Select the type of data to be saved — Pattern, Song, or
All.
Continue to hold [SHIFT] and press button [15] repeatedly to select the
desired type. To save all three data types, select “ALL.”
4 Go back to the connected device and start recording.
This operation too may differ depending on your particular device. On most
sequencing software (such as XGworks lite), this can be as simple as clicking the Record button.
5 Execute the Bulk Send operation.
Press the flashing [15] button once to enable Bulk Send, then once more to
actually start the operation. (To cancel, press [EXIT].)
Allows you to save Pattern, Song, and/or
System data of the AN200 to a MIDI data filer
or sequencer.
Set up the AN200 and the recording device.
Hold [SHIFT] and press button [15] (MIDI
BULK), repeatedly if necessary, to select the
desired data type. Start recording on the
other device, then press [15] twice to send
the data.
Settings
Pttn (Pattern)
Sends only User Pattern data (up to 128
Patterns) via MIDI OUT.
SonG (Song)
Sends only Song data (up to 10 Songs)
via MIDI OUT.
ALL (All)
Sends all three types of data above (Pattern, Song, System) via MIDI OUT.
108
Chapter 19 Master Class 2 — Advanced Music Production
92
Loading back your saved Patterns and Songs
Once you’ve saved your valuable data, you can bring it all back to your AN200 — with this simple operation.
1 Set up the AN200 and the recording device.
Connect the two as shown with a standard MIDI cable.
Load your Song/Pattern
data from the connected
device.
AN200
MIDI IN
MIDI OUT
Yamaha MDF3, or computer
with MIDI interface
Make the proper connections and make sure the connected device has the appropriate data on disk.
(Setup for Bulk Send on the other device may involve some additional steps; refer to the relevant owner’s
manual for details.)
2 Make sure the AN200 is set to Pattern mode.
Press the [PATTERN] button if necessary.
BEFORE you load anything to the AN200, make sure you have no important unsaved data
remaining on the instrument — it will all be erased in the operation! Best thing to do is use Bulk
Send to first save the existing data (as a temporary file), then go ahead and load the data.
3 Start the Bulk Send (or other appropriate) operation on the connected
device.
This operation too may differ depending on your particular device. On most sequencing software (such
as XGworks lite), this can be as simple as clicking the Play button.
That’s all there is to it! The AN200 automatically receives the data and loads it to the proper memory location.
• Lifesaver for live applications
Bulk Send is real handy for performers. If you’re gigging and the
AN200 is your main workhorse, you may need more than the 10 User
Songs to get by. Fortunately, you can save your data in 10-Song banks
(might as well save your Pattern data, too) — then load each bank as
you need it, between sets.
• Be a pack rat
You really ought to save everything you’ve ever created on the AN200.
Floppy disks are small and cheap, and you’ll be glad you archived all
your precious masterworks.
109
Appendix
Function Index
This index lets you quickly find information on the various functions and parameters of
the AN200. All the references here are to Tip numbers, except for a few page references
(for Tips that stretch over several pages).
A
AEG.......................................................................................Tip 36
Amplitude Modulation Depth ................................................Tip 32
AN200 Editor ........................................................................Tip 89
Attack....................................................................................Tip 36
B
Beat.................................................................................Tips 6, 58
Beat (Song Edit)....................................................................Tip 64
bpm ........................................................................................Tip 5
bpm (Song Edit) ...................................................................Tip 63
Bulk Send......................................................................Tips 91, 92
G
Gate Time...................................................................... Tips 25, 71
Gate Time (Song Edit)...........................................................Tip 64
Gate Time (Step Recording)................................ Tip 59 (p. 74, 79)
I
Insert Pattern........................................................................Tip 65
Instrument Select (Step Recording) ................... Tip 59 (p. 76, 79)
C
K
Chorus ..................................................................................Tip 16
Clear Sequence .....................................................................Tip 56
Clear Song ............................................................................Tip 61
Clock.............................................................................Tips 79, 83
Control Change In/Out ..........................................................Tip 88
Copy Sequence .....................................................................Tip 55
Copy Voice............................................................................Tip 52
Cutoff....................................................................................Tip 18
Key Assign............................................................................Tip 45
keyboard........................................................................... Tips 3, 9
D
M
Decay....................................................................................Tip 36
Delay.....................................................................................Tip 16
Delete Pattern .......................................................................Tip 66
Distortion..............................................................................Tip 17
Measure Select .....................................................................Tip 62
Memory Protect....................................................................Tip 60
Metronome ...........................................................................Tip 57
MIDI channels............................................................... Tips 80, 81
MIDI Control (Sequencer).....................................................Tip 90
MIDI Receive Channel...........................................................Tip 81
MIDI Thru .............................................................................Tip 86
Move Step.............................................................................Tip 53
E
Effect Parameter ...................................................................Tip 16
Effect Type ............................................................................Tip 16
Effect Wet .....................................................................Tips 15, 16
Effects..........................................................................Tips 15 - 17
EG .........................................................................................Tip 36
[EXIT] button ........................................................................Tip 23
110
Free EG recording .................................................................Tip 48
Free EG Trigger .....................................................................Tip 48
Free EG Type.........................................................................Tip 48
L
Length (Free EG )..................................................................Tip 48
LFO ..............................................................................Tips 32 - 35
LFO Wave..............................................................................Tip 35
loading data (from MIDI data filer, etc.) ................................Tip 91
N
Noise Level ...........................................................................Tip 43
notes, entering for Step Recording (Pitch) ......... Tip 59 (p. 73, 79)
F
O
Factory Reset........................................................................Tip 24
FEG .......................................................................................Tip 36
FEG Depth...............................................................Tips 20, 38, 39
Filter.............................................................................Tips 18 - 20
Filter Modulation Depth.........................................................Tip 33
Flanger..................................................................................Tip 16
FM Depth ..............................................................................Tip 41
Free EG .........................................................................Tips 48, 49
Free EG Length .....................................................................Tip 49
octaves, changing.................................................................Tip 10
Original Value........................................................................Tip 22
Overdrive/Amp......................................................................Tip 16
P
Pan .......................................................................................Tip 30
Pattern mode ..........................................................................Tip 1
Pattern Select ........................................................... Tips 3, 77, 78
Appendix
Function Index
Pattern Select (Song Edit)............................................. Tips 62, 64
Pattern Select Assign............................................................Tip 31
Pattern speed, doubling/halving..............................................Tip 7
Patterns ..................................................................................Tip 1
Patterns, copying..................................................................Tip 55
Patterns, erasing (clearing)...................................................Tip 56
Patterns, recording ....................................................... Tips 58, 59
Patterns, selecting .................................................... Tips 2, 77, 78
Patterns, storing ...................................................................Tip 60
Phaser...................................................................................Tip 16
Pitch Modulation Depth ........................................................Tip 34
Pitch offset (Song Edit).........................................................Tip 64
Portamento ...........................................................................Tip 40
T
[TAP] button ...........................................................................Tip 5
tempo .....................................................................................Tip 5
Top.................................................................... Tips 50, 74, 75, 76
Track Mute ............................................................................Tip 28
Track Mute (Song Edit) .........................................................Tip 64
Transpose ............................................................... Tips 26, 72, 73
Transpose Pattern.................................................................Tip 54
Trigger (Free EG )..................................................................Tip 48
Type (Free EG ) .....................................................................Tip 48
U
User Patterns........................................................................Tip 60
R
Real-time Recording .............................................................Tip 58
recording (Free EG tracks) ....................................................Tip 48
recording (Patterns)...................................................... Tips 58, 59
recording (Scenes) ...............................................................Tip 47
recording (Songs).................................................................Tip 62
recording to a sequencer .............................................. Tips 87, 88
Release .................................................................................Tip 36
Resonance ............................................................................Tip 18
Retrigger and Roll.................................................................Tip 51
Reverb ..................................................................................Tip 16
Reverse...................................................................................Tip 4
Reverse (Song Edit)..............................................................Tip 64
Rhythm tracks ......................................................................Tip 11
Rhythm tracks (Step Recording) .............................. Tip 59 (p. 76)
V
VCF ..............................................................................Tips 18 - 20
VCF Types .............................................................................Tip 19
VCO 1 Wave..........................................................................Tip 44
VCO 1/2 Balance ...................................................................Tip 42
VCO 2 Wave..........................................................................Tip 44
Velocity .................................................................................Tip 12
Velocity (Step Recording) ................................... Tip 59 (p. 74, 79)
Voices, copying.....................................................................Tip 52
Voices, selecting ...................................................................Tip 52
Volume .................................................................................Tip 30
W
Wave (LFO)...........................................................................Tip 35
Wave (VCO 1, 2) ...................................................................Tip 44
S
saving data (to MIDI data filer, etc.) ......................................Tip 91
Scene......................................................................Tips 13, 14, 47
Scenes, morphing between...................................................Tip 14
Show Value...........................................................................Tip 21
Song Edit mode ....................................................................Tip 62
Song mode .....................................................................Tips 8, 62
Songs, erasing (clearing)......................................................Tip 61
Songs, recording ..................................................................Tip 62
Songs, selecting .....................................................................Tip 8
Songs, storing ......................................................................Tip 67
Start/Stop button ....................................................................Tip 1
Step Mute .............................................................................Tip 29
Step Mute (Step Recording) ..................................... Tip 59 (p. 75)
Step Recording .....................................................................Tip 59
Storing Patterns....................................................................Tip 60
Storing Songs.......................................................................Tip 67
Sustain..................................................................................Tip 36
Swing....................................................................................Tip 27
Swing (Song Edit).................................................................Tip 64
sync .........................................................................Tips 79, 82,83
Sync Mode............................................................................Tip 46
Sync Pitch.............................................................................Tip 46
111
Appendix
About the Included CD-ROM
For Windows Me/98/95 Users
This CD-ROM contains the following;
• Acrobat Reader 4.0
• XGworks lite
• AN200 Editor
XGworks lite Plug-in software
• PLG150-AN Preset Voice Files
These are Preset Voice Files for the PLG150-AN. These are
compatible with the AN200, so can be edited with the AN200
Editor.
File names are “PlgAnP1.AN2” and “PlgAnP2.AN2.”
Some voices of the PLG150-AN may sound different when
played on the AN200.
Minimum System Requirement
XGworks lite V3.0A
OS:
CPU:
Windows Me/98/95
Pentium/75MHz or faster (Pentium/
166MHz or faster is recommended)
Available Memory:
16MB or more
(32MB or more is recommended)
Free space in Hard Disk: 30MB or more
Display:
800 x 600, 256 colors or more
Installing Softwares
■ Acrobat Reader 4.0 • • • • • • • • • • • • • • • • •
You need to install Acrobat Reader to view the PDF manuals
accompanied with each application in advance.
If you have installed an older version of Acrobat Reader on
your PC, first you need to execute “Uninstall” before proceeding.
■ XGworks lite • • • • • • • • • • • • • • • • • • • • • • •
In addition to sequencer function, XGworks lite can be used as
convenient voice editors once the Plug-in applications mentioned below are installed.
PDF manual of the XGworks lite (entry version) is the same
as the one for the XGworks. Please be aware that some of the
windows/functions described in the manual are not available
with the XGworks lite. Unavailable Windows/Functions Staff
Window, Drum Window, Control section of Piano Roll Window,
Printing of Staff Window, Plug-in software (Voice To score R,
Auto Arranger, Guitar Arranger, SW1000XG Mixer, Auto Play,
Importer) Jobs (Voice To score, XF Information Editor)
Although the PDF manual of the XGworks lite includes the
explanations on the package contents and software installation procedure, those are obsolete. Please refer to those of
this Installation Guide.
1 Double-click on the “XGworks” folder.
“Japanese” and “International” folders will be displayed.
2 Double-click on the “International” folder.
Various files like “Setup.exe” will be displayed.
3 Double-click on the “Setup.exe.”
XGworks lite Ver.3.0 Setup Dialog box will be displayed.
4 Execute the installation by following the directions appearing on the screen.
After the installation, select <Restart>.
After restarting the Windows, you will find the YAMAHA folder
on your PC (Program Files as the default) and XGworksLite
folder in the YAMAHA folder.
Refer to the “XGworks Manual” (XGworks.pdf) and online manuals how to use the application.
■ AN200 Editor • • • • • • • • • • • • • • • • • • • • • •
1 Double-click on the “Acroread” folder.
Four different language folders will be displayed.
You can use the AN200 Editor Plug-in applications of XGworks
lite to edit the Patterns of the AN200.
2 Select the language you want to use and double-click on its
folder.
“ar40***.exe” file will be displayed. (“***” indicates the
selected language.)
1 Double-click on the “Plug” folder.
Various files like “Setup.exe” will be displayed.
3 Double-click on the “ar40***.exe.”
Acrobat Reader Setup Dialog box will be displayed.
4 Execute the installation by following the directions appearing on the screen.
After completing the installation procedure, you will find the
Acrobat folder on your PC (Program Files as the default).
Refer to the [Reader Guide] in the [Help] menu how to use the
Acrobat Reader.
112
2 Double-click on the “Setup.exe.”
YAMAHA AN200 Editor Setup Dialog box will be displayed.
3 Execute the installation by following the directions appearing on the screen.
After completing the installation procedure, you will find the
AN200 Editor Plug-in software in the “XGworksLite” folder and
find that AN200 Editor Plug-in application is added to the
[Plug-in] menu on the XGworks lite.
Refer to the online help/PDFmanuals how to use the application.
Appendix
About the Included CD-ROM
For Macintosh Users
This CD-ROM contains the following;
The CD-ROM includes two folders: “Internatiotal” and “Japanese.”
Double-click on the “International” folder to open it. You will
find a variety of applications and data files packed in the following four folders.
• Acrobat Reader 4.0
• Open Music System (OMS) 2.3.8
• AN200 Editor
• PLG150-AN Preset Voice Files
These are Preset Voice Files for the PLG150-AN. These are
compatible with the AN200, so can be edited with the AN200
Editor.
File names are “PlgAnP1.AN2” and “PlgAnP2.AN2.”
Some voices of the PLG150-AN may sound different when
played on the AN200.
Minimum System Requirement
AN200 Editor
OS:
CPU:
Mac OS8.0 to 9.04
PowerPC604, 100MHz or faster (G3,
300MHz or faster is recommended)
Available memory:
15MB or more
Free space in Hard Disk: 8MB or more (excluding the OMS)
Display:
800 x 600, 256 colors or more
Installing Softwares
■ Acrobat Reader 4.0 • • • • • • • • • • • • • • • • •
You need to install Acrobat Reader to view the PDF manuals
accompanied with each application in advance.
1 Double-click on the “Acrobat” folder.
Three different language folders will be displayed: English,
German and French.
2 Select the language you want to use and double-click on its
folder.
“Reader Installer” will be displayed.
The Installer name may differ depending on the language you
select.
3 Double-click on the “Reader Installer.”
Acrobat Reader Setup Dialog will be displayed.
4 Execute the installation by following the directions appearing on the screen.
After the installation, you will find the “Adobe Acrobat” folder
on your computer (Hard Disk as the default).
Refer to the [Reader Guide] in the [Help] menu how to use the
Acrobat Reader.
■ Open Music System (OMS) 2.3.8 • • • • • • • •
OMS allows you to use several MIDI applications on the Mac
OS at the same time.
1 Double-click on the “OMS” folder (English version only).
“Install OMS 2.3.8” will be displayed.
2 Double-click on the “Install OMS 2.3.8.” OMS Setup Dialog will be displayed.
3 Execute the installation by following the directions appearing on the screen.
After the installation, select <Restart>.
After restarting the Macintosh, you will find the “Opcode”/
“OMS Applications” folder on your computer (Hard Disk as
the default).
4 Copy the “OMS_2.3_Mac.pdf” in the “OMS” folder in the
CD-ROM to the “OMS Applications” folder by drag & drop
operation.
Refer to the “OMS_2.3_Mac.pdf” (English version only) how
to use the application.
5 Copy the “OMS Setup for YAMAHA” folder in the “OMS”
folder in the CD-ROM to the hard disk on your computer by
drag & drop operation. In the “OMS Setup for YAMAHA”
folder you will find the OMS Setup files for the AN200 Desktop Control Synthesizer, which you can use them as the
template.
■ AN200 Editor • • • • • • • • • • • • • • • • • • • • • •
AN200 Editor allows you to edit the AN200 Patterns on your
computer.
1 Double-click on the “AN200 Editor” folder.
“Install AN200 Editor” will be displayed.
2 Double-click on the “Install AN200 Editor.”
AN200 Installation Dialog will be displayed.
3 Execute the installation by following the directions appearing on the screen.
After the installation, you will find the “AN200 Editor for Macintosh” folder on your computer (Hard Disk as the default).If you
use French or German MacOS, French or German manual are
automatically installed.
Refer to the “AN200Editor.pdf” in the same folder how to use
the application.
113
Appendix
Specifications
4.DISPLAY
7SEG LED
1.FUNCTIONS
Tone Generator Analog Physical Modeling
(2VCO(Osc.Sync, FM), Noise, RingMod., Filter(FEG), Amp(AEG),
2LFO, PEG) + AWM2
5.CONNECTORS
OUTPUT L(MONO)/R
MIDI IN/OUT
DC IN
PHONES
Timber
1 (AN) + 3 (AWM2) parts
Polyphony
5 (AN) + 32 (AWM2) Notes
Effector
Distortion, 3-Band EQ (only AN)
+ 1 Effector (Tempo Delay/Reverb, Flanger/Chorus, Phaser, Amp.Simulator)
Pattern
Preset Pattern x 256, User Pattern x 128
Scene
2 Scene/Pattern
Step Sequencer
MIDI Sync, MIDI Transmit
Others
Free EG (4 tracks)
x1
Rotary Encorder
x1
Phone x 2
Din x 2
Stereo phone
6.MAXIMUM OUTPUT LEVEL
Phones
+0.5dBm (33ohm)
Stereo Output
+9.0dBm (10kohm)
7.DIMENSIONS,WEIGHT
338.0(W) x 208.9(D) x 51.7(H) mm, 1600 g
2.CONTROLLERS
Sound Control Knob
x 16
(Cutoff/Filter Type, Resonance, FEG Depth, VCO1/2 Balance, FM
Depth, Sync Pitch, Noise Level, EG Attack, EG Decay, EG Sustain,
EG Release, Portamento Time, Effect Param/Pan, Effect Wet/Vol,
LFO Speed, Scene Control)
Master Volume Knob
x4
3.PANEL SWITCHES
Sound Control Sw.
x8
(LFO Detail, Key Assign, VCO1 Wave, Sync Mode, VCO2 Wave,
Effect Type, EG Select, Dist Sw )
Scene x 2, Sequencer. Sw x 2, Mode x 2, Pattern Select x 1,
Keyboard Mode x 1, Step Select x 16, Step Group Select x 2,
Track Select x 2, Play Effect x 2, Octave x 2, Tap Tempo x 1,
Free EG Sw. x 4, Free EG Mode x 1, Free EG Length x 1, Store x 1,
Show Value x 1, Shift x 1, Exit x 1
8.ACCESSORIES
CD ROM (for Windows and Macintosh) x 1
Owner's Manual
x1
AC Adaptor
x1
(Power supply recommendation may vary from country to country.
Please check with your nearest Yamaha dealer for further details.)
• Specifications and descriptions in this owner’s manual are for information purposes only. Yamaha Corp. reserves the right to change or modify products or
specifications at any time without prior notice. Since specifications, equipment or
options may not be the same in every locale, please check with your Yamaha
dealer.
• Die technischen Daten und Beschreibungen in dieser Bedienungsanleitung
dienen nur der Information. Yamaha Corp. behält sich das Recht vor, Produkte
oder deren technische Daten jederzeit ohne vorherige Ankündigung zu
verändern oder zu modifizieren. Da die technischen Daten, das Gerät selbst oder
Sonderzubehör nicht in jedem Land gleich sind, setzen Sie sich im Zweifel bitte
mit Ihrem Yamaha-Händler in Verbindung.
• Les caractéristiques techniques et les descriptions du mode d’emploi ne sont
données que pour information. Yamaha Corp. se réserve le droit de changer ou
modifier les produits et leurs caractéristiques techniques à tout moment sans
aucun avis. Du fait que les caractéristiques techniques, les équipements et les
options peuvent différer d’un pays à l’autre, adressez-vous au distributeur
Yamaha le plus proche.
Appendix
Error Messages
Display indication
114
Message
Comment
Err1 (flashes)
Battery Low
This appears when the voltage of the internal backup battery
becomes low. Have the battery replaced by your local Yamaha
dealer or any Yamaha-authorized service personnel.
Err2 (flashes)
MIDI Buffer Full
This appears when too much MIDI data has been received at one
time, causing the unit to stop processing data.
Err3 (flashes)
MIDI Data Error
This appears when the received MIDI data is incorrect or contains
errors.
Err4 (flashes)
MIDI Checksum Error
This appears when checksum of the received System Exclusive data
is incorrect.
Appendix
Troubleshooting
Problem
Possible cause/Solution
No power.
Is the adaptor properly plugged into both the AN200 and the AC outlet?
(Page 11)
No sound.
• Is the panel volume control set to an appropriate level?
• Are other volume-related parameters set to appropriate levels? (Page
39)
• Is the EG Attack Time appropriately short, for short percus-sive
sounds? (Page 46)
• Is the Velocity of keyboard is appropriate? (Page 21)
No sound from a particular track.
• Is the track set to a proper Volume? (Page 39)
• Is the Track Mute setting appropriate? In other words, is the track
unmuted? (Page 37)
• Are all recorded steps on? (Step Mute, page 38)
• Is Cutoff set to a proper level? (Page 27)
No sound when playing the keyboard.
Is the [KEYBOARD] button lit? If not press it to enable the keyboard.
(Page 20)
No sound when playing a connected MIDI keyboard or
other device.
• Have you connected the MIDI cables properly?
• Are all MIDI channel settings appropriate? (Page 97)
The knobs and other Voice controls have no effect on
the sound.
• Is the Synth track selected? (If one of the Rhythm tracks is selected,
some knobs may affect the Rhythm sound instead.)
• Is the Step Edit mode active? In other words, are either of the buttons
[STEP 1-8] or [STEP 9-16] on? (If so, turning some of the knobs may
unexpectedly change some of the recorded steps.) (Page 73)
The Sequence doesn’t play back.
• Is Show Value active? (Page 31) Is Original Value active? (Page 32)
Make sure these are off.
• Have you selected any of these modes — Pattern Job, MIDI Setup, or
Utility?
• When syncing to another MIDI device, have you made sure that the
MIDI connections and relevant settings are correct? (Page 96)
• Is the MIDI clock set to “Internal”? (Page 97)
Recording (either Sequence or Free EG) doesn’t work.
Is the Pattern mode active? Press [PATTERN] to make sure you’re in
Pattern mode.
Free EG tracks can’t be recorded.
Are any of the Free EG tracks selected (on)? (Page 60)
Turning Free EG tracks on or off has no effect.
Is the Synth track selected?
The length of the notes of the Sequence sounds wrong.
Has the playback Gate Time been set to a value other than “100”? (Page
35)
The pitch of the Sequence sounds wrong.
Has the Transpose Pattern setting been changed? Call up this function
to check the value, and change it if necessary. (Page 66)
When playing by the external sequencer, the Step
Sequencer of the AN200 starts.
Is the MIDI control set to “Out” or “Off”? (Page 107)
When playing the AN200 by the AN200 Editor, the Step
Sequencer of the AN200 does not play correctly even if
pressing the [PLAY] button.
• Is the MIDI control set to “On” or “In”? (Page 107)
• Is the MIDI clock set to “Internal”? (Page 97)
The bulk data cannot be received by the AN200 Editor.
Are the MIDI IN/OUT jacks of the AN200 and the MIDI OUT/IN jacks of
the computer (or MIDI interface) are properly connected? (Page 106)
115
Appendix
Analog Physical Modeling Synthesis and the AN200
At the heart of the AN200’s stunning, dynamic analog-like sound is a highly sophisticated
and versatile tone generating method — the Analog Physical Modeling Synthesis system.
We won’t try to explain how Analog Physical Modeling works — that would take several
pages. Besides, you can hear for yourself the enormous power and punch this system
delivers. In this section, we’ll just briefly outline the structure of the AN200, and show you
what happens to the sound within the AN200 system as it’s generated, processed and
enhanced.
■ Oscillators, Filters and Amplifiers • • • • • • • • • • • • • • • • • • • • • • • • • • • • • • •
Very simply, there are three basic elements of sound: pitch, tone (or timbre) and volume (or “amplitude” in
synth-speak). Within the AN200, these three elements are created or controlled by the VCO (oscillator), VCF
(filter), and VCA (amplifier).
VCO
VCF
VCA
OUT
The amplifier determines the volume
The filter controls the timbre
The oscillator creates the source pitch
(and also the basic timbre, depending on the waveform)
And that’s basically how the AN200 creates sound. Of course, there are a few other elements in the system
— as you can see here:
LFO1, LFO2
PEG
FEG
AEG
Effects
VCO1
VCF
Oscillator Sync
Master
FM
VCA
Distortion
Slave
Oscillator
Sync
Ring
Modulator
MIXER
VCO2
Noise
Feedback
Control blocks in italics are functions that can only be changed or adjusted by using the
included AN200 Editor software. They cannot be controlled from the panel of the AN200
itself.
116
3-Band EQ
Appendix
Analog Physical Modeling Synthesis and the AN200
■ VCO 1 and VCO 2• • • • • • • • • • • • • • • • • • • • • • • • • • • • • • • • • • • • • • • • • • • •
Here is where the sound begins. The VCO generates a waveform — usually relatively simple ones, such as
sine, saw, and square waves. The AN200 features two independent VCOs, each with an extensive wave set,
providing sound-creating capabilities that are exceptionally complex and flexible — for a dynamic, rich
sound that would be impossible with just one VCO. (Also see Tips 42, 44, and 46.)
What’s more, VCO 1 is actually made up of two oscillators, which can be configured as “master” and “slave.”
Plus, VCO 2 can be used to modulate VCO 1, for even greater sonic complexity.
The PEG block (Tip 36) is used to control how the pitches of the VCOs change over time. LFOs 1 and 2
(Tips 32 - 35) are modulation waves that can be routed not only to the VCO but the VCF and VCA blocks as
well — for creating a variety of special tremolo, wah, and vibrato effects.
■ VCF • • • • • • • • • • • • • • • • • • • • • • • • • • • • • • • • • • • • • • • • • • • • • • • • • • • • •
Here’s where the sound is processed. The VCF takes the sound of the VCOs and filters out certain frequency
ranges. The more complex the sound generated by the VCOs, the greater the sound-shaping potential of
this section.
VCF includes a comprehensive set of different filter types (such as Low Pass, High Pass, Band Pass, and
Band Eliminate), and provides controls for adjusting the Cutoff frequency of the filter, and the Resonance (or
emphasis) of the frequency cutoff point. (Also see Tips 18 - 20.)
The FEG block (Tip 37) is used to control how the filter of the VCF changes over time. A special FEG Depth
control (Tips 20, 38, and 39) also affects VCF operation.
■ VCA • • • • • • • • • • • • • • • • • • • • • • • • • • • • • • • • • • • • • • • • • • • • • • • • • • • • •
Finally, here’s where the sound level is controlled. The VCA (controlled over time by the AEG block; see Tip
36) outputs the sound, before it is sent to the Effect block for more processing. (Also see Tips 15 - 17.)
117
Appendix
MIDI Data Format
1. Channel messages
Since this is a relative change parameter in Rhythm track, it specifies an increase or decrease relative
to 64. Increasing this value will lengthen the release time that follows a note-off.
1.1 Note on/note off
These messages convey keyboard performance data.
Range of note numbers transmitted and received = C-2...G8
Velocity range = 1...127 (Velocity is received only for note-on)
1.2.12 Attack Time
This message adjusts the EG attack time that was specified by the sound data.
1.2 Control changes
These messages convey control operation information for volume or pan etc.
Their functions are differentiated by the control number (Ctrl#).
Control#
Parameter
Data Range
0
Bank Select MSB
0...127
32
Bank Select LSB
0...127
The Bank Select data will be processed only after a Program Change is received, and then voice bank
will change at that time. If you wish to change the voice bank as well as the voice, you must transmit
Bank Select and Program Change messages as a set, in the following order: Bank Select MSB, LSB,
and Program Change.
1.2.2 Modulation
This message controls the depth of modulation.
Parameter
Modulation
Parameter
Portamento Time
Data Range
0...127
Parameter
Main Volume
Data Range
0...127
0...127
Data Range
0...127
1.2.6 Panpot
This message controls the panning (stereo location) of each part.
Parameter
Pan
Data Range
0...127
Parameter
Hold1
Control#
94
Parameter
Effect4 Depth
Data Range
0...63, 64...127
(OFF, ON)
NRPN
MSB LSB
18H
rrH
7FH
7FH
category
Synth Track only
Rhythm Track only
Since this is a relative change parameter in Rhythm track, it specifies an increase or decrease relative
to 64. Higher values will produce a more distinctive sound.
For some sounds, the effective range may be less than the possible range of settings.
118
Parameter
Release Time
Data Range
0...127
0...64...127
(-64...0...+63)
--
Data Entry *1
MSB LSB
--
Parameter Name and Value Range
RPN Null
This empties settings from RPN and NRPN
numbers.
Internal data is not affected.
--
Synth Track only
Rhythm Track only
param
Common
VCO1
SYNC
VCO2
portamento
wave
mode
wave
AEG
FEG
1.2.11 Release Time
This message adjusts the EG release time that was specified by the sound data.
Control#
72
mm
Parameter Name and Data Range
Drum Instrument Pitch Coarse
rr : drum instrument note number
mm : 00H - 40H - 7FH (-64...0...+63)
scene
wave
pmd
pmd2
fmd
amd
speed
attack
decay
sustain
release
attack
decay
sustain
release
key assign
Data Range
0...63, 64...127
(OFF, ON)
Data Range
0...127
0...64...127
(-64...0...+63)
Data Entry*1
MSB LSB
*1 See 1.2.4
SCENE
LFO
1.2.10 Harmonic Content
This message adjusts the resonance of the filter that is specified for the sound.
Parameter
Harmonic Content
Data Range
0...127
1.2.16 NRPN (Non-registered parameter number)
Use NRPN MSB and NRPN LSB to specify the parameter that you wish to modify, and then use Data
Entry (see 1.2.4) to set the value for the specified parameter. (Rhythm Track only).
When ON, Portamento produces a smooth glide connecting two notes of different pitch. The time
over which the pitch changes is adjusted by Portamento Time (see 1.2.3). No effect in Rhythm tracks.
Control#
71
Synth Track only
1.2.18 Others
If the Control Change IN/OUT = ALL, all following Control Change Number are transmitted and
received.
If the Control Change IN/OUT = NORM, the following Control Change Number in
are transmitted and received.
1.2.9 Portamento
This message controls Portamento pedal on/off.
Parameter
Portamento
Data Range
0...127
1.2.15 Effect4 Depth
This message adjusts the Send level to Effect.
When this is ON, currently-sounding notes will continue to sound even if note-off messages are
received.
Control#
65
Synth Track only
Rhythm Track only
*1 See 1.2.4
1.2.8 Holdl
This message controls sustain pedal on/off.
Control#
64
Parameter
Decay Time
RPN
MSB LSB
1.2.7 Expression
This message controls expression for each part. (It is used to create volume changes during a song.)
Parameter
Expression
Data Range
0...127
0...64...127
(-64...0...+63)
1.2.17 RPN (Registered parameter number)
Use RPN MSB and RPN LSB to specify the parameter that you wish to modify.
Data Range
0...64...127
0 is left, 64 is center, and 127 is right.
Control#
1l
Parameter
Brightness
Increasing this value will more effective.
With a value of 0 there will be no sound, and a value of 127 will produce the maximum volume.
Control#
10
Control#
74
It determines how long it takes for the sound changes from maximum level to sustain level.
1.2.5 Main Volume
This message controls the volume of each part. (It is used to adjust the volume balance between
parts.)
Control#
7
1.2.13 Brightness
This message adjusts the cutoff frequency of the low pass filter specified by the sound data.
Control#
75
Data Range
0...127
A value of 0 is no effect, and 127 is the longest Portamento time. No effect in Rhythm tracks.
Parameter
Data Entry MSB
Data Entry LSB
Synth Track only
Rhythm Track only
1.2.14 Decay Time
This message adjusts the EG decay time that was specified by sound data.
1.2.4 Data Entry
This message sets the value of the parameter which was specified by RPN (see 1.2.17) and NRPN
(see 1.2.16) (Rhythm Track only).
Control#
6
38
Data Range
0...127
0...64...127
(-64...0...+63)
Since this is a relative change parameter in Rhythm track, it specifies an increase or decrease relative
to 64. Lower values will produce a more mellow sound.
For some sounds, the effective range may be less than the possible range of settings.
1.2.3 Portamento Time
This message controls the degree of Portamento (see 1.2.9).
Control#
5
Parameter
Attack Time
Since this is a relative change parameter in Rhythm track, it specifies an increase or decrease relative
to 64. Increasing this value will make the attack more gradual, and decreasing this value will make
the attack sharper.
1.2.1 Bank Select
This message selects the voice bank.
Control#
1
Control#
73
CC#
SYNTH
3
15
18
57
19
80
16
73*
75*
31
72*
82
83
28
29
8
9
5*
50
34
51
RHYTHM
-
*
*
*
*
*
Appendix
MIDI Data Format
category
misc
EFFECT
vco 1/2
fm depth
sync pitch
noise level
type
DISTORTION
VCF
param
wet ( send )
switch
cutoff
MIXER
2. System exclusive messages
CC#
param
SYNTH
68
35
22
39
88
89
48
94
49
74*
filter type
resonance
59
71*
FEG depth
pan
volume
81
10*
7*
RHYTHM
94
-
2.1 Parameter changes
This device uses the following parameter changes.
[ UNIVERSAL REALTIME MESSAGE ]
1) Master Volume
[ UNIVERSAL NON REALTIME MESSAGE ]
1) Identity Request (INQUIRY MESSAGE)
2) Identity Reply (INQUIRY MESSAGE)
*
*
74*
71*
10*
7*
1.3 Channel mode messages
These messages specify the basic operation of a part.
1.3.1 All Sound Off
This message silences all notes being played on the corresponding channel.
However, channel messages such as Note-on and Hold-on will be maintained in their present state.
Control#
120
Parameter
All Sound Off
Data Range
0
1.3.2 Reset All Controllers
This message changes the settings of the following controllers.
Controller
Pitch bend change
Channel pressure
Modulation
Expression
Hold
Portamento
Value
±0 (Center)
0 (OFF)
0 (OFF)
127 (Max.)
0 (OFF)
0 (OFF)
The following data is not changed
Parameter values specified for program change, bank select MSB/LSB, volume, pan, effect send level
4.
Control#
121
Parameter
Reset All Controllers
Data Range
0
1.3.3 All Note Off
This message turns off all notes which are currently on for the corresponding part.
However, if Hold 1 or Sostenuto are on, notes will continue to sound until these are turned off.
Control#
123
Parameter
All Note Off
Data Range
0
1.3.4 Omni Off
Works the same as when All Note Off is received.
Control#
124
Parameter
Omni Off
Data Range
0
1.3.5 Omni On
Works the same as when All Note Off is received.
Control#
125
Parameter
Omni On
Data Range
0
1.3.6 Mono
Works the same as when All Sound Off is received, and if the value (mono number) is in the range of
0... 16, sets the corresponding channel to Mode4* (m = 1).
Control#
126
Parameter
Mono
Data Range
0 ... 16
* Mode4 is a state in which only channel messages on the specified channel will be received, and
notes will be played individually (monophonically).
1.3.7 Poly
Works the same as when All Sound Off is received, and sets the corresponding channel to Mode3*.
Control#
127
Parameter
Poly
Data Range
0
* Mode3 is when channel messages will be received only on the specified channel, and notes will be
sounded polyphonically.
1.4 Program change
This message is used to switch voices.
It changes the program number on the receiving channel. When the change is to include the voice
bank, transmit the program change after sending the Bank Select message (see 1.2.1).
1.5 Pitch bend
This message conveys information on pitch bend operations.
1.6 Channel aftertouch
This message conveys the pressure after the key is played on the keyboard (for an entire MIDI channel). The pressure can be controlled for each part. This message will affect the notes currently playing.
[ AN200 NATIVE PARAMETER CHANGE ]
1) AN200 System parameter change
2) Current Voice Common parameter change
3) Current Voice Additional parameter change
4) Current Voice Element parameter change
5) Currnet Voice Step Seq. parameter change
6) Currnet Rhythm Step Seq. parameter change
7) Current Effect parameter change
8) Current Mulit Part parameter change
2.1.1 Universal realtime messages
2.1.1.1 Master Volume
11110000
01111111
01111111
00000100
00000001
* 0sssssss
0ttttttt
11110111
or
11110000
01111111
0xxxnnnn
00000100
00000001
0sssssss
0ttttttt
11110111
F0H
7FH
7FH
04H
01H
SSH
TTH
F7H
= Exclusive status
= Universal Real Time
= ID of target device
= Sub-ID #1=Device Control Message
= Sub-ID #2=Master Volume
= Volume LSB
= Volume MSB
= End of Exclusive
F0H
7FH
XNH
04H
01H
SSH
TTH
F7H
= Exclusive status
= Universal Real Time
= Device Number, xxx = don't care
= Sub-ID #1=Device Control Message
= Sub-ID #2=Master Volume
= Volume LSB
= Volume MSB
= End of Exclusive
When received, the Volume MSB is reflected in the System Parameter MASTER VOLUME.
* The binary expression 0sssssss is expressed in hexadecimal as SSH.
The same applies elsewhere.
2.1.2 Universal non-realtime messages
2.1.2.1 Identity Request
11110000
01111110
0xxxnnnn
00000110
00000001
11110111
F0H
7EH
XNH
06H
01H
F7H
= Exclusive status
= Universal Non-Real Time
= ID of target device
= Sub-ID #1=General Information
= Sub-ID #2=Identity Request
= End of Exclusive
When this message is received, the Identity Reply Message (2.1.2.2, below) is transmitted.
2.1.2.2 Identity Reply
11110000
01111110
0xxxnnnn
00000110
00000010
01000011
00000000
01000001
00000010
00000101
00000000
00000000
00000000
00000001
11110111
F0H
7EH
XNH
06H
02H
43H
00H
41H
02H
05H
00H
00H
00H
01H
F7H
= Exclusive status
= Universal Non-Real Time
= ID of target device
= Sub-ID #1=General Information
= Sub-ID #2=Identity Reply
= YAMAHA ID
= Device Family Code LSB AN200 ID #1
= Device Family Code MSB AN200 ID #2
= Device Number Code LSB AN200 ID #3
= Device Number Code MSB AN200 ID #4
= End of Exclusive
When the Identity Request message (2.1.2.1, above) is received, this message is transmitted.
2.1.3 AN200 Native parameter change
This message sets parameters unique to the AN200.
Each message can set a single parameter. The message format is as follows.
11110000
01000011
0001nnnn
01011100
0ggggggg
0mmmmmmm
0lllllll
0vvvvvvv
:
11110111
or
11110000
01000011
0001nnnn
01101101
0ggggggg
0mmmmmmm
0lllllll
F0H
43H
1NH
5CH
GGH
MMH
LLH
VVH
:
F7H
Exclusive status
YAMAHA ID
N:Device Number
Model ID
Address High
Address Mid
Address Low
Data
F0H
43H
1NH
6DH
GGH
MMH
LLH
Exclusive status
YAMAHA ID
N:Device Number
Model ID
Address High
Address Mid
Address Low
End of Exclusive
119
Appendix
MIDI Data Format
0vvvvvvv
:
11110111
VVH
:
F7H
Data
End of Exclusive
For parameters whose Data Size is 2 or 4, the appropriate amount of data will be transmitted as
indicated by Size.
2.1.3.1 System parameter change
Address and Byte Count are given in tables <1-n>.
Byte Count is indicated by the total size of the Data in tables <1-n>.
Bulk dump is received when the beginning of the block is specified in "Address."
"Block" indicates the unit of the data string that is indicated in tables <1-n> as "Total Size."
Check sum is the value that produces a lower 7 bits of 0 when ths Start Address, Byte Count,
Data, and the Check sum itself are added.
2.2.1.1 System bulk dump
This message sets the System block (see Tables <2-1> and <2-2>).
2.1.3.2 Current Voice Common parameter change
This message sets the Common block of the voice is sounding currently (see Tables <1-1> and
<1-2>).
2.1.3.3 Current Voice Additional parameter change
This message sets the Additional block of the voice is sounding currently (see Tables <1-1> and
<1-4>).
2.1.3.4 Current Voice Element parameter change
This message sets the Element block of the voice is sounding currently (see Tables <1-1> and <13>).
This message sets the System block (see Tables <2-1> and <2-2>).
2.2.1.2 Current Voice Common bulk dump
This message sets the Common block of the voice is sounding currently (see Tables <1-1> and
<1-2>).
2.2.1.3 Current Voice Additional bulk dump
This message sets the Additional block of the voice is sounding currently (see Tables <1-1> and
<1-4>).
2.2.1.4 Current Voice Element bulk dump
This message sets the Element block of the voice is sounding currently (see Tables <1-1> and <13>).
2.1.3.5 Current Voice Scene1 parameter change
This message sets the Scene1 block of the voice is sounding currently (see Tables <1-1> and <15>).
2.2.1.5 Current Scene1 bulk dump
This message sets the Scene1 block of the voice is sounding currently (see Tables <1-1> and <15>).
2.1.3.6 Current Voice Scene2 parameter change
This message sets the Scene2 block of the voice is sounding currently (see Tables <1-1> and <16>).
2.1.3.7 Current Voice Step Seq parameter change
This message sets the Step Seq block of the voice(SYNTH Track) is sounding currently (see
Tables <1-1> and <1-7>).
2.1.3.8 Currnet Rhythm Step Seq parameter change
This message sets the Step Seq block of the Rhythm Track (see Tables <2-1> and <2-8>).
2.1.3.9 Current Effect parameter change
This message sets the Effect block (see Tables <2-1> and <2-3>).
2.1.3.10 Current Mulit Part parameter change
This message sets the Multi Part block (see Tables <2-1> and <2-6>).
2.2.1.6 Current Scene2 bulk dump
This message sets the Scene2 block of the voice is sounding currently (see Tables <1-1> and <16>).
2.2.1.7 Current Voice Step Seq bulk dump
This message sets the Step Seq block of the voice(SYNTH Track) is sounding currently (see
Tables <1-1> and <1-7>).
2.2.1.8 Current Rhythm Step Seq bulk dump
This message sets the Step Seq block of the Rhythm Track is sounding currently (see Tables <21> and <2-8>).
2.2.1.9 Current Effect bulk dump
This message sets the Effect block (see Tables <2-1> and <2-3>).
2.2.1.10 Current Multi Part bulk dump
This message sets the Multi Part block (see Tables <2-1> and <2-6>).
2.2 Bulk dump
2.2.1.11 User Pattern Voice bulk dump
This device uses only the following bulk dump receiving messages.
[ AN200 NATIVE BULK DUMP ]
1) System bulk dump
2) Current Voice Common bulk dump
3) Current Voice Additional bulk dump
4) Current Voice Element bulk dump
5) Current Voice Scene1 bulk dump
6) Current Voice Scene2 bulk dump
7) Currnet Voice Step Seq. bulk dump
8) Currnet Rhythm Step Seq. bulk dump
9) Current Effect bulk dump
10) Current Mulit Part bulk dump
11) User Pattern Voice 1...128
12) User Pattern Voice Additional 1...128
13) User Pattern Voice Scene1 1...128
14) User Pattern Voice Scene2 1...128
15) User Pattern Multi Part 1 ... 128
16) User Pattern Rhythm Step Seq 1 ... 128
17) User Song 1 ... 10
And the following bulk dump messages are received and changed as data of the AN200.
[ AN1x BULK DUMP ]
1) AN1x Current Common bulk dump
2) AN1x Current Scene bulk dump
3) AN1x Current Step Seq Pattern bulk dump
4) AN1x User Voice 1 ... 128
2.2.1 AN200 Native Bulk Dump
This message sets the special parameters for AN200.
Unlike Parameter change, one message can modify multiple parameters.
11110000
01000011
0000nnnn
01011100
0sssssss
0ttttttt
0ggggggg
0mmmmmmm
0lllllll
0vvvvvvv
:
0kkkkkkk
11110111
120
F0H
43H
0NH
5CH
SSH
TTH
GGH
MMH
LLH
VVH
:
KKH
F7H
Exclusive status
YAMAHA ID
N:Device Number
Model ID
ByteCountMSB
ByteCountLSB
Address High
Address Mid
Address Low
Data
Check-sum
End of Exclusive
This message sets the User Pattern Voice block (see Tables <1-1> and <1-8>).
2.2.1.12 User Pattern Voice Additional bulk dump
This message sets the User Pattern Voice Additional block (see Tables <1-1> and <1-9>).
2.2.1.13 User Pattern Voice Scene1 bulk dump
This message sets the User Pattern Voice Scene1 block (see Tables <1-1> and <1-10>).
2.2.1.14 User Pattern Voice Scene2 bulk dump
This message sets the User Pattern Voice Scene2 block (see Tables <1-1> and <1-11>).
2.2.1.15 User Pattern Effect bulk dump
This message sets the User Pattern Voice Effect block (see Tables <2-1> and <2-9>).
2.2.1.16 User Pattern Multi Part bulk dump
This message sets the User Pattern Voice Multi Part block (see Tables <2-1> and <2-8>).
2.2.1.17 User Pattern Rhythm Step Seq bulk dump
This message sets the User Pattern Rhythm Step Seq block (see Tables <2-1> and <2-8>).
2.2.1.18 User Song bulk dump
This message sets the User Song block (see Tables <2-1> and <2-8>).
2.2.2 AN1x bulk dump
The AN1x bulk dump messages are received and changed as data of the AN200.
11110000
01000011
0000nnnn
01011100
0sssssss
0ttttttt
0ggggggg
0mmmmmmm
0lllllll
0vvvvvvv
:
0kkkkkkk
11110111
F0H
43H
0NH
5CH
SSH
TTH
GGH
MMH
LLH
VVH
:
KKH
F7H
Exclusive status
YAMAHA ID
N:Device Number
Model ID
ByteCountMSB
ByteCountLSB
Address High
Address Mid
Address Low
Data
Check-sum
End of Exclusive
The details are the same as for 2.2.1 (AN200 Native Bulk Dump). However, see Table <3-1> for
the Base address.
More details (Address, Byte Count, etc.), see the AN1x parameter list included with the AN1x.
Appendix
MIDI Data Format
3. Realtime Messages
2.2.2.1 AN1x Current Common bulk dump
When the Common block bulk data of the voice sounds currenly is received from the AN1x, the
AN200 responds to it (see the Table <3-1>).
3.1 Active Sensing
11111110
The following parameters are invalid on the AN200, or affect differently compared with the ones
applied to the AN1x.
Scene Select (Always "Scene1" is fixed.)
Layer Mode ("Single" or "Unison")
Layer Pan, Layer Separation
Common Vtrl Matrix 1—2 Data (Source, Parameter, Depth)
Vari-Ef Type (Always "Gutar Amp.Simulator" is fixed.)
Dly-Ef, Rev-Ef Data (Type, Return, Parameter 1—7)
Arpeggio/StepSEQ Scene Sw. ("Off" or "On (only Scene1-side)")
FreeEG Track Scene Switch ("Off or "On (only Scene1-side)")
Parameters in connection with Arpeggio.
FEH
This is transmitted by 200msec.
After FE is received one time, if the MIDI signal does not come within 400 msec, AN200 will act
the same as when ALL SOUND OFF, ALL NOTE OFF, and RESET ALL CONTROLLERS are
received, and return to the condition where has not been received once.
3.2 Timing Clock
11111000
F8H
ON/OFF of the transmitting and receiving can be set.
3.3 Start
11111010
2.2.2.2 AN1x Current Scene1 bulk dump
FAH
ON/OFF of the transmitting and receiving can be set.
When the Scene1 block bulk data of the voice sounds currenly is received from the AN1x, the
AN200 responds to it (see the Table <3-1>).
3.4 Continue
The following parameters are reacted by the AN200.
Ctrl Matrix 16 Data (Source, Parameter, Depth)
11111011
FBH
ON/OFF of the transmitting and receiving can be set.
2.2.2.3 AN1x Current Step Seq Pattern bulk dump
When the Step SEQ block of the voice sounds currenly is received from the AN1x, the AN200
responds to it (see the Table <3-1>).
The Following parameters are invalid on the AN200, or affect differently compared with the ones
applied to the AN1x.
Step Seq Base Unit
Step Seq Length
Step Seq CtrlChange Value1...16
3.5 Stop
11111100
FCH
ON/OFF of the transmitting and receiving can be set.
4. System Common Messages
4.1 Song Position Pointer
2.2.2.4 AN1x User Voice bulk dump
F2H
SONG POSITION LSB
SONG POSITION MSB
When the User Voice block bulk data is received from the AN1x, the AN200 responds to it (see
the Table <3-1>).
11110010
0vvvvvvv
0vvvvvvv
The following parameters are invalid on the AN200, or affect differently compared with the ones
applied to the AN1x.
Data of Scene 2
Common Data (See 2.2.2.1)
Scene1 Data (See 2.2.2.2)
ON/OFF of the transmitting and receiving can be set.
<1-1>
Parameter Base Address
MODEL ID = 5C (AN1x)
Parameter
Address
(H)
10
10
10
10
10
10
20
:
20
Curret Voice
AN200 User Pattern Voice
Description
(M)
00
0D
0E
10
30
31
00
:
7F
(L)
00
00
00
00
00
00
00
:
00
AN200 User Pattern Voice 1
:
AN200 User Pattern Voice 128
Current Voice Common
AN200 Current Voice Add
Current Voice Step Seq
Current Voice Element
AN200 Current Voice Scene1
AN200 Current Voice Scene2
AN200 User Pattern Voice Add
22
:
22
00
:
7F
00
:
00
AN200 User Pattern Voice Add 1
:
AN200 User Pattern Voice Add 128
AN200 User Pattern Voice Scene-1
40
:
40
00
:
7F
00
:
00
AN200 User Pattern Voice Scene-1 1
:
AN200 User Pattern Voice Scene-1 128
AN200 User Pattern Voice Scene-2
41
:
41
00
:
7F
00
:
00
AN200 User Pattern Voice Scene-2 1
:
AN200 User Pattern Voice Scene-2 128
<1-2>
MIDI Parameter Change table ( Current Voice Common Buffer)
Address
Size
Data
Prameter Name
(H)
(H)
(H)
10 00 00
1
20...7F
Voice Name 1
01
1
20...7F
Voice Name 2
02
1
20...7F
Voice Name 3
03
1
20...7F
Voice Name 4
04
1
20...7F
Voice Name 5
05
1
20...7F
Voice Name 6
06
1
20...7F
Voice Name 7
07
1
20...7F
Voice Name 8
08
1
20...7F
Voice Name 9
09
1
20...7F
Voice Name 10
0a
1
00...16
Voice Category
0b
0c
0d
0e
0f
1
1
1
1
1
00...01
01...20
NOT USED (AN1x : Scene Select)
Unison Sw. (AN1x : Layer Mode)
NOT USED
NOT USED
Unison Detune
Description
Default
Ascii Code
Ascii Code
Ascii Code
Ascii Code
Ascii Code
Ascii Code
Ascii Code
Ascii Code
Ascii Code
Ascii Code
--,Pf...Wv
I
n
I
t
Scene1(1):fixed
off(0),on(1)
1(scene1)
00(off)
--6
1...32
P
t
n
--
121
Appendix
MIDI Data Format
122
10
12
13
14
15
16
17
18
19
2
1
1
1
1
1
1
1
1
27...F0
1a
1b
1c
1e
20
22
24
26
1
1
2
2
2
2
2
2
28
29
2a
2b
2c
2d
2e
1
1
1
1
1
1
1
2f
30
31
32
34
36
38
3a
3c
3e
40
41
42
44
46
48
4a
4c
4e
1
1
1
2
2
2
2
2
2
2
1
1
2
2
2
2
2
2
2
NOT USED
NOT USED
NOT USED
NOT USED
NOT USED
NOT USED
NOT USED
NOT USED
NOT USED
NOT USED
NOT USED
NOT USED
NOT USED
NOT USED
NOT USED
NOT USED
NOT USED
NOT USED
NOT USED
--------------------
50
51
52
53
54
55
56
1
1
1
1
1
1
1
NOT USED
NOT USED
NOT USED
NOT USED
NOT USED
NOT USED
NOT USED
--------
57
58
5a
1
2
2
NOT USED
NOT USED
NOT USED
----
5c
5d
1
1
00...03
00...04
Free EG Trigger
Free EG Loop Type
5e
1
02...60
Free EG Length
5f
60
61
62
63
64
65
66
67
68
1
1
1
1
1
1
1
1
1
2
6a
2
00...40
00...01
00...40
00...01
00...40
00...01
00...40
00...01
00...01
00...7F
00...01
00...7F
NOT USED
Free EG Trk Param 1
Free EG Trk Scene Switch 1
Free EG Trk Param 2
Free EG Trk Scene Switch 2
Free EG Trk Param 3
Free EG Trk Scene Switch 3
Free EG Trk Param 4
Free EG Trk Scene Switch 4
Free EG Trk1 Data1 MSB
Free EG Trk1 Data1 LSB
Free EG Trk1 Data2 MSB
Free EG Trk1 Data2 LSB
off(0)...Track Level(40)
off(0),on(1)
off(0)...Track Level(40)
off(0),on(1)
off(0)...Track Level(40)
off(0),on(1)
off(0)...Track Level(40)
off(0),on(1)
0...1
0...127
0...1
0...127
*2
*2
*2
*2
-00(off)
00(off)
00(off)
00(off)
00(off)
00(off)
00(off)
00(off)
1
0
1
0
:
:
03 66
:
2
03 68
2
03 6a
2
00...01
00...7F
00...01
00...7F
00...01
00...7F
Free EG Trk1 Data192 MSB
Free EG Trk1 Data192 LSB
Free EG Trk2 Data1 MSB
Free EG Trk2 Data1 LSB
Free EG Trk2 Data2 MSB
Free EG Trk2 Data2 LSB
0...1
0...127
0...1
0...127
0...1
0...127
*2
*2
*2
*2
*2
*2
1
0
1
0
1
0
:
:
06 66
:
2
06 68
2
06 6a
2
00...01
00...7F
00...01
00...7F
00...01
00...7F
Free EG Trk2 Data192 MSB
Free EG Trk2 Data192 LSB
Free EG Trk3 Data1 MSB
Free EG Trk3 Data1 LSB
Free EG Trk3 Data2 MSB
Free EG Trk3 Data2 LSB
0...1
0...127
0...1
0...127
0...1
0...127
*2
*2
*2
*2
*2
*2
1
0
1
0
1
0
:
:
09 66
:
2
09 68
2
0...1
0...127
0...1
0...127
0...1
1
0
1
0
2
Free EG Trk3 Data192 MSB
Free EG Trk3 Data192 LSB
Free EG Trk4 Data1 MSB
Free EG Trk4 Data1 LSB
Free EG Trk4 Data2 MSB
*2
*2
*2
*2
09 6a
00...01
00...7F
00...01
00...7F
00...01
00...02
00...64
00...03
22...3C
00...64
04...28
34...4C
0E...36
34...4C
0A...78
1C...3A
34...4C
Common BPM
NOT USED
NOT USED
NOT USED
NOT USED
NOT USED
NOT USED
NOT USED
NOT USED
20(14h) ... 40(28h) ... 240(F0h) ... 300(12Ch)
*3
NOT USED (AN1x : Var-Ef Type)
Output Gain (AN1x : reserve)
Gutar Amp.Simulator : Dist Drive
Gutar Amp.Simulator : Amp.Type
Gutar Amp.Simulator : LPF
Gutar Amp.Simulator : Dist Out Level
NOT USED
NOT USED
Gutar Amp.Simulator:fixed
+0dB(0), +6dB(1), +12dB(2)
0...100
off(0) ,stack(1) ,combo(2) ,tube(3)
1.0k~Thru
0~100
0d (Amp.Sim.)
00(+0dB)
64(100)
01(stack)
30(5.0kHz)
3c(60)
---
3-Band EQ Low Freq
3-Band EQ Low Gain
3-Band EQ Mid Freq
3-Band EQ Mid Gain
3-Band EQ Mid Resonance(Q)
3-Band EQ High Freq
3-Band EQ High Gain
32Hz(04)...2.0kHz(28)
-12dB(34)...0(40)...+12dB(76)
100Hz(0E)...10.0kHz(36)
-12dB(34)...0(40)...+12dB(4C)
1.0(10)...12.0(78)
500Hz(1C)...16.0kHz(3A)
-12dB(34)...0(40)...+12dB(4C)
11(140Hz)
40(+0dB)
28(2.0kHz)
40(+0dB)
0A(1.0)
34(8.0kHz)
40(+0dB)
free(0),midi in notes(1),all notes(2),seq start(3)
off(0),forwardd(1),forwardd-half(2),
alternate(3),alternate-half(4)
1/2bar(2),1bar(3),3/2bars(4),
2bars(5),3bars(6),4bars(7),6bars(8),
8bars(9),1.0sec(0A)...8.0sec(50)
...16.0sec(60)
8C(140)
---------
03(seq start)
01(forward)
05(2bars)
*1
*1
*1
*1
Appendix
MIDI Data Format
:
:
0C 66
:
2
00...7F
Free EG Trk4 Data2 LSB
0...127
*2
0
00...01
00...7F
Free EG Trk4 Data192 MSB
Free EG Trk4 Data192 LSB
0...1
0...127
*2
*2
1
0
TOTAL SIZE 668
*1 : see other table (Free EG Track Paramter List)
*2 : only Bulk Dump (not received as parameter change)
*3 : BPM = ((1st & 03h) * 128 + 2nd) + ((1st & 78h)/8)/10
<1-3>
MIDI Parameter Change table ( Current Voice Element Buffer )
Address
Size
Data
Prameter Name
(H)
(H)
(H)
10 10 00
1
00...02
Key Assign Mode
01
1
28...58
Pich Up (PB Range +)
02
1
28...58
Pich Down (PB Range -)
03
1
00...7F
PEG Decay
04
1
00...7F
PEG Depth
05
1
01...03
PEG Switch
06
1
00...01
Portamento Mode
07
08
09
0a
0c
0d
0f
10
11
12
1
1
1
2
1
2
1
1
1
1
00...7F
00...01
00...14
00...FF
00...7F
00...FF
00...02
00...7F
00...7F
00...04
Portamento Time
LFO Reset Mode
LFO1 Wave
LFO1 Speed
LFO1 Delay
LFO2 Speed
Sync Mode
Sync Pitch
Sync Pitch Depth
Sync Pitch Source
13
14
15
1
1
1
01...03
00...7F
00...04
Sync Pitch Mod Switch
FM Depth
FM Source 1
16
1
00...07
FM Source 2
17
1
00...04
VCO1 Wave
00...06
VCO1 Wave
18
19
1
1
00...7F
0E...72
VCO1 Pitch Coarse
VCO1 Pitch Fine
1a
1b
1
1
1c
1
1d
1
00...7F
00...7F
00...7F
00...7F
00...7F
00...07
VCO1 Edge
VCO1 Pulse Width
VCO1 Mix
VCO1 PWM Depth
Detune
VCO1 PWM Source
1e
20
2
1
01...FF
00...05
VCO1 Pitch Mod Depth
VCO2 Wave
21
22
23
24
25
1
1
1
1
1
26
1
00...7F
0E...72
00...7F
00...7F
00...7F
00...7F
00...07
VCO2 Pitch Coarse
VCO2 Pitch Fine
VCO2 Edge
VCO2 Pulse Width
VCO2 PWM Depth
VCO2 X-MOD Depth
VCO2 PWM Source
00...04
VCO2 X-MOD Source
27
29
2a
2b
2c
2
1
1
1
1
01...FF
00...7F
00...7F
00...7F
00...7F
VCO2 Pitch Mod Depth
Mixer VCO1 Level
Mixer VCO2 Level
Mixer Ring Mod Level
Mixer Noise Level
2d
2e
2f
30
31
32
1
1
1
1
1
1
00...7F
00...7F
00...7F
00...7F
00...7F
00...05
FilterEG Attack Time
FilterEG Decay Time
FilterEG Sustain Level
FilterEG Release Time
HPF Cutoff Freq
VCF Filter Type
33
34
35
37
38
39
3a
3b
3c
3d
3e
3f
40
41
42
1
1
2
1
1
1
1
1
1
1
1
1
1
1
1
00...7F
0D...7F
00...FF
00...7F
20...7F
00...7F
00...7F
00...7F
00...7F
00...7F
00...7F
00...7F
00...7F
00...7F
00...8F
VCF Filter Cutoff
VCF Filter Resonance
FilterEG Depth
FillrEG Velocity Sens
VCF Keyboard Track
VCF Filter Mod Depth
AmpEG Attack Time
AmpEG Decay Time
AmpEG Sustain Level
AmpEG Release Time
VCA Feedback Level
VCA Volume
AmpEG Velocity Sens
VCA Amp Mod Depth
Gutitar Amp.Simulator Dry/Wet
Description
Default
poly(0),mono(1),legato(2)
-24(28)...+24(58)
-24(28)...+24(58)
0...127
-64...+63 semitones
VCO1(1),VCO2(2),both(3)
normal(0),sustain-key(1)
full-time(0),fingered(1)
0...127
off(0),key-on(1)
sine(0)...offset-s/h2(14)
1(0)...256(FF)
0...127
1(0)...256(FF)
off(0),vco1 mastter to slave(1), vco2 to vco1(2)
-64...+63
-64...+63
fixed(0),PEG(1),FEG(2),LFO1(3),
LFO2(4)
master(1),slave(2),both(3)
-64...+63
fixed(0),PEG(1),FEG(2),LFO1(3),
LFO2(4)
VCO2 freq(0),VCO1(1),VCO1-sub(2),
PEG(3),FEG(4),LFO1(5),LFO2(6),VCO2 output(7)
saw(0),pulse(1),saw2(2),mix(3)
multi-saw(4)
saw(0),pulse(1),inner1(2),
inner2(3),inner3(4),square(5),noise(6)
-64...+63 semitone
-50...+50 cent
00(poly)
42(+2)
3E(-2)
0
40(+0)
03(both)
00(normal)
0...127
0%(0)...50%(40)...99%(7F)
0...127
-64...+63
0...127
fixed(0),PEG(1),FEG(2),
LFO1(3),LFO2(4),LFO2-phase(5),
LFO2-fast(6),VCO2(7)
-127...+127
saw(0),pulse(1),saw2(2),mix(3)
triangle(4),sine(5)
-64...+63 semitone
-50(0E)...+50 cent(72)
0...127
0%(0)...50%(40)...99%(7F)
-64...+63
-64...+63
fixed(0),PEG(1),FEG(2),
LFO1(3),LFO2(4),LFO2-phase(5),
LFO2-fast(6),VCO1(7)
fixed(0),PEG(1),FEG(2),
LFO1(3),LFO2(4)
-127...+127
0...127
0...127
0...127
0...127
0...127
0...127
0...127
0...127
0(thru)...127
LPF-24dB(0),LFP-18dB(1),
LPF-12dB(2),BPF(3),HPF-12dB(4),
BEF(5)
0...127
-12(0D)...0(19)...+102(7F)
-128...+127
-64...+63
-32...+63
-64...+63
0...127
0...127
0...127
0...127
0...127
0...127
-64...+63
-64...+63
D63>W(1)...D=W(40)...D<W63(7F)
*1
*2
2C(44)
00(off)
00(sine)
53(84)
0
1F(32)
0(off)
40(+0)
40(+0)
00(fixed)
*5
03(both)
40(+0)
00(fixed)
00(VCO2 freq)
*3
00(saw)
*4
40(+0)
40(+0)
*7
*8
*7
*8
*7
64(100)
40(50%)
40(+0)
04(LFO2)
80(+0)
00(saw)
*9
*9
*9
*10
*9
40(+0)
40(+0)
7F(127)
40(50%)
40(+0)
04(LFO2)
*10
80(+0)
7F(127)
0
0
0
0
40(64)
7F(127)
55(85)
00(thru)
00(LPF-24dB)
64(100)
19(+0)
A0(+32)
40(+0)
40(+0)
40(+0)
0
40(64)
7F(127)
24(36)
0
69(105)
40(+0)
40(+0)
01(D63>W)
123
Appendix
MIDI Data Format
43
1
00... 00
Distortion Switch
0(off),1(on)
44
45
46
47
48
49
4a
4b
4c
4d
4e
4f
50
51
52
53
54
55
56
57
58
59
5a
5b
5c
5d
5e
5f
60
61
62
63
64
65
66
67
68
69
6a
6b
6c
6d
6e
6f
70
71
72
73
1
1
1
1
1
1
1
1
1
1
1
1
1
1
1
1
1
1
1
1
1
1
1
1
1
1
1
1
1
1
1
1
1
1
1
1
1
1
1
1
1
1
1
1
1
1
1
1
00...72
00...2E
00...7F
00...72
00...2E
00...7F
00...72
00...2E
00...7F
00...72
00...2E
00...7F
00...72
00...2E
00...7F
00...72
00...2E
00...7F
00...72
00...2E
00...7F
00...72
00...2E
00...7F
00...72
00...2E
00...7F
00...72
00...2E
00...7F
00...72
00...2E
00...7F
00...72
00...2E
00...7F
00...72
00...2E
00...7F
00...72
00...2E
00...7F
00...72
00...2E
00...7F
Ctrl Matrix Source1
Ctrl Matrix Param 1
Ctrl Matrix Depth 1
Ctrl Matrix Source2
Ctrl Matrix Param 2
Ctrl Matrix Depth 2
Ctrl Matrix Source3
Ctrl Matrix Param 3
Ctrl Matrix Depth 3
Ctrl Matrix Source4
Ctrl Matrix Param 4
Ctrl Matrix Depth 4
Ctrl Matrix Source5
Ctrl Matrix Param 5
Ctrl Matrix Depth 5
Ctrl Matrix Source6
Ctrl Matrix Param 6
Ctrl Matrix Depth 6
Ctrl Matrix Source7
Ctrl Matrix Param 7
Ctrl Matrix Depth 7
Ctrl Matrix Source8
Ctrl Matrix Param 8
Ctrl Matrix Depth 8
Ctrl Matrix Source9
Ctrl Matrix Param 9
Ctrl Matrix Depth 9
Ctrl Matrix Source10
Ctrl Matrix Param 10
Ctrl Matrix Depth 10
Ctrl Matrix Source11
Ctrl Matrix Param 11
Ctrl Matrix Depth 11
Ctrl Matrix Source12
Ctrl Matrix Param 12
Ctrl Matrix Depth 12
Ctrl Matrix Source13
Ctrl Matrix Param 13
Ctrl Matrix Depth 13
Ctrl Matrix Source14
Ctrl Matrix Param 14
Ctrl Matrix Depth 14
Ctrl Matrix Source15
Ctrl Matrix Param 15
Ctrl Matrix Depth 15
NOT USED
NOT USED
NOT USED
off(0)...Assign Knob8(72)
off...PEG Attack(2E)
Depends on Ctrl Matrix Param
off(0)...Assign Knob8(72)
off...PEG Attack(2E)
Depends on Ctrl Matrix Param
off(0)...Assign Knob8(72)
off...PEG Attack(2E)
Depends on Ctrl Matrix Param
off(0)...Assign Knob8(72)
off...PEG Attack(2E)
Depends on Ctrl Matrix Param
off(0)...Assign Knob8(72)
off...PEG Attack(2E)
Depends on Ctrl Matrix Param
off(0)...Assign Knob8(72)
off...PEG Attack(2E)
Depends on Ctrl Matrix Param
off(0)...Assign Knob8(72)
off...PEG Attack(2E)
Depends on Ctrl Matrix Param
off(0)...Assign Knob8(72)
off...PEG Attack(2E)
Depends on Ctrl Matrix Param
off(0)...Assign Knob8(72)
off...PEG Attack(2E)
Depends on Ctrl Matrix Param
off(0)...Assign Knob8(72)
off...PEG Attack(2E)
Depends on Ctrl Matrix Param
off(0)...Assign Knob8(72)
off...PEG Attack(2E)
Depends on Ctrl Matrix Param
off(0)...Assign Knob8(72)
off...PEG Attack(2E)
Depends on Ctrl Matrix Param
off(0)...Assign Knob8(72)
off...PEG Attack(2E)
Depends on Ctrl Matrix Param
off(0)...Assign Knob8(72)
off...PEG Attack(2E)
Depends on Ctrl Matrix Param
off(0)...Assign Knob8(72)
off...PEG Attack(2E)
Depends on Ctrl Matrix Param
74
75
76
1
1
1
3E...42
00...7F
NOT USED
Oct Shift
PEG Attack
77
78
1
1
00...14
00...0F
LFO2 Wave
LFO Assign Group
79
1
01..03
FM Algorithm
1(on)
*6,11
*6
*6
*6,11
*6
*6
*6,11
*6
*6
*6,11
*6
*6
*6,11
*6
*6
*6,11
*6
*6
*6,11
*6
*6
*6,11
*6
*6
*6,11
*6
*6
*6,11
*6
*6
*6,11
*6
*6
*6,11
*6
*6
*6,11
*6
*6
*6,11
*6
*6
*6,11
*6
*6
-40(+0)
0
-2(3E), 0(40),+2(42)
0...127
sine(0)...offset-s/h2(14)
VCO1(bit3),VCO2(bit2),VCA(bit1),
VCF(bit0)
both(1),master(2),slave(3)
0(off)
0(off)
40(+0)
0(off)
0(off)
40(+0)
0(off)
0(off)
40(+0)
0(off)
0(off)
40(+0)
0(off)
0(off)
40(+0)
0(off)
0(off)
40(+0)
0(off)
0(off)
40(+0)
0(off)
0(off)
40(+0)
0(off)
0(off)
40(+0)
0(off)
0(off)
40(+0)
0(off)
0(off)
40(+0)
0(off)
0(off)
40(+0)
0(off)
0(off)
40(+0)
0(off)
0(off)
40(+0)
0(off)
0(off)
40(+0)
----
05(triangle)
00(LFO1 to All)
*5
03(slave)
TOTAL SIZE 7A
*1 :
*2 :
*3 :
*4 :
*5 :
*6 :
*7 :
*8 :
*9 :
*10 :
*11 :
Key Assign Mode = poly
Key Assign Mode = mono,legato
Oscillator Sync Mode = off
Oscillator Sync Mode = on ('VCO1 master to slave' or 'VCO2 to VC1')
Oscillator Sync Mode = 'VCO1 master to slave'
see other table (Ctrl Matrix Paramter List)
VCO1 Wave is not MultiSaw.
VCO1 Wave is MultiSaw.
VCO2 Wave is not Triangle or Sine.
VCO1 Wave is Triangle or Sine.
CC# 3,5,7,8,9,10,15,16,18,19,22,28,29,31,34,35,39,48,49,50,51,57,59,68,71,72,73,74,75,80,81,82,83,88,89,MW~AC8 cannot be set.
<1-4>
MIDI Parameter Change table ( AN200 Current Voice Additional Buffer)
Address
Size
Data
Prameter Name
(H)
(H)
(H)
10 0d 00
1
0...7F
Scene Control Param
01
1
00...7F
VCO1/2 Balance
<1-5>
MIDI Bulk Dump Parameter table ( AN200 Current Scene-1 )
Address
Size
Data
Prameter Name
(H)
(H)
(H)
10 30 00
2
00...FF
LFO1 Speed
02
1
00...7F
AmpEG Attack Time
03
1
00...7F
AmpEG Decay Time
04
1
00...7F
AmpEG Sustain Level
05
1
00...7F
AmpEG Release Time
06
1
00...7F
FilterEG Attack Time
07
1
00...7F
FilterEG Decay Time
08
1
00...7F
FilterEG Sustain Level
09
1
00...7F
FilterEG Release Time
0A
1
00...7F
Portamento Time
124
Description
Default
0...127
-64...0...+63
0
40(+0)
Description
Default
1(0)...256(FF)
0...127
0...127
0...127
0...127
0...127
0...127
0...127
0...127
0...127
53(84)
0
40(64)
7F(127)
24(36)
0
40(64)
7F(127)
55(85)
2C(44)
Appendix
MIDI Data Format
0B
0C
0D
0E
1
1
1
1
00...7F
00...7F
00...7F
00...05
Sync Pitch
FM Depth
Mixer Noise Level
VCF Filter Type
0F
10
11
13
14
15
16
17
1
1
2
1
1
1
1
1
00...7F
0D...7F
00...FF
00...7F
00...7F
00...7F
00...7F
00...7F
VCF Filter Cutoff
VCF Filter Resonance
FilterEG Depth
VCO1/2 Balance
Volume
Pan
Effect Send
Effect parameter
-64...+63
-64...+63
0...127
LPF-24dB(0),LFP-18dB(1),
LPF-12dB(2),BPF(3),HPF-12dB(4),
BEF(5)
0...127
-12(0D)...0(19)...+102(7F)
-128...+127
-64...0...+63
0...127
CENTER(0),L63...C...R63(1...64...127)
0...127
refer to Effect Type List <Table 2-4>
40(+0)
40(+0)
0
00(LPF-24dB)
64(100)
19(+0)
A0(+32)
40(+0)
64(100)
40(64)
0
0
TOTAL SIZE 18
mm = 00 ~ 7F : User Voice Scene-1 No.1 ~ User Voice Scene-1 No.128
<1-6>
MIDI Bulk Dump Parameter table ( AN200 Current Scene-2 )
Address
Size
Data
Prameter Name
(H)
(H)
(H)
10 31 00
2
00...FF
LFO1 Speed
02
1
00...7F
AmpEG Attack Time
03
1
00...7F
AmpEG Decay Time
04
1
00...7F
AmpEG Sustain Level
05
1
00...7F
AmpEG Release Time
06
1
00...7F
FilterEG Attack Time
07
1
00...7F
FilterEG Decay Time
08
1
00...7F
FilterEG Sustain Level
09
1
00...7F
FilterEG Release Time
0A
1
00...7F
Portamento Time
0B
1
00...7F
Sync Pitch
0C
1
00...7F
FM Depth
0D
1
00...7F
Mixer Noise Level
0E
1
00...05
VCF Filter Type
0F
10
11
13
14
15
16
17
1
1
2
1
1
1
1
1
00...7F
0D...7F
00...FF
00...7F
00...7F
00...7F
00...7F
00...7F
VCF Filter Cutoff
VCF Filter Resonance
FilterEG Depth
VCO1/2 Balance
Volume
Pan
Effect Send
Effect parameter
Description
Default
1(0)...256(FF)
0...127
0...127
0...127
0...127
0...127
0...127
0...127
0...127
0...127
-64...+63
-64...+63
0...127
LPF-24dB(0),LFP-18dB(1),
LPF-12dB(2),BPF(3),HPF-12dB(4),
BEF(5)
0...127
-12(0D)...0(19)...+102(7F)
-128...+127
-64...0...+63
0...127
CENTER(0),L63...C...R63(1...64...127)
0...127
refer to Effect Type List <Table 2-4>
53(84)
0
40(64)
7F(127)
24(36)
0
40(64)
7F(127)
55(85)
2C(44)
40(+0)
40(+0)
0
00(LPF-24dB)
64(100)
19(+0)
A0(+32)
40(+0)
64(100)
40(64)
0
0
TOTAL SIZE 18
mm = 00 ~ 7F : User Voice Scene-2 No.1 ~ User Voice Scene-2 No.128
<1-7>
MIDI Bulk Dump Parameter table ( Current Step Seq )
Address
Size
Data
Prameter Name
(H)
(H)
(H)
10 0e 00
1
04,06,07
Step Seq Base Unit
01
1
08,0C,10
Step Seq Length
02
1
NOT USED
03
1
NOT USED
04
1
NOT USED
05
1
NOT USED
06
1
00...7F
Step Seq Note No 1
07
1
00...7F
Step Seq Note No 2
08
1
00...7F
Step Seq Note No 3
09
1
00...7F
Step Seq Note No 4
0A
1
00...7F
Step Seq Note No 5
0B
1
00...7F
Step Seq Note No 6
0C
1
00...7F
Step Seq Note No 7
0D
1
00...7F
Step Seq Note No 8
0E
1
00...7F
Step Seq Note No 9
0F
1
00...7F
Step Seq Note No 10
10
1
00...7F
Step Seq Note No 11
11
1
00...7F
Step Seq Note No 12
12
1
00...7F
Step Seq Note No 13
13
1
00...7F
Step Seq Note No 14
14
1
00...7F
Step Seq Note No 15
15
1
00...7F
Step Seq Note No 16
16
1
00...7F
Step Seq Velocity 1
17
1
00...7F
Step Seq Velocity 2
18
1
00...7F
Step Seq Velocity 3
19
1
00...7F
Step Seq Velocity 4
1A
1
00...7F
Step Seq Velocity 5
1B
1
00...7F
Step Seq Velocity 6
1C
1
00...7F
Step Seq Velocity 7
1D
1
00...7F
Step Seq Velocity 8
1E
1
00...7F
Step Seq Velocity 9
1F
1
00...7F
Step Seq Velocity 10
20
1
00...7F
Step Seq Velocity 11
21
1
00...7F
Step Seq Velocity 12
22
1
00...7F
Step Seq Velocity 13
23
1
00...7F
Step Seq Velocity 14
24
1
00...7F
Step Seq Velocity 15
25
1
00...7F
Step Seq Velocity 16
26
1
00...7F
Step Seq Gate Time LSB 1
27
1
00...7F
Step Seq Gate Time LSB 2
Description
Default
1/8(4)...1/12(6)...1/16(7)
8step(8),12step(C),16steps(10)
07(1/16)
10
----C3(3C)
C3(3C)
C3(3C)
C3(3C)
C3(3C)
C3(3C)
C3(3C)
C3(3C)
C3(3C)
C3(3C)
C3(3C)
C3(3C)
C3(3C)
C3(3C)
C3(3C)
C3(3C)
100(64)
100(64)
100(64)
100(64)
100(64)
100(64)
100(64)
100(64)
100(64)
100(64)
100(64)
100(64)
100(64)
100(64)
100(64)
100(64)
94%(3C)
94%(3C)
C-2(0)...G8(7F)
C-2(0)...G8(7F)
C-2(0)...G8(7F)
C-2(0)...G8(7F)
C-2(0)...G8(7F)
C-2(0)...G8(7F)
C-2(0)...G8(7F)
C-2(0)...G8(7F)
C-2(0)...G8(7F)
C-2(0)...G8(7F)
C-2(0)...G8(7F)
C-2(0)...G8(7F)
C-2(0)...G8(7F)
C-2(0)...G8(7F)
C-2(0)...G8(7F)
C-2(0)...G8(7F)
rest(0),1...127
rest(0),1...127
rest(0),1...127
rest(0),1...127
rest(0),1...127
rest(0),1...127
rest(0),1...127
rest(0),1...127
rest(0),1...127
rest(0),1...127
rest(0),1...127
rest(0),1...127
rest(0),1...127
rest(0),1...127
rest(0),1...127
rest(0),1...127
*1
*1
125
Appendix
MIDI Data Format
28
29
2A
2B
2C
2D
2E
2F
30
31
32
33
34
35
36
37
38
39
3A
3B
3C
3D
3E
3F
40
41
42
43
44
45
46
47
48
49
4A
4B
4C
4D
4E
4F
50
51
52
53
54
55
56
57
58
59
5A
5B
5C
5D
5E
5F
60
61
62
63
64
65
1
1
1
1
1
1
1
1
1
1
1
1
1
1
1
1
1
1
1
1
1
1
1
1
1
1
1
1
1
1
1
1
1
1
1
1
1
1
1
1
1
1
1
1
1
1
1
1
1
1
1
1
1
1
1
1
1
1
1
1
1
1
00...7F
00...7F
00...7F
00...7F
00...7F
00...7F
00...7F
00...7F
00...7F
00...7F
00...7F
00...7F
00...7F
00...7F
00...07
00...07
00...07
00...07
00...07
00...07
00...07
00...07
00...07
00...07
00...07
00...07
00...07
00...07
00...07
00...07
00...01
00...01
00...01
00...01
00...01
00...01
00...01
00...01
00...01
00...01
00...01
00...01
00...01
00...01
00...01
00...01
Step Seq Gate Time LSB 3
Step Seq Gate Time LSB 4
Step Seq Gate Time LSB 5
Step Seq Gate Time LSB 6
Step Seq Gate Time LSB 7
Step Seq Gate Time LSB 8
Step Seq Gate Time LSB 9
Step Seq Gate Time LSB 10
Step Seq Gate Time LSB 11
Step Seq Gate Time LSB 12
Step Seq Gate Time LSB 13
Step Seq Gate Time LSB 14
Step Seq Gate Time LSB 15
Step Seq Gate Time LSB 16
NOT USED
NOT USED
NOT USED
NOT USED
NOT USED
NOT USED
NOT USED
NOT USED
NOT USED
NOT USED
NOT USED
NOT USED
NOT USED
NOT USED
NOT USED
NOT USED
Step Seq Gate Time MSB 1
Step Seq Gate Time MSB 2
Step Seq Gate Time MSB 3
Step Seq Gate Time MSB 4
Step Seq Gate Time MSB 5
Step Seq Gate Time MSB 6
Step Seq Gate Time MSB 7
Step Seq Gate Time MSB 8
Step Seq Gate Time MSB 9
Step Seq Gate Time MSB 10
Step Seq Gate Time MSB 11
Step Seq Gate Time MSB 12
Step Seq Gate Time MSB 13
Step Seq Gate Time MSB 14
Step Seq Gate Time MSB 15
Step Seq Gate Time MSB 16
Step Seq Mute 1
Step Seq Mute 2
Step Seq Mute 3
Step Seq Mute 4
Step Seq Mute 5
Step Seq Mute 6
Step Seq Mute 7
Step Seq Mute 8
Step Seq Mute 9
Step Seq Mute 10
Step Seq Mute 11
Step Seq Mute 12
Step Seq Mute 13
Step Seq Mute 14
Step Seq Mute 15
Step Seq Mute 16
*1
*1
*1
*1
*1
*1
*1
*1
*1
*1
*1
*1
*1
*1
1%(0)...100%(40)...200%(7F)...1600%(3FF)
1%(0)...100%(40)...200%(7F)...1600%(3FF)
1%(0)...100%(40)...200%(7F)...1600%(3FF)
1%(0)...100%(40)...200%(7F)...1600%(3FF)
1%(0)...100%(40)...200%(7F)...1600%(3FF)
1%(0)...100%(40)...200%(7F)...1600%(3FF)
1%(0)...100%(40)...200%(7F)...1600%(3FF)
1%(0)...100%(40)...200%(7F)...1600%(3FF)
1%(0)...100%(40)...200%(7F)...1600%(3FF)
1%(0)...100%(40)...200%(7F)...1600%(3FF)
1%(0)...100%(40)...200%(7F)...1600%(3FF)
1%(0)...100%(40)...200%(7F)...1600%(3FF)
1%(0)...100%(40)...200%(7F)...1600%(3FF)
1%(0)...100%(40)...200%(7F)...1600%(3FF)
1%(0)...100%(40)...200%(7F)...1600%(3FF)
1%(0)...100%(40)...200%(7F)...1600%(3FF)
MuteOFF(0),MuteON(1)
MuteOFF(0),MuteON(1)
MuteOFF(0),MuteON(1)
MuteOFF(0),MuteON(1)
MuteOFF(0),MuteON(1)
MuteOFF(0),MuteON(1)
MuteOFF(0),MuteON(1)
MuteOFF(0),MuteON(1)
MuteOFF(0),MuteON(1)
MuteOFF(0),MuteON(1)
MuteOFF(0),MuteON(1)
MuteOFF(0),MuteON(1)
MuteOFF(0),MuteON(1)
MuteOFF(0),MuteON(1)
MuteOFF(0),MuteON(1)
MuteOFF(0),MuteON(1)
*1,2
*1,2
*1,2
*1,2
*1,2
*1,2
*1,2
*1,2
*1,2
*1,2
*1,2
*1,2
*1,2
*1,2
*1,2
*1,2
94%(3C)
94%(3C)
94%(3C)
94%(3C)
94%(3C)
94%(3C)
94%(3C)
94%(3C)
94%(3C)
94%(3C)
94%(3C)
94%(3C)
94%(3C)
94%(3C)
----------------0
0
0
0
0
0
0
0
0
0
0
0
0
0
0
0
MuteOFF(0)
MuteOFF(0)
MuteOFF(0)
MuteOFF(0)
MuteOFF(0)
MuteOFF(0)
MuteOFF(0)
MuteOFF(0)
MuteOFF(0)
MuteOFF(0)
MuteOFF(0)
MuteOFF(0)
MuteOFF(0)
MuteOFF(0)
MuteOFF(0)
MuteOFF(0)
TOTAL SIZE 66
*1 : MSB bit 2-0 -> bit 9-7
LSB bit 6 -0 -> bit 6-0
*2 : This should be transmitted after sending Step Seq Gate Time LSB n.
<1-8>
MIDI Bulk Dump Parameter table ( User Pattern Voice )
Address
Size
Data
Prameter Name
(H)
(H)
(H)
20 mm 00
1
20...7F
Voice Name 1
01
1
20...7F
Voice Name 2
02
1
20...7F
Voice Name 3
03
1
20...7F
Voice Name 4
04
1
20...7F
Voice Name 5
05
1
20...7F
Voice Name 6
06
1
20...7F
Voice Name 7
07
1
20...7F
Voice Name 8
08
1
20...7F
Voice Name 9
09
1
20...7F
Voice Name 10
0a
1
00...16
Voice Category
0b
0c
0d
0e
0f
10
12
13
14
15
16
126
1
1
1
1
1
2
1
1
1
1
1
00...01
01...20
27...F0
NOT USED (AN1x : Scene Select)
Unison Sw. (AN1x : Layer Mode)
NOT USED
NOT USED
Unison Detune
Common Tempo
NOT USED
NOT USED
NOT USED
NOT USED
NOT USED
Description
Default
Ascii Code
Ascii Code
Ascii Code
Ascii Code
Ascii Code
Ascii Code
Ascii Code
Ascii Code
Ascii Code
Ascii Code
--,Pf...Wv
I
n
I
t
Scene1(1):fixed
off(0),on(1)
1(scene1)
00(off)
--6
8C(140)
------
1...32
20(14h) ... 40(28h) ... 240(F0h) ... 300(12Ch)
P
t
n
--
Appendix
MIDI Data Format
17
18
19
1
1
1
NOT USED
NOT USED
NOT USED
1a
1b
1c
1e
20
22
24
26
1
1
2
2
2
2
2
2
28
29
2a
2b
2c
2d
2e
1
1
1
1
1
1
1
2f
30
31
32
34
36
38
3a
3c
3e
40
41
42
44
46
48
4a
4c
4e
1
1
1
2
2
2
2
2
2
2
1
1
2
2
2
2
2
2
2
NOT USED
NOT USED
NOT USED
NOT USED
NOT USED
NOT USED
NOT USED
NOT USED
NOT USED
NOT USED
NOT USED
NOT USED
NOT USED
NOT USED
NOT USED
NOT USED
NOT USED
NOT USED
NOT USED
--------------------
50
51
52
53
54
55
56
57
58
5a
5c
5d
1
1
1
1
1
1
1
1
2
2
1
1
00...03
00...04
NOT USED
NOT USED
NOT USED
NOT USED
NOT USED
NOT USED
NOT USED
NOT USED
NOT USED
NOT USED
Free EG Trigger
Free EG Loop Type
----------03(seq start)
01(forward)
5e
1
02...60
Free EG Length
5f
60
61
62
63
64
65
66
67
68
1
1
1
1
1
1
1
1
1
2
6a
2
00...40
00...01
00...40
00...01
00...40
00...01
00...40
00...01
00...01
00...7F
00...01
00...7F
NOT USED
Free EG Trk Param 1
Free EG Trk Scene Switch 1
Free EG Trk Param 2
Free EG Trk Scene Switch 2
Free EG Trk Param 3
Free EG Trk Scene Switch 3
Free EG Trk Param 4
Free EG Trk Scene Switch 4
Free EG Trk1 Data1 MSB
Free EG Trk1 Data1 LSB
Free EG Trk1 Data2 MSB
Free EG Trk1 Data2 LSB
off(0)...Track Level(40)
off(0),on(1)
off(0)...Track Level(40)
off(0),on(1)
off(0)...Track Level(40)
off(0),on(1)
off(0)...Track Level(40)
off(0),on(1)
0...1
0...127
0...1
0...127
*8
*8
*8
*8
-00(off)
00(off)
00(off)
00(off)
00(off)
00(off)
00(off)
00(off)
1
0
1
0
:
:
03 66
:
2
03 68
2
03 6a
2
00...01
00...7F
00...01
00...7F
00...01
00...7F
Free EG Trk1 Data192 MSB
Free EG Trk1 Data192 LSB
Free EG Trk2 Data1 MSB
Free EG Trk2 Data1 LSB
Free EG Trk2 Data2 MSB
Free EG Trk2 Data2 LSB
0...1
0...127
0...1
0...127
0...1
0...127
*8
*8
*8
*8
*8
*8
1
0
1
0
1
0
:
:
06 66
:
2
06 68
2
06 6a
2
00...01
00...7F
00...01
00...7F
00...01
00...7F
Free EG Trk2 Data192 MSB
Free EG Trk2 Data192 LSB
Free EG Trk3 Data1 MSB
Free EG Trk3 Data1 LSB
Free EG Trk3 Data2 MSB
Free EG Trk3 Data2 LSB
0...1
0...127
0...1
0...127
0...1
0...127
*8
*8
*8
*8
*8
*8
1
0
1
0
1
0
:
:
09 66
:
2
09 68
2
0...1
0...127
0...1
0...127
0...1
0...127
1
0
1
0
2
Free EG Trk3 Data192 MSB
Free EG Trk3 Data192 LSB
Free EG Trk4 Data1 MSB
Free EG Trk4 Data1 LSB
Free EG Trk4 Data2 MSB
Free EG Trk4 Data2 LSB
*8
*8
*8
*8
09 6a
00...01
00...7F
00...01
00...7F
00...01
00...7F
*8
0
:
:
0C 66
:
2
00...01
00...7F
Free EG Trk4 Data192 MSB
Free EG Trk4 Data192 LSB
0...1
0...127
*8
*8
1
0
Key Assign Mode
Pich Up (PB Range +)
poly(0),mono(1),legato(2)
-24(28)...+24(58)
00...02
00...64
00...03
22...3C
00...64
04...28
34...4C
0E...36
34...4C
0A...78
1C...3A
34...4C
( from Here : User Voice Scene's Data )
1
00...02
1
28...58
----
NOT USED (AN1x : Var-Ef Type)
Output Gain (AN1x : reserve)
Gutar Amp.Simulator : Dist Drive
Gutar Amp.Simulator : Amp.Type
Gutar Amp.Simulator : LPF
Gutar Amp.Simulator : Dist Out Level
NOT USED
NOT USED
Gutar Amp.Simulator:fixed
+0dB(0), +6dB(1), +12dB(2)
0...100
off(0) ,stack(1) ,combo(2) ,tube(3)
1.0k~Thru
0~100
0d (Amp.Sim.)
00(+0dB)
64(100)
01(stack)
30(5.0kHz)
3c(60)
---
3-Band EQ Low Freq
3-Band EQ Low Gain
3-Band EQ Mid Freq
3-Band EQ Mid Gain
3-Band EQ Mid Resonance(Q)
3-Band EQ High Freq
3-Band EQ High Gain
32Hz(04)...2.0kHz(28)
-12dB(34)...0(40)...+12dB(76)
100Hz(0E)...10.0kHz(36)
-12dB(34)...0(40)...+12dB(4C)
1.0(10)...12.0(78)
500Hz(1C)...16.0kHz(3A)
-12dB(34)...0(40)...+12dB(4C)
11(140Hz)
40(+0dB)
28(2.0kHz)
40(+0dB)
0A(1.0)
34(8.0kHz)
40(+0dB)
free(0),midi in notes(1),all notes(2),seq start(3)
off(0),forwardd(1),forwardd-half(2),
alternate(3),alternate-half(4)
1/2bar(2),1bar(3),3/2bars(4),
2bars(5),3bars(6),4bars(7),6bars(8),
8bars(9),1.0sec(0A)...8.0sec(50)
...16.0sec(60)
05(2bars)
*7
*7
*7
*7
00(poly)
42(+2)
127
Appendix
MIDI Data Format
1
1
1
1
1
28...58
00...7F
00...7F
01...03
00...01
Pich Down (PB Range -)
PEG Decay
PEG Depth
PEG Switch
Portamento Mode
1
1
1
2
1
2
1
1
1
1
00...7F
00...01
00...14
00...FF
00...7F
00...FF
00...02
00...7F
00...7F
00...04
Portamento Time
LFO Reset Mode
LFO1 Wave
LFO1 Speed
LFO1 Delay
LFO2 Speed
Sync Mode
Sync Pitch
Sync Pitch Depth
Sync Pitch Source
1
1
1
01...03
00...7F
00...04
Sync Pitch Mod Switch
FM Depth
FM Source 1
1
00...07
FM Source 2
1
00...04
VCO1 Wave
00...06
VCO1 Wave
1
1
00...7F
0E...72
VCO1 Pitch Coarse
VCO1 Pitch Fine
1
1
1
00...7F
00...7F
00...7F
00...7F
00...7F
00...07
VCO1 Edge
VCO1 Pulse Width
VCO1 Mix
VCO1 PWM Depth
Detune
VCO1 PWM Source
2
1
01...FF
00...05
VCO1 Pitch Mod Depth
VCO2 Wave
1
1
1
1
1
1
00...7F
0E...72
00...7F
00...7F
00...7F
00...7F
00...07
VCO2 Pitch Coarse
VCO2 Pitch Fine
VCO2 Edge
VCO2 Pulse Width
VCO2 PWM Depth
VCO2 X-MOD Depth
VCO2 PWM Source
00...04
VCO2 X-MOD Source
2
1
1
1
1
01...FF
00...7F
00...7F
00...7F
00...7F
VCO2 Pitch Mod Depth
Mixer VCO1 Level
Mixer VCO2 Level
Mixer Ring Mod Level
Mixer Noise Level
1
1
1
1
1
1
00...7F
00...7F
00...7F
00...7F
00...7F
00...05
FilterEG Attack Time
FilterEG Decay Time
FilterEG Sustain Level
FilterEG Release Time
HPF Cutoff Freq
VCF Filter Type
1
1
2
1
1
1
1
1
1
1
1
1
1
1
1
1
00...7F
0D...7F
00...FF
00...7F
20...7F
00...7F
00...7F
00...7F
00...7F
00...7F
00...7F
00...7F
00...7F
00...7F
01...7F
00... 00
VCF Filter Cutoff
VCF Filter Resonance
FilterEG Depth
FillrEG Velocity Sens
VCF Keyboard Track
VCF Filter Mod Depth
AmpEG Attack Time
AmpEG Decay Time
AmpEG Sustain Level
AmpEG Release Time
VCA Feedback Level
VCA Volume
AmpEG Velocity Sens
VCA Amp Mod Depth
Gutitar Amp.Simulator Dry/Wet
Distortion Switch
0...127
0...127
0...127
0...127
0(thru)...127
LPF-24dB(0),LFP-18dB(1),
LPF-12dB(2),BPF(3),HPF-12dB(4),
BEF(5)
0...127
-12(0D)...0(19)...+102(7F)
-128...+127
-64...+63
-32...+63
-64...+63
0...127
0...127
0...127
0...127
0...127
0...127
-64...+63
-64...+63
D63>W(1)...D=W(40)...D<W63(7F)
0(off),1(on)
1
1
1
1
1
1
1
1
1
1
1
1
1
1
1
1
00...72
00...2E
00...7F
00...72
00...2E
00...7F
00...72
00...2E
00...7F
00...72
00...2E
00...7F
00...72
00...2E
00...7F
00...72
Ctrl Matrix Source1
Ctrl Matrix Param 1
Ctrl Matrix Depth 1
Ctrl Matrix Source2
Ctrl Matrix Param 2
Ctrl Matrix Depth 2
Ctrl Matrix Source3
Ctrl Matrix Param 3
Ctrl Matrix Depth 3
Ctrl Matrix Source4
Ctrl Matrix Param 4
Ctrl Matrix Depth 4
Ctrl Matrix Source5
Ctrl Matrix Param 5
Ctrl Matrix Depth 5
Ctrl Matrix Source6
off(0)...Assign Knob8(72)
off...PEG Attack(2E)
Depends on Ctrl Matrix Param
off(0)...Assign Knob8(72)
off...PEG Attack(2E)
Depends on Ctrl Matrix Param
off(0)...Assign Knob8(72)
off...PEG Attack(2E)
Depends on Ctrl Matrix Param
off(0)...Assign Knob8(72)
off...PEG Attack(2E)
Depends on Ctrl Matrix Param
off(0)...Assign Knob8(72)
off...PEG Attack(2E)
Depends on Ctrl Matrix Param
off(0)...Assign Knob8(72)
1
128
-24(28)...+24(58)
0...127
-64...+63 semitones
VCO1(1),VCO2(2),both(3)
normal(0),sustain-key(1)
full-time(0),fingered(1)
0...127
off(0),key-on(1)
sine(0)...offset-s/h2(14)
1(0)...256(FF)
0...127
1(0)...256(FF)
off(0),vco1 mastter to slave(1), vco2 to vco1(2)
-64...+63
-64...+63
fixed(0),PEG(1),FEG(2),LFO1(3),
LFO2(4)
master(1),slave(2),both(3)
-64...+63
fixed(0),PEG(1),FEG(2),LFO1(3),
LFO2(4)
VCO2 freq(0),VCO1(1),VCO1-sub(2),
PEG(3),FEG(4),LFO1(5),LFO2(6),VCO2 output(7)
saw(0),pulse(1),saw2(2),mix(3)
multi-saw(4)
saw(0),pulse(1),inner1(2),
inner2(3),inner3(4),square(5),noise(6)
-64...+63 semitone
-50...+50 cent
0...127
0%(0)...50%(40)...99%(7F)
0...127
-64...+63
0...127
fixed(0),PEG(1),FEG(2),
LFO1(3),LFO2(4),LFO2-phase(5),
LFO2-fast(6),VCO2(7)
-127...+127
saw(0),pulse(1),saw2(2),mix(3)
triangle(4),sine(5)
-64...+63 semitone
-50(0E)...+50 cent(72)
0...127
0%(0)...50%(40)...99%(7F)
-64...+63
-64...+63
fixed(0),PEG(1),FEG(2),
LFO1(3),LFO2(4),LFO2-phase(5),
LFO2-fast(6),VCO1(7)
fixed(0),PEG(1),FEG(2),
LFO1(3),LFO2(4)
-127...+127
0...127
0...127
0...127
0...127
*9
*10
3E(-2)
0
40(+0)
03(both)
00(normal)
2C(44)
00(off)
00(sine)
53(84)
0
1F(32)
0(off)
40(+0)
40(+0)
00(fixed)
03(both)
40(+0)
00(fixed)
00(VCO2 freq)
*11
00(saw)
*12
40(+0)
40(+0)
*15
*16
*15
*16
*15
64(100)
40(50%)
40(+0)
04(LFO2)
80(+0)
00(saw)
*17
*17
*17
*18
*17
40(+0)
40(+0)
7F(127)
40(50%)
40(+0)
04(LFO2)
*18
80(+0)
7F(127)
0
0
0
0
40(64)
7F(127)
55(85)
00(thru)
00(LPF-24dB)
64(100)
19(+0)
A0(+32)
40(+0)
40(+0)
40(+0)
0
40(64)
7F(127)
24(36)
0
69(105)
40(+0)
40(+0)
01(D63>W)
1(on)
*14,19
*14
*14
*14,19
*14
*14
*14,19
*14
*14
*14,19
*14
*14
*14,19
*14
*14
*14,19
0(off)
0(off)
40(+0)
0(off)
0(off)
40(+0)
0(off)
0(off)
40(+0)
0(off)
0(off)
40(+0)
0(off)
0(off)
40(+0)
0(off)
Appendix
MIDI Data Format
1
1
1
1
1
1
1
1
1
1
1
1
1
1
1
1
1
1
1
1
1
1
1
1
1
1
1
1
1
1
1
1
00...2E
00...7F
00...72
00...2E
00...7F
00...72
00...2E
00...7F
00...72
00...2E
00...7F
00...72
00...2E
00...7F
00...72
00...2E
00...7F
00...72
00...2E
00...7F
00...72
00...2E
00...7F
00...72
00...2E
00...7F
00...72
00...2E
00...7F
Ctrl Matrix Param 6
Ctrl Matrix Depth 6
Ctrl Matrix Source7
Ctrl Matrix Param 7
Ctrl Matrix Depth 7
Ctrl Matrix Source8
Ctrl Matrix Param 8
Ctrl Matrix Depth 8
Ctrl Matrix Source9
Ctrl Matrix Param 9
Ctrl Matrix Depth 9
Ctrl Matrix Source10
Ctrl Matrix Param 10
Ctrl Matrix Depth 10
Ctrl Matrix Source11
Ctrl Matrix Param 11
Ctrl Matrix Depth 11
Ctrl Matrix Source12
Ctrl Matrix Param 12
Ctrl Matrix Depth 12
Ctrl Matrix Source13
Ctrl Matrix Param 13
Ctrl Matrix Depth 13
Ctrl Matrix Source14
Ctrl Matrix Param 14
Ctrl Matrix Depth 14
Ctrl Matrix Source15
Ctrl Matrix Param 15
Ctrl Matrix Depth 15
NOT USED
NOT USED
NOT USED
1
1
1
3E...42
00...7F
NOT USED
Oct Shift
PEG Attack
1
1
00...14
00...0F
LFO2 Wave
LFO Assign Group
1
01..03
FM Algorithm
( from Here : User Voice StepSEQ's Data )
1
04,06,07
1
08,0C,10
1
00...03
1
1
1
1
00...7F
1
00...7F
1
00...7F
1
00...7F
1
00...7F
1
00...7F
1
00...7F
1
00...7F
1
00...7F
1
00...7F
1
00...7F
1
00...7F
1
00...7F
1
00...7F
1
00...7F
1
00...7F
1
00...7F
1
00...7F
1
00...7F
1
00...7F
1
00...7F
1
00...7F
1
00...7F
1
00...7F
1
00...7F
1
00...7F
1
00...7F
1
00...7F
1
00...7F
1
00...7F
1
00...7F
1
00...7F
1
00...7F
1
00...7F
1
00...7F
1
00...7F
1
00...7F
1
00...7F
1
00...7F
1
00...7F
1
00...7F
1
00...7F
1
00...7F
1
00...7F
1
00...7F
1
00...7F
1
00...7F
1
00...7F
1
1
Step Seq Base Unit
Step Seq Length
NOT USED
NOT USED
NOT USED
NOT USED
Step Seq Note No 1
Step Seq Note No 2
Step Seq Note No 3
Step Seq Note No 4
Step Seq Note No 5
Step Seq Note No 6
Step Seq Note No 7
Step Seq Note No 8
Step Seq Note No 9
Step Seq Note No 10
Step Seq Note No 11
Step Seq Note No 12
Step Seq Note No 13
Step Seq Note No 14
Step Seq Note No 15
Step Seq Note No 16
Step Seq Velocity 1
Step Seq Velocity 2
Step Seq Velocity 3
Step Seq Velocity 4
Step Seq Velocity 5
Step Seq Velocity 6
Step Seq Velocity 7
Step Seq Velocity 8
Step Seq Velocity 9
Step Seq Velocity 10
Step Seq Velocity 11
Step Seq Velocity 12
Step Seq Velocity 13
Step Seq Velocity 14
Step Seq Velocity 15
Step Seq Velocity 16
Step Seq Gate Time LSB 1
Step Seq Gate Time LSB 2
Step Seq Gate Time LSB 3
Step Seq Gate Time LSB 4
Step Seq Gate Time LSB 5
Step Seq Gate Time LSB 6
Step Seq Gate Time LSB 7
Step Seq Gate Time LSB 8
Step Seq Gate Time LSB 9
Step Seq Gate Time LSB 10
Step Seq Gate Time LSB 11
Step Seq Gate Time LSB 12
Step Seq Gate Time LSB 13
Step Seq Gate Time LSB 14
Step Seq Gate Time LSB 15
Step Seq Gate Time LSB 16
NOT USED
NOT USED
off...PEG Attack(2E)
Depends on Ctrl Matrix Param
off(0)...Assign Knob8(72)
off...PEG Attack(2E)
Depends on Ctrl Matrix Param
off(0)...Assign Knob8(72)
off...PEG Attack(2E)
Depends on Ctrl Matrix Param
off(0)...Assign Knob8(72)
off...PEG Attack(2E)
Depends on Ctrl Matrix Param
off(0)...Assign Knob8(72)
off...PEG Attack(2E)
Depends on Ctrl Matrix Param
off(0)...Assign Knob8(72)
off...PEG Attack(2E)
Depends on Ctrl Matrix Param
off(0)...Assign Knob8(72)
off...PEG Attack(2E)
Depends on Ctrl Matrix Param
off(0)...Assign Knob8(72)
off...PEG Attack(2E)
Depends on Ctrl Matrix Param
off(0)...Assign Knob8(72)
off...PEG Attack(2E)
Depends on Ctrl Matrix Param
off(0)...Assign Knob8(72)
off...PEG Attack(2E)
Depends on Ctrl Matrix Param
*14
*14
*14,19
*14
*14
*14,19
*14
*14
*14,19
*14
*14
*14,19
*14
*14
*14,19
*14
*14
*14,19
*14
*14
*14,19
*14
*14
*14,19
*14
*14
*14,19
*14
*14
-40(+0)
0
-2(3E), 0(40),+2(42)
0...127
sine(0)...offset-s/h2(14)
VCO1(bit3),VCO2(bit2),VCA(bit1),
VCF(bit0)
both(1),master(2),slave(3)
0(off)
40(+0)
0(off)
0(off)
40(+0)
0(off)
0(off)
40(+0)
0(off)
0(off)
40(+0)
0(off)
0(off)
40(+0)
0(off)
0(off)
40(+0)
0(off)
0(off)
40(+0)
0(off)
0(off)
40(+0)
0(off)
0(off)
40(+0)
0(off)
0(off)
40(+0)
----
05(triangle)
00(LFO1 to All)
*13
1/8(4)...1/12(6)...1/16(7)
8step(8),12step(C),16steps(10)
C-2(0)...G8(7F)
C-2(0)...G8(7F)
C-2(0)...G8(7F)
C-2(0)...G8(7F)
C-2(0)...G8(7F)
C-2(0)...G8(7F)
C-2(0)...G8(7F)
C-2(0)...G8(7F)
C-2(0)...G8(7F)
C-2(0)...G8(7F)
C-2(0)...G8(7F)
C-2(0)...G8(7F)
C-2(0)...G8(7F)
C-2(0)...G8(7F)
C-2(0)...G8(7F)
C-2(0)...G8(7F)
rest(0),1...127
rest(0),1...127
rest(0),1...127
rest(0),1...127
rest(0),1...127
rest(0),1...127
rest(0),1...127
rest(0),1...127
rest(0),1...127
rest(0),1...127
rest(0),1...127
rest(0),1...127
rest(0),1...127
rest(0),1...127
rest(0),1...127
rest(0),1...127
*20
*20
*20
*20
*20
*20
*20
*20
*20
*20
*20
*20
*20
*20
*20
*20
03(slave)
07(1/16)
10
----C3(3C)
C3(3C)
C3(3C)
C3(3C)
C3(3C)
C3(3C)
C3(3C)
C3(3C)
C3(3C)
C3(3C)
C3(3C)
C3(3C)
C3(3C)
C3(3C)
C3(3C)
C3(3C)
100(64)
100(64)
100(64)
100(64)
100(64)
100(64)
100(64)
100(64)
100(64)
100(64)
100(64)
100(64)
100(64)
100(64)
100(64)
100(64)
94%(3C)
94%(3C)
94%(3C)
94%(3C)
94%(3C)
94%(3C)
94%(3C)
94%(3C)
94%(3C)
94%(3C)
94%(3C)
94%(3C)
94%(3C)
94%(3C)
94%(3C)
94%(3C)
---
129
Appendix
MIDI Data Format
1
1
1
1
1
1
1
1
1
1
1
1
1
1
1
1
1
1
1
1
1
1
1
1
1
1
1
1
1
1
1
1
1
1
1
1
1
1
1
1
1
1
1
1
1
1
00...07
00...07
00...07
00...07
00...07
00...07
00...07
00...07
00...07
00...07
00...07
00...07
00...07
00...07
00...07
00...07
00...01
00...01
00...01
00...01
00...01
00...01
00...01
00...01
00...01
00...01
00...01
00...01
00...01
00...01
00...01
00...01
NOT USED
NOT USED
NOT USED
NOT USED
NOT USED
NOT USED
NOT USED
NOT USED
NOT USED
NOT USED
NOT USED
NOT USED
NOT USED
NOT USED
Step Seq Gate Time MSB 1
Step Seq Gate Time MSB 2
Step Seq Gate Time MSB 3
Step Seq Gate Time MSB 4
Step Seq Gate Time MSB 5
Step Seq Gate Time MSB 6
Step Seq Gate Time MSB 7
Step Seq Gate Time MSB 8
Step Seq Gate Time MSB 9
Step Seq Gate Time MSB 10
Step Seq Gate Time MSB 11
Step Seq Gate Time MSB 12
Step Seq Gate Time MSB 13
Step Seq Gate Time MSB 14
Step Seq Gate Time MSB 15
Step Seq Gate Time MSB 16
Step Seq Mute 1
Step Seq Mute 2
Step Seq Mute 3
Step Seq Mute 4
Step Seq Mute 5
Step Seq Mute 6
Step Seq Mute 7
Step Seq Mute 8
Step Seq Mute 9
Step Seq Mute 10
Step Seq Mute 11
Step Seq Mute 12
Step Seq Mute 13
Step Seq Mute 14
Step Seq Mute 15
Step Seq Mute 16
1%(0)...100%(40)...200%(7F)...1600%(3FF)
1%(0)...100%(40)...200%(7F)...1600%(3FF)
1%(0)...100%(40)...200%(7F)...1600%(3FF)
1%(0)...100%(40)...200%(7F)...1600%(3FF)
1%(0)...100%(40)...200%(7F)...1600%(3FF)
1%(0)...100%(40)...200%(7F)...1600%(3FF)
1%(0)...100%(40)...200%(7F)...1600%(3FF)
1%(0)...100%(40)...200%(7F)...1600%(3FF)
1%(0)...100%(40)...200%(7F)...1600%(3FF)
1%(0)...100%(40)...200%(7F)...1600%(3FF)
1%(0)...100%(40)...200%(7F)...1600%(3FF)
1%(0)...100%(40)...200%(7F)...1600%(3FF)
1%(0)...100%(40)...200%(7F)...1600%(3FF)
1%(0)...100%(40)...200%(7F)...1600%(3FF)
1%(0)...100%(40)...200%(7F)...1600%(3FF)
1%(0)...100%(40)...200%(7F)...1600%(3FF)
MuteOFF(0),MuteON(1)
MuteOFF(0),MuteON(1)
MuteOFF(0),MuteON(1)
MuteOFF(0),MuteON(1)
MuteOFF(0),MuteON(1)
MuteOFF(0),MuteON(1)
MuteOFF(0),MuteON(1)
MuteOFF(0),MuteON(1)
MuteOFF(0),MuteON(1)
MuteOFF(0),MuteON(1)
MuteOFF(0),MuteON(1)
MuteOFF(0),MuteON(1)
MuteOFF(0),MuteON(1)
MuteOFF(0),MuteON(1)
MuteOFF(0),MuteON(1)
MuteOFF(0),MuteON(1)
*20
*20
*20
*20
*20
*20
*20
*20
*20
*20
*20
*20
*20
*20
*20
*20
--------------0
0
0
0
0
0
0
0
0
0
0
0
0
0
0
0
MuteOFF(0)
MuteOFF(0)
MuteOFF(0)
MuteOFF(0)
MuteOFF(0)
MuteOFF(0)
MuteOFF(0)
MuteOFF(0)
MuteOFF(0)
MuteOFF(0)
MuteOFF(0)
MuteOFF(0)
MuteOFF(0)
MuteOFF(0)
MuteOFF(0)
MuteOFF(0)
TOTAL SIZE 748
mm = 00 ~ 7F : User Voice No.1 ~ User Voice No.128
*1
*2
*3
*4
*5
*6
*7
*8
:
:
:
:
:
:
:
:
*9 :
*10 :
*11 :
*12 :
*13 :
*14 :
*15 :
*16 :
*17 :
*18 :
*19 :
*20 :
see other table(Arpeggio Type List)
see other table(Ctrl Matrix Parameter List)
become available only when Step Seq is selected and Kbd Mode='ptn-sel&norm' or 'ptn-sel¬e-shift'
only when Arpeggio is selected
only when Step Seq is selected
except *3
see other table (Free EG Track Paramter List)
only Bulk Dump (not received as parameter change)
Key Assign Mode = poly
Key Assign Mode = mono,legato
Oscillator Sync Mode = off
Oscillator Sync Mode = on ('VCO1 master to slave' or 'VCO2 to VC1')
Oscillator Sync Mode = 'VCO1 master to slave'
see other table (Ctrl Matrix Paramter List)
VCO1 Wave is not MultiSaw.
VCO1 Wave is MultiSaw.
VCO2 Wave is not Triangle or Sine.
VCO1 Wave is Triangle or Sine.
CC# 3,5,7,8,9,10,15,16,18,19,22,28,29,31,34,35,39,48,49,50,51,57,59,68,71,72,73,74,75,80,81,82,83,88,89,MW~AC8 cannot be set.
MSB bit 2-0 -> bit 9-7
LSB bit 6 -0 -> bit 6-0
<1-9>
MIDI Bulk Dump Parameter table ( User Pattern Voice additional )
Address
Size
Data
Prameter Name
(H)
(H)
(H)
22 mm 00
1
0...7F
Scene Control Param
01
1
0...7F
VCO1/2 Balance
TOTAL SIZE 2
mm = 00 ~ 7F : User Voice Add No.1 ~ User Voice Add No.128
* This Bulk Dump should be transmitted after sending User Voice Bulk (20 mm 00).
130
Description
Default
0...127
-64...0...+63
0
40(+0)
Appendix
MIDI Data Format
<1-10>
MIDI Bulk Dump Parameter table ( User Pattern Voice Scene-1 )
Address
Size
Data
Prameter Name
(H)
(H)
(H)
40 mm 00
2
00...FF
LFO1 Speed
02
1
00...7F
AmpEG Attack Time
03
1
00...7F
AmpEG Decay Time
04
1
00...7F
AmpEG Sustain Level
05
1
00...7F
AmpEG Release Time
06
1
00...7F
FilterEG Attack Time
07
1
00...7F
FilterEG Decay Time
08
1
00...7F
FilterEG Sustain Level
09
1
00...7F
FilterEG Release Time
0A
1
00...7F
Portamento Time
0B
1
00...7F
Sync Pitch
0C
1
00...7F
FM Depth
0D
1
00...7F
Mixer Noise Level
0E
1
00...05
VCF Filter Type
0F
10
11
13
14
15
16
17
1
1
2
1
1
1
1
1
00...7F
0D...7F
00...FF
00...7F
00...7F
00...7F
00...7F
00...7F
VCF Filter Cutoff
VCF Filter Resonance
FilterEG Depth
VCO1/2 Balance
Volume
Pan
Effect Send
Effect parameter
Description
Default
1(0)...256(FF)
0...127
0...127
0...127
0...127
0...127
0...127
0...127
0...127
0...127
-64...+63
-64...+63
0...127
LPF-24dB(0),LFP-18dB(1),
LPF-12dB(2),BPF(3),HPF-12dB(4),
BEF(5)
0...127
-12(0D)...0(19)...+102(7F)
-128...+127
-64...0...+63
0...127
CENTER(0),L63...C...R63(1...64...127)
0...127
refer to Effect Type List <Table 2-4>
53(84)
0
40(64)
7F(127)
24(36)
0
40(64)
7F(127)
55(85)
2C(44)
40(+0)
40(+0)
0
00(LPF-24dB)
64(100)
19(+0)
A0(+32)
40(+0)
64(100)
40(64)
0
0
TOTAL SIZE 18
mm = 00 ~ 7F : User Voice Scene-1 No.1 ~ User Voice Scene-1 No.128
<1-11>
MIDI Bulk Dump Parameter table ( User Pattern Voice Scene-2 )
Address
Size
Data
Prameter Name
(H)
(H)
(H)
41 mm 00
2
00...FF
LFO1 Speed
02
1
00...7F
AmpEG Attack Time
03
1
00...7F
AmpEG Decay Time
04
1
00...7F
AmpEG Sustain Level
05
1
00...7F
AmpEG Release Time
06
1
00...7F
FilterEG Attack Time
07
1
00...7F
FilterEG Decay Time
08
1
00...7F
FilterEG Sustain Level
09
1
00...7F
FilterEG Release Time
0A
1
00...7F
Portamento Time
0B
1
00...7F
Sync Pitch
0C
1
00...7F
FM Depth
0D
1
00...7F
Mixer Noise Level
0E
1
00...05
VCF Filter Type
0F
10
11
13
14
15
16
17
1
1
2
1
1
1
1
1
00...7F
0D...7F
00...FF
00...7F
00...7F
00...7F
00...7F
00...7F
VCF Filter Cutoff
VCF Filter Resonance
FilterEG Depth
VCO1/2 Balance
Volume
Pan
Effect Send
Effect parameter
Description
Default
1(0)...256(FF)
0...127
0...127
0...127
0...127
0...127
0...127
0...127
0...127
0...127
-64...+63
-64...+63
0...127
LPF-24dB(0),LFP-18dB(1),
LPF-12dB(2),BPF(3),HPF-12dB(4),
BEF(5)
0...127
-12(0D)...0(19)...+102(7F)
-128...+127
-64...0...+63
0...127
CENTER(0),L63...C...R63(1...64...127)
0...127
refer to Effect Type List <Table 2-4>
53(84)
0
40(64)
7F(127)
24(36)
0
40(64)
7F(127)
55(85)
2C(44)
40(+0)
40(+0)
0
00(LPF-24dB)
64(100)
19(+0)
A0(+32)
40(+0)
64(100)
40(64)
0
0
TOTAL SIZE 18
mm = 00 ~ 7F : User Voice Scene-2 No.1 ~ User Voice Scene-2 No.128
* This Bulk Dump should be transmitted after sending User Voice Bulk (20 mm 00).
131
Appendix
MIDI Data Format
<1-12>
AN200 Control Matrix & Free EG Track Parameter List
Parameter Name
Group
Param Name
-----
off
Total Tune
Pitch Up
Pitch Down
PEG
PEG Decay
PEG Depth
PEG Switch
Portmnt Time
LFO
LFO1 Wave
LFO1 Speed
LFO1 Delay
LFO2 Speed
SYNC Sync Mode
Sync Pitch
SyncPit Dp
Sync Pitch Src
Sync Pmod Sw
FM
FM Depth
FM Source1
FM Source2
VCO1 VCO1 Wave
VCO1 Pitch
VCO1 Fine
VCO1 Edge
PW1/Mix
PWM1/Detune
PWM1 Src
(LFO) VCO1 Pmod Dp
VCO2 VCO2 Wave
VCO2 Pitch
VCO2 Fine
VCO2 Edge
PW2
PWM2/Xmod Dp
PWM2/Xmod Src
(LFO) VCO2 Pmod Dp
MIXER VCO1 Lvl
VCO2 Lvl
Ring Mod Lvl
Noise Lvl
VCF
FEG Attack
FEG Decay
FEG Sustain
FEG Release
HPF Cutoff
VCF Type
VCF Cutoff
Resonance
FEG Depth
FEG Vel Sens
VCF Key Trk
(LFO) VCF FMod Dp
AEG Attack
VCA
AEG Decay
AEG Sustain
AEG Release
(MIXER) VCA F.B.
VCA Volume
AEG Vel Sns
(LFO) VCA Mod Dp
Dist.
Dry/Wet
PLG-AN PEG Attack
LFO2 Wave
FM Algorithm
AN200 VCO 1/2 Balance
Effect Param
Effect Wet Level
Track Pan
Track Level
Ctrl Matrix :
Parameter
Data Value
0
1
2
3
4
5
Ctrl Matrix :
Calc. Method
Multiply
or Add *1
--add
add
add
add *2
mul
mul
CC
AT
--x
O
O
O
O
x
O
x
O
O
O
x
O
O
x
x
O
x
x
x
x
x
O
O
O
x
O
x
x
x
O
O
O
x
O
O
O
O
O
O
O
O
O
O
x
O
O
O
mul
mul
x
x
O
O
O
O
O
O
O
6
add
7
8
9
add
add
add
10
11
mul
12
mul
13
14
15
16
17
add
add
add
add
add
mul
18
add
19
20
21
22
23
add
add
add
add
24
25
26
27
28
29
30
31
32
33
34
35
36
37
38
39
40
41
42
43
44
45
46
mul
add
mul
mul
mul
mul
add *2
add *2
add
add *2
add
add
add
add
add *2
add *2
add
add *2
add
add *2
Free EG :
Trk Param
Ctrl Matrix : Source
x
O
O
O
x
x
x
x
x
x
x
Data Range
(-24) - (+24)
(-24) - (+24)
(-64) - (+63)
(-64) - (+63)
(-64) - (+63)
(-64) - (+63)
(-64) - (+63)
(-64) - (+63)
(-64) - (+63)
(-64) - (+63)
(-64) - (+63)
(-64) - (+63)
(-64) - (+63)
(-64) - (+63)
(-63) - (+63)
(-64) - (+63)
(-64) - (+63)
(-64) - (+63)
(-63) - (+63)
(-64) - (+63)
(-64) - (+63)
(-64) - (+63)
(-64) - (+63)
(-64) - (+63)
(-64) - (+63)
(-64) - (+63)
(-64) - (+63)
(-64) - (+63)
(-64) - (+63)
(-64) - (+63)
(-64) - (+63)
(-64) - (+63)
(-64) - (+63)
(-64) - (+63)
(-64) - (+63)
(-64) - (+63)
(-64) - (+63)
(-64) - (+63)
(-64) - (+63)
(-64) - (+63)
(-64) - (+63)
Vel
KeyRnd
--O
x
x
O
O
x
O
x
O
O
O
x
O
O
x
x
O
x
x
x
x
x
O
x
O
x
x
x
x
x
O
x
O
x
x
O
O
O
O
O
O
x
O
O
x
O
O
(Vel x)
KeyRnd
x
x
x
O
O
x
O
x
(Vel x)
KeyRnd
x
x
x
O
x
x
x
x
x
x
x
Data Range
(-64) - (+63)
(-64) - (+63)
(-64) - (+63)
(-64) - (+63)
(-64) - (+63)
(-64) - (+63)
(-64) - (+63)
(-64) - (+63)
(-64) - (+63)
(-64) - (+63)
(-64) - (+63)
(-64) - (+63)
(-64) - (+63)
(-64) - (+63)
(-64) - (+63)
(-64) - (+63)
(-64) - (+63)
(-64) - (+63)
(-64) - (+63)
(-64) - (+63)
(-64) - (+63)
(-64) - (+63)
(-64) - (+63)
(-64) - (+63)
FEG VelSns
(-64) - (+63)
(-64) - (+63)
(-64) - (+63)
(-64) - (+63)
AEG VelSns
(-64) - (+63)
(-64) - (+63)
KeyTrk
--x
x
x
O
O
x
O
x
O
O
O
x
O
O
x
x
O
x
x
x
O
O
O
x
O
x
x
x
O
O
O
x
O
x
x
O
O
O
O
O
O
x
O
O
x
(x)
O
O
x
x
x
O
O
x
O
x
O
x
x
x
O
x
x
x
x
x
x
x
Data Range
Data Value
0
(-64) - (+63)
(-64) - (+63)
(-64) - (+63)
(-64) - (+63)
(-64) - (+63)
(-64) - (+63)
(-32) - (+32)
(-64) - (+63)
(-64) - (+63)
(-64) - (+63)
(-64) - (+63)
(-64) - (+63)
(-64) - (+63)
(-64) - (+63)
(-64) - (+63)
(-64) - (+63)
(-64) - (+63)
(-64) - (+63)
(-64) - (+63)
(-64) - (+63)
(-64) - (+63)
(-64) - (+63)
(-64) - (+63)
(-64) - (+63)
(-64) - (+63)
VCF KeyTrk
(-64) - (+63)
(-64) - (+63)
(-64) - (+63)
(-64) - (+63)
(-64) - (+63)
(-64) - (+63)
(-64) - (+63)
1
2
3
4
5
6
7
8
9
10
11
12
13
14
15
16
17
18
19
20
21
22
23
24
25
26
27
28
29
30
31
32
33
34
35
36
37
38
39
40
41
42
43
44
45
46
47
48
49
50
51
52
53
54
55
56
--57
58
59
60
61
62
63
64
*1. The effect of the controller on the parameter value is either added or multiplied as indicated. Also, when two or more different controllers are simultaneously assigned
and applied to the same parameter, the combined effect of the controllers on the parameter value follows the same rule (is either added or multiplied).
*2. For these parameters, positive values decrease the time, making the EG rate faster.
132
Appendix
MIDI Data Format
<2-1>
Rhythm Track Parameter Base Address
MODEL ID = 6D
Parameter
System
Current Effects
Current Multi Part
(H)
00
02
08
:
Address
(M)
00
01
00
:
02
08
Description
(L)
00
00
System
Cuttnet Effect
00
:
00
00
Rhythm Track 1 Part Parameter
:
Rhythm Track 3 Part Parameter
Synth Track Part Parameter
Current Rhythm StepSeq
10
:
00
:
02
00
:
00
Current Rhythm Trk1 Step Seq
:
Current Rhythm Trk3 Step Seq
User Pattern Rhythm Step Seq
20
:
00
:
7f
00
:
00
User Pattern Rhythm Trk1 Step Seq 1
:
User Pattern Rhythm Trk1 Step Seq 128
21
:
00
:
7f
00
:
00
User Pattern Rhythm Trk2 Step Seq 1
:
User Pattern Rhythm Trk2 Step Seq 128
22
:
00
:
7f
00
:
00
User Pattern Rhythm Trk3 Step Seq 1
:
User Pattern Rhythm Trk3 Step Seq 128
User Pattern Effect
30
:
00
:
7f
00
:
00
User Pattern Effect 1
:
User Pattern Effect 128
User Pattern Multi Part
40
:
00
:
7f
00
:
00
Rhythm Trk 1 User Pattern Part 1
:
Rhythm Trk 1 User Pattern Part 128
41
:
00
:
7f
00
:
00
Rhythm Trk 2 User Pattern Part 1
:
Rhythm Trk 2 User Pattern Part 128
42
:
00
:
7f
00
:
00
Rhythm Trk 3 User Pattern Part 1
:
Rhythm Trk 3 User Pattern Part 128
48
:
00
:
7f
00
:
00
Synth Track User Pattern Part 1
:
Synth Track User Pattern Part 128
60
:
00
:
7f
00
:
00
:
69
:
:
00
:
7f
:
Song1 measure1
:
Song1 measure128
:
00
:
00
Song10 measure1
:
Song10 measure128
70
:
00
:
7f
00
:
00
:
79
:
:
00
:
7f
:
Song1 measure129
:
Song1 measure256
:
00
:
00
Song10 measure129
:
Song10 measure256
User Song
<2-2>
MIDI Parameter Change table ( SYSTEM )
Address
Size
Data
(H)
(H)
(H)
00 00 00
4
04
1
05
06
1
07
2
01...C8
09
1
00...03
Prameter Name
(RESERVED)
(RESERVED)
(NOT USED)
(RESERVED)
Play Effect Gate Time
Step Seq Loop Type
alternateB(3)
Description
1%(1)...200%(C8)
forward(0),backward(1),alternateA(2),
Default
(H)
----64(100%)
00(forward)
TOTAL SIZE 09
<2-3>
MIDI Parameter Change table (CURRENT EFFECT)
Address
Size
Data
Prameter Name
(H)
(H)
(H)
02 01 00
1
00 - 03
EFFECT TYPE MSB
01
1
00 - 02
EFFECT TYPE LSB
02
1
00 - 7F
EFFECT PARAMETER
TOTAL SIZE 3
Description
refer to Effect Type List <Table 2-4>
refer to Effect Type List <Table 2-4>
refer to Effect Type List <Table 2-4>
Default
(H)
00
00
00
133
Appendix
MIDI Data Format
<2-4>
Effect Type List
Type MSB
Type LSB
00
01
02
03
00
01
02
03
Delay1(mono)
Flanger1
Phaser1
AmpSim1
Delay2(stereo)
Flanger2
Phaser2
AmpSim2
Delay3(cross)
Chorus
Phaser3
AmpSim3
Reverb
----
<2-4-1>
Effect type
Delay 1 (mono)
Delay 2 (stereo)
Delay 3 (cross)
Reverb
Flanger 1
Flanger 2
Chorus
Phaser 1
Phaser 2
Phaser 3
AmpSim 1
AmpSim 2
AmpSim 3
Control Paramater
Tempo Sync Resolution
Tempo Sync Resolution
Tempo Sync Resolution
Reverb Time
LFO Speed
LFO Speed
LFO Speed
LFO Speed
LFO Speed
LFO Speed
Drive
Drive
Drive
Value
0 - 127
0 - 127
0 - 127
0 - 127
0 - 127
0 - 127
0 - 127
0 - 127
0 - 127
0 - 127
0 - 127
0 - 127
0 - 127
table#1
LFO Frequency
Data
0
1
2
3
4
5
6
7
8
9
10
11
12
13
14
15
16
17
18
19
20
21
22
23
24
25
26
27
28
29
30
31
134
Value
0.00
0.04
0.08
0.12
0.16
0.21
0.25
0.29
0.33
0.37
0.42
0.46
0.50
0.54
0.58
0.63
0.67
0.71
0.75
0.79
0.84
0.88
0.92
0.96
1.00
1.05
1.09
1.13
1.17
1.22
1.26
1.30
table#3
table#3
table#3
table#2
table#1
table#1
table#1
table#1
table#1
table#1
0.3 s - 16.0 s
0.00Hz - 39.7Hz
0.00Hz - 39.7Hz
0.00Hz - 39.7Hz
0.00Hz - 39.7Hz
0.00Hz - 39.7Hz
0.00Hz - 39.7Hz
table#2
Reverb time
Data
32
33
34
35
36
37
38
39
40
41
42
43
44
45
46
47
48
49
50
51
52
53
54
55
56
57
58
59
60
61
62
63
Value
1.34
1.38
1.43
1.47
1.51
1.55
1.59
1.64
1.68
1.72
1.76
1.80
1.85
1.89
1.93
1.97
2.01
2.06
2.10
2.14
2.18
2.22
2.27
2.31
2.35
2.39
2.43
2.48
2.52
2.56
2.60
2.65
Data
64
65
66
67
68
69
70
71
72
73
74
75
76
77
78
79
80
81
82
83
84
85
86
87
88
89
90
91
92
93
94
95
Value
0.69
2.77
2.86
2.94
3.02
3.11
3.19
3.28
3.36
3.44
3.53
3.61
3.70
3.86
4.03
4.20
4.37
4.54
4.71
4.87
5.04
5.21
5.38
5.55
5.72
6.05
6.39
6.72
7.06
7.40
7.73
8.07
Data
96
97
98
99
100
101
102
103
104
105
106
107
108
109
110
111
112
113
114
115
116
117
118
119
120
121
122
123
124
125
126
127
Value
8.41
8.74
9.08
9.42
9.75
10.0
10.7
11.4
12.1
12.7
13.4
14.1
14.8
15.4
16.1
16.8
17.5
18.1
19.5
20.8
22.2
23.5
24.8
26.2
27.5
28.9
30.2
31.6
32.9
34.3
37.0
39.7
Data
0,1
2,3
4,5
6,7
8,9
10,11
12,13
14,15
16,17
18,19
20,21
22,23
24,25
26,27
28,29
30,31
32,33
34,35
36,37
38,39
40,41
42,43
44,45
46,47
48,49
50,51
52,53
54,55
56,57
58,59
60,61
62,63
Value
0.3
0.4
0.5
0.6
0.7
0.8
0.9
1.0
1.1
1.2
1.3
1.4
1.5
1.6
1.7
1.8
1.9
2.0
2.1
2.2
2.3
2.4
2.5
2.6
2.7
2.8
2.9
3.0
3.1
3.2
3.3
3.4
table#3
Tempo resolution
Data
Value
64,65
3.5
66,67
3.6
68,69
3.7
70,71
3.8
72,73
3.9
74,75
4.0
76,77
4.1
78,79
4.2
80,81
4.3
82,83
4.4
84,85
4.5
86,87
4.6
88,89
4.7
90,91
4.8
92,93
4.9
94,95
5.0
96,97
5.5
98,99
6.0
100,101
6.5
102,103
7.0
104,105
7.5
106,107
8.0
108,109
8.5
110,111
9.0
112,113
9.5
114,115 10.0
116,117 11.0
118,119 12.0
120,121 13.0
122,123 14.0
124,125 15.0
126,127 16.0
Data
0~7
8~15
16~23
24~31
32~39
40~47
48~55
56~63
64~71
72~79
80~95
96~127
Value
1/32
1/24
1/16
1/12
3/32
1/8
1/6
3/16
1/4
1/3
3/8
1/2
Appendix
MIDI Data Format
<2-5>
MIDI Parameter Change table (User Voice EFFECT)
Address
Size
Data
Prameter Name
(H)
(H)
(H)
30 nn 00
1
00 - 03
EFFECT TYPE MSB
01
1
00 - 02
EFFECT TYPE LSB
02
1
00 - 7F
EFFECT PARAMETER
TOTAL SIZE 3
Description
refer to Effect Type List <Table 2-4>
refer to Effect Type List <Table 2-4>
refer to Effect Type List <Table 2-4>
Default
(H)
00
00
00
nn = Pattern Number
<2-6>
MIDI Parameter Change table ( MULTI PART )
Address
Size
Data
(H)
(H)
(H)
08 pp 00
1
01
1
02
1
03
1
04
1
05
1
00 - 7F
06
1
00 - 7F
07
1
00 - 7F
08
1
09
1
0A
1
00 - 7F
0B
1
00 - 7F
0C
1
0D
1
0E
1
TOTAL SIZE 0F
Prameter Name
(RESERVED)
(RESERVED)
(RESERVED)
(RESERVED)
(RESERVED)
VOLUME
PAN
EFFECT1 SEND
(RESERVED)
(RESERVED)
FILTER CUTOFF FREQUENCY (*2)
FILTER RESONANCE (*2)
(RESERVED)
(RESERVED)
(RESERVED)
Description
0 - 127
CENTER/RANDOM (*1) (0),L63...C...R63(1...64...127)
0 - 127
-64 - +63
-64 - +63
Default
(H)
-----64
40
00
--40
40
----
pp = Part Number ( 00 - 02 : Rhythm Track 1 - 3, 08 : Synth Track )
*1 CENTER when pp = 08(Synth Track), RANDOM when pp = 0,1,2(Rhythm Track)
*2 reserved when pp = 08(Synth Track)
<2-7>
MIDI Parameter Change table (User Voice MULTI PART )
Address
Size
Data
Prameter Name
(H)
(H)
(H)
4p nn 00
1
(RESERVED)
01
1
(RESERVED)
02
1
(RESERVED)
03
1
(RESERVED)
04
1
(RESERVED)
05
1
00 - 7F
VOLUME
06
1
00 - 7F
PAN
07
1
00 - 7F
EFFECT1 SEND
08
1
(RESERVED)
09
1
(RESERVED)
0A
1
00 - 7F
FILTER CUTOFF FREQUENCY (*2)
0B
1
00 - 7F
FILTER RESONANCE (*2)
0C
1
(RESERVED)
0D
1
(RESERVED)
0E
1
(RESERVED)
TOTAL SIZE 0F
Description
0 - 127
CENTER/RANDOM (*1) (0),L63...C...R63(1...64...127)
0 - 127
-64 - +63
-64 - +63
Default
(H)
-----64
40
00
28
00
40
40
----
nn = Pattern Number
p = Part Number ( 0 - 2 : Rhythm Track 1 - 3, 8 : Synth Track )
*1 CENTER when pp = 08(Synth Track), RANDOM when pp = 0,1,2(Rhythm Track)
*2 reserved when pp = 08(Synth Track)
<2-8>
MIDI Parameter Change table ( Rhythm Track Current Step Seq Pattern )
Address
Size
Data
Prameter Name
(H)
(H)
(H)
10 0p 00
1
NOT USED
01
1
NOT USED
02
1
NOT USED
03
1
NOT USED
04
1
NOT USED
05
1
NOT USED
06
1
00...78
Step Seq Inst 1
07
1
00...78
Step Seq Inst 2
08
1
00...78
Step Seq Inst 3
09
1
00...78
Step Seq Inst 4
0A
1
00...78
Step Seq Inst 5
0B
1
00...78
Step Seq Inst 6
0C
1
00...78
Step Seq Inst 7
0D
1
00...78
Step Seq Inst 8
0E
1
00...78
Step Seq Inst 9
0F
1
00...78
Step Seq Inst 10
10
1
00...78
Step Seq Inst 11
11
1
00...78
Step Seq Inst 12
12
1
00...78
Step Seq Inst 13
13
1
00...78
Step Seq Inst 14
14
1
00...78
Step Seq Inst 15
15
1
00...78
Step Seq Inst 16
16
1
00...7F
Step Seq Velocity 1
17
1
00...7F
Step Seq Velocity 2
18
1
00...7F
Step Seq Velocity 3
Description
Default
Ba1C(0)...DgW7(78)
Ba1C(0)...DgW7(78)
Ba1C(0)...DgW7(78)
Ba1C(0)...DgW7(78)
Ba1C(0)...DgW7(78)
Ba1C(0)...DgW7(78)
Ba1C(0)...DgW7(78)
Ba1C(0)...DgW7(78)
Ba1C(0)...DgW7(78)
Ba1C(0)...DgW7(78)
Ba1C(0)...DgW7(78)
Ba1C(0)...DgW7(78)
Ba1C(0)...DgW7(78)
Ba1C(0)...DgW7(78)
Ba1C(0)...DgW7(78)
Ba1C(0)...DgW7(78)
rest(0),1...127
rest(0),1...127
rest(0),1...127
------SD10
SD10
SD10
SD10
SD10
SD10
SD10
SD10
SD10
SD10
SD10
SD10
SD10
SD10
SD10
SD10
100(64)
100(64)
100(64)
135
Appendix
MIDI Data Format
19
1A
1B
1C
1D
1E
1F
20
21
22
23
24
25
26
27
28
29
2A
2B
2C
2D
2E
2F
30
31
32
33
34
35
36
37
38
39
3A
3B
3C
3D
3E
3F
40
41
42
43
44
45
46
47
48
49
4A
4B
4C
4D
4E
4F
50
51
52
53
54
55
56
57
58
59
5A
5B
5C
5D
5E
5F
60
61
62
63
64
65
TOTAL SIZE
1
1
1
1
1
1
1
1
1
1
1
1
1
1
1
1
1
1
1
1
1
1
1
1
1
1
1
1
1
1
1
1
1
1
1
1
1
1
1
1
1
1
1
1
1
1
1
1
1
1
1
1
1
1
1
1
1
1
1
1
1
1
1
1
1
1
1
1
1
1
1
1
1
1
1
1
1
66
00...7F
00...7F
00...7F
00...7F
00...7F
00...7F
00...7F
00...7F
00...7F
00...7F
00...7F
00...7F
00...7F
00...7F
00...7F
00...7F
00...7F
00...7F
00...7F
00...7F
00...7F
00...7F
00...7F
00...7F
00...7F
00...7F
00...7F
00...7F
00...7F
00...7F
00...7F
00...7F
00...7F
00...7F
00...7F
00...7F
00...7F
00...7F
00...7F
00...7F
00...7F
00...7F
00...7F
00...7F
00...7F
00...07
00...07
00...07
00...07
00...07
00...07
00...07
00...07
00...07
00...07
00...07
00...07
00...07
00...07
00...07
00...07
00...01
00...01
00...01
00...01
00...01
00...01
00...01
00...01
00...01
00...01
00...01
00...01
00...01
00...01
00...01
00...01
Step Seq Velocity 4
Step Seq Velocity 5
Step Seq Velocity 6
Step Seq Velocity 7
Step Seq Velocity 8
Step Seq Velocity 9
Step Seq Velocity 10
Step Seq Velocity 11
Step Seq Velocity 12
Step Seq Velocity 13
Step Seq Velocity 14
Step Seq Velocity 15
Step Seq Velocity 16
Step Seq Gate Time LSB 1
Step Seq Gate Time LSB 2
Step Seq Gate Time LSB 3
Step Seq Gate Time LSB 4
Step Seq Gate Time LSB 5
Step Seq Gate Time LSB 6
Step Seq Gate Time LSB 7
Step Seq Gate Time LSB 8
Step Seq Gate Time LSB 9
Step Seq Gate Time LSB 10
Step Seq Gate Time LSB 11
Step Seq Gate Time LSB 12
Step Seq Gate Time LSB 13
Step Seq Gate Time LSB 14
Step Seq Gate Time LSB 15
Step Seq Gate Time LSB 16
Step Seq Pitch 1
Step Seq Pitch 2
Step Seq Pitch 3
Step Seq Pitch 4
Step Seq Pitch 5
Step Seq Pitch 6
Step Seq Pitch 7
Step Seq Pitch 8
Step Seq Pitch 9
Step Seq Pitch10
Step Seq Pitch11
Step Seq Pitch12
Step Seq Pitch13
Step Seq Pitch14
Step Seq Pitch15
Step Seq Pitch16
Step Seq Gate Time MSB 1
Step Seq Gate Time MSB 2
Step Seq Gate Time MSB 3
Step Seq Gate Time MSB 4
Step Seq Gate Time MSB 5
Step Seq Gate Time MSB 6
Step Seq Gate Time MSB 7
Step Seq Gate Time MSB 8
Step Seq Gate Time MSB 9
Step Seq Gate Time MSB 10
Step Seq Gate Time MSB 11
Step Seq Gate Time MSB 12
Step Seq Gate Time MSB 13
Step Seq Gate Time MSB 14
Step Seq Gate Time MSB 15
Step Seq Gate Time MSB 16
Step Seq Mute 1
Step Seq Mute 2
Step Seq Mute 3
Step Seq Mute 4
Step Seq Mute 5
Step Seq Mute 6
Step Seq Mute 7
Step Seq Mute 8
Step Seq Mute 9
Step Seq Mute 10
Step Seq Mute 11
Step Seq Mute 12
Step Seq Mute 13
Step Seq Mute 14
Step Seq Mute 15
Step Seq Mute 16
rest(0),1...127
rest(0),1...127
rest(0),1...127
rest(0),1...127
rest(0),1...127
rest(0),1...127
rest(0),1...127
rest(0),1...127
rest(0),1...127
rest(0),1...127
rest(0),1...127
rest(0),1...127
rest(0),1...127
*1
*1
*1
*1
*1
*1
*1
*1
*1
*1
*1
*1
*1
*1
*1
*1
0...127
0...127
0...127
0...127
0...127
0...127
0...127
0...127
0...127
0...127
0...127
0...127
0...127
0...127
0...127
0...127
1%(0)...100%(40)...200%(7F)...1600%(3FF)
1%(0)...100%(40)...200%(7F)...1600%(3FF)
1%(0)...100%(40)...200%(7F)...1600%(3FF)
1%(0)...100%(40)...200%(7F)...1600%(3FF)
1%(0)...100%(40)...200%(7F)...1600%(3FF)
1%(0)...100%(40)...200%(7F)...1600%(3FF)
1%(0)...100%(40)...200%(7F)...1600%(3FF)
1%(0)...100%(40)...200%(7F)...1600%(3FF)
1%(0)...100%(40)...200%(7F)...1600%(3FF)
1%(0)...100%(40)...200%(7F)...1600%(3FF)
1%(0)...100%(40)...200%(7F)...1600%(3FF)
1%(0)...100%(40)...200%(7F)...1600%(3FF)
1%(0)...100%(40)...200%(7F)...1600%(3FF)
1%(0)...100%(40)...200%(7F)...1600%(3FF)
1%(0)...100%(40)...200%(7F)...1600%(3FF)
1%(0)...100%(40)...200%(7F)...1600%(3FF)
MuteOFF(0),MuteON(1)
MuteOFF(0),MuteON(1)
MuteOFF(0),MuteON(1)
MuteOFF(0),MuteON(1)
MuteOFF(0),MuteON(1)
MuteOFF(0),MuteON(1)
MuteOFF(0),MuteON(1)
MuteOFF(0),MuteON(1)
MuteOFF(0),MuteON(1)
MuteOFF(0),MuteON(1)
MuteOFF(0),MuteON(1)
MuteOFF(0),MuteON(1)
MuteOFF(0),MuteON(1)
MuteOFF(0),MuteON(1)
MuteOFF(0),MuteON(1)
MuteOFF(0),MuteON(1)
*1,2
*1,2
*1,2
*1,2
*1,2
*1,2
*1,2
*1,2
*1,2
*1,2
*1,2
*1,2
*1,2
*1,2
*1,2
*1,2
100(64)
100(64)
100(64)
100(64)
100(64)
100(64)
100(64)
100(64)
100(64)
100(64)
100(64)
100(64)
100(64)
94%(3C)
94%(3C)
94%(3C)
94%(3C)
94%(3C)
94%(3C)
94%(3C)
94%(3C)
94%(3C)
94%(3C)
94%(3C)
94%(3C)
94%(3C)
94%(3C)
94%(3C)
94%(3C)
0(00)
0(00)
0(00)
0(00)
0(00)
0(00)
0(00)
0(00)
0(00)
0(00)
0(00)
0(00)
0(00)
0(00)
0(00)
0(00)
0
0
0
0
0
0
0
0
0
0
0
0
0
0
0
0
MuteOFF(0)
MuteOFF(0)
MuteOFF(0)
MuteOFF(0)
MuteOFF(0)
MuteOFF(0)
MuteOFF(0)
MuteOFF(0)
MuteOFF(0)
MuteOFF(0)
MuteOFF(0)
MuteOFF(0)
MuteOFF(0)
MuteOFF(0)
MuteOFF(0)
MuteOFF(0)
p = Part Number ( 0 - 2 : Rhythm Track 1 - 3 )
*1 : MSB bit 2-0 -> bit 9-7
LSB bit 6 -0 -> bit 6-0
*2 : This should be transmitted after sending Step Seq Gate Time LSB n.
<2-9>
MIDI Bulk Dump Parameter table ( Rhythm Track User Step Seq Pattern )
Address
Size
Data
Prameter Name
(H)
(H)
(H)
2p nn 00
1
NOT USED
1
NOT USED
1
NOT USED
1
NOT USED
1
NOT USED
1
NOT USED
1
00...78
Step Seq Inst 1
1
00...78
Step Seq Inst 2
136
Description
Default
Ba1C(0)...DgW7(78)
Ba1C(0)...DgW7(78)
------SD10
SD10
Appendix
MIDI Data Format
1
1
1
1
1
1
1
1
1
1
1
1
1
1
1
1
1
1
1
1
1
1
1
1
1
1
1
1
1
1
1
1
1
1
1
1
1
1
1
1
1
1
1
1
1
1
1
1
1
1
1
1
1
1
1
1
1
1
1
1
1
1
1
1
1
1
1
1
1
1
1
1
1
1
1
1
1
1
1
1
1
1
1
1
1
1
1
1
1
1
1
1
1
1
TOTAL SIZE 66
00...78
00...78
00...78
00...78
00...78
00...78
00...78
00...78
00...78
00...78
00...78
00...78
00...78
00...78
00...7F
00...7F
00...7F
00...7F
00...7F
00...7F
00...7F
00...7F
00...7F
00...7F
00...7F
00...7F
00...7F
00...7F
00...7F
00...7F
00...7F
00...7F
00...7F
00...7F
00...7F
00...7F
00...7F
00...7F
00...7F
00...7F
00...7F
00...7F
00...7F
00...7F
00...7F
00...7F
00...7F
00...7F
00...7F
00...7F
00...7F
00...7F
00...7F
00...7F
00...7F
00...7F
00...7F
00...7F
00...7F
00...7F
00...7F
00...7F
00...07
00...07
00...07
00...07
00...07
00...07
00...07
00...07
00...07
00...07
00...07
00...07
00...07
00...07
00...07
00...07
00...01
00...01
00...01
00...01
00...01
00...01
00...01
00...01
00...01
00...01
00...01
00...01
00...01
00...01
00...01
00...01
Step Seq Inst 3
Step Seq Inst 4
Step Seq Inst 5
Step Seq Inst 6
Step Seq Inst 7
Step Seq Inst 8
Step Seq Inst 9
Step Seq Inst 10
Step Seq Inst 11
Step Seq Inst 12
Step Seq Inst 13
Step Seq Inst 14
Step Seq Inst 15
Step Seq Inst 16
Step Seq Velocity 1
Step Seq Velocity 2
Step Seq Velocity 3
Step Seq Velocity 4
Step Seq Velocity 5
Step Seq Velocity 6
Step Seq Velocity 7
Step Seq Velocity 8
Step Seq Velocity 9
Step Seq Velocity 10
Step Seq Velocity 11
Step Seq Velocity 12
Step Seq Velocity 13
Step Seq Velocity 14
Step Seq Velocity 15
Step Seq Velocity 16
Step Seq Gate Time LSB 1
Step Seq Gate Time LSB 2
Step Seq Gate Time LSB 3
Step Seq Gate Time LSB 4
Step Seq Gate Time LSB 5
Step Seq Gate Time LSB 6
Step Seq Gate Time LSB 7
Step Seq Gate Time LSB 8
Step Seq Gate Time LSB 9
Step Seq Gate Time LSB 10
Step Seq Gate Time LSB 11
Step Seq Gate Time LSB 12
Step Seq Gate Time LSB 13
Step Seq Gate Time LSB 14
Step Seq Gate Time LSB 15
Step Seq Gate Time LSB 16
Step Seq Pitch 1
Step Seq Pitch 2
Step Seq Pitch 3
Step Seq Pitch 4
Step Seq Pitch 5
Step Seq Pitch 6
Step Seq Pitch 7
Step Seq Pitch 8
Step Seq Pitch 9
Step Seq Pitch10
Step Seq Pitch11
Step Seq Pitch12
Step Seq Pitch13
Step Seq Pitch14
Step Seq Pitch15
Step Seq Pitch16
Step Seq Gate Time MSB 1
Step Seq Gate Time MSB 2
Step Seq Gate Time MSB 3
Step Seq Gate Time MSB 4
Step Seq Gate Time MSB 5
Step Seq Gate Time MSB 6
Step Seq Gate Time MSB 7
Step Seq Gate Time MSB 8
Step Seq Gate Time MSB 9
Step Seq Gate Time MSB 10
Step Seq Gate Time MSB 11
Step Seq Gate Time MSB 12
Step Seq Gate Time MSB 13
Step Seq Gate Time MSB 14
Step Seq Gate Time MSB 15
Step Seq Gate Time MSB 16
Step Seq Mute 1
Step Seq Mute 2
Step Seq Mute 3
Step Seq Mute 4
Step Seq Mute 5
Step Seq Mute 6
Step Seq Mute 7
Step Seq Mute 8
Step Seq Mute 9
Step Seq Mute 10
Step Seq Mute 11
Step Seq Mute 12
Step Seq Mute 13
Step Seq Mute 14
Step Seq Mute 15
Step Seq Mute 16
Ba1C(0)...DgW7(78)
Ba1C(0)...DgW7(78)
Ba1C(0)...DgW7(78)
Ba1C(0)...DgW7(78)
Ba1C(0)...DgW7(78)
Ba1C(0)...DgW7(78)
Ba1C(0)...DgW7(78)
Ba1C(0)...DgW7(78)
Ba1C(0)...DgW7(78)
Ba1C(0)...DgW7(78)
Ba1C(0)...DgW7(78)
Ba1C(0)...DgW7(78)
Ba1C(0)...DgW7(78)
Ba1C(0)...DgW7(78)
rest(0),1...127
rest(0),1...127
rest(0),1...127
rest(0),1...127
rest(0),1...127
rest(0),1...127
rest(0),1...127
rest(0),1...127
rest(0),1...127
rest(0),1...127
rest(0),1...127
rest(0),1...127
rest(0),1...127
rest(0),1...127
rest(0),1...127
rest(0),1...127
*1
*1
*1
*1
*1
*1
*1
*1
*1
*1
*1
*1
*1
*1
*1
*1
0...127
0...127
0...127
0...127
0...127
0...127
0...127
0...127
0...127
0...127
0...127
0...127
0...127
0...127
0...127
0...127
1%(0)...100%(40)...200%(7F)...1600%(3FF)
1%(0)...100%(40)...200%(7F)...1600%(3FF)
1%(0)...100%(40)...200%(7F)...1600%(3FF)
1%(0)...100%(40)...200%(7F)...1600%(3FF)
1%(0)...100%(40)...200%(7F)...1600%(3FF)
1%(0)...100%(40)...200%(7F)...1600%(3FF)
1%(0)...100%(40)...200%(7F)...1600%(3FF)
1%(0)...100%(40)...200%(7F)...1600%(3FF)
1%(0)...100%(40)...200%(7F)...1600%(3FF)
1%(0)...100%(40)...200%(7F)...1600%(3FF)
1%(0)...100%(40)...200%(7F)...1600%(3FF)
1%(0)...100%(40)...200%(7F)...1600%(3FF)
1%(0)...100%(40)...200%(7F)...1600%(3FF)
1%(0)...100%(40)...200%(7F)...1600%(3FF)
1%(0)...100%(40)...200%(7F)...1600%(3FF)
1%(0)...100%(40)...200%(7F)...1600%(3FF)
MuteOFF(0),MuteON(1)
MuteOFF(0),MuteON(1)
MuteOFF(0),MuteON(1)
MuteOFF(0),MuteON(1)
MuteOFF(0),MuteON(1)
MuteOFF(0),MuteON(1)
MuteOFF(0),MuteON(1)
MuteOFF(0),MuteON(1)
MuteOFF(0),MuteON(1)
MuteOFF(0),MuteON(1)
MuteOFF(0),MuteON(1)
MuteOFF(0),MuteON(1)
MuteOFF(0),MuteON(1)
MuteOFF(0),MuteON(1)
MuteOFF(0),MuteON(1)
MuteOFF(0),MuteON(1)
*1,2
*1,2
*1,2
*1,2
*1,2
*1,2
*1,2
*1,2
*1,2
*1,2
*1,2
*1,2
*1,2
*1,2
*1,2
*1,2
SD10
SD10
SD10
SD10
SD10
SD10
SD10
SD10
SD10
SD10
SD10
SD10
SD10
SD10
100(64)
100(64)
100(64)
100(64)
100(64)
100(64)
100(64)
100(64)
100(64)
100(64)
100(64)
100(64)
100(64)
100(64)
100(64)
100(64)
94%(3C)
94%(3C)
94%(3C)
94%(3C)
94%(3C)
94%(3C)
94%(3C)
94%(3C)
94%(3C)
94%(3C)
94%(3C)
94%(3C)
94%(3C)
94%(3C)
94%(3C)
94%(3C)
0(00)
0(00)
0(00)
0(00)
0(00)
0(00)
0(00)
0(00)
0(00)
0(00)
0(00)
0(00)
0(00)
0(00)
0(00)
0(00)
0
0
0
0
0
0
0
0
0
0
0
0
0
0
0
0
MuteOFF(0)
MuteOFF(0)
MuteOFF(0)
MuteOFF(0)
MuteOFF(0)
MuteOFF(0)
MuteOFF(0)
MuteOFF(0)
MuteOFF(0)
MuteOFF(0)
MuteOFF(0)
MuteOFF(0)
MuteOFF(0)
MuteOFF(0)
MuteOFF(0)
MuteOFF(0)
p = Part Number ( 0 - 2 : Rhythm Track 1 - 3 )
nn = User Pattern Number ( 0 - 7F )
137
Appendix
MIDI Data Format
*1 : MSB bit 2-0 -> bit 9-7
LSB bit 6 -0 -> bit 6-0
*2 : This should be transmitted after sending Step Seq Gate Time LSB n.
<2-10>
MIDI Parameter Change table (User Song)
Address
Size
Data
(H)
(H)
(H)
6s mm 00
2
00 - FF, 100-17F,
3FFE, 3FFF
02
2
14 - 12C, 3FFF
04
2
01-C8, FF
06
07
08
09
0A
1
1
1
1
1
00 - 03, 7F
32 - 53, 7F
28 - 58, 7F
00 - 01, 7F
00-0F, 7F (*1)
Prameter
Description
Default
PATTERN NUM
P.001-P.256, U.001-U128, End, ----
P.001
BPM
PLAY FX GATETIME
20.0 - 300.0, ---01-200, ----
140.0
100
BEAT
SWING
PITCH
LOOP TYPE
TRACK MUTE
16, 12, 8, ----24 - 24, ---For, bACk, ---oooo-____, ----
16
50
0
For
oooo
TOTAL SIZE 0B
s = song number
mm = measure (0:1st, 1:2nd... 7f:128th)
Address
(H)
7s mm 00
Size
(H)
2
02
04
2
2
Data
(H)
00 - FF, 100-17F,
3FFE, 3FFF
14 - 12C, 3FFF
01-C8, FF
06
07
08
09
0A
1
1
1
1
1
00 - 03, 7F
32 - 53, 7F
28 - 58, 7F
00 - 01, 7F
00-0F, 7F (*1)
Prameter
Description
Default
PATTERN NUM
P.001-P.256, U.001-U128, End, ----
P.001
BPM
PLAY FX GATETIME
20.0 - 300.0, ---01-200, ----
BEAT
SWING
PITCH
LOOP TYPE
TRACK MUTE
16, 12, 8, ----24 - 24, ---For, bACk, ---oooo-____, ----
TOTAL SIZE 0B
s = song number
mm = measure (0:129th, 1:130th... 7f:256th)
*1 bit 0: Synth Track, bit1: Rhythm Track 1, bit2:Rhythm Track 2, bit3:Rhythm Track 3, Track(n) is muted when bit(n) = 1.
*2 BPM = ((1st & 03h) * 128 + 2nd) + ((1st & 78h)/8)/10
<3-1>
AN1x Parameter Base Address
MODEL ID = 5C (AN1x)
Parameter
Current Voice
User Voice
138
Address
(H)
(M)
10
00
10
0E
10
10
00
11
:
:
7F
11
Description
(L)
00
00
00
00
:
00
AN1x Current Voice Common
AN1x Current Voice Step Seq Pattern
AN1x Current Voice Scene1
AN1x User Voice 1
:
AN1x User Voice 128
*2
140.0
100
16
50
0
For
oooo
MIDI Implementation Chart
YAMAHA
[ DESKTOP CONTROL SYNTHESIZER ]
Model AN200 MIDI Implementation Chart
Transmitted
Date:20-DEC-2000
Version : 1.0
Recognized
Remarks
Function...
Basic
Channel
Default
Changed
1 - 4
1 - 16
1 - 4
1 - 16
Mode
Default
Messages
Altered
3
x
**************
3
3,4 (m=1)
x
1 - 127
: True voice **************
Note
Number
0 - 127
0 - 127
Velocity
Note ON
Note OFF
o 9nH,v=1-127
o 9nH,v=0
o 9nH,v=1-127
x
After
Touch
Key's
Ch's
x
x
x
o
Pitch Bend
x
o 0-24 semi
0,32
1,5,7,10
11
6,38
Control
64,65
71-75
Change
94
98-99
16,18,19,80-83
x
o
x
o
x
o
o
o
o
o
o
o
o
o
o
o
o
o
Prog
Change
o
**************
o 0 - 127
0 - 127
o
o
: True #
System Exclusive
Bank Select
Data Entry
Sound Controller
Effect Depth
NRPN LSB,MSB
Knob Control
o
x
x
*3
o
x
x
*2
System
: Clock
Real Time: Commands
o
o
*3
*3
o
o
*4
*2
Aux
x
x
x
x
o
x
Common
: Song Pos.
: Song Sel.
: Tune
*1
:All Sound off
:Reset All Cntrls
:Local ON/OFF
:All Notes OFF
Mes- :Active Sense
sages:Reset
Notes:
*1
*2
*3
*4
o(120,126,127)
o(121)
x
o(123-125)
o
x
m is always treated as "1" regardless of its value.
if MIDI control is in or in/out
if MIDI control is out or in/out
if MIDI sync is external
Mode 1 : OMNI ON , POLY
Mode 3 : OMNI OFF, POLY
Mode 2 : OMNI ON ,MONO
Mode 4 : OMNI OFF,MONO
o : Yes
x : No
139
Appendix
Rhythm Track Instrument List
Note No.
140
Note
Voice Name
Display
Description
Note No.
Note
Voice Name
Display
Description
SD D&B
Sd11
Bright smash snare
3
SD Dist
Sd12
090 distorted snare
3
SD Elec 1
Sd13
090 house snare
3
SD Elec 2
Sd14
090 tight snare
F
3
SD Rim 1
rim1
Heavily struck rim shot
66
F#
3
SD Rim 2
rim2
Lightly struck rim shot
67
G
3
HH D&B Cls
HHC1
Pedal hi-hat
bA1G
68
G#
3
HH D&B Opn
HHo1
Hi-hat open and closed
PulseBass G#
b1G
69
A
3
HH Ana Cls 1
HHC2
090 tight closed hi-hat
PulseBass A
bA1A
70
A#
3
HH Ana Opn 1
HHo2
080 analog open hi-hat
A# -2
PulseBass A#
b1A
71
B
3
HH Syn Cls
HHC3
Electric beat box hi-hat (closed)
11
B
-2
PulseBass B
bA1b
72
C
4
HH Syn Opn
HHo3
Electric beat box hi-hat (open)
12
C
-1
SineBass C
bA2C
73
C#
4
HH Ana Cls 2
HHC4
090 house hi-hat (closed)
13
C# -1
SineBass C#
b2C
74
D
4
HH Ana Cls 2
HHo4
090 house hi-hat (open)
14
D
SineBass D
bA2d
75
D#
4
Tom Dist
tom1
090 overdriven tom
15
D# -1
SineBass D#
b2d
76
E
4
Tom Ana 1
tom2
80’s electro tom
16
E
-1
SineBass E
bA2E
77
F
4
Tom Ana 2
tom3
090 house tom
17
F
-1
SineBass F
bA2F
78
F#
4
Tom Synth
tom4
Resonant synthesizer zap
18
F#
-1
SineBass F#
b2F
79
G
4
Tom Sine
tom5
High-pitched synthesized tom
19
G
-1
SineBass G
bA2G
80
G#
4
Crush Cym
CCYm
Loud crash cymbal
20
G# -1
SineBass G#
b2G
81
A
4
Ride Cym
rdC1
Ride cymbal struck on edge
21
A
SineBass A
bA2A
82
A#
4
Ride Bell
rdC2
Ride cymbal struck on bell
22
A# -1
SineBass A#
b2A
83
B
4
Tambourine
tmbr
Palm-struck tambourine
23
B
-1
SineBass B
bA2b
84
C
5
Tabla Open
tbL1
Open tabla
24
C
0
PickBass C
bA3C
85
C#
5
Tabla Mute
tbL2
Muted tabla
25
C#
0
PickBass C#
b3C
86
D
5
Tabla Nah
tbL3
Nah tabla
26
D
0
PickBass D
bA3d
87
D#
5
Udu Low
udu1
African Udu drum low
27
D#
0
PickBass D#
b3d
88
E
5
Udu High
udu2
African Udu drum high
28
E
0
PickBass E
bA3E
89
F
5
Udu Finger
udu3
African Udu finger
29
F
0
PickBass F
bA3F
90
F#
5
Clave
CLA<
080 claves
30
F#
0
PickBass F#
b3F
91
G
5
Maracas
mrCs
Latin maracas
31
G
0
PickBass G
bA3G
92
G#
5
Shaker
SH)r
Samba shaker
32
G#
0
PickBass G#
b3G
93
A
5
Clap
CLAp
090 house clap
33
A
0
PickBass A
bA3A
94
A#
5
Scratch 1
SCr1
Forward record scratch
34
A#
0
PickBass A#
b3A
95
B
5
Scratch 2
SCr2
Backward record scratch
35
B
0
PickBass B
bA3b
96
C
6
Scratch 3
SCr3
Record scratch back and forth 1
36
C
1
BD Analog
bd01
080 boom kick
97
C#
6
Scratch 4
SCr4
Record scratch back and forth 2
37
C#
1
BD R&B 1
bd02
Dry kick drum
98
D
6
Ripper
rppr
Over-blown mic distortion
38
D
1
BD R&B 2
bd03
Sliced kick
99
D#
6
Zap 1
2Ap1
Scratchy synth zap
39
D#
1
BD Lo-Fi
bd04
Loose gated kick
100
E
6
Zap 2
2Ap2
Hi-res laser zap
40
E
1
BD Jungle
bd05
Tight gated kick
101
F
6
Rev Low
r<LU
Eerie reverse reverb effect
41
F
1
BD Hip 1
bd06
Thumping kick drum with boosted low end
102
F#
6
Synth Vibra
SY<b
Fluttering whistle-like noise
42
F#
1
BD Hip 2
bd07
Gated kick with harmonic overtones
103
G
6
Metal
mEtL
Percussive metallic sound
43
G
1
BD Tech
bd08
Hard electric kick
104
G#
6
Click
CLC)
Squishy percussive noise
44
G#
1
BD Dist 1
bd09
Heavily distorted kick
105
A
6
Gt Attack
GtAt
Electric guitar with wah effect
45
A
1
BD Dist 2
bd10
Punchy kick with overdrive
106
A#
6
Gt Power
GtPU
Sustaining distorted guitar chord
46
A#
1
BD Human 1
bd11
Voice drum “Tuh”
107
B
7
Stab Organ
Stor
47
B
1
BD Human 2
bd12
Voice drum “Buh”
108
C
7
SlowBass
bA4
Drone bass slow attack
48
C
2
BD Elec 1
bd13
Trans kick
109
C#
7
FingerBass
bA5
Drone bass fast attack
49
C#
2
BD Elec 2
bd14
090 distorted kick
110
D
7
SynthBass 1
Sbs1
030 saw wave (closed filter)
50
D
2
BD Elec 3
bd15
090 house kick
111
D#
7
SynthBass 2
Sbs2
030 saw wave (half-open filter)
51
D#
2
SD Live
Sd01
Tight snare with slight room reverb
112
E
7
SynthBass 3
Sbs3
030 saw wave (open filter)
52
E
2
SD R&B 1
Sd02
Snare with sharp attack
113
F
7
SynthBass 4
Sbs4
030 saw wave (high resonance)
53
F
2
SD R&B 2
Sd03
Snappy hip-hop snare
114
F#
7
Digi Wave 1
dGU1
Falling synth note modulated with LFO
54
F#
2
SD Analog
Sd04
080 analog snare
115
G
7
Digi Wave 2
dGU2
Sitar-like sound with long filter decay
55
G
2
SD Hip 1
Sd05
Loose snare with a gated effect
116
G#
7
Digi Wave 3
dGU3
Sitar-like sound with vibrato
56
G#
2
SD Hip 2
Sd06
Slightly muffled lo-fi snare
117
A
7
Digi Wave 4
dGU4
High-pitched UFO (looped)
57
A
2
SD Hip 3
Sd07
Hard smashing gated snare
118
A#
7
Digi Wave 5
dGU5
Synth note with a quick rise in pitch
58
A#
2
SD Cut
Sd08
Jungle snare
119
B
7
Digi Wave 6
dGU6
Bell sound with a slight drop in pitch
59
B
2
SD Dodge
Sd09
Fast sample hit
120
C
8
Digi Wave 7
dGU7
Metal can struck with mallet
60
C
3
SD Timbre
Sd10
Industrial hammer-like sound
bA1C
61
C#
C# -2 PulseBass C#
b1C
62
D
D
PulseBass D
bA1d
63
D#
D# -2
PulseBass D#
b1d
64
E
4
E
-2
PulseBass E
bA1E
65
5
F
-2
PulseBass F
bA1F
6
F#
-2
PulseBass F#
b1F
7
G
-2
PulseBass G
8
G# -2
9
A
10
0
C
1
2
3
-2
-2
-2
-1
-1
PulseBass C
Filtered square wave synth bass
Super low sine wave bass
Pick bass
3
Synth chord stab
Appendix
Pattern List
Preset Bank 1 (Bank MSB=63, LSB=0, Pgm#1-64)
No.
Pgm#
P001
1
P002
Pattern Name
Group
Preset Bank 1 (Bank MSB=63, LSB=0, Pgm#65-128)
BPM
No
Pgm#
Phatty
138
P065
65
2
Fat 5th
135
P066
P003
3
Acid EG-O
125
P004
4
Noize On
P005
5
P006
6
P007
7
P008
8
P009
9
P010
10
P011
P012
No.
Pgm#
Induction
100
P129
1
New Boyz
104
66
Moon GAZA
120
P130
2
Naja
90
P067
67
Pick-Sweep
105
P131
3
Homies
92
140
P068
68
SwillJoker
130
P132
4
Waz Up
102
Joshin
134
P069
69
HONNOU
115
P133
5
G Money
99
Flabber
170
P070
70
NippingSIN
128
P134
6
New York
105
Bad Sign
136
P071
71
Break-Qoo
140
P135
7
Old Fool
96
3rd Love
142
P072
72
Inter Step
147
P136
8
Booty
102
5th Morf
134
P073
73
Guri Guri
143
P137
9
Free Hip
Short Saw
134
P074
74
Cyber Punk
130
P138
10
Hold Up
74
11
Noizz
135
P075
75
Xmod Fuzz
127
P139
11
Duh Funk
100
12
Nu Basic
135
P076
76
Hood Lead
132
P140
12
Sealant
95
P013
13
The Race
135
P077
77
Whirlwind
157
P141
13
Layin
110
P014
14
DarkTemple
145
P078
78
One Stomp
165
P142
14
OooNo
102
P015
15
Maneki
150
P079
79
Rhino
130
P143
15
Ghost
80
P016
16
Gabbler
170
P080
80
Vegas
135
P144
16
Trippin
70
P017
17
No. 1
140
P081
81
Dane
109
P145
17
Creepers
76
P018
18
Electra
126
P082
82
Carina
118
P146
18
Magnetizer
89
P019
19
Come Back
118
P083
83
Hard Hop
120
P147
19
Elec Hop
90
P020
20
Power X
128
P084
84
Science
130
P148
20
Generation
96
P021
21
Crossfire
132
P085
85
Blackbooty
130
P149
21
Equuleus
86
P022
22
Happy Joe
129
P086
86
Mechanoid
130
P150
22
Musca
84
P023
23
Elitdance
135
P087
87
Springy
114
P151
23
Cetus
67
P024
24
90s Line
127
P088
88
Arnee
125
P152
24
Uproar
78
P025
25
Mappet
130
P089
89
Punch Bass
132
P153
25
Flippin
86
P026
26
Last Dance
122
P090
90
HPF Move
130
P154
26
Oranges
100
P027
27
HiPassLead
138
P091
91
Raw Saw
132
P155
27
Old Skool
P028
28
Hook Time
139
P092
92
HiPassFire
137
P156
28
Trigger-D
P029
29
Voco Cry
140
P093
93
Uni Pluck
132
P157
29
Trick
P030
30
Fifth
130
P094
94
MiniAttack
132
P158
30
Code Break
90
P031
31
Tech Fade
132
P095
95
Wiggin
102
P159
31
CircuitBrk
114
P032
32
Comicstrip
136
P096
96
TribeGathr
107
P160
32
BttlString
110
P033
33
Finger
132
P097
97
Basix
120
P161
33
No Way Out
95
P034
34
Drip Drop
142
P098
98
Satori
138
P162
34
Kick Rocks
102
P035
35
Drib Hop
130
P099
99
Not Cheap!
140
P163
35
AJ
100
P036
36
Pulse Step
135
P100
100
Boolee
141
P164
36
Future Hop
96
P037
37
Hybridz
132
P101
101
ElecHopper
135
P165
37
Cyber
95
P038
38
Gyroscope
128
P102
102
Israel
142
P166
38
Krank
96
P039
39
Cuneiform
140
P103
103
Neko
150
P167
39
Irie
165
P040
40
MinimalOrg
140
P104
104
Xmod Line
142
P168
40
Orion
170
P041
41
Silver BO
135
P105
105
Trance Saw
132
P169
41
Pass Out
170
P042
42
Crazy Acid
142
P106
106
Drifter
140
P170
42
Feynmenn
170
P043
43
Willis
135
P107
107
2 Grey
135
P171
43
Inca
150
P044
44
Inter
125
P108
108
Sharp Cut
139
P172
44
DumbNbayc
160
P045
45
Up There
145
P109
109
Runner
134
P173
45
MowLowCow
180
P046
46
3rd Wave
116
P110
110
Rising
138
P174
46
Kristel
165
P047
47
Millennia
121
P111
111
Long Rezz
135
P175
47
Ghosting
164
P048
48
Snarly
125
P112
112
Solid
134
P176
48
Tech Step
170
P049
49
Afterhours
125
P113
113
Diedsloppy
150
P177
49
Optician
P050
50
Velocity
140
P114
114
Big Mix
140
P178
50
BurtonsFin
P051
51
Orbitron
120
P115
115
Mai
140
P179
51
All Dark
P052
52
B-Tech
130
P116
116
Tech Tron
128
P180
52
Rider
160
P053
53
Hard House
140
P117
117
DesertRave
134
P181
53
Devilfish
160
P054
54
HypnoHouse
120
P118
118
Denter
139
P182
54
Beestee
135
P055
55
Hello 2001
110
P119
119
Syncer
130
P183
55
Monoceros
88
P056
56
Ideo-Gram
130
P120
120
T-World
141
P184
56
Lynx
88
P057
57
OWN-Q-Beat
128
P121
121
GOA
145
P185
57
Hydrus
88
P058
58
Overabound
125
P122
122
Karate
145
P186
58
Centaurus
129
P059
59
ExtensionD
135
P123
123
Polarity-X
127
P187
59
Cygnus
122
P060
60
Dawn OFF
135
P124
124
Dendo-Girl
140
P188
60
Mars
82
P061
61
Bug Filter
128
P125
125
Junop
130
P189
61
Mushroom
135
P062
62
Digi-FANG
105
P126
126
Kami
135
P190
62
Jazzwonka
125
P063
63
DarkWalker
115
P127
127
Playerz
134
P191
63
Dark Trip
100
P064
64
Sam-u-Rai
95
P128
128
Toddy
140
P192
64
Stranger
house
breaks 1
Group
Preset Bank 2 (Bank MSB=63, LSB=1, Pgm#1-64)
BPM
techno
Pattern Name
breaks 1
trance
Pattern Name
Group
hiphop
BPM
96
65
triphop
69
76
170
drum'n bass
breaks 2
180
175
132
141
Appendix
Pattern List
Preset Bank 2 (Bank MSB=63, LSB=1, Pgm#65-128)
No.
Pgm#
P193
65
P194
Pattern Name
142
User Bank (Bank MSB=63, LSB=2, Pgm#1-64)
User Bank (Bank MSB=63, LSB=2, Pgm#65-128)
BPM
No.
Pre.#
Pattern Name
Group
BPM
No.
Pre.#
Pattern Name
Group
BPM
Crazy Hip
98
U001
P099
Not Cheap!
trance
140
U065
P125
Junop
trance
130
66
Dark Hip
98
U002
P064
Digi-FANG
breaks 1
105
U066
P088
Arnee
breaks 1
125
P195
67
Tripnotic
110
U003
P132
Waz Up
hiphop
102
U067
P134
New York
hiphop
105
P196
68
BeatAnthem
120
U004
P006
Flabber
techno
170
U068
P018
Electra
techno
126
P197
69
Beat O
130
U005
P192
Stranger
breaks 2
132
U069
P187
Cygnus
drum'n bass
122
P198
70
Cheekz
122
U006
P038
Gyroscope
house
128
U070
P037
Hybridz
house
132
P199
71
Scene Bass
123
U007
P071
Break-Qoo
breaks 1
140
U071
P066
Moon GAZA
breaks 1
120
P200
72
Hood Bass
115
U008
P147
Elec Hop
triphop
90
U072
P131
Homies
hiphop
92
P201
73
Ruffy
118
U009
P014
DarkTemple
techno
145
U073
P005
Joshin
techno
134
P202
74
Drug Dist
125
U010
P185
Hydrus
drum'n bass
88
U074
P176
Tech Step
drum'n bass
170
P203
75
Sync Pulse
136
U011
P105
Trance Saw
trance
132
U075
P104
Xmod Line
trance
142
P204
76
Step Rezz
130
U012
P060
Dawn OFF
breaks 1
135
U076
P094
MiniAttack
breaks 1
132
P205
77
Wild Scene
125
U013
P191
Dark Trip
breaks 2
100
U077
P213
Big Three
breaks 2
122
P206
78
Hyper Saw
116
U014
P002
Fat 5th
techno
135
U078
P007
Bad Sign
techno
136
P207
79
Dark Line
123
U015
P190
Jazzwonka
drum'n bass
125
U079
P169
Pass Out
drum'n bass
170
P208
80
Pulse Gruv
132
U016
P098
Satori
trance
138
U080
P123
Polarity-X
trance
127
P209
81
Phanki
128
U017
P092
HiPassFire
breaks 1
137
U081
P073
Guri Guri
breaks 1
143
P210
82
E-Blub
126
U018
P129
New Boyz
hiphop
104
U082
P135
Old Fool
hiphop
96
P211
83
Bleach
126
U019
P041
Silver BO
house
135
U083
P040
MinimalOrg
house
140
P212
84
Hard Step
132
U020
P214
Hardy
breaks 2
122
U084
P231
ElectroBrk
breaks 2
120
P213
85
Big Three
122
U021
P126
Kami
trance
135
U085
P110
Rising
trance
138
P214
86
Hardy
122
U022
P067
Pick-Sweep
breaks 1
105
U086
P083
Hard Hop
breaks 1
120
P215
87
Livin 12
94
U023
P164
Future Hop
triphop
96
U087
P160
BttlString
triphop
110
P216
88
Lionbar
135
U024
P003
Acid EG-O
techno
125
U088
P034
Drip Drop
techno
142
P217
89
Claw
96
U025
P171
Inca
drum'n bass
150
U089
P188
Mars
drum'n bass
82
P218
90
Dirty Dog
96
U026
P113
Diedsloppy
trance
150
U090
P121
GOA
trance
145
P219
91
Full Reso
96
U027
P069
HONNOU
breaks 1
115
U091
P064
Sam-u-Rai
breaks 1
95
P220
92
Funky
114
U028
P194
Dark Hop
breaks 2
98
U092
P211
Blech
breaks 2
126
P221
93
Tinkly
125
U029
P004
Noize On
techno
140
U093
P049
Afterhours
house
125
P222
94
Porkyscrat
122
U030
P177
Optician
drum'n bass
170
U094
P152
Uproar
triphop
78
P223
95
Rowntree
124
U031
P242
Velpecula
ambient
49
U095
P251
Ambi Fade
ambient
98
P224
96
Granulator
150
U032
P205
Wild Scene
breaks 2
125
U096
P234
Facevalue
breaks 2
160
P225
97
Mute Rezz
138
U033
P101
ElecHopper
trance
135
U097
P111
Long Rezz
trance
135
P226
98
Bungraa5va
170
U034
P078
One Stomp
breaks 1
165
U098
P089
Punch Bass
breaks 1
132
P227
99
StormStack
136
U035
P130
Naja
hiphop
90
U099
P137
Free Hip
hiphop
96
P228
100
Norma
132
U036
P025
Mappet
techno
130
U100
P021
Crossfire
techno
132
P229
101
AWA-dance
126
U037
P230
Shandy
breaks 2
165
U101
P209
Phanki
breaks 2
128
P230
102
Shandy
165
U038
P043
Willis
house
135
U102
P054
HypnoHouse
house
120
P231
103
ElectroBrk
120
U039
P081
Dane
breaks 1
109
U103
P090
HPF Move
breaks 1
130
P232
104
Rutger
135
U040
P149
Equuleus
triphop
86
U104
P154
Oranges
triphop
100
P233
105
Fat Ohm
150
U041
P035
Drib Hop
techno
130
U105
P001
Phatty
techno
138
P234
106
Facevalue
160
U042
P178
BurtonsFin
drum'n bass
180
U106
P167
Irie
drum'n bass
165
P235
107
Seepy
155
U043
P119
Syncer
trance
130
U107
P114
Big Mix
trance
140
P236
108
Draco
104
U044
P055
Hello 2001
breaks 1
110
U108
P244
Pyxis
ambient
105
P237
109
Smoked
80
U045
P224
Granulator
breaks 2
150
U109
P241
Dorado
breaks 2
64
P238
110
Stealthy
108
U046
P023
Elitdance
techno
135
U110
P026
Last Dance
techno
122
P239
111
Strain
112
U047
P189
Mushroom
drum'n bass
135
U111
P182
Beestee
drum'n bass
135
P240
112
Tribal
105
U048
P046
3rd Wave
house
116
U112
P112
Solid
trance
134
P241
113
Dorado
64
U049
P057
OWN-Q-Beat
breaks 1
128
U113
P193
Crazy Hip
breaks 2
98
P242
114
Velpecula
49
U050
P138
Hold Up
hiphop
74
U114
P140
Sealant
hiphop
95
P243
115
Pyxis
35
U051
P032
Comicstrip
techno
136
U115
P039
Cuneiform
house
140
P244
116
Carm Down
105
U052
P215
Livin 12
breaks 2
94
U116
P204
Step Rezz
breaks 2
130
P245
117
Subliminal
106
U053
P128
Toddy
trance
140
U117
P117
DesertRave
trance
134
P246
118
Okyou
40
U054
P075
Xmod Fuzz
breaks 1
127
U118
P093
Uni Pluck
breaks 1
132
P247
119
Chacra
115
U055
P159
CircuitBrk
triphop
114
U119
P161
No Way Out
triphop
95
P248
120
Paranoia
120
U056
P010
Short Saw
techno
134
U120
P017
No. 1
techno
140
P249
121
Burning
105
U057
P175
Ghosting
drum'n bass
164
U121
P186
Centaurus
drum'n bass
129
P250
122
Back Door
102
U058
P102
Israel
trance
142
U122
P240
Tribal
breaks 2
105
P251
123
Ambi Fade
98
U059
P063
DarkWalker
breaks 1
115
U123
P146
Magnitizer
triphop
89
P252
124
Bootes
92
U060
P221
Tinkly
breaks 2
125
U124
P163
AJ
triphop
100
P253
125
Sagitarius
75
U061
P036
Pulse Step
house
135
U125
P100
Boolee
trance
141
P254
126
Aquarius
68
U062
P183
Monoceros
drum'n bass
88
U126
P120
T-World
trance
141
P255
127
Lacerta
44
U063
P244
Carm Down
ambient
105
U127
P059
ExtensionD
breaks 1
135
P256
128
Fornax
55
U064
P226
Bungraa5va
breaks 2
170
U128
P072
Inter Step
breaks 1
147
Song 1 : Demo 1 ( trance/breaks )
Song 2 : Demo 2 ( triphop )
Song 3 : Demo 3 ( ambient )
Group
breaks 2
ambient
AN200:U123,U124 & SU200:BANK A (Trip Hop Demo)
AN200:U125,U126 & SU200:BANK B (Trance Demo)
AN200:U127,U128 & SU200:BANK C (Break Beats Demo)
AN200:U123,U124 & DX200:U123,U124 (Trip Hop Demo)
AN200:U125,U126 & DX200:U125,U126 (Trance Demo)
AN200:U127,U128 & DX200:U127,U128 (Break Beats Demo)
SOFTWARE LICENSING AGREEMENT
The following is a legal agreement between you, the end user, and Yamaha Corporation (“Yamaha”). The enclosed Yamaha software program is
licensed by Yamaha to the original purchaser for use only on the terms set forth herein. Please read this licensing agreement with care. Opening this
package indicates that you accept all terms outlined herein. If you do not agree to the terms, return this package unopened to Yamaha for a full
refund.
1. GRANT OF LICENSE AND COPYRIGHT
Yamaha grants you, the original purchaser, the right to use one copy of the enclosed software program and data (“SOFTWARE”) on a single-user
computer system. You may not use it on more than one computer or computer terminal. The SOFTWARE is owned by Yamaha and is protected by
Japanese copyright laws and all applicable international treaty provisions. You are entitled to claim ownership of the media in which the SOFTWARE
is included. Therefore, you must treat the SOFTWARE like any other copyrighted materials.
2. RESTRICTIONS
The SOFTWARE program is copyrighted. You may not engage in reverse engineering or reproduction of the SOFTWARE by other conceivable
methods. You may not reproduce, modify, change, rent, lease, resell, or distribute the SOFTWARE in whole or in part, or create derivative works
from the SOFTWARE. You may not transmit or network the SOFTWARE with other computers.
You may transfer ownership of the SOFTWARE and the accompanying written materials on a permanent basis provided that you retain no copies and
the recipient agrees to the terms of the licensing agreement.
3. TERMINATION
The licensing condition of the software program becomes effective on the day that you receive the SOFTWARE. If any one of the copyright laws or
clauses of the licensing conditions is violated, the licensing agreement shall be terminated automatically without notice from Yamaha. In this case,
you must destroy the licensed SOFTWARE and its copies immediately.
4. PRODUCT WARRANTY
Yamaha warrants to the original purchaser that if the SOFTWARE, when used in normal conditions, will not perform the functions described in the
manual provided by Yamaha, the sole remedy will be that Yamaha will replace any media which proves defective in materials or workmanship on an
exchange basis without charge. Except as expressly set forth above, the SOFTWARE is provided “as is,” and no other warranties, either expressed or
implied, are made with respect to this software, including, without limitation the implied warranties of merchantability and fitness for a particular
purpose.
5. LIMITED LIABILITY
Your sole remedies and Yamaha’s entire liability are as set forth above. In no event will Yamaha be liable to you or any other person for any damages,
including without limitation any incidental or consequential damages, expenses, lost profits, lost savings or other damages arising out of the use or
inability to use such SOFTWARE even if Yamaha or an authorized dealer has been advised of the possibility of such damages, or for any claim by any
other party.
6. GENERAL
This license agreement shall be interpreted according to and governed by Japanese laws.
143
SOFTWARE-LIZENZVEREINBARUNG
Die folgende Vereinbarung ist eine rechtsgültige Vereinbarung zwischen Ihnen, dem Endanwender, und der Yamaha Corporation („Yamaha”).
Yamaha erteilt dem ursprünglichen Käufer für das beiliegende Yamaha-Softwareprogramm ausschließlich zu den hier ausgeführten Bedingungen
eine Lizenz zur Verwendung. Bitte lesen Sie diese Lizenzvereinbarung sorgfältig. Durch das Öffnen dieser Packung bringen Sie zum Ausdruck, daß
Sie alle darin enthaltenen Bedingungen akzeptieren. Wenn Sie nicht mit den Bedingungen einverstanden sind, können Sie die Packung ungeöffnet an
Yamaha zurückgeben; der Kaufpreis wird in voller Höhe zurückerstattet.
1. ERETILUNG VON LIZENZ UND COPYRIGHT
Yamaha erteilt Ihnen, dem ursprünglichen Käufer, das Recht, ein Exemplar des beiliegenden Softwareprogramms und der darin enthaltenen Daten
(„SOFTWARE”) als Einzelperson auf jeweils einem Computer zu verwenden. Sie dürfen sie nicht auf mehr als einem Computer bzw. einer
Computerstation verwenden. Die SOFTWARE bleibt im Besitz von Yamaha und ist durch japanische Copyrightgesetze sowie alle anwendbaren
internationalen Vertragsbestimmungen geschützt. Sie haben ein Anspruchsrecht auf das Eigentum an den Medien, denen die SOFTWARE beiliegt.
Daher müssen Sie die SOFTWARE wie alle anderen durch Copyright geschützten Materialien behandeln.
2. EINSCHRÄNKUNGEN
Die SOFTWARE ist durch Copyright geschützt. Sie dürfen Sie weder analysieren noch durch anderweitige Methoden reproduzieren. Sie dürfen die
SOFTWARE weder ganz noch teilweise reproduzieren, modifizieren, verändern, gegen Entgelt oder unentgeltlich verleihen, verkaufen oder
vertreiben, und Sie dürfen auf der Grundlage der SOFTWARE keine Ableitungen erstellen. Sie dürfen die SOFTWARE nicht an andere Computer
senden oder in Netzwerke einspeisen. Sie dürfen das Eigentum an der SOFTWARE und den schriftlichen Begleitmaterialien auf unbefristeter Basis
unter den Voraussetzungen übertragen, daß Sie keine Kopien zurückbehalten und sich der Empfänger mit den Bedingungen der Lizenzvereinbarung
einverstanden erklärt.
3. BEENDIGUNG
Die Lizenzbedingung des Softwareprogramms wird am Tag, an dem Sie die SOFTWARE erhalten, wirksam. Falls ein Copyrightgesetz oder eine
Bestimmung der Lizenzbedingungen verletzt wird, wird automatisch und ohne Benachrichtigung durch Yamaha die Lizenzvereinbarung beendet. In
diesem Fall müssen Sie die lizensierte SOFTWARE und ihre Kopien unverzüglich vernichten.
4. PRODUKTGARANTIE
Yamaha garantiert dem ursprünglichen Käufer, daß, falls die SOFTWARE bei Verwendung unter normalen Bedingungen nicht die in der von Yamaha
bereitgestellten Anleitung beschriebenen Funktionen erfüllt, die einzige Abhilfe darin bestehen wird, daß Yamaha auf Austauschbasis kostenlos jedes
Medium ersetzen wird, das Material- oder Verarbeitungsfehler aufweist. Abgesehen von dem oben Ausgeführten wird die SOFTWARE „wie die Ware
liegt und steht” geliefert, und es werden keine anderen ausdrücklichen oder stillschweigenden Garantien hinsichtlich dieser Software übernommen,
einschließlich, aber nicht beschränkt auf, die stillschweigenden Garantien für handelsübliche Qualität und Eignung für einen bestimmten
Einsatzzweck.
5. BESCHRÄNKTE HAFTUNG
Ihre einzige Abhilfe und die gesamte Haftung Yamahas bestehen in dem oben Ausgeführten. Keinesfalls haftet Yamaha Ihnen oder einer anderen
Person gegenüber für etwaige Schäden, einschließlich, aber nicht beschränkt auf, zufällige Schäden oder Folgeschäden, Kosten, Verdienstausfall,
verlorene Ersparnisse oder andere Schadenersatzansprüche, die aus der Verwendung der SOFTWARE oder aus der Tatsach hervorgehen, daß diese
SOFTWARE nicht verwendet werden konnte, selbst wenn Yamaha oder ein autorisierter Händler über die Möglichkeit derartiger
Schadenersatzansprüche informiert wurde, oder für etwaige andere Ansprüche einer anderen Partei.
6. ALLGEMEINES
Diese Lizenzvereinbarung soll gemäß und in Übereinstimmung mit den japanischen Gesetzen ausgelegt werden.
144
CONTRAT DE LICENCE DE LOGICIEL
Ceci est un contrat entre vous-même, l’utilisateur final, et Yamaha Corporation (“Yamaha”). Le logiciel Yamaha ci-inclus est concédé sous licence par
Yamaha à l’acheteur original et ne peut être utilisé que dans les conditions prévues aux présentes. Veuillez lire attentivement ce contrat de licence. Le
fait d’ouvrir ce coffret indique que vous acceptez l’ensemble des termes du contrat. Si vous n’acceptez pas lesdits termes, renvoyez le coffret non
ouvert à Yamaha pour en obtenir le remboursement intégral.
1. CONCESSION DE LICENCE ET DROITS D’AUTEUR
Yamaha vous concède le droit d’utiliser, en tant qu’acheteur original, un exemplaire du logiciel et des données afférentes à celui-ci (“LOGICIEL”)
sur un ordinateur pour utilisateur unique. Vous n’êtes pas autorisé à utiliser ces éléments sur plus d’un ordinateur ou terminal d’ordinateur. Le
LOGICIEL est la propriété de Yamaha. Il est protégé par les dispositions relatives au droit d’auteur contenues dans la législation japonaise et les
traités internationaux. Vous êtes en droit de revendiquer l’appartenance du support du LOGICIEL. A ce titre, vous devez traiter le LOGICIEL comme
tout autre élément protégé par le droit d’auteur.
2. RESTRICTIONS
Le LOGICIEL est protégé par le droit d’auteur. Vous n’êtes pas autorisé à reconstituer la logique du LOGICIEL ou à reproduire ce dernier par
quelque autre moyen que ce soit. Vous n’êtes pas en droit de reproduire, modifier, prêter, louer, revendre ou distribuer le LOGICIEL en tout ou partie,
ou d’utiliser le LOGICIEL à des fins de création dérivée. Vous n’êtes pas autorisé à transmettre le LOGICIEL à d’autres ordinateurs ou à l’utiliser en
réseau.
Vous êtes en droit de céder, à titre permanent, le LOGICIEL et la documentation imprimée qui l’accompagne, sous réserve que vous n’en conserviez
aucun exemplaire et que le bénéficiaire accepte les termes du présent contrat.
3. RESILIATION
Les conditions énoncées dans le présent contrat de licence prennent effet à compter du jour où le LOGICIEL vous est remis. Si l’une quelconque des
dispositions relatives au droit d’auteur ou des clauses du contrat ne sont pas respectées, le contrat de licence sera résilié de plein droit par Yamaha, ce
sans préavis. Dans ce cas, vous devrez immédiatement détruire le LOGICIEL concédé sous licence ainsi que les copies réalisées.
4. GARANTIE PRODUIT
Si, dans des conditions normales d’utilisation, le LOGICIEL ne remplit pas les fonctions décrites dans le manuel fourni, Yamaha s’engage vis-à-vis
de l’acheteur original à remplacer gratuitement, sur la base d’un échange, tout support reconnu défectueux par suite d’un défaut de matière première
ou d’un vice de fabrication. Ceci constitue le seul recours opposable à Yamaha. Hormis dans les cas expressément énoncés plus haut, le LOGICIEL
est livré “en l’état” et toute autre garantie expresse ou implicite le concernant, y compris, de manière non limitative, toute garantie implicite de qualité
marchande et d’adéquation à un usage particulier, est exclue.
5. RESPONSABILITE LIMITEE
Votre unique recours et la seule responsabilité de Yamaha sont tels qu’énoncés précédemment. En aucun cas Yamaha ne pourra être tenu responsable,
par vous-même ou une autre personne, de quelques dommages que ce soit, notamment et de manière non limitative, de dommages indirects, frais,
pertes de bénéfices, pertes de fonds ou d’autres dommages résultant de l’utilisation ou de l’impossibilité d’utiliser le LOGICIEL, même si Yamaha ou
un distributeur agréé ont été prévenus de l’éventualité de tels dommages, ou de quelque autre revendication formulée par une tierce partie.
6. REMARQUE GENERALE
Le présent contrat de licence est régi par le droit japonais, à la lumière duquel il doit être interprété.
145
For details of products, please contact your nearest Yamaha or the
authorized distributor listed below.
Pour plus de détails sur les produits, veuillez-vous adresser à Yamaha ou
au distributeur le plus proche de vous figurant dans la liste suivante.
NORTH AMERICA
CANADA
Yamaha Canada Music Ltd.
135 Milner Avenue, Scarborough, Ontario,
M1S 3R1, Canada
Tel: 416-298-1311
U.S.A.
Yamaha Corporation of America
6600 Orangethorpe Ave., Buena Park, Calif. 90620,
U.S.A.
Tel: 714-522-9011
CENTRAL & SOUTH AMERICA
MEXICO
Yamaha de Mexico S.A. De C.V.,
Departamento de ventas
Javier Rojo Gomez No.1149, Col. Gpe Del
Moral, Deleg. Iztapalapa, 09300 Mexico, D.F.
Tel: 686-00-33
BRAZIL
Yamaha Musical do Brasil LTDA.
Av. Rebouças 2636, São Paulo, Brasil
Tel: 011-853-1377
ARGENTINA
Yamaha Music Argentina S.A.
Viamonte 1145 Piso2-B 1053,
Buenos Aires, Argentina
Tel: 1-4371-7021
PANAMA AND OTHER LATIN
AMERICAN COUNTRIES/
CARIBBEAN COUNTRIES
Yamaha de Panama S.A.
Torre Banco General, Piso 7, Urbanización Marbella,
Calle 47 y Aquilino de la Guardia,
Ciudad de Panamá, Panamá
Tel: 507-269-5311
EUROPE
THE UNITED KINGDOM
Yamaha-Kemble Music (U.K.) Ltd.
Sherbourne Drive, Tilbrook, Milton Keynes,
MK7 8BL, England
Tel: 01908-366700
IRELAND
Danfay Ltd.
61D, Sallynoggin Road, Dun Laoghaire, Co. Dublin
Tel: 01-2859177
GERMANY/SWITZERLAND
Yamaha Europa GmbH.
Siemensstraße 22-34, 25462 Rellingen,
F.R. of Germany
Tel: 04101-3030
AUSTRIA
Yamaha Music Austria
Schleiergasse 20, A-1100 Wien Austria
Tel: 01-60203900
THE NETHERLANDS
Yamaha Music Nederland
Kanaalweg 18G, 3526KL, Utrecht, The Netherlands
Tel: 030-2828411
BELGIUM
Yamaha Music Belgium
Keiberg Imperiastraat 8, 1930 Zaventem, Belgium
Tel: 02-7258220
FRANCE
Die Einzelheiten zu Produkten sind bei Ihrer unten aufgeführten
Niederlassung und bei Yamaha Vertragshändlern in den jeweiligen
Bestimmungsländern erhältlich.
Para detalles sobre productos, contacte su tienda Yamaha más cercana
o el distribuidor autorizado que se lista debajo.
ASIA
ITALY
Yamaha Musica Italia S.P.A.,
Combo Division
Viale Italia 88, 20020 Lainate (Milano), Italy
Tel: 02-935-771
SPAIN/PORTUGAL
Yamaha-Hazen Electronica Musical, S.A.
Ctra. de la Coruna km. 17, 200, 28230
Las Rozas (Madrid) Spain
Tel: 91-201-0700
GREECE
Philippe Nakas S.A.
Navarinou Street 13, P.Code 10680, Athens, Greece
Tel: 01-364-7111
SWEDEN
Yamaha Scandinavia AB
J. A. Wettergrens Gata 1
Box 30053
S-400 43 Göteborg, Sweden
Tel: 031 89 34 00
INDONESIA
PT. Yamaha Music Indonesia (Distributor)
PT. Nusantik
Gedung Yamaha Music Center, Jalan Jend. Gatot
Subroto Kav. 4, Jakarta 12930, Indonesia
Tel: 21-520-2577
KOREA
Cosmos Corporation
1461-9, Seocho Dong, Seocho Gu, Seoul, Korea
Tel: 02-3486-0011
Yamaha Music Malaysia, Sdn., Bhd.
Lot 8, Jalan Perbandaran, 47301 Kelana Jaya,
Petaling Jaya, Selangor, Malaysia
Tel: 3-703-0900
YS Copenhagen Liaison Office
Generatorvej 8B
DK-2730 Herlev, Denmark
Tel: 44 92 49 00
FINLAND
F-Musiikki Oy
Kluuvikatu 6, P.O. Box 260,
SF-00101 Helsinki, Finland
Tel: 09 618511
PHILIPPINES
Yupangco Music Corporation
339 Gil J. Puyat Avenue, P.O. Box 885 MCPO,
Makati, Metro Manila, Philippines
Tel: 819-7551
SINGAPORE
Yamaha Music Asia Pte., Ltd.
11 Ubi Road #06-00, Meiban Industrial Building,
Singapore
Tel: 65-747-4374
NORWAY
Norsk filial av Yamaha Scandinavia AB
Grini Næringspark 1
N-1345 Østerås, Norway
Tel: 67 16 77 70
ICELAND
Skifan HF
Skeifan 17 P.O. Box 8120
IS-128 Reykjavik, Iceland
Tel: 525 5000
TAIWAN
Yamaha KHS Music Co., Ltd.
10F, 150, Tun-Hwa Northroad,
Taipei, Taiwan, R.O.C.
Tel: 02-2713-8999
THAILAND
OTHER EUROPEAN COUNTRIES
Yamaha Europa GmbH.
Siemensstraße 22-34, 25462 Rellingen,
F.R. of Germany
Tel: 04101-3030
AFRICA
Yamaha Corporation,
Asia-Pacific Music Marketing Group
Nakazawa-cho 10-1, Hamamatsu, Japan 430-8650
Tel: 053-460-2312
MIDDLE EAST
TURKEY/CYPRUS
Yamaha Europa GmbH.
Siemensstraße 22-34, 25462 Rellingen,
F.R. of Germany
Tel: 04101-3030
Yamaha Music Gulf FZE
LB21-128 Jebel Ali Freezone
P.O.Box 17328, Dubai, U.A.E.
Tel: 971-4-881-5868
Tom Lee Music Co., Ltd.
11/F., Silvercord Tower 1, 30 Canton Road,
Tsimshatsui, Kowloon, Hong Kong
Tel: 2737-7688
MALAYSIA
DENMARK
OTHER COUNTRIES
HONG KONG
Siam Music Yamaha Co., Ltd.
121/60-61 RS Tower 17th Floor,
Ratchadaphisek RD., Dindaeng,
Bangkok 10320, Thailand
Tel: 02-641-2951
THE PEOPLE’S REPUBLIC OF CHINA
AND OTHER ASIAN COUNTRIES
Yamaha Corporation,
Asia-Pacific Music Marketing Group
Nakazawa-cho 10-1, Hamamatsu, Japan 430-8650
Tel: 053-460-2317
OCEANIA
AUSTRALIA
Yamaha Music Australia Pty. Ltd.
Level 1, 99 Queensbridge Street, Southbank, Victoria
3006, Australia
Tel: 3-9693-5111
NEW ZEALAND
Music Houses of N.Z. Ltd.
146/148 Captain Springs Road, Te Papapa,
Auckland, New Zealand
Tel: 9-634-0099
COUNTRIES AND TRUST
TERRITORIES IN PACIFIC OCEAN
Yamaha Corporation,
Asia-Pacific Music Marketing Group
Nakazawa-cho 10-1, Hamamatsu, Japan 430-8650
Tel: 053-460-2312
Yamaha Musique France,
Division Professionnelle
BP 70-77312 Marne-la-Vallée Cedex 2, France
Tel: 01-64-61-4000
HEAD OFFICE Yamaha Corporation, Pro Audio & Digital Musical Instrument Division
Nakazawa-cho 10-1, Hamamatsu, Japan 430-8650
Tel: 053-460-2445
SY22