1
,_ MITSUBISHI
Television
Owner's
Guide
RISK OF ELECTRIC SHOCK
DO NOT OPEN
CAUTION: TO REDUCE THE RISK OF ELECTRIC SHOCK,
DO NOT REMOVE COVER (OR BACK).
NO USER-SERVICEABLE
PARTS INSIDE.
REFER SERVICING TO QUALIFIED SERVICE PERSONNEL.
The lightning flash with arrowhead
symbol,
within an equilateral
triangle, is intended to
alert the user to the presence of uninsulated
"dangerous voltage" within the product's
enclosure that may be of sufficient magnitude
constitute
a risk of electric shock.
to
The exclamation
point within an equilateral
triangle is intended to alert the user to the
presence of important
operating
and
maintenance
(servicing) instructions
in the
literature
accompanying
the appliance.
,Warning:
Don't leave stationary
images, such as stock market reports, video
games, station logos, or the TV's displays, on-screen for more than
10 minutes. Still patterns
such as these can scar the picture tube,
causing permanent
damage to the TV.
WARNING:
TO PREVENT
MOISTURE.
FIRE OR SHOCK
HAZARD,
DO NOT EXPOSE
THIS APPLIANCE
TO RM:N OR
CAUTION:
TO PREVENT ELECTRIC SHOCK HAZARD, DO NOT USE THIS UNIT'S (POLARIZED)
PLUG
WITH AN EXTENSION
CORD, RECEPTACLE
OR OTHER OUTLET UNLESS THE BLADES
CAN BE FULLY INSERTED
TO PREVENT BLADE EXPOSURE.
NOTE
TO CATV
SYSTEM
INSTALLER:
THIS REMINDER IS PROVIDED
TO CALL THE CATV SYSTEM INSTALLER'S
ATTENTION
TO ARTICLE 820-40 OF THE NEC THAT PROVIDES GUIDELINES
FOR PROPER
GROUNDING
AND, IN PARTICULAR,
SPECIFIES
THAT THE CABLE GROUND SHALL BE
CONNECTED
TO THE GROUNDING
SYSTEM OF THE BUILDING,
AS CLOSE TO THE
POINT OF CABLE ENTRY AS PRACTICAL.
GUIDE
_
Table
MITSUBISHI
OWNER'S
of Contents
Important
Preface:
Safeguards
Welcome
Summary
Unpacking
What's
to Mitsubishi
of Special
Features
in Each Chapter
1: Getting
5
.................................................................
6
..........................................................................
Used in this Guide ....................................................
to Know Your
3
...................................................................
Your TV .................................................................................
Some Conventions
Chapter
.....................................................................................
TV ........................................................
7
8
9
11
Overview of the Front Panel ..................................................................
12
Overview of the Remote Control ...........................................................
Getting ready to use the remote control ...........................................
Remote control buttons and functions ..............................................
14
14
16
Chapter
2: Connecting
Overview
Your TV ...................................................................
of the Back Panel
...................................................................
Basic Connections
.................................................................................
TV + antenna or cable without a cable box ....................................
TV + cable with a cable box .............................................................
TV + separate UHF and VHF antennas
........................................
TV + VCR + antenna or cable without a cable box ........................
TV + VCR + cable with a cable box .................................................
TV + audio system ............................................................................
Chapter
3: Operating
Your TV ....................................................................
Getting Started ......................................................................................
Adjusting the color purity .................................................................
Using the remote control to operate VCRs, cable boxes
and other equipment ....................................................................
Turning the TV on/off ........................................................................
Selecting the input source .................................................................
Changing channels ............................................................................
Understanding
the ViewPoint ®on-screen menus ...........................
Setting the clock ...............................................................................
Memorizing channels ........................................................................
Adding and deleting channels
............................................................
Selecting the menu type ....................................................................
Naming the input ................................................................................
Naming the channels
........................................................................
Using video mute ................................................................................
Selecting the menu language ...........................................................
21
221
24:
25
26
27
28
31
34
35
3(i
37
39
44
45
46
50
51
53
54
55
5'7
513
59
60
Table
of Contents
Getting Started
Selecting the
Customizing
Adjusting
Using the
Adjusting
(cont.)
(cont.)
A/V Memory position .................................................
the A/V Memory position .............................................
the video functions .......................................................
closed caption decoder .................................................
the sound ......................................................................
61
63
64
66
68
Using the Advanced Features ...............................................................
Setting the timer ...............................................................................
Using the parental lock .....................................................................
Using SuperQuickView
...................................................................
71
72
73
77
TM
Chapter
4: Using
Understanding
the Special
the On-Screen
.....................................................
Displays
79
.................................................
80
Using the Sleep-Timer
...........................................................................
Setting the Sleep-timer
.....................................................................
Changing or canceling the Sleep-timer
..........................................
81
82
83
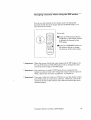
Using the Picture-in-Picture
(PIP) Modes ..........................................
Activating
the PIP image .................................................................
Selecting the source of the PIP image ..............................................
Changing channels while using the PIP modes .............................
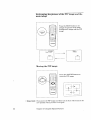
Exchanging
the picture of the PIP image
and the main image .....................................................................
Moving the PIP image .......................................................................
Freezing the PIP image ....................................................................
84
85
86
87
Chapter
5: Troubleshooting
Caution
Cleaning
and Care
.........................................................................
..................................................................................
.................................................................................................
Calling for Service
88
88
89
91
94
!)4
..................................................................................
!)5
Appendix:
Procedure
for Bypassing
the
Parental
Lock ..................................................................................................
97
Index
99
..................................................................................................................
Warranty
2
Features
..........................................................................
Table of Contents
Inside
Back
Cover
IMPORTANT
SAFEGUARDS
PLEASE READ AJ_L THESE INSTRUCTIONS
REGARDING
YOUR TELEVISION
SET AND
RETAIN FOR FUTURE REFERENCE.
FOLLOW ALL WARNINGS
AND INSTRUCTIONS
MARKED ON THE TV RECEIVER.
1.
2.
3.
4.
Read Instructions
Read all safety and operating
operating the appliance.
Retain
Instructions
Retain the safety and operating
future reference.
Heed Warnings
Adhere to all warnings
operating instructions.
Follow
6.
71
before
instructions
on the appliance
for
and in the
Instructions
Follow all operating
5.
9o
instructions
and use instructions.
Warning:
Cleaning
Unplug this TV receiver from the wall outlet before
cleaning. Do not use liquid or aerosol cleaners.
Cleaners can permanently
damage the cabinet or
screen. Use a damp cloth for cleaning.
Attachments
and Equipment
Never add any attachments
and/or equipment
without approval of the manufacturer
as such
additions may result in the risk of fire, electric
or other personal injury.
Water and Moisture
Do not use this TV receiver
where
contact
shock
with or
immersion
in wa_er is possible. Do not use near bath
tubs, wash bowls, kitchen sinks, laundry tubs,
swimming pools, etc.
8.
Ventilation
Slots and openings in the cabinet are
provided for ventilation
and to ensure reliable
operation of the TV receiver and to protect it
from overheating.
Do not block these openings
or allow them to be blocked by placing the TV
receiver on a bed, sofa, rug, or other similar
surface. Nor should it be placed over a radiator
or heat register. If the TV receiw_r is to be
placed in a rack or bookcase, ensure that
there is adequate ventilation
and that the
manufacturer's
instructions
haw_ been
adhered to.
Accessories
Do not place this TV receiver on an unstable cart,
stand, tripod, bracket, or table. The TV receiver may
fall,_ausing
serious injury to a child or adult, and
serious damage to the appliance. Use only with a
cart, stand, tripod, bracket, or table recommended
by
the manufacture:c,
or sold with the TV receiver. Any
mounting
of the appliance should follow the manufacturer's
instruc, tions, and should use a mounting
accessory recomraended
by the manufacturer.
An appliance and cart
combination
should be
moved with care. Quick
stops, excessive force,
and uneven surfaces may
cause the appliance and
cart combination
to
overturn.
10. Power Sources
This TV receiver should be operated only from
the type of power source indicated on the
marking label. If you are not sure of the type of
power supplied to your home, consult your
appliance dealer or local power company.
11. Grounding
or Polarization
This TV receiver is equipped with a polarized
alternating
current line plug hinting one blade
wider than the other. This plug will fit into the
power outlet only one way. If you are unable to
insert the plug fully into the outlet, try
reversing
the plug. If the plug should still fifil to
fit, contact your electrician
to replace your
obsolete outlet. Do not defeat the safety purpose
of the polarized plug.
12. Power-Cord
Protection
Power-supply
cords should be routed so that
they are not likely to be walked on or pinched
by items placed upon or against them, paying
particular
attention
to cords .at plugs, conw_nience recepl;acles, and the point where they
exit from the appliance.
13. Lightning
For added protection for this TV receiver during
a lightning
storm, or when it is left unattended
and unused for long periods of time, unplug: it
from the wall outlet and discormect the antenna
or cable system. This will prevent damage to the
TV receiver due to lightning .anc power-line
surges.
Important
14. Power
Safeguards
(cont.)
Lines
An outside antenna
system should not be located
in the vicinity of overhead power lines or other
electric light or power circuits, or where Jt can fall
into such power lines or circuits. When installing
an outside antenna system, extreme care should
be taken to keep from touching such power lines
or circuits as contact with them might be fatal.
15. Overloading
Do not overload wall outlets and extension cords
as this can result in a risk of fire or electric shock.
16. Object and Liquid Entry
Never push objects of any kind into this TV
receiver through openings as they may touch
dangerous
voltage points or short-out parts that
could result in a fire or electric shock. Never spill
liquid of any kind on the TV receiver.
17. Outdoor
Antenna
Grounding
If an outside antenna
or cable system is connected
to the TV receiver, be sure the antenna
or cable
system is grounded so as to provide some protection against voltage surges and built-up static
charges.
Section 810 of the National Electrical Code, ANSI/
NFPA No. 70-1984, provides information
with
respect to proper grounding of the mast and
supporting
structure,
grounding
of the lead in
wire to an antenna discharge
unit, size of
grounding
col_ductors, location of antenna
discharge unit, connection to grounding
electrodes,
and requirements
for the grounding electrode.
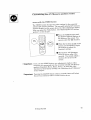
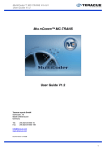
EXAMPLE OF ANTENNA GROUNDING
"_--_ANTENNA
•
,Ik I
.j..'_OUND
CI-AMP.__
_ANTENNA
_J/
_'_
I
ELECTRI_-'_""'-_
I
SERVICE
I
L-.._.
LEAD IN WIRE
_._/DISCHARGE
] _f/'l
I
EQUIPMENT--._
I--
GROUNDIN G
CONDUCTORS
" _'_'_-POWER
NEC -- NATIONAL ELECTRICAL
CODE
19. Damage
Requiring
Service
Unplug this TV receiver from the wall outlet
and refer servicing to qualified service
personnel under the following conditions:
(a) When the power-supply
cord or plug is
damaged.
(b) If liquid has been spilled, or objects have
fallen into the TV receiver.
(c) If the TV receiver has been exposed to rain
or water.
(d) If the TV receiver doe.'; not operate normally
by following the operating instructions.
Adjust only those controls that are covered
by the operating instr_tctmns
as an improper
adjustment
of other controls may result in
damage and will often require extensive
work by a qualified technician
to restore the
TV receiver to its nomnal operation.
(e) If the TV receiver has been dropped or the
cabinet has been damaged.
(f) When the TV receiver exhibits a distinct
change in performance
-- this indicates a
need for service.
20. Replacement
Parts
When replacement
parts are required,
be sure
the service technician
has used replacement
parts specified by the manu3!acturer
or :haw._ the
same characteristics
as the original part.
Unauthorized
substitutions
may result in fire,
electric shock or other hazards.
21. Safety Check
Upon completion
of any semice or repairs to this
TV receiver, ask the service technician
to
perform safety checks to determine
that the TV
receiver is in safe operating condition.
(NEC SECT'ON 810-20)
!
/ / /'-.
JI
_'--.__
UN,T
18. Servicing
Do not attempt
to service this_ TV receiw_r
yourself as opening or removing covers may
expose you to dangerous
voltage or other'
hazards.
Refer all servicing to qualified ,_ervice
personnel.
SERVICE GROUNDING
ELECTRODE SYSTEM
(NEC ART 250, PART H)
t,Warning::
Do not leave stationary
images, such
market reports, video games, station
the TV_s displays, on-screen for more
minutes.
Still patterns such as these
the picture tube, causing permanent
the TV.
as stock
logos, or
than 10
can scar
damage to
Welcome
PREFACE
to Mitsubishi
Congratulations
on your purchase of this Mitsu.bishi TV. Your TV
is designed for superb viewing pleasure as well as continued
reliability.
To familiarize
you with your TV and owner's guide, we suggest that
you read through the preface, which provides the :following important information:
t
Summary
of Special
t
Unpacking
t
What's
in Each
t
Some
Conventions
Your
Features
TV
Chapter
Used
in this
Guide
Mitsubishi has strived to create your TV so that iTf_
will bring you
years of viewing enjoyment.
Similarly, your owne:c's guide is
designed with a "user friendly" philosophy that will help you take
advantage
of all of your equipment's
features.
Once again,
Mitsubishi!
thank
you for selecting
our product
and welcome
to
5
Summary
of Special
Features
Your top rated
Mitsubishi
TV delivers
these
special features::
• 181-Channel
Capacity
--- programs up to 18] channels
68 antenna channels or 125 cable channels).
• Two-Speaker
Sound System
produces clear stereo sound.
--- a special
speaker
(either
system that
• Expanded
Sound Capability
--- allows you to connect
the TV to an external audio system for enhanced listening
pleasure.
Remote
Control
with
TV/VCR/DVD/AUDIO
Control---
uses a single remote control transmitter
to operate the TV,
selected Mitsubishi VCRs, DVD player and audio componem_s,
as well as certain VCRs, cable boxes, and satellite receivers
from other manufacturers.
° Digital Dynamic
Comb Filter -- creates a smooth, continuous
picture texture by comparing the individual scanning lines _th
those directly above and below.
• On-Screen
Displays
--- appear whenever you adjust
showing you the status of its. various functiom_.
• ViewPoint
®On-Screen
Operating
System
TV's features with easy-to-follow
instructiens.
• Closed Caption Decoder
included with TV programs
your 'IV,
--- simplifies
the
.... decodes hidden text information
and displays the text on-screen.
Extended
Data Services
--- (also known as "XDS,') allows
broadcasters
to supply you with channel i_d_ormation, program
information,
and the time of day. You can display this ilaformation on-screen.
• Picture-in-Picture
Mode --- allows you to view two different
hve pictures at the same time.
Each of these features
Chapter 3, "Operating
Special Features."
6
Preface:
Welcome
will be explained in more detail in
Your TV," and in Chapter 4, "Using the
to Mitsubishi
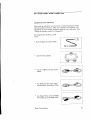
t Unpacking
Your
TV
What you will find
As you unpack your new TV, please
following items are included:
•
•
•
•
check to be sure that the
an owner's guide containing
a warranty
a registration
card
a remote control transmitter
a set of two AAA size batteries
for the remote
cc,ntrol
A few suggestions
Before you hook up your new TV, please take
a few minutes
to:
O
Complete the registration
card. The registration
card asks for
the TV's serial number, which you will find on the back of the
unit.
O
Keep the box and packing
materials
for future
use.
File your sales receipt.
O
Place the TV on a stable
the hook-up.
Unpacking
Your TV
surface
with sufficienl_ lighting
to do
7
i What's
in Each
Chapter
Here's
Chapter
location
what you will find in this owner's
1, "Getting
and functions
guide:
to Know Your TV," introduces you to the
of the buttons and controls of your TV.
Chapter
2, "Connecting
Your TV," explains how to connect
VCR, antenna, cable box and other equipment to your TV.
a
Chapter
3, "Operating
Your TV," provides the step-by-step
instructions
you need in order to use your TV.
Chapter
4, "Using
the special features
the Special
of the TV.
Features,"
explains
how to use
Chapter
5, '_rroubleshooting,"
summarizes
the problems
you may have along with suggestions
for remedying these
problems.
The appendix
explains
a procedure
You will also find a detailed
8
Preface:
Welcome
index
to Mitsubishi
for bypassing
the parental
at the back of the book.
lock.
Some
Conventions
Used
in this
Guide
Mitsubishi has gone to great effort to provide you with an easy-tofollow, useful owner's guide. You will find that different types of
information
are treated in different ways.
You should read information
labeled Important
and infocmation
that is boxed and labeled Warning.
The owner's guide uses these
terms sparingly, and you should carefully read all information
highlighted
in this manner.
[main
topic or task
I
I tist of related
topics or tasks
I
critical
new
WV.
topics or tasks
/
]
I Io,e, oto.
DImportant:
This cue indicates
I related
information
to the operation
of your
This cue alerts you to
information
describing
dangerous
situations that could
ruin your equipment
or cause
electrical shock.
Some Conventions
Used in this Guide
!
The step-by-step
instructions
on how to accomplish a
particular
task are signaled
by white numbers on a black
background.
9
CHAPTER
Getting
toONEt aow
Your
TV
Now that you have unpacked your TV, read through the safety
information,
and glanced at the overview explaining iaow this
owner's guide is organized, it's time to become familiar with the
buttons and controls you will be using when you operate the TV.
This chapter will introduce the range of options available when
using the buttons on the remote control or on the 'lW's front panel.
It also offers some general guidelines for using the remote control.
Most functions can be controlled by using either the front panel or
the remote control, but certain specialized functic.ns require the use
of one or the other. This chapter, which will familiarize you with
the full range of button functions, contains the following sections:
Overview
of the Front
Overview
of the Remote
Panel
Control
11
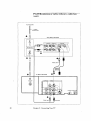
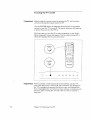
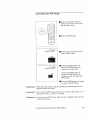
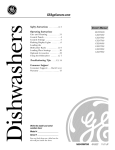
Overview
of the
Front
Panel
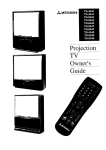
CS-32309
CS-36309,
CS-40309
PROG
TIMER
_,VE_
PO
CK-32310
LJ
ammI=
CK-36310
I
I
INPUT
@
DEGAUSS
12
Chapter
1: Getting
to Know Your TV
Q
power/program
timer indicator
This indicator lights up in green when you tur:a the TV on; it
blinks in green when the timer is set and the T_s power is off.
®
power button (POWER)
Use to turn the TV on or off. When you turn the TV on, the
power indicator will light in green.
®
A!V reset button
(_
RESET)
Press to reset, all audio and video functions to their normal
level or setting except for volume, the "Listen to:" function
(Stereo/SAP/Mono),
speaker (off/on), and closed captioning.
®
volume
controls
(VOL, VOLUME)
Press the • button to turn up the volume
turn down the volume.
®
®
channel
controls
Use the • button
and the • button
(CH, CHANNEL)
to switch to a channel
to switch to a channel
and the • button
wi.th a higher number
with a lower number.
input button (INPUT)
Use to select the input source you wish to watch:
• TV channels
• The sources
connected
to Input
1 and Input
2
®
A/V memory
button
Press repeatedly
to switch the A/V memory positions of Standard, Music, Movie or News. (Models CS-32309, CK-3231()
only)
®
degauss
button (DEGAUSS)
Use this button to correct color impurity.
CS-40309, and CK-36310 only)
®
to
(Models
CS-36309,
color purity adjustment
switches
Set these switches according to the placeraent and position of
your TV. See "Adjusting the color purity" in Chapter 3.
(Front panel of model CK-36310 only. Also, found on rear
panel of models CS-36309 and CS-40309. Not available on
models CS-32309 and CK-32310.)
Overview
of the Front Panel
13
[
Overview
of the
Remote
Control
Getting
ready
to use
installing
the batteries
the remote
control
O
Take the two AAA size batteries
from the packing
O
Remove the back cover of the remote control by pushing
in the direction of the arrow and lifting off the cover.
O
Load the batteries
as indicated in the illustration,
malting
that they are positioned correctly (+ to +, and - to - ).
O
Replace
the back cover of the remote
bag.
the tab
,sure
control.
O
O
size AAA
batteries
@ @
For best results,
use Duracell*
AAA (MN2400)
*Duracell is a registered
14
Chapter
1: Getting to Know Your TV
batteries.
trademark
of DuraceH,
Inc.
some
do's and don'ts
To ensure that your remote
follow these guidelines:
• Don't press two
are specifically
• Don't allow the
• Avoid dropping
• When cleaning
chemicals. Use
general
control
control to operate
Be within
O
Point the tip of the remote
20 feet of the desired
the appropriate
for using
equipment.
control
button
the '_7, VCR, or cable box,
toward
or sequence
of the Remote
tile equipment.
of buttons.
batteries
• Don't use a new battery with an old one.
• Don't heat, take apart, or throw batteries
Overview
properly,
instructions
O
guidelines
working
or more buttons at the same time, unless you
instructed
to do so in this owner's guide.
remote control to get wet or become heated.
the remote control on a hard sucface.
the remote control, don't use any harsh
only a soft, slightly moistened cloth.
When using the remote
follow these procedures:
Press
will continue
Control
into a fire.
15
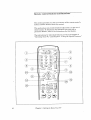
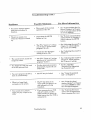
Remote
control
buttons
and functions
This section provides you with an overview
buttons and the features that they control.
of the remote
control's
This section does not provide detailed explanations
on the use of
these buttons. To determine
which buttons are used with a
particular
feature,
refer to the instructions
fi)r that feature.
The instructions
for individual features are tbund in Chapter 3.
"Operating Your TV," and Chapter 4, "Using tile Special Features."
VCR
DVD
POWER
m®®l c
®®®/
Q ® GI7
G--)o__
INPUT
@
MUTE
INFO
ADJUST
@
@
@
SLEEP
V
tED
AUDIO
c--n
REC
REWIREV
16
Chapter
1: Getting
STOP
PLAY
PAUSE
FF/FWD
to Know Your TV
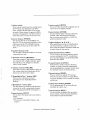
@
(!) selectswitch
Yourremotecontrolhasfour controllayers:
theTV layer,theVCRlayer,theDVD
layer,andtheAUDIOlayer.Youcanset
up eachoftheselayersto operatea different pieceofequipment.Usethis switchto
selectthelayeryouwantto setup or use.
@power button
(POWER)
Use to turn the TV on or off. When you
turn the TV on, the power indicator on the
front panel of the TV will light in green.
(The select switch must be set to the TV
layer.)
(_)number
buttons
(0-9)
Use to select a channel number
a parental lock code.
or to enter
(!) channel
control
(CHANNEL)
Press the top part of the button to change
to a channel with a higher number; press
the bottom part to change to a channel
with a lower number.
(6) SuperQuickView
button
(SQV)
Press to view channels you have
TM
into SuperQuickView
TM
(_)input button
(INPUT)
Use to select the input source you wish to
watch:
• TV channels
connected
to Input
(_)enter button
(ENTER,)
Use this button after selecting a channel
number, after selecting an item from
the on-screen menu system, or with the
picture-in-picture
mode.
(_)adjust
buttons
(A, V, ,, • )
After selecting an audio o1' video function,
use these buttons to adjust it. Also use
these with the picture-in-picture
mode and
to select items in the menus.
(_ information
button (INFO)
Use to view an on-screen _ummary of the
current settings for the TV or cable functions and the display rela':ed to Extended
Data Services (XDS)
button (CANCEL)
This button is used to cancel a channel
number, to clear a channel programmed
into SuperQuickView
memory, and to clear
the settings of some on-screen menus.
@home
button
(HOME)
Press to return to regular TV viewing
from the on-screen meau:_, to turn off t!he
on-screen displays, and to cancel the closed
captioning.
@ sleep timer button (SLEEP)
Use to program the TV to turn off automatically at a later time.
(7) QuickView
button
(QV)
Use this button to recall the last channel
viewed or to recall a memorized
channel.
(See "Changing channels" in Chapter 3.)
• The sources
Input 2
and to
@ cancel
(_) volume control
(VOLUME)
Press the top part of the button to turn up
the volume; press the bottom part of the
button to turn down the volume.
programmed
memory.
(_) mute control
(MUTE)
Use to turn the sound off completely
restore it to its original volume.
@ menu button (MENU)
Use this button to display the on-screen
menu system, which contains additional
instructions
for special functions.
1 and
Overview
of the Remote
Control
17
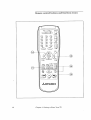
Remote
control
buttons
VCR
DVD
and
functions
(cont.)
POWER
___;o,o O
CHANNEL
QQ®_j
®QG
Q®®
G®G
INPUT
@
MUTE
INFO
ADJUST
®
@
©
REC
STOP
®_
R_W/REV
PAUSE
|
of
PLAY
FF/FWD
]
Art=MITSUBISHI
18
Chapter
1: Getting
to Know Your TV
@
Remote
(_) audio and video
Use these buttons
buttons
controls
to select the audio and
video functions you want to adjust.
Repeatedly
press the AUDIO button
VIDEO button to select one of the
functions listed below.
• audio function
button
- stereo/SAP/mono
- bass
- treble
- balance
- surround off/on
- speaker
control
and
functions
(cont.)
• pause button
(PAUSE) -- Press to
freeze the PIP image, and to return to a
"live" image.
° exchange
button
(EXCH) -- Press to
exchange the pictures of the PIP image
and the main image.
• adjust buttons
(A, Y, ', • ) -- Pres_ to
move the PIP image on.screen.
or
(AUDIO)
(_audio
and VCR buttons
Use these buttons to control VCRs, cassette
decks, DVD players, CD players, etc.
These are pre-programmed
to operate
select Mitsubishi components.
off/on
• video function
button
(VIDEO)
- tint
- color
- contrast
- brightness
- sharpness
- notch filter off/on
- color temperature
low/middle/high
- skin-tone off/on
- closed captions and text
(_ picture-in-picture
controls
Use to control the special picture-in-picture
(PIP) function.
(See "Using the Picture-inPicture (PIP) modes" in Chapter 4.)
• PIP button
(PIP) -- Press to turn on
the PIP image, to change its size, or to
cancel it.
VCR channel
button
(VCR CH) -- If
you use a VCR as the source for the PIP
image, use this button to change the
channel of the PIP image.
This button will change channels on your
VCR when the VCR is turned on even if
you are not using PIP.
• PIP input button (PIP INPUT) -Press repeatedly
to switch the source of
the PIP image between the TV and the
external inputs.
Overview
of the Remote
Control
19
CHAPTER
Connecting
TWO
Your TV
This chapter offers step-by-step
instructions
ibr completing
most common hook-ups.
It contains the following sections:
Overview
Basic
of the
Back
the
Panel
Connections
21
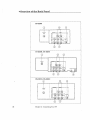
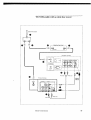
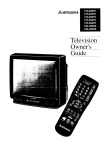
Overview
of the Back
Panel
CS-32309
VHFiUHF
OUTF UT
(75_)
CS-36309,
CS-40309
?
VHF/UHF
°_PuTI
_l
L
CK-32310,
Q
CK-36310
-?
VHFIUHF
(75_)
22
Chapter
2: Connecting
Your TV
_
S÷V_
E!O
STRENGTH
DIRECTIO_
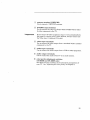
(j_) antenna
terminal
(VHF/UHF)
Use to connect a VHF/UHF antenna.
®
[_Important:
S-VIDEO input terminal
Use to connect the video of a Super
S-video component to the TV.
VHS (S-VHS) VCR or other
If you connect S-video equipment,
Input-1 will automatically
be
the input for viewing your S-video product, and you cannot use
the Video input 1 terminal ((_) below).
®
®
®
video input terminals
Use to connect the video output
component to the TV.
VCR or another
audio input terminals
Use to connect the audio output from a VCR or other
audio
output
Use to connect
®
i_om a standard
equipment.
terminals
the audio
of the TV to an audio system.
color purity adjustment
switches
(CS-36309 and CS-40309 only)
Set these switches according to the placement and position
your TV. See "Adjusting the color purity" in Chapter 3.
of
23
Basic
Connections
This section describes the equipment
and procedures
needed for
basic hook-ups.
For more complex hook-ups, contact your dealer or
local cable company.
The connections
explained in this section are:
24
•
TV+antenna
or cable
•
TV+cable
•
TV+separate
•
TV+VCR+antenna
•
TV+VCR+cable
•
TV+stereo
with
a cable
UHF
audio
without
a cable
box
box
and VHF antennas
or cable
with
a cable
without
a cable
box
system
%Important:
You must connect a VCR to your TV to see two separate
when using the Picture-in-Picture
(PIP) feature.
_Warning:
You should unplug
connecting them.
Chapter
your TV and any other components
2: Connecting
box
Your TV
pictures
before
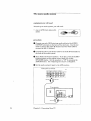
TV+antenna
equipment
or cable
without
a cable
box
you will need
If you have a standard
75-ohm coaxial
additional
equipment.
If your antenna
twin leads), you'll need:
cable, you _11 not need
has two leads (called flat
one 75-300 ohm transformer
}_
75 Ohm
Coaxial Cable
TV rear terminals
300 Ohm Flal
Twin Lead
--(
VI_F,_IHF
''_
JT
INPUT
1
1
O
O
O
/
Optional 300 Ohm to 75 Ohm
Matching Transformer
connecting
a cable
O Push or screw the end of the cable onto the a_tenna
the television.
connecting
an antenna
O Use a screwdriver
with
to connect
O Push or screw the transformer
television.
Basic Connections
fiat twin
terminal
on
leads
the leads to the transformer.
onto the antenna
terminal
on the
25
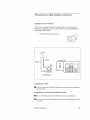
TV+ cable
equipment
with
a cable
box
you will need
Use this hook-up if you need a cable box to descramble
cable signals. After you complete this hook-up, you should set up your
.
remote control to operate
your cable box. (See "Using the remote
control" in Chapter 3.)
To complete the hook-up,
you will need:
•
one coaxial
cable
Procedure
O Connect
box.
the incoming
cable to the IN terminal
on the cable
O Connect a coaxial cable to the OUT terminal on the cable box;
connect the other end of this cable to the antenna termirml on
the back of the TV.
Incoming Cable
Cable Box
Rear Terminals
.....
(
_-__e
)
TV Rear Terminals
75 Ohm
Coaxial Cable
ouT¢-O":_
VHF/UHF
(75_)
0
O
26
Chapter
2: Connecting
Your TV
INPUT
2
1
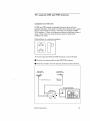
TV+ separate
equipment
UHF
and VHF
antennas
you will need
If UHF and VHF signals are brought into your home with two
separate
antennas,
you'll need to combine the antennas
into a single
wire to connect them to the TV. To do this you will need a UHFi
VHF combiner.
(There are different combiners for different kinds of
leads. Check with your local electronics store for the kind of
combiner you need.)
Pictured
below is a standard
To connect
separate
O Connect
O Press
VHF
combiner.
UHF and VHF antennas
the antenna
the combiner
leads to the UHF/VHF
onto the antenna
combiner.
terminal
on the television.
UHF Antenna
(Channels 14-69)
Antenna
(Channels 2-13)
,,,u
to your television:
_///
\\\_,\\X_l
--
300_ Flat Twin Lead
300 _ Flat Twin Lead
300 Ohm
L=_
to
75OhmCombiner
]_--'7_
II
F
_'--_'_--_----_
,o_,,
_'TV rear
II I,_1
I _ '
terminals
----] I
h
Basic Connections
27
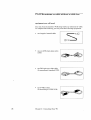
TV+VCR+antenna
equipment
or cable
without
a cable
box
you will need
You may want to connect a VCR along with your antennas
or cable.
To complete this hook-up, you may need the f_llowing equipment.
one length
of coaxial cable
one set of RCA pin-type
cables
audio
one RCA pin type video cable
(if connecting a standard VCR)
one S-Video cable
(if connecting
28
Chapter
a S-VHS VCR)
2: Connecting
Your TV
TV+VCR+antenna
(cont.)
procedure
See illustration
O Connect
terminal
Connect
terminal
or cable
without
on the following
page.
the incoming cable or antenna
on the VCR.
one end of a coaxial
on the VCR.
a cable box
to the ANTENNA
cable to the ANTENNA
Connect the other end of the cable to the antenna
the TV.
IN
OUT
terminal
on
Connect an RCA pin-type video cable to the VIDEO OUT te_ainal on the back of the VCR. Connect the other end of this cable
to the VIDEO INPUT terminal on the back of the television.
_>Important:
If you are connecting
a Super VHS (S-VHS) VCR, use a Super Video
cable instead of an RCA pin-type video cable.
Connect a Super
Video cable to the S-VIDEO OUT terminal on the VCR. Connect
the other end of this cable to the S-VIDEO INPUT terminal on the
back of the television.
Connect a set of RCA pin-type audio cables 1_othe AUDIO OUT
terminals
on the back of the VCR. Use the red cable to connect
the right (R) channel
(L) channel.
and the white
cable for connecting
the left
Connect the other ends of this cable to the AUDIO INPUT
terminals
on the back of the television.
Important:
_>Important:
If your VCR is monaural (non-stereo),
you will only connect a single
RCA pin-type audio cable. Connect the cable to the VCR, then
connect the other end to the L (LEFT) audio input on the back of
the television.
If your VCR has the video channel switch,
See your VCR's owner's guide for details.
Set the VCR to the playback
set to "OFF/AV" mode.
mode.
To view the VCR, select the external input source by us![ng the
INPUT button on the control panel or remote control.
Basic Connections
29
TV+VCR+antenna
(cont.)
Incomin
or Cable
without
a cable
box
Cable
75 Ohm
Coaxial Cable
0
VCR Rear Terminals
IN
Antenna
0
Yello__
P417o% 1
TV Rear Terminals
0
O
_cab[e
typl
VHF/UHF
(75_)
®
STRENGTH
White Lead
30
Chapter
2: Connecting
Red Lead
Your TV
DIRECTIO
TV+VCR+cable
equipment
with
a cable
box
yon will need
This hook-up will allow you to record scrambled channels while
viewing another channel.
After you complete this hook-up, you
should set up your remote control to operate :your cable box. (See
"Using the remote control" in Chapter 3.)
To complete
need:
• three
the hook-up,
lengths
one two-way
•
of coaxial
you'll
cable
splitter
one set of RCA pin-type
cables
audio
one RCA pin-type video cable
(if connecting a standard
VCR)
•
one Super Video cable (S-VHS)
(if connecting an S-VHS VCR)
Basic Connections
31
TV+VCR+cable
procedure
See illustration
0
Connect
splitter.
with
a cable
on the following
the incoming
box
(cont.)
page.
cable to the IN terminal
c,n the two--way
O Connect a coaxial cable to one of the OUT teIzninals on the twoway splitter; connect the other end of this cable to the antenna
terminal (UHF/VHF) on the back of the TV.
Connect another coaxial cable to the other OUT terminal on the
two-way splitter; connect the other end of this cable to the IN (or
Cable) terminal on the back of the cable box.
Connect the third coaxial cable to the OUT (or to TV) terminal
on the back of the cable box; connect the other end of the ,cable to
the ANTENNA IN terminal on the back of the VCR.
O Connect an RCA pin-type video cable to the VIDEO OUT terminal on the back of the VCR. Connect the other end of this cable
to the VIDEO INPUT terminal on the back oft he television.
_>Important:
If you are connecting a Super VHS (S-VHS) VCR, use a Super
Video cable instead of an RCA pin-type video cable. Connect a
Super Video cable to the S-VIDEO OUT terminal ,_n the VCR.
Connect the other end of this cable to the S-VK)EO INPUT l_erminal on the back of the television.
Connect a set of RCA pin-type audio cables to the AUDIO OUT
terminals
on the back of the VCR. Use the red cable to connect
the right (R) channel and the white cable fo_:connecting
the left
(L) channel.
Connect the other ends of this cable to the AUDIO
terminals
on the back of the television.
INPUT
[:>Important:
If your VCR is monaural (non-stereo),
you will only connect a single
RCA pin-type audio cable. Connect the cable to the VCR, then
connect the other end to the L (LEFT) audio input; on the back of
the television.
[:>Important:
If your VCR's channel switch has an "OFF/AV" setting,
setting.
See your VCR's owner's guide for details
To view
0
use this
the VCR:
Turn on the VCR.
Set the TV to the external input source by using the INPUT
button on the remote control or the front panel of the TV.
32
Chapter
2: Connecting
Your TV
TV+VCR+cable
_
Cable
From
@
with
a cable
box
(cont.)
Outside
O
O
Cable
Box Rear
Panel
VCR
O
Rear "rerminals
J
O
)_"
VIDEO
OUT
/
Antenna
@
OUT
Red Lead -
O
TV Rear
Terminals
Ol.r[ pLrr
INPUT
2
I
VHF_HF
0
Red
Basic Connections
33
TV+ stereo
audio
system
equipment
you will need
To hook-up
an audio system,
• one set of RCA pin-type
you will need:
audio
ca os
procedure
0
Connect one end of
OUTPUT terminals
cable to connect the
connect the left (L)
RCA pin-type audio cables to the AUDIO
on the back of the television.
Use the red
right (R) channel and the white cable to
channel.
@ Connect
the other ends of this cable to the AUX IN terminals
the back of the audio system.
O
Turn off the television's
speakers.
To do this, press the AUDIO
function button on the remote control until you see the
SPEAKER display.
Set the speakers to "Off' by pressing the
ADJUST button.
See "Adjusting the sound" :LnChapter 3.
O Set the audio system's
Audio system
input
to the AUX positio_,_.
rear terminals
TV rear terminals
/ ,qnO_
White
34
on
Chapter
2: Connecting
Lead
_
_
%z
Your TV
Red Lead
_
CHAPTER
Operating
THREE
Your TV
Now that your TV is connected to a cable system, an antenna,
and
possibly some external components,
it's time 1_oenjoy your equ.ipment. This chapter will explain how to operate the TV, first focusing on functions that are basic and easy and t.hen explaining some
advanced features.
This chapter
0
Getting
0
Using
explains:
Started
the Advanced
Features
35
Getting
Started
This section is designed to get you started enjoying your new 2%'.
If you follow these procedures
one by one, you will soon begdn
discovering everything
your television can do.
You'll find information
• Adjusting
the
on:
color
purity
• Using the remote
control
and other equipment
• Turning
the input
• Changing
channels
• Understanding
• Setting
• Adding
the ViewPoint
the menu
• Naming
the input
• Naming
the channels
video
• Selecting
• Customizing
• Adjusting
channels
type
mute
the menu
language
A/V memory
the picture
the closed
• Adjusting
Chapter
III on-screen
channels
and deleting
• Selecting
36
cable
hoxes,
source
the clock
• Memorizing
• Using
VCRs,
the TV on/off
• Selecting
• Using
to operate
caption
the sound
3: Operating
Your TV
decoder
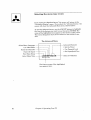
menus
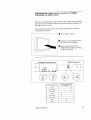
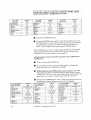
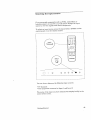
Adjusting
CS-40309,
the color
CK-36310
purity
only)
(models
CS-36309,
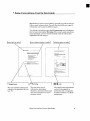
Because your Mitsubishi
color television has a large-screen
picture
tube, the earth's magnetic field can produce discolored patches on
the edges of your screen.
To avoid this problem,
install your television:
follow these instructions
O
when you first
Turn off the TV set.
O Determine
the compass direction the screen is facing.
O Select tlhe pasition for the
DIRECTION
switch according
to the c:hart below.
CS-36309,
CS-40309
back panel
CK-36310
frontpanel
@
©
l_
TV SET
DIRECTION
DIRECTION
SW:ITCH
S
NEUTRAL
N
North
X
North
East
X
North
West
X
South
Getting
Started
X
South
East
X
South
West
X
East
X
West
X
37
Adjusting
O
the
color
purity
((:ont.)
Turn the TV on, and check the color perforraance.
If a discolored patch still exists, change the STRENGTH
switch
to the other position.
If there is still impurity, wait a few
minutes, then press the DEGAUSS button on the control panel.
You may need to adjust the color purity switches if you change
position or location.
If there is still color impurity after adjusting tke switches,
please contact your Mitsubishi Authorized
Wa_Tanty Center.
_Important:
38
Color impurity can also be caused by unshielded
s_eakers
strong magnets.
Move these items away from youc TV.
Chapter
3: Operating
Your TV
and
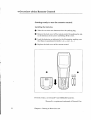
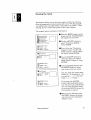
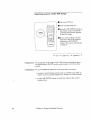
Using
boxes
about
the remote
and other
your
This TV's
layer, the
to operate
layer you
the remote
remote
control
equipment
to operate
VCRs,
cable
control
remote control has four "layers": the TV layer, the VCR
DVI) layer, and the AUDIO layer. Each layer can be used
a different component in your A/V system. You select the
want to use by setting the "select" switch across tlhe top of
control.
When you first receive your remote control, the TV layer is set up
to operate your Mitsubishi TV, the VCR layer is programmed
to
operate Mitsubishi
VCRs, the DVD layer is set to operate
Mitsubishi DVD players, and the AUDIO layer is set to operate the
Mitsubishi AiV receiver.
You can use the following buttons to
operate your TV.
•
•
•
•
•
•
power button
pause button
mute control
super quick view button
quick view button
volume control
• input button
• channel control
• enter button
•
•
•
•
•
audio and video controls
menu button
cancel button
information
button
home but_:on
• sleep timer button
• number buttons
• PIP controls
• A/V memory
button
If you have a cable box (including the digital satc.llite box), a nonMitsubishi VCR, a Mitsubishi laserdisc player, an A/V receiver, or
a compact disc, you can set up the layers in the remote control to
operate these components.
The VCR layer can be set up to operate a non-Mitsubishi
VCR or a
Mitsubishi DVD player; the DVD layer can be set to operate a
Mitsubishi DVD player, another VCR, cable box, Mitsubishi
laserdisc player, A/V receiver; the AUDIO layer (;an be set up to
operate a Mitsubishi
DVD player, an A/V receiver or cable box; and
the TV layer can be set up to operate the volume control of an A/V
receiver.
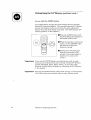
setting
up the remote
control
to operate
your
VCR
O
Turn offyour
O
Set the select switch on the remote
want to set up: VCR or DVD.
O
While holding in the POWER button on the remote, enter the
code number listed in the chart on the following page for your
brand of VCR. Be sure to enter both digits of' the code number.
If more than one number is listed, begin with the first one.
Getting
Started
VCR.
to choose the layer you
39
Using
boxes
If your VCR
is this brand...
Mitsubishi (A)
Mitsubishi
Canon
Emerson
Funai
General Electric
Goldstar
Hitachi
JVC
...enterthis
code
01
02
O3
04, 05
06
O3
O7
08
O9
the remote
and other
control
to operate
components
(cont.)
...enterthis
code
If your VCR
is this brand...
03, 10, 11
O6
12
Magnavox
Multitech
NEC
Panasonic
Philco
____ 03,2_1
_ __ 03, 10
03, 10, 11
O3
Philips
Quasar
RCA
Sanyo
__
08. 13 20
14
the POWER
VCRs,
If your VCR
is this brand.
Scot
Shar E
Sony____
Sylvania
__
_mjohonic
Teknika
Toshiba
Totevision
Zenith
cable
...enterthiis
code
15
16
17, 18
03,10_z!__
06
04, 0(;!____
15
07
19
0
Release
button.
O
Press the POWER button again. Your VCR should turn on. If
the VCR turns on, your remote control is now set up to operate
your VCR. (See "using your remote control to operate your
VCR" in this chapter for remote control VCR functions.)
If your VCR does not turn on, repeat the instructions,
trying each
code number listed for your brand of VCR. If none of these code
numbers work, try each number, 01 through 21.
setting up the remote
satellite
box
box or
Set the select switch on the top of the remol:e to choose tlhe
layer you want to set up: DVD or AUDIO.
O
While holding in the POWER button on the remote, enter tile
code number listed in the chart below for your brand of cable/
satellite box. Be sure to enter both digits of the code number. If
more than one number is listed, begin with the first one.
O
Release
operate
57, 59, 62, 67, 89
73, 74, 98
93
55
66
Oak
Panasonic
55, 56, 57
52, 53, 69
57
Pioneer
Prime Star
Pulsar
RCA
RCA DSS
40
cable
O
ABC
Color Voice
Comtronics
Gemini
General Electric
General Instruments
Hamlin
Hitachi
Jerrolcl
Magnavox
Memorex
your
Turn on your cable/satellite
...enter this
code
Macom
to operate
O
If your cable/satellite
box is this brand...
54, 55, 56, 57, 58
59, 60, 85, 87
71
94
51
control
the POWER button. (See "using your remote control to
your cable/satellite
box" later in this chapter.)
...enterthis
code
If yourcable/satellite
boxisthis brand...
Paragon
Philips
Regal
Regency
Samsung
Chapter
box.
61, 62, 82
63, 70
51
73, 74, 75, 76, 77
__93 , 94, 98, 99
64, 65, 84
48
51
63
49
53
79
65, 84
3: Operating
Your TV
If your cable/sate
box is this bran
Scientific Atlar
Signature
Sony DSS
_rucar
Starcom
Starqate
Tocom
Toshiba
United Artists
United Cable
Viewstar
Zenith
...enterthis
cod(;
66, 88, 89, 9t, 92
57
47
63
54, 55 "56.87
55
67, 6& 72 __
51
62'
54
93, 94
51
Using
boxes
0
[_Important:
the remote
and other
control
to operate
components
(cont.)
VCRs,
cable
Press the POWER button again. Your cable/satelLite
box should
turn off. If the cable/satellite
box turns off, your remote control is
now set up to operate your cable/satellite
box. If your cable/satellite
box does not turn off, repeat the instructions
above, trying each code
number listed for your brand of cable/satellite
box. If none of these
numbers work, try each number, 51 through 99.
Some of the boxes can be turned on with the CI_NNEL
the number buttons instead of the POWER button.
buttons
or
setting up the remote control
to operate your Mitsubishi
components
(DVD player, laserdisc
player cr A/V receiver)
O
Turn off your component.
O
Set the select switch on the top of the remote to choose the layer
you want to set up. For a laser disc player, choose DVD. For a
DVD player, choose VCR, DVD or AUDIO. For an A/V receiver,
choose DVD or AUDIO.
While holding in the POWER button
enter one of these code numbers:
• For
30,
• For
• For
• For
on the remote
contro!,
a Mitsubishi AN receiver and compact disc player:
31, 35 or 38
a Mitsubishi laserdisc player: 32 or 33
a Mitsubishi DVD player: 34
a Yamaha A/V receiver and compact disc player: 36 or 37
Be sure to enter both digits of the code number.
one number is listed, begin with the first one.
the POWER
If more than
0
Release
button.
0
Press the POWER button again. Your component should turn
on. If it does, your remote control is now set nap to operate your
component.
If it does not turn on, repeat the instructions
above,
trying the other code numbers listed for your component.
(See "using your remote control to operate your Mitsubishii DVD
player or laserdisc player" and "using your remote control to
operate your Mitsubishi A/V receiver" in this chapter for information on using the remote to operate your other components.)
Getting
Started
41
Using
boxes
notes
the remote
and other
about
your
control
to operate
components
(cont.)
remote
VCRs,
cable
control
_Important:
Sometimes manufacturers
will change their products, or they r;Lay
use more than one code. If this is the case, your remote may not be
able to operate your VCR or cable box.
_Important:
When you replace the batteries
will usually return to its initial
remote again.
resetting
setting
O
O
the layer
of your
in your remote control, the remote
setting. You may need to set up your
remote
to the original
factory
Turn off the power of the component you wish to reset.
Set the select switch to choose the layer you have set the
component to.
While holding in the POWER button on the remote, enter
code 00.
Release the POWER button.
using
your
remote
control
to operate
your
VCR
After you have set up your remote control for your particular
of VCR, you can use the remote to operate your VCR.
O
the
brand
Use the select switch on the remote control to choose the layer
that you set up to operate your VCR: VCR or DVD.
Point the remote at the VCR and press the desired buttons.
If you are using a Mitsubishi
VCR, you will be able to use all ,_f the
buttons on the remote to operate your VCR except for MUTE, VOLUME, and the PIP function buttons, which will always operate tlhe TV
itself.
If you are using another brand of VCR, you can use the POWER,
CHANNEL, REC, STOP, PAUSE, REW, PLAY, and FF buttons to
operate your VCR.
using
your
remote
control
to operate
your
cable/satel[lite
After you have set up your remote control for your particular
cable/satellite
box, you can use the remote to operate it.
O
box
brand
Use the select switch on the remote to choose the layer that you
set up to operate your cable/satellite
box: DVD or AUDIO.
Point the remote at the box and press the desired buttons.
You can use the POWER, CHANNEL, numbers (0-9), and ENTER
buttons to operate your cable box. If you are using an RCA DSS or
PRIMESTAR ®receiver, you may be able to use additional buttons.
42
Chapter
3: Operating
Your TV
of
Using
boxes
the remote
and other
using your remote
player or laserdisc
control
to operate
components
(cont.)
control
player
to operate
your
VCRs,
cable
Mitsubishi
I)VD
After you have set up your remote control for your DVD player
laserdisc player, you can use the remote to operate the player.
O
O
or
Use the select switch on the remote control to choose the ]ayer
that you set up to operate your laserdisc player: DVD.
Point the remote at the DVD player or laserdisc player and press
the desired buttons.
You can use the POWER, CHANNEL, numbers (0-9) (for laserdisc
player only), INFO, MENU, CANCEL, STOP, PAUSE, REW, PLAY,
and FF buttons to operate your DVD player or laserdisc player.
using your
products
remote
control
to operate
After you have set up your remote
can use the remote to operate it.
control
your
Mitsubislhi
audio
for your A/V receiver,
you
Use the select switch on the remote control _;ochoose the ]ayer
that you set up to operate :your receiver: TV DVD, or AUDIO.
Point the remote control at the A/V receiver and press the
desired buttons.
If you are using a Mitsubishi HTS-100, you can use the POWER,
VOLUME, and MUTE buttons to operate tlhe receiver.
If you are using a Mitsubishi HTS-300, you can use the POWER,
CHANNEL, INPUT, VOLUME, ENTER, nuraber (0-9), INFO,
MENU, CANCEL, AUDIO, VIDEO.. ADJUST, and MUTE buttons
operate the receiver.
If you are using a Mitsubishi
M-VR400, M-VR6()0, M-VR800 or
M-VR1000, you can use the POWER, VOLU-ME: 0-9, and MU'rE
buttons to operate the receiver.
The ADJUST buttons will access
M-VR800/1000
menus.
to
the
If you are using the Mitsubishi M-CD500 CD player, you can use the
PAUSE, STOP, FF, and REW buttons to operate the CD player.
PRIMESTAR
Getting
®is a registered
Started
servicemark
of PRIMESTAR
Partn:ers
LP.
43
Turning
_Important:
the
TV on/off
Before using the remote control to operate the TV, set the select
switch on the top the remote control to TV.
Use the POWER button on either the control panel or the remolse
control to turn the TV on and off. The power indicator will light up
in green when you turn the TV on.
The first time you turn the TV on after unpacking
it, the "Select
Menu Language" screen will appear. Use the steps on page 60 to
select the language for the on-screen :menu.
mmm
CZ_
__
_
_Important:
44
o
0
There is always a small amount of current flowin_ into the TV,
even when the power is turned off. This maintains
any changes to
the TV's settings and operates the built-in clock and timing functions. Unplugging
the set will erase these settings, requiring you to
set them again. Unplug the TV only when it won't be used for a
long time.
Chapter
3: Operating
Your TV
Selecting
the
input
source
If you connected components
such as VCRs, camcorders,
or
laserdisc players to your TV, you will need tc_change the input
source to view the signals from these components.
To select an input source, press the input
control panel or on the remote control.
You can choose between
the following
butto:a (INPUT)
input
on the
sources:
• TV channels
• The equipment
connected
to Input
1 and Input
The name of the input you have selected
corner of the screen.
Getting
Started
2
will display
briefly in the
45
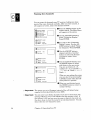
Changing
channels
Your TV offers you four ways of changing channels once their
numbers have been programmed
into channel memory:
• selecting
• directly
channels
accessing
one-by-one
a channel
• using the QuickView
switch to a particular
TM
To change
channels
faster,
by pressing
controls
tile number
buttons
option to recall the last channel,
memorized
channel
• using the SuperQuickView"
channels on a user-chosen
Important:
with the channel
function
list
use either
to alternate
or to
between
of the following procedures:
• Enter three digits for every channel number, using zeros where
needed. For example, enter 0,?4 to view channel 4 and 028 to
view channel 28.
• Press the ENTER button after selecting the number
channel. For example, press 4 and ENTER to view
channel 4.
Important:
46
of the
If you memorized
channels using the Indoor/Outdoor Antenna, your
TV can receive antenna channels 2-13 (VHF) and 14-69 (UHF). If
you memorized
channels using the Cable Antenna, your TV can
receive cable channels
1-125. If :you select a channel outside of the
memorized range, your TV will not change channels.
Chapter
3: Operating
Your TV
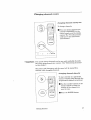
Changing
channels
c=:=:_ ¢
OOO
@
_Important:
(cont.)
changing
channels
To change
channels:
O
one-by-one
Press one of the channel scan
controls (CI-U_NNEL) on the
control panel or on the remote
control. The TV will aulmmatically tune to the next memorized channel.
@
You cannot change channels one-by-one unLil available channels
have been programmed
into memory. (See "M:ernorizing channels"
in this chapter.)
The picture will disappear
and the sound wilJt be muted
moment while changing channels.
ch anging
channels
for a
directly
To move directly to a particular
channel without going through the
programmed
channels in between:
O Use the number buttons on the
remote control to select the
number of the channel
want to _iew.
Press
the ENTER
you
button.
\ _Mrrsusm_ i
Getting
Started
47
Changing
channels
(cont.)
using
the QuickView
TM
option
The QuickView
feature carl work
in two ways: to recall the last
channel viewed (Last Channel
Recall), or to recall a channe.1 you
put into QuickView memory.
_0
O00LQ
ooou
ooo
If you ihave not memorized
a
channel !into QuickView
Memory, Last Channel
Recall
allows you to use the QV button
to switch back and forth between the last two channels
viewed.
QuickView
Memo_
allows
you to use the QV but;ton to
switch back and forth between
the last channel you were
watching and the channel you
put into QuickView memory.
Setting
0
the QuickView
Tune to the channel
memory
you wish to memorize.
Press and hold the QV button for about 2 seconds. The channel
numbers will appear on the screen, indicating
that you have
memorized that channel.
bImportant:
O
After chan_ng
to another channel, press the QV button
immediately
return to the memorized
channel.
0
If you press the QV button while watching the memorized
channel, you will return to the last chan:nel viewed.
The memorized QV channel will remain in memory until you
replace it with a new channel using the procedure above. To :restore
the Last Channel Recall feature, re-memorize
the channels.
(See
"Memorizing
Channels" in this chapter.)
This procedure also
erases all of your SuperQuickView
channels and channel names.
TM
48
to
Chapter
3: Operating
Your TV
Changing
channels
(cont.)
using the SuperQuickView
option
_0
ooofiB
To view selected
OOO_
progTammed
memory:
ooou
Joo H
,2C
TM
channels
into SuperQuickView
O Enter the desired channel
SuperQuickView
memory.
"Using Super-QuickView,"
this chapter.)
into
(See
in
O Press the SQV button
repeatedly to view the SQV
channels in sequence.
Getting
Started
49
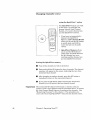
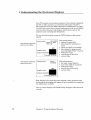
Understanding
the ViewPoint
One of the distinctive
ViewPoint On-Screen
® on-screen
features of this TV is Mitsubishi's
Operating
System.
menus
exclusive
Unlike other television menus systems, ViewPoint includes a
special Picture-in-Picture
screen to let you view the TV picture
while you are using the menu.
ViewPoint also provides step-by-step
the TV's special capabilities.
When using the ViewPoint
mind:
• The selected
• The on-screen
minutes.
menu
system,
instructions
please
item is indicated
menus
:for using
some of
keep the following
in
in yellow.
will turn off if no item is selected
within
5
• Some on-screen menu items must be set before other items are
available. For example, "Set the Timer" will only be available if
"Set the Clock" has been set.
• You can exit the on-screen
MENU button repeatedly.
viewing.
menus any time by pressing the
You will then return to regular TV
• You can also exit the on-screen
button on the remote control.
50
Chapter
3: Operating
Your TV
menus
by pressing
the HOME
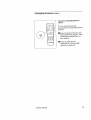
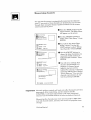
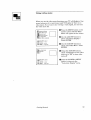
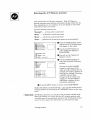
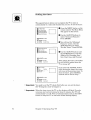
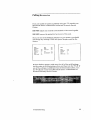
Setting
the clock
Your TV contains an internal
clock. If there is a broadcaster
in your
area that is sending the current time along "with its regular broadcast signal, then your TV can automatically
set i'_s clock with this
signal. Otherwise,
you can set the clock yourself.
[]
7%' Main
[]
First
[]
Menu
Time Setup
Customize
Display
[_] Advanced
Features
[]
Memory
Select
AN
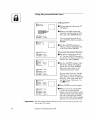
O Press the MENU button on the
remote control. The Main Menu
will appear
-----_ ADJUST
to select
ENTER
to enter
MENU
to exit menus
[]
First Time
[]
Set the Clock
_
Memorfze
[]
Add/delete
_
Channels
DJUST
You will see the "First Time
Setup" screen. Use the
ADJUST buttons to select "Set
the Clock." Press ENTER
10 select
to go back
[]
Set the Clock
_']
Auto
_]
Day
: Sunday
_]
Time
: 12:00
clock:
Time zone:
_
Daylight
savings
On
pm
Central
:Off
ADJUST
to select
ENTER
to enter
MENU
to go back
[]
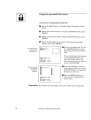
Set the Clock
[]
Auto clock:
[]
Day
: Sunday
[]
Time
: 12:00
[]
Time zone: Central
[]
Daylight
savings
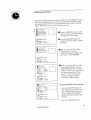
If you want your TV to set its
clock automatically,
use the
ADJUST buttons to set "Auto
clock" to "On"; if you want to set
the clock yourself, set "Auto
clock" to "Off," and see the
section "setting the clock
yourself," in this chapter.
using
automatic
clock
setting
On
pm
: Off
_
ADJUST
to select
_
ENTER
to enter
MENU
to go back
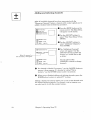
Use tile ADJUST buttons to
select the time zone you live in.
The available time zones are:
Central, Mountain,
Pacific,
Alaska, Hawaii, Atlantic and
Eastern.
• Press
Getting
to
Press
to enter
___J MENU
[]
O Use the ADJUST buttons
select "First Time Setup."
ENTER.
Setup
Channels
ENTER
cn the screen.
Started
the ENTER
button.
51
Setting
the
[]
Set the Clock
[]
Auto clock:
[-1
Day
: Sunday
[]
Time
: 12:00 pm
r_
Time zone:
[]
Daylight
savings
_Important:
The
that
your
reset
(cont.)
If you follow daylight savings,
use the ADJUST buttons to
answer the question with "On."
Otherwise._ answer "Off:" Press
FNTER.
On
Central
:Off
]ADJUST
Important:
clock
The automatic
clock set up is
completed. The screen will
return to the :'First Time Setup"
menu.
to select
ENTER
to enter
MENU
to go back
TV's clock will not be set until you tune your TV to a channel
is broadcasting
the time via Extended Data Services O[DS). If
TV loses power, you will need to tune to that channel again to
your clock.
If you set "Daylight sax4ngs" to "On," your TV will adjust
by one hour when daylight savings begins and ends.
[]
Set the Clock
[]
Auto clock:
[]
Day
setting
clock
yourself
Off
: - -
E_] Time
the
the clock
:
• Use the ADJUST
:
buttons
or the
key pad to set "Auto clock" to
"Off." Press ENTER.
_
ADJUST
to select
ENTER
to enter
MENU
to go back
[]
Set the Clock
[]
Auto clock:
[]
Day
• Use the ADJUST
select the "Day." Press
Off
[_
ENTER.
: - - : .....
•
_
to
• Use the ADJUST buttons or'
number buttons to set the
"Time."
: Sunday
]Time
buttons
DJUST
After you have set the "Day"
and "Time," press the ENTER
button to start the clock.
to select
ENTER
to enter
MENU
togoback
The screen
Time Setup"
[]
Set the Clock
[]
Auto clock:
[]
Day
: Sunday
r_
Time
: 12:oo pm
will return
to the "First
menu.
l_Important:
Off
You can clear the time by pressing
_he CANCEL button when ":Auto
clock" is highlighted.
_
52
ADJUST
to select
ENTER
to enter
MENU
to go back
Chapter
3: Operating
If you are receiving a VCR signal
on channel 3 or channel 4, tlhe
automatic
setting may not work
correctly.
Your TV
Memorizing
channels
You can use the menus to automatically
memorize the channels
your TV can receive. Once channels are memoldzed, you Call scan
through them using the channel up/down controls on the remote
control and control panel.
O Press the MENU button on the
remote control. The Main Menu
will appear on the screen.
[]
First Time
[]
Set the Clock
Setup
[]
Memorize
[]
Add!delete
Channels
] ADJUST
to select
ENTER
to enter
MENU
to go back
[]
Memorize
[]
Indoodeutdeer
antenna
_]
to your "IV?
i} ADJI,,IST
to select
ENTER
to enter
MENU
to go back
Memorize
ChanneJs
Channel
003
Now memorizing
you can recewe.
Please
[_
_Important:
stand
CANCEL
O Use the ADJUST buttons to
choose the type of antenna you
connected: Cable antenna or
lndoor/eul_door antenna.
Press
ENTER,.
You will see a message
channel memorization
Not in memory
_]
to
Press
You will see the "First 'rime
Setup" screen. Use the AD.JUST buttons to select "Memorize Channels."
Press ENTER.
Channels
What is connected
_1
O Use the ADJUST buttons
select "First Time Setup."
ENTER.
Channels
]
all the stations
that
is in
progress. A channel being
added to memory will be
labeled "In memory." Channels
not being added will be labeled
"Not in memory." You can stop
channel memorization
at any
time by pressing CANCEL.
by.
to stop memorization
Channel up/down controls will work only after channels In,ave been
memorized. After memorizing,
use the channel controls
(CttANNEL)
to advance sequentially
to the next memorized
channel. Use the number buttons to select indi_ddual channels.
Memorizing the channels
nels and channel names,
settings.
Getting
Started
may erase all of your QV or SQV chanand may also cancel the program timer
53
+
Adding
and
deleting
channels
/
After all available channels have been memorized with the
"Memorize Channels" feature, channels with weaker signals
added or deleted with the following procedure.
[]
First Time Setup
[]
Set the Clock
[]
Memorize
[]
Add/delete
O Press the MENU button on the
remote control. The Main Menu
will appear on the screen.
Channels
Channels
O Use the AI)JUST buttons
select "Fir,_t Time Setup."
ENTER.
]
DJUST
to enter
i_
MENU
to go back
[]
Add/delete
[]
Channel
: 003 ABCD
Not in memory
Use the ADJUST
select "Add!delete
Press ENTER.
O
Channels
i'_
DJUST
to add
MENU
to go back
Channels"
You can also use the
CHANNEL controls to change
channels.
to select
ENTER
The "Add/delete
buttons to
Channels."
screen _dll appear. Use the
ADJUST butruns to select the
channel you would like to add
or delete,.
I
_]
to
Press
to select
ENTER
Either "In memory" or
"Not in memory" will appear.
can be
If a channel is labeled "In memory," use the CANCEL button
remove it from memory. If a channel is lat)eled "Not in
memory," use the ENTER button to add it to memory.
When you are finished adding and deleting channels,
HOME button to return to normal TV viewing.
to
press the
Adding a channel to memory allows you to tune 1;othe channel with
the channel up/down controls. If a channel is not in memory, you
can only tune to it with the number buttons.
54
Chapter
3: Operating
Your TV
Selecting
the menu
type
You can display the on-screen menus in one of two ways. The
"Standard
menu," which is illustrated
in this manual, prm,ides
step-by-step
instructions
for all features. The "Advanced menu"
you select each feature directly by its name and icon.
Your TV's normal setting is the "Standard
menu."
between the Standard
and Advanced menus:
_TV
[]
To switch
Main Menu
First Time Setup
[]
Customize
Display
[]
Advanced
Features
[]
Setect
q[]}Press the MENU button on the
remote control. The Main Menu
will appear on the screen.
A,,V Memory
]ADJUST
O Use the ADJUST
to select
ENTER
to enter
MENU
to exit menus
[]
Customize
[]
Select
[]
Name the Input
[]
Name the Channels
[]
Select
Mute
Menu
]ADJUST
Language
to enter
MENU
to go back
[]
Select
[_
Standard
[]
Advanced
I
You will see the "Customize
Display" menu. Use the AJ_JUST buttons to select "Select
Menu Type." Press ENTF, R.
Menu Type
menu
menu
0 Use the ADJUST buttons to
select "Standard
menu" or
"Advanced :menu."
Press the ENTER
button..
DJUST
or MENU
to select
ENTER
to enter
MENU
to go back
Getting
to
to select
ENTER
]
buttons
select "CusVgmize Display."
Press ENTER.
Display
Menu Type
Use Video
[_
lets
Started
55
Selecting
the menu
type
(cont.)
If you select the "Standard
menu," the screen will return to the
"Customize Display" menu. If you select the "Advanced menu," the
screen will show the Advanced Main menu (shown below).
To use the Advanced menu, use the ADJUST buttons to highlight
the icon of the feature you want. to use, then press ENTER. The
name of the highlighted
icon appears at the bottom of the screen.
This menu disappears
if you do not select an item within 5 minutes.
The Advanced
Select Menu Language
Use Video Mute
Name the Channels
Name the Input
First Time Setup
Menu
I 1
_q[]EIEl[][][]_-
Select Menu Type
Select
Menu Type
The feature name of the highlighted
icon appears here.
56
Chapter
3: Operating
Your TV
Advanced
Features
• Set the Timer
• Use Parental
Lock
• Set SuperQuickView
Select A/V Memory
Naming
the input
This feature allows you to name the inputs so that you can keep
track of components
you have connected to your TV. For example,
you might name one input "VCR," and another one "DISC." ,_Lfter
naming, the new name will appear on the screen display.
The original
names
[]
Customize
[_
Name the Input
Use Video
[]
Select
Mute
Menu
_----_ ADJUST
Language
to enter
MENU
to go back
[]
Name the Input
[]
Input-1
[]
Input-2
New
O Use the ADJUST
select "Customize
Press ENTER.
to select
ENTER
to enter
MENU
to go back
Name the Input
[]
Input-1
ABCDE
[]
Input-2
.....
Input label
DJUST
buttons to
Display."
O You will see the "Customize
Display" screen. Use the ,M)JUST buttons to selec,t "Name
the Input." Press ENTER.
name
[]
[_
I
- ....
] ADJUST
1
I
to select
ENTER
Input label
and Input-2.
0 Press the MENU button on the
remote control. The Main Menu
will appear on the screen.
Display
[_SelectMenuType
[]
Name the Channels
[]
are Input-1
Use the ,._DJUST buttons to
select the input you want to
name (Input-l,
Input-2). Press
ENTER.
Use the ADJUST button,_ and
the ENTER button to select
each letter in the new name.
You can name the inputs using
letters (A- Z), numbers (0 - 9),
or s)m:bols (:/. , ( ) I " # $ % &'
blank + ; < = > ? blank - ).
New name
If you press the CANCEL
button while setting the name,
you will move one position back.
You can clear the entire name
to select
ENTER
to enter
MENU
to go back
by pressing CANCEL when the
first position is seleced.
O
Getting
Started
When you are finished, press
the MENU button; the screen
will return to the "Customize
Display" menu.
57
Naming
the channels
You can name the channels your TV receives, helping
track of the many channels available. After you enter
will appear on-screen, next to the channel number.
[]
Customize
[]
Name the Input
["_-']
Select
[] Name
[]
Use Video
[]
Select
O Press the MENU button on the
remote control. The Main Menu
Display
Menu
Type
the
Channels
will appear
I
on the screen.
I
O Use the ADJUST
select "Customize
Press ENTER.
Mute
Menu Language
---_ADJUST
you keep
a name, it
buttons to
Display."
to select
ENTER
to enter
MENU
to go back
[]
Name the Channels
[]
Channel
:003
r_
New name
: ....
O You will see the "Customize
Display" screen. Use the AD,JUST buttons to select "Name
the Channels."
Press ENTER.
O
Use the ADJUST buttons,
channel controls or number
buttons to select the channel
you want to name.
ENTER.
--_ ADJUST
to enter
MENU
to go back
Name
[]
Channel
[]
New
_
to select
ENTER
[]
Use the ADJUST buttor.,s and
the ENTEP button to select
each letter in the new name.
You can use letters (A- Z),
numbers (0 -9), or symbols (:/.
, ( ) [ "#$ % &'blank+
;;< = > ?
blank - ).
the Channels
: 003
name:AB--
ADJUST
to select
ENTER
to enter
MENU
to go back
When you are setting the name,
you can clear :it by pressing the
CANCEL button when the ]eftmost position is pointed.
O
When you are finished, press
the HOME button to return to
normal
[_ Important:
Important:
58
Press
vie'_ing
The names you set will appear instead of the call letters
supplied by Extended Data Services (XDS).
being
You can name up to thirty channels. If you try to name more, the
message "Memory over!" will indicate that the memory is Kill. If
the memory is full and you want to name a zhannel, you must use
the above steps to clear the name for an existing channel.
You can
then select the new channel to name.
Chapter
3: Operating
Your TV
Using
video
mute
When you use the video mute functions, your TV will display a blue
screen whenever it is receiving a weak VCR signal or there is no
video input. If you want to try viewing a weak _,iignal, you can turn
the video mute off.
[]
Customize
[]
Select
Menu Type
[]
Name
the Input
[]
Name
the Channels
[]
Use Video
[]
Select
O Press the MENU button on the
remote control. The TV Main
Menu "will appear on the screen.
Display
Mute
Menu
] ADJUST
to select
ENTER
to enter
MENU
to go back
[]
Use Video
_]
Automatic
Off
Use the ADJUST
select "Customize
Press ENTER.
Language
Use the ADJUST buttons to
select "Use Video Mute." Press
ENTER.
Mute
i
I
] ADJUST
to select
ENTER
to enter
MENU
to go back
Getting
Started
buttons to
Display."
I
Using
select
mute
mute
the ADJUST buttons,
"Automatic"
to turn video
on or "Off' to turn video
off.
O Press the ENTER or MENU
button to return to the
"Customize Display" menu.
59
Selecting
the menu
language
This TV allows you to display tlhe on-screen
languages,
English or Spanish.
[]
Customize
[]
Select
Menu Type
[]
Name
the Input
[]
Name the Channels
[]
Use Video
[]
Select
[_
I_
60
to select
to enter
MENU
to go back
Select
English
[]
Espaflo[
O Use the ADJUST buttons to
select "Customize Display."
Press the ENTER button.
Use the ADJUST buttons to
select "Select Menu Language."
Press the ENTER button.
Menu Language
Use the ADJUST buttons to
select the language for the
on-screen inenu.
_7
ADJUST
to select
I_
ENTER
to enter
MENU
to go back:
Chapter
of two
Mute
Menu Language
ENTER
[]
in either
O Press the MENU button on the
remote control. The TV Main
Menu will appear on the screen.
Display
ADJUST
[]
menus
3: Operating
Press the ENTER or MENU
button to return to the
"Custom:[ze Display" menu.
Your TV
Selecting
the
A/V Memory
position
Your TV has four A/V Memory positions.
Each A/V Memory
position contains preset picture and sound settings to best suit the
type of program you are watching.
You can change or reset the,_e
memories as much as you like.
The four memory
"Standard"
positions
- - - normal
picture
"Music" - - - vivid picture
"Movie" - - - soft picture
'2qews" - - - optimized
are:
and sound
and lively sound
and strong
for listening
to speech
0
[]
rv
Main
[]
Menu
First Time Setup
[]
Customize
[]
Advanced
Features
[]
Select
Memory
J-_
r_7
AN
to select
ENTER
to enter
MENU
to exit menus
in news programs
Press the MENU button on the
remote conl:rol. The Main Menu
will appear
Display
ADJUST
sound
0
on the screen.
Use the ADJUST buttons to
select "Select A/V Memory."
Press ENTER.
0 You will see the "Select A/V
Memory" screen.
O Use the ADJUST
select the desired
[]
Select
[]
Standard
A!V Memory
[]
Music
[]
Movie
[]
News
]ADJUST
[]
to select
ENTER
to enter
CANCEL
to reset
MENU
to go back
buttons to
A/V Memory
position.
You can press the CANCEI,
button to reset many of the
audio and video settings; for the
selected A!V memory position to
their factory settings.
Pressing
CANCEL will not affect
changes made to volume, the
"Listen to:" function (Stereo/
SAP/Mono), speaker (off,on),
and closed captioning.
Press
the MENU button
to return
to the MAIN MENU.
Models CS-32309 and CK-32310 only -- You can also select the A/V
memory position by pressing the A/V MEMORY button on the front
panel.
[>Important:
A/V Memory positions are specific to the currently
selected input.
When you change your input, the last A/V memory position used
with that input is automatically
selected.
See "Selecting the input
source" in this chapter for information
on choosing your input.
Getting
Started
61
Selecting
the A/V Memory
position
Although the preset A/V Memory positions are designed to optimize
the picture and sound quality for different types of programming,
you can adjust individual settings (tint, treble, etc.) for any position. See "Customizing
the A2_ memory posi_ion" starting on the
next page for information
on adjusting individual video and audio
settings.
[:>Important: Closed
captioning
positions.
_Important:
62
adjustment
The "Select A/V Memory"
channels.
Chapter
3: Operating
is independent
menu
Your TV
is not avai]able
of A/V memory
after you lock
Customizing
the A/V Memory
position
You can adjust the individual video and audio settings for each of
the four preset A,n¢ memory positions to your desired picture arid
sound qualities.
This section provides descriptions
of each video
and audio setting, and explains how to adjust them for the A!V
memory positions.
See "Selecting the A/V Memory position" in this
chapter for more information.
_Important:
You can cancel any adjustments
made to an A/V Memory position
and return it to the factory settings.
See "Selecting the A/V
memory position" in this chapter for more information.
Adjusting
the picture
This section contains descriptions
for each _:ideo setting and
explains how to adjust them for the A/V Memory positions.
descriptions
of video
functions
TINT provides a scale that adjusts the proportion of red to green
the picture. This determines
the delicate tones of color.
COLOR provides
a scale that
determines
the intensity
in
of the color.
CONTRAST
provides a scale that controls the level of white-toblack in the picture. When the contrast is low, you will be able to
see the variety of shades in the darker images on the screen. Vv_en
the contrast is high, the screen's dark images will appear more
uniformly black, but this will also make the colors on the screen
seem more vibrant.
BRIGHTNESS
provides
ness of the picture.
SHARPNESS
of the picture.
provides
NOTCH FILTER
striped or checked
a scale that controls
a scale that
is used in special
patterns.
adjusts
the overall
the detail
cases tc sl;abilize
bright-
and clarity
the color of
COLOR TEMP (Color temperature)
allows you to set how the
TV will display white images. Your choices are "Low," "High," or
"Middle."
• With the "Low" setting, white images on-screen will have a
warm cast to them.
• With the "High" setting, white images on-screen will have a cool
cast to them. This setting may be the most realistic picture
under bright lighting.
• With the "Middle" setting, white images on-screen will be
balanced between the above warm and cool settings.
Getting
Started
63
Customizing
the
SKIN-TONE
A/V Memory
adds warmth
is used to control
adjusting
the
video
(cont.)
and red tones to the picture.
the closed caption
"Using the closed caption
position
decoder"
decodc_r. For details,
see
in this chapter.
functions
You can adjust the video settings for any A/V memory position
using the MENU or VIDEO buttons on the remote control. You can
adjust the _
function only by using the MENU button.
access
with
the MENU
button
O Press the MENU button on the
remote control The TV Main
Menu appears on the screen.
_©
ooo_
O O O r-,
OOO
H
O Use the ADJUST buttons to
select "Seiiect A/V Memor:y."
Press ENTER.
oooN
O
_]
Video Function
Standard
[]
Tint
[]
Color
[]
Contrast
[]_
Brightness
Sharpness
_
[]
Notch filter
: Off
[]
Color temp
[]
Skin-tone
[]
_
The four A!V memory po,_itions
appear. Select the A/V position
to adjust by pressing the
ADJUST "Jp/down buttons.
When the desired position is
se]ected, press ENTER.
0 The video s_ttings for the
selected A/V memory position
display. Use the ADJUST up/
down buttons to select the
setting to change and press
ENTER.
: Middle
: Off
: When muting
The setting .appears at the
bottom of the screen.
O
While the function is still on the screen, use the ADJUST
left buttons to adjust the function's setting.
right/
The functions will disappear
from the screen after a few seconds. You cannot adjust a function if it is not on the screen.
64
Chapter
3: Operating
Your TV
Customizing
access
the A/V Memory
with the VIDEO
position
(cont.)
button
The VIDEO button changes the video settings for the currently
selected A/V memory position.
The currently
selected A/V memory
position displays on the screen above the video adjustment
display
when you press the Video button.
See "Selecting the A/V memory
position" in this chapter.
O Press the VIDEO button until
the desired flmction displays at
the bottom ot:the screen. You
cannot select the _
function.
I1%==
While the function is still on the
screen, use tlhe ADJUST right/
left buttons to adjust the
function's setting.
The function, will disappear
from the screen after a few
seconds.
function
screen.
You cannot adjust
if it is not on the,
a
_>Important:
If you use the VIDEO button, any adjustments
made to vide()
functions are memorized
into the currently
selected A/V Memory.
position (Standard,
Movie, Music, News). To reset the video
functions to their factory settings, see "Selecting the A/V Memory"
in this chapter.
E>Important:
Pressing the ADJUST button alone in normal picture
the previous selected video or audio fimction menu.
Getting
Started
will select
65
Customizing
Using
the A/V Memory
the closed
caption
position
(cont.)
decoder
Many broadcasters
now supply closed captioning information
along
with their regular broadcasts.
Your TV can decode that information
and display it on the TV screen.
Closed captioning was initially designed so that those with hearing
difficulties could more fully enjoy viewing television. However,
closed captioning can also be used in other way% such as:
• helping children learn to read.
• learning a foreign language
• using the television without disturbing
There are two types of captioning
standard
and text.
that
others
broadcasters
can send:
Standard
captioning
is related to the prograra that is being
shown. Standard
captioning
usually follows the dialogue of tlhe
characters
on-screen.
Text captioning
often contains information such as weather or
news. Text captioning blocks out your view of the program you are
watching.
Your TV can decode four different standard
captioning
signals and
four different text captioning signals from each 'IW station. However, each station may be broadcasting
only one or two captioning
signals, or none at all.
When
setting
the decoder
you can choose to:
• display one of four standard
captioning signals (_C7:1, _--Q:2,
:3, [C-C7:4)
• display one of four text captioning
signals ([_C--]: Text 1, _]_ :
Text 2, _ : Text 3, [] : Text 4)
• display captions when muting ( U-_ : When Muting)
• turn the captions off ( [] : O_,
If you select" _ : When Muting," the standard
captioning
([] :1) will appear whenever you use the MUTE button.
signal
_>Important: If
you set the decoder to a "standard"
caption setting and tune to a
broadcaster
that is not sending a caption signal, no captions will
appear.
_>
Important:
66
The content of captions are determined
by the broadcaster.
If your
captions show strange characters,
misspellings,
or odd grammar,
it
is not a malfunction
of the TV.
Chapter
3: Operating
Your TV
Customizing
adjusting
the A/V Memory
the closed
caption
position
(cont,,)
decoder
You can access the closed caption decoder screen using the MENU
button. When adjusting the closed caption decoder, you can use the
buttons on the remote control.
O Press the MENU button on the
remote control. The TV Main
Menu will appear on the screen.
©©
O Use the ADJUST buttons to
select "S
_ elect
" "A/V Memory"
Press ENTER.
O Select the closed caption display
by pressing the ADJU_,T up/
clown buttons. Press the adjust
right or left button.
>Important:
[]
Video
Function
Standard
[]
Tint
[]
[]
Color
Contrast
[]
[]
Brightness
Sharpness
[]
[]
Notch filter : Off
Color temp : Middte
[]
[]
Skin-tone : Off
_
: When muting
If you set the decoder to a "text" setting and tune to a broadcast
that, is not sending that text signal but is sending a different "text"
signal or a "standard"
closed captions signal, a large black box: will
block your view of that channel.
If you tune to a broadcast
that is
not sending any "text" or "standard"
closed captions, your view of
the channel will not be disturbed.
Press HOME to make the black
box disappear.
_Important:
If you cannot display any captions on the screen, please keep iin
mind that not all broadcasts,
video tapes, or laserdiscs supply
closed caption signals.
Additionally,
captions might not appear if:
• you are playing a video tape that is worn or deteriorated
• you are starting to play a laserdisc from still or search mode
Getting
Started
67
Customizing
Adjusting
the A/V Memory
position
(cont.)
the sound
This section contains descriptions
for each audio setting and
explains how to adjust them for the AN memory positions.
descriptions
of audio
functions
LISTEN TO allows you to determine how your TV will receive an
audio signal and play back the sound that you hear. You can set
this function to "Stereo," "S.A.P.," and "Mono.':
• For almost all situations,
you should choose Stereo. With this
setting, the TV will play stereo broadcasts in stereo and mono
broadcasts
in mono. If a channel is broadcasting
in stereo, the
word "Stereo" will display when you tune to that channel.
• Some TV stations will broadcast
second audio program, or
S.A.P. signal. This signal is an additional soundtrack
that you
can't hear during normal TV viewing. An S.A.P. signal might be
related to the program you are watching, such as a soundtrack
in a foreign langnage, or it might be unrelated,
such as a
weather report. If a channel is broadcasting
an S.A.P. signal,
the letters "SAP" will appear on-screen when you tune to that
channel.
Choose "Listen to: SAP" to hear the S.A.P. signal.
• Use the Mono setting if you are receiving a weak audio signal.
This setting will reduce background
noise. However, with this
setting, the TV will only play in mono, even if the program you
are watching is in stereo.
BASS
controls
TREBLE
the volume
controls
of low frequency
the volume
sound.
of high fl'equency
sound.
BALANCE adjusts the level of sound between the left and right
speakers. Adjust the scale until the sound seems to come equally
from both speakers.
SURROUND
creates simulated
stereo
can set this function to "OFF' or "On."
and surround
effects.
You
• Select Off if you do not want to use any surround effects.
• Select On if you are watching a stereo program; your TV will
create a simulated
surround effect, making the sound seem to
extend around and behind you.
SPEAKER allows you to turn the TV's internal
• Choose On if you want to play the TV's sound
built-in speakers.
• Choose Off if you connected an audio system
you want to play the sound of the TV through
68
Chapter
3: Operating
Your TV
speakers
through
on or off.
the TV's
to your TV and
the audio system.
Customizing
adjusting
the AN
the audio
Memory
position
(cont.)
functions
You can adjust the audio settings for any A!V Memory position
using the MENU or AUDIO buttons on the remote control.
access
with the MENU
button
0
c=::_
0
Menu will appear
Ooo(i
ooou
OOO
,
0
OCl_G
[]Audio
Function
Standard
[]
Listen to : Stereo
[]
[]
Bass
Treble
[]
[]
Balance
Surround
[]
Speaker
: Off
The setting
on the screen.
Use the ADJUST buttons to
select "Select A/V Memory."
Press ENTER twice to ,display
the settings for the selected
audio mode.
O The four ?JV Memory positions
appear. Select the A/V position
to adjust by pressing the
,M)JUST up/down buttons.
When the desired position is
selected, press ENTER.
O
: Off
Press the MENU button on the
remote control. The TV Main
The audio settings for the
selected P.JV Memory position
display. Use the ADJUST up/
down buttons to select the
setting to change and press
ENTER.
appears at the bottom
of the screen.
While the function is still on the screen, use the ADJUST
left buttons to adjust the function's setting.
O
right/
The functions will disappear
from the screen after a few seconds. (You cannot adjust a function if it is not on the screen.)
Getting
Started
69
Customizing
Access
the A/V Memory
with the AUDIO
posi_ion
(cont.)
button
The AUDIO button changes the audio settings for the currently
selected A/V memory position. The currently selected A/V Memory
position will display on the screen above the audio adjustment
display when the Audio button is pressed.
(See "Selecting the A/V
memory position," in this chapter.)
O Press the AUDIO button until
the desired function displays on
the bottom of"the screen.
oooc
OOO_,
000_
O
While the function
is still on the
screen, use the ADJUST right/
left buttons to adjust the
fhnction's setting.
O The functions will disappear
fl'om the screen after a few
seconds. (You cannot adjust
function if it is not on t]he
screen.)
70
a
_Important:
If you use the AUDIO button, any adjustments
made to audio
functions are memorized into the currently
selected A/V Memory
position (Standard,
Movie, Music, News). To reset the audio
functions to their factory settings, see "Selecting the A/V Memory"
in this chapter.
_Important:
Pressing the ADJUST button alone while viewing a normal picture
will select the previous selected video or auciie function menu.
Chapter
3: Operating
Your TV
Using
the Advanced
Features
This section explains
features. You'll learn
• Setting
the
how to use some of the more advanced
about:
timer
• Using
the
parental
• Using
SuperQuickView
Using the Advanced
lock
Features
TM
71
Setting
the
This special
automatically
timer
feature allows you to program the TV to turn on
at a time and channel that you set. To set the timer:
O
[]
TV Main
[]
First Time Setup
Menu
[]
Customize
[]
Advanced
[]
Select
Display
will appear
on the screen.
Features
A/V Memory
] ADJUST
Press the MENU button on the
remote control. The Main Menu
O
to select
ENTER
to enter
MENU
to exit menus
[]
Advanced
[]
Set the Timer
[]
Use Parental
_"]
Use SuperQuickView
Use the ADJUST
select "Ad.vanced
Press ENTER.
buttons to
Features."
O You
will s_ee the "Advanced
Features _'screen. Use the
ADJUST buttons to select
"Set the Timer." Press ENTER.
Features
Lock
O
Use the .4D JUST buttons
and
the ENTER button to set Day
(Mon-to-Fri, Everyday, SunSat), Start time, and C,hannel.
---_ ADJUST
to enter
MENU
to go back
[]
Set the Timer
[]
Day
[]
Start
time :
If you press the CANCEl, button
while setting the timer, tlhe arrow
will move to the previous item. To
clear the timer, press CANCEL
with the arrow next to "Day."
:
:---
]-"_-'] ADJUST
[_
After setting the timer, the indicator will blink in green when the
TV is turned[ off.
: Sunday
[]Channel
72
to select
ENTER
to select
ENTER
to enter
MENU
to go back
_Important:
You need to set the TV's clock first before you can set the timer.
See "Setting the clock" in Chapter 3.
[_Important:
When the timer turns the TV on, the display will flash. If you do
not press any function buttons for about 5 minutes, the TV will
automatically
turn off. Press a function button (such as the INFO
button) to keep the TV on and turn off the flashing display.
Chapter
3: Operating
Your TV
Using
the parental
lock
This special feature allows you to lock the entfre TV during a
certain time period or lock up to ten individual channels. (You
cannot lock the TV and lock individual channels at the same time.)
When you turn on the lock, you enter a 4-digit secret code that will
allow you to turn off the lock later.
If you try to turn on a locked TV, view a locked channel, or the
locking "time period" begins, you will see a message asking you to
enter the secret code. If you don't enter the code within fiw_
minutes, the TV will turn off or tune to an unlocked channel.
If you enter the secret code, the message will ,disappear and the
lock will be turned off temporarily.
However, the TV or channels
will be locked again after you turn off the TV. This will continue
until you turn the lock off permanently.
To turn the lock off
permanently,
follow the procedure later in this section.
using
[]
Advanced
[]
Set the Timer
[]
Use Parental
r_use
Features
parental
lock
O :Press the MENU butten.
:Main Menu will appear.
Lock
The
SuperQuickView
Use the ADJUST buttons to
select "Advanced Features."
Press ENTER.
_]
_Important:
ADJUST
to select
ENTER
to enter
MENU
to go back
[]
Use Parental
[]
Lock the rv
[]
Lock the Channel
O Use the ADJUST buttons to
select "Use Parental
Lock."
Press ENTER.
Lock
]ADJUST
to select
[_
ENTER
to enter
MENU
to go back
O Use the ADJUST buttons to
select "Lock the TV" or "Lock
the Channel." Press ENTER.
If you selected
see page 74.
If you selected "Lock the Channel," see page 75.
If you turn the parental
Using the Advanced
"Lock the _FV,"
TV lock on, you cannot
Features
use the timer.
73
Using
the parental
lock
(cont.)
locking
[]
Lock the TV
[]
Secret
code
: ....
O The message
will appea:r.
The lock is now off.
Enter your personal code
using NUMBER
buttons.
Then press ENTER
to set the lock,
ENTER
to enter
MENU
to go back
[]
Lock the TV
[]
Setting
the TV
for locking the TV
O Enter a four-digit secret code
using the :lumber buttons (10-9);
then, pres,_ the ENTER button.
You can cancel the code if you
press CANCEL before you :press
ENTER.
: Off
Use the ADJUST buttons to
select a sel:ting: Off, Ahvays On,
or By Time. Press ENTER.
If you select the setting:
_--'] ADJUST to select
ENTER
to enter
MENU
to go back
"By Time"
O The cursor will move to "Lock
at." Use the ADJUST buttons to
set the time at which you want to
lock the TV. Press ENTER.
[]
Lock the TV
[]
Setting
: By Time
[]Lockat
[]
Unlock
-_---']ADJUST
I_
[_
to enter
CANCEL
to reset
MENU
to go back
Lock the TV
[]
Setting
Unlock
:12:00pm
at : 12:00 pm
-"] ADJUST
[_
74
If you set the "Lock at:" and the
"Unlock at:" times to the same
time, the lock will be in effect all
the time. This is the same as if
you had chosen "Always on" in
step _ above.
: By Time
[]Lockat
_Important:
to select
ENTER
[]
[]
Use the ADJUST buttons to set
the time a:: which you want to
unlock the TV. Press ENTER;
the screen will return to the
"Advanced Features"
menu.
:12:00pm
at : - - : - -
Press
0 When you turn on a locked TV,
or if the lock's "time peIiod;'
begins, you will be asked to enter
your four-digit secret code. Enter
the code to temporarily
disable
the lock. The lock will be enabled
again when you turn the TV off.
to select
ENTER
to enter
CANCEL
to reset
MENU
to go back
HOME to exit the menus.
The TV will be locked at all times if you set the lock by time but do
not set the TV's clock.
Chapter
3: Operating
Your TV
Using
the parental
lock
(cont.)
locking
[]
Lock the Channel
[]
Secret code
O The message for locking
channel will appear.
: ....
[]
to enter
MENU
to go back
O Enter a four-digit
using the number
press ENTER.
]ADJUST
[]
I_--1-61--[]--I_--_...
to enter
MENU
to go back
Lock the Channel
[] 003ABCD
_.-@--.
_--@...
----_ ADJUST
L_
I'o]--1-61.-_.-rs].-@._.
to enter
MENU
to go back
Repeat the steps above to lock
additional
channels. When you
are fin:ished, press the HOME
button tc, turn off the menus.
When :you try to view a locked
channel, you will be asked to
enter your four-digit secret
code. Enter the code to
to select
ENTER
You will see the channel h)ck
set up screen. Use the ADJUST
buttons to select a position.
Press ENTER.
O Use the ,_J:)JUST buttons or
CHANNEL buttons to choose
the channel you want to lock.
Press ENTER.
to select
ENTER
secret code
buttons (0-9);
You can cancel the code if you
press C A_qCEL before you press
ENTER.
Lock the Channel
[]--I_--I_--I_--_]_..
a
I
The lock is now off.
Enter ',,our personal code
using NUMBER
buttons.
Then press ENTER
to select the channels.
ENTER
the channel
temporarily
disable the lock.
The lock will be enabled again
when you turn the TV off.
Using the Advanced
Features
75
Using
the
canceling
parental
lock
or changing
Press the MENU button.
screen.
O
Select "Advanced
ENTER.
O
You will see this
screen if you
locked the TV.
[]
[]
Setting
Features"
I_
76
using the ADJUST
Lock" using the ADJUST
0
DJUST
: Off
on the
buttons;
buttons;
press
press
to enter
MENU
to go back
Press the CANCEL button to
unlock that channel, or use the
ADJUST buttons to change the
channel to a new one.
Lock the Channel
@._.
@--@--I_--_...
DJUST
to enter
MENU
to go back
If you forget your four-digit
Chapter
Press the MENU button to
return to the "Advanced Features" menu.
to select
ENTER
If you were locking tile TV, use
the ADJUST button to select
the setting "Off' to turn off the
lock.
If you were locking the channel,
use the ADJUST buttons to
place the cursor next to the
channel whose lock you want to
cancel. Press ENTER.
to select
ENTER
[]--1"5]--1"5]--15]--_...
_
DI.mportant:
The Main :Menu will appear
[_'] Lock the 7V
I'_
screen if you
locked the
channel.
lock
Enter the four digits of your secret code using the number
buttons (0-9); press ENTER.
--}
You will see this
parental
O
Select "Use Parental
ENTER.
(cont.)
3: Operating
secret
Your TV
code, please
see the Appendix.
Using
SuperQuickView
TM
SQV
SuperQuickView
allows you to cycle through a list of up to ten
numbers with the SQV button.
Use the menus to add channels to
the list or to remove channels from the list. You can also add
channels directly to the list using only the remote control's SQV
button.
customizing
QuickView
[_]
Advanced
[]
Set the Timer
[]
Use Parental
Features
I
I
Lock
[",'_ Use SuperQuickView
-----I ADJUST
[]
to enter
MENU
to go back
O Press the MENU button on the
remote control. The Main Menu
will appear' on the screen.
O Use the ADJUST
select "Advanced
Press ENTER.
to select
ENTER
I_--I_---
[5]--15]--I_---
Ib]--I_--I_--to select
to enter
MENU
to go back
[]
Use SuperQuickView
I_
003 ABCD
[_--"
I_--1-61.-I_--[] ....
0 Use the M)JUST buttons to
select a position in the list;
press ENTER.
O
ENTER
[6i--I_--I_--1_---
]ADJUST
to select
_}
ENTER
to enter
MENU
10 go back
Using the Advanced
buttons to
Features."
Use the ADJUST buttons to
select "Use SuperQuickView."
Press ENTER.
Use SuperQuickView
I_--r_--.
_ADJUST
the Superl!ist with the menus
Use the ADJUST buttons,
CHANNEL buttons or number
buttons to add a channel to the
list; pre,;s ENTER. You can
clear a channel by pressing the
CANCEL button.
O Repeat steps 0 and O to
customi:ze the SuperQuickView
memory.
O Press the MENU button
this menu.
Features
to exit
77
Using
SuperQuickView
TM
(cont.)
SQV
adding channels
directly
control's
SQV button
78
to the list with the remote
O
Use the channel controls or numbe:c buttons
the channel you want to add to the list.
to tune the TV to
O
Press and hold the SQV button fi)r about 2 seconds; the letters
"SQV" will appear under the channel number, indicating that
the channel has been added to SuperQuickView
memory in the
next available position.
_Important:
If the SuperQuickView
memory is full, the letters "SQV" will flash
when you hold the SQV button for about 2 seconds. Use the steps
on the preceding page to replace a current SuperQuickView
channel with a new channel.
_Important:
Once you've added a channel to the SQV memory, the letters "SQV"
appear under the channel number any time the channel number is
displayed, even if you tune to the channel in another manner.
Chapter
3: Operating
Your TV
_
CHAPTER
Using
the FOUR
Special
Features
In addition to the basic and advanced features explained in the
previous chapter, this TV offers several special features not generally available on ether brand TVs. This chapter will explain how to
use these distinctive features. It contains the following topics:
Understanding
the
Sleep
On-Screen
)
Using
the
)
Using
the Picture-in-Picture
Displays
Timer
(PIP)
Modes
79
Understanding
the
On-Screen
Displays
Your TV provides an on-screen summary of 1:he current settings for
the TV or cable channels, as well as the info::mation related to
Extended Data Services (XDS). XDS allows broadcasters
to supply
you with the current time, channel information
(such as call letters
and the network name), and program information
(such as the
program name and program description).
To view this information,
control.
network name
If the source of the main
picture is an antenna:
press the INFO button
023 ESPN
Stereo & SAP
SQV QV
023
program name
program description
Thursday
If the source of the main
network name
10:23 am
Input-1
S-VIDEO
picture is an input:
O23
program name
on the remote
This setting shows:
• channel number (23)
• this channers
call letters or
name
• stereo and SAP are available
• this channel is programmed
into SuperQuickView'"
memory
• PIPinput
source
• current clay of the week
• current time
This setting shows:
• the inpu_ name (Input-l)
• an S-video cable is connected
• PIP input source
• current clay of the week
• current time
program description
Thursday 10:23 am
Both displays also show where the network _]ame, program name
and program description will appear if the broadcaster
is supplying
the information
via XDS.
The on-screen
seconds.
80
Chapter
displays
will automatically
4: Using the Special
Features
die,appear
after about
10
Using
the
Sleep
Timer
This special feature allows you to set the TV r_oturn off automatically. You can set the TV to turn off after a period of time ra:aging
from 10 to 120 minutes, in ten minute intervals.
In this section you
will learn:
• Setting
• Changing
the sleep
timer
or canceling
Using the Sleep Timer
the sleep
timer
81
Setting
the
sleep
'OO
OO
timer
O
'O[_
O Press the SLEEP button on the
remote control. The sleep timer
display will appear on tlhe
screen.
hilt
c::::l a:=l
7¥ Sleep Timer
120 min.
O Select how long you want the
'I_r to stay on by repeatedly
pressing the SLEEP button.
The time will decrease in 10
minute intervals
press the button.
When you
want, stop
The sleep
disappear
each time you
reach the time you
pressing the button.
timer display will
after a few seconds.
O To view the amount of time left
in the sleep timer press the
SLEEP t)u'_ton once. The onscreen display shows the
amount of time remaining.
_>Important:
During the last minute before the TV turns off; "Sleep Timer 1
rain." will flash in red to remind you that the sleep timer is set.,
TV Sleep Timer
82
Chapter
1 min.
4: Using the Special
Features
Changing
or canceling
TV Sleep Timer
10 min.
the sleep
timer
O Press the SLEEP button on the
remote control. An on-screen
display wil[ indicate the
amount of Lime remaining
the TV turl._s off.
until
O Repeatedly
press the SLEEP
button to change the remaining
time or to cancel the sleep
timer. The sleep timer is
canceled when "- --" appears
instead of the remaining
time.
Using the Sleep Timer
83
Using
the
Picture-in-Picture
(PIP)
Modes
One of the special features of the TV is the picture-in-picture
(PIP)
mode, which allows you to view two different sources at the same
time, In this section you'll learn:
• Activating
the PIP
• Selecting
the
• Changing
channels
• Exchanging
image
• Moving
• Freezing
_>Important:
84
source
the
the
the
image
of the
while
picture
PIP image
using
of the
the PIP
PIP
image
modes
and
the
main
PIP image
PIP
image
You must have a VCR connected to the 'I_ _using Input I or Input
in order to see two different live action pictures when u,sing PIP.
Chapter
4: Using the Special
Features
2
Activating
the
PIP
image
O Select the number of the TV
channel you want to view with
the channel control.
Press
O23 ESPN
Stereo & SAP
the PIP button,
O A PIP image will appear
corner of' the screen.
in the
023
O23 ESPN
Stereo & SAP
023
O Press PIP again within 10
seconds; the PIP image will
reduce, to a smaller size.
(If you wait longer than 10
seconds the PIP image will
disappear
when you press the
PIP button.)
Press Lhe PIP button once again
to cance:L the PIP image.
_>Important:
When the main image is black and white, the PIP image
appear in black and white.
will also
E>Important:
If you move the PIP image and then turn it off, it will remain
new position when you turn it on again.
'_Important:
Do not press the PIP button
is not broadcasting.
while you are watching
Using the Picture-in-Picture
(PIP) Modes
a channel
in its
that
85
Selecting
source
of the
PIP
image
I_ Turn
your
VCR on.
Turn the PIP image
on.
O Press the PIP INPUT button on
the remote control repeatedly
until the VCR picture appears
in the P:[P image.
If you want to select a source
other than. the VCR, continue
pressing the PIP INPUT
button. The source will change
as follows:
[-_TV--_
_
INPUT-2
L>Important:
To change the main image while a PIP image is displayed, press
the input button (INPUT) on the control panel or on the remote
control.
_Important:
To see two different
channels
• connect a second tuning
shown in the connection
• use the PIP INPUT
tuning source
86
INPUT-1
Chapter
4: Using
at the same time, you must:
source (such as a VCR) to an input as
diagrams in Chapter 2 of this manual
button
the Special
j
to select the input
Features
for the second
Changing
channels
while
using
the PIP
modes
You can use the buttons on the remote control to change the
channels of both the main image and the small PIP image, as if
your TV had two tuners.
To do this:
_z::_ 0
O 0 0 r'h
oooNl
OOO_
0001.4
I_ =, _-"-i1!
o ,:::_z:, ®
0 Press the VCR channel button
(VCR CH) on the remote control
to change the channel of' the
PIP image.
O Press the CHANNEL button on
the remolse control to change
the chamm]L of the main image.
_>Important:
When the source of both the main image and the PIP image is the
TV, the VCR channel (VCR CH) button will nos change the ,channels of the main image or the PIP image.
_>Important:
You must have set up the '_VCR" layer of your remote for this
button to work correctly. (See "Using the remolse control to operate
VCRs, cable boxes and other equipment"
in Chapter 3.)
E>Important:
If you use a cable box with your VCR, do not u,_e this button unless
your VCR is able to control your cable box. Otherwise,
switch the
remote to the layer that controls your cable box and use the main
channel buttons.
Using the Picture-in-Picture
(PIP) Modes
87
Exchanging
main image
the picture
oooc
ooo_
OOO_
ooo_
Stereo
of the
023 ESPN
& SAP
the PIP
image
and the
Press the EXCH button !_oexchange the picture of thE,'main
(background)
image and the PIP
image.
Input -1
S-VIDEO
023
Input-1
Moving
PIP
image
Press the ,ad)JUST buttons
move the PIP image.
bImportant:
88
If you move the PIP image and then turn it off, it will remain
new position when you turn it on again.
Chapter
4: Using the Special
Features
to
in its
Freezing
the PIP
image
QQOC/
ooo1'-1
OOO_
0001-4
O Press the PAUSE button to
freeze the PIP image on the
screen.
O Press PAUSE
a liw_ picture.
[>Important:
.again to return
If you press the pause button while viewing a picture
image, a PIP image will appear and be frozen.
without
to
a PIP
disappears
after a
few seconds
Using the Picture-in-Picture
(PIP) Modes
89
A
CHAPTER
FIVE
Troubleshooting
Even though you're now familiar with the basic and advanced
operations
of the TV, you may run into trouble from time to time as
you become accustomed
to the TV. This chapter offers solutions to
some of the common problems you may encounter. We suggest that
you consult this chart before contacting
a Mit:subishi service
representative.
91
Troubleshooting
Problems
The remote
work.
Possible
control
doesn't
• The TV takes several
seconds to respond to button
commands.
You can't access
a channel.
You can't see a different
channel in the reduced PIP
image.
(cont.)
For More
Solutions
Check that the batteries
installed correctly.
are
Information
See "Getring ready to use
the remote control" in
Chapter 1 for an explanation
of how to install batteries.
Check that the select switch
is set to "TV."
See "Remote control buttons
and functions" in Chapter
1,
which explains where the
select switch is located.
Be sure that you are
pointing the tip of the
remote control toward the
TV from a distance of no
more than 20 feet.
See "Getting ready to use
the remote control" in
Chapter
1, which contains
pointers for using the remote
contrd.
•
Use the ENTER
avoid delays.
See "Changing channels" in
Chapter 3, which explains
the function of the ENTER
button.
•
Be sure that the channel you
want to view is programmed
into memory.
See "Memorizing
channels"
in Chapter 3, which ,explains
how to program channels
into the TV's memory.
•
Check that the TV is tuned
to the correct input source
(antenna)
for that channel.
See "Selecting the input
source" in Chapter 3, which
explains how to change the
input source.
•
Use the PIP INPUT button
to change the source of the
PIP image.
button
to
•
See "Using the Picture-inPicture (PIP) Modes" in
Chapter 4.
•
See "U,_ing the Picture-inPict_.re (PIP) Modes," in
Chapter 4.
Make sure you have a
second source, such as a
VCR, turned on and connected to your TV.
PIP image is distorted
not in color.
92
or is
•
Cycle through PIP sources
by pressing PIP INPUT
repeatedly.
Chapter
5: Troubleshooting
Troubleshooting
Problems
Possible
(cont.)
Solutions
For More
On-screen displays appear
each time you adjust a
function.
This is part of the normal
operation of the TV.
See "Understanding
the OnScreen Displays" in Chapter
4 for a thll explanation
of the
on-screen displays.
There's no sound even
when the volume is turned
Check that the MUTE
button isn't on.
See "Remote control buttons
and functions" in Chapter 1,
which explains the MUTE
button.
The TV's "Listen to:" setting
may be set to "second audio
program" (S.A.P.).
See "Adjusting the sound" in
Chapter 3, which explains
the "Listen to" setting.
Check that the "Speaker"
setting is set to "On."
See "Adjusting
Chapter 3.
up.
The sound
doesn't
match
the sound" in
the
•
The TV's "Listen to:" setting
may be set to "second audio
program" (S.A.P.).
•
See "A_justing the sound" in
Chapter 3, which explains
the "Listen to" setting.
You forget the code you used
to set the parental lock.
•
Use the alternate
procedure
that doesn't require the use
of the code.
•
See the Appendix,
"Procedu.re for Bypas,sing
the Parental Lock."
You can't program the TV to
turn on automatically.
•
The TV may be locked.
•
See "Using the parental
lock" in Chapter 3.
image on screen.
•
Information
Tt_ere is a large black
rectangle on the screen.
The TV has been set to
%ext" mode, but there is no
text information
being
broadcast.
You cannot see a picture
when you play a tape in the
VCR.
If you connected your VCR
with A/V cables, use the
INPUT button to select the
input source that the VCR is
connected to
Troubleshooting
See "Using the closed
caption ,_lecoder" in Chapter
3, or press HOME to make
the rectangle disappear.
•
See "Selecting the input
source" for an explanation
about changing the input.
93
Caution
"Warning:
care
Don't leave stationary
images on-screen for more than 10 minutes.
These images can scar the picture tube, causing permanent
damage to the TV. Some examples of stationary
images are:
•
•
•
•
•
_Important:
and
stock-market
reports
station logos (especially bright ones)
video game displays
shopping channel displays
the television's
own on-screen displays
If you plan to place speakers next to the TV, make sure they are
magnetically
shielded.
Ordinary speakers will cause distortion in
the picture due to their strong magnets.
This distortion, ihowever,
will not harm the picture tube.
For maximum enjoyment and safe operation of your Mitsubishi
Color TV, please read the "IMPORTANT
SAFEGUARDS"
carefully
and apply them properly.
Cleaning
Normally,
TV clean.
light dusting
with a non-scratching
duster
will keep your
If you want to wipe down your TV, turn it off and unplug it. Then,
wipe it gently with a soft cloth slightly moistened with water.
You can add a few drops of mild liquid detergent
to the water for
oily dirt.
DO NOT allow liquid to enter
DO NOT use strong
or abrasive
DO NOT use spray liquids
the TV through
Chapter
5: Troubleshooting
slots.
cleaners.
or cleaners
DO NOT scrub or rub the TV harshly.
94
the ventilation
directly
on the TV_s surface.
Wipe gently.
Calling
for service
If you are unable to correct a problem with your _.W',consult your
Mitsubishi dealer or Mitsubishi Authorized
W_.rranty Service
Center.
DO NOT adjust
DO NOT remove
any controls
the protective
not described
in this owner's
guide.
back cover of thi,_ unit.
If you see one of the following displays on your screen, you should
not change any settings. These are special displays used by the
factory.
3dia
CCD
: On
: On
Initial
: Off
Auto clock
: On
: Off
: 1
Hotel
Power res
: _)ff
: Off
PIP
: On
Antenna
: 1
: 2
AV MEMORY
: Off
Input
When
Initial
E2RESIET
Hotel
Power
res
Antenna
Input
When
mute
: On
mute
: 2
: On
If these displays appear, make sure that all of the on/off settings
are the same as the illustrations
above and then turn the TV off. If
any of the settings are different from the illustrations
above, 1;urn
the TV off and consult your Mitsubishi
dealer or Mitsubishi Authorized Warranty
Service Center.
Troubleshooting
95
APPENDIX
Procedure
for Bypassing
Cut along dotted
the Parental
Lock
line and file after reading.
After you set the lock, you will need the secret
code in order to:
• view a locked channel
• view the locked TV
• cancel the lock
If you forget the code, you can view the locked TV without entering
the code. To do this, simply press the buttons on your remote
labeled "QV" and "9" at the same time whenever your secret code is
requested.
_Important:
Unlocking with this procedure is only temporary.
completely, follow the procedure below:
To cancel
the lock
O
Turn on your TV. If the TV requests your secret code, press the
"QV" button and the "9" button on the remote control at the
same time.
O
Press the MENU button to view the main mena. Use the
ADJUST button to select "Advanced Features."
Press ENTER.
Use the ADJUST
ENTER.
button
to select "Use Parental
Lock." Press
0
Press the "QV" button and the "9" button on the remote
at the same time, instead of entering the code.
O
If you were using "Lock the TV," select a setting
the ADJUST button to turn off the lock.
If you were using "Lock the ChanneL"
to place the cursor next to the channel
turn off. Press ENTER.
control
"Off' using
use the .ADJUST button
whose lock you want to
Press the CANCEL button to unlock that channel, or use the
ADJUST buttons to change the channel to a new one.
Press the MENU button
menu.
[>Important:
to return
to the "Advanced
Features"
You must use the remote control included with this TV. You cannot
use a remote control from another Mitsubishi
component, and you
cannot use any "Universal" remotes from other manufacturers.
97
Index
A
A/V Components
Using the remote with ...........
A/V Memory Button ...................
A/V Memory Positions
Adjusting the picture .............
Adjusting the sound ...............
Customizing
...........................
Selecting .................................
A/V Reset Button .......................
A/V System
Adjusting color purity ............
Adjusting the picture .............
Adjusting the sound ...............
Adjusting video functions ......
Adjusting audio functions
.....
Customizing
the memory
position ...............................
Memory positions ...................
Selecting the A!V memory
position ...............................
Using external audio components ...................................
Using video mute ...................
Adjust Buttons ............................
Advanced Features
Using ......................................
Antennas
Using UHF .............................
Using VHF .............................
Audio Functions
Adjusting ..........................
68,
Balance ...................................
Bass ........................................
Descriptions
............................
Listen to ..................................
Speaker
..................................
Surround
................................
Treble .....................................
Audio Inputs ..............................
Audio Outputs ............................
41
13
63
68
63
61
13
37
63
68
64
69
63
61
61
34
59
17
71
27
27
69
68
68
68
68
68
68
68
22
22
B
Back Panel
Connections .............................
Balance ........................................
Basic Connections
......................
Bass ............................................
22
68
24
68
C
Cable TV
Using remote with ................. 40
Using with a cable box ... 26, 31
Using with an antenna .......... 28
Calling For Service ....................
Cancel Button ............................
Caution and Care .......................
Cleaning your TV ...................
Channel Controls .................. 13,
Channels
95
17
94
94
17
Adding ....................................
Changing ................................
Changing with PIP ................
Deleting ..................................
Locking ...................................
Memorizing
............................
Naming ...................................
Using QuickView
. ................
Using SuperQuickView
..49,
Using the SQV button ...........
Cleaning your TV .......................
Clock
Setting ....................................
Setting the timer. ..................
Closed Caption Decoder
Adjusting
................................
Closed Captioning
......................
Adjusting the closed caption
decoder ...............................
Standard
captioning
..............
Text captioning
......................
Color ...........................................
Color Purity
Adjusting
................................
Color Temperature
....................
Connections
Antenna ..................................
Audio inputs ...........................
Audio outputs .........................
Back Panel .............................
54
46
87
54
75
53
58
48
77
78
94
TM
TM
S-Video ...................................
TV+ cable with a cable box ....
TV+ separate UHF and VHF
antennas .............................
TV+ stereo audio system .......
TV+VCR+antenna
or cable
without a cable box ............
TV+VCR+cable
with a cable
box ......................................
Video inputs ...........................
Video outputs .........................
Consumer
Relations ..................
Contrast
.....................................
Control Panel .............................
Controls
Channel ..................................
Direction switch .....................
Front panel .............................
Locking the TV .......................
Remote control .......................
Selecting the language
..........
Index
51
72
67
66
67
66
66
63
37
63
22
22
22
22
22
26
27
34
28
31[
22
22
95
63
12
13
22
12
74
16
60
Selecting _,he menu type .........
Turning your TV on/off ..........
Understanding
the on-screen
displays ..............................
U sing the on-screen menus...
Volume .....................................
Customizing
the A/V Memory
Position ...............................
55
44
80
50
13
63
D
Degauss
Button
.........................
13
E
Enter Button ..............................
17
Espafiol .......................................
60
Extended Data Services (X_IS)
........................................
17, 80
H
Home Button
..............................
17
I
Important
Safeguards
...............
Information
Button .....................
Input Button (Front Panel) ........
Input Button (Remote) ..............
Inputs
Audio ......................................
Naming ...................................
S-Video ...................................
Selecting PIP source ..............
Selecting the input sourc.e .....
Video .......................................
3
17
13
17
22
57
22
86
45
22
L
Language
Selectirg ..................................
60
Listen-To Function
....................
68
Locking Channels
......................
75
Using the parental
lock ......... 71
Locking Your TV ........................
74
Bypassing the parental
lock.. 97
M
Memorizing
Menu
channels
.................
53
Selecting the menu langmage
Selecting the menu type ........
Menu Buttcn ..............................
Mute
Using video mute ...................
Mute Button ...............................
60
55
17
59
17
99
N
Naming the Channels ................
Naming the Input ......................
Notch Filter ................................
Number Buttons (0-9) ................
Using with a cable box ... 40, 42
Using with Mitsubishi
audio
components
........................
41
Using with Mitsubishi
DVD
players ................................
43
Using with Mitsubishi
laserdisc
players ................................
43
Using with VCRs ............ 39, 42
Using with Mitsubishi
A/V
receivers .............................
43
58
57
63
17
O
On-Screen Displays
Understanding
.......................
On-Screen Menus
80
S
Using ......................................
Operating
Your TV ....................
Outputs
Audio ......................................
Video .......................................
50
35
22
22
P
Parental
Lock
Bypassing ...............................
Canceling ................................
Changing ................................
Using ......................................
Picture-in-Picture
(PIP) Modes
See PIP
PIP
97
76
76
71
Activating
the PIP image ......
Changing channels while
using .......................................
Freezing the image ................
Selecting the source ...............
Using ......................................
Power Button (Front Panel) ......
Power Button (Remote) .............
Power/Program
Timer Indicator
Problems and Solutions .............
85
87
89
86
84
13
17
13
92
Q
QuickView
Description
.............................
Setting QuickView memory
QV Button ..................................
TM
48
.. 48
17
R
Remote Control
Buttons ...................................
Description
.............................
Functions ................................
General instructions
............
Installing batteries
................
Using to adjust audio
functions ............................
Using to adjust video
functions ...........................
100
S.A.P ...........................................
68
Select Switch ..............................
17
Service ........................................
95
Sharpness
...................................
63
Sleep Button .......................
17, 82
Sleep Timer
Changing or canceling ........... 83
Setting ....................................
82
Using ......................................
81
Sound
Adjusting ................................
68
Spanish Language
.....................
60
Speaker Function .......................
68
Special Features
................... 6, 79
SQV Button .........................
17, 78
Stereo Audio
Using external audio components ...................................
34
SuperQuickView
Customizing
...........................
77
Using ......................................
77
Using the SQV button ........... 78
Surround
....................................
68
TM
T
Timer
Setting ....................................
Using the sleep timer ............
Tint .............................................
Treble .........................................
Troubleshooting
.........................
Calling for service ..................
72
81
63
68
91
95
U
16
39
16
15
14
69
Unpacking
Your TV ...................
7
V
VCR
Using remote with ................. 41
Using with a cable box .......... 31
Using without a cable box ..... 28
64
Index
Video Controls .............................
Adjusting .................................
Brightness
...............................
Color ........................................
Color Temperature
.................
Contrast
..................................
Notch Filter .............................
Sharpness
................................
Skin-tone .................................
Tint ..........................................
Video Inputs ................................
Video Mute
Using .......................................
Video Outputs .............................
ViewPoint * Menus
63
64
63
63
63
63
63
63
63
63
22
59
22
Using .......................................
50
Volume Control .................... 13, 17
X
XDS.
See
Extended
Data
Services
MITSUBISHI COLOR TELEVISION OR COLOR MONITOR
LIMITED WARRANTY
MITSUBISHI CONSUMER
an
ELECTRONICS
authorized MITSUBISHI Audio/Video
AMERICA,
INC. ("MCEA") warrants to the original purchaser of this television or monitor it'purchased
from
Dealer that, should it prove defective by reason of improper workmanship and,'or material:
a. Picture Tube. For two years from the date of purchase at retail, we will repair or replace, at our option, any defective picture tube without charge t'or the tube.
b. Other
Parts. For one year from the date of original purchase at retail, we will repair or replace, at our option, any de_eclive part without ct=arge for the part.
c. All parts used for replacement are warranted for the remainder of the original warranty period.
d. Labor. For one year from the date of original purchase at retail, we will provide the labor for a warranty repair by an authorized MITSUB IS HI service center
without charge.
e. Notice. To obtain warranty service, you must notify an authorized MITSUB [SHI service center oI' any defect withir the applicable
I. TO OBTAIN WARRANTY
a. Contact
MCEA
your nearest
at the address
b. Warranty
territory
own expense,
charge.
SERVICE DURING THE FIRST YEAR:
authorized
MITSUBISHI
and telephone
service
customm-ily
number
will be provided
covered
warranty time period.
center,
whose
and/or
name
and address
can be obtained
from your MITSU]3ISHI
dealer
or by writing
or calling
below.
in your home or, if required,
by an authorized
or pay for any travel
service
provided
MITSUBISHI
transportation
at an authorized
service
center.
costs the service
service
shop, provided
If not, you must either
center
may charge
deliver
that your televis! on is located
your television
to and from your home.
to an authorized
Actual
service
within
the geographic
service
location
labor will be provided
at your
without
c. Proof of purchase date from an authorized MITSUBISHI Dealer is required when requesting warranty service. Present your sales receipt or other document
which establishes proof and date of purchase. THE RETURN OF THE OWNER REGISTRATION CARD IS NOT A CONDITION O]= WARRANTY
COVERAGE
However, please return the Owner Registration Card so that we ca_ contact you should a question of safety arise which could affect you.
2. AFFER THE FIRST YEAR, to obtain warranty service for a d{._fectivepicture tube, you are responsible for d_livering th,_television or monitor to an authorized
MITSUBISHI
3.
THIS
service center at your own expense.
WARRANTY
MITSUBISHI
damage;
maintenance.
4. ANY
EXPRESS
IMPLICATION
abuse
external
Consult
antenna
NOT
PARTICULAR
DAMAGES,
7. This warranty
g. BEFORE
or exclusions
gives
you
REQUESTING
specific
service
PROVIDED
SHALL
WHETHER
MCEA
of products
AND
EXCLUDED
ANY
AND
EXPRESSLY
BE LIABLE
ARISING
in electrical
purchased
on how long an implied
warranty
power.
or serviced
outside
REMEDY
WHICH,
D TO A TERM
OR ANY
OF WARRANTY,
lasts, or the exclusion
RETAIN
STREET
legal rights
CONSUMER
FOR
THIS
PROVISION,
WARRANTIE
(set-up)
MIGHT
ARISE
OTHER
PERSON
BREACH
FOE ANY
OF CONTRACT,
please
and you may also have other
review
the instruction
booklet
of authorized
ELECTRONICS
or limitation
of incidental,
INCIDENTAL,
SPECIAL
OF PURCHASE
OR
special,
or consequential
damages,
rights
which
to insure
proper
MITS UBISHI
AMERICA,
vary
from state
so
installation
Service
to state.
and correct
Cenler(s).
customer
control
adjustmerm
If you are unab e to obtain
If the problem
this information,
please
INC.
MITSUBISHI
i
FOR YOUR RECORDS
STATE
)
BY
AND
OR OTHERWISE.
SERIAL
NO.
ADDRESS
(
and user-
g OF MERCHANTABILITY
ZIP
PURCHASE
DATE
/
MO
PLACE
adjustments
freight
fiom installation,
NAME
CITY
PHONE
initial techaical
arising
OF ONE YEAR.
GA 30091-5025
CUSTOMER
all costs
than an authorized
the.. product;
may not apply to you.
SERVICE,
THIS PORTION
other
accompany
'Jser controls.
BUT
THE IMPLIED
by anyone
which
also excludes
the U.S.A.,
regarding
Po.ox 0
Norcross,
ot this product
to the instructions
This warranty
for information
TO PURCHASER
or service
contrary
DISCLAIMED.
L1MITE
OUT OF BREACH
repair
in a manner
with the product
HEREIN,
ARE
alteration,
operation
or fluctuation
furnished
persists, contact your nearest MITSUBISHI
Dealer for name(s)
,:all 1-800-332-2119,
or write us at the address below.
MITSUBISHI
by: modification,
of, the product;
instructions
PURPOSE
states do not allow limitations
limitations
caused
OF LAW, IS HEREBY
NO CIRCUMSTANCES
CONSEQUENTIAL
systems,
the operating
WARRANTY
FOR ANY
damage
to, or misuse
by acts of God such as lightning
OR OPERATION
OF FITNESS
5. UNDER
NOT COVER
physical
caused
of user controls,
required
5. Some
center;
or any damage
adjustment
Ehe above
DOES
service
/
DAY
YR
_= MITSUBISHI
MITSUBISHI
6100
Atlantic
Norcross,
CONSUMER
ELECTRONICS
AMERICA,
INC.
Blvd.
GA 30071-1305
© 1997 Mitsubishi Consumer Electronics America, Inc.
Printed in U.S.A
871C909A7