1
SEARS
Owner's
Manual
Model Nos.
14471
14475
14478
Model and Serial
Number Plate
enmore
AUTOMATIC
DISHWASHER
CAUTION: Read and follow all Safety
Rules and Operating Instructions
before first use of this product.
Sears,
Roebuck
165D3592P062
SR5561
347
CG
Printed in U.S.A.
and Co., Hoffman
Estates,
IL 60179
U.S.A.
Warranty
.Below
Important Safety Instructions
.......
3
Important Parts of Your Dishwasher
. .4
What Your Dishwasher
Needs ........
Rinse Agent Dispenser
Proper Loading
...........
..............
In
11,
User Maintenance
Instructions
5
Care and Cleaning
..............
6
Air Gap .......................
.....
13
13
t
Special Tips ..............
Operating Instructions
_ .....
...........
7-9
Detergent Dispenser .............
10
Problems and Solutions
Detergent Usage Guide
10
Sears Service ..................
Full One-Year
Dishwasher
..........
Warranty
on
For one year from the first day of use
in your home, Sears will repair, free of
charge, defects in material or workmanship
which appear in this dishwasher.
Full Ten;Year Warranty
Against
Leaks in the Tub and Inner Door
Panel
For ten years from the first day of use in
your home, if a leak should occur as a
result of failure of the tub or inner door
panel due to cracking, chipping, or peeling,
Sears will replace, free of charge, the tub
or inner door panel.
13
Color Panels ...................
14
.......
20
The model number of your automatic
dishwasher is found on the serial plate
fastened to. the tub wall just inside the
dishwasher door.
All repair parts are available for immediate
purchase or special order when you visit
your nearest Sears Service Center, or the
Service Department at most Sears
Stores. To request service or order parts
by phone, call the toll free numbers lisl,_,'l
on the back cover.
•When requesting service or ordering p -"....
always provide the following informatL.
• Product Type
• Part Number
If the dishwasher is subjected to other than
private family use, the above warranty.
coverage is effective for only 90 days.
° Model Number
Warranty service is available by
contacting the nearest Sears Service
Center/Department in the United States.
This warranty applies only while this '
product is in use in the United States.
Sears, Roebuck
and Co.,
Dept. 817WA,
Hoffman Estates,
IL 60179
This warranty gives you specific legal
rights, and you may also have other rights
which vary from state to state.
15-18
• Part Description
A WARNING:
Please follow these basic precautions, including the following:
t ,,,ad all instructions before using your
dishwasher.
• Only use detergents and rinse agents
recommended for use in a dishwasher.
• Store detergents and rinse agents in a
cooldry place out of children's reach.
• Do not tamper with controls.
• Do not operatedishwasherunlessall
enclosurepanelsare properlyin place.
• Always-disConnectelectricalpowerto
dishwasherbefore attemptingto service
it. We recommendhavinga qualified
technicianservice yourappliance.
• Remember, use dishwasherfor its
intendedpurposeonly.
• To avoid risk of electrical shock,
the dishwasher must be electrically
grounded before it is operated.
• If you did not receive Installation
instructions with your dishwasher, you
can get a copy by contacting your Sears
Service Center.
• Do not touch heating element during
or immediately after use. Allow time to
cool.
• Load sharp or pointed tableware with
handles up (points down) to avoid injury
when reaching into dishwasher.
• Load sharp items and knives so they
aren't likely to damage door seal.
• Do not sit or stand on or abuse
• Do not washplastic itemsunlessmarked
dishwasher door or dishracks.
"Dishwasher-Safe"ol:equivalent. If
• Do not allow children to play in or on
unmarked,checkmanufacturer's
dishwasher.
recommendations.
• This dishwasher must be properly
installed in accordance with the
installation Instructions before it is used.
• When discarding old dishwasher,
be sure to remove door to prevent
accidental entrapment.
r-ROUNDING
,,,iSTRUCTIONS
• Do not install the dishwasher on
• carpeted floor.
-"
_nect to a properly rated, protected
,=,_dsized power-supply circuit to avoid
electrical overload.
• This appliancemustbe connected to
a grounded metal, permanent wiring
system;or an equipment-grounding
conductormustbe run withthe circuit
conductorsand connectedto the
equipment-grounding
terminal or lead
of the appliance.
AWARNING:
The improper connection of the
equipment-grounding conductor can
result in a risk of electric Shock. Check
with a ,qualified electrician or service
representative if you are in doubt whether
the appliance is properly grounded.
WARNING:
Under certain conditions, hydrogen gas
may build up in a hot water system that
has not been used for two weeks or more.
HYDROGEN GAS IS EXPLOSIVE. To
prevent injury or damage, before using
dishwasher, turn on all hot water faucets
and allow water to run for several
minutes..This will allow gases to escape.
As the g_s is flammable, do not smoke or
use an open flame or appliance near
faucets while they are open.
NOTE: Do not_store or use combustible
materials, gasoline or other flammable
vapors and liquids in the vicinity of this
or any other appliance.
SAVE THESE
3INSTRUCTIONS
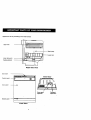
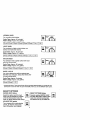
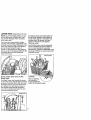
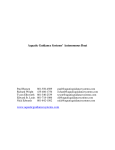
Appearancewill varyaccordingto the model number
Upper rack
;i
_
I
Washtower
__
Lowersprayarm
Lowerrack
Heatingelement
Right
Side
View
Door latch
Control panel
_,..,."_.,,,.
JI
Inner
@
Door,
...............
Door panel
Rinse agent
dispenser
°.
Bottom panel
r
Front
View
Detergent
dispensers
"
_ Water
.. _letdishesclean and dry you need hot
water.To help you get water of the proper
temperature;your dishwasher
automaticallyheats the water in the wash
cycle.Higherwater temperatureis needed
to dissolvegrease and activatepowder
detergents.For good washingand drying,
the enteringwater must be at least 120°F.
To preventdishdamage, inletwater
shouldnot exceed 150_F.
Water
Conditions
In areas where water is very hard (12
grains or more), it may be necessaryto
•installa "watersoftenerto assure proper
performancefrom your dishwasher.If you
do not knowthe hardnessof yourwater
supply,contactyourlocalwater
departmentor bringa sample intoyour
Sears storefor testing.
Checkyour watertemperaturewith a
candy or meat thermometer.
Turnon the hot water faucet nearestthe
dishwasher.Put the thermometerin a
glass and let the water run continuously .Detergents
intothe glass untilthe temperaturestops Only use detergentslabeled for use in
rising.
automaticdishwashers.NEVER use
Do not operatethe dishwasherduringor
laundrydetergents,liquidsoaps or other
rightafterother heavy use of hot water,
householdcleanersin yourdishwasher.
suchas for laundry or bathing..
Some detergentswillbe more effective
with yourwater conditionsthan others.
Water Pressure
Store detergentin a cool, dry place.
Water supplypressuremustbe between
15 and 120 poundsper square inch.To
determineif you have enoughpressure,
put a 1 quart containerunder a fully
ed hot waterfaucet nearest the
_,..washer. If the container fillsin less
th^n9 seconds,water pressureis within
_.ceptablerange. Be sure all other
faucets are turned off duringthis test.
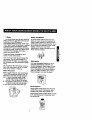
Rinse Agents
Rinseagents make water flow offdishes
quickerthan usual.This lessens water
spottingand makesdryingfaster,too.
Rinseagents come in eitherliquidor solid
form.Yourdishwasher'sdispenseruses
the liquidlorm.
Most utensils and dishware can be safely
washed in your dishwasher. However,
some materials may require special
handling.
Aluminum: Some darkening may take
place. Colored aluminum may fad.e. Do
not place aluminum items directly in front
of detergent dispensers where contact
with undissolved detergent could cause
pitting, spotting or discoloration.
Cast Iron: Cast iron utensils should be
handwashed.
China: Antique, hand-painted china and
those with gold or platinum rings should
be handwashed.
Crystal: Load carefully in upper rack
only. To prevent chipping, items should
not touch. Handwash delicate items.
Select NO HEAT DRY option to air-dry
crystal items.
Flatware: Sterling, silverplate and
stainless steel are normally dishwasher
safe. Flatware with dark decorative
shading and/or non-metallic handles
should be handwashed.
Pewter: Pewteror pewter-like materials
should be handwashed.
Plastic: Plastic items should be placed in
upper rack only. Wash only those items
marked "Dishwasher Safe."
Wood: Wood items should be
handwashed.
Glass: Milk glass should be handwashed.
Non-Stick Coatings: After washing, wipe
the non-stick coating area with vegetable
oil to keep it from losing its non-stick
quality.
Non-Dishware Items: DO NOT wash
items such as electronic air cleaner filters,
furnace filters and pa.int brushes in your
dishwasher. Damage to dishwasher and
discoloration or staining of dishwashei"
may result.
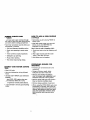
nearance
may vary
_11111111111
I
wJb_llXnJtv
POTS N0nM_L Ur_T WATI3
RUd
WASm W/din _
WATEIt NOk_tT MSt'T
HEM
m
mmmmm
mmm
_LAV
•
g
oft
PtAI1E
Wml
V
,==.=%.0=.
\
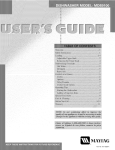
STARTING
: 1 $T_UlT
YOUR
• Load the dishwasher
and 12).
DISHWASHER
If you plan to use the PLATE WARMER
option (which is for warming clean dishes
•and plates for the serving of hot foods),
follow these steps:
(see pages 11
• Add detergent (see page 10).
• Close the door but do not latch it.
1. Load Clean dishware to be warmed.
2. Make sure NO HEAT DRY is not
selected.
• If dishwasher drains into a food waste
disposer, operate disposer until it is
empty.
3. Be sure the door is unlatched.
• Turn on hot water faucet nearest
dishwasher and let it run until the water
is hot.
4. Slowly turn the Dial to PLATE
WARMER.
• Push selector buttons for desired cycles
and options.
When NOT using WASH DELAY
• For all cycles but RINSE & HOLD,
slowly turn the Dial to START. Then latch
door to start the dishwasher.
• ,,you plan to use the RINSE & HOLD
_le, push the NORMAL WASH button
J turn the Dial to the desired cycle.
Then latch the door to start the
dishwasher.
SELECT
THE
5. Latch door to start the cycle.
• Slowly turn the Dial to START for the
NORMAL WASH cycle. Then latch the
door to start the dishwasher.
When using WASH DELAY (for all cycles)
• Slowly turn the Dial to desired delay
time (up to 5 hours). Then latch the door
to start the timer.
• The DELAY light will come on and stay on
until the dishwasher starts automatically
at the end of the selected delay time.
CYCLE
WAIm O_4V
For heavily soiled dishes and pots and pans.
_
Cycle Time: Approx. 95 minutes*
Water Usage: Approx. 9.3 gallons
m
"-
,' '
,_,
* Unex_'ended times. These cycle times will be increased approximately 21 minutes
for your dishwasher to heat the water for good washability when you use the WATER
HEAT option.
7
I _r&ql
.O MA'W,S.I'll
_H OIlY
For normally soiled dishes.
,.-
Cycle Time: Approx. 95 minutes*
Water Usage: Approx. 8.0 gallons
,
2 t ST_
I
2'
I
For prerinsed or lightly soiled dishes and
dishes
have been stored.
LIGHT that
WASH
Cycle Time: Approx. 95 minutes*
Water Usage: Approx. 6.7 gallons
WATER MISER
For tableware that is lightly soiled with fresh
soils and is prerinsed.
Cycle Time: Approx. 95 minutes*
Water Usage: Approx. 5.4 gallons
RINSE & HOLD
For rinsing dishes that will be washed later.
DO NOT use detergent. Select NO HEAT DRY
no-heat drying option.
Cycle Time: Approx. 9 minutes
Water Usage: Approx. 2.6 gallons
* Unextended times. These cycle times will be increased approximately 21 minutes for your
dishwasher to heat the water for good washability when you use the WATER HEAT option.
SELECT
OPTIONS
RESET OPTIONS Button
WATER HEAT Option
Select this option and the main wash cycle is extended 21 minutes
while the dishwasher heats the
water for good washing and drying.
NO HEAT DRY option
Turns heater off for entire drying
period. ,To shorten drying time,
open dishwasher door slightly.
Cancels selected WATER HEAT ,
and NO HEAT DRY options. Main
wash time will not be extended,
and dishes will dry in heated air.
[-'_-I
8
I--'-']
.4ORMAL
P "UNDS
SIGHTS
HOW TO ADD A DISH
A CYCLE
AND
.ou'll see water vapor coming through
the vents by the door latch during drying
and when water is being pumped out.
DURING
• Add dishes any time during RINSE &
HOLD cycle.
• You'll hear occasional sounds while your
dishwasher is running:
• With other wash cycles, you can add
dishes at any time BEFORE the
detergent cup has opened.
• Soft food disposer shredding action.
Here's how to add a forgotten dish:
• Drain valve opening to pump water
out.
1. Push door latch to the left. Washing will
stop.
• Timer control as cycle progresses.
2. Wait a few seconds until the water
calms. Then open the door.
• Detergent cup opening.
3. Add dishes you've forgotten.
• Pump motor starting.
• The motor stops during drying.
PREPARING
WASHING
ENERGY
TIPS
AND
WATER
SAVING
• Wash full loads.
• Use your dishwasher
hours.
during off-peak
DISHES
FOR
• Prerinsing of normal food soil is not
necessary.
• Scrape off bones, seeds, skins,
toothpicks and other hard soils.
• Use the LIGHT WASH cycle whenever
possible.
• Remove hard shelled vegetables,
meat trimmings, leafy vegetables, and
excessive amounts of oil or grease.
:lect COOL DRY option when you
=on't need dry dishes in a hurry.
• Remove foods with high acid content-they can discolor stainless steel.
n't prerinse normally soiled dishes.
• Load correctly to ensure good washing
action.
• Remove large quantities of any food.
• When using the POTS PANS cycle, less
preparation is required. This cycle can
wash heavily-soiled dishes and remove
dried-on and baked-on soils from pots,
pans and casseroles. However, items
with burned-on soils may not come
clean. ;
You'llfind twodetergentdispenserson
the insidedoorof yourdishwasher.
Always close the main cup tightly.Wh_"
is firmly latched you will hear a clickin_
sound. It is not necessary to overtighten.
Open cup
!
cup
Close the main cup..
Do not add detergent until you are ready
to start the cycle. Use fresh detergent.
The dispenser will automatically release
detergent at the correct times during the
cycle.
Detergent
Cycles
NOTE: To openthe detergentdispenser
afterit has been closed,unlatchthe door
and rotatethe Diala full turn tothe OFF
position.When the closedcupcontains
soap it is bestthatthe doorbe in a
partiallyopenpositionbeforerotatingthe
Dial.Thiswillhelp reducethe amountof
detergentand rinseaid agent spillageinto
the tub.
Usage Guide (powder or liquid)
Moderately
Soft Water
Hard Water
(0 to 3 grains) (4 to 8 grains)
LightWash
"
Hard Water
(9 to 12 grains)
Very Hard Water
(over 12 grains)
Pots Pans
NormalWash
Main Cup
1 tablespoon
Each Cup
1 tablespoon
Main Cup
Half Full
Each Cup
Half Full
Main Cup
CompletelyFull
EachCup
CompletelyFull
Water Softener
Recommended
WaterSoftene""
Recommendo
Rinse& Hold
No Detergent
No Detergent
No Detergent
Water Softener
Recommended
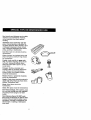
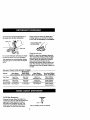
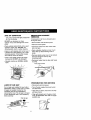
To fill the
dispenser:
Unscrew the cap. Note the FULL line
on the tip of the cap. Add the liquid rinse
agent until it just reaches the top of
the FULL line. Replace the cap. The
dispenser automatically releases the
rinse agent into the final rinse water.
• Full/_
Fill as needed, but do not overfill
10
JPPER
RACK
(appearance
will vary)
• upper rack is best for glasses, cups
• saucers. Cups and glasses fit best
along the sides• This is also the place for
dishwasher-safe plastics. Make sure small
plastic items are lodged in tightly so they
can't fall onto the heating unit. Arrange
stemware so that it cannot move easily.
Don't let the glasses touch each other•
The upper rackis handy for all kindsof
odd shapes.Saucepans,mixingbowls
and otheritems shouldbe placedface
,n.When loadingdishwasher-safe
, .stics make sure each plasticitem is
_'-",Jredover two fingers. This willinsure
i washingresults.
11
LOWER
RACK
(appearance
will vary)
NOTE: Do not load large platters or trays
in front right corner of lower rack. They
mayprevent detergent from circulating
in the wash cycle.
-I:he lower rack is best used for plates,
saucers, and cookware. Large items such
as broiler pans and racks should go in the
lower rack along the edge. Load platters,
pots and bowls along the sides, in
corners, or in the back. For best washing
results, all items should be positioned with
the soiled side of the dish facing the
center of the rack.
Put flatware in the removable basket W,;'"
fork and knife handles up to protect yo,
hands. Place spoons in the basket with
handles down. Mix knives, forks and
spoons so they don't nest together.
Distribute evenly.
Small plastic items, such as measuring
spoons and lids from small containers,
are not recommended for automatic
dishwashing. If placed in dishwasher, they
should go in bottom of utensil basket with
silverware on top.
Utensil basket
Keep
lower
center
rack.
area
clear
in the
The Wash Tower rises through the center
of the lower rack during the wash and rinse
portions of the cycle. Don't block it or load
tall things next to it. Also, be careful not to
let a portion of an item such as a pot or
dish handle extend through the bottom
rack. This could block the wash arm and
cause poor washing results.
CAUTION
Take out anything
that may fall or
extend through the
bottom of the utensil basket.
Wash Tower
12
;ARE
OF SURFACES
'can control panel with lightly dampened
ath. Dry thoroughly.
DO NOT use abrasives or sharp
objects--they could damage the control
panel.
• Clean outside cabinet finish with a good
appliance polish wax. DO NOT use
scouring pads, harsh or gritty cleaners.
• Interior is self-cleaning with normal use. If
it should ever need cleaning, use a mild
cleansing powder. If hard water causes
lime build-up, clean as follows:
Ipour 2 cups white vinegar into empty
dishwasher. DO NOT use detergent.
IOperate
cycle.
machine on NORMAL WASH
PROTECTION
FREEZING
AGAINST
If dishwasher is left in an unheated place
during the winter:
• Shut Off water and electrical power.
• Remove access panel.
• Disconnect water lines from valve. Drain
into a flat pan,
• Drain collection chamber at rear of unit
below filter by disconnecting hose to
pump.
• Remove plastic pump cover in tub bottom
and use sponge to soak up any
remaining water.
• Reconnect water lines to valve and hoses
to pump.
Pumpcover screws
PREPARATION
FOR
MOVING
UARE OF AIR GAP
• Disconnect electrical power.
If an air gap was installed for your built-in
dishwasher, check to make sure it is clean.
Ai r gaps are usually mounted on the
countertop and can be inspected by
removing the cover. The air gap is not part
of your dishwasher and is not covered by
Sears warranty.
• Turn off water supply, disconnect water
and drain lines.
• Tape racks in place; close door securely
and tape it shut.
• Wrap with blankets and, if using a hand
truck, li!t dishwasher from side in upright
position only
Drain air gap
13
OPTIONAL
ACCESSORIES
You can change the door and lower
access panel appearance of your
dishwasher by ordering one of these
optional accessories:
• Color Panels
'
• 1/4" Wood Panel Trim Kit
These accessories
!
are available from:
Dri-View Manufacturing
4706 AIImond Avenue
Louisville, KY 40209
Specify accessory number when ordering.
DESCRil=TIONS
OF OPTIONAL
ACCESSORIES
Color Panels-- Replacement door and
lower access panels are available in the
following colors:
GPF400A (Almond)
GPF400B (Black)
GPF400W (White)
Wood Panel Trim-Kit--This
accessory
contains trim and instructions for you to
supply and install a 114" thick decorative
wood door and lower access panel:
22-16071 (White)
22-16075 (Black)
22-16078
(Almond)
NOTE: The 22°16072 dishwasher door
spring kit must also be ordered and
installed when the door panel weighs
four Ibs. or more.
14
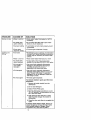
CAUSED
,shwasher
will not start
• Dishwasher not
receiving electricity
•Check house fuse or circuit breaker.
• Dial not in correct
position for cycle
selected
• Make sure Dial is turned far enough and
cycle button is fully pushed in.
• Turning the Dial
too far
• Turn Dial to START. Be careful you do not
turn the Dial any farther than necessary.
There is a delay between start-up and water
fill so you will not hear any wash action
right away.
•Turningthe Dial
too far
• See the solution above.
• No water supply
• Make sure water supply valve under sink is
turned on.
• Water inlet valve
clogged
• Water valve supply line may be clogged with
sediment. Clean out.
Unusual noise
• Improper loading
• Utensils may not be secure on rack pins,
or something small may have dropped from
the rack. Water is causing utensils to rattle.
Make sure everything is securely placed
in dishwasher.
Dishwasher
leaks
• Dishwasher not
level
• Level dishwasher as described in Installation
Instructions. Don't place dishwasher on carpet.
• Too much sudsing
• Improper detergent. Use automatic
dishwasher detergent only or try a
different brand or less detergent.
Dishwasher will
not fill with water
BY
SOLUTION
-'qOBLEM
• If hand dishwashing detergent is used by
mistake, pour one measuring cup of
vegetable oil in bottom of tub and run
dishwasher through a complete NORMAL
WASH cycle with recommended amount of
automatic dishwashing detergent.
• To remove suds from tub: Open dishwasher.
Let suds evaporate. Add 1 gallon of cold
water to tub. Close and latch dishwasher.
Pump out Water by slowly turning Dial until a
drain period is reached. Repeat if necessary.
• Spilled rinse agent
• Spilled rinse agent can cause foam during
washing. This can lead to overflowing. Wipe
up accidental spill of rinse agent with a
damp cloth.
•Dishwasherdoor
interfereswith
surrounding
cabinets
• Make sure door does not touch cabinets
when opening or closing. Use levelling legs
to level dishwasher.
15
PROBLEM
CAUSED
Dishes not dry
•Water is not hot
• Raise water heater thermostat to 140°F if
necessary.
• NO HEAT DRY,
option selected
• Do not select NO HEAT DRY option.Allow
dishes to dry in heated air.
• Improper Ioadir_g
• Load dishes so items drain properly. Avoid
overloading.
• Rinse agent
dispenser empty
• Fill rinse agent dispenser if empty.
• Hard water
• Fill detergent cups to capacity. Use dishwasher
detergent with highest available phosphorous
content. May be necessary to install a water
softener
• Water is not hot
• Raise water heater thermostat
• NO HEAT DRY
option selected
• Drying without heat may cause some
spotting. Do not select NO HEAT DRY option.
• Not enough or
poor quality
detergent
• Use more fresh automatic dishwasher
detergent. Use detergent with highest
available phosphorous content,
especially if you have hard water.
• Old detergent
• Use only fresh, automatic dishwasher
detergent. Store tightly closed in a coot, dry
place. Discard old, lumpy or separated
detergent. Do not fill detergent dispenser
until ready to wash.
• No rinse agent
• Fill rinse agent dispenser.
Spotting and
filming
BY
SOLUTION
to 140°F.
To remove stubborn spots and film from
glassware:
1. Remove all metal utensils from the
dishwasher.
2. Do not add detergent.
3. Select POTS PANS cycle.
4. Start the dishwasher and allow to run for
18 to 20 minutes. The dishwasher will now
be in the main wash.
5. Then open the door and pour 2 cups
(500 ml) white vinegar into bottom of
dishwasher.
6. Close the door and allow to complete the
cycle.
If vinegar rinse doesn't work: Repeat as
above, except use 1/4 cup (60 ml) of citric
acid crystals instead of vinegar. (Most
drugstores carry citric acid crystals.)
16
' _ROBLEM
CAUSED
{ching--i permanent
filming which
cannot be
removed
,Too much
detergent
in soft water
• Reduce amount of dishwasher detergent.
Use detergent with lower phosphorous content.
• Improper loading
• Make sure dishes and glassware are loaded
properly to permit water spray to rinse all
surfaces. Do not overload.
• Normal amount of
water
• It is normal for a small amount of clean water
to remain in bottom of tub after each cycle.
Water left
in bottom
of tub
BY
SOLUTION
• Clean the drain air gap. See User
Maintenance Instructions.
°
Dishes and
interior of
dishwasher
brown or yellow
• Iron or manganese
in water
• Install an iron or manganese filter in home
water supply.
Film build-up on
lower front of tub
• Some detergent
did not dissolve
• Use fresh, automatic dishwasher detergent.
Use detergent with highest available
phosphorous content, especially if you have
hard water. Raise water heater thermostat to
140°F if necessary. Run water at sink until hot
before starting dishwasher. Remove film with
dishwashing detergent and warm water.
Silverware
stained
• Undissolved
detergent contacting
wet silverware
• Avoid spilling dry detergent on wet
silverware. Clean with silver polish.
• Acidic or salty
food soils
• Use RINSE & HOLD cycle. Certain foods left
on silverware for extended periods of time may
cause pitting.
.Silver plate worn
off exposing base
metal--takes on
bronze hue
,Remove tarnish with silver polish
,Metal utensils
rubbing against
dishes during wash
•Load metal utensils so they do not rub against
dishes. Marks may be removed with mild
abrasive cleanser and plastic scouring pad.
"°onze tarnish
; silver plate
Black or gray
marks on dish
Dishware chipped • Improper loading
ior broken
Dishwasher odor
• Do not overload. Load glasses in upper rack
only. See Lopding section for tips.
,Soiled dishes held
too long in
dishwasher
,Use RINSE & HOLD cycle if dishes will not be
washed at end of day.
• Vinyl rack coating
•Plastic odorwill be gone after severalweeks use.
17
PROBLEM
CAUSED
BY
Motor hums
• Dishwasher has
not been used on
a regular basis
!
Staining of
tub interior
SOLUTION
• If you do not use your dishwasher often,
set it to fill and pump out once every week.
This will help keep the seal moist and the
garbage disposer clear.
• Some detergents
contain colorant
(pigment or dyes)
•This will discolor the tub interior with extended
use. Check the detergent dispenser for signs
of any discoloration. If dispenser is discolored,
change to detergent without any colorant.
• Some tomato-based
foods can stain
• Using the RINSE & HOLD cycle after adding
dish to the load can decrease the level of staining.
Vapor at the
vent
• This is a normal occurf'ence.
• Water vapor comes
through the vent by
the door latch during
drying and when
water is being
pumped out
Detergent cup
lid won't latch
after adding
detergent
• Dial not in OFF
position
• Dial must be in OFF position for cup lid to
close and latch properly. If you unlatch the
door and open it to dryyour dishes, the Dial
does not advance to OFF by itself.
18
NOTES
19
For the repair or replacementparts you need
delivereddirectlyto your home
Call7 am - 7 pro, 7 days a week
1-800-366-PART
(1-800-366-7278)
|
For in-homemajor brandrepair service
Call 24 hours a day, 7 days a week
1-800-4-REPAIR
(1-800-473-7247)
For the location of a
Sears Parts and Repair Center in your area
Call 24 hours a day, 7 days a week
mINmNm
mmmmmm
1-800-488-1222
For informationon purchasinga Sears
MaintenanceAgreementor to inquire
aboutan existingAgreement
call 9 am - 5 pm, Monday-Saturday
_,_,4_
1-800-827-6655
Whenrequestingserviceor ordering
parts, always providethe following
information:
• ProductType
• Model Number
• Part Number
• Part Description
2O
SEARS
America's Repair Specialists