1
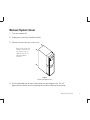
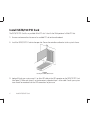
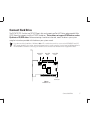
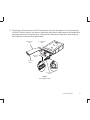
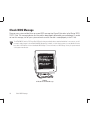
SATA /150 PCI CARD
Installation Guide
P/N: 20237700
Maxtor Corporation
500 McCarthy Blvd., Milpitas, California 95035 USA
Part Number
20237700
Copyright
Copyright © 2003 Maxtor Corporation. All rights reserved. Changes are periodically made to the information herein which will be incorporated in
revised editions of this publication. Maxtor may make changes or improvements to the product(s) described in this publication at any time and
without notice. MaxBlast is a trademark and Maxtor is a registered trademark of Maxtor Corporation. All other brands or products are trademarks
or registered trademarks of their respective holders.
FCC Declaration of Conformance
This device complies with part 15 of the FCC Rules. Operation is subject to the following two conditions: (1) this device may not cause harmful
interference, and (2) this device must accept any interference received including interference that may cause undesired operation.
Contents
Getting Started . . . . . . . . . . . . . . . . . . . . . . . . . . . . . . . . . . . . . . . . . . . . . . . . 1
Handling Precautions . . . . . . . . . . . . . . . . . . . . . . . . . . . . . . . . . . . . . . . . . . . . . 1
Included in this Kit . . . . . . . . . . . . . . . . . . . . . . . . . . . . . . . . . . . . . . . . . . . . . . . . 1
Back Up Your Data . . . . . . . . . . . . . . . . . . . . . . . . . . . . . . . . . . . . . . . . . . . . . . . 2
About Serial ATA . . . . . . . . . . . . . . . . . . . . . . . . . . . . . . . . . . . . . . . . . . . . . . . . . 2
Tools Required . . . . . . . . . . . . . . . . . . . . . . . . . . . . . . . . . . . . . . . . . . . . . . . . . . 2
Remove System Cover . . . . . . . . . . . . . . . . . . . . . . . . . . . . . . . . . . . . . . . . . 3
Install SATA/150 PCI Card . . . . . . . . . . . . . . . . . . . . . . . . . . . . . . . . . . . . . 4
Connect Hard Drive . . . . . . . . . . . . . . . . . . . . . . . . . . . . . . . . . . . . . . . . . . . . 5
Connecting a SATA Hard Drive . . . . . . . . . . . . . . . . . . . . . . . . . . . . . . . . . . . . . . 6
Connecting an Ultra ATA Hard Drive . . . . . . . . . . . . . . . . . . . . . . . . . . . . . . . . . . 8
Check BIOS Message . . . . . . . . . . . . . . . . . . . . . . . . . . . . . . . . . . . . . . . . . 10
Install Windows Driver . . . . . . . . . . . . . . . . . . . . . . . . . . . . . . . . . . . . . . . . 11
Existing Windows 98 Installation . . . . . . . . . . . . . . . . . . . . . . . . . . . . . . . . . . . 11
New Windows 98 Installation . . . . . . . . . . . . . . . . . . . . . . . . . . . . . . . . . . . . . . 12
Existing Windows Me Installation . . . . . . . . . . . . . . . . . . . . . . . . . . . . . . . . . . . 14
New Windows Me Installation . . . . . . . . . . . . . . . . . . . . . . . . . . . . . . . . . . . . . 15
Existing Windows 2000 Installation . . . . . . . . . . . . . . . . . . . . . . . . . . . . . . . . . 17
New Windows 2000 Installation . . . . . . . . . . . . . . . . . . . . . . . . . . . . . . . . . . . . 18
Existing Windows XP Installation . . . . . . . . . . . . . . . . . . . . . . . . . . . . . . . . . . . 19
New Windows XP Installation . . . . . . . . . . . . . . . . . . . . . . . . . . . . . . . . . . . . . . 20
Confirm Driver Installation . . . . . . . . . . . . . . . . . . . . . . . . . . . . . . . . . . . . 22
Windows 98 . . . . . . . . . . . . . . . . . . . . . . . . . . . . . . . . . . . . . . . . . . . . . . . . . . . 22
Windows Me . . . . . . . . . . . . . . . . . . . . . . . . . . . . . . . . . . . . . . . . . . . . . . . . . . 22
Windows 2000 . . . . . . . . . . . . . . . . . . . . . . . . . . . . . . . . . . . . . . . . . . . . . . . . . 23
Windows XP . . . . . . . . . . . . . . . . . . . . . . . . . . . . . . . . . . . . . . . . . . . . . . . . . . . 23
Getting Help . . . . . . . . . . . . . . . . . . . . . . . . . . . . . . . . . . . . . . . . . . . . . . . . . . . 24
Warranty . . . . . . . . . . . . . . . . . . . . . . . . . . . . . . . . . . . . . . . . . . . . . . . . . . . . . . . 25
Getting Started
Thank you for selecting a Maxtor SATA/150 PCI Card. This installation
guide will lead you through the installation of your new card.
Maxtor SATA/150
PCI Card
SATA Interface Cable
(not included in all kits)
If you encounter any difficulties with installation, please visit us online
at www.maxtor.com and click on Support.
Figure 1 shows the components included in the standalone SATA/150
PCI Card kit. Cards included with Maxtor hard drive kits may not
include all of the components shown. To install the drive, you will need
the tools shown in Figure 2 on page 2, including a full version of your
operating system.
Max•Blast ™
Driver CD or
Diskette
SATA Power
Adapter Cable
(not included in all kits)
This Installation
Guide
Figure 1
Included in this Kit
Handling Precautions
Adapter cards are sensitive to electrostatic discharge (ESD)
damage. Handle the adapter card by its sides. Do not touch the
printed circuit board assembly.
Do not connect/disconnect any cables when the system power
is on.
Do not force or rock the adapter card connectors into or out of
their connection sockets.
Getting Started
1
Back Up Your Data
Protect your data by backing up existing hard drives before installing
your new Maxtor SATA/150 PCI Card.
System Man
ual
About Serial ATA
Serial ATA (SATA) technology offers you the following benefits:
•
•
•
•
System User Manual
World’s fastest ATA interface
Ideal for high-performance RAID
Thin, easy-plug cable design for improved airflow
Simple, no-jumper installation
Unlike standard ATA drives, Serial ATA drives do not require the use
of jumpers to install the drive.
Operating System
CD and Boot Disk
Visit www.maxtor.com and click on Support for the latest SATA
information and software updates.
Philips Screwdriver
Small Needle-Nose Pliers
Figure 2
Required Tools
2
Getting Started
Remove System Cover
1. Turn your computer off.
2. Unplug your system from the electrical outlet.
3. Remove the cover from your system case.
Refer to your system user
manual for instructions on
removing the cover, or
obtain the services of a
qualified installation
technician.
Figure 3
Removing the System Cover
4. Attach a grounding strap or touch a metal portion of your computer case. This will
ground you to minimize the risk of exposing the hard drive to electrostatic discharge.
Remove System Cover
3
Install SATA/150 PCI Card
The SATA/150 PCI Card fits any available 32-bit PCI slot. It also fits the 32-bit portion of a 64-bit PCI slot.
1. Unscrew and remove the slot cover of an available PCI slot on the motherboard.
2. Install the SATA/150 PCI Card into the open slot. Secure the controller card bracket to the system’s frame.
Figure 4
Inserting the SATA/150 PCI Card
3. (optional) Attach your system case’s 2- or 4-pin LED cable to the LED connector on the SATA/150 PCI Card
(see Figure 5). Make sure that pin 1 on the connector is aligned with pin 1 of the cable. Consult your system
case manual for more details on the LED connections for your case.
4
Install SATA/150 PCI Card
Connect Hard Drive
The SATA/150 PCI Card has two SATA/150 ports that each support one Serial ATA drive and one parallel Ultra
ATA/133 port that supports two Ultra ATA/IDE hard drives. The card does not support ATAPI devices such as
Zip drives or CD/DVD drives. Before connecting a hard drive to the card, mount the drive in your system
using the instructions provided with the drive or your system manual.
If you have an existing installation of Windows 2000 or XP on a drive that you wish to connect to the SATA/150 PCI card, DO
NOT connect the drive to the card yet. Leave the drive attached to its current controller. You must install the Windows driver for
the SATA/150 PCI Card before connecting your hard drive to the card. See Install Windows Driver on page 10 for details.
Serial ATA
Port 2
Ultra ATA
Port 3
Serial ATA
Port 1
LED
Connector
Figure 5
Available Ports
Connect Hard Drive
5
Connecting a SATA Hard Drive
Each of the two SATA/150 ports on the SATA/150 PCI Card supports a single SATA hard drive. To connect
a SATA drive to the card:
1. Attach one end of a SATA interface cable to one of the SATA connectors on the card.
(See Figure 5 on page 5.)
2. Attach the other end of the SATA interface cable to the SATA connector on the rear of the hard drive.
SATA Interface
Cable
Power Supply
Cable
SATA
Figure 6
Attaching Cables to SATA Drive with 4-pin Power Connector
6
Connect Hard Drive
3. Your Serial ATA drive should be equipped with a 4-pin legacy power connector or a 15-pin SATA power
connector. If the drive has a 4-pin legacy connector (as shown in Figure 8), connect an available 4-pin power
plug from the system power supply to the drive as shown. If the drive has only a 15-pin power connector,
use a SATA power adapter cable (not included in all kits) to convert a 4-pin power plug from the power
supply into a 15-pin plug. Then attach the 15-pin plug to the 15-pin power connector on the drive.
If your drive has both 4-pin and 15-pin power connectors, do not attach power cables to both connectors;
powering both connectors simultaneously will damage the drive.
Connect Hard Drive
7
Connecting an Ultra ATA Hard Drive
The SATA/150 PCI Card has one Ultra ATA/133 port that supports up to two Ultra ATA/IDE hard drives on a
single 80-conductor, 40-pin Ultra ATA cable (sold separately). The card does not support ATAPI devices such
as Zip drives or CD/DVD drives. For maximum compatibility and data integrity, Maxtor strongly recommends
that you do not use older 40-conductor ATA/IDE cables with this card.
1. Configure the jumpers of the Ultra ATA hard drive to the cable select setting. If you are connecting two Ultra
ATA drives, they should both be configured to the cable select (CS) setting. Consult the drive label,
documentation, or manufacturer for jumper configuration information. Jumper settings for popular Maxtor
models are shown below in Figure 7.
Style A2
Style A1
(Includes
DiamondMax Plus 9)
(Includes
DiamondMax 16)
Style B
Style C
(Includes DiamondMax
Plus 8 and Fireball 3)
(Models D740X-6L
and D540X-4K)
Master
Slave
Master
Cylinder
Limitation
Jumper (CLJ)
(not for use
with this card)
Cable
Select
Slave
Cable
Select
Figure 7
Jumper Block Positions
2. Plug the blue connector on the Ultra ATA cable straight into the Ultra ATA connector on the card. The correct
orientation of the cable connector can be found by matching the key notch on one side of the cable
connector with the corresponding groove in the ATA connector.
8
Connect Hard Drive
3. Plug the black cable connector into the ATA connector on the rear of the hard drive. If you are connecting
two Ultra ATA drives and wish to use one as a boot drive, plug the black cable connector into the boot drive
and the gray connector into the other drive. If neither drive will be used as a boot drive, either the gray or
black connector can be used. See Figure 8 below.
ATA Interface
Cable
Secondary Drive
(Gray)
Boot Drive
(Black)
PCI Card
(Blue)
Power Supply
Cable
Figure 8
Connecting the Cables
Connect Hard Drive
9
Check BIOS Message
Power on your system and look for an on-screen BIOS message (see Figure 9) that refers to the Maxtor SATA/
150 PCI Card. This message indicates that the card has been properly detected by your motherboard. If you do
not see this message, turn off your system and make sure that the card is seated properly in the PCI slot.
The SATA/150 PCI Card is a PCI Plug-n-Play (PnP) device that automatically detects attached hard drives. In most cases, you will
not need to make changes in the motherboard BIOS Setup utility; however, on some newer systems, you may be able to set the
boot order of SATA devices in the motherboard’s BIOS Setup. For more information on BIOS Setup, consult your system manual
or the system manufacturer.
Figure 9
SATA/150 PCI Card BIOS Message
10
Check BIOS Message
Install Windows Driver
The next step is to install a Windows driver for the card so that it can be properly identified by the operating
system. This kit includes either a floppy disk or a MaxBlast CD containing the drivers for the card. If you do not
have a floppy drive, the latest drivers for the card can be downloaded from the Software Downloads section of
the Maxtor Support website at www.maxtor.com.
The Maxtor SATA/150 PCI Card is compatible with Windows 98SE (Second Edition), Windows Me, Windows
2000, and Windows XP. For maximum compatibility, Maxtor recommends updating to the latest Service Pack
from Microsoft at windowsupdate.microsoft.com.
Existing Windows 98 Installation
The following section details the installation of SATA/150 PCI Card drivers on a system that has Windows 98
already installed and running.
1. After installing the SATA/150 PCI Card and configuring the hard drive, power up the system and boot into
Windows.
2. The Add New Hardware Wizard will appear, informing you that it has found a PCI Mass Storage Controller.
3. Click Next, then choose Search for the best driver for your device (Recommended).
4. Insert the provided driver diskette or CD. (If you inserted a CD, close the language chooser that appears.)
5. Click Next, then mark the Specify a location checkbox and click Browse.
6. Browse to the Win 9X-Me folder on the CD or floppy.
7. Click Next. A message informing you that Windows has found Win98-ME Maxtor SATA/150 PCI Card should
appear.
Install Windows Driver
11
8. Click Next, then click Finish
9. When asked if you want to restart your computer, remove any floppies or CDs then click Yes.
If you are installing a new, unformatted drive, format and partition the drive using the software included with the drive or
download the latest available formatting software from the drive manufacturer’s website. For Maxtor and Quantum drives,
MaxBlast installation software is available for download from www.maxtor.com. Consult the drive installation guide or
manufacturer for more information.
New Windows 98 Installation
The following section details the installation of the SATA/150 PCI Card drivers while installing Windows 98.
1. Format and partition your hard drive using the software included with the drive or download the latest
available formatting software from the drive manufacturer’s website. For Maxtor and Quantum drives,
MaxBlast installation software is available for download from www.maxtor.com. Consult the drive
installation guide or manufacturer for more information.
2. Insert your Windows 98 system boot disk into the floppy drive and restart the system.
3. When prompted to start the computer with CD-ROM support, select this option so that Windows will load
the CD-ROM driver.
After the system boot disk finishes loading, you should see the A:\ prompt. Above the prompt, you should
also see a line saying Drive X: = Driver MSCD001unit 0 where X is the drive letter assigned to the CD-ROM
drive. Depending on how many devices are connected to the ATA/IDE cables, the assigned CD-ROM drive
letter could be E, F, G, etc.
4. Note the CD-ROM drive letter, and insert your Windows CD in the CD-ROM drive.
12
Install Windows Driver
5. At the A:\ prompt, type X: (where X is the CD-ROM letter) and press Enter.
6. At the X:\ prompt, type SETUP and press Enter. Follow the on-screen prompts to complete the Windows
installation.
7. After installation, right-click on My Computer and select Properties from the popup menu.
8. In the System window, choose the Device Manager tab.
9. In the hierarchical display under Other Devices is a listing for PCI Mass Storage Controller. Click PCI Mass
Storage Controller then click the Properties button.
10. In the Properties window, choose the Driver tab then choose Update Driver and click Next.
11. Choose Search for a better driver than the one your device is using now (recommended) then click Next.
12. Insert the provided driver diskette or CD. (If you inserted a CD, close the language chooser that appears.)
13. Choose Specify Location then click Browse.
14. Browse to the Win 9X-Me folder on the CD or floppy.
15. Click the Next button. A message informing you that Win98-ME Maxtor SATA/150 PCI Card has been
detected should appear.
16. Click Next, then click Finish.
17. When asked if you want to restart your computer, remove any floppies or CDs then click Yes.
Install Windows Driver
13
Existing Windows Me Installation
The following section details the installation of SATA/150 PCI Card drivers on a system that has Windows Me
already installed and running.
1. After installing the SATA/150 PCI Card and configuring the hard drive, power up the system and boot into
Windows.
2. The Add New Hardware Wizard will appear, informing you that it has found a PCI Mass Storage Controller.
3. Click Next, then from the generated list box, choose Specify the location of the driver (Advanced).
4. Click Next, then from the generated choices, choose Specify a location.
5. Insert the provided driver diskette or CD. (If you inserted a CD, close the language chooser that appears.)
6. Choose Specify a location then click Browse.
7. Browse to the Win 9X-Me folder on the CD or floppy.
8. Click Next. A message informing you that Windows Me has found Win98-ME Maxtor SATA/150 PCI Card
should appear.
9. Click Next, then click Finish.
10. When asked if you want to restart your computer, remove any floppies or CDs then click Yes.
14
Install Windows Driver
If you are installing a new, unformatted drive, format and partition the drive using the software included with the drive or
download the latest available formatting software from the drive manufacturer’s website. For Maxtor and Quantum drives,
MaxBlast installation software is available for download from www.maxtor.com. Consult the drive installation guide or
manufacturer for more information.
New Windows Me Installation
The following details the installation of the SATA/150 PCI Card drivers while installing Windows Me.
1. Format and partition your hard drive using the software included with the drive or download the latest
available formatting software from the drive manufacturer’s website. For Maxtor and Quantum drives,
MaxBlast installation software is available for download from www.maxtor.com. Consult the drive
installation guide or manufacturer for more information.
2. Insert your Windows Me system boot disk into the floppy drive and restart the system.
3. When prompted to start the computer with CD-ROM support, select this option so that Windows will load
the CD-ROM driver.
4. After the system boot disk finishes loading, you should see the A:\ prompt. Above the prompt, you should
also see a line saying Drive X: = Driver MSCD001unit 0 where X is the drive letter assigned to the CD-ROM
drive. Depending on how many devices are connected to the ATA/IDE cables, the assigned CD-ROM drive
letter could be E, F, G, etc.
5. Note the CD-ROM drive letter, and insert your Windows CD in the CD-ROM drive.
6. At the A:\ prompt, type X: (where X is the CD-ROM letter) and press Enter.
Install Windows Driver
15
7. At the X:\ prompt, type SETUP and press Enter. Follow the onscreen prompts to install Windows Me
completely.
8. After installation, right-click on My Computer and select Properties from the popup menu.
9. In the System window, choose the Device Manager tab.
10. In the hierarchical display under Other Devices is a listing for PCI Mass Storage Controller. Click PCI Mass
Storage Controller then click the Properties button.
11. In the Properties window, choose the Driver tab then choose Update Driver and click Next.
12. Choose Search for a better driver than the one your device is using now (recommended) then click Next.
13. Insert the provided driver diskette or CD. (If you inserted a CD, close the language chooser that appears.)
14. Choose Specify Location then click Browse.
15. Browse to the Win 9X-Me folder on the CD or floppy.
16. Click the Next button. A message informing you that Win98-ME Maxtor SATA/150 PCI Card should appear.
17. Click Next, then click Finish.
When asked if you want to restart your computer, remove any floppies or CDs then click Yes.
16
Install Windows Driver
Existing Windows 2000 Installation
If you have an existing installation of Windows 2000 or XP on a SATA or Ultra ATA drive that you wish to connect to the SATA/
150 PCI card, DO NOT connect the drive to the card yet. Leave the drive attached to its current controller. You must install the
Windows driver for the SATA/150 PCI Card before connecting your hard drive to the card.
The following section details the installation of SATA/150 PCI Card drivers on a system that has Windows 2000
already installed and running.
1. After installing the SATA/150 PCI Card and rebooting your system, Windows 2000 will detect a Mass
Storage Controller and display the Found New Hardware Wizard. Insert the driver diskette or CD.
(If you inserted a CD, close the language chooser that appears.)
2. In the Found New Hardware Wizard window, click Next.
3. Select “Search for a suitable driver for my device (recommended)” then click Next.
4. Select the “Specify a location” checkbox, deselect the other checkboxes, and click Next.
5. Click the Browse button.
6. Browse to the Win2000 folder on the driver diskette or CD, then click Open.
7. Click OK.
8. Windows will detect the driver for the Maxtor SATA/150 PCI Card. Click Next.
9. When the wizard has finished installing the driver, remove any floppies or CDs then click Finish to restart
your system.
Install Windows Driver
17
10. After Windows has restarted, perform a regular shutdown. Connect the interface and power cables to any
hard drives you wish to attach to the card, then restart your system.
If you are installing a new, unformatted drive, format and partition the drive using the software included with the drive or
download the latest available formatting software from the drive manufacturer’s website. For Maxtor and Quantum drives,
MaxBlast installation software is available for download from www.maxtor.com. Consult the drive installation guide or
manufacturer for more information.
New Windows 2000 Installation
If your system does not have a floppy drive, you may need to connect a 3.5-inch floppy drive temporarily to install the SATA
driver from a diskette. Windows 2000 and XP Setup typically do not allow browsing to a CD to install drivers.
The following details the installation of the SATA/150 PCI Card drivers while performing a new installation of
Windows 2000.
1. If you received a driver diskette with this card, continue to the next step. If you received a MaxBlast CD
containing drivers for this card, boot your system to the MaxBlast CD and select the option to create a SATA
PCI card driver diskette. If you downloaded the drivers from www.maxtor.com, load the drivers onto a
floppy disk.
2. Boot your system from the Windows 2000 installation CD.
3. When prompted by the Windows installer to install a third-party SCSI or RAID driver, press F6.
4. When the Windows 2000 Setup window is generated, press S to specify an Additional Device(s).
5. Insert the SATA/150 PCI Card driver diskette into drive A: and press Enter.
18
Install Windows Driver
6. Choose Win 2000 Maxtor SATA/150 PCI Card from the list that appears on screen, and then press Enter.
7. Press S to use the driver on the floppy disk and then press Enter to continue with installation.
8. The Windows 2000 Setup screen will appear again saying “Setup will load support for the following mass
storage devices:” The list will include Win 2000 Maxtor SATA/150 PCI Card. If there are any additional
devices to be installed, specify them now then continue to the next step.
From the Windows 2000 Setup screen, press Enter. Setup will now load all device files and complete the
Windows 2000 installation.
Existing Windows XP Installation
If you have an existing installation of Windows 2000 or XP on a SATA or Ultra ATA drive that you wish to connect to the SATA/
150 PCI card, DO NOT connect the drive to the card yet. Leave the drive attached to its current controller. You must install the
Windows driver for the SATA/150 PCI Card before connecting your hard drive to the card.
The following section details the installation of SATA/150 PCI Card drivers on a system that has Windows XP
already installed and running.
1. After installing the SATA/150 PCI Card and rebooting your system, Windows XP will detect a Mass Storage
Controller and display the Found New Hardware Wizard. Insert the driver diskette or CD. (If you inserted a
CD, close the language chooser that appears.)
2. In the Found New Hardware Wizard window, select “Install from a list or specific location (Advanced)” and
click Next.
Select “Search for the best driver in these locations,” then select the “Include this location in the search”
checkbox and click the Browse button.
Install Windows Driver
19
3. Browse to the WinXP folder on the provided driver diskette or CD, then click Next.
4. When the New Hardware Wizard has finished installing the SATA/150 PCI Card driver, click Finish.
5. Perform a normal shutdown and power the system off.
6. Connect the interface and power cables to any hard drives you wish to attach to the card, then restart your
system.
If you are installing a new, unformatted drive, format and partition the drive using the software included with the drive or
download the latest available formatting software from the drive manufacturer’s website. For Maxtor and Quantum drives,
MaxBlast installation software is available for download from www.maxtor.com. Consult the drive installation guide or
manufacturer for more information.
New Windows XP Installation
If your system does not have a floppy drive, you may need to connect a 3.5-inch floppy drive temporarily to install the SATA
driver from a diskette. Windows 2000 and XP Setup typically do not allow browsing to a CD to install drivers.
The following details the installation of the driver while performing a new installation of Windows XP.
1. If you received a driver diskette with this card, continue to the next step. If you received a MaxBlast CD
containing drivers for this card, boot your system to the MaxBlast CD and select the option to create a SATA
PCI card driver diskette. If you downloaded the drivers from www.maxtor.com, copy the drivers onto a
floppy disk.
2. Boot your system from the Windows XP installation CD.
3. When prompted by the Windows installer to install a third-party SCSI or RAID driver, press F6.
20
Install Windows Driver
4. When the Windows XP Setup window is generated, press S to specify an Additional Device(s).
5. Insert the driver diskette into drive A: and press Enter.
6. Choose WinXP Maxtor SATA/150 PCI Card from the list that appears on screen, and then press Enter.
7. Press S to use the driver on the floppy disk and then press Enter to continue with installation.
8. The Windows XP Setup screen will appear again saying “Setup will load support for the following mass
storage devices:” The list will include WinXP Maxtor SATA/150 PCI Card. If there are any additional devices
to be installed, specify them now then continue to the next step.
9. From the Windows XP Setup screen, press Enter. Setup will now load all the drivers and complete the
Windows XP installation.
Install Windows Driver
21
Confirm Driver Installation
To confirm that the Windows driver for the card has been properly installed, perform the following steps for
your operating system:
Windows 98
1. Choose Settings from the Start menu.
2. Choose Control Panel, then double-click the System icon.
3. Choose the Device Manager tab, then click the ‘+’ in front of SCSI Controllers. Win98-ME Maxtor SATA/150
PCI Card should appear.
Windows Me
1. Right-click the My Computer icon and select Properties from the popup menu.
2. Select the Device Manager tab.
3. Click the ‘+’ in front of SCSI & RAID Controllers. Win98-ME Maxtor SATA/150 PCI Card should appear.
22
Confirm Driver Installation
Windows 2000
1. Right-click the My Computer icon and select Manage from the popup menu.
2. Click Device Manager in the menu tree.
3. Click the ‘+’ in front of SCSI Controllers. Win2000 Maxtor SATA/150 PCI Card should appear.
Windows XP
1. Right-click the My Computer icon and select Manage from the popup menu.
2. Click Device Manager in the menu tree.
3. Click the ‘+’ in front of SCSI Controllers. WinXP Maxtor SATA/150 PCI Card should appear.
If the driver has not been installed properly, you may need to reinstall the driver as described in the
previous section.
Confirm Driver Installation
23
Getting Help
Worldwide Support Website
www.maxtor.com
Click on Support to access the Knowledge Base, download the latest software updates, and get assistance via e-mail.
Europe, Middle East, and Africa Support
Support available in English, French and German
Telephone:
+353 1 204 1111 (all countries)
08 25 31 43 22 (in France)
01801 62 98 67 (in Germany)
North America and Latin America Support
Support available in English
Telephone:
1-800-2-MAXTOR (1-800-262-9867)
303-678-2015 (outside the US and Canada)
Australia and Asia-Pacific Support
Support available in English
Telephone:
24
+61-2-9369-3662
Getting Help
Warranty
Maxtor’s warranty obligations are limited to the terms set forth:
Maxtor warrants to the original consumer purchaser (“you” or
“your”) that new Maxtor accessory products (“Products”) will be
free from defects in material and workmanship for the Standard
Warranty Period for the relevant product, which is one (1) year. The
start of the warranty period is the latter of the date of purchase by
you from Maxtor or Maxtor’s authorized reseller. If a Product is
purchased from Maxtor or Maxtor’s authorized reseller by you after
the last production date for that Product, and proof of purchase can
be provided, then the start of the warranty period is the documented
date of such purchase.
telephone number for obtaining customer assistance within your
jurisdiction. Once the Maxtor Service Center determines that a
repair is required, Maxtor will issue an RMA number. A copy of your
receipt or bill of sale bearing the name and location of Maxtor’s
authorized reseller and the Maxtor serial number and model number
of the Product in which the defect has been reported may be
required as a proof of your purchase for warranty service.
The warranty applies only to the Maxtor products that can be
identified by the original, unaltered Maxtor trademark, trade name or
logo affixed to them. Maxtor does not warrant any product that is
not manufactured by, for, or with permission from Maxtor.
This warranty does not cover any of the following conditions:
For replacement Products, the warranty on the replacement Product
is the remainder of the warranty on the original Product or 90 days,
whichever is longer.
• Normal wear and tear
The Products are manufactured from parts and components that are
new or equivalent to new in accordance with industry standards.
• Damage caused during installation of the Product
If you discover a defect in material and workmanship for the
Standard Warranty Period and Maxtor agrees that the defect exists,
Maxtor will, at its option, repair or replace the Product at no charge
to you, provided it is returned during the Standard Warranty Period,
with transportation charges prepaid, to the facility designated by
Maxtor. The Product must be properly packaged in Maxtor or
Maxtor-approved packaging, with the Return Material Authorization
(RMA) number clearly displayed on the outside of the packaging, to
obtain warranty service.
To request warranty service and before returning a Maxtor product,
please contact the Maxtor Service Center. Refer to the Maxtor
Installation Guide or www.maxtor.com to locate the appropriate
• Abuse, unreasonable use, mistreatment, or neglect
• Unusual physical or electrical stress or power fluctuations
• Damage caused by the equipment or system with which the
Product is used
• Damage caused by modification or repair not made or authorized by Maxtor
• Products whose Maxtor Serial Number has been removed or
defaced
• Damage caused by use of non-Maxtor packaging
• Damage caused by improper or improperly used packaging
• Damage caused by lack of ESD protection
• Products that are determined to be stolen
Warranty
25
Maxtor owns all parts removed from the repaired Products. Maxtor
uses new and reconditioned parts in performing warranty repairs
and building replacement products.
THIS WARRANTY AND REMEDIES SET FORTH ABOVE ARE
EXCLUSIVE AND IN LIEU OF ALL OTHERS, WHETHER ORAL OR
WRITTEN, EXPRESSED, IMPLIED OR STATUTORY. MAXTOR
SPECIFICALLY DISCLAIMS TO THE MAXIMUM EXTENT
PERMITTED BY LAW ANY AND ALL IMPLIED WARRANTIES OR
CONDITIONS, AS TO THE PRODUCTS OR ANY OTHER MATTER
WHATSOEVER. IN PARTICULAR, BUT WITHOUT LIMITATION,
MAXTOR SPECIFICALLY DISCLAIMS ANY AND ALL IMPLIED
WARRANTIES OR CONDITIONS OF SATISFACTORY QUALITY,
MERCHANTABILITY, FITNESS FOR A PARTICULAR PURPOSE AND
NON-INFRINGEMENT OF THIRD PARTY RIGHTS OR ANY OTHER
WARRANTY ARISING FORM A COURSE OF DEALING OR USAGE
OF TRADE. No Maxtor distributor, reseller, dealer, agent or
employee is authorized to make any modification, extension or
addition to this warranty.
MAXTOR IS NOT RESPONSIBLE OR LIABLE FOR ANY SPECIAL,
INCIDENTAL, INDIRECT OR CONSEQUENTIAL DAMAGES
HOWEVER CAUSED AND WHETHER OR NOT MAXTOR WAS
ADVISED IN ADVANCE OF THE POSSIBILITY OF SUCH DAMAGES,
INCLUDING BUT NOT LIMITED TO LOSS OF DATA OR
PROGRAMS, LOST PROFITS, DOWNTIME, GOODWILL, DAMAGE
OR REPLACEMENT OF EQUIPMENT AND PROPERTY, AND ANY
COSTS OF RECOVERING, PROGRAMMING OR REPRODUCING
ANY PROGRAM OR DATA STORED IN OR USED WITH MAXTOR
PRODUCTS. This limitation of liability, however, will not apply to
claims for death or personal injury caused by the negligence of
Maxtor or its associated companies, officers, representatives or
agents.
26
Warranty
Some jurisdictions do not allow the exclusion or limitation of
incidental or consequential damages or exclusions of implied
warranties, so the above limitations or exclusions may not apply to
you. This warranty gives you specific legal rights, and you may also
have other rights that vary from jurisdiction to jurisdiction. If a
Product is purchased from Maxtor or Maxtor’s authorized reseller by
you in Europe, Africa, and the Middle East, you may have additional
warranty rights which are explained at www.maxtor.com.
This Statement of Limited Warranty shall be exclusively interpreted
in accordance with the English language with the meaning of its
terms. Should a translated version of this Limited Warranty deviate
from the English language version, only the English version shall
apply and be binding.