1
Copyright
MS DOS® is a registered trademark of the Microsoft Corporation; MS Windows® is a
registered trademark of the Microsoft Corporation; MS Windows NT® is a registered
trademark of the Microsoft Corporation; MS Windows 95® is a registered trademark of
the Microsoft Corporation; MS Windows 98® is a registered trademark of the Microsoft
Corporation; MS Remote Access Service® is a registered trademark of the Microsoft
Corporation; Netware is a registered trademark of the Novell Corporation.
Right of Ownership
The software program and the manual provided with ISDN SURF are subject to the
©Copyright 1998 of acotec GmbH. All rights reserved.
No part of this software may be copied, changed, transferred in any shape or form, into
other languages without the express prior written consent of Siemens AG.
Note regarding the manual
The software and manual are made with the greatest possible care. Siemens AG accepts no liability for errors that may be contained in the manual or may result from using
the manual.
Siemens AG reserves the right to make alternations to this manual without prior notice.
Siemens AG accepts no responsibility for loss or damages caused as a result of use of
the software.
Contents
Contents
Safety Instructions and Approval ............................................................................................... 7
Safety Instructions ......................................................................................................................... 7
Instructions regarding the location of the ISDN card ...................................................................... 7
Approval ...........................................................................................................................................8
Important instructions about installation and operation ........................................................ 9
About this manual .......................................................................................................................... 9
What is ISDN? ................................................................................................................................ 9
What does I-SURF offer? ............................................................................................................... 9
Features .........................................................................................................................................11
Technical Data .............................................................................................................................. 11
Instructions for operation through a PBX .......................................................................................12
Giving away I-SURF or disposing of it .......................................................................................... 12
Warranty ....................................................................................................................................... 12
Siemens Service ............................................................................................................................13
Hotline ................................................................................................................................... 13
Siemens Support Server ........................................................................................................ 13
Installation of the I-SURF ISDN Card ....................................................................................... 15
Overview ...................................................................................................................................... 15
Installation requirements .............................................................................................................. 15
System requirements ............................................................................................................ 15
Requirements for access to ISDN ......................................................................................... 15
Deliverables .................................................................................................................................. 15
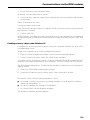
Installing the ISDN-card ..................................................................................................................16
Hardwareinstallation .............................................................................................................. 16
Preparing the computer ...........................................................................................................16
Open the computer housing ....................................................................................................16
Installing the card, closing the PC housing and connecting the cable .....................................16
After installing your card ..........................................................................................................17
Driver Software installation ............................................................................................................18
Installation of the driver software under Windows 98 ........................................................... 18
Deinstallation of the driver software under Windows 98 ...................................................... 19
Installation of the driver software under Windows 95 ............................................................20
a. Procedure for Win 95 (original version) ...............................................................................20
b. Procedure for Win 95 (Service Release 2.0 and subsequent releases) ..............................20
In order to import a new driver for your card ......................................................................... 21
Deinstallation of driver software under Windows 95 ............................................................. 21
Installation of driver software under Windows NT 4.0 ...........................................................22
To import a new driver for your card ..................................................................................... 24
Correction for selection of Do not install a driver .....................................................................25
Additional instructions on the installation of the ISDN card ................................................... 25
Getting rid of interrupt conflicts ...............................................................................................25
Checking the Interrupt assignment of the ISDN card ..............................................................25
Installing the I-SURF Program Package ................................................................................... 27
Overview ...................................................................................................................................... 27
Installation requirements .............................................................................................................. 27
Installation of the I-SURF ISDN program package ........................................................................ 28
Installation and Parameter Settings of Exchange .................................................................. 32
Continuation of the Setup of the I-SURF ISDN program package ...........................................34
Uninstalling .....................................................................................................................................40
Contents
Brief description of I-SURF ........................................................................................................ 41
Menu overview ............................................................................................................................ 41
User Configuration ....................................................................................................................... 42
The ISDN LineManager ................................................................................................................ 43
The Fax Dialer ................................................................................................................................44
The Fax Viewer ............................................................................................................................ 44
The EFT Dialer ................................................................................................................................45
The EFT Explorer .......................................................................................................................... 45
The Voicegate ................................................................................................................................46
ISDN Modems ............................................................................................................................. 46
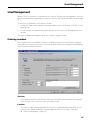
UserManagement ...................................................................................................................... 47
Entering numbers ......................................................................................................................... 47
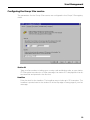
Configuring the Group 3 fax service ...............................................................................................51
Configuring the Group 4 fax service ...............................................................................................52
Configuring EuroFileTransfer ..........................................................................................................53
Configuring Voicegate .................................................................................................................. 55
ISDN LineManager ..................................................................................................................... 57
Configuring ISDN line ................................................................................................................... 57
Configuring ISDN card ....................................................................................................................60
Sending and receiving messages (only in Online Documentation) ...................................... 63
Sending and receiving fax messages ........................................................................................... 63
Sending a fax message .......................................................................................................... 63
Sending a fax message in MS Exchange .................................................................................63
Sending a fax message via Drag&Drop on the Fax Dialer .......................................................65
Sending a fax message with double-click on the Fax Dialer ....................................................66
Sending a fax message from an application ............................................................................68
Sending a fax message via MS Explorer or from the desktop .................................................68
Receiving a fax message ....................................................................................................... 68
The Fax Viewer ...................................................................................................................... 69
Commands in the File menu ....................................................................................................70
Commands in the Edit menu ...................................................................................................71
Commands in the View menu .................................................................................................71
Commands in the Options menu .............................................................................................73
Commands in the Window menu ............................................................................................73
Sending and receiving files using EuroFileTransfer ........................................................................74
Sending files .......................................................................................................................... 74
Sending a file in MS Exchange ................................................................................................74
Sending files via Drag&Drop on the EFT Dialer .......................................................................76
Sending a message with double-click on the EFT Dialer .........................................................77
Sending a file via MS Explorer or from the desktop ................................................................77
Receiving files ........................................................................................................................ 78
The I-SURF Dialer ...........................................................................................................................79
The EFT Explorer (only in Online Documentation) ................................................................. 85
Setting up a connection ............................................................................................................... 86
Disconnecting EFT Explorer ......................................................................................................... 87
Working with files and directories ..................................................................................................88
Copying files from the distant terminal .................................................................................. 88
Copying files from your computer to the distant terminal ......................................................89
Renaming files on the distant terminal .................................................................................. 89
Deleting files on the distant terminal ..................................................................................... 89
Contents
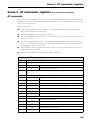
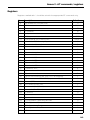
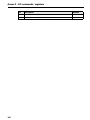
An overview of all commands ........................................................................................................90
The commands in the Connection menu ............................................................................... 90
The commands in the Edit menu ............................................................................................91
The commands in the View menu ..........................................................................................92
The commands in the Extras menu ....................................................................................... 92
The VoiceGate (only in Online Documentation) .....................................................................
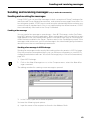
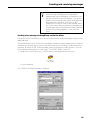
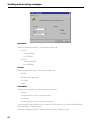
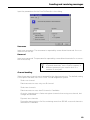
Recording an announcement .......................................................................................................
Recording an announcement over the phone ........................................................................
Recording an announcement via the microphone .................................................................
Conversion of WAV files ........................................................................................................
Monitoring incoming calls ............................................................................................................
Remote control ............................................................................................................................
Setting pins for remote control ..............................................................................................
Changing the password for remote control ...........................................................................
Monitoring calls via remote control ........................................................................................
93
93
93
94
94
95
96
96
97
98
The I-SURF Address Book (only in Online Documentation) .................................................. 99
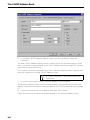
Adding a new entry to an address book ....................................................................................... 99
Adding an entry in an I-SURF Address Book ......................................................................... 99
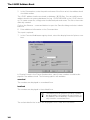
Entries in the personal address book ................................................................................... 103
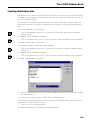
Creating distribution lists ..............................................................................................................105
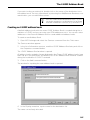
Creating an I-SURF address book .............................................................................................. 107
Communications via the ISDN modems (only in Online Documentation) ......................... 111
Configuring the ISDN modem .................................................................................................... 111
Dial-Up Networking under Windows 98 .......................................................................................116
Installing Dial-Up Networking under Windows 98 ............................................................... 116
Setting up a new Dial-Up Networking connection under Windows 98 ................................ 117
Setting up a Dial-Up Networking connection under Windows 98 .........................................120
Enabling access by callers under Windows 98 .................................................................... 121
Access to the Internet under Windows 98 .......................................................................... 124
Dial-Up Networking under Windows 95 ..................................................................................... 124
Installing Dial-Up Networking under Windows 95 ............................................................... 124
Setting up a new Dial-Up Networking connection under Windows 95 ................................ 125
Setting up a Dial-Up Networking connection under Windows 95 ........................................ 128
Enabling access by callers under Windows 95 .................................................................... 129
Access to the Internet under Windows 95 ...........................................................................132
Dial-Up Networking under Windows NT 4.0 .............................................................................. 132
Installing Dial-Up Networking under Windows NT ............................................................... 132
Setting up a new Dial-Up Networking connection under Windows NT ............................... 134
Enabling access by callers under Windows NT ................................................................... 137
Access to the Internet under Windows NT ......................................................................... 138
HyperTerminal ............................................................................................................................ 138
Setting up a connection with HyperTerminal .........................................................................138
Microsoft Exchange (only in Online Documentation) .......................................................... 141
Sending and receiving messages ............................................................................................... 141
Receiving a message ........................................................................................................... 141
Sending a message ............................................................................................................. 141
Attaching files to a message ................................................................................................ 142
Selecting the recipient from the Address Book ................................................................... 143
Saving messages ................................................................................................................. 144
Deleting messages ...............................................................................................................145
Forwarding messages ......................................................................................................... 145
Contents
ISDN options .............................................................................................................................. 145
ISDN Send options .............................................................................................................. 145
Status of sent message ....................................................................................................... 147
ISDN Status for a recipient ...................................................................................................149
The I-SURF Support Module ................................................................................................... 151
Installation requirements: ........................................................................................................... 151
Installation .................................................................................................................................. 151
Technical Details ..........................................................................................................................153
Annex 1 - The ACO_CT32.EXE CAPI test program ................................................................ 155
Problems with incoming calls ................................................................................................157
Annex 2 - AT commands / registers (only in Online Documentation) ................................ 159
AT commands ............................................................................................................................ 159
Registers .................................................................................................................................... 161
Glossary .................................................................................................................................... 163
Index .......................................................................................................................................... 169
Safety Instructions and Approval
Safety Instructions and Approval
Safety Instructions
●
Please read the installation instructions carefully, before you connect and start up
the Siemens ISDN I-SURF 2 card for the first time.
●
If you give the Siemens ISDN I-SURF 2 card to a third person, you should give the
installation instructions to that person as well.
●
The Siemens ISDN I-SURF 2 card is a complex electronic unit that may be repaired
only be authorised, qualified personnel. Do not attempt to make repairs or changes
to your card yourself.
●
Please note that the data cable must be neither pulled out nor plugged in during a
thunderstorm.
●
The Siemens ISDN I-SURF 2 card is designed for the S0 basic rate access, it must
not be used on any other type of access.
●
Small children and babies are in danger of choking or suffocating if they put small
objects in their mouths. In the case of the I-SURF, the clip binding the cable could
pose such a danger. Please keep this out of reach of children.
●
When handling the I-SURF be careful not to injure yourself on jutting out screws
and sharp edges.
Instructions regarding the location of the ISDN card
●
The ISDN I-SURF 2 card is designed for operation in a sheltered space and within
a temperature range of +5 C to +40 C.
●
Make sure that the Siemens ISDN I-SURF 2 card is not subjected to direct sunlight
or other heat sources. The electronic components may be damaged as a result.
●
Do not place the Siemens ISDN I-SURF card in a damp place such as a bathroom.
●
The mains plug of the NTBA is to be plugged in.
Static charges can damage the electronics of your ISDN card. Please note the following
tips in order to prevent damage:
●
Hold the card only by its edges. Don’t touch any connections or components.
●
Leave the card in the anti-static sleeve until you install it.
●
Before you touch the card, get rid of any static charges. To do this, touch an earthed
metal surface, such as the PC case.
●
Don’t lay the card on a metal surface.
●
Move the card as little as possible, in order to prevent electrostatic charges due to
your clothing, the carpets or the furniture.
7
Safety Instructions and Approval
Approval
Federal Communication Commission approval from the „Federal Office for Telecommunication Approvals" has been granted for this ISDN product. It can be connected to,
and operated from, any ISDN multi-device connection and system. It has been approved in accordance with the EU guideline 91/263/EWG for Telecommunication Terminals.
This equipment complies with the requirements of the EU guidelines and the
national amendments applicable in Germany.
The CE label confirms that the equipment complies with the above mentioned guidelines.
8
Important instructions about installation and operation
Important instructions about installation and operation
About this manual
This manual describes the installation of the Siemens ISDN I-SURF 2 card, the drivers
and the ISDN program package I-SURF.
I-SURF is largely integrated into Windows, so that many operating steps will already be
familiar to you. For this reason, the description of Windows-specific components given
in this manual will be kept to a minimum.
To simplify your use of this manual, all the program interface terms - e.g. commands,
command buttons, window names etc. - are shown in italics.
The most important points regarding operation of I-SURF are contained in the printed
manual. Additional chapters are to be found in the online documentation. This you will
find after you have installed the I-SURF ISDN program package, in the Start menu under
Start ➱ Programs ➱ Siemens I-SURF 2.1 ➱ I-SURF online documentation.
This manual reflects the state of knowledge at
the time of printing.
The most recent information is to be found in the
file "Readme.txt'" on your CD ROM and the notes
in the HTML based CD-launcher.
What is ISDN?
The ISDN (Integrated Services Digital Network) is a communications network on which
all types of communications, from the phone to data transmission, go through a single
interface. Up to eight terminal devices - phones, fax machines, PCs etc.- can be connected to one interface.
Data are sent over the ISDN on two channels called the B-channels. This means that
two calls can be set up simultaneously via one interface. This also means you can use
two services at the same time, for example you can send a fax and, at the same time,
make a phone call or receive messages.
What does I-SURF offer?
I-SURF is a passive internal ISDN card with which a PC can access an ISDN Basic Rate
Interface ((BRI) - variously referred to as Basic Rate Access (BRA) or 2B+D and referred
to hereafter in this manual as the S0 interface) for ISDN.
CD Launcher
The CD launcher, which starts automatically when you put in the I-SURF CD, leads you
through the software on the CD, gives you instructions on installation and contains new
information that could not be included in the operating instructions or in the online documentation.
9
Important instructions about installation and operation
Drivers for CAPI 2.0 and NDIS WAN-Miniports
After installing the I-SURF drivers you already meet the technical requirements for surfing on the Internet and sending and receiving e-mails (NDIS WAN-Miniports).
To do this, you can use the access software from Internet providers (e.g. AOL, CompuServe, T-Online) or the Windows 98 components (Dial-up network, Internet Explorer
4.0 and Outlook Express). You will find a more detailed explanation of this in the CD
launcher.
With CAPI 2.0, I-SURF offers a platform for ISDN program packages.
I-SURF ISDN Program package
After installing the I-SURF program package, you can in addition
●
send and receive fax messages with your PC
Fax messages can be sent from MS Exchange, using the I-SURF Fax Dialer, from
an application via the printer driver, or from MS Explorer. Received fax messages
are displayed in MS Exchange and can be opened and edited using the document
display. Faxes are sent and received at a speed of up to 14,400 baud.
●
use your PC as a voicegate
Incoming calls are accepted, saved on the PC and monitored via the sound card.
You can record announcements using the telephone or a microphone attached to
the PC.
●
send and receive files using EuroFileTransfer
Files can be sent from MS Exchange, using the I-SURF EFT Dialer, or from MS Explorer. Received files are displayed in MS Exchange and can be opened and edited
using the appropriate application. Data compression, channel bundling and EFT
Short Hold help you save time and money. You safeguard your computer with password and anti-virus protection.
●
work interactively with remote EFT terminals
With the EFT Explorer you can connect to remote EFT terminals and navigate your
way through them. You have the ability to delete or rename files on the remote terminal and download files from it to your own computer.
●
set up calls to analog and digital remote terminals
In addition to the interface provided with the installation of the drivers, the ISDN
modems installed with I-SURF offer you an even greater range of possibilities for
accessing digital and analog remote PCs. You can use various Microsoft programs
(e.g. Dial-Up Networking, HyperTerminal) with the ISDN modems. The Dial-Up Networking program gives you access to remote computers and networks connected
to them. You can communicate with a remote computer as though on a LAN and
set up connections to the Internet. HyperTerminal enables you to set up calls to
mailboxes and send and receive files.
10
Important instructions about installation and operation
Features
●
Operating systems supported:
Microsoft Windows 98, Microsoft Windows 95, Microsoft Windows NT 4.0
●
Program and application interface COMMON ISDN API (CAPI) Version 2.0
●
B-channel protocols supported
●
–
L1: transparent / HDLC / V.110
–
L2: transparent / X.75SLP with V.42bis / V.120 async
–
L3: transparent / X.25 / ISO 8208 / T70NL / T90NL
D-channel protocol supported:
–
DSS1
●
NDIS-WAN Miniport (Windows 98, Windows 95)
●
Remote Access Service CAPI for Windows NT 4.0
●
EFT, Fax, Answering machine (VoiceGate)
●
Digital and analog modems for Internet Dial-up Networking and Mailbox access
●
Online software (T-Online, AOL, Compuserve, GermanyNet)
●
Support module for direct access to a support server
●
Application sharing and Internet telephony with NetMeeting (component of Windows 98)
●
Shareware (e.g. Acrobat Reader)
●
Online documentation
●
Additional products
Together with I-SURF, you have received additional software products on the CD-ROM:
●
T-Online decoder
●
AOL and Compuserve access software
●
germany.net installation program
●
Netscape Browser
Technical Data
Energy consumption
Energy supply from PC
Approved ambient environment for operation
+5 °C to +45 °C
ISDN protocol
ISDN DSS1
11
Important instructions about installation and operation
Instructions for operation through a PBX
●
The I-SURF was designed for operation at an ISDN main line with the Euro-ISDNProtocol DSS1. In addition, operation though a PBX is supported: you can enter
parameters like "Main line number" and "Number for an outside line."
●
Most PBXs supply an S0 interface that acts like an ISDN main line. In these cases,
I-SURF can be operated without difficulty. However, if the S0 interface supplied by
the PBX does not behave like an ISDN main line, malfunctioning could result.
Giving away I-SURF or disposing of it
Your I-SURF should be given away only with the operating instructions. After you have
finished with it, please dispose of the device in accordance with the laws on conservation of the environment.
Warranty
Siemens AG offers a warranty on this ISDN card for a period of 12 months from the date
of purchase from the dealer. Your purchase receipt serves as proof of date of purchase,
so keep it in a safe place.
Siemens AG will repair any manufacturing or material defects that arise during the period of guarantee. Siemens AG will decide whether it will fulfil the warranty by repairing, replacing or exchanging the defective ISDN card.
The guarantee does not cover damages due to tampering, wear and tear or intervention
by a third party. The guarantee does not cover expendable materials, nor does it cover
those defects which do not significantly affect the value or the usability of the device.
The Siemens product that you have bought fulfils the technical requirements for plugging into the German public telephone network.
You can make any warranty claims at the Siemens Service.
12
Important instructions about installation and operation
Siemens Service
Hotline
If you have any questions about your device malfunctioning, contact our Hotline team
on these numbers:
National
International
Germany:
01805 333 220
+49 / 1805 / 333 220
Austria:
0 1 1707 5004
+43 / 1 / 1707 5004
Switzerland:
0 1 495 4487
+41 / 1495 4487
Please have the following information ready when you call:
●
Exact description of the problem
●
Description and version of your ISDN card
●
Information about your PC configuration:
The easiest way to get this information is to call up the Device Manager with Start
➱ Settings ➱ Control Panel ➱ System and then print out the Combined Device and
System Overview with the Print key.
The Hotline can best help you if you are sitting in front of your PC with the problematic
situation on the screen when you call.
Siemens Support Server
The Siemens Support Server for PC communication is a Remote Access Service (RAS)
server which you can access with your Internet Browser through the Internet.
On the server you will find software updates, tips and tricks and news. It is worthwhile
to dial in from time to time in order to keep up to date on the newest developments.
After installing I-SURF’s ISDN application programs, in the Start menu under I-SURF 2.1
➱ System Configuration ➱ Support Module, you will find an installation program which
checks whether all the necessary operating system components for access to our server are installed in your system and which will help you if necessary to install any missing
components. You will find a step-by-step introduction to connecting up with the support computer in the chapter,➔ "The I-SURF Support Module" page 151.
After the installation, your PC is set up as an Internet client, so that you can reach the
Support Server with a mouse click.
You will find detailed technical information about access to the Support Server in the
Chapter entitled ➔ "The I-SURF Support Module" page 151.
13
Important instructions about installation and operation
14
Installation of the I-SURF ISDN Card
Installation of the I-SURF ISDN Card
Overview
The I-SURF is an internal, passive ISDN card for the S0 basic rate access. Using this
card under Windows 95,98 and NT 4.0, you can, for example, send and receive faxes,
surf the Internet, run home banking or use the answering-machine function. Eurofiletransfer with channel bundling and data compression is possible.
Installation requirements
System requirements
●
IBM-compatible computer, at least a Pentium with 166 MHz, 32 MB RAM
●
An unoccupied 16-Bit ISA bus extension slot
●
The Windows® 98, Windows® 95, Windows® NT 4.0 operating system installed
on your PC. For the installation of Windows 98 / 95 / NT 4.0 and the necessary components, we refer you to the corresponding Windows documentation.
●
ca. 10 MB of hard disk space (for the drivers alone)
●
A free interrupt
●
two single unused I/O addresses
●
CD-ROM drive
●
Windows 98, Windows 95 or Windows NT 4.0 CD
(unless the Windows installation files are already on your hard disk. Look for *.cab
on all drives and note down the directory they are in.)
You will find the additional system requirements necessary for the installation of the
ISDN application software in the chapter entitled "Installing the I-SURF Program Package" in section ➔ “Installation requirements“ page 27.
Requirements for access to ISDN
●
Basic connection (S0 interface) for ISDN
●
DSS1 protocol (you can find out what protocol you have from your provider (British
Telecom, Deutsche Telekom, etc.)
Deliverables
The following components are supplied with your I-SURF card:
●
1 I-SURF ISDN card (pnp) for the 16 Bit ISA-bus
●
1 ISDN-S0-connecting cable with RJ45/IAE plugs
●
1 CD-ROM with drivers for Windows 98, Windows 95 and Windows NT 4.0,
I-SURF ISDN program package, online documentation and access software from a
selection of Internet providers.
●
1 set of operating instructions
15
Installation of the I-SURF ISDN Card
Installing the ISDN-card
Hardwareinstallation
Preparing the computer
Note the hardware configuration of your system. In the Device Manager there is a display showing which input/output range addresses and interrupt numbers on your PC
are currently occupied. You may also need to check the interrupt allocations in the computer’s BIOS SETUP. (Look up the description of the BIOS SETUP in the PC manual.)
This information may be useful if it becomes necessary to clear up any conflicting interrupts or input/output range addresses.
Open the computer housing
●
Switch your computer off and disconnect all peripheral equipment (printer, screen
etc.) and power connections.
●
Remove the screws from the PC housing and put them in a safe place.
●
Remove the PC housing.
Installing the card, closing the PC housing and connecting the cable
The card should be installed in an ISA Bus socket.
Please note that it is advisable to put some care
into considering the location when you actually
put the I-SURF card into the computer; if it is inserted in a slot too close to other cards, its functioning might be impaired by the heat given off
by those other cards or by electromagnetic
waves emanating from them.
1.
Remove the blanking plate from an expansion slot. Retain the screw so you can use
it later to secure the card.
2. Hold the card by its upper edge and press it firmly into the expansion slot.
The following step is particularly important for
correct grounding of the card:
3. Marry up the screw hole in the assembled blanking plate of the ISDN card with the
screw hole on the rear panel of your PC. Using the screw you previously removed
from the plate, firmly secure the card.
4. Stow all cables within the PC so that they will not be damaged when the PC housing is replaced.
5. Assemble the PC housing and tighten the screws again.
6. Reconnect all the connecting cables to peripheral equipment.
7.
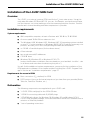
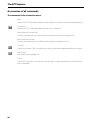
16
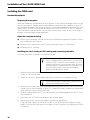
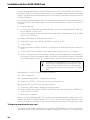
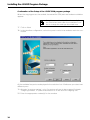
Plug the ISDN cable into the RJ45 socket of the ISDN card (see figure on next
page). Connect the other end of the cable to the S0 socket of your building’s ISDN
connection.
Installation of the I-SURF ISDN Card
Please note that the data cable must be neither
withdrawn nor inserted during a thunderstorm.
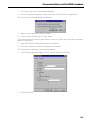
Slot sheet
ISDN card
socket
for
ISDN
cable
After installing your card
Please switch your computer (and possible peripheral devices) on.
If your system does not start:
●
Check again that you have correctly followed all steps
●
Check your system for interrupt conflicts - see ➔ “Checking the Interrupt assignment of the ISDN card“ page 25.
17
Installation of the I-SURF ISDN Card
Driver Software installation
Because there are many possible combinations of installed components (network
cards, dial-up network, etc.), a variety of sequences are possible when installing hardware and drivers. The following steps are also dependent on both the operating system
and the amount already installed.
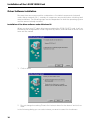
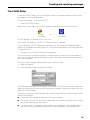
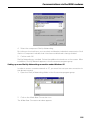
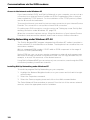
Installation of the driver software under Windows 98
When you start your PC again after having installed the ISDN I-SURF 2 card, it will automatically be recognized as a new Plug and Play device, and a Wizard for driver installation will be started.
1.
Click on Next.
2. Do not change the setting "Search for the best driver for the device" and click on
Next.
In the following dialog you can select where you want to search for the drivers.
18
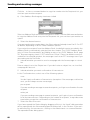
Installation of the I-SURF ISDN Card
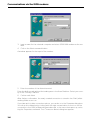
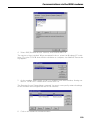
3. In the box "Specify a location", put in the following path:
D:\drv_98 (instead of D, put in the letter designating your CD-ROM drive) and click
on Next.
In the following dialog, the driver found will be offered to you.
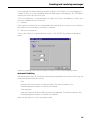
4. Accept this driver with Next.
The driver files will be copied, and dialogs about ISDN configuration will appear.
5. Ignore these dialogs with Next - Next - Next - Finish.
At this point, you might be asked for the path for the driver files. If this happens, just
enter it again and click on OK.
The necessary files will be copied.
After the copying process is finished, the Hardware Wizard will announce that the software for the new device will be installed.
6.
Click on Finish.
Now you will be asked if you want to restart the PC so that the installation of the new
hardware can take effect.
7.
Click on Yes and the PC will be restarted.
If you do not yet have a dial-up network installed in your system, you will be prompted
to install the dial-up network so as to be able to set up external connections.
Click on OK in order to install the dial-up network.
Deinstallation of the driver software under Windows 98
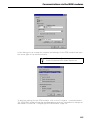
In order to deinstall the driver software for the Siemens ISDN I-SURF 2 card, select
(from the Start menu) Start --> Settings --> Control panel --> Network .
The network dialog will be opened.
1.
From the list, select the entry "ACOTEC ISDN WAN Miniport Adapter" and click on
Remove.
This entry and two further entries, "Siemens ISDN I-SURF 2" and "acotec CAPI 20 Protocol VER 1.1" will be removed from the list.
2. Click on OK.
Both drivers will be removed.
3. Restart the computer.
19
Installation of the I-SURF ISDN Card
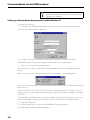
Installation of the driver software under Windows 95
During the installation, you might be prompted to insert the Windows 95 CD-ROM. You
should therefore have the CD-ROM ready or make a note of the path to the place on
the hard disk where you have saved the Windows 95 *.cab-files.
Due to the many variants of Win 95 and the many combinations of installed components (network card, dial-up networking, etc.), a number of different sequences are
possible when driver software is installed. In the following, we describe the most frequently occuring sequences.
a. Procedure for Win 95 (original version)
1.
The I SURF card will be automatically recognized as a new Plug and Play device
when you start the PC again after installing the card. The "New Hardware Found"
dialogue will appear. Select the "Driver from disk provided by hardware manufacturer" option and confirm with OK.
2. In the dialog that now opens, enter the path "d:\drv_95" (instead of "d" put in the
letter of the alphabet designating your CD ROM drive) and continue with OK. The
driver data will now be copied.
3. You might be asked to reboot the PC. Confirm this with Yes.
4. In order to have the basis for connecting to the Internet as soon as the driver is installed, the installation of the "NDIS WanMiniPortAdapters" will be offered. Confirm
with Yes.
5. Agree to the licencing conditions of Microsoft Dial Up Networking 1.3 with Yes.
6. Some files will be copied, and dialogs on ISDN configuration will appear. Ignore these dialogs with Next - Next - Next - Finish.
7.
Answer the question about whether the PC should be rebooted with Yes.
b. Procedure for Win 95 (Service Release 2.0 and subsequent releases)
1.
After the installation of the I-SURF, the card will be automatically recognized as a
new Plug and Play device when the PC is restarted. The "Device-driver Update
Wizard" window will then appear. Click on Next.
2. Click on "Other Position" and enter "d:\drv_95" (insead of "d" put in the letter of the
alphabet designating your CD-ROM drive) and continue with OK and Next.
3. Because of a bug in Win 95, a prompt to insert the "I-SURF 2.0" will now appear.
Confirm the message with OK.
4. Enter the path "d:\drv_95" again and continue with OK. Driver files are copied.
5. In order to have the basis for connecting to the Internet as soon as the driver is installed, the installation of the "NDIS WanMiniPortAdapters" will be offered. Confirm
with Yes.
6. Agree to the licencing conditions of Microsoft Dial Up Networking 1.3 with Yes.
7.
20
Some files will be copied, and dialogs on ISDN configuration will appear. Ignore these dialogs with Next - Next - Next - Finish.
Installation of the I-SURF ISDN Card
Several files will be copied.
8.
You will now be asked if you want to restart the PC, so that the settings for the
new hardware can take effect.
9. Click on Yes.
The PC will be restarted.
In order to import a new driver for your card
First you must deinstall the old driver. In order to do this, you must select Siemens
ISDN I-SURF 2 in the Device Manager (can be reached via Start -> Settings -> Control
Panel -> System -> (parameter card) Device Manager -> (area) Network card) and click
on Remove.
10. Restart the computer.
11. Install the card again.
Deinstallation of driver software under Windows 95
If you want to deinstall the driver software for the Siemens ISDN I-SURF 2 card (from
menu start) Start --> Settings --> System control --> Network.
The Network dialog will be opened.
Deinstallation of the driver software now takes place in two stages:
First stage:
1.
In the list, select the entry "acotec ISDN WAN miniport Adapter" and click on Delete.
The entry will be deleted from the list.
2. Click on OK.
The acotec ISDN WAN miniport Adapter will be deleted.
Second stage:
1.
In the list, select only the entry "Siemens ISDN I-SURF 2" and click on Delete.
Do not select any other entries.
2. After clicking on OK both entries for the card, "Siemens ISDN I-SURF 2" and corresponding protocol "Acotec CAPI 20 Protocol VER 1.1" will be deleted from the list.
Both drivers will be deleted.
3. Restart the PC.
21
Installation of the I-SURF ISDN Card
Installation of driver software under Windows NT 4.0
ATTENTION: In order to be able to install the
driver for the ISDN card, you must have administrator rights.
It is only when the system has recognized your Siemens ISDN I-SURF 2 card that the
driver for this card can be installed. In order to do this, the ISA Plug and Play driver (ISA
PNP enabler driver) from Microsoft has to be on your system, so that it can recognize
the card automatically. If this is not yet the case, you will now have to undertake this
installation, which is described in the following.
ATTENTION: The ISA PNP enabler driver will not
be automatically installed with Windows NT.
It has to be manually installed after the Windows NT.
Carry out the following instructions in order to install the ISA PNP enabler driver:
1.
Put the Windows NT, Version 4.0-CD in the CD-ROM-drive.
2. Open the Explorer.
3. In the Windows NT Explorer, click on the CD-ROM-drive.
4. Go to the directors DRVLIB\PNPISA\X86.
5. With the righthand mouse button, click on the file "PNPISA.INF".
6. In the context menu which then pops up, select Install. The ISA PNP enabler driver
will be installed.
Windows will ask you if you want to reboot the computer.
7.
Confirm with Yes.
When you restart Windows NT 4.0, I-SURF will be recognized as a new Plug and Play
device and the dialog New Hardware Found will appear.
22
Installation of the I-SURF ISDN Card
Under no circumstances should you select the option
Do not install a driver as the PNP system (Microsoft
ISA Plug and Play enabler driver) will not be able to
find the card. If you do select this option by mistake,
then you must follow the instructions in the
section➔ “Correction for selection of Do not install a
driver“ page 25, .
1.
Select the option Driver from disk provided by hardware manufacturer and confirm
your selection with OK.
The Installation from disk will be opened.
2. Put the I-SURF CD in the CD-ROM drive. After a few seconds, the start page of the
CD-Launcher will automatically be shown with your Internet browser. Close the Internet browser.
3. In the box Copy data from: enter the following path:
D:\drv_nt (instead of D, enter the letter of the alphabet designating your CD-ROM
drive) and click on OK.
The dialog Select device shows a list of drivers compatible with the ISDN card.
4. Select the driver "Siemens ISDN I-SURF 2" and confirm with OK.
The driver will be installed.
If a defect occurs during installation when copying the file ISDN.CPL, please close the Control
Panel, if it is open.
After successful completion of the installation, the dialog ISDN adapter settings will be
shown.
.
23
Installation of the I-SURF ISDN Card
On the Settings parameter card, the ISDN-Protocol "DSS1" (EuroISDN), the "Point to
Multipoint" type of connection and A-Law for the language coding process have been
preset. These settings are the right ones for the normal Euro-ISDN connection from the
German Telekom.
On the Resources parameter card, you can make the settings for the system resources
that the card uses. Be careful that in the box entitled Resource conflict „no conflicts“
is shown.
5. Confirm with OK.
6. In the "acotec ISDN RasCapi Setup" window, you will be asked if the MS-RAS is to
be configured. Click on Yes.
7.
In the next window, enter the path the Windows NT installation files (e.g. E:\i386)
and click on Continue.
The "Add on RAS device" dialog will be shown.
8. Select the connection „ISDN1 - AcoRas“ and click on OK.
9. Click on Add.
10. Select the device "ISDN2 - AcoRas," so that you can work with two B-channels at
once.
11. In the „RAS-Setup“ window, mark a B-channel and then click on Configure... .
12. In the „Configure use of connection“ dialog, you can configure the selected port
(B-channel). If you only need the RAS for access to the Siemens Support Server and
to surf the Internet, switch on „outgoing calls“ and confirm your selection with OK.
Windows NT Workstations only have one port
that can be configured for incoming calls. The
options Only incoming calls or Incoming and
outgoing calls can only be allocated to a single
port.
Repeat steps 11 and 12 for the second B-channel.
13. Click on Network.
The „Network configuration“ dialog will be shown.
14. Select the „TCP/IP“ Client protocol and confirm with OK.
Repeat steps 13 and 14 for the second B-channel.
15. Close the „RAS-Setup“ dialog by clicking on Next.
16. Enter the path at the end of which the NT files are to be found (e.g. E.\i386) and
confirm with Continue.
17. Reboot the computer.
When you reboot Windows NT 4.0, the driver will be automatically loaded and is then
ready to be used. The ISDN Adapter icon is in the Control Panel program group. You can
use it to change the settings for your card, to deinstall the card or to install other cards.
To import a new driver for your card
Go to the Control Panel and from there, start the ISDN Adapter, in order to install the
new driver by using the commands Update or Properties --> Driver --> Change driver.
24
Installation of the I-SURF ISDN Card
Correction for selection of Do not install a driver
1.
Select the menu item Execute from the Start program menu of Windows NT.
2. Enter the name Regedt32 as file to be executed and confirm with OK.
3. In the following dialog, select the key SIE0020 (Path: HKEY_LOCAL_MACHINE/
SYSTEM/CurrentControlSet/Enum/ISAPNP).
4. In the Security menu, open the Authorisations ...menu item
The Registration key authorisations dialog will be opened.
5. In this dialog, activate the option Replace authorisations in all existing partial keys.
6. Mark the name Administrators and for the type of access, select "Full" .
7.
Confirm with OK.
8. Mark the key SIE0020 and delete it.
Additional instructions on the installation of the ISDN card
The card has been designed in such a way that it can be installed without using switches or jumpers.
Getting rid of interrupt conflicts
The BIOS system or Windows allocates a system interrupt to the ISA expansion slot.
In rare cases, problems can arise when several devices use the same system interrupt.
If problems do arise, you can do the following:
Check to see how the computers interrupts have been allocated. If several devices use
the same interrupt as the I-SURF card:
–
change the interrupt allocation for the I-SURF card (see below) or:
–
change the interrupt allocations for the other devices that use the same interrupt as I-SURF.
Checking the Interrupt assignment of the ISDN card
You can check the interrupt assignment of the ISDN card and change it if necessary as
follows:
●
Under Windows NT 4.0
1.
Open the ISDN Adapter icon in the Control Panel by double-clicking on it.
The ISDN Adapter window will be opened.
2. In the list, select the ISDN card and click on the Properties command.
The ISDN Adapter Properties will be opened.
3. Click on the Resources parameter card to bring it to the top.
If you want to change any resource settings, then
4. Select that resource and click on Change settings... .
In the window that then appears, make the changes.
25
Installation of the I-SURF ISDN Card
●
Under Windows 95 and 98
1.
In the Control Panel window, click on the System icon.
The System Properties window will be opened.
2. Bring the Device Manager parameter card to the top (by clicking on it) and in
the list of network cards, select the Siemens ISDN I-SURF 2 card. Click on the
Properties card.
The Properties window will be opened.
3. Bring the Resources parameter card to the top and in the Resources settings,
select the required resource (Interrupt or Address).
4. Click on the Change settings... command and make the changes in the window
that follows.
26
Installing the I-SURF Program Package
Installing the I-SURF Program Package
Overview
After installation of the drivers, your PC - with the CAPI 2.0 interface - fulfils the requirements for installing ISDN application programs.
With the installation of the "I-SURF" ISDN program package, you can extend your PC’s
functions to include:
●
answering machine
●
fax
●
EuroFileTransfer (EFT)
●
digital and analog modems
Installation requirements
●
a driver, correctly installed according to the chapter ➔ "Installation of the I-SURF
ISDN Card" page 15.
●
an IBM-compatible computer, at least a Pentium with 166 MHz; 32 MB RAM.
●
at least 25-80 MB hard disk space (depending on amount to be installed)
●
a sound card (only necessary to listen to messages left by callers on the answering
machine)
If you want to listen to incoming calls via a
sound-card, the "audiorecorder" and "Audiocompression" components (in the standard configuration of Windows 95, 98 and NT) are necessary. If you want to install these now, open the
Control Panel and select the component Software. In the register card Windows-Setup, mark
the component Multimedia and click on Details.
In order to proceed with the installation, please
follow the instructions on the screen.
The fax, answering machine and Euro-File-Transfer functions require Microsoft Exchange or MS
Outlook (not to be confused with Outlook Express!). If neither of the programs are available,
Exchange will be automatically installed from
the Windows CD.
If you intend to use Microsoft software that contains Exchange or Outlook (e.g. Office 97, Office
98, Outlook 97, Exchange Server), you should install these programs before you install the ISURF ISDN program package, so that I-SURF
can use this base.
27
Installing the I-SURF Program Package
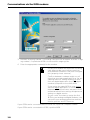
Installation of the I-SURF ISDN program package
Before the setup of I-SURF, the I-SURF drivers must be correctly installed (see
➔ "Installation of the I-SURF ISDN Card" page 15).
1.
Put the CD-ROM into the CD drive.
2. Start the CD-Launcher by clicking on setup.exe.
3. Choose the language.
Please follow the instructions in the launcher. You will arrive automatically at the page
where you can call up the installation setup of I-SURF.
4. Click the symbol to install the I-SURF applications.
The I-SURF Welcome screen is then called up.
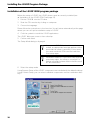
5. Confirm with Next.
The Setup Mode dialog is displayed.
If no current CAPI 2.0 protocol has yet been installed, an appropriate message appears at this
point and the setup is cancelled. In this event,
you must install the ISDN card first and then
start setup again.
Installation under NT: If you don’t have local Administrator rights, the setup is cancelled. For
further information please refer to the Microsoft
NT documentation.
6. Select the setup mode.
Using Express Setup, all the I-SURF components are installed with the default settings.
Using Custom Setup, you can select individual components and the installation directory.
28
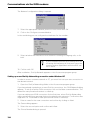
Installing the I-SURF Program Package
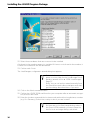
Items 7 to 15 apply only to Custom Setup.
7.
In the Registration window, type your name and company.
By default, entries are taken from Windows. Overwrite these settings if need be.
8. Confirm with Next.
After further confirmation of the registration entries, the Select Target Directory dialog
box appears.
9. Choose the directory in which you want to install I-SURF.
By default, the following directory is shown in the Destination Directory box:
C:\Program Files\Siemens\I-SURF 2.1
To input a different directory, click on the Browse... command button and, in the Directory window that appears next, select the desired directory.
10. Confirm with Next.
The Select Spool Directory dialog box appears.
11. Give the name of the spool directory.
By default, the subdirectory \SPOOL of the destination directory is shown as the spool
directory.
To input a different directory, click on the Browse... command button and, in the Directory window that appears next, select the desired directory.
12. Confirm with Next.
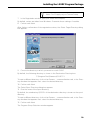
The Program Group Selection window appears.
29
Installing the I-SURF Program Package
13. Choose the program folder in which you want to install I-SURF.
a) If you wish to create a new program folder, enter a name in the Program Folder box.
The default setting is "Siemens I-SURF 2.1".
b) If you want to add I-SURF to an existing program folder, select a folder in the Existing Folders window.
14. Confirm with Next.
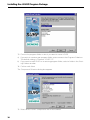
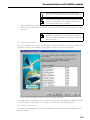
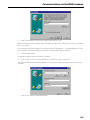
The Component Selection dialog box appears.
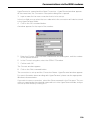
15. Select which I-SURF components are to be installed.
30
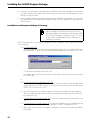
Installing the I-SURF Program Package
By default, all components are selected. You can deselect individual components by
clicking on them.
Base Module
contains some files that I-SURF needs, and must always be installed.
Online Documentation
The manual is installed in electronic form.
Fax Group 3
contains the fax service for Group 3.
Fax Group 4
contains the fax service for Group 4.
EuroFileTransfer
EuroFileTransfer interactive (EFT Explorer) and as Store & Forward.
Answering Machine
contains the answering machine Voicegate.
ISDN Modem
installs an analog modem emulation (14400 baud and various digital modems (e.g.
RNA, X.75, V110, V120, etc.)) so that a large number of communications protocols
are available for modem-based applications (e.g. Dial-up Network or Hyperterminal).
The amount of disk space required and the amount still available on the selected drive
are shown on the screen.
16. Confirm with Next.
The I-SURF files are now copied to the stated directory.
What you do next depends on whether MS Exchange or MS Outlook is installed in your
computer:
a) if neither Exchange nor Outlook is installed on your computer, you start at ➔ ’Point
1" page 32 of the directions which follow.
31
Installing the I-SURF Program Package
b) if you do not yet have a message store available in your Exchange/Outlook profile,
you will receive a message to this effect and you start at ➔ ’Point 8" page 33 of the
directions which follow.
c) if Exchange/Outlook is already installed and the settings completed, you can start
the setup of the ISDN application program at ➔ ’Point 17" page 34 of the directions
which follow.
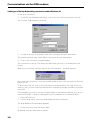
Installation and Parameter Settings of Exchange
MS Exchange is not part of the standard installation package of Windows 98, but it can be
found as additional software on the Windows 98
CD. If MS Exchange is installed on your PC, then
it was either installed with other software or
manually installed.
If MS Exchange has not yet been installed on your computer, it will now be automatically installed.
1a. For Windows 98:
Enter the path at the end of which the program "wms.exe" is to be found on the
Windows 98-CD (e.g.: d:\tools\oldwin95\message\wms.exe) and click on OK.
Confirm the following query with Yes.
A window with licensing information might appear. Accept the licensing conditions with Yes.
or
1b. For Windows 95 and Windows NT 4.0:
In the Copy files dialog, in the Source box, enter the letter of the alphabet that
designates the CD-ROM drive (e.g.: D:\) into which you have put the Windows
95/NT 4.0 CD and click on OK.
2. MS Exchange will be installed. Ignore the error message that might appear "Not enough disk space/Not enough memory/Not enough system resources"
by clicking on OK.
3. For Windows 95 and Windows 98: Finish the Setup wizard for Inbox with Cancel.
4. For Windows 95 and Windows 98: Confirm the question as to whether you are
sure that you want to cancel the installation of MS Exchange with OK.
5. When the setup of MS Exchange is complete, confirm the following window
with Next.
32
Installing the I-SURF Program Package
6. Answer the question "are you sure that the installation of MS Exchange is ended?" with Yes.
Now you will be informed that you don’t yet have a message store in your profile.
A message store is a file in which all messages sent and received (e.g. calls and
faxes) are saved. Exchange calls this file "Personal folders" or "Postbox".
7.
Click on OK.
And then the window Create/Open Personal Folders File will appear.
I
8. In the box Name, enter a name for your personal folders and click on Open. Your
personal folders will now be created.
9. In the window Create Microsoft Personal Folders you can make settings for
your new mailbox. Usually one can adopt the standard settings without making
any changes. You can obtain more detailed explanations by clicking once on
Help.
33
Installing the I-SURF Program Package
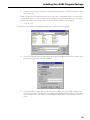
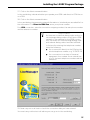
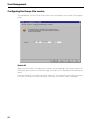
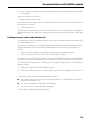
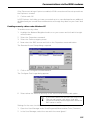
Continuation of the Setup of the I-SURF ISDN program package
When the copying process has ended, the wizard for ISDN port and modem installation
appears.
Note: You can call up this Wizard manually from
the Start menu even after the installation in order to change the settings described here
17. Click on Next.
18. In the interface configuration, select the ports to which the modems are to be connected.
All the available free ports are displayed in the selection lists. Make sure you select two
different ports.
19. Activate 'Incoming number', only if incoming calls are to be accepted. Activate
'Outgoing number', if a particular extension is to be used for outgoing calls.
20. Enter the appropriate number(s) for the modem.
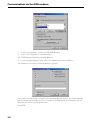
34
Installing the I-SURF Program Package
If your modem is to respond to incoming calls
please make sure that you avoid conflicts between numbers during user configuration
(property sheet: services) which will follow later on in this setup program.
Conflicts between numbers might occur if
more than one analog application (e.g. fax,
answering machine, analog modem) or more
than one digital application (e.g. EFT, digital
modems) responds to the same extension.
If you assign the same extension to one analog and one digital application, no conflict
between numbers will arise, because I-SURF
will recognize whether the incoming call requires an analog or a digital service.
So you could, for instance, assign the first extension to your analog and digital modems,
the second to your answering machine and
the third to your fax- and EFT-services.
If your ISDN card is connected to a PBX, enter only the extension number allocated by
the PBX to the ISDN card.
If your ISDN card is directly connected to an S0 line, enter one of your subscriber numbers (MSNs).
Only in France:
If you have an S0 plug in the French ISDN network, you only have to enter the last four digits
of your telephone number.
If your telephone number is "12 34 56 78":
Then you only enter "5678".
21. Confirm with Next.
In the next dialog, you can see an overview of all the modems in the first column. The
interface to which the modem is allocated is shown in the second column.
35
Installing the I-SURF Program Package
22. Select those modems that are or are not to be installed.
A tick next to the modem means it is installed. If there is no tick next to the modem, it
is either not installed or will be deinstalled.
23. Confirm with Finish.
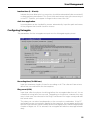
The LineManager configuration wizard dialog box appears.
Detailed information about the LineManager is
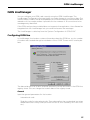
given in on-line Help for the LineManager configuration wizard, and in ➔ "ISDN LineManager"
page 57.
Note: You can call up this wizard manually from
the Start Menu even after installation and change the settings described here, if you wish.
24. Click on the Next command button.
25. Confirm the I-SURF ISDN card found on your computer after an automatic recognition process with Next.
26. Enter the location name and the local area code without the long distance number
(e.g. 0 in Germany). Select the country in which you are located.
Only in France:
As there are no local exchange dialing codes in
the French ISDN network, you must leave the
box for local exchange dialing code blank.
36
Installing the I-SURF Program Package
27. Click on the Next command button.
In the next dialog, indicate whether you operate your ISDN card direct to ISDN line or
on a PBX.
28. Click on the Next command button.
In the next dialog, the previously entered information is listed and you are asked for further information. For Direct to ISDN line, enter your phone number.
For a PBX connection, enter the connection outgoing number, the main phone number
and the extension number.
Only in France:
As there are no national dialing codes and no local exchange dialing codes in the French ISDN
network, in the settings for the ISDN connection, the boxes for local exchange dialing code
and national dialing code should be left blank.
In the box for entering the telephone number,
enter the following:
●
for a connection directly to the S0 plug, the
whole telephone number, e.g. 12 34 56 78.
●
for a connection to an item of terminal
equipment, the number for an outside line,
e.g. 0), the main telephone number and the
extension.
29. Now carry out a call test to check the connection data you have entered.
You must carry out the test call before you can go on to the next dialog.
37
Installing the I-SURF Program Package
Only in France:
If you install a German or an English version of ISURF in France, the test call to yourself will be
unsuccessful. Nevertheless, in this case, you
can still continue with the setup.
30. Click on the Next command button.
The Country specific settings dialog is opened.
31. Select the appropriate Speech-data coding and Maximum transfer rate, and click on
the Next command button.
A summary of all the location data is displayed.
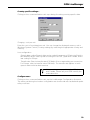
32. Click on the Apply command button to conclude the configuration.
33. Close the LineManagement Configuration wizard by clicking on the Finish command button.
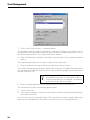
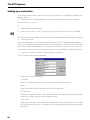
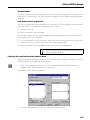
The Services dialog box appears. This and the following dialog boxes for configuring individual services are identical with those for the I-SURF User Management.
34. Enter the appropriate numbers to which the services are to react when there are
incoming calls.
Example of a possible distribution of MSNs to the various services
:
38
MSN 1
MSN 2
MSN 3
Answering machine and EFT (and external ISDN Telephone)
Fax Group 3 und Fax Group 4
Digital and analog modems
Installing the I-SURF Program Package
Only in France:
As in France only the last four digits are transmitted over the ISDN network, you should enter
only the last four digits of your telephone number if you have an S0 line. If your complete telephone number is 12 34 56 78, for example, then
you should enter just 5678 in the box for extension/number.
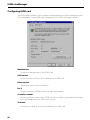
35. Close the Configuration dialog with OK.
In order to read the Online documentation, you need the Adobe Acrobat Reader, version 3.0. if this program is not yet installed on your computer, you will be asked if you
want to install it.
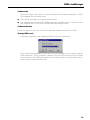
36. Click on Yes and follow the installation program of the Adobe Acrobat Reader 3.0.
You might have to first make this installation program visible by pressing on <ALT>
and <TAB> in order to follow it. After the installation of the Acrobat Reader, you can
confirm the complete installation with Next.
You will now be asked whether the PC should be rebooted.
a) If you select the Yes, reboot PC now option, Windows is rebooted and the ISDN
services you selected will then be available.
b) If you select the No, computer will be rebooted later option, setup will be completed without rebooting Windows. Remember, however, that the I-SURF settings will
not take effect until you reboot Windows.
Siemens I-SURF 2.1 appears in the Programs start group.
39
Installing the I-SURF Program Package
Uninstalling
You can only uninstall I-SURF completely. It is not possible to delete individual components.
1.
In Control Panel, open Add/Remove programs.
2. If you have installed the I-SURF Support Module (➔ "The I-SURF Support Module"
page 151), mark the entry "I-SURF Support" and click on Add/Remove, answer the
question whether you really want to do this with Yes and confirm the end of the
deinstallation with OK.
3. Select the Siemens I-SURF 2.1 entry and click on the Add/Remove command button.
The query appears on the screen
"Are you sure you want to remove I-SURF 2.1"
4. Confirm with Yes.
If an I-SURF Address Book was installed in MS Exchange, you will be asked if you want
to delete the address file.
If you answer with Yes, your I-SURF Address Book with all its entries will be deleted. If
you want to retain the Address Book for other applications or for a possible reinstallation of I-SURF, reply with No.
After a further query, I-SURF with all its components is uninstalled.
40
Brief description of I-SURF
Brief description of I-SURF
The aim of this chapter is to give you a brief overview of the functions and structure of
I-SURF. The main functions of I-SURF are explained briefly below. Detailed discussions
of individual points are contained in the later chapters of this manual.
Menu overview
You can call up the Siemens I-SURF 2.1 program group with the Start and Programs
command button.
The following menu options are available:
System services
This menu group lists all the I-SURF system services.
CAPI Test
Opens the CAPI test program. You can use this test program to test your connection and your interface.
I-SURF CAL Server
CAL stands for Communication Access Layer. The CAL Server module is necessary
in order to run the program.
I-SURF EFT Server
The EFT server is the I-SURF program component that receives and sends EFT
messages. The EFT Server works invisibly in the background.
I-SURF Telematic Server
The Telematic Server is the I-SURF program component that receives and sends
telematic services - fax, teletex and telex. The Telematic Server works invisibly in
the background.
I-SURF Voice Server
The Voice Server is the I-SURF program component that receives and sends voice
messages. The Voice Server works invisibly in the background.
Stop I-SURF
All currently running services (e.g. EFT-, Fax- and Voice-Server) are stopped.
System configuration
With this menu option, you can make basic system settings for I-SURF in the
UserManagement and in the LineManager and you can start the modem wizard.
I-SURF Support Module
I-SURF Support Installation
With this menu option the setup program for installation of your Siemens Support
access is started. After installation, the three following points are available: Siemens Support connection, Siemens Support Homepage and readme.txt.
41
Brief description of I-SURF
Siemens Support Connection
A Dial-Up connection to the Siemens Support Server is established. As soon as you
are connected, please select the menu option Siemens Support Homepage.
Siemens Support Homepage
With this menu option your Internet-Explorer automatically loads the Siemens Support Homepage, provided you established a connection to the Siemens Support
Server beforehand by clicking the menu option Siemens Support Connection.
readme.txt
This text file is a summary of all the notes about the Support Server that you receive
during the installation of the access.
I-SURF EFT Dialer
Starts the EFT Dialer, with which you can send files.
I-SURF Explorer
Starts the EFT Explorer. With the EFT Explorer you can connect to remote EFT terminals.
I-SURF Fax Dialer
Starts the Fax Dialer, with which you can send fax messages.
I-SURF Faxviewer
Starts the Faxviewer. You can use the I-SURF Faxviewer to display fax messages.
I-SURF ISDN Monitor
Starts the ISDN Monitor. The Monitor displays which ISDN lines are available and which
lines are currently carrying data.
I-SURF Online Documentation
Opens the I-SURF manual in its electronic form. You must have the Adobe Acrobat Reader installed in order to read this PDF file.
User Configuration
In the User Management, you can set all the parameters required by a specific user for
fax, EuroFileTransfer and Voicegate. These basic settings are required so that you can
use the functions of I-SURF.
To open the User Configuration, select the User Management component in the
I-SURF System configuration program group.
The Services registry sheet
In this registry sheet you can choose the services you wish to use. The numbers for the
selected services are entered. When incoming calls arrive, the services that have been
installed and started will respond to these entered numbers.
If there is a number conflict between Fax3 and the Voicegate, it will be displayed.
42
Brief description of I-SURF
The Group 3 Fax registry sheet
The parameters for the Group 3 fax service are configured in this registry sheet. Here,
you can enter a Station ID and a header to be printed at the top of every page of your
fax message.
The Group 4 Fax registry sheet
The parameters for the Group 4 fax service are configured in this registry sheet.
The EuroFile Transfer registry sheet
Parameters for EFT data transfer are configured in this registry sheet. You can select
the number of channels to be used for the EFT connection, and specify whether data
should be transferred in compressed form. You can also specify virus protection and
password protection.
The Voicegate registry sheet
The parameters for the Voicegate are entered in this registry sheet. Specify the maximum recording time for a call and how many times the phone should ring before the
Voicegate picks up the call. You can select an existing announcement or record a new
one.
For detailed information about
UserManagement, see ➔ “UserManagement“
page 47.
The ISDN LineManager
You can configure your adapter correctly using the ISDN LineManager. The
LineManager Configuration Assistant helps you make changes to connection data. The
self-ringing test that it contains checks and updates the connection data you have entered.
To open the LineManager, select the I-SURF LineManager Configuration component in
the I-SURF System configuration program group.
The ISDN line registry sheet
This registry sheet shows the data for the location that was set up during the installation of I-SURF. You can change the data here, and can check the settings by clicking on
the New configuration... button.
The ISDN Card registry sheet
This registry sheet shows the ISDN card properties.
You can find detailed information about the
LineManager in the Chapter ➔ “ISDN
LineManager“ page 57.
43
Brief description of I-SURF
The Fax Dialer
You can use the Fax Dialer to send faxes. You can open the Fax Dialer by double-clicking
on the
I-SURF
Fax Dialer
icon, or from the I-SURF menu. Naturally, you can also simply Drag and Drop files you
want to send on to the Fax Dialer icon. In the Dialer window, you can enter the number
to be dialed or select an addressee from the Address Book. Files can be included as
attachments. Click on the Send command button to send the fax to the addressee.
You also have the option of sending fax messages via MS Exchange or MS Explorer, or
direct from the application.
If MS Exchange is opened, incoming fax messages are indicated in the task bar by the
symbol.
You can find detailed information about the Fax
Dialer in the Chapter "Sending and receiving
messages (only in Online Documentation)".
The Fax Viewer
Received fax messages can be displayed and edited on the screen using the Fax Viewer.
In the Fax Viewer, documents can be
●
viewed
●
edited
●
printed
●
forwarded
●
saved.
The Faxviewer is opened automatically when you open a received fax in MS Exchange.
But you can also start the Faxviewer from the I-SURF program group.
Fax messages that you open with a double-click in MS Exchange are displayed in the
TIFFG3 fax format.
Detailed information about Faxviewer is given in
the Chapter "Sending and receiving messages
(only in Online Documentation)" in section
➔ “The Fax Viewer“.
44
Brief description of I-SURF
The EFT Dialer
You can use the EFT Dialer to send files. You can open the EFT Dialer by double-clicking
on the
I-SURF
EFT Dialer
icon, or from the I-SURF menu. Naturally, you can also simply Drag and Drop files you
want to send on to the EFT Dialer icon. In the Dialer window, you can enter the number
to be dialed or select an addressee from the Address Book. Files can be included as
attachments. Click on the Send command button to send the files to the addressee.
You also have the option of sending files via MS Exchange or MS Explorer, or directly
from the application.
If MS Exchange is open, newly arriving messages will be displayed by the icon in the
task bar. They are stored in the MS Exchange Inbox folder.
Detailed information about the EFT Dialer is
contained in the Chapter "Sending and receiving
messages (only in Online Documentation)" in
section ➔ “Sending and receiving files using
EuroFileTransfer“.
The EFT Explorer
You can start the EFT Explorer from the I-SURF program group.
Using the EFT Explorer, you can connect up to a remote EFT terminal and, in a directory
to which you have been granted access, you can copy, move, rename and delete files;
you can also download files from and upload files to the remote terminal (interactive
EFT).
To set up a new connection, select the New command from the Connection menu and
enter the connection data. You will then see a display in the EFT Explorer of the directory on the remote terminal to which you have been given access. Here, you can now
copy, rename and delete files and directories.
To disconnect again, select the Disconnect command from the Connection menu.
Detailed information about the EFT Explorer is
contained in the Chapter "The EFT Explorer (only
in Online Documentation)".
45
Brief description of I-SURF
The Voicegate
You can accept incoming calls on your computer and listen to them later, just as with a
conventional answering machine.
You can record announcements for the voicegate using the telephone or a microphone
attached to the PC. To do this, select the Voicegate registry sheet in the User Management. Here, you can either select a WAV file that was previously recorded with the microphone or you can record a new announcement by clicking on the Record command
button.
Detailed information about the voicegate is contained in the Chapter "The VoiceGate (only in
Online Documentation)".
ISDN Modems
The ISDN modems integrated into I-SURF give you access to digital and analog remote
terminals. The modems and the modem interfaces were configured during installation.
You can call up the Modem Installation Assistant again at any time via the I-SURF program group System Configuration and make changes to the interfaces and / or modems.
Detailed information about the ISDN Modems is
given in the Chapter "Communications via the
ISDN modems (only in Online Documentation)".
46
UserManagement
UserManagement
When I-SURF is installed, a standard user is set up. During user configuration, you can
set all the parameters required by a specific user for fax, EuroFileTransfer and voicegate.
To run user configuration, proceed as follows:
1.
Using the Start and Programs command button, open the Siemens I-SURF 2.1 program group.
2. In the System configuration program group, click on the User Management component.
The user management appears with the Services registry sheet.
Entering numbers
The numbers for the available services should be entered into the Services registry
sheet. When incoming calls arrive, the services that have been installed and started will
react to these entered numbers.
Services
The installed services are listed in the rows. By putting a tick beside the relevant
services you can choose the ones you wish to use.
Location
The main socket number displayed in this box is generated automatically. It consists of the number entered in LineManagement for this location. (see also
➔ “ISDN LineManager“ page 57).
47
UserManagement
MSN (Multiple Subscriber Number)/Number
Enter the number for the appropriate service. The number shown in the Location
box is here in order to complete the required digits.
Tries for dialing
Indicate whether dialing should be automatically repeated if an outgoing call is unsuccessful (e.g. a fax message was to be sent to an engaged distant terminal).
Number of tries: Enter how often dialing should be repeated.
Interval: Enter the intervals at which dialing should be repeated.
Conflicts between numbers
Indicates whether a number conflict exists, i.e. if the same number has been entered for group 3 fax and the voicegate. If a number conflict is displayed, enter a
different number for either the voicegate or the group 3 fax service.
Change MAPI Settings...
Opens the dialog box to change the MAPI Settings.
In this dialog box, you can specify what profile should be used when the I-SURF Fax
and EFT Dialers start up. If you use only a single MAPI profile, you normally do not need
to change any of the existing settings.
Before messages can be sent and received via MS Exchange, a profile must be set up.
This profile tells MS Exchange, among other things, what address books should be
used, where messages are saved, and what information services should be used. One
such information service is the Siemens I-SURF Transport, which controls the exchange
of messages via ISDN.
A profile is also required when you send a message via the I-SURF Dialer rather than
directly via MS Exchange. If MS Exchange has been started, then the profile set in MS
Exchange will simply be used. If MS Exchange has not been started, you must indicate
which profile should be used.
During the installation of MS Exchange, a default profile is set up that can be expanded
as required. When you install I-SURF, the Siemens I-SURF Transport is automatically
added to this default profile as new information service.
In most applications, the default profile is set up as the only profile and all the required
information services are included in it. In general, therefore, it is not necessary to make
any changes to the settings in the profiles.
It is possible, however, to create additional profiles that are configured in accordance
with the relevant requirements. In this event, you must state which profile you wish to
use for which application.
48
UserManagement
Default profile
Displays the profile from MS Exchange that will be used. Click the arrow at the
right-hand edge of the box to display a list of all available profiles, and select the
profile that should be used by default when the I-SURF Dialer is started.
Save settings to default profile
Changes made in UserManagement are copied to the default profile.
When starting an application
Choose here whether the default profile should always be used, or whether you
would like to select the profile when an application is started.
display profile selection box
Select this option if the profile selection box should be displayed whenever the
I-SURF Dialer is started.
always use the default profile
Select this option if the profile shown in the Default Profile box should always
be used when the I-SURF Dialer is started.
You can at any time record a further profile in the selection list for the standard profile.
1.
Highlight the Inbox icon on your screen and click with the right mouse button.
2. Select the Properties command.
The I-SURF ISDN Services Properties dialog with the Services registry sheet is opened.
The list shows all the ISDN services available in the profile.
49
UserManagement
3. Click on the Show Profiles... command button.
The Mail/Microsoft Exchange Profile dialog is opened. This gives you a selection list of
all the profiles that have been installed on your computer. To add a new profile, click on
the Add command button. The Setup Assistant is started.
4. Select the Manually configure information services and click on the Next command
button.
The next dialog prompts you to input a name for the new profile.
5. Enter a name for the new profile and confirm by clicking on Next.
The Profile name properties dialog is opened. By clicking on the Add command button,
you can allocate the desired services to the new profile by highlighting the relevant profile and clicking on OK.
The Siemens I-SURF Transport service must be
allocated to the profile. If no MS-Mail or Microsoft Exchange Server is configured, you definitely should set up a Personal folder.
6. Enter the requested data for the relevant service, and confirm with OK.
The Properties of profile name dialog appears again.
7.
Confirm with OK.
8. Then select whether or not you wish to start the mail automatically with Windows,
and confirm with OK.
You can now close the Setup Assistant. The new profile has been created. When you
start the User Management, the profile is shown in the list of standard profiles.
50
UserManagement
Configuring the Group 3 fax service
The parameters for the Group 3 fax service are configured in the Group 3 Fax registry
sheet.
Station ID
Type your fax number, including your country code and dialing code, as your station
ID. During the transmission of a fax message, the station ID is displayed to the distant terminal and printed in the first line.
Headline
Enter the text for the headline. The headline may include up to 32 characters. The
headline is printed next to the station ID at the top edge of every page of your fax
message.
51
UserManagement
Configuring the Group 4 fax service
The parameters for the Group 4 fax service are configured in the Group 4 Fax registry
chart.
Station ID
Type your fax number, including your country code and dialing code, as your station ID.
During the transmission of a fax message, the station ID is displayed to the distant terminal.
Enter the alpha ID in the last box of the station ID. The alpha ID can be freely selected.
It consists of three to seven characters, and may only contain letters and digits.
52
UserManagement
Configuring EuroFileTransfer
The parameters for data transfer via EFT are configured in the EuroFileTransfer registry
sheet.
EFT username
Type in your username for EFT connections. The username is required by some distant terminals for a connection to be set up.
With some remote terminals you can select any username, but there are some distant terminals that require a specified name. In this event, contact the distant terminal to ascertain the name.
By default, either the user name that was recorded during user-defined installation
or the Windows username from express installation is copied over from I-SURF.
The EFT username and the I-SURF username, however, are completely independent of each other.
Start directory
Shows the path for the Start directory. Distant EFT terminals can download files
from this directory and its subdirectories. The path of the Start directory cannot be
changed.
53
UserManagement
Password
Clicking on this command button calls up a dialog for password input. Here you can
specify a password for external subscribers who wish to access your Start directory. By default there is a Public directory to which every user has read and write access. If a password is specified, the system creates a new user with the username
GUEST. All users then have access to the directory only by using the username
GUEST.
Private directory
Input the name of the private directory. The private directory is the working directory on your computer to which files that you download from distant EFT terminals
are written.
Service
Select the number of channels to be used for the connection. This function is used
only when the distant terminal uses the same compression.
one channel
Data transmission uses only one B-channel.
two channels static
Data transmission uses two B-channels if available.
As a rule, transmission is faster using two channels than using one channel, but
charges are doubled.
two channels dynamic
During the transmission of a file containing more than 300 kB, a second channel is switched in if available.
Compression for transfer
State whether data should be compressed for transfer. The files to be transferred
are then automatically compressed before being sent. This function is used only
when the distant terminal uses the same compression.
none
The data are transferred uncompressed.
standard
The data are compressed in accordance with the EFT standard, i.e. the compression is compatible with all EFT correspondents who also support EFT compression.
Warn if deleting a file
State whether a message should be displayed when you delete files on the distant
terminal during a connection with EFT Explorer.
Warn if replacing a file
State whether a message should be displayed when you delete files on the remote
terminal during a connection with EFT Explorer.
54
UserManagement
Inactive time (1 - 10 min):
Indicate the time after which a connection should be automatically disconnected if
no data are being transferred. This Short Hold mechanism helps you save money if
in the EFT Explorer you happen to forget to disconnect the call.
Anti virus application
Incoming data can be checked for viruses automatically. Input the path and name
of the program that should check for viruses.
Configuring Voicegate
The parameters for the voicegate are input into the Voicegate registry sheet.
Recording time (30-1200 sec)
Input the maximum length of time for recording a call. The caller will hear a tone
about five seconds before this time expires.
Ring count (0-10)
Input how often the phone should ring before the voicegate takes the call. It is assumed that a ring lasts five seconds. Depending on the phone, however, this may
vary. In that case, the value set in the Ring Count box will no longer correspond with
the actual value.
The value you can enter here depends on the connection combination. If the PC
and telephone are connected in parallel to the same bus, the voicegate and the telephone must have the same number and the voicegate must have the appropriate
number of digits set. If 0 is entered, the voicegate will take the message immediately.
55
UserManagement
If the PC is connected to a phone that is connected to a PBX rather than the same
bus, the telephone has to be diverted to the voice mailbox if the voicegate is to take
the calls. The number of digits depends on the PBX being used.
Pins for remote control
Click this command button to open the Pins for remote control dialog box. You can
find additional information about remote control in chapter "The VoiceGate (only in
Online Documentation)" in section ➔ “Remote control“ page 96.
Standard outgoing message
Input a path and the name of the file that contains the desired answertext for the
greeting message and/or the goodbye message. These are the texts that are
played back by default. Answer texts are stored in sound files (which can be identified by the extension .WAV). The files must be in 8 kHz, 8 bit, mono format.
...
Click on this command button to open a window displaying the WAV files in individual directories. Select a file.
Play
By clicking on this button you can listen to the selected announcements over the
sound recorder.
Record
Opens a dialog box for recording a new answer text over the phone (see also in
chapter "The VoiceGate (only in Online Documentation)" in section ➔ “Recording
an announcement“ page 93).
Special outgoing messages
If you click on the ...for incoming number button, the Outgoing messages for incoming
numbers dialog will be opened. In this dialog, you can allocate specific answer texts to
individual callers. A caller is defined by his complete telephone number (country code,
area code, subscriber number) You can also delete the allocation of an answer text in
this dialog.
Play messages on
With the aid of the Computer and Phone options, you can determine how the incoming
messages are to be listened to. If they are to be heard via the computer (which must,
of course, have a sound board), then choose computer. Choose telephone if you want
to listen to the messages over the telephone. Enter the telephone number of the telephone you are going to use for this purpose.
56
ISDN LineManager
ISDN LineManager
You can configure your ISDN card correctly using the ISDN LineManager. The
LineManager Configuration Assistant helps you make changes to connection data. The
call test that it contains checks and updates the connection data you have entered. Normalization of the number makes it possible for the numbers of all connections to be
unambiguously identified.
If the ISDN card you have installed does not support a fax application, the software fax
integrated into the LineManager lets you send and receive fax messages.
The LineManager is called up from the System Configuration of ISDN SURF.
Configuring ISDN line
In LineManager, the location contains information about the ISDN line, e.g. its number.
A location was created during the installation of the I-SURF Server and is used by default.
The data relating to the location that was previously set up are shown in the ISDN line
registry sheet. You can change the location data in this registry sheet.
General
Input the general parameters for the location.
International code
State the code for international calls. The code prefix is the number that has to be
dialed before the country code (00 or 000 in the UK, 00 in Germany, 011 in the USA,
etc.).
57
ISDN LineManager
Country code
Enter the country code of your plug (44 for the UK, 49 for Germany, 1 for the USA
etc.).
National code
Enter the discrimination digit, if any, for calls outside your own local network (0 in
Germany). The national code must be dialed before the local area code.
Area code
Enter the area code of your socket.
ISDN line (direct)
These boxes are enabled only if you are connected to a PBX, i.e. if you are operating
your ISDN card direct to ISDN line.
Digit(s) incoming from network
Enter the digits that are transmitted over the network before the area code. The
setting is checked with the call test and corrected if necessary.
Common number
Enter the number of your extension unless the entire number is sent from the exchange.
The setting is checked with the call test and corrected if necessary.
PBX configuration
Enable this option, if you operate a PBX, and enter the parameters of your PBX.
Connection outgoing
Input the outside-line digit. The outside-line digit is the digit or series of digits you
have to dial to get an outside line from your own PBX. The outside-line digit depends on your system.
Connection incoming
Enter the discrimination digit generated by the PBX for incoming calls.
Mainline
Input the number of the main socket.
Busnumber
Enter the bus number. If your PBX passes only the last digit to the ISDN card when
there is an incoming call, enter the remaining digits of the MSN as the bus number.
Example:
Your main number is 55453 and the MSN is 314. The PBX passes only the last digit,
i.e. the 4. Enter the first two digits of the MSN (31) as the bus number.
58
ISDN LineManager
Country specific settings...
Clicking on this command button calls up a dialog for setting country-specific data.
Charging - cost per unit
Enter the cost of one telephone unit. You can change the displayed currency unit in
Windows System Control (Country settings) by selecting the appropriate country and
currency.
Line configuration
Speech data coding: Speech data can be coded (compressing 12 bits into 8 bits) in
two different ways. Select µ-law encoding for the USA, Japan and Canada, and alaw coding for Europe.
Transfer rate: Select a transfer rate of 56 kbit/s if this is required by your connection.
For Europe, select a transfer rate of 64 kbit/s. The transfer rate applies to both
speech data and other data services.
Various settings are possible in the USA, Japan
and Canada. Please ask your ISDN service provider about this.
Configure new...
Clicking on this command button calls up the LineManager Configuration Assistant.
The values set during the location configuration are shown and are checked and updated by a call test.
59
ISDN LineManager
Configuring ISDN card
The ISDN cards installed in your computer are displayed in the ISDN card registry sheet.
The configuration of the ISDN card is displayed in the ISDN card registry sheet.
Manufacturer
Shows the manufacturer of the ISDN card.
CAPI version
Shows the version of the CAPI linked with the ISDN card.
Driver version
Shows the version of the card driver.
Fax 3
Shows whether the ISDN card has its own fax3 module.
Controller number
Shows the serial number of the ISDN card. This number is automatically allocated
by LineManager when an ISDN card is set up.
Channels
Shows the number of channels provided by the ISDN card.
60
ISDN LineManager
Software fax
Check this option if you wish to use the software fax module contained in I-SURF.
The software fax should be used
●
if the ISDN card does not support a fax module
●
the hardware fax module of the ISDN card has a narrower range of functions than
the software fax (i.e. less than 14,400 baud transmission rate).
Software Modem
Check this option if you wish to use the software modem contained in I-SURF.
Change ISDN card...
A dialog is opened so that a different ISDN card can be selected.
If you have installed several ISDN cards on your computer, you can select another
ISDN card here. I-SURF, however, supports only one ISDN card. Press the OK button to return to the ISDN card registry sheet, which shows the properties of the
most recently selected ISDN card.
61
ISDN LineManager
62
Sending and receiving messages
Sending and receiving messages (only in Online Documentation)
Sending and receiving fax messages
Using I-SURF, you can send fax messages to both conventional Group 3 analogue fax
machines and Group 4 digital fax machines, and receive fax messages from them. Unless otherwise stated, I-SURF tries to send using the substantially faster and more economical Group 4 standard and, if this is not supported by the distant terminal, I-SURF
then automatically falls back to the Group 3 standard.
Sending a fax message
You can send a fax message in several ways - from MS Exchange, via the Fax Dialer,
from MS Explorer or from an application. When a message is sent successfully, a message appears in the Sent Items folder (proviso: the option Save copy to "Sent Objects"
folder has been enabled in the Extras - Options menu in the Send registry sheet). If the
message could not be sent, you'll find a message in the Inbox folder giving information
about the error that occurred during transmission.
Sending a fax message in MS Exchange
Sending fax messages works exactly like sending other documents in MS Exchange.
Only the principles are explained here: you can find more information in your MS Exchange documentation and in ➔ “Microsoft Exchange (only in Online Documentation)“
page 141.
1.
Open MS Exchange.
2. Click on the New Message icon or, in the Compose menu, select the New Message command.
The editing window for creating a new message is opened.
3. In the To box, input one or more recipients.
You have the following input options:
a) Input the name of the recipient as found in the Address Book.
63
Sending and receiving messages
b) Input the phone number of the distant terminal, in the form:
[FAX:Number]
for faxes with automatic fallback
[FX3:Number]
for fax 3
[FX4:Number]
for fax 4
You have the following options when entering a number:
●
entering the number in "canonical" (normalized) form, e.g. [FX3:+49 30 46402 300]
●
entering the number in "normal" form, e.g. [FX3:030 46402 300]
●
entering a "!" before the number, i.e. the number is dialed exactly as it was entered,
e.g. [FX3:!030 46402 300]
●
entering with a "*" before the number, i.e. the outside-line digit is automatically
placed before the number, e.g. [FX3:*46402 300]
c) Click on the Address Book icon.
The Address Book is opened and you can select a recipient (see also chapter "Microsoft
Exchange (only in Online Documentation)", ➔ “Selecting the recipient from the
Address Book“ page 143).
You can send a message to several recipients at the same time, using different services, e.g. Fax and Mail.
4. In the Cc field, input those who should receive a copy of the message.
You have the same input options as when naming recipients. This input is optional.
5. In the Subject box, input the subject line of the message.
6. In the Message box, input the text of the message.
You can attach documents to your message that come from other applications (see also
chapter "Microsoft Exchange (only in Online Documentation)" section ➔ “Attaching files
to a message“ page 142)
Attached documents are always printed out on a new page. They should be attached
at the end of a message, so that only one page change is caused.
7.
Set the send options, if appropriate.
(see also chapter "Microsoft Exchange (only in Online Documentation)", section
➔ “ISDN Send options“ page 145).
8. Click on the Send icon or, in the File menu, select the Send command.
Your fax is sent, and you receive a message in the Sent Items folder. If the fax message
could not be sent, you'll find a message in the Inbox giving information about the error
that occurred during transmission.
64
Sending and receiving messages
During the sending process, the program in
which the fax message was composed is
opened and a print operation is initiated to control the conversion into fax format. In most programs, the printing process starts automatically
but there are some (e.g. MS Excel or MS
PowerPoint) in which it has to be started manually. In this case, after sending the message you
should wait until the program has been opened
and the Print dialog appears. Then start the
Print.
Sending a fax message via Drag&Drop on the Fax Dialer
Using the I-SURF Fax Dialer, you can send documents as fax messages simply using
drag and drop.
The explanations in this section are intended to enable you get started quickly. They are
therefore confined to the "normal case" when faxing: the sending of a document to a
recipient. But the I-SURF Dialer provides many more options and functions. You can
find a detailed description in section ➔ “The I-SURF Dialer“ page 79.
1.
Mark one or more files (e.g. in MS Explorer) and drag them to the icon
I-SURF
Fax Dialer
on your desktop.
The I-SURF Fax Dialer window is opened.
65
Sending and receiving messages
2. In the Dialing mode box, select the way the number should be dialed.
Three options are available:
●
Direct dial: The number is dialed just as it was entered.
●
Automatic line call: The outside-line digit does not need to be entered but is determined automatically by the system.
●
Location name: The number of the location as configured in the LineManager is
used and must be supplemented with the requisite digits in the Number box.
3. In the Number box, enter the recipient's number to correspond with the selected
dialing mode.
To send the document to further addressees, click on ...to list>> and enter further addressees. If you wish to send further documents, you can also drag them to the Fax
Dialer icon.
4. Click on Send.
The message sent without any further confirmation.
During the sending process, the program in
which the fax message was composed is
opened and a print operation is initiated to control conversion into fax format. In most programs, the printing process starts automatically
but there are some (e.g. MS Excel or MS
PowerPoint) in which it has to be started manually. In this case, after sending the message you
should wait until the program has been opened
and the Print dialog appears. Then start the
Print.
Sending a fax message with double-click on the Fax Dialer
You can also send fax messages by simply opening the Fax Dialer with a double-click.
1.
Double-click on the Fax Dialer icon.
I-SURF
Fax Dialer
The extended dialing window of the I-SURF Fax Dialer is opened.
66
Sending and receiving messages
2. In the Number box, input the number of the recipient.
3. In the Dialing mode box, select the way the number should be dialed.
Three options are available:
●
Direct dial: The number is dialed just as it was entered.
●
Automatic line call: The outside-line digit does not need to be entered but is determined automatically by the system.
●
Location name: The number of the location as configured in the LineManager is
used and must be supplemented with the requisite digits in the Number box.
4. In the Number box, enter the recipient's number to correspond with the selected
dialing mode.
5. Select the files to be sent.
6. Click on Send.
The message sent without any further confirmation.
During the sending process, the program in
which the fax message was composed is
opened and a print operation is initiated to control conversion into fax format. In most programs, the printing process starts automatically
but there are some (e.g. MS Excel or MS
PowerPoint) in which it has to be started manually. In this case, after sending the message you
should wait until the program has been opened
and the Print dialog appears. Then start the
Print.
67
Sending and receiving messages
Sending a fax message from an application
You can send files direct from the application in which you create them.
1.
Open the file you want to send and select the command Print or Printer Setup.
2. Select ISDNFAX as the printer.
3. Start the print.
The I-SURF Fax Dialer window opens for the sending of a fax message. For the further
procedure, see ➔ “Sending a fax message via Drag&Drop on the Fax Dialer“ page 65.
After the message has been sent, ISDNFAX is still set as the printer. You must therefore
set up your original printer manually again.
Sending a fax message via MS Explorer or from the desktop
To send one or more files direct from Explorer or the desktop
1.
With the right mouse button, mark the file to be sent.
A menu with the main file editing commands opens up.
2. Select the command Send To.
A list showing a selection of the services available for the transmission is displayed.
3.
a) Select the service I-SURF Fax Dialer.
The I-SURF Fax Dialer window is opened. For the further procedure, see
➔ “Sending a fax message via Drag&Drop on the Fax Dialer“ page 65
or
b) Select the service Mail Recipient.
MS Exchange is opened. For the further procedure, see also ➔ “Sending a fax
message in MS Exchange“ page 63.
Receiving a fax message
Newly arrived fax messages, like all messages in MS Exchange, are indicated in the
task bar by the symbol
.
1.
Open MS Exchange and select the Inbox folder.
In the list of received messages, the From box contains the text Fax 'Number' for fax
messages.
68
Sending and receiving messages
2. Double-click on the fax message.
The fax viewer is opened with the fax message (see section ➔ “The Fax Viewer“ page
69).
The Fax Viewer
Received fax messages can be displayed and edited using the fax viewer.
In the fax viewer, documents can be
●
viewed
●
edited
●
printed
●
saved.
The fax viewer is opened automatically when you open a received fax in MS Exchange.
But you can also start the fax viewer from the I-SURF program group.
Fax messages that you open with a double-click in MS Exchange are displayed in the
TIFFG3 fax format.
69
Sending and receiving messages
Commands in the File menu
Open
Use this command to open a file. The fax viewer can read files in TIF and ATF format.
Close
Use this command to close a file.
Save
Use this command to save the current document.
Save as...
Use this command to save the current document. It lets you change the directory, filename and file format as well.
The following file formats are available:
●
TIFFG 3 format
●
DCX format
●
PCX format
In the PCX format, only one page at a time can
be saved. If you save a multipage fax as a PCX
document, a file for each page is created automatically. The appropriate page number is appended to the selected filename.
Print
Use this command to open the Print dialog.
Printer setup
The Printer Setup dialog is opened.
The printer set up in the fax viewer does not always correspond with the standard printer selected under Windows, because the fax viewer has its own printer manager.
Thus, the printer can be set up independently of the standard Windows printer. This
setup remains in force after you leave the fax viewer and is unaffected by any change
of the standard printer under Windows.
1 D:\README.TIFFG3
In this part of the menu you will find a list of the recently displayed files. They can be
opened with a click.
Exit
This command closes the fax viewer.
70
Sending and receiving messages
Commands in the Edit menu
Undo
Undoes the last action.
Cut
Removes a marked section and puts it into the clipboard.
Copy
Copies a marked section and puts it into the clipboard.
Paste
Pastes the contents of the clipboard into the current document. You can change the
position of the inserted section by clicking and dragging it with the mouse.
Delete
Deletes a marked section.
Commands in the View menu
Toolbar
Use this command to switch on or off the display of the toolbar.
Status bar
Use this command to switch on or off the display of the status bar.
Zoom
The zoom functions change the size of the document displayed on the screen.
The following scales can be selected:
100 %
50 %
25 %
12 %
Zoom in
reduces the display by one step
Zoom out
enlarges the display by one step
Rotate page
Use this command to rotate your document through the following angles:
0°
90°
71
Sending and receiving messages
180°
270°
Rotate all pages
Rotates all the pages of a document to the desired position.
Contrast
Set a contrast that makes your document clearly legible.
light
normal
deep
This option has no effect on original displays at 100%.
Invert
This command sets a
black on white display or a
white on black display (inverted)
An inverted display makes heavily blackened fax documents become legible.
Page
Previous
Displays the previous page of your document.
Next
Displays the next page of your document, if further pages exist.
First
Displays the first page of your document.
Last
Displays the last page of your document.
Go to...
Displays a dialog in which you can input the desired page number. If the input page
number is too high, the last page of the document is displayed.
72
Sending and receiving messages
Commands in the Options menu
Save settings on exit
This command enables/disables the option that saves all important settings when you
exit:
●
position and size of the display window
●
zoom
●
contrast
●
inverse display
●
printer for output
●
list of the most recently opened documents
●
document path
● last selected file type
Exception: Every document type can be displayed with specific settings. Different values are
stored for fax documents than, e.g., for other text documents.
Commands in the Window menu
New window
This command makes an additional window available for editing the current document.
Cascade
The open windows are shown cascading.
Tile vertically
The open windows are shown tiled vertically.
Tile horizontally
The open windows are shown tiled horizontally.
Arrange icons
The icons are aligned with each other.
1 README.tiffg3
In this part of the menu you will find a list of the recently displayed files. Clicking on
them brings them into the foreground.
73
Sending and receiving messages
Sending and receiving files using EuroFileTransfer
Using I-SURF, you can transfer files by EuroFileTransfer. EuroFileTransfer - EFT for short
- is a Europe-wide data transmission standard. In data transfer by EFT, it doesn't matter
what EFT software is being used by the distant terminal: data can be exchanged with
any distant terminal that operates in accordance with the EFT standard.
Sending files
You can send one or more files by ETF in several ways - from MS Exchange or via the
EFT Dialer. If the files were successfully sent, a message appears in MS Exchange, in
the Sent Items folder. If the message could not be sent, you'll find a message in the
Inbox folder giving information about the error that occurred during transmission.
If necessary, you can adjust the EFT parameters in the I-SURF configuration (see also
section ➔ “Configuring EuroFileTransfer“ page 53).
Sending a file in MS Exchange
Files can be sent via MS Exchange just like ordinary mail.
1.
Open MS Exchange.
2. Click on the New Message icon or, in the Compose menu, select the New Message command.
The editing window for creating a new message is opened.
3. In the To box, input one or more recipients.
You have the following input options:
a) Input the name of the recipient. The recipient must already be listed in the Address
Book.
b) Input the phone number of the distant terminal, in the form: [EFT:Number. You have
the following options when entering a number:
74
●
entering the number in "canonical" (normalized) form, e.g. [EFT:+49 30 46402 300]
●
entering the number in "normal" form, e.g. [EFT:030 46402 300]
●
entering a "!" before the number, i.e. the number is dialed exactly as it was entered,
e.g. [EFT:!030 46402 300]
●
entering with a "*" before the number, i.e. the outside-line digit is automatically
placed before the number, e.g. [EFT:*46402 300]
Sending and receiving messages
c) via the Address Book (see also chapter "Microsoft Exchange (only in Online Documentation)", section ➔ “Selecting the recipient from the Address Book“ page 143).
You can send a message to several recipients at the same time, using different services, e.g. EFT and Mail.
4. In the Subject box, input the subject line of the message.
If the recipient doesn't have MS Exchange, the text of the Subject line appears as a text
file in RTF format.
5. If necessary, input additional text into the Message box and insert the file(s) to be
sent as attachments.
The text in the Message box appears to the recipient as a text file in RTF format.
6. Set the send options, if appropriate.
To set the Send options, see chapter "Microsoft Exchange (only in Online Documentation)", section ➔ “ISDN Send options“ page 145.
7.
Click on the Send icon or, in the File menu, select the Send command.
The files are sent, and you receive a message in the Sent Items folder. If the transmission was unsuccessful, you'll find a message in the Inbox giving information about the
error that occurred during transmission.
75
Sending and receiving messages
Sending files via Drag&Drop on the EFT Dialer
You can send files simply and quickly via the I-SURF EFT Dialer.
The explanations in this section are intended to enable you get started quickly. They are
therefore confined to the "normal case" when sending a message via EFT: i.e. sending
a file to a recipient. The I-SURF Dialer, however, provides many more options and functions. You can find a detailed description in section ➔ “The I-SURF Dialer“ page 79.
1.
Mark one or more files (e.g. in MS Explorer) and drag them to the icon
I-SURF
EFT Dialer
on your desktop.
The I-SURF EFT Dialer window is opened.
2. In the Dialing mode box, select the way the number should be dialed.
Three options are available:
●
Direct dial: The number is dialed just as it was entered.
●
Automatic line call: The outside-line digit does not need to be entered but is determined automatically by the system.
●
Location name: The number of the location as configured in the LineManager is
used and must be supplemented with the requisite digits in the Number box.
3. In the Number box, enter the recipient's number to correspond with the selected
dialing mode.
76
Sending and receiving messages
To send the document to further addressees, click on ...to list>> and enter further addressees. If you wish to send further documents, you can also drag them to the EFT
Dialer icon.
4. Click on Send.
The message is sent without any further confirmation.
Sending a message with double-click on the EFT Dialer
You can also send messages by simply opening the EFT Dialer with a double-click.
1.
Double-click on the EFT Dialer icon.
I-SURF
EFT Dialer
The extended dialing window of the I-SURF Dialer is opened
2. In the Dialing mode box, select the way the number should be dialed.
Three options are available:
●
Direct dial: The number is dialed just as it was entered.
●
Automatic line call: The outside-line digit does not need to be entered but is
determined automatically by the system.
●
Location name: The number of the location as configured in the LineManager
is used and must be supplemented with the requisite digits in the Number box.
3. In the Number box, enter the recipient's number to correspond with the selected
dialing mode.
4. Select the files to be sent.
5. Click on Send.
The message is sent without any further confirmation.
Sending a file via MS Explorer or from the desktop
To send a file direct from the desktop or via MS Explorer:
1.
With the right mouse button, mark the file.
A menu with the main file editing commands opens up.
2. Select the command Send To.
A list showing the services available for the transmission is displayed.
77
Sending and receiving messages
3.
a) Select the service I-SURF EFT Dialer.
The I-SURF EFT Dialer window is opened. For the further procedure, see
➔ “Sending files via Drag&Drop on the EFT Dialer“ page 76.
or
b) Select the service Mail Recipient.
MS Exchange is opened. For the further procedure, see ➔ “Sending a file in MS
Exchange“ page 74.
Receiving files
If MS Exchange is open, newly arriving messages will be displayed by the icon
the task bar. They are stored in the MS Exchange Inbox folder.
1.
in
Open MS Exchange and select the Inbox folder.
In the list of received messages, the From box contains the text File from 'Number' for
incoming files.
2. Double-click on the message.
MS Exchange opens a window with the appropriate message containing the files as
attachments.
If the sender sent the files from MS Exchange and input a Subject line and/or additional
message text, they appear as text files in RTF format.
3. Double-click on the icon of a file.
The appropriate application is opened with the file.
78
Sending and receiving messages
The I-SURF Dialer
Using the I-SURF Dialer, you can send files simply using drag and drop, either as fax
messages or via EuroFileTransfer.
To send a message - as a fax or via EFT
1.
Open the I-SURF Dialer.
Mark one or more files (e.g. in MS Explorer) and drag them to one of the icons
I-SURF
Fax Dialer
or
I-SURF
EFT Dialer
on your desktop, or double-click on the icon.
The I-SURF Fax Dialer or I-SURF EFT Dialer window is opened.
If you started the I-SURF Dialer with a double-click, the expanded Dialer window is
opened. If you drag a file to the Dialer icon, only the left-hand part of the Dialing window
is opened at first.
2. Decide how you want to indicate the recipient.
You can choose to input the recipient's number direct or select it from the Address
Book, by clicking the appropriate registry sheet. The mode selected for the previous input is set as default.
The input mask changes, depending on your choice of input.
3. Input a recipient.
a) If the Number registry sheet was clicked
In the Number box, input the number of the recipient. Click the arrow at the right-hand
edge of the input box to open a list of the last ten numbers called, any of which you can
select by clicking (redial).
The way the number is entered depends on the Dialing mode you have selected. Three
options are available:
●
Direct dial: The number is dialed just as it was entered.
●
Automatic line call: The outside-line digit does not need to be entered but is determined automatically by the system.
●
Location name: The number of the location as configured in the LineManager is
used and must be supplemented with the requisite digits in the Number box.
79
Sending and receiving messages
Click the ...to list>> command button to copy the number into the Recipients list; you
can then input another recipient.
b) If the Address Book registry sheet was clicked
Select an Address Book and mark the recipient's name. Click the Add command button
to copy the Address Book entry into the Recipients list; you can then input another recipient.
4. Select the desired service.
If you are inputting the number direct, the Service box will already show Fax Gr 3 or EFT
as default, depending on which Dialer had been opened.
If you select the recipient from the Address Book, the default service recorded in the
Address Book is automatically selected (see also chapter "The I-SURF Address Book
(only in Online Documentation)" ➔ “Adding an entry in an I-SURF Address Book“ page
99 , Business registry sheet). If EFT rather than Group 3 Fax is the default service recorded for the selected recipient, the message is sent as an EFT message, even if you
are sending via the Fax Dialer.
5. Indicate whether you want to send a coverpage with the fax message or a short
fax.
Enter a subject line in the Subject box. If you don't enter a subject line, no short fax/
coverpage will be sent.
6. Indicate whether you want confirmation of transmission.
In the Confirmation box, select one of the following options:
none
You don't get confirmation of transmission (exception: if the message could not be
sent, you will always receive a message).
per recipient
If you are sending a message to several recipients, you'll get a confirmation for each
recipient.
whole job
If you are sending a message to several recipients, you'll get only one confirmation
for all the transmissions. Depending on the number of recipients, it may take some
time before you get the confirmation of transmission.
7.
Select the files to be sent.
If you have opened the Dialer dialog by dragging a file to it, the "small" dialing window
will be opened with the filename displayed at bottom left, in the File box. If you wish
to add more files for transmission, clicking on the Attachments >> command button.
The expanded Dialer dialog opens.
80
Sending and receiving messages
If you opened the Dialer dialog by double-clicking on the Dialer icon or by dragging a
number of files to it, the expanded Dialer window opens immediately. The File attachment(s) box lists the files to be sent.
Click on the Browse... command button to open the Files to send dialog, in which you
can select additional files to be sent.
8. Preview
If this option is enabled, a fax is displayed before being sent so that you can check the
document once more after it has been converted.
9. Set the send options.
Click on the Options command button to do it. The I-SURF Send Options dialog appears.
Input the sending time and the number of retries in the General registry sheet.
Automatic Redialing
Indicate whether the call should be automatically repeated if transmission fails (e.g. because the distant terminal is busy).
Tries
Indicate how many retries should be made. The value entered in the
UserManagement system is used as the default.
Time between
Input the intervals at which dialing should be repeated. The value entered in the
UserManagement system is used as the default.
Input the fax options in the Fax registry sheet.
81
Sending and receiving messages
Resolution
State the desired resolution. The possible values are
for fax 3:
normal (96 lpi)
fine (196 lpi)
for fax 4:
normal (200 dpi)
fine (400 dpi)
Format
State the desired format. The possible values are
DIN A4
DIN A5 (landscape only)
US Letter
Legal
Orientation
Indicate the orientation of the document to be sent.
Portrait
The document is sent in portrait format.
Landscape
The document is sent in landscape format.
If an orientation was stated on the creation of a document (e.g. in Word for Windows),
that orientation is always used.
Input the parameters for EFT transmission in the EFT registry sheet.
82
Sending and receiving messages
Input the parameters for the EuroFileTransfer in this dialog.
Username
Input your username. The username is required by some distant terminals for a connection to be set up.
Password
Input your password. The password is required by some distant terminals for a connection to be set up.
If you want to send your message to a number
of remote terminals, each of which requires a
different password, you need to do it in a
number of send jobs.
Channel bundling
Select how many channels are to be used for the data transmission. The default setting
is the option that was set in the I-SURF UserManagement system.
Static one channel
Data transmission uses only one B-channel.
Static two channels
Data transmission uses two B-channels if available.
As a rule, transmission is faster using two channels than using one channel, but
charges are doubled.
Dynamic two channels
During the transmission of a file containing more than 300 kB, a second channel is
switched in if available.
83
Sending and receiving messages
Compression
State whether data should be compressed for transfer. The data to be transferred are
then automatically compressed before being sent and are decompressed by the distant terminal.
The default setting is the option that was set in the I-SURF UserManagement system.
no
The data are transferred uncompressed.
ETS standard
The files are compressed in accordance with the ETS standard.
Close the options dialog with OK. The Dialer window reappears.
10. Click on Send.
The message is sent without further confirmation.
If you don't want to send the message yet but you do want the inputs to be stored,
click on the Save command button. The I-SURF Dialer is closed without the document
being sent. All the inputs you have made are stored in the MS Exchange Inbox folder.
84
The EFT Explorer
The EFT Explorer (only in Online Documentation)
Using the EFT Explorer, you can connect up to a distant EFT terminal and, in those of
its directories to which you have access, you can copy, move, rename and delete files.
You can also download files from and upload files to the distant terminal (interactive
EFT).
Start the EFT Explorer from the I-SURF program group. The EFT Explorer window appears.
The names of the EFT subscribers are listed in the left-hand part of the window. By default, subscribers are displayed in two groups: the Directory group and the Last Used
group.
All Address Book entries for distant EFT terminals are contained in the Directory group
of subscribers. The last ten connections are recorded in the Last Used group of subscribers.
Description of the icons
Subscriber group
Click the icon
or double-click on the group icon to open the subscriber group.
EFT Subscribers
If you mark a subscriber, the appropriate data are shown in the right-hand part of the
window. Click the icon
or double-click on the group icon to set up the connection.
Call Setup
A connection is currently being set up to the selected subscriber.
existing connection
You are connected to the subscriber.
Disconnect
The connection with the subscriber is currently being broken.
85
The EFT Explorer
Setting up a connection
If the subscriber to whom you wish to set up a connection is already recorded in the
Address Book
1.
Double-click on the appropriate icon in the left-hand part of the main window.
The connection is set up.
or
1.
Mark the desired subscriber.
2. Click on the icon or, in the Connection menu, select the Connect to command.
The EFT Destination window, with the connection data already entered into it, appears.
3. Confirm with OK.
If you are setting up a connection for the first time, the EFT Address dialog appears.
Enter your username and password there. These details are saved by EFT Explorer and
don't have to be entered again the next time a connection is set up to this subscriber.
If you want a connection with a subscriber who is not recorded in the Address Book
1.
From the Connection menu, select the New command.
The EFT Destination window appears.
2. Input your connection details.
Company
Enter the company name of the subscriber at the distant terminal.
Name
Enter the name of the subscriber at the distant terminal.
EFT-Number
Enter the complete number of the distant terminal, including where necessary the
outside line digit, country code and dialing code.
User name
Input your username. The username is required by some distant terminals in order
to check your access rights. If need be, contact the distant terminal to ascertain the
username.
86
The EFT Explorer
Password
Input your password. The password is required by some distant terminals in order
to check your access rights. If need be, contact the distant terminal to ascertain the
password.
For security, the password is not displayed while being entered: instead, a * is displayed for each character.
3. Click on the OK command button.
The connection is set up.
When the connection has been set up, the directory, subdirectories and files on the distant terminal to which you have access appear in the right-hand window of the EFT Explorer.
Depending on your access rights, you can now copy, rename and delete files and
download them to your computer. You operate EFT Explorer largely in the same way as
you already know from MS Explorer (see also section ➔ “Working with files and directories“ page 88).
While the connection is open, the status line at the bottom edge of the EFT Explorer
shows the following information:
●
number of channels
●
compression
●
current connection time
●
call charges incurred so far
Disconnecting EFT Explorer
To terminate a connection
1.
Mark the call that is to be disconnected.
2. Click on the Disconnect icon or, in the Connection menu, select the Disconnect
command.
The connection is broken.
Even when the connection is being broken, the directory information is retained, i.e.
you can still see the opened directory on the distant terminal in the Explorer window.
If you wish to set the call up again, click with the right mouse button in the opened window and, from the Context menu, select the Update command. The connection is set
up again, and you will be in the last directory to be opened.
87
The EFT Explorer
Working with files and directories
When you have set up a connection, the directory, subdirectories and files on the distant terminal to which you have access appear in the EFT Explorer Depending on your
access rights on the distant terminal, you can now copy, rename and delete files and
directories.
Copying files from the distant terminal
You can either copy files via the clipboard or download them direct to your computer.
To copy files via the clipboard
1.
In EFT Explorer, mark the files you want to copy.
2. From the Edit menu, select the Copy command.
3. In MS Explorer, open the directory on your computer to which you want to copy the
files.
4. From the Edit menu, select the Paste command.
To download files direct from the distant terminal
1.
In EFT Explorer, mark the files you want to copy.
2. Click on the Get icon or, in the Edit menu, select the Get command.
The files are copied to the private directory on your computer. On specifying the private
directory, see also section ➔ “Configuring EuroFileTransfer“ page 53.
If you want to download files to a directory on your computer other than the private directory, select the Get to... command. A dialog is opened in which you can select the
desired destination directory.
If a file of the same name already exists in the
destination directory, it will be overwritten. Depending on the settings in the
UserManagement system, it may be that no
warning is displayed (see also section
➔ “Configuring EuroFileTransfer“ page 53).
88
The EFT Explorer
Copying files from your computer to the distant terminal
You can only copy files to the distant terminal if you have been given write access to
the destination directory.
1.
In EFT Explorer, mark the files you want to copy to the distant terminal.
2. From the Edit menu, select the Copy command.
3. In MS Explorer, open the directory on the distant terminal to which you want to
copy the files.
4. From the Edit menu, select the Paste command.
You can also copy files to the distant terminal simply using drag and drop.
1.
In EFT Explorer, open the destination directory on the distant terminal.
2. In EFT Explorer, mark the files on your computer that you want to copy.
3. With the mouse button held down, drag the marked files to the destination directory on the distant terminal.
Renaming files on the distant terminal
You can only rename files on the distant terminal if you have been given write access
to the directory.
1.
In EFT Explorer, mark the file you want to rename.
2. From the Edit menu, select the Rename command.
When the filename is stored in a different colour and the text cursor appears, you can
overwrite the old name.
Deleting files on the distant terminal
You can only delete files on the distant terminal if you have been given write access to
the directory.
1.
In EFT Explorer, mark the file you want to delete.
2. From the Edit menu, select the Delete command.
89
The EFT Explorer
An overview of all commands
The commands in the Connection menu
New
Opens the EFT Destination dialog so that a new connection can be entered and set up.
Connect to
Opens the EFT Destination dialog to set up a connection.
Abort transfer (current file)
Cancels the transmission of the current file without disconnecting the call.
Abort transfer (all files)
Cancels the transmission of all files without disconnecting the call.
Journal....
Opens the Journal. The Journal function has not yet been implemented in this version.
Disconnect
Disconnects the marked call.
Close
Closes EFT Explorer. If connections are still open, a query whether they should be broken is displayed.
90
The EFT Explorer
The commands in the Edit menu
Cut
Deletes the marked files and transfers them to the clipboard.
Copy
Copies the marked files to the clipboard.
Paste
Pastes the marked files from the clipboard to the current directory.
Delete
Deletes the marked files from the hard disk on the distant terminal.
Get
Copies the marked files from the distant terminal into your own working directory.
Get to...
Opens a dialog for the selection of the directory to which the files from the distant terminal should be downloaded.
Rename
Switches into the mode for renaming a file or directory.
New Address...
Opens the I-SURF Address Book for a new address to be input. The New Address
function has not yet been implemented in this version of I-SURF.
Properties..
Opens the Properties... dialog with information about the marked file.
91
The EFT Explorer
The commands in the View menu
Explore local
Opens the working directory in MS Explorer.
Large icons
Switches the Viewer into large icons.
Small icons
Switches the Viewer into small icons.
List
Switches the Viewer into a list.
Details
Switches the Viewer into Details.
Toolbar
Switches the toolbar on and off.
Status bar
Switches the status bar on and off.
The commands in the Extras menu
Configuration...
Opens the I-SURF UserManagement system.
Update UserManagement
Copies data from the UserManagement system (data compression, number of channels etc.) and enables them for the current session.
92
The VoiceGate
The VoiceGate (only in Online Documentation)
You can accept incoming calls on your computer and listen to them later, just as with a
conventional answering machine. Calls, and your announcements, are stored as sound
files (identifiable by their WAV extension) and can be monitored over the Audiorecorder.
Before you can accept calls, you have to enter into the I-SURF UserManagement system the number and required parameters for the VoiceGate.
Recording an announcement
Your announcements are stored on the computer in WAV files. Using the Audiorecorder, you can edit these files, i.e. cut or combine them, or dub in other WAV files.
The WAV files must be in 8 kHz, 8 bit, mono format.
You can obtain information about the Audiorecorder from the manufacturer's documentation.
A particularly useful feature is that announcements can be varied according to the time.
You can record a new text in two ways:
●
over the phone or
●
over a microphone connected to your computer.
Recording an announcement over the phone
1.
Open the I-SURF UserManagement system and select the VoiceGate registry
sheet.
2. Click on the Record command button.
The Record new outgoing message window appears.
3. Select the Type of record file.
4. In the Enter record file box, enter the path and name of the file to which the announcement should be saved.
93
The VoiceGate
If you click on the Browse command button, the Open File window appears, showing
the WAV files in the individual directories. Select the directory in which you wish to
save the file with the announcement, and enter the filename.
5.
Enter the number of the phone that the VoiceGate should ring for recording.
6. Click on the Start command button.
The phone rings.
7.
Pick up the handset.
You are now prompted to record your announcement.
8. Dictate your announcement and then replace the handset.
If you make a slip during the recording or want to interrupt recording for any other reason, click the Cancel command button and start again from item 4.
Your announcement has now been saved in the nominated file.
9. By clicking on the Test button you can listen to the selected announcement.
If you have selected the Use this new message for the answering machine option, the
WAV file is displayed in the registry sheet VoiceGate in the Outgoing message box.
10. Click on OK.
The Record new outgoing message dialog is closed and the VoiceGate configuration
dialog is displayed again.
11. Close the Configuration dialog with OK.
Recording an announcement via the microphone
If there is a microphone connected to your PC, you can record your announcements via
the microphone. The announcement must be saved as a file in WAV format (8 kHz, 8
bit, mono). For information about using the microphone, please see the relevant documentation from the manufacturer.
To accept the newly recorded text as the current announcement
1.
Open the I-SURF UserManagement system and select the VoiceGate registry
sheet.
2. In the Answertext box, enter the path and name of the file and confirm with OK.
Conversion of WAV files
WAV files that are used for the VoiceGate must be in the 8-kHz, 8-bit mono format. To
convert files from a different format, proceed as follows:
1.
Open the Audiorecorder in the Accessories/Multimedia program group.
2. From the File menu, select the Open option.
Select the WAV file you wish to convert, and confirm with OK.
You can also open the Audiorecorder by doubleclicking on the appropriate WAV file.
94
The VoiceGate
3. From the Edit menu, select the Audio Properties option.
The Audio Properties dialog with the Audio registry sheet is opened. Keep the properties that are set there.
4. Click on the Adapt command button.
The Adapt dialog appears.
5. In the Attribute box, select the 8.000 Hz; 8 Bit; Mono file format, and confirm with
OK.
The WAV file now has the correct file format. The Audio Properties dialog reappears.
6. Confirm with OK and close the Audiorecorder.
Monitoring incoming calls
All incoming calls are received by the VoiceGate and are passed on to your Inbox. Newly
arrived calls, like all messages in MS Exchange, are indicated in the task bar on your
computer by the symbol
, if MS Exchange is running.
To monitor a call
1.
Open MS Exchange and select the Inbox folder.
In the list of received messages, the From box contains the text Call from 'Number'.
2. Double-click on the item.
The Audiorecorder is opened.
3. Click on the Playback symbol in the Audiorecorder.
The call is played back over the sound card.
Using the Audiorecorder, you can save calls as WAV files. To do this, select the Save As
command from the File menu and then enter a filename.
95
The VoiceGate
It is not possible to save calls from MS Exchange.
For security, the password is not displayed while being entered: instead, a * is displayed for each character.
4. Confirm with Exit.
Remote control
You can also listen elsewhere to calls that have come in for you, using remote control.
Setting pins for remote control
To set the pins for remote control
1.
Open the I-SURF UserManagement system and select the VoiceGate registry
sheet.
2. Click on the Pins For Remote Control command button.
The Remote control window appears.
3. Enter the parameters for remote control.
Change Password
Enter the password for remote control. The password may contain up to ten characters.
The digits 0 - 9 are permissible.
96
The VoiceGate
Pins
Enter the keys that will be used to initiate the various actions during remote control.
The digits 0 - 9 are permissible.
Go to first message
Winds to the first message.
Go to last message
Winds to the last message.
Play
The current call and all subsequent calls are played back.
Play all messages
All calls still in the Inbox are played back.
Go forward
Winds one call forward.
Go backward
Winds one call backward.
Stop
Interrupts the playback of a call.
Delete actual message
The actual message is deleted.
Delete all messages
All messages are deleted.
4. Click on OK.
The changes are accepted and the dialog is closed.
Changing the password for remote control
To change the password for remote control
1.
In the Remote Control dialog, click on the Change password command button.
The Change Password for remote control dialog appears.
2. Type the new password into the New and Confirm boxes.
The repeated input is an additional safety measure to ensure that the new password
was correctly entered.
97
The VoiceGate
For security, the password is not displayed while being entered: instead, a * is displayed for each character.
3. Confirm with OK.
Monitoring calls via remote control
You can monitor calls from any conventional phone by remote control.
1.
Call your VoiceGate.
2. While the answertext is being played back, enter your password using the keys.
The VoiceGate „knows“ from the password that a remote control is to be begun and
switches into the appropriate mode.
3. Press the key allocated to the desired action.
Depending on your input, calls are now played back, deleted or wound forward/back.
You can start a new action at any time by pressing a different button.
98
The I-SURF Address Book
The I-SURF Address Book (only in Online Documentation)
The I-SURF Address Book, which is integrated into MS Exchange, provides you with a
powerful tool for managing your ISDN addresses.
Adding a new entry to an address book
An address book contains a list of recipients, with their names and numbers. You can
organize your address books to meet your personal requirements.
You can store your I-SURF addresses in the I-SURF address book or in the MS Exchange personal address book.
Adding an entry in an I-SURF Address Book
The window for adding a new address to an address book can be called up in various
ways, depending on whether you have just opened a list of folders or the New Message window.
If you have opened a list of folders:
Click on the Address Book icon or, from the Tools menu, select the command
Address Book.
The Address Book window is opened.
1.
2. Click on the New Entry icon or, in the File menu, select the New Entry command.
The New Entry window is opened.
If you have opened the New Message window:
Click on the Address Book icon or, from the Tools menu, select the Address Book
command.
The Address Book window is opened.
1.
2. Click on the New Entry command button.
The New Entry window is opened.
.
3. In the Put this entry box, select the address book in which you wish to enter the
recipient, e.g. I-SURF Address Book.
99
The I-SURF Address Book
4. As the type of entry, select I-SURF Mail Address.
5. Click on the OK command button.
The New Address Properties window appears.
6. In the Phone Numbers registry sheet, input the number(s) of the recipient.
Name
Input the recipient's name as it should appear in the address book. The entry in the
Name field is overwritten if you enter a name in the Business registry sheet.
Phone no.
Input the number of the recipient. You can enter up to eight numbers for each entry in
the Address Book. To do this, select the numbers you wish to enter from the list on the
right beside the Name box. The terms Business, Fax etc. serve to distinguish between
the various numbers and can be freely allocated.
Only one address book entry is displayed for
each recipient, even if you input several numbers. If when sending a message you select the
recipient from the address book, the number
that was selected as the default number in the
Business registry sheet will be dialed (see below).
If you make no changes to the predefined location and the display of numbers, you can
input the numbers as you do in "normal" telephoning.
Comment
Input notes about the number.
100
The I-SURF Address Book
Services
State which services are allocated to the number. A tick in the Available column means
that the recipient can be reached via this service.
The Fax option indicates the fax service with automatic fallback.
If more than one service is allocated to a number, select in the Default column which
service should be the default one. This default service is always used when a connection is set up to the stated number, unless you select a different service when setting
up the connection.
Configuration - EFT
Input the parameters for EFT connections to the distant terminal.
User
Login username at distant EFT terminal. If need be, contact the distant terminal to
ascertain the username.
Password
Login password at distant EFT terminal. If need be, contact the distant terminal to
ascertain the password.
Configuration - Fax
Input the parameters for fax messages.
G4 dpi
Resolution for Group 4 fax. The possible values are
200 dpi (normal)
400 dpi (fine)
G3 lpi
Resolution for Group 3 fax. The possible values are
98 lpi (normal)
196 lpi (fine)
7.
In the Business registry sheet, input the address of the recipient.
Inputs in this registry sheet are optional.
101
The I-SURF Address Book
Name
First
Input the recipient's first name as it should appear in the address book.
Last
Input the recipient's surname as it should appear in the address book.
Address
Input the recipient's address.
City/State/Zip code/Country
Input the requested address information.
Title
Input the title of the recipient in his company.
Company
Input the recipient's company name.
Department
Input the name of the recipient's department.
Office
Input a designation for the recipient's office.
Assistant
Input the name of the recipient's assistant.
102
The I-SURF Address Book
Phone Number display box
Input the default number for the recipient. The default number is the one used by default if several numbers have been recorded for a recipient.
8. In the Notes registry sheet you can input notes about your recipient entries.
Entering notes is optional.
9. Confirm the new entry in the address book with OK or Apply.
A new entry appears in the address book with the corresponding data.
Entries in the personal address book
1.
Click on the Address Book icon or, in the Tool menu, select the Address Book command.
The Address Book window is opened.
2. Click on the New Entry command button .
The New Entry window is opened.
3. In the Put this entry field, select the personal address book.
4. As the type of entry, select I-SURF Address.
5. Click on the OK command button.
The New I-SURF Address Properties window appears.
103
The I-SURF Address Book
6. In the New I-SURF Address registry sheet, input the recipient's name and
number(s)
The New I-SURF Address registry sheet is identical with the Numbers registry sheet
when a recipient is being entered in the I-SURF Address Book (see page 56). Input recipient data as described there.
The numbers can also be entered in the Phone Numbers registry sheet. They are automatically copied into the New I-SURF Address sheet.
In I-SURF, only the EFT and Fax3 services are
supported.
7.
In the Business registry sheet, input the address of the recipient.
The Business registry sheet in MS Exchange largely corresponds with the Business
registry sheet when a recipient is being entered in the I-SURF Address Book (see page
57).
8. Confirm the new entry in the address book with OK or Apply.
A new entry with the corresponding data appears in the personal address book.
104
The I-SURF Address Book
Creating distribution lists
A distribution list combines a number of recipients into a group. If you want to send a
message to all members of a distribution list, you need only enter the name of the list
as the message recipient.
The window for creating a new distribution list can be called up in various ways, depending on whether you have just opened a list of folders or the New Message window.
If you have opened a list of folders:
1.
Click on the Address Book icon or, from the Tools menu, select the command
Address Book.
The Address Book window is opened.
2. Click on the New Entry icon or, in the File menu, select the New Entry command.
The New Entry window is opened.
If you have opened the New Message window:
Click on the Address Book icon or, from the Tools menu, select the Address Book
command.
The Address Book window is opened.
1.
2. Click on the New Entry icon or, in the File menu, select the New Entry command.
The New Entry window is opened.
.
3. In the Put this entry box, select the I-SURF Address Book to which you wish to add
the distribution list.
4. As the type of entry, select I-SURF Mail - Distribution List.
If you want to create a distribution list in the personal address book, select Personal
Distribution List as the type of entry.
5. Click on the OK command button.
The New Distribution List Properties window appears.
105
The I-SURF Address Book
6. In the Display name box, input a name for the distribution list.
Previously entered members are listed in the box below the name. When a new list is
being created, this box is empty.
7.
Click on the Add/Remove Members command button.
The Edit new Distribution List Members dialog is opened, in which you can add new
recipients to the distribution list.
To add a new member to the distribution list
1.
Mark the appropriate entry in the left-hand list box and click on the Members command button. The entry is copied into the Personal Distribution List box. You can
copy any number of list members into the distribution list this way.
2. Confirm with OK.
The Properties of New Entry window appears. The distribution list is displayed again,
now listing all the new members.
106
The I-SURF Address Book
If you wish to alter an existing list, double-click on the name of the distribution list in
the address book. The list is opened and, by selecting the Add/Remove Members command button, you can add further entries.
You can create mixed distribution lists, i.e. you
can enter recipients in a distribution list who are
reached via different services (e.g. fax and EFT).
Creating an I-SURF address book
A default address book with the name I-SURF Address Book is created during the installation of I-SURF and you can enter your ISDN addresses into it. You can also enter
addresses in the Personal Address Book or create additional address books.
To create a new Address Book
1.
Open MS Exchange and select the Services command from the Tools menu.
The Services window appears.
2. In the list of information services, mark the I-SURF Address Book entry and click on
the Properties command button.
The I-SURF Address Book window is opened.
All address books created so far are displayed in the These I-SURF address books have
been set up in the profile box. By default, the I-SURF Address Book that was created
during the installation of I-SURF is entered.
3. Click on the Add command button.
The window for inputting the new address book is opened.
4. In the Display name box, input a name for the distribution list.
The name can be freely allocated.
107
The I-SURF Address Book
5. In the Filename box, enter the path and name of the file to which the address book
should be written.
The I-SURF address books are stored in database (.MDB) files. You can add the new
address book to an existing database file (e.g. I-SURFPAB.MDB in the I-SURF directory). To create a new file, simply enter the desired path and name. The file is then automatically created.
Click on the Browse... command button to open the Save As dialog and select a database file.
6. Enter additional information in the Comment box.
This input is optional.
7.
In the Canonical Addresses registry sheet, select the display format of phone numbers.
In Display Format in the Phone Numbers box, specify how numbers should be displayed in the address book. The following options are available:
canonical
The numbers are displayed in normalized form.
localized
The numbers are displayed in their dialed form.
The display format specifies the way numbers
are displayed in the Address Book interface. In
the Address Book database, numbers are basically stored in normalized form.
The socket data for the location are displayed in the Codes and Line boxes.
108
The I-SURF Address Book
Codes
Country
Displays the country code.
Area
Displays the area code.
Line
Main Line
Displays the main number.
Outgoing
Displays the outside-line digit for calls outside the PBX.
The location data cannot be changed.
8. Confirm with OK.
In the I-SURF Address Book window, the newly set up address book appears in the list
of address books in the current profile.
9. Confirm with OK.
The Services window appears.
10. Close the window with OK.
The new address book is now contained in the current profile. Before you can display
it or create new entries, you must close and reopen MS Exchange.
To change the properties of an I-SURF address book
1.
Open MS Exchange and select the Services command from the Tools menu.
The Services window appears.
2. In the list of information services, mark the I-SURF Address Book entry and click on
the Properties command button.
The I-SURF Address Book window is opened.
3. Mark an address book and click on the Properties command button.
The I-SURF Address Book window appears, displaying the data for the selected address book. This window corresponds to the dialog for creating a new address book.
Parameters are input and altered as described there.
4. Confirm your changes with OK.
109
The I-SURF Address Book
110
Communications via the ISDN modems
Communications via the ISDN modems (only in Online Documentation)
The ISDN modems contained in I-SURF let you use TAPI-based communications programs over the ISDN and set up calls to both digital and analog remote terminals.
The ISDN modems are installed automatically during the installation of I-SURF. You can
use them with some TAPI-capable Windows modem applications, e.g. Dial-Up Networking and HyperTerminal.
The installed driver emulates two serial interfaces, each with a modem connected. You
can control these "virtual" modems using AT commands. The AT command set is a de
facto standard. The ISDN modems open up ISDN services to Windows applications, as
well as to DOS applications using modems and running under Windows NT. No special
adaptation is necessary to use ISDN services.
Configuring the ISDN modem
In the installation of I-SURF, six different ISDN modems are set up and default values
are configured for each of them for the various applications (HyperTerm, Dial-Up Networking, MS Money). As a rule, you can operate using these preset values.
The following modems are available:
●
ISDN X.75 modem
The X.75 protocol is used for the data transmission. The modem can be used for terminal applications, mailbox access or to access CompuServe (X.75).
●
ISDN RNA modem
This modem provides access to PPP remote terminals in accordance with RFC 1618
(synchronous PPP). Thus you can use ISDN access to Internet providers, RAS servers,
T-Online (PPP access) etc.
●
ISDN V.120 modem
The V.120 protocol is used for the data transmission.
●
ISDN V.110 modem
The V.110 protocol is used for the data transmission.
●
ISDN HDLC modem
The HDLC protocol is used for the data transmission.
●
Analog modem
With this modem you can set up calls to remote analog terminals.
The modems and interfaces specified during installation can be changed at any time.
1.
In the I-SURF System Configuration, call up the modem installation.
2. Confirm the first dialog with Next.
111
Communications via the ISDN modems
3. Activate 'Incoming number', if incoming calls are to be accepted. Activate 'Outgoing number', if a particular MSN is to be used for outgoing calls.
4. Enter the appropriate number(s) for the modem.
In case your modem will respond to incoming
calls please make sure that you avoid conflicts between numbers in the user configuration (property sheet: services).
Conflicts between numbers might occur if
more than one analog application (e.g. fax, answering machine, analog modem) or more
than one digital application (e.g. EFT, digital
modems) responds to the same MSN.
If you assign the same MSN to one analog
and one digital application, no conflict
between numbers will arise, because I-SURF
realizes whether the incoming call requires an
analog or a digital service.
So you could, for instance, assign the first
MSN to your analog and digital modems, the
second to your answering machine and the
third to your fax- and EFT-services.
If your ISDN card is connected direct to ISDN line, input the complete number.
If your ISDN card is connected to a PBX, input the MSN.
112
Communications via the ISDN modems
After configuring a number in the ModemWizard, it is necessary to restart the computer .
The settings made here are applicable to all modems, as standard. The modems can also be
configured individually, however.
5. Select whether an MSN should be used for an outgoing call and, if so, enter the
MSN ( the number that the modem should indicate as the calling number in outgoing calls.
The interfaces can only be selected during installation. If you wish to specify new interfaces,
you will have to deinstall the modems and then
reinstall them.
6. Confirm with Next.
In the next dialog, you can see an overview of all the modems in the first column. The
interface to which the modem is allocated is shown in the second column.
7.
Select those modems that are or are not to be installed.
A tick against the modem means it is either being or has already been installed. If there
is no tick against the modem, it is either not installed or being deinstalled.
8. Confirm with Finish.
To set further parameters for the ISDN modem, proceed as follows (required only in
special cases):
113
Communications via the ISDN modems
1.
In Control Panel, call the Modems program.
If you have never worked with or configured the modems before, the Standard information dialog will appear first. Enter the necessary information and close the dialog.
The Modems Properties window appears.
2. In the list of modems, mark the one whose settings you wish to change.
3. Click on the Properties command button.
The ISDN Modem Properties window appears.
4. In the Settings registry sheet, select the Advanced command button.
The Advanced Connection Settings dialog is opened.
5. In the Extra Settings box, enter the modem parameters.
Make entries with the aid of AT command and register.
The Annex to this manual gives a detailed list of
the AT commands and registers.
114
Communications via the ISDN modems
Some examples of important AT commands are given below.
Setting numbers
With the command AT&A, up to 10 numbers can be entered into a list. This MSN list is
the basis for interpreting the numbers in incoming and outgoing calls.
Outgoing ISDN numbers
Using the command AT&En (n=index of the MSN), the number used as "own number"
in outgoing calls is selected from the list of numbers. In the absence of the AT&E command, the MSN with index 0 is always used. If an outgoing number was entered in the
Modem Wizard, it is registered and activated using the index 9. If no number was registered in the Modem Wizard, some index should be registered and activated with
AT&E.
Example:
AT&A1=123&E1
Acceptance of incoming calls
Using the command AT&Ln1n2n3... (ni=index of the MSN) specifies the numbers via
which the modem can be reached. As many MSNs as you like may be chosen from the
list. If an asterisk (*) is entered, all calls (regardless of the list of numbers) will be responded to. If AT&L- is entered, no incoming call is responded to. If the incoming
number was configured in the Modem Wizard, it is registered and activated using the
index 8. Otherwise, the Wizard will automatically use the entry AT&L0. Currently, only
calls of the type "unrestricted digital data" (CIP value 2) are responded to. The analog
modem responds to “analog calls” (CIP values 1 and 4).
Example:
AT&A1=111&A20222&L12 (Acceptance of incoming calls for the numbers 111 and
222).
115
Communications via the ISDN modems
Dial-Up Networking under Windows 98
The Dial-Up Networking program integrated into Windows 98 makes it possible to access remote PCs and networks via a modem. The telephone line is used as the communications medium.
With its integrated ISDN modem, I-SURF adds an ISDN component to the range of
functions of Dial-Up Networking.
Via the ISDN line, you can access remote computers or networks and communicate
with them as though you were connected via a LAN. You can copy and edit files, for
example, or access the resources of the remote terminal. A condition for this that the
remote terminal is set up as a Dial-Up Networking server.
Using Dial-Up Networking you can set up only one connection, even though the ISDN
connection provides you with two channels.
If you have installed the ISDN Accelerator Pack,
you can also use channel bundling for Dial-Up
Networking. This requires, however, that the remote terminal also support channel bundling.
Installing Dial-Up Networking under Windows 98
To install the program Dial-Up Networking on your computer:
1.
Call up Add/remove programs from the Control Panel.
2. Select the Windows Setup registry sheet.
3. In the list of Windows components, mark the Communications entry and click on
the Details command button.
The Communications window appears, with a list of all available components.
116
Communications via the ISDN modems
By clicking on the check box, you can select and deselect individual components.
Checkboxes that already have a tick in them when you open this dialog show that the
components have already been installed. If you click on such a checkbox and thereby
remove the tick from the checkbox, the component will be de-installed. If you click on
an empty checkbox and thereby put a tick in it, the component will be installed.
4. Select the components Dial-Up Networking and Dial-Up Server.
5. Confirm with OK.
6. Confirm the Windows Setup registry sheet with OK as well.
Dial-Up Networking is installed.
After installation, Dial-Up Network appears in the program group Accessories->Communications.
Setting up a new Dial-Up Networking connection under Windows 98
In order to access a remote network or PC, you must first set up a new connection to
that remote terminal.
1.
Open the Dial-Up Networking folder in the Accessories --> Connections program
group.
If there is not yet a connection, then the Wizard for setting up the first connection will
be automatically started. This Wizard will also be started if you click on Make New Connection.
2. Click on the Make New Connection icon.
117
Communications via the ISDN modems
The Make New Connection window appears.
3. Input a name for the selected computer and select ISDN RNA modem as the modem.
4. Click on the Next command button.
A window appears for the input of the number.
5. Enter the number of the remote terminal.
Enter the dialling code without the leading zero in the Area Code box. Select your country in the Country Code box.
6. Confirm with Next.
After further confirmation, the newly created connection is stored in the Dial-Up Networking folder as an icon.
118
Communications via the ISDN modems
If you later wish to alter connection options, you can do so in the Properties dialog box.
You call up this dialog box by clicking with the right mouse button on the icon for the
connection in the Dial-Up Networking window and, in the menu that opens up, selecting the Properties command. The 'Connection Name' dialog box appears.
In this dialog you can change the number and settings of the ISDN modem and input
the server type of the remote terminal.
Click on the Server Types parameter card to
check the permissible network protocols.
To alter the settings for the ISDN modem, select the General parameter card and click
on the Configure... command button. The ISDN RNA modem Properties window appears and you can make the changes as described in section ➔ “Configuring the ISDN
modem“ page 111.
The changes made in the ISDN RNA Modem
Properties dialog box affect all connections set
up with this modem.
119
Communications via the ISDN modems
Setting up a Dial-Up Networking connection under Windows 98
To set up a connection
1.
In the Dial-Up Networking window, click on the connection you want to set up.
The Connect To dialog box is opened.
2. In order to access a computer, enter your username and your password.
The remote terminal uses these data to check your access entitlement.
3. Click on the Connect command button.
The connection is set up. Call setup can take a few seconds; it is displayed on the
screen.
When the connection has been set up, the Connected to... window appears.
As long as the connection is live, the window remains open. You can save it to the task
bar as an icon.
To disconnect the call, click on the Disconnect command button. As long as the connection is live, you can communicate with the computer as though you were connected
via a LAN.
If, for example, you wish to access a shared folder on the remote network, you can connect to that folder so that it is displayed on your computer as an extra disk drive.
1.
Open MS Explorer.
2. In the Extras menu, select the Map Network Drive command.
The Map Network Drive window appears.
3. In the Drive box, enter the drive letter.
By default, the next free letter is preset.
120
Communications via the ISDN modems
4. In the Path box, input the name of the computer you are connected to and the path
of the folder.
Inputs should be in this form:
\\computername\sharename
If the "Reconnect at logon" option is enabled, a DUN connection will be set up next time
the Explorer is started.
5. Confirm with OK.
In MS Explorer, the folder you have connected up to is now displayed as an additional
disk drive and you can edit files and directories as though they were on your "own" disk
drive.
Enabling access by callers under Windows 98
A condition for access by external callers is that your computer must be set up as a DialUp Networking server.
To set your computer up as a Dial-Up Networking server, when the installation of the
Dial-Up Network is done, the Dial-Up Networking server also has to have been installed.
1.
Open the Dial-Up Networking folder in the Accessories program group.
2. In the Connections menu, select the DUN Server submenu.
A condition for the DUN Server option is that the file RNASERV.dll (Microsoft PlusPack)
must be in the system directory of your computer. This file contains the DUN Server.
The DUN Server dialog opens, showing all the modems installed on your computer as
registry sheets.
3. Select the ISDN RNA modem registry sheet.
4. Enable the Enable access for callers option, and close the dialog by clicking on OK.
You need to carry out the following operations only if
●
you made no entry in the box for incoming numbers in the Wizard for modem installation/configuration, or
●
you wish to disable the settings in the Wizard.
1.
In Control Panel, call the Modems program.
The Modems Properties window appears.
121
Communications via the ISDN modems
2. In the list of modems, mark the ISDN RNA-Modem.
3. Click on the Properties command button.
The ISDN Modem Properties window appears.
4. In the Settings registry sheet, select the Advanced command button.
The Advanced Connection Settings dialog is opened.
If you have not registered a number in the Modem Wizard, enter in the Extra Settings
box the string that activates the list of numbers (AT&A0=xxx&L0) otherwise, the modem will pick up no incoming data calls.
xxx=MSN
122
Communications via the ISDN modems
As standard, the number registered in the Modem Wizard is responded to.
5. Confirm with OK.
Your computer is now set up as a DUN Server, and all callers can access it. In addition,
resources must be allocated on the computers that are to be accessed.
1.
In Control Panel, open the Network program.
2. In the Configuration registry sheet, select the File and Print Sharing option.
The File and Print Sharing dialog box appears.
3. Select the resources you wish to share.
4. Confirm with OK and close Control Panel.
If you have selected I want to be able to give others access to my files, you also have
to allocate drives or directories.
1.
Open MS Explorer and mark the drive or directory.
2. From the File menu, select the Properties command.
The Properties of 'directory name' dialog appears.
3. In the Temp Properties registry sheet, specify the type of access.
4. Confirm with OK.
123
Communications via the ISDN modems
Access to the Internet under Windows 98
If you have installed I-SURF and Dial-Up Network on your computer, you can set up a
connection to an Internet Service Provider via ISDN. A requirement here is that you
have installed the TCP/IP protocol. For the installation of the TCP/IP protocol, please
see the Microsoft documentation.
To access the Internet, you must first set up a new connection to your Internet Service
Provider. This connection is set up like a normal DUN connection.
On setting up a DUN connection, see also section ➔ “Setting up a new Dial-Up Networking connection under Windows 98“ page 117.
When the connection has been set up, follow the directions of your Internet Service
Provider to move around the network, read E-mail or access further information.
Dial-Up Networking under Windows 95
The Dial-Up Networking program integrated into Windows 95 makes it possible to access remote PCs and networks via a modem. The telephone line is used as the communications medium.
With its integrated ISDN modem, I-SURF adds an ISDN component to the range of
functions of Dial-Up Networking.
Via the ISDN line, you can access remote computers or networks and communicate
with them as though you were connected via a LAN. You can copy and edit files, for
example, or access the resources of the distant terminal. A condition for this that the
remote terminal is set up as a Dial-Up Networking server.
Using Dial-Up Networking you can set up only one connection, even though the ISDN
connection provides you with two channels.
If you have installed the ISDN Accelerator Pack,
you can also use channel bundling for Dial-Up
Networking. This requires, however, that the remote terminal also support channel bundling.
Installing Dial-Up Networking under Windows 95
To install the program Dial-Up Networking on your computer:
1.
Call up Add/remove programs from the Control Panel.
2. Select the Windows Setup registry sheet.
3. In the list of Windows components, mark the Connections entry and click on the
Details command button.
The Connections window appears, with a list of all available components.
124
Communications via the ISDN modems
4. Select the component Dial-Up Networking.
By clicking on the check box, you can select and deselect individual components. A tick
next to a component indicates that it has been enabled and is being installed.
5. Confirm with OK.
Dial-Up Networking is installed. Follow the additional instructions on the screen. After
installation, Dial-Up Network appears in the Accessories program group.
Setting up a new Dial-Up Networking connection under Windows 95
In order to access a remote network or PC, you must first set up a new connection to
that distant terminal.
1.
Open the Dial-Up Networking folder in the Accessories program group.
2. Click on the Make New Connection icon.
The Make New Connection window appears.
125
Communications via the ISDN modems
3. Input a name for the selected computer and select ISDN RNA modem as the modem.
4. Click on the Next command button.
A window appears for the input of the number.
5. Enter the number of the distant terminal.
Enter the dialling code without the leading zero in the Area Code box. Select your country in the Country Code box.
6. Confirm with Next.
After further confirmation, the newly created connection is stored in the Dial-Up Networking folder as an icon.
If you later wish to alter connection options, you can do so in the Properties dialog box.
You call up this dialog box by clicking with the right mouse button on the icon for the
connection in the Dial-Up Networking window and, in the menu that opens up, selecting the Properties command. The 'Connection Name' dialog box appears.
126
Communications via the ISDN modems
In this dialog you can change the number and settings of the ISDN modem and input
the server type of the remote terminal.
Click on the Server Type command button to
check the permissible network protocols.
To alter the settings for the ISDN modem, click on the Configure... command button.
The ISDN RNA modem Properties window appears and you can make the changes as
described in section ➔ “Configuring the ISDN modem“ page 111.
127
Communications via the ISDN modems
The changes made in the ISDN RNA Modem
Properties dialog box affect all connections set
up with this modem.
Setting up a Dial-Up Networking connection under Windows 95
To set up a connection
1.
In the Dial-Up Networking window, click on the connection you want to set up.
The Connect To dialog box is opened.
2. In order to access a computer, enter your username and your password.
The distant terminal uses these data to check your access entitlement.
3. Click on the Connect command button.
The connection is set up. Call setup can take a few seconds; it is displayed on the
screen.
When the connection has been set up, the Connected to... window appears.
As long as the connection is live, the window remains open. You can save it to the task
bar as an icon.
To disconnect the call, click on the Disconnect command button. As long as the connection is live, you can communicate with the computer as though you were connected
via a LAN.
If, for example, you wish to access a shared folder on the remote network, you can connect to that folder so that it is displayed on your computer as an extra disk drive.
1.
Open MS Explorer.
2. In the Extras menu, select the Map Network Drive command.
The Map Network Drive window appears.
128
Communications via the ISDN modems
3. In the Drive box, enter the drive letter.
By default, the next free letter is preset.
4. In the Path box, input the name of the computer you are connected to and the path
of the folder.
Inputs should be in this form:
\\computername\sharename
If the "Reconnect at logon" option is enabled, a DUN connection will be set up next time
the Explorer is started.
5. Confirm with OK.
In MS Explorer, the folder you have connected up to is now displayed as an additional
disk drive and you can edit files and directories as though they were on your "own" disk
drive.
Enabling access by callers under Windows 95
A condition for access by external callers is that your computer must be set up as a DialUp Networking server.
To set your computer up as a Dial-Up Networking server
1.
Open the Dial-Up Networking folder in the Accessories program group.
2. In the Connections menu, select the DUN Server submenu.
A condition for the DUN Server option is that the file RNASERV.dll (Microsoft PlusPack)
must be in the system directory of your computer. This file contains the DUN Server.
The DUN Server dialog opens, showing all the modems installed on your computer as
registry sheets.
3. Select the ISDN RNA modem registry sheet.
4. Enable the Enable access for callers option, and confirm with Accept.
You need to carry out the following operations only if
●
you made no entry in the box for incoming numbers in the Wizard for modem installation/configuration, or
●
you wish to disable the settings in the Wizard.
1.
In Control Panel, call the Modems program.
The Modem Properties window appears.
129
Communications via the ISDN modems
2. In the list of modems, mark the ISDN RNA modem.
3. Click on the Properties command button.
The ISDN Modem Properties window appears.
4. In the Settings registry sheet, select the Advanced command button.
The Advanced Modem Settings dialog is opened.
If you have not registered a number in the Modem Wizard, enter in the Extra Settings
box the string that activates the list of numbers (AT&A0=xxx&L0) otherwise, the modem will pick up no incoming data calls.
xxx=MSN
As standard, the number registered in the Modem Wizard is responded to.
5. Confirm with OK.
Your computer is now set up as a DUN Server, and all callers can access it. In addition,
resources must be allocated on the computers that are to be accessed.
130
Communications via the ISDN modems
1.
In Control Panel, open the Network program.
2. In the Configuration registry sheet, select the File and Print Sharing option.
The File and Print Sharing dialog box appears.
3. Select the resources you wish to share.
4. Confirm with OK and close Control Panel.
If you have selected I want to give others access to my files, you also have to allocate
drives or directories.
1.
Open MS Explorer and mark the drive or directory.
2. From the File menu, select the Properties command.
The Properties of 'directory name' dialog appears.
3. In the Temp properties registry sheet, specify the type of access.
4. Confirm with OK.
131
Communications via the ISDN modems
Access to the Internet under Windows 95
If you have installed I-SURF and Dial-Up Network on your computer, you can set up a
connection to an Internet Service Provider via ISDN. A requirement here is that you
have installed the TCP/IP protocol. For the installation of the TCP/IP protocol, please
see the Microsoft documentation.
To access the Internet, you must first set up a new connection to your Internet Service
Provider. This connection is set up like a normal DUN connection.
On setting up a DUN connection, see also section ➔ “Setting up a new Dial-Up Networking connection under Windows 95“ page 125.
When the connection has been set up, follow the directions of your Internet Service
Provider to move around the network, read E-mail or access further information.
Dial-Up Networking under Windows NT 4.0
The Dial-Up Network/RAS program integrated into Windows NT makes it possible to
access remote PCs and networks via a modem. The telephone line is used as the communications medium.
With its integrated ISDN modem, I-SURF adds an ISDN component to the range of
functions of Dial-Up Networking.
Via the ISDN line, you can access remote computers or networks and communicate
with them as though you were connected via a LAN. You can copy and edit files, for
example, or access the resources of the distant terminal.
Using Dial-Up Network/RAS you can set up only one connection, even though the ISDN
connection provides you with two channels.
Installing Dial-Up Networking under Windows NT
To install the program Dial-Up Networking on your computer:
1.
Highlight the Network Neighborhood icon on your screen and click with the right
mouse button.
2. Select the Properties command.
3. Select the Services registry sheet and click on the Add command button.
The Select Network Service window is opened. From the list of the various network
services, select the appropriate one for installation.
132
Communications via the ISDN modems
4. Select RAS (Remote Access Service), and confirm with OK.
The service is then installed. When prompted to do so, place the Windows NT installation CD in the CD-ROM drive. When installation is complete, the Add RAS Device dialog appears.
5. As the modem, select either ISDN X.75 modem, ISDN RNA modem, Analog modem or ISDN HDLC modem and confirm with OK.
The Remote Access Setup dialog is opened. You must now specify network settings
for the modem and configure the use of the interface.
6. Click on the Network command button.
133
Communications via the ISDN modems
The Network configuration dialog is opened.
7.
Select the appropriate network protocols and confirm with OK.
8. Click on the Configure command button.
In the next dialog you can configure the interfaces for the modem.
9. Select whether the interface is to be used for incoming or outgoing calls, or for
both.
If you configure a port for an incoming call or an
incoming and outgoing call, that port cannot be
used by another application while the RAS server is active.
10. Confirm with OK.
After installation, Dial-Up Network appears in the Accessories program group.
Setting up a new Dial-Up Networking connection under Windows NT
In order to access a remote network or PC, you must first set up a new connection to
that distant terminal.
1.
Open the Dial-Up Networking folder in the Accessories program group.
If you have already created one or more Dial-Up connections, the DUN-Network dialog
appears. To set up a further DUN connection click on the New command button. The
wizard for new phone-book entries is called up.
If you are setting up a DUN connection for the first time, when Dial-Up Networking
starts you will receive a message that no phonebook entry yet exists. Confirm this message with OK. The wizard for new phone-book entries is called up.
2. Enter a name for the new connection and confirm by clicking on Next.
The Server dialog appears.
3. Select the second option and confirm with Next.
The Phone Number dialog is opened.
134
Communications via the ISDN modems
4. Enter the number of the DUN Server you wish to call.
Where necessary, the number must include the outside line digit, the country code and
the local code.
You can enter further numbers by clicking on the Alternatives... command button. If the
first number cannot be reached, another can automatically be dialed.
5. Confirm with Next.
A new phonebook entry has been created.
6. Click on the Finish command button to save the new connection.
The Dial-Up Networking dialog appears, showing the new phonebook entry with the
number.
7.
Click on the More command button.
135
Communications via the ISDN modems
8. Select the Edit entries and modem properties option.
The Edit phonebook entry dialog box appears. The name of the entry and the number
are shown here, in the Entries registry sheet. The information can be changed at any
time.
9. In the Dial with box, select the ISDN RNA modem in order to set up a call.
10. Confirm with OK.
The Dial-Up Networking dialog appears again.
11. Click on the Dial command button.
A call is set up on the basis of the information that has been set. You are prompted to
enter the name and password of the remote terminal.
12. In order to access a computer, enter your username and as your password.
The distant terminal uses these data to check your access entitlement.
13. Click on the OK command button.
The connection is set up. Call setup can take a few seconds, it is displayed on the
screen.
When the connection has been set up, the Connected to... window appears.
As long as the connection is live, the window remains open. You can save it to the task
bar as an icon.
To disconnect the call, click on the Disconnect command button. As long as the connection is live, you can communicate with the computer as though you were connected
via a LAN.
If, for example, you wish to access a shared folder on the remote network, you can connect to that folder so that it is displayed on your computer as an extra disk drive.
1.
Open MS Explorer
2. In the Extras menu, select the Map Network Drive command.
The Map Network Drive window appears.
3. In the Drive box, enter the drive letter.
By default, the next free letter is preset.
4. In the Path box, input the name of the computer you are connected to and the path
of the folder.
Inputs should be in this form:
\\computername\sharename
136
Communications via the ISDN modems
If the "Reconnect at logon" option is enabled, a DUN connection will be set up next time
the Explorer is started.
5. Confirm with OK.
In MS Explorer, the folder you have connected up to is now displayed as an additional
disk drive and you can edit files and directories as though they were on your "own" disk
drive.
Enabling access by callers under Windows NT
To enable access by callers
1.
Highlight the Network Neighborhood icon on your screen and click with the right
mouse button.
2. Select the Properties command.
3. Select the Services registry sheet.
4. Now select the RAS service and click on the Properties command button.
The Remote Access Setup dialog is opened.
5. Click on the Configure command button.
The Configure Port Usage dialog appears.
6. Select either the Receive calls only or the Dial out and Receive calls option.
If you select either the Receive calls only or the
Dial out and receive calls option, that port
cannot be used by another application while the
RAS server is active.
Settings for the user should then be made in the User Manager.
1.
Open the User Manager under Start/Programs/Administrative Tools (Common).
2. In the User Manager, select the user with the name "guest".
137
Communications via the ISDN modems
Double-click on the user to open the User Properties dialog.
3. Click on the Dialin command button.
The Dial-in Options dialog appears.
4. Enable the Grant dialin permission to user option.
You have now given the user access to the computer.
Access to the Internet under Windows NT
If you have installed I-SURF and Dial-Up Network on your computer, you can set up a
connection to an Internet Service Provider via ISDN. A requirement here is that you
have installed the TCP/IP protocol. For the installation of the TCP/IP protocol, please
see the Microsoft documentation.
To access the Internet, you must first set up a new connection to your Internet Service
Provider. This connection is set up like a normal DUN connection.
On setting up a DUN connection, see also section ➔ “Setting up a new Dial-Up Networking connection under Windows NT“ page 134.
HyperTerminal
Using the HyperTerminal program, which is integrated into Windows 98, you can set
up a connection to another computer and exchange data, even if Windows is not running on it. Using HyperTerminal, you can send and receive files or set up connections
to mailboxes and other information programs.
With its integrated ISDN modem, I-SURF adds an ISDN component to the range of
functions of this program.
Setting up a connection with HyperTerminal
If you set up a connection with HyperTerminal, the X.75 modem should be used for the
remote terminal uses X.75 (e.g. Mailbox). If need be, contact the remote terminal to
ascertain the protocol.
The protocol can be set globally for all connections using the ISDN modem configuration (see section ➔ “Configuring the ISDN modem“ page 111).
To set up a new connection:
1.
Open the HyperTerminal folder in the Accessories program group.
2. Click on the Hypertrm icon
138
Communications via the ISDN modems
HyperTerminal is opened and the New Connection - HyperTerminal window appears.
At the same time, the Connection Description dialog box is opened.
3. Input a name for the new connection that is to be set up.
In the Icon field you can select the icon under which the connection will later be stored
in the HyperTerminal folder.
4. Click on the OK command button.
A window appears for the input of the number.
5. Enter the Country code, the Area code without the leading zero, and the number
of the remote terminal.
6. In the Connect using box, select the ISDN X.75 modem.
7.
Confirm with OK.
The Connect window appears.
8. Click on the Dial command button.
The connection is set up and the Connection Name - HyperTerminal window appears.
For more information about working with HyperTerminal, please see the appropriate
Windows documentation.
If you wish to save a connection, select the Save command in the File menu. The connection is saved under the selected name and icon in the HyperTerminal folder, and you
can set up from there by clicking on it.
139
Communications via the ISDN modems
140
Microsoft Exchange
Microsoft Exchange (only in Online Documentation)
The ISDN application programs of I-SURF integrate ISDN communication services in
the operating system. To do this, the Messaging Application Program Interface (MAPI)
defined by Microsoft is used. Therefore in order to manage and display all incoming and
outgoing messages (e.g. fax, EFT, e-mail, calls), something called a MAPI client will be
necessary.
For this, you can either use the Exchange supplied with Windows 95 / 98 / NT 4.0 or
the Outlook program - which you have to buy.
Outlook Express, delivered with Windows 98, has a user interface very similar to that
of Outlook, but which unfortunately does not support the MAPI interface, so that Outlook Express can only deal with Internet services like e-mail and news.
Exchange and Outlook can be installed and operated at the same time as Outlook Express.
This part of the I-SURF documentation is intended to give you an initial approach to
working with Microsoft Exchange. For more detailed information, please refer to the
Windows 95 / 98 / NT 4.0 documentation and the on-line Help for MS Exchange. Information about Outlook can be found in the documentation supplied with it.
Sending and receiving messages
Receiving a message
When you receive a new message, when MS Exchange is open the icon
in your taskbar. To view the message:
1.
appears
In MS Exchange, open the Inbox folder.
A list of the messages that have been received is displayed. Messages that have not
yet been opened are shown in bold.
2. Click on a message to open it.
Attached files are shown by an icon in the opened message.
3. To read an attached file, click on the icon.
The appropriate application is opened with the file.
Sending a message
1.
Click on the New Message icon or, in the Compose menu, select the New Message command.
The New Message window is opened.
2. In the To field, input one or more recipients for the message.
Separate multiple names from each other with a semicolon. You can also select the recipients via the address book.
3. In the Cc field, input those who should receive a copy of the message.
4. In the Subject box, input the subject line of the message.
5. In the Message box, input the text of the message.
141
Microsoft Exchange
You can attach files to your message that come from other applications.
6. Click on the Send icon or, in the File menu, select the Send command.
The message is sent off and appears in the Sent Items folder.
Attaching files to a message
You have two ways to attach files from other applications to your messages:
1.
Click on the Insert File icon or, in the New Message window, select the File command from the Insert menu..
The Insert File window appears.
2. Mark the file you want to insert.
3. In the Insert As box, select how the file should be attached.
Text only
The contents of the file appear as ANSI text in the message.
142
Microsoft Exchange
An attachment
The file is copied into the message as an icon and is sent along with it. By double-clicking the icon, the recipient can open the file, provided he has installed the appropriate
program.
Link attachment to original file
The file is linked with the message, but not sent with it. The recipient can only read it
if he can access the computer on which the file is held.
4. Confirm with OK.
The file is included in the message.
You can also attach files by simply dragging and dropping them from the Desktop or
from Explorer into the message.
1.
On the Desktop or in MS Explorer, mark one or more files you want to copy over.
2. Drag the files into the text box in the New Message window
The file is included in the message at the point to which you dragged it.
You can include files only as attachments when
you use drag and drop.
Selecting the recipient from the Address Book
When you create a new message you don't have to input recipients manually - you can
select them from the address book instead.
1.
Click on the Address Book icon or, in the New Message window, select the
Address Book command from the Tool menu.
The Address Book dialog is opened.
2. In the Show Names from the box, select an address book.
143
Microsoft Exchange
3. In the list of names, mark one or more recipients or distribution lists, and click on
the To command button.
The selected names are copied into the list of Message recipients.
4. Confirm with OK.
The recipients are copied into the To field in the current message.
Saving messages
In MS Exchange, you can save messages to any directory.
1.
Mark or open the message that is to be saved.
2. From the File menu, select the Save As ... command.
The Save As window is opened.
3. Select the directory and filename under which the message is to be saved.
4. Select whether the message or only the attached files should be saved.
Save the Message(s) only
Saves the opened or selected message without attachments. If more than one message is selected, they are saved to a single file.
Save these Attachments only
Saves the files attached to the message. You can select attachments in the list or exclude attachments from it. Individual files can be saved under new names. If you have
selected more than one file, they are always saved under their old names.
144
Microsoft Exchange
Deleting messages
1.
Mark or open the message that is to be deleted.
2. Click on the Delete icon or, in the File menu, select the Delete command.
The marked file is moved to the Deleted Items folder.
3. If you want to delete a message definitively, mark it in the Deleted Items folder.
4. Click on the Delete icon or, in the File menu, select the Delete command.
The message is definitively deleted.
Forwarding messages
You can forward received messages to other recipients.
1.
Open the message you want to forward, or mark it in the Inbox folder.
2. Click on the Forward icon or, in the Compose menu, select the Forward command.
A window for creating a new message is opened. The message that is to be forwarded
is already entered in this window.
3. In the To box, input the recipient.
If you wish, you can add further text in the message box.
4. Click on the Send icon or, in the File menu, select the Send command.
The message is forwarded.
ISDN options
ISDN Send options
To specify the options for an ISDN message that is to be sent:
1.
In the message window, select the Properties command from the File menu.
The Note Properties ... window appears.
2. Select the ISDN Send Options registry sheet.
3. Input the options for the message that is to be sent.
145
Microsoft Exchange
Service
Select the service via which a message is to be sent.
From address book (default setting)
The service used is the one recorded in the address book as the default service for the
relevant recipient.
Fax
The message is sent as a fax with automatic fallback.
Group 3 Fax
The message is sent as a Group 3 fax.
Group 4 Fax
The message is sent as a Group 4 fax.
EuroFileTransfer
The message is sent as a file via EFT.
Location
This function has not yet been implemented in this version of I-SURF.
146
Microsoft Exchange
Resolution
State the resolution at which a fax message should be sent. The following values can
be selected:
For Group 3 Fax
normal (98 lpi)
fine (196 lpi)
For Group 4 Fax
normal (200 dpi)
very fine (400 dpi)
More Options
The dialog I-SURF Send Options appears (see also chapter "Sending and receiving messages (only in Online Documentation)", ➔ “The I-SURF Dialer“ page 79).
4. Confirm your inputs with OK.
Status of sent message
Information about sent messages is displayed in the ISDN status windows.
1.
In the Sent Items folder, mark the message whose status you want displayed.
2. From the File menu, select the Properties command.
The Properties window appears.
3. Select the ISDN Transmission Status registry sheet.
Status
Indicates whether a message was sent successfully. When a message is sent to several recipients, its overall status is displayed. The following statuses are displayed:
147
Microsoft Exchange
active
The message is currently being converted and sent.
cancelled
The process was cancelled before the message or parts of it were sent.
part sent
The message was incompletely sent or was not sent to all recipients.
sent
The message was completely sent to all recipients.
Warning!
The process is still ongoing but an error has occurred that must be eliminated. In
this event, an error message appears in the Inbox with notes on what to do.
Costs
Indicates the costs for the transmission. In the case of transmission to several recipients, the total costs are stated.
Duration
Indicates the duration of the transmission. In the case of transmission to several recipients, the total duration is stated.
Size
Indicates the number of pages in a fax message or the size of transmitted files.
Status - Address - Date
For all recipients of a message, lists the status, the recipient's address/number and the
date of transmission.
Details ...
Opens a window with further information about a single recipient.
4. Close the window with OK.
148
Microsoft Exchange
ISDN Status for a recipient
When a message is sent to a distribution group, the overall status for all recipients is
displayed in the ISDN Transmission Status registry sheet. You can, however, obtain a
display of information about individual recipients.
1.
In the Sent Items folder, mark the message whose status you want displayed.
2. From the File menu, select the Properties command.
The Properties of ... window appears.
Select the ISDN Transmission Status registry sheet.
3. Mark a recipient and click on the Details ... command button.
The ISDN Transmission Status Details window with information about the recipient appears.
Status
Indicates the status of a message. Click on the arrow to open a list of all statuses of
this message so far.
Costs
Shows the costs for the transmission.
Duration
Indicates the duration of the transmission. In the case of transmission to several recipients, the total duration is stated.
Size
Indicates the number of pages in a fax message or the size of transmitted files.
Resolution (for fax messages only)
Indicates the resolution at which a fax was sent.
149
Microsoft Exchange
Number
Shows the selected number of the recipient.
Station ID (for fax messages only)
Shows the ID of the distant fax terminal.
Address
Shows the name and address of the recipient from the address book.
Error
When transmission of a message was incomplete, indicates the cause of error. You
also receive a message in the Inbox giving more detailed information about possible
causes of error and their elimination.
4. Close the window with OK.
150
The I-SURF Support Module
The I-SURF Support Module
The Siemens Support Server for PC communication is a Remote Access Service (RAS)
Server which you can access with your Internet browser using the same technique as
you would with the Internet. The server can be accessed with an ISDN direct connection. This way, for accessing the server, no Internet account is necessary and you attain
the full ISDN speed.
The Support Server allows you to download current information and documentation
and to obtain I-SURF software updates. In addition, you can read FAQs (Frequently
Asked Questions) and send your questions to the Support. It is worthwhile dialing in
from time to time in order to find out about the latest developments.
The access to the Support Server is installed for you by a setup program. Only a few
manual settings have to be made. A detailed online guide leads you through this installation.
Installation requirements:
If the I-SURF drivers have been correctly installed in an intact Windows operating system, all the installation requirements for access to the Support Server have been fulfilled.
In case there are some components you still have to install, there are detailed instructions in the windows that pop up automatically.
Please have ready your corresponding operating system CD.
Installation
1.
Please close all other applications.
2. Choose Programs --> Siemens I-SURF 2.1 --> I-SURF Support Module -->
I-SURF Support Installation to call the Installation of the I-SURF Support Module.
In the next window you are asked if you wish to install the Siemens Support Client .
3. Click on Yes.
The Siemens Support-Server Setup will be started.
The window which will now be opened contains general information about the Support
Server.
4. After having read everything, click on Yes.
If the installation program finds that some operating system components are missing,
the corresponding Control Panel will be opened and in a second window, the necessary
actions will be described.
If the operating system environment contains the requirements for a connection to a
RAS Server, the parameters for a connection to the Support Server will be deposited in
the dial-up network, and the I-SURF Support program group will appear with three new
icons:
●
Siemens Support Dialer (=icon for starting to set up the connection)
●
Siemens Support Homepage (=icon for opening the homepage)
●
readme.txt (=icon for showing hints)
151
The I-SURF Support Module
At the same time, the Instructions for the setting up the first connection dialogue will
appear. It contains instructions for the first connection to the Siemens Support server.
5. Carry out the instructions in this window step by step. Do not forget to clear down
the connection after using the Support Server. You will find the instructions for this
too in the Instructions for the setting up the first connection.
6. In the window Instructions for setting up the first connection, click on Yes to finish
the Setup Program.
This Setup Program has been optimized for access via the Microsoft Internet Explorer versions 3.x and 4.0. If you use another browser,
you may have to make the settings described in
this window manually.
If your Internet browser has been set up for accessing via a proxy address, then you have to
put the address of the Support Server
(192.168.255.141) in the Proxy Exception List so
that your browser can access the Support Server. Please check to see if your browser adopted
the entries made by the installation program.
You can find these in Internet Explorer 4.0 under
Control Panel ➱ Internet ➱ Connection ➱
Proxyserver ➱ Extended ➱ Exceptions.
152
The I-SURF Support Module
Technical Details
Online professionals will find all the technical information on the Siemens Support Server access in the following table.
Subscriber number
01805 234534 (from Germany)
+49 1805 234534
Modem
NDIS WAN Miniport or RNA-Modem
Server type
PPP: Windows 98, Windows NT, Internet
Register on network
No
Activate software compression
Yes
Demand encoded password
No
Protocol
TCP/IP
IP address allocated by server
Yes
Name Server Addresses
allocated by server
Yes
IP header compression
Yes
Use standard gateway
Yes
Login
pccards
Password
letmein
Domains
-
URL
http://192.168.255.141/support
Proxy
-
153
The I-SURF Support Module
154
Annex 1 - The ACO_CT32.EXE CAPI test program
Annex 1 - The ACO_CT32.EXE CAPI test program
To test both your connection and the drivers, you can use the acotec CAPI 2.0 tester
(ACO-CT32.EXE)..
The ACO-CT32.EXE program is based on the CAPI2032.DLL and can simulate outgoing
calls with the various transmission protocols on the B-channel. The tester can be made
to react to incoming calls: it logs the number transmitted, the application class and any
error messages.
After the program starts, this interface is displayed:
Info menu
In this menu you can select the profile of your ISDN card under Controller. The B-channel protocols supported by your card are then displayed.
Outgoing calls
In the Call menu you can use the make a call command to open the window shown
here:
Here you can enter the called party number and the application class to be transmitted
for an outgoing call.
For the most common applications you can directly select the application classes, under application class.
If you select the generic application class, you can configure the outgoing call in more
detail. An expanded window is displayed, in which you can also set B-channel protocols.
155
Annex 1 - The ACO_CT32.EXE CAPI test program
In the expanded window, you can also set special application classes. "CIP values" are
defined in the CAPI 2.0 specification for the appropriate application classes. For a detailed explanation of these values please refer to the CAPI 2.0 specification, which you
can download from our support PC.
When all settings have been selected, click on OK. A control window is displayed,
which again lists the selected parameters for you.
A call setup is displayed in a Journal window by means of a "CONN_ACT_IND". Pressing
the Connect B3 command button thus activates a connection in the B3 layer. If you like
to disconnect the call, click on disconnect.
Incoming calls
For incoming calls, click in the Listen menu on the listen incoming calls command. The
Listen Parameters window appears in which you can enter the number (MSN) to which
the CAPI tester is to react.
You can make the tester react either to special application classes or to all application
classes using the everything option.
The application class and the number, if transmitted, is also recorded.
156
Annex 1 - The ACO_CT32.EXE CAPI test program
The entries under CIP mask can be selected if, under listen to, you select the special
option. All the possible CIP values are listed here. You can find more information about
this in the CAPI 2.0 specification, held on our Support PC. As standard, the options in
the Listen / network information menu are not set, nor are they required for the normal
CAPI test.
Config menu
The default settings should be used here: they need not be changed for the CAPI test.
Problems with incoming calls
Problems with incoming calls could be a result of the subscriber number transmitted
by the network does not match the subscriber number defined in the User configuration.
157
Annex 1 - The ACO_CT32.EXE CAPI test program
158
Annex 2 - AT commands / registers
Annex 2 - AT commands / registers (only in Online Documentation)
AT commands
The AT commands listed here have been standardized world-wide. All commands to be
passed to the modem must begin with the prefix AT (AT<command>). The only exception is the command A/.
Please note that:
●
in the "Extra settings" command line in the "Advanced connection settings" dialogue, 60 characters can be input,
●
several commands can be input on one line,
●
the commands ATA, ATD, ATZ, ATO, ATH and ATF can only be used as the last commands on a line,
●
the string following the AT&S command (set string register) must be terminated
with a ";" if a further command is to follow (otherwise, the next command will be
interpreted as part of the string),
●
commands for which "ignored" is shown have no effect on the driver but are acknowledged with "OK" and
●
unlisted commands are responded to with "ERROR".
Implemented AT commands
A
&A
Take a call
Set and read an MSN list entry
n=
set MSN ... to item n
n?
allocate MSN to item n
A/
repeat last command line (A/ without preceding AT, without terminating
CR)
B/
protocol for outgoing calls
D/
0
X.75 (B3 transparent)
1
V.110 (asynchron)
5
T-Online
7
analogue (if CAPI-support available)
8
RNA (HDLC with async to sync PPP conversion)
12
V.120
14
HDLC (raw)
Dial
P
pulse dialing, ignored
T
tone dialing, ignored
W
wait for dial tone, ignored
@
wait for dial tone, ignored
L
last number
159
Annex 2 - AT commands / registers
Implemented AT commands
E
&En
F
&F
echo command to host
0
off
1
on
use MSN index n as outgoing number
ignored
standard configurations (reset, and disconnect if necessary
H
hang up
I
issue product information
0
product information and CAPI version
remainder ignored
K
ignored
L
speaker volume, ignored
&Lnnn
Listen to (multiple) MSNs ("+"= any call (MSN), "-"=no listening)
M
speaker control, ignored
N
ignored
O
return to on-line condition
0
toggle on-line
1
toggle on-line (with new synchronization, treated like 0)
P
pulse dialing, ignored
Q
suppress result codes (quiet mode)
S
0
display
1
suppress
set and read register
r=x
set bit b of register r to value n
r,b=n
set bit b of register r to value n
r?
&S
read register r
set and read string register
r=...
V
set register r to value x
r.b=n
set string register r (";" is interpreted as command termination)
abbreviated or plain result codes
0
result codes as figures
1
result codes as plain text
X
detect carrier /busy tone, ignored
Z
load profile
currently only:0 default setting
160
Annex 2 - AT commands / registers
Registers
Registers marked with ! should be set with the appropriate AT commands only.
No.
Description
Default
0
auto answer on (>=1)/off(==0)
0
2
ESC character
43 ("+")
3
CR character
13
4
LF character
10
5
backspace character
12
ESC sequence time interval in ms
1000
8
1(MSN 0)
13
MSN bitmasks for incoming calls
18
index of the MSN for outgoing calls
0
23
B2 protocol, address A
3
24
B2 protocol, address B
1
25
B2 protocol, modulo mode
3
26
B2 protocol, window size
7
30
B3 protocol, LIC
0
31
B3 protocol, HIC
0
32
B3 protocol, LTC
1
33
B3 protocol, HTC
1
34
B3 protocol, LOC
0
35
B3 protocol, HOC
0
36
B3 protocol, modulo mode
8
37
B3 protocol, window size
2
76
protocol for incoming calls (0=X.75,1= as outgoing)
1
78
PPP distant terminal RFC 1618 ("synchronous")
1
!79
protocol (ATB)
0
!80
echo mode (0=off/1=on)
1
!81
verbal mode (0=off/1=on)
1
!82
quite mode (0=off/1=on)
0
100
B1 protocol
0
101
B2 protocol
0
102
B3 protocol
103
B1Configuration, Maximum Bit Rate
104
B1Configuration, Bits per Char
8
105
B1Configurattion, Parity
0
0
106
B1configuration, Stop Bits
0
111
CIP-Value
2
161
Annex 2 - AT commands / registers
No.
162
Description
Default
112
B1Configuration (Modem/Options)
0x50
113
B2 Configuration (Modem/Options)
0
Glossary
Glossary
Address Book
The names, numbers and address of recipients are stored in Microsoft Exchange's
address books. When sending a message you need only select a name from an
address book: MS Exchange will find the correct address.
B1 protocol
Represents the protocol for OSI layer 1 (physical layer).
B2 protocol
Represents the protocol for OSI layer 2 (data link layer).
B3 protocol
Represents the protocol for OSI layer 3 (network layer).
Basic Rate Interface (Direct to ISDN line)
An ISDN connection with two 64-kbit/s B-channels and one 16-kbit/s D-channel, to
which up to eight terminals can be connected.
B-channel
The B-channel or user-data channel serves for the transfer of ISDN user data at a rate
of 64 kbit/s.
Btx Decoder
The Btx Decoder is required so that the data supplied by T-Online can be processed and
displayed on your computer.
CAPI
The Common Application Program Interface is a standardized interface between an
ISDN application (e.g. I-SURF) and the ISDN controller card.
CAPI Subsystem
The CAPI Subsystem provides an interface between communications programs such
as I-SURF or Dial-Up Networking and the ISDN controller card.
Data compression
Data compression allows files to be greatly reduced in size. If files are compressed before transfer, the transmission time and related charges are reduced.
Datex-J
Datex-J is a Deutsche Telekom service that enables access to further applications, such
as Btx or database querying (e.g. Telebox.400). It differs from the conventional Btx service in that the connection is made via ISDN and is therefore substantially faster.
Dial-Up Networking
The Dial-Up Networking program lets a user access a remote network over the telephone network. Dial-Up Networking is contained as a subsystem in Windows 95.
163
Glossary
D-channel
The D-channel or signalling channel serves to carry service attributes in ISDN. All the
signals that affect the setup and disconnection of a call are transmitted on the D-channel.
DSS1
The Digital Subscriber System No. 1 is the protocol used in EuroISDN. DSS1 provides
a wider range of services than 1TR6 (e.g. three-party calls). It will completely replace
1TR6 in future.
EFT
see EuroFileTransfer.
EuroFileTransfer
EuroFileTransfer is a European standard for data transfer between computers. Files can
be sent, downloaded and received.
EuroFileTransfer Server
The EuroFileTransfer Server is the I-SURF program component that receives and sends
files. The EuroFileTransfer Server works invisibly in the background.
Explorer
The Windows Explorer is a component of the user interface, and serves in the management of folders and files. It corresponds to the File Manager of earlier versions of
Windows.
Group 3 Fax
A group 3 fax device sends and receives analog data at a maximum rate of 14,000 bit/
s and with a maximum resolution of 196 dpi. It communicates over the conventional
telephone network or via ISDN.
HDLC
High-level Data Link Control. A protocol for the secure transmission of data.
HyperTerminal
HyperTerminal is a terminal program contained in Windows 95 that enables connections to be made via a modem and the telephone wires to other computers and mailboxes.
Internet
The Internet is the world's largest combined group of computers. It offers access to
several thousand computers, which contain all imaginable kinds of information. Access
to the Internet is provided by an Internet Service Provider (ISP).
ISDN
Integrated Services Digital Network. A digital communications network that provides
all services (speech, text, images and data) through one connection.
164
Glossary
ISDN Controller
The ISDN controller implements the interface between the ISDN and the PC. In general, an ISDN controller is understood to mean an ISDN controller card and the software
needed to operate it.
ISDN Modem
The ISDN modem incorporated in I-SURF enables modem-based applications (e.g. DialUp Networking) to be connected to the ISDN.
Headline
The headline appears at the top of the page in faxes. The headline can contain any text,
subject to a limit of 32 characters, with no accents.
LAN
A Local Area Network is a network within, e.g., a company that enables communication
between the computers connected to it.
Modem
A modulator/demodulator is a device used for data transmission over the telephone
network.
Microsoft Exchange
Microsoft Exchange is the communications exchange of Windows 95. Using Microsoft
Exchange you can receive and send messages of all kinds.
Some services are already included in MS Exchange, e.g. MS Mail for communicating
with other subscribers to a LAN. In addition, the structure of MS Exchange makes it
possible to integrate a large number of other information services - such as I-SURF and to address all of them in the same way, so that the user can use them via the common Exchange interface.
MSN
Multiple Subscriber Numbering allows different terminals on a EuroISDN socket to be
individually dialed. A subscriber having a basic access is allocated three different numbers by the phone company. A further seven numbers can be ordered, subject to payment of a charge.
Normal dialing
In normal dialing, each individual digit is dialed immediately.
OSI reference model
The Open Systems Interconnection reference model is a standardized model that organizes a communications system in seven layers.
Outside-line number
The outside-line number is the digit or series of digits you have to dial in order to get
an outside line from your own PBX. The outside-line number depends on your system.
165
Glossary
Point-to-MultiPoint Connection
At a Point-to-MultiPoint connection, several terminals can be connected in parallel. A
terminal of this type may also be a PBX suitable for a Point-to-MultiPoint connection.
Point-to-Point Connection
A Point-to-Point connection is suitable only for the connection of one terminal. As a rule,
this is a PBX capable of being dialed directly and suitable for a Point-to-Point connection. In rare cases, an ISDN card (S2M or S0) is operated at a Point-to-Point connection.
PPP
Point-to-point (also peer-to-peer) protocol. Transmission protocol on connection-oriented networks, e.g. ISDN.
The protocol consists of a number of standards and subprotocols. These describe the
structure of transmitted data on various networks. The intention is to insure that communications equipment from different manufacturers uses uniform procedures for
communications.
Profile
In MS Exchange, the profile contains all the essential information about the information
services, files and address books used by you, and the settings for them.
Protocol
Software that controls the transmission and reception of data over a network. A distinction is made between network protocols, such as IPX/SPX or TCP/IP, and ISDN protocol, such as 1TR6 or DSS1.
Sender ID
While a fax is being sent, the Sender ID is shown on the recipient's display and is printed at the top edge of the fax. It states the sender's number.
The Sender ID is input together with the country code, local code and extension number.
Example: 49 30 4644427
Task bar
The task bar is located at the lower edge of the screen. The task bar lists the opened
programs.
TEI
The Terminal Endpoint Identifier is the last digit in the number of an ISDN connection
under the German national protocol 1TR6. If Deutsche Telekom has released the TEI to
you, you can specify a digit between 0 and 9 to each of your terminals, e.g. phone and
fax. This allocation can be changed at any later time.
166
Glossary
Telematic Server
The Telematic Server is an I-SURF program component that receives and sends telematics services - fax, teletex and telex. The Telematic Server works invisibly in the background.
Fax is the only telematics service included in this version of I-SURF.
V.110
A transmission protocol used to match slow data from the analog world to the ISDN.
V.120
A transmission protocol.
Voicegate
The voicegate function is implemented by the Voice Server. When Voice Server is running, calls are accepted and stored on your computer or the I-SURF Server.
Voice Server
The Voice Server is the I-SURF program component that receives and sends voice messages. The Voice Server works invisibly in the background.
WAV file
Files with the extension .WAV in which sounds are stored. WAV files are edited and
played back using the Audiorecorder.
X.75
ISDN transmission protocol. X.75 is the standard protocol for accessing mailboxes.
167
Glossary
168
Index
Index
A
Address book ................................................ 99
adding a new entry ................................. 99
creating distribution lists ....................... 105
Analog modem ............................................ 111
announcement
recording over the phone ....................... 93
recording via microphone ....................... 94
Anti-virus application ..................................... 55
Automatic Redialing ...................................... 81
B
Busnumber ................................................... 58
C
Call Setup ...................................................... 85
Canonical Addresses ................................... 108
CAPI Version ................................................. 60
CD Launcher ................................................... 9
Change ISDN card ......................................... 61
Channelbundling
Dynamic two channels ........................... 83
Static one channel .................................. 83
Static two channels ................................ 83
Component Selection ................................... 30
Compression ...........................................54, 84
Configuration
EuroFileTransfer ..................................... 53
Group 3 fax ............................................. 51
Group 4 fax ............................................. 52
Voicegate ................................................ 55
connection
new ......................................................... 90
Country code ................................................. 58
D
Default profile ............................................... 49
Dial-Up Networking
enabling access by callers under W95 . 129
enabling access by callers under W98 . 121
Distribution list ............................................ 105
Dynamic two channels .................................. 83
E
EFT
Compression ....................................54, 84
Inactive time ........................................... 55
Private directory ...................................... 54
Start directory ......................................... 53
EFT Dialer ...................................................... 76
EFT Explorer ................................................. 85
disconnecting ......................................... 87
setting up a connection .......................... 86
EFT number .................................................. 86
EFT Subscribers .............................................85
EFT-Username ..................................53, 83, 86
Entering numbers ..........................................47
EuroFile Transfer ...........................................53
F
Fax Dialer ................................................ 65, 66
Fax display .....................................................69
Fax message
receiving ..................................................68
sending ....................................................63
sending from an application ....................68
sending via MS Explorer or desktop .......68
sending via the Fax Dialer ................ 65, 66
File
copying from a distant terminal ...............88
copying from the computer .....................89
deleting ...................................................89
receiving ..................................................78
renaming .................................................89
sending from desktop .............................77
sending in MS Exchange .........................74
sending via EFT Dialer .............................76
sending via MS Explorer .........................77
Format ...........................................................82
G
Group 3 fax ....................................................51
Group 4 fax ....................................................52
H
Headline .........................................................51
I
Inactive time ..................................................55
Installation
driver software under Windows 95 .........20
driver software under Windows 98 .........18
driver software under Windows NT 4.0 ..22
International code ..........................................57
Interval ...........................................................48
ISDN card
change .....................................................61
Software Fax ...........................................61
ISDN HDLC modem ....................................111
ISDN modem ...............................................111
ISDN RNA modem ......................................111
ISDN Send options ......................................145
ISDN V.110 modem .....................................111
ISDN V.120 modem .....................................111
ISDN X.75 modem .......................................111
ISDNFAX printer ............................................68
I-SURF Address book ....................................99
adding an entry ........................................99
creating .................................................107
I-SURF Dialer .................................................79
I-SURF EFT Dialer ..........................................79
169
Index
I-SURF Fax Dialer ....................................68, 79
L
LineManager ................................................. 57
Location ........................................................ 47
M
Mainline ........................................................ 58
Message
attaching files ....................................... 142
deleting ................................................. 145
forwarding ............................................ 145
receiving ............................................... 141
saving ................................................... 144
selecting recipients ............................... 143
sending ................................................. 141
status .................................................... 147
Modem
Analog modem ..................................... 111
ISDN HDLC modem ............................. 111
ISDN RNA modem ............................... 111
ISDN V.110 modem .............................. 111
ISDN V.120 modem .............................. 111
ISDN X.75 ............................................. 111
MS Explorer ............................................68, 77
MSN .............................................................. 48
N
Remote control
changing the password ...........................97
monitoring calls .......................................98
setting pins ..............................................96
Resolution ......................................................82
Ring count .....................................................55
S
Send options ..................................................81
Service
one channel .............................................54
two channel dynamic ..............................54
two channel static ...................................54
Setup Mode ...................................................28
Software Fax .................................................61
Start directory ................................................53
Static one channel .........................................83
Static two channels .......................................83
Station ID .......................................................51
Support Module ...........................................151
Installation .............................................151
Installation Requirements ......................151
T
Tries for dialing ..............................................48
two channel dynamic .....................................54
two channel static .........................................54
National code ................................................ 58
NDIS WAN-Miniports .................................... 10
Number of tries ............................................. 48
U
O
Voicegate .......................................................55
Recording time ........................................55
Ring count ...............................................55
one channel ................................................... 54
Orientation .................................................... 82
P
Password ................................................83, 87
PBX
Busnumber ............................................. 58
Connection incoming .............................. 58
Connection outgoing .............................. 58
Mainline .................................................. 58
Personal address book ................................ 103
Private directory ............................................ 54
Program Group Selection .............................. 29
R
recipients .................................................... 143
Recording time .............................................. 55
Registry sheet
EuroFile Transfer .................................... 53
Group 3 fax ............................................. 51
ISDN card ............................................... 60
ISDN line ................................................. 57
Number ................................................... 79
Voicegate ................................................ 55
170
Uninstalling ....................................................40
V