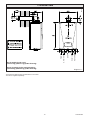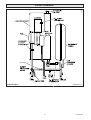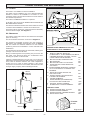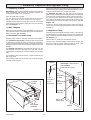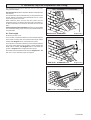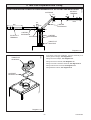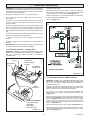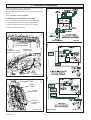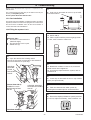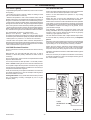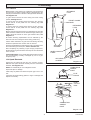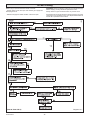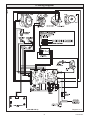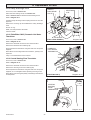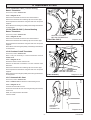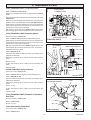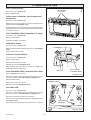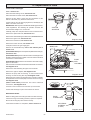
1
2000225294A.04.04
Instructions for Use
Installation and Servicing
F24e
G.C. No. 47-920-45
HIGH EFFICIENCY
CONDENSING COMBINATION BOILER
F28e
G.C. No. 47-920-39
HIGH EFFICIENCY
CONDENSING COMBINATION BOILER
F28e SB
G.C. No. 41-920-37
HIGH EFFICIENCY
CONDENSING SYSTEM BOILER
Saunier Duval, Nottingham Road, Belper, Derbyshire. DE56 1JT
www.saunier-duval.co.uk
11915
To b e l e f t w i t h t h e u s e r
Guarantee Registration
Thank you for installing a new Saunier Duval appliance in your home.
Saunier Duval appliances' are manufactured to the very highest standard so we are pleased to offer our customers' a
Comprehensive Guarantee.
This product is guaranteed for 24 months from the date of installation or 30 months from the date of manufacture,
whichever is the shorter, for parts. In addition this product is guaranteed for 12 months from the date of intallation or
18 months from the date of manufacture, whichever is the shorter, for labour.
The second year of the parts guarantee, from the beginning of the 13th month onwards after installation, is
conditional upon the boiler having been serviced by a CORGI registered gas installer, in accordance
with the manufacturer's recommendations. We strongly recommend regular servicing of your gas appliance, but
where the condition is not met, any chargeable spare parts or components issued within the applicable guarantee
period still benefit from a 12 month warranty from the date of issue by the manufacturer.
We recommend you complete and return as soon as possible your guarantee registration return literature, supplied in
the document envelope.
If your guarantee registration return literature is missing you can obtain a copy by telephoning
the Saunier Duval Customer Service number 0044(0)1773 525914.
RECORD YOUR SAUNIER DUVAL APPLIANCE DIRECT BY CALLING
0044 (0)870 240 3413
Customer service :
Saunier Duval GB Great Britain :
Tel. 00 44 (0)1773 525914
Fax. 00 44 (0)1773 828070
Saunier Duval,
Nottingham Road, Belper, Derbyshire. DE56 1JT
Saunier Duval IE IRELAND:
Tel. 00 353 (0)14191919
Fax. 00 353 (0)14584806
Hevac,
Muirfield Drive
Naas Road
Dublin 12
Technical Advice Line:
Tel. 00 44 (0)1773 828400
General and Sales enquiries:
Tel. 00 44 (0)870 606 4351
Fax. 00 44 (0)1773 820569
2000225294A
2
Contents
The instructions consist of three parts, User, Installation and Servicing Instructions, which
includes the Guarantee Registration Card. The instructions are an integral part of the
appliance and must, to comply with the current issue of the Gas Safety (Installation and Use)
Regulations, be handed to the user on completion of the installation.
CONTENTS
DESCRIPTION
SECTION
PAGE No.
INTRODUCTION
Important Information
Manual Handling
4
5
INSTRUCTIONS
Appliance Introduction
Appliance Safety Devices
General Information
Maintenance and Servicing
Operating the Boiler
(F24e & F28e ONLY) Optional Programmer
7
7
8
8
9
11
FOR THE USER
INSTALLATION
INSTRUCTIONS
SERVICING
INSTRUCTIONS
Technical Data
Technical Information
Heating System Design
(F24e & F28e ONLY) Domestic Hot Water
System Design
Boiler Schematic
Boiler Location, Flue and Ventilation
Installation Preparation and Appliance Fixing
Horizontal Top Flue Preparation and Fitting
Vertical Flue Preparation and Fitting
Twin Flue Preparation and Fitting
Gas/Water Connections
Safety Discharge Valve and
Condensate Connections
Electrical Connections
Commissioning
Servicing
Fault Finding
Wiring Diagram
Replacement of Parts
Spare Parts
3
1
2
3
13
15
16
4
5
6
7
8
8
8
9
17
18/19
20
22
23
26
28
32
10
11
12
35
37
39
13
14
15
16
17
41
46
50/51
52
63
2000225294A
INTRODUCTION - Important Information
WARNINGS
Gas Leak or Fault
Turn off the gas emergency control valve immediately. Eliminate all sources of ignition, i.e.smoking, blowlamps, hot air guns etc.
Do not operate electrical lights or switches either on or off. Open all doors and windows,ventilate the area.
Sheet Metal Parts
This boiler contains metal parts (components) and care should be taken when handling and cleaning, with particular
regard to edges.
Sealed Components
Under no circumstances must the User interfere with or adjust sealed parts.
Gas Category
Control of Substances Hazardous to Health
The boilers are of the I2H category for use with Natural Gas
(G20) as distributed in the United Kingdom and Ireland and
cannot be used on any other gas.
Under Section 6 of The Health and Safety at Work Act 1974, we
are required to provide information on substances hazardous to
health.
Gas Safety (Installation and Use) Regulations
The adhesives and sealants used in this appliance are cured
and give no known hazard in this state.
In your own interests and that of safety, it is the Law that
ALL gas appliances must be installed by a competent
person only, in accordance with the current issue of the
above regulations.
Insulation Pads / Ceramic Fibre
These can cause irritation to skin, eyes and the respiratory tract.
If you have a history of skin complaint you may be susceptible
to irritation. High dust levels are usual only if the material is
broken.
Testing and Certification
This boiler is tested and certificated for safety and
performance. It is, therefore, important that no alteration is
made to the boiler, without permission, in writing, from
Saunier Duval.
Normal handling should not cause discomfort, but follow normal
good hygiene and wash your hands before eating, drinking or
going to the lavatory.
Any alteration not approved by Saunier Duval, could invalidate
the certification, boiler warranty and may also infringe the
current issue of the statutory requirements.
If you do suffer irritation to the eyes or severe irritation to the skin
seek medical attention.
Electrical Supply
Mandatory WARNING for EEC countries
The boiler must be earthed.
This appliance is designed, approved and inspected to meet the
requirements of the intended market. The data label indicates
where the product was manufactured and the country for which
it is intended.
All system components shall be of an approved type and all
wiring to current I.E.E. wiring regulations.
External wiring must be correctly earthed, polarised and in
accordance with the relevant standards.
CE Mark
In GB this is BS 6891.
This boiler meets the requirements of Statutory Instrument, No.
3083 The Boiler (Efficiency) Regulations, and therefore is
deemed to meet the requirements of Directive 92/42/EEC on
the efficiency requirements for new hot water boilers fired with
liquid or gaseous fuels.
In IE this is the current edition of I.S.813 "Domestic Gas
Installations".
The boiler must be connected to a permanent 230V ac, 50Hz
supply.
Connection of the whole electrical system of the boiler, including
any heating controls, to the electrical supply must be through
one common isolator and must be fused 3 Amp maximum.
Type test for purposes of Regulation 5 certified by: Notified body
0063.
Product/production certified by: Notified body 0086.
Isolation should be by a double pole switched fused spur box,
with a minimum gap of 3mm for both poles. The fused spur box
should be readily accessible and preferably adjacent to the
appliance. It should be identified as to its use.
The CE mark on this appliance shows compliance with:
1. Directive 90/396/EEC on the approximation of the laws of the
Member States relating to appliances burning gaseous fuels.
Alternatively connection can be made through an unswitched
shuttered socket and 3A fused 3-pin plug both to the current
issue of BS 1363 may be used, provided they are not used in a
room containing a bath or shower.
2. Directive 73/23/EEC on the harmonisation of the Laws of the
Member States relating to electrical equipment designed for
use within certain voltage limits.
3. Directive 89/336/EEC on the approximation of the Laws of
the Member States relating to electromagnetic compatibility.
2000225294A
Wiring to the boiler must be PVC 85OC insulated cable, not less
than 0.75mm2 (24/0.20mm).
4
Introduction - Manual Handling
IMPORTANT. With regards to the Manual Handling Operations,
1992 Regulations, the following lift operations are recommended
as the appliance weight exceeds a one man lift.
Carriage of carton from point of delivery to
point of installation - roofspace.
Recommend 2-person lift. Ensure co-ordinated movements
during lift. Avoid upper body/top heavy bending - do not lean
forward/sideways. Clear the route before attempting the lift.
Take care to avoid trip hazards, slippery or wet surfaces and
when climbing steps and stairs. When transferring appliance
into roofspace, recommend 1 person to be in roofspace to
receive the appliance and other person to be below to pass up
and support appliance. Ensure safe lifting techniques are used
- keep back straight - bend using legs. Keep load as close to
body as possible. Always use assistance if required. It is
assumed safe access, flooring and adequate lighting are
provided in the roof space. It is recommended a risk assessment
of the roof space area be carried out before moving the
appliance into the area to take into account access, stability of
flooring, lighting and other factors, and appropriate measures
taken.
General recommendations when handling
Clear the route before attempting the lift.
Ensure safe lifting techniques are used - keep back straight bend using legs.
Keep load as close to body as possible.
Do not twist - reposition feet instead.
If 2 persons performing lift, ensure co-ordinated movements
during lift.
Avoid upper body/top heavy bending - do not lean forward/
sideways.
Recommend wear suitable cut resistant gloves with good grip
to protect against sharp edges and ensure good grip.
Unpacking of Appliance from carton.
Always use assistance if required.
Recommend 2 persons unpack appliance from carton. Always
keep working area clear. Recommend cut base end of carton
and open carton flaps, then tilt boiler forwards from its side onto
its base and remove carton by sliding up over the boiler. Ensure
safe lifting techniques are used - keep back straight - bend using
legs. Keep load as close to body as possible. Always use
assistance if required. Dispose of packaging in a responsible
manner. Recommend wear suitable cut resistant gloves with
good grip to protect against sharp edges and ensure good grip
when handling appliance outside packaging.
Removal of carton from delivery van
Recommend 2 person lift or 1 person with use of sack truck. If
1 person is performing lift, straddle the load, tilt and place carton
into position on truck. Recommend secure appliance onto truck
with suitable straps. Ensure safe lifting techniques are used keep back straight - bend using legs. Keep load as close to body
as possible. If 2 persons performing lift, ensure co-ordinated
movements during lift. Always use assistance if required.
Carriage of carton from point of delivery to
point of installation - ground floor
Positioning of Appliance for Final Installation no obstructions.
Recommend 2 person lift or 1 person with use of sack truck. If
1 person is performing lift, straddle the load, tilt and place carton
into position on truck. Recommend secure appliance onto truck
with suitable straps. Ensure safe lifting techniques are used keep back straight - bend using legs. Keep load as close to body
as possible. If 2 persons performing lift, ensure co-ordinated
movements during lift. Clear the route before attempting the lift.
If removing boiler from truck straddle the load and tilt forwards
to facilitate secure grip. Ensure safe lifting techniques are used
- keep back straight - bend using legs. Do not twist - reposition
feet instead. Take care to avoid trip hazards, slippery or wet
surfaces and when climbing steps and stairs. Always use
assistance if required.
Recommend 2 persons lift appliance to position into place. Fit
bracket securely onto wall before lifting appliance into position.
Obtain firm grip on front and sides of appliance, lift upwards,
ensure stable balance achieved and lift upwards to position in
place on bracket. Ensure safe lifting techniques are used - keep
back straight - bend using legs - when lifting load from floor level.
Do not twist - reposition feet instead. Keep boiler as close as
possible to body throughout lift to minimise strain on back.
Ensure co-ordinated movements to ensure equal spread of
weight of load. Always use assistance if required. Recommend
wear suitable cut resistant gloves with good grip to protect
against sharp edges and ensure good grip when handling
appliance.
Carriage of carton from point of delivery to
point of installation - first or higher floor,
cellar.
Recommend 2-person lift or 1 person with use of sack truck. If
1 person is performing lift, straddle the load, tilt and place carton
into position on truck. Recommend secure appliance onto truck
with suitable straps. Ensure safe lifting techniques are used keep back straight - bend using legs. Keep load as close to body
as possible. If 2 persons performing lift, ensure co-ordinated
movements during lift. Avoid upper body/top heavy bending - do
not lean forward/sideways. Clear the route before attempting
the lift. If removing boiler from truck straddle the load and tilt
forwards to facilitate secure grip. Ensure safe lifting techniques
are used - keep back straight - bend using legs. Do not twist reposition feet instead. Take care to avoid trip hazards, slippery
or wet surfaces and when climbing steps and stairs. Always use
assistance if required.
5
2000225294A
Introduction - Manual Handling
Positioning of Appliance for Final Installation
- above worktop, foreseeable obstructions etc.
Recommend 2 persons lift appliance to position into place. Fit
bracket securely onto wall before lifting appliance into position.
Obtain firm grip on front and sides of appliance, lift upwards,
onto worktop if practicable. Ensure stable balance achieved
and lift upwards to position in place on bracket. If 2 persons
positioning onto bracket obtain firm grip at front and sides/base
of boiler. Ensure co-ordinated movements during 2 person lifts
to ensure equal spread of weight of load. Ensure safe lifting
techniques are used - keep back straight - bend using legs when lifting load from floor level. Do not twist - reposition feet
instead. Keep boiler as close as possible to body throughout lift
to minimise strain on back. Avoid upper body/top heavy
bending - do not lean forward/sideways. Always use assistance
if required. Recommend wear suitable cut resistant gloves with
good grip to protect against sharp edges and ensure good grip
when handling appliance.
Positioning of Appliance for Final Installation
- within compartment etc. restricting
installation.
Recommend 2 persons lift appliance to position into place,
space permitting. Fit bracket securely onto wall before lifting
appliance into position. Obtain firm grip on front and sides of
appliance, lift upwards, onto worktop if practicable. Ensure
stable balance achieved and lift upwards to drop into place onto
bracket. If 2 persons positioning onto bracket obtain firm grip at
front and sides/base of boiler. Ensure co-ordinated movements
during 2 person lifts to ensure equal spread of weight of load. If
1 person positioning onto bracket recommend obtain firm grip
supporting base of boiler. Ensure safe lifting techniques are
used - keep back straight - bend using legs - when lifting load
from floor level. Do not twist - reposition feet instead. Keep
boiler as close as possible to body throughout lift to minimise
strain on back. Always use assistance if required. Recommend
wear suitable cut resistant gloves with good grip to protect
against sharp edges and ensure good grip when handling
appliance.
Positioning of Appliance for Final Installation
- in roof space restricting installation.
Recommend 2 persons lift appliance to position into place,
space permitting. Fit bracket securely onto wall before lifting
appliance into position. Obtain firm grip on front and sides of
appliance, lift upwards, ensure stable balance achieved and lift
upwards to drop into place onto bracket. If 2 persons positioning
onto bracket obtain firm grip at front and sides/base of boiler.
Ensure co-ordinated movements during 2 person lifts to ensure
equal spread of weight of load. If 1 person positioning onto
bracket recommend obtain firm grip supporting base of boiler.
Ensure safe lifting techniques are used - keep back straight bend using legs - when lifting load from floor level. Do not twist
- reposition feet instead. Keep boiler as close as possible to
body throughout lift to minimise strain on back. Always use
assistance if required. Recommend wear suitable cut resistant
gloves with good grip to protect against sharp edges and ensure
good grip when handling appliance. It is recommended a risk
assessment of the roof space area be carried out before moving
the appliance into the area to take into account access, stability
of flooring, lighting and other factors, and appropriate measures
taken.
2000225294A
6
User Instructions - Appliance Introduction
The EnviroPlus F24e & F28e boilers are wall mounted high
efficiency condensing combination boilers with electronic ignition
providing central heating and instantaneous hot water.
Accessories
The EnviroPlus F28e SB boiler is a wall mounted high
efficiency condensing system boiler with electronic ignition
providing central heating and indirect hot water.
For further information contact your supplier.
A range of accessories are available.
Both the central heating and domestic hot water (F24e & F28e
only) temperature are user adjustable.
F24e & F28e ONLY Domestic hot water demand always has
priority over heating demand.
The boiler is designed for use as part of a sealed water central
heating system with fully pumped circulation. The pump,
expansion vessel and associated safety devices are all fitted
within the boiler.
The boilers have fan assisted balanced flues which both
discharges the products of combustion to and draws the
combustion air from the outside of the room.
The boilers are suitable for horizontal top, vertical flue or
twin-pipe flue system connection. Refer to section 8 of these
instructions and the Saunier Duval flue options guide
(available from your nearest stockist) for further information.
Manufacturer's instructions must not be taken as overriding
statutory requirements. Reference in these instructions to British
standards and statutory regulations/requirements apply only to
the United Kingdom. For Ireland the current edition of I.S.813
"Domestic Gas Installations" must be used.
These instructions should be carefully followed for the safe and
economical use of your boiler.
Note: The boiler serial number is marked on the data label
attached to the inner casing panel. The 'Controls & lighting'
section describes how to safely use the boiler.
User Instructions - Appliance Safety Devices
Overheating safety
Frost protection
In the event of the boiler overheating the safety devices will
cause a safety shutdown. If this happens, call your installation/
servicing company.
The appliance has a built in frost protection device that protects
the boiler from freezing. With the gas and electric supplies ON
and irrespective of any room thermostat setting, the frost
protection device will operate the pump when the temperature
of the boiler water falls below 7OC.
Electrical supply failure
The boiler will not operate without an electrical supply. Normal
operation of the boiler should resume when the electrical supply
is restored.
The burner will fire if the temperature inside the boiler falls to
3OC.
Reset any central heating system controls, to resume normal
operation.
Any other exposed areas of the system should be protected by
a separate frost thermostat.
When the temperature reaches 10OC the boiler stops.
If the boiler does not resume normal operation turn the mains
reset switch off and on. If the boiler does not resume normal
operation call your installation/servicing company.
Heating safety valve
CAUTION: A Safety Valve with a discharge pipe is fitted to this
boiler.
The valve MUST NOT BE TOUCHED except by a competent
person. If the valve discharges at any time, switch the boiler off
and isolate it from the electrical supply. Contact your installation/
service company.
7
2000225294A
User Instructions - General Information
IMPORTANT NOTE:
Clearances
Please be advised that the 'Benchmark' logbook should be
completed by the engineer on completion of commissioning or
servicing.
If fixtures are positioned close to the boiler, space must be
left as shown in section 2. Enough space must also be left in
front of the boiler to allow for servicing.
All CORGI Registered Installers carry a CORGI ID card, and
have a registration number. Both should be recorded in your
benchmark Logbook. You can check your installer is CORGI
registered by calling CORGI direct on: 01256 372300.
Condensate Drain
Water Treatment
Pluming from flue terminal
In the case of an existing installation, it is ESSENTIAL that prior
to installing the new boiler the system is thoroughly flushed.
Like all condensing boilers this appliance will produce a plume
of condensation from the flue terminal in cool weather. This is
due to the high efficiency and hence low flue gas temperature
of the boiler. It is normal and not a fault indication.
The condensate drain, see section 10.2, must not be modified
or blocked.
For optimum performance after installation of a new system, the
boiler and its associated central heating system should also be
flushed. Flushing should be carried out in accordance with
BS7593: 1992 using a cleanser such as Sentinel X300 or X400,
Fernox Superfloc or Salamander corrosion guard cleaner.
Electrical and Gas Supplies
If the mains electricity and gas are to be turned off for any
long periods during severe weather, it is recommended that
the whole system, including the boiler, should be drained to
avoid the risk of freezing. Make sure that, if fitted, the
immersion heater in the cylinder is switched off.
For long-term corrosion protection, after flushing, an inhibitor
suitable for stainless steel exchangers should be used, refer to
the current issue of BS 5449 and BS 7593 on the use of
inhibitors in central heating systems. Examples are Sentinel
X100 Fernox or Salamander corrosion guard inhibitor.
If you have a sealed water system contact your installation/
servicing company as draining, refilling and pressurising MUST
be carried out by a competent person.
Compartment Installations
If the boiler is fitted into a compartment it does not require
ventilation openings.
Do not use the compartment for storage.
The boiler is not suitable for cupboard installation.
User Instructions - Maintenance and Servicing
Draining and filling
If this appliance is installed in a rented property there is a duty
of care imposed on the owner of the property by the current
issue of the Gas Safety (Installation and Use) Regulations,
Section 35.
Caution: The boiler is installed as part of a sealed system which
must only be drained and filled by a competent person.
If the boiler is to be out of use for any long periods during severe
weather conditions, it is recommended that the whole system,
including the boiler, be drained to avoid the risk of freezing.
Servicing/maintenance should be carried out by a competent
person in accordance with the rules in force in the countries of
destination.
If in doubt, consult your installation/servicing company.
Cleaning
To obtain service, please call your installer or Saunier Duval
service organisation using the telephone number on the front
cover of this literature.
WARNING: This appliance contains metal parts (components)
and care should be taken when handling and cleaning with
particular regard to edges of sheet metal parts to avoid any
possibility of personal injury.
Spare Parts
REMEMBER, When replacing a part on this appliance, use only
spare parts that you can be assured conform to the safety and
performance specification that we require. Do not use
reconditioned or copy parts that have not been clearly authorised
by Saunier Duval.
The boiler casing can be cleaned using a mild liquid detergent
with a damp cloth, then a dry cloth to polish.
Do not use any form of abrasive or solvent cleaner as you may
damage the paintwork.
Do not use abrasive or solvent cleaners.
If a part is required contact Saunier Duval Service using the
telephone number on the inside front cover of this booklet.
Maintenance and Servicing
Please quote the name of the appliance, this infomation will be
on the name badge on the front of the appliance.
To ensure the continued efficient and safe operation of the
appliance it is recommended that it is checked and serviced as
necessary at regular intervals. The frequency of servicing will
depend upon the particular installation conditions and usage,
refer to guarantee registration on the front cover of this literature.
2000225294A
If in doubt seek advice from the local gas company or Saunier
Duval service organisation using the telephone number on the
inside front cover of this booklet.
8
User Instructions - Operating the Boiler
12170
Running lamp illuminated green when burner is lit
(fault indicated by a red flashing light)
Domestic hot water
temperature control
knob
(F24e & F28e ONLY)
Digital Display
HEATING "ON"
ON/OFF
switch
HEATING "OFF"
Optional Programmer
(F24e & F28e ONLY)
Central heating
control knob
Diagram 1
OPERATION OF THE BOILER
1.
Check that all isolating valves on the boiler are open and that water flows from the hot water tap.
2.
If you are in any doubt about the boiler being filled with water contact your installer or Saunier Duval's own
service organisation using the telephone number on the inside front cover of this booklet.
3.
Check that the electrical supply to the boiler is ON and set any remote controls as required.
4.
With the User controls in their "OFF" positions, as shown in the above diagram, turn the ON/OFF switch to the
ON (1) position, the running lamp will initially illuminate (green) then go off, the system pressure will be displayed
and should read on the digital display, at least 0.7bar (recommended 1.0bar), if less, pressurise as described in
the System Pressurisation section.
USER CONTROLS
CENTRAL HEATING CONTROL
1.
Turn the central heating knob "ON", the lighting sequence will begin, the running lamp will illuminate (green) to
indicate the boiler has lit, the system temperature will now be displayed instead of system pressure.
The temperature of the central heating water can be adjusted by turning the central heating control knob
to desired setting between 1 'Min' and 5 'Max' or
Set the control knob to
frost protection. 5 'Max', is appoximately 87°C.
to switch off heating.
If the boiler fails to light, reset the controls, see paragraph below, TO RESET
If a fault occurs the running lamp will flash red and a fault code will appear on the digital display.
DOMESTIC HOT WATER CONTROL (F24e & F28e ONLY)
2.
Position 0 - hot water OFF. Position 1 - hot water between 38oC and 55oC approx.
The ECO setting is recommended and ideally suited to normal family use (showers, washing up etc.).
Positions between ECO and MAX are for occasional use, for water above 55oC approx.
TO RESET
3.
Turn the ON/OFF switch to 0, wait for 5 seconds, turn ON/OFF switch to 1, the boiler is reset.
If the fault persists contact your installer/service provider using the telephone number on the inside font cover of
this booklet.
TO TURN THE BOILER OFF
4.
Turn the ON/OFF switch to the OFF (0) position.
Turn the gas supply OFF at the gas service cock if the boiler is to be out of use for some time.
9
2000225294A
User Instructions - Operating the Boiler
12211
System Pressurisation
(F24e & F28e ONLY) If the digital display shows pressure less
than 0.7bar, re-pressurise the system to 1bar by gently opening
the built in filling taps underneath the boiler, see diagram 2. Tap
extension tools are provided to facilitate this.
Using the tap extensions connected to tap (a) and tap (b) open
tap (b) and then slowly open tap (a). Re-pressurise the system
to a pressure of 1.0 bar indicated on the digital display. When
the system is pressurised you must close tap (b) and then tap
(a).
If the system repeatedly loses pressure, YOU MUST CONTACT
YOUR INSTALLER OR SAUNIER DUVAL'S OWN SERVICE
ORGANISATION USING THE TELEPHONE NUMBER ON
THE INSIDE FRONT COVER OF THIS BOOKLET.
FILLING LOOP
(F28e SB ONLY) This sealed water system must be filled and
pressurised by a competent person.
TAP (a)
EXTENSION
YOU MUST CONTACT YOUR INSTALLER OR SAUNIER
DUVAL'S OWN SERVICE ORGANISATION USING THE
TELEPHONE NUMBER ON THE INSIDE FRONT COVER OF
THIS BOOKLET.
(F24e & F28e ONLY)
To Turn the Boiler Off
There is a mains reset switch on the right hand side of the
controls fascia, which will isolate the boiler. However, it is
preferable to leave the electrical supply on whenever possible
to permit operation of the built-in frost protection and daily pump
and valve exercise.
To turn off the central heating use the room thermostat or
programmer.
To turn off the domestic hot water turn the hot water temperature
control knob to the minimum setting.
For holiday mode turn both of the temperature knobs to the
minimum setting.
2000225294A
10
TAP (b)
EXTENSION
Diagram 2
User Instructions - (F24e & F28e ONLY) Optional Programmer
10205
General description
The programmer is factory preset which switches the boiler on
and off up to three times a day as shown below.
FACTORY PRESET TIMES
1st
1st
2nd
2nd
3rd
3rd
ON
OFF
ON
OFF
ON
OFF
6.30
8.30
12.00
12.00
16.30
22.30
Diagram 2
NOTE: The 2nd "ON" and "OFF" preset time will not bring the
boiler on. In most cases this may not be required but can be
programmed by the user if desired.
10302
The programmer has an "advance" feature to manually switch
the boiler "ON" or "OFF" and a holiday feature so that you can
programme the boiler to start automatically when returning from
holiday. Details on how to set these feature are given further on
in these instructions.
Setting the Time
Make sure there is an electrical supply to the boiler and the
boiler is switched "ON".
Place the slide switch to
Press the "RESET" (res) button for a few seconds, using a
pointed object such as a pencil. When released the display will
begin to flash, see diagram 2. Using the + and - buttons, set
the display to the correct time in twenty four hour format, for
example, 1300 for 1pm, see diagram 3.
Diagram 3
10303
Helpful hint The + and - buttons are used to change the times.
Press and release for small changes, hold the button down and
the time will change quickly.
To use the internal, factory set, programmes place the slide
switch to the 'RUN' position. The display will show the current
time and the "ON" or "OFF" symbol will be displayed according
to whether the programmer has switched the boiler on or off.
To Override or Advance the programmer
To advance the time clock operation, that is, switch the heating
on when it is off or vice versa, press the "ON/OFF" button. The
programmer will switch the heating on or off and the "ON" or
"OFF" symbol will flash on the display to show that it has been
overridden, see diagram 4.
Diagram 4
10304
Note: The boiler will stay "ON" or "OFF", as selected, until the
programmer reaches its next on or off time. From then on, the
programmer will switch the boiler on and off according to the
internal programme.
When the boiler is again controlled by the internal programme
the "ON" or "OFF" symbol will stop flashing. The operation of
the programmer can be overridden in this way at any time.
Diagram 5
11
2000225294A
User Instructions - (F24e & F28e ONLY) Optional Programmer
10305
To set the programmer ON and OFF times
Note: The programmer can be set to give a minimum of one and
a maximum of three "ON" and "OFF" times.
Place the slide switch to "SET".
Press the "enter" button. The display will show the first "ON"
time, see diagram 5.
Using the + and - buttons, change the first "ON" time to the time
you require then press the "enter" button twice. This stores the
new time and displays it to confirm it has been stored in the
programmer memory.
Press the "enter" button again. The display will show the first
"OFF" time, see diagram 6.
Press the "enter" button again. The display will now show the
first "OFF" time you have just entered.
Repeat the above for the remaining "ON" and "OFF" times.
ON
10306
Diagram 6
Using the + and - buttons, change the first "OFF" time to the time
you require. Press the "enter" button twice. The display will
show the first "ON" time.
When the "ON" and "OFF" times have been set, place the slide
switch to "RUN".
Note: If all three "ON" and "OFF" times are not required, follow
the above instructions but after setting the desired times, set the
other times to show a series of dashes, using the + and buttons, see diagram 7. The series of dashes are between
times 23.59 and 0.00.
Helpful Hint If you get confused and wish to start again, press
the "Reset" (res) button and the programmer will revert to the
internal factory set programme. You can now reset the current
time and start again.
Diagram 7
10307
To check the programme "ON" and "OFF"
times
The programmed "ON" and "OFF" times can be checked at any
time by moving the slide switch from "RUN" to "SET".
Successive presses of the "enter" button will show the "ON"
and "OFF" times.
Always return the slide switch to "RUN" to return to normal timed
working.
To set the 'Holiday' feature
The programmer has a holiday feature which can be set, if
required, to keep the central heating "OFF" for a period between
one hour and twenty seven days. This can be used, for example,
to keep the central heating "OFF" during a holiday. After the
programmed time has elapsed, the boiler will return to its normal
programmes and switch on the boiler in time for a return from
holiday.
10308
Diagram 8
Place the slide switch to " HOL " , the letter "h" will appear on the
display, see diagram 8.
Using the + and - buttons, set the "Holiday" time required.
After the display has shown "twenty three hours", the "h" symbol
on the display will change to a "d". The Holiday time will now be
displayed in days, instead of hours, see diagram 9.
Use the "ON/OFF" button to set the boiler to the required
operation during the "Holiday" period.
Place the slide switch to "RUN".
After the programmed "Holiday" time, the boiler will return to
normal timed operation.
2000225294A
Diagram 9
12
Net lift weight (boiler only)
(F24e 47 kg) (F28e 47 kg) (F28e SB 42 kg)
Gross lift weight (boiler and packaging)
(F24e 52 kg) (F28e 52 kg) (F28e SB 47 kg)
RETURN
D.C.W. IN
GAS
D.H.W. OUT
FLOW
12179
1 Technical Data
Diagram 1.1
The boiler and fittings pack are delivered in one carton.
The flue is supplied separately.
13
2000225294A
1 Technical Data
(F24e ONLY) Heating
(F24e ONLY) Hot water
Heat input (max) NET Q
25.6 kW
87,347 BTU/H
Heat input (min) NET Q
5.0 kW
17,060 BTU/H
Heat output (max) GROSS P
25.1 kW
85,641 BTU/H
Heat output (min) GROSS P
4.9 kW
16,719 BTU/H
Heat output (max) Condensing Mode
26.5 kW
90,418 BTU/H
Efficiency - Sedbuk A
90.3%
Maximum heating temperature
87° C
Expansion vessel effective capacity
8l
Expansion vessel charge pressure
0.5 bar
Maximum system capacity at 75°C
110 l
Safety valve,
maximum service pressure 3 bar
Heat input (max) NET Q
Heat input (min) NET Q
Heat output (max) GROSS P
Heat output (min) GROSS P
Maximum hot water temperature
Minimum hot water temperature
Specific flow rate (for 35° C temp rise)
Threshold flow rate
Maximum supply pressure
Minimum supply pressure
25.6 kW
87,347 BTU/H
5.0 kW
17,060 BTU/H
25.1 kW
85,641 BTU/H
4.9 kW
16,719 BTU/H
63° C
38° C
10 l/min.
1.5 l/min.
10 bar
1 bar
(F28e ONLY) Hot water
Heat input (max) NET Q
(F28e ONLY) Heating
Heat input (min) NET Q
Heat input (max) NET Q
29.6 kW
100,995 BTU/H
Heat input (min) NET Q
5.9 kW
20,130 BTU/H
Heat output (max) GROSS P
29.0 kW
98,948 BTU/H
Heat output (min) GROSS P
5.8 kW
19,789 BTU/H
Heat output (max) Condensing Mode
31.2 kW
106,454 BTU/H
Efficiency - Sedbuk A
90.3%
Maximum heating temperature
87° C
Expansion vessel effective capacity
8l
Expansion vessel charge pressure
0.5 bar
Maximum system capacity at 75°C
110 l
Safety valve,
maximum service pressure 3 bar
Heat output (max) GROSS P
Heat output (min) GROSS P
Maximum hot water temperature
Minimum hot water temperature
Specific flow rate (for 35° C temp rise)
Threshold flow rate
Maximum supply pressure
Minimum supply pressure
29.6 kW
100,995 BTU/H
5.9 kW
20,130 BTU/H
29.0 kW
98,948 BTU/H
5.8 kW
19,789 BTU/H
63° C
38° C
12 l/min.
1.5 l/min.
10 bar
1 bar
Combustion
Products outlet diameter
Fresh air inlet diameter
Combustion products values
at Max.
60 mm
100 mm
CO (40ppm)
CO2 (9.4%)
NOx class 5 (3.5ppm)
Electrical
Electrical supply
Electrical rating
Level of protection
Internal Fuse rating
230 V ~ 50Hz
180 W fused at 3A
IPX4D
125mAT on PCB
3.15AT on Fan Supply
Natural Gas (G20)
Inlet pressure
2000225294A
14
20 mbar
CO2 on Max Open
9.2%
CO2 on Low Open
8.3%
Gas rate maximum
3.1 m3/h
Gas rate minimum
0.6 m3/h
2 Technical Information
In IE, the installation must be carried out by a competent
person and installed in accordance with the current edition of
I.S.813 "Domestic Gas Installations", the current Building
Regulations and reference should be made to the current ETCI
rules for Electrical Installation.
IMPORTANT NOTICE
Where no British Standards exists, materials and equipment
should be fit for their purpose and of suitable quality and
workmanship.
The installation of this boiler must be carried out by a competent
person in accordance the rules in force in the countries of
destination.
In GB the following Codes of Practice apply:
BS4814, BS6798, BS5440 Part 1 and 2, BS5546 Part 1,
BS5449, BS6891, BS6700, BS7074 Part 1 and 2, BS7593,
BS7671.
Manufacturer's instructions must not be taken as overriding
statutory requirements.
In IE: I.S.813, BS5546, BS 5449, BS 7074, BS 7593.
1.2 Statutory Requirements
Manufacturer's instructions must not be taken as overriding
statutory requirements.
In GB the installation of the boiler must be carried out by a
competent person as described in the following regulations:
Note: For further information, see the current issue of the
Building Regulations, approved document L1 ( in the UK) and
the references:
The manufacturer's instructions supplied.
The Gas Safety (Installation and Use) Regulations.
1) GIL 59, 2000: Central heating system specification (CheSS)
and
The appropriate Buildings Regulations either The Building
Regulations, The Building Regulations (Scotland),The Building
Regulations (Northern Ireland).
2) GPG 302, 2001: Controls for domestic central heating
system and hot water. BRECSU.
The Water Fittings Regulations or Water byelaws in Scotland.
Certification
The Health and Safety at Work Act, Control of Substances
Hazardous to Health (COSHH).
The Current I.E.E. Wiring Regulations.
This boiler certificated to the current issue of EN 483 : 2000 for
performance and safety.
Where no specific instructions are given, reference should be
made to the relevant British Standard Code of Practice.
It is important that no alteration is made to the boiler, without
permission, in writing, from Saunier Duval.
Any alteration that is not approved by Saunier Duval, could
invalidate the warranty and could also infringe the current issue
of the Statutory Requirements.
12405
3 Heating System Design
Diagram 3.1
15
2000225294A
3 Heating System Design
- The EnviroPlus F24e, F28e and F28e SB are for use with
sealed central heating systems.
3.2 Filling the Sealed System
- The safety valves are an integral part of the boiler and cannot
be adjusted.
NOTE: The water pressure at the boiler must be at least 1.2bar
to enable filling the boiler to a minimum pressure. If not
pressurisation must be carried out by an alternative filling loop.
- The circulation pump is integral with the boiler.
The boiler has a built in filling device, see diagram 3.3. A pushon extension is supplied in the loose items pack to ease access
to the filling device tap.
- Pipe sectional areas shall be determined in accordance with
normal practices, using the output/pressure curve, see diagram
3.1. The distribution system shall be calculated in accordance
with the output requirements of the actual system, not the
maximum output of the boiler. However, provision shall be
made to ensure sufficient flow so that the temperature difference
between the flow and return pipes be less than or equal to 20°C.
The minimum flow is 1249 l/h this equates to a system
temperature differential of 20°C.
This filling device is designed to enable the re-pressurisation of
the system in the event of loss of pressure. It is not intended to
be used to completely fill the system. If so used, it may take a
long time to fill the system.
Refer to diagram 3.3. Using the tap extensions connected to
tap (a) and tap (b) open tap (b) and then slowly open tap (a). Repressurise the system to a pressure of 1.0 bar indicated on the
digital display with no demand. When the system is pressurised
you must close tap (b) and then tap (a).
The system can be fitted with a lockable balancing valve if
necessary in the main flow or return pipes shown as valve 'A'
in (F24e & F28e ONLY diagram 3.2) or (F28e SB ONLY
diagram 3.2a).
To fill the system quickly provision should be made to include a
proprietry filling loop external to the boiler.
- The piping system shall be routed so as to avoid any air
pockets and facilitate permanent venting of the installation.
Bleed fittings must be provided at every high point of the system
and on all radiators.
Suitable external filling systems are shown diagramatically, see
diagram 3.4. The system should be pressurized to 1 bar,
indicated on the digital display with no heating demand.
- The total volume of water permitted for the heating system
depends, amongst other things, on the static head in the cold
condition. The expansion vessel on the boiler is pressurised at
0.5 bar and allows a maximum system volume of 110 litres for
an average temperature of 75°C and a maximum service
pressure of 3 bar. This pressure setting can be modified at
commissioning stage if the static head differs. An additional
expansion vessel can be fitted to the system if required, see
diagram 3.2.
3.3 Water Treatment
In the case of an existing installation, it is ESSENTIAL that prior
to installing the new boiler the system is thoroughly flushed. For
optimum performance after installation of a new system, the
boiler and its associated central heating system should also be
flushed. Flushing should be carried out in accordance with
BS7593: 1992 using a cleanser such as Sentinel X300 or X400,
or Fernox Superfloc.
- Provision shall be made for a drain valve at the lowest point of
the system. A drain for the appliance is provided as an integral
part of the boiler positioned at the rear bottom of the boiler, see
diagram 9.2.
For long-term corrosion protection, after flushing, an inhibitor
suitable for cast aluminium exchangers should be used, refer to
the current issue of BS 5449 and BS 7593 on the use of
inhibitors in central heating systems.
In GB it is necessary to comply with the Water Supply (Water
Fittings) Regulations 1999 (for Scotland, the Water Byelaws
2000, Scotland).
BOILER
Filling device
HOT OUT
To comply with the Water regulations your attention is drawn to:
The Water Regulations guide published by the Water Regulations
Advisory Service (WRAS) gives full details of the requirements.
DOMESTIC
WATER
In IE the requirements given in the current edition of I.S.813
"Domestic Gas Installations" and the current Building Regulations
must be followed.
3.1 Bypass
COLD SUPPLY IN
12254
The installation of the boiler must comply with the requirements
of the current issue of BS6798, in Ireland, refer also to the
current edition of I.S.813 "Domestic Gas Installations".
ADDITIONAL
EXPANSION
VESSEL (if required)
NOTE: All systems must have at least one radiator not fitted with
a thermostatic valve.
The boiler is fitted with a fixed bypass. Ensure that the flow rate
does not drop below the figure specified, see diagram 3.1.
A bypass is not required on the central heating circuit unless the
system controls could allow the boiler to operate when there is
no flow.
'A'
Where an additional bypass is fitted, it must be placed at least
1.5 metres from the appliance, see diagram 3.2.
BYPASS
(if required)
HEATING CONTROL
CIRCUIT VALVE
RETURN
DRAIN
POINT
Diagram 3.2
2000225294A
16
12253
10157
3 Heating System Design
Additional
expansion
vessel
(if required)
Boiler
Bypass
(if required)
Return
Drain
point
'A'
Flow
Control
valve
Diagram 3.2a
12211
Heating
circuit
TYPE CA
FILLING LOOP
TAP (a)
EXTENSION
(F24e & F28e ONLY)
TAP (b)
EXTENSION
Diagram 3.4
Diagram 3.3
4 (F24e & F28e ONLY) Domestic Hot Water System Design
All domestic hot water circuits, connections, fittings must be in
accordance with the relevant standards and water supply
regulations.
- The boiler will operate with a supply pressure of 0,6 bar, but
under reduced flow rate. In these circumstances the filling loop
will not pressurise the boiler.
For GB: Refer to the current addition of the Water Regulations
Guide.
Best operating comfort will be obtained from a supply pressure
of 1 bar.
For IE: The current edition of I.S.813 "Domestic Gas Installations".
4.1 Hard Water Areas
- Copper tubing or plastic Hep20 may be used for the domestic
hot water system. Unnecessary pressure losses should be
avoided.
In areas where the water is 'hard', more than 200mg/litre, it is
recommended that a proprietary scale reducer is fitted in the
cold water supply to the boiler.
- Provision shall be made for a drain valve at the lowest point of
the system.
17
2000225294A
11907
5 Boiler Schematic
Diagram 5.1
(F24e & F28e ONLY)
2000225294A
18
12248
5 Boiler Schematic
BYPASS
(F28e SB ONLY)
Diagram 5.1a
19
2000225294A
6 Boiler Location, Flue and Ventilation
6.1 Location
This boiler is not suitable for outdoor installation.
This boiler may be installed in any room, although particular
attention is drawn to the installation of a boiler in a room
containing a bath or shower where reference must be made to
the relevant requirements.
The boiler must NOT be installed in a cupboard.
In GB this is the current I.E.E. WIRING REGULATIONS and
BUILDING REGULATIONS.
In IE reference should be made to the current edition of I.S.813
"Domestic Gas Installations" and the current ETCI rules.
11508
The boiler must be mounted on a flat wall, which is sufficiently
robust to take its weight, see diagram 1.1.
6.2 Clearances
The position of the boiler must be such that there is adequate
space for servicing.
The recommended clearances are shown in diagram 6.1.
The minimum acceptable spacings from the terminal to
obstructions and ventilation openings are shown in diagram
6.2. For Ireland the minimum distances for flue terminal
positioning must be those detailed in I.S.813 "Domestic Gas
Installations".
MINIMUM SITING DIMENSIONS FOR THE
POSITIONING OF FLUE TERMINALS
The terminal must be exposed to the external air, allowing free
passage of air across it at all times.
MM
HORIZONTAL FLUES
A DIRECTLY BELOW, ABOVE OR
HORIZONTALLY TO AN OPENING, AIR BRICK,
OPENING WINDOWS, AIR VENT, OR ANY
OTHER VENTILATION OPENING
300
B BELOW GUTTER, DRAIN/SOIL PIPE
75
C BELOW EAVES
200
D BELOW A BALCONY OR CAR PORT
200
E FROM VERTICAL DRAIN PIPES AND
SOIL PIPES
150
F FROM INTERNAL/EXTERNAL CORNERS
OR TO A BOUNDARY ALONGSIDE THE
TERMINAL
300
G ABOVE ADJACENT GROUND OR
BALCONY LEVEL
300
H FROM SURFACE OR A BOUNDARY
FACING THE TERMINAL
600
I
FACING TERMINALS
1200
J FROM OPENING (DOOR/WINDOW)
IN CAR PORT INTO DWELLING
1200
K VERTICAL FROM A TERMINAL
1500
L HORIZONTALLY FROM A TERMINAL
300
Being a condensing boiler some pluming may occur from the
flue outlet. This should be taken into consideration when
selecting the position for the terminal.
Carports or similar extensions of a roof only, or a roof and one
wall, require special consideration with respect to any openings,
doors, vents or windows under the roof. Care is required to
protect the roof if made of plastic sheeting. If the carport
comprises of a roof and two or more walls, seek advice from the
local gas supply company before installing the boiler.
11901
25mm
ABOVE
ELBOW
25mm
VERTICAL FLUES
M FROM ADJACENT WALL TO FLUE
N FROM ANOTHER TERMINAL
P FROM ADJACENT OPENING WINDOW
Q ABOVE ROOF LEVEL
5mm
600mm
300
600
1000
300
TERMINAL
GUARD
300mm
Diagram 6.1
2000225294A
Diagram 6.2
20
6 Boiler Location, Flue and Ventilation
6.3 Terminal guard
A terminal guard is required if persons could come into contact
with the terminal or the terminal could be subject to damage.
If a terminal guard is required, it must be positioned to provide
a minimum of 50mm clearance from any part of the terminal and
to be central over the terminal.
A suitable terminal guard type K3, see diagram 6.2 can be
supplied by:
Tower flue components Ltd.
Morley road, Tonbridge, Kent, TN9 1RA.
6.4 Flue options
There are various flue systems to choose from as follows:
Horizontal top flue,
Flue Extension, 90O
Vertical flue.
Flue Extensions 45O and 90O
Twin flue.
Flue Extensions 45O and 90O
For detailed information refer to flue options guide. This is
available from your nearest stockist.
6.5 Timber Frame Buildings
If the boiler is to be installed in a timber frame building it should
be fitted in accordance with the Institute of Gas Engineers
document IGE/UP/7/1998. If in doubt seek advice from the local
gas undertaking or Saunier Duval.
6.6 Room Ventilation
The boiler is room sealed, so when it is installed in a room or
space, a permanent air vent is not required.
21
2000225294A
7 Installation Preparation and Appliance Fixing
7.1 Unpacking of Boiler
When using extension pipes with the horizontal rear flue, a core
drill size of 125mm should be used to allow the extension pieces
to slope at 35mm/metre (2.5o) towards the boiler.
IMPORTANT: With regards to the Manual Handling Operations,
1992 Regulations, the following lift operation exceeds the
recommended weight for a one man lift.
For extended side flues, the flue hole centre should be
determined by extending the dashed inclined line on the template
to the side wall. This dashed line is drawn at 35mm/metre (2.5o)
rise from the boiler. Where this line reaches the side wall, a
horizontal line should be marked. The vertical centre line of the
flue should then be marked at 206mm from the back wall, see
diagram 7.2.
Stand the boiler carton upright.
Cut and remove the securing straps and lift off the carton
sleeve. Place aside any loose components until required.
Carefully lay the boiler on its back, remove the two front casing
panel securing screws and lift off the panel from two retaining
lugs, see diagram 7.1.
To allow for the flue passing through the wall at this angle a
125mm hole should be drilled irrespective of internal or external
installation.
7.2 Wall Template
7.4 Appliance Fixing
Remove the wall template from the installation pack and place
in the desired position on a flat wall, giving due consideration to
boiler clearances, see section 6.
Reposition the wall template mark the position of the hanging
bracket fixing holes. Drill the fixing holes and insert suitable wall
plugs. Fix the hanging bracket to the wall using suitable screws,
see diagram 7.2.
7.3 Horizontal Flue Hole Cutting
Mark the centre of the flue hole and remove the wall template.
Lift the boiler into position in the following manner.
The standard horizontal flue is designed with an internal fall
of 35mm/metre towards the boiler for disposal of condensate.
If the standard flue length alone is being used then the flue hole
of diameter 105mm can be cut in the position marked on the wall
template.
Lean the top of the boiler slightly to the wall and position just
above the hanging bracket. Allow the boiler to slowly move
downwards until engaged in the hanging bracket.
For standard side flues the horizontal flue centre line on the
wall template should be extended to the side wall, and the
vertical centre of the flue hole marked at 206mm from the back
wall.
For installations with external access, a 105mm diameter core
drill can be used.
For installations with internal access only a 125mm diameter
core drill should be used.
Horizontal - Standard flue
2.5° Inclined Extended flue length
11902
206mm
90°
ø105
Standard
ø125
Extended
12182
FRONT
CASING
PANEL
WALL
PLUG
ø105
EXTERNAL
FITTING
ø125
INTERNAL
FITTING
HANGING
BRACKET
WALL
TEMPLATE
SECURING
SCREWS
SCREW
Diagram 7.2
Diagram 7.1
2000225294A
22
8 Horizontal Top Flue Preparation and Fitting
The standard horizontal flue is fitted onto the top of the boiler
using the flue adaptor.
11971
WALL THICKNESS 'X' = 75 TO 527mm
See diagrams 8.1 to 8.3 to determine whether a standard flue
can be used.
The standard flue can be extended using 1m long extension kits
and 90° elbows to maximum equivalent length of 3.5m - Note:
A 90° elbow equals 1m of flue.
"X"
When extension pipes are used the flue system must be
designed to have a continuous fall to the boiler of at least 2.5°
to allow condensate to run back into the boiler and out via the
drain.
Horizontal Internal Flue Installation The flue can be installed
from inside the building, when access to the outside wall face is
not practicable.
8.1 Flue Length
Diagram 8.1
REAR FLUE - STANDARD
All dimensions are in mm.
For a rear flue, measure the distance from the outside wall face
to the boiler mounting wall. Check that the flue length will be
suitable, see diagram 8.1 for a standard flue system.
11973
DISTANCE 'Y' = 330 TO 732mm
For a side flue, measure the distance from the outside wall face
to the flue outlet centre line of the boiler. Check that the flue
length will be suitable, see diagram 8.2 for a left hand flue
system or diagram 8.3 for a right hand flue system.
If the measurement exceeds those shown in diagrams 8.1 - 8.3
then one or more extension pipes are required.
"Y"
SIDE FLUE - STANDARD Left
Diagram 8.2
11972
DISTANCE 'Y' = 310 TO 732mm
"Y"
SIDE FLUE - STANDARD Right
23
Diagram 8.3
2000225294A
8.2 Rear Flue
(LIPS POINT INWARDS)
Mark the air duct assembly and the flue duct at the lengths
shown in diagram 8.4.
FLUE ELBOW
12257
8 Horizontal Top Flue Preparation and Fitting
Then cut to length, cutting square and removing any burrs.
8.3 Standard Side Flue
Fit the flue spigot 'H', supplied with the boiler with the three
securing screws to the top of the boiler. Fit the flue elbow 'G' to
the flue spigot a small amount of lubricant should be applied to
the seal before fitting the flue elbow, see the relevant part of
diagram 8.6.
LIP SEALS
Measure from the outside wall face to the flue elbow 'Y' add
45mm. Measure and mark the flue to length. Make sure that the
flue duct groove is engaged on air duct tab and is pushed fully
into the air duct. When fully engaged the measurment at the end
of the terminal will be 65mm. Then cut, cutting square and
removing any burrs, see diagram 8.5.
45
'Y'
OUTSIDE
WALL
FACE
8.4 Side Flue With Extensions
Fit the flue spigot 'H', supplied with the boiler with the three
securing screws to the top of the boiler. Fit the flue elbow 'G' to
the flue spigot a small amount of lubricant should be applied to
the seal before fitting the flue elbow, see the relevant part of
diagram 8.6.
Measure from the outside wall face to the flue elbow 'Y' add
45mm. Measure and mark the flue to length. Make sure that the
flue duct groove is engaged on air duct tab and is pushed fully
into the air duct. When fully engaged the measurment at the end
of the terminal will be 65mm. Then cut, cutting square and
removing any burrs, see diagram 8.5.
65
CUT
BOILER
'Y'+45
X + 240
( AIR DUCT ASSEMBLY)
X
11904
AIR DUCT AND
FLUE DUCT CUT
TO LENGTH
AIR DUCT
FLUE
DUCT
FLUE ASSEMBLY
FITTED TO BOILER
BOILER
MOUNTING
WALL
BOILER
SPACER
PIECE
OUTSIDE
WALL
FACE
X + 305
( FLUE DUCT )
REAR FLUE
2000225294A
SIDE DUCT - STANDARD / EXTENDED FLUE
Diagram 8.5
Diagram 8.4
24
8 Horizontal Top Flue Preparation and Fitting
8.5 Flue Assembly
8.6 Flue Attachment to Boiler,
refer to Diagram 8.6.
The flue assembly is an entirely push fit design.
The lip seals should be fitted in the correct orientation into the
flue elbow, see diagram 8.4.
Make sure all joints are properly fitted, sealed and secured.
Internal rear flue fitting. While the flue spigot 'H' is attached
to the boiler, push the flue elbow 'G' into the adaptor. Pull air pipe
'B' and flue duct 'A' into the flue elbow. A small amount of
lubricant should be applied to the rubber seals in the elbow to
facilitate this.
Remove all burrs from cut pipes.
Push rubber sealing collar 'F' along flue against inside wall face.
Diagram 8.5 shows the components supplied in the standard
flue kit.
External and Side flue fitting. Remove flue spigot 'H' from the
boiler and fit 'H' to the flue elbow 'G' and fit flue elbow 'G' to air
pipe 'B' and flue duct 'A'. A small amount of lubricant should be
applied to the rubber seals in the elbow to facilitate this.
Lubricate the lip seals prior to inserting flue pipes.
Having cut the air and flue ducts as described in sections 8.1
- 8.4, assemble the flue as follows: the flue can be assembled
externally and internally by following sections A and C, or
entirely from inside by following sections B and C.
Secure the flue spigot 'H' to the top of the boiler with the 3 screws
provided.
NOTE: Ensure that the 'up' label on air pipe 'B' is at the top, i.e.
the tab protruding into the hole at the outer end of the pipe is
uppermost. For internal fitting it may be necessary to mark the
flue protruding internally 'top', to ensure the flue does not twist
on fitting.
A. Internal fitting - Fit the rubber sealing collar 'D' into the
groove at the outer end of the air pipe 'B'.
Fit spacer piece 'E' over air pipe 'B', ensure correct orientation,
see diagram 8.5.
Push the air pipe 'B' through the wall until collar 'D' is clear of the
outside face of the wall.
Pull the air pipe 'B' back to ensure that collar 'D' is pulled up to
the outside wall face.
Ensure spacer piece 'E' is pushed into the wall, see diagram
8.4.
Fit sealing flange 'F' over the air pipe but not against the inside
wall face.
B. External fitting - Fit the rubber sealing collar 'D' into the
groove at the outer end of the air pipe 'B'.
Push the air pipe 'B' into the wall until collar 'D' is pushed up
against the outside face of the wall.
Fit sealing flange 'F' over the air pipe and against the inside wall
face.
C. Fitting Completion - Ensure flue pipe 'A' is fully inserted into
the air pipe 'B' ensuring that the groove on the outer end
engages in the air pipe tab.
Ensure flue pipe spacer 'C' is correctly located between 'A' and
'B'.
11903
Attach any extension pieces as necessary.
'E'
'D'
'A'
'G'
'C'
SCREW
GROOVE
(3 OFF)
'UP'
LABEL
'F'
'B'
'E'
'H'
TAB
FLUE PIPE
GROOVE
Diagram 8.6
25
2000225294A
ROOF TERMINAL
Pt.No. 08510300
1M EXTENSION
Pt.No. 08509900
VERTICAL FLUE
ADAPTOR KIT
Pt.No. A2024900
12208
8 Vertical Flue Preparation and Fitting
45° BEND
Pt.No. 08510200
FLAT ROOF
WEATHER COLLAR
Pt.No. 08510700
90° BEND
Pt.No. 08510100
PITCHED ROOF
WEATHER COLLAR
Pt.No. 08510500
400mm-500mm
TELESCOPIC PIPE
Pt.No. 08510000
8.7 Vertical Flue
These instructions are for the installation of this vertical flue and
its accessories only. Diagram 8.7 shows the Vertical Flue
Adaptor kit and Accessories.
Lubricate the rubber seals prior to inserting flue pipes.
Make sure all joints are properly fitted, sealed and secured.
Remove all burrs from cut pipes.
You can either cut the 1 metre extension pipes cutting equal
amounts off both the air duct and flue duct, cut the plain end not
the flared end where the sealing rings are fitted, or use the
400mm - 500mm metre adjustable pipe to make up the required
flue length.
Note: The 400mm-500mm telescopic pipe if used is fitted to the
top outlet of the appliance.
Your selected flue arrangement must be secured with fixing
brackets. One fixing bracket to be used for every metre of flue
pipe used.
The terminal should be positioned as to cause the least problem
with the dispersal of products of combustion and any pluming
that may occur.
The use of weather collars are the preferred method when
installing the roof terminal.
An Example Vertical Flue Installation. (The flue assembly is an
entirely push fit design), see diagram 8.8.
Terminal Installation, see diagram 8.9.
2000225294A
26
FIXING
BRACKET
Pt.No. 08512000
Diagram 8.7
12196
8 Vertical Flue Preparation and Fitting
12192
FITTING FLAT ROOF FLASHING
FITTING PITCHED ROOF FLASHING
VERTICAL ROOF
TERMINAL
565
TERMINAL
100
*
FLAT ROOF
FLASHING
1x90°
or 2x45°
ELBOWS
730
1 METRE
EXTENSION
1 METRE
EXTENSION
*
*
PITCHED ROOF
FLASHING
Fit flat roof or pitched
weather collar onto
vertical roof terminal.
Make sure a weather
proof seal is made
in accordance with
good building practice.
*
1 METRE
EXTENSION
1x90°
or 2x45°
ELBOWS
VERTICAL ROOF
TERMINAL
400-500mm
ADJUSTABLE
PIPE
VERTICAL
FLUE
ADAPTOR
445
140
1195
* FIXING BRACKETS
1 METRE
EXTENSION
Diagram 8.8
27
Diagram 8.9
2000225294A
TWIN FLUE
ADAPTOR KIT
Pt.No.A2025000
1M EXTENSION
Pt.No.08547800 (Aluminium)
TWIN PIPE TO
CONCENTRIC
ADAPTOR
Pt.No.08511800
PITCHED ROOF
WEATHER COLLAR
Pt.No.08510500
FLAT ROOF
WEATHER COLLAR
Pt.No.08510700
SINGLE PIPE
TO TERMINAL
ADAPTOR
Pt.No.08511900
12209
8 Twin Flue Preparation and Fitting
0.5M EXTENSION
Pt.No.08547600 (Aluminium)
0.5M EXTENSION AIR DUCT
Pt.No.08547200 (Plastic)
45° BEND
Pt.No.08538800
HORIZONTAL FLUE
TERMINALS Pt.No.08511500
FIXING
BRACKET
VERTICAL
Pt.No.08512000
FIXING
BRACKET TWIN
FLUE
Pt.No.08511700
CONCENTRIC HORIZONTAL
TERMINAL Pt.No.08584900
90° BEND
Pt.No.08538700
Diagram 8.10
8.10 Twin Flue
These instructions are for the installation of this twin flue and its
accessories only. Diagram 8.10 shows the Twin Flue Adaptor
kit and Accessories.
Refer to the Flue Options Guide available from your nearest
stockist for flue lengths and sample installations.
Lubricate the rubber seals prior to inserting flue pipes.
Make sure all joints are properly fitted, sealed and secured.
Remove all burrs from cut pipes.
If an extension pipe requires cutting, cut the plain end not the
flared end where the sealing rings are fitted.
Your selected flue arrangement must be secured with fixing
brackets. One fixing bracket to be used for every metre of flue
pipe used.
The terminal should be positioned as to cause the least problem
with the dispersal of products of combustion and any pluming
that may occur.
The use of weather collars are the preferred method when
installing the roof terminal.
2000225294A
28
FLUE CONFIGURATION EXAMPLE INCLUDING DIMENSIONS TO AID CUTTING AND INSTALLATION
AIR DUCT
45°ELBOW
TERMINAL
50
50
50
12198
8 Twin Flue Preparation and Fitting
1000
92
900
92
1 METRE
EXTENSION
40
50
FLUE DUCT
TERMINAL
1 METRE
EXTENSION
1 METRE
EXTENSION
90°ELBOW
TWIN FLUE
ADAPTOR
Diagram 8.11
12199
TWIN FLUE
ADAPTOR
An Example Twin Flue Installation. (The flue assembly is an
entirely push fit design), see diagram 8.11.
Fitting Twin Flue Adaptor, see diagram 8.12.
Fitting Twin Flue Terminals, see diagram 8.13.
Fitting Concentric Horizontal Terminal, see diagram 8.14.
Fitting Vertical Roof Terminal, see diagram 8.15.
Fitting Weather Collars, see diagram 8.16.
SUPPORT
BRACKET
Diagram 8.12
29
2000225294A
90°ELBOW
12203
8 Twin Flue Preparation and Fitting
SEALING
COLLARS
1 METRE
EXTENSION
(cut to fit)
90°ELBOW
AIR DUCT
TERMINAL
SEALING
COLLARS
FLUE DUCT
TERMINAL
11742
Diagram 8.13
1 METRE
EXTENSION
CONCENTRIC
ADAPTOR
INTERNAL
SEALING
COLLAR
CONCENTRIC
HORIZONTAL
TERMINAL
EXTERNAL
SEALING
COLLAR
Diagram 8.14
2000225294A
30
12204
11743
8 Twin Flue Preparation and Fitting
FLAT ROOF
FLASHING
VERTICAL ROOF
TERMINAL
565
100
VERTICAL
ROOF
TERMINAL
After installation
the vertical roof
terminal must be
secured with a
fixing bracket
SINGLE
CONCENTRIC
PIPE
ADAPTOR
ADAPTOR
730
Fit flat roof or pitched
weather collar onto
vertical roof terminal.
Make sure a weather
proof seal is made
in accordance with
good building practice.
PITCHED ROOF
FLASHING
SINGLE PIPE
ADAPTOR
445
CONCENTRIC
ADAPTOR
VERTICAL
ROOF
TERMINAL
1195
140
1 METRE
EXTENSION
CONCENTRIC
ADAPTOR
SINGLE
PIPE
ADAPTOR
Diagram 8.15
Diagram 8.16
31
2000225294A
9 Gas/Water Connections
These packs are for the (F24e & F28e ONLY)
Packs supplied with the boiler
4. Pipe pack containing
Central heating pipe (2 off)
Domestic water pipe (2 off)
Gas pipe (1 off)
1/2 in. gasket (3 off) b
3/4 in. gasket (2 off) c
1. Isolating valve pack containing
Heating isolating valves (2 off)
Domestic cold water isolating valves (1 off)
Domestic hot water elbow (1 off)
Gas isolating valve (1 off)
2. Safety discharge pipe pack containing
Safety discharge valve pipe (1 off)
15mm seal washer (1 off)
Tubing nut (1 off)
3. Installation pack containing
Installation manual (inc. guarantee card)
Ø15mm seal washer (1 off) a
Polyacetal gasket (4 off) d
Wall template (1 off)
Filling device extensions (2 off)
3 pole inline plug (1 off)
Securing screws (3 off)
Condense adapter (1 off)
WALL
TEMPLATE
a Ø15mm sealing washer
b 1/2 in. gasket
c 3/4 in. gasket
d Polyacetal gasket
FILLING
DEVICE
EXTENSIONS
HANGING BRACKET
12261
3 POLE
INLINE
PLUG
15mm
SAFETY
DISCHARGE
PIPE
CONDENSE
ADAPTER
15mm
22mm
d
15mm
d
c
CENTRAL
HEATING
FLOW
d
b
GAS
ISOLATING
VALVE
DOMESTIC
COLD WATER
SUPPLY IN
b
DOMESTIC
HOT WATER
OUT
d
b
c
CENTRAL
HEATING
RETURN
Diagram 9.1
and make good the final connection to the gas isolating valve,
see diagrams 9.1 and 9.2.
9.1 Gas Connection
The position is shown on the wall template.
Do not subject the gas isolating valve to heat.
A gas pipe, gas isolating valve and gaskets are supplied in
packs at the bottom of the boiler packaging.
The whole of the gas installation, including the meter, should be
inspected, tested for soundness and purged in accordance with
the current issue of BS6891 and in IE the current edition of
I.S.813 " Domestic Gas Installations ".
Refer also to section 1.
Remove plug from gas isolating valve.
Refer also to Section 1.
Fit the sealing washer into the securing nut attached to the gas
isolating valve. Connect the gas isolating valve to the boiler. Fit
the sealing washer into the securing nut attached to the gas pipe
2000225294A
22mm
15mm
a
32
9 Gas/Water Connections
ISOLATING
VALVE
9172
ON/OFF
LEVER
GAS
ISOLATING
VALVE
ALL VALVES SHOWN IN
CLOSED POSITION
(F24E & F28e ONLY)
DOMESTIC COLD WATER
INLET ISOLATING
VALVE
(F24E & F28e ONLY)
TAP EXTENSION
KNOBS (a) and (b)
(b)
(a)
12177
(F24E & F28e ONLY)
DOMESTIC
HOT WATER
OUT ELBOW
CENTRAL
HEATING
FLOW AND
RETURN
ISOLATING
VALVES
ISOLATING
VALVE
CENTRAL
HEATING FLOW
ISOLATING
VALVE
SAFETY VALVE
DISCHARGE PIPE
GAS
ISOLATING
VALVE
DRAIN
POINT
DOMESTIC COLD
WATER SUPPLY
ISOLATING VALVE
(F24E & F28e ONLY)
CENTRAL
HEATING
RETURN
ISOLATING
VALVE
Diagram 9.2
12210
9.2 (F24E & F28e ONLY) Water Connections
The position is shown on the wall template.
A central heating and domestic water pipe, isolation valves,
domestic hot water elbow and gaskets are supplied in packs at
the bottom of the boiler packaging.
Remove plugs from isolation valves and domestic hot water
elbow.
Fit the polyacetal washers onto the isolation valves and domestic
hot water elbow. Connect the isolating valves and domestic hot
water elbow to the boiler. Fit the sealing washers into the
securing nuts attached to the central heating and domestic
water pipes and make good the final connection to the isolating
valves and domestic hot water elbow, see diagrams 9.1 and
9.2.
FILLING
LOOP
VALVES
Do not subject the isolation valves to heat.
(F24e & F28e ONLY) Fit the tap extension knobs to the filling
loop valves on the filling loop, see diagram 9.3.
Please refer to condensate connection before proceeding, see
section 10.2.
TAP (a)
EXTENSION
(F24e & F28e ONLY)
33
TAP (b)
EXTENSION
Diagram 9.3
2000225294A
9 Gas/Water Connections
These packs are for the (F28e SB ONLY)
4. Pipe pack containing
Central heating pipe (2 off)
Domestic water pipe (2 off) (F28e ONLY)
Gas pipe (1 off)
1/2 in. gasket (3 off) b
3/4 in. gasket (2 off) c
Packs supplied with the boiler
1. Isolating valve pack containing
Heating isolating valves (2 off)
Gas isolating valve (1 off)
2. Safety discharge pipe pack containing
Safety discharge valve pipe (1 off)
15mm seal washer (1 off)
Tubing nut (1 off)
3. Installation pack containing
Installation manual (inc. guarantee card)
Ø15mm seal washer (1 off) a
Polyacetal gasket (2 off) d
Wall template (1 off)
3 pole inline plug (1 off) (F28e ONLY)
Securing screws (3 off)
Condense adapter (1 off)
a Ø15mm sealing washer
b 1/2 in. gasket
c 3/4 in. gasket
d Polyacetal gasket
WALL
TEMPLATE
(F28e ONLY)
3 POLE
INLINE
PLUG
12263
HANGING BRACKET
15mm
SAFETY
DISCHARGE
PIPE
CONDENSE
ADAPTER
15mm
22mm
22mm
a
d
d
c
CENTRAL
HEATING
FLOW
c
b
GAS
ISOLATING
VALVE
CENTRAL
HEATING
RETURN
Diagram 9.1a
Fit the polyacetal washers onto the isolation valves. Connect
the isolating valves to the boiler. Fit the sealing washers into the
securing nuts attached to the central heating water pipes and
make good the final connection to the isolating valves, see
diagrams 9.1a and 9.2.
9.2 (F28e SB ONLY) Water Connections
The position is shown on the wall template.
A central heating water pipe, isolation valves and gaskets are
supplied in packs at the bottom of the boiler packaging.
Do not subject the isolation valves to heat.
Remove plugs from isolation valves.
Please refer to condensate connection before proceeding, see
section 10.2.
2000225294A
34
10 Safety Discharge Valve and Condensate Connections
10.1 Safety Discharge Valve
A short discharge pipe with nut and washer are supplied in a
pack at the bottom of the boiler packaging. Connect the discharge
tube to the heating safety valve. This must be extended, using
not less than 15mm o.d. pipe, to discharge, in a visible position,
outside the building, facing downwards, preferably over a drain,
see diagram 10.1.
12214
SAFETY
DISCHARGE
VALVE
WARNING: it must not discharge above an entrance, window
or any type of public access area.
IMPORTANT NOTE: To facilitate servicing of the appliance,
the discharge pipe MUST ONLY be extended using compression
fittings.
The pipe must have a continuous fall and be routed to a position
so that any discharge of water, possibly boiling, or steam cannot
create any danger to persons, damage to property or external
electrical components and wiring. Tighten all pipe connection
joints.
TUBING
NUT
10.2 Condensate Drain Connection
The condensate drain connection is beside the pump at the rear
of the boiler, see diagram 10.2. A condense adaptor for
21.5mm plastic overflow pipe is supplied loose in the installation
pack and should be used to fit to the drain connection, if
required, to discharge condensate to a drain. The drain pipe
should have a fall of a least 2.5o away from the boiler.
CONDENSATE
DRAIN
12178
DISCHARGE
Diagram 10.1
(F24e/F28e SHOWN ) PIPE
Condensate should, if possible be discharged into the household
internal drainage system. If this is not practicable, discharge
can be allowed into the external household drains or a purpose
designed soak away, refer to diagram 10.3.
It is recommended that any external condensate drain pipe is
insulated and also preferably of 32mm diameter, to prevent
freezing in adverse weather conditions.
The condensate is discharged periodically in 'slugs' by syphonic
action.
It is not necessary to provide air breaks or extra traps in the
discharge pipe as there is already a 75mm. high trap inside the
boiler. Fitting an extra trap may cause the boiler siphon to work
incorrectly.
CAP
Refer to BS5546 or BS6798 for advice on the disposal of boiler
condensate.
CONDENSE
ADAPTOR
CONDENSATE
DRAIN PIPE
Diagram 10.2
(F24e/F28e SHOWN )
35
2000225294A
INTERNAL SOIL
AND VENT STACK
12333
10 Safety Discharge Valve and Condensate Connections
EXTERNAL SOIL
AND VENT STACK
BOILER
BOILER
EXTERNAL
MAX. 3M
MIN. DIA. 21MM
NO RESTRICTION
ON LENGTH
MIN. DIA. 21MM
NO RESTRICTION
ON LENGTH
Internal Soil and Vent Pipe
External Soil and Vent Pipe or Rainwater Pipe
BOILER
SINK
(CONSTITUTES
AIR BREAK)
EXTERNAL LENGTH
OF PIPE 3M MAX. *
BOILER
MIN. DIA. 21MM
OPEN END OF PIPE
DIRECT INTO GULLEY
BELOW GROUND BUT
ABOVE WATER LEVEL
MIN. DIA. 21MM
NO RESTRICTION
ON LENGTH
*NOTE: FOR EXTENDED
PIPE RUNS 32MM DIA.
PIPE SHOULD BE USED.
External Termination to a Gulley or Hopper
Internal Termination into Combined Sink Waste
21MM TERMINATION FROM APPLIANCE
*NOTE: FOR EXTENDED PIPE RUNS 32MM DIA.
PIPE SHOULD BE USED.
MIN. DIA. 21MM
NO RESTRICTION
ON LENGTH
2.5o FALL
CEMENT MORTAR SEALING
BOILER
25MM
SINK
100MM PLASTIC TUBE
300MM
BOTTOM OF TUBE SEALED
HOLE DEPTH
400MM
OPEN END OF PIPE DIRECT INTO
GULLEY BELOW GROUND LEVEL
BUT ABOVE WATER LEVEL.
2 ROWS OF 3 x 12MM
HOLES AT 25MM CENTRES
50MM FROM BOTTOM OF
TUBE. HOLES TO FACE AWAY
FROM HOUSE.
Internal Termination Downstream of
Sink Waste
External Termination into Soakaway
NOTE: PIPEWORK SHOULD ALWAYS FALL AWAY FROM BOILER BY AT LEAST 2.5 0
Diagram 10.3
2000225294A
36
11 Electrical Connections
WARNING: This appliance must be earthed. This appliance
must be wired in accordance with these instructions. Any fault
arising from incorrect wiring cannot be put right under the terms
of the Saunier Duval guarantee.
Lower the control panel.
This boiler will operate continuously on heating as supplied, if
the wire link (E), fitted between the two terminals of the heating
controls connection, is left in place, see diagram 11.1.
All system components must be of an approved type.
System heating controls e.g. Room thermostat, should be fitted
in accordance with the rules in force.
Do not interrupt the mains supply with a time switch or
programmer.
Refer to diagram 11.2.
11985
Connection of the whole electrical system and any heating
system controls to the electrical supply must be through a
common isolator.
Isolation should preferably be by a double pole switched fused
spur box having a minimum contact separation of 3mm on each
pole. The fused spur box should be readily accessible and
preferably adjacent to the boiler. It should be identified as to its
use.
A fused three pin plug and shuttered socket outlet may be used
instead of a fused spur box provided that:
a) They are not used in a room containing a fixed bath or
shower.
b) Both the plug and socket comply with the current issue of
BS1363.
IMPORTANT: If a replacement mains supply cable is required
it must be purchased. Part Number S1008600.
11.1 External Controls - Voltage Free
RETAINING
SLOTS
RETAINING
CORD
CONTROL
PANEL REAR
COVER
SECURING
SCREW (3)
12224
WARNING: UNDER NO CIRCUMSTANCES MUST ANY
MAINS VOLTAGE BE APPLIED TO ANY OF THE TERMINALS
ON THE VOLTAGE FREE HEATING CONTROLS
CONNECTION.
(F24e & F28e ONLY)
Diagram 11.2
11.2 External Controls - Mains Voltage
WARNING: UNDER NO CIRCUMSTANCES MUST ANY
MAINS VOLTAGE BE APPLIED TO ANY OF THE TERMINALS
ON THE VOLTAGE FREE HEATING CONTROLS
CONNECTION PLUG.
WIRE
LINK (E)
Remove the MAINS VOLTAGE HEATING CONTROLS
CONNECTION PLUG from the fittings pack and install on the
230V control board as the following text describes.
Gain access to the 230V controls board by unclipping the
control panel user interface and carefully lower forward, see
diagram 11.3.
Remove the wire link (E) from the voltage free heating controls
connection plug diagram 11.3, connect the external controls as
shown in diagram 11.5, connect the mains voltage heating
controls connection plug and external controls cable to the
230V controls board, then route the external controls cable as
shown in diagram 11.4.
(F24e & F28e ONLY)
VOLTAGE FREE
HEATING
CONTROLS
CONNECTION
Gain access to the rear of the control panel, see diagram 11.1.
Thread the external controls cable through the front, close the
control panel user interface and secure the cable in the strain
relief, see diagram 11.4.
Diagram 11.1
37
2000225294A
11 Electrical Connections
11627
Route the external controls cable through to the rear of the
control panel where the other cables exit.
External controls should be fitted in accordance with the rules
in force.
Refer to Section 15 wiring diagram.
11.3 Electrical Connections - Testing
Carry out preliminary electrical system checks as below:
1. Test insulation resistance to earth of mains cables.
2. Test the earth continuity and short circuit of cables.
RETAINING LATCHES
11987
3. Test the polarity of the mains.
F28e SB
11974
CONTROLS
OPTION PCB
Diagram 11.3
CABLE
EXIT
11984
PLUG
12184
SYSTEM
CONTROLS CABLE
( MAINS VOLTAGE)
11983
CONTROLS PANEL
USER INTERFACE
MAINS
CABLE
STRAIN
RELIEF
SYSTEM
CONTROLS
CABLE
Diagram 11.4
2000225294A
F24e & F28e
38
Diagram 11.5
12 Commissioning
3
The commissioning and first firing of the boiler must only be
done by a competent person.
Undo cap on automatic air vent on top of boiler
and leave undone.
12217
Please ensure the "Benchmark" logbook is completed and left
with the user.
Do not operate the boiler without water.
12.1 Gas Installation
The whole of the gas installation, including the meter, should be
inspected, tested for soundness and purged in accordance with
the current issue of BS6891 and in IE the current edition of
I.S.813 "Domestic Gas Installations".
12.2 Filling the system 1 to 8
4
1
Switch ON (I)
Fill the system until the pressure gauge reads
1.0 bar, reter to Section 3.2and 3.3.
Make sure that :
The boiler is connected to the
electrical supply.
The gas service cock is open.
Switch OFF (0)
2
Open the three boiler isolating valves.
The slot of the screw corresponds to flow direction.
(Turn anti-clockwise to open fully)
5
CENTRAL
HEATING
FLOW
ISOLATING
VALVE
Bleed each radiator to remove air, ensure all
bleed screws are re-tightened.
If necessary repressurise the system, refer to
procedure 4.
6
Leave cap on automatic air vent on top of boiler
open. (see procedure 3)
(F24e & F28e ONLY)
DOMESTIC COLD
WATER ISOLATING
VALVE
7
CENTRAL HEATING
RETURN ISOLATING
VALVE
Flush the domestic hot water system by
opening the hot water taps for several minutes.
8
Ensure the display indicates a system pressure
of 1.0 bar, adjust if necessary, refer to Section 3.2.
(F24e/F28e SHOWN )
39
2000225294A
12 Commissioning
12.3 Initial Lighting
12.5 Instruct the User
- Adjust heating temperature to maximum, refer to User Controls
and Lighting.
Instruct and demonstrate the lighting procedure and advise the
user on the safe and efficient operation of the boiler.
- Check that any system controls, if fitted, are calling for heat
(set room thermostat to maximum).
Instruct on and demonstrate the operation of any heating
system controls.
- Allow the temperature to rise to the maximum value, with all
radiator valves open. The temperature rise will cause release of
the gases contained in the water of the central heating system.
Advise the user on the use and maintenance of any scale
reducer and pass on any relevant instructional documents.
Advise that to ensure the continued efficient and safe operation
of the boiler it is recommended that it is checked and serviced
at regular intervals. The frequency of servicing will depend upon
the installation conditions and usage, but in general, once a
year should be enough.
- Gases driven towards the boiler will be automatically released
through the automatic air vent. The gases trapped at the highest
point of the system must be released by bleeding the radiators.
- Check the burner gas rate required, ten minutes after lighting.
Refer to Data Label on the inner casing panel. Should there be
any doubt about the gas rate it should be checked at the meter.
Draw attention, if applicable, to the current issue of the Gas
Safety (Installation and Use) Regulations, Section 35, which
imposes a duty of care on all persons who let out any property
containing a gas appliance in the U.K.
The approximate gas rate is for guidance only
(MAX.) 2.7 m3/h (97 ft3/h) (MIN.) 0.5 m3/h (19 ft3/h)
On reaching maximum temperature, the boiler should be turned
off and the system drained as rapidly as possible whilst still hot.
The user shall not interfere with or adjust sealed components.
- Refill system to a pressure of 1.0 bar and vent as before.
It is the Law that any servicing is carried out by a competent
person.
- Restart boiler and operate until a maximum temperature is
reached. Shut down boiler and vent heating system. If necessary,
top up heating system and make sure that a pressure of at least
1 bar is indicated when system is COLD.
Advise the user of the precautions necessary to prevent damage
to the system, boiler and the building, in the event of the heating
system being out of use during frost or freezing conditions.
Advise the user that the permanent mains electrical supply
SHOULD NOT be switched off, as the built in frost protection
and pump saver (anti sieze) program would not be operable.
12.4 DHW Pre-heat Function
There is a domestic hot water pre-heat function which is factory
set to on.
Reminder, leave these instructions and the 'Benchmark' logbook
with the user.
With pre-heat "On" the boiler will light every hour, or after a
demand, to reheat the primary domestic hot water circuit if
necessary.
For IE, it is necessary to complete a "Declaration of Conformity"
to indicate compliance to I.S.813. An example of this is given in
the current edition of I.S.813.
The pre-heat function can be turned off if required but the DHW
response will be affected.
To turn the pre-heat off, slide dip switch 1 to the 'ON' position.
Refer to section 11.3 to gain access to the user interface PCB.
On completion adjust the temperature control and any system
controls to their required settings. In addition it is neccessary to
complete the "Benchmark" logbook.
For IE, it is neccessary to complete a "Declaration of Conformity"
to indicate compliance to I.S.813. An example of this is given in
the current edition of I.S.813.
Testing Flue Gases: If any doubt exists that the flue products
are not exhausting correctly, investigate by use of a gas
analyser (FGA).
DIP SWITCH
preheat OFF
USER
INTERFACE
PCB
12186
DIP SWITCH
preheat ON
Diagram 12.1
2000225294A
40
13 Servicing
13.1 General
RETAINING
LUGS
Measurement of the products of combustion can be achieved
by connection of a probe to the flue elbow or alternatively to the
sample point at the base of the flue outlet pipe inside the boiler,
see diagram 13.2.
To gain access remove the front casing and inner casing
panels, see diagram 13.1.
FRONT CASING
PANEL
To remove the front casing panel remove the two securing
screws and lift off the panel from two retaining lugs, see
diagram 13.1.
RETAINING
LUGS
To remove the inner casing panel remove the two securing
screws and lift off the panel from two retaining lugs, see
diagram 13.1.
Before commencing with a service or replacement of parts the
boiler should be isolated from the electrical supply and the gas
supply should be turned off at the gas isolation valve, see
diagram 9.2.
All routine servicing requirements can be achieved by the
removal of the front casing and inner casing panels only.
Unless stated otherwise any part removed during servicing
should be replaced in the reverse order to removal.
SECURING
SCREWS
Servicing should always include the removal of any debris from
the condensate pipe and siphon, refer to Section 13.5.
After completing any servicing of gas carrying components,
ALWAYS test for gas soundness and carry out a functional test
of the controls.
INNER CASING
PANEL
Testing Flue Gases: If any doubt exists that the flue products
are not exhausting correctly, investigate by use of a gas
analyser (FGA).
SECURING
SCREWS
13.2 Spark Electrode
Disconnect the electrode lead and two securing screws.
Withdraw the spark electrode carefully from the combustion
chamber, see diagram 13.3.
Diagram 13.1
COMBUSTION
SAMPLE
POINT
NOTE: On reassembly do not overtighten screws.
Inspect the tips for damage.
Clean away any debris and check the spark gap is 3.5 to 4.5
mm.
FLUE
ELBOW
Check the electrode sealing gasket for signs of damage and
replace if necessary.
FLUE
OUTLET
PIPE
COMBUSTION
SAMPLE
POINT
Diagram 13.2
41
2000225294A
13 Servicing
12185
13.3 Burner and Fan
Refer to diagram 13.4.
Remove spark electrode lead, heating flow thermistor electrical
connections and electrical connections to the fan and gas valve.
HEATING FLOW
ELECTRICAL
CONNECTIONS
Remove gas pipe securing clip.
SECURING
PLATE SCREW
(Slacken pull
forwards
to remove)
SPARK
ELECTRODE
LEAD
While supporting the gas valve, fan and silencer assembly,
slacken the fan securing plate screw enough to withdraw the
securing plate.
Carefully swing the gas valve, fan and silencer assembly out
from under the combustion chamber, while supporting the
burner. (Take care as the burner will drop down). Remove the
burner.
Inspect the burner for any signs of damage.
The burner can be cleaned if necessary by washing in warm
soapy water and rinsing with clean water. DO NOT use wire or
sharp instruments to clean the holes of the burner.
LEDGE
FAN
SECURING
PLATE
Examine the fan seal and replace if necessary.
IMPORTANT: Care should be taken when inserting the burner
into the heat exchanger chamber and replacing the gas valve,
fan and silencer assembly. The fan seal must be seated
correctly with the burner before the fan securing plate is refitted.
Refit the fan securing plate, ensure that the dimples are
uppermost and that the fork on the plate engages onto the ledge
on the heat exchanger chamber, see inset diagram 13.4.
13.4 Heat Exchanger
The heat exchanger does not require cleaning during servicing.
SPARK
ELECTRODE
LEAD
GAS VALVE
ELECTRICAL
CONNECTIONS
11916
GASKET
FAN
ELECTRICAL
CONNECTIONS
GAS PIPE
SECURING
CLIP
11917
SECURING
SCREW (2)
12225
BURNER
FAN
SEAL
SECURING
SCREW (2)
SPARK
ELECTRODE
SPARK GAP
3.5 to 4.5mm
GAS VALVE, FAN
AND SILENCER
ASSEMBLY
Diagram 13.3
2000225294A
42
Diagram 13.4
13.5 Condensate Drain
FIXING
BRACKET
Refer to diagram 13.5 and 13.6.
12178
13 Servicing
Remove condensate drain pipe.
Slide fixing bracket forward and remove, ease condensate
drain down off the inlet connection.
CONDENSATE
DRAIN
Carefully remove the condense drain taking care not to spill any
water which may be in the unit. As the unit is lifted remove the
flexible connection on the outlet.
Remove the cap at the base of the condense trap.
Remove any solids found.
Remove the strainer and clean.
Remove the float, clean and check it floats.
Flush water through the trap to remove any remaining solids.
Check for any debris in the outlet pipe of the condensate drain
and clean as necessary.
CONDENSATE
DRAIN PIPE
Reassemble and fill the trap with water, refit the condensate
drain.
DOMESTIC HOT WATER
OUTLET COUPLING
When refitting the cap ensure that a watertight seal is achieved,
but do not use excessive force.
(F24e/F28e SHOWN )
Diagram 13.5
12258
13.6 Combustion Check.
STRAINER
Once the appliance has been reassembled (apart from the front
and inner casing panels) connect a CO2 combustion analyser to
the sample point on the flue elbow, or alternatively to the point
at the base of the flue outlet pipe inside the boiler casing, see
diagram 13.2.
FLOAT
Turn on the gas service cock, see diagram 9.2.
With the power off and the appliance cold, unclip the controls
fascia and hinge it down to reveal the potentiometers on the rear
of the User interface, see diagrams 13.7 and 13.8. Take care
not to allow the fascia to drop down and damage the wiring.
CONDENSE
TRAP
Turn on the electrical supply.
Ensure external controls are calling for heat. The boiler should
fire automatically.
Allow the boiler to fire for a minimum of 60 seconds and then,
using an electrical screwdriver, rotate the service potentiometer
fully clockwise, see diagram 13.8. This will allow the digital
display to indicate the 'flashing' fan speed on the appliance
fascia.
SEAL
CAP
In the fully clockwise position the display should be indicating
the maximum fan speed of the appliance, this should be 54.
Check the CO2 value, which should be 9.2% ± 0.2%.
RETAINING
LATCHES
Note that with the inner case front panel fitted the
combustion readings will increase slightly to 9.3% ± 0.3%.
12228
Diagram 13.6
If adjustment proves necessary then proceed as follows.
Any adjustment to the gas valve should only be carried out by
a competant person.
Refer to diagram 13.9.
Adjust the maximum rate CO2 with the throttle to 9.2%. (Rotate
anti-clockwise to increase).
Rotate the service potentiometer fully anti-clockwise. Hold it in
this position for about 5 seconds before rotating the service
potentiometer clockwise to the mid-point or 3 o'clock position.
The fan should reduce to 1300 rpm which will flash '13' on the
LCD display.
Check the CO2 value, which should be 8.3% ± 0.2%.
Diagram 13.7
If adjustment proves necessary then proceed as follows.
43
2000225294A
13 Servicing
Adjustment of the CO2 at minimum rate is very coarse so
carefully adjust the CO2 with the offset adjustment to 8.3%, see
diagram 13.9.
12265
OFFSET
ADJUSTMENT
Rotate the service potentiometer fully clockwise, see diagram
13.8 and recheck the maximum rate combustion, which should
be 9.3% ± 0.2%.
After checking combustion rotate the service potentiometer
fully anti-clockwise so that the display indicates the water
temperature.
Replace the cap on the test point and refit the control cover front
panel.
THROTTLE
13.7 (F24e & F28e ONLY) Domestic Cold Water
Filter
If the water flow rate through the appliance has reduced it may
be necessary to clean or replace the filter.
Turn off the electrical supply to the boiler.
Refer to section 13.10 and drain the domestic hot water circuit.
Diagram 13.9
Undo the plug which holds the filter in its housing and remove
the filter to clean or renew if necessary, see diagram 13.10.
Replace the filter into its housing and replace plug.
Open the cold water isolating valve and test the Domestic Hot
Water circuit for soundness.
12193
PIPE ASSEMBLY
Check for leaks.
13.8 (F24e & F28e ONLY) Domestic Cold Water
Inlet Filter
DOMESTIC
COLD
WATER
FILTER
HOUSING
PLUG
If the water flow rate through the appliance has reduced it may
be necessary to clean or replace the filter.
Turn off the electrical supply to the boiler.
Refer to section 13.10 and drain the domestic hot water circuit.
Undo the union nut which holds the filter in its housing and
remove the filter to clean or renew if necessary, see diagram
13.11.
Open the cold water isolating valve and test the Domestic Hot
Water circuit for soundness.
Check for leaks.
12256
USER
INTERFACE
PCB
DOMESTIC
COLD WATER
INLET FILTER
SERVICE
POTENTIOMETER
DOMESTIC
COLD WATER
SUPPLY
ISOLATING
VALVE
MIN.
MAX.
2000225294A
Diagram 13.10
12262
(F24e & F28e ONLY)
(F24e & F28e ONLY)
Diagram 13.8
44
Diagram 13.11
13 Servicing
12194
13.9 Draining of Boiler Heating Circuit
Drain down the Heating Circuit of the boiler only, by closing the
heating flow and return isolating valves, see diagram 9.2.
Refer to diagram 13.12.
Attach a length of hose to the drain point and open the drain
valve.
After servicing or replacing parts, close the drain valve and
remove the hose. Open the heating flow and return isolating
valves and refill, vent and pressurise the heating circuit. See
relevant parts of section 12.
Check for leaks.
13.10 (F24e & F28e ONLY) Draining of Boiler
Hot Water Circuit
DRAIN
VALVE
Drain the Domestic Hot Water circuit by closing the cold-water
isolation valve, see diagram 9.2.
DRAIN POINT
After servicing or replacing parts open the cold-water isolation
valve and slowly open a hot water tap to remove air. Close the
hot water tap and check for any leaks.
13.11 Inner Casing Panel Seal Check.
Diagram 13.12
11918
Open one or more hot water taps to drain the hot water circuit.
FRONT
CASING
PANEL
Check the condition of the seal, replace as required.
To replace remove the old seal, thoroughly clean the casing
sufaces. Fit the new seal, it is supplied to the correct length, see
diagram 13.13.
13.12 Heat exchanger
INNER
CASING
PANEL
Only clean the heat exchanger if the the measured CO2 cannot
be adjusted to the figure specified in section 13.6.
Remove the gas supply pipe securing clips. Carefully push the
pipe up and turn to the left and down to remove.
Remove the burner and fan, see section 13.3.
Using a soft brush clean the inside of the heat exchanger
SEAL
Do not use a wire brush or tools likely to damage the heat
exchanger.
Diagram 13.13
Check the CO2 value adjust as required, refer to section 13.6.
45
2000225294A
14 Fault Finding
When trying to operate the boiler make sure that :
WARNING: Always isolate the boiler from the electrical supply
before carrying out any electrical replacement work.
- All gas supply cocks are open and that the gas supply has
been purged of air.
Always check for gas soundness after any service work.
Should there be any doubt about the voltage supply to any of the
components, it is possible to carry out a simple electrical test to
ensure all is operational in that area.
12251
- Electrical supply and water isolation valves are open.
(F24e & F28e ONLY)
2000225294A
Diagram 14.1
46
14 Fault Finding
To carry out the electrical test, gain access to the Control Box
PCB, as follows:
Hinge down the control box.
Remove Torx screws and unhook the rear panel.
For layout of PCB, see (F24e / F28e) diagram 15.1 or
(F28e SB) diagram 15.1a
11988
To check components see (F24e / F28e) Table 1 or
(F28e SB) Table 1a .
(F28e SB ONLY)
Diagram 14.1a
47
2000225294A
14 Fault Finding
(F24e / F28e ONLY) Table 1.
(F28e SB ONLY) Table 1a.
COMPONENT
C.H. thermistor
Fan
10K Ω @ 25°C
24V DC accross terminals on fan,
40V dc in standby mode,
see diagram 14.2.
Check 3.15 AT fuse on DC fan supply.
OVERHEAT
RESET
BUTTON
12216
24VDC/55 Ω
12195
Gas Valve
OVERHEAT
THERMISTOR
TERMINALS
Diagram 14.2
Diagram 14.3
14.1 Overheat Thermistor reset button, see
diagram 14.3. Positioned at the rear left under
the fan.
2000225294A
48
12410
14 Fault Finding
Diagram 14.4
49
2000225294A
11919a
15 Wiring Diagram
MAINS VOLTAGE HEATING CONTROLS PLUG
REMOVE VOLTAGE FREE LINK
230V SWITCHED LIVE FROM OPTIONAL FROST STAT.
230V SWITCHED LIVE FROM HEATING CONTROLS.
VOLTAGE FREE
HEATING CONTROLS
PLUG
LINK
REMOVE THE LINK IF FITTING
VOLTAGE FREE OR 230V
SYSTEM CONTROLS.
IF THE LINK IS NOT REMOVED
THE BOILER WILL RUN
CONTINUOUSLY.
(F24E & F28e ONLY)
2000225294A
Diagram 15.1
50
12240
15 Wiring Diagram
(F28e SB ONLY)
Diagram 15.1a
51
2000225294A
16 Replacement of Parts
16.1 General
16.5 Transformer
Replacement of parts must be carried out by a competent
person.
For access, refer to section 16.1.
Refer to diagram 16.2.
Before replacing any parts the boiler should be isolated from the
mains electric supply and the gas should be turned off at the gas
isolation valve on the boiler, see diagram 9.2.
Unplug electrical connection from the transformer.
Drop down control panel and undo the three screws securing
rear cover and lift up, see diagram 11.1.
Unless stated otherwise parts are replaced in the reverse order
to removal.
Unplug transformer lead from main PCB, see diagram 16.3.
After replacing any parts always test for gas soundness and if
necessary carry out functional test of the controls.
Release cable grip located on boiler case.
For replacement of parts the front casing and the inner casing
panel of the boiler will need to be removed. To remove undo the
two screws on the underside of the front casing and lift off. Undo
the two screws on the front of the inner front panel and lift off.
Remove transformer and lead.
Undo the screw securing the transformer and unhook from the
rear of securing bracket.
When reconnecting electrical connection to transformer do not
force on connector.
To hinge a side panel undo and remove the three screws
securing each side panel to the boiler, two at the front and one
on the top.
TRANSFORMER
ELECTRICAL
CONNECTION
12197
The side panels can be hinged sideways to aid replacement of
parts.
16.2 Ignition Electrode
For access, refer to section 16.1.
Refer to diagram 13.3, remove the ignition electrode lead and
two securing screws. Withdraw the ignition electrode carefully
from the combustion chamber.
FUSE
16.3 Igniter Unit
For access, refer to section 16.1.
Remove ignition lead and electrical connection then remove
igniter unit by removing the securing screw, see diagram 16.1.
16.4 Ignition Lead
For access, refer to section 16.1.
Refer to diagrams 13.3 and 16.1.
SECURING
BRACKET
Diagram 16.2
TRANSFORMER
CONNECTION
12197
IGNITION LEAD
CONNECTOR
SECURING
SCREW
12200
Pull the ignition electrode lead off the ignition electrode and the
connector to the igniter unit.
ELECTRICAL
CONNECTOR
IGNITER
UNIT
SECURING
SCREW
FUSE
RETAINING CLIPS
Diagram 16.1
2000225294A
52
Diagram 16.3
16 Replacement of Parts
12265
16.6 Gas Control Valve
For access, refer to section 16.1.
Refer to section 13.3 for removal of the fan/gas control valve
and silencer assembly.
SECURING
SCREW (3)
Remove the gas control valve and plate which is held by the
three plate securing screws, see diagram 16.4.
After replacing the gas control valve the combustion CO2 will
need to be checked and adjusted if necessary. See section
13.6.
GAS
CONTROL
VALVE
16.7 Fan and Silencer
For access, refer to section 16.1.
ELECTRICAL
CONNECTION
Refer to section 13.3 for removal of the fan/gas control valve
and silencer assembly.
Remove the gas control valve and plate which is held by the
three plate securing screws, see diagram 16.4.
SECURING
CLIP
Unclip silencer box from silencer cover and remove the venturi
plate secured with three screws, see diagram 16.5.
Diagram 16.4
Check 'O' ring and fan seal and replace if necessary.
16.8 Burner
For access, refer to section 16.1.
'O' RING
Replace burner.
12181
FAN SEAL
Refer to section 13.3 for removal of the fan/gas control valve
and silencer assembly.
SILENCER
COVER
VENTURI
PLATE
SWIRL
PLATE
SECURING
SCREW (3)
SILENCER
BOX
Diagram 16.5
53
2000225294A
16 Replacement of Parts
16.9 (F24e/F28e ONLY) Plate to Plate Heat
Exchanger
16.10 Pump (head only)
Drain the heating circuit, see section 13.9.
Drain the boiler heating circuit, see section 13.9.
Drain the hot water circuit, see section 13.10.
Make sure that the filling loop valves are closed, then proceed
as Section 16.19 (F24e or F28e only).
For access, refer to section 16.1.
Release Rhd. side panel to gain increased access.
Refer to diagram 16.7.
Remove retaining clips from water connections, see diagram
16.6.
Remove the four cap head screws.
Remove the plate to plate heat exchanger from pipes.
Carefully remove the pump head together with cable. Do not
strain cable.
When replacing water connections fit the 'O' rings onto the
copper pipe tails, care should be taken not to damage 'O' rings,
when securing with retaining clips.
Support the pump head, unscrew cable cover at the side of
pump head and take off.
Disconnect wiring from pump head.
Refill, vent and pressurise the boiler.
Reconnect wiring to new pump head and fit cover.
Fit the new pump head with 'O' ring.
Refill, vent and pressurise the boiler.
SUPPORT
BRACKET
12212
12187
Check for leaks.
CABLE
COVER
REDUCED PRESSURE
ZONE VALVE
CLAMPING
PLATE
(2 OFF)
RETAINING
SCREW
(4 OFF)
RETAINING
CLIP (4 OFF)
PUMP
CAP HEAD
HEAD
SCREW (4)
(F24e/F28e ONLY)
12244
PLATE TO
PLATE HEAT
EXCHANGER
SECURING
CLIPS
Diagram 16.7
CABLE
COVER
COLD WATER
INLET PIPE
PUMP HEAD
(F24e/F28e ONLY)
2000225294A
(F28e SB ONLY)
Diagram 16.6
54
CAP HEAD
SCREW (4)
Diagram 16.7a
16 Replacement of Parts
16.11 Expansion Vessel (F24e/F28e ONLY)
16.11a Expansion Vessel (F28e SB ONLY)
For access and to hinge Rhd. side panel, refer to section 16.1.
For access and to hinge R/H side panel, refer to section 16.1.
Drain the boiler heating circuit, see section 13.9.
Drain the boiler heating circuit, see section 13.9.
Drain the boiler hot water circuit, see section 13.10.
Refer to diagram 16.8a.
Remove Plate to Plate heat exchanger, refer to section 16.9.
Undo the coupling at the base of the vessel.
Disengage flue adaptor pipe, see diagram 8.6 and remove flue
outlet pipe.
Remove the retaining clip securing the expansion vessel supply
pipe, pull out the supply pipe.
Undo coupling and remove cold water inlet pipe, see diagram
16.6.
Remove the securing screw to remove the bottom support
bracket.
Undo coupling on domestic hot water outlet pipe, see diagram
13.5.
Remove the securing bolt on the top panel of the boiler. Remove
support bracket.
Remove Pump head, refer to section 16.10, in order to undo
coupling at the rear of the three way valve and swing pipe clear
of expansion vessel, see diagram 16.7.
Remove the vessel.
Refer to diagram 16.8.
Fit a new gasket between the expansion vessel and coupling.
Undo the coupling at the base of the vessel.
Refill, vent and pressurise the boiler.
Remove the securing screws on the top panel of the boiler.
Remove support bracket.
Check for leaks.
Fit the replacement unit.
Draw the vessel up and forward carefully easing the plate to
plate pipes clear and remove.
12243
Fit the replacement unit.
Fit a new gasket between the expansion vessel and coupling.
Refill, vent and pressurise the boiler.
BOLT
TOP
SUPPORT
BRACKET
12213
Check for leaks.
SECURING
SCREW (2)
SUPPORT
BRACKET
12193
EXPANSION
VESSEL
COUPLING
EXPANSION
VESSEL
COUPLING
EXPANSION
VESSEL PIPE
RETAINING
CLIP
(F24e/F28e ONLY)
(F28e SB ONLY)
Diagram 16.8
55
Diagram 16.8a
2000225294A
16.12 Safety Discharge Valve
SAFETY
DISCHARGE
VALVE
For access, refer to section 16.1.
Drain down the heating circuit, see section 13.9.
SECURING
CLIP
12214
16 Replacement of Parts
Refer to section 13.9 and drain the boiler heating circuit.
Refer to diagram 16.9
Undo the safety discharge valve coupling and remove from the
pipework.
Remove the securing clip and withdraw the safety discharge
valve.
Fit new 'O' ring.
Refill, vent and pressurise the boiler.
Check for leaks.
16.13 (F24e/F28e ONLY) Domestic Hot Water
Thermistor
COUPLING
(F24e & F28e SHOWN )
For access, refer to section 16.1.
Diagram 16.9
Refer to diagram 16.10.
Remove the electrical connections from the thermistor.
Remove the thermistor and retaining clip.
DOMESTIC
HOT WATER
THERMISTOR
Fit the replacement thermistor using the heat sink compound
supplied.
Note: When reconnecting electrical connections, polarity is not
important.
Carry out a functional test of the controls.
16.14 Central Heating Flow Thermistor
For access, refer to section 16.1.
Refer to diagram 16.11.
Remove the electrical connections from the thermistor.
Remove the securing screw from retaining clip.
Fit the replacement thermistor using the heat sink compound
supplied, do not overtighten when replacing securing screw.
Note: When reconnecting the polarity of the wiring to thermistors
is unimportant.
12215
(F24e/F28e ONLY)
Diagram 16.10
SECURING
SCREW
CENTRAL
HEATING
FLOW
THERMISTOR
Diagram 16.11
2000225294A
56
16 Replacement of Parts
12222
16.15 (F24e/F28e ONLY) Central Heating
Return Thermistor
For access, refer to section 16.1.
Refer to diagram 16.12.
Remove the electrical connections from the thermistor.
Remove the thermistor and retaining clip from the flow pipe.
Fit the replacement thermistor using the heat sink compound
supplied.
Note: When reconnecting, the polarity of the wiring to thermistors
is unimportant.
16.15a (F28e SB ONLY) Central Heating
Return Thermistor
For access, refer to section 16.1.
CENTRAL HEATING
RETURN THERMISTOR
Refer to diagram 16.12a.
Remove the electrical connections from the thermistor.
(F24e/F28e ONLY)
Diagram 16.12
Remove the thermistor and retaining clip from the flow pipe.
12245
Fit the replacement thermistor using the heat sink compound
supplied.
Note: When reconnecting the polarity of the wiring to thermistors
is unimportant.
16.16 Overheat Cutoff Thermistor
For access, refer to section 16.1.
Note: It may be necessary to remove transformer refer to
section 16.5.
Refer to diagram 16.13.
Positioned at the rear left under the fan.
Remove the electrical connections from the overheat cutoff
thermistor.
Remove the thermistor and retaining clip from the flow pipe.
Fit the replacement thermistor using the heat sink compound
supplied.
CENTRAL HEATING
RETURN THERMISTOR
Note: When reconnecting the polarity of the wiring to thermistor
is unimportant.
(F28e SB ONLY)
Diagram 16.12a
16.17 Automatic Air Vent
12216
For access, refer to section 16.1.
Refer to section 13.9 and drain the boiler heating circuit.
Refer to diagram 16.14.
Unscrew the automatic air vent.
Fit the new automatic air vent and 'O'ring ensuring the vent cap
is left loose.
Refill, vent and pressurise the boiler.
Check for leaks.
OVERHEAT
CUTOFF
THERMISTOR
57
Diagram 16.13
2000225294A
16.18 (F24e/F28e ONLY) Flow Sensor
AIR VENT
For access, refer to section 16.1.
12217
16 Replacement of Parts
Refer to section 13.10 and drain the boiler hot water circuit.
Refer to diagram 16.15.
Remove the electrical connection to the flow sensor.
Remove the securing clip between the flow sensor and the plate
to plate heat exchanger.
Undo the coupling to the cold water inlet pipe.
Remove flow sensor.
Remove flow restrictor and fit to replacement.
Fit new 'O' rings.
After replacing the flow sensor, open the cold-water isolation
valve and slowly open a hot water tap to remove air.
SEAL
Close the hot water tap and check for any leaks.
Diagram 16.14
16.19 (F24e/F28e ONLY) Reduced Pressure
Zone Valve and Filling Loop Tubes Assembly
Refer to diagram 16.16.
12206
SECURING
BRACKET
For access, refer to section 16.1.
SECURING
CLIP
Remove the retaining clips to remove the reduced pressure
zone valve and filling loop tubes assembly.
Fit new 'O' rings.
Replace the reduced pressure zone valve and filling loop tubes
assembly, refill, vent and pressurise the boiler.
Check for leaks.
16.20 (F24e/F28e ONLY) Filling Loop Valve.
FLOW
SENSOR
For access, refer to section 16.1.
Refer to section 13.10 and drain the boiler hot water circuit.
Refer to diagram 16.16.
COUPLING
Remove the clip securing the filling loop valve to the domestic
water inlet. Disengage by pulling forward.
(F24e/F28e ONLY)
Diagram 16.15
Remove the clip securing the filling loop to the valve.
12193
Remove the valve from the filling loop.
Fit new 'O' rings.
After replacing the filling loop valve open the cold water isolation
valve and slowly open a hot water tap to remove air. Close the
hot water tap and check for any leaks.
REDUCED
PRESSURE
ZONE VALVE
FILLING
LOOP TUBE
FILLING
LOOP TUBE
(F24e/F28e ONLY)
2000225294A
58
RETAINING
CLIPS
Diagram 16.16
16 Replacement of Parts
12193
16.21 (F24e/F28e ONLY) Three Way Valve
Refer to sections 13.9 and 13.10.
ELECTRICAL
CONNECTIONS
Remove the Reduced Pressure Zone Valve Refer to Section
16.19.
Remove the electrical connection from the three way valve, see
diagram 16.7.
Remove the pipe assembly from between the cold water inlet
isolation valve to cold water filter housing, see diagram 13.10.
NOTE: If there is sufficient clearance to remove the right hand
side panel and gain access to the rear union connection, it is not
neccessary to remove the pump head.
With the pump head removed as Section 16.10. Remove the
pipe retaining clip and disconnect the two union connections.
16.22 (F24e/F28e ONLY) Pressure Sensor
For access, refer to section 16.1.
THREE WAY VALVE
Refer to section 13.9 and drain the boiler heating circuit.
(F24e/F28e ONLY)
NOTE: If there is sufficient clearance to remove the right hand
side panel and gain access to the rear union connection, it is not
neccessary to remove the pump head.
RETAINING
CLIP
With the pump head removed as Section 16.10. Remove the
pipe retaining clip and disconnect the two union connections.
Diagram 16.17
PRESSURE SENSOR
Remove the three way valve.
Refer to diagram 16.18.
Disconnect the electrical lead by pushing up retaining tab to
withdraw the lead plug.
Remove the retaining clip to remove the low water pressure
sensor.
Fit new 'O' ring.
Fit the new pressure sensor. Refill vent and pressurise the
boiler.
Check for leaks.
16.22a (F28e SB) Pressure Sensor
For access, refer to section 16.1.
(F24e/F28e ONLY)
Refer to diagram 16.18a.
Disconnect the electrical lead by pushing up retaining tab to
withdraw the lead plug.
PRESSURE SENSOR
Remove the retaining clip to remove the low water pressure
sensor.
Diagram 16.18
RETAINING
CLIP
12246
Refer to section 13.9 and drain the boiler heating circuit.
Fit new 'O' ring.
Fit the new pressure sensor. Refill vent and pressurise the
boiler.
Check for leaks.
16.23 (F24e/F28e ONLY) Domestic Cold Water
Inlet Filter
For access, refer to section 16.1.
Refer to section 13.8.
Fit new 'O' rings.
16.24 Inner Casing Panel Seal
For access, refer to section 16.1.
(F28e SB ONLY)
Diagram 16.18a
Refer to section 13.11.
59
2000225294A
16.25 Condense Drain
12228
16 Replacement of Parts
RETAINING
LATCHES
For access, refer to section 16.1.
Refer to section 13.5.
16.26 Access to Switches, User Interface and
Programmer
For access, refer to section 16.1.
Release the front of the fascia by carefully unclipping the two
retaining latches, see diagram 16.19.
Do not allow the front of the fascia to swing down and be loosely
held by the electrical connections. Either remove the connections
or support the fascia.
16.27 (F24e/F28e ONLY) Programmer (if fitted)
For access, refer to section 16.1.
Remove electrical plug.
Diagram 16.19
Unclip and withdraw programmer.
SWITCH COVER
For access, refer to section 16.1.
Remove electrical leads and lift the switch cover, see diagram
16.20.
12220
16.28 Mains Switch
Remove switch from housing.
16.29 User Interface Board
For access, refer to section 16.1.
Remove electrical plug.
Remove the two securing screws.
Withdraw the board, see diagram 16.21.
When replacing the board refer to instructions supplied with
replacement PCB on setting it up.
SWITCH
16.30 (F24e/F28e ONLY) Three Way Valve PCB
Refer to section 16.1 for access.
ELECTRICAL
CONNECTIONS
Diagram 16.20
ELECTRICAL
CONNECTIONS
Remove electrical plug.
Remove the two securing screws.
12226
Drop down control panel and undo the three screws securing
rear cover and lift up, see relevant part of diagram 11.1.
Withdraw the board, see diagram 16.22.
16.31 Main PCB
For access, refer to section 16.1.
Drop down control panel and undo the three screws securing
rear cover and lift up, see relevant part of diagram 11.1.
Remove the electrical connections to the PCB.
Prise back the two PCB retaining clips and withdraw the PCB,
see diagram 16.22.
SECURING
SCREWS
When refitting the rear panel ensure the leads are not trapped.
Diagram 16.21
2000225294A
60
16.32 Control Box
For access, refer to section 16.1.
SECURING
SCREWS (2)
Remove relevant plugs and connectors, refer to wiring diagrams
section 15.
12229
16 Replacement of Parts
THREE WAY
VALVE PCB
(F24e/F28e ONLY)
Withdraw grommets and leads so they are hanging loose.
Unthread the retaining cord and remove the control box by
drawing it outwards away from its retaining slots, see relevant
part of diagram 11.1.
16.33 Fuses PCB - Control Box
Remove the front casing, refer to the relevant part of section
16.1.
Drop down the control panel and undo three screws securing
the rear cover and lift up, see relevant part of diagram 11.1.
Remove the fuse holder from the mainPCB and replace fuse,
see diagram 16.22.
PCB - Transformer
For access, refer to section 16.1.
Refer to diagram 16.2 and wiring diagrams section 15.
Replace fuse.
16.34 230V Controls Option
For access, refer to section 16.1.
Gain access to the 230v controls optionPCB by unclipping the
control panel interface and carefully lowering forward, see
diagram 11.3.
Disconnect the electrical connection from the 230V controls
option PCB and the electrical connection from the main PCB.
RETAINING CLIPS
FUSE
HOLDER
Diagram 16.22
Remove the 230V controls interface retaining screw.
Remove the 230V controls option PCB, see diagram 16.23.
RETAINING
SCREW
11419
230V CONTROLS
OPTION PCB
Diagram 16.23
61
2000225294A
16 Replacement of Parts
12267
16.35 Heat Exchanger
Refer to section 16.1.
Drain the boiler heating circuit, see section 13.9.
Drain the boiler hot water circuit, see section 13.10.
Remove the flue elbow, water and gas connections at the
bottom of the boiler, any electrical connections.
Lift the boiler up and off the hanging bracket, carefully lay the
boiler on its back on the floor.
IMPORTANT: With regards to the Manual Handling Operations,
1992 Regulations, the following lift operation exceeds the
recommended weight for a one man lift.
SYPHON
ADAPTOR
Carefully pull up turn and pull forward to remove the flue duct.
Remove the spark electrode, see section 13.2.
Remove the central heating flow thermistor, see section 16.14.
Remove the igniter unit, see section 16.3.
Remove the burner and fan, see section 13.3.
Unclip and remove the gas supply pipe.
WIRE CLIP
SECURING NUT
Remove the condensate trap, refer to the relevant part of
section 13.5.
12265
Diagram 16.24
Remove the transformer, see section 16.5.
(F24E & F28e ONLY) Remove the plate to plate heat exchanger,
see section 16.9.
(F24E & F28e ONLY) Remove the domestic hot water pipe from
the boiler at the domestic hot water connector and the electrical
connections to the thermistor.
PUMP
AND
HOUSING
(F24E & F28e ONLY) Remove the domestic cold water supply
pipe from the boiler.
Disconnect the overheat cutoff thermistor electrical connections,
see diagram 16.13.
Remove the central heating flow pipe from the boiler.
Remove the syphon adapter, see diagram 16.24.
Remove the pump with it's housing. To remove disconnect
securing nut and securing wire clip, see diagram 16.25.
Diagram 16.25
12266
Remove the two screws securing the pump connector carefully
lever/pull down to remove the pump connector from it's housing,
see diagram 16.26.
(F24E & F28e ONLY) Disconnect flow sensor electrical
connections, see diagram 16.15.
Unscrew to remove the air vent from the top of the boiler.
Lift the heat exchanger up and ease forward to remove.
IMPORTANT NOTES.
PUMP
CONNECTOR
When re-fitting parts ensure all grommets are fitted correctly.
Check all 'O' rings and sealing washers, replace as required.
Ensure all securing clips are seated correctly.
Commission the boiler on completion, refer to section 12.
SECURING
SCREWS
(2 OFF)
Diagram 16.26
2000225294A
62
17 Spare Parts
When ordering spare parts, contact Saunier Duval service organisation using the telephone number on the inside front cover of this
booklet.
Please quote the name of the appliance and serial number, to be found on the data label.
If ordering from British Gas also quote the G.C. number of the part.
Key No.
Part No.
Description
GC Part No.
1
2000802521
Transformer
H17-674
2
2000802218
Overheat Cutoff Thermistor
H17-653
3
2000801911
Pressure Sensor
E83997
4
2000802777
(F24e ONLY) Plate to Plate Heat Exchanger
H19-988
4
2000802211
(F28e ONLY) Plate to Plate Heat Exchanger
H17-628
5
802227
(F24e/F28e) Three Way Valve
H17-671
6
802200
Electrode
H17-596
7
2000802107
Safety Discharge Valve
H17-683
8
S801068
Automatic Air Vent
E24302
9
802261
Three Way Valve Interface PCB
H17-791
10
802199
Flow Thermostat
H17-594
11
801722
C.H. Flow Thermistor
E84003
11a
802250
D.H.W. Thermistor (F24e/F28e)
H17-827
12
802265
Gas control valve
H17-619
13
802266
Flow Sensor
H17-721
14
801655
Igniter Unit
E84015
15
2000802120
230V Controls Option PCB
H19-989
16
802259
Main PCB
H17-679
17
802226
Pump
H17-664
18
802260
Interface Board (F24e/F28e)
H17-746
18
802281
Interface Board (F28e SB)
H17-713
19
2000802204
Fan
H17-618
20
S801039
Burner (F24e)
E24257
20
S801142
Burner (F28e)
E24426
63
2000225294A
1
11922
17 Spare Parts
2
3
4
5
7
8
6
9
13
10
15
11
and
11a
12
14
17
16
18
19
20
Diagram 17.1
Because of our constant endeavour for improvement, details may vary slightly from those shown in these instructions.
2000225294A
64