1
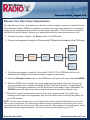
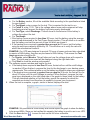
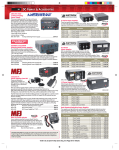
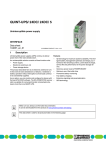
Building a DC Uninterruptible Power Supply for Your Ham Shack
West Mountain Radio provides all the tools you need to build a simple, customizable, and costeffective uninterruptible power supply (UPS) right at home! Learn how West Mountain Radio
products make it easy to find out how much power your rig consumes during normal use and
properly size your backup battery. We will later show you how to assemble your UPS and
maintain it, ensuring your rig is always protected from power loss.
How it Works
A UPS allows you to create a system that provides continuous power to your Amateur radio
equipment in emergency situations. The system utilizes West Mountain Radio’s PWRgate
product to monitor the voltage supplied to your equipment and immediately switch power
sources depending on whichever source’s voltage is higher.
This article will walk you through every step for building a UPS to meet the exact demands
of your radio equipment. The process begins with understanding the power required by your
equipment and choosing both a power supply and battery to fit those needs. After determining
and purchasing the correct power supply and battery, we’ll assemble the UPS and discuss how
to maintain your setup to ensure the equipment is always protected from power loss.
UPS System Overview
A typical UPS assembled using West Mountain Radio components will look like the one shown here.
Radio
Equipment
PS
Power Supply
Super
PWRgate
PG40S
OUT
PWRcheck
(optional)
PWRguard
(optional)
RIGrunner
Radio
Equipment
BAT
PWRcheck
(optional)
Radio
Equipment
Battery
West Mountain Radio
1
www.westmountainradio.com
Super PWRgate PG40S [www.westmountainradio.com/UPSPGATE]
The Super PWRgate PG40S is a 12V backup power switch/charger designed to power
equipment from either a power supply or battery. In the case of a power blackout or power
supply failure, the device will instantly switch to a battery, providing your radio equipment with
stable, uninterrupted power. When power is restored, the PWRgate will switch back to the power
supply as well as recharge and maintain the battery, automatically preparing your system for the
next power emergency. The Super PWRgate PG40S is optimized to charge and maintain full
capacity for AGM and Gel sealed, lead-acid type batteries.
PWRcheck [www.westmountainradio.com/UPSPCK]
The PWRcheck is a DC power analyzer that can measure 0V to 60V up to 40A. The device can help
assess the load requirements, as well as monitor the status and health, of a DC power supply system.
For this article, the PWRcheck will be used to determine the power requirements of your radio equipment.
Such measurement will help you to calculate and choose the best battery to power your equipment.
PWRguard [www.westmountainradio.com/UPSPGD]
The PWRguard is an automatic safety switch for use between a power source and load. The
device will instantly cut power to the load if the supply voltage ever goes above 15V or below
11.5V. In addition, the device will prevent a battery from over-discharging by cutting it off before it
is drained past 11.5V.
For this article, the PWRguard is used to protect the radio equipment connected through the
RIGrunner to the PWRgate. This added security helps protect your equipment from damage
when an under or overvoltage spike occurs.
RIGrunner [www.westmountainradio.com/UPSRIG]
The RIGrunner is a power strip that provides a safe, convenient way to connect all of your 12V
DC radio equipment to a power source. Separate fused outputs are provided for overcurrent
protection on each system component. In addition, the device is equipped with Anderson
Powerpole® connectors that allow your system to conform to Amateur Radio Emergency
Services (ARES), Radio Amateur Civil Emergency Service (RACES), Radio Society of Great
Britain (RSGB), and American Radio Relay League (ARRL) recommendations for high current
12V DC connectors.
For this article, the RIGrunner is used to connect all of your devices to the PWRguard. Several
models of the RIGrunner are available to suit both the quantity and demand of your equipment.
West Mountain Radio
2
www.westmountainradio.com
Power Supply
The UPS built in this article is rated for 12V at up to 40A systems. Make sure to use a variable
power supply capable of at least 15V to ensure the battery can be charged.
Battery [www.westmountainradio.com/UPSBAT]
West Mountain Radio recommends using sealed lead acid batteries for your UPS because they
are easy to maintain and do not generate dangerous fumes while recharging. Two types of
sealed lead acid batteries are Absorbed Glass Mat (AGM) and Gel.
AGM batteries are a more popular choice due to their capability of a higher burst of transient
current and excellent life expectancy if kept above 60% charge. AGM batteries are typically less
expensive than Gel.
Gel batteries do not offer the same power capacity for the size but do offer a slower discharge
rate. Gel batteries operate at higher temperatures as well as in any orientation. It is important to
note that the charging process for Gel batteries is very specific, and if not followed properly may
permanently damage the battery.
West Mountain Radio offers both types of batteries for your ordering convenience. Batteries are
shipped directly by the distributor.
Computerized Battery Analyzer III (CBA III) [www.westmountainradio.com/UPSCBA]
The CBA III is a battery capacity tester. Software is provided with the CBA III that can record and
graphically display the behavior of a battery as it is used.
While not a part of the UPS system, the CBA III is used to determine the true capacity and capability
of your system’s battery. The performance of your battery will differ depending on the demand of
your equipment and health of your battery. This tool allows us to confirm that your equipment will be
protected and powered for the time you require.
West Mountain Radio
3
www.westmountainradio.com
Measure Your Rig’s Power Requirements
This step shows us how much power your Amateur radio equipment requires to operate. It uses
West Mountain Radio’s PWRcheck product to measure the amp-hours drawn from your power
supply by the equipment during normal and emergency operation. This information is useful to
calculate the correct battery to power your equipment when the main power source is lost.
1. Connect the power supply to the Source end of the PWRcheck.
2. Connect your equipment through the RIGrunner and PWRgate to the Load end of the PWRcheck.
Radio
Equipment
Source
Power Supply
Load
PWRcheck
PWRgate
RIGrunner
Radio
Equipment
Radio
Equipment
3. Turn the power supply on and set it to provide 13.8V DC. The PWRcheck will turn on,
displaying the voltage produced by the power supply on the screen.
4. Press the Display Format button on the PWRcheck until you see a screen labeled AHOUR.
5. Allow the PWRcheck to monitor the power supply and equipment while you use your rig
as you normally would - ideally monitoring at least 24 hours of operation. If considering
the UPS for emergency situations, test the equipment under heavy usage. Afterwards, the
AHOUR screen will display how many amp-hours were required to power your rig.
6. Divide this number by the total number of hours your rig was tested. The result is the
average current load of the equipment. Use this information when choosing the battery for
your UPS system.
NOTE: Test the power requirements of your Amateur radio setup using the PWRcheck every time you
add or remove equipment. All equipment has different power requirements and modifying your setup
may change the amount of power your UPS needs to provide. This means you may have greater usage
and needs during emergency operation. Take this into account while designing your UPS.
West Mountain Radio
4
www.westmountainradio.com
Specify the Battery Capacity [1]
Specifying the capacity of your ham shack’s back-up battery involves more than multiplying your
rig’s average load current by the desired backup time in hours. If you do not consider derating
factors such as capacity tolerance, battery life cycle, and run time relative to 20 hours, your
back-up battery will not have the capacity to give you years of trouble-free service.
West Mountain Radio’s new online Battery Capacity Calculator takes those factors into account
and is ideal for use with AGM and Gel sealed lead acid batteries. It can be found online at:
www.westmountainradio.com/batcalc
EXAMPLE: Below is a UPS system designed to provide 0.5A to a system for 3 days. We will
refer to this example battery throughout this article.
Current load = 0.5 A Backup hours = 72 hrs
The required battery capacity would be 58 amp-hours.
Verify the Battery Capacity
After the battery type is calculated and purchased, we want to make sure it can actually fit
the demand of your equipment. Now use West Mountain Radio’s CBA III to characterize the
battery’s behavior over time on a PC and compare it to the data used to choose the battery. We
recommend testing the battery and power needs of your system using the PWRcheck and CBA
III every 3 months to ensure your UPS is in working condition.
NOTE: The CBA III device and software provided must be installed on a PC before performing
this step. For instructions, see the software CD provided with the CBA III.
1. Verify that the battery is fully charged. A full charge is required for the CBA III to perform
an accurate analysis of the battery’s capacity.
2. Connect the battery to the BATTERY input on the CBA III.
3. Connect your PC via the USB port on the device.
Battery
Battery
West Mountain Radio
USB
CBA
5
Computer
www.westmountainradio.com
4. Open the CBA III Software. After the splash screen, a window will open showing an empty
white box and different information along the right-hand side.
5. Click the New Test button
to open a new battery test.
6. The next window is requesting information about the battery.
West Mountain Radio
6
www.westmountainradio.com
a. For the Battery section, fill out the available fields according to the specifications listed for your battery.
b. For Test Name, enter a name for the test. This is required for the test to run.
c. For Cutoff V, enter 11.5V. This is the voltage where some radio equipment will stop functioning and will prevent the battery from being overly discharged.
d. For Test Type, select Discharge. This will show us the behavior of the battery’s voltage throughout the test.
e. For Test Amps:
i. If the backup hours required is less than 20 hours, test the battery using the average
current load determined in the Test Power Supply section. This will allow us to confirm
that the battery can last the amount of time for which we chose it.
ii. If the backup hours required is greater than or equal to 20 hours, test the battery
using its amp-hours capacity divided by 20. This will allow us to verify the value for
which the manufacturer tested it.
EXAMPLE: Our UPS was designed to provide 72 hours of power and was later calculated to require a 58Ah battery. Assume we purchased a 60Ah battery. That means the Test Amps parameter should be 3A.
f. For Graphs, select Minutes. This will show us how the voltage drops with respect to time. The total amp-hours used will be displayed along the right-hand side.
g. Click Start to close the window and proceed.
7. The software opens a window and begins the test.
a. If the backup hours required is less than 20 hours, the test will run until the cutoff voltage is reached. When finished, compare the time for the discharge to your backup power requirements. This confirms whether or not the battery is sufficient to power your equipment.
b. If the backup hours required is greater than or equal to 20 hours, the test will run for
about 20 hours until the cutoff voltage is reached. When finished, compare the total
amp-hours displayed on the right-hand side of the graph to those listed for the battery.
This will determine whether or not the battery meets the capacity for which the
manufacturer tested it and therefore its capability to power your equipment.
8. When the test is complete, a graph, similar to below, displays the data.
EXAMPLE: We purchased a 60Ah battery and should expect the graph to show the battery to be around 60Ah. Since our test verifies this capacity, the battery is good to use in our UPS.
9. Click the Save button
to save the test results for future reference.
West Mountain Radio
7
www.westmountainradio.com
Compare Your Battery to When it Was New
Battery capacity will degrade over time, lasting anywhere between 6 months to 48 months
depending on usage and battery chemistry. The battery’s capacity can be checked regularly
using West Mountain’s Radio CBA III device. A battery is considered near end-of-life if its charge
capacity is around 60% to 80% of its initial charge capacity.
The initial battery test file can be opened at a later date to have additional tests recorded
alongside it, allowing the multiple tests to be compared.
1. Verify that the battery is fully charged. A full charge is required for the CBA III to perform
an accurate analysis of the battery’s capacity.
2. Open the CBA III software, click the Open File button
, and select the file with which
we performed the initial battery analysis.
3. The test will open. Click the Add Test button . A window will appear asking whether you
want to add a new test to the current document, or create a new document. Click New Test
to close the window and proceed.
4.
5.
6.
A window opens to request information about the battery. Fill out the information following
the same process outlined earlier in this section. When finished, click Start to close the
window and proceed.
The initial graph will appear again. A second, different colored line will begin recording the
new data measured by the CBA III.
The following graph demonstrates what a degrading battery will look like using the CBA III. The black line is the initial test result, while the red line is the new test result.
EXAMPLE: The initial test of the battery’s capacity measured around 60Ah. The new test measures a capacity around 48Ah. Because the new capacity is around 60% to 80% of the original, the battery is approaching end-of-life and purchasing a replacement battery should be considered.
West Mountain Radio
8
www.westmountainradio.com
Battery degradation makes it extremely important to test your battery at regular intervals, usually
every 3 months, to ensure your equipment will be protected when there is a power outage and
the need for emergency communications.
Assemble Your UPS System
Assemble your UPS system as shown in the following diagram.
PS
Power Supply
Super
PWRgate
PG40S
OUT
PWRcheck
(optional)
PWRguard
(optional)
Radio
Equipment
RIGrunner
Radio
Equipment
BAT
PWRcheck
(optional)
Radio
Equipment
Battery
West Mountain Radio
9
www.westmountainradio.com
Options
· Place a PWRguard between your radio equipment and PWRgate to protect your system from under or overvoltage spikes.
· Place a PWRcheck between the Battery and PWRgate to keep track of the battery’s
charge and capacity. This will let you to monitor the degradation of the battery, if any, and
whether or not charges are complete.
· Place a PWRcheck between your radio equipment and PWRgate to see the power demand
of your system in real time.
Wires and Connectors
· All wires have some resistance that can cause a voltage drop between devices. Use heavy
gauge wire at as short a length as possible to reduce this effect. An online power loss calculator for wire runs can be found online at: www.westmountainradio.com/wirecalc
· West Mountain Radio carries 15, 30 and 45 amp Powerpole connectors for up to 16, 12 and
10 gauge wire, respectively. A video tutorial showing how to assemble Powerpole
connectors using West Mountain Radio’s PWRcrimp tool is online at:
www.westmountainradio.com/nlvideo
Setting Up PWRgate for Your Battery Type
Different battery types require different methods of charging. The PWRgate is equipped to
charge either AGM or Gel sealed lead acid batteries. The battery mode must be selected using
the jumper pins labeled J1 located in the lower right-hand corner of the inside of the PWRgate.
Remove the fuses and both screws from the top cover to access the inside.
a. If using an AGM battery, the power supply must be set to provide 14.5V. The jumper must be installed on both pins.
b. If using a Gel battery, the power supply must be set to provide 14.1V. The jumper must
be installed on only one pin.
Congratulations!
You have built your own customized UPS and can now rest easy knowing your Amateur radio
equipment is protected during emergency power outages. A UPS built with West Mountain
Radio’s DC power products will provide a smooth transition from your power supply to your
backup battery without disturbing the operation of your rig, then switch back to your power
supply and recharge your battery after power is restored. Your rig will be protected from power
supply over and undervoltage and your battery from over-discharge. Finally, you are able to
monitor how your UPS performs as well as check the health of your battery, ensuring your
system is well prepared for emergency communications!
73 and good DX
The hams at West Mountain Radio
[1] “Sealed Lead Acid Battery Applications.” Transtronics. wiki.xtronics.com/index.php/Sealed_Lead_Acid_Battery_Applications.
All trademarks are the property of their respective owners.
West Mountain Radio
10
www.westmountainradio.com