1
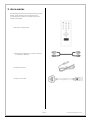
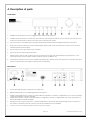
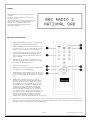
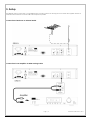
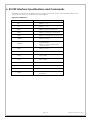
DR201V
FM/DAB/DAB+ Stereo Tuner
User Guide
Dear Customer
Thank you for deciding to purchase this Sansui product. This instruction manual will give you a general idea of how this device
operates, as well as providing you with information on safety procedures and cleaning. In order to maintain this product in
good condition, and to ensure it’s safe operation, please take a few minutes to read and carefully follow all the safety and
operating instructions found in this manual.
Please retain this instruction manual for future reference and pass it along with the device if handed over to a third party.
Should you have any additional questions regarding the operation or installation of this device, or should any problems arise
from its use, then please contact a specialized dealer or our service team for further information.
We assume no liability for any damage incurred as a result of improper use resulting from failure to comply with the safety
instructions found in this manual. Under such circumstances all claims under warranty will become null & void. We assume no
liability for any consequential damage!
This product is EMV-certified and complies with all European and National guideline requirements. A declaration of CE
conformity has been established for this product. Certification has been documented and entrusted to the manufacturer
Table of Contents
1.
INTENDED USE ..................................................................................................................................................... 5
EXPLANATION OF SYMBOLS ..................................................................................................................................................... 5
2.
SAFETY INFORMATION ........................................................................................................................................ 6
3.
ACCESSORIES ....................................................................................................................................................... 7
4.
DESCRIPTION OF PARTS ....................................................................................................................................... 8
FRONT PANEL....................................................................................................................................................................... 8
REAR PANEL......................................................................................................................................................................... 8
DISPLAY .............................................................................................................................................................................. 9
REMOTE CONTROL HANDSET .................................................................................................................................................. 9
5.
SETUP .................................................................................................................................................................11
CONNECTION OF ANTENNA OR EXTERNAL AERIAL ...................................................................................................................... 11
CONNECTION TO AN AMPLIFIER VIA RCA ANALOG CABLE ........................................................................................................... 11
CONNECTION TO AN AMPLIFIER VIA COAXIAL DIGITAL CABLE ....................................................................................................... 12
CONNECTION TO AN AMPLIFIER VIA OPTICAL DIGITAL CABLE ....................................................................................................... 12
6.
RS 232 INTERFACE SPECIFICATIONS AND COMMANDS .......................................................................................13
7.
TROUBLESHOOTING AND ERROR MESSAGES ......................................................................................................14
8.
MAINTENANCE AND HANDLING .........................................................................................................................15
TRANSPORTING OR SENDING THE DEVICE ................................................................................................................................. 15
KEEPING THE EXTERNAL CASE CLEAN ....................................................................................................................................... 15
CLEANING THE DEVICE .......................................................................................................................................................... 15
9.
SPECIFICATIONS..................................................................................................................................................17
Before use
Please read this instruction manual thoroughly before operating this device and retain it for further reference. Following and
heeding all the information found in this instruction manual will maintain this product in good condition and ensure its safe
operation. This instruction manual contains information on how to operate and maintain this device. Should a component
require maintenance, servicing or repair, then please consult a qualified dealer or service technician.
1. Intended Use
This device is a stereo radio tuner capable of receiving FM/VHF, DAB and DAB+ broadcasts.
Please adhere to all of the safety information and instructions found in this instruction manual.
Explanation of symbols
An exclamation mark is intended to inform the
user of important information, operation or
maintenance instructions, or that special
attention is required.
This symbol is intended to alert you to the
presence of unprotected live parts or
components found within the product’s
enclosure, or of dangerous connections that
upon contact may be of sufficient magnitude
to constitute a risk of electric shock. Cables
intended for such connections should only be
connected by qualified personnel or you
should only use ready to connect cables.
There are no user-serviceable parts found
inside the device, therefore the device need
never be opened.
Page | 5
© Sansui UK 2012 DR201V IB Ver 1.0 Rev 0.0
2. Safety Information
The following safety and hazard warnings are not only
for the protection of your device, but also serve as a
protection against potential health hazards. Please
take time to read the following instructions carefully.
We assume no liability for personal or property
damage resulting from the failure to comply
with the safety instructions, or from improper
operation or handling. Under such
circumstances, all claims under warranty will
become void
-
For safety and licensing (CE) reasons any
unauthorized modification and/or changes to
the device is prohibited and will void the
warranty and all warranty claims.
-
Any persons operating, installing, setting up, or
servicing this device must be trained and
qualified accordingly, and observe these
operating instructions.
-
Ensure that the device has been set up correctly
by following all the instructions found in the
instruction manual
-
-
-
-
-
This is a protection class II device. Make sure that
the voltage supply of the power outlet used
meets the required voltage specifications
230V/~50 Hz.
Power supply cables should be routed so that
they are not likely to be walked on, squashed or
pinched by items placed upon or against them.
Pay particular attention to cords at plugs, power
outlets, and at the point at which they exit from
the device. Avoid exposing the cable to
extreme heat or cold. Ignoring the above
mentioned instructions could result in cable
damage and present the danger of an electric
shock.
-
Keep packaging and protective foil away from
children at all times to avoid the danger of
suffocation.
-
The device should never come into contact with
water or moisture.
-
To prevent the risk of fire or electric shock make
sure that liquids, such as dripping or splashing
water, rain or moisture, do not come in contact
with the device and power supply plug
-
Operate this device in a moderate climate and
never expose it to extreme temperatures, such
as high humidity.
-
Condensation can build up suddenly if the
device is brought from a colder area into a
warmer area (e.g. when transporting). Should
this happen, allow the device to warm up to
room temperature first before using.
-
Care should be taken so that liquids do not
come in contact with the interior, this is why
containers containing liquids, e.g. buckets, vases
or plants should never be placed anywhere near
this product, including the power supply plug.
This could not only damage the device, but also
present a fire hazard.
-
It is imperative to avoid contact with moisture,
e.g. never operate in the bathroom.
-
Make sure the device is properly ventilated
during operation and never operate it in
constricted areas, such as for example in a
bookcase or shelf. Never block ventilation
openings with magazines, tablecloths, curtains
or similar.
-
Make sure the device is placed on a firm and
stable surface.
-
Never place any sources of fire on top of or near
the device and power supply plug (e.g. lighted
candle).
Should any obvious damage be seen on the
device or on the connection cables, do not
contact them in any way. Switch of the
corresponding circuit breaker in the power
distribution panel first, before carefully
unplugging the power plug from the wall outlet.
Do not operate the device further! Please
contact or take it to a qualified service
technician or specialty workshop.
Please note that excessive sound pressure
created when listening to loud volume levels
with earphones or headphones can lead to
permanent hearing damage.
-
Please adhere to the additional safety
information found in the individual chapters of
this instruction manual.
-
In order to completely cut off the power supply
to the device, unplug the power plug from the
wall outlet. Merely turning the device off with the
ON/OFF button is not sufficient. Also make sure
that power outlets are easily accessible.
When connecting other devices, please refer to
the safety and operating instructions found in
the literature accompanying the device.
-
Please contact our technical hotline or a service
technician for further information, should you be
in doubt about device operation, safety or when
making connections, or if any questions arise
that are not explained within this manual.
-
Contribute to a better environment by using a
designated recycling site for the disposal of
packaging material.
Always pull on the plug’s grips and never on the
cable to remove it from a wall outlet. Unplug the
device from the power outlet if not in use for a
longer period of time.
-
For safety reasons, always unplug the device
from the power outlet during thunder storms.
-
Eliminate potential tripping hazards by routing
cables in such a way that no one can trip or
stumble over them.
-
Never use the device, if the power cable or
device is damaged.
Page | 6
© Sansui UK 2012 DR201V IB Ver 1.0 Rev 0.0
3. Accessories
The following accessories are supplied with the system.
Please check all these parts are present before
proceeding. Please inform your dealer if any part is
missing or damaged.
1 x Remote control handset
1 x stereo left and right Phono to Phono cable for
connecting to amplifier
1 x DAB wire antenna
1 x mains power cable
Page | 7
© Sansui UK 2012 DR201V IB Ver 1.0 Rev 0.0
4. Description of parts
Front Panel
1
DAB/FM waveband selector. Press to toggle between DAB and FM reception.
2
In DAB mode press this key to activate auto scan function. In FM mode press this key once to activate auto search to next
station. Press and hold this for about 2 seconds to auto search previous station.
3
Info button. Press to view DAB station or program information or Radio Data Service (RDS) information in FM mode.
4
Stereo/Mono selector switch. In FM mode, depending on signal quality, it may be necessary to switch to mono mode to
minimise interference in the signal.
5
Pre-set Down. Press to select previous pre-set station.
6
Pre-set Up. Press to select next pre-set station.
7
Memory button. Press to add a station to the pre-set memory. Press and hold and simultaneously press button 5 or 6 to
select the memory location number desired. (maximum pre-sets available is 10)
8
Power button. Depress to turn on power. Indicator lamp glows blue. Indicator lamp turns red if put into standby mode from
remote control handset. Press again to switch power off completely.
Rear Panel
1.
Power cable inlet: Plug in the supplied power cable here.
2.
RS232 control interface for connecting external control device.
3.
Digital Coaxial S/PDIF output. Connect a COAX cable (not supplied) to connect to a digital input such as the coaxial input
on the Sansui SAP201V or SAV601 amplifiers.
Digital Optical output. Connect an optical cable (not supplied) to connect to a digital input such as the optical input on
the Sansui SAP201V or SAV601 amplifiers.
4.
5.
RCA/phono stereo output connections. Connect supplied RCA to RCA stereo pair cable ensuring the red connector on
the cable is connected to the red connector on both the CDD201V and your amplifier.
6.
Antenna connection for attaching supplied wire antenna or external antenna.
Page | 8
© Sansui UK 2012 DR201V IB Ver 1.0 Rev 0.0
Display
The DR201V has a two line 16 digit display as
pictured.
The top line of the display shows the current
listened to station.
When in DAB mode, if the input selector control
dial is rotated, the bottom display will scroll
through a list of available radio stations.
In FM mode RDS data information will be
displayed if available.
Remote Control Handset
1
DAB/FM SELECTOR button. Press to switch between
DAB digital radio and FM analogue radio.
2
PRESET CHANNEL buttons. Press once to select preset station from 1 to 10. Press and hold the numeric
button to save the station to pre-set number.
3
TUN+ button. In DAB Mode: Press TUN+ or TUN- to
scroll through the station list. In FM Mode: Press
TUN+ or TUN- to scroll through the frequencies (in
steps of .05MHz).
4
INFO button. This changes what information is
displayed on line 2 of the LCD display. To see DAB
information or FM RDS information.
5
TUN- button (See 3 above)
6
MUTE button. Press once to activate MUTE function.
Press again to cancel MUTE function.
7
STANDBY button. The Standby button turns the unit
on or to standby mode. When the unit is in standby
mode the LCD backlight is off and the power LED is
red.
8
ENTER button. In DAB mode press to confirm
selection of the station after scrolling through the
station list. Press and hold for 2 seconds to switch
'AUTO ENTER' on/off. AUTO ENTER on: no need to
press ENTER button or ROTARY CONTROL knob on
front panel to confirm the station selected after
scrolling. AUTO ENTER off: you must press ENTER
button or ROTARY CONTROL knob on front panel
to confirm the station selected after scrolling. In FM
mode: Press once to change audio mode: AUTO
mode will automatically detect between stereo
and mono broadcasts, press again to activate
MONO mode, which will play all broadcasts in mono only.
9
AUTO TUNE button. In DAB mode: Press once to activate a full search across entire band(s). In FM mode: Press once to
activate a 'seek' up through FM frequencies to find the next available station. Press and hold to activate a 'seek' down
through FM frequencies to find the next available station.
Page | 9
© Sansui UK 2012 DR201V IB Ver 1.0 Rev 0.0
-
Always follow the manufacturer's
instructions when recharging
rechargeable batteries.
-
Touching leaking or damaged batteries
could cause skin burns. Use protective
gloves suitable for handling such batteries.
-
Always ensure that the device has been
turned off after use.
-
Always change/replace all batteries at
the same time.
-
If required clean battery and device
contacts before inserting,
Inserting/changing batteries
Remove the battery compartment lid carefully. Remove
the used batteries. Insert new batteries, observing the
correct polarity as displayed inside the remote. Replace
the battery lid carefully.
Information on handling batteries and rechargeable
batteries
Please adhere to the following information when handling
batteries and rechargeable batteries.
-
Keep batteries out of children’s reach.
-
Batteries are hazardous and do not
belong in household waste.
Ensure correct polarity when inserting
batteries.
-
-
Always remove batteries when the remote
control is not in use for long periods of
time.
-
Never leave batteries lying around
unsupervised. If swallowed these could
pose a choking hazard to children and
pets. Seek emergency medical care
immediately, should this happen.
-
Never expose batteries to extreme
temperatures, such as sunlight, fire, ovens,
etc. there is a risk of explosion!
-
Make sure that batteries are not
dismantled, short-circuited or are thrown
into fire. Never re-charge nonrechargeable batteries. There is a risk of
explosion!
Page | 10
© Sansui UK 2012 DR201V IB Ver 1.0 Rev 0.0
5. Setup
The DR201V must be connected to an amplifier before any radio stations can be enjoyed. It also needs the supplied antenna or
external aerial connected to ensure DAB or FM reception is possible.
Connection of Antenna or External Aerial
Connection to an Amplifier via RCA Analog Cable
Page | 11
© Sansui UK 2012 DR201V IB Ver 1.0 Rev 0.0
Connection to an Amplifier via Coaxial Digital Cable
Connection to an Amplifier via Optical Digital Cable
Page | 12
© Sansui UK 2012 DR201V IB Ver 1.0 Rev 0.0
6. RS 232 Interface Specifications and Commands
The DR201V is equipped with an RS232 interface to enable control of the unit in a custom installation. Below is the
command list for use by your qualified custom install engineer.
DAB RS232 COMMAND LIST
COMMAND
DESCRIPTION/ RETURN TO PC INFO
ON
DR201V---> On
OFF
DR201V---> Off
BAND
DR201V--> Band Command Ok
TUNE+
DR201V--> Tuning Up Command Ok
TUNE-
DR201V--> Tuning Down Command Ok
PRESET 1
DR201V--> Preset: 1
PRESET10
MAX 10 PRESETS。
OVER 10 RETURN:
DR201V--> Preset Command Error
,Max 10 presets.
SAVE 1
DR201V--> Save: 1
SAVE 10
AUTO+
DR201V--> Up search for FM/Quick
scan for DAB
AUTO-
DR201V--> Down search for FM/Full
scan for DAB
ENTER
DR201V--> Enter Command Ok
MUTE ON
DR201V--> Mute On
MUTE OFF
DR201V--> Mute Off
STATUS
97.40 MHz FM
Auto(Stereo)
Page | 13
© Sansui UK 2012 DR201V IB Ver 1.0 Rev 0.0
7. Troubleshooting and error messages
The DR201V is equipped with state-of-the-art technology and is safe to operate. Nevertheless, problems or malfunctions
may occur. Before contacting Sansui customer support, refer to the following for possible solutions.
PROBLEM
No power when switched on
POSSIBLE SOLUTION
-
Mains socket not switched on or faulty
-
Plug not fully inserted into wall socket
-
Internal mains fuse has blown inside the unit,
this will need to be replaced by a qualified service
technician
-
Power cord has become damaged, this should be
replaced immediately by a qualified technician
No sound
No sound in one channel
-
Power not turned on
-
Volume setting low
-
Loudspeaker cables not connected
-
Poor reception on DAB tuner
-
Correct audio input source not selected on front panel
-
Audio source input cables connected incorrectly or
damaged
-
Audio input source faulty
Loudspeaker cables connected incorrectly or
damaged
Loud buzz or hum
-
Loudspeakers are faulty
-
Audio input cables damaged or not correctly
connected
Weak bass, diffused stereo image
-
Tuner sited too close to TV
-
Speaker connections out of phase check + and – terminals
are connected to corresponding terminals on both
amplifier and loudspeakers
Distorted sound
-
Frayed wires may be touching on speaker terminals
causing distortion
Weak or very poor signal on FM
Audio input source switches not
-
Volume control may be set too high
-
Internal fault would need servicing by a qualified service
working
Remote control not working
technician.
-
Check if the batteries have been inserted correctly.
-
If batteries are empty, replace them with new ones.
-
Remove any objects found between the remote control
and the remote sensor.
-
Make sure the distance between the remote control and
the device does not exceed 8 m
Buttons do not function (on the DR201V
-
Turn the DR201V off and then on again.
and/or remote control)
-
As an alternative, turn the DR201V off, unplug it from the
power outlet and plug in again.
Any repairs other than those mentioned above are to be carried out solely by an authorised technician.
Page | 14
© Sansui UK 2012 DR201V IB Ver 1.0 Rev 0.0
8. Maintenance and handling
Carry out a technical safety inspection on a regular basis, e.g. check if the power cable or housing has not been
damaged.
If there is reason to believe that the device can no longer be operated safely, then disconnect it immediately from the
power supply and secure it against any unintentional operation. Carefully remove the power cable plug from the wall
outlet and where applicable switch off the corresponding circuit breaker first.
It can be assumed that safe operation is no longer possible, if:
there is visible damage to the device or power cable,
the device has become wet or water has been able to get inside.
it has been stored for a long period of time under unfavorable conditions
Dropped, exposed to rigorous transport conditions or otherwise damaged.
Always adhere to the following safety instructions before cleaning and maintenance:
Live parts may be exposed, if the covering is opened or parts are removed.
-
The device must be disconnected from the power supply source prior to service, maintenance
or repairs.
Repairs are only to be carried out by qualified personnel, who are familiar with the hazards involved
and the relevant regulations.
Transporting or sending the device
Please retain the original box and the packaging material in case you need to transport or send the device out for
maintenance at a later date. Please note that the device should be repacked in the original packaging. The box and
packaging have been especially developed for this device in order to protect it during transport and against damage.
Retain this instruction manual for future reference and where required pass it along with the device if handed over to a
third party. It contains important information on initial operation and handling.
Keeping the external case clean
Never use volatile fluids near the device, as for example insect spray. Avoid letting the device come in contact with
rubber or plastic products for longer periods of time. These could otherwise leave marks behind.
Cleaning the device
Unplug the power cable before cleaning. Always use a soft and dry cloth to clean the unit’s exterior. If the device is
extremely dirty you can use a soft cloth, dampened with water or a mild cleaning solution to clean. Never use any
abrasive or harsh cleaning agents (e.g. alcohol, benzene or thinners) as these could damage the controls, casing or any
markings and labels found on the device.
Page | 15
© Sansui UK 2012 DR201V IB Ver 1.0 Rev 0.0
Important Notice
Please note that electrical and electronic devices must never be disposed of in regular household waste!
Consumers are legally obligated and responsible for the proper disposal of electronic devices by returning them
to collection sites designated for the recycling of electrical and electronic equipment waste after the useful life
of the device has come to an end. For more information concerning collection sites and correct disposal please
contact your local authority or waste management company. The presence of the above symbol on a device,
or its packaging or within the instruction manual indicates that the item must not be disposed of in normal
unsorted municipal waste.
In doing so you are fulfilling all recycling and disposal obligations and are optimising and contributing to a better
environment. These disposal regulations apply to batteries and rechargeable battery disposals as well. Most
batteries contain hazardous chemicals which can contaminate the environment and human health if they are
discarded in ordinary household waste. According to legislation batteries are to be returned to the place of
purchase or disposed of at a designated recycling site
Page | 16
© Sansui UK 2012 DR201V IB Ver 1.0 Rev 0.0
9. Specifications
-
Signal to Noise Ratio
DAB @2Vp-p, with instrumental 20k LPF enabled. >85dB (A)
FM Ultimate signal to noise ratio 98MHz @60dBuV/75KHz Dev. Fmod=1KHz,
Amplitude=1.3Vpp Mono >75dB
-
Total Harmonic Distortion (THD)
DAB @2Vp-p with instrumental 20K LPF enabled <0.1%
FM 98MHz@60dBuV/75KHz Dev. Mono Fmod=1KHz, Amplitude=1.3Vpp
<0.5%
-
Frequency Range
DAB BAND 3: 5A 174.928MHz - 13F 239.200MHz
FM 87.5MHz - 108MHz
-
Analog Outputs
RCA/phono stereo left & right x 1
-
Digital Outputs
COAXIAL x 1,Optical TOSLINK x 1
-
Control Interface
RS232
-
RF Input
F Type connector (screw thread)(to VHF/FM diplexer) 50 ohms
-
Power Supply
AC 230V, 50/60 Hz
-
Power Consumption
Max 20W
-
Dimensions
(W x H x D) : 430 x 80 x 283 mm
-
Weight
Net 3.8kg Gross 5kg
-
Output Level
1.1V +/- 2dB @ 1KHz 0dB
-
S/N Ratio (A)
>80dB
-
Power Supply
AC 230V ~ 50Hz
-
Max Power Consumption
20Watts
NOTE: Specifications and design are subject to possible modifications without notice
Page | 17
© Sansui UK 2012 DR201V IB Ver 1.0 Rev 0.0
www.sansui.co.uk
© Sansui UK 2012 DR201V IB Ver 1.0 Rev 0.0