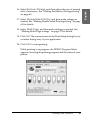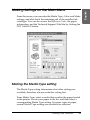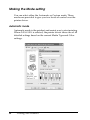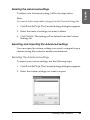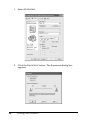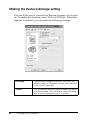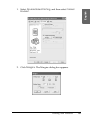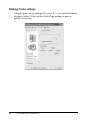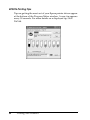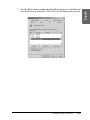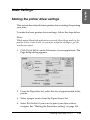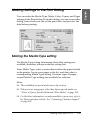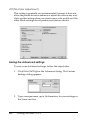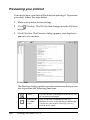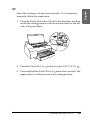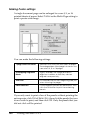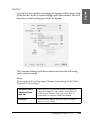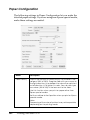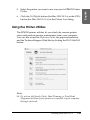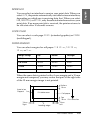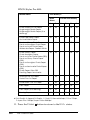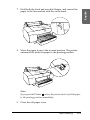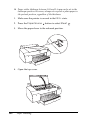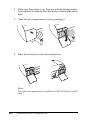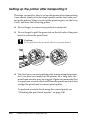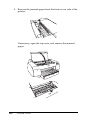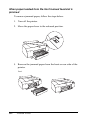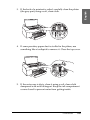
1
English
®
Reference Guide
Color Ink Jet Printer
All rights reserved. No part of this publication may be reproduced, stored in a retrieval
system, or transmitted in any form or by any means, mechanical, photocopying, recording,
or otherwise, without the prior written permission of Seiko Epson Corporation. No patent
liability is assumed with respect to the use of the information contained herein. Neither is
any liability assumed for damages resulting from the use of the information contained herein.
Neither Seiko Epson Corporation nor its affiliates shall be liable to the purchaser of this
product or third parties for damages, losses, costs, or expenses incurred by purchaser or third
parties as a result of: accident, misuse, or abuse of this product or unauthorized modifications,
repairs, or alterations to this product, or (excluding the U.S.) failure to strictly comply with
Seiko Epson Corporation's operating and maintenance instructions.
Seiko Epson Corporation shall not be liable against any damages or problems arising from
the use of any options or any consumable products other than those designated as Original
Epson Products or Epson Approved Products by Seiko Epson Corporation.
EPSON and EPSON ESC/P are registered trademarks and EPSON ESC/P 2 is a trademark
of Seiko Epson Corporation.
Speed, Fontware, FaceLift, Swiss, and Dutch are trademarks of Bitstream Inc.
CG Times and CG Omega are registered trademarks of Miles, Inc.
Univers is a registered trademark of Linotype AG and/or its subsidiaries.
Antique Olive is a trademark of Fonderie Olive.
Albertus is a trademark of Monotype Corporation plc.
Coronet is a trademark of Ludlow Industries (UK) Ltd.
Arial and Times New Roman are registered trademarks of Monotype Corporation plc.
General Notice: Other product names used herein are for identification purposes only and
may be trademarks of their respective owners. Epson disclaims any and all rights in those
marks.
Copyright © 2004 Seiko Epson Corporation. All rights reserved.
2
English
Printer Parts
Front view
Roll paper cover
Rear manual
feed slot
Paper lever
Top cover
Control panel
Roll paper support
Ink lever
Maintenance tank
Paper tray cover
Paper tray
Front manual feed slot
ink compartment
Ink cartridge slot
Rear view
Knobs
Rear cover
AC inlet
USB interface connector
IEEE1394 interface connector
3
Contents
Chapter 1 Printing with Windows
Printer Software Introduction. . . . . . . . . . . . . . . . . . . . . . . . . . . . . . .
Accessing the Printer Software. . . . . . . . . . . . . . . . . . . . . . . . . . . . . .
From Windows XP . . . . . . . . . . . . . . . . . . . . . . . . . . . . . . . . . . .
From Windows Me and 98. . . . . . . . . . . . . . . . . . . . . . . . . . . . .
From Windows 2000 . . . . . . . . . . . . . . . . . . . . . . . . . . . . . . . . . .
From Windows applications . . . . . . . . . . . . . . . . . . . . . . . . . . .
Basic Settings. . . . . . . . . . . . . . . . . . . . . . . . . . . . . . . . . . . . . . . . . . . . .
Making the printer driver settings . . . . . . . . . . . . . . . . . . . . . .
Canceling printing. . . . . . . . . . . . . . . . . . . . . . . . . . . . . . . . . . . .
Making Settings on the Main Menu . . . . . . . . . . . . . . . . . . . . . . . . .
Making the Media Type setting . . . . . . . . . . . . . . . . . . . . . . . .
Making the Color setting . . . . . . . . . . . . . . . . . . . . . . . . . . . . . .
Making the Mode setting . . . . . . . . . . . . . . . . . . . . . . . . . . . . . .
Making Advanced setting . . . . . . . . . . . . . . . . . . . . . . . . . . . . .
Checking the Ink Levels . . . . . . . . . . . . . . . . . . . . . . . . . . . . . . .
Previewing your printout . . . . . . . . . . . . . . . . . . . . . . . . . . . . .
Using the Print Assistant function . . . . . . . . . . . . . . . . . . . . . .
Making Settings on the Paper Menu . . . . . . . . . . . . . . . . . . . . . . . . .
Making the Paper Source setting . . . . . . . . . . . . . . . . . . . . . . .
Making the Borderless setting . . . . . . . . . . . . . . . . . . . . . . . . . .
Making the Auto Cut setting . . . . . . . . . . . . . . . . . . . . . . . . . . .
Making the Paper Size setting . . . . . . . . . . . . . . . . . . . . . . . . . .
Making the Copies setting . . . . . . . . . . . . . . . . . . . . . . . . . . . . .
Making the Orientation settings . . . . . . . . . . . . . . . . . . . . . . . .
Making the Printable Area setting . . . . . . . . . . . . . . . . . . . . . .
Making the Roll Paper Option settings . . . . . . . . . . . . . . . . . .
Making Settings on the Layout Menu . . . . . . . . . . . . . . . . . . . . . . . .
Making the Reduce/Enlarge setting . . . . . . . . . . . . . . . . . . . .
Making Double-sided Printing setting. . . . . . . . . . . . . . . . . . .
Making Multi-Page settings. . . . . . . . . . . . . . . . . . . . . . . . . . . .
Using the Printer Utilities . . . . . . . . . . . . . . . . . . . . . . . . . . . . . . . . . .
Checking the print head nozzles. . . . . . . . . . . . . . . . . . . . . . . .
Cleaning the print head . . . . . . . . . . . . . . . . . . . . . . . . . . . . . . .
4
12
13
13
13
14
14
14
14
20
21
21
23
24
28
43
44
46
47
48
48
52
55
56
57
58
60
63
64
65
72
76
78
80
English
Aligning the print head . . . . . . . . . . . . . . . . . . . . . . . . . . . . . . . .81
Using Printer and Option Information . . . . . . . . . . . . . . . . . . .81
Starting EPSON LFP Remote Panel . . . . . . . . . . . . . . . . . . . . . .82
Making the Speed & Progress settings . . . . . . . . . . . . . . . . . . .83
Getting Information Through Online Help . . . . . . . . . . . . . . . . . . . .86
Checking Printer Status and Managing Print Jobs . . . . . . . . . . . . . .87
Using the Progress Meter . . . . . . . . . . . . . . . . . . . . . . . . . . . . . .87
Using the EPSON Spool Manager . . . . . . . . . . . . . . . . . . . . . . .90
Using EPSON Status Monitor 3 . . . . . . . . . . . . . . . . . . . . . . . . .91
Increasing the Print Speed . . . . . . . . . . . . . . . . . . . . . . . . . . . . . . . . . .93
General tips . . . . . . . . . . . . . . . . . . . . . . . . . . . . . . . . . . . . . . . . . .93
Using Speed & Progress . . . . . . . . . . . . . . . . . . . . . . . . . . . . . . .94
Sharing Your Printer . . . . . . . . . . . . . . . . . . . . . . . . . . . . . . . . . . . . . . .94
For Windows XP. . . . . . . . . . . . . . . . . . . . . . . . . . . . . . . . . . . . . .95
For Windows Me and 98 . . . . . . . . . . . . . . . . . . . . . . . . . . . . . . .99
For Windows 2000 . . . . . . . . . . . . . . . . . . . . . . . . . . . . . . . . . . .104
Updating and Uninstalling the Printer Software . . . . . . . . . . . . . .108
Updating the driver in Windows XP and 2000 . . . . . . . . . . .108
Updating to Windows Me. . . . . . . . . . . . . . . . . . . . . . . . . . . . .108
Uninstalling the printer driver . . . . . . . . . . . . . . . . . . . . . . . . .108
Uninstalling the USB Host Device Driver . . . . . . . . . . . . . . . . . . . .110
Chapter 2 Printing with Mac OS 9.x
Printer Software Introduction . . . . . . . . . . . . . . . . . . . . . . . . . . . . . .111
Accessing the Printer Software . . . . . . . . . . . . . . . . . . . . . . . . . . . . .112
Accessing the Print dialog. . . . . . . . . . . . . . . . . . . . . . . . . . . . .112
Accessing the Page Setup dialog . . . . . . . . . . . . . . . . . . . . . . .112
Accessing the Layout dialog . . . . . . . . . . . . . . . . . . . . . . . . . . .112
Accessing the Utility dialog . . . . . . . . . . . . . . . . . . . . . . . . . . .112
Basic Settings . . . . . . . . . . . . . . . . . . . . . . . . . . . . . . . . . . . . . . . . . . . .113
Making the printer driver settings . . . . . . . . . . . . . . . . . . . . . .113
Canceling printing . . . . . . . . . . . . . . . . . . . . . . . . . . . . . . . . . . .116
Making Settings in the Print Dialog . . . . . . . . . . . . . . . . . . . . . . . . .117
Making the Media Type setting . . . . . . . . . . . . . . . . . . . . . . . .117
Making the Color setting. . . . . . . . . . . . . . . . . . . . . . . . . . . . . .119
Making the Mode setting . . . . . . . . . . . . . . . . . . . . . . . . . . . . .120
Making Advanced setting . . . . . . . . . . . . . . . . . . . . . . . . . . . . .123
5
Making the Copies setting . . . . . . . . . . . . . . . . . . . . . . . . . . . .
Making the Pages setting . . . . . . . . . . . . . . . . . . . . . . . . . . . . .
Setting the print time . . . . . . . . . . . . . . . . . . . . . . . . . . . . . . . .
Previewing your printout . . . . . . . . . . . . . . . . . . . . . . . . . . . .
Making Settings in the Page Setup Dialog . . . . . . . . . . . . . . . . . . .
Making the Paper Sizes setting . . . . . . . . . . . . . . . . . . . . . . . .
Making the Paper Source setting . . . . . . . . . . . . . . . . . . . . . .
Making the Borderless setting . . . . . . . . . . . . . . . . . . . . . . . . .
Making the Auto Cut setting . . . . . . . . . . . . . . . . . . . . . . . . . .
Making the Orientation setting . . . . . . . . . . . . . . . . . . . . . . . .
Making Double-sided Printing setting. . . . . . . . . . . . . . . . . .
Making the Reduce or Enlarge setting . . . . . . . . . . . . . . . . . .
Making the Printable Area settings . . . . . . . . . . . . . . . . . . . .
Making the Roll Paper Option settings . . . . . . . . . . . . . . . . .
Making Settings in the Layout Dialog. . . . . . . . . . . . . . . . . . . . . . .
Making the Fit to Page setting . . . . . . . . . . . . . . . . . . . . . . . . .
Making Multi-Page settings. . . . . . . . . . . . . . . . . . . . . . . . . . .
Making Print Order settings . . . . . . . . . . . . . . . . . . . . . . . . . .
Using the Printer Utilities . . . . . . . . . . . . . . . . . . . . . . . . . . . . . . . . .
Checking the print head nozzles. . . . . . . . . . . . . . . . . . . . . . .
Cleaning the print head . . . . . . . . . . . . . . . . . . . . . . . . . . . . . .
Aligning the print head . . . . . . . . . . . . . . . . . . . . . . . . . . . . . .
Getting Information Through Online Help . . . . . . . . . . . . . . . . . .
Checking Printer Status and Managing Print Jobs . . . . . . . . . . . .
Using the EPSON StatusMonitor . . . . . . . . . . . . . . . . . . . . . .
Accessing EPSON StatusMonitor . . . . . . . . . . . . . . . . . . . . . .
Making Configuration Settings . . . . . . . . . . . . . . . . . . . . . . . .
Using EPSON Monitor IV . . . . . . . . . . . . . . . . . . . . . . . . . . . .
Accessing EPSON Monitor IV . . . . . . . . . . . . . . . . . . . . . . . . .
Managing print jobs using EPSON Monitor IV . . . . . . . . . .
Sharing Your Printer . . . . . . . . . . . . . . . . . . . . . . . . . . . . . . . . . . . . .
Setting up your printer as a shared printer . . . . . . . . . . . . . .
Accessing the shared printer . . . . . . . . . . . . . . . . . . . . . . . . . .
Uninstalling the Printer Software . . . . . . . . . . . . . . . . . . . . . . . . . .
6
134
134
135
136
137
138
139
139
143
146
147
153
154
155
157
158
159
161
162
164
165
166
167
167
167
167
169
170
170
172
174
175
176
177
English
Chapter 3 Printing with Mac OS X
Printer Software Introduction . . . . . . . . . . . . . . . . . . . . . . . . . . . . . .178
Accessing the Printer Software . . . . . . . . . . . . . . . . . . . . . . . . . . . . .180
Accessing the Page Setup dialog . . . . . . . . . . . . . . . . . . . . . . .180
Accessing the Print dialog. . . . . . . . . . . . . . . . . . . . . . . . . . . . .180
Accessing the Utility dialog . . . . . . . . . . . . . . . . . . . . . . . . . . .180
Page Setup Dialog Settings. . . . . . . . . . . . . . . . . . . . . . . . . . . . . . . . .181
Settings . . . . . . . . . . . . . . . . . . . . . . . . . . . . . . . . . . . . . . . . . . . . .181
Format for . . . . . . . . . . . . . . . . . . . . . . . . . . . . . . . . . . . . . . . . . .182
Paper Size. . . . . . . . . . . . . . . . . . . . . . . . . . . . . . . . . . . . . . . . . . .182
Orientation. . . . . . . . . . . . . . . . . . . . . . . . . . . . . . . . . . . . . . . . . .183
Scale . . . . . . . . . . . . . . . . . . . . . . . . . . . . . . . . . . . . . . . . . . . . . . .183
Print Dialog Settings . . . . . . . . . . . . . . . . . . . . . . . . . . . . . . . . . . . . . .184
Printer. . . . . . . . . . . . . . . . . . . . . . . . . . . . . . . . . . . . . . . . . . . . . .184
Presets . . . . . . . . . . . . . . . . . . . . . . . . . . . . . . . . . . . . . . . . . . . . .184
Copies & Pages . . . . . . . . . . . . . . . . . . . . . . . . . . . . . . . . . . . . . .185
Layout . . . . . . . . . . . . . . . . . . . . . . . . . . . . . . . . . . . . . . . . . . . . .186
Output Options. . . . . . . . . . . . . . . . . . . . . . . . . . . . . . . . . . . . . .187
Print Settings . . . . . . . . . . . . . . . . . . . . . . . . . . . . . . . . . . . . . . . .188
Printer Color Management . . . . . . . . . . . . . . . . . . . . . . . . . . . .196
Paper Configuration. . . . . . . . . . . . . . . . . . . . . . . . . . . . . . . . . .202
Roll Paper Option . . . . . . . . . . . . . . . . . . . . . . . . . . . . . . . . . . . .205
Expansion . . . . . . . . . . . . . . . . . . . . . . . . . . . . . . . . . . . . . . . . . .209
Summary . . . . . . . . . . . . . . . . . . . . . . . . . . . . . . . . . . . . . . . . . . .210
Saving your settings in the Print dialog . . . . . . . . . . . . . . . . .210
Using your saved settings in the Print dialog . . . . . . . . . . . .211
Preview . . . . . . . . . . . . . . . . . . . . . . . . . . . . . . . . . . . . . . . . . . . .211
Performing Borderless Printing. . . . . . . . . . . . . . . . . . . . . . . . . . . . .212
Canceling Printing. . . . . . . . . . . . . . . . . . . . . . . . . . . . . . . . . . . . . . . .214
Printer Utility Dialog. . . . . . . . . . . . . . . . . . . . . . . . . . . . . . . . . . . . . .214
Accessing the EPSON Printer Utility. . . . . . . . . . . . . . . . . . . .214
Using the Printer Utilities . . . . . . . . . . . . . . . . . . . . . . . . . . . . .215
Checking the print head nozzles . . . . . . . . . . . . . . . . . . . . . . .217
Cleaning the print head . . . . . . . . . . . . . . . . . . . . . . . . . . . . . . .219
Aligning the print head . . . . . . . . . . . . . . . . . . . . . . . . . . . . . . .220
Starting EPSON LFP Remote Panel . . . . . . . . . . . . . . . . . . . . .220
Using the Print Assistant function . . . . . . . . . . . . . . . . . . . . . .221
Getting Information Through Online Help . . . . . . . . . . . . . . . . . . .221
Uninstalling the Printer Software . . . . . . . . . . . . . . . . . . . . . . . . . . .222
7
Chapter 4 The Control Panel
Buttons, Lights, and Messages . . . . . . . . . . . . . . . . . . . . . . . . . . . . .
Buttons . . . . . . . . . . . . . . . . . . . . . . . . . . . . . . . . . . . . . . . . . . . .
Lights. . . . . . . . . . . . . . . . . . . . . . . . . . . . . . . . . . . . . . . . . . . . . .
Combination of buttons . . . . . . . . . . . . . . . . . . . . . . . . . . . . . .
Messages . . . . . . . . . . . . . . . . . . . . . . . . . . . . . . . . . . . . . . . . . . .
SelecType Settings . . . . . . . . . . . . . . . . . . . . . . . . . . . . . . . . . . . . . . .
When to use SelecType . . . . . . . . . . . . . . . . . . . . . . . . . . . . . . .
SelecType menu list . . . . . . . . . . . . . . . . . . . . . . . . . . . . . . . . .
Basic SelecType setting procedure . . . . . . . . . . . . . . . . . . . . .
Details of SelecType . . . . . . . . . . . . . . . . . . . . . . . . . . . . . . . . .
Checking the print head nozzles. . . . . . . . . . . . . . . . . . . . . . .
Aligning the print head . . . . . . . . . . . . . . . . . . . . . . . . . . . . . .
Making the paper settings . . . . . . . . . . . . . . . . . . . . . . . . . . . .
Printing a status sheet. . . . . . . . . . . . . . . . . . . . . . . . . . . . . . . .
Setting the alert value of the paper. . . . . . . . . . . . . . . . . . . . .
223
223
225
226
227
228
228
229
234
235
246
248
253
256
256
Chapter 5 Maintenance Mode
Maintenance Mode. . . . . . . . . . . . . . . . . . . . . . . . . . . . . . . . . . . . . . .
Maintenance mode setting procedure . . . . . . . . . . . . . . . . . .
Maintenance mode list . . . . . . . . . . . . . . . . . . . . . . . . . . . . . . .
Details of maintenance mode items . . . . . . . . . . . . . . . . . . . .
258
258
259
260
Chapter 6 Paper Handling
Notes on Epson Special Media and Other Media . . . . . . . . . . . . .
Using Epson special media . . . . . . . . . . . . . . . . . . . . . . . . . . .
Using paper other than Epson special media . . . . . . . . . . . .
Using Roll Paper. . . . . . . . . . . . . . . . . . . . . . . . . . . . . . . . . . . . . . . . .
Attaching the roll paper to the spindle . . . . . . . . . . . . . . . . .
Attaching the spacer to the spindle . . . . . . . . . . . . . . . . . . . .
Removing the roll paper from the spindle . . . . . . . . . . . . . .
Loading roll paper. . . . . . . . . . . . . . . . . . . . . . . . . . . . . . . . . . .
Using the roll paper belt. . . . . . . . . . . . . . . . . . . . . . . . . . . . . .
Cutting the roll paper or printing page lines . . . . . . . . . . . .
8
263
263
264
265
265
267
268
269
273
274
English
Using Cut Sheet Media . . . . . . . . . . . . . . . . . . . . . . . . . . . . . . . . . . . .276
Checking the paper path . . . . . . . . . . . . . . . . . . . . . . . . . . . . . .276
Loading cut-sheet media . . . . . . . . . . . . . . . . . . . . . . . . . . . . . .277
Chapter 7 Maintenance and Transportation
Replacing Ink Cartridges . . . . . . . . . . . . . . . . . . . . . . . . . . . . . . . . . .295
Converting the Black Ink Cartridges . . . . . . . . . . . . . . . . . . . . . . . .300
Updating the printer driver information . . . . . . . . . . . . . . . .306
Replacing the Maintenance Tank . . . . . . . . . . . . . . . . . . . . . . . . . . .308
Replacing the Paper Cutter . . . . . . . . . . . . . . . . . . . . . . . . . . . . . . . .310
Cleaning the Printer . . . . . . . . . . . . . . . . . . . . . . . . . . . . . . . . . . . . . .314
If you have not used your printer for a long time . . . . . . . . .315
Transporting the Printer . . . . . . . . . . . . . . . . . . . . . . . . . . . . . . . . . . .316
Over a long distance. . . . . . . . . . . . . . . . . . . . . . . . . . . . . . . . . .316
Over a short distance . . . . . . . . . . . . . . . . . . . . . . . . . . . . . . . . .317
Setting up the printer after transporting it . . . . . . . . . . . . . . .318
Chapter 8 Problem Solver
Troubleshooting. . . . . . . . . . . . . . . . . . . . . . . . . . . . . . . . . . . . . . . . . .320
Printer stops printing unexpectedly . . . . . . . . . . . . . . . . . . . .320
The printer does not turn on or stay on . . . . . . . . . . . . . . . . .328
The printer prints nothing. . . . . . . . . . . . . . . . . . . . . . . . . . . . .328
Printouts are not what you expected. . . . . . . . . . . . . . . . . . . .335
Print Quality Could be Better . . . . . . . . . . . . . . . . . . . . . . . . . .339
Color documents print in black only . . . . . . . . . . . . . . . . . . . .342
Printing could be faster . . . . . . . . . . . . . . . . . . . . . . . . . . . . . . .343
Roll paper cannot be cut . . . . . . . . . . . . . . . . . . . . . . . . . . . . . .344
Paper feed or paper jam problems occur frequently. . . . . . .345
Roll paper does not eject properly . . . . . . . . . . . . . . . . . . . . . .346
Clearing paper jams . . . . . . . . . . . . . . . . . . . . . . . . . . . . . . . . . .347
Contacting Customer Support . . . . . . . . . . . . . . . . . . . . . . . . .355
Technical Support Web Site . . . . . . . . . . . . . . . . . . . . . . . . . . .355
Paper Information . . . . . . . . . . . . . . . . . . . . . . . . . . . . . . . . . . . . . . . .356
Paper settings . . . . . . . . . . . . . . . . . . . . . . . . . . . . . . . . . . . . . . .356
9
Chapter 9 Product Information
Printer Specifications . . . . . . . . . . . . . . . . . . . . . . . . . . . . . . . . . . . . .
Printing . . . . . . . . . . . . . . . . . . . . . . . . . . . . . . . . . . . . . . . . . . . .
Printable area . . . . . . . . . . . . . . . . . . . . . . . . . . . . . . . . . . . . . . .
Mechanical . . . . . . . . . . . . . . . . . . . . . . . . . . . . . . . . . . . . . . . . .
Electrical . . . . . . . . . . . . . . . . . . . . . . . . . . . . . . . . . . . . . . . . . . .
Environmental . . . . . . . . . . . . . . . . . . . . . . . . . . . . . . . . . . . . . .
Initialization . . . . . . . . . . . . . . . . . . . . . . . . . . . . . . . . . . . . . . . .
Standards and Approvals . . . . . . . . . . . . . . . . . . . . . . . . . . . .
Paper . . . . . . . . . . . . . . . . . . . . . . . . . . . . . . . . . . . . . . . . . . . . . .
Ink cartridges . . . . . . . . . . . . . . . . . . . . . . . . . . . . . . . . . . . . . . .
System Requirements . . . . . . . . . . . . . . . . . . . . . . . . . . . . . . . . . . . .
To use your printer with Windows . . . . . . . . . . . . . . . . . . . .
To use your printer with Mac OS 9.x . . . . . . . . . . . . . . . . . . .
To use your printer with Mac OS X . . . . . . . . . . . . . . . . . . . .
Interface Specifications . . . . . . . . . . . . . . . . . . . . . . . . . . . . . . . . . . .
USB interface . . . . . . . . . . . . . . . . . . . . . . . . . . . . . . . . . . . . . . .
IEEE1394 Interface. . . . . . . . . . . . . . . . . . . . . . . . . . . . . . . . . . .
359
359
361
362
363
363
364
365
365
367
369
369
369
370
371
371
372
Chapter 10 Options and Consumable Products
Options. . . . . . . . . . . . . . . . . . . . . . . . . . . . . . . . . . . . . . . . . . . . . . . . .
Roll paper spindle . . . . . . . . . . . . . . . . . . . . . . . . . . . . . . . . . . .
Interface card . . . . . . . . . . . . . . . . . . . . . . . . . . . . . . . . . . . . . . .
Interface cable . . . . . . . . . . . . . . . . . . . . . . . . . . . . . . . . . . . . . .
Borderless Print Spacer. . . . . . . . . . . . . . . . . . . . . . . . . . . . . . .
Consumable Products . . . . . . . . . . . . . . . . . . . . . . . . . . . . . . . . . . . .
Paper cutter . . . . . . . . . . . . . . . . . . . . . . . . . . . . . . . . . . . . . . . .
Maintenance Tank . . . . . . . . . . . . . . . . . . . . . . . . . . . . . . . . . . .
Ink cartridges . . . . . . . . . . . . . . . . . . . . . . . . . . . . . . . . . . . . . . .
Black ink conversion cartridge . . . . . . . . . . . . . . . . . . . . . . . .
Epson Special Media . . . . . . . . . . . . . . . . . . . . . . . . . . . . . . . . . . . . .
Roll paper . . . . . . . . . . . . . . . . . . . . . . . . . . . . . . . . . . . . . . . . .
Cut sheets . . . . . . . . . . . . . . . . . . . . . . . . . . . . . . . . . . . . . . . . .
10
373
373
373
374
374
375
375
375
375
377
377
378
379
About paper margin . . . . . . . . . . . . . . . . . . . . . . . . . . . . . . . . . . . . . .381
About Platen Gap . . . . . . . . . . . . . . . . . . . . . . . . . . . . . . . . . . . . . . . .382
Cleaning the Printer . . . . . . . . . . . . . . . . . . . . . . . . . . . . . . . . . . . . . .383
About the Black Ink Conversion Kit. . . . . . . . . . . . . . . . . . . . . . . . .386
Glossary
Index
11
English
Appendix A Corrections
Chapter 1
Printing with Windows
Printer Software Introduction
The printer software that comes with your printer includes a
printer driver and printer utilities. The printer driver lets you
choose from a variety of settings to get the best results from your
printer. The printer utilities help you check the printer and keep
it in top condition.
The printer software includes the following menus.
Menu
Settings and Utilities
Main
Media Type, Color, Mode, Ink Levels, Print Preview, Print
Assistant
Paper
Paper Source, Borderless, Auto Cut, Paper Size (Page Size),
Copies, Orientation, Printable Area (When Paper Tray or
Manual Feed is selected as the Paper Source), Roll Paper
Option (When Roll Paper or Roll Paper (Banner) is selected
as the Paper Source.)
Layout
Reduce/Enlarge, Double-Sided Printing, Multi-Page
Utilities
EPSON Status Monitor 3, Nozzle Check, Head Cleaning, Print
Head Alignment, Printer and Option Information (EPSON
Stylus Pro 4800 only), EPSON LFP Remote Panel, Speed &
Progress
For information on making printer driver settings, see “Making
Settings on the Main Menu” on page 21, “Making Settings on the
Paper Menu” on page 47, and “Making Settings on the Layout
Menu” on page 63.
For information on the printer utilities, see “Using the Printer
Utilities” on page 76.
12
Printing with Windows
Note:
❏ The specific features available in the printer software vary
depending on the version of Windows you are using.
❏ The printer driver screens that appear in this manual are provided
for EPSON Stylus Pro 4800 running on Windows XP. The screens
of EPSON Stylus Pro 4400 and EPSON Stylus Pro 4800 are almost
the same, except as noted.
The online help provides more information on the printer software.
See “Getting Information Through Online Help” on page 86.
Accessing the Printer Software
English
1
1
1
1
1
To access the printer software installed in your computer, follow
the steps below.
Note:
The specific features available in the printer software vary depending on
the versions of Windows you are using.
1
1
1
From Windows XP
1. Click Start, click Control Panel, click Printers and Other
Hardware, and then click Printers and Faxes.
1
2. Right-click your printer icon, and click Printing Preferences.
The printer software window appears.
1
1
From Windows Me and 98
1. Click Start, point to Settings, and then select Printers.
1
2. Right-click your printer icon, and click Properties. The
printer software window appears.
Printing with Windows
13
From Windows 2000
1. Click Start, point to Settings, and then select Printers.
2. Right-click your printer icon, and click Printing Preferences.
The printer software window appears.
From Windows applications
1. Click Print or Page Setup on the File menu.
2. Make sure your printer is selected, and click Printer, Setup,
Options, Properties, or Preference. Depending on your
application, you may need to click a combination of these
buttons. The printer software windows appears.
Basic Settings
Making the printer driver settings
This section describes the basic printer driver settings for printing
your data.
To make the basic printer driver settings, follow the steps below.
1. Click Print on the File menu of your application. The Print
dialog box appears.
2. Make sure your printer is selected, and then click Properties
or Options. You may need to click a combination of these
buttons. The driver settings window appears.
14
Printing with Windows
3. Click the Main tab. The Main menu appears.
English
1
1
1
1
1
1
1
4. From Media Type, select a media that matches the paper
loaded in the printer. See “Media Type setting list” on page 22.
Note:
❏ Check the media type and its paper path. See “Paper path list”
on page 276.
❏ The Media Type setting determines what other settings are
available; therefore, always make this setting first.
1
1
1
❏ Some media types are not available for the Paper Source setting
you have selected.
1
1
Printing with Windows
15
5. Make the Color setting. Select Color or Color/B&W Photo to
print color or monochrome photos, or Black to print a draft
or black text only.
For EPSON Stylus Pro 4800 only:
If you want to print advanced monochrome photos, select
Advanced B&W Photo.
Note:
When printing on any media other than tracing paper, we
recommend Color or Color/B&W Photo even if the data to print
is black.
6. Make the Mode setting. Check that Automatic is selected.
7. Adjust Speed and Quality in the Mode box if a slider
appears. Drag the slider to the left or right depending on
which is more important.
For EPSON Stylus Pro 4800 only:
If you have selected Advanced B&W Photo as the Color
setting, select the Color Toning setting from the pull-down
menu.
Note:
Depending on the Media Type setting you choose, a slider may not
appear in the Mode box.
8. Select the color control mode from the pull-down menu in the
Mode box. For detailed information, see “Color Control
mode” on page 25.
16
Printing with Windows
9. Click the Paper tab. The Paper menu appears.
English
1
1
1
1
1
1
1
10. Select a paper source from the Paper Source list.
1
11. Select Borderless to print your data with no margins. See
“Making the Borderless setting” on page 48.
12. From the Paper Size list, select the size of paper loaded in the
printer.
Note:
Most Windows applications feature paper size settings that override
similar settings in the printer driver.
13. Make settings for Copies and Orientation, as necessary.
1
1
1
1
Printing with Windows
17
14. When Paper Tray or Manual Feed is selected as the Paper
Source setting, make the Printable Area settings as needed.
See “Making the Printable Area setting” on page 58.
When Roll Paper or Roll Paper (Banner) is selected as the
Paper Source setting, make the Roll Paper Option settings as
needed. See “Making the Roll Paper Option settings” on page
60.
15. Click the Layout tab. The Layout menu appears.
Note:
❏ The functions on the Layout menu are not available when Roll
Paper (Banner) is selected as the Paper Source setting.
❏ Depending on the paper source you choose, some of the
functions may not be available.
18
Printing with Windows
17. Select Double-Sided Printing, and then make settings as
needed. See “Making Double-sided Printing setting” on page
65 for details.
1
English
16. Select Reduce/Enlarge, and then adjust the size of printed
data, if necessary. See “Making the Reduce/Enlarge setting”
on page 64.
1
1
18. Select Multi-Page, and then make settings as needed. See
“Making Multi-Page settings” on page 72 for details.
19. Click OK. The screen returns to the Print Setup dialog box (or
a similar dialog box) of your application.
1
1
20. Click Print to start printing.
While printing is in progress, the EPSON Progress Meter
appears, showing the printing progress and the status of your
printer.
1
1
P
1
1
1
1
1
Printing with Windows
19
Canceling printing
To cancel printing in progress, click Stop on the EPSON Progress
Meter.
You can also pause or restart printing. To pause printing, click
Pause. To resume printing, click this button again.
c
20
Caution:
If you stop printing in progress, you may need to start printing
again from the beginning for best result; otherwise, misalignment
or banding may appear in the printed image.
Printing with Windows
Making Settings on the Main Menu
From this menu, you can make the Media Type, Color, and Mode
settings, and also check the remaining ink of the installed ink
cartridges. You can also access the Reference Guide, the paper
information, and the Technical Support Web Site by clicking the
Print Assistant button.
English
1
1
1
1
1
1
1
1
1
1
Making the Media Type setting
The Media Type setting determines what other settings are
available; therefore, always make this setting first.
1
From Media Type, select a media that matches the paper loaded
in the printer. Locate your paper in the list, and then select a
corresponding Media Type setting. For some types of paper,
several Media Type settings are available for selection.
Printing with Windows
21
1
Note:
❏ The availability of special media varies by country.
❏ When using paper other than Epson special media, see “Notes on
Epson Special Media and Other Media” on page 263.
❏ For the latest information on the special media available in your area,
refer to the Epson customer support website. See “Contacting
Customer Support” on page 355.
Media Type setting list
22
Media Type Setting
Epson Special Media Name/
Description
Photo Quality Ink Jet Paper
Photo Quality Ink Jet Paper
Singleweight Matte Paper
Singleweight Matte Paper
Enhanced Matte Paper
Enhanced Matte Paper
Archival Matte Paper
Archival Matte Paper
Photo Glossy Paper
Photo Glossy Paper
Photo Semigloss Paper
Photo Semigloss Paper
Premium Glossy Photo Paper
Premium Glossy Photo Paper
Premium Semigloss Photo Paper
Premium Semigloss Photo Paper
Premium Luster Photo Paper
Premium Luster Photo Paper
Premium Luster Photo Paper (250)
Premium Luster Photo Paper (250)
Premium Glossy Photo Paper (250)
Premium Glossy Photo Paper (250)
Premium Semigloss Photo Paper
(250)
Premium Semigloss Photo Paper
(250)
Premium Semimatte Photo Paper
(250)
Premium Semimatte Photo Paper
(250)
Photo Paper Gloss 250
Photo Paper Gloss 250
Proofing Paper Semimatte
EPSON Proofing Paper Semimatte
(Commercial)
Printing with Windows
Watercolor Paper - Radiant White
Textured Fine Art Paper
Textured Fine Art Paper
Velvet Fine Art Paper
Velvet Fine Art Paper
UltraSmooth Fine Art Paper
UltraSmooth Fine Art Paper
Plain Paper
-
Plain Paper (Line drawing)
-
Singleweight Matte Paper
(line drawing)
Singleweight Matte Paper
Tracing Paper
-
1
English
Watercolor Paper - Radiant White
1
1
1
Making the Color setting
1
EPSON Stylus Pro 4400
1
Make the Color setting. Select Color/B&W Photo to print color
or monochrome photos, or Black to print a draft or black text only.
Note:
When printing on any media other than tracing paper, we recommend
Color/B&W Photo even if the data to print is black.
EPSON Stylus Pro 4800
Make the Color setting. Select Color to print color or monochrome
photos, or Black to print a draft or black text only. If you want to
print advanced monochrome photos, select Advanced B&W
Photo.
Note:
When printing on any media other than tracing paper, we recommend
Color even if the data to print is black.
1
1
1
1
1
1
Printing with Windows
23
Making the Mode setting
You can select either the Automatic or Custom mode. These
modes are provided to give you two levels of control over the
printer driver.
Automatic mode
Automatic mode is the quickest and easiest way to start printing.
When Automatic is selected, the printer driver takes care of all
detailed settings based on the current Media Type and Color
settings.
24
Printing with Windows
Quality and Speed slider
Color Control mode
When Color (or Color/B&W Photo) is selected as the Color
setting and Automatic as the Mode setting, the Color Control
pull-down menu appears in the Mode box.
1
1
1
1
You can select from the following settings.
EPSON Vivid
1
English
Depending on the media you choose in the Media Type setting
while Color (or Color/B&W Photo) or Black is selected as the
Color setting and Automatic as the Mode setting, a Quality or
Speed slider appears in the Mode box. Select Quality when print
quality is more important than print speed. Select Speed when
print speed is more important than print quality.
Select this setting to produce vivid blue and green tones
in printouts.
1
Note:
Because this setting reproduces blue and green tones
that cannot be displayed by your monitor, your printouts
may differ from the screen images when this function is
selected.
1
1
Charts and
Graphs
Intensifies the colors and lightens the midtones and
highlights of an image. Use this setting for presentation
graphics, such as charts and graphs.
EPSON
Standard
(sRGB)
For EPSON Stylus Pro 4800 only:
Increases the contrast in images. Use this setting for color
photographs.
1
Adobe RGB
For EPSON Stylus Pro 4800 only:
Matches image color to Adobe RGB.
1
1
1
Printing with Windows
25
Color Toning (for EPSON Stylus Pro 4800 only)
When you select Advanced B&W Photo as the Color setting
while Automatic is selected, the Color Toning pull-down menu
appears in the Mode box.
You can select from the following settings.
26
Neutral
This setting provides standard image
correction for most photos. Try this first.
Cool
This setting gives a cool tone to your photos.
Warm
This setting gives a warm tone to your photos.
Sepia
This setting applies a sepia tone to your photos.
Printing with Windows
Custom mode
1
English
The Custom mode lets you make a wide range of changes with a
single click of the mouse. In the Custom Settings pull-down menu,
you will find ready-made settings provided by Epson.
1
1
1
1
1
1
1
Note:
These ready-made settings may not appear, depending on the Media
Type and Color settings.
Advanced Photo
Advanced Photo
2880
PhotoEnhance
1
1
Good for printing scanned photos and
digitally captured images in high quality.
Helps prevent misprinting of ink dots that
may occur due to movement of the print
head and paper.
1
This mode lets you select image-correction
settings specially designed for scanned or
digitally captured photos.
Printing with Windows
1
27
Making Advanced setting
The Advanced setting gives you complete control over your
printing environment. Use these settings to experiment with new
printing ideas, or to fine-tune a range of print settings to meet
your individual needs. Once you are satisfied with your new
settings, you can give them a name and add them to the Custom
Settings pull-down menu.
To make Advanced settings, follow the steps below.
1. Select Custom from the Main menu, and then click
Advanced. The Advanced dialog box appears.
2. Make sure a media matching the media loaded in the printer
is selected. See “Media Type setting list” on page 22.
28
Printing with Windows
Note:
When printing on any media other than tracing paper, we
recommend Color or Color/B&W even if the data to print is black.
4. Select a Print Quality setting.
5. If you are using non-Epson special media, click the Paper
Config button, and then make settings as needed. For details,
see “Paper Configuration” on page 30.
6. Make the Printer Color Management settings. For details, see
“Printer Color Management” on page 33.
Note:
Some settings are enabled or disabled depending on the Media Type,
Color, and Print Quality settings you have made.
1
English
3. Make the Color setting. Select Color or Color/B&W to print
color or monochrome photos, or Black to print a draft or black
text only. If you want to print advanced monochrome photos,
select Advanced B&W Photo.
1
1
1
1
1
1
7. Make other settings as needed. For details, see the online help.
8. Click OK to apply your settings and then return to the Main
menu. If you want to return to the previous screen without
applying your settings, click Cancel.
1
1
1
1
1
Printing with Windows
29
Paper Configuration
The following settings in the Paper Configuration dialog box let
you make the detailed paper settings.
Mode
Description
Color Density
Adjusts the strength of Color Density. Use a value in the
range of -50% to +50%. Drag the slider to the right (+) to
deepen the color of your printout or left (-) to lighten its
color. You can also type a number (-50 to +50) in the box
next to the slider.
Use this function when you print on paper other than
Epson special media.
Set the slider to the 0 position when you print on Epson
special media.
Note:
Deepening of the color of printout may not be possible,
depending on the printing mode.
30
Printing with Windows
Description
Drying Time
per Print
Head Pass
Adds a waiting time when the print head reaches the end
of every pass.
Set this value using the slider or text box. To improve the
print quality by using slow ink absorption on the media,
set a higher value.
The drying time per print head pass can be set from 0 to
5 seconds, in 0.1 second increments.
Note:
If you use this feature, the printing time will be longer.
Paper Feed
Adjustment
Controls the paper feeding value, in 0.01% increments. If
the paper feeding value is too large, white horizontal
micro banding may appear. If the paper feeding value
is too small, dark horizontal micro banding may appear.
Paper Suction
Decreasing the air suction at the platen can avoid
wrinkling or waving of thin or saturated media, or
eliminating vertical banding. The relationship of the
parameter and the suction power is indicated as follows:
Standard : 100%
-1: 50%
-2: 30%
-3: 10%
-4:
6%
1
English
Mode
1
1
1
1
1
1
Paper
Thickness
This value automatically appears according to the Media
Type setting. If you use non-Epson media, modify this
value for your media. Refer to the paper specifications,
or print "Thickness Pattern" to find out the paper thickness.
Cut Method
Determines the best cutting method according to the
paper thickness.
Standard:
Normal speed and normal cut pressure
Thin Paper:
Low cut pressure
Thick Paper, Fast: High speed and high cut pressure
Thick Paper, Slow:Low speed and high cut pressure
1
1
1
1
1
Printing with Windows
31
Mode
Description
Platen Gap
Platen Gap is the height from the media loaded in the
printer to the print head. By adjusting this parameter, you
may produce better print quality. This is set automatically
according to the Paper Thickness setting specified.
Note:
Setting Platen Gap to Narrow may produce better print
quality, but make sure the media does not wrinkle or
touch the print head; otherwise, printed data or the print
head surface may be damaged. Use Wider or Wide in
such case.
Eject Roller
Type
Select the Eject Roller Type that best fits your media.
Auto:
The printer selects the most appropriate setting
automatically. When you use Epson special media,
usually select this setting.
Starwheel-Sheet:
If you want to print on cut-sheet paper that is non-Epson
special media, select this setting.
Starwheel-Roll Curled:
If you want to print on strongly curled roll paper that is
non-Epson special media, select this setting.
No Roller-Roll Normal:
If you want to print on roll paper that is non-Epson special
media, select this setting.
32
Printing with Windows
Printer Color Management
This setting provides the color matching and image-enhancement
methods. When you select this setting, additional settings appear
under the Printer Color Management box where you can select a
Mode setting and adjust the color enhancement sliders. For details
on the additional settings, see the online help.
English
1
Color Controls
1
1
1
1
1
1
1
1
1
1
1
Printing with Windows
33
When Advanced B&W Photo is selected as the Color setting,
the following screen appears. You can then adjust the advanced
monochrome settings. For details on the additional settings, see
the online help.
34
Printing with Windows
PhotoEnhance
1
English
This setting provides a variety of image-correction settings that
you can apply to your photo images before printing.
PhotoEnhance does not affect your original data. When you select
this setting, you will need to make the Tone and Digital Camera
Correction settings.
1
1
1
1
1
1
1
1
Note:
❏ This mode is available only with 16-, 24-, or 32-bit color data.
❏ Printing with PhotoEnhance selected may increase the time required
in printing, depending on your computer system and the amount of
the data contained in your data.
1
1
1
Printing with Windows
35
❏ The Tone setting appears for EPSON Stylus Pro 4400 only.
Tone
Auto Correct
Provides standard image correction for
most photos. Try this first.
Sepia
Applies a sepia tone to your photos.
Neutral Gray
Applies a black and white tone to your
print data.
Warm Gray
Applies a warmer black and white tone
to your print data than Neutral Gray.
Cool Gray
Applies a cooler black and white tone
to your print data than Neutral Gray.
Digital Camera Correction
If you are printing photos taken with a
digital camera, select this check box to
give your printed photos a smooth and
natural appearance like that of photos
taken with a film camera.
Select the Smooth Skin check box to
adjust the image to make its skin color
smooth.
36
Printing with Windows
Off (No Color Adjustment)
1
English
This setting turns off the printer driver color management, which
is useful when you use the color management function of the
application to apply an ICC profile.
1
1
1
1
1
1
1
1
1
1
1
Printing with Windows
37
ICM
This setting uses the Windows color matching method to
automatically adjust printout colors to match colors on your
screen. Select this setting when printing scanned photographs or
computer graphics.
Note:
❏ Be aware that the ambient light and the age, quality, and settings of
the monitor can affect the quality of your color matching.
❏ The following settings are available for Windows XP/2000 only.
38
ICM Mode
Select the ICM mode from Host ICM, Driver ICM (Basic),
or Driver ICM (Advanced).
Image,
Graphics, and
Text check
boxes
These check boxes are available only when Driver ICM
(Advanced) is selected as the ICM Mode.
Select the check box you want to set.
Printing with Windows
Select an input profile.
This setting is not available when Host ICM is selected
as the ICM Mode setting.
Intent
Select the rendering intent or color mapping
preference.
1
Saturation:
This setting is the best option for presentation graphics
to accurately reproduce vivid colors. Use of this setting
is not recommended when printing photo data.
Perceptual:
This setting renders an image’s color to appear
naturally, and is often used to render the wide color
range of the original image. Use of this setting is
recommended when printing photo data.
Absolute Colorimetric:
This setting renders an image by maintaining an
absolute color range so that there is a 1-to-1 ratio of
absolute lab coordinates. This setting is not
recommended when printing photo data and normal
conversions.
Select a printer profile.
Printer Profile
Description
Shows the description of the selected printer profile.
Show all profiles
Shows all profiles in the Input Profile and the Printer
Profile pull-down menu.
1
1
Relative Colorimetric:
This setting renders an image by maintaining a relative
color range, and is often used when most of the color
range before conversion is found in the image after
conversion. Use of this setting is recommended when
printing photo data.
Printer Profile
1
English
Input Profile
1
1
1
1
1
This setting is not available when Host ICM is selected
as the ICM Mode setting.
1
1
1
Printing with Windows
39
Saving the Advanced settings
To save your Advanced settings, follow the steps below.
1. Click Save Settings. The Custom Settings dialog box appears.
2. Type a unique name, up to 31 characters, for your settings in
the Name text box.
3. Click Save. Your setting will be added to the Custom Setting
List.
You can save up to 100 custom settings (including the imported
settings). You can select your saved settings from the Custom
Settings pull-down menu in the Mode box on the Main menu.
When you select your saved settings in the Custom Settings list,
be aware that making new settings, for example Media Type and
Color settings, may change your custom settings. This may cause
unexpected results in your printouts. If this happens, reselect
your saved settings and try printing again.
Note:
The names of the ready-made settings provided by Epson cannot be
applied to your new settings.
40
Printing with Windows
Deleting the Advanced settings
Note:
You cannot delete ready-made settings from the Custom Settings list.
1. Click Save Settings. The Custom Settings dialog box appears.
English
1
To delete your Advanced setting, follow the steps below.
1
2. Select the name of settings you want to delete.
1
3. Click Delete. The setting will be deleted from the Custom
Settings list.
1
1
Exporting and importing the Advanced settings
You can export the custom settings you saved, or import from a
custom setting file created in another environment.
1
Exporting the Advanced settings
1
To export your custom settings, use the following steps.
1. Click Save Settings. The Custom Settings dialog box appears.
2. Select the custom settings you want to export.
1
1
1
1
1
Printing with Windows
41
3. Click Export.
4. Select the location where you want to save the file, and then
enter the file name.
5. Click Save.
6. When the message “Processing complete.” appears, click OK.
Importing the Advanced settings
To import custom settings, use the following steps.
1. Click Save Settings. The Custom Settings dialog box appears.
2. Click Import.
3. Select the folder where the file for importing settings is
located, and then select the file.
4. Click Open.
5. When the message “Processing complete.” appears, click OK.
Note:
The custom setting that includes ICM options cannot be transferred
between Windows XP/2000 and Windows Me/98.
42
Printing with Windows
Checking the Ink Levels
English
1
You can check the amount of the remaining ink of each ink
cartridge.
1
1
1
1
1
1
1
Note:
If EPSON Stylus Pro 4800 is not connected properly or EPSON Status
Monitor 3 is not installed, Cartridge Option appears instead.
The Cartridge Option is not displayed for EPSON Stylus Pro 4400.
1
1
1
1
Printing with Windows
43
Previewing your printout
If you select the Print Preview check box, you can see how your
printout will look before printing. When you send a print job to
the printer, the EPSON Print Preview window appears, allowing
you to make changes before printing.
The EPSON Preview toolbar contains several buttons that you can
use to perform the following functions.
44
Zoom
Click this button to enlarge or reduce the
size of the previewed image.
Fit-to-screen
Click this button to scale the previewed
image so that it fits the current window
size. This is convenient when you want to
see the entire image at one time.
Maximum zoom
Click this button to display the previewed
image at the maximum possible zoom
ratio.
Printing with Windows
Click this button to display a rectangle
indicating the printable area on the
previewed image. The printer cannot
print anything which is outside of this
rectangle. Click this button again to turn
this feature off.
Previous page
Click this button to display the previous
page. If there is no previous page, this
button is not available.
Next page
Click this button to display the next page.
If there is no next page, this button is not
available.
You can also manipulate the previewed data in the following
ways.
1
English
Printable area
on/off
1
1
1
1
❏ Select and preview individual pages.
1
❏ Reduce or enlarge the size of preview.
❏ Select and print any or all pages.
❏ Magnify the previewed document: Click View and then select
Magnify to open the Magnify window, which magnifies the
area of the previewed document outlined by the red box. By
dragging the red box, you can change the part of the
document to magnify.
❏ Specify which pages in the document you want to print: Click
Print Option, and then select Remove Page or Add Page.
After you previewing the data, click Print to print the data, or click
Cancel to cancel printing.
1
1
1
1
1
1
Printing with Windows
45
Using the Print Assistant function
You can access the following information by clicking the Print
Assistant button:
❏ Reference Guide (Troubleshooting page)
❏ Paper information that is most suitable for printing
❏ Technical Support Web Site
46
Printing with Windows
Making Settings on the Paper Menu
You can make Paper Source, Borderless, Auto Cut, Paper Size
(Page Size), Copies, Orientation, and Printable Area or Roll Paper
Option settings on this menu.
English
1
1
1
1
1
1
1
1
Note:
❏ When Paper Tray or Manual Feed is selected as the Paper
Source setting, Printable Area appears on the menu by default.
When Roll Paper or Roll Paper (Banner) is selected as the Paper
Source setting, Roll Paper Option appears on the menu.
❏ Most Windows applications feature paper size and page layout
settings that override similar settings in the printer driver.
However, if your application does not have these features, verify the
settings on the printer driver’s Paper menu.
Printing with Windows
47
1
1
1
1
Making the Paper Source setting
You can select Paper Tray, Roll Paper, Roll Paper (Banner), or
Manual Feed from the Paper Source setting. Select one that
matches the paper loaded in the printer.
Making the Borderless setting
You can print your data without margins on paper.
For this printing mode, Epson recommends the following media
conditions.
Accommodate media width:
❏
❏
❏
❏
❏
❏
❏
❏
❏
❏
❏
❏
❏
❏
❏
8 inch, 203.2 mm
210 mm (A4)
Letter (8.5 in), 215.9 mm
10 inch, 254 mm
257 mm
297 mm (A3)
300 mm
12 inch, 304.8 mm
329 mm (Super A3/B)
13 inch, 330.2 mm
14 inch, 355.6 mm
400 mm
16 inch, 406.4 mm
420 mm (A2)
17 inch, 431.8 mm
Note:
❏ You cannot perform borderless printing on cut-sheet media with a
width of 420 mm (A2).
❏ When printing on roll paper with a width of 8 inches or 420 mm
(A2), attach a spacer to the spindle. See “Attaching the spacer to the
spindle” on page 267.
48
Printing with Windows
❏ When printing on cut-sheet media, only the left and right margins
are set to zero.
❏ The ink may contaminate the platen of the printer. In this case, wipe
the ink away using a cloth.
❏ Printing with this feature takes longer time than normal printing.
❏ Only Plain Paper and Plain Paper (line drawing) can set the bottom
margin to 3 mm. When printing on the other media, the bottom
margin is always 14 mm.
❏ When Premium Glossy Photo Paper (250) roll paper or Premium
Semigloss Photo Paper (250) roll paper is used in printing, the top
margin is always 20 mm.
❏ Smear may result in the top and bottom areas depending on the
media.
1
English
❏ If your application has margin settings, make sure they are set to
zero before printing.
1
1
1
1
1
1
To print your data with this feature, follow the steps below.
1
1
1
1
1
Printing with Windows
49
1. Select Borderless.
2. Click the Expansion button. The Expansion dialog box
appears.
50
Printing with Windows
3. Choose Auto Expand or Retain Size, and the amount of
enlargement.
Retain Size
Select this setting if you want to enlarge the size of
print data automatically and print with no margins.
You can choose the amount of enlargement by
moving the slider.
1
Note:
Enlarged areas that exceed the paper size will not
be printed on the paper.
1
Select this setting if you do not want to change the
ratio of your print data.
If you select this setting, you need to enlarge your
image data to exceed the paper width, to avoid
unprinted areas appearing along the left and right
edges. Enlarging 3 mm in both the left and right
directions is recommended, using the application
that created the data.
1
1
1
To use this feature, see “Making the Paper Size
setting” on page 55.
Amount of
Enlargement
English
Auto Expand
1
When you select Auto Expand, the slider becomes
available. Using the slider, you can control the
amount of the image that extends beyond the
edges of the paper during borderless printing.
For most print jobs, Standard is recommended in
order to eliminate margins on all sides of the paper.
In a very humid environment, the width of paper
may expand due to moisture absorption. In this
case, move the slider to Max to eliminate margins
around the image. If Max is selected, the center of
the image may move about 1 mm to the right.
Moving the slider towards Min decreases the
amount of the image enlargement; however, as this
amount decreases, margins may appear on one or
more sides of the paper.
4. Make the Auto Cut setting. For details, see “Making the Auto
Cut setting” on page 52.
1
1
1
1
1
1
5. Click OK.
6. Start printing your data from your application.
Printing with Windows
51
Making the Auto Cut setting
This setting is available only when Roll Paper or Roll Paper
(Banner) is selected as the Paper Source setting. You can select
how the paper is cut after printing.
Single Cut
Select this setting if you want to save paper. If you select this
setting, the boundary of a picture or the boundary of a page is cut.
However, the cut position may shift slightly.
Note:
❏ When printing on Premium Glossy Photo Paper (250) roll paper or
Premium Semigloss Photo Paper (250) roll paper, do not select this
setting; otherwise, the print quality may decline.
❏ This setting appears only when the Borderless check box is selected.
52
Printing with Windows
Double Cut
English
1
Select this setting to avoid the slight gap that occurs with the
Single Cut setting. A margin is created between pictures, and
1 mm along the inside of each picture is cut.
Note:
This setting appears only when the Borderless check box is selected.
1
1
1
1
1
1
Normal Cut
Select this setting to keep margins at the top and bottom of the
printed data.
1
1
1
1
1
Printing with Windows
53
Off
Select this setting to cut printouts manually. To cut printouts
manually, follow the steps below.
1. Press the Paper Feed or Paper Feed button, and then
match the cutting position with the scissors mark on the left
side of the print head.
2. Press the Paper Source
.
button to select Roll Auto Cut On
3. Press and hold the Paper Source button for 3 seconds. The
paper cutter cuts the printout at the cutting position.
54
Printing with Windows
You can select a paper size that you want to use. Select the proper
paper size from the Paper Size list.
1
English
Making the Paper Size setting
You can also add a custom paper size, using the steps below.
1
1. Select User Defined from the Paper Size list. The User Defined
Paper Size dialog box appears.
1
1
1
1
1
2. Enter Paper Size Name, Paper Width and Paper Height,
and then select Unit.
Note:
If you are using Windows Me or 98, the maximum paper height is
44 inches (111.76 cm).
1
1
1
3. Click OK to save the custom paper size.
1
1
Printing with Windows
55
Making the Copies setting
You can specify the number of copies to print. Enter a number in
the Copies box, or click the arrow next to the box. You can enter
any number from 1 to 9999. When printing multiple copies of your
document, select Collate to print one complete document set at
a time. Select Reverse Order to print your documents in reverse
order, starting with the last page.
56
Printing with Windows
Making the Orientation settings
English
1
You can specify the direction of printing on the page.
1
1
1
1
1
1
1
Portrait
Print direction is short edge first, like most magazines.
Landscape
Print direction is long edge first, like many
spreadsheets.
Rotated by 180°
Prints your document upside down.
1
1
Note:
This function is not available when Roll Paper (Banner)
is selected as the Paper Source setting.
1
1
Printing with Windows
57
Making the Printable Area setting
This setting is available when you select Paper Tray or Manual
Feed as the Paper Source setting. You can make the following
settings.
Standard
Select this setting to use the standard printable area.
Note:
This setting is available only when Plain Paper, Plain Paper (line
drawing), or Tracing Paper is selected as the Media Type setting.
58
Printing with Windows
Maximum
1
Note:
❏ This setting is available only when Plain Paper, Plain Paper (line
drawing), or Tracing Paper is selected as the Media Type setting.
1
❏ The print quality may decline at the edges of printouts when this
setting is selected. Before printing large jobs using this setting, print
a single sheet to check the quality. When this setting is selected, make
sure that paper loaded in the paper tray is not curled.
1
Centered
English
Select this setting to increase the printable area at the bottom edge.
1
1
Select this setting to center printouts.
1
1
1
1
1
1
1
Printing with Windows
59
Making the Roll Paper Option settings
This option is available when you select Roll Paper or Roll Paper
(Banner) as the Paper Source setting. You can make the following
settings.
60
Printing with Windows
Auto Rotate
This function is effective only when the print data length is shorter
than the printable width of the roll paper. The print data will
automatically be turned 90 degrees to print crosswise, saving roll
paper.
1
English
Note:
This function is available only when Roll Paper is selected as the Paper
Source setting.
1
1
1
1
Original
Auto Rotate off
1
Auto Rotate on
1
To enable this function, follow the steps below.
1. Select Auto Rotate. The Roll Width button is activated.
1
2. Click Roll Width. The Roll Paper Width dialog box appears.
1
1
1
3. Select the installed roll paper size from the pull-down menu.
1
4. Click OK.
Printing with Windows
61
Print Page Line
This function lets you specify whether to print a page line on the
right side, and also below the document for manual cutting. To
enable this function, select Print Page Line.
The Print Page Line operation changes according to the Auto Cut
setting. Check these settings as necessary by referring to the
printer’s operation.
Auto Cut
Print Page Line
Printer’s Operation
Single Cut
Double Cut
Normal Cut
Selected
Prints page line on the right side
only, and cuts paper
automatically after the print job.
Single Cut
Double Cut
Normal Cut
Not selected
Does not print page line, but cuts
paper automatically after the
print job.
Off
Selected
Prints page lines on the right side
and below the document, but
does not cut paper
automatically after the print job.
Off
Not selected
Does not print page lines or cut
paper.
Save Roll Paper
Note:
This function is available only when Roll Paper (Banner) is selected
as the Paper Source setting.
This function is effective if you wish to save roll paper, because
the blank portion of the last page of your printed data is not fed
through the printer.
To enable this function, select Save Roll Paper.
62
Printing with Windows
Making Settings on the Layout Menu
You can make the Reduce/Enlarge, Double-Sided Printing, and
Multi-Page settings on this menu.
Note:
❏ The functions on the Layout menu are not available when Roll
Paper (Banner) is selected as the Paper Source setting.
English
1
1
1
❏ According to the paper source you choose, some of the functions are
not available.
1
1
1
1
1
1
1
1
1
Printing with Windows
63
Making the Reduce/Enlarge setting
You can fit the size of your data to the size of paper you to print
on. To enable this function, select Reduce/Enlarge. When this
function is enabled, you can make the following settings.
64
Fit to Page
Proportionally enlarges or reduces the size of your
data to make it fit the paper size you have selected
in the Output Paper Size.
Custom
Lets you define the percentage you want to enlarge
or reduce a data. Click the arrows next to the Scale
box to select a proportion from 10 to 400%.
Printing with Windows
You can perform double-sided printing. There are two types of
double-sided printing available. Standard double-sided printing
allows you to print the odd-numbered pages first. Once these
pages are printed, the paper can be reloaded for printing the
even-numbered pages onto the opposite side of the paper.
You can also perform Folded Booklet double-sided printing. It
lets you make single-fold booklets.
Note:
❏ The double-sided printing feature is not available when the printer
is accessed over a network or used as a shared printer, Status
Monitor 3 is not installed, or your system is not configured to
support bi-directional communication.
1
English
Making Double-sided Printing setting
1
1
1
1
❏ Only use media types that are suitable for double-sided printing;
otherwise, the print quality may deteriorate.
1
❏ Depending on the type of paper and the amount of ink used to print
text and images, ink may bleed through to the other side of the paper.
1
❏ The surface of the paper may be smeared during double-sided
printing.
1
❏ This function is available only when Paper Tray is selected as the
Paper Source setting.
1
1
1
1
Printing with Windows
65
Standard double-sided printing
To print odd and even numbered pages on the opposite sides of
a sheet, follow the steps below.
1. Select Double-Sided Printing.
2. Click Margins. The following dialog box appears.
66
Printing with Windows
4. Specify the width of the binding margin, using the Binding
Margin text box. You can specify any width from 3 to 30 mm.
Note:
The actual binding margin may vary depending on the settings
specified in your application. We recommend that you test the print
quality before printing the entire job.
5. Click OK to return to the Layout menu, and then click OK to
save your settings.
1
English
3. Specify the edge of the paper where binding will be placed.
You can choose Left, Top, or Right.
1
1
1
1
6. Make sure paper is loaded, and then send a print job from
your application. Instructions for generating the
even-numbered pages will be displayed while the
odd-numbered pages are output.
1
7. Follow the on-screen instructions and reload the paper.
Note:
❏ The paper may curl during printing due to the amount of ink
used. If this problem occurs, slightly curl the sheets in the
opposite direction prior to reloading them into the printer.
❏ Align the sheet stack by tapping its edges against a hard, flat
surface prior to reloading the stack into the printer.
1
1
1
❏ Follow the instructions provided when reloading the printouts.
Paper jams or improperly placed binding margins may occur if
the printouts are not reloaded correctly.
1
❏ In the event of a paper jam, see “Clearing paper jams” on page
347.
1
1
8. Once the paper is reloaded, click Resume to print the
even-numbered pages.
Printing with Windows
67
Folded Booklet double-sided printing
You can also make single-fold booklets using the double-sided
printing feature. When you create a single-fold booklet, the pages
that appear on the outside (after the booklet is folded) are printed
first. The pages that will appear inside the booklet can then be
printed after the paper is reloaded into the printer.
✽
2
1
3
4
5
6
7
8
10 12
9 11
Single-fold booklet
✽ Binding Edge
A booklet can be created by printing pages 1 and 4 on the first
sheet of paper, pages 5 and 8 on the second sheet of paper, and
pages 9 and 12 on the third sheet of paper. After these sheets are
reloaded into the sheet feeder, you can then print pages 2 and 3
on the back of the first sheet of paper, pages 6 and 7 on the back
of the second sheet of paper, and pages 10 and 11 on the back of
the third sheet of paper. The resulting pages can then be folded
and bound together into a booklet.
To create the booklet, follow the steps below.
68
Printing with Windows
1. Select Double-Sided Printing, and then select Folded
Booklet.
English
1
1
1
1
1
1
1
1
2. Click Margins. The Margins dialog box appears.
1
1
1
1
Printing with Windows
69
3. Specify the edge of the paper where binding will be placed.
You can choose Left, Top, or Right.
Note:
When Portrait is selected as the Orientation setting on the Paper
menu, Left or Right binding positions are available. The Top binding
position is supported when Landscape is selected as the
Orientation setting.
4. Specify the width of the binding margin, using the Binding
Margin text box. You can specify any width from 3 to 30 mm.
The specified margin width will be used on both sides of the
fold. For example, if a 10-mm margin is specified, a 20-mm
margin will be inserted. (A margin of 10 mm will be placed
on each side of the fold.)
✽
✽ ✽
✽ Folding Edge
✽✽ Margin
5. Click OK to return to the Layout menu, and then click OK to
save your settings.
6. Make sure paper is loaded, and then send a print job from
your application.
70
Printing with Windows
Note:
❏ The paper may curl during printing due to the amount of ink
used. If this problem occurs, slightly curl the sheets in the
opposite direction prior to reloading them into the printer.
❏ Align the sheet stack by tapping its edges against a hard, flat
surface prior to reloading the stack into the printer.
❏ Follow the instructions provided when reloading the printouts.
Paper jams or improperly placed binding margins may occur if
the printouts are not reloaded correctly.
8. Once the paper is reloaded, click Resume to print the inside
pages.
9. Once printing is complete, fold the sheets and bind them
together using a stapler or other binding method.
1
English
7. Instructions for printing the inside pages will be displayed
while the outside pages are output. Follow the on-screen
instructions to reload the paper.
1
1
1
1
1
1
1
1
1
1
1
Printing with Windows
71
Making Multi-Page settings
Selecting Multi-Page lets you choose between the N-up and
Poster settings.
Note:
This function is available only when Paper Tray is selected as the Paper
Source setting.
72
Printing with Windows
Making N-up settings
1
English
Select N-up as the Multi-Page setting to print two or four pages
of your document on one sheet of paper.
1
1
1
1
1
1
1
When N-up is selected, you can make the following settings.
2 Pages
4 Pages
Prints two or four pages of your data on a single
sheet of paper.
Page Order
Opens the Print Layout dialog box, where you
can specify the order in which the pages will be
printed. Some settings may be unavailable,
depending on the Orientation selection on the
Paper menu.
Print page frames
Prints frames around the pages printed on each
sheet.
1
1
1
1
Printing with Windows
73
Making Poster settings
A single page can be enlarged to cover 4, 9, or 16 printed sheets
of paper. Select Poster as the Multi-Page setting to print a
poster-size image.
74
Printing with Windows
1
English
Click Settings to adjust the way your poster will print. The Poster
Settings dialog box opens.
1
1
1
1
1
You can make the following settings.
1
Print Cutting
Guides
Check this box to turn the cutting guide options on.
Overlapping
Alignment Marks
Slightly overlaps the images and prints alignment
markers so that they can be aligned more precisely.
Trim Lines
Prints border lines on the images to guide you when
trimming the pages.
If you only want to print a few of the panels without printing the
entire poster, click the panels that you do not want to print, and
then click OK to close the Poster Settings dialog box.
1
1
1
1
1
Printing with Windows
75
Using the Printer Utilities
The EPSON printer utilities let you check the current printer
status and perform printer maintenance from your screen.
Note:
❏ The letter in parentheses after the utility name indicates the shortcut
key for that utility. Press ALT and the letter on the keyboard to open
that utility.
❏ Do not use the Nozzle Check, Head Cleaning, or Print Head
Alignment utilities if your printer is connected to your computer
through a network.
❏ Do not use the Nozzle Check, Head Cleaning, or Print Head
Alignment utilities while printing is in progress; otherwise, your
printout may be marred.
76
Printing with Windows
EPSON Status Monitor 3
Note:
This utility is available when your system is configured to support
bi-directional communication.
1
English
This utility provides you with printer status information, such as
the amount of ink remaining, the free space of the maintenance
tank, and it also checks for printer error.
1
1
Nozzle Check
This utility checks the print head nozzles for clogging. Check the
nozzles when you notice the print quality has declined and after
cleaning to confirm that the print head nozzles have been cleaned.
See “Checking the print head nozzles” on page 78.
If you click Auto in the Nozzle Check dialog box, or turn on AUTO
CLEANING from the control panel on the printer, this utility not
only checks the clogging nozzles, but also performs head cleaning
automatically.
1
1
1
1
Head Cleaning
This utility cleans the print head. You may need to clean the print
head if you notice the print quality has declined. Use this utility
to perform head cleaning. See “Cleaning the print head” on page
80.
Head Alignment
This utility can be used to improve the print quality of your
printed data. The alignment of the print head may need to be
adjusted if vertical lines appear out of alignment or if white or
black banding noise appear in your printed data. Use this utility
to realign the print head. See “Aligning the print head” on page
81.
Printing with Windows
77
1
1
1
1
1
Printer and Option Information
This function enables the printer driver to check the printer
configuration information. You can check or select the black ink
set on the printer. See “Using Printer and Option Information” on
page 81.
Note:
This function is supported by EPSON Stylus Pro 4800 only.
EPSON LFP Remote Panel
This utility lets you optimize your printer. See “Starting EPSON
LFP Remote Panel” on page 82.
Checking the print head nozzles
If you find that the printed data is unexpectedly faint or dots in
the printed data are missing, you may be able to identify the
problem by using the Nozzle Check utility.
To use the Nozzle Check utility, follow the steps below.
Note:
Do not start the Nozzle Check utility while printing is in progress;
otherwise, your printout may be marred.
1. Make sure paper is loaded in the printer.
2. Click Nozzle Check.
78
Printing with Windows
1
English
3. Click Print if you want to visually check if any print head
nozzles are clogged, if you are using non-Epson special
media, or if the width of paper you are using is less than
210 mm. Click Auto if you want to perform an automatic
nozzle check, and if the nozzle check indicates it is necessary.
1
1
1
1
1
Note:
If you turn on AUTO CLEANING from the control panel on the printer
even though Print has been selected, the Nozzle Check utility not
only checks for the clogged nozzles, but also performs head cleaning
automatically. If you are using non-Epson special media, or if the
width of paper you are using is less than 210 mm, turn off AUTO
CLEANING from the control panel on the printer.
4. Follow the on-screen instructions to print a nozzle check
pattern.
1
1
1
1
If you find missing dots, clean the print head nozzle. See
“Cleaning the print head” on page 80.
1
1
Printing with Windows
79
Cleaning the print head
If you find that the printed data is unexpectedly faint or dots in
the printed data are missing, you may be able to solve these
problems by using the Head Cleaning utility to clean the print
head, which ensures that the nozzles are delivering ink properly.
To use the Head Cleaning utility, follow the steps below.
Note:
❏ Do not start the Head Cleaning utility while printing is in progress;
otherwise, your printout may be marred.
❏ To save ink, use the Nozzle Check utility first to confirm that the
print head needs to be cleaned. This is because the cleaning process
consumes some ink.
❏ When one check ink out light is flashing or on, you cannot clean the
print head. Replace the appropriate ink cartridge first. See
“Replacing Ink Cartridges” on page 295.
1. Make sure the printer is turned on and all ink check lights are
off.
2. Click Head Cleaning.
3. Follow the on-screen instructions.
4. Click Print Nozzle Check Pattern in the Head Cleaning
dialog box to confirm that the head is clean and to reset the
cleaning cycle.
If you still find missing dots after cleaning, try the following
solutions.
❏ Select PWR CLEANING from the control panel on the printer. See
“PWR CLEANING” on page 245.
80
Printing with Windows
❏ Replace some of ink cartridges as they may be old or
damaged.
If the print quality remains a problem after you have tried these
solutions, contact your dealer. See “Contacting Customer
Support” on page 355.
1
English
❏ Repeat this procedure four or five times, turn the printer off
and leave it alone overnight, and then try head cleaning again.
1
1
1
Aligning the print head
If you find misaligned lines or black or white banding on the
printed data, you may be able to solve these problems by using
the Print Head Alignment utility to align the print head.
1
To use the Print Head Alignment utility, follow the steps below.
1
1. Make sure paper is loaded in the printer.
1
2. Click Head Alignment.
1
3. Follow the on-screen instructions.
1
Using Printer and Option Information
You can check or select the black ink set on the printer.
1
Note:
This function is supported by EPSON Stylus Pro 4800 only.
1
1. Make sure the printer is turned on.
1
Printing with Windows
81
2. Click Printer and Option Information. The following dialog
box appears.
The printer driver usually obtains the ink cartridge
information automatically, and prints in the appropriate print
mode. If this is not possible, a message appears in the Current
Setting box to prompt you to select an ink cartridge. In this
case, select the correct ink cartridge according to the actual
ink cartridge set on the printer.
3. Click OK.
Starting EPSON LFP Remote Panel
You can optimize your printer using this utility. To start EPSON
LFP Remote Panel, see the steps below.
1. Make sure the printer is turned on.
2. Click EPSON LFP Remote Panel.
3. Follow the on-screen instructions. See the EPSON LFP
Remote Panel online help for details.
82
Printing with Windows
You can make settings related to print speed and progress. To
make the Speed & Progress settings, click Speed & Progress on
the Utility menu. The Speed & Progress dialog box appears.
1
English
Making the Speed & Progress settings
1
1
1
1
1
1
Note:
The specific features available in the printer software vary depending on
the printer model and the version of Windows that you are using.
1
1
High Speed Copies
To print multiple copies of your data faster, select High Speed
Copies. This speeds up printing by using your hard disk space
as a cache when printing multiple copies of your data.
1
1
Show Progress Meter
To display the Progress Meter every time you print, select Show
Progress Meter. Then, you can monitor the progress of your print
job.
Printing with Windows
83
1
Always spool RAW datatype (For Windows XP and 2000
only)
To enable NT-based clients spool documents to use the RAW
format instead of the EMF (metafile) format, select the Always
Spool Raw datatype check box (Windows NT-based
applications use the EMF format by default).
Try using this option if documents spooled in the EMF format do
not print correctly.
Depending on the data to print, spooling RAW datatype requires
fewer resources than EMF, so some problems (“Insufficient
Memory/Disk Space to Print”, “Slow print speed”, etc) can be
solved by selecting this option.
Note:
When you spool RAW datatype, the print progress as displayed by the
Progress Meter may differ from the actual printing progress.
Page Rendering Mode (For Windows XP and 2000 only)
Use this function when the print speed is extremely slow or when
the print head stops for a few minutes while printing. When this
check box is selected, the print speed may improve by rendering
as page.
However, the following problems may occur.
❏ Print progress displayed in the Progress Meter window may
differ from the actual print progress.
❏ Printing may take a longer time to start.
Monitoring Preferences
This function lets you specify the monitoring feature of EPSON
Status Monitor 3.
To make settings for EPSON Status Monitor 3, follow the steps
below.
84
Printing with Windows
1
English
1. Click Monitoring Preference. The Monitoring Preference
dialog box appears.
1
1
1
1
1
1
2. Make the following settings.
Select Notification
Select Shortcut Icon
Allow Monitoring of
shared printers
Displays the current error item notification
settings. Select the appropriate check boxes
to specify the error types for which you wish
to receive notification.
Select the Shortcut Icon check box to display
a shortcut icon in your Windows taskbar.
Clicking the shortcut icon in the taskbar will
open EPSON Status Monitor 3. Click the icon
you prefer as shortcut icon, and you can
confirm the icon at the right.
Allows monitoring of a shared printer by other
computers.
1
1
1
1
1
3. Click OK.
Printing with Windows
85
Getting Information Through Online Help
Your printer software has extensive online help, which provides
instructions on printing, making printer driver settings, and using
printer utilities.
To access help from your application, follow the steps below.
1. Click Print or Page Setup on the File menu.
2. Click Printer, Setup, Options, or Properties. Depending on
your application, you may need to click a combination of
these buttons. You can also access the printer software.
3. You can view a detailed explanation using the following
ways.
❏ Click the (?) button on the top right of the printer driver
window, and then click the item.
❏ Right-click the item, and then click the What's this?
button.
❏ Click Help on the Main, Paper, Layout, or Utility menu
for help related to the item on that menu.
86
Printing with Windows
1
Using the Progress Meter
1
English
Checking Printer Status and Managing Print
Jobs
1
When you send a print job to the printer, the Progress Meter
window opens.
1
1
1
1
1
The Progress Meter indicates the progress of the current print job
and provides printer status information when bi-directional
communication between the printer and your computer is
established. This meter also displays helpful tips for better
printing and error messages.
1
Note:
The Progress Meter window does not appear when the Show Progress
Meter check box is turned off in the Speed & Progress dialog box. See
“Making the Speed & Progress settings” on page 83 for more
information.
1
Printing with Windows
87
1
1
EPSON Printing Tips
Tips on getting the most out of your Epson printer driver appear
at the bottom of the Progress Meter window. A new tip appears
every 30 seconds. For more details on a displayed tip, click
Details.
88
Printing with Windows
Error messages
When the ink runs low or out, or when the maintenance tank
becomes full, the How to button appears in the Progress Meter
window. Click How to, and EPSON Status Monitor will lead you
step by step through a procedure to replace the cartridge or the
maintenance tank.
1
English
If a problem occurs during printing, an error message appears in
the text box at the top of the Progress Meter window. Check the
message and solve the problem accordingly.
1
1
1
1
1
1
1
1
1
1
1
Printing with Windows
89
Using the EPSON Spool Manager
Note:
EPSON Spool Manager is not available for Windows XP and 2000.
EPSON Spool Manager is similar to Windows Print Manager. If
it receives two or more print jobs at one time, it puts them on a
print queue in the order received. When a print job reaches the
top of the print queue, the EPSON Spool Manager sends the job
to the printer.
From the Spool Manager, you can view print status information
on the print jobs that have been sent to your printer. You can also
cancel, pause, and resume the selected print jobs.
To open EPSON Spool Manager, follow the steps below.
1. Send a print job to your printer. A short cut icon of your
printer appears on the taskbar.
2. Click the EPSON Stylus Pro 4400 or EPSON Stylus Pro 4800
icon. The EPSON Spool Manager dialog box appears.
3. If you want to cancel printing, select a print job and then click
Cancel. If you want to pause or resume printing, select a
print job and then click Pause/Resume.
90
Printing with Windows
Using EPSON Status Monitor 3
English
1
EPSON Status Monitor 3 displays detailed information on the
printer status.
1
1
1
1
1
Accessing EPSON Status Monitor 3 from the shortcut icon
To access EPSON Status Monitor 3 from the shortcut icon,
double-click the printer-shaped shortcut icon on the Windows
taskbar.
Note:
To add a shortcut icon to the taskbar, see “Monitoring Preferences” on
page 84.
Accessing EPSON Status Monitor 3 from the printer driver
To access EPSON Status Monitor 3 from the printer driver, follow
the steps below.
1. Access the printer driver. See “Accessing the Printer
Software” on page 13.
1
1
1
1
1
2. Click the Utility tab to open the Utility menu.
3. Click EPSON Status Monitor 3.
Printing with Windows
1
91
Viewing information in EPSON Status Monitor 3
EPSON Status Monitor 3 provides the following information.
Current Status
EPSON Status Monitor 3 provides you with detailed printer
status information, a graphic display, and status messages. If the
ink runs low or out, or the maintenance tank becomes full, the
How to button appears in the EPSON Status Monitor 3 window.
Click How to to display instructions on how to replace the
cartridge or the maintenance tank.
Information
EPSON Status Monitor 3 provides a graphic display of the
remaining amount of ink and the free space of the maintenance
tank.
92
Printing with Windows
1
General tips
1
English
Increasing the Print Speed
Printing color data using higher print quality settings takes longer
than printing black-and-white data using standard print quality,
as the volume of high quality color data is much greater. For this
reason, it is important to be selective in your use of color and print
quality settings if you also require a faster print speed.
However, even if your data requires the highest print quality and
extensive use of color, it may still be possible to optimize the print
speed by adjusting other printing conditions.
The following table shows the factors that inversely affect print
speed and print quality.
Print quality
Higher
Lower
Print speed
Slower
Faster
Print Quality
SuperFine 1440dpi
Normal 360dpi
High Speed
Off
On
Image Size
Large
Small
Resolution
High
Low
Advanced
menu settings
Data
characteristics
Advanced
menu settings
Data
characteristics
1
1
1
1
Faster
Slower
Color
Black
Color or
Color/B&W Photo
Flip
Horizontal
Off
On
Variety of
colors
Grayscale
Full color
Printing with Windows
1
1
The following table shows the factors related to print speed only.
Print speed
1
1
1
1
93
Print speed
Hardware
resources
Software status
Faster
Slower
System
speed
Fast
Slow
HDD free
space
Large
Small
Memory free
space
Large
Small
Running
applications
One
Many
Virtual
memory
Not in use
In use
Using Speed & Progress
You can make certain print speed settings in the Speed & Progress
dialog box. To access this dialog box, click Speed & Progress on
the Utility menu. For details, see “Making the Speed & Progress
settings” on page 83.
Sharing Your Printer
This section describes how to share your printer so that other
computers on a network can use it.
The computer on a network can share the printer that is directly
connected to one of them. The computer that is directly connected
to the printer is the printer server, and the other computers are
the clients which need permission to share the printer with the
printer server. The clients share the printer via the printer server.
Note:
To connect your printer directly to a network without setting it up as a
shared printer, consult your network administrator.
94
Printing with Windows
For Windows XP
Setting up your printer as a shared printer
English
1
To share a printer that is connected directly to your computer with
others on a network, follow the steps below.
1
1. Click Start, and then click Printers and Faxes.
1
2. Right-click your printer icon, and click Sharing. If the
following menu appears, click Network Setup Wizard or If
you understand the security risks but want to share
printers without running the wizard, click here, and follow
the on-screen instruction.
1
1
1
1
1
1
1
1
1
Printing with Windows
95
3. Select Share this printer, and type the name in the Share name
box.
4. Click OK.
Note:
Do not choose any drivers from the Additional Drivers list.
Accessing the shared printer
To access the shared printer from another computer on a network,
follow the steps below.
Note:
Your printer must be set up as a shared resource on the computer to
which it is directly connected before you can access it from another
computer.
1. Install the printer driver to the client computer from the
software CD-ROM.
2. Click Start, and then click Printers and Faxes. Right-click
your printer's icon, and open the Properties for your printer.
96
Printing with Windows
3. Click the Ports tab, and click Add Port.
English
1
1
1
1
1
1
4. Select Local Port, then click New Port.
1
1
1
5. In the text box, type the following information:
\\name of computer that is connected to the printer\name of
the shared printer
1
1
Then click OK.
1
Printing with Windows
97
6. Close the Printer Ports dialog box to return to the Ports menu.
7. On the Ports menu, make sure that the new port is added and
the check box is selected. Click OK to close the Properties.
98
Printing with Windows
For Windows Me and 98
Setting up your printer as a shared printer
English
1
To share a printer connected directly to your computer with other
computers on a network, follow the steps below.
1
1. Click Start, point to Settings, and then click Control Panel.
1
2. Double-click Network.
1
3. Click File and Print Sharing.
1
1
1
1
1
4. Click the I want to be able to allow others to print to my
printer(s), and click OK.
1
1
1
Printing with Windows
99
5. In the Network window, click OK.
6. In the Control Panel, double-click Printers.
Note:
❏ If a dialog box requesting the Windows Me or 98 CD-ROM
appears, insert the CD-ROM in the CD-ROM drive, then
follow the on-screen instructions.
❏ If a dialog box appears requesting you to restart your computer,
do so. Then open the Printers folder, and continue from step 7.
7. Select your printer, and choose Sharing on the File menu.
8. Select Shared As, enter the printer information as needed,
and click OK.
100
Printing with Windows
Accessing the shared printer
Note:
Your printer must be setup as a shared resource on the computer to which
it is directly connected before you can access it from another computer.
1. On the computer you want to access the printer from, click
Start, point to Settings, and then click Printers.
2. Double-click Add Printer. The Add Printer Wizard screen
appears.
1
English
To access the shared printer from another computer on a network,
follow the steps below.
1
1
1
1
1
1
1
1
3. Click Next.
1
1
1
Printing with Windows
101
4. Click Network printer, then click Next.
5. Click Browse.
102
Printing with Windows
6. Double-click the icon of the computer that is directly
connected to the printer. Then click the printer’s icon.
English
1
1
1
1
1
1
7. Click OK and follow the on-screen instructions.
1
1
1
1
1
1
Printing with Windows
103
For Windows 2000
Setting up your printer as a shared printer
To share a printer that is connected directly to your computer with
others on a network, follow the steps below.
1. Click Start, point to Settings, and then click Printers.
2. Select your printer, then click Sharing on the File menu.
3. Select Shared as, and enter the name in the Share Name text
box.
4. Click OK.
Note:
Do not choose any drivers from the Additional Drivers list.
104
Printing with Windows
Accessing the shared printer
Note:
Your printer must be set up as a shared resource on the computer to
which it is directly connected before you can access it from another
computer.
1. Install the printer driver to the client computer from the
software CD-ROM.
1
English
To access the shared printer from another computer on a network,
follow the steps below.
1
1
1
2. Open the Printer folder from the Control Panel, right-click
your printer’s icon, and open the Properties for your printer.
1
3. Click the Ports tab, and click Add Port.
1
1
1
1
1
1
1
Printing with Windows
105
4. Select Local Port, and click New Port.
5. In the text box, type the following information:
\\name of computer that is connected to the printer\name of
the shared printer
Then click OK.
6. When you enter the information, the Cancel button on the
Printer Ports dialog box changes to the Close button. Click
Close to return to the Ports menu.
106
Printing with Windows
1
English
7. On the Ports menu, make sure that the new port is added and
the check box is selected. Click OK to close the printer driver.
1
1
1
1
1
1
1
1
1
1
1
Printing with Windows
107
Updating and Uninstalling the Printer Software
This section describes how to upgrade your Windows operating
system, update the printer software in Windows XP, Me, or 2000,
and uninstall the printer driver from your computer.
Updating the driver in Windows XP and 2000
When you update the printer driver in Windows XP and
Windows 2000, you must uninstall the previous printer driver
before you install the new driver. Installing over the existing
printer driver results in a failure to update. To uninstall the printer
driver, see “Uninstalling the printer driver” on page 108.
Updating to Windows Me
If you have upgraded your computer’s operating system from
Windows 98 to Windows Me, you must uninstall your printer
software, and install it again. To uninstall the printer driver, see
“Uninstalling the printer driver” on page 108.
Uninstalling the printer driver
To uninstall the printer driver, follow the steps below.
Windows XP
1. Click Start, click Control Panel, and then click Add or
Remove Programs.
2. Select EPSON Printer Software to uninstall the printer driver
from the software list.
3. Click the Change/Remove button.
108
Printing with Windows
5. Follow the on-screen instructions to complete uninstallation.
1
English
4. Select the EPSON Stylus Pro 4400 or EPSON Stylus Pro 4800
icon.
1
Windows Me, 98, and 2000
1. Click Start, point to Settings, and then select Control Panel.
2. Double-click the Add/Remove Programs icon.
3. Select EPSON Printer Software to uninstall the printer driver
from the software list.
4. Click the Add/Remove button (for Windows Me and 98
users) or the Change/Remove button (for Windows 2000
users).
5. Select the EPSON Stylus Pro 4400 or EPSON Stylus Pro 4800
icon.
6. Follow the on-screen instructions to complete uninstallation.
Note:
If you are using the USB port to connect the printer in Windows Me or
98, you need to uninstall an additional USB components. See
“Uninstalling the USB Host Device Driver” on page 110.
1
1
1
1
1
1
1
1
1
1
Printing with Windows
109
Uninstalling the USB Host Device Driver
To uninstall the USB Host Device Driver, follow the steps below.
Note:
❏ This function is for Windows Me and 98 only.
❏ This function activates only when you are using a USB conversion
cable.
1. Click Start, point to Settings, and then select Control Panel.
2. Double-click the Add/Remove Programs icon.
3. Select EPSON USB Printer Devices.
4. Click the Add/Remove button
Note:
If EPSON USB Printer Devices does not appear in the Add/Remove
Program list, double-click EPUSBUN.EXE on the printer software
CD-ROM.
5. Follow the on-screen instructions.
110
Printing with Windows
Chapter 2
English
2
Printing with Mac OS 9.x
2
Printer Software Introduction
The printer software that comes with your printer includes a
printer driver and printer utilities. The printer driver lets you
choose from a variety of settings to get the best results from your
printer. The printer utilities help you check the printer and keep
it in top operating condition.
The printer software includes the following dialogs.
2
2
2
2
Dialog
Settings and Utilities
Print
Media Type, Color, Mode, Copies, Pages
Page Setup
Paper Size, Paper Source, Borderless, Auto Cut, Orientation,
Double-Sided Printing, Reduce or Enlarge, Printable Area,
Roll Paper Option
2
Layout
Fit to Page, Multi-Page, Print Order
Utility
EPSON StatusMonitor, Nozzle Check, Head Cleaning, Print
Head Alignment, Configuration
2
For information on making printer driver settings, see “Making
Settings in the Print Dialog” on page 117, “Making Settings in the
Page Setup Dialog” on page 137, and “Making Settings in the
Layout Dialog” on page 157.
2
2
For information on the printer utilities, see “Using the Printer
Utilities” on page 162.
2
The online help provides more information on the printer
software. See “Getting Information Through Online Help” on
page 167.
2
Printing with Mac OS 9.x
111
Accessing the Printer Software
To access the printer software installed in your computer, follow
the steps below.
Accessing the Print dialog
To access the Print dialog, click Print on the File menu of your
application, or click Options in the Page Setup dialog.
Accessing the Page Setup dialog
To access the Page Setup dialog, click Page Setup on the File
menu of your application.
Accessing the Layout dialog
To access the Layout dialog, click the
Print dialog.
Layout icon button in the
Accessing the Utility dialog
To access the Utility dialog, click the
Print or Page Setup dialog.
112
Printing with Mac OS 9.x
Utility icon button in the
2
Making the printer driver settings
2
English
Basic Settings
This section describes the basic printer driver settings for printing
your data.
2
To make the basic printer driver settings, follow the steps below.
Note:
While many Macintosh applications override the settings made in the
printer driver, some do not, so you must verify the settings to get the
results you expect.
1. Click Page Setup on the File menu of your application. The
Page Setup dialog appears.
2
2
2
2
2
2
2
2. From the Paper Size list, select the size of paper loaded in the
printer.
2
3. Select a paper source from the Paper Source list.
2
4. Select Borderless if you want to print your data with no
margins. See “Making the Borderless setting” on page 139.
Printing with Mac OS 9.x
113
5. Make settings for Orientation, Double-Sided Printing, and
Reduce or Enlarge, as necessary.
6. When Paper Tray or Manual Feed is selected as the Paper
Source setting, make the Printable Area setting as needed. See
“Making the Printable Area settings” on page 154.
When Roll Paper or Roll Paper (Banner) is selected as the
Paper Source setting, make Roll Paper Option settings as
needed. See “Making the Roll Paper Option settings” on page
155.
7. After making your settings, click OK to close the Page Setup
dialog.
8. Click Print on the File menu of your application. The Print
dialog appears.
9. From Media Type, select a media that matches the paper
loaded in the printer. See “Media Type setting list” on page
118.
Note:
Check the media type and its paper path. See “Paper path list” on
page 276.
10. Make the settings for Copies and Pages.
114
Printing with Mac OS 9.x
For EPSON Stylus Pro 4800 only:
If you want to print advanced monochrome photos, select
Advanced B&W Photo.
Note:
When printing on any media other than tracing paper, we
recommend Color or Color/B&W Photo even if the data to print
is black.
12. Make the Mode setting. Check that Automatic is selected.
Note:
When Automatic is selected, the printer driver takes controls of
all detailed settings based on the current Media Type setting and
Color settings.
2
2
2
2
2
2
13. Adjust Speed and Quality in the Mode box if a slider
appears. Drag the slider to the left or right depending on
which is more important.
For EPSON Stylus Pro 4800 only:
If you have selected Advanced B&W Photo as the Color
setting, select the Color Toning setting from the pull-down
menu.
Note:
Depending on the Media Type setting you choose, a slider may not
appear in the Mode box.
14. Select the color control mode from the pull-down menu in the
Mode box. For detailed information, see “Color Control
mode” on page 120.
15. Click Print to start printing.
Printing with Mac OS 9.x
2
English
11. Make the Color setting. Select Color or Color/B&W Photo to
print color or monochrome photos, or Black to print a draft
or black text only.
115
2
2
2
2
2
Canceling printing
To cancel printing in progress, follow the steps below.
c
Caution:
If you stop printing in progress, you may need to start printing
again from the beginning for best result; otherwise, misalignment
or banding may appear in the printed image.
When background printing is on
1. Select EPSON Monitor IV from the Application menu at the
right end of the menu bar.
2. Turn off the printer.
3. Click the name of data which is in print process on the screen,
then click
Stop to cancel the print job.
When background printing is off
1. Turn off the printer.
2. Hold down the J Command key on your keyboard, and press
the [.] period key to cancel the print job.
116
Printing with Mac OS 9.x
Making Settings in the Print Dialog
You can make the Media Type, Mode, Color, Copies, and Pages
settings in the Print dialog. From this dialog, you can access other
dialog, from which you can set the print time, and preview the
data before printing.
English
2
2
2
2
2
2
Making the Media Type setting
2
The Media Type setting determines what other settings are
available; therefore, always make this setting first.
From Media Type, select a media that matches the paper loaded
in the printer. Locate your paper in the list, and then select a
corresponding Media Type setting. For some types of paper,
several Media Type settings are available for selection.
Note:
❏ The availability of special media varies by country.
2
2
❏ When you are using paper other than Epson special media, see
“Notes on Epson Special Media and Other Media” on page 263.
❏ For the latest information on media available in your area, refer to
the Epson customer website. See “Contacting Customer Support”
on page 355.
Printing with Mac OS 9.x
2
117
2
2
Media Type setting list
118
Media Type Setting
Epson Special Media Name/
Description
Photo Quality Ink Jet Paper
Photo Quality Ink Jet Paper
Singleweight Matte Paper
Singleweight Matte Paper
Enhanced Matte Paper
Enhanced Matte Paper
Archival Matte Paper
Archival Matte Paper
Photo Glossy Paper
Photo Glossy Paper
Photo Semigloss Paper
Photo Semigloss Paper
Premium Glossy Photo Paper
Premium Glossy Photo Paper
Premium Semigloss Photo Paper
Premium Semigloss Photo Paper
Premium Luster Photo Paper
Premium Luster Photo Paper
Premium Luster Photo Paper (250)
Premium Luster Photo Paper (250)
Premium Glossy Photo Paper (250)
Premium Glossy Photo Paper (250)
Premium Semigloss Photo Paper
(250)
Premium Semigloss Photo Paper
(250)
Premium Semimatte Photo Paper
(250)
Premium Semimatte Photo Paper
(250)
Photo Paper Gloss 250
Photo Paper Gloss 250
Proofing Paper Semimatte
EPSON Proofing Paper Semimatte
(Commercial)
Watercolor Paper - Radiant White
Watercolor Paper - Radiant White
Textured Fine Art Paper
Textured Fine Art Paper
Velvet Fine Art Paper
Velvet Fine Art Paper
UltraSmooth Fine Art Paper
UltraSmooth Fine Art Paper
Plain Paper
-
Plain Paper (Line drawing)
-
Printing with Mac OS 9.x
Singleweight Matte Paper
Tracing Paper
-
2
English
Singleweight Matte Paper
(line drawing)
2
Making the Color setting
2
EPSON Stylus Pro 4400
Make the Color setting. Select Color/B&W Photo to print color
or monochrome photos, or Black to print a draft or black text only.
Note:
When printing on any media other than tracing paper, we recommend
Color/B&W Photo even if the data to print is black.
2
2
2
EPSON Stylus Pro 4800
Make the Color setting. Select Color to print color or monochrome
photos, or Black to print a draft or black text only. If you want to
print advanced monochrome photos, select Advanced B&W
Photo.
Note:
When printing on any media other than tracing paper, we recommend
Color even if the data to print is black.
2
2
2
2
2
2
Printing with Mac OS 9.x
119
Making the Mode setting
You can select the Automatic or Custom mode. These modes are
provided to give you three levels of control over the printer
driver.
Automatic mode
Automatic mode is the quickest and easiest way to start printing.
When Automatic is selected, the printer driver takes care of all
detailed settings based on the current Media Type and Color
settings.
Quality and Speed slider
Depending on the media you choose in the Media Type setting
while Color (or Color/B&W Photo) or Black is selected as the
Color setting and Automatic as the Mode setting, a Quality or
Speed slider appears in the Mode box. Select Quality when print
quality is more important than print speed. Select Speed when
print speed is more important than print quality.
Color Control mode
When Color (or Color/B&W Photo) is selected as the Color
setting and Automatic as the Mode setting, the Color Control
pull-down menu appears in the Mode box.
120
Printing with Mac OS 9.x
You can select from the following settings.
Select this setting to produce vivid blue and green tones
in printouts.
Note:
Because this setting reproduces blue and green tones
that cannot be displayed by your monitor, your printouts
may differ from the screen images when this function is
selected.
Charts and
Graphs
Intensifies the colors and lightens the midtones and
highlights of an image. Use this setting for presentation
graphics, such as charts and graphs.
EPSON
Standard
(sRGB)
For EPSON Stylus Pro 4800 only:
Increases the contrast in images. Use this setting for color
photographs.
Adobe RGB
For EPSON Stylus Pro 4800 only:
Matches image color to Adobe RGB.
2
English
EPSON Vivid
2
2
2
2
2
Color Toning (for EPSON Stylus Pro 4800 only)
When you select Advanced B&W Photo as the Color setting
while Automatic is selected, the Color Toning pull-down menu
appears in the Mode box.
2
You can select from the following settings.
2
Neutral
This setting provides standard image
correction for most photos. Try this first.
Cool
This setting gives a cool tone to your photos.
Warm
This setting gives a warm tone to your photos.
Sepia
This setting applies a sepia tone to your photos.
2
2
2
2
Printing with Mac OS 9.x
121
Custom mode
The Custom mode lets you make a wide range of changes with a
single click of the mouse. In the Custom Settings pull-down menu,
you will find ready-made settings provided by Epson.
Note:
These ready-made settings may be dimmed, depending on the Media
Type and Color settings.
Advanced Photo
Advanced Photo
2880 dpi
122
Good for printing scanned photos and digitally
captured images in high quality. Helps prevent
misprinting of ink dots that may occur due to
movement of the print head and paper.
ColorSync
Automatically adjusts printout colors to match
colors on your screen.
PhotoEnhance
This mode lets you select image-correction settings
specially designed for scanned or digitally captured
photos.
Printing with Mac OS 9.x
The Advanced setting gives you complete control over your
printing environment. Use these settings to experiment with new
printing ideas, or to fine-tune a range of print settings to meet
your individual needs. Once you are satisfied with your new
settings, you can give them a name and add them to the Custom
Settings list.
2
English
Making Advanced setting
2
2
To make Advanced settings, follow the steps below.
1. Select Custom in the Print dialog, and then click Advanced.
The Advanced dialog appears.
2
2
2
2
2
2
2. Make sure a media matching the media loaded in the printer
is selected. See “Media Type setting list” on page 118.
3. Make the Color setting. Select Color or Color/B&W Photo to
print color or monochrome photos, or Black to print a draft
or black text only. If you want to print advanced monochrome
photos, select Advanced B&W Photo.
2
2
2
Printing with Mac OS 9.x
123
Note:
When printing on any media other than tracing paper, we
recommend Color or Color/B&W Photo even if the data to print
is black.
4. Select a Print Quality setting.
5. If you are using non-Epson special media, click Paper
Config, and then make settings as needed. For details, see
“Paper Configuration” on page 125.
6. Make the Printer Color Management settings. For details, see
“Printer Color Management” on page 128.
Note:
Some settings are enabled or disabled depending on the Media Type,
Color, and Print Quality settings you have made.
7. Make other settings as needed. For details, see the online help.
8. Click OK to apply your settings and then return to the Print
dialog. If you want to return to the previous screen without
applying your settings, click Cancel.
124
Printing with Mac OS 9.x
Paper Configuration
English
2
2
2
2
2
2
The following settings in Paper Configuration let you make the
detailed paper settings.
Mode
Description
Color Density
Adjusts the strength of Color Density. Use a value in the
range of -50% to +50%. Drag the slider with your mouse to
the right direction (+) to deepen the color of your printout
or left direction (-) to lighten its color. You can also type
a number (-50 to +50) in the box next to the slider.
Use this function when you print on paper other than
Epson special media.
Set the scroll bar to the 0 position when you print on Epson
special media.
Note:
Deepening of the color of printout may not be possible,
depending on the printing mode.
2
2
2
2
2
2
Printing with Mac OS 9.x
125
Mode
Description
Drying Time
per Print
Head Pass
Adds a waiting time when the print head reaches the end
of every pass.
Set this value using the slider or text box. To improve the
print quality by using slow ink absorption on the media,
set a higher value.
The drying time per print head pass can be set from 0 to
5 seconds, in 0.1 second increments.
Note:
If you use this feature, the printing time will be longer.
Paper Feed
Adjustment
Controls the paper feeding value, in 0.01% increments. If
the paper feeding value is too large, white horizontal
micro banding may appear. If the paper feeding value
is too small, dark horizontal micro banding may appear.
Paper Suction
Decreasing the air suction at the platen can avoid
wrinkling or waving of thin or saturated media, or
eliminating vertical banding. The relationship of the
parameter and the suction power is indicated as follows:
Standard : 100%
-1: 50%
-2: 30%
-3: 10%
-4: 6%
Paper
Thickness
This value automatically appears according to the Media
Type setting. If you use non-Epson media, modify this
value for your media. Refer to the paper specifications,
or print "Thickness Pattern" to find out the paper thickness.
Cut Method
Determines the best cutting method according to the
paper thickness.
Standard:
Normal speed and normal cut pressure
Thin Paper:
Low cut pressure
Thick Paper, Fast:High speed and high cut pressure
Thick Paper, Slow:Low speed and high cut pressure
126
Printing with Mac OS 9.x
Description
Platen Gap
Platen Gap is the height from the media loaded in the
printer to the print head. By adjusting this parameter, you
may produce better print quality. This is set automatically
according to the Paper Thickness setting specified.
Note:
Setting Platen Gap to Narrow may produce better print
quality, but make sure the media does not wrinkle or
touch the print head; otherwise, printed data or the print
head surface may be damaged. Use Wider or Wide in
such case.
Eject Roller
Type
2
English
Mode
2
2
2
Select the Eject Roller Type that best fits your media.
Auto:
The printer selects the most appropriate setting
automatically. When you use Epson special media,
usually select this setting.
2
Starwheel-Sheet:
If you want to print on cut-sheet paper that is non-Epson
special media, select this setting.
Starwheel-Roll Curled:
If you want to print on strongly curled roll paper that is
non-Epson special media, select this setting.
No Roller-Roll Normal:
If you want to print on roll paper that is non-Epson special
media, select this setting.
2
2
2
2
2
2
2
Printing with Mac OS 9.x
127
Printer Color Management
Color Controls
This setting provides the color matching and image-enhancement
methods. When you select this setting, additional settings appear
under the Printer Color Management box where you can select a
Mode setting and adjust the color enhancement sliders. For details
on the additional settings, see the online help.
128
Printing with Mac OS 9.x
2
English
When Advanced B&W Photo is selected as the Color setting,
the following screen appears. You can then adjust the advanced
monochrome settings. For details on the additional settings, see
the online help.
2
2
2
2
2
PhotoEnhance
This setting provides a variety of image-correction settings that
you can apply to your photo images before printing.
PhotoEnhance does not affect your original data. When you select
this setting, you will need to make the Tone and Digital Camera
Correction settings.
2
2
2
2
2
2
Printing with Mac OS 9.x
129
Note:
❏ This mode is available only with 16-, 24-, or 32-bit color data.
❏ This mode is available only when 32-bit color is selected as your
monitor display setting for Macintosh.
❏ Printing with PhotoEnhance selected may increase the time required
in printing, depending on your computer system and the amount of
the data contained in your data.
❏ The Tone setting appears for EPSON Stylus Pro 4400 only.
Tone
Auto Correct
This setting provides standard image
correction for most photos. Try this first.
Sepia
This setting applies a sepia tone to your
photos.
Neutral Gray
This setting applies a black and white
tone to your print data.
Warm Gray
This setting applies a warmer black and
white tone to your print data than
Neutral Gray.
Cool Gray
This setting applies a cooler black and
white tone to your print data than
Neutral Gray.
Digital Camera Correction
If you are printing photos taken with a
digital camera, select this check box to
give your printed photos a smooth and
natural appearance like that of photos
taken with a film camera.
Select the Smooth Skin check box to
adjust the image to make its skin color
smooth.
130
Printing with Mac OS 9.x
ColorSync
2
English
This setting automatically adjusts printout colors to match colors
on your screen. Select this setting when printing scanned
photographs or computer graphics.
2
2
2
2
2
Note:
Be aware that the ambient light and the age, quality, and settings of the
monitor can affect the quality of your color matching.
2
2
2
2
2
2
Printing with Mac OS 9.x
131
Off (No Color Adjustment)
This setting is generally not recommended, because it does not
allow the printer driver to enhance or adjust the color in any way.
Only use this setting when you create a new color profile or if the
other Mode settings do not produce satisfactory results.
Saving the Advanced settings
To save your Advanced settings, follow the steps below.
1. Click Save Settings in the Advanced dialog. The Custom
Settings dialog appears.
2. Type a unique name, up to 16 characters, for your settings in
the Name text box.
132
Printing with Mac OS 9.x
3. Click Save. Your settings will be added to the Custom
Settings pull-down menu.
You can save up to 100 groups of settings. You can select your
saved group of settings from the Custom Settings pull-down
menu in the Print dialog.
When you select your saved settings in the Custom Settings, be
aware that making new settings, for example Media Type and
Color settings, may change your custom settings. This may cause
unexpected results in your printouts. If this happens, reselect
your saved settings and try printing again.
Note:
The names of the ready-made settings provided by Epson cannot be
applied to your new settings.
English
2
2
2
2
2
2
Deleting the Advanced settings
To delete your Advanced settings, follow the steps below.
Note:
You cannot delete ready-made settings from the Custom Setting list.
2
2
1. Open the Custom Settings dialog.
2
2
2
2. Select the name of settings you want to delete.
3. Click Delete. The setting will be deleted from the Custom
Settings list.
Printing with Mac OS 9.x
133
2
Making the Copies setting
You can specify the number of copies. Type the number you want
in the Copies box, or click the arrows next to the box. You can
enter any number from 1 to 9999.
Making the Pages setting
You can specify the range or printed pages. Select either All or
Range. If you select Range, enter the appropriate range of pages
in the Range text box.
134
Printing with Mac OS 9.x
You can specify the time you want the printer to begin printing
your data.
To set the print time, follow the steps below.
1. Click
2
English
Setting the print time
2
2
Background Printing, if necessary.
2. Select On as the Background Printing, if necessary.
2
2
2
3. Select Urgent, Normal, Print at, or Hold as the Print Time
setting. If you select Print at, use the arrows beside the date
and time boxes to specify the date and time that you want to
print the data.
Note:
Make sure that the computer and printer are turned on at the date
and time you specify.
4. Click OK.
5. In the Print dialog, make sure that your print settings are as
you want them, and click Print.
2
2
2
2
2
2
Printing with Mac OS 9.x
135
Previewing your printout
You can see how your data will look before printing it. To preview
your data, follow the steps below.
1. Make your printer driver settings.
2. Click
Preview. The Print button changes into the Preview
button.
3. Click Preview. The Preview dialog appears, and displays a
preview of your data.
The Preview dialog contains several icon buttons that you can
use to perform the following functions.
136
Zoom
Click this button to enlarge or reduce the size
of the previewed page.
Show/Hide
Printable
Area
Click this button to display or hide the
borderlines which indicate the printable area.
The printer cannot print anything which is
outside of this area.
Printing with Mac OS 9.x
Click these buttons to add or remove selected
pages from the list of pages to be printed.
Remove
page
4. If you are satisfied with the previewed data, click Print. If you
are not satisfied with the appearance of the data, click
Cancel. The Preview and Print dialogs close with the current
print settings preserved. Open the Print dialog again to make
additional changes to the print settings.
2
English
Add page
2
2
2
Making Settings in the Page Setup Dialog
2
You can make the Paper Size, Paper Source, Borderless, Auto Cut,
Orientation, Reduce or Enlarge, Printable Area, and Roll Paper
Option settings in this dialog.
2
2
2
2
2
2
2
Printing with Mac OS 9.x
137
Making the Paper Sizes setting
You can select the paper size that you want to use. Select the paper
size in the Paper Size pull-down menu.
You can also add a customized paper size. To do this, follow the
steps below.
1. Click Customize. The following dialog appears.
2. To define a new paper size, click New.
3. Type a unique name for the paper size in the paper size list.
4. Specify the measurement unit as either cm or inch.
5. Enter the width and height of your paper by typing the text
in the appropriate text boxes.
Note:
The maximum paper height is 44 inches (111.76 cm).
6. Specify the margins by typing in the Margin text boxes or by
manipulating the preview image.
7. Click OK to return to the Page Setup dialog.
138
Printing with Mac OS 9.x
You can select Paper Tray, Roll Paper, Roll Paper (Banner), or
Manual Feed from the Paper Source pull-down menu. Select one
that matches the paper loaded in the printer.
2
2
Making the Borderless setting
You can print your data without margins on paper.
For this printing mode, Epson recommends the following media
conditions.
2
2
Accommodate media width:
❏
❏
❏
❏
❏
❏
❏
❏
❏
❏
❏
❏
❏
❏
❏
2
English
Making the Paper Source setting
8 inch, 203.2 mm
210 mm (A4)
Letter (8.5 in), 215.9 mm
10 inch, 254 mm
257 mm
297 mm (A3)
300 mm
12 inch, 304.8 mm
329 mm (Super A3/B)
13 inch, 330.2 mm
14 inch, 355.6 mm
400 mm
16 inch, 406.4 mm
420 mm (A2)
17 inch, 431.8 mm
2
2
2
2
2
Note:
❏ You cannot perform borderless printing on cut-sheet media with a
width of 420 mm (A2).
❏ When printing on roll paper with a width of 8 inches (203.2 inch)
or 420 mm (A2), attach the spacer to the spindle. See “Attaching
the spacer to the spindle” on page 267.
Printing with Mac OS 9.x
139
2
2
❏ If your application has margin settings, make sure they are set to
zero before printing.
❏ When printing on cut-sheet media, only the left and right margins
are set to zero.
❏ The ink may contaminate the platen of the printer. In this case, wipe
the ink away using a cloth.
❏ Printing with this feature takes longer time than normal printing.
❏ Only Plain Paper and Plain Paper (line drawing) can set the bottom
margin to 3 mm. When printing on the other media, the bottom
margin is always 14 mm.
❏ When Premium Glossy Photo Paper (250) roll paper or Premium
Semigloss Photo Paper (250) roll paper is used in printing, the top
margin is always 20 mm.
❏ Smear may result in the top and bottom areas depending on the
media.
To print your data with this feature, follow the steps below.
1. Select Borderless.
140
Printing with Mac OS 9.x
2. Click the Expansion button. The following dialog appears.
English
2
2
2
3. Choose Auto Expand or Retain Size from the pull-down
menu.
Auto Expand
Select this setting if you want to enlarge the size of
print data automatically and print with no margins.
You can choose the amount of enlargement by
moving the slider.
Note:
Enlarged areas that exceed the paper size will not
be printed on the paper.
Retain Size
Select this setting if you do not want to change the
ratio of your print data.
If you select this setting, you need to enlarge your
image data to exceed the paper width, to avoid
unprinted areas appearing along the left and right
edges. Enlarging 3 mm in both the left and right
directions is recommended, using the application
that created the data.
To use this feature, see “Making the Paper Sizes
setting” on page 138.
2
2
2
2
2
2
2
2
2
Printing with Mac OS 9.x
141
Amount of
Enlargement
When you select Auto Expand, the slider becomes
available. Using the slider, you can control the
amount of the image that extends beyond the
edges of the paper during borderless printing.
For most print jobs, Standard is recommended in
order to eliminate margins on all sides of the paper.
In a very humid environment, the width of paper may
expand due to moisture absorption. In this case,
move the slider to Max to eliminate margins around
the image. If Max is selected, the center of the image
may move about 1 mm to the right.
Moving the slider towards Min decreases the amount
of the image enlargement; however, as this amount
decreases, margins may appear on one or more
sides of the paper.
4. Make the Auto Cut setting. See “Making the Auto Cut setting”
on page 143.
5. Click OK.
6. Start printing your data from your application.
142
Printing with Mac OS 9.x
This setting is available only when Roll Paper or Roll Paper
(Banner) is selected as the Paper Source setting. You can select
how the paper is cut after printing.
2
English
Making the Auto Cut setting
2
Single Cut
Select this setting if you want to save paper.
2
If you select this setting, the boundary of a picture or the boundary
of a page is cut. However, the cut position may shift slightly.
2
Note:
❏ When printing on Premium Glossy Photo Paper (250) roll paper or
Premium Semigloss Photo Paper (250) roll paper, do not select this
setting; otherwise, the print quality may decline.
2
❏ This setting appears only when the Borderless check box is selected.
2
2
2
2
2
2
2
Printing with Mac OS 9.x
143
Double Cut
Select this setting to avoid the slight gap that occurs with the
Single Cut setting. A margin is created between pictures, and
1 mm along the inside of each picture is cut.
Note:
This setting appears only when the Borderless check box is selected.
Normal Cut
Select this setting to keep margins at the top and bottom of the
printed data.
144
Printing with Mac OS 9.x
Off
English
2
Select this setting to cut printouts manually. To cut printouts
manually, follow the steps below.
1. Press the Paper Feed or Paper Feed button, and then
match the cutting position with the scissors mark on the left
side of the print head.
2
2
2
2
2
2
2. Press the Paper Source
button to select Auto Cut On
.
3. Press and hold the Paper Source button for 3 seconds. The
paper cutter cuts the printout at the cutting position.
2
2
2
2
2
Printing with Mac OS 9.x
145
Making the Orientation setting
You can specify the direction of printing on the page.
Portrait
Print direction is short edge first, like most magazines.
Landscape
Print direction is long edge first, like many
spreadsheets.
Rotated by 180°
Prints your document upside down.
Note:
This function is not available when Roll Paper (Banner)
is selected as the Paper Source setting.
146
Printing with Mac OS 9.x
You can perform double-sided printing. There are two types of
double-sided printing available. Standard double-sided printing
allows you to print the odd-numbered pages first. Once these
pages are printed, the paper can then be reloaded for printing the
even-numbered pages onto the opposite side of the paper.
You can also perform Folded Booklet double-sided printing. It
lets you make single-fold booklets.
Note:
❏ The double-sided printing feature is not available when the printer
is accessed over a network, or is used as a shared printer.
❏ Depending on the media type, stacks of up to 30 sheets can be loaded
into the sheet feeder during double-sided printing.
❏ Only use media types that are suitable for double-sided printing;
otherwise, the print quality may deteriorate.
❏ Depending on the type of paper and the amount of ink used to print
text and images, ink may bleed through to the other side of the paper.
❏ The surface of the paper may be smeared during the double-sided
printing.
2
English
Making Double-sided Printing setting
2
2
2
2
2
2
2
2
2
2
2
Printing with Mac OS 9.x
147
Standard double-sided printing
To print odd and even numbered pages on the opposite sides of
a sheet, follow the steps below.
1. Select the Double-Sided Printing.
2. Click Margins. The following dialog appears.
3. Specify the edge of the paper where binding will be placed.
You can choose Left, Top, or Right.
4. Specify the width of the binding margin, using the Binding
Margin text box. You can specify any width from 3 to 30 mm.
148
Printing with Mac OS 9.x
5. Click OK to return to the Page Setup dialog, and then click OK
to save your settings.
6. Make sure paper is loaded, and then send a print job from
your application. Instructions for generating the
even-numbered pages will be displayed while the
odd-numbered pages are output.
7. Follow the on-screen instructions and reload the paper.
Note:
❏ The paper may curl during printing due to the amount of ink
used. If this problem occurs, slightly curl the sheets in the
opposite direction prior to reloading them into the printer.
2
English
Note:
The actual binding margin may vary depending on the settings
specified in your application. We recommend that you test the print
quality before printing the entire job.
2
2
2
2
2
❏ Align the sheet stack by tapping its edges against a hard, flat
surface prior to reloading the stack into the printer.
2
❏ In the event of a paper jam, see “Clearing paper jams” on page
347.
2
❏ Follow the instructions provided when reloading the printouts.
Paper jams or improperly placed binding margins may occur if
the printouts are not reloaded correctly.
2
2
8. Once the paper is reloaded, click Resume to print the
even-numbered pages.
2
2
Printing with Mac OS 9.x
149
Folded Booklet double-sided printing
You can also make single-fold booklets using the double-sided
printing feature. When you create a single-fold booklet, the pages
that appear on the outside (after the booklet is folded) are printed
first. The pages that will appear inside the booklet can then be
printed after the paper is reloaded into the printer.
✽
2
1
3
4
5
6
7
8
10 12
9 11
Single-fold booklet
✽ Binding Edge
A booklet can be created by printing pages 1 and 4 on the first
sheet of paper, pages 5 and 8 on the second sheet of paper, and
pages 9 and 12 on the third sheet of paper. After these sheets are
reloaded into the sheet feeder, you can then print pages 2 and 3
on the back of the first sheet of paper, pages 6 and 7 on the back
of the second sheet of paper, and pages 10 and 11 on the back of
the third sheet of paper. The resulting pages can then be folded
and bound together into a booklet.
To create the booklet, follow the steps below.
150
Printing with Mac OS 9.x
2
English
1. Select Double-Sided Printing, and then select the Folded
Booklet.
2
2
2
2
2. Click Margins. The Margins dialog appears.
3. Specify the edge of the paper where binding will be placed.
You can choose Left, Top, or Right.
2
2
2
2
Note:
When Portrait is selected as the Orientation setting in the printer
driver, Left or Right binding positions are available. The Top
binding position is supported when Landscape is selected as the
Orientation setting.
2
2
2
Printing with Mac OS 9.x
151
4. Specify the width of the binding margin, using the Binding
Margin text box. You can specify any width from 3 to 30 mm.
The specified margin width will be used on both sides of the
fold. For example, if a 10-mm margin is specified, a 20-mm
margin will be inserted (a margin of 10 mm will be placed on
each side of the fold).
✽
✽
Portrait
✽
Landscape
✽ Folding Edge
✽✽ Margin
5. Click OK to return to the Page Setup dialog, and then click OK
to save your settings.
6. Make sure paper is loaded, and then send a print job from
your application.
7. Instructions for printing the inside pages will be displayed
while the outside pages are output. Follow the on-screen
instructions to reload the paper.
152
Printing with Mac OS 9.x
❏ Align the sheet stack by tapping its edges against a hard, flat
surface prior to reloading the stack into the printer.
❏ Follow the instructions provided when reloading the printouts.
Paper jams or improperly placed binding margins may occur if
the printouts are not reloaded correctly.
8. Once the paper is reloaded, click Resume to print the inside
pages.
9. Once printing is complete, fold the sheets and bind them
together using a stapler or other binding method.
2
English
Note:
❏ The paper may curl during printing due to the amount of ink
used. If this problem occurs, slightly curl the sheets in the
opposite direction prior to reloading them into the printer.
2
2
2
2
2
Making the Reduce or Enlarge setting
You can enlarge or reduce the size of data while maintaining its
aspect ratio. You can enter any number from 25 to 400 in the
Reduce or Enlarge box.
2
2
2
2
2
2
Printing with Mac OS 9.x
153
Making the Printable Area settings
This setting is available when you select Paper Tray or Manual
Feed as the Paper Source setting. You can make the following
settings.
Standard
Select this setting to use the standard printable area.
Maximum
Select this setting to increase the printable area at the bottom edge.
Note:
❏ This setting is available only when Plain Paper, Plain Paper (line
drawing), or Tracing Paper is selected as the Media Type setting.
❏ The print quality may decline at the edges of printouts when this
setting is selected. Before printing large jobs using this setting, print
a single sheet to check the quality. When this setting is selected, make
sure that paper loaded in the paper tray is not curled.
Centered
Select this setting to center printouts.
154
Printing with Mac OS 9.x
This option is available when you select Roll Paper or Roll Paper
(Banner) as the Paper Source setting. You can make the following
settings.
2
English
Making the Roll Paper Option settings
2
2
2
2
2
Auto Rotate
Note:
This function is available only when Roll Paper is selected as the Paper
Source setting.
This function is effective only when the print data length is shorter
than the printable width of the roll paper. The print data will
automatically be turned 90 degrees to print crosswise, saving roll
paper.
2
2
2
2
2
Original
Auto Rotate off
2
Auto Rotate on
To enable this function, select Auto Rotate.
Printing with Mac OS 9.x
155
Print Page Line
This function lets you specify whether to print a page line on the
right side and also below the printed data for manual cutting. To
enable this function, select Print Page Line.
The Print Page Line operation changes according to the Auto Cut
setting. Check these settings as necessary by referring to the
printer’s operation.
Auto Cut
Print Page Line
Printer’s Operation
Single Cut
Double Cut
Normal Cut
Selected
Prints page line on the right side
only, and cuts paper
automatically after the print job.
Single Cut
Double Cut
Normal Cut
Not selected
Does not print page line, and
cuts paper automatically after
the print job.
Off
Selected
Prints page lines on the right side
and below the printed data, but
does not cut paper
automatically after the print job.
Off
Not selected
Does not print page lines or cut
paper automatically after the
print job.
Save Roll Paper
Note:
This function is available only when Roll Paper (Banner) is selected
as the Paper Source setting.
This function is effective if you wish to save roll paper, because
blank portion of the last page or your printed data is not fed
through the printer.To enable this function, select Save Roll
Paper.
156
Printing with Mac OS 9.x
Making Settings in the Layout Dialog
You can make the Fit to Page, Multi-Page, and Print Order settings
in this dialog.
Note:
❏ The functions on the Layout menu are not available when Roll
Paper (Banner) is selected as the Paper Source setting.
English
2
2
2
❏ According to the paper source you choose, some of the functions are
not available.
2
2
2
2
2
2
2
2
2
Printing with Mac OS 9.x
157
Making the Fit to Page setting
You can enlarge or reduce the size of the data proportionally to
make it fit the paper size you selected in the Paper Size pull-down
menu. To use this function, select Fit to Page, and select the paper
size you loaded in the printer in the Output Paper Size pull-down
menu.
158
Printing with Mac OS 9.x
Selecting Multi-Page lets you choose between the Pages Per Sheet
and Poster settings.
Making Pages Per Sheet settings
Select Pages Per Sheet as the Multi-Page setting to print two or
four pages of your document on one sheet of paper.
2
English
Making Multi-Page settings
2
2
2
2
2
2
When Pages Per Sheet is selected, you can make the following
settings.
2 Pages
4 Pages
Prints two or four pages of your document on a
single sheet of paper.
Page Order
Allows you to specify the order in which the
pages will be printed on the sheet of paper.
Print page frames
Prints frames around the pages printed on each
sheet.
2
2
2
2
2
Printing with Mac OS 9.x
159
Making Poster settings
A single document page can be enlarged to cover 4, 9, or 16
printed sheets of paper. Select Poster as the Multi-Page setting to
print a poster-size image.
You can make the following settings.
1 page covers xx sheets
Specifies how many printed sheets of paper
the enlarged document page is to cover. You
can select 4, 9, or 16 pages.
Overlapping Alignment
Marks
Slightly overlaps the images and prints
alignment markers so that they can be
aligned more precisely.
Trim Lines
Prints border lines on the images to guide you
when trimming the pages.
Panel Selection
Click the panels you do not need to print, then
click the OK button to print the remaining
panels.
If you only want to print a few of the panels without printing the
entire poster, click Panel Selection, then click the panels that you
do not wish to print, and then click OK. Only the panels that you
did not click will be printed.
160
Printing with Mac OS 9.x
You can specify the printing order for your print job. When
printing multiple copies of your document, select Collate to print
one complete document set at a time. Select Reverse Order to
print your documents in reverse order, starting with the last page.
2
English
Making Print Order settings
2
2
2
2
2
2
2
2
2
2
2
Printing with Mac OS 9.x
161
Using the Printer Utilities
The EPSON printer utilities let you check the current printer
status and perform printer maintenance from your screen.
Note:
❏ Do not use the Nozzle Check, Head Cleaning, or Print Head
Alignment utilities if your printer is connected to your computer
through a network.
❏ Do not use the Nozzle Check, Head Cleaning, or Print Head
Alignment utilities while printing is in progress; otherwise, your
printout may be marred.
EPSON StatusMonitor
This utility provides you with printer status information, such as
the amount of remaining ink.
162
Printing with Mac OS 9.x
Nozzle Check
If you click Auto in the Nozzle Check dialog, or turn on AUTO
CLEANING from the control panel on the printer, this utility not
only checks the clogging nozzles, but also performs head cleaning
automatically.
Head Cleaning
This utility cleans the print head. You may need to clean the print
head if you notice the print quality has declined. Use this utility
to perform head clean. See “Cleaning the print head” on page 165.
2
English
This utility checks the print head nozzles for clogging. Check the
nozzles when you notice the print quality has declined and after
cleaning to confirm that the print head nozzles have been cleared.
See “Checking the print head nozzles” on page 164.
2
2
2
2
2
Print Head Alignment
This utility can be used to improve the print quality of your
printed data. The alignment of the print head may need to be
adjusted if vertical lines appear out of alignment or if white or
black banding noise appear in your printed data. Use this utility
to realign the print head. See “Aligning the print head” on page
166.
2
2
2
Configuration
Clicking this button opens the Configuration Settings dialog,
where you can change the way the EPSON Status Monitor utility
notifies you when the printer status changes. See “Making
Configuration Settings” on page 169.
2
2
2
Printing with Mac OS 9.x
163
Checking the print head nozzles
If you find that the printed data is unexpectedly faint or dots in
the printed data are missing, you may be able to identify the
problem by checking the print head nozzles by using the Nozzle
Check utility.
To use the Nozzle Check utility, follow the steps below.
Note:
Do not start the Nozzle Check utility while printing is in progress;
otherwise, your printout may be marred.
1. Make sure paper is loaded in the printer.
2. Click Nozzle Check.
3. Click Print if you want to visually check if any print head
nozzles are clogged, if you are using non-Epson special
media, or if the width of paper you are using is less than
210 mm. Click Auto if you want to perform an automatic
nozzle check, and if the nozzle check indicates it is necessary.
164
Printing with Mac OS 9.x
2
English
Note:
If you turn on AUTO CLEANING from the control panel on the printer
even though Print has been selected, the Nozzle Check utility not
only checks for the clogged nozzles, but also performs head cleaning
automatically. If you are using non-Epson special media, or if the
width of paper you are using is less than 210 mm, turn off AUTO
CLEANING from the control panel on the printer.
2
2
4. Follow the on-screen instructions to print a nozzle check
pattern.
2
5. If you find missing dots, clean the print head nozzles,
referring “Cleaning the print head” on page 165.
2
Cleaning the print head
If you find that the printed data is unexpectedly faint or dots in
the printed data are missing, you may be able to solve these
problems by using the Head Cleaning utility to clean the print
head, which ensures that the nozzles are delivering ink properly.
To use the Head Cleaning utility, follow the steps below.
Note:
❏ Do not start the Head Cleaning utility while printing is in progress;
otherwise, your printout may be marred.
❏ To save ink, use the Nozzle Check utility first to confirm that the
print head needs to be cleaned. This is because the cleaning process
consumes some ink.
2
2
2
2
2
❏ When one check ink out light is flashing or on, you cannot clean the
print head. Replace the appropriate ink cartridge first. See
“Replacing Ink Cartridges” on page 295.
2
1. Make sure the printer is turned on and all ink check lights are
off.
2
Printing with Mac OS 9.x
165
2. Click Head Cleaning.
3. Follow the on-screen instructions.
4. Click Print Nozzle Check Pattern in the Head Cleaning
dialog to confirm that the head is cleaned and to reset the
cleaning cycle.
If you still find missing dots after cleaning, try these solutions.
❏ Select PWR CLEANING from the control panel on the printer. See
“PWR CLEANING” on page 245.
❏ Repeat this procedure four or five times, turn the printer off
and leave it alone overnight, and then try head cleaning again.
❏ Replace some of ink cartridges as they may be old or
damaged.
If the print quality remains a problem after you have tried these
solutions, contact your dealer. See “Contacting Customer
Support” on page 355.
Aligning the print head
If you find misaligned lines or black or white banding on the
printed data, you may be able to solve these problems by using
the Print Head Alignment utility to align the print head.
To use the Print Head Alignment utility, follow the steps below.
1. Make sure paper is loaded in the printer.
2. Click Print Head Alignment.
3. Follow the on-screen instructions.
166
Printing with Mac OS 9.x
Getting Information Through Online Help
Your printer software has extensive online help, which provides
instructions on printing, making printer driver settings, and using
printer utilities.
To access the online help, click Print or Page Setup on the File
menu of your application, and click
Help.
Checking Printer Status and Managing Print
Jobs
Using the EPSON StatusMonitor
English
2
2
2
2
2
2
EPSON StatusMonitor regularly monitors the printer status. If a
printer error is detected, you will be informed with an error
message. You can also use this utility to check ink levels before
printing.
2
2
Accessing EPSON StatusMonitor
To access EPSON StatusMonitor, follow the steps below.
2
1. Click Print or Page Setup on the File menu of your
application.
2
2
2
Printing with Mac OS 9.x
167
2. Click
Remaining Ink Level, or click
Utility. If you click
Utility, click EPSON StatusMonitor in the Utility dialog.
The EPSON StatusMonitor dialog appears.
EPSON StatusMonitor informs you of the amount of ink
remaining and the free space of the maintenance tank as of the
time the StatusMonitor was opened. To update the information,
click Update.
168
Printing with Mac OS 9.x
You can select the way the EPSON StatusMonitor utility monitors
your printer, and the way you will be notified of information. To
make Configuration settings, click Configuration in the Utility
dialog. The Configuration Settings dialog appears.
2
English
Making Configuration Settings
2
2
2
2
2
2
You can make the following settings in this dialog.
2
Error notification
Choose how the EPSON StatusMonitor
notifies you in case of an error.
Warning
Choose how the EPSON StatusMonitor
notifies you if a warning message becomes
necessary.
Temporary Spool folder
Choose the folder for temporary spooling of
print data.
Temporary High Speed
Copies folder
Choose the folders for multiple-copy print
data storage.
2
2
2
2
Printing with Mac OS 9.x
169
Data will be sent to the
printer after being stored
on your disk.
Select this check box to prevent horizontal
banding in your printout. By default,
graphics data is sent by the computer to the
printer in rectangular bands, which
prevents the printer from having to
reconstruct an entire data in memory
before printing it. Selecting this check box
will make the computer temporarily store
the data on its hard drive and then send it
to the printer as a whole to prevent banding
in the printed image.
Check for errors before
starting to print.
Select this check box if you want to check
for errors before starting to print.
Check the ink level
before starting to print.
Select this check box if you want to check
the ink level before starting to print.
Using EPSON Monitor IV
After you send a print job to the printer, you can use the EPSON
Monitor IV utility to check, cancel, or change the priority of print
job that are queued for printing. This utility also shows the status
of the job currently being printed.
Accessing EPSON Monitor IV
To access EPSON Monitor IV, follow the steps below.
170
Printing with Mac OS 9.x
2
English
1. Select On as the Background Printing setting in the Chooser
or in the Background Printing dialog.
2
2
2
2
2. Send a print job to the printer.
3. Select EPSON Monitor IV from the Application menu at the
right end of the menu bar. The EPSON Monitor IV dialog
appears.
2
2
2
2
2
Note:
You can also open EPSON Monitor IV dialog by double-clicking the
EPSON Monitor IV icon in the Extensions folder.
Printing with Mac OS 9.x
171
2
2
Managing print jobs using EPSON Monitor IV
You can manage the print jobs in the following ways.
❏ Use the following buttons to hold, resume, and delete print
jobs. Select the print job that you want to manage, and click
the appropriate button.
Hold
Pauses printing and keep the current
print job at the top of the print queue.
Resume
Resumes printing.
Delete
Stops printing and deletes print job
from the print queue.
❏ Click Stop Print Queue to stop printing. Once this button is
pressed, the name of the button turns to Start Print Queue.
Click Start Print Queue to resume printing.
❏ Use the following buttons to start the printer utilities.
Print Head
Cleaning
Starts the Head Cleaning utility
Remaining
Ink Level
Starts EPSON StatusMonitor, which
displays the amount of ink remaining
and the free space of the
maintenance tank
❏ Double-click a file in the list to preview it.
Note:
This function is disabled when you are printing the ESC/P
command file.
❏ Double-click Copies to change the number of copies to print
out.
172
Printing with Mac OS 9.x
2
English
❏ Click the Show details arrow to open an extension at the
bottom of the EPSON Monitor IV dialog. The extension
displays detailed information on the selected data’s printer
software settings.
2
2
2
2
2
Changing print job priority
To change the priority of print jobs in a print queue, follow the
steps below.
2
Note:
You can also change the priority of print jobs that had print times
previously set in the Background Printing dialog.
2
1. Select the print job that you want to change the priority in the
Document Name.
2
2
2
2
Printing with Mac OS 9.x
173
2. Click the Show details arrow to open an extension at the
bottom of the EPSON Monitor IV dialog.
3. Select Urgent, Normal, Hold, or Print Time from the Priority
pull-down menu.
Sharing Your Printer
This section describes how to share your printer so that other
computers on a network can use it.
The computer on a network can share the printer that is directly
connected to one of them. The computer that is directly connected
to the printer is the printer server, and the other computers are
the clients which need permission to share the printer with the
printer server. The clients share the printer via the printer server.
Note:
To connect your printer directly to a network without setting it up as a
shared printer, consult your network administrator.
174
Printing with Mac OS 9.x
To share a printer connected directly to your computer with other
computers on an AppleTalk network, follow the steps below.
2
English
Setting up your printer as a shared printer
1. Turn on the printer.
2
2. Select Chooser from the Apple menu and click the printer’s
icon. Select the port to which the printer is connected.
2
2
2
2
2
2
3. Click Setup. The Printer Sharing Setup dialog appears.
2
2
2
4. Select Share this Printer, and type the printer name and
password information as needed.
Printing with Mac OS 9.x
2
175
5. Click OK. The name of the shared printer appears in the port
list in the Chooser.
6. Close the Chooser.
Accessing the shared printer
To access the shared printer from another computer on the
network, follow the steps below.
1. Turn on your printer.
2. On each computer from which you want to access the printer,
select Chooser from the Apple menu. Click your printer's
icon and select the printer port you want to use from the Select
a printer port box on the right. You can only select from the
printers connected to your current AppleTalk zone.
176
Printing with Mac OS 9.x
2
English
3. If the following dialog appears, enter the password for the
printer, then click OK.
2
2
4. Select the appropriate Background Printing option button to
turn background printing on or off.
5. Close the Chooser.
2
2
2
Uninstalling the Printer Software
To uninstall the printer driver, follow the steps below.
1. Turn on your computer and insert the printer software
CD-ROM into the CD-ROM drive. The Epson printer software
disk opens automatically.
2. Find the English folder, and double-click it.
2
2
3. Double-click the Printer Driver folder.
2
4. Double-click the EPSON STYLUS PRO 4400 or EPSON STYLUS
PRO 4800 folder, and Disk 1 folder in it.
2
5. Double-click the Installer icon, and follow the on-screen
instructions to open the Installer dialog.
2
6. Select Uninstall from the pull-down menu at the top left, and
click the Uninstall button at the bottom right.
2
Printing with Mac OS 9.x
177
Chapter 3
Printing with Mac OS X
Printer Software Introduction
The printer software which comes with your printer includes a
printer driver and printer utilities. The printer driver lets you
choose from a variety of settings to get the best results from your
printer. The printer utilities help you check the printer and keep
it in top operating condition.
The printer software includes the following dialogs.
Dialog
Settings and Utilities
Page Setup
Page Attributes setting:
Format for, Paper Size, Orientation, Scale
Custom Paper Size setting:
Paper Size, Printer Margins
Summary setting:
Summary of current settings
178
Printing with Mac OS X
Common in all options:
Printer, Presets
3
English
Print
Copies & Pages option:
Copies, Collated, Pages
3
Layout option:
Pages Per Sheet, Layout Direction, Border
Output Options option:
Save as File, Format
3
Print Settings option:
Media Type, Color, Mode
Printer Color Management option:
Color Management
3
Paper Configuration option:
Color Density, Drying Time per Print Head Pass, Paper Feed
Adjustment, Paper Thickness, Paper Suction, Cut Method,
Platen Gap, Eject Roller Type
3
Roll Paper Option:
Auto Cut, Print Page Line, Save Roll Paper
3
Expansion option:
Amount of enlargement slider
3
Summary option:
Summary of current settings
Utility
EPSON Status Monitor, Nozzle Check, Head Cleaning, Print
Head Alignment, EPSON LFP Remote Panel, Print Assistant
3
3
3
3
3
Printing with Mac OS X
179
Accessing the Printer Software
To access the printer software installed in your computer, follow
the steps below.
Accessing the Page Setup dialog
To access the Page Setup dialog, click Page Setup on the File
menu of your application.
Accessing the Print dialog
To access the Print dialog, click Print on the File menu of your
application.
Accessing the Utility dialog
To access the Utility dialog, double-click the EPSON Printer Utility
icon in the Applications folder in Macintosh HD (default
setting).
180
Printing with Mac OS X
Page Setup Dialog Settings
You can make the appropriate Settings, Format for, Paper Size,
Orientation, and Scale settings for printing.
Note:
The Page Setup dialog is a standard feature of Mac OS X. See your
operating system’s documentation for details.
English
3
3
3
3
3
3
3
Settings
3
You can select Page Attributes, Custom Paper Size, or
Summary.
3
Page Attributes
3
Displays the page setup settings.
Custom Paper Size
3
Displays the paper size settings.
3
Summary
Displays the list of current setting items.
Printing with Mac OS X
181
Format for
Select a desired printer.
Note:
Always match the Format for setting in the Page Setup dialog with the
Printer setting in the Print dialog; otherwise, the data may not be printed
correctly.
Paper Size
Select a paper size and a print area that you want to use.
For Mac OS X 10.2.0 to 10.2.3 users, the print area is listed after
Paper Size in the Paper Size list.
For Mac OS X 10.2.4 or later users, the print area is listed when
you click the arrow mark next to the Paper Size you have selected.
When you select a paper size that supports a print area other than
Standard, you can select the print area. If you cannot select the
print area, it is set to Standard.
The following table lists the print areas you can select.
182
Printer
Description
Standard
Prints on cut-sheet paper with 14-mm bottom
margin, and 3-mm top, left and right margins.
Maximum
Prints on cut-sheet paper with 3-mm margins
in four directions.
Borderless (Auto Expand)
Prints data enlarged on cut-sheet paper with
3-mm top margin, 14-mm bottom margin,
and 0-mm left and right margins.
Borderless
(Auto Expand, Maximum)
Prints data enlarged on cut-sheet paper with
3-mm top and bottom margins, and 0-mm left
and right margins.
Printing with Mac OS X
Prints on roll paper with 3-mm margins in four
directions.
Roll Paper - Borderless
(Auto Expand)
Prints data enlarged on roll paper without
margins.
Roll Paper - Banner
Prints multi-page data on roll paper
continuously with 3-mm left and right margins
and 0-mm top and bottom margins.
Borderless (Retain Size)
Prints data on cut-sheet paper with 3-mm top
margin, 14-mm bottom margin, and 0-mm left
and right margins, while retaining the ratio of
the original size.
Borderless
(Retain Size, Maximum)
Prints data on cut-sheet paper with 3-mm top
and bottom margins and 0-mm left and right
margins, while retaining the ratio of the
original size.
Roll Paper - Borderless
(Retain Size)
Prints data on roll paper without margins,
while retaining the ratio of the original size.
Roll Paper - Borderless
Banner
Prints multi-page data on roll paper
continuously without margins.
3
English
Roll Paper
3
3
3
3
3
3
Orientation
3
Select a printing orientation.
3
Scale
Input a scale to reduce or enlarge the size of your data.
3
3
3
Printing with Mac OS X
183
Print Dialog Settings
You can make the appropriate Printer and Presets settings use for
printing.
Note:
The Print dialog is the standard feature of Mac OS X. See your operating
system’s documentation for details.
Printer
Select a printer you want to use.
Note:
Always match the Format for setting in the Page Setup dialog with the
Printer setting in the Print dialog; otherwise, data may not be printed
correctly.
Presets
You can select Standard or Save As.
Standard
Prints with the current settings.
184
Printing with Mac OS X
Save as
English
3
Prints with the custom saved settings.
3
Copies & Pages
You can make the appropriate Copies, Collated, Pages settings
that you want to use for printing.
3
3
3
3
3
Copies
To make the Copies setting, enter the number of copies that you
want to print in the Copies text box.
Collated
To make print order setting, select Collated to print one complete
document set at a time when printing multiple copies.
Pages
To make the Pages setting, select either All or From and to. If you
select From and to, enter the first page of the appropriate range
of pages in the From text box and the last page in the to text box.
3
3
3
3
3
Printing with Mac OS X
185
Layout
You can make the appropriate Pages per Sheet, Layout Direction,
and Border settings that you want to use for printing.
Note:
Layout is the standard feature of Mac OS X. See your operating system’s
documentation for details.
Pages per Sheet
You can print multiple pages of your data on a single piece of
paper. You can select from 1, 2, 4, 6, 9, or 16.
Layout Direction
You can specify the order in which the pages will be printed on
the sheet of paper.
Border
You can print a border around the pages printed on each sheet.
You can select from None, Single hairline, Single thin line,
Double hairline, or Double thin line.
186
Printing with Mac OS X
You can print your data as a file if you click the Save as File check
box, and select its format from the Format pull-down menu.
3
English
Output Options
3
3
3
If you want to print your data on paper, clear the Save as File
check box.
Note:
Output Options is the standard feature of Mac OS X. See your operating
system’s documentation for details.
3
3
3
3
3
3
3
3
Printing with Mac OS X
187
Print Settings
You can make the Media Type, Color, and Mode settings.
Page Setup
Shows the print area that has been chosen from the Paper Size list
in the Page Setup dialog. Select the print area chosen from the
Paper Size list in the Page Setup dialog.
When printing on cut-sheet paper, select Paper Tray if you are
using the paper tray or select Manual Feed if you are using the
front or rear manual feed slot.
188
Printing with Mac OS X
Media Type
English
3
The Media Type setting determines what other settings are
available; therefore, always make this setting first.
From Media Type, select a media that matches the paper loaded
in the printer. Find your paper in the list, and then select a
corresponding Media Type setting. For some kinds of paper,
several Media Type settings are available for selection.
Note:
❏ The availability of special media varies by country.
3
3
3
❏ When you are using paper other than Epson special media, see
“Notes on Epson Special Media and Other Media” on page 263.
❏ For the latest information on media available in your area, refer to
the Epson customer website. See “Contacting Customer Support”
on page 355.
Media Type setting list
3
3
3
Media Type Setting
Epson Special Media Name/
Description
Photo Quality Ink Jet Paper
Photo Quality Ink Jet Paper
Singleweight Matte Paper
Singleweight Matte Paper
Enhanced Matte Paper
Enhanced Matte Paper
Archival Matte Paper
Archival Matte Paper
Photo Glossy Paper
Photo Glossy Paper
Photo Semigloss Paper
Photo Semigloss Paper
Premium Glossy Photo Paper
Premium Glossy Photo Paper
Premium Semigloss Photo Paper
Premium Semigloss Photo Paper
Premium Luster Photo Paper
Premium Luster Photo Paper
Printing with Mac OS X
3
3
3
3
3
189
Premium Luster Photo Paper (250)
Premium Luster Photo Paper (250)
Premium Glossy Photo Paper (250)
Premium Glossy Photo Paper (250)
Premium Semigloss Photo Paper
(250)
Premium Semigloss Photo Paper
(250)
Premium Semimatte Photo Paper
(250)
Premium Semimatte Photo Paper
(250)
Photo Paper Gloss 250
Photo Paper Gloss 250
Proofing Paper Semimatte
EPSON Proofing Paper Semimatte
(Commercial)
Watercolor Paper - Radiant White
Watercolor Paper - Radiant White
Textured Fine Art Paper
Textured Fine Art Paper
Velvet Fine Art Paper
Velvet Fine Art Paper
UltraSmooth Fine Art Paper
UltraSmooth Fine Art Paper
Plain Paper
-
Plain Paper (Line drawing)
-
Singleweight Matte Paper
(line drawing)
Singleweight Matte Paper
Tracing Paper
-
Color
EPSON Stylus Pro 4400
Make the Color setting. Select Color/B&W Photo to print color
or monochrome photos, or Black to print a draft or black text only.
Note:
When printing on any media other than tracing paper, we recommend
Color/B&W Photo even if the data to print is black.
190
Printing with Mac OS X
EPSON Stylus Pro 4800
Note:
When printing on any media other than tracing paper, we recommend
Color even if the data to print is black.
3
English
Make the Color setting. Select Color to print color or monochrome
photos, or Black to print a draft or black text only. If you want to
print advanced monochrome photos, select Advanced B&W
Photo.
3
3
3
Mode
You can select the Automatic, Custom, or Advanced settings.
3
Automatic
Automatic is the quickest and easiest way to start printing. When
Automatic is selected, the printer driver takes care of all detailed
settings based on the current Media Type and Color settings.
3
3
3
3
3
3
3
Printing with Mac OS X
191
Quality and Speed slider
Depending on the media you choose in the Media Type setting
while Color (or Color/B&W Photo) or Black is selected as the
Color setting and Automatic as the Mode setting, a Quality or
Speed slider appears in the Mode box. Select Quality when print
quality is more important than print speed. Select Speed when
print speed is more important than print quality.
Color Control mode
When Color (or Color/B&W Photo) is selected as the Color
setting and Automatic as the Mode setting, the Color Control
pull-down menu appears.
You can select from the following settings.
EPSON Vivid
Select this setting to produce vivid blue and green tones
in printouts.
Note:
Because this setting reproduces blue and green tones
that cannot be displayed by your monitor, your printouts
may differ from the screen images when this function is
selected.
192
Charts and
Graphs
Intensifies the colors and lightens the midtones and
highlights of an image. Use this setting for presentation
graphics, such as charts and graphs.
EPSON
Standard
(sRGB)
For EPSON Stylus Pro 4800 only:
Increases the contrast in images. Use this setting for color
photographs.
Adobe RGB
For EPSON Stylus Pro 4800 only:
Matches image color to Adobe RGB.
Printing with Mac OS X
Custom
3
English
Custom lets you make a wide range of changes with a single click
of the mouse. In the Custom Settings pull-down menu, you will
find ready-made settings provided by Epson.
3
3
3
3
3
3
The Custom Settings pull-down menu includes the following
ready-made settings.
Note:
These ready-made settings may be dimmed, depending on the Media
Type and Color settings.
Advanced Photo
Advanced Photo
2880 dpi
ColorSync
Good for printing scanned photos and digitally
captured images in high quality. Helps prevent
misprinting of ink dots that may occur due to
movement of the print heads and paper.
3
3
3
Automatically adjusts printout colors to match
colors on your screen.
Printing with Mac OS X
3
3
193
Advanced Settings
Advanced Setting gives you complete control over your printing
environment. Use these settings to experiment with new printing
ideas, or to fine-tune a range of print settings to meet your
individual needs. Once you are satisfied with your new settings,
you can give them a name and add them to the Custom Settings
list.
194
Print Quality
Select the print quality that you want to use for printing.
Super
MicroWeave
Gives you slightly more detail, but the print time will be
longer.
High Speed
Activates bidirectional printing so your printer prints in
both left-to-right and right-to-left directions. This setting
speeds up printing, but decreases the print quality.
Flip Horizontal
Prints your data as it would appear in a mirror. Text and
graphics appear reversed.
Printing with Mac OS X
Depending on the Print Quality setting you select, you
can turn on Finest Detail to print text, solid graphics,
and line art with very sharp edges.
Color Toning
When you select Advanced B&W Photo as the Color,
the Color Toning pull-down menu appears.
(For EPSON
Stylus Pro 4800
only)
Neutral:
This setting provides standard image correction for
most photos. Try this first.
3
English
Finest Detail
3
3
Cool:
This setting gives a cool tone to your photos.
3
Warm:
This setting gives a warm tone to your photos.
Sepia:
This setting applies a sepia tone to your photos.
Fine Adjustment:
This setting appears when you change the Tone, adjust
the settings using the slide bars or the color circle, or
select the Highlight Point Shift check box.
3
3
3
3
3
3
3
3
Printing with Mac OS X
195
Printer Color Management
This option gives you control over the color matching and
adjustment methods provided by the printer driver.
Use these settings to experiment with new printing ideas or to
fine-tune a range of printer settings to meet your individual
needs. Once you are satisfied with your new settings, you can add
them to the Custom Setting list in the Print dialog.
196
Printing with Mac OS X
Color Controls
3
English
Select this setting to use the color matching and adjustment
methods provided with the printer. Click the triangle next to the
Advanced Settings to see details.
3
3
3
3
3
3
3
3
3
3
3
Printing with Mac OS X
197
Mode
EPSON Vivid
Select this setting to enrich the blue and green tones in
printouts.
Note:
Because this setting reproduces blue and green tones
that cannot be displayed by your monitor, your printouts
may differ from the screen images when this function is
selected.
Charts and
Graphs
Intensifies the colors and lightens the midtones and
highlights of an image. Use this setting for presentation
graphics, such as charts and graphs.
EPSON
Standard
(sRGB)
For EPSON Stylus Pro 4800 only:
Increases the contrast in images. Use this setting for color
photographs.
Adobe RGB
For EPSON Stylus Pro 4800 only:
Matches image color to Adobe RGB.
Gamma
Controls image contrast by modifying the midtones and
mid-level grays.
Advanced Settings
The color enhancement sliders adjust the indicated options in a
range of -25% to +25%.
Drag the slider to the right or left with your mouse to adjust the
settings. You can also type a value from -25% to +25% in the boxes
next to the sliders.
198
Printing with Mac OS X
Color Controls (for Advanced B&W Photo)
3
English
When Advanced B&W Photo is selected as the Color, the
following screen appears. You can adjust the advanced
monochrome settings. For the details of additional settings, see
the online help.
3
3
3
3
3
3
3
3
3
3
3
Printing with Mac OS X
199
ColorSync
This setting automatically adjusts printout colors to match colors
on your screen. Select this setting when printing scanned
photographs or computer graphics.
Note:
Be aware that the ambient light and the age, quality, and settings of the
monitor can affect the quality of your color matching.
200
Printing with Mac OS X
Off (No Color Adjustment)
3
English
This setting is generally not recommended, because it does not
allow the printer driver to enhance or adjust the color in any way.
Only use this setting when you create a new color profile or if the
other Mode settings do not produce satisfactory results.
3
3
3
3
3
3
3
3
3
3
3
Printing with Mac OS X
201
Paper Configuration
The following settings in Paper Configuration let you make the
detailed paper settings. If you are using non-Epson special media,
make these settings as needed.
Mode
Description
Color Density
Adjusts the strength of Color Density. Use a value in the
range of -50% to +50%. Drag the slider with your mouse to
the right direction (+) to deepen the color of your printout
or left direction (-) to lighten its color. You can also type
a number (-50 to +50) in the box next to the slider.
Use this function when you print on paper other than
Epson special media.
Set the scroll bar to the 0 position when you print on Epson
special media.
Note:
Deepening of the color of printout may not be possible,
depending on the printing mode.
202
Printing with Mac OS X
Description
Drying Time
per Print
Head Pass
Adds a waiting time when the print head reaches the end
of every pass.
Set this value using the slider or text box. To improve the
print quality by using slow ink absorption on the media,
set a higher value.
The drying time per print head pass can be set from 0 to
5 seconds, in 0.1 second increments.
Note:
If you use this feature, the printing time will be longer.
Paper Feed
Adjustment
Controls the paper feeding value, in 0.01% increments. If
the paper feeding value is too large, white horizontal
micro banding may appear. If the paper feeding value
is too small, dark horizontal micro banding may appear.
Paper
Thickness
This value automatically appears according to the media
for the Media Type setting. If you use non-Epson media,
modify this value for your media is recommended. Refer
to the paper specifications, or print "Thickness Pattern" to
find out the paper thickness.
Paper Suction
Cut Method
3
English
Mode
3
3
3
3
3
Decreasing the air suction at the platen is useful to avoid
wrinkling or waving of thin or saturated media, or
eliminating vertical banding. The relationship of the
parameter and suction power is as follows.
3
Standard : 100%
-1: 50%
-2: 30%
-3: 10%
-4: 6%
3
Determines the best cutting method according to the
paper thickness.
Standard:
Normal speed and normal cut pressure
Thin Paper:
Low cut pressure
Thick Paper, Fast:High speed and high cut pressure
Thick Paper, Slow:Low speed and high cut pressure
3
3
3
3
Printing with Mac OS X
203
Mode
Description
Platen Gap
Platen Gap is the height from the media loaded in the
printer to the print head. By adjusting this parameter, you
may produce better print quality. This is set automatically
according to the Paper Thickness setting specified.
Note:
Setting Platen Gap to Narrow may produce better print
quality, but make sure the media does not wrinkle or
touch the print head; otherwise, printed data or the print
head surface may be damaged. Use Wider or Wide in
such case.
Eject Roller
Type
Select the Eject Roller Type that best fits your media.
Auto:
The printer selects the most appropriate setting
automatically. When you use Epson special media,
usually select this setting.
Starwheel-Sheet:
If you want to print on cut-sheet paper that is non-Epson
special media, select this setting.
Starwheel-Roll Curled:
If you want to print on strongly curled roll paper that is
non-Epson special media, select this setting.
No Roller-Roll Normal:
If you want to print on roll paper that is non-Epson special
media, select this setting.
204
Printing with Mac OS X
You can make Auto Cut, Print Page Line, and Save Roll Paper
settings.
3
English
Roll Paper Option
3
3
3
3
Auto Cut
3
You can select the following cutting methods.
3
Single Cut
Select this setting if you want to save paper.
If you select this setting, the boundary of a picture or the boundary
of a page is cut. However, the cut position may shift slightly.
3
3
3
3
3
Printing with Mac OS X
205
Note:
When printing on Premium Glossy Photo Paper (250) roll paper or
Premium Semigloss Photo Paper (250) roll paper, do not select this
setting; otherwise, print quality may decline.
Double Cut
Select this setting to avoid the slight gap that occurs with the
Single Cut setting. A margin is created between the pictures, and
1 mm along the inside of each picture is cut.
206
Printing with Mac OS X
Normal Cut
3
English
Select this setting to keep margins at the top and bottom of the
printed data.
3
3
3
3
3
Off
Select this setting to cut the printouts manually. To cut the
printouts manually, follow the steps below.
3
1. Press the Paper Feed or Paper Feed button, and match
the cutting position with the scissors mark on the left side of
the print head.
3
3
3
3
3
Printing with Mac OS X
207
2. Press the Paper Source
button to select Auto Cut On
.
3. Press and hold the Paper Source button for 3 seconds. The
paper cutter cuts the printout at the cutting position.
Print Page Line
You can specify whether to print a page line on the right side and
also below the printed data for manual cutting.
The Print Page Line operation changes according to the Auto Cut
setting. Check these settings as necessary by referring the printer’s
operation.
Auto Cut
Print Page Line
Printer’s Operation
Single Cut
Double Cut
Normal Cut
Selected
Prints page line on the right side
only, and cuts paper
automatically after the print job.
Single Cut
Double Cut
Normal Cut
Not selected
Does not print page line, and
cuts paper automatically after
the print job.
Off
Selected
Prints page lines on the right side
and below the printed data, but
does not cut paper
automatically after the print job.
Off
Not selected
Does not print page lines or cut
paper automatically after the
print job.
Save Roll Paper
This function is effective if you wish to save roll paper, because
blank portion of the last page or your printed data is not fed
through the printer.
208
Printing with Mac OS X
You can print your data without margins on paper. This menu
appears when you select the paper size with Borderless (Auto
Expand), Borderless (Auto Expand, Maximum), or Roll Paper
- Borderless (Auto Expand) as the Paper Size in the Page Setup
dialog.
3
English
Expansion
3
3
3
3
3
3
Amount of
Enlargement
Using the slider, you can control the amount of the image
that extends beyond the edges of paper during
borderless printing.
3
For most print jobs, Standard is recommended to
eliminate margins on all sides of paper.
In a very humid environment, the width of paper may
expand due to moisture absorption. In this case, move
the slider to Max to eliminate margins around the image.
If Max is selected, the center of the image may move
about 1 mm to the right.
Moving the slider towards Min decreases the amount of
the image enlargement; however, as this amount
decreases, margins may appear on one or more sides of
paper.
Printing with Mac OS X
3
209
3
3
3
Summary
You can confirm the current settings in the Print dialog.
Note:
The Summary option is a standard feature of Mac OS X.
Saving your settings in the Print dialog
To save your settings in the Print dialog, follow the steps below.
1. Select Save as from the Presets.
2. Enter the name of the custom setting in the Save Preset As.
3. Make sure that the name you entered in step 2 is saved in the
Presets pull-down menu.
210
Printing with Mac OS X
To use your saved settings, select the name of your custom setting
from the Presets pull-down menu.
If you change the Media Type or Color settings while your
customized setting is selected in the Saved Settings list, your
saved setting is not affected by the change. To return to your saved
setting, simply reselect it in the list.
3
English
Using your saved settings in the Print dialog
3
3
3
Preview
You can see how your data will look before actually printing it.
Note:
Preview is a standard feature of Mac OS X.
3
3
To preview your data, follow the steps below.
3
1. Make your printer driver settings.
2. Click Preview in the Print dialog. The Preview dialog appears
and displays a preview of your data.
3
3
3
3
3
Printing with Mac OS X
211
Performing Borderless Printing
When selecting the paper size with Borderless (Auto Expand),
Borderless (Auto Expand, Maximum), Borderless (Retain
Size), Borderless (Retain Size, Maximum), Roll Paper Borderless (Auto Expand), Roll Paper - Borderless (Retain
Size), or Roll Paper - Borderless Banner as the Paper Size in the
Page Setup dialog, Epson recommends the following media
conditions.
Accommodate media width:
❏
❏
❏
❏
❏
❏
❏
❏
❏
❏
❏
❏
❏
❏
❏
8 inch, 203.2 mm
210 mm (A4)
Letter (8.5 in), 215.9 mm
10 inch, 254 mm
257 mm
297 mm (A3)
300 mm
12 inch, 304.8 mm
329 mm (Super A3/B)
13 inch, 330.2 mm
14 inch, 355.6 mm
400 mm
16 inch, 406.4 mm
420 mm (A2)
17 inch, 431.8 mm
Note:
❏ You cannot perform borderless printing on cut-sheet media with a
width of 420 mm (A2).
❏ When printing on roll paper with a width of 8 inches (203.2 inch)
or 420 mm (A2), attach the spacer to the spindle. See “Attaching
the spacer to the spindle” on page 267.
❏ If your application has margin settings, make sure they are set to
zero before printing.
212
Printing with Mac OS X
❏ The ink may contaminate the platen of the printer. In this case, wipe
the ink away using a cloth.
❏ Printing with this feature takes longer time than normal printing.
❏ Only Plain Paper and Plain Paper (line drawing) can set the bottom
margin to 3 mm. When printing on the other media, the bottom
margin is always 14 mm.
❏ When Premium Glossy Photo Paper (250) roll paper or Premium
Semigloss Photo Paper (250) roll paper is used in printing, the top
margin is always 20 mm.
❏ Smear may result in the top and bottom areas depending on the
media.
To perform borderless printing, follow the steps below.
Note:
Always match the Format for setting in the Page Setup dialog with the
Printer setting in the Print dialog; otherwise, data may not be printed
correctly.
1. Select the paper size with Borderless (Auto Expand),
Borderless (Auto Expand, Maximum), Borderless (Retain
Size), Borderless (Retain Size, Maximum), Roll Paper Borderless (Auto Expand), Roll Paper - Borderless (Retain
Size), or Roll Paper - Borderless Banner as the Paper Size in
the Page Setup dialog.
2. Make the Auto Cut setting. See “Auto Cut” on page 205.
3
3
3
3
3
3
3
3
3
3
3. Click OK.
3
4. Start printing your data from your application.
Printing with Mac OS X
3
English
❏ When printing on cut-sheet media, only the left and right margins
are set to zero.
213
Canceling Printing
To cancel printing, follow the steps below.
1. Open the Print Center.
2. Turn off the printer.
3. In the Document Name list, select the data which is printing
and click the Delete button to cancel printing.
Printer Utility Dialog
Accessing the EPSON Printer Utility
To access the EPSON Printer Utility, follow the steps below.
1. Double-click Macintosh HD (default setting).
2. Double-click the Applications folder.
3. Double-click the EPSON Printer Utility icon.
Mac OS X 10.2 or later users can also access the EPSON Printer
Utility dialog in the following way.
1. Double-click Macintosh HD (default setting).
2. Double-click the Applications folder.
3. Double-click the Utilities folder.
4. Double-click the Print Center icon (for Mac OS X 10.2.X) or
Printer Setup Utility (for Mac OS X 10.3).
214
Printing with Mac OS X
6. Click the Configure button (for Mac OS X 10.2.x) or the Utility
button (for Mac OS X 10.3.x) in the Printer List dialog.
Using the Printer Utilities
3
English
5. Select the printer you want to use to access its EPSON Printer
Utility.
3
3
The EPSON printer utilities let you check the current printer
status and perform printer maintenance from your computer.
You can also access the Reference Guide, the paper information,
and the Technical Support Web Site by clicking the Print Assistant
button.
3
3
3
3
3
3
3
Note:
❏ Do not use the Nozzle Check, Head Cleaning, or Print Head
Alignment utilities if your printer is connected to your computer
through a network.
Printing with Mac OS X
215
3
3
❏ Do not use the Nozzle Check, Head Cleaning, or Print Head
Alignment utilities while printing is in progress; otherwise, your
printout may be marred.
EPSON StatusMonitor
This utility provides you with printer status information, such as
the amount of remaining ink.
Nozzle Check
This utility checks the print head nozzles for clogging. Check the
nozzles when you notice the print quality has declined and after
cleaning to confirm that the print head nozzles have been cleared.
See “Checking the print head nozzles” on page 217.
If you click Auto in the Nozzle Check dialog, or turn on AUTO
CLEANING from the control panel on the printer, this utility not
only checks the clogging nozzles, but also performs head cleaning
automatically.
Head Cleaning
This utility cleans the print head. You may need to clean the print
head if you notice the print quality has declined. Use this utility
to perform head cleaning. See “Cleaning the print head” on page
219.
Print Head Alignment
This utility can be used to improve the print quality of your
printed data. The alignment of the print head may need to be
adjusted if vertical lines appear out of alignment or if white or
black banding noise appear in your printed data. Use this utility
to realign the print head. See “Aligning the print head” on page
220.
216
Printing with Mac OS X
EPSON LFP Remote Panel
3
English
This utility lets you optimize your printer. See “Starting EPSON
LFP Remote Panel” on page 220.
3
Print Assistant
You can also access the Reference Guide, the media information,
and Technical Support Web Site by clicking the Print Assistant
button. See “Using the Print Assistant function” on page 221.
3
3
Checking the print head nozzles
If you find that the printed data is unexpectedly faint or dots in
the printed data are missing, you may be able to identify the
problem by checking the print head nozzles by using the Nozzle
Check utility.
To use the Nozzle Check utility, follow the steps below.
3
3
3
Note:
Do not start the Nozzle Check utility while printing is in progress;
otherwise, your printout may be marred.
3
1. Make sure paper is loaded in the printer.
3
2. Click Nozzle Check.
3
3
3
Printing with Mac OS X
217
3. Click Print if you want to visually check to see if any print
head nozzles are clogged, if you are using non-Epson special
media, or if the width of paper you are using is less than
210 mm. Click Auto if you want to perform an automatic
nozzle check, and if the nozzle check indicates it is necessary.
Note:
If you turn on AUTO CLEANING from the control panel on the printer
even though Print has been selected, the Nozzle Check utility not
only checks for the clogged nozzles, but also performs head cleaning
automatically. If you are using non-Epson special media, or if the
width of paper you are using is less than 210 mm, turn off AUTO
CLEANING from the control panel on the printer.
4. Follow the on-screen instructions to print a nozzle check
pattern.
5. If you find missing dots, clean the print head nozzles,
referring “Cleaning the print head” on page 219.
218
Printing with Mac OS X
If you find that the printed data is unexpectedly faint or dots in
the printed data are missing, you may be able to solve these
problems by using the Head Cleaning utility to clean the print
head, which ensures that the nozzles are delivering ink properly.
3
English
Cleaning the print head
3
3
To use the Head Cleaning utility, follow the steps below.
Note:
❏ Do not start the Head Cleaning utility while printing is in progress;
otherwise, your printout may be marred.
❏ To save ink, use the Nozzle Check utility first to confirm that the
print head needs to be cleaned. This is because the cleaning process
consumes some ink.
❏ When one check ink out light is flashing or on, you cannot clean the
print head. Replace the appropriate ink cartridge first. See
“Replacing Ink Cartridges” on page 295.
1. Make sure the printer is turned on and all ink check lights are
off.
3
3
3
3
3
2. Click Head Cleaning.
3. Follow the on-screen instructions.
4. Click Print Nozzle Check Pattern in the Head Cleaning
dialog to confirm that the head is cleaned and to reset the
cleaning cycle.
If you still find missing dots after cleaning, try these solutions.
❏ Select PWR CLEANING from the control panel on the printer. See
“PWR CLEANING” on page 245.
❏ Repeat this procedure four or five times, turn the printer off
and leave it alone overnight, and then try head cleaning again.
Printing with Mac OS X
219
3
3
3
3
❏ Replace some of ink cartridges as they may be old or
damaged.
If the print quality remains a problem after you have tried these
solutions, contact your dealer. See “Contacting Customer
Support” on page 355.
Aligning the print head
If you find misaligned lines or black or white banding on the
printed data, you may be able to solve these problems by using
the Print Head Alignment utility to align the print head.
To use the Print Head Alignment utility, follow the steps below.
1. Make sure paper is loaded in the printer.
2. Click Print Head Alignment.
3. Follow the on-screen instructions.
Starting EPSON LFP Remote Panel
You can optimize your printer by using this utility. To start
EPSON LFP Remote Panel, see the steps below.
1. Make sure the printer is turned on.
2. Click EPSON LFP Remote Panel.
3. See the EPSON LFP Remote Panel online help for details.
220
Printing with Mac OS X
You can access the following information by clicking the Print
Assistant button:
❏ Reference Guide (Troubleshooting page)
❏ Paper information that is most suitable for the printing
3
English
Using the Print Assistant function
3
3
❏ Technical Support Web Site
3
Getting Information Through Online Help
3
Your printer software has extensive online help, which provides
you with instructions on printing, making printer driver settings,
and using the printer utilities.
To access the online help, follow the steps below.
3
3
1. Click Print on the File menu of your application.
2. Select Print Settings or Printer Color Management option.
3. Click the Help button.
3
3
3
3
3
Printing with Mac OS X
221
Uninstalling the Printer Software
To uninstall the printer driver, follow the steps below.
1. Turn on your computer and insert the printer software
CD-ROM into the CD-ROM drive. The Epson printer software
disk opens automatically.
2. Open the Mac OS X Software folder.
3. Double-click the Printer Driver folder.
4. Double-click the SPro4400_xxx or SPro4800_xxx icon.
5. If the Authenticate dialog appears, enter the password or
phrase and then click OK.
6. Click Continue.
7. Select Uninstall from the pull-down menu at the top left, and
click the Uninstall button at the bottom right.
222
Printing with Mac OS X
Chapter 4
English
4
The Control Panel
4
Buttons, Lights, and Messages
The control panel of the printer consists of 6 buttons, 3 lights, and
a 32-character liquid crystal display (LCD).
4
4
4
1 2 3 4 5 6 7 8
4
Menu
3sec.
4
Buttons
4
This section describes the functions of the buttons on the control
panel.
Button
Description
1
Power button
Turns the printer on or off.
2
Pause button
Stops printing temporarily.
4
Restarts printing if pressed when printer is in the
pause mode.
Clears print data in the printer memory if
pressed and held for 3 seconds.
The printer returns to the READY status when this
button is pressed in the SelecType mode.
The Control Panel
4
223
4
4
3
Paper Source
button
Selects a paper source (Roll Auto Cut On
/Roll Auto Cut Off
/Sheet )
Cuts the roll paper automatically after printing
if pressed and held for 3 seconds when Roll
Auto Cut On
is selected.
Returns to the previous level when pressed in
the SelecType mode.
4
Paper Feed
button
Feeds paper the in forward direction.
Ejects the cut-sheet paper when Sheet
selected as the paper source.
is
Feeds the roll paper before cutting it when Roll
Auto Cut On
setting is selected as the
paper source.
Loads a sheet from the paper tray to the
printing position automatically if Sheet
is
selected as the paper source.
Selects a desired parameter from the selected
item if pressed in the SelecType mode.
Changes the parameters in forward order
when selecting a desired parameter in the
SelecType mode.
5
Paper Feed
button
Feeds paper in the reverse direction as much
as the paper has been fed by using the Paper
Feed button
.
Note:
If you have fed the paper forward by hand,
you cannot feed the paper in the reverse
direction by using this button.
Loads a sheet from the paper tray to the
printing position automatically if Sheet
is
selected as the paper source.
Selects a desired parameter from the selected
item if pressed in the SelecType mode.
Changes the parameter in the reverse order
when selecting a desired parameter in the
SelecType mode.
224
The Control Panel
Menu button
Enters the SelecType mode.
4
English
6
Enters PRINT STATUS MENU if pressed during
printing.
Selects a desired menu in forward order if
pressed in the SelecType mode.
Sets the selected parameter in the selected
item in the SelecType mode.
Executes the item if the selected item is for
execution only.
Cleans the print head if pressed and held for 3
seconds.
This section describes the functions of the lights on the control
panel.
The lights let you know the status of the printer and the type of
an error when it occurs.
Light
8
4
4
4
Lights
7
4
Description
Pause light (green)
Ink check light
(red)
4
4
4
On:
The printer is in the pause mode.
Flashing:
The printer is printing.
The printer is cleaning the print head.
The printer is drying ink on the printed paper.
4
Off:
The printer is ready to print data.
4
On:
The installed ink cartridge is empty.
The installed ink cartridges cannot be used
with this printer.
The maintenance tank is full.
4
4
Flashing:
The installed ink cartridge is nearly empty.
The maintenance tank is nearly full.
The Control Panel
225
9
Paper check light
(red)
On:
No paper is loaded in the paper tray when
Sheet
is selected as the paper source.
Roll paper is out when Roll Auto Cut On
or
Roll Auto Cut Off
is selected as the paper
source.
The selected paper source (Roll Auto Cut On
/Roll Auto Cut Off
/Sheet ) does not
match the paper source in the printer driver.
The paper lever is in the released position.
The loaded paper is too thick for head
cleaning.
Flashing:
Paper is jammed.
Paper is not cut correctly after the print job
when Roll Auto Cut On
is selected as the
paper source.
Paper is not loaded straight.
Paper is not detected.
Cut sheet is not ejected correctly.
Combination of buttons
This section describes the functions available when several
buttons are pressed at the same time.
Buttons
Function
1. Power button
If the printer is turned on while you are
pressing and holding the Pause button, the
printer enters the Maintenance Mode.
2. Pause button
226
The Control Panel
This section describes the meaning of messages displayed on the
LCD.
The messages are either status messages or error messages. For
error messages, see “An error has occurred” on page 320.
4
English
Messages
4
4
Message
Description
READY
The printer is ready to print data.
PRINTING
The printer is processing data.
PLEASE WAIT
Wait until READY appears.
PAUSE
The printer is paused.
PRESS PAUSE
BUTTON
Press the Pause button.
CUTTING
The printer is cutting the printout.
CHARGING INK
The printer is charging the ink delivery system.
RESET
The printer is being reset.
F/W UPDATING
The printer is updating the FirmWare.
UPDATE COMPLETE
The printer has completed update of the FirmWare.
POWER OFF
The printer is being turned off.
CLEANING
The printer is cleaning the ink tubes.
4
4
4
4
4
4
4
4
4
The Control Panel
227
SelecType Settings
When to use SelecType
The SelecType mode enables you to make printer settings similar
to those you would normally make in the driver or software, as
well as other additional settings — directly through the control
panel.
Note:
❏ Some applications may send commands to the printer that override
the SelecType settings. If you are not getting the results you expect,
check your application’s settings.
❏ To see the current SelecType settings, print a status sheet.
228
The Control Panel
Note:
If you are using EPSON Stylus Pro 4400, PRINTABLE PG and INK
LEFT show only 4 ink cartridges.
Menu
Item
Parameter
“PRINTER SETUP”
on page 235
“ROLL COUNTER or SHEET
COUNTER” on page 235
-
“PLATEN GAP” on page
236
NARROW, STANDARD,
WIDE, WIDER, WIDEST
“PAGE LINE” on page 236
ON, OFF
“INTERFACE” on page
237
AUTO, USB, IEEE1394,
OPTION
“CODE PAGE” on page
237
PC437, PC850
“PAPER MARGIN” on
page 237
T/B15 mm, T/B35 mm,
15 mm, 3 mm
“PPR SIZE CHK” on page
238
ON, OFF
“PPR ALIGN CHK” on
page 238
ON, OFF
“TIME OUT” on page 238
OFF, 30SEC, 60SEC,
180SEC, 300SEC
“CUTTER ADJ” on page
238
EXEC
“REFRESH MRGN” on
page 238
ON, OFF
“SHEET SIZE CK” on page
239
ON, OFF
“AUTO NZL CK” on page
239
ON, OFF
“AUTO CLEANING” on
page 239
OFF, ON
“QUIET CUT” on page 239
ON, OFF
“INIT SETTINGS” on page
239
EXEC
The Control Panel
4
English
SelecType menu list
4
4
4
4
4
4
4
4
4
4
4
229
“TEST PRINT” on
page 240
230
The Control Panel
“NOZZLE CHECK” on
page 240
PRINT
“STATUS CHECK” on page
240
PRINT
“JOB INFO” on page 240
PRINT
“CUSTOM PAPER” on
page 240
PRINT
“VERSION” on page 240
Axxxxx
“PRINTABLE PG” on page
241
MK (or PK) xxxxxxxPG
C xxxxxxxPG
4
M xxxxxxxPG
Y xxxxxxxPG
LK xxxxxxxPG
4
LC xxxxxxxPG
LM xxxxxxxPG
4
LLK xxxxxxxPG
“INK LEFT” on page 241
MK (or PK) E*****F,
E****F, E***F, E**F, E*F,
nn%
C E*****F, E****F, E***F,
E**F, E*F, nn%
M E*****F, E****F, E***F,
E**F, E*F, nn%
Y E*****F, E****F, E***F,
E**F, E*F, nn%
LK E*****F, E****F, E***F,
E**F, E*F, nn%
LC E*****F, E****F, E***F,
E**F, E*F, nn%
LM E*****F, E****F, E***F,
E**F, E*F, nn%
LLK E*****F, E****F,
E***F, E**F, E*F, nn%
“MAINT TANK” on page
241
E*****F, E****F, E***F,
E**F, E*F, nn%, 0%
“USAGE COUNT” on
page 242
INK xxxxx. xml
4
English
“PRINTER STATUS”
on page 240
4
4
4
4
4
4
4
PPR xxxxx. xcm
4
The Control Panel
231
“USE COUNT CLR” on
page 242
INK EXEC
PAPER EXEC
“JOB HISTORY” on page
242
No. 0-No. 9
“JOB HSTRY CLR” on
page 242
EXEC
“TOTAL PRINTS” on page
242
nnnnnn
“SERVICE LIFE” on page
242
CUTTER
E*****F, E****F, E***F,
E**F, E*F, EF
CR MOTOR
E*****F, E****F, E***F,
E**F, E*F, EF
PF MOTOR
E*****F, E****F, E***F,
E**F, E*F, EF
HEAD UNIT
E*****F, E****F, E***F,
E**F, E*F, EF
CLEANING UNIT
E*****F, E****F, E***F,
E**F, E*F, EF
232
The Control Panel
“MAINTENANCE”
on page 245
“HEAD
ALIGNMENT” on
page 246
“CUTTER REPLACE”
on page 246
“PAPER NUMBER” on
page 243
STANDARD, 1-10
“PLATEN GAP” on page
243
NARROW, STANDARD,
WIDE, WIDER, WIDEST
“THICKNESS PAT” on
page 243
PRINT
“THICKNESS NUM” on
page 244
1 - 16
“CUT METHOD” on page
244
STANDARD, THIN
PAPER, THICK,FAST,
THICK,SLOW
“PPR FEED ADJ” on page
244
-0.70% - 0.70%
4
“EJECT ROLLER” on page
244
AUTO, SHEET, ROLL
CURLED, ROLL
NORMAL
4
“DRYING TIME” on page
245
0.0 SEC- 10.0 SEC
“SUCTION” on page 245
STANDARD, -1, -2, -3, -4
“M/W ADJ” on page 245
STANDARD, 1, 2
“CUTTER REPL” on page
245
EXEC
“BK INK CHANGE” on
page 245
EXEC
“PWR CLEANING” on
page 245
Y, N
“CLOCK SETTING” on
page 245
YY/MM/DD HH:MM
MM/DD/YY HH:MM
“PAPER THKNS” on page
246
STD, 0.1 mm - 1.6 mm
“ALIGNMENT” on page
246
AUTO, MANUAL
EXEC
-
4
English
“CUSTOM PAPER”
on page 243
4
4
4
4
4
4
4
4
4
The Control Panel
233
Basic SelecType setting procedure
This section describes how to enter the SelecType mode and make
settings with the buttons on the control panel.
Note:
❏ Press the Pause button whenever you want to exit the SelecType
mode and return to the READY status.
❏ Press the Paper Source
button to return to the previous step.
1. Enter the SelecType mode
Make sure that READY appears on the LCD, and then press the
button. The first menu appears on the LCD.
Menu
2. Select a menu
Press the Paper Feed
desired menu.
or Paper Feed
button to select a
3. Set the menu
Press the Menu
button to set the selected menu. The first
item appears on the LCD.
4. Select an item
Press the Paper Feed
desired item.
or Paper Feed
button to select a
5. Set the item
Press the Menu
button to enter the selected item. The first
parameter appears on the LCD.
6. Select a parameter
Press the Paper Feed or Paper Feed
parameter for the item.
234
The Control Panel
button to select a
After execution, the printer exits the SelecType mode and
returns to the READY status.
8. Exit the SelecType mode
Press the Pause button. The printer returns to the READY
status.
Details of SelecType
4
English
7. Set the parameter
Press the Menu
button to store the selected parameter. If
the parameter is for execution only, press the Menu button
to execute the function for the item.
4
4
4
4
PRINTER SETUP
4
This menu contains the following items.
ROLL COUNTER or SHEET COUNTER
4
You can get a message when there is not much paper left, by
setting the roll alert or sheet alert.
When using roll paper, enter the length of roll paper set in the
printer and the alert value.
When using cut-sheet paper, enter the number of cut sheets set in
the printer and the alert value.
Note:
This setting is available only when you select Roll Paper or Cut Sheet
for PAPER COUNTER in the Maintenance mode.
4
4
4
4
4
The Control Panel
235
PLATEN GAP
You can adjust the distance between the print head and paper.
Normally, leave this set to STANDARD. If you find that printed
images are smeared, select WIDE or WIDER. Select NARROW for
printing on thin paper, or WIDEST for printing on thick paper.
PAGE LINE
You can select whether to print the page line (line along which to
cut off) on roll paper. Select ON if you want to print the page line,
or OFF otherwise.
This operation changes according to the Auto Cut settings.
Paper Source
Print Page Line
Printer’s Operation
Roll Auto Cut On
On
Prints a page line on the right
side only, and cuts paper
automatically after the print
job.
Roll Auto Cut On
Off
Does not print any page lines,
and cuts paper automatically
after the print job.
Roll Auto Cut Off
On
Prints page lines on the right
side and below the data, but
does not cut paper
automatically after the print
job.
Roll Auto Cut Off
Off
Does not print any page lines
and does not cut paper.
Note:
When Sheet
236
is selected as the paper source, this setting is not available.
The Control Panel
INTERFACE
CODE PAGE
You can select a code page: PC437 (extended graphics) or PC850
(multilingual).
You can select margins for roll paper: T/B 15 mm, T/B 35 mm,
15 mm, or 3 mm.
Top
Bottom
Left/Right
T/B 15 mm
15 mm
15 mm
3 mm
T/B 35 mm
35 mm
35 mm
3 mm
15 mm
15 mm
15 mm
15 mm
3 mm
3 mm
3 mm
3 mm
4
15mm
Right
Leading edge
4
4
4
Roll paper
Top
15mm
4
4
Bottom
15mm
Printable area
4
4
When the same data is printed with a 3 mm margin and a 15 mm
margin and compared, you may notice that part of the right side
of the 15 mm margin image is not printed.
Area to be
Clipped
4
4
PAPER MARGIN
Margin settings
4
English
You can select an interface to receive your print data. When you
select AUTO, the printer automatically switches between interfaces,
depending on which one is receiving data first. When you select
USB, IEEE1394, or OPTION, only the selected interface receives your
print data. If no more print job is received, the printer returns to
an idle state after 10 seconds or more.
Print direction
15mm
Left
The Control Panel
237
4
PPR SIZE CHK
When you select ON, the printer stops printing if the width of paper
loaded in the printer does not match the data width. When you
select OFF, the printer continues to print even if the paper width
does not match the data, and the printer may print beyond the
paper.
Note:
When you load the paper using the manual feed slot, select ON.
PPR ALIGN CHK
When you select ON, if the paper is not straight, PAPER NOT
STRAIGHT appears on the LCD and the printer stops printing.
When you select OFF, a paper align error does not occur even if
the printed data is out of range of the paper, and the printer
continues to print.
TIME OUT
The setting range is 30 to 300 seconds. If the cable of your printer
is unplugged or your printer hangs up for more than the set time
range, the print job is cancelled and the printer starts paper feed.
CUTTER ADJ
You can adjust the paper cutting position when printing with a
top and bottom margin of zero. This function prints cutter
adjustment patterns and you can select the appropriate cutting
position from them.
REFRESH MRGN
When you select ON, the printer cuts an extra print area after
borderless printing is used automatically.
238
The Control Panel
SHEET SIZE CK
AUTO NZL CK
4
English
When you select ON, if the size of the cut-sheet paper loaded in the
printer does not match the size of data, the printer stops printing
and WRONG PAPER SIZE appears on the printer’s control panel.
When OFF is selected, the printer continues to print even if the size
of the cut-sheet paper does not match the data, and the printer
may print beyond the paper.
4
4
When you select ON, the printer performs a nozzle check before
printing, for each print job.
4
Note:
❏ Do not select ON if you are using non-Epson special media, or if the
width of paper you are using is less than 210 mm.
4
❏ This setting is available only when you select ON for AUTO
CLEANING.
4
4
AUTO CLEANING
When you select ON and perform a nozzle check from the printer
driver or the control panel, the printer not only checks for clogged
nozzles, but also performs head cleaning automatically.
Note:
Do not select ON if you are using non-Epson special media, or if the width
of paper you are using is less than 210 mm.
4
4
4
QUIET CUT
When you select ON, the printer cuts the printout slowly to
decrease the cutting noise and paper particles.
4
INIT SETTINGS
You can return all setting values you have made in the PRINTER
SETUP to their factory set value.
The Control Panel
239
4
TEST PRINT
This menu contains the following items.
NOZZLE CHECK
You can print a print head nozzle check pattern for each ink
cartridge. From the printing results, you can check whether the
nozzles are delivering ink properly. For details, see “Checking the
print head nozzles” on page 246.
Note:
You can print a nozzle check pattern using the Utility menu in the
printer software. For Windows, see “Checking the print head nozzles”
on page 78. For Mac OS 9.x, see “Checking the print head nozzles” on
page 164. For Mac OS X, see “Checking the print head nozzles” on page
217.
STATUS CHECK
You can print the current SelecType status. For details, see
“Printing a status sheet” on page 256.
JOB INFO
You can print the job information saved in the printer (up to 10
jobs).
CUSTOM PAPER
You can print information that you have registered.
PRINTER STATUS
This menu contains the following items.
VERSION
You can see the firmware version.
240
The Control Panel
PRINTABLE PG
INK LEFT
4
You can see the amount of ink left in each ink cartridge.
E ✽✽✽✽✽ F
(100-81%)
E ✽✽✽✽
F
(80-61%)
E ✽✽✽
F
(60-41%)
E ✽✽
F
(40-21%)
E✽
F
(20-11%)
nn%
(less than 10%)
0%
(ink end)
4
English
You can see the number of pages printable for each ink cartridge.
4
4
4
4
4
MAINT TANK
4
You can see the free capacity of the Maintenance tank.
E ✽✽✽✽✽ F
(100-81%)
E ✽✽✽✽
F
(80-61%)
E ✽✽✽
F
(60-41%)
E ✽✽
F
(40-21%)
E✽
F
(20-11%)
4
4
4
nn%
(less than 10%)
0%
(maintenance tank full)
The Control Panel
4
241
USAGE COUNT
You can see the ink consumption in milliliters and paper
consumption amount in centimeters.
Note:
Values shown in USAGE COUNT are rough indications.
USE COUNT CLR
You can clear the values set in USAGE COUNT.
JOB HISTORY
You can see ink consumption (INK) in milliliters, paper
consumption (PAPER) in cm2, and the time required for a print job
(PRINT TIME) in seconds for each print job saved in the printer.
The latest job is saved as No. 0.
JOB HSTRY CLR
You can clear the job history in the printer.
TOTAL PRINTS
You can see the total amount of pages you have printed.
SERVICE LIFE
You can see the service life of each consumable.
CUTTER
You can see the cutter life.
Note:
Values displayed on the LCD are rough indications.
242
CR MOTOR
For maintenance service person only
PF MOTOR
For maintenance service person only
HEAD UNIT
For maintenance service person only
CLEANING UNIT
For maintenance service person only
The Control Panel
CUSTOM PAPER
English
4
This menu contains the following items. To make the paper
setting, see “Making the paper settings” on page 253.
4
PAPER NUMBER
When you select STANDARD, the printer determines paper
thickness automatically. You can also select No. X (X can be any
number between 1 to 10) to register the following settings or to
recall the following settings you have made.
❏
❏
❏
❏
❏
❏
❏
❏
❏
Platen gap
Thickness pattern
Thickness number
Cut method
Paper feed adjustment
Eject roller type
Drying time
Suction
MicroWeave adjustment
4
4
4
4
Note:
If you select STANDARD, the printer prints data according to the driver
settings. If you select No. X, the control panel settings override the driver
settings unless you select AUTO in THICKNESS NUM.
PLATEN GAP
You can adjust the distance between the print head and paper.
Normally, leave this set to STANDARD. If you find that printed
images are smeared, select WIDE or WIDER. Select NARROW for
printing on thin paper, or WIDEST for printing on thick paper.
4
4
4
4
4
THICKNESS PAT
You can print the paper thickness detection pattern. If you select
STANDARD in PAPER NUMBER, the pattern is not printed.
The Control Panel
243
4
THICKNESS NUM
If you use Epson special media, normally select AUTO. If you use
non-Epson special media, check the paper thickness detection
pattern, and then enter the number for the print pattern with the
smallest gap.
CUT METHOD
You can specify a cutting method: STANDARD, THIN PAPER, THICK,
FAST, or THICK, SLOW.
PPR FEED ADJ
You can set the paper feed amount. The range is -0.70 to 0.70%.
EJECT ROLLER
You can select AUTO, SHEET, ROLL CURLED, or ROLL NORMAL.
AUTO
The printer selects the most appropriate setting
automatically. When you use Epson special media,
usually select this setting.
SHEET
If you want to print on cut-sheet paper that is non-Epson
special media, select this setting.
ROLL CURLED
If you want to print on strongly curled roll paper that is
non-Epson special media, select this setting.
Note:
Make sure that the ink is dry enough on the paper
before the roller touches the media; otherwise, the ink
will soil the roller surface, which stamps on the prints.
ROLL NORMAL
244
If you want to print on roll paper that is non-Epson
special media, select this setting. When roll paper is
selected for the printer, this parameter is selected and
no feed roller is used. If you select this parameter while
using cut sheets, you need to eject the cut-sheet paper
one by one.
The Control Panel
DRYING TIME
4
English
You can set the ink drying time for each print head pass. The range
is 0 to 10 seconds.
4
SUCTION
You can set the suction pressure used to feed the printed-paper.
Select STANDARD, -1, -2, -3, or -4.
M/W ADJ
You can adjust the MicroWeave mode. The setting range is
STANDARD, 1 and 2. Increase the value to give priority to the print
speed, or decrease it to give priority to the print quality.
4
4
4
MAINTENANCE
4
This menu contains the following items.
CUTTER REPL
You can see the procedure used to replace the paper cutter. Follow
the instructions on the LCD.
4
4
BK INK CHANGE
You can change the black ink according to your purpose. You can
choose either Matte Black or Photo Black. See “Converting the
Black Ink Cartridges” on page 300 for details.
4
4
PWR CLEANING
You can use this function to clean the print head more effectively
than normal head cleaning.
CLOCK SETTING
4
You can set year, month, date, hour, and minute.
The Control Panel
4
245
HEAD ALIGNMENT
This menu contains the following items.
PAPER THKNS
You can adjust the thickness of the paper to use. If you use Epson
special media and its paper thickness is 0.2 mm or 1.2 mm, select
STD. If you use non-Epson special media, enter the paper thickness
in the range of 0.1 to 1.6 mm.
ALIGNMENT
You can correct any head misalignment to obtain optimum
printing results. For details, see “Aligning the print head” on page
248.
CUTTER REPLACE
You can see the procedure used to replace the paper cutter. Follow
the instructions on the LCD.
Checking the print head nozzles
To find out if nozzles are delivering ink properly, you can print a
nozzle check pattern. If the nozzles are not delivering ink
properly, missing dots will be evident in the print pattern. To
print a nozzle check pattern, follow the steps below.
Note:
❏ If you want to perform an auto nozzle check before printing for each
print job, select ON for AUTO CLEANING and then select ON for
AUTO NZL CK.
❏ Before you start printing your data, make sure that nozzle check
pattern printing is complete; otherwise, the print quality may
decline.
246
The Control Panel
1. Make sure that paper is loaded in the printer.
4
button to enter the SelecType mode.
English
2. Press the Menu
3. Press the Paper Feed or Paper Feed button to display
button.
TEST PRINT, and then press the Menu
4
4. Press the Paper Feed
NOZZLE CHECK.
4
or Paper Feed
button to display
5. Press the Menu
button to display PRINT.
6. Press the Menu
check pattern.
button again to start printing a nozzle
After a nozzle check pattern is printed, the printer exits the
SelecType mode and returns to the READY status.
Nozzle check pattern examples:
good
4
4
4
4
4
head cleaning necessary
4
4
If you find that any dots are missing from the test lines in the
pattern, you need to clean the print heads. Press the Menu
button for more than 3 seconds or access the Head Cleaning utility
software. For Windows, see “Cleaning the print head” on page
80. For Mac OS 9.x, see “Cleaning the print head” on page 165.
For Mac OS X, see “Cleaning the print head” on page 219.
The Control Panel
247
4
4
Aligning the print head
To prevent deterioration of print quality caused by misalignment
of print head, align the print head before you start printing your
data. You can align the print head either manually or
automatically. Try the automatic print head alignment first. If the
print head is still misaligned, try to perform the print head
alignment manually.
Aligning the print head automatically
1. Make sure that paper is loaded in the printer.
Note:
For best results in printing the head alignment pattern, use the same
media that one you normally use to print your data.
2. Press the Menu
button to enter the SelecType mode.
3. Press the Paper Feed or Paper Feed button to display
HEAD ALIGNMENT, and then press the Menu
button.
4. When PAPER THKNS appears, press the Menu
button.
5. Press the Paper Feed or Paper Feed button to select
STD or paper thickness value between 0.1 mm and 1.6 mm.
When the paper thickness value is 0.2 mm or 1.2 mm, select
STD. Otherwise, select the actual paper thickness value.
6. Press the Menu
button to register your value.
7. Press the Paper Source button , then press the Paper Feed
button.
8. When ALIGMENT appears on the lower row on the LCD, press
the Menu
button.
9. Press the Menu
button to select AUTO, and press the Paper
Feed or Paper Feed button to select BI-D 2-COLOR.
248
The Control Panel
10. Press the Menu
button, and the printer starts printing.
After printing is complete, the head alignment starts
automatically.
If you are not satisfied with the result of BI-D 2-COLOR
alignment, press the Paper Source button to return to the
previous level, and then select BI-D ALL.
If you are not satisfied with the result of BI-D ALL alignment,
try UNI-D.
You can also align the print head individually by selecting #1,
#2, or #3. Select an ink dot size from #1 to #3 depending on
the media you use and the print mode you want to try. The
table below illustrates which parameter is available for the
media type and print quality. For Print Quality, refer to the
printer driver.
EPSON Stylus Pro 4400:
Media Name
Print Quality ✽
Main Menu
Custom Print Quality
A
B
C
D
E
F
Photo Quality Ink Jet Paper
Singleweight Matte Paper
Enhanced Matte Paper
Archival Matte Paper
Singleweight Matte Paper
(line drawing)
#1
#2
-
#1
#2
#3
Plain Paper
#1
#2
#1
#1
#2
-
Plain Paper (line drawing)
#1
#2
-
#1
#2
-
Tracing Paper
#1
#2
-
#1
#2
-
English
4
4
4
4
4
4
4
4
4
✽ Print Quality A: Speed, B: Quality, C: Draft, D: Normal-360dpi, E: Fine-720dpi,
F: Super Fine-1440dpi
The Control Panel
249
4
4
4
EPSON Stylus Pro 4800:
Print Quality ✽
Media Name
Main
Menu
Custom Print Quality
A
B
C
D
E
F
Photo Quality Ink Jet Paper
Singleweight Matte Paper
Singleweight Matte Paper (line
drawing)
#1
#2
-
#1
#2
#3
Enhanced Matte Paper
Archival Matte Paper
#2
#3
-
#1
#2
#3
Premium Glossy Photo Paper
Premium Semigloss Photo Paper
Premium Luster Photo Paper
Watercolor Paper - Radiant White
-
#3
-
-
#2
#3
Photo Glossy Paper
Photo Semigloss Paper
Premium Luster Photo Paper (250)
Premium Glossy Photo Paper
(250)
Premium Semigloss Photo Paper
(250)
Premium Semimatte Photo Paper
(250)
Photo Paper Gloss 250
Proofing Paper Semimatte
#2
#3
-
-
#2
#3
Textured Fine Art Paper
Velvet Fine Art Paper
-
#3
-
-
-
#3
UltraSmooth Fine Art Paper
-
#3
-
-
-
#3
Plain Paper
#1
#2
#1
#1
#2
-
Plain Paper (line drawing)
#1
#2
-
#1
#2
-
Tracing Paper
#1
#2
-
#1
#2
-
✽ Print Quality A: Speed, B: Quality, C: Draft, D: Normal-360dpi, E: Fine-720dpi,
F: Super Fine-1440dpi, Super Photo-2880dpi
11. Press the Pause
250
The Control Panel
button to return to the READY status.
Aligning the print head manually
1. Press the Menu
button to enter the SelecType mode.
4
English
If you are not satisfied with the result of the automatic head
alignment, you can perform the head alignment manually. To
perform head alignment manually, follow the steps below.
4
2. Press the Paper Feed or Paper Feed button to display
HEAD ALIGNMENT, and press the Menu
button.
4
3. When PAPER THKNS appears, press the Menu
4
button.
4. Press the Paper Feed or Paper Feed button to select
STD or paper thickness value between 0.1 mm and 1.6 mm.
When the paper thickness value is 0.2 mm or 1.2 mm, select
STD. Otherwise, select the actual paper thickness value.
4
5. Press the Menu
4
button to register your value.
6. Press the Paper Source button , then press the Paper Feed
button.
7. When ALIGMENT appears on the lower row on the LCD, press
the Menu
button.
4
4
8. Press the Menu
button to select MANUAL, and press the
Paper Feed or Paper Feed button to select BI-D
2-COLOR.
4
9. Press the Menu
4
button, and the printer starts printing.
Head alignment pattern examples:
4
4
The Control Panel
251
EPSON Stylus Pro 4800:
Lm
Lc
1 2
3 4 5 6 7 8 9
1 2
3 4 5 6 7 8 9
1 2
3 4 5 6 7 8 9
EPSON Stylus Pro 4400:
M
C
1 2
3 4 5 6 7 8 9
10. After printing is finished, the pattern number and current set
number are displayed. Select the set that has the smallest gaps,
and then press the Paper Feed or Paper Feed button
to display the number for that set.
11. Press the Menu
button to register the set number. The next
pattern number appears. Then repeat step 10.
If you are not satisfied with the result of this alignment, press
the Paper Source button to return to the previous level,
and then select BI-D ALL.
If you are not satisfied with the result of BI-D ALL alignment,
try UNI-D.
252
The Control Panel
button to return
4
English
12. After you set the patterns, press the Pause
to the READY status.
Making the paper settings
4
You can register and recall your own paper settings according to
any media.
4
The paper settings you can make are:
❏
❏
❏
❏
❏
❏
❏
❏
❏
4
Platen gap
Thickness pattern
Thickness number
Cut method
Paper feed adjustment
Eject roller type
Drying time
Suction
MicroWeave adjustment
4
4
4
Registering the settings
To register the paper settings, follow the steps below.
4
1. Load the paper that you want to check.
2. Press the Menu
3. Press the Paper Feed
CUSTOM PAPER.
4. Press the Menu
4
button to enter the SelecType mode.
or Paper Feed
button to display
4
button to display PAPER NUMBER.
5. Press the Menu
button, and then press the Paper Feed
or Paper Feed button to select STANDARD or the number
(No. 1 to No. 10) you want to register as the setting.
The Control Panel
253
4
4
If you use Epson special media, select STANDARD, and then go
to the step 9. You do not need to make the paper thickness
setting because STANDARD automatically determines the paper
thickness.
6. Press the Menu
button to display PLATEN GAP, and then
press the Paper Feed or Paper Feed button to select
NARROW, STANDARD, WIDER, WIDE, or WIDEST.
7. Press the Menu
button to save the selected platen gap
setting, and THICKNESS PAT appears on the LCD.
8. Press the Menu
button again to print the paper thickness
test printing pattern.
Paper thickness test pattern example:
1
2
3
4
5
6
7
8
9
10
11
12
13
14
15
16
smallest gap
9. Examine the printed pattern to determine which set of lines
are aligned (showing the smallest gap), and note the
corresponding number.
10. After the pattern is printed, THICKNESS NUM appears. Press the
Paper Feed or Paper Feed button to select the number
noted in step 9.
11. Press the Menu
button to save the selected value.
12. CUT METHOD appears. Press the Paper Feed or Paper Feed
button to select STANDARD, THICK, SLOW, THICK, FAST, or
THIN PAPER, and then press the Menu
button.
254
The Control Panel
4
14. EJECT ROLLER appears. Select AUTO, SHEET, ROLL CURLED, or
button.
ROLL NORMAL, and then press the Menu
4
15. DRYING TIME appears. Press the Paper Feed or Paper
Feed button to select the time in seconds, and then press
the Menu
button.
4
16. SUCTION appears. Press the Paper Feed or Paper Feed
button to select STANDARD, -1, -2, -3, or -4.
17. M/W ADJ appears. Press the Paper Feed or Paper Feed
button to adjust MicroWeave. Increase the value to give
priority to the print speed, or decrease it to give priority to the
print quality.
18. Press the Menu
4
4
4
button to save the selected value.
4
Selecting the registered settings
To select the registered settings, follow the steps below.
1. Press the Menu
English
13. PPR FEED ADJ appears. Press the Paper Feed or Paper
Feed button to set the paper feed amount, and then press
the Menu
button.
4
button to enter the SelecType mode.
2. Press the Paper Feed or Paper Feed
CUSTOM PAPER, and then press the Menu
button to display
button.
3. Press the Paper Feed or Paper Feed
PAPER NUMBER, and then press the Menu
button to display
button.
4. Press the Paper Feed or Paper Feed button to select
the number registered that you want to use. If you select
STANDARD, the printer prints data according to the driver
settings. If you select No. X, the control panel settings override
the driver settings.
The Control Panel
255
4
4
4
4
button. If you select No. X, the number
5. Press the Menu
you selected appears on the LCD.
6. Press the Pause
button to exit the SelecType mode.
Printing a status sheet
In the SelecType mode, you can print a status sheet to see the
current SelecType default values. To print a status sheet, follow
the steps below.
1. Make sure that paper is loaded in the printer.
2. Press the Menu
button to enter the SelecType mode.
3. Press the Paper Feed or Paper Feed button to display
TEST PRINT, and then press the Menu
button.
4. Press the Paper Feed or Paper Feed
STATUS CHECK, and then press the Menu
5. Press the Menu
sheet.
button to display
button.
button again to start printing a status
After printing is finished, the printer exits the SelecType mode
and returns to the READY status.
Setting the alert value of the paper
You can get a message when there is not much left, by setting the
alert value using the steps below.
Note:
This setting is available only when you select Roll Paper or Cut Sheet
for PAPER COUNTER in the Maintenance mode.
256
The Control Panel
button to enter the SelecType mode.
2. Press the Paper Feed or Paper Feed button to display
PRINTER SETUP, and then press the Menu
button.
3. Press the Paper Feed or Paper Feed button to display
ROLL COUNTERor SHEET COUNTER, and then press the Menu
button.
4. Press the Paper Feed or Paper Feed button to select
the length of the roll paper (between 5 and 99.5 m or 15 and
300 ft) or the number of cut-sheet paper (between 10 and 250)
set in the printer, and then press the Menu
button.
5. The screen changes so that you can select the alert value. Press
the Paper Feed or Paper Feed button to select the alert
value. For roll paper, select a value between 1 and 15 m or 3
and 50 ft. For cut-sheet paper, select a value between 5 and 50.
6. Press the Menu
4
English
1. Press the Menu
4
4
4
4
4
button to set the alert value.
7. After you set the alert value, press the Pause
return to the READY status.
button to
4
4
4
4
4
4
The Control Panel
257
Chapter 5
Maintenance Mode
Maintenance Mode
Maintenance mode setting procedure
This section describes how to enter the maintenance mode and
how to make settings with the buttons on the control panel.
To make the maintenance mode settings, follow the steps below.
Note:
Press the Paper Source
button to return to the previous step.
1. Enters the maintenance mode
Confirm the printer is turned off first. While pressing and
holding the Pause button, press the Power button to
turn on the printer.
2. Select an item
Press the Paper Feed
desired item.
or Paper Feed
button to select a
3. Set the item
button to enter the selected item. The first
Press the Menu
parameter is displayed on the LCD.
4. Select a parameter
Press the Paper Feed or Paper Feed
parameter for the item.
button to select a
5. Set the parameter
button to store the selected parameter.
Press the Menu
If the parameter is for execution only, press the Menu
button to execute the function for the item.
258
Maintenance Mode
6. Exit the maintenance mode
Press the Power button to turn off the printer, and turn it
on again.
5
English
Note:
If second parameter is displayed on the LCD, repeat the steps 4 and
5 to select and set the second parameter.
5
5
Maintenance mode list
Item
First parameters
Second parameters
“HEX DUMP” on
page 260
PRINT
EXEC
“LANGUAGE” on
page 260
ENGLISH, FRENCH,
ITALIAN, GERMAN,
SPANISH, PORTUGUESE
-
“PAPER COUNTER”
on page 261
OFF, ROLL PAPER, CUT
SHEET
-
“UNITS” on page 261
METER, FEET/INCHES
-
“CUT PRESSURE” on
page 262
0% - 150%
-
“SSCL” on page 262
EXEC
-
“DEFAULT PANEL” on
page 262
EXEC
-
“CRTG INFO MENU”
on page 262
MK INFO
C INFO
M INFO
Y INFO
LK INFO
LC INFO
LM INFO
LLK INFO
MANUFACT,
CARTRIDG, INK TYPE,
INK CAP, INK LEFT,
PROD DATE, EXPIRE
DATE, INK LIFE, AGE
5
5
5
5
5
5
5
5
Note:
If you are using EPSON
Stylus Pro 4400, LK, LC,
LM, and LLK are not
displayed.
Maintenance Mode
5
259
Details of maintenance mode items
HEX DUMP
Data received from the host computer can be printed out in
hexadecimal numbers.
To print it out, follow the steps below.
1. Make sure that paper is loaded in the printer.
2. In maintenance mode, press the Paper Feed
Feed button to display HEX DUMP.
or Paper
3. Press the Menu
button to display PRINT. Press the Menu
button again to start printing.
The print data in the print buffer is printed with 16-byte hex.
data in the left column, and corresponding ASCII characters
in the right column.
Note:
If the last data is less than 16 bytes, it is not printed until you press the
Pause button.
LANGUAGE
You can select the language to be displayed on the LCD.
To select a suitable language, follow the steps below.
1. In maintenance mode, press the Paper Feed or Paper
Feed button to display LANGUAGE, and press the Menu
button.
2. Press the Paper Feed
language.
260
Maintenance Mode
or Paper Feed
to select a suitable
Note:
It takes a while until READY (or similar word in the language selected)
appears.
You can select a paper remaining counter function. When this
function is on, ROLL COUNTER or SHEET COUNTER appears on the
PRINTER SETUP menu.
1. In the maintenance mode, press the Paper Feed or Paper
Feed button to display PAPER COUTNER, and then press the
Menu
button.
2. Press the Paper Feed
suitable function.
or Paper Feed
button to select a
You can select the units for displaying length. To select the units,
follow the steps below.
Note:
This item is available only when you choose ENGLISH in LANGUAGE.
1. In maintenance mode, press the Paper Feed or Paper
Feed button to display UNITS, and press the Menu
button.
2. Press the Paper Feed
suitable unit.
5
5
5
5
button.
UNITS
3. Press the Menu
5
5
PAPER COUNTER
3. Press the Menu
5
English
3. Press the Menu
button to set the language. Confirm that
the READY (or similar word in the language selected) appears
on the LCD.
or Paper Feed
5
5
5
5
button to select a
5
button to set the units.
Maintenance Mode
261
CUT PRESSURE
You can select cutting pressure.
SSCL
You can perform ultrasonic head cleaning.
DEFAULT PANEL
You can set all setting values you made in the SelecType mode to
their factory set value.
CRTG INFO MENU
For maintenance service person only.
262
Maintenance Mode
Chapter 6
English
6
Paper Handling
6
Notes on Epson Special Media and Other
Media
6
Although most types of coated paper provide good printing
results, the print quality varies depending on the paper quality
and the manufacturer. Test the print quality before purchasing a
large amount of paper.
c
Caution
Keep fingers off the printable surface of the media, as fingerprints
may reduce the print quality. Whenever possible, use gloves to
handle media.
6
6
6
6
Using Epson special media
Epson provides special media that can enhance the usage and
expressive power of the printing results. When using Epson
special media, make sure the appropriate settings are made in the
printer driver. For information on Epson special media, see
“Epson Special Media” on page 377.
6
6
6
Note:
❏ Use Epson special media in a normal room environment
(temperature and humidity) for best results.
❏ When using Epson special media, read the enclosed instruction
sheets first.
6
6
Paper Handling
263
Storing Epson special media
To keep the quality of Epson special media:
❏ Store unused media in the original plastic bag and outer
package so as to avoid moisture problems.
❏ Avoid storing the media in places exposed to high
temperature, humidity, or direct sunlight.
Using paper other than Epson special media
When you use paper other than Epson special media, or print
using the RIP (Raster Images Processor), see the instructions
included with the paper or RIP system, or contact your supplier
for more information.
264
Paper Handling
6
Attaching the roll paper to the spindle
6
English
Using Roll Paper
When installing the roll paper onto the spindle, follow the steps
below.
6
1. Slide the black movable flange off the end of the spindle.
6
6
2. When attaching roll paper with a 2-inch core, remove the gray
attachments.
6
6
6
6
Note:
Keep the gray attachments in a safe place for future use.
6
6
6
Paper Handling
265
When attaching roll paper with a 3-inch core, slide the gray
attachments to the black and white ones, matching the four
arrows.
3. Place the roll paper on a flat surface so that it does not unwind.
Slide the roll paper onto the spindle and onto the white flange
until it fixes into place.
Note:
Do not stand the spindle when attaching the roll paper. It may cause
slant paper feeding.
4. Slide the black movable flange (removed in step 1) onto the
spindle and into the end of the roll paper until it fixes into
place.
266
Paper Handling
When you perform borderless printing on roll paper with a width
of 8 inches or 420 mm (A2), you need to attach a spacer to the
spindle.
6
English
Attaching the spacer to the spindle
6
To attach the spacer to the spindle, follow the steps below.
Note:
You cannot attach the spacer to the spindle when the gray attachments
for roll paper with a 3-inch core are attached to the spindle.
1. Slide the black movable flange off the end of the spindle.
6
6
6
2. Slide the spacer onto the white flange.
6
6
6
6
3. Slide the roll paper until it fixes into place.
4. Slide the black movable flange onto the spindle and into the
end of the roll paper until it fixes into place.
6
6
6
Paper Handling
267
Removing the roll paper from the spindle
To remove the roll paper from the spindle, follow the steps below.
1. Place the paper loaded spindle down on a flat surface.
2. Slide the black movable flange off the end of the spindle by
tapping the same end of the spindle with your hand to loosen
it. The flange is removed.
c
Caution:
To remove the black movable flange from the spindle, do not
hold the spindle vertically and tap the end on the floor;
otherwise, damage may occur.
3. Remove the roll paper from the spindle.
Note:
Store unused roll paper in its original package. Put the roll paper into
the plastic bag and outer package so as to avoid moisture problems.
268
Paper Handling
Loading roll paper
English
6
To load roll paper, follow the steps below.
6
1. Open the roll paper cover.
6
6
6
6
2. Make sure the black movable flange is fixed into the end of
the roll paper properly.
3. Hold the roll paper spindle so that the black movable flange
is on the left side.
6
6
6
6
6
6
Paper Handling
269
4. Make sure the roll paper is attached to the printer properly.
5. Move the paper lever to the released position.
6. Hold both sides of the paper, and then load the paper in the
paper insertion slot. Pull the paper until it hangs down over
the paper tray.
Note:
If you load thin paper, press the Paper Feed button to decrease
the value of paper suction. If you load thick and curled paper, press
the Paper Feed button to increase the value of paper suction.
270
Paper Handling
6
English
7. Hold both the fixed and movable flanges, and rewind the
paper to the line marked with the arrow mark.
6
6
6
6
8. Move the paper lever to the secured position. The printer
automatically feeds the paper to the printing position.
6
6
6
6
6
Note:
If you press the Pause button, the printer starts to feed the paper
to the printing position immediately.
6
6
9. Close the roll paper cover.
Paper Handling
271
10. Raise the roll paper support.
11. Extend the paper tray and paper tray cover according to the
paper size.
12. Press the Paper Source button to select Roll Auto Cut On
or Roll Auto Cut Off
.
Now the printer is ready to print. While the printer is printing, do
not open the top cover. If the top cover is opened while printing
is in progress, the printer stops printing, and then restarts printing
when the top cover is closed. Stopping and restarting printing
may reduce the print quality.
272
Paper Handling
6
English
c
Caution:
Do not leave the paper in the printer for a long period of time; its
quality will deteriorate. We recommend that you remove the paper
from the printer after printing.
6
Using the roll paper belt
The roll paper belt is packed with the optional 2/3 inch Dual Roll
Feed Spindle. You can also purchase the optional roll paper belt.
To use the roll paper belt, tap the end of the roll paper belt lightly
on the roll paper. The belt will wrap itself around the roll paper.
6
6
6
6
6
To remove the roll paper belt, simply unwrap it from around the
paper. When not using the roll paper belt, keep it wound around
the end of the spindle.
6
6
6
6
6
Paper Handling
273
Cutting the roll paper or printing page lines
When your print job is finished, the printer cuts the roll paper
automatically or prints page lines around the printed data
according to your settings. You can make these settings using the
control panel or printer software.
Note:
❏ Printer driver settings usually override the control panel settings.
Use your printer driver settings whenever possible.
❏ When the printer cuts the printout, it may take a little time to
proceed with cutting after printing is finished.
Cutting the roll paper automatically
To cut the roll paper automatically after printing, follow the steps
below.
1. Before printing, press the Paper Source
Roll Auto Cut On
.
button to select
2. Print your data.
To make the auto cut setting using the printer driver, see “Making
the Auto Cut setting” on page 52 for Windows, “Making the Auto
Cut setting” on page 143 for Mac OS 9.x, or “Auto Cut” on page
205 for Mac OS X.
Cutting the roll paper with the cut button
To cut the roll paper with the cut button after printing, follow the
steps below.
1. Before starting to print, press the Paper Source
select Roll Auto Cut Off
.
2. Print your data.
274
Paper Handling
button to
6
English
3. Press the Paper Feed button or Paper Feed button to
match the cutting position on the paper with the cutting
position on the left side of the print head.
6
6
6
6
4. Press the Paper Source
.
button to select Roll Auto Cut On
5. Press and hold the Paper Source button for 3 seconds. The
printer cuts the printout at the cutting position.
6
6
6
Printing page lines
If you want to print continuously on roll paper and then cut the
pages yourself after you finish printing, use the Print Page Line
setting.
6
To make the Print Page Line setting using the control panel, see
“PAGE LINE” on page 236.
6
To make the Print Page Line setting using the printer software,
see “Print Page Line” on page 62 for Windows, “Print Page Line”
on page 156 for Mac OS 9.x, or “Print Page Line” on page 208 for
Mac OS X.
6
Paper Handling
275
6
Using Cut Sheet Media
Checking the paper path
The paper path changes according to the media type you use.
Always check the media type and its paper path.
Paper path list
Paper Path
Media Name
Paper Tray
Premium Semigloss Photo Paper
Premium Luster Photo Paper
Photo Quality Ink Jet Paper
EPSON Proofing Paper Semimatte (Commercial)
Archival (Enhanced) Matte Paper
Watercolor Paper - Radiant White
Bright White Ink Jet Paper
Plain paper
Front Manual Feed Slot
UltraSmooth Fine Art Paper
Rear Manual Feed Slot
Premium Glossy Photo Paper
Premium Semigloss Photo Paper
Premium Luster Photo Paper
Photo Quality Ink Jet Paper
EPSON Proofing Paper Semimatte (Commercial)
Archival (Enhanced) Matte Paper
Watercolor Paper - Radiant White
Velvet Fine Art Paper
Bright White Ink Jet Paper
Plain paper
276
Paper Handling
You can load cut-sheet media into the paper tray, front manual
feed slot, or rear manual feed slot.
The paper tray can hold up to 250 sheets of 17 lb. or 64 g/m² plain
paper. Do not load paper above the arrow mark on the inside
surface of the right edge guide.
For information on the loaded capacity of Epson special media,
see the following table.
Epson special media
Size
Loadable capacity in
the paper tray
Premium Semigloss Photo Paper
A4
100
LTR
100
A3
50
Super A3/B
50
LTR
100
A3
50
Super A3/B
50
A4
200
LTR
200
EPSON Proofing Paper
Semimatte (Commercial)
Super A3/B
50
Archival (Enhanced) Matte
Paper
A4
100
LTR
100
A3
50
Super A3/B
50
Watercolor Paper-Radiant
White
Super A3/B
20
Bright White Ink Jet Paper
A4
100
Premium Luster Photo Paper
Photo Quality Ink Jet Paper
Paper Handling
6
English
Loading cut-sheet media
6
6
6
6
6
6
6
6
6
6
6
277
Loading A3 or larger paper in the paper tray
1. Make sure the printer is on and in the READY state.
2. Press the Paper Source
button to select Sheet
3. Extend the paper tray and paper tray cover.
4. Lift up the paper tray cover.
278
Paper Handling
.
6
English
5. Pull the paper guide roller up, and then slide the edge guide
to the left slightly wider than the width of your paper.
6
6
6
6
6. Clean the inside of the paper tray to remove any dust. Dust
may affect the print quality.
7. Fan a stack of paper, and then tap it on a flat surface to even
the edges.
6
6
6
6
6
If the paper is curled, flatten it before you load it. If it curls
excessively and jams frequently, stop using it.
6
6
Paper Handling
279
8. Load the sheets with the printable face down and the right
edge of the paper resting against the right side of the paper
tray. Make sure the sheets lie flat on the bottom of the tray.
Note:
❏ Always set the paper’s short edge first.
❏ When you load sheets of paper, make sure to put the edges of the
paper against the right inner corner of the paper tray; otherwise,
printing may become misaligned.
❏ When you add more sheets of paper to the paper tray, always
line up the edges of the added paper to those of the paper already
loaded.
280
Paper Handling
9. Adjust the length of the paper tray and the edge guide
according to the paper size.
English
6
6
6
6
6
10. Put the paper guide roller down. Make sure the paper guide
roller is placed on the edge of the paper.
6
6
6
6
6
6
6
Paper Handling
281
11. Adjust the length of paper tray cover, and then attach it to the
paper tray.
Note:
Make sure the roll paper support is not raised.
12. If you have extended the paper tray and cover fully, pull the
paper tray cover extension to support large-size printouts.
282
Paper Handling
Now, the printer is ready to print. While the printer is printing,
do not open the top cover. If the top cover is opened while printing
is in progress, the printer stops printing, and then restarts printing
when the top cover is closed. Stopping and restarting printing
may reduce the print quality.
Loading paper smaller than A3 in the paper tray
button to select Sheet
6
6
6
1. Make sure the printer is on and in the READY state.
2. Press the Paper Source
6
English
Note:
Before printing on cut-sheet media, make sure paper in the paper tray is
not curled. If it is curled, uncurl it; otherwise, a paper jam may occur.
6
.
3. Lift up the paper tray cover, and then pull the paper guide
roller.
6
6
6
6
6
6
6
Paper Handling
283
4. Pull the paper guide, and then slide the edge guide to the left
slightly wider than the width of your paper.
5. Clean the inside of the paper tray to remove any dust. Dust
may decrease the print quality.
6. Fan a stack of paper, and then tap it on a flat surface to even
the edges.
If the paper is curled, flatten it before you load it. If it curls
excessively and jams frequently, stop using it.
284
Paper Handling
6
English
7. Load the sheets with the printable face down and the right
edge of the paper resting against the right side of the paper
tray. Make sure the sheets lie flat on the bottom of the tray.
6
6
6
6
6
Note:
❏ Always set the paper’s short edge first.
6
❏ When you load sheets of paper, make sure to put the edges of the
paper against the right inner corner of the paper tray; otherwise,
printing may become misaligned.
❏ When you add more sheets of paper to the paper tray, always
line up the edges of the added paper to those of the paper already
loaded.
6
6
6
6
6
Paper Handling
285
8. Adjust the length of the paper guide and the edge guide
according to the paper size.
9. Put the paper guide roller down, and then re-attach the paper
tray cover.
Note:
❏ Make sure the roll paper support is not raised.
❏ Before printing on cut-sheet media, make sure paper in the paper
tray is not curled. If it is curled, uncurl it; otherwise, a paper jam
may occur.
286
Paper Handling
6
English
Now, the printer is ready to print. While the printer is printing,
do not open the top cover. If the top cover is opened while printing
is in progress, the printer stops printing, and then restarts printing
when the top cover is closed. Stopping and restarting printing
may reduce the print quality.
6
Loading paper into the front manual feed slot
As the printer feeds paper from the front side to the rear side of
the printer, keep enough space between the rear side of the printer
and the wall, according to the following table.
6
6
6
6
Paper size
Space
A2
377.5 mm
Super A3/B
266.5 mm
A3
203.5 mm
A4
80.5 mm
6
6
6
Note:
❏ When PPR SIZE CHK is set to OFF on the printer’s control panel,
you cannot feed the paper from the manual feed slot. See “PPR SIZE
CHK” on page 238 for details.
❏ When you print on a cut-sheet media with a thickness of 0.5 mm or
more, always load the sheet from the front manual feed slot.
6
6
❏ You can load one sheet at a time into the front feed slot.
❏ Load paper with the printable surface up.
Paper Handling
6
287
❏ Paper with a thickness between 0.08 and 1.6 mm can be set in the
landscape position. However, always set recycled or plain paper in
the portrait position, regardless of the thickness.
1. Make sure the printer is on and in the READY state.
2. Press the Paper Source
button to select Sheet
3. Move the paper lever to the released position.
4. Open the top cover.
288
Paper Handling
.
5. Insert a sheet to where paper is usually ejected.
English
6
6
6
6
6
6. Pass the paper under the feed roller.
6
6
6
6
6
6
6
Paper Handling
289
7. Adjust the right side of the paper with the line marked with
an arrow mark, and also adjust the bottom edge of the paper
with the line marked with your paper size on the paper tray.
If your paper size is Letter, A4, or B4, set the paper edge to
LTR/A4/B4. If your paper size is not listed above, set the paper
edge to OTHERS.
8. Close the top cover.
290
Paper Handling
6
English
9. Move the paper lever to the secured position. The printer
automatically feeds the paper to the printing position.
6
6
6
6
Note:
❏ If PPR SIZE CHK is set to OFF, REMOVE PAPER appears on the
LCD. You need to select ON for PPR SIZE CHK on the printer’s
control panel.
❏ If you press the Pause button, the printer starts to feed the
paper to the printing position immediately.
6
6
6
6
6
6
6
Paper Handling
291
10. Extend the paper tray and paper tray cover according to the
paper size. If you do not extend them, the printout may fall.
Note:
Make sure the roll paper support is not raised.
Now, the printer is ready to print. While the printer is printing,
do not open the top cover. If the top cover is opened while printing
is in progress, the printer stops printing, and then restarts printing
when the top cover is closed. Stopping and restarting printing
may reduce the print quality.
c
292
Caution:
Do not leave the paper in the printer for a long period of time; its
quality will deteriorate. We recommend that you remove the paper
from the printer after printing.
Paper Handling
Loading paper into the rear manual feed slot
English
6
Note:
❏ You can load one sheet at a time into the rear feed slot.
❏ Load paper with the printable surface up.
6
❏ Paper with a thickness between 0.08 and 1.6 mm can be set in the
landscape position. However, always set recycled or plain paper and
A4, Letter size, or 8 × 10 in. paper in the portrait position,
regardless of the thickness.
6
1. Make sure the printer is on and in the READY state.
2. Press the Paper Source
button to select Sheet
6
6
.
3. Hold the left and right edges of the paper. Align the left edge
of the paper with the target paper size on the roll paper cover,
and then insert the paper until it meets resistance.
6
6
6
6
6
6
The printer automatically feeds the paper to the printing
position.
Note:
If you press the Pause button, the printer starts to feed the paper
to the printing position immediately.
Paper Handling
293
6
4. Adjust the length of the paper tray and the paper tray cover
according to the paper size. If you do not extend them, the
printout may fall.
Note:
Make sure the roll paper support is not raised.
Now, the printer is ready to print. While the printer is printing,
do not open the top cover. If the top cover is opened while printing
is in progress, the printer stops printing, and then restarts printing
when the top cover is closed. Stopping and restarting printing
may reduce the print quality.
c
294
Caution:
Do not leave the paper in the printer for a long period of time; its
quality will deteriorate. We recommend that you remove the paper
from the printer after printing.
Paper Handling
Chapter 7
English
7
Maintenance and Transportation
7
Replacing Ink Cartridges
When the printer’s indicator light is flashing, this indicates that
the ink is low and you need to obtain a replacement ink cartridge.
When the indicator light remains on, this indicates that there is
no more ink and you need to replace the empty ink cartridge. The
LCD panel also displays INK LOW or INK OUT.
Note:
Even if only one ink cartridge is empty, the printer cannot continue to
print.
Epson recommends the use of genuine Epson ink cartridges.
Other products not manufactured by Epson may cause damage
to your printer not covered by Epson’s warranties. For detailed
information on ink cartridges, see “Ink cartridges” on page 367.
To check the product codes of ink cartridges, see “Consumable
Products” on page 375.
Caution:
Leave the old ink cartridge installed in the printer until you are
ready to replace it with a new one.
Note:
❏ The UltraChrome ink cartridges for EPSON Stylus Pro
4000/7600/9600 can also be used with EPSON Stylus Pro 4400.
❏ The UltraChrome K3 ink cartridges are designed for the exclusive
use of EPSON Stylus Pro 4800.
Maintenance and Transportation
7
7
7
7
7
7
To replace an ink cartridge, follow the steps below.
c
7
295
7
7
7
1. Make sure the printer is on. Find out which cartridge needs
to be replaced, as indicated by the steady or flashing Ink check
light.
2. Open the ink compartment cover by pushing it.
3. Raise the ink levers to the released position.
Note:
The right ink compartment is available for EPSON Stylus Pro 4800
only.
296
Maintenance and Transportation
4. Carefully pull the empty cartridge straight out of the printer.
English
7
7
7
7
w
Warning:
If ink gets on your hands, wash them thoroughly with soap
and water. If ink gets into your eyes, flush them immediately
with water.
c
Caution:
Do not shake cartridges (that have been installed previously)
with too much force.
5. Make sure the replacement ink cartridge is the correct color,
and remove it from the package. Shake the ink cartridge well
before installing it for best results.
7
7
7
7
7
7
7
7
Maintenance and Transportation
297
Note:
A protection system is provided to prevent improper cartridge
insertion. If you cannot insert the ink cartridge smoothly, the type
of cartridge may be incorrect. Check the package and product code.
6. Hold the ink cartridge with the arrow mark facing up and
pointing to the rear of the printer, and then insert it into the
slot. Do not force the cartridge in further by hand.
Note:
If the Ink check light remains on, this indicates the ink cartridge may
not be installed correctly. Remove the ink cartridge and then reinsert
it as described above.
7. Lower the ink lever to the secured position.
298
Maintenance and Transportation
8. Close the ink compartment cover. The printer returns to the
previous status.
7
English
Note:
If you install an ink cartridge in the wrong slot, NO INK CRTG
appears on the LCD. Make sure that the correct ink cartridge is
installed in the correct slot.
7
7
7
7
7
Note:
If you have installed 220 ml ink cartridge, do not close the ink
compartment cover.
7
7
7
7
7
7
Maintenance and Transportation
299
Converting the Black Ink Cartridges
You can change the black ink according to your purpose. You can
choose either Matte Black or Photo Black.
c
Caution:
To avoid interrupting a black ink change, observe the following
conditions:
❏ Do not turn off the printer.
❏ Do not open the top cover.
❏ Do not remove the rear cover.
❏ Do not move the paper lever to the released position.
❏ Do not remove the ink cartridges.
❏ Do not remove the maintenance tank.
❏ Do not unplug the power cord.
Note:
❏ If an electrical power failure occurs during this operation, turn the
printer on again. You can continue your procedure at the breakpoint.
❏ The Black Ink Conversion Kit is required when changing the black
ink. Also, the black ink cartridge (either Matte or Photo that you
want to convert) is required. To check the product code, see
“Consumable Products” on page 375.
❏ If MNT TK NEAR FULL or MNT TNK FULL appears on the LCD, you
need to replace the maintenance tank. See “Replacing the
Maintenance Tank” on page 308.
To change the black ink, follow the steps below.
1. Make sure that READY appears on the LCD panel.
300
Maintenance and Transportation
button to enter the SelecType mode.
3. Press the Paper Feed or Paper Feed button to display
MAINTENANCE on the LCD, and then press the Menu
button.
4. Press the Paper Feed or Paper Feed button to display
BK INK CHANGE, and then press the Menu
button.
5. Press the Menu
button again to execute.
6. Make sure RAISE THE RIGHT INK LEVER appears on the LCD,
and then raise the ink lever on the right ink compartment.
7
English
2. Press the Menu
7
7
7
7
7
7
7
7. Make sure RAISE THE LEFT INK LEVER appears on the LCD,
and then raise the ink lever on the left ink compartment.
7
7
7
7
Maintenance and Transportation
301
8. Make sure REMOVE INK CRTG appears on the LCD, and then
remove all four ink cartridges from the left ink compartment.
9. Make sure INSTALL CNVRSION CRTG appears on the LCD, and
then insert three conversion cartridges in the slots on the left
ink compartment.
Note:
If REPLACE CNVRSION CRTG appears on the LCD, press the Pause
button. Remove the old conversion cartridge(s) from the left ink
compartment, and then insert the new conversion cartridge(s).
Finally, go to step 4 to start again.
302
Maintenance and Transportation
7
English
10. Make sure LOWER THE LEFT INK LEVER appears on the LCD,
and then lower the ink lever on the left ink compartment.
7
7
7
11. The printer starts draining ink, and DRAINING XX% appears on
the LCD. Wait until draining is complete.
7
7
12. When draining is complete, RAISE THE LEFT INK LEVER
appears on the LCD. Raise the ink lever on the left ink
compartment.
7
7
7
7
7
7
Maintenance and Transportation
303
13. Make sure REMOVE CNVRSION CRTG appears on the LCD, and
then remove the conversion cartridges from the slots on the
left ink compartment.
14. Make sure INSERT INK CRTG appears on the LCD, and then
insert the cartridges in their specified slots.
304
Maintenance and Transportation
7
English
15. Make sure LOWER BOTH INK LEVERS appears on the LCD, and
then lower the ink levers on the right and left ink
compartments.
7
7
7
7
16. Make sure RAISE THE BOTH INK LEVERS appears on the LCD,
and then raise the ink lever on the right and left ink
compartments.
7
7
7
7
7
17. The printer starts charging ink. After a while, ink lever
messages appear on the LCD. When a message appears on the
LCD, raise or lower the ink levers accordingly until READY
appears on the LCD.
Maintenance and Transportation
305
7
7
Note:
Because ink charging after black ink conversion consumes a large
quantity of ink, you may need to replace the ink cartridges soon.
18. When READY appears on the LCD, ink charging is completed.
Close the ink compartment covers.
Note:
If you have installed 220 ml ink cartridges, do not close the ink
compartment covers.
Updating the printer driver information
After the replacement operation, update the driver information
using the steps below.
For Windows
Click the Main tab and make sure that the correct ink cartridge is
displayed. If not, set the information manually by clicking the
Utility tab and then the Printer and Option Information button.
306
Maintenance and Transportation
For Mac OS 8.6 to 9.x
7
English
Select Chooser from the Apple menu, and then click the printer's
icon and printer port.
7
7
7
7
7
For Mac OS X
Remove the printer from the Print Center (for Mac OS X 10.2.x)
or the Printer Setup Utility (for Mac OS X 10.3.x), and then add it
again.
7
7
7
7
7
7
Maintenance and Transportation
307
Replacing the Maintenance Tank
If MNT TNK FULL or MNT TK NEAR FULL appears on the LCD, replace
the maintenance tank.
To check the product code of the Maintenance Tank, see
“Consumable Products” on page 375.
To replace the maintenance tank, follow the steps below.
1. For EPSON Stylus Pro 4800 only:
If you are using 220 ml ink cartridges, remove the four ink
cartridges from the right ink compartment. Make sure to close
the ink compartment cover after you have removed the ink
cartridges.
2. Open the package of a new maintenance tank.
3. Put your hand on the handle under the right ink compartment,
then gently pull the maintenance tank outward.
4. Put the used maintenance tank in the plastic bag provided.
Note:
Do not tilt the used maintenance tank until after it is sealed in the
plastic bag.
308
Maintenance and Transportation
5. Insert the new maintenance tank into place.
English
7
7
7
7
6. For EPSON Stylus Pro 4800 only:
If you are using 220 ml ink cartridges, reinstall the removed
ink cartridges.
7
7
7
7
7
7
7
7
Maintenance and Transportation
309
Replacing the Paper Cutter
When the paper cutter does not cut cleanly, it may be blunt and
require replacement.
w
Warning:
Be careful not to cut yourself while replacing the paper cutter.
To check the product code of the Auto Cutter Spare Blade, see
“Consumable Products” on page 375.
To replace the paper cutter, follow the steps below.
1. Make sure the printer is on.
2. Press the Menu
button to enter the SelecType mode.
3. Press the Paper Feed or Paper Feed
CUTTER REPLACE on the LCD.
button to display
Note:
You can also take the following steps.
Press the Paper Feed or Paper Feed button to display
MAINTENANCE on the LCD. Press the Menu
button, and then
press the Paper Feed or Paper Feed button to display
CUTTER REPL.
4. Press the Menu
button to display EXEC. Press the Menu
button again. The paper cutter holder moves to the
replacement position.
c
310
Caution:
Never move the paper cutter holder by hand; otherwise,
damage to your printer may occur.
Maintenance and Transportation
7
English
5. When the print head stops at the replacement position, OPEN
TOP COVER appears. Open the top cover.
7
7
7
7
6. When REPLACE CUTTER appears on the LCD, push in the side
pin and turn the paper cutter cover to the right to open the
casing.
7
7
7
7
7
7
7
Maintenance and Transportation
311
7. Slowly take your finger off the side pin, and carefully remove
the old cutter from the printer.
8. Remove the new paper cutter from its package.
9. Fully insert the new cutter in the paper cutter holder. Make
sure the cutter slide pin is set to the left.
312
Maintenance and Transportation
7
English
10. While pushing in the side pin, turn the paper cutter cover to
the left to close the casing.
7
7
7
Note:
Make sure the paper cutter cover is set correctly; otherwise, the paper
may not be cut.
7
7
11. Make sure CLOSE TOP COVER appears, and then close the top
cover. The cutter holder moves to the home (far right)
position.
7
12. Wait until READY appears on the LCD.
7
7
7
7
7
Maintenance and Transportation
313
Cleaning the Printer
To keep your printer operation in its top condition, clean it
thoroughly several times a year.
w
c
Warning:
Be careful not to touch the gears inside the printer.
Caution:
❏ Never use alcohol or thinners to clean the printer; these
chemicals can damage the components as well as the case.
❏ Be careful not to get water on the printer mechanism or
electronic components.
❏ Do not use a hard or abrasive brush.
❏ Do not spray the inside of the printer with lubricants;
unsuitable oils can damage the mechanism. Contact your
dealer or a qualified service person if lubrication is needed.
See “Contacting Customer Support” on page 355.
1. Make sure the printer is turned off and all the lights are off,
and then unplug the power cord.
2. Open the roll paper cover and remove the roll paper spindle.
Also remove any paper from the printer.
3. Make sure the ink compartment covers are closed, and then
use a soft brush to carefully clean away any dust or dirt inside
the printer.
4. Close the roll paper cover.
5. Open the top cover and use a soft brush to carefully clean
away any dust or dirt inside the top cover, and then close the
cover.
314
Maintenance and Transportation
7
English
6. If the platen is soiled with ink, clean it using a soft, clean cloth
dampened with mild detergent.
7. If the outer case is dirty, clean it using a soft, clean cloth
dampened with mild detergent. Keep the ink compartment
covers closed to prevent water from getting inside.
7
8. If the inside of the printer accidentally gets soiled with ink,
wipe it off with a damp cloth.
7
If you have not used your printer for a long time
7
If you have not used your printer for a long time, the print head
nozzles may become clogged. Perform a nozzle check and clean
the print head.
7
To perform a nozzle check using the control panel, see “Checking
the print head nozzles” on page 246.
To perform a nozzle check using the printer software, see
“Checking the print head nozzles” on page 78 for Windows,
“Checking the print head nozzles” on page 164 for Mac OS 9.x, or
“Checking the print head nozzles” on page 217 for Mac OS X.
To clean the print head using the control panel, press the Menu
button for more than 3 seconds.
To clean the print head using the printer software, see “Cleaning
the print head” on page 80 for Windows, “Cleaning the print
head” on page 165 for Mac OS 9.x, or “Cleaning the print head”
on page 219 for Mac OS X.
If you have not used your printer for more than six months, the
printer requires head cleaning. If PERFORM POWER CLEANING?
appears on the LCD when you turn on the printer, select Y, and
then press the Menu button to start head cleaning.
If you want to perform head cleaning later, select N.
Maintenance and Transportation
315
7
7
7
7
7
7
7
Note:
❏ If you select Y to start head cleaning, you need to move the ink levers
according to the messages on the LCD.
❏ Even if you will not be using your printer for a long time, leave the
ink cartridges installed.
Transporting the Printer
Over a long distance
If you need to transport your printer over a long distance, repack
the printer using the original box and packing materials.
To repack the printer, follow the steps below.
1. Make sure the printer is turned on.
2. Remove the following parts.
❏ Roll and cut sheet media
❏ Roll paper spindle
❏ Paper tray and paper tray cover
3. Raise the ink levers.
You can choose whether to remove the ink cartridges.
Regardless of your choice, you must keep the ink levers raised
when transporting the printer; otherwise, ink may leak from
the printer.
4. Make sure the print head is in the home (far right) position.
316
Maintenance and Transportation
7
English
5. Push the green tab on the left side of the print head to the right
to lock the print head.
7
7
7
7
6. Make sure the ink levers are raised, and then turn off the
printer.
7
7. Make sure the printer is turned off, and then unplug the
power cord.
8. Insert the protective materials and repack the printer. Contact
your dealer for assistance. See “Contacting Customer
Support” on page 355.
Over a short distance
7
7
7
If you need to move the printer over a short distance, be sure to
perform the following tasks.
❏ Raise the ink levers.
❏ Lift the printer, using at least two people. The printer weighs
approximately 50 kg (110.3 lb) and must be lifted carefully.
7
7
7
Maintenance and Transportation
317
Setting up the printer after transporting it
The steps you need to take to set up the printer after transporting
it are almost identical to the steps carried out the first time you
set up the printer. When you set up the printer again, see the Setup
Guide, and note the following points.
❏ Do not forget to remove any protective materials.
❏ Do not forget to pull the green tab on the left side of the print
head to release the print head.
c
Caution:
Do not push down the green tab; otherwise you may break it.
❏ The first time you start printing after transporting the printer,
or if you have not turned on the printer for a long time, the
print head nozzles may be clogged. Epson recommends that
you perform a nozzle check and clean the print head, and also
realign the print head to ensure print quality.
To perform a nozzle check using the control panel, see
“Checking the print head nozzles” on page 246.
318
Maintenance and Transportation
To clean the print head using the control panel, press the
Menu
button for 3 seconds.
To clean the print head using the printer software, see
“Cleaning the print head” on page 80 for Windows, “Cleaning
the print head” on page 165 for Mac OS 9.x, or “Cleaning the
print head” on page 219 for Mac OS X.
7
English
To perform a nozzle check using the printer software, see
“Checking the print head nozzles” on page 78 for Windows,
“Checking the print head nozzles” on page 164 for Mac OS
9.x, or “Checking the print head nozzles” on page 217 for Mac
OS X.
7
7
7
To realign the print head using the control panel, see
“Aligning the print head” on page 248.
7
To realign the print head using the printer software, see
“Aligning the print head” on page 81 for Windows, “Aligning
the print head” on page 166 for Mac OS 9.x, or “Aligning the
print head” on page 220 for Mac OS X.
7
7
7
7
7
7
7
Maintenance and Transportation
319
Chapter 8
Problem Solver
Troubleshooting
Printer stops printing unexpectedly
Head cleaning, ink charging, or ink drying is in progress
Check to see if the Pause light is flashing. If so, the printer is in
the process of head cleaning, ink charging or ink drying. During
head cleaning, ink charging, and ink drying, PLEASE WAIT appears
on the LCD. Wait until the printer resumes printing.
An error has occurred
Many common printer problems can be identified by the
messages on the LCD.
You can also check the lights on the control panel for errors. See
“Lights” on page 225.
For other messages not included in the following table, see
“Messages” on page 227.
320
Problem Solver
Error messages
Description
What to do
UNABLE TO PRINT
An error may be
occurring when you try
to print patterns such as
nozzle check or head
alignment.
End the TEST PRINT
MENU first, and solve
the error displayed on
the LCD. Then try to
print patterns again.
MNT TK NEAR FULL
The maintenance tank is
almost full.
Replace the
maintenance tank with
a new one. See
“Replacing the
Maintenance Tank” on
page 308.
INK LOW
MNT REQ nnnn
REMOVE PAPER
Ink cartridge is nearly
empty.
Replacement of ink
cartridge is nearly
needed.
Although you can
continue printing in INK
LOW situation, it may
decline the print
quality.
A part used in the printer
has nearly reached the
end of its life. "nnnn"
shows the code of the
part.
Note the code and
contact your dealer.
See “Contacting
Customer Support” on
page 355.
Cleaning cannot be
executed because thick
paper is loaded.
Remove the thick
paper, and move the
paper lever to the
secured position.
The printer could not
feed the printout.
Remove the printout.
English
8
Message
8
8
8
8
8
8
8
8
8
8
8
Problem Solver
321
NOZZLES STILL
CLOGGED
The nozzles are still
clogged.
Run the Head Cleaning
utility. For Windows, see
“Cleaning the print
head” on page 80. For
Mac OS 9.x, see
“Cleaning the print
head” on page 165. For
Mac OS X, see
“Cleaning the print
head” on page 219.
CHANGE PAPER
TYPE
The loaded paper does
not match the paper
type selected.
Match the loaded
paper to the paper
type. See “Buttons” on
page 223.
WRONG PAPER
SIZE
The loaded paper size
does not match the
data size.
Match the loaded
paper size to the data
size.
PAPER OUT
No paper is loaded in the
printer.
Load paper correctly.
Roll paper is out while
printing is in progress.
Load a new roll paper.
A2 size cut sheet media
has been installed for
borderless printing.
Install a different size of
cut sheet media or roll
paper. See “Making the
Borderless setting” on
page 48 for Windows,
“Making the Borderless
setting” on page 139 for
Mac OS 9.x, or
“Performing Borderless
Printing” on page 212
for Mac OS X.
The printer cannot
detect the loaded cut
sheet media, because it
is wavy or curled.
Flatten the cut sheet
media.
The printer cannot
detect the loaded
paper.
Move the paper lever.
NO BORDERLESS
WITH THIS SIZE
RELOAD PAPER
Note:
Those messages
are displayed on
the LCD
alternately.
RELOAD PAPER
322
Problem Solver
Cut sheet media
inserted from the front
manual feed slot is not
inserted deep enough.
Insert the paper
deeper. See “Loading
paper into the front
manual feed slot” on
page 287.
NOT STRAIGHT
RELOAD
Cut sheet media is not
loaded straight, and
needs to be aligned.
Load the cut sheet
media correctly. See
“Loading cut-sheet
media” on page 277.
PAPER NOT
STRAIGHT
The paper is not loaded
straight.
Load paper straight.
PAPER NOT CUT
Paper is not cut correctly
when Roll Auto Cut On
is selected.
Open the top cover
and remove the uncut
paper. If RELOAD
PAPER appears on the
LCD, reload paper.
The paper cutter may
not be installed
correctly. See
“Replacing the Paper
Cutter” on page 310.
Paper cutter may be
blunt. Replace the
paper cutter. See
“Replacing the Paper
Cutter” on page 310.
COMMAND
ERROR
Damaged data is sent to
the printer.
Stop printing, and press
the Pause button for 3
seconds.
The printer receives data
with a wrong command.
The installed printer
driver is not correct for
the printer.
Stop printing, and press
the Pause button for 3
seconds. Then make
sure that the installed
printer driver is correct
for the printer.
8
English
RELOAD PAPER
INSERT DEEPLY
8
8
8
8
8
8
8
8
8
8
8
Problem Solver
323
DRIVER INK SET
SETTING IS WRONG
The cartridge option of
the printer driver has not
been changed yet.
Stop printing, and then
press and hold the
Pause button for 3
seconds. Finally, select
the correct ink
cartridge in the printer
driver according to the
actual ink cartridge set
on the printer. See
“Updating the printer
driver information” on
page 306. If you want to
continue printing, press
the Pause button.
Non-Epson genuine ink
cartridge is installed.
Press the Pause button
for 3 seconds to cancel
printing. If you want to
continue printing, press
the Pause button.
LOAD ROLL PAPER
The roll paper is not set
correctly.
Load the roll paper
correctly, and select
Roll Auto Cut On
or
Roll Auto Cut Off .
See “Loading roll
paper” on page 269.
LOAD SHEET PAPER
IN P. TRAY
The cut sheet media is
not set correctly in the
paper tray.
Set the cut sheet media
in the paper tray
correctly, and select
Sheet . See “Loading
cut-sheet media” on
page 277.
FEED SHEET PAPER
The cut sheet media
needs to be loaded
manually.
Load the cut sheet
media.
FORBIDDEN MEDIA
FROM P. TRAY
Cut sheet media, which
is to be loaded from the
front or rear manual feed
slot, is being loaded from
the paper tray.
Remove the cut sheet
media from the paper
tray, and load it from
the proper paper feed
slot. See “Checking the
paper path” on page
276.
MISMATCH ERROR
Note:
These messages
are displayed on
the LCD
alternately.
324
Problem Solver
The cut sheet media
needs to be loaded
manually.
Load the cut sheet
media manually from
the front or rear manual
feed slot. See
“Checking the paper
path” on page 276.
TIMES REMAINING
The conversion cartridge
needs to be replaced
soon. (The remaining
times of the conversion
cartridge appears on
the LCD.)
Replacement of
conversion cartridge is
nearly needed. Press
the Pause button.
The conversion cartridge
needs to be replaced.
Replace the
conversion cartridge
with a new one. Or,
complete the
replacement of the K
ink by pressing the
Pause button.
REPLACE
CNVRSION CRTG
INK OUT
INVALID INK CRTG
WRONG INK CRTG
Ink cartridge is empty.
Ink cartridge with the
wrong product code is
installed.
Ink cartridge that
cannot be used with this
printer is installed.
Replace the empty ink
cartridge with a new
one. See “Replacing Ink
Cartridges” on page
295.
Remove the ink
cartridge, and install
the ink cartridge with
the correct product
code. See
“Consumable
Products” on page 375.
Remove the ink
cartridge, and install
the ink cartridge that
can be used with this
printer. See
“Consumable
Products” on page 375.
8
English
FEED SHEET PAPER
MANUALLY
8
8
8
8
8
8
8
8
8
8
8
Problem Solver
325
326
SET INK CRTG
CSIC error has occurred.
Remove the ink
cartridge and reinstall
it. If this message
appears after
reinstalling the ink
cartridge, replace it.
See “Replacing Ink
Cartridges” on page
295.
NO INK CRTG
Ink cartridge is not
installed, or ink lever is
raised to the released
position.
Install ink cartridge, or
lower the ink lever to
the secured position.
MNT TNK FULL
The maintenance tank is
full.
Replace the
maintenance tank with
a new one. See
“Replacing the
Maintenance Tank” on
page 308.
LOWER INK LEVERS
Both ink levers have
been raised.
Lower the ink levers.
LOWER L INK LVR
The ink lever on the left
ink compartment has
been raised.
Lower the ink lever on
the left ink
compartment.
LOWER R INK LVR
The ink lever on the right
ink compartment has
been raised.
Lower the ink lever on
the right ink
compartment.
TOP COVER OPEN
Top cover is open.
Close the top cover.
LOAD PAPER
The paper lever is in the
released position.
Move the paper lever
to the secured position.
SET PAPER LEVER
Paper lever is in the
released position.
Move the paper lever
to the secured position.
Problem Solver
Paper is jammed in the
printer.
Release the paper lever
first. Then, open the top
cover if necessary and
remove the jammed
paper. If TURN PRINTER
PWR OFF AND THEN ON
appears on the LCD,
turn the printer off,
leave it for a while, and
then turn it on again.
See “Clearing paper
jams” on page 347.
NO MNT TNK
The maintenance tank is
not set in the printer.
Install the maintenance
tank.
REAR COVER
OPEN
The rear cover is open.
Close the rear cover.
UPDATE FAILED
The printer failed to
update the FirmWare.
Update the FirmWare
again.
OPTION I/F ERROR
The installed interface
cannot be used with this
printer.
Remove the interface
card, and install the
interface card that can
be used with this printer.
See “Options” on page
373.
UNLOCK PRINT
HEAD
Print head is locked.
Pull the green tab on
the left side of the print
head to release the
print head.
SERVICE REQ
nnnnnnnn
Print head is locked.
Pull the green tab on
the left side of the print
head to release the
print head.
A fatal error has
occurred.
Turn the printer off,
leave it for a while, and
turn the printer on
again. If this message
appears on the LCD
again, note the code
and contact your
dealer. See
“Contacting Customer
Support” on page 355.
Problem Solver
327
8
English
RELEASE LEVER
REMOVE PAPER
JAM
8
8
8
8
8
8
8
8
8
8
8
The printer does not turn on or stay on
When the Pause light does not come on and mechanism
initialization does not start even when the Power button is
pressed to turn on the printer, try the following solutions for the
problem.
❏ Turn off the printer and make sure the power cord is securely
plugged into the printer.
❏ Make sure your outlet works and is not controlled by a wall
switch or timer.
❏ Make sure the supplied voltage to the printer matches the
rating voltage labeled on the printer. If not, turn off the printer
and unplug the power cord immediately. Contact your dealer
for assistance. See “Contacting Customer Support” on page
355.
c
Caution:
If the supplied voltage and rating voltage do not match, do not
plug the printer back in again, as damage may occur.
The printer prints nothing
The printer is not correctly connected to the computer
Try one or more of these solutions:
❏ Turn off the printer and computer. Make sure the printer’s
interface cable is securely plugged into the correct terminal of
the computer.
❏ Make sure the interface cable specifications match the
specifications for the printer and computer.
❏ Make sure the interface cable is directly connected to the
computer without passing through any device, such as a
printer switching device, or extension cable.
328
Problem Solver
Your Epson printer is not selected as the default printer
8
English
Install the printer driver if it is not installed yet, and follow the
steps below to select your Epson printer as the default printer.
8
For Windows XP
1. Click the Start button, and Printer and Faxes.
2. Right-click EPSON Stylus Pro 4400 or EPSON Stylus Pro 4800.
8
8
3. Select Set As Default Printer, then close the window.
For Windows Me, 98, and 2000
1. Click the Start button, point to Settings and select Printers.
8
2. Right-click EPSON Stylus Pro 4400 or EPSON Stylus Pro 4800
in the Printers window.
8
3. Select Set As Default, then close the Printers window.
8
For Mac OS 9.x
1. Click the Apple menu and select Chooser. If the SPro 4400
or SPro 4800 printer icon can be seen, the printer driver is
correctly installed.
2. Make sure the EPSON Stylus Pro 4400 or EPSON Stylus Pro
4800 is selected for the printer port.
8
8
8
For Mac OS X
Make sure that the printer driver Stylus Pro 4400 or Stylus Pro
4800 is correctly added to the Print Center (for Mac OS X 10.2.x)
or Printer Setup Utility (for Mac OS X 10.3), and the correct one is
selected in the Print Center or the Printer Setup Utility.
Problem Solver
329
8
8
Printer port setting does not match the printer connection
port (for Windows only)
To select the printer port, follow the steps below.
For Windows XP
1. Click Start, click Control Panel, click Printers and Other
Hardware, and then click Printers and Faxes.
2. Right-click EPSON Stylus Pro 4400 or EPSON Stylus Pro 4800,
then select Properties.
3. Click the Ports tab.
4. Make sure that your printer port is selected.
For Windows Me or 98
1. Click Start, point to Settings, and then select Printers.
2. Right-click EPSON Stylus Pro 4400 or EPSON Stylus Pro 4800
in the Printers window, then select Properties.
3. Click the Details tab.
4. Make sure that your printer driver is selected in the Print
using the following driver list. Then select the port to which
your printer is connected in the Print to following port list.
For Windows 2000
1. Click Start, point to Settings, and then select Printers.
2. Right-click EPSON Stylus Pro 4400 or EPSON Stylus Pro 4800
in the Printers window, then select Properties.
3. Click the Ports tab.
4. Make sure that your printer port is selected.
330
Problem Solver
If you canceled the plug-and-play driver installation in
Windows Me or 98 before the procedure was complete, the USB
printer device driver or the printer software may be incorrectly
installed.
8
English
The USB printer device driver or the printer software may be
incorrectly installed (Windows Me and 98 only)
8
8
To ensure that the driver and printer software are installed
correctly, follow the steps below.
Note:
The printer driver screens that appear in this procedure are for
Windows 98. The appearance of the Windows Me printer driver screens
differ only slightly.
8
8
1. Click the Start button, point to Settings, and then click
Printers. Make sure that the icon for your printer appears in the
Printers window.
8
2. Select the icon of your printer, and click Properties on the File
menu.
8
8
8
8
8
8
Problem Solver
331
3. Click the Details tab.
If EPUSBX: (EPSON Stylus Pro 4400) or EPUSBX: (EPSON
Stylus Pro 4800) appears in the Print to the following port list,
then the USB printer device driver and printer software are
installed correctly.
If the correct port is not displayed, proceed to the next step.
332
Problem Solver
4. Click the Device Manager tab.
English
8
8
8
8
8
8
If your drivers are correctly installed, EPSON USB Printer
Device should appear on the Device Manager menu.
If EPSON USB Printer Devices does not appear on the Device
Management menu, click the plus (+) sign beside Other
devices to view the installed devices.
8
8
8
If USB Printer, EPSON Stylus Pro 4400, or EPSON Stylus Pro
4800 appears under Other devices, the printer software is
not installed correctly. Proceed to step 5.
If neither USB Printer nor EPSON Stylus Pro 4400/EPSON
Stylus Pro 4800 appears under Other devices, click Refresh
or unplug the USB cable from the printer, and then plug it into
the printer again. Once you have confirmed that these items
appear, proceed to step 5.
Problem Solver
333
8
8
8
5. Under Other devices, select USB Printer, EPSON Stylus Pro
4400, or EPSON Stylus Pro 4800, and click Remove. Then
click OK.
When the following dialog appears, click OK.
6. Click OK to close the System Properties dialog.
7. Uninstall the printer software. See “Uninstalling the printer
driver” on page 108.
334
Problem Solver
To increase the available memory in your Macintosh, select
Control Panel from the Apple menu and double-click the
Memory icon. You can increase the size of RAM cache or virtual
memory to increase total available memory. Also quit all
unnecessary applications.
The printer sounds like it is printing, but nothing prints
8
English
The printer driver does not have enough available memory
(for Mac OS 9.x only)
8
8
Try one or more of these solutions:
8
❏ Run the Head Cleaning utility. For Windows, see “Cleaning
the print head” on page 80. For Mac OS 9.x, see “Cleaning the
print head” on page 165. For Mac OS X, see “Cleaning the
print head” on page 219.
8
❏ If the Head Cleaning utility does not work, replace the ink
cartridges. See “Replacing Ink Cartridges” on page 295.
8
Printouts are not what you expected
8
Incorrect, garbled characters, or blank pages print
Try one or more of these solutions:
❏ For Windows, clear any stalled print jobs from the Progress
Meter. See “Using the EPSON Spool Manager” on page 90.
For Mac OS 9.x, clear any stalled print jobs from the EPSON
Monitor IV. See “Managing print jobs using EPSON Monitor
IV” on page 172.
❏ If the problem persists, turn off the printer and computer.
Make sure the printer’s interface cable is plugged in securely.
Problem Solver
8
335
8
8
8
8
Incorrect margins
Try one or more of these solutions:
❏ Check the margin settings in your application.
❏ Make sure the margins are within the printable area of the
page. See “Printable area” on page 361.
❏ For Windows, check the Borderless setting in the Paper menu.
Make sure they are correct for the paper size you are using.
See “Making Settings on the Paper Menu” on page 47.
For Mac OS 9.x, check the Borderless setting in the Page Setup
dialog. Make sure they are correct for the paper size you are
using. See “Making Settings in the Page Setup Dialog” on
page 137.
❏ Make sure the paper set position is correct. See “Using Roll
Paper” on page 265, or “Using Cut Sheet Media” on page 276.
Inverted image
For Windows, turn off the Flip Horizontal setting in the Advanced
menu. See “Making Advanced setting” on page 28.
For Mac OS 9.x, turn off the Flip Horizontal setting in the
Advanced dialog. See “Making Advanced setting” on page 123.
For Mac OS X, turn off the Flip Horizontal setting in the Advanced
Settings selected in the Print Settings selected in the Print dialog.
See “Advanced Settings” on page 194.
Printed color differs from the color on the screen
Try one or more of these solutions:
❏ Adjust the Color Density in the Paper Configuration dialog.
For Windows, see “Paper Configuration” on page 30. For Mac
OS 9.x, see “Paper Configuration” on page 125. For Mac OS
X, see “Paper Configuration” on page 202.
336
Problem Solver
❏ Since monitors and printers produce colors differently,
printed colors will not always match on screen colors
perfectly. However, the above color systems are provided to
overcome color differences.
For Mac OS 9.x, select ColorSync to color match your system
in the Advanced dialog. See “Making Advanced setting” on
page 123.
For Mac OS X, select ColorSync to color match your system
in the Printer Color Management selected in the Print dialog.
See “Printer Color Management” on page 196.
8
English
❏ Make sure the media type setting matches the paper being
used.
8
8
8
8
❏ You can produce sharper images with more vivid colors.
For Windows, select PhotoEnhance in the Advanced menu.
See “Making Advanced setting” on page 28.
8
For Mac OS 9.x, select PhotoEnhance in the Advanced
dialog. See “Making Advanced setting” on page 123.
❏ For Windows, select Color Controls in the Advanced menu,
and adjust color, brightness, etc. as required. See “Making
Advanced setting” on page 28.
Mac OS 9.x, select Color Controls in the Advanced dialog,
and adjust color, brightness, etc. as required. See “Making
Advanced setting” on page 123.
For Mac OS X, select Color Controls in the Printer Color
Management selected in the Print dialog. See “Printer Color
Management” on page 196.
❏ Mac OS 9.x, make sure your application and data reading
devices support the ColorSync system when you are selecting
ColorSync in the Advanced dialog. See “Making Advanced
setting” on page 123.
Problem Solver
8
337
8
8
8
8
8
A ruled line shifts
Perform the print head alignment. For Windows, see “Aligning
the print head” on page 81. Mac OS 9.x, see “Aligning the print
head” on page 166. For Mac OS X, see “Aligning the print head”
on page 220.
If the problem persists, perform the print head cleaning. For
Windows, see “Cleaning the print head” on page 80. For Mac OS
9.x, see “Cleaning the print head” on page 165. For Mac OS X, see
“Cleaning the print head” on page 219.
Printout has smears on the bottom edge
Try one or more of these solutions:
❏ If the paper is curled towards the printable side, flatten it or
curl it slightly to the opposite side.
❏ For Windows, if you use Epson special media, check the
Media Type setting in the Main menu. See “Making Settings
on the Main Menu” on page 21.
For Mac OS 9.x, if you use Epson special media, check the
Media Type setting in the Print dialog. See “Making Settings
in the Print Dialog” on page 117.
For Mac OS X, if you use Epson special media, check the
Media Type setting in the Print Settings selected in the Print
dialog. See “Page Setup” on page 188.
For paper other than Epson’s, register and select paper
thickness in the SelecType mode. Make sure it is correct for
the paper you are using. See “Making the paper settings” on
page 253.
❏ Set the PLATEN GAP to WIDE in the PRINTER SETTING of the
SelecType mode. See “PRINTER SETUP” on page 235.
338
Problem Solver
Print Quality Could be Better
English
8
Horizontal banding
8
Try one or more of these solutions:
❏ For Windows, check the Media Type setting in the Main
menu. Make sure it is correct for the paper you are using. See
“Making Settings on the Main Menu” on page 21.
For Mac OS 9.x, check the Media Type setting in the Print
dialog. Make sure it is correct for the paper you are using. See
“Making Settings in the Print Dialog” on page 117.
For Mac OS X, check the Media Type setting in the Print
Settings selected in the Print dialog. Make sure it is correct for
the paper you are using, see “Page Setup” on page 188.
❏ Make sure the printable side of the paper is face-up.
❏ Run the Head Cleaning utility to clear any clogged ink
nozzles. For Windows, see “Cleaning the print head” on page
80. For Mac OS 9.x, see “Cleaning the print head” on page 165.
For Mac OS X, see “Cleaning the print head” on page 219.
You can also clean the print head nozzles using the control
panel. To clean the print head nozzles, press the Menu
button for 3 seconds.
❏ Check the Paper Feed value. Reduce the value to improve
light banding, and increase it for dark banding. For Windows,
“Paper Configuration” on page 30. For Mac OS 9.x, see “Paper
Configuration” on page 125. For Mac OS X, see “Paper
Configuration” on page 202.
❏ Check the Ink check light. If necessary, replace ink cartridges.
See “Replacing Ink Cartridges” on page 295.
Problem Solver
339
8
8
8
8
8
8
8
8
8
8
Vertical misalignment or banding
Try one or more of these solutions:
❏ For Windows, turn off the High Speed setting in the
Advanced menu. See “Making Advanced setting” on page 28.
For Mac OS 9.x, turn off the High Speed setting in the
Advanced dialog. See “Making Advanced setting” on page
123.
For Mac OS X, turn off the High Speed setting in the
Advanced Settings is selected in the Print Settings selected in
the Print dialog. See “Advanced Settings” on page 194.
❏ Run the Print Head Alignment utility. For Windows, see
“Aligning the print head” on page 81. For Mac OS 9.x, see
“Aligning the print head” on page 166. For Mac OS X, see
“Aligning the print head” on page 220.
Faint printout or gaps
Try one or more of these solutions:
❏ Make sure that the ink cartridges do not exceed the expiry
date. The expiry date is labeled on the outside of the ink
cartridge.
❏ For Windows, check the Media Type setting in the Main
menu. Make sure it is correct for the paper you are using. See
“Making Settings on the Main Menu” on page 21.
For Mac OS 9.x, check the Media Type setting in the Print
dialog. Make sure it is correct for the paper you are using. See
“Making Settings in the Print Dialog” on page 117.
For Mac OS X, check the Media Type setting in the Print
Settings selected in the Print dialog. Make sure it is correct for
the paper you are using. See “Page Setup” on page 188.
340
Problem Solver
You can also clean the print head nozzles using the control
panel. To clean the print head nozzles, press the Menu
button for 3 seconds.
❏ Check the Ink check light. If necessary, replace ink cartridges.
See “Replacing Ink Cartridges” on page 295.
❏ Select Standard as Platen Gap in the Paper Configuration
dialog box. For Windows, see “Paper Configuration” on page
30. For Mac OS 9.x, see “Paper Configuration” on page 125.
For Mac OS X, see “Paper Configuration” on page 202.
8
English
❏ Run the Head Cleaning utility to clear any clogged ink
nozzles. For Windows, see “Cleaning the print head” on page
80. For Mac OS 9.x, see “Cleaning the print head” on page 165.
For Mac OS X, see “Cleaning the print head” on page 219.
8
8
8
8
8
Blurry or smeared printout
Try one or more of these solutions:
❏ For Windows, check the Media Type setting in the Main
menu. Make sure it is correct for the paper you are using. See
“Making Settings on the Main Menu” on page 21.
For Mac OS 9.x, check the Media Type setting in the Print
dialog. Make sure it is correct for the paper you are using. See
“Making Settings in the Print Dialog” on page 117.
For Mac OS X, check the Media Type setting in the Print
Settings selected in the Print dialog. Make sure it is correct for
the paper you are using. See “Page Setup” on page 188.
❏ If the paper you are using is not supported by the printer
driver, make the paper thickness setting in the SelecType
mode. See “CUSTOM PAPER” on page 243.
Problem Solver
341
8
8
8
8
8
8
❏ Make sure your paper is dry and the printable side is face-up.
Also, make sure you are using the correct type of paper. See
“Paper” on page 365 for specifications.
❏ Ink may have leaked inside the printer; wipe the inside of the
printer with a soft, clean cloth.
❏ Run the Head Cleaning utility. For Windows, see “Cleaning
the print head” on page 80. For Mac OS 9.x, see “Cleaning the
print head” on page 165. For Mac OS X, see “Cleaning the
print head” on page 219.
You can also clean the print head nozzles using the control
panel. To clean the print head nozzles, press the Menu
button for 3 seconds.
Color documents print in black only
Try one or more of these solutions:
❏ Make sure the color data settings in your application are
correct.
❏ For Windows, make sure Color or Color/B&W Photo is set
in the Main menu. See “Making Settings on the Main Menu”
on page 21.
For Mac OS 9.x, make sure Color or Color/B&W Photo is set
in the Print dialog. See “Making Settings in the Print Dialog”
on page 117.
For Mac OS X, make sure Color or Color/B&W Photo is set
in the Print Settings selected in the Print dialog. See “Color”
on page 190.
342
Problem Solver
Printing could be faster
❏ Select High Speed on the Advanced dialog box. For
Windows, see “Making Advanced setting” on page 28. For
Mac OS 9.x, see “Making Advanced setting” on page 123. For
Mac OS X, see “Advanced Settings” on page 194.
❏ For Windows, select the Automatic mode and move the
slider towards Speed in the Main menu to increase print
speed. See “Making Settings on the Main Menu” on page 21.
For Mac OS 9.x, select the Automatic mode and move the
slider towards Speed in the Print dialog to increase print
speed. See “Making Settings in the Print Dialog” on page 117.
For Mac OS X, select Automatic mode and move the slider
towards Speed in the Print Settings selected in the Print
dialog to increase print speed. See “Mode” on page 191.
❏ Do not run too many applications at the same time. Close any
applications you are not using.
❏ Change the interface card of your computer to IEEE1394 or
USB 2.0.
Note:
IEEE1394 and USB 2.0 are available only with the following OS.
English
8
Try one or more of these solutions:
8
8
8
8
8
8
8
8
8
IEEE 1394:
Windows XP, Me, 2000
Mac OS 9.x
Mac OS X
8
USB 2.0:
Windows XP, 2000
8
Problem Solver
343
❏ Delete unnecessary files to make room on your hard disk
drive.
Note for Windows:
Your computer may not have enough memory. For further tips, see
“Increasing the Print Speed” on page 93.
Roll paper cannot be cut
Try one or more of these solutions:
❏ Make sure that paper cutter cover is set correctly. See
“Replacing the Paper Cutter” on page 310.
❏ Make sure that the Roll Auto Cut On
is selected as the
Paper Source on the LCD. Press the Paper Source button
if necessary. Then press and hold the Paper Source button
for 3 seconds. The printer cuts the roll paper.
❏ Make sure that Normal Cut, Single Cut, or Double Cut is
selected as the Auto Cut in the printer driver. For Windows,
see “Making the Auto Cut setting” on page 52. For Mac OS
9.x, see “Making the Auto Cut setting” on page 143. For Mac
OS X, see “Auto Cut” on page 205.
❏ Cut the roll paper by hand if necessary. Check that the paper
thickness of the roll paper loaded in the printer matches the
paper specification (see “Paper” on page 365). If so, the paper
cutter may be blunt and require replacement. See “Replacing
the Paper Cutter” on page 310.
Note:
If you use roll paper other than Epson special media, see the user
documentation included with the paper, or contact your supplier.
344
Problem Solver
Paper feed or paper jam problems occur
frequently
English
8
Try one or more of these solutions:
8
❏ Before loading paper and guiding it through the paper
insertion slot, adjust paper suction.
To adjust the paper suction using the printer driver, see
“Paper Configuration” on page 30 for Windows, see “Paper
Configuration” on page 125 for Mac OS 9.x, or see “Paper
Configuration” on page 202 for Mac OS X.
To adjust the paper suction using the control panel, see
“CUSTOM PAPER” on page 243.
8
8
❏ Make sure the paper is not folded or wrinkled.
8
❏ Make sure the paper is flattened.
❏ Make sure printing occurs within the operational
temperature range.
8
❏ Make sure the paper is not damp.
❏ Make sure the paper is not too thick or too thin. See “Paper”
on page 365.
8
8
❏ Make sure no foreign objects are inside the printer.
❏ For Windows, check the Media Type setting in the Main
menu. Make sure it is correct for the paper you are using. See
“Making Settings on the Main Menu” on page 21.
For Mac OS 9.x, check the Media Type setting in the Print
dialog. Make sure it is correct for the paper you are using. See
“Making Settings in the Print Dialog” on page 117.
For Mac OS X, check the Media Type setting in the Print
Settings selected in the Print dialog. Make sure it is correct for
the paper you are using. See “Page Setup” on page 188
Problem Solver
8
345
8
8
8
❏ Make sure that the platen gap setting matches your paper.
You can change the platen gap setting in the PRINTER SETUP
of the SelecType mode. See “PLATEN GAP” on page 236.
❏ For non-Epson special media, check the paper type selected
in the CUSTOM PAPER of the SelecType mode. See “Making the
paper settings” on page 253.
Whenever loading non-Epson special media, test if the paper
can be loaded correctly before printing.
To clear Paper jams, see “Clearing paper jams” on page 347.
Roll paper does not eject properly
Try one ore more of these solutions:
❏ Roll paper is wound tightly and may feed with a curl. Flatten
it before you load it.
❏ Select Starwheel-Roll Curled as the Feed Roller Type in the
Paper Configuration dialog box. For Windows, see “Paper
Configuration” on page 30. For Mac OS 9.x, see “Paper
Configuration” on page 125. For Mac OS X, see “Paper
Configuration” on page 202.
346
Problem Solver
Clearing paper jams
English
8
When roll paper is jammed
8
To remove jammed roll paper, follow the steps below:
1. Turn off the printer.
2. Open the roll paper cover, and move the paper lever to the
released position.
8
8
8
8
8
3. Cut the paper at the paper insertion slot, and remove the roll
paper.
8
8
8
8
8
Problem Solver
347
4. Remove the jammed paper from the front or rear side of the
printer.
If necessary, open the top cover, and remove the jammed
paper.
348
Problem Solver
When paper loaded from the paper tray is jammed
English
8
To remove jammed paper, follow the steps below.
1. Turn off the printer.
8
2. Move the paper lever to the released position.
8
8
8
8
3. Remove the paper tray from the printer.
8
8
8
8
8
8
Problem Solver
349
4. Carefully remove the jammed paper.
If necessary, open the top cover, and remove the jammed
paper.
350
Problem Solver
8
English
If the paper is jammed around the rear cover, remove the rear
cover by squeezing the knobs, and remove the jammed paper.
8
8
8
8
8
8
8
8
8
8
8
Problem Solver
351
When paper loaded from the front manual feed slot is
jammed
To remove jammed paper, follow the steps below:
1. Turn off the printer.
2. Move the paper lever to the released position.
3. Remove the jammed paper from the front or rear side of the
printer.
Front
352
Problem Solver
Rear
English
8
8
8
8
When paper loaded from the rear manual feed slot is
jammed
8
To remove jammed paper, follow the steps below:
8
1. Turn off the printer.
8
2. Move the paper lever to released position.
8
8
8
8
8
Problem Solver
353
3. Remove the jammed paper from the front. If necessary, open
the top cover and remove the jammed paper.
354
Problem Solver
If your Epson product is not operating properly and you cannot
solve the problem using the troubleshooting information in your
product documentation, contact customer support services for
assistance. Check your Pan-European Warranty Document for
information on how to contact EPSON Customer support. They
will be able to help you much more quickly if you give them the
following information:
❏ Product serial number
(The serial number label is usually on the back of the product.)
❏ Product model
❏ Product software version
(Click About, Version Info, or similar button in the product
software.)
❏ Brand and model of your computer
8
English
Contacting Customer Support
8
8
8
8
8
❏ Your computer operating system name and version
8
❏ Names and versions of the software applications you
normally use with your product
8
8
Technical Support Web Site
Go to http://www.epson.com and select the Support section of
your local EPSON web site for the latest drivers, FAQs, manuals
and other downloadables.
Epson's Technical Support Web Site provides help with problems
that cannot be solved using the troubleshooting information in
your printer documentation.
Problem Solver
355
8
8
8
Paper Information
Epson offers specially designed media for ink jet printers to meet
most high-quality printing needs.
See “Epson Special Media” on page 377 for more detailed
information on the Epson special media.
Paper settings
Roll paper
Media Name
Paper
Thickness
Borderless
Printing
Spindle
ICC Profile
Premium Glossy
Photo Paper (250)
0.3 mm
R
3
Pro4800
PGPP250.icc
Premium Luster
Photo Paper (250)
0.3 mm
R
3
Pro4800
PLPP250.icc
Premium
Semigloss Photo
Paper (250)
0.3 mm
R
3
Pro4800
PSPP250.icc
Premium
Semimatte Photo
Paper (250)
0.3 mm
R
3
Pro4800
PSmPP250.icc
Photo Paper Gloss
250
0.3 mm
R
3
Pro4800
PPG250.icc
Photo Semigloss
Paper
0.2 mm
R
(Borderless
Print
Spacer is
required)
2
Pro4800
PSP.icc
0.2 mm
R
(Borderless
Print
Spacer is
required)
2
Pro4800
PGP.icc
Photo Grade
Semigloss Paper
Photo Glossy
Paper
Photo Grade
Glossy Paper
356
Problem Solver
EPSON Proofing
Paper Semimatte
(Commercial)
0.2 mm
NR
2
Pro4800
PRPS.icc
Enhanced Matte
Paper
0.3 mm
NR
3
Pro4800
EMP_PK.icc
Pro4800
EMP_MK.icc
Pro4400
EMP.icc
Singleweight
Matte Paper
0.1 mm
NR
2
Pro4800
SWMP_PK.icc
Pro4800
SWMP_MK.icc
Pro4400
SWMP.icc
Textured Fine Art
Paper
0.4 mm
NR
3
Pro4800
TFAP_PK.icc
Pro4800
TFAP_MK.icc
✽ In the Borderless Printing column, R stands for Recommended and NR stands
for Not Recommended.
Cut sheets
English
8
8
8
8
8
8
8
8
Media Name
Paper
Thickness
Borderless
Printing
ICC Profile
Premium Glossy Photo
Paper
0.3 mm
Right and
Left sides
only
Pro4800 PGPP.icc
8
Premium Luster Photo
Paper
0.3 mm
Right and
Left sides
only
Pro4800 PLPP.icc
8
Premium Semigloss
Photo Paper
0.3 mm
Right and
Left sides
only
Pro4800 PSPP.icc
8
EPSON Proofing Paper
Semimatte
(Commercial)
0.2 mm
Right and
Left sides
only
Pro4800
PPSmC.icc
Problem Solver
8
357
Archival Matte Paper
0.3 mm
Enhanced Matte Paper
Right and
Left sides
only
Pro4800
ARMP_PK.icc
Pro4800
ARMP_MK.icc
Pro4400
ARMP.icc
Pro4800
EMP_PK.icc
Pro4800
EMP_MK.icc
Pro4400 EMP.icc
358
Photo Quality Ink Jet
Paper
0.1 mm
Right and
Left sides
only
Pro4800
PQIJP_PK.icc
Pro4800
PQIJP_MK.icc
Pro4400
PQIJP.icc
Bright White Ink Jet
Paper
0.1 mm
Right and
Left sides
only
Pro4800
Standard.icc
Pro4400
Standard.icc
Velvet Fine Art Paper
0.5 mm
Right and
Left sides
only
Pro4800
VFAP_PK.icc
Pro4800
VFAP_MK.icc
UltraSmooth Fine Art
Paper
0.5 mm
Right and
Left sides
only
Pro 4800
USFAP_PK.icc
Pro4800
USFAP_MK.icc
Watercolor
Paper-Radiant White
0.3 mm
Right and
Left sides
only
Pro 4800
WCRW_PK.icc
Pro4800
WCRW_MK.icc
Problem Solver
Chapter 9
English
9
Product Information
9
Printer Specifications
9
Printing
9
Printing
method
On-demand ink jet
Nozzle
configuration
EPSON Stylus Pro
4400
9
Black: 180 nozzles × 2
(Matte Black × 2)
Color: 180 nozzles × 6
(Cyan × 2, Magenta × 2, Yellow × 2)
EPSON Stylus Pro
4800
Black: 180 nozzles × 3
(Photo Black or Matte Black, Light
Black, Light Light Black)
Color: 180 nozzles × 5
(Cyan, Magenta, Light Cyan, Light
Magenta, Yellow)
9
9
9
9
Character mode
Character Pitch
Printing Column
10 cpi*
167
9
* characters per inch
9
9
Product Information
359
Raster graphic
mode
Horizontal
resolution
Printable width
Available dots
360 dpi*
425.8 mm
(17.03 inches)
5904
720 dpi
425.8 mm
(17.03 inches)
11814
1440 dpi
425.8 mm
(17.03 inches)
23629
2880 dpi
425.8 mm
(17.03 inches)
47259
* dots per inch
360
Resolution
Maximum 2880 × 1440 dpi
Print direction
Bidirectional
Control code
ESC/P Raster
Line spacing
1/6 inch or programmable in
1440 inch increments
Paper feed speed
215 ± 10 mm seconds per 1/6 inch
line
RAM
64 MB
Character tables
PC 437 (US, Standard Europe)
PC 850 (Multilingual)
Character sets
EPSON Courier 10 cpi
Product Information
Printable area
English
9
A
9
B-R
B-L
9
C
A
B-L
B-R
C
9
9
Roll paper
The minimum top margin is 3.0 mm (0.12")
Cut sheets
The minimum top margin is 3.0 mm (0.12")
Roll paper
The minimum left margin is 3.0 mm (0.12")
Cut sheets
The minimum left margin is 3.0 mm (0.12")
Roll paper
The minimum right margin is 3.0 mm (0.12")
Cut sheets
The minimum right margin is 3.0 mm (0.12")
Roll paper
The minimum bottom margin is 3.0 mm (0.12")
Cut sheets
The minimum bottom margin is 3.0 mm (0.12")
9
9
For roll paper, the following margin widths can be selected using
the control panel as follows. For details, see “PAPER MARGIN”
on page 237.
Parameter
A
B-L
B-R
C
T/B 15 mm
(Default)
15 mm
3 mm
3 mm
15 mm
T/B 35 mm
35 mm
3 mm
3 mm
35 mm
15 mm
15 mm
15 mm
15 mm
15 mm
3 mm
3 mm
3 mm
3 mm
3 mm
Product Information
9
9
9
9
9
361
Note:
The printer automatically detects the dimensions of the paper that is
loaded. Print data that exceeds the printable area of the paper cannot be
printed.
Mechanical
Paper feed method
Friction
Paper path
Roll paper
Cut sheets (paper tray/front manual
insertion/rear manual insertion)
Dimensions
Width: 848 mm (33.92 inches)
Depth: 764 mm (30.56 inches)
Height: 354 mm (14.16 inches)
Weight
EPSON Stylus Pro 4400:
Approx. 39.0 kg (85.8 lb) without consumables
EPSON Stylus Pro 4800:
Approx. 40.2 kg (88.44 lb) without consumables
362
Product Information
Electrical
English
9
Rated voltage
100 to 240 V
Input voltage range
90 to 264 V
Rated frequency range
50 to 60 Hz
Input frequency range
49 to 61 Hz
Rated current
1.0 - 0.5 A
Power consumption
Approx. 52 W or less when printing
(ISO10561 Letter Pattern)
9
9
9
9
5 W or less in sleep mode
Approx. 1 W or less when printer is off
9
Note:
Check the label on the back of the printer for voltage information.
9
Environmental
9
Temperature
Humidity
Operation
10 to 35°C (50 to 95°F)
Print Quality
Guarantee
15 to 25°C (59 to 77°F)
Storage
-20 to 40°C (-4 to 104°F)
Operation
20 to 80% RH*
Print Quality
Guarantee
40 to 60% RH*
Storage
20 to 85% RH**
9
9
9
9
* Without condensation
** Stored in shipping container
Product Information
363
Operational conditions (temperature and humidity):
Initialization
Hardware initialization at power on
The printer mechanism is set to its
initial state.
The input data buffer and print
buffer are cleared.
The printer returns to the default
condition last set.
Software initialization when the
ESC@ (initialize the printer)
command is received
The print buffer is cleared.
Panel button initialization by
pressing the Pause button on the
control panel for 3 seconds, or *INI
signal is sent
Print head capping occurs.
The printer returns to the default
condition last set.
Paper is ejected, if any.
The input data buffer and print
buffer are cleared.
The printer returns to the default
condition last set.
364
Product Information
Standards and Approvals
English
9
Safety
9
UL 60950
CSA 22.2 No. 60950
Low Voltage Directive 73/23/EEC
EMC
9
EN 60950
FCC part 15 subpart B class B
9
CSA C108.8 class B
AS/NZS 3548 class B
EMC Directive 89/336/ECC
EN 55022 Class B
EN 55024
EN 61000-3-2
9
EN 61000-3-3
9
Paper
9
Roll paper:
Size
203 mm (8 inches) to 432 mm (17 inches) (W) ×
45000 mm (1771.68 inches) (L) when internal
diameter is 2 inches
9
203 mm (8 inches) to 432 mm (17 inches) (W) ×
202000 mm (7952.88 inches) (L) when internal
diameter is 3 inches
Outer diameter
9
9
103 mm (4.05 inches) maximum when 2/3 dual roll
feed spindle is set as 2 inch roll paper spindle
150 mm (5.90 inches) maximum when 2/3 dual roll
feed spindle is set as 3 inch roll paper spindle.
Paper types
Plain paper, special papers distributed by Epson
Thickness
(for plain paper)
0.08 to 0.11 mm (0.003 to 0.004 inches)
Product Information
9
9
365
Weight
(for plain paper)
64 gf/m² (17 lb) to 90 gf/m² (24 lb)
Cut sheets:
Size
8 × 10 inches, 203.2 × 254 mm
A4 (210 × 297 mm)
Letter (8.5 ×11 inches, 215.9 × 279.4 mm)
B4 (257 × 364 mm)
11 × 14 inches, 279.4 × 355.6 mm
US B (11 × 17 inches, 279.4 × 431.8 mm)
A3 (297 × 420 mm)
300 × 450 mm
Super A3/B (329 × 483 mm)
B3 (364 × 515 mm)
400 × 600 mm
A2 (420 × 594 mm)
16 × 20 inches, 406.4 × 508 mm
US C (17 × 22 inches, 431.8 × 558.8 mm)
Paper types
Plain paper, special papers distributed by Epson
Thickness
(for plain paper)
0.08 to 0.11 mm (0.003 to 0.004 inches)
Weight
(for plain paper)
64 gf/m² (17 lb) to 90 gf/m² (24 lb)
Note:
❏ Since the quality of any particular brand or type of paper may be
changed by the manufacturer at any time, Epson cannot attest to
the quality of any non-Epson brand or type of paper. Always test
samples of paper before purchasing large quantities or printing large
jobs.
366
Product Information
❏ When the paper is curled or folded, flatten them before loading.
Ink cartridges
Colors
9
English
❏ Poor quality paper may reduce print quality and cause paper jams
or other problems. If you encounter problems, switch to a higher
grade of paper.
9
9
EPSON Stylus Pro 4400
9
Matte Black
Cyan
9
Magenta
Yellow
EPSON Stylus Pro 4800
9
Photo Black
Matte Black
9
Light Black
Light Light Black
9
Cyan
Magenta
Yellow
9
Light Cyan
Light Magenta
Cartridge life
9
2 years from production date if unopened.
Within 6 months after opening package.
Temperature
Storage (uninstalled)
9
-30 to 40°C (-22 to 105°F)
1 month at 40°C (104°F)
Storage (installed)
9
-20 to 40°C (-4 to 104°F)
1 month at 40°C (104°F)
Product Information
367
Capacity
110 ml
220 ml
Dimensions
110 ml: 25.1 mm (W) × 165.8 mm (D) × 105.3 mm (H)
(0.98 inches (W) × 6.52 inches (D) × 4.14 inches (H))
220 ml: 25.1 mm (W) × 280.8 mm (D) × 105.3 mm (H)
(0.98 inches (W) × 11.05 inches (D) × 4.14 inches (H))
Weight
110 ml: Approx. 200 g (0.44 lb)
220 ml: Approx. 385 g (0.85 lb)
c
368
Caution:
Epson recommends the use of original Epson ink cartridges only.
Other products not manufactured by Epson may cause damage
to your printer not covered by Epson's warranties.
Product Information
9
To use your printer with Windows
9
English
System Requirements
Your computer should also meet the following system
requirements:
9
Minimum system
Recommended system
Pentium 330 MHz for Windows XP
Pentium 150 MHz for Windows Me
Pentium 133 MHz for Windows 2000
Pentium for Windows 98
Pentium 4.1.4 GHz or higher
processor
9
128 MB RAM for Windows XP
64 MB RAM for Windows 2000
32 MB RAM for Windows Me and 98
256 MB RAM or more
9
100 MB or more hard disk space
3 GB or more free disk space
9
VGA monitor
VGA or better monitor
Your computer dealer can help you update your system if it does
not meet these requirements.
To use your printer with Mac OS 9.x
9
9
Your computer should also meet the following system
requirements:
9
Minimum system
Recommended system
PowerPC
PowerPC G4 800 MHz or higher processor
Mac OS 9.1 or later
Mac OS 9.1 or later
128 MB available memory
256 MB or more available memory
60 MB free disk space
2 GB or more free disk space
Product Information
9
9
9
369
Note:
The amount of available memory varies according to the number and
kind of applications that are open. To see how much memory is available,
choose About This Computer from the Apple menu and refer to the
memory size (listed in kilobytes) under “Largest Unused Block”
(1,024 K = 1 MB).
To use your printer with Mac OS X
Your computer should also meet the following system
requirements:
Minimum system
Recommended system
Computer that can run
Mac OS X 10.2.0
PowerPC G4 800 MHZ or higher processor
Mac OS X 10.2.0 or later
Mac OS X 10.2.3 or later
128 MB or more available
memory
256 MB or more of available memory
60 MB or more free disk space
2 GB or more free disk space
Note:
To see how much memory is available, choose About this Mac from
the Apple menu.
370
Product Information
Interface Specifications
English
9
Your printer is equipped with a USB interface, an IEEE1394
interface and an Ethernet interface.
9
USB interface
9
The printer’s built-in USB interface is based on the standards
specified in the Universal Serial Bus Specifications Revision 2.0,
the Universal Serial Bus Specification Revision 1.1, and the
Universal Serial Bus Device Class Definition for Printing Devices
Version 1.1. This interface has the following characteristics.
Standard
Based on Universal Serial Bus Specifications
Revision 2.0, Universal Serial Bus Specification
Revision 1.1, Universal Serial Bus Device Class
Definition for Printing Devices Version 1.1
Bit rate
480 Mbps (High Speed Mode)
12 Mbps (Full Speed Device)
Data encoding
NRZI
Adaptable connector
USB Series B
Recommended cable
length
5 meters (5.5 yard)
9
9
9
9
9
Note:
Only computer equipped with a USB connector and running
Windows XP, Me, 98, 2000, or Mac OS 9.x to X.10.x support the USB
interface.
9
9
9
9
Product Information
371
IEEE1394 Interface
The IEEE 1394 interface has the following characteristics.
Basic specifications
Data transfer method
Half-duplex Data/Strobe differential serial
Synchronization
method
DS-Link bit level encoding
Encoding/decoding
DS-Link bit level encoding
Compatible
connectors
IEEE 1394-1995 compliant plug (6 contact)
Connector pin signal layout
Pin
number
Signal
name
Function
1
VP
Cable power supply
2
VG
Cable ground
3
TPB*
Strobe during receipt, data during transmission
(differential pair)
4
TPB
5
TPA*
6
TPA
Data during receipt, strobe during transmission
(differential pair)
Power class
Power class code 100
No power supply from external sources
Fitted with a repeat function with bus power
372
Product Information
Chapter 10
English
10
Options and Consumable Products
10
Options
The following options are available for use with your printer.
Note:
The availability of options and consumable products varies by location.
10
10
10
Roll paper spindle
To use optional spindles, see “Using Roll Paper” on page 265.
2/3 inch Dual Roll Feed Spindle
C12C811171
2/3 inch Dual Roll Feed Spindle (High Tension)
C12C811191
Roll Paper Belt
C12C890121
10
10
10
10
Interface card
To install optional interface card, see the Setup Guide.
EpsonNet 10/100 BASE TX High Speed Int. Print
Server
C12C82405✽
10
Note:
The asterisk (✽) is a substitute for the last digit of the product code, which
varies by location.
Options and Consumable Products
10
373
10
Interface cable
IEEE 1394 Cable
C836302
Borderless Print Spacer
When printing on roll paper with a width of 8 inches (203.2 mm)
or 420 mm (A2), attach the spacer to the spindle. To attach the
spacer to the spindle, see “Attaching the spacer to the spindle” on
page 267.
Borderless Print Spacer for 420 mm and
8 inch Roll Paper
374
Options and Consumable Products
C12C811201
Consumable Products
The following consumable products are available for use with
your printer.
Paper cutter
English
10
10
10
If you notice the edge of the paper is not cut cleanly, you can
replace the cutter blade. See “Replacing the Paper Cutter” on page
310.
Auto Cutter Spare Blade
C12C815291
10
10
10
Maintenance Tank
This tank absorbs discharged liquid. If it becomes full, you need
to replace it. See “Replacing the Maintenance Tank” on page 308.
Maintenance Tank
C12C890191
10
10
10
Ink cartridges
To replace ink cartridges, see “Replacing Ink Cartridges” on page
295.
Note:
❏ The product number varies by country.
❏ The UltraChrome ink cartridges for EPSON Stylus Pro
4000/7600/9600 can also be used with EPSON Stylus Pro 4400.
❏ The UltraChrome K3 ink cartridges are for the exclusive use of
EPSON Stylus Pro 4800.
Options and Consumable Products
375
10
10
10
EPSON Stylus Pro 4400 ink cartridges
Ink cartridge (Matte Black)
110 ml: T5438
220 ml: T5448
Ink cartridge (Cyan)
110 ml: T5432
220 ml: T5442
Ink cartridge (Magenta)
110 ml: T5433
220 ml: T5443
Ink cartridge (Yellow)
110 ml: T5434
220 ml: T5444
EPSON Stylus Pro 4800 ink cartridges
376
Ink cartridge (Photo Black)
110 ml: T5641
220 ml: T5651
Ink cartridge (Matte Black)
110 ml: T5438
220 ml: T5448
Ink cartridge (Cyan)
110 ml: T5642
220 ml: T5652
Ink cartridge (Magenta)
110 ml: T5643
220 ml: T5653
Ink cartridge (Yellow)
110 ml: T5644
220 ml: T5654
Ink Cartridge (Light Black)
110 ml: T5647
220 ml: T5657
Ink cartridge (Light Cyan)
110 ml: T5645
220 ml: T5655
Ink cartridge (Light Magenta)
110 ml: T5646
220 ml: T5656
Options and Consumable Products
110 ml: T5649
220 ml: T5659
10
English
Ink cartridge (Light Light Black)
10
Black ink conversion cartridge
You can change the black ink according to your purpose. You can
choose either Matte Black or Photo Black. See “Converting the
Black Ink Cartridges” on page 300 for details.
10
Black Ink Conversion Kit
10
T564A
10
Epson Special Media
Most plain paper works well in your printer. In addition, Epson
offers specially designed media for ink jet printers to meet most
high-quality printing needs.
Note:
❏ The availability of special media varies by country.
10
10
10
❏ The names of some special media vary by country. Use the product
number to confirm the type of special media you need or have.
❏ For the latest information on media available in your area, contact
Epson customer support web site. See “Contacting Customer
Support” on page 355.
10
10
10
10
Options and Consumable Products
377
Roll paper
Media Name
Size
Product
Code
Recommended
Application
Premium Glossy
Photo Paper (250)
16" × 100’ (30.5 m)
S041742
Photo Contract
Proofing
Premium Luster
Photo Paper (250)
10" × 100’ (30.5 m)
S041644
300 mm × 30.5 m
S041646
16" × 100’ (30.5 m)
S041737
Premium Semigloss
Photo Paper (250)
16" × 100’ (30.5 m)
S041743
Premium Semimatte
Photo Paper (250)
16" × 100’ (30.5 m)
S041738
Photo Paper Gloss
250
17" × 100’ (30.5 m)
S041879
Photo Semigloss
Paper
16.5" × 100’ (30.5 m)
S041779
16.5" × 100’ (30.5 m)
S041778
EPSON Proofing
Paper Semimatte
(Commercial)
17" × 100’ (30.5 m)
S041724
13" × 50’ (15 m)
S041668
Enhanced Matte
Paper
17" × 100’ (30.5 m)
S041725
POP
3D CAD/GIS
Photo/Fine Art
Singleweight Matte
Paper
17" × 131.7’ (40 m)
S041746
POP
2D CAD/GIS
Imposition
Proofing
Textured Fine Art
Paper
17" × 50’ (15 m)
S041745
Photo/Fine Art
Photo Grade
Semigloss Paper
Photo Glossy Paper
Photo Grade Glossy
Paper
378
Options and Consumable Products
Contract
Proofing
Media Name
Size
Product
Code
Recommended
Application
Premium Glossy Photo
Paper
LTR
S041286
Photo
10
English
Cut sheets
10
S041667
A4
10
S041285
S041287
10
S041297
S041624
A3
S041288
10
S041315
Super A3/B
S041289
10
S041316
Premium Luster Photo
Paper
LTR
S041405
A3
S041406
Super A3/B
S041407
A4
S041332
LTR
S041331
A3
S041334
Super A3
S041328
Super B
S041327
EPSON Proofing Paper
Semimatte
(Commercial)
Super A3/B
S041744
Contract
Proofing
Archival Matte Paper
LTR
S041341
Enhanced Matte Paper
A4
S041342
POP
3D CAD/GIS
Photo/Fine Art
A3
S041344
Super A3/B
S041340
Premium Semigloss
Photo Paper
10
10
10
Options and Consumable Products
10
379
10
10
Photo Quality Ink Jet
Paper
LTR
S041029
S041062
A4
S041061
Bright White Ink Jet
Paper
A4
S041442
Velvet Fine Art Paper
LTR
S041598
Super A3/B
S041637
Super A3/B
S041869
US-C
S041897
Super A3
S041352
Super B
S041351
UltraSmooth Fine Art
Paper
Watercolor
Paper-Radiant White
380
Options and Consumable Products
POP
2D CAD/GIS
Imposition
Proofing
Photo/Fine Art
Appendix A
English
xA
nd
pe
Ap
Corrections
xA
nd
pe
Ap
About paper margin
In the Control Panel and Product Information section of the
Reference Guide, the supported paper margins are incorrect. The
correct paper margins should be DEFAULT, T/B 15 mm,
T/B 25 mm, 15 mm, and 3 mm.
Margin settings
Top
Bottom
DEFAULT
See the list below.
3 mm
T/B 15 mm
15 mm
15 mm
3 mm
T/B 25 mm
25 mm
25 mm
3 mm
15 mm
15 mm
15 mm
15 mm
3 mm
3 mm
3 mm
3 mm
xA
nd
pe
Ap
xA
nd
pe
Ap
The following table shows the default paper margin for the paper.
Top/Bottom
Left/Right
Plain Paper
Singleweight Matte Paper
Enhanced Matte Paper
Premium Semimatte Photo Paper (250)
Premium Luster Photo Paper (250)
Photo Paper Gloss 250
Photo Glossy Paper
Photo Semigloss Paper
Textured Fine Art Paper
UltraSmooth Fine Art Paper
Proofing Paper Semimatte
15 mm
3 mm
Premium Glossy Photo Paper (250)
Premium Semigloss Photo Paper (250)
20 mm
xA
nd
pe
Ap
xA
nd
pe
Ap
Left/Right
Roll Paper
xA
nd
pe
Ap
xA
nd
pe
Ap
xA
nd
pe
Ap
xA
nd
pe
Ap
xA
nd
pe
Ap
xA
nd
pe
Ap
3 mm
Corrections
381
Note:
❏ When you set the margin once, the margin applies to all media. To
change the paper margin, select the target margin setting again.
❏ Try T/B 25 mm when smear may result in the top and bottom areas.
When you select the paper margin setting except DEFAULT, the
following number appears on the right side of the paper mark on
the printer’s control panel.
Margin settings
Number
T/B 15 mm
1
T/B 25 mm
2
15 mm
1
3 mm
0
About Platen Gap
In the Control Panel section of the Reference Guide, the description
about Platen Gap on the Custom Paper menu is incorrect. WIDEST
is not supported, so read it as below.
You can adjust the distance between the print head and paper.
Normally, leave this set to STANDARD. If you find that printed
images are smeared, select WIDE. Select NARROW for printing on
thin paper, or WIDER for printing on thick paper.
Note:
❏ There is also Platen Gap on the Printer Setup menu, but this one
supports WIDEST. Only Platen Gap on the Custom Paper menu
does not support WIDEST.
❏ The setting will return to STANDARD after you turn the printer
on and off.
382
Corrections
Cleaning the Printer
In the Maintenance and Transportation section of the Reference
Guide, we have added some more information for Cleaning the
Printer, so read it as below.
To keep your printer operation in its top condition, clean it
thoroughly if it becomes soiled.
w
c
English
xA
nd
pe
Ap
xA
nd
pe
Ap
xA
nd
pe
Ap
Warning:
Be careful not to touch the gears inside the printer.
xA
nd
pe
Ap
Caution:
❏ Never use alcohol or thinners to clean the printer; these
chemicals can damage the components as well as the case.
xA
nd
pe
Ap
❏ Be careful not to get water on the printer mechanism or
electronic components.
xA
nd
pe
Ap
❏ Do not use a hard or abrasive brush.
xA
nd
pe
Ap
❏ Do not spray the inside of the printer with lubricants;
unsuitable oils can damage the mechanism. Contact your
dealer or a qualified service person if lubrication is needed.
1. Make sure the printer is turned off and all the lights are off,
and then unplug the power cord. Leave the printer for a
minute.
xA
nd
pe
Ap
xA
nd
pe
Ap
xA
nd
pe
Ap
xA
nd
pe
Ap
xA
nd
pe
Ap
Corrections
383
c
Caution:
Do not touch the following parts; otherwise, printouts may
be soiled.
Roller
Ink
absorption
Print head
guide
2. Open the top cover and then use a soft, clean cloth to carefully
remove any dust or dirt inside the printer. Wipe the gray part
by following the directions of the arrows.
If there is a serious problem of dirt on the inside of the printer,
clean it using a soft, clean cloth dampened with mild
detergent. Then, wipe the inside of the printer dry with a dry,
soft cloth.
384
Corrections
xA
nd
pe
Ap
English
3. If the back of a printout is soiled, carefully clean the platen
(the gray part) using a soft, clean cloth.
xA
nd
pe
Ap
xA
nd
pe
Ap
xA
nd
pe
Ap
4. If some powdery paper dust is stuffed in the platen, use
something like a toothpick to remove it. Close the top cover.
xA
nd
pe
Ap
xA
nd
pe
Ap
xA
nd
pe
Ap
xA
nd
pe
Ap
xA
nd
pe
Ap
5. If the outer case is dirty, clean it using a soft, clean cloth
dampened with mild detergent. Keep the ink compartment
covers closed to prevent water from getting inside.
xA
nd
pe
Ap
xA
nd
pe
Ap
xA
nd
pe
Ap
Corrections
385
About the Black Ink Conversion Kit
The Black Ink Conversion Kit is packed with the printer. Epson
does not sell it as a consumable anymore.
Note:
Contact your dealer if the Black Ink Conversion Kit is needed.
386
Corrections
English
Glossary
The following definitions apply specifically to printers.
application
A software program that helps you carry out a particular task, such as word
processing or financial planning.
ASCII
American Standard Code for Information Interchange. A standardized coding
system for assigning numerical codes to letters and symbols.
banding
The horizontal lines that sometimes appear when printing graphics. This occurs
when the print heads are misaligned. See also MicroWeave.
bit
A binary digit (0 or 1), which is the smallest unit of information used by a printer
or computer.
brightness
The lightness or darkness of an image.
buffer
The portion of the printer's memory used to store data before printing it.
byte
A unit of information consisting of eight bits.
characters per inch (cpi)
A measure of the size of text characters, sometimes referred to as pitch.
CMYK
Cyan (blue-green), magenta, yellow, and black. These colored inks are used to
create the subtractive system array of printed color.
color matching
A method of processing color data so that colors displayed on a computer screen
closely match colors in printouts. A variety of color-matching software is
available. See also ColorSync and sRGB.
Glossary
387
ColorSync
Macintosh software that is designed so you get WYSIWYG (What You See Is What
You Get) color output. This software prints colors as you see them on your screen.
cpi
See characters per inch.
default
A value or setting that takes effect when the equipment is turned on, reset, or
initialized.
DMA
Direct Memory Access. A data transfer feature that by-passes a computer’s CPU
and allows direct communication between the computer’s memory and
peripheral devices (such as printers).
dot matrix
A method of printing in which each letter or symbol is formed by a pattern
(matrix) of individual dots.
dpi
Dots per inch. The dpi measures the resolution. See also resolution.
drive
A memory device, such as CD-ROM, hard disk, or floppy disk. In Windows, a
letter is assigned to each drive for easy management.
driver
A software program that sends instructions to a computer peripheral to tell it
what to do. For example, your printer driver accepts print data from your word
processor application and sends instructions to the printer on how to print this
data.
economy printing
Printing in which images are printed with fewer dots to save ink.
error diffusion
Error diffusion blends individual colored dots with the colors of the surrounding
dots to create the appearance of natural colors. By blending colored dots, the
printer can achieve excellent colors and subtle color gradation. This method is
best suited for printing documents that contain detailed graphics or photographic
images.
388
Glossary
Abbreviation for Epson Standard Code for Printers. This system of commands
gives you control of your printer from your computer. It is standard for all Epson
printers and supported by most application programs for personal computers.
ESC/P Raster
A command language that gives you control of your printer from your computer.
Commands in this language produce laser-like features, such as enhanced
graphics printing.
font
A style of type designated by a family name.
grayscale
A scale of shades of gray from black to white. Grayscale is used to represent colors
when printing with black ink only.
halftones
Patterns of black or colored dots used to reproduce an image.
halftoning
Method of using dot patterns to represent an image. Halftoning makes it possible
to produce varying shades of gray using only black dots, or a nearly infinite array
of colors using only a few colors of dots. See also halftones.
head alignment
The operation to correct any misalignment of the print heads. Vertical banding
will be corrected.
head cleaning
The operation to clean any clogged nozzles for correct printing.
high speed printing
Printing in which images are printed in both directions. This provides faster
printing.
initialization
Returns the printer to its defaults (fixed set of conditions). This happens every
time you turn on the printer or reset the printer.
ink cartridge
The cartridge which contains ink.
ink jet
A method of printing in which each letter or symbol is formed by precisely
spraying ink onto paper.
Glossary
389
English
ESC/P
interface
The connection between the computer and the printer. A serial interface transmits
data one bit at a time.
interface cable
The cable that connects between the computer and the printer.
LCD
Liquid Crystal Display. Shows various messages according to status of the
printer.
local printer
The printer which is connected to the computer’s port directly by interface cable.
media
Materials upon which data is printed, such as roll paper and cut sheets, plain
paper, and special paper.
memory
The part of the printer’s electronic system that is used to store information (data).
Some information is fixed and is used to control how the printer operates.
Information that is sent to the printer from the computer is stored in the memory
temporarily. See also RAM and ROM.
MicroWeave
Printing in which images are printed in finer increments to reduce the possibility
of banding and to produce laser-like images. See also banding.
monochrome
This means printing with only one color of ink, which is generally black ink.
nozzle
Fine tubes in the print head through which ink is sprayed on the page. Print
quality may decline if print head nozzles are clogged.
nozzle check
A method for checking the operation of the printer. When you perform a nozzle
check, the printer prints the firmware (ROM) version and a nozzle check pattern.
online help
Helpful comments related to the current window or dialog box.
Peer-to-peer networks
Windows 98 support peer-to-peer networking. Any computer can access the
resources of a computer on the network.
390
Glossary
The Epson software to change the shade of tone, to correct image data and to
change the sharpness of the image data.
port
An interface channel through which data is transmitted between devices.
printable area
The area of a page on which the printer can print. It is smaller than the physical
size of the page due to margins.
printer driver
A software program that sends commands for using the features of a particular
printer. Often shortened to “driver”. See also driver.
printing mode
The number of dots per inch used to represent an image.
EPSON Stylus Pro 4400 has three printing mode settings: SuperFine (1440 dpi),
Fine (720 dpi), and Normal (360 dpi).
EPSON Stylus Pro 4800 has four printing mode settings: SuperPhoto (2880 dpi),
SuperFine (1440 dpi), Fine (720 dpi), and Normal (360 dpi).
print queue
If your printer is connected to a network, print jobs that are sent to the printer
while it is busy are stored in a waiting line, or print queue, until they can be
printed.
Progress Meter
A meter that shows the progress of the current print job for Windows.
RAM
Random Access Memory. The portion of the printer's memory used as a buffer
and for storing user-defined characters. All data stored in RAM is lost when the
printer is turned off.
reset
To return a printer to its defaults by turning the printer off and then back on.
resolution
The number of dots per inch used to represent an image.
ROM
Read Only Memory. A portion of memory that can only be read and cannot be
used for data storage. ROM retains its contents when you turn off the printer.
Glossary
391
English
PhotoEnhance
RGB
Red, green, and blue. These colors, in phosphors irradiated by the computer
monitor's electron gun, are used to create the additive array of screen colors.
SelecType settings
Settings made using the printer’s control panel. In the SelecType mode, various
printer settings that are not available using the printer driver, such as test print
settings, can be made.
serial interface
See interface.
spool
The first step in printing, in which the printer driver converts the print data into
codes that your printer understands. This data is then sent to the printer directly
or to the print server.
Spool Manager
The software program that converts print data into codes that your printer
understands. See also spool.
sRGB
Windows software that is designed so you get WYSIWYG (What You See Is What
You Get) color output. This software prints colors as you see them on your screen.
Status Monitor
The software program that allows you to check the printer’s status.
subtractive colors
Colors produced by pigments that absorb some colors of light and reflect others.
See also CMYK.
utility
A program for carrying out a specific function, which is usually related to system
maintenance.
WYSIWYG
Acronym for What You See Is What You Get. This term is used to describe
printout that looks exactly as it appeared on screen.
392
Glossary
English
Index
A
Advanced Photo, 122, 193
Advanced settings
Macintosh, 123
Windows, 28
Auto Rotate
Macintosh, 155
B
Background printing, 170
Black ink cartridges, 300
Buttons, 223
C
Cleaning
printer, 314
ColorSync setting, 122, 193
Configuration settings, 169
Consumable products, 375
Contacting EPSON, 355
Customer support, 355
Custom mode
Macintosh, 122
Windows, 27
Cut sheet media
media type, 377
using, 278, 283
D
Dual roll feed spindle, 265
E
EPSON Monitor3, 171
EPSON special media, 263, 377
EPSON Spool Manager, 90
Index
393
EPSON StatusMonitor
Macintosh, 162, 167, 216
Windows, 91
Error indication, 320
H
Head Alignment, 248
I
Ink cartridges, 295, 300, 375
Ink options
Macintosh, 123
Windows, 29
L
Layout menu (Windows), 63 to 75
Loading roll paper, 269
M
Maintenance Mode, 258
Maintenance tank, 308
Media Type setting
Macintosh, 117
Windows, 21
Multi-page printing
Macintosh, 159, 160
Windows, 73, 74
N
Notes for media, 263
Nozzle check pattern, 247
O
Online help
Macintosh, 167
Macintosh (Mac OS X), 221
Windows, 86
Options, 373
394
Index
English
P
Page line, 275
Paper cutter, 310
Paper Thickness, 253
PhotoEnhance settings
Windows, 35
Preview feature
Macintosh (Mac OS X), 211
Printer driver
Macintosh, 117
Windows, 21
Printer Software
uninstalling (Windows only), 108
updating, 108
Printer Software for Macintosh (Mac OS X)
utilities, 214 to 221
Printer utilities
Macintosh, 162
Windows, 76
Print Quality setting
Macintosh, 124
Windows, 29
Progress Meter, 87
R
Replacing
Ink cartridges, 295
Maintenance tank, 308
Roll paper
loading, 269
media type, 377
Roll Paper saving
Macintosh, 156
S
SelecType
menus, 229
setting procedure, 234
usage, 228
SelecType menus
head alignment, 246
paper configuration, 243
Index
395
printer setting, 236
Specifications
electrical, 363
interface, 371
Standards and Approvals, 365
Spindle
attaching the roll paper, 265
removing the roll paper, 268
Status Message, 227
Status Sheet, 256
System requirements
Macintosh, 369
T
Technical support, 355
Transport the printer, 316
Troubleshooting, 320
U
Utilities
Macintosh (Mac OS X), 214 to 221
Utility
Speed & Progress, 83
Using, 94
396
Index