1
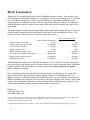
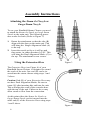
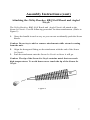
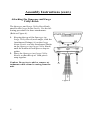
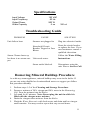
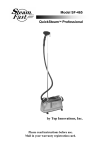
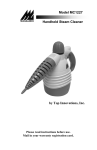
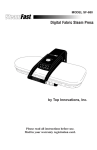
Handheld Steam Cleaner
Instruction Manual
Model MC1220
1
Dear Customer,
Thank you for purchasing the McCulloch Handheld Steam Cleaner. This product, like
all the products in the McCulloch line, is designed to save you cleaning time. It will also
save you money because you will eliminate the need to use harsh chemicals in the
cleaning process. Imagine a product that not only cleans but also reduces or eliminates
Microbiological counts, reduces smoke and others odors from virtually any material in
your home.
Top Innovations recently had an independent study performed on the effects of steam in
reducing and eliminating Microbiological counts on various Household surfaces. The
results of some of those tests are reflected in the table below.
Before Steam Treatment
Outdoor Glass Top Table
3,100
Marble Shower Ledge Surface
56,000,000
Ceramic Pet Food Bowl
1,300,000
Bathroom Floor Tile
16,000
Bathroom Sink Stopper Unit
42,800,000
Porcelain Toilet Bowl Inside Surface
140,000,000
Kitchen Sink Drain/Disposal
52,000,000
Child Sneakers Sole
23,300,000
After 5 seconds Steam
Treatment
180
495,000
39,000
1,400
1,100,000
390,000
810,000
560,000
“Microbiological counts were reduced as much as 97.6% after five seconds exposure to
the steam. Surviving counts may be further reduced by longer exposure times. Microbial
counts could also be expected to be further reduced with more frequent use of the
unit.” (Emphasis Added)
We at Top Innovations are proud of the quality lineup of products we sell under the
McCulloch brand. Our goal is to produce quality products at affordable prices. As
industry leaders in Steam Cleaner and Clothes Steamers, we pay diligent attention to all
details regarding our products. We are always striving to improve the quality, safety and
features of our products. Should you have an idea that would allow us to improve your
satisfaction with the product, please do not hesitate to contact us.
Benny Lee
Chairman and CEO
Top Innovations, Inc.
* If you wish to obtain a complete copy of the independent report or if you have any question about your steam
cleaner, please contact our Customer Service at 1-800-711-6617 ext. 102/130 or email to
[email protected].
(1) Independent testing report (December 1, 2003) by California Microbiological Consulting, Inc., page 04.
2
IMPORTANT SAFETY INSTRUCTIONS
Read this instruction manual before using the appliance. Always follow
basic safety precautions, including the following:
1. Only use accessories recommended by the manufacturer.
2. To protect against risk of electrical shock, do not immerse the appliance in water or other liquid.
3. Do not allow the steam cleaner to be used by children. Use caution
when using near children or pets.
4. Unplug from electrical outlet when not in use, before putting on or
taking off parts, and before cleaning.
5. Do not leave the steam cleaner unattended while plugged in.
6. Avoid contact with hot parts or burns that could occur. Keep hands,
hair and clothing away from these parts to prevent risk of injury.
7. Do not operate any appliance with a damaged cord or plug or after
the appliance malfunctions or is damaged in any manner. A damaged cord, plug or unit may result in fire, electrical shock or injury.
8. Do not pull or carry the unit by its power cord.
9. Allow the unit to cool before storage.
10. Do not let the power cord touch hot surfaces or get tangled around
corners or under doors.
11. Do not handle the cleaner, power cord or plug with wet hands.
12. Do not operate the unit without wearing shoes.
13. Do not operate steam cleaner without properly filling it with water.
14. Never turn the steam cleaner upside down or sideways by more than
45º.
15. Never use the steam cleaner on electrical or electronic equipment.
16. Always keep the steam nozzle pointed away from people and pets as
the hot steam can cause burns.
17. This appliance has a grounded (3 prong) plug. Use only in 3 pronged
outlets. Do not attempt to defeat this safety feature.
18. Burns can occur by touching hot parts, hot water or steam.
19. Never put detergent or any other chemicals into the cleaner.
20. Do not remove the Safety Cap without unplugging the unit and letting it cool for at least 5 minutes.
SAVE THESE INSTRUCTIONS
3
Getting to Know Your MC1220
The following features and accessories should have come with your
Handheld Steam Cleaner . If any accessories are missing please see
the Service Call section of this manual.
6
5
1
2
3
4
Figure 1
1.
2.
3.
4.
5.
6.
7.
8.
9.
10.
11.
12.
13.
14.
15.
16.
Safety Cap
Steam Button
Carrying Handle
Steam Ready Light
Steam Jet Nozzle
Short Nylon Utility Brush
Long Nylon Utility Brush
Brass BBQ Brush
Scrub Brush
Angled Nozzle
Extension Hose
Large Steam Nozzle
Squeegee
Large Utility Brush
Terry Cover
Measuring Cup
4
Figure 2
Learning About Your Steamer
x
The Safety Cap (1) provides access to the Boiler for water filling. It
also contains a pressure relief mechanism for safety.
x
The Steam Button (2) operates a valve which controls the release of
steam.
x
The Carrying Handle (3) allows for one-handed operation.
x
The Steam Ready Light (4) is illuminated when the Boiler is heating
and goes out when the steam is ready.
x
The Steam Jet Nozzle (5) provides a concentrated stream of powerful
steam for cleaning. It can be used alone or in combination with the
Utility or Brass brushes.
x
The Short Nylon Utility Brush (6) and the Long Nylon Utility Brush
(7) attach to the Steam Jet Nozzle and assist the steam in removing
stubborn dirt, grease, grim and stains.
x
The Brass BBQ Grill Brush (8) attaches to the Steam Jet Nozzle and
works with steam to clean BBQ grills. Note: The Brass Brush will
scratch soft surfaces. Use with caution.
x
The Scrub Brush (9) attaches to the Steam Jet Nozzle and is useful in
cleaning sinks, counter tops and stoves.
x
The Angled Nozzle (10) attaches to the Steam Jet Nozzle and helps redirect steam to those hard to reach areas.
x
The Extension Hose (11) provides a 30 inch extension for attaching
the Steam Jet Nozzle or the Large Steam Nozzle.
x
The Large Steam Nozzle (12) produces a wider steam coverage. It
provides an attachment point for the Terry Cover, Squeegee and
Large Utility Brush.
x
The Squeegee (13) attaches to the Large Steam Nozzle and allows you
to easily clean your windows, shower doors and mirrors.
x
The Large Utility Brush (14) attaches to the Large Steam Nozzle for
cleaning larger areas such as tiled floors and carpets.
x
The Terry Cover (15), used in combination with the Large Steam Nozzle, turns the unit into a Fabric Steamer for de-wrinkling all types of
fabric.
x
The Measuring Cup (16) insures you fill the unit with the optimum
amount of water for best results. Its built-in spout makes adding water
a breeze.
5
Assembly Instructions
Attaching the Steam Jet Nozzle or
Large Steam Nozzle
To use your Handheld Steam Cleaner you need
to attach the Steam Jet Nozzle or Large Steam
Nozzle to the main unit. The following procedure works for both. (Refer to Figure 3).
1.
Rotate the attachment so that the tabs (B)
align with the slots on the main unit. This
will bring the Single Alignment Mark (A)
to the top.
Insert the nozzle as far as it will go and
then rotate, in either direction, by 90º. This
will bring the Dual Alignment Marks (C) to
the top. The attachment is now secure.
2.
Using the Extension Hose
Figure 3
The Extension Hose (see Figure 4) of your
Handheld Steam Cleaner is designed to extend
the reach of the unit. One end (D) can be inserted into the steam cleaner using steps 1 and
2 above.
Caution: End (D) of your Extension Hose may
not have Dual Alignment Marks. Be sure to
rotate 90º after inserting this end into the unit.
This will align the seam of the extender hose
with the top of the unit. Failure to do so may
allow steam to flow from the connection.
At this point either the Steam Jet Nozzle or
Large Steam Nozzle can be inserted into the
other end (E) of the Extension Hose using steps
1 and 2 above.
Figure 4
6
Assembly Instructions (cont)
Attaching the Utility Brushes, BBQ Grill Brush and Angled
Nozzle
The Utility Brushes, BBQ Grill Brush and Angled Nozzle all attach to the
Steam Jet Nozzle. Use the following procedure for these attachments. (Refer to
Figure 5).
1.
Grasp the handle in such a way so you can not accidentally push the Steam
Button.
Caution: Do not try to add or remove attachments while steam is coming
from the unit.
2.
3.
Align the hexagonal fitting on the attachment with the end of the Steam
Jet Nozzle.
Push the attachment onto the Steam Jet Nozzle as far as it will go.
Caution: The tip of the Steam Jet Nozzle contains metal that can reach
high temperatures. To avoid burns never touch the tip of the Steam Jet
Nozzle.
Figure 5
7
Assembly Instructions (cont.)
Attaching the Squeegee and Large
Utility Brush
The Squeegee and Large Utility Brush both
attach to the Large Steam Nozzle. Use the following procedure for these attachments.
(Refer to Figure 6).
1.
2.
Keeping the top of the Squeegee (or
Large Utility Brush) at an angle, slide the
Attachment Fittings (A) on the Large
Steam Nozzle over the Attachment Hooks
on the Squeegee (or Large Utility Brush)
until the bottom of both pieces snap together.
Move the Squeegee (or Large Utility
Brush) so that the top of both pieces
snap together.
Caution: Do not try to add or remove attachments while steam is coming from the
unit.
Figure 6
8
Water Filling Instructions
1.
2.
Place the unit on a level surface.
Unplug the Power Cord.
If the steam cleaner might still be hot from a previous use, complete steps 3-5 below. Otherwise proceed to step 6.
3.
4.
Press the Steam Button continuously until all steam is removed from the unit.
Continue to press the Steam Button while cautiously unscrewing the Safety
Cap.
Caution: Always press the Steam Button while unscrewing the Safety Cap.
This ensures any steam inside the unit will be safely vented out the nozzle.
5.
Let the unit cool for at least 5 minutes.
Warning: Always allow the unit to cool before adding water. Cold water
added to a hot boiler can cause hot water and steam to shoot out the fill hole.
6.
Remove the Safety Cap and empty any water that might remain from a previous use.
Caution: Emptying the unit before filling it ensures that the proper amount
of water is added. Too much water can cause excess water in the steam and
could damage the unit. Excess water could also trigger the pressure relief
feature of the Safety Cap which could result in burns.
7.
Fill the Measuring Cup to the maximum fill line with water (6 oz or 180 ml).
Note: To prolong the lifetime of your steam cleaner, we recommend using
Distilled or De-mineralized water.
8.
Carefully line up the spout on the Measuring Cup with the water fill hole and
slowly pour the contents down the fill hole.
Warning: Extreme care should be taken when pouring water into the boiler.
Do not look directly down the fill hole when filling and keep your free hand
and any children or pets at a safe distance.
9.
Replace the Safety Cap.
9
Operating the Handheld Steam Cleaner
1. Plug the power cord into a convenient receptacle. The Steam Ready Light
will immediately illuminate. (Note: The Steam Ready Light is illuminated
when the Boiler is heating. The unit has no power switch.)
Warning: This appliance has a grounded (3 prong) plug. Use only in properly installed 3 pronged outlets. Do not attempt to defeat this safety feature.
2.
3.
The Steam Ready Light should extinguish in 3-4 minutes, indicating that the
cleaner is ready to steam.
To begin cleaning press the Steam Button on the Handle.
Warning: Be sure the Nozzle or other attachment is pointed is a safe direction before pressing the Steam Button.
4.
5.
During use the Steam Ready Light may come back on. This is normal. If you
notice a drop in pressure release the Steam Button until the Steam Ready
Light goes out again.
When finished using the steam cleaner unplug the unit.
Caution: Do not let the steam cleaner operate with a dry Boiler or damage to
the unit could occur.
Cleaning and Storage Procedure
1.
2.
3.
4.
5.
6.
7.
8.
Unplug the unit.
Wait for the unit to cool completely (at least 30 minutes).
Remove the attachments.
Carry the unit to a convenient sink or tub.
Drain any leftover water from the unit.
Flush the Water Reservoir with fresh water and drain. This helps to remove
any mineral residue that may have built up. Repeat this step several times.
(Optional) Reattach the attachments.
Store the unit.
Service Calls
If you have any problems or questions and the Troubleshooting Guide does not
help, please call our customer support at 1-800-711-6617, send an email to
[email protected], or go to our website,
www.topinnovations.com. Please DO NOT return a unit without calling and
receiving a Return Authorization Number .
10
Specifications
Input Voltage
Input Frequency
Output Power
Water Capacity
120
60
900
6
VAC
Hz
W
oz
180 ml
Troubleshooting Guide
PROBLEM
Unit fails to heat
Steam Cleaner heats up
but there is no steam output.
CAUSE
SOLUTION
Steamer not plugged in
Plug into electrical outlet.
Household Circuit
Breaker Tripped or Fuse
Blown
Reset the circuit breaker
or replace the fuse. If you
need assistance contact a
qualified electrician.
Unit needs water.
Steam outlet blocked.
Follow the Water Filling
Instructions.
Discontinue using the
unit. Place a Service Call.
Removing Mineral Buildup Procedure
As with any steam appliance, mineral buildup may occur in the boiler. If
you are not using distilled or de-mineralized water we suggest you follow
this procedure monthly.
1.
2.
3.
4.
5.
Perform steps 1-5 of the Cleaning and Storage Procedure.
Prepare a mixture of 50% vinegar and 50% water in the Measuring
Cup. Pour the mixture into the Boiler.
Let stand for 45 minutes. Note: Do not plug the unit in while it is
filled with the vinegar-water mixture.
Drain the vinegar-water mixture from the Boiler.
Flush the Water Reservoir with fresh water and drain until no vinegar
smell remains. You may need to repeat this step several times.
11
Top Innovations, Inc.
400 NW Platte Valley Drive
Riverside, Missouri 64150
www.topinnovations.com
Toll Free: 1-800-711-6617
Printed in China
12