1
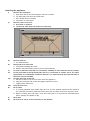
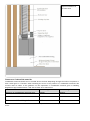
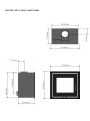
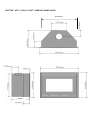
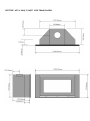
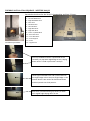
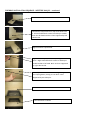
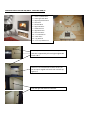
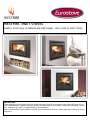
WESTFIRE INSET STOVES MODELS: WF32/UNIQ 32 NARROW AND WIDE FRAME, WF23/UNIQ 23 INSET STOVE IMPORTANT These appliances will become very hot during operation; a glove is provided for use when the stove is hot. We recommend that a guard should be used for the protection of the young, elderly and vulnerable. Do not burn rubbish or pre sawn / treated timber in this appliance. Please read the instruction manual carefully before installation and use. Please keep this manual for future reference. UK: Installation Manual and Operating instructions WESTFIRE WF23/UNIQ 23 INSET, WESTFIRE WF32/UNIQ32 INSET This manual refers to the stove type listed above, which has been tested in accordance with EN13240. Congratulations on your purchase of a new wood burning stove from Westfire ApS. Please read this manual carefully in order to ensure that you get maximum enjoyment from your new stove and to prevent any problems. Please note that “all local regulations, including those referring to national and European Standards, need to be complied with when installing this appliance”. For further information on installing and using fireplaces and wood burning stoves, please see the relevant building regulations that apply to the country in which WESTFIRE WF32/UNIQ32 AND WF23/UNIQ23 has been approved, as well as the relevant brochure on the correct use of wood burning stoves available from your local stove supplier or your Chimney sweep. These instructions cover the basic principles to ensure the satisfactory installation of the WESTFIRE WF23/UNIQ23 and WF32/UNIQ 32 inset wood stove, although detail may need slight modification to suit particular local site conditions. In all cases the installation must comply with current Building Regulations, Local Authority Byelaws and other specifications or regulations as they affect the installation of the stove. It should be noted that the Building Regulations requirements may be met by adopting the relevant recommendations given in British Standards BS 8303, BSEN15287 as an alternative means to achieve an equivalent level of performance to that obtained following the guidance given in Approved Document J. HEALTH AND SAFETY PRECAUTIONS Special care must be taken when installing the stove such that the requirements of the Health and Safety at Work Act are met. Handling Adequate facilities must be available for loading, unloading and site handling. Fire Cement Some types of fire cement are caustic and should not be allowed to come into contact with the skin. In case of contact wash immediately with plenty of water. Asbestos This stove contains no asbestos. If there is a possibility of disturbing any asbestos in the course of installation then please seek specialist guidance and use appropriate protective equipment. Metal Parts When installing or servicing this stove care should be taken to avoid the possibility of personal injury. STOVE PERFORMANCE & TESTING The WESTFIRE WF23/UNIQ23 and WF32/UNIQ 32 insets have been approved in accordance with EN 13240. Stove model Weight Nominal heat output Wood Smokeless fuels WF32/UNIQ32 INSET 112kg 5.9KW N/A WF23/UNIQ23 INSET 92kg 6.1KW N/A PREPARATORY WORK AND SAFETY CHECKS - IMPORTANT WARNING This stove must not be installed into a chimney that serves any other heating appliance. There must not be an extractor fan fitted in the same room as the stove as this can cause the stove to emit fumes into the room. Chimney- Chimney Connection - Flue Diameter 150mm (160cm2) In order for the stove to perform satisfactorily the chimney height must be sufficient to ensure an adequate draught so as to clear the products of combustion and prevent smoke problems into the room. Tested Draft Max Draft Flue gas temperature Flue gas flow WF32/UNIQ32 INSET WF23/UNIQ23 INSET 12pa 25pa 243°c 4.6g/sec 12pa 25pa 281° c 5.2 g/sec NOTE: A chimney height of not less than 4.5 metres measured vertically from the outlet of the stove to the top of the chimney should be satisfactory. Alternatively the calculation procedure given in BS 5854:1980 may be used as the basis for deciding whether a particular chimney design will provide sufficient draught. Installing the appliance Each Installation is different for every property and it is not possible to give detailing for every installation. The Installation must comply with Building regulations and follow best practice construction methods. Typical fireplace constructions have a supporting lintel. Do not remove lintel without support of the main building structure of the building. Do not use the appliance to support the structure. The outlet from the chimney should be above the roof of the building in accordance with the provisions of Building Regulations Approved Document J. If installation is into an existing chimney then it must be sound and have no cracks or other faults which might allow fumes into the house. Older properties, especially, may have chimney faults or the cross section may be too large i.e. more than 160 mm x 160 mm. Remedial action should be taken, if required, seeking expert advice. If it is found necessary to line the chimney then a flue liner suitable for solid fuel must be used in accordance with Building Regulations Approved Document J. Any existing chimney must be clear of obstruction and have been swept clean immediately before installation of the stove. If the stove is fitted in place of an open fire then the chimney should be swept one month after installation to clear any soot falls which may have occurred due to the difference in combustion between the stove and the open fire. NOTE- When installing the Uniq32/WF32 or Uniq 23/WF23 inset in to a fire place opening with a traditional flue we recommend installation of the appliance with flue liner for optimum performance. If there is no existing chimney then either a prefabricated block chimney in accordance with Building Regulations Approved Document J or a twin walled insulated stainless steel flue to BS 4543 can be used. These chimneys must be fitted in accordance with the manufacturer’s instructions and Building Regulations. A single wall metal fluepipe is suitable for connecting the stove to the chimney but is not suitable for using for the complete chimney. The chimney and connecting fluepipe must have a minimum diameter of 150 mm and its dimension should be not less than the size of the outlet socket of the stove. Any bend in the chimney or connecting fluepipe should not exceed 45. 90 bends should not be used. If it is found that there is excessive draught in the chimney then either an adjustable flue damper or alternatively a draught stabiliser should be fitted. The adjustable flue damper should not close off the flue entirely but should in its closed position leave a minimum continuous opening free area of at least 20 % of the total cross sectional area of the flue or fluepipe. Adequate provision e.g. easily accessible soot door or doors must be provided for sweeping the chimney and connecting flue pipe WF 23 / UNIQ 23 BUILDERS APERTURE SIZE WF 32 / UNIQ 32 BUILDERS APERTURE SIZE 420mm Narrow frame model Wide frame model WF23/UNIQ 23, WF 32 / UNIQ 32 DOOR REMOVAL Installing the appliance I) II) III) IV) V) VI) VII) VIII) IX) X) XI) Remove door and frame a. Open door and lift so bottom hinge in lifts out of holder. b. Tilt base away from stove and lower door. c. Door should now be released. d. Place door in a safe place. Remove frame from stove. a. Once door is removed b. Loosen four Allen keys and frame will come away. Remove Brick set a. See manual below Remove Bar from flue collar a. Loosen bolts holding flue collar b. Remove flue collar taking care not to lose nuts and bolts. Fit collar to stainless steel flue( we recommend a 500mm of 1mm stainless steel if possible) Fill any Void with at the back and sides with a 6;1 vermiculite to cement mix or any other good quality non-combustible insulation material. It is important that the back and sides of the stove are well insulated. Connect the stove to the flue a. Pull stove collar to top of stove from inside the appliance. b. Align bolt locations and re-bolt the spigot( and Flue) to stove. c. Tighten bolts and secure. Finish around stove Re-fit frame a. If a newly plastered room please take care not to leave painted frame and door fitted as the extremes of moisture while the plaster dries and can cause corrosion to the paint work. b. Before re-fitting door and frame, store door and frame in a dry and well ventilated place while allowing the plaster to dry Re-fit door Re-fit brick as shown in the instructions in this booklet. Typical installation of an inset stove Distance to Combustible materials Combustible materials should not be located where the heat dissipating through the walls of fireplaces or flues could ignite it. Therefore when installing the stove in the presence of combustible materials due account must be taken of the guidance on the separation of combustible material given in Building Regulations Approved Document J and also in these stove instructions. WF32/UNIQ32 INSET WF23/UNIQ23 INSET Distance to combustible materials rear 300mm 200mm Distance to combustible materials side 200mm 350mm Distance to soft furnishing in front 1100mm 1100mm The minimum distances to flammable materials are specified on the EN 13240 plate on the back of the stove. Hearth The hearth should be able to accommodate the weight of the stove and its chimney if the chimney is not independently supported. The WESTFIRE WF23/UNIQ 23 INSET, WESTFIRE WF32/UNIQ32 INSET wood inset stove has been tested and is suitable to be installed above a 12mm non combustible plate such as Westfire 12mm glass plates or 20mm slate plates. Installation of the stove must be at a minimum height of 450mm for 12mm hearth. Installation of all hearths should comply in size and construction so that it is in accordance with the provisions of the current Building Regulations Approved Document J. The clearance distances to combustible material beneath, surrounding or upon the hearth and walls adjacent to the hearth should comply with the guidance on the separation of combustible material given in Building Regulations Approved Document J and also in these stove instructions. If the stove is to be installed in front of a wooden floor, it must be covered with a non-combustible material at least 12mm thick, in accordance with Building Regulations Approved Document J, to a distance of 30 cm in front of the stove and 15 cm to each side measuring from the door of the combustion chamber. Combustion air supply In order for the stove to perform efficiently and safely there should be an adequate air supply into the room in which the stove is installed to provide combustion air. This is particularly necessary if the room is double-glazed or a flue draught stabiliser is operating in the same room as the appliance. The provision of air supply to the stove must be in accordance with current Building Regulations Approved Document J. An opening window is not appropriate for this purpose. Air inlets must be positioned in such a way that they cannot be blocked. An air inlet may be a vent (the vent must be open and the capacity of the vent sufficient when the stove is lit) or a fresh air system linked to the stove. The WESTFIRE WF23/UNIQ 23 INSET has an option of a closed air supply collar; this enables the stove to take all combustion air (primary, secondary and tertiary) directly from outside with a 100mm pipe from the stove. The WESTFIRE WF32/UNIQ 32 INSET does not have a closed combustion option. FLUE AND AIR INTAKE POSITIONS WF32/UNIQ32 INSET WF23/UNIQ23 INSET Distance from rear to centre of top flue exit 150mm 135 mm Distance from floor to centre of rear flue exit N/A N/A Distance from top of appliance casing to centre of Air intake. N/A 500mm WESTFIRE WF23/ UNIQ 23 INSET MODEL WESTFIRE WF32 / UNIQ 32 INSET NARROW FRAMED MODEL 810.00mm 405mm WESTFIRE WF32/ UNIQ 32 INSET WIDE FRAMED MODEL WESTFIRE WF23/UNIQ 23 INSET, WESTFIRE WF32/UNIQ32 INSET WF32/UNIQ32 INSET WF32/UNIQ32 INSET WF23/UNIQ23 INSET Narrow frame Wide frame Std frame Height (frame) 610mm 570mm 660mm Width (frame) 880mm 1000mm 670mm Height (stove box) 555mm 555mm 600mm Width (stove box) 810mm 810mm 610mm Depth (stove box) 405mm 380mm 375mm Closed combustion fitted as standard NOT AVALIABLE NOT AVAILABLE OPTIONAL Westfire Insulated chambers The WESTFIRE WF32/UNIQ32 AND WF23/UNIQ23 stove is lined with heat deflection panels and baffles, these panels are designed to ensure the maximum efficiency and are an integral part of the clean burn process of the stove. These baffles should not be removed other than for cleaning the stove. Any defective panels should be replaced. Commissioning and handover Ensure loose parts are fitted in accordance with the instructions given in the instruction booklet. On completion of the installation allow a suitable period of time for any fire cement and mortar to dry out, a small fire may be lit to check that smoke and fumes are taken from the stove up the chimney and emitted safely into the atmosphere. Do not run at full output for at least 24 hours. On completion of the installation and commissioning ensure that the operating instructions for the stove are left with the customer. Ensure to advise the customer on the correct use of the appliance with the fuels likely to be used on the stove and notify them to use only the recommended fuels for the stove. Advise the user what to do should smoke or fumes be emitted from the stove. The customer should be warned to use a fireguard to BS 6539 in the presence of children, aged and/or infirm persons. Operating your stove- WESTFIRE WF23/UNIQ 23 INSET, WESTFIRE WF32/UNIQ32 INSET The first lighting of your stove. The heat-resistant paint on your stove will cure and harden the first time you light your appliance. The curing process produces a good deal of smoke and odour, it is therefore important that the first time you light your stove the room should be well ventilated. During the process it is important to open and close the stove door periodically (every 30mins) during the first couple of firings therefore preventing the door seal cord around the door from sticking and coming away from the door. Once the heat-resistant paint has hardened the smell will disappear. This stove is NOT designed to be used with the door open, the stove door must be kept closed except when lighting the stove, adding firewood or removing ash in order to prevent flue gases from escaping. NOTE! Always use dry wood for your stove, your stove will burn better and more efficiently with better quality dry wood. Wet wood will cause your stove to burn inefficiently. Lighting your appliance Quality Firelighters should be used when lighting the stove. (Never use mentholated spirit, petrol or other flammable liquids). Lighting your stove with firelighters will be more reliable and easier than using paper. To light your stove 1. Place a few smaller pieces of dry wood (kindling) in the stove on top of the non toxic firelighters, place one or two small dry split (¼ split) logs on top. 2. Fully slide open the secondary air slider. Pull out fully primary air slider. The stoves air supplies are now fully open. 3. Light the firelighters and push door to closed position but do not close latch, this will allow a small gap of 1cm for more air to be supplied to stove. 4. After approximately 10 minutes when the fire is burning brightly shut latch on the door. 5. Once fire is hot push in fully the primary air slider. This will close off the primary air control to the stove. If the stove begins to die when the primary is closed, open slider again and leave open for another ten minutes. 5. After approximately another 10 minutes close the secondary air slider to the specified position for the stove (See table). For the stove to burn cleanly plenty of secondary air is needed, please do not be tempted to shut the fire down too early as this may cause smoke. At nominal heat output, expect to refuel your stove approximately once an hour. The WESTFIRE WF23/UNIQ 23 INSET, WESTFIRE WF32/UNIQ32 INSET stoves are all equipped with a control level for secondary air designed to ensure a plentiful supply of oxygen during firing. When lit, the stove will get very hot and due care must therefore be exercised. Please use a glove and operating tool supplied when operating levers and dampers. RE-FUELING To re-fuel your stove in the cleanest way. Only refuel your stove when flames have died down and you have glowing embers. Before refuelling, open secondary air slider fully, also open primary air slider fully and leave for 5 minutes. Open door gently, add two pieces of wood measuring approx 33cm with a combined weight of approx 1.5kg and close the door. Leave the air sliders open for 10 minutes to allow the fire to reach a good temperature. Close (push in) primary air slider and slide secondary air slider to position for the stove. In the event of a chimney fire: Close the air damper and the stove door, and call 999 or your local fire department. If your stove is overheating close all air sliders and the door must be closed, and left until the stove has returned to nominal temperature. Basic Positions of dampers during operation (nominal) WF23/UNIQ 23 WF 32/UNIQ 32 Secondary air 60% open 30% open Primary air closed closed You will need to become familiar with your stove in order to be able to regulate the secondary air intake correctly, as factors such as the quality and height of your chimney, the quality of your fuel and the external conditions play a large role in your stove performance. It is easy to see whether the stove is functioning correctly; however incomplete combustion may lead to a build-up of hard, shiny soot on the inside of your stove and glass. To prevent sooting of the chamber and glass introduce secondary air, also check that your wood is dry. It is important to check the draft conditions before lighting your stove. This may be done, for instance, by crumpling a piece of newspaper, placing it in the combustion chamber and lighting it. The draft conditions are good if the smoke is drawn away through the chimney. CONTROLS on WESTFIRE WF 32 /UNIQ32 INSET CONTROLS on WESTFIRE WF 23 /UNIQ 23 INSET Door operation When opening the door of your Westfire stove always wear the glove that is provided to protect your hand from possible heat. WOOD FUEL IMPORTANT: Never use toxic wood such as chipboard, impregnated, painted wood or pre-sawn wood such as pallets. Good quality wood is the most important factor in your stove working efficiently and cleanly. Always use dry firewood. The dryness of the firewood plays an important role since the use of wet wood results in poor fuel economy and may cause a tarry sooty film on the internals of the stove. Newly cut wood contains 60–70% water, making it totally unsuitable for use as firewood. Newly cut wood should be stacked and air dried under cover for two years before being used as firewood. SOLID SMOKELESS FUELS- The WESTFIRE WF32/UNIQ32 AND WF23/UNIQ23 stoves are not suitable for use with smokeless fuels. The stove will burn best when burning wood. HOUSE COAL AND PETROLEUM COKE ARE NOT SUITABLE FOR USE ON THIS STOVE; ITS USE WILL INVALIDATE THE GUARANTEE. Overnight burning Westfire Uniq32/WF32 or Uniq 23/WF23, are designed to burn wood. Wood burns more efficiently and cleanly if is burnt hotter. Westfire do not recommend that their stoves are burnt overnight for this reason. As a night time regime we recommend that the fire is loaded when hot and burnt for five minutes with the secondary air slider fully open until the new wood has taken and is burning, then close the secondary air valve to its operational position. On returning to the stove in the morning the fire will have burnt out. Reload with some paper or firelighter and some kindling and open all the sliders fully to relight quickly. Beware as the ash bed will have hot embers. Use of operating tools Always use the operating tools provided when handling parts likely to be hot when the stove is in use. Maintenance WESTFIRE WF23/UNIQ23 and WF32/UNIQ 32 inset wood stoves need to have the ash removed from the stove at regular intervals. Make sure the stove is completely cold before cleaning out ash (embers can remain hot for over 24 hours). To clean the outside of the stove use a dry cloth. IMPORTANT! – Check for ash build up under and behind the ash pan, ash build-up under ash pan cause primary air to remain open Annual service The inside of the stove should be serviced /cleaned once a year. To clean the inside, remove all ash, soot and tar residue from the combustion chamber. Remove insulated chamber panels and baffle, to clean out any dirt and soot will collected behind them. Check the quality of all insulated panels and replace any which are damaged or cracked, replace stove door rope cord in the door. Check glass is correctly positioned. The stove, the flue pipe connection and the chimney should be checked regularly by a qualified engineer. The chimney should also be checked for blockages before relighting the stove if it has not been used for an extended period of time. The paint/ lacquer can wear thin in exposed places due to overheating. This, and other lacquer damage, may be repaired using a Westfire Senotherm paint/lacquer spray available from your Westfire dealer. Ash must be stored in a non-combustible container and must not be mixed with other combustible waste. Cleaning the glass Incorrect firing, for example using wet wood, or slow burning can result in the viewing window becoming covered in soot. This soot can be easily and effectively removed by using a damp cloth or when necessary a proprietary stove glass cleaner or an ordinary scouring liquid, when the glass is cold Periods of Prolonged Non-Use If the stove is to be left unused for a prolonged period of time then it should be given a thorough clean to remove ash and unburned fuel residues. To enable a good flow of air through the appliance to reduce condensation and subsequent damage, leave the air controls fully open. FIRE BRICK INSTALLATION SEQUENCE - WESTFIRE UNIQ 23 Vermiculite brick set for the Uniq 23 freestanding and Uniq 23 inset . Installation procedure: 1 – Inner Top Turbulence Brick 2 – Left Mid Baffle Brick 3 – Right Mid Baffle Brick 4 – Rear Brick 5 – Left Base Brick 6 – Left Side Brick 7 – Right Base Brick 8 – Right Side Brick 9 – Outer Top Baffle Brick 10 – Rear Base Brick 11 – Front Base Brick 12 – Grate Support 13 – Grate 14 – Log Retainer 1 2 3 9 4 10 6 5 12,13 Inner top turbulence brick 1 is positioned on the secondary air pipe with angled edge at rear, sloping down. Brick 1 is held in place with a steel pin. Left & right mid baffle bricks 2 & 3 positioned with full angled edge at front and part angled edge on the outside. Bricks 2 & 3 need to be fitted lower down and slid upwards into final position. Rear brick 4 positioned lining up tertiary air holes with angled edge sloping down at rear. 11 14 7 8 FIRE BRICK INSTALLATION SEQUENCE - WESTFIRE UNIQ 23 - continued Left base brick 5 positioned. Left side brick 6 positioned on top of left base brick 5. Left mid baffle brick 2 must be held up to enable brick 6 to be fitted. Brick 2 is then supported by left side brick 6. Right base brick 7 positioned. Right side brick 8 positioned on top of right base brick 7. Right mid baffle brick 3 must be held up to enable brick 8 to be fitted. Brick 3 is then supported by right side brick 8. Outer top baffle brick 9 fitted with angled edge at rear sloping down, resting on rear brick 4 and supported by two side pins. Rear base brick 10 fitted. Front base brick 11 fitted. FIRE BRICK INSTALLATION SEQUENCE - WESTFIRE UNIQ 23 - continued Grate support 12 fitted. Grate 13 fitted. Log retainer 14 fitted. FIRE BRICK INSTALLATION SEQUENCE - WESTFIRE UNIQ 32 1 – Outer Top Baffle Brick 2 – Left Angled Side Brick 3 – Right Angled Side Brick 4 – Rear Brick 5 - Left Side Brick 6 – Right Side Brick 7 – Left Base Brick 8 – Right Base Brick 9 – Rear Base Brick 10 – Front Base Brick 11 – Base Grate 12 – Log Retainer 13 – Inner Top Baffle Brick 1 13 5 2 3 4 9 11 7 8 10 12 Outer top baffle brick 1 must be held in place and then supported by left and right angled side bricks 2 & 3. Position rear brick 4 below chrome tertiary air bar and push angled side bricks 2 & 3 to butt up against it. Left and right side bricks 5 & 6 fitted. 6 FIRE BRICK INSTALLATION SEQUENCE - WESTFIRE UNIQ 32 Left base brick 7 fitted. Right base brick 8 fitted. Rear base brick 9 fitted. Front base brick 10 fitted. Base grate 11 fitted. Log retainer 12 fitted. Inner top baffle brick 13(Angled parallel edge at rear resting on chrome tertiary air bar) fitted and supported with two side pins. Trouble shooting 1. Fire will not burn - check a) b) c) d) e) the air inlet is not obstructed in any way, that chimneys and flueways are clear, that a suitable fuel is being used, that there is an adequate air supply into the room, that an extractor fan is not fitted in the same room as the fire. 2. Fire blazing out of control - check a) the doors are tightly closed, b) the air control is turned down to the minimum setting, c) the air inlet damper is closed and that it is not prevented from closing completely by a piece of ash, d) a suitable fuel is being used, e) the door seals are in good condition. f) the chimney draft may be too strong g) ash pan seal h) for ash below ash pan causing pan to not seat correctly and clean out. 3) Soot forms on the window a) The firewood may be too wet b) the intake of secondary air may be insufficient c) fire not hot enough 4) The stove fails to heat fully a) The firewood may be too wet b) the intake of secondary air may be insufficient 5) Smoke or odour a) Weak chimney draft b) check for blockages in the flue pipe/chimney c) check the height of the chimney in relation to the surroundings 6) Soot in the chimney a) The firewood may be too wet b) intake of secondary air may be insufficient Chimney Fires If the chimney is thoroughly and regularly swept, chimney fires should not occur. However, if a chimney fire does occur turn the air control setting to the minimum, and tightly close the doors of the stove. This should cause the chimney fire to go out in which case the control should be kept at the minimum setting until the fire in the stove has gone out. The chimney and flue ways should then be cleaned. If the chimney fire does not go out when the above action is taken then the fire brigade should be called immediately. After a chimney fire the chimney should be carefully examined for any damage. Expert advice should be sought if necessary Permanent air vent The stove requires a permanent air vent to the room or a direct connection to the closed air port at the rear of the stove. This is to provide adequate air supply in order for the stove to operate safely and efficiently. In accordance with current Building Regulations the installer may have fitted a permanent air supply vent into the room in which the stove is installed to provide combustion air. This air vent should not under any circumstances be shut off or sealed. WARNING NOTE Properly installed, operated and maintained this stove will not emit fumes into the dwelling. Occasional fumes from de-ashing and re-fuelling may occur. However, persistent fume emission is potentially dangerous and must not be tolerated. If fume emission does persist, then the following immediate action should be taken:(a) Open doors and windows to ventilate room (b) Let the fire go out or eject and safely dispose of fuel from the appliance (c) Check for flue or chimney blockage and clean if required (d) Do not attempt to relight the fire until the cause of the fume emission has been identified and corrected. If necessary seek expert advice. The most common cause of fume emission is flueway or chimney blockage. For your own safety these must be kept clean at all times. IMPORTANT NOTES General Before lighting the stove check with the installer that the installation work and commissioning checks described in the installation instructions have been carried out correctly and that the chimney has been swept clean, is sound and free from any obstructions. As part of the stoves’ commissioning and handover the installer should have shown you how to operate the stove correctly. Use of fireguard When using the stove in situations where children, aged and/or infirm persons are present a fireguard must be used to prevent accidental contact with the stove. The fireguard should be manufactured in accordance with BS 6539. Chimney cleaning The chimney should be swept at least once a year for smokeless fuels and a minimum of twice a year for wood and other fuels. It is important that the flue connection and chimney are swept prior to lighting up after a prolonged shutdown period. If the stove is fitted in place of an open fire then the chimney should be swept one month after installation to clear any soot falls which may have occurred due to the difference in combustion between the stove and the open fire. In situations where it is not possible to sweep through the stove the installer will have provided alternative means, such as a soot door. After sweeping the chimney the stove flue outlet and the flue pipe connecting the stove to the chimney must be cleaned with a flue brush. HETAS Ltd Approval This appliance has obtained HETAS Ltd approval on a safe and fit for purpose level (single tick approval) for burning wood logs only as detailed in list of recommended fuels above. Approval does not cover the use of other fuels either alone or mixed with the recommended fuels listed, nor does it cover instructions for the use of other fuels. Guarantee Your new stove is covered by a five year guarantee against manufacturing defects. Your receipt documents the date of purchase. The guarantee does not cover damage caused by faulty operation such as overheating (burning of not recommended fuels) or the stove being incorrectly connected, or damage which occurs as a result of external physical force. The guarantee does not cover damage to replaceable parts (Firebricks, Cast Grates and Glass), transport costs associated with repairs under warranty or the installation/dismantling of the stove in connection with repairs under warranty. Warning! Any unauthorised modification of the appliance is forbidden. Only replacement parts recommended by Westfire ApS should be used for repairs. UK IMPORTER EUROSTOVE LIMITED, UNIT S5, MENDIP INDUSTRIAL ESTATE, MENDIP ROAD, ROOKESBRIDGE. SOMERSET. BS26 2UG. TEL: 01934 750500 MAIL: [email protected] WEB: WWW.EUROSTOVE.CO.UK