1
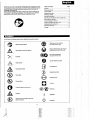
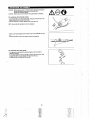
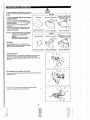
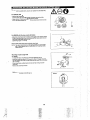
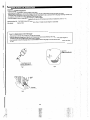
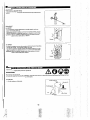
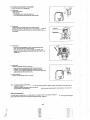
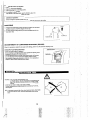
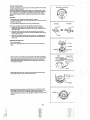
English I ltaliano I Spanish
I@
I
RECEIVED
FER 1 4 2000
Brush Cutter
Decespugliatore
Desbrozadora
Grass Trimmer
Tagliabordi
Cortabordes
EM4250
EM4251
. .
'.
9
EM4250
Important:
Read this instruction manual carefully before putting the Brush CuHedGrass Trimmer into operation and strictly observe the safety
regulations1
Preserve inslruclionmanual carefullyl
Importante:
Prima di meltere in funzione il decespugliatore/lagliabordi, leggere attentamenle il presente manuale; rispellare rigorosamenle le norme
di sicureual
Conservare it manuale delle islruzioni per I'usol
Importante:
Leer cuidadosamente este manual de inslrucciones antes de poner en marcha la mequina y observar estriclamenle las normas de
segurldad.
Conservar esle manual de inslruccionescon cuidado.
.-
Thank you very much for purchasing the MAKITA Brush Cuner/Grass trimmer.
We are pleased to recommend to you the MAKITA Brush Cuner/Grass trimmer
which is the result of a long development programme and many years of
knowledge and experience.
Please read this booklet which refers in detail lo the various points that will
demonstrate its outstanding performance. This will assist you to obtain the
best possible result from your MAKITA Brush CutlerlGrass trimmer.
Page
Table of Contents
Symbols
..................................................
Safety instructions
Technical data ........................................
Designation
.............................
Mounting of
...........................................
Mounling of
........................
Mounting of
Before start of operation ..........................................
Correct handling of machine ....
.....................................................
1
2
7
8
11
Resharpeningthe cuHi
Servicing inslruclions
.........................................
You will nole the following symbols when reading the instructions manual.
Read instruction Manual
Wear eye and ear protection
(for Grass trimmer only)
Take Particular care and Anention
Wear protective helmet, eye and ear
protection (for Brush Cutter only)
Do not use metal blades
(for grass trimmer only)
Forbidden
Top permissible tool speed
Keep distance
Fuel (Gasoline)
Flying object hazard
Engine-Manualstart
No Smoking
Emergencystop
No open flame
First Aid
Protective gloves must be worn
Recycling
Kickback
I
0
Keep the area of operation clear of all
persons and pets
1
OWTART
OFFlSTOP
20
. .
,.: 3.
.i !:. .:5. :I,
,
! (i.
:'
' E
;'.
?I
:
Start the Brush Cutter/Grass trimmer only in accordance with the instructions.
Do not use any other methods for starting the engine1
-Use the Brush CuWGrass trimmer and the tools only for such applications
as specified.
-Only start the Brush CutterlGrass trimmer engine, aHer the entire assembly is
done. Operation of the device Is only permitted after all the appropriate
accessories are attached1
-Before starting make sure that the cutting tool has no contact with hard
objects such as branches, stones etc. as the cutting tool will revolve when
starting.
-The engine is lo be switched off immediately in case of any engine problems.
-Should the cutting tool hit stones or other hard objects, immediately switch off
the engine and inspect the cutting tool.
-Inspect the cutting tool at short regular intervals for damage (detection of
hairline cracks by means of tapping-noise test).
-Operate the Brush CuHer/Grass trimmer only with the shoulder strap attached
which is to be suitably adjusted before putting the Brush CuttedGrass trimmer
into operation. It is essential to adjust the shoulder strap according to the
user's size to prevent fatigue occurring during use. Never hold the cutter with
one hand during use.
-During operation always hold the Brush CuttedGrasstrimmer with both
hands.
Always ensure a safe footing.
-Operate the Brush Cutter/Grass trimmer in such a manner as to avoid
inhalationof the exhaust gases. Never run the engine in enclosed rooms
(risk of gas poisoning). Carbon monoxide Is an odorless gas.
-Switch off the engine when resting and when leaving the Brush CuttdGrass
trimmer unattended, and place it in a safe location to prevent danger to
others or damage to the machine.
-Never put the hot Brush CuHer/Grass trimmer onto dry grass or onto any
combustible materials.
-The cutting tool has to be equipped with it's appropriate guard.
Never run the cutter without this guard1
-All protective installations and guards supplied with the machine must be
used during operalion.
-Never operate the engine with faulty exhaust muffler.
-Shut off the engine during transport.
-During transport over long distances the tool protection included with the
equipment must always be used.
-Ensure safe position of the Brush Cutter/Grass trimmer during car transportation to avoid fuel leakage.
-When transporting the Brush Cutter/Grass trimmer, ensure that the fuel tank
is completely empty.
-When unloading the Brush Cutter/Grasstrimmer from the truck, never drop
the Engine to the ground or this may severely damage the fuel tank.
v
e
n
c
y
, never drop or cast the Brush CuttedGrass
trimmer to the ground or this may severely damage the Brush CutterlGrass
.
trimmer.
-Remember to lift the entire equipment from the ground when moving the
equipment. Dragging the fuel tank is highly dangerous and will cause
damage and leakage of fuel, possibly causing fire.
STOP
---
Resting
Refuelling
Maintenance
Tool Replacement
n
L
3
- -
-
* Transport
Refuelling
-Shut off the engine during refuelling, keep away from open flames and do
not smoke.
-Avoid skin contact with mineral oil products. Do not inhale fuel vapor.
Always wear protective gloves during refuelling. Change and clean
protective clothing at regular intervals.
-Take care not to spill either fuel or oil in order to prevent soil contamination
(environmental protection). Clean the Brush Cutter/Grass trimmer Immediately after fuel has been spilt.
-Avoid any fuel contact with your clothing. Change your clothing instantly if
fuel has been spilt on it (to prevent clothing catching fire).
-Inspect the fuel cap at regular intervals making sure that it can be securely
fastened and does not leak.
-Carefully tighten the fuel tank cap. Change location to start the engine (at
least 3 meters away from the place of refuelling).
-Never refuel in closed rooms. Fuel vapors accumulate at ground lever (risk of
explosions).
-Only transport and store fuel in approved containers. Make sure the fuel
stored is not accessible to children.
0
I
Method of Operation
-Only use the Brush cutter/Grass trimmer in good light and visibility. During
the winter season beware of slippery or wet areas, ice and snow (risk of
slipping). Always ensure a safe footing.
-Never cut above walst height.
-Never stand on a ladder and run the Brush culter/Grars trimmer.
-Never climb up Into trees to perform cutting operation with the Brush cutter/
Grass trimmer.
-Never work on unstable surfaces.
-Remove sand, stones, nails etc. found within the working range.
Foreign particles may damage the cutting tool and can cause dangerous
kick-backs.
-Before commencing cutting, the cutting tool must have reached full working
speed.
Kickback
A
,
Caution:
Kickback
-When operating the brush cutter. uncontrolled kickback may occur.
-This is particularly the case when attempting to cut within a blade segment
between 12 and 2 o'clock.
-Never apply the brush cutter within a segment between 12 and 2 o'clock.
-Never apply this segment of the brush cutter blade to solids, such as bushes
and trees, etc.. having a diameter in excess of 3 cm or the brush cutter will be
deflected at great force with the risk of injuries.
Diagrammatic
i
Kickback prevention
To avold klckbacks, observe the followlng:
-Operation within a blade segment between 12 and 2 o'clock presents positive
hazards, especially when using metal cutting tools.
-Cutting operations within a blade segment between 11 and 12 o'clock, and
between 2 and 5 o'clock, must only be performed by trained and experienced
operators, and then only at their own risk.
Easy cutting with almost no kickback is possible within a blade segment
between 8 and 11 o'clock.
Diagrammatic
flgure
Cutting Tools
Employ only the correct cutting tool for the job in hand.
EM4250. EM4251 with cutter blade (Star Blade (4 teeth), Eddy Blade (8 teeth)),
Nylon cutting head
For cutting thick materials, such as weed, high grass, bushes, shrubs,
underwood, thicket etc. (max. 2 cm dia. thickness). Perform this cutting work
by swinging the brush cutter evenly in half-circles from right to left (similar to
using a scylhe).
9
I
Maintenance instructions
-The condltion of the cutter, in particular of the cutting tool of the protective
devices and also of the shoulder strap must be checked before commencing
work. Particular attention is lo be paid to the cutting blades which must be
correctly sharpened.
-Turn off the engine and remove spark plug connector when replacing or
sharpening cutting tools, and also when cleaning the cutter or cutting tool.
4
. .
Never straighten or weld damaged cutting tools.
-Operate the Brush cutter/Grass trimmer with as little noise and contamination
as possible. In particular check the correct setting of the carburetor.
-Clean the Brush cutler/Grass trimmer at regular intervals and check that all
screws and nuts are well tightened.
-Never service or store the Brush cutter/Grass trimmer in the vicinity of
naked flames.
-Always store the Brush cutter/Grass trimmer In locked rooms and with an
emptied fuel tank.
c
Observe the relevant accident prevention instructions issued by the relevant
trade associations and by the insurance companies.
Do not perform any modifications on the Brush culler/Grass trimmer as this
will endanger your safety.
The performance of maintenance or repair work by the user is limited to those
activities as described In the instruction manual. All other work is to be done
by an Authorized Service Agent. Use only genuine spare parts and
accessories released and supplied by MAKITA.
Use of non-approved accessories and tools means increased risk of
accidents.
MAKlTA will not accept any liability for accidents or damage caused by the
use of non-approved cutting tools and fixing devices of cutting tools, or
accessories.
First Aid
In case of accident make sure that a first-aid box is available in the vicinity of
the cutting operations. Immediately replace any item taken from the first aid
box.
0
When asking for help, please give the following information:
-Place of accident
-What happened
-Number of injured persons
-Kind of injuries
-Your name
EU Conformity Declaration
Packaging
The MAKITA Brush cuRer/Grass trimmer will be delivered in DNO protective
cardboard boxes to prevent transport damage. Cardboard is a basic raw
material and is therefore consequently
.
. reusable or suitable for recycling
(waste paper recycling).
The undersigned, Yasuhiko Kanzakl, as authorized by MAKITA
INTERNATIONALEUROPE LTD., Michigan Drive. Tongwell. Milton
Keynes, Bucks MK15BJD, U.K., declare that the Makita Machines,
Type :
manufactured by Robin conforms to the basic safely and health
requirements of the applicable EU guidelines:
EU Machineguideline 98/37/EG
EU EMC guideline89/336/EWG (modifiedby 91/263/EWG,92/31/
EWG and 93/68/EWG)
The most important standards applied to properly meet the
requirements of the above EU guidelines were:
EN 11806, ClSPR 12, EN50082-1, DIN VDE0879TI.
Milton Keynes, 18.9.99
For MAKITA INTERNATIONAL EUROPE LTD.
3Yasuhiko Kanzaki
Managing Director
5
!
EM4251
EM4250
Loop handle
U handle
Model
Dimensions : length x width x height (without cutting blade)
1760~330x265
mm
Mass (without plastic guard and cutting blade)
176Ox6OOx405
5.2
kg
5.4
Volume (fuel tank)
cm3
500
Volume (oil tank)
cm3
80
Engine displacement
cm3
Maximum engine performance
I
24.5
kw
0.66 at 7000 min
Engine speed at recommendedmaw. spindle speed
min'
8500
Maximum spindle speed (corresponding)
min"
6500
Maximum fuel co&umption
kslh
330
Slkh
408
Idling speed
min"
3000
Clutch engagement speed
min"
3750
Carburetor
type
WALBRO WYL
Ignition system
type
Solid stale ignition
Spark plug
type
NGK CMR6A
Electrode gap
mm
Maximum specific fuel consumption
Right handle
(Rear grip)
Vibration per
IS0 7916"
Idling
mls2
Racing or W.0.T
m/s*
0.7
- 0.8
2.59
I
6.27
4.72
I
4.7
-~
mk2
3.26
3.83
mls2
7.24
7.56
Sound pressure level average to IS0 7917''
db(A)
87.7
87.7
Sound power level average to IS0 10884')
db(A)
97.7
97.7
Left handle
(Front grip)
Idling
Racing or W.0.T
'
Fuel
Engine Oil
Gear ratio
6
:.
EM4250
Brush Cutter
;B
1
2
3
4
5
6
7
8
9
10
11
12
13
14
15
16
17
18
20
21
24
25
d
7
DESIGNATION OF PARTS
Fuel Tank
Rewind Starter
Air Cleaner
1-0Switch (onloffl
Spark Plug
Exhaust Muffler
Clutch Case
Rear Grip
Hanger
Handle
Control Lever
Control Cable
Shaft
Protector
Gear CaselHead Case
Handle Holder
Cutter Blade
Nylon Cutting Head
Fuel Filler Cap
Starter Knob
Exhaust Pipe
Oil Gauge
c
CAUTION: Before doing any work on the brush cutter, always stop the engine
and pull the spark plug connector off the spark plug.
Always wear protective gloves1
CAUTION: Start the brush cutter only after having assembled it completely.
For machines with U Handle models
-Insert the handle bar into the handle holder, making sure that the boss in the
handle holder fits into the hole in the handle.
-ARer the handle bar is in place, tighten the four bolls (M5 x 25).
NOTE: Be sue the bolts are tight, but do not overtighten,
-Fit the control cable (together with the earth cord) to the handle with two clips
I
(3).
-Avoid any tendency of the control cable lo loop at the handle bar.
For machines with Loop Handle
-Fix a barrier to the leH side of the machine together with the handle for
operator's protection.
-Do not adjust position of the loop handle loo close to the control grip. Keep
not less than 25cm distance between the handle and the grip.
(a distance collar is provided for this purpose.)
G6
4
9
,
8
To meet the applicable safety provisions, only the tool/
protector combinations as indicated in the table must
be used.
Be sure to use genuine MAKITA cutter blades
EM 4250
Star Blade
Protector for metal blades
Protector for metal blades (Usebladdcord
of protector
cutter)
for metal
or nylon cutting head.
-The cutter blade musl be well polished, free of
cracks or breakage. I f the cutter blade hits against a
stone during operation, stop the engine and check
the blade immediately.
-Polish or replace the cutter blade every three hours
of operation.
-If the nylon cutting head hits against a stone during
operation, stop the engine end check the nylon
cutting head immediately.
CAUTION: The appropriate protector must always be
installed, for your own safety and in order
to comply with accident-prevention
regulations.
Operation of the equipment without the
guard being in place Is not permitted.
..
PART NO.6208501400
PART NO. 6258038000
PART NO. 625805000
EM 4251
Protector for cord cutter
Nylon cutting head
Protector for cord cutter
PART NO. 6218014001
PART NO. 6218008003
(Use of protector for metal
bladdcord cutter)
For EM4250
-The outside diameter of the cutter blade must be
230mm (9-1/16'). Never use any blades surpassing
230mm (9-1/16") in outside diameter.
PART NO. 6258047002
For EM4250, EM4251
-Install the clamp (3) on the shaft so that the projection of the clamp (3) is
inserted into the opening between the gear case (1) and the shaft
Secure the protector (4) with the installatlon bolts M6 x 30 (2) and screw
M5 x 8 (5).
Use of protector for metal blade / cord cutter.
-In use of the metal blade, fasten the protector (4) to the clamp (3) with two
bolts M6 x 30 (2).
P
-In use of the cord cutter, insert the protector (2) into the protector (I), and
fasten them with two screw (4) and two nuts (3).
9
,
Turn the machine upside down, and you can replace the cutter blade easily.
For EM4250, EM4251
-Insert the hex wrench through lhe hole in the gear case and rotate the
receiver washer (3)until it is locked with the hex wrench.
-Loosen the nut (1) (lefl-handthread) with the socket wrench and remove the
nut (l), and clamp washer (2).
P
For EM4250 with the hex wrench still in place.
-Mount the cutter blade onto the shafl so that the guide of the receiver washer
(3)fits in the arbor hole in the cutter blade. Install the clamp washer (2) and
secure the cutter blade with the nut (1).
(Tightening lorque: 13 - 23 N-m]
NOTE: Always wear gloves when handling the cutter blade.
NOTE: The cutter blade-fasteningnut (with spring washer) is a consumable
part. I f there appears any wear or deformation on the spring washer,
replace the nut.
I
Mounting of nylon cutting head
-
For EM4251
-To install the nylon cutting head (7). remove the tightening nut (8).
-Insert the socket-headwrench (11) through the hole in the gear case and
turn the support washer until it will be locked with its notch (12) (or the shaft
will be locked).
-Then screw Ihe nylon cutting head onto the shaft by turning it counterclockwise.
-Remove the socket-head wrench.
I
I
-Make sure that the blade is the left way up.
Rotation
10
Inspection and Refill of Engine Oil
-Perform the following procedure, with the engine cooled down.
-While keeping the engine level, remove the oil gauge, and confirm that the oil is filled within the upper and lower limit marks.
When the oil is in short in such a way that the oil gauge touches the oil only by its tip, in particular with the oil gauge remaining inserted in the
crankcase without screwing-in (Fig. 1). refill new oil near the port (Fig. 2).
-For reference, the oil refill time is about 10h ( I O times or 10 tanks of oil refill).
-If the oil changes in color or mixes with dirt, replace it with new one. (For the interval and method of replacement, refer to P 17)
Recommended oil: SAE IOW-30oil of API Classification, Class SF or higher (4-cycle engine for automobile)
oil volume:
Approx. 8Occ
Polnt 1 In Replacement of Oil “011Gauge”
-Remove dust or dirt near the oil refill port, and detach the oil gauge.
-Keep the detached oil gauge free of sand or dust. Otherwise, any sand or dust adhering to the oil gauge may cause irregular oil
circulation or wear on the engine parts, which will result in troubles.
-As an example to keep the oil gauge clean, it is recommendedto insert the oil gauge on its knob side into the engine cover, as shown
in F i g 3
If oil adheres around
Fig.:!
Fg.1
9
Fig3
I1
,.
I
./.
( 1 ) Keep the engine level, and detach the oil gauge.
(2) Fill oil up to the edge of the oil refill port. (Refer lo Fig2 of the preceding
page).
Feed oil with the lubricant refill container.
(3) Securely tighten the oil gauge. Insufficient tightening may cause oil
leakage.
L
Polnt 2 In Replacement of 011: “If oll spllls out”
-If oil spills out belween the fuel tank and engine main unit, the oil is sucked into through the cooling air intake port, which will
contaminate the engine. Be sure lo wipe out spilt oil before start of operation.
REFUELING
Handllng of Fuel
-
.
It is necessary l o handle fuel with utmost care. Fuel may contain substances similar to solvents. Refueling must be performed in a sufficien
ventilated room or in the open air. Never inhale fuel vapor, and keep fuel away from you. if you touch fuel repeatedly or for a long time, the
skin becomes dry, which may cause skin disease or allergy. If fuel enters into the eye, clean the eye with fresh water. If your eye remains
still irritated, consult your doctor.
Storage Period of Fuel
Fuel should be used up within a period of 4 weeks, even if it is kept in a special container in a well-ventilated shade.
If a special container is not used or if the container Is not covered, fuel may deteriorate in one day.
Fuel
The engine is a four-stroke engine. Be sure to use an automobile gasoline (regular gasoline or premium gasoline).
Polnts for Fuel
t
-Never use a gasoline mixture which contains engine oil. Otherwise, it will cause excessive carbon accumulation or mechanical troubles.
-Use of deterioratedoil will cause irregular Startup.
Refueling
WARNING: INFLAMMABLES STRICTLY PROHIBITED
Gasollne used: Automobile gasoline (unleaded gasoline)
-Loosen the tank cap a little so that there will be no difference In atmospheric
pressure.
-Detach the tank cap, and refuel, discharging air by tilting the fuel tank so that
the refuel port will be oriented upward. (Never refill fuel full to the oil refill
Port.)
-Wipe well the periphery of the tank cap to prevent foreign matter from
entering into the fuel tank.
-After refueling, securely tighten the tank cap.
12
Fuel
-
Attachment of shoulder strap
-Adjust the strap length so that the culter blade will be kept parallel with the
ground.
Detachment
1
For EM4251
-In an emergency, pull the release belt (1) strongly upward, and you can
detach the machine from you.
Be extremely careful lo maintain control of the machine at this time. Do not
allow the machine to be deflected toward you or anyone in the work vicinity.
WARNING: Failure to maintain complete control of the machine at all could
result in serious bodily injury or DEATH.
For EM4250
-In case of emergency, remove the emergency detachment lever (2) by pulling
strongly with a finger. The machine sill detach from body.
Be extremely careful to maintain control of the machine at this time. Do not
allow the machine to be deflected toward you or anyone in the work vicinity.
WARNING: Failure to maintain complete control of the machine at all could
result in serious bodily Injury or DEATH.
Observe the applicable accident prevention regulationsl
START IN G
Move at least 3m away from the place of refuelling. Place the brush cutter on a clean piece of ground taking care that the cuaing tool does
not come into contact with the ground or any other objects.
ACold start
Thronle contrqdial
1) Set this machine on a flat space.
13
For machine w i t h U Handle or Loop Handle
1) Set the 1-0switch (1) to OPERATION.
2) Choke lever
Close the choke lever.
Choke opening:
- Full closing in cold or when the engine is cold.
- Full or half opening in restart just after stop of operation.
Primer pump
Continue to push the primer pump until fuel enters into the primer pump. (In
general, fuel enters into the primer pump by 7 to 10 pushes.)
If the primer pump is pushed excessively, an excess of gasoline returns to
the fuel tank.
Recoil starter
- Pull the start knob gently until it is hard to pull (compression point).
Then, return the start knob, and pull it strongly.
- Never pull the rope to the full. Once the start knob is pulled, never
release your hand immediately. Hold the start knob until it returns to its
original point.
Choke lever
When the engine starts, open the choke lever.
Open the choke lever progressively while checking the engine
operation. Be sure to open the choke lever to the full in the end.
In cold or when the engine is cooled down, never open the choke lever
suddenly. Otherwise, the engine may stop.
-
Warm-up operation
Cohtinue warm-up operation for 2 to 3 minutes.
9
Note: -If the starter handle is pulled repeatedly when the choke lever remains at "START" position, the engine will not start easily due to
excessive fuel intake.
-In case of excessive fuel intake. remove the spark plug and pull the starter handle slowly to remove excess fuel. Also, dry the
electrode section of the spark plug.
Caution during Operation:
If the throttle lever is opened fully in a no-load operation, the engine rotation is increasedto 10,000min or more. Never operate the engine
a higher speed than required and at an approximate speed of 6,000 8,500min I.
-
14
B: Startup after warm-up operation
1) Push the primer pump repeatedly.
2) Keep the throttle lever at the Idling position.
3) Pull the recoil starter strongly.
4) If it is difficult l o start the engine, open the thronle by about I D .
Pay enenlion to the cutter blade which may rotate.
Attention In Operation
When the engine is operated upside down, white smoke may come out from the muffler.
STOPPING
1) Release the throttle lever (6) fully, and when the engine rpm has lowered,
set the 1-0switch to STOP the engine will now stop.
2) Be aware that the cutting head may not stop immediately and allow it to
slow down fully.
I
ADJUSTMENT O F LOW-SPEED ROTATION (IDLING)
When it Is necessary lo adjust the low-speed rotation (idling), perform it by the carburetor adjusting screw.
CHECKUP OF LOW-SPEEDROTATION
-Set the low-speed rotation to 3000mln-'.
If it is necessary to change the rotation speed, regulate the adjusting screw
(illustratedon the lefl), with Phillips screwdriver.
-Turn the adjusting screw to the right. and the engine rotation will increase.
Turn the adjusting screw to the lefl. and the engine rotalion will drop.
-The carburetor is generally adjusted before shipment. If it is necessary lo
readjust it. please contact Authorized Service Agent.
CAUTION: The cutting tools mentioned below must only be resharpenedby
an authorized facility. Manual resharpening will result in imbalthe
ances of the culling tool causing vibrations and damage IO
equipment.
-cutter blade (star blade (4 teeth), eddy blade (8 teeth))
An expert resharpening and balancing service is provided by Authorized
Service Agents.
NOTE: To increase the service life of the cutter blade (star blade, eddy blade)
it may be turned over once, until both cutting edges have become
blunt.
I
15
I
NYLON CUlTING HEAD
Most effective cutting area
The nylon cutting head is a dual string trimmer head capable of both automatic
and bump i% feed mechanisms.
The nylon cutting head will automatically feed out the proper length of nylon
cord by the changes in centrifugal force caused by increasing or decreasing
rpms. However, to cut soft grass more efficiently, bump the nylon cutting
head against the ground to feed out extra cord as indicated under operation
section.
Operatlon
-Increase the nylon cutting head speed to approx. 6,000min’.
Low speed (under 4,800min-‘) is not suitable. the nylon cord will not feed out
properly at low speed.
-The most effective cutting area is shown by the shaded area.
Full speed
Idle speed
If the nylon cord does not feed out automatically proceed as follows:
1. Release the throttle lever to run the engine idle and then squeeze the
throttle lever fully. Repeat this procedure until the nylon cord feeds out to
the proper length.
2. If the nylon cord is too short to feed out automatically with the above
procedure, bump the knob of the nylon cutting head against the ground to
feed out the nylon cord.
3. If the nylon cord does not feed out with procedure 2, rewindheplace the
nylon cord by following the procedures described under ‘Replacing the
nylon cord“.
LKnob
Repiaclng the ngon cord
Y
/
-First, stop the engine.
-Press on the housing latches inward to lift off the cover, then remove the
spool.
Latches
Press
I
Press
Spool
-Hook the center of new nylon cord into the notch in the center of the spool,
with one end of the cord extending about 80mm (3-1/8”)
more than the other.
Then wind both ends firmly around the spool in the direction of the head
rotation (left-hand direction Indicated by LH and right-hand direction by RH
on the side of the spool).
I
I
I
80mm(3-1IS”)
- ’-,I- 1 - ‘
:,
For left hand rotati
Spool
I
-Wind all but about 100mm (3-15/16”) of the cords, leaving the ends temporarily hooked through a notch on the side of the spool.
I
I
I
-Mount the spool In the housing so that the grooves and protrusions on the
spool match up with those in the housing. Keep the side with letters on the
spool visible on the top. Now, unhook the ends of the cord from their
temporary position and feed the cords through the eyelets to come out of the
housing.
16
I
-Align the protrusion on the underside of the cover with the slots of the
eyelets.
Then push cover firmly Onto the housing to secure it.
eaL
1
Cover
Protrusion
Slot of eyelet
CAUTION: Before doing any work on the Brush cuHer/Grass trimmer, always stop the engine and pull the plug cap off the spark plug (see
"checking the spark plug').
Always wear protective gloves1
To ensure a long service life and to avoid any damage to the equipment, the following servicing operations should be performed at regular
intervals.
Dally checkup and malntenance
-Before operation, check the machine for loose screws or mlssing parts. Pay particular attention to the tightness of the cutter blade or
nylon culling head.
-Before operation, always check for clogging of the cooling air passage and the cylinder fins.
Clean them if necessary.
-Perform the following work daily after use:
Clean the Brush cutler/Grass trimmer externally and inspect for damage.
Clean the air filter. When working under extremely dusty conditions, clean the filter the severall times a day.
Check the blade or the nylon cutting head for damage and make sure it is firmly mounted.
Check that there is sufficient difference between idling and engagement speed lo ensure that the cutting tool is at a standstill while the
engine is Idling (if necessary reduce idling speed).
If under idling conditions the tool should still continue to run, consult your nearest Authorized Service Agent.
-Check the functioning of the 1-0switch, the lock-off lever, the control lever, and the look button.
--
. .
'.
REPLACEMENT OF ENGINE OIL
Deterloratedengine oil will shorten the life of the sliding and rotating parts lo a great extent. Be sure lo check the period and quantity of
replacement.
ATTENTION : In general, the engine main unit and engine oil still remain hot just after the engine is stopped. In replacement of oil,
confirm that the engine main unit and engine oibare sufficiently cooled down. Otherwise, there may remain a risk of
scald.
Interval of replacement : Initially, every 20 operating hours, and subsequently every 50 operating hours
Recommended 011 : SAEIOW-30 oil of API ClassificationSF Class or higher (4-stroke engine oil for automobile)
In replacement, perform the following procedure.
1) Confirm that the tank cap is tightened securely.
2) Detach the oil gauge.
Keep the oil gauge free from dust or dirt.
I Fyel tank cap
I
auge
17
_
I
'
3) Place waste or paper near the oil refill port.
or paper
4) Detach the oil gauge, and drain oil, tilting the main unit toward the oil refill
PO"..
Drain oil in a container.
5) Keep the engine level, and feed new oil up to the edge of the oil refill port.
In refill, use a lubricant refill container.
6) After refill, securely lighten the oil gauge. Insufficient tightening of the oil
gauge will lead lo oil leakage.
I
POINTS ON OIL
- Never discard replaced engine oil in garbage, earth or sewage ditch. Disposal of oil is regulated by law. In disposal, always follow
the relevant laws and regulations. For any points remaining unknown, contact Authorized Sewice Agent.
- Oil will deteriorate even when it is kept unused. Perform inspection and replacement at regular intervals (replace with new oil
every 6 months).
I Set the cut part to this position (top lefl)
CLEANING OF AIR CLEANER
A
DANGER:lNFLAMMABLESSTRlCTLYPROHIBITED
Interval of Cleaning and Inspection: Daily (every 10 operating hours)
-Remove the air cleaner cover-fixing bolts.
-Pull the cover lower side and detach the air cleaner cover.
-Turn the choke lever l o the full close side, and keep the carburetor off from
dust or dirt.
-Detach the element, wash it with tepid water-diluted neutral detergent, and
dry it up. Remount the element according to the lines indicated In Fig.4.
-Use waste and wipe out oil adhering to the air cleaner cover and plate
breather.
-Immediately after cleaning is finished, attach the cleaner cover and tighten it
with fixing bolts. (In remounting. first place the upper claw, and then the
lower claw.)
Plat
Une(slash-lined)
Fig.4
18
CHECKING THE SPARK PLUG
-Only use the supplied universal wrench lo remove or to install the spark
plug.
-The gap belween the two electrodes of Ihe spark plug should be 0.7-0.8mm
(0.028"-0.032").
If the gap is too wide or too narrow, adjust it. If the spark
plug is clogged with carton or fouled, clean it thoroubhly or replace it.
CAUTION: Never touch the spark plug connector while the engine is running
(danger of hlgh voltage electric shock).
0.7mm-OBmm
(0.028"-0.0327
SUPPLY OF GREASE TO GEAR CASE
-supply grease (Shell Alvania 2 or equivalent) to the gear case through the
grease hole every 30 hours. (Genuine MAKITA grease may be purchased
from your MAKITA dealer.)
CLEANING OF FUEL FILTER
Fuel pipe
WARNING: INFLAMMABLES STRICTLY PROHIBITED
Interval of Cleaning and Inspection: Monthly (every 50 operating hours)
Suction head In the fuel tank
-The fuel filler (1) of the suction head is used to filler the fuel required by the
carburetor.
-A periodical visual inspection of the fuel filler is to be conducted. For that
purpose open the tank cap, use a wire hook and pull out the suction head
through the tank opening. Filters found to have hardened, been pollutedor
clogged up are to be replaced.
-Insufficient fuel supply can result in the admissible maximum speed being
exceeded. It is therefore important to replace the fuel filter at least quarterly
to ensure satisfactory fuel supply to the carburetor.
REPLACEMENT OF FUEL PIPE
CAUTION: INFLAMMABLES STRICTLY PROHIBITED
Interval of Cleaning and Inspection: Daily (every 10 operating hours)
Replacement: Annually (every,200 operating hours)
.
Replace the fuel plpe every year, regardless of operating frequency. Fuel
leakage may lead to fire.
Ifany leakage is detected during inspection, replace the oil pipe immediately.
INSPECTION OF BOLTS, NUTS AND SCREWS
-Retighten loose bolts, nuts, etc.
-Check for fuel and oil leakage.
-Replace damaged parts with new ones for safety operation.
CLEANING O F PARTS
-Keep the engine always clean.
-Keep the cylinder fins free of dust or dirt. Dust or dirt adhering lo the fins will
cause seizure.
REPLACEMENT OF GASKETS AND PACKINGS
In reassembling after the engine is dismounted, be sure lo replace the gaskets and packings with new ones.
Any mainlenance of adjustment work that is not Included and described in this manual is only to be performed by Authorized Service Agents.
19
..
i
-When the machine Is in storage for a long time, drain fuel from the fuel tank
and carburetor, as follows: Drain all fuel from the fuel tank. Dispose of
properly and In accordance with all local laws.
-Remove the spark plug and a few drops of oil into the spark plug hole.
Then, pull the starter gently, so that oil covers the engine inside and tighten
the spark plug.
-Clear dirt or dust from the cutter blade and outside of engine, wipe them
with a oil-immersed cloth and keep the machine in a place as dry as
possible.
n
ity
Fault location
-ault
system
3bservation
3ause
Engine not starting or with
jiff iculty
gnition system
gnition spark O.K.
'ault in fuel supply or compression system, mechanical
lefect
'40 ignition spark
STOP-switch operated. wiring fault or short circuit. spark
plug or connector defective, ignition module faulty
Fuel supply
Fuel tank filled
Incorrect choke position, carburetor defective, fuel supply
line bent or blocked, fuel dirty.
Compression
No compression when
oulled over
Cylinder bottom gasket defective, crankshafl seals
damaged, cylinder or piston rings defective or improper
sealing of spark plug
Mechanicalfault
Starter not engaging
Broken starter spring, broken parts inside of the engine
Tank filled ignition spark
existing
Carburetor contaminated, have it cleaned
Tank filled
Incorrect idling adjustment, carburetor contaminated
Warm start problems
Engine starts but dies
Fuel supply
Fuel tank vent defective, fuel supply line interrupted,
cable or STOP-switch faulty
Insufficient performance
Several systems
may simultaneously
be affected
Engine idling poor
Air filter contaminated.carburetor contaminated,muffler
clogged, exhaust duct in the cylinder clogged
i
20
Operating time
Engine oil
Eghtening Parts
(bolt, nut)
Fuel tank
',
Throttle lever
stop switch
Cutting blade
Low-speedrotation
Air cleaner
Ignition plug
Cooling air duct
Fuel pipe
F a r - c a s e grease
I
Fuel filter
Clearance between air intakc
I Carburetor
Perform initial replacement afler 20h operalion.
*2 For the 200 operating hour inspection, request Authorized Service Agent or a machine shop.
'1
3'
Afler emptying the fuel tank, continue to run the engine and drain fuel in the carburetor.
21
I
TROUBLESHOOTING
Vir
Before making a request for repairs, check a trouble for yourself. If any abnormality is found, control your machine according to the
description of this manual. Never lamper or dismount any part contrary to the description. For repairs, contact Authorized Service Agent or
local dealership.
lietl
Pro
MI
s!rf
ant
TaG
Push 7 lo 10 times.
Failure to operate primer pump
1 Feed fuel.
Lack of fuel
Clogged fuel filter
Clean
Deteriorated fuel
Deteriorated fuel makes starting more difficult
Replace with new one. (Recommended
replacement: 1 month)
Excessive suction of fuel
Set throttle lever from medium speed to high
speed, and pull starter handle until engine
starts. Once engine starts, cutter blade
starts rotating. Pay full attention to cutter
blade.
Engine does not start
If engine will not start still, remove spark plug,
make electrode dry, and reassemble them as
they originally are. Then, start as specified.
L
Ne
1 Attach securelv
Detached DIUO
cao
~~
Contaminated spark plug
Clean
Abnormal clearance of sDark Dlua
1 Adjust clearance
Other abnormality of spark plug
Replace
Abnormal carburetor
Make request for inspection and maintenance.
Starter rooe cannot be Dulled
Make reauest for inspection and maintenance
~
Make request for inspection and maintenance
Abnormal drive system
I Perform warm-up operation
Insufficient warm-up
Choke lever is set to "CLOSE" although engine
is warmed up
Engine stops soon
Engine speed does not increase
Cioaoed fuel filter
II
Set to .CLOSE"
Clean
Contaminated or clogged air cleaner
1 Clean
Abnormal carburetor
I Make reauest for inspection and maintenance
~~
~~
~
Make request for inspection and maintenance
Abnormal drive system
Loosened cutler blade-tiphteninpnut
Sutler blade does not rotate
I Tighten securely
Twigs caught by cutter blade or dispersionRemove foreign matter
preventing cover
Stop engine immediately
I Make request for inspection and maintenance.
Abnormal drive system
~~
Wain unit vibrates abnormally.
1
Loosened cutter blade-tiahteninanut
~
Stop engine immediately
+
:utter blade does not stop immediately.
Stop engine immediately
Engine does not s t r .
Replace cutter blade
Broken, bent or worn cutter blade
Shifted convex part of cutter blade and cutler
blade S U D D O ~fitlina
~
I Tiahten securely
I
Attach securely
Abnormal drive system
Make request for inspection and maintenance
High idling rotation
Adjust
Detached throttle wire
Attach securely
Abnormal drive system
Make request for inspection and maintenance
Detached connector
Attach securely
~~
Abnormal electric system
Make request for inspection and maintenance.
Run engine at idling. and set choke
lever to CLOSE.
When the engine does not start after warm-up operation:
I f there is no abnormality found for the check items, open the throttle by about 113 and start the engine
22
'