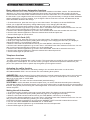
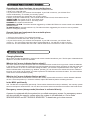
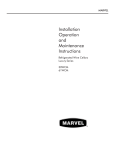
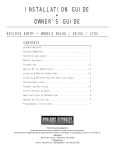
1
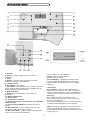
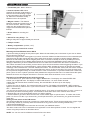
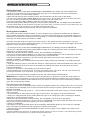
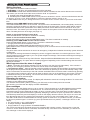
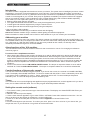
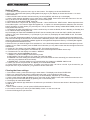
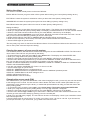
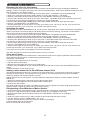
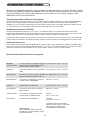
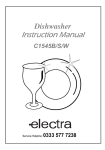
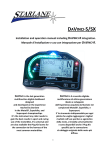
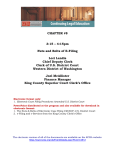
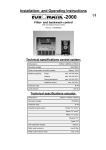
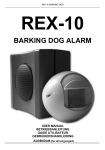
WIRELESS SECURITY SYSTEM
Home Prosafe
Sc9100
GB
Introduction alarmconsole
page 2
Installing
page 3
Registering sensors and remotes
page 5-7
Storing Phone Numbers
page 8
Recording an own message
page 8
Using the Security System
page 9
What happens when the alarm is triggered
page 9
Home Automation functions
page 10
Setting Timers
page 11
Changing the access code (PIN)
page 12
Removing/De-registering a sensor
page 13
Trouble shooting
page 16
GB User's manual
SE Användarmanual
FI Manuaali
Artnr 36.1990
The security console
1. Display
2. Armed - Indicator lights up when the alarm is
switched on.
3. Sirén
4. Battery - Indicator lights up when the backup
batteries are empty or not installed.
5. Tamper contact
6. AC Adapter connections.
7. Arm Home button Alarm function for when you are at
home. All Door/Window Sensors are activated, but the
Motion Detectors remain unarmed.
8. Built-in Speaker.
9. Arm Away button Full alarm. All sensors are
activated.
10. Built-in Microphone.
11. Wired inputs.
12. Telephone connection.
13. Emergency battery compartment. “Rechargeable
batteries only!”.
14. Console Keypad Buttons. Used for all number
entries.
15. Menu Start Up - Used to initially enter the menu
and then to move up through the items.
16. Menu Start Down - Used to initially enter the menu
and to move down through the items.
17. On - Switch on a X10 Module.
18. Off - Switch off a X10 Module.
19. OK - Confirm setting.
20. Clear/Bypass - Clear/bypass Used to clear
entries back up through the menu levels, and to
bypass problem Door/Window Sensors or Motion
Detectors.
LCD-Display
Zone numbers - Every sensor represents a socalled zone in the system. There are 30 zones for
wireless sensors (numbers 1-30 on the display) and
2 zones for wired sensors (numbers 31 and 32 on
the display).
Zone numbers on: Door or window is open.
Zone number flashing slowly: There is a problem
with the sensor(page 9)
Zone number flashing quickly: The sensor has been
“overruled” with the Bypass Function (page 9)
Chime - Chime is switched on when the system is
switched off. When this function is activated, you
hear a pleasant ding-dong when someone enters the
house (page 13).
2
Installing
! Chose a good space for the console and make sure you have a wall socket (230V) and a telephone connection
close by. For optimal range it is best to mount the console central to the objects you wish to secure. This
ensures that the distance between the console and the sensors is as short as possible and the range will be
sufficient. Plan the location of the Door/Window Sensors and Motion Detectors so that the RF path which runs
in a straight line from sensor to Console is not obstucted by large metal objects such as a refrigerators or
freezers, and passes through as few walls as possible.
! You can place the console on any flat surface or mount it onto the wall.
Connecting the AC adapter. Connect the AC adapter to the corresponding connection(6). Plug the flying lead of
the adapter into a 230V/50Hz wall socket. You can fixate the wire by looping it behind the hooks on the back of the
console. When connecting the adapter and opening the top compartment of your console, you will see the word
TAMPER on the display. After closing the compartment, enter your PIN code(facyory settings 0000se page 12) to
remove the word TAMPER. The display now shows DISARMED and you will hear a double tone to confirm.
NOTE: Only use the Ps18 AC adapter included in the set..
Installing the emergency batteries
Just take off the discharge protection before installing the system(plastic flap with text “PULL”).Use always
rechargeable batteries.After inserting the batteries and closing the compartment,enter your pin code to remove the
word TAMPER. The display now shows DISARMED and you will hear a double tone to confirm.
Telephone connection
Open the top compartment on your console. Connect the telephone wire to the corresponding connection (12).
You can fixate the wire by looping it behind the hooks on the back of the console.Console can share line with a
standard phone but not a FAX. The console cannot be directly connected to an ISDN connection.Se page8
The contents of the Home Prosafe system.
!
!
!
!
!
Security base console SC28/SC9100
Motion detector MS18
Door/Window sensor DS18
Key chain remote KR18
Phoneplugs for Se and FI
Important Properties and Features
Register up to 30 wireless sensors with console.
Emergency, The built-in telephone dialler (Tone and Pulse) can dial up to six different telephone numbers..
Can register up to 16 wireless remote controls (KR18/KR21/SH600).
2 different alarm messages:custom recordable message + fixed multi lingual emergency message.
Use the phone to listen to what is causing the alarm.
Silent alarm possible (no siren). Additional Ph7208 siren available..
2 inputs for wired sensors.
Intelligent sensor control: The console checks functions and battery status.
Trigged alarm (possible with lights are swiched O and OFF. Prevention with so called “LIVED IN LOOK”:
Your lights are switched ON and OFF in such a way that it appears as if you are home, in respond to the 7
days timer.
! Can use up to 4 Thermostats Ts10. Temperature points to create e.g: Comfort, Economy and Frost level.
!
!
!
!
!
!
!
!
!
The menus
After connecting the console, the display will read HOME CONTROL. The time will be displayed on the bottom line(for
setting the time, see page 8. If you do not see the words HOME CONTROL but TAMPER, you need to close the top
compartment on the console. After closing the compartment, enter your PIN code(factory settings 0000) to remove the
word TAMPER. The display now shows DISARMED and you will hear a double tone to confirm. Then the text HOME
CONTROL will be shown.
Choosing your language
All menu items are displayed in English for default. You can choose any of the other available languages as follows:
1.To access the menu press the menu upp or menu down button. The display now shows ENTER PIN.
2.Enter the 4-digit PIN code(factory setting 0000). The display is cleared and shows a * for each number entered. When
the PIN code has been entered correctly, the first menu item will show up on the display.
3.Use the menu buttons upp/down to go to menu item 7. OPTIONS. Press OK to select this menu item. You can also
go to this menu item directly by pressing a 7 on the keypad.
4.Use the menu buttons upp/down to go to submenu item LANGUAGES. Press OK to select this submenu item.
5.Use the menu buttons upp/down to select your language. Press OK to select and confirm.
7.Press Clear and afterwards 1(=Yes) to quit the menu.
3
The menu in English
! To access the menu, press the menu upp or menu down button. The display now shows ENTER PIN. Use the
menu buttons upp/down to go trough the menues.
1. INSTALL Registering and de-registering sensors, remote controls and thermostats.
2. SET CLOCK Setting the clock se page 8
3. PHONE NUMBERS Setting the phone numbers se page 8
Sub menu:
PHONE 1
PHONE 2
PHONE 3
PHONE 4
PHONE 5
PHONE 6
4.MESSAGE: Recording and checking your own spoken message se page 8
Sub menu:
RECORD Record your own spoken message.
REPLAY Listen to your own spoken message.
5. NEW PIN Change your PIN code (se page 12).
6. MEMORY CLEAR Clear all sensors, remote controlls, thermostats, timers or settings (se page 5-7).
Sub-menu:
CLEAR ALL SENSORS Remove a registered sensor.
CLEAR ALL REMOTES Remove a registered remote control.
CLEAR ALL TIMERS Remove all timer settings at once.
CLEAR ALL THERMOSTATS Remove all thermostat settings at once.
CLEAR LOG Remove the Event Log.
MASTER RESET Clear the memory.
7. OPTIONS
Sub menu:
CHIME - CHIME ON/CHIME OFF When the chime function is activated, the display will show a sound
symbol.(se page13).
SIREN - SIREN ON / SIREN OFF Switch off siren for silent alarm ( page 13).
HOUSE CODE: Change the House Code for Home Automation functions (page 15).
UNIT CODE: Change the Unit Code for Home Automation functions (page13).
ANSWER TYPE: Answer ON/OFF/VOICE MAIL(page 15)
SENSOR MODE: Use sensors as emergency sensor
SENSOR 27-32: NO+ON/OFF Used for settings zones 27 to 32 to send Home Automation ON or OFF
commands on House Code +1 and Unit Code 7-12, in respond alarm trigger from respective zones 27-32
(E.g.zone 27 is related to UC 7,29 to 9 etc).
COMFORT: To set COMFORT ,ECONOMY and FROST level temperatures.
LANGUAGE: English/Francais/Deutsch/Nederlands/Italiano/Espanol/Portugese/Svenska/Romana/Turke
8. DELAYS
Sub menu:
ENTRY DELAY The time you get to switch off the system after entering your house (page 12).
EXIT DELAY before the system will be armed on whenyou leave your house (page 12).
DIAL DELAY before the system calls out in case of an alarm (page 12).
ANSWERS DELAY before the system picks up the phone when dialling in (page 12).
9. SET TIMER
NEW TIMER Setting a new timer or thermostat setback (page 11).
0. EVENTS LOG
VIEW LOG Overview of last 40 security events.
4
Key Chain Remote
1.Control indicator -Comes on when the remote
control sends a radio signal when the key are pressed.
When the indicator lblinks only weakly , the batteries
have to be replaced.
2. Arm - Switches on the Security System in the Arm
Away Mode. All sensors are activated.
3. Disarm - Switches off the Security Systemt.
4. A on/off - Switches on/off the lights connected to the
Lamp Module set to the Home Automation Base
Address.
5. B on/off -Switches on/off the lights connected to the
Lamp Module set to the Home Automation Base Adress
+1.
KR18E
6/7. Panic -When both keys ARM(2) and DISARM(3)
are pressed simultaneously, an immediate alarm is
initiated by the Security System. (NOTE! ON KR21E Press the both
reed key simultaneously).
1
3
2
4
8. Battery holder - The back of the remote can be easily opened by
taking the two parts apart. Use Cr2016 (2xCR2016, 3V lithium
batteries.
Using the Key Chain Remote Control
A new Kr18 contains batteries for default. INITIALIZING THE
KR18:Press the ARM key for more than 3 seconds and release the
button; the indicator blinks. Release the button.The remote control has
now chosen a unique code, which can be registered with your console.
6/7
KR21E
When pressing the Arm button the LED should flash quickly a few times. When the LED lights up and stays lit,
you need to re-initialiaze the KR18.
Registering the Key Chain Remote Control with the Console
1. To access the menu, press either the menu upp or down button. The display now shows ENTER PIN.
2.Enter your 4-digit PIN code (facyory setting 0000). The display is cleared and shows a * for each number
entered.
3. When the PIN code has been entered correctly, the word INSTALL will show up on the display.
4. Press OK. The display now reads INSTALL ZONE.
5. Press the ARM button on your key chain remote control. The console will beep to confirm. The display will read
RMOT 1 SET.If you have more than 1 remote control installed, it will show e.g. RMOT 2 SET, RMOT 3 SET.
- RMOT 16 SET. You can register up to 16 remote controls.
6. Repeat step 5 for every remote control you wish to register.
7. Press CLEAR to go back to the first menu item. Press CLEAR again to quit the menu. To confirm your choice,
press 1 for Yes or 2 for No. If you choose Yes, you will quit the menu. If you choose No, you go back to the first
menu item.You can also remove remote controls from the menu e.g when you have lost a remote control(page 12)
.
5
Door/Window sensor
1. Transmitter part - Built-in antenna..
2.Control indicator LED -When
pressing the Tamper contact button, or
when the unit is transmitting a signal
to the base station, this LED will light
up. When the LED blinks weakly,
batteries have to be replaced.
3. Magnet contact - The distance
between magnet and contact may not
be more than 5mm. When mounted,
make sure the small arrows on the
magnet and transmitter base part are
lined up.
4. Screw holes for mounting the
sensor.
DS18E
5. Switch for entry delays -For
setting a delay time of approximately 30 seconds.
6. Tamper contact .
7. Battery compartment (2xAAA, 1.5V).
8. Connecting for extra wired contact.
Mounting the Door/Window Sensor DS18
1.Open the casing by taking the two pieces apart. Mount the transmitter part on the frame of your door or widow.
Do not close the casing yet.
2.Mount the magnet on the moving part of your door of window. Make sure that the arrows on the transmitter part
(see the arrow) and the magnet are facing each other when the door or window is closed. Keep the distance
between the transmitter part and the magnet (when door or window is closed) as small as possible(max 5mm).
Door/Window sensors may be hidden behind drapes for a more discreet installation.Set the switch for entry
delay(5) to MIN when you have installed the sensor on a widow and on MAX when the sensor is installed on a
door. When the switch is set to MAX, you have time to open and close the door without triggering the alarm. If you
want an instant alarm (on e.g) the backdoor), set the switch to MIN. Activate the sensor by pressing the tamper
contact(6) onthe transmitter for 4 seconds. Release the button. The door/window sensor has now chosen a unique
code, which can be registered with your console.Place the sensor as high as possible: This gives the best range.
Do not place the magnet directly on a metal surface.In case of metal frame, or synthetic frames with a metal core,
place a piece of wood or plastic (min 5mm thick) between the magnet and the frame. On metal frames the space
between the sensor and magnet should be no more than 3mm when the window or door is closed
Registering a Door/Window Sensor with the Console
1.To access the menu, press either the menu upp or down button. The display now shows ENTER PIN.
2.Enter your 4-digit PIN code. The display is cleared and shows a * for each number entered.
3.When the PIN code has been entered correctly, the word INSTALL will show up on the display.
4. Press OK.
5. Open your door or window. The console will beep to confirm. The display will read ZONE 1 SET. A memory
space for a sensor is called a zone. If you have more than 1 sensor installed, it will show e.g ZONE 2 SET.ZON 3
SET --- ZON 30 SET.
You can choose in witch zone you want to install the sensor. If you want to install the sensor in zone 3, press 3 on
the number pad before executing step 5. It’s advisable to write down which zone contains which sensor.
6. Repeat step 5 for every door/window sensor you wish to register.
7. Press CLEAR to go back to the first menu item. Press CLEAR again to quit the menu. To confirm this choice,
press 1 for Yes or 2 for No. If you choose Yes, you will quit the menu.If you choose No, you go back to the first
menu item.
Adding a wired sensor to the D/W sensor
The Ds18 Door/Window sensor has a contact for a extra wired sensor. These sensors needs to be of type of type
NC (normally closed dry contacts) and there should not be any power on this contact (potential-free).
1.Open the transmitter part.
2.Remove the wired bridge from connection and connect your additional sensor.
The wired contact can have it’s dedicated zone registration on the Security Base Console. You can register the
contact using the procedure as described above.
NOTE! You can also use Door/Window contact DS10 to the alarm.
6
Motion detector Ms18
1.Control Indicator - Lights
up when a signal is
transmitted.
2. PIR
3.Tamper contact.
4.Battery compartment
(2xAA, 1.5V).
5.Sensitivity switch ½
Iin setting 1 the sensor will
iinstantly react to movement,
in setting 2 the sensor is less
sensitive and will only react
after registering multiple
movements.
MS18E
6. TEST button.
Mounting the Motion Detector MS18
The motion detctor works by detecting changes in temperature. Do not mount the detector too close to a heater or
air conditioner.
The motion detector has a range of 12m and an angle of 90. Because of the special lens the sensor ‘looks down’.
Always mount the Ms18 at a height of about 180cm from the floor and place it in such a way that the detector can
cover the area you want to secure. The mounting bracket can be placed at an angle (90) or directly against the
wall.
Using the Motion Detector
1. Open the battery compartment and insert the batteries (2xAA, alkaline)
2. Keep the TEST button (6) pressed for about 4 seconds. The LED will flash once. Release the button. The LED
will flash twice. The motion detector has now chosen a unique code, which can be registered with your console.
Place the motion detector upside down so that it can’t detect any movement during registration.
Place the sensor as high as possible: This gives the best range. Do not place the sensor directly on a metal
surface or in direct sunshine.
Test mode: Testing the location of your motion detector
1.Set the switch (5) to 1 and press the TEST button (6) until the indicator (1) flashes twice.
2. Wait 20-30 seconds.
3.Walk in front of the sensor. The indicator (1) lets you know when a movement has been detected. This allows
you too check whether the sensor has been mounted on the right place.
4.Press the TEST button again to be able to use the sensor as normal.
After 2 minutes the motion detector will go back to the normal mode.
Registering a motion Detector with the Console
1. To access the menu press the menu upp or nenu down button. The display now shows ENTER PIN.
2. Enter your 4-digital PIN code (factory setting 0000 for changing PIN code see page 12).
3. When the PIN code has been entererd correctly, the word INSTALL will show up on the display.
4. Press OK. The display will read INSTALL ZONE.
5. Press the TEST button of the motion detector or turn it around, so that that the sensor will detect movement.
The console will beep to confirm. The display will read Zone 1 SET.
A memory space for a sensor is called a zone. If you have more than 1 sensor installed, it will show e.g ZONE 2
SET, ZONE 3 ZET, ZONE 4 SET, -- ZONE 30 SET.
You can choose in which zone you want to install the sensor. If you want to install the sensor in zone 3, press 3 on
the number pad before executing step 5. It’s advisable to write down which sensor you have registered in which
zone.
6. Repeat step 5 for every motion detector you wish to register.
7. Press CLEAR again to quit the menu. To confirm your choice, press 1 for Yes or 2 for No. If uou choose Yes,
you will quit the menu. If you choose No, you go back to the first menu item.
NOTE You can also use motionsensor Ms10 to the alarm.
7
Setting up the Security Console
Setting the clock
1. To access the menu, press either the menu upp or down button. The display now shows ENTER PIN.
2. Enter your 4-digit PIN code (factory setting 0000 see page 12 for changing the PIN code). The display is
cleared and shows a * for each number entered.
3.When the PIN code has been entered correctly, the word INSTALL will show upp on the display.
4. Use the menu bottons upp or menu down to go to menu item 2. SET CLOCK. Press OK to select this menu
item. You can also go to this menu item directly by pressing a 2 on the number pad.
5.Use the menu buttons upp or down to select the correct day of the week.
6.Use the number pad to enter the new time (24 hour notation), followed by OK. The display now reads INSTALL.
7. Press CLEAR again to quit the menu. To confirm your chice, press 1 for Yes or 2 for No. If you choose Yes, you
will quit the menu. If you choose No, you go back to the first menu item.
If you press CLEAR while entering the time, the time entered will be deleted.
Storing phone numbers
The console has a built-in telephone dialler. In case of an alarm up to 6 telephone numbers can be dialled. All
persons called will be able to listen to the message you have recorded (see page 8). The message needs to be
confirmed by the person answering the phone by pressing a 0 on their phone (DTMF response). The dialler then
knows the next numbers does not need to be called.
First make a list with the phone numbers you want to enter, in the order they need to be dialled. If you have
connected the console via an PABX phone system, you may need to add a 0, or possible other digit in front of the
telephone number to get an external land line.
1. To access the menu, press either the menu upp or down button. The display now shows ENTER PIN.
2.rEnter your 4-digit PIN code (factory setting 0000 see page 12 fo changing the PIN code) The display is cleared
and shows a * for each number entered..
3.When the PIN code has been entered correctly, the word INSTALL will displayed.
4.Use the menu buttons upp or down to go to menu item 3. PHONE NUMS. Press OK to select this menu item.
You can also go to this menu item directly by pressing a 3 on the number pad.
5.Use the menu buttons upp/down to go to the memory space where you want to enter a telephone number
(PHONE 1, PHONE 2 _ PHONE 6).
6.Press OK when you have arrived at the memory space. After pressing OK at PHONE 1, the display will read
SET PH 1.
7. Enter the telephone number. Press the OFF button for a dial pause (use a dial pause between the extra 0 and
the telephone number when the console is connected to a PABX phone system. A small letter p can now be
noticed on the display).
8. Press OK. You will now automatically go to next memory space.
9. Press CLEAR again to quit the menu. To confirm your choise, press 1 for Yes or 2 for No. If you choose Yes,
you will quit the menu. If you choose No, you go back to the first menu item.
If you press CLEAR while entering a telephone number, the number entered will be deleted..
IMPORTANT: It’s mandatory to have all 6 positions programmed. It’s allowed to program the same number on
different locations., But be aware if you program less than 6 different telphone numbers, the console will try to
contact you at these numbers several times in case of an alarm. As soon as the call is confirmed by a DTMF “0”
press, the console will stop dialling.
Recording your own message
You can record an own message that will be used by the telephone dialler. The message can be up to 12 seconds
long. Make sure the message is not too short, because this will cause a long silence period when the message is
played and repeated.
Example: “This is the security system of .... Press 0 after the message to hear what is going on. Please undertake
action as agreed.”
1.To access the menu, press either the menu upp or down button. The display now shows ENTER PIN.
2. Enter your 4-digit PIN code (factory setting 0000 see page 12 for changing the code). The display is cleared
and shows a * for each number entered.
3.When the PIN code has been entered correctly, the word INSTALL will show up on the display.
4.Use the menu buttons upp/down to go to menu item 4. MESSAGE. Press OK to select this menu item. You can
also go to this menu item directly by pressing a 4 on the number pad.
5. Press 1 for RECORD.
6.The display now shows PLEASE WAIT. When the display reads SPEAK NOW you can record your message
(max 12 seconds). The distance to the microphone should be around 30cm.
7.After recording, wait until the RECORD/REPLAY option comes up again. Press 2 (REPLAY) to listen to the
recorded message..
8. Press CLEAR to quit the menu. To confirm this choise, press 1 for Yes or 2 for No. If you choose Yes, you will
quit the menu. If you choose No, you go back to the first menu item.
8
Using the Home Prosafe system
Setting the alarm
The system has two different alarm functions::
1. ARM AWAY - Full alarm. All registered Sensors will be activated.
2. ARM HOME - Partial alarm All Door/Window sensors will be activated, but the motion detectors are not armed.
This means you can walk around the house, while the ‘shell’ of is protected.
A. A single press arms all Door/Window sensors.
B. A double press of ARM HOME results in every sensor to be active in zones 1-16 but motion detectors are still
not active in in zones 17-30. All Door/Window sensors are however active in zones 17-30.
In ARM HOME mode can your Garage be armed via a motion sensor and the “shell” of your house at the same
time.
Switching on the ARM AWAY function via the console
Press the ARTM AWAY button on the console. The system will be activated after a short delay (delay can be set,
see page 12).During the delay you will hear a couple of tunes at the same pitch. The entry delay will be used for
Ds18 Door/Window sensor (Ds18 switch set to MAX) and motion sensor Ms18 for Zone 15 and 16. when your
enter the house. This means you have enough time to switch off the system via the console without triggering the
alarm. The delay times can be change (see page 12)
Switch on via the Key Remote Control Kr18
Press the ARM button. The alarm is switched on instantly.
Switch on via the Comfort Remote Sh600
Set the slide switch to SEC. Press the ARM AWAY button. The alarm is switched on instantly.
Switching on the ARM HOME function via the console
Press the ARM HOME button on the console. The alarm is switched on instantly.
1. A single press arms all Door/Window sensors.
2. A double press of ARM HOME activates all Sensors in zones 1 - 16.
ARM HOME function cannot be switched on by using key chain remote Kr18 but can be used by remote Sh600.
Panic alarm
The panic alarm can be switched on in case of an emergency, independet of whether the security system is Armed
or Disarmed.
The telephone message indicates the emergancy sensor is triggered and that it is not the burglar alarm. This is
done by adding an extra message to your own spoken telephone message. This standard multi-lingual message is
embedded info the system.
Activate the alarm via the Kr18 Key Chain Remote. Keep the ARM and DISARM buttons of the remote control
pressed simultaneously. The panic alarm is instantly triggered. Depending on the console settings the siren will or
will not be activated.
What happens when the alarm is tripped.
1. Sirén - The built-in siren will be activated. You can choose to turn the siren off (silent alarm). If the console is
working on the emergency batteries, the siren will not be used, to save battery power.
2. The telephone dialler: - After the last digit of the first telephone number has been dialled, the spoken message
will be played and repeated several times. If the call is answered by pressing 0, the console will stop calling. If the
call is not answered, the second up to the sixth number are dialled until one of these calls is confirmed by pressing
0. The person who receives the phone call can listen to what is going on in the building for one minute. The siren
is switched off while you are listening. The console will remain on alert. If the alarm is triggered again later, the
telephone dialler will be activated again.
Disarming the system
Press DISARM on your remote control. The display will indicate the zone that is causing the alarm. To remove this
message, press ARM and then DISARM.
You can also switch off the system by entering your PIN code on the number pad of the console.
After entering your PIN code the display will read ‘DISARMED’.
Error messages
The number 1-32 in the display refer to up to 32 “zones”. These represent up to 30 Door/Window sensors and/or
Motion detectors you install plus 2 hard wired zones. The numbers show open zones, problem zones and
bypassed zones by beaing displayed as steady on (door or window open), slow flash (there’s problem with that
zone) or a fast flash (that zone has been bypassed). Attempting to armwith an open or problem zone makes the
Console beep continuosly and it will display in words on the display what the cause is, but only for one zone at a
time. Bypassing that zone (by pressing the Clear button) moves on to the next problem zone, if there is one.
The status off all sensors is checked after the security system is switched on. If a problem is found, you will hear
the two-tone ‘problem signal’. If a sensor (e.g.zone 9) indicates there is a problem, a message is shown on the
display:
! An open window or door: OPEN ZONE 9.
! A tamper message: TAMPER ZONE 9.
! Empty batteries or range problems: PROBLEM ZONE 9.
The console and the Ds18 and Ms18 sensors are equipped with a tamper contact. If anyone tries to open the
console or sensor while the alarm is activated, the alarm will trip. If the alarm is NOT activated, you will see an
error message on the console display.8
9
X10 Home Automation
Introduction
The alarm console is equipped with functions to secure your home. The system uses an intelligent process to control
the lighting in your house, so that it appears as if you are at home. The X10 technology also offers you several socalled comfort functions. You can e.g. Wireless control lamps connected to Lamp/Dimmer modules with your remote
control or via the keypad on your console. Every lamp or appliance controlled by the system needs to be equipped
with an X10 receiver module. These modules are easy to install (Plug & Play) and are also available separately,
which means you can expand the system as you wish and when you wish.:
! Blinking Lamps when the larm is trigged.
! Your lights are switched ON and OFF in such a way that it appears as if you are home.
! Control lights and electrical equipment by using the remote control.
! Control lights and other electrical equipment by using the telephone.
A few of the Plug & Play modules::
Lm12 Lamp/Dimmer module Plug-in module to switch and dim lighting.
Am12 Device/Switch module. Plug-in module to switch lighting and electrical equipment.
More information on these modules can be found on www.electia.se or you can contact your local dealer.
Addressing your modules
An adress can be set for every X10 module. This adress consists of a HOUSE CODE (A-P) and a UNIT COD (1-16).
The HOUSE CODE of all your components needs to be set to the same letter code (keep all the HOUSE CODES set
to A. (See page 14). With the UNIT CODE you can give every module its own number, so that they can be
indvidually controlled via keypad or via remote SH600.
Alarm functions of the X10-modules
Four the below functions must the reference adress for the console be A1 and A2. For changing the reference
adress se page 15
Functions of the Lamp/Dimmer modules
! When Arming the system via the console, the lamps on A1 and A2 will be switched on during the Exit Delay. As
soon as the system is activated, the lamp will be switched off. When Arming the system via remote control, the
lamps will be switched off. When Arming the system via remote control, the lamps will be switched on and off
quickly to indicate the system is activated (comparable to the alarm system of a car). In the case of an alarm the
lights connected to lamp/dimmer modules with addresses A1 cand A2 will flash. After 4 minutes the lights will
remain on.
! Press on the remote controls A/B LIGHTS ON/OFF buttons. The lamps on respective adress A1 or A2 will be
switched On. Press the A/B LIGHTS ON/OFF . The lamps on respective adress A1 or A2 will be switched Off.
Comfort functions of the security console
You can also control the modules using the console. If you do not see a menu, the console is in HOME CONTROL
mode. The display shows HOME CONTROL. To control a module with Unit Code 1. Press 1 followed by ON or OFF.
If you want to control MODULE 12, press 1 , then 2, followed by ON or OFF. To control all lamps ON press 0
followed by ON. To control all lamps off press 0 followed by OFF.
Timers
The console can turn on and off lighting and appliances at pre-programmed times, so that it appears as if you are at
home, the so called LIVED IN LOOK. You can also program timed temperature setbacks.
Setting the console mode (software)
1. To access the menu, press the menu upp or menu down button. The display now shows ENTER PIN. Enter your
4-digit PIN code.
2. INSTALL will show up on the display.
4. Use the menu buttons upp/down to go to menu ITEM 7. OPTIONS. Press OK to select this menu item . You can
also go to this menu item directly by pressing a 7 on the number pad.
5. Press “0” on the the number pad. Use the menu buttons upp/down to choose EURO 7 DAY.
Press OK.
6. Press CLEAR again to quit the menu. To confirm your chice, press 1 for Yes or 2 for No. If you choose Yes, you
will quit the menu. If you choose No. You go back to the first menu item.
10
X10 - Hemautomation
Setting Timers
1. To access the menu press the menu upp or down button. The display now shows ENTER PIN.
2. Enter your 4-digit PIN code (factory setting 0000. See page 12) The display is cleared and shows a * for each
number entered.
3. When the PIN code has been entered correctly, the word INSTALL will show up on the display.
4. Use the menu buttons upp/down to go to menu item 9. SET TIMER. Press OK to select this menu item. You can
also go to this menu item directly by pressing a 9 on the number pad.
5. The display will read NEW TIMER. Press OK.
6. When set to Euro 7-days mode, the display will read 1. Home CNTR and 2. HEAT ICOOL. Select respective timer
to set; either option 1 for control of lights and appliances , or option 2 for timed temperature setbacks. Use the menu
buttons upp/down to check timers you previously set. The top menu item is always called NEW TIMER, unless all 14
timer points have been set.
7. The display will read CHOOSE DAYS. Use the number keys to enter the DAYS, where 1=Monday, 2=Tuesday and
so on. When the days are set,press OK.
8a) The display will read UNIT NUMBER OR THST. Use the number pad to enter the UNIT CODE of the desired
module (1-16) or the Thermostat nr (1-4). Example: If you enter 12, the display will read TIMER 12 ON. The lowest
line will read “:”.
8b). In case the Temperature setback is chosen, an extra chice has to be made, regarding which temperature level
has to be used during the timed event. Choose either COMFORT (which is the comfort level set to the console fo the
respective thermostat), ECONOMY (setback applies for all registered Temperature Zones), or FROST(also applies
for all registered thermostats at once)
9. Enter the time you want the lights to be switched on, or the timed temperature setback has to take place (24 hour
notation). If you make a mistake, press CLEAR. Press ON when you only want to enter the time the lights need to be
switched on.
10. Press OK. The display now reads TIMER 12 OFF. The lowest line will read “:”.
11. Enter the time you want lights to be switched off or the timed temperature setback has to stop.
12. The bottom line on the display now reads 1. WEEKLY
13. Use the menu buttons upp/down to select.
1. WEEKLY: The timer setting is executed every week.
2. ONE WEEK: The timer setting is only used one week from today.
3. RANDOM: The timer setting is executed weekly, but varies within the hour entered (if you entered 20:30, the
time may vary between 20:00 and 20:59).
4. ARMED ONLY: The timer setting is only executed when the system is in ARMED AWAY mode.
14. Make your choise and press OK. The display now reads NEW TIMER.
15. Press CLEAR again to quit the menu. To confirm your choice, press 1 for Yes or 2 for No. If you choose Yes, you
will quit the menu. If you choose No, you go back to the first menu item.
Clearing the timer settings
1. To access the menu, press the menu upp or down button. The display now shows ENTER PIN.
2. Enter your 4-digit PIN code (factory setting 0000 see page 12 for changing the PIN code).
3. When the PIN code has been entered correctly, the word INSTALL will show up on the display.
4. Use the menu buttons upp and down to go to menu item 9. SET TIMER. Press OK to select this menu item. You
can also go to this menu item directly by pressing a 9 on the number pad.
5. The display will read NEW TIMER.
6. Use the menu buttons upp and down to check timers you set before. The timers are shown in the following format:
12 ON 12:40
OFF 18:30
7. When a timer is shown, you can press CLEAR to delete the timer.
8. You need to confirm your choice (CLEAR TIMER). Press 1 for Yes and 2 for No.
9. Press CLEAR again to quit the menu.
11
Advanced system functions
Setting the delays
You can set a number of delay times via the menu DELAYS:
ENTRY DELAY The time you get to switch off the system after entering your house (factory setting 30 sec).
EXIT DELAY before the system is switched on when you leave the house (factory setting 60sec).
ANSWER DELAY before the system picks up the line when dialling in (factory setting 5 sec).
DIAL DELAY before the system calls out in case of an alarm (factory setting 30 sec)
Setting the delays:
1. To access the menu, press either the menu upp or down button . The display now shows ENTER PIN.
2. Enter you 4-digit PIN code (factory setting 0000). The display is cleard and shows a * for each number entered.
3. When the PIN code has been entered correctly, the word INSTALL will show up on the display.
4. Use the menu buttons upp/downto go to menu item 8. DELAYS. Press OK to select this menu item. You can
also go to this menu item directly by pressing an 8 on the nuber pad.
5. Select ENTRY DELAY, EXIT DELAY, ANSWER DELAY OR DIAL DELAY and press OK.
6. Enter the time required (1-99 secunds). Press OK, press CLEAR to delete the values entered.
7. Press CLEAR again to quit the menu.
The entry delay only works for the Ds18 Door/Window Sensor if set to MAX and MS18 motion detectors in zon 15
and 16 other (other zones will respond instantly).
Clearing the memory of your security system.
You can delete sensors, remote controls, timers or all settings via the menu MEMORY CLEAR. The PIN code is
never erased. This code can only be reset by the factory.
1.To access the menu, press the menu upp or menu down button. The display now shows ENTER PIN.
2. Enter your 4-digit OPIN code (factory setting 0000).
3. When the PIN code has been entered correctly, the word INSTALL will show up on the display.
4. Use the menu buttons upp and down to go to menu item 6. MEMORY CLEAR. Press OK to select this menu
item. You can also go to this menu item directly by pressing a 6 on the number pad.
5. Select CLEAR ALL SENSORS, CLEAR ALL REMOTES, CLEAR ALL TIMERS, CLEAR ALL THERMOSTATS,
CLEAR LOG OR MASTER RESET.
6. You are now asked to CONFIRM CLR. Press 1 for Yes or 2 for No.
7. Press CLEAR again to quit the menu.
CLEAR ALL SENSORS Remove a registered sensor
CLEAR ALL REMOTES Remove a registered remote control or Additional (wireless) sensor.
CLEAR ALL TIMERS Remove all timer settings at once.
CLEAR LOG Remove Event Log.
MASTER RESET Clear the memory.
Changing the access code (PIN)
The access code is your personal identification code. After changing this code, you are only one who has access
to the settings on the console. You also use this code to disarm the alarm via the number pad. Make sure you
memorise the code, because only the factory, or authorized representatives can help you reset the code to the
factory setting (0000).
1. To access the menu, press the menu upp or menu down button. The display now shows ENTER PIN.
2. Enter your 4-digit PIN code (factory setting 0000). For every digit entered a * will appear.
3. When the PIN code has been entered correctly, the word INSTALL will show up on the display.
4. Use the menu buttons upp or down to go to menu item 5. NEW PIN. Press OK to select this menu item. You
can also go to this menu item directly by pressing a 5 on the number pad.
5. Enter your new PIN code (4 digits). The new PIN can be seen on the display. Check if you entered the correct
PIN code and press OK.
6. Press CLEAR again to quit the menu. To confirm your choice, press 1 for Yes or 2 for No. If you choose Yes,
you will quit the menu. If you choose No, you go back to the first menu item.
12
Advanced security functions
Disarming the siren for silent alarm
You can set the security system to raise the alarm without sounding the siren (just the telephone dialler and
lighting). In case of a burglary, the built-in siren will not be activated (N.B., Other sirens installed will still work). The
siren is turned on in the factory settings.
1. To access the menu, press the menu upp or menu down button. The display now shows ENTER PIN.
2. Enter your 4-digit PIN code (factory setting 0000). For every digit entered, a * will appear.
3. When the PIN code has been entered correctly, the word INSTALL will show up on the display.
4. Use the menu buttons upp or down to go back to menu item 7. OPTIONS- Press OK to select this menu item.
You can also go to this menu item directly by pressing a 7 on the number pad.
5. Use the menu buttons upp or down to go to menu item SIREN- Press OK to select this menu item.
6. Choose 1 for SIREN ON or 2 for SIREN OFF.
7. Press CLEAR again to quit the menu. To confirm your choise, press 1 for Yes or 2 for No. If you choose Yes,
you will quit the menu. If you choose No, you go back to the first menu item.
Activating the chime
The console can, when in DISARMED mode, sound a chime - ding-dong- when a door armed with a Door/Window
sensor is openend. This ensures that you will always hear if someone is entering your house or small children
open a door. This function is activated in the factory settings.
1. To access the menu, press the menu upp or menu down button. The display now shows ENTER PIN.
2. Enter your 4-digit PIN code (factory setting 0000). For every digit entered a * will appear.
3. When the PIN code has been entered correctly, the word INSTALL will show up on the display.
4. Use the menu buttons upp or down to go to menu item 7. OPTIONS. Press OK to select this menu item.
You can also go to this menu item directly by pressing a 7 on the number pad.
5. Use the menu bottons upp or down to go to menu item CHIME. Press OK to select this menu item.
6. Choose 1 for CHIME ON or 2 for CHIME OFF.
7. Press CLEAR again to quit the menu. To confirm your choice, press 1 for Yes or 2 for No. If you choose Yes,
you will quit the menu. If you choose No, you go back to the first menu item.
8. If you see a note (music) on the display, the chime is activated.
The chime function also works for the wired inputs on zones 31 and 32.
Using wired inputs
The console has two inputs for wired sensors. These sensors need to be of type NC (Normally /closed contacts).
There should not be any power on these inputs (ptential-free /dry).
Connecting a wired sensor.
1. Open the top compartment on your console.
2. You will see two wired inputs.
3. Remove the wire bridge and connect your wired sensor.
4. Close the top compartment of your console and enter your PIN code to remove the word TAMPER from the
display.
5. The wired sensor is now ready for use.
Adding a wired sensor to the Door/Window sensor Ds18.
The Ds18 Door/Window sensor has a contact for an extra wired sensor. These sensors need to be of type NC
(normally closed contacts). There should not ba any power on this contact (potenyial-free). A few examples:
Securing a window with multiple magnetic contacts.
Adding extra sensors to your system, e.g smoke detectors, temperature sensors, sensors to detect electrical
failures etc.
1. Open the transmitter part of the Ds18 by taking the two parts apart.
2. Remove the wire bridge from the connection for the wired sensor.
3. Connect the wired sensor.
The wired contact has its own Zone on the Base Console. You can register the contact using the procedure (to
register a sensor, activate the alarm with your sensor in step 5).
Deregistering a Door/Window or Motion Sensor.
1. To access the menu press themenu upp or menu down button. The display now shows ENTER PIN.
2. Enter your 4-digit PIN code (factory setting 0000 se page 12 for changing the PIN code)
3. When the PIN code has been entered correctly, the word INSTALL will show up on the display.
4. Press OK.
5. Enter the number of the zone you want to earse on the number pad and press CLEAR.
6. You are asked to confirm CLEAR ZONE 1. Yes 2. No.
7. Press 1 to erase the zone. The zone number is shown on the display.
8. Press CLEAR again to quit the menu.
Zones 31 and 32 can not be erased.
13
Advanced Home Automation functions
Besides the Plug&Play modules a large number of built-in switches, sun blind switches, remote
controls and special modules are available. With the addition of these modules you can control
nearly everything that is electrically powered in your home via your security systems. See
www.ehem.se for more information.
Checking the status of the security system
Set a X10 module to adress B4 (=HC+1, UC=4). This Home Automation module is now automatically switched on
as soon as the security system is activated. When the system is disarmed, the module is also switched off.
Example: you can connect a table lamp to this X10 module. If the system is activated, this lamp is always turned
on. This means you can instantly see if the system is activated when you are outside.
Installing an extra siren Ph7208
Set the siren Ph7208 to adress A1 (=HC, UC=1). To avoid false alarms, the system waits 20 seconds after
triggering the alarm before the siren is activated. The siren will give a piercing two-tone signal for 4 minutes. After
these 4 minutes the siren is automatically switched off (or sooner if the alarm is switched off)
ATTENTION: When using a security system, the extra sirens will always work in case of an alarm, even when the
system is set to silent alarm. The Siren Ph7208 is meant for indoor use and can be plugged into any wall socket.
Universell extra sirén
You can also add sirens and warning lights that are not part of the range. Please use a separately available Ad10,
Aw12 or the Am12. Set this module to adress B6 =(HC+1, UC=6). The module is switched on in case of an alarm
and switched off after 4 minutes.Power for the Sirén is 220 V 50Hz, if not use module UM7206.
,
All Home Automation functions at a glance
Function
Comfort lighting
You can switch your lighting using the A1 och A2 (HC, UC=1 + UC=2)
buttons Lights ON and Lights OFF on
your key chain remote control.
Exit delay
Lights are awitched on during the exit
delay.
Alarm lighting
In case of an alarm, the lights will flash A1 och A2 (HC, UC=1 + UC=2)
during 4 minutes and then remain on.
Statusindicator
The lights are switched on when the
system is set to Arm Away.
B4 (HC+1, UC=4)
X10-siren
Ph7208 extra 110 dB sirén.
A1 och A2 (HC, UC=1 + UC=2)
Universalsiren
Connect an own siren to a AM12 or
AD10 module.
B6 (HC+1, UC=6)
H.A Automation
H.A functions in respond to sensor
(27-32) when in ARMED mode.
B7-B12
(HC+1, UC=7-12).
Thermostats
Thermostats H.A addresses
B13-B16
(=HC+1, UC=13-16)
A1 och A2 (HC, UC=1 + UC=2)
This table uses the unchanged
settings (House Code + Unit Code)
for the basic console adress.
The default base adress ia A1.
Power failure
After 15 minutes will the alarm be
trigged and a phonemessege will be
sent “power failure”.
14
Advanced Home Automation functions
Basic address for Home Automation functions
The basic adress is set to control multiple Home Automation modules on the Base console. The standard basic
address is A1. The A in this address is called the House Code. The House Code of the console, the remote
controls and the Home Automation modules all have to have the same letter. The 1 in the basic adress is called
the Unit Code. If your neighbour also have a security system, it may be necessary to change the basic addresses
and the addresses of your X10 modules. If you change the House Code of the console, the addresses for the
Home Automation functions also change.
1.To access the menu, press the menu upp or menu down button. The display now shows ENTER PIN.
2.Enter your 4-digit PIN code (factory setting 0000 se page 12 for changing the PIN code).
3.When the PIN code has been entered correctly, the word INSTALL will show up on the display.
4.Use the menu buttons upp /down to go to menu item 7. OPTIONS. Press OK to select this menu item. You can
also go to this menu item directly by pressing a 7 on the number pad.
5. Use the menu buttons upp/down to go to menu item HOUSECODE. Press OK to select this menu item.
6. Use the menu buttons upp/down to select the desired House Code and press OK.
7. Press CLEAR again to quit the menu.
Change the Unit Code (UC).
1.To access the menu, press the menu upp or menu down button. The display now shows ENTER PIN.
2. Enter your 4-digit PIN code (factory setting 0000. See page 12 for changing the PIN code.) The display is
cleared and shows a * for changing the PIN code.
3. When the PIN code has been entered correctly, the word INSTALL will show up on the display.
4. Use the menu buttons upp/down to go to menu item 7. OPTIONS. Press OK to select this menu item. You can
also go to this menu item directly by pressing a 7 on the number pad.
5. Use the menu buttons upp/down to go to menu item UNITCODE. Press OK to select this menu item.
6. Use the menu buttons upp/down to select the desired Unit Code and press OK.
7. Press CLEAR again to quit rthe menu.
Telephone functions
Calling the security system.
The alarm system is equipped with a call-in-function. This means that you can dial in to the console remotely via
any telephone or mobile phone. You can also control your lights, devices and temperature setbacks via your
phone. The system has a built-in speech chip that guides you through the menues.
Activating the call-in function
The call-in function is switched off in the factory settings. You can switch the function on via the menu
OPTIONS/ANSWER TYPE. You can choose one of the following three options:
ANSWER ON: Call-in activated. The time delay before the console answers the phone can be set in the menu
DELAYS/ANSWER DELAY. The standard delay is 30 seconds. If you use an answer phone or voice mail, we
advice you to use option 3: VOICE MAIL.
ANSWER OFF: The call-in function is deactivated (standard setting)
VOICE MAIL: Call-in activated. Choose this option when you use the standard voicemail system offered by
your telecom supplier. To access the console, ring your home number twice. Let the phone ring for 10 seconds the
first time. Hang up the phone and ring the number again after 10 seconds, but within 30 seconds. The console will
answer the phone.
Setting the call-in function:
1. To access the menu, press the menu upp or menu down button.The display now shows ENTER PIN.
2. Enter your 4-digit PIN code (factory setting 0000 see page 12 for changing the PIN code)
3. When the PIN code has been entered correctly, the word INSTALL will show up on the display.
4. Use the menu buttons upp/down to go to menu item 7. OPTIONS. Press OK to select this menu item. You can
also go to this menu item directly by pressing a 7 on the number pad.
5.Use the menu buttons upp/down to go to menu item ANSWER TYPE. Press OK to select this menu item.
6. You can now select ANSWER ON. ANSWER OFF or VOICE MAIL.
7. Use the menu buttons upp/down to go to the desired menu item and press OK.
8. Press CLEAR again to quit the menu.
15
Advanced Home Automation functions
Operating the alarm functions via an outside phone
1. Call your home number. The console will answer. Please enter PIN.
2. Enter your 4-digt PIN code.
3. If your PIN is correct, you will hear ‘PIN accepted’. If your PIN is incorrect, you will hear ‘Error’.
4.Press 0 followed by * to activate your security system.
5.PPress 0 followed by # to deactivate your security system
6. When you press 9 9 followed by *, the console will do a status check, where status can be:.
ARMED HOME: The system is set to Arm Home mode.
ARMED AWAY: The system is set to Arm Away mode.
DISARMED:The system is switched off.
EMERGENCY ALARM: The alarm has been triggered by a PANIC BUTTON on a remote control or an additional
(wireless) sensor.
ALARM IN ZONE 3: (example with zone 3). The alarm has been triggered by the sensor in zone 3 (wireless
sensor or emergency sensor).
Operate lights and equipment via an outside phone
IHC=A and unit code UC=4.
1. Call your home number. The console will answer .
2. You will hear ‘Please enter PIN’. Enter your PIN code.
3. If your PIN is correct, you will hear ‘PIN accepted’- If your PIN is incorrect, you will hear ‘Error’.
4.Press 4 *: The X10 module with Unit Code 4 will be switched on. You will hear ‘4 ON’ to confirm.
5.Press 4 #: The X10 module with Unit Code 4 will be switched off. You will hear ‘4 OFF’ to confirm.
Trouble shooting
Changing Batteries
When used normally the batteries in sensors and remote controls last about a year. The life span of batteries does
depend on how often a sensor is activated.
What to do if a zone indicator flashes slowly?
One of the sensors or motion detectors has not contacted the base console for a longer time. Check the batteries
in the sensor or motion detector. Erase the zone and reregister the sensor. Move the sensor so that the signal can
reach the console. If an error is found while setting the alarm, you will hear a repeated twotone ‘error signal’. If a
sensor indicates there is a problem (e.g. Window opened), you can choose not to activate this sensor. While the
two tone ‘error signal’ can be heard, you need to press the CLEAR button and reset the alarm. The zone indicator
of the sensor concerned flashes quickly.
What to do if a zone indicator flashes quickly?
You have pressed the CLEAR button to activate the security system while a sensor or motion detector indicated
an error. Solve the problem (i.e. Close the window, replace the batteries) before activating the zone.
Is the MS18 pet-friendly
I No. The Ms18 is not specifically pet-friendly. These motion detectors do exist (not wireless). Your security system
has an extra input for wired sensors. You can also connect the sensors to the external contact of the Ds18 sensor.
Emergency sensor (always mode) the alarm is activated directly
A sensor is registered with the system into so called emergency sensor. An emergency sensor
will also activate the security system when the system is not switched on. Go to mode
SENSOR MODE and SET ALWAYS SENSORS. To deactivate go to clear sensors.
16