1
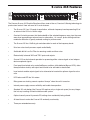
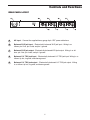
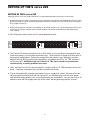
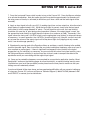
40
63
100
160
250
400
630
1K
1.6K
2.5K
4K
6.3K
10K
CH 1
16K
25
-30 -18
DUAL 15 BAND
EQUALIZER
-6
0
40
63
100
160
250
400
630
1K
1.6K
2.5K
4K
6.3K
10K
CH 2
16K
+6 +18
-30 -18
12
6
12
12
6
6
6
3
6
6
3
0
0
0
0
0
0
6
6
-20
6
6
-20
12
12
OFF
12
12
OFF
LOW CUT
40
63
100
160
250
400
630
1K
1.6K
2.5K
4K
6.3K
10K
16K
CH 1
0
+6 +18
LOW CUT
BYPASS
BYPASS
25
-6
25
40
63
100
160
250
400
630
1K
1.6K
2.5K
4K
6.3K
10K
DUAL 15 BAND EQUALIZER
16K
CH 2
POWER
S Class Signal Processors
25
12
Safety Instructions
Caution: To reduce the hazard of electrical shock, do not
remove cover or back.
No user serviceable parts inside. Please refer all servicing to qualified personnel.
WARNING: To reduce the risk of fire or electric shock, do not expose this unit to rain or moisture.
The lightning flash with an arrowhead symbol within an equilateral triangle, is intended to alert the user to the
presence of uninsulated "dangerous voltage" within the products enclosure that may be of sufficient magnitude
to constitute a risk of electric shock to persons.
The exclamation point within an equilateral triangle is intended to alert the user to the presence of important
operating and maintenance (servicing) instructions in the literature accompanying the product.
Important Safety Instructions
1. Please read all instructions before operating the unit.
2. Keep these instructions for future reference.
3. Please heed all safety warnings.
4. Follow manufacturers instructions.
5. Do not use this unit near water or moisture.
6. Clean only with a damp cloth.
7. Do not block any of the ventilation openings. Install in accordance with the manufacturers instructions.
8. Do not install near any heat sources such as radiators, heat registers, stoves, or other apparatus (including
amplifiers) that produce heat.
9. Do not defeat the safety purpose of the polarized or grounding-type plug. A polarized plug has two blades with
one wider than the other. A grounding type plug has two blades and a third grounding prong. The wide blade or
third prong is provided for your safety. When the provided plug does not fit your outlet, consult an electrician for
replacement of the obsolete outlet.
10. Protect the power cord from being walked on and pinched particularly at plugs, convenience receptacles and at
the point at which they exit from the unit.
11. Unplug this unit during lightning storms or when unused for long periods of time.
12. Refer all servicing to qualified personnel. Servicing is required when the unit has been damaged in any way,
such as power supply cord or plug damage, or if liquid has been spilled or objects have fallen into the unit, the
unit has been exposed to rain or moisture, does not operate normally, or has been dropped.
Table of Contents
Introduction
2
System Features
3
Controls and Functions
Front Panel
Rear Panel
4
5
Setting Up and Using the S curve 215
System Configurations
6-7
8 - 10
About Equalization
11
Grounding Techniques
12
Using a Patchbay
12
Using the S curve 215 with an RTA
13
Using the S curve 215 to “Ring Out” a Monitor System
14
S curve 215 Wiring Guide
15
Specifications
16
Pass-Band Graphs
16
Block Diagram
17
Copyright 2003, Samson Technologies Corp.
Printed June., 2003
Samson Technologies Corp.
575 Underhill Blvd.
P.O. Box 9031
Syosset, NY 11791-9031
Phone: 1-800-3-SAMSON (1-800-372-6766)
Fax: 516-364-3888
www.samsontech.com
Introduction
Congratulations on purchasing the Samson S curve 215 2/3 Octave, Stereo, 15 Band Constant Q
Graphic Equalizer! Although this product is designed for easy operation, we suggest you take some
time out first to go through these pages so you can fully understand how we’ve implemented a number
of unique features.
The S curve 215 is a professional quality signal processor that gives you precise tonal control over two
channels of audio. Center detented sliders with LED illumination allow you to selectively cut or boost
selected frequency areas by as much as 12 dB. Front panel controls include output level sliders, lowcut and bypass switches, while the rear panel provides electronically balanced inputs and outputs.
Thanks to low noise circuitry, the S curve 215 can be used in a wide variety of applications, including
live performance (in conjunction with either Front Of House or monitor mixers), in broadcast environments, or for recording.
In this manual, you’ll find a more detailed description of the features of the S curve 215, as well as a
guided tour through the front and rear panels, step-by-step instructions for using the unit, suggested
applications for use with a patch bay, a Real Time Analyzer (RTA) or for ringing out monitor systems,
reference appendices, and full specifications.
You’ll also find a warranty card enclosed—please don’t forget to fill it out and mail it so that you can
receive online technical support and so we can send you updated information about other Samson
products in the future. Also, be sure to check out our website (http://www.samsontech.com) for complete information about our full product line.
With proper care and adequate air circulation, your S curve 215 will operate trouble free for many
years. We recommend you record your serial number in the space provided below for future reference.
Serial number:
Date of purchase:
Should your unit ever require servicing, a Return Authorization number (RA) must be obtained before
shipping your unit to Samson. Without this number, the unit will not be accepted. Please call Samson at
1-800-3SAMSON (1-800-372-6766) for a Return Authorization number prior to shipping your unit.
Please retain the original packing materials and if possible, return the unit in the original carton and
packing materials.
2
S curve 215 Features
25
40
63
100
160
250
400
630
1K
1.6K
2.5K
4K
6.3K
10K
CH 1
16K
25
-30 -18
DUAL 15 BAND
EQUALIZER
12
12
6
6
6
3
-6
0
40
63
100
160
250
400
630
1K
1.6K
2.5K
4K
6.3K
10K
CH 2
16K
+6 +18
LOW CUT
-30 -18
12
12
6
6
6
3
0
0
0
0
6
6
-20
6
6
-20
12
12
OFF
12
12
OFF
0
0
40
63
100
160
250
400
630
1K
1.6K
2.5K
4K
6.3K
10K
16K
CH 1
0
+6 +18
POWER
LOW CUT
BYPASS
BYPASS
25
-6
25
40
63
100
160
250
400
630
1K
1.6K
2.5K
4K
6.3K
10K
16K
CH 2
The Samson S curve 215 Graphic Equalizer utilizes state-of-the-art, Constant Q filtering technology for
precise tonal control. Here are some of it’s main features:
•
The S curve 215 has 15 bands of equalization, with each frequency band representing 2/3 of
an octave in the 25 Hz to 16 kHz range.
•
Constant Q circuitry ensures that the bandwidth of the selected frequency area stays the same
even when approaching maximum boost or attenuation. As a result, phase shifting and intermodulation distortion is greatly reduced, making for pristine sound.
•
The S curve 215 has 12 dB of gain and attenuation for each of the frequency bands.
•
Ultra-low noise circuity ensures superb audio fidelity.
•
Switchable 80 Hz Low Cut Filter for removing rumble and floor noise.
•
Electronically balanced XLR and TRS inputs and outputs.
•
S curve 215 has dual channel operation for processing either a stereo signal or two independent monophonic signals.
•
Front panel hard-wired, relay controlled Bypass switches (with dedicated Bypass LEDs) allow
the equalization circuitry and output level control to be activated or deactivated.
•
Level controls enable output signals to be attenuated or boosted for optimum signal-to-noise
ratio.
•
LED faders and LED bar VU meters.
•
Relay power-on circuitry prevents speaker “thumps” when the unit is turned on.
•
Internal power supply ensures reliability and trouble-free operation.
•
Standard 19" rack design (the S curve 215 requires only a single rack space) for easy integration into any traveling or fixed installation audio system.
•
Optional security cover kit prevents EQ settings from accidentally being altered.
•
All-steel chassis makes the S curve 215 eminently road-worthy.
•
Three year extended warranty.
3
Controls and Functions
FRONT PANEL LAYOUT
2
1
25
40
63
100
160
250
400
630
1K
1.6K
2.5K
4K
6.3K
10K
4
3
CH 1
16K
25
-30 -18
DUAL 15 BAND
EQUALIZER
12
12
6
6
6
3
-6
0
40
2
1
63
100
160
250
400
630
1K
1.6K
2.5K
4K
6.3K
10K
-30 -18
12
12
6
6
6
3
0
0
0
0
6
6
-20
6
6
-20
12
12
OFF
12
12
OFF
0
0
40
63
100
160
250
400
630
1K
1.6K
2.5K
4K
6.3K
10K
16K
CH 1
-6
0
+6 +18
POWER
LOW CUT
BYPASS
BYPASS
25
6
CH 2
16K
+6 +18
LOW CUT
4
3
25
40
63
100
160
250
5
400
630
1K
1.6K
2.5K
4K
6.3K
10K
16K
CH 2
5
1
Equalizer level sliders - Independent Equalizer sliders are provided for each frequency
area (The S curve 215 provides 15 frequency areas).Calibration markings on either side of
each Equalizer slider allow you to cut or boost each frequency area. In the S curve 215,
independent Equalizer sliders are provided for each of the two channels (Channel A and
Channel B).
2
Output level sliders - Use these to adjust the output level of signal leaving the S curve 215
via its rear-panel output connectors (see C and E on page 5 for more information). When a
Level slider is at its center detented “0” position, the corresponding output signal is at unity
gain (that is, there is no cut or boost). When a Level slider is moved all the way up (to the
“+6 dB”) position, the corresponding output signal is boosted by 6 dB. When a Level slider
is moved all the way down (to the “∞” position), the corresponding output signal is infinitely
attenuated (that is, there is no signal). In the S curve 215, independent Level sliders are
provided for each of the two channels (Channel 1 and Channel 2). Note that the Level slider is deactivated when the S curve 215 is in Bypass mode (see #5).
3
LEVEL METER - Six segment LED bar VU meter displaying the Input Level from –30dB to +18dB.
4
LOW CUT - When pressed in, the LED in the switch lights yellow and an 80 Hz highpass filter
is applied to the signal, effectively removing rumble and other low frequencies. In the S
curve 215, independent HPF switches are provided for each of the two channels (Channel
1 and Channel 2).
5
Bypass switches - When not pressed in, the equalization circuitry is made inactive so that
the signal passes through unaffected, regardless of the settings of the Equalizer or Level
sliders. When pressed in, the LED in the switch lights green and the equalization circuitry
affects the signal as per the setting of the front panel Equalizer and Level sliders (see #1
and #2). In the S curve 215, independent Bypass switches are provided for each of the two
channels (Channel 1 and Channel 2).
6
Power switch - Use this to turn the power on and off.
4
Controls and Functions
REAR PANEL LAYOUT
A
AC input - Connect the supplied heavy gauge 3-pin “IEC” power cable here.
B
Balanced XLR jack input - Electronically balanced XLR jack input. Wiring is as
follows: pin 2 hot, pin 3 cold, and pin 1 ground.
C
Balanced XLR jack output - Electronically balanced XLR jack output. Wiring is as follows: pin 2 hot, pin 3 cold, and pin 1 ground.
D
Balanced 1/4" TRS jack input - Electronically balanced 1/4" TRS jack input. Wiring is as
follows: tip hot, ring cold, and sleeve ground.
E
Balanced 1/4" TRS jack output - Electronically balanced 1/4" TRS jack output. Wiring
is as follows: tip hot, ring cold, and sleeve ground.
5
SETTING UP THE S curve 215
SETTING UP THE S curve 215
Setting up your S curve 215 Graphic Equalizer is a simple procedure which takes only a few minutes:
1. Remove all packing materials (save them in case of need for future service) and decide where the unit is to be
physically placed—it can be used free-standing or mounted in a standard 19" rack (The S curve 215 requires
only a single rack space).
2. Make sure the power to all mixers and amplifiers in your audio system is off. On the front panel of the S curve
215, place the Bypass switches to their out (off) position and set the Level slider(s) to their bottom-most
“OFF” setting.
3. Set all Equalizer sliders to their flat (“0”) center detented position.
25
40
63
100
160
250
400
630
1K
1.6K
2.5K
4K
6.3K
10K
CH 1
16K
25
-30 -18
DUAL 15 BAND
EQUALIZER
-6
0
40
63
100
160
250
400
630
1K
1.6K
2.5K
4K
6.3K
10K
CH 2
16K
+6 +18
-30 -18
12
12
6
12
12
6
6
6
3
6
6
3
0
0
0
0
0
0
6
6
-20
6
6
-20
12
12
OFF
12
12
OFF
LOW CUT
40
63
100
160
250
400
630
1K
1.6K
2.5K
4K
6.3K
10K
16K
CH 1
0
+6 +18
POWER
LOW CUT
BYPASS
BYPASS
25
-6
25
40
63
100
160
250
400
630
1K
1.6K
2.5K
4K
6.3K
10K
16K
CH 2
4. The S curve 215 can be used either as an “in-line” device, as an insert device (in conjunction with
mixer insert points), or in an effects send-return loop. The illustrations on pages 8-10 show each of
these typical configurations. Choose the configuration that is best for your application and then
begin by making the S curve 215 input connections, using either the XLR or 1/4" TRS connectors
on the rear panel. WARNING: Both the XLR and 1/4" TRS inputs should not be connected
simultaneously, or loading problems may result.
5. Next, make the S curve 215 output connections, using the XLR or 1/4" TRS connectors on the rear
panel. If required, connections can be made simultaneously to both.
6. Plug in the supplied AC connector and connect it to any standard AC socket. Because of the special relay power-on circuitry built into the S curve 215, you can even plug it into the same power
strip that other audio devices (such as a mixing console) are connected to. You can then turn on all
devices at once with the single power strip on-off switch, without generating speaker “thumps.”
6
SETTING UP THE S curve 215
7. Press the front panel Power switch in order to turn on the S curve 215. Press the Bypass switches
in to activate the equalizer. Note that audio signal will be muted for approximately five seconds until
the relay power-on circuitry is activated (at which time you’ll hear a click and the audio signal will be
unmuted).
8. Apply an input signal to the S curve 215 (if sending signal from a mixer output bus, drive the mixer’s
output meters at approximately 0 VU). While the input signal is present, slowly raise the front panel
Level slider(s) to their center detented “0” points. For best signal-to-noise ratio, the Level slider(s)
should be at or near the “0” point during normal operation. However, if the output signal is weak, use
the appropriate Level slider(s) to slightly boost the volume (to a maximum of 6 dB). Conversely, if the
signal causes the front panel +18 LEDs to light, use the appropriate Level slider(s) to attenuate volume
as necessary. In normal operation, the +18 LED(s) should not light at all; if they do, use the Level sliders to lower the volume of the output signal so that they do not light at all (clipping not only sounds
awful, it can also damage speakers!).
9. Experiment by moving each of the Equalizer sliders up and down, carefully listening to the audible
result on the audio signal. Bear in mind that the very lowest and highest frequency areas may have little or no effect on some signals. If there is significant low frequency noise (rumble) in the signal,
engage the Low Cut switch(es) as necessary. As you work with the various front panel controls, press
the front panel Bypass switch(es) in and out from time to time in order to compare the effect of the
equalization curve you are creating with the original input signal.
10. Once you’ve created the frequency curve required for your particular application (see the “About
Equalization” section on the following pages for more information), an optional locking security cover
(available from your local Samson dealer) can be placed over the front panel to make sure that your
settings are not inadvertently altered.
If you have followed all the steps above and are experiencing difficulties with any aspect of setting up
or using your S curve 215, you can call Samson Technical Support (1-800-372-6766) between 9 AM
and 5 PM EST, or contact your local distributor.
7
S curve 215 System Configurations
Using the S curve 215 with Active Speakers
In this example the mixer’s left and right outputs are connected to the S curve 215’s Channel 1 and Channel 2 inputs. Then, the S curve 215’s
Channel 1 and Channel 2 outputs are connected to the inputs of the active (self-powered) loudspeakers.
Using the S curve 215 with Passive Speakers
In this example the mixer’s left and right outputs are connected to the S curve 215’s Channel 1 and Channel 2 inputs. Then, the S curve 215’s
Channel 1 and Channel 2 outputs are connected to the inputs of a 2-channel power amp. Next, the power amplifier’s outputs are connected
to the passive (non-powered) loudspeakers.
8
S curve 215 System Configurations
Using the S curve 215 in Insert Points
You can use the S curve 215 in your mixer’s insert points if you want to equalize one stereo, or two mono channels, individually in the mix. In
this example, the S curve 215’s Channel 1 INPUT and OUTPUT are inserted on a piano channel using a 1/4-inch TRS to 2 x 1/4-inch TS “Y”
cable. The S curve 215’s Channel 2 INPUT and OUTPUT are connected to the bass guitar channel using the same type of insert cable. For
more information on cable wiring see the S Curve 215 Wiring Guide page 15 in this manual.
Using the S curve 215 for Mains and Monitors
In this example, the S curve 215 is used for both the main PA speakers running a mono mix, and for the monitor mix, also in mono. For the
main PA, the mixer’s MONO output is connected to the S curve 215’s Channel 1 INPUT. Then, the S curve 215’s Channel 1 OUTPUT is connected to the input of the right main PA active (self-powered) loudspeaker. The left main PA speaker is connected by “daisy-chaining” from the
right. For the monitor mix, the mixer’s AUX output is connected to the S curve 215’s Channel 2 INPUT. The S curve 215’s Channel 2 OUTPUT is
connected to the input of the monitor power amplifier operating in bridge mode. Finally, the power amplifier’s outputs are connected to the
passive (non-powered) monitor loudspeakers.
9
In this example, two S curve 215’s are used for the stereo main and for the 2-channel monitor mix. The mixer’s left and right outputs are connected to the first S curve 215’s Channel 1
and Channel 2 inputs for the main PA speakers. Then, the first S curves 215’s Channel 1 and Channel 2 outputs are connected to the inputs of the power amplifier for the main speakers.
For the monitor mix, the mixer’s AUX1 and AUX2 outputs are connected to the second S curve 215’s Channel 1 and Channel 2 inputs. Then, the second S curves 215’s Channel 1 and
Channel 2 outputs are connected to the inputs of the 2-channel power amp. Finally, the power amplifiers outputs are connected to the passive (non-powered) monitor loudspeakers.
S curve 215 System Configurations
Using Two S curve 215’s for Mains and Monitors
10
About Equalization
The S curve 215 gives you fine control over shaping a sound, using a process called equalization. But
there are few areas of sound engineering more misunderstood than equalization, and, just as good EQ
can really help a sound, bad EQ can really hurt it, so read on...
Every naturally occurring sound consists of a broad range of pitches, or frequencies, combined together in a unique way. This blend is what gives every sound its distinctive tonal color. The range of frequencies that can be heard by humans is sometimes called the audible range, and it includes frequencies from as low as 20 Hz (that is, 20 wavecycles per second) to those as high as 20 kHz (that is,
20,000 wavecycles per second).
The S curve 215 uses high-quality filters, dividing the audible range into 15, 2/3 octave frequency
areas, centered at 25 Hz, 40 Hz, 63 Hz, 100 Hz, 160 Hz, 250 Hz, 400 Hz, 630 Hz, 1 kHz, 1.6 kHz, 2.5
kHz, 4 kHz, 6.3 kHz, 10 kHz, and 16 kHz. “Constant Q” circuitry ensures that the bandwidth of each of
these frequency areas stays the same even when approaching maximum boost or attenuation resulting
in greatly reduced phase shifting and intermodulation distortion.
Each frequency area can be cut or boosted by as much as 12 dB, giving you finer control and allowing
you to construct gentler frequency curves.
In most instances, the best way to approach equalization is to think in terms of which frequency areas
you need to attenuate, as opposed to which ones you need to boost (boosting a frequency area also
has the effect of boosting the overall signal; too much EQ boost can actually cause overload). Be
aware of the phenomenon of masking, where loud sounds in one frequency range obscure softer
sounds in the same range; by cutting EQ “notches” in a loud signal, you can actually make room for a
softer one to shine through. And try not to think of EQ as a miracle worker—no amount of equalization
can put a singer in tune or remove the distortion from an overloaded input signal! The key is to get the
signal right in the first place, by using correct gain structure and mic placement.
If you are using your S curve 215 to equalize a complex mono or stereo signal (for example, the master
mix output of a mixing console), a more natural sound can be obtained by setting up gentle “smile”
curves than by simply cutting or boosting individual frequency areas. For example, if you decide that
you want to boost one particular frequency area by 6 dB, try boosting the adjacent areas (the frequency directly above and below the target frequency) by 3 dB each.
If you are using your S curve 215 to equalize signal from individual instruments, here are a few general
suggestions: Boosting the low frequency areas of instruments such as bass drums or bass guitar will
add warmth and make the sound “fatter”; conversely, you may want to attenuate the low frequency
components of instruments such as cymbals, high-hats, and shakers so as to “thin” them out.
Attenuating mid-range frequencies (the 1 kHz - 5 kHz area) can give a vocal performance more of an
“FM-radio” feel, while boosting those frequencies can help a vocal cut through dense instrumentation.
Be careful not to boost high frequencies too much or you risk adding hiss to the signal, though just a
touch can help add “shimmer” to an acoustic guitar, ride cymbal, or high-hat. You can also use the
highest or lowest equalizer sliders to reduce hiss (by attenuating high frequencies) or rumble (by attenuating low frequencies). Rumble can also be attenuated by engaging the front panel Low Cut
switch(es), which insert a High Pass Filter starting at 80 Hz.
11
Grounding Techniques
Hum and buzz are the biggest enemies you face when interconnecting a large number of different pieces of
equipment to one another. This is because each piece of equipment may operate at a marginally different voltage
(this difference is called potential) and, when two devices at slightly different potential are physically connected
with audio cabling, the end result can be nasty, extraneous noise (mind you, connecting two devices at very different potential can result in a major electrical shock!).
However, there are several steps you can take to avoid grounding problems. First, assuming you have an isolated electrical circuit that can handle the electrical demands of all connected audio equipment (these needs will
usually be modest), you should always plug all connected equipment into the same circuit. If possible, nothing
else but this equipment should be connected to that circuit. If you can’t do this, at least avoid plugging your audio
equipment into the same circuit that is already powering things like heavy machinery, air conditioners, heaters,
refrigerators, washing machines, neon signs or fluorescent light fixtures. One particular culprit that will almost
certainly create problems is the standard light dimmer (the kind that uses silicon controlled rectifiers). Where lowlevel lighting is desired, use incandescent fixtures with autotransformer-type dimmers (sometimes called Variacs)
instead—these cost considerably more than the standard dimmer you’ll find at your local hardware store, but are
well worth the extra expense.
Three-prong plugs (such as the one used by the S curve 215) should always be used as is; don’t use adapters. If
you are using rack-mounted audio devices such as the S curve 215 and are experiencing hum or buzz, there's a
simple test to determine the source of the problem: while keeping all devices powered on and connected with
audio cabling, physically remove each device, one by one, from the rack. If the hum disappears when a particular
device is removed, that device is the culprit.
We also recommend that you use balanced audio cabling and connectors wherever possible. S curve 215 provides electronically balanced inputs and outputs. The diagram on pg. 14 shows how XLR connectors should be
wired for use with these inputs and outputs.
In addition, you can minimize possible interference by planning your audio, electrical, and computer cable runs so
that they are as far apart from one another as possible and so they don’t run parallel to one another. If they have
to cross, try to ensure that they do so at a 90° angle (that is, perpendicular to one another). In particular, try to
keep audio cabling away from external AC/DC adapters.
If your S curve 215 is in a fixed location such as a recording studio, you may want to invest the time and money
into creating a star ground network. This is by far the best technique for avoiding grounding problems. It involves
using a formidable ground source such as a cold water pipe or a copper spike driven into the earth. A thick
grounding cable is connected to that source and is then brought to a central distribution point; from there, individual cables are connected to each piece of equipment. This setup also requires that you lift the ground plug of all
three-prong AC connectors, so there is the possibility of danger if it is done incorrectly. We strongly recommend
that you contract with a qualified professional to carry out this or any kind of electrical work.
Another, less common problem you may encounter is that of oscillation (a ringing tone), which, apart from being
annoying, is potentially dangerous to your speakers. This is generally caused either by poor outside wiring or by
having an out of phase signal (most commonly from an outboard signal processor). If audible oscillation occurs,
you should be able to eliminate the problem by reversing that signal’s phase (many signal processors have a
switch that allows you to do this).
Using the S curve 215 with a Patchbay
If you are using the S curve 215 with an audio patchbay (such as S patch or S patch plus), you may find it advantageous to connect its inputs and outputs directly to a pair of patch points. This way, you can opt to route signal
to the equalizer from any source. For example, in a recording environment where you are using the S curve 215
to “tune” the room, you may typically want to have the control room outputs routed to the equalizer inputs and the
equalizer outputs routed to the power amplifier(s) driving the control room speakers. For maximum convenience
and flexibility, we recommend that you half-normal these connections to the S curve 215 patchpoints, so that the
routing will automatically be made unless a patch cable is inserted. If a different signal (such as a bus output or
insert) needs to be substituted, you can then override the half-normalled connection simply by inserting a patch
cable.
Using the S curve 215 with an RTA
An RTA (Real Time Analyzer) is a device which measures the relative levels of multiple frequency
areas. This device, in conjunction with a pink noise generator, is the perfect companion for your S
curve 215. Together with a high quality microphone, these tools allow you to fine tune the overall frequency response of your audio system in any given environment (this procedure is sometimes known
as “tuning” a room).
To use this kind of system, connect the S curve 215 to your mixer’s main outputs or across main mix
output inserts (see pages 8 - 9 in this manual for typical configuration diagrams). Set the S curve 215
Level slider(s) to the center detented “0 dB” position. Start by placing all front panel Equalizer sliders
at their flat (“0”) center detented position. Then inject pink noise into your loudspeakers via your mixer
at a normal operating level (make sure the pink noise is loud enough to drown out any ambient noise
floor caused by air conditioners or outside traffic, etc.). Finally, connect a quality microphone to the
RTA and place the mic in a typical listening position. Because pink noise consists of all audible frequencies blended together at equal level, the RTA should, in theory, show all frequency bands to be
flat. However, due to anomalies in every physical environment, this will rarely if ever be the case.
While watching the RTA, use the front panel Equalizer sliders to make corrections to the signal, boosting any dips in the measured frequency response and attenuating any peaks. Repeat the procedure
three or four times from different listening positions, averaging the results if necessary to come up with
an equalization curve that works well at all positions. If you get drastically different measurements at
different listening positions, you may need to reposition various loudspeakers or change the amount of
power applied to some of them.
Bear in mind that an analyzer “listening” to pink noise is no substitute for the human ear listening to
actual program material. A perfectly flat frequency response is not necessarily the best sounding frequency response, so, once you have used the RTA to tune a room “by the numbers,” be sure to audition the results by playing typical audio signal (music, speech, etc.) through your system and continue
to fine tune by ear. Be prepared to compromise—and if there’s a discrepancy between what the RTA
says and what your own ears tell you, always go with the latter.
13
Using the S curve 215 to Remove Feedback
One of the most important applications for the S curve 215 is removing feedback from an
onstage monitor system. This procedure is sometimes called “ringing out,” since feedback
usually begins with a slight ringing sound at the resonant frequencies where the loop
between microphone and speaker is loudest. The advanced Constant Q circuitry used by
both models ensures that adjacent program frequencies which may not be causing any problems are unaffected even when attenuating problem frequencies by their maximum amount.
To ring out a monitor system, start by setting up the stage exactly as it will be used during
performance, preferably with the performers themselves standing in front of the mics they
will be using (this is important since the physical placement of objects—or people—on the
stage can affect the generation of feedback loops in different frequency areas). With power
to all audio components turned off, connect the S curve 215 to the monitor mixer, preferably
at its main mix inserts (if these are not available, connect the unit in-line, between the monitor mixer outputs and the monitor amplifier inputs). (See pages 8-9 in this manual for typical
configuration diagrams.)
Next, power up all audio equipment (turning on the amplifiers last) and, using one monitor
output only, gradually turn up the volume while a performer is speaking or singing into the
primary mic for that monitor. Continue slowly increasing the volume until a feedback howl
just begins. Using your ears or an RTA (Real Time Analyzer), identify the approximate frequency at which this feedback occurs. Lower the corresponding Equalizer slider until the
feedback disappears. Then continue slowly turning up the volume until another feedback
howl just begins. Again identify the approximate frequency of this feedback and lower the
corresponding Equalizer slider until the feedback disappears. Repeat this procedure until
you reach the point where many different frequencies begin to feedback at once or when you
find that you’ve already attenuated most of the feedback frequencies that are occurring. This
is the point at which the process stops—you’ve gotten as much gain out of the monitor system as you can without adjusting the physical placement of the mic or monitor speaker.
Repeat this procedure for each monitor output (each time using the primary mic for that monitor).
When done successfully, “ringing out” (which should be done before every performance) can
add another 3 to 15 dB more of usable gain to your monitor system—so it’s well worth the
time and effort!
14
S curve 231 Wiring Guide
S curve 215 Wiring Guide
There are several ways to interface the S curve 215, depending on your exact monitoring set-up.
Follow the cable diagrams below for connecting your monitor system.
1/4” TRS Insert Cable
Return
Send
Send
Send
Return
Send
Return
Return
Un-Balanced 1/4” to 1/4” Cable
Signal
Tip (signal)
Ground
Ground
Sleeve (ground)
Signal
Signal
Signal
Ground
Ground
Tip (signal)
Sleeve (ground)
Balanced 1/4” to 1/4” Cable
Signal (ring)
Tip (signal) Ring (signal)
Signal (tip)
Ground
Sleeve (ground)
Ground
Signal (ring)
Tip (signal)
Ring (signal)
Signal (tip)
Signal (ring)
Signal (tip)
Signal (tip)
Signal (ring) Ground
Ground
Sleeve (ground)
Balanced XLR to XLR Cable
Hot (2) Common (1)
1
2
2
3
End View
Common
Hot
Hot
Common (1) Hot (2)
Common
1
1
3
2
3
Solder Points
Solder Points
Cold (3)
Cold
Cold
Female XLR
Male XLR
Cold (3)
Unbalanced 1/4” to RCA Cable
Tip (signal)
Tip (signal)
Sleeve (ground)
Tip (signal)
Sleeve (ground)
Sleeve (ground)
Un-Balanced XLR to RCA Cable
Tip (signal)
Hot (2) Common (1)
1
2
3
End View
2
Tip (signal)
1
3
Cold (Pin 3)
(no connection)
Solder Points
Cold (3)
Sleeve (ground)
Male XLR
Sleeve (ground)
15
2
1
3
End View
Specifications
Center frequencies (Hz)
25, 40, 63, 100, 160, 250, 400, 630,
1 k, 1.6 k, 2.5 k, 4 k, 6.3 k, 10 k, 16 k
Variable range
±12 dB
Frequency response (unity)
<10 Hz to 90 kHz ±3 dB
THD+N, unity gain
(20Hz to 20kHz)
Less than 0.01%
Max. Output Level gain
+6 dB
High pass filter
80 Hz (18 dB/ oct)
Noise (with 20 kHz LPF, all faders flat)
-85 dB
Dimensions
19 in. (w) x 10.5 (d) x 1.75 (h)
482 mm (w) x 267 (d) x 44 (h)
Weight
6.1 lb.; 2.8 kg
Boost
+12
RESPONSE (dB)
+10
+5
0
-5
-10
-12
Cut
20
50
100
200
500
1K
2K
FREQUENCY (Hz)
16
5K
10K 20K
S curve 215 Block Diagram
17
Samson Technologies Corp.
575 Underhill Blvd.
P.O. Box 9031
Syosset, NY 11791-9031
Phone: 1-800-3-SAMSON (1-800-372-6766)
Fax: 516-364-3888
www.samsontech.com