1
Avaya Meeting Exchange
Web Portal 5.1
User Guide
04-602766
Web Portal 5.1
November 2008
Issue 1.0
© 2008 Avaya Inc. All Rights Reserved.
Notice
While reasonable efforts were made to ensure that the information in this
document was complete and accurate at the time of printing, Avaya Inc. can
assume no liability for any errors. Changes and corrections to the information
in this document may be incorporated in future releases.
Documentation disclaimer
Avaya Inc. is not responsible for any modifications, additions, or deletions to
the original published version of this Documentation unless such modifications,
additions, or deletions were performed by Avaya.
Link disclaimer
Avaya Inc. is not responsible for the contents or reliability of any linked third
party Web sites referenced elsewhere within this Documentation and Avaya
does not necessarily endorse the products, services, or information described
or offered within them. We cannot guarantee that these links will work all of the
time and we have no control over the availability of the linked pages.
License
USE OR INSTALLATION OF THE PRODUCT INDICATES THE END USER'S
ACCEPTANCE OF THE TERMS SET FORTH HEREIN AND THE GENERAL
LICENSE TERMS AVAILABLE ON THE AVAYA WEBSITE AT
http://support.avaya.com/LicenseInfo/ ("GENERAL LICENSE TERMS"). IF
YOU DO NOT WISH TO BE BOUND BY THESE TERMS, YOU MUST
RETURN THE PRODUCT(S) TO THE POINT OF PURCHASE WITHIN TEN
(10) DAYS OF DELIVERY FOR A REFUND OR CREDIT.
Avaya grants End User a license within the scope of the license types
described below. The applicable number of licenses and units of capacity for
which the license is granted will be one (1), unless a different number of
licenses or units of capacity is specified in the Documentation or other
materials available to End User. "Designated Processor" means a single
stand-alone computing device. "Server" means a Designated Processor that
hosts a software application to be accessed by multiple users. "Software"
means the computer programs in object code, originally licensed by Avaya and
ultimately utilized by End User, whether as stand-alone Products or
pre-installed on Hardware. "Hardware" means the standard hardware
Products, originally sold by Avaya and ultimately utilized by End User.
License Type(s):
Concurrent User License (CU). End User may install and use the Software on
multiple Designated Processors or one or more Servers, so long as only the
licensed number of Units are accessing and using the Software at any given
time. A "Unit" means the unit on which Avaya, at its sole discretion, bases the
pricing of its licenses and can be, without limitation, an agent, port or user, an
e-mail or voice mail account in the name of a person or corporate function
(e.g., webmaster or helpdesk), or a directory entry in the administrative
database utilized by the Product that permits one user to interface with the
Software. Units may be linked to a specific, identified Server.
Database License (DL). Customer may install and use each copy of the
Software on one Server or on multiple Servers provided that each of the
Servers on which the Software is installed communicate with no more than a
single instance of the same database.
Copyright
Except where expressly stated otherwise, the Product is protected by copyright
and other laws respecting proprietary rights. Unauthorized reproduction,
transfer, and or use can be a criminal, as well as a civil, offense under the
applicable law.
Third-party Components
Certain software programs or portions thereof included in the Product may
contain software distributed under third party agreements ("Third Party
Components"), which may contain terms that expand or limit rights to use
certain portions of the Product ("Third Party Terms"). Information identifying the
copyright holders of the Third Party Components and the Third Party Terms
that apply is available on Avaya's web site at:
http://support.avaya.com/ThirdPartyLicense/
For full information, please see the complete document, Avaya Third Party
Terms, Document number 04-601558. To locate this document on the website,
simply go to http://www.avaya.com/support and search for the document
number in the search box.
Warranty
Avaya Inc. provides a limited warranty on this product. Refer to your sales
agreement to establish the terms of the limited warranty. In addition, Avaya’s
standard warranty language, as well as information regarding support for this
product, while under warranty, is available through the following Web site:
http://www.avaya.com/support.
Avaya fraud intervention
If you suspect that you are being victimized by toll fraud and you need technical
assistance or support, call Technical Service Center Toll Fraud Intervention
Hotline at +1-800-643-2353 for the United States and Canada. Suspected
security vulnerabilities with Avaya Products should be reported to Avaya by
sending mail to: [email protected].
For additional support telephone numbers, see the Avaya Web site:
http://www.avaya.com/support
Trademarks
Avaya and the Avaya logo are registered trademarks of Avaya Inc. in the
United States of America and other jurisdictions. Unless otherwise provided in
this Documentation, marks identified by "®," "™" and "SM" are registered
marks, trademarks and service marks, respectively, of Avaya Inc. All other
trademarks are the property of their respective owners.
For the most current versions of documentation, go to the Avaya support Web
site: http://www.avaya.com/support
Contents
Preface
. . . . . . . . . . . . . . . . . . . . . . . . . . . . . . . . . . . . . . . .
7
Purpose. . . . . . . . . . . . . . . . . . . . . . . . . . . . . . . . . . . . . . . . .
7
Intended Audience. . . . . . . . . . . . . . . . . . . . . . . . . . . . . . . . . . .
7
Important Notice . . . . . . . . . . . . . . . . . . . . . . . . . . . . . . . . . . . .
7
Related Information . . . . . . . . . . . . . . . . . . . . . . . . . . . . . . . . . .
8
Contacting Avaya . . . . . . . . . . . . . . . . . . . . . . . . . . . . . . . . . . .
8
Chapter 1: Introduction to the Avaya Web Portal . . . . . . . . . . . . . . . . . . . .
9
Features . . . . . . . . . . . . . . . . . . . . . . . . . . . . . . . . . . . . . . . .
9
Benefits. . . . . . . . . . . . . . . . . . . . . . . . . . . . . . . . . . . . . . . . .
10
User Requirements . . . . . . . . . . .
Browsers . . . . . . . . . . . . .
Web Server Operating Systems.
Client Operation Systems . . . .
.
.
.
.
11
11
11
11
New Features in this release . . . . . . . . . . . . . . . . . . . . . . . . . . . . .
11
Chapter 2: Logging in to the Avaya Web Portal . . . . . . . . . . . . . . . . . . . . .
13
Conferences . . . . . . . . . . . . . . . . . . . . . . . . . . . . . . . . . . . . . .
13
Logging in . . . . . . . . . . . . .
Logging in to the Web Portal .
Troubleshooting Log-in . . . .
My password has expired .
My account is disabled . .
.
.
.
.
.
14
14
14
15
15
Chapter 3: Reserving Conferences. . . . . . . . . . . . . . . . . . . . . . . . . . . .
17
.
.
.
.
.
.
.
.
.
.
.
.
.
.
.
Reserving Conferences . . . . . . . . .
A Short Note on Passcodes . . . . .
Entering Passcodes . . . . . . .
Auto-Generate Passcodes Field
Passcode Clashing . . . . . . .
Creating Reservations. . . . . . . .
Configuring Advanced Options . . .
Making Changes to Reservations .
.
.
.
.
.
.
.
.
.
.
.
.
.
.
.
.
.
.
.
.
.
.
.
.
.
.
.
.
.
.
.
.
.
.
.
.
.
.
.
.
.
.
.
.
.
.
.
.
.
.
.
.
.
.
.
.
.
.
.
.
.
.
.
.
.
.
.
.
.
.
.
.
.
.
.
.
.
.
.
.
.
.
.
.
.
.
.
.
.
.
.
.
.
.
.
.
.
.
.
.
.
.
.
.
.
.
.
.
.
.
.
.
.
.
.
.
.
.
.
.
.
.
.
.
.
.
.
.
.
.
.
.
.
.
.
.
.
.
.
.
.
.
.
.
.
.
.
.
.
.
.
.
.
.
.
.
.
.
.
.
.
.
.
.
.
.
.
.
.
.
.
.
.
.
.
.
.
.
.
.
.
.
.
.
.
.
.
.
.
.
.
.
.
.
.
.
.
.
.
.
.
.
.
.
.
.
.
.
.
.
.
.
.
.
.
.
.
.
.
.
.
.
.
.
.
.
.
.
.
.
.
.
.
.
.
.
.
.
.
.
.
.
.
.
.
.
.
.
.
.
.
.
.
.
.
.
.
.
.
.
.
.
.
.
.
.
.
.
.
.
.
.
.
.
.
.
.
.
.
.
.
.
.
.
.
.
.
.
.
.
.
.
.
.
.
.
.
.
.
.
.
.
.
.
.
.
.
.
.
.
.
.
.
.
27
27
28
28
.
.
.
.
.
.
.
.
.
.
.
.
.
.
.
.
Inviting Conferees to the Conference . . . . . . . . . . .
Inviting Conferees using Microsoft Outlook . . . . . .
Inviting Conferees using Browser E-mail . . . . . . .
Inviting Conferees from the Web Portal address book
.
.
.
.
.
.
.
.
.
.
.
.
.
.
.
.
26
26
27
.
.
.
.
.
.
.
.
.
.
.
.
.
.
.
.
Microsoft Outlook Integration. . . . . . . . . . . . . . . . . . . . . . . . . . . . .
Creating Appointments in the Microsoft Outlook Calendar. . . . . . . . . . .
Creating an Appointment in the Conferees’ Calendar . . . . . . . . . . . . .
.
.
.
.
.
.
.
.
.
.
.
.
.
.
.
.
17
18
18
19
19
19
20
25
.
.
.
.
.
.
.
.
.
.
.
.
.
.
.
.
.
.
.
.
.
.
.
.
Avaya Meeting Exchange Web Portal 5.1 User Guide
.
.
.
.
.
.
.
.
.
.
.
.
.
.
.
.
.
.
.
.
.
.
.
.
.
.
.
.
.
.
.
.
November 2008
3
Contents
Attaching Files to Conference Invitations . . . . . . . . . . . . . . . . . . . . . .
30
Deleting Reservations . . . . . . . . . . . . . . . . . . . . . . . . . . . . . . . . .
31
Notifying Participants . . . . . . . . . . . . . . . . . . . . . . . . . . . . . . . . .
31
Setting up Repeating Options . . . . . . . . . . . . . . . . . . . . . . . . . . . .
32
Managing Live Conferences . . . . . . . . . . . . . . . . . . . . . . . . . . . . .
33
Chapter 4: Viewing and Modifying Conference Details . . . . . . . . . . . . . . . . .
35
Viewing Scheduled Conferences . . . . . . . . . . . .
Searching for Conferences by Date . . . . . . . .
Searching for Conferences by Reference Number
Searching for Conferences by Keyword . . . . . .
.
.
.
.
35
35
37
37
Making Changes to Scheduled Conferences . . . . . . . . . . . . . . . . . . . .
Editing a single conference . . . . . . . . . . . . . . . . . . . . . . . . . . . .
Editing a series of conferences. . . . . . . . . . . . . . . . . . . . . . . . . .
38
38
39
Deleting Conferences . . . . . . . . . . . . . . . . . . . . . . . . . . . . . . . . .
Deleting a single conference . . . . . . . . . . . . . . . . . . . . . . . . . . .
Deleting a series of conferences . . . . . . . . . . . . . . . . . . . . . . . . .
40
40
41
Modifying the Schedule Page . . . . . . . . . . . . . . . . . . . . . . . . . . . . .
41
Chapter 5: Playing Conference Recordings . . . . . . . . . . . . . . . . . . . . . . .
43
Accessing Recorded Conferences . . . . . . . . . . . . . . . . . . . . . . . . . .
43
Playing Recorded Conferences. . . . . . . . . . . . . . . . . . . . . . . . . . . .
44
Chapter 6: Editing your Personal Profile. . . . . . . . . . . . . . . . . . . . . . . . .
47
Editing your Personal Account . . . . . . . . . . . . . . . . . . . . . . . . . . . .
47
Editing your Participant List . . . . . . .
Adding New Participants . . . . . . .
Deleting Existing Participants . . . .
Modifying the Details of Participants .
.
.
.
.
48
48
49
49
Chapter 7: Adding a New User . . . . . . . . . . . . . . . . . . . . . . . . . . . . . .
51
Introduction to Self Administration. . . . . . . . . . . . . . . . . . . . . . . . . .
51
Accessing Self Administration . . . . . . . . . . . . . . . . . . . . . . . . . . . .
Accessing Self Administration Directly . . . . . . . . . . . . . . . . . . . . .
Accessing Self Administration from the Web Portal . . . . . . . . . . . . . .
51
52
52
Adding a New User . . . . . . . . . . . . . . . . . . . . . . . . . . . . . . . . . .
52
Chapter 8: Generating Reports . . . . . . . . . . . . . . . . . . . . . . . . . . . . . .
55
Web Portal Reports . . . . . . . . . . . . . . . . . . . . . . . . . . . . . . . . . .
55
Generating Reports . . . . . . . . . . . . . . . . . . . . . . . . . . . . . . . . . .
55
4
.
.
.
.
.
.
.
.
.
.
.
.
.
.
.
.
Avaya Meeting Exchange Web Portal 5.1 User Guide
.
.
.
.
.
.
.
.
.
.
.
.
.
.
.
.
.
.
.
.
.
.
.
.
.
.
.
.
.
.
.
.
.
.
.
.
.
.
.
.
.
.
.
.
.
.
.
.
.
.
.
.
.
.
.
.
.
.
.
.
.
.
.
.
.
.
.
.
.
.
.
.
.
.
.
.
.
.
.
.
.
.
.
.
.
.
.
.
.
.
.
.
.
.
.
.
.
.
.
.
.
.
.
.
.
.
.
.
.
.
.
.
.
.
.
.
.
.
.
.
.
.
.
.
November 2008
Contents
Viewing Report Details in a Microsoft Excel™ spreadsheet . . . . . . . . . . . .
57
Chapter 9: Advertising Conferences and Recordings . . . . . . . . . . . . . . . . .
59
Advertised Conferences and Recordings . . . . . . . . . . . . . . . . . . . . . .
59
Advertising Conferences . . . . . . . . . . . . . . . . . . . . . . . . . . . . . . .
59
Index
. . . . . . . . . . . . . . . . . . . . . . . . . . . . . . . . . . . . . . . .
Avaya Meeting Exchange Web Portal 5.1 User Guide
61
November 2008
5
Contents
6
Avaya Meeting Exchange Web Portal 5.1 User Guide
November 2008
Preface
This chapter describes the purpose of the Avaya Web Portal Application User Guide. It also
describes the layout of the manual and lists various ways of contacting Avaya.
Purpose
The Avaya Web Portal Application User Guide describes the Avaya Web Portal. The Avaya
Web Portal acts as an easy to use point of access to the Avaya conferencing bridge. It enables
users to book conferences, manage various conference properties such as conference
recording, and control live conferences from their workstations. This manual describes the steps
involved in each of these tasks.
Intended Audience
The Avaya Web Portal Application User Guide is aimed at those who wish to book and control
conference from their workstation without the involvement of a third party operator. The manual
is aimed at a non-technical audience and requires no specialist background knowledge.
Important Notice
The Avaya Web Portal User Guide describes all of the features that are included in the
application. Please note that these features are configurable by your system administrator and
may not be available with your interface. For more information, please consult your system
administrator.
Avaya Meeting Exchange Web Portal 5.1 User Guide
November 2008
7
Preface
Related Information
●
Avaya Web Conferencing Documentation
●
Avaya Web Portal Online Help
●
Avaya Web Portal Administrator Guide
●
Conference Viewer User Guide
Contacting Avaya
The following table lists telephone numbers and E-mail addresses.
For information on Meeting Exchange servers and features
US and Canada Technical
Support
+1-800-242-2121
+1-800-866-5469
+1-720-444-0734
E-mail: [email protected]
Fax: +1-978-677-5134
International Technical Support
+353-1-207-5666 (CS7000)
+353-1-207-5667
+353-1-207-5668
E-mail: [email protected]
E-mail: [email protected]
Avaya Support Web site
www.avaya.com/support
Avaya Web site
www.avaya.com
8
Avaya Meeting Exchange Web Portal 5.1 User Guide
November 2008
Chapter 1: Introduction to the Avaya Web
Portal
This chapter describes the Avaya Web Portal. It also describes its features and benefits.
The Avaya Web Portal allows easy access to the Avaya conferencing bridge. It enables users to
book conferences, manage various conference properties; such as conference recording and
control live conferences from their workstations.
The Avaya Web Portal interface is divided into three parts defined by unique urls.
●
User’s Section
The Web Portal User’s section enables users to book and manage conferences, manage
their contacts and account information and view reports. For more information, see the
remainder of this document.
The User (Moderator) URL is: http://<ipaddress>/webportal/login.
●
Administrator’s Section
The Web Portal’s Administrator’s section enables administrators to configure available
functionality, define the Web Portal’s appearance, and generate Administrator Reports.
For more information, see the Avaya Meeting Exchange 5.1 Web Portal Administrator
Guide.
●
Wholesaler’s Section
The Wholesaler for Web Portal section enables wholesalers to create companies, clients
and resellers. They can also reserve conferences on behalf of a third party. For more
information, see the Avaya Meeting Exchange 5.1 Wholesaler for Web Portal Guide.
Tip:
Tip:
All of these guides are available on support.avaya.com.
Features
The Avaya Web Portal empowers regular users by giving them access to functionality
traditionally reserved for trained operators. Regular users are now conference organizers and
conference managers. Third party operators are no longer required. Conferences can be
reserved, customized, and controlled in real time from individual workstations.
Avaya Meeting Exchange Web Portal 5.1 User Guide
November 2008
9
Chapter 1: Introduction to the Avaya Web Portal
The Avaya Web Portal enables users to:
●
Reserve conferences
Users can book conferences. They can specify the date, duration, time and size. They can
also select notification options for their Participants and configure recurrence patterns for
their conferences. They can associate features such as data conferencing, conference
advertising, and additional security.
●
Manage scheduled conferences
Users can view a list of their scheduled conferences. They can also change a large
number of properties associated with these conferences, such as name, duration, size and
Conferee/Moderator passcodes.
●
Administer Participants
Users can manage the profiles of their regular conference attendees. They can add new
Participants, edit existing Participant details, and delete old Participants. These contact
details are used when conference notifications are sent.
●
Manage personal accounts
Users can update their own account details. In most cases, they can change their
passwords, contact details and preferred time zone. In some implementation situations,
users cannot change their own passwords. This limitation is due to the fact that their
password is used for access to other applications and resides on a central server.
●
Record and play back conferences
Users can record their conferences. They can store the recording for a configurable period
of time. Recordings can be played back as many times as necessary. During the
conference, users can use the Audio Console to pause the recording.
●
Generate reports
Users can produce reports based on the information in the Avaya Web Portal. For
example, they can produce attendance and conference details reports. Reports
information can be displayed in a variety of different formats.
●
Microsoft Outlook Integration
Users can use their Microsoft Outlook address book to invite Participants to a conference.
They can also create appointments in their own, and other Participant’s Microsoft Outlook
calendar.
Benefits
The Avaya Web Portal brings the conference management capabilities of the Avaya
conferencing bridge to every workstation. Individual users can manage their whole conferencing
experience from a standard Web browser. The Avaya Web Portal offers:
10
Avaya Meeting Exchange Web Portal 5.1 User Guide
November 2008
User Requirements
●
An easy-to-use graphic interface that requires no specialist technical knowledge.
●
An integrated solution that uses industry standard protocols and conventions.
●
A simple, easy installation and configuration.
●
A customizable interface that can be branded to suit individual customer needs.
●
A framework for the management of both demand and scheduled conferencing.
●
An economical alternative to the provision of dedicated conference operators.
User Requirements
Web Portal 5.1 supports:
Browsers
●
Internet Explorer 6 and 7
●
Mozilla Firefox 2
Web Server Operating Systems
●
Microsoft Windows 2003 Server with Service Pack 2
Client Operation Systems
●
Microsoft Windows XP SP2
●
Microsoft Vista Business
New Features in this release
The new features in this release include:
●
Password expiry
Your Web Portal System Administrator can now configure a password expiry threshold on
your Web Portal system. If they configure this threshold, you must update your Web Portal
password at pre-configured intervals. For more information, see My password has
expired on page 15.
Avaya Meeting Exchange Web Portal 5.1 User Guide
November 2008
11
Chapter 1: Introduction to the Avaya Web Portal
●
Account expiry
Your Web Portal System Administrator can now configure an account inactivity threshold.
If you do not log in to the Web Portal for a configurable period of time, the conferencing
system may disable your Web Portal account. For more information, see My account is
disabled on page 15.
●
Legal disclaimer screen
Your Web Portal System Administrator can now configure the display of a legal disclaimer
screen. This legal disclaimer screen displays after you log in to the Web Portal. On the
legal disclaimer screen, you can click OK to progress to the My Schedule screen. Your
Web Portal System Administrator can deactivate this feature. For more information, see
Logging in to the Web Portal on page 14.
12
Avaya Meeting Exchange Web Portal 5.1 User Guide
November 2008
Chapter 2: Logging in to the Avaya Web
Portal
This chapter defines conferences. It also describes how to access the Avaya Web Portal. It
contains the following sections:
●
Conferences
●
Logging in
Conferences
A conference is a pre-arranged assembly of people who meet for the purposes of consultation,
discussion, or exchange of opinions. There may or may not be a formal agenda associated with
the meeting.
During an audio conference, groups of people attend a meeting held over the telephone. Using
Avaya audio conference software, attendees or Participants based in various locations, can
virtually meet using the medium of the telephone.
During a data conference, groups of people share information using their computers and their
telephones. Visual information is communicated using Avaya data conferencing software while
regular audio conferencing also takes place.
Audio and data conferences can be public or private.
A public conference is an audio or data conference that is advertised on the Web Portal.
Anyone, using an account name and a company name, can view a list of scheduled public
conferences. The access details associated with each scheduled public conference are
displayed. Typically, conferences that are open to all employees, such as annual general
meetings, are allocated public status.
A private conference is an audio or data conference that is not advertised on the Web Portal.
When they log in using their account details, Web Portal account holders can view a list of their
scheduled private conferences.
Avaya Meeting Exchange Web Portal 5.1 User Guide
November 2008
13
Chapter 2: Logging in to the Avaya Web Portal
Logging in
This section describes how to log in to the Web Portal application. It also describes some
potential issues which may occur. It contains the following sections:
●
Logging in to the Web Portal
●
Troubleshooting Log-in
Logging in to the Web Portal
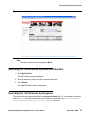
1. Start your Web browser.
2. Enter the Avaya Web Portal address in the Address field and press Enter.
The Login screen is displayed.
Note:
Your Web Portal System Administrator can configure the type of information that
the Web Portal requires, such as company name, account reference number, and
so on. In this example, you must enter an e-mail address and a password.
Note:
3. Enter your e-mail address in the Email field.
4. Enter your password in the Password field.
5. Click Submit.
The My Schedule screen is displayed.
Note:
Before the Web Portal displays the My Schedule screen, it may display an legal
disclaimer screen. Your Web Portal System Administrator can configure the
display of this screen. On this legal disclaimer screen, click OK to progress to the
My Schedule screen.
Note:
Troubleshooting Log-in
This section describes some common log-in issues:
14
●
My password has expired
●
My account is disabled
Avaya Meeting Exchange Web Portal 5.1 User Guide
November 2008
Logging in
My password has expired
Your Web Portal System Administrator may have configured a password expiry threshold on
your Web Portal system. If this is the case, you must update your Web Portal password at
pre-configured intervals. If your password is out-of-date, the Web Portal prompts you to enter a
new password and to confirm this new password. At this point, the Web Portal displays the My
Schedule screen.
My account is disabled
Your Web Portal System Administrator may have configured an account inactivity threshold. If
you do not log in to the Web Portal for a configurable period of time, the conferencing system
may disable your Web Portal account. If the conferencing system disables your account, you
must contact your Web Portal System Administrator to request them to enable your account
again.
Avaya Meeting Exchange Web Portal 5.1 User Guide
November 2008
15
Chapter 2: Logging in to the Avaya Web Portal
16
Avaya Meeting Exchange Web Portal 5.1 User Guide
November 2008
Chapter 3: Reserving Conferences
This chapter describes how to reserve a conference. It outlines how to reserve a conference,
configure recurrence patterns, set up recording and notify Participants. It also describes how to
associate properties such as rollcall and security with the conference booking. It contains the
following sections:
●
Reserving Conferences
●
Microsoft Outlook Integration
●
Inviting Conferees to the Conference
●
Attaching Files to Conference Invitations
●
Deleting Reservations
●
Notifying Participants
●
Setting up Repeating Options
●
Managing Live Conferences
Reserving Conferences
The Avaya Web Portal enables you to create customized conferences to meet your exact
requirements. For example, you can create repeating conferences, notify Participants by e-mail
and configure various levels of security.
Your Web Portal System Administrator may also allocate you an on-demand conference. You
can use your on-demand conference at any time, without booking it. It is always available. To
use it, simply notify any potential Participants of the start time and conference access codes. If
you never use your on-demand conference, the conferencing system may suspend it and it will
no longer be available to you.
There are two points to remember when using your on-demand conference:
●
It is likely that there is a limit on the number of Participants that can attend your on-demand
conference.
●
The conferencing system cannot guarantee telephone line availability for your on-demand
conference.
Avaya Meeting Exchange Web Portal 5.1 User Guide
November 2008
17
Chapter 3: Reserving Conferences
Tip:
So, if you wish to organize a conference for a large group of people and need
assurance that they can all access the conference, Avaya recommend reserving
a scheduled conference.
Tip:
For more information, see:
●
A Short Note on Passcodes
●
Creating Reservations
●
Configuring Advanced Options
●
Making Changes to Reservations
A Short Note on Passcodes
A passcode enables entry to a conference. There are two types of passcode: Conferee
passcode and Moderator passcode. A Conferee passcode grants access to Conferee-level
conference features. A Moderator passcode grants access to Moderator-level conference
features. In the Meeting Exchange 5.1 applications, Passcode is often shortened to Code.
For more information, see:
●
Entering Passcodes
●
Auto-Generate Passcodes Field
●
Passcode Clashing
Entering Passcodes
Your Web Portal System Administrator configures the Moderator and Conferee Passcode fields.
For example, your Web Portal System Administrator can configure Meeting Exchange to always
generate passcodes for all conferences. Alternatively, they can configure Meeting Exchange to
give you the option of entering your own sequence of numbers or accepting the
system-generated passcodes. Table 1 describes User experience associated with the two
configuration options that are available to your Web Portal System Administrator.
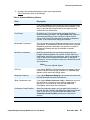
Table 1: Passcode Configurations
18
Option
Description
Option 1
You must accept the passcodes that Meeting Exchange generates.
Option 2
You can enter your own sequence of number or you can accept the
passcodes that Meeting Exchange generates.
Avaya Meeting Exchange Web Portal 5.1 User Guide
November 2008
Reserving Conferences
Auto-Generate Passcodes Field
The Auto-Generate Passcodes option indicates whether Meeting Exchange generates the
passcodes for your conference. If Auto-Generate Passcodes is selected, Meeting Exchange
generates the conference passcodes.
If the Auto-Generate Passcodes option is selected and you also enter your own sequence of
numbers for your conference passcode, Meeting Exchange uses your sequence of numbers as
the conference passcode if the sequence is not currently being used by another conference.
For more information, see Passcode Clashing on page 19.
If the Auto-Generate Passcodes options is not selected and you forget to enter your own
sequence of numbers for your conference passcode, Meeting Exchange displays an error
message to prompt you to enter a sequence of numbers or to enable the Auto-Generate
Passcodes option.
Passcode Clashing
Passcode clashing occurs when the sequence of numbers that you enter for your Moderator or
Conferee passcode is currently being used by another conference.
If the Auto-Generate Passcodes option is enabled and passcode clashing occurs, Meeting
Exchange uses the automatically generated passcodes.
If the Auto-Generate Passcodes option is not enabled and passcode clashing occurs, Meeting
Exchange displays an error message to prompt you to re-enter an alternative sequence of
numbers.
Creating Reservations
Complete the following steps to create a conference reservation.
1. Click Book meeting. The Book screen is displayed.
2. Enter the name of the conference in the Conference Name field.
3. Enter the number of Participants in the Number of Participants field.
4. Select the conference date from the Date of Conference drop-down list.
5. Select the conference start time from the Conference Start Time drop-down list.
6. Enter the conference duration in the Conference Duration field. The CRS determines the
minimum duration.
7. Select Advertise Conference to advertise the conference.
8. Select Simultaneous Data Conference to reserve a data conference.
Avaya Meeting Exchange Web Portal 5.1 User Guide
November 2008
19
Chapter 3: Reserving Conferences
Note:
Note:
If you are using Adobe Connect, can reserve an Adobe Connect data conference.
You can also select which template is used for the Adobe Connect data
conference when it is initiated. For more information about Adobe Connect, see
your Web Portal System Administrator.
9. Select Auto Generate Passcodes to enable the system to generate the conference
access passcode.
Alternatively, enter your passcodes in the Conferee Passcode and Moderator Passcode
text areas. For more information on passcodes, see A Short Note on Passcodes on
page 18.
10. Select the cabinet that you would like to reserve the conference on from the Cabinet drop
down list.
Note:
Note:
If you select Any, the CRS chooses the cabinet that the conference is reserved
on.
11. At this stage, you can click Book to create the reservation.
The Reservation Details screen displays.
Configuring Advanced Options
You can configure a number of advanced booking options before you complete the conference
booking process. Alternatively, you can configure the advanced booking options after you
complete the conference booking process. You can do this by editing and updating the booked
conference.
To configure advanced options:
1. Click the Advanced tab to access the advanced options.
20
Avaya Meeting Exchange Web Portal 5.1 User Guide
November 2008
Reserving Conferences
2. Configure the advanced settings to match your requirements.
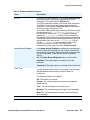
Table 2 describes each of the settings.
Table 2: Advanced Booking Options
Field
Description
Best Fit
If you select Best Fit, the conferencing server ensures that if
the necessary conferencing resources are unavailable, it will
strive to provide the closest match to your start time and
conference size combination.
Cost Center
By default, the Cost Center usually contains the Client
account reference number. The Cost Center field relates to
accounting and billing. It can contain a number of other
values, such as an End User account number, a telephone
number, or an international calling card number.
Moderated Conference
You can choose to allocate Moderator status to one or several
Participants. A Moderator accesses the conference using the
Moderator passcode. Moderators can access a number of
conference features that are not available to regular
Conferees.
Multi-Site Conference
MultiSite dynamically links conferences distributed over
bridges located anywhere in the world. A caller dials into a
local bridge, joins the local conference, and is connected by
audio to other local conferences that make up the global
conference. You can choose to make your conference a multi
site conference.
Note:
Note:
This is an optional feature.
Toll Free
If you select Toll Free, Participants have the option of using a
toll free number to access the conference. A Toll Free flag
appears in the reports and billing output.
Moderator Hang Up
If you select Moderator Hang Up, the conference ends when
the last Moderator leaves the conference.
Allow Conference Lock
If you select Allow Conference Lock, a Moderator can lock
the conference. Conference lock adds an extra level of
security to a conference as it ensures that additional
Participants cannot enter the conference.
Conference Code Duration
After the conference starts, you can specify the number of
minutes that the Conferee and Moderator passcodes remain
valid. If you set it to 0, the passcodes are always valid.
Conference Code Duration provides an extra level of
security.
Avaya Meeting Exchange Web Portal 5.1 User Guide
November 2008
21
Chapter 3: Reserving Conferences
Table 2: Advanced Booking Options
Field
Description
Pin Mode
A PIN code is an identification number that is unique to each
Participant (both Moderators and Conferees). The name of
the Participant and their unique identification number are
stored in a PIN list. When you create a new Participant, Web
Portal generates a PIN code for each new Participant and
stores it in the PIN list.
The PIN Mode options are:
● Off
● System
● Conference
If you select Off, Meeting Exchange does not use PIN codes
for the conference reservation.
If you select System PIN, Meeting Exchange grants
conference access to a Participant if they enter the correct
passcode and a PIN code which matches any entry in the
system’s PIN list, which is stored in a database table on the
bridge. Web Portal creates this system PIN list automatically
by allocating a PIN to each new Participant that you add to a
your address book.
If you select Conference PIN, the CRS automatically assigns
the following PIN list to the conference: cl_confref. This
means that Meeting Exchange only grants conference access
to Participants if they are invited to the conference. For more
information, see Pin List on page 23.
Tip:
Billing Code Prompt
22
Tip:
In a typical scenario, if you select System PIN
mode, Meeting Exchange accepts the PIN
code of anyone in the your address book. If
you select Conference, Meeting Exchange
only accepts the PIN code of the people you
have invited to the conference.
If you select Billing Code Prompt, the conferencing server
prompts the Moderator for a billing code just before they enter
the conference. The billing code is used for accounting and
billing purposes.
Avaya Meeting Exchange Web Portal 5.1 User Guide
November 2008
Reserving Conferences
Table 2: Advanced Booking Options
Field
Description
Pin List
In the Web Portal environment, if you select Conference PIN,
the CRS assigns a dynamically-created PIN list to the
conference. You cannot edit the PIN List field.
The CRS dynamically creates a PIN list for each conference.
This PIN list contains only the invitees for that particular
conference. If you specify Conference PIN, you can restrict
conference entry to the invitees only.
As an aside, Meeting Exchange names this PIN list using this
naming convention: cl_conference reference.txt. If
the conference reference is 123456, Meeting Exchange
assigns the cl_123456.txt PIN list to the conference. In
this example, Meeting Exchange grants conference access to
Participants if they enter the correct passcode and a PIN code
which matches any entry in the cl_123456.txt PIN list.
The file cl_123456.txt only contains the PINs of the
invitees to conference 123456. This functionality
automatically occurs when you select Conference PIN.
Name Record Playback
If the Name Record Playback is enabled, the conferencing
server prompts all Participants to call out their name before
they enter the conference. Moderators can then play an audio
roll call of attendees. There are are number of possible
values:
Off: The Name Record Playback option is not enabled.
Individual: The system plays a recording only to the
individual.
Conference:The system plays a recording to the conference.
Enter Tone
You can choose to play a tone or a recorded voice message
that Participants hear whenever someone enters a
conference.
The following options are available:
Off: The feature is not active.
System: The conferencing server uses a pre-configured
default setting.
Tone: The conferencing server sounds a tone.
Message: The conferencing server plays a voice message.
Both: The conferencing server sounds a tone and plays a
voice message.
Avaya Meeting Exchange Web Portal 5.1 User Guide
November 2008
23
Chapter 3: Reserving Conferences
Table 2: Advanced Booking Options
Field
Description
Exit Tone
You can choose to play a tone or a recorded voice message
that Participants hear whenever someone leaves a
conference.
The following options are available:
Off: The feature is not active.
System: The conferencing server uses a pre-configured
default setting.
Tone: The conferencing server sounds a tone.
Message: The conferencing server plays a voice message.
Both: The conferencing server sounds a tone and plays a
voice message.
Music Source
You can specify whether to play music to Conferees who are
on hold. You can also choose which music to play. From the
Music Source drop-down list, you can select Off to switch
the music off. Alternatively, you can select a source for your
music. The numbers one to four represent four file locations
on the bridge. For more information on the types of music
stored in these four file locations, contact your CRS System
Administrator. Music is stored in the .wav format, but
additional functionality is available to dial out to an external
music source.
Note:
Conference Viewer
If you select Conference Viewer, you allow Moderators to
view an Operator-attended conference using a Web
browser. Specifically, Moderators can communicate with
Operators during Polling and Q&A sessions.
Note:
24
Note:
It is important to note that if you select Off,
you cannot place your Conferees in an on
hold state.
Note:
This is an optional feature.
Auto Increase Participants
If you select Auto Increase Participants, you enable an
extra level of flexibility with regard to conference size. You
can increase conference size during the live conference.
Auto Extend Duration
If you select Auto Extend Duration, you enable an extra
level of flexibility with regard to conference length. You can
increase conference length during the live conference.
Avaya Meeting Exchange Web Portal 5.1 User Guide
November 2008
Reserving Conferences
Table 2: Advanced Booking Options
Field
Description
Prompt Set
You select the language used in conference notification
messages. Your Meeting Exchange System Administrator
can configure up to 20 languages.
Note:
Dial List
Note:
Languages are optional. Your Meeting
Exchange System Administrator can
configure the number of languages in
accordance with your requirements.
You can enter the filename of a dial list to be associated with
the conference. A dial list is a list of contact names and their
telelphone numbers. The dial list is stored on the bridge in a
specific location.
3. Click Book or Update. Web Portal records your selections.
Making Changes to Reservations
After you confirm the reservation, you can change the details associated with it.
1. Click Amend Conference Details in the Reservation Details section.
The Reservation Details section is displayed.
2. Click Update.
The Book screen is displayed. All the configurable fields are populated with the selected
conference details.
3. Modify the details as required.
4. Click Update.
The updated reservation details are displayed.
5. Click Done.
The Reservations Details main page is displayed.
6. Click Done.
The My Schedule page is displayed. The updated conference has been added to the
schedule.
You can also make changes to reservations by clicking View/Edit on the My Schedule
screen. This only applies to conference reservations in the future.
Avaya Meeting Exchange Web Portal 5.1 User Guide
November 2008
25
Chapter 3: Reserving Conferences
Microsoft Outlook Integration
Microsoft Outlook integration enables you to invite Participants to the conference from your
Microsoft Outlook address book. You can also place the conference invitation in the Microsoft
Outlook appointment format. This feature places the conference reservation in Participants’
Microsoft Outlook calendar. For more information, see:
●
Creating Appointments in the Microsoft Outlook Calendar
●
Creating an Appointment in the Conferees’ Calendar
Creating Appointments in the Microsoft Outlook Calendar
You can create appointments in your Microsoft Outlook Calendar. Microsoft Outlook then alerts
you, at a specified time beforehand to remind you that your conference is about to start.
Note:
Note:
These appointment details contain the Moderator passcode. If you would like to
give Moderator access to other Participants, you can forward this appointment to
them using Microsoft Outlook. Creating an Appointment in the Conferees’
Calendar on page 27 describes how you can create an appointment for
Conferees. In this case, the appointment details contain the Conferee passcode,
which gives Conferee access to other Participants. For more information on
passcodes, see A Short Note on Passcodes on page 18.
1. Complete the steps in Creating Reservations on page 19.
The Reservation Details screen is displayed.
2. Click Create at the Create Appointment for Moderator area of the Outlook Calendar
section.
Note:
Note:
A File Download dialog may display. Select Open on this dialog.
The Meeting Window is displayed.
3. Click Accept.
Microsoft Outlook places the meeting in your calendar.
26
Avaya Meeting Exchange Web Portal 5.1 User Guide
November 2008
Inviting Conferees to the Conference
Creating an Appointment in the Conferees’ Calendar
Complete these steps to create an appointment in your Conferees’ calendar.
1. Complete the steps in Creating Reservations on page 19.
The Reservation Details screen is displayed.
2. Click Create at the Create Appointment and Invite Conferees area of the Outlook
Calendar section.
Note:
A File Download dialog may display. Select Open on this dialog.
Note:
The Appointment window is displayed.
3. Click Invite Attendees to invite Conferees to the conference.
4. Enter the attendees e-mail address in the To or CC field.
5. Click Send.
The selected Conferees receive an e-mail inviting them to the conference. An appointment
is created in their Microsoft Outlook calendar if they accept the invitation.
Inviting Conferees to the Conference
As the conference Moderator, you can send an e-mail to selected Conferees. You can do this by
using Microsoft Outlook or another e-mail application. For more information, see:
●
Inviting Conferees using Microsoft Outlook
●
Inviting Conferees using Browser E-mail
●
Inviting Conferees from the Web Portal address book
Inviting Conferees using Microsoft Outlook
1. Complete the steps in Creating Reservations on page 19.
The Reservation Details screen is displayed.
2. Click Invite at the Invite Conferees via email section of the Email invitations area.
An e-mail window is displayed.
Avaya Meeting Exchange Web Portal 5.1 User Guide
November 2008
27
Chapter 3: Reserving Conferences
Note:
Note:
Web Portal automatically enters the conference details in the main body of the
e-mail. The conference details contain the Conferee passcode. The Avaya Web
Conferencing access URL is displayed if Simultaneous Data Conference is
selected during conference reservation.
3. Enter the e-mail addresses of the Conferees that you want to invite in the To or CC area.
4. If you wish to add file attachments, you can add these now.
5. Click Send.
The selected Conferees receive an e-mail outlining the conference date, time and access
details.
Note:
Note:
When you use Microsoft Outlook to invite Conferees, Meeting Exchange does not
create PIN codes for these Conferees. For more information on PIN codes, see
Pin Mode on page 22.
Inviting Conferees using Browser E-mail
1. Complete the steps in Creating Reservations on page 19.
The Reservation Details screen is displayed.
2. Click Invite at the Invite Conferees via Browser email section of the Email Invitations
area.
The Sending Invitations screen is displayed.
3. Copy and paste the text into an e-mail.
The text contains the Conferee passcode.
4. Enter the e-mail addresses of the Conferees that you want to invite to the conference in
the To or CC area.
5. If you wish to add file attachments, you can add these now.
6. Click Send.
The selected Conferees receive an e-mail outlining the conference date, time and access
details.
Inviting Conferees from the Web Portal address book
1. Complete the steps in Creating Reservations on page 19.
The Reservation Details screen is displayed.
28
Avaya Meeting Exchange Web Portal 5.1 User Guide
November 2008
Inviting Conferees to the Conference
2. Click Invite at the Invite from on-board Address Book section of the Email invitations
area.
The Invite screen is displayed.
3. Select the conference chairman by selecting Chairman beside one of the members of
your address book.
Note:
Note:
The conference chairman receives the Moderator passcode. For more
information on passcodes, see A Short Note on Passcodes on page 18.
4. Select the tick box beside the other members of your address book that you want to invite
to the conference.
5. You can attach files to the conference invitation by clicking Conference Attachments. For
more information, see Attaching Files to Conference Invitations on page 30.
6. You can also change the default notification options by clicking Notification Options. For
more information, see Notifying Participants on page 31.
7. Click OK.
The selected Conferees receive an e-mail outlining the conference date, time, and access
details.
Avaya Meeting Exchange Web Portal 5.1 User Guide
November 2008
29
Chapter 3: Reserving Conferences
Attaching Files to Conference Invitations
If you wish to attach files to a conference invitation, there are a number of options:
●
You can use the attachment functionality that exists in your e-mail application, such as
Microsoft Outlook or Lotus Notes. When you invite Conferees using e-mail or browser
e-mail, you must use this method of file attachment. For more information, see Inviting
Conferees using Microsoft Outlook on page 27 and Inviting Conferees using Browser
E-mail on page 28.
●
Alternatively, you can use the attachment functionality that exists in the Web Portal. When
you invite Conferees using the on-board address book, you can use this method of file
attachment. For more information on inviting Conferees using the on-board address book,
see Inviting Conferees from the Web Portal address book on page 28.
To attach files to conference invitations:
1. Complete the steps in Creating Reservations on page 19.
The Reservation Details screen is displayed.
2. In the Email Invitations panel, click the Invite button next to Invite from on-board
Address Book.
The Web Portal displays the invitation, notification, and attachment options.
3. Click the Conference Attachments tab to display the Attachment File fields.
4. In the Attachment File field, enter the full path to the file you wish to attach to the
conference call invitation.
You can attach up to five files.
Note:
Note:
You can use the Browse button to easily locate the file you wish to attach.
5. Click Upload.
The Web Portal uploads the file attachments.
The Web Portal displays the message Attachments Uploaded Successfully when it
completes the upload.
Note:
30
Note:
The Notification Subsystem is the name of the component which sends the
e-mails. If the Notifications Subsystem is unable to send the file attachments, it
does not display any error message. For example, if the attachments are too big,
the Notification Subsystem may be unable to successfully deliver the attachments
to the Participants. In this situation, the Web Portal does not report any error. The
attachment size limit is set by your CRS System Administrator.
Avaya Meeting Exchange Web Portal 5.1 User Guide
November 2008
Deleting Reservations
Deleting Reservations
You can also delete a reservation before it has been confirmed.
1. Click Delete in the Reservation section of the confirm booking screen.
A confirmation screen is displayed.
2. Click Yes.
The reservation is deleted and the My Schedule page is displayed.
Notifying Participants
The Avaya Web Portal can automatically notify Conferees of conference details by e-mail or
SMS or both. A file can also be attached to e-mails. The Avaya Web Portal can automatically
send you, as the Moderator, an attendance report. However, in order to allow notifications
enough time to reach their recipient, you must book conferences with notifications a number of
minutes in advance of the conference start time. You can also configure notifications when you
are inviting Conferees using the Web Portal address book.
1. Click Edit at the My Schedule screen.
The reservation details are displayed.
2. Click Notification.
The Notification screen is displayed.
3. Select the notification method from the Notification drop-down list. For more information,
see Table 4.
4. Select the appropriate checkboxes. For more information, see Table 3.
5. Enter any remarks in the Comments field.
6. Enter the conference organizer’s name in the Contact Name field.
7. Enter the conference organizer’s e-mail address in the Contact Phone field.
8. Enter the conference organizer’s phone number in the Contact Email field.
9. Click Update.
The reservation is updated.
Avaya Meeting Exchange Web Portal 5.1 User Guide
November 2008
31
Chapter 3: Reserving Conferences
Table 3: Notification Types
Notification Type
Description
Notify Attendance
Sends a Participant report to the Moderator after the
conference has taken place.
Notify Cancellations
Sends a notification to Conferees if the conference is
cancelled.
Notify Reminder
Sends a reminder to Conferees before the conference is due
to take place.
Notify Confirmations
Sends a reservation confirmation to the Moderator to confirm
that the conference has been booked. Also sends invitations
to the Conferees.
Notify Changes
Sends a message to Conferees if any changes are made to
the conference reservation.
Table 4: Notification Methods
Notification Type
Description
Email
Select this option to send an e-mail notifying Conferees of
conference details, or changes to conference details.
SMS
Select this option to send a SMS message notifying
Conferees of conference details, or changes to conference
details.
Email and SMS
Select this option to send an e-mail and SMS message
notifying Conferees of conference details, or changes to
conference details.
Setting up Repeating Options
1. Complete steps 1-8 in Creating Reservations on page 19.
2. Click Recurrence.
The Recurrence screen is displayed.
3. Select Make this conference a recurring event.
The repeat options are enabled.
32
Avaya Meeting Exchange Web Portal 5.1 User Guide
November 2008
Managing Live Conferences
4. Enter the number of repeats in the Total Conference Count field.
5. Select the frequency of the repeating conference from the Frequency drop-down list.
●
If you choose Daily, select the days to exclude from the options listed below. For
example, you may want to exclude Saturday and Sunday from any recurring
reservation.
●
If you choose Weekly or Every 2nd Week, enter the day of the week in the Day of
Week field.
●
If you choose Week in Month, select the week number from the Week in Month
drop-down list.
●
If you choose Date in Month, select the date from the Date in Month drop-down list.
6. Select the appropriate checkboxes to exclude particular days from the recurrence pattern.
For example, you may want to exclude Saturdays and Sundays from a daily recurring
conference.
7. Click Book.
The reservation screen is displayed.
Managing Live Conferences
The Avaya Audio Console is a Web Portal component which provides you with a live visual
display of your live conference.
Tip:
Tip:
Avaya has produced a Meeting Exchange 5.1 Audio Console User Guide, which
is available on support.avaya.com. The Meeting Exchange 5.1 Audio Console
also has fully integrated online help.
Avaya Meeting Exchange Web Portal 5.1 User Guide
November 2008
33
Chapter 3: Reserving Conferences
34
Avaya Meeting Exchange Web Portal 5.1 User Guide
November 2008
Chapter 4: Viewing and Modifying
Conference Details
This chapter describes how to view a list of scheduled conferences. It also describes how to
make changes to conference. You can change details associated with conferences that have
yet to begin and conferences that are in progress. For more information, see:
●
Viewing Scheduled Conferences
●
Making Changes to Scheduled Conferences
●
Deleting Conferences
●
Modifying the Schedule Page
Viewing Scheduled Conferences
You can view your scheduled conferences by date, keyword or conference reference. You can
enter a date range and view the conferences that are scheduled to take place between those
dates. You can also enter a conference reference number or a keyword and view the details
associated with that particular conference. For more information, see:
●
Searching for Conferences by Date
●
Searching for Conferences by Reference Number
●
Searching for Conferences by Keyword
Searching for Conferences by Date
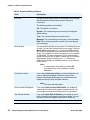
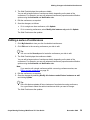
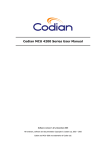
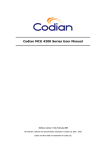
1. Click My Schedule.
The My Schedule page is displayed.
Avaya Meeting Exchange Web Portal 5.1 User Guide
November 2008
35
Chapter 4: Viewing and Modifying Conference Details
Figure 1: My Schedule Screen
2. Select a date range from the Starting and Ending drop down lists.
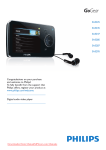
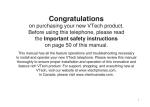
3. Click Search.
The Search Results screen is displayed.
36
Avaya Meeting Exchange Web Portal 5.1 User Guide
November 2008
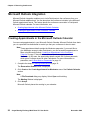
Viewing Scheduled Conferences
Figure 2: Search Results screen
Note:
Note:
Demand conferences are displayed in Bold.
Searching for Conferences by Reference Number
1. Click My Schedule.
The My Schedule page is displayed.
2. Enter a reference number into the Conference Ref field.
3. Click Search.
The Search Results screen is displayed.
Searching for Conferences by Keyword
The keyword search feature searches the Conference Name field. So, for example, a keyword
such as sales could find conferences with conference names such as Sales Conference,
Sales Meeting, Marketing and Sales Update, and so on.
Avaya Meeting Exchange Web Portal 5.1 User Guide
November 2008
37
Chapter 4: Viewing and Modifying Conference Details
1. Click My Schedule.
The My Schedule page is displayed.
2. Enter a keyword relating to the conference in the Keyword field.
3. Click Search.
The Search Results screen is displayed.
Making Changes to Scheduled Conferences
This section describes how to make changes to scheduled conferences, but you can also make
changes to reservations before you confirm them. For more information, see Making Changes
to Reservations on page 25.
It is important to note that you can make changes to a single conference, or, in the case of
recurring conferences, you can make changes to either a single instance or the entire series of
conferences.
●
Editing a single conference
●
Editing a series of conferences
Note:
If you select notify changes when you set up the scheduled conference, the
conference Participants are informed of any changes made to the reservation.
Note:
When making changes to conferences, it is important to note that your most recent edit
overrides any previous edits. For example, if you edit a single conference and then edit the
entire series, the edits to the entire series override the edit to the single conference.
Editing a single conference
You can edit:
●
A single one time conference
●
A single instance of a recurring conference
To edit a conference:
1. Click My Schedule to view your list of scheduled conferences.
2. Click Edit next to the conference you wish to edit.
Tip:
38
Tip:
You can use the Search panel to locate the conference you wish to edit.
Avaya Meeting Exchange Web Portal 5.1 User Guide
November 2008
Making Changes to Scheduled Conferences
3. The Web Portal displays the conference details.
You can edit a large number of conference details, depending on the state of the
conference. For example, you can edit advanced conference properties and notification
options using the Advanced and Notification tabs.
4. Edit the conference, as required.
5. Save the changes, as follows:
●
If it is a single one time conference, click Update.
●
If it is a recurring conference, select Modify this instance only and click Update.
The Web Portal saves the updates.
Editing a series of conferences
1. Click My Schedule to view your list of scheduled conferences.
2. Click Edit next to the recurring conference you wish to edit.
Tip:
Tip:
You can use the Search panel to locate the conference you wish to edit.
3. The Web Portal displays the conference details.
You can edit a large number of conference details, depending on the state of the
conference. For example, you can edit advanced conference properties and notification
options using the Advanced and Notification tabs.
Note:
Note:
If you want to edit a single conference within a recurring conference series, see
Editing a single conference on page 38.
4. Edit the conference, as required.
5. Save the changes by selecting Modify this instance and all future instances as well
and clicking Update.
Tip:
Tip:
Since this feature updates all future instances of a selected recurring conference,
it is a good idea to select the earliest conference which you want to change.
The Web Portal saves the updates.
Avaya Meeting Exchange Web Portal 5.1 User Guide
November 2008
39
Chapter 4: Viewing and Modifying Conference Details
Deleting Conferences
This section describes how to delete scheduled conferences, but you can also delete
reservations before you confirm them. For more information, see Deleting Reservations on
page 31.
It is important to note that you can delete a single conference, or, in the case of recurring
conferences, you can delete either a single instance or the entire series of conferences.
●
Deleting a single conference
●
Deleting a series of conferences
Note:
If you select notify changes when you set up the scheduled conference, the
conference Participants are informed of any changes made to the reservation.
Note:
Deleting a single conference
You can delete:
●
A single one time conference
●
A single instance of a recurring conference
To delete a conference:
1. Click My Schedule to view your list of scheduled conferences.
2. Click Delete next to the conference you wish to delete.
Tip:
You can use the Search panel to locate the conference you wish to delete.
Tip:
3. Confirm the deletion of the conference, as follows:
40
●
If it is a single one time conference, the Web Portal displays a Delete Conference
confirmation message. Click OK to confirm the deletion of the conference.
●
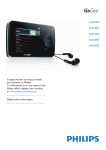
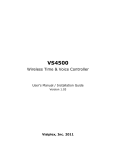
If it is a recurring conference, the Web Portal displays a selection dialog. Select Delete
this conference only and click Close.
Avaya Meeting Exchange Web Portal 5.1 User Guide
November 2008
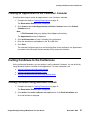
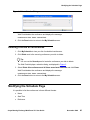
Modifying the Schedule Page
Figure 3: Delete Selection Dialog
Web Portal deletes the conference and displays the message:
Conference has been cancelled.
4. Click the Done button to return to the My Schedule screen.
Deleting a series of conferences
1. Click My Schedule to view your list of scheduled conferences.
2. Click Delete next to the recurring conference you wish to delete.
Tip:
You can use the Search panel to locate the conference you wish to delete.
Tip:
The Web Portal displays a selection dialog, as displayed in Figure 3.
3. Select Delete this conference and all future associated instances and click Close.
Web Portal deletes the conference and displays the message:
Conference has been cancelled.
4. Click the Done button to return to the My Schedule screen.
Modifying the Schedule Page
It is possible to list the conferences in three different formats:
●
Name
●
Start Time
●
Reference
Avaya Meeting Exchange Web Portal 5.1 User Guide
November 2008
41
Chapter 4: Viewing and Modifying Conference Details
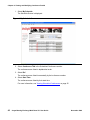
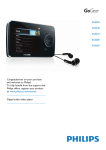
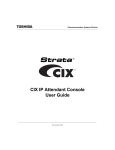
1. Select My Schedule.
The Schedule Screen is displayed.
Figure 4: My Schedule Screen
2. Select Conference Title in the Scheduled Conference section.
The conferences are listed in alphabetical order.
3. Select Ref.
The conferences are listed incrementally by their reference number.
4. Select Start Time.
The conferences are listed by their start time.
For more information, see Viewing Scheduled Conferences on page 35.
42
Avaya Meeting Exchange Web Portal 5.1 User Guide
November 2008
Chapter 5: Playing Conference
Recordings
This chapter describes how to play recorded conferences. Recorded conferences are stored for
a configurable period of time and can be played as many times as required. This chapter also
describes how to listen to streamed audio content over the Web.1For more information, see:
●
Accessing Recorded Conferences
●
Playing Recorded Conferences
Accessing Recorded Conferences
Recorded conferences are stored for a configurable period of time. You can access a list of
recorded conferences that have not yet reached their expiry date.
1. Click My Account.
The Edit Account screen is displayed.
1. Streaming is an optional feature.
Avaya Meeting Exchange Web Portal 5.1 User Guide
November 2008
43
Chapter 5: Playing Conference Recordings
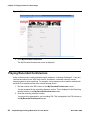
Figure 5: Edit Account screen
2. Click My Recorded Conferences.
The My Recorded Conferences screen is displayed.
Playing Recorded Conferences
Audio conferences are usually played through a telephone. In Meeting Exchange 5.1, they are
recorded and stored in the .WAV audio format. Sometimes, customers choose to use an
external system to store recordings. For example, some customers use a transfer method such
as WinSCP to transfer the files to an external storage device.
1. Dial the number in the DDI column on the My Recorded Conferences screen.
You are prompted for the recording reference number. This is displayed in the Recording
Number column on the My Recorded Conferences screen.
2. Enter the recording reference number.
You may also be prompted for your recording PIN. This is displayed in the PIN column on
the My Recorded Conferences screen.
44
Avaya Meeting Exchange Web Portal 5.1 User Guide
November 2008
Playing Recorded Conferences
3. Enter your recording reference number.
The conference is played.
Avaya Meeting Exchange Web Portal 5.1 User Guide
November 2008
45
Chapter 5: Playing Conference Recordings
46
Avaya Meeting Exchange Web Portal 5.1 User Guide
November 2008
Chapter 6: Editing your Personal Profile
This chapter describes how to edit your personal profile. Your personal profile consists of your
contact details and the contact details of your conference Participants. For more information,
see:
●
Editing your Personal Account
●
Editing your Participant List
Editing your Personal Account
1. Click My Account.
The Edit Account screen is displayed.
The Login Name and Address fields hold your name and address. The Contact Name
and Address fields hold the name and address that should be used for notifications. In
many cases, both sets of details are identical. In some cases, you may wish to direct all
notifications through a secretary or assistant.
2. Update the Login Name and Address fields as required.
3. Update your password as follows:
Note:
●
Click Modify Password.
●
The Web Portal application displays the Password Modification screen.
●
Enter your existing password in the Password field.
●
Enter your new password in the New Password and Confirm New Password fields.
●
Click Update Client.
Note:
The Password Changed field displays the date on which the password was last
changed.
The Web Portal updates your passwords and displays the Edit Account screen.
4. Enter a phone number in the Phone, Secondary Phone, and Mobile Phone fields.
5. Update the Fax and E-mail fields as necessary.
6. Update the Contact fields as necessary.
7. Select your preferred time zone from the Preferred Timezone drop-down list.
Avaya Meeting Exchange Web Portal 5.1 User Guide
November 2008
47
Chapter 6: Editing your Personal Profile
!
Important:
Important:
You must select your prefered time zone. You will not be able to schedule a
conference unless you select a time zone. Please contact your Web Portal
System Administrator if the time zone that you are in is not available from the
drop down list.
8. Click Update.
Your personal account details are updated.
Editing your Participant List
Editing tasks include:
●
Adding New Participants
●
Deleting Existing Participants
●
Modifying the Details of Participants
Adding New Participants
1. Click Address Book.
The Address Book screen is displayed.
2. Click New Contact.
The New Contact screen is displayed.
3. Enter the new Participants’ name in the Name field.
4. Enter the new Participants’ e-mail address in the Contact E-mail field.
5. Enter the Participants’ main contact telephone number in the Dial Out Number field.
Note:
Note:
Include any leading digits that are necessary to connect from your telephone to
the Participants’ telephone.
6. Enter the new Participants’ fax number in the Fax Number field.
7. Enter a brief description of the new Participant in the Description field.
8. Enter the new Participants’ alternative contact telephone numbers in the Secondary
Phone and Mobile Phone fields.
9. Click Add to Address Book.
The new Participants’ details are saved to your address book.
48
Avaya Meeting Exchange Web Portal 5.1 User Guide
November 2008
Editing your Participant List
Deleting Existing Participants
1. Click Address Book.
The Local Address Book screen is displayed.
2. Click Delete beside the Participant you want to delete.
The Participant is deleted from your address book.
Modifying the Details of Participants
1. Click Address Book.
The Local Address Book screen is displayed.
2. Click Modify beside the Participant you want to modify.
The Update Contact screen is displayed.
3. Modify the Participant details as required.
You can modify:
●
Name
●
Contact E-mail
●
Dial Out Number
●
Fax Number
●
Description
●
Secondary Phone
●
Mobile Phone
4. Click Update Contact.
The Participant details are updated and the Contact Listing screen is displayed.
Avaya Meeting Exchange Web Portal 5.1 User Guide
November 2008
49
Chapter 6: Editing your Personal Profile
50
Avaya Meeting Exchange Web Portal 5.1 User Guide
November 2008
Chapter 7: Adding a New User
As a Web Portal User, you can add other Users. The Users, that you add, can then book their
own conferences. Web Portal Users are commonly known as Clients or Moderators. This
chapter describes how to add new Users. It contains the following sections:
●
Introduction to Self Administration
●
Accessing Self Administration
●
Adding a New User
!
Important:
Important:
In some cases, your Web Portal System Administrator may have switched off this
feature. In this situation, you cannot create other Users. Please contact your CRS
Front End Operator or Web Portal System Administrator to create new Users.
Introduction to Self Administration
The process of adding a new User is called Self Administration. Self Administration means that
you, as a Web Portal User, can perform a task that has previously been performed by Web
Portal Administrators. Self Administration empowers Web Portal Users and reduces the
workload of Web Portal Administrators.
Accessing Self Administration
There are two ways to access the Self Administration feature:
●
Accessing Self Administration Directly
●
Accessing Self Administration from the Web Portal
Avaya Meeting Exchange Web Portal 5.1 User Guide
November 2008
51
Chapter 7: Adding a New User
Accessing Self Administration Directly
You can access the Self Administration feature directly by using the following syntax in your
Web browser:
http://<Web Server Name>/webportal/selfadmin/add-client
Note:
Note:
If your Web Portal System Administrator has switched off this feature, the Web
Portal application displays an error message when you attempt to access the Self
Administration feature directly.
Accessing Self Administration from the Web Portal
You can access the Self Administration feature from the Web Portal as follows:
1. Go to the Web Portal Login page.
Note:
Note:
The syntax for the Web Portal Login page is http://<Web Server Name>/
webportal/login
2. Click Create an Account.
The Web Portal applications displays the Self Administration page.
Note:
Note:
If your Web Portal System Administrator has switched off this feature, the Create
an Account link is not displayed.
Adding a New User
To add a new User:
1. On the Self Administration page, enter the new User’s details. Table 5 describes each of
the new User fields.
52
Avaya Meeting Exchange Web Portal 5.1 User Guide
November 2008
Adding a New User
Note:
Note:
Your Web Portal System Administrator controls which fields are displayed to
Users. Your Self Administration page may display a subset of the files listed in
Table 5.
Table 5: New User Details
Field
Description
Name
Enter the new User’s full name.
Company
Name
Enter the name of your company. You can use the Search button to
display a list of all the companies on the system.
Phone Number
Enter the telephone number of the new User.
Password
Your System Administrator sets the minimum length of the password. For
example, they may set the minimum password length to 5 characters, to
10 characters or to 20 characters. Your System Administrator can also
force you to ensure that the password has a certain level of complexity.
For example, you may have to include uppercase and lowercase
characters, as well as digits and symbols. Please contact your System
Administrator to find out the minimum length and complexity of the client
passwords in the Web Portal.
Email
Enter the e-mail address of the new User.
Confirm
Password
Enter the text which you entered in the Password field. If you copy the
text that you entered in the Password field and then paste it into the
Confirm Password field, the Web Portal does not correctly record the
entry. You must retype the full phrase.
Title
Enter a title for the new User. For example, enter a title such as, Mrs.,
Mr., Dr., and so on.
Address
Enter the address of the new User. You can enter the company address.
Second Phone
You can enter a second telephone number for the new User. For
example, you may want to enter their assistant’s telephone number.
Mobile Phone
You can enter a mobile telephone number for the new User.
Fax Number
You can enter a fax number for the new User.
Job Title
You can enter the new User’s job title.
Comment
This is a free text field. You can enter some additional information or a
special note in relation to the new User.
Timezone
You can select a default timezone for the new User. Similarly, your Web
Portal System Administrator can ensure that the most commonly used
timezone is displayed, by default, in the Timezone field on the Self
Administration page.
Avaya Meeting Exchange Web Portal 5.1 User Guide
November 2008
53
Chapter 7: Adding a New User
Table 5: New User Details
Note:
Field
Description
Preferred
Language
You can select the preferred language for e-mail notifications and
inconference messages. The choices in the Preferred Language list
depend on the languages that are available on your conferencing server.
In a default installation of Meeting Exchange, only English is available.
Your System Administrator must add other languages. Languages are
linked to DDIs.
External ID
You can enter a numeric value to associate the new User with an external
database. For example, you can enter a phrase which links the User with
an external list of sales targets.
External String
You can enter a phrase which associates the new User with an external
database. For example, you can enter a phrase which links the User with
a list of resources that exists outside of the CRS framework.
Note:
Mandatory fields are indicated on the Self Administration page by an asterix
symbol (*). You must enter a value in each mandatory field.
2. Click Add Client.
The Web Portal application adds the new User and displays the Client Summary page.
Note:
Note:
54
Note:
The new User can now log in to the Web Portal application and create
conferences for themselves. To test the log in details, there is a link to the Web
Portal Log in page on the Client Summary page.
Note:
Your Web Portal System Administrator can configure the Web Portal application
to automatically create an on-demand conference for each new User. If your Web
Portal System Administrator has enabled the automatic creation of an on-demand
conference, the Web Portal application displays the access details on the Client
Summary page.
Avaya Meeting Exchange Web Portal 5.1 User Guide
November 2008
Chapter 8: Generating Reports
This chapter describes how to generate a list of all conferences. You can view the details in a
selection of graphical formats. For more information:
●
Web Portal Reports
●
Generating Reports
●
Viewing Report Details in a Microsoft Excel™ spreadsheet
Web Portal Reports
There are three different types of reports for Moderators:
●
Audio Conference. Displays conference activity in a selected graphical format.
●
Data Conference. Displays data conference activity in a selected graphical format.
●
Port Usage. Displays data defined by the levels of system utilization during a conference
or a series of conferences. System activity is checked over time with the relevant
information saved to the system database.
It is also possible to view the data in a Microsoft Excel™ spread sheet. The output is listed in a
series of fields.
Note:
Note:
It is important to note that each report only shows your own conferences and
conference usage. You cannot see the usage patterns of other Moderators. Web
Portal System Administrators can view global reports which show usage patterns
across the Web Portal system.
Generating Reports
You can generate graphical representations of conference activity.
1. Click My Account.
The My Account screen is displayed.
2. Click Conference Reports.
The Conference Reports screen is displayed.
Avaya Meeting Exchange Web Portal 5.1 User Guide
November 2008
55
Chapter 8: Generating Reports
3. Select what type of report you want to generate.
For more information, see Web Portal Reports on page 55.
4. Select the date that you want the report generation to start from the Start Day drop down
list.
5. Select the date that you want the report generation to end from the End Day drop down
list.
6. Select, from the following options, the chart type. The report data is displayed in this
format:
●
Vertical Bar Chart
●
Line Chart
●
Pie Chart
●
Area Chart
●
Stacked Area Chart
●
Horizontal Bar Chart
●
3D Vertical Bar Chart
●
3D Horizontal Bar Chart
●
3D Stacked Vertical Chart.
7. Click Generate Report.
The report is generated and the graphical representation of the data is displayed on
screen.
56
Avaya Meeting Exchange Web Portal 5.1 User Guide
November 2008
Viewing Report Details in a Microsoft Excel™ spreadsheet
Figure 6: Generated Report Example
Viewing Report Details in a Microsoft Excel™ spreadsheet
You can also view the report output in more accurate detail by creating a .csv file. For more
information see the Avaya Reports and Billing Guide.
1. Complete steps 1-7 in Generating Reports on page 55.
2. Click Report CSV File.
The File Download dialog is displayed.
3. Select whether you want to open the Microsoft Excel™ spreadsheet from it’s current
location or save it to your hard disk and click OK.
The Microsoft Excel™ spreadsheet is displayed if you have decided to open the file from
its current location.
The Save As dialog is displayed if you have decided to save the file to your hard disk.
4. Enter a location to save the file and click Save.
The Microsoft Excel™ spreadsheet is saved to that location.
Avaya Meeting Exchange Web Portal 5.1 User Guide
November 2008
57
Chapter 8: Generating Reports
58
Avaya Meeting Exchange Web Portal 5.1 User Guide
November 2008
Chapter 9: Advertising Conferences and
Recordings1
This chapter describes how to advertise conferences and recordings and how to view
advertised conferences and recordings. For more information, see:
●
Advertised Conferences and Recordings
●
Advertising Conferences
Advertised Conferences and Recordings
Advertised conferences are conferences whose access details are displayed on the Web Portal.
Web Portal users with a valid account and company name can view the list of advertised
conferences associated with their company. Advertising means that anyone, using an
appropriate account and company name, can view the starting time and entry codes associated
with conferences.
Advertised conferences are also known as public conferences.
Web Portal users can access advertised conferences and recordings. Both advertised
conferences and recordings are listed on the Web Portal Login screen.
Advertising Conferences
An audio conference can be advertised on the company Intranet. You can access the list of
advertised conferences using the Public Conferences menu on the Avaya Web Portal. You can
also access the list on advertised conferences on the Web Portal Login screen. Advertising
means that anyone, using an appropriate account and company name, can view the starting
time and entry codes associated with conferences.
1. Complete steps 1-7 in Creating Reservations on page 19.
2. Click Book.
3. Select the Advertise Conference check box from the Common section.
4. Click Book.
The Reservation details screen is displayed.
1. Advertising conferences and recordings is an optional feature.
Avaya Meeting Exchange Web Portal 5.1 User Guide
November 2008
59
Chapter 9: Advertising Conferences and Recordings
5. Confirm the reservation.
60
Avaya Meeting Exchange Web Portal 5.1 User Guide
November 2008
Index
Index
start day . . . . . . . . . . . . . . . . . . . . . . 56
A
accessing recordings . . . . . . . . . . . . . . . . 43
adding participants . . . . . . . . . . . . . . . . . 48
advertising conferences . . . . . . . . . . . . . . 59
T
Technical support
contact information . . . . . . . . . . . . . . . . 8
C
conference viewer . . . . . . .
conferences
making changes to scheduled
playing recorded . . . . . .
search by keyword . . . . .
search by reference number .
searching . . . . . . . . .
viewing. . . . . . . . . . .
. . . . . . . . . . 24
.
.
.
.
.
.
.
.
.
.
.
.
.
.
.
.
.
.
.
.
.
.
.
.
.
.
.
.
.
.
.
.
.
.
.
.
.
.
.
.
.
.
.
.
.
.
.
.
.
.
.
.
.
.
.
.
.
.
.
.
38
44
37
37
35
35
E
editing participant list . . . . . . . . . . . . . . . . 48
editing personal profile . . . . . . . . . . . . . . . 47
end day . . . . . . . . . . . . . . . . . . . . . . 56
G
generating reports . . . . . . . . . . . . . . . . . 55
P
PIN codes
entering moderator and participant. . . . . . . . 20
R
recordings
playing . . .
report CSV file .
report formats .
reports . . . .
.
.
.
.
.
.
.
.
.
.
.
.
.
.
.
.
.
.
.
.
.
.
.
.
.
.
.
.
.
.
.
.
.
.
.
.
.
.
.
.
.
.
.
.
.
.
.
.
.
.
.
.
.
.
.
.
.
.
.
.
.
.
.
.
.
.
.
.
.
.
.
.
43
57
56
55
S
screen
edit account . . . . . . . . . . . . . . . . . . 44
my schedule . . . . . . . . . . . . . . . . . 36, 42
search results . . . . . . . . . . . . . . . . . 37
Avaya Meeting Exchange Web Portal 5.1 User Guide
November 2008
61
Index
62
Avaya Meeting Exchange Web Portal 5.1 User Guide
November 2008