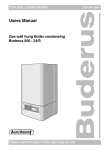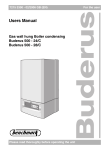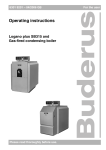
1
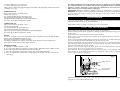
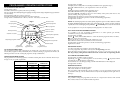
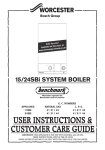
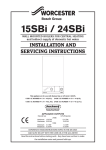
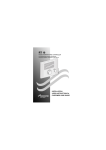
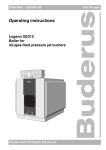
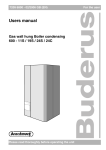
7716 192 029
15SBi & 24SBi SYSTEM BOILERS
TWIN CHANNEL DIGITAL
PROGRAMMER INSTALLATION &
OPERATING INSTRUCTIONS
General information is given in the users instruction leaflet despatched with the
appliance and/or on the lighting instruction plate fitted to the appliance.
I AUTO O
M
T
W
RUN DHW CH
Th
F
S
Su
8: 3 7
P
DAY
HR
MIN
ADV
Set
Reset
WORCESTER HEAT SYSTEMS LTD (Bosch Group) Cotswold Way, Warndon, Worcester WR4 9SW.
Tel: 01905 754624 Fax: 01905 754619 www.worcester-bosch.co.uk
This booklet is accurate at the date of printing but will be superseded and should be disregarded if specifications
and/or appearances are changed in the interests of continued improvement. All goods sold are subject to our official
Conditions of Sale, a copy of which may be obtained on application
8 716 105 046a 07/02
THESE INSTRUCTIONS APPLY IN THE UK ONLY THESE INSTRUCTIONS
ARE TO BE LEFT WITH THE USER OR AT THE APPLIANCE
To advance HW mode, press ADV once.
To advance CH mode, press ADV twice.
When a channel is ‘advanced’ the
symbol appears at the bottom right of the display, and the channel number
will change to on (or off).
PERMANENT ON
Right switch must be in the RUN position.
Set left slide switch to I.
For permanent HW demand, press ADV once
For permanent CH demand, press ADV twice.
The channel number will flash for 3 seconds and then stay on.
To cancel, set left slide switch back to AUTO
PERMANENT OFF
Right switch must be in the RUN position.
Set left slide switch to O.
Gas Safety (Installation and Use) Regulations 1998: All gas appliances must be installed
by a competent person, in accordance with the above regulations. Failure to install the
appliance correctly could lead to prosecution. The manufacturers notes must not be
taken, in any way, as overriding statutory obligations.
IMPORTANT: Read these instructions carefully in order to get the best from your appliance.
WARNING: This appliance must be earthed and protected by a 3A fuse if a 13A plug is used,
or, if any other type of plug is used, by a 5A fuse either in the plug or adaptor or at the
distribution board.
PROGRAMMER
5 day/2 day (simple setting) or multiday (full function setting) twin channel digital programmer.
The HW and CH channels can be set independently.
Integral lithium battery provides 5 year back up in case of mains failure.
For permanent HW off, press ADV once
For permanent CH off, press ADV twice.
When set to permanent off, the selected channel will permanently flash.
To cancel, set left slide switch back to AUTO
RESET
In case of confusion or errors, the programmer can be completely reset by pressing the Reset
button with a small implement such as a biro
The right switch must be in the RUN position.
The display will flash zeros and the programme times will reset to their standard times.
Start again at section ‘To Set Present Time and Day’.
HELPFUL HINTS
● Channel 1 is DHW, channel 2 is CH.
● If you get stuck whilst programming, set right switch to RUN then back to DHW (or CH)
● An ‘odd’ programme step number is always the ON time.
An ‘even’ programme step number is always the corresponding OFF time.
● For every odd number (on time) the corresponding even number (off time) must use the
same day(s).
TO FIT THE PROGRAMMER
Before starting work, turn off the mains electricity supply to the appliance.
Remove the front panel from the appliance by sliding it upwards to clear the locating pegs and
securing clips.
Remove the three screws securing the bottom panel to the fascia.
Remove the two screws securing the fascia assembly to the appliance and lower it forwards to
the servicing position.
Remove the programmer blanking plate from the front of the fascia by carefully releasing the
clips at the rear right-hand side and withdrawing the plate from the front.
Feed the electrical lead from the programmer through the fascia to exit directly underneath it
and fit the programmer by hooking the top two lugs up into the facia slots and then push the
bottom two clips until they snap into position.
From the rear of the fascia, remove the plastic splash cover to reveal the electrical connection
box and remove the two screws securing the cover to the box.
Secure the cable from the programmer using the clamping positions on the underside of the
fascia and the rear of the electrical connection box and plug the cable into the corresponding
five-way socket on the rear of the fascia.
Fig. 1.
Clamp cable here
Connect plug from
timeswitch here
Replace the electrical box cover, splash cover and fascia bottom panel, and secure the fascia
using the two screws and refit the front panel.
4
1
PROGRAMMER OPERATING INSTRUCTIONS
TO SET PRESENT TIME AND DAY
Set right switch to RUN.
Press HR & MIN buttons together (until colon stops flashing)
After 15 seconds the colon will start flashing again signifying the settings cannot be changed. Repeat this step if you still want
to set time and day.
Press DAY button until arrow points to correct day.
Press HR and MIN buttons separately until correct time is displayed.
Set right switch to DHW then back to RUN (or leave for 15 seconds) to start the clock.
Permanent off
Normal run mode
Fig. 2.
Set DHW programme
Timed programme
Permanent on
I AUTO O
Set right switch to DHW.
The display shows weekdays Mon...Fri and the first standard on-time (programme step 1)
Press HR & MIN buttons for your required first on time for the week.
Press P
Display shows the first standard off-time (programme step 2)
Press HR & MIN buttons for your required off time.
Use buttons P HR and MIN as above for next weekday switch period, then the two weekend
periods, finishing with programme step 8.
Odd programme step numbers are on times and even numbers are off times.
Set right switch to CH and repeat above for all central heating programmes.
Set right switch to RUN.
NOTE: The standard programme also contains further programme steps 9-16. These should be ‘switched off’ ie
the display should flash 0.00 at each of these steps. To check this press P again to view these switch points. If
required, these can be switched off by pressing ADV then P TOGETHER for 5 seconds, then release the buttons.
Set CH programme
RUN DHW CH
In case of confusion or errors you can completely reset the programmer. See ‘Reset’ section.
Channel 1 (DHW)
Monday to Sunday
M
T
W
Th
F
S
Su
Channel 2 (CH)
8: 3 7
Actual time or set time
12
3
Demand symbol (light bulb)
Advanced symbol
P
DAY
HR
MIN
ADV
Set
Step through programme
Programmer step number
Reset
Advance button
Set actual or
programme day
Set time or
programme hours
Set time or
programme minutes
TO SET PROGRAMME TIMES
This programmer provides eight switch periods per channel, with a day selection of Mon...Fri, Mon...Sat,
Sat/sun, all days together or all days individually. If it is considered confusing to programme all variations, the
following describes two levels of setting the programme; simple or full-function;
SIMPLE PROGRAMME SETTING
The programmer has an in-built programme of ‘standard’ switching times shown in the table. These may be
changed to suit your specific requirements.
PROGRAMME STEP
STANDARD PROGRAMME
DHW MON-FRI
CH MON-FRI
1
6.30am
6.30am
2
8.30am
8.30am
3
4.30pm
4.30pm
4
10.30pm
10.30pm
SAT-SUN
SAT-SUN
5
7.00am
7.00am
6
9.00am
9.00am
7
4.00pm
4.00pm
8
11.00pm
11.00pm
2
FULL-FUNCTION PROGRAMME SETTING
It is possible to set your programme requirements to 8 switch periods (per channel) over
combinations of days, weeks and weekends.
Set right switch to DHW.
Use the P , DAY, HR and MIN buttons to create the desired programme times as follows;
P to step to the next switch time.
DAY to set the day (or days) at which the switch time occurs
HR & MIN to set the hours and minutes for the switch time.
Set right switch to CH and repeat above for all central heating programmes.
Right switch to RUN.
IMPORTANT NOTES
An ‘odd’ programme step number is always the ON time.
An ‘even’ programme step number is always the corresponding OFF time.
Hence the eight switch periods are programme steps 1-2, 3-4, 5-6, 7-8, 9-10, 11-12, 13-14, 15-16.
The day (or days) setting must be indentical for the on time and corresponding off time.
TO VIEW PROGRAMME TIMES
Set right switch to DHW or CH as required.
Repeatedly press P to scroll through the on and off times (or keep P depressed and the unit
automatically scrolls through the switch times).
If switch times are to be changed, simply use HR and MIN buttons when displayed.
Set right switch to RUN.
NORMAL RUNNING
Right switch must be in the RUN position
Left switch should be in AUTO position
The programmer will automatically operate according to your set programme periods. In addition
to actual time and day, various smaller characters may also be displayed on the right of the screen.
See Fig 2.
ADVANCE FACILITY
It is possible to change the programme to the next on or off period in advance of the set time.
The switches must be in the AUTO and RUN positions.
3
To advance HW mode, press ADV once.
To advance CH mode, press ADV twice.
When a channel is ‘advanced’ the
symbol appears at the bottom right of the display, and the channel number
will change to on (or off).
PERMANENT ON
Right switch must be in the RUN position.
Set left slide switch to I.
For permanent HW demand, press ADV once
For permanent CH demand, press ADV twice.
The channel number will flash for 3 seconds and then stay on.
To cancel, set left slide switch back to AUTO
PERMANENT OFF
Right switch must be in the RUN position.
Set left slide switch to O.
Gas Safety (Installation and Use) Regulations 1998: All gas appliances must be installed
by a competent person, in accordance with the above regulations. Failure to install the
appliance correctly could lead to prosecution. The manufacturers notes must not be
taken, in any way, as overriding statutory obligations.
IMPORTANT: Read these instructions carefully in order to get the best from your appliance.
WARNING: This appliance must be earthed and protected by a 3A fuse if a 13A plug is used,
or, if any other type of plug is used, by a 5A fuse either in the plug or adaptor or at the
distribution board.
PROGRAMMER
5 day/2 day (simple setting) or multiday (full function setting) twin channel digital programmer.
The HW and CH channels can be set independently.
Integral lithium battery provides 5 year back up in case of mains failure.
For permanent HW off, press ADV once
For permanent CH off, press ADV twice.
When set to permanent off, the selected channel will permanently flash.
To cancel, set left slide switch back to AUTO
RESET
In case of confusion or errors, the programmer can be completely reset by pressing the Reset
button with a small implement such as a biro
The right switch must be in the RUN position.
The display will flash zeros and the programme times will reset to their standard times.
Start again at section ‘To Set Present Time and Day’.
HELPFUL HINTS
● Channel 1 is DHW, channel 2 is CH.
● If you get stuck whilst programming, set right switch to RUN then back to DHW (or CH)
● An ‘odd’ programme step number is always the ON time.
An ‘even’ programme step number is always the corresponding OFF time.
● For every odd number (on time) the corresponding even number (off time) must use the
same day(s).
TO FIT THE PROGRAMMER
Before starting work, turn off the mains electricity supply to the appliance.
Remove the front panel from the appliance by sliding it upwards to clear the locating pegs and
securing clips.
Remove the three screws securing the bottom panel to the fascia.
Remove the two screws securing the fascia assembly to the appliance and lower it forwards to
the servicing position.
Remove the programmer blanking plate from the front of the fascia by carefully releasing the
clips at the rear right-hand side and withdrawing the plate from the front.
Feed the electrical lead from the programmer through the fascia to exit directly underneath it
and fit the programmer by hooking the top two lugs up into the facia slots and then push the
bottom two clips until they snap into position.
From the rear of the fascia, remove the plastic splash cover to reveal the electrical connection
box and remove the two screws securing the cover to the box.
Secure the cable from the programmer using the clamping positions on the underside of the
fascia and the rear of the electrical connection box and plug the cable into the corresponding
five-way socket on the rear of the fascia.
Fig. 1.
Clamp cable here
Connect plug from
timeswitch here
Replace the electrical box cover, splash cover and fascia bottom panel, and secure the fascia
using the two screws and refit the front panel.
4
1
15SBi & 24SBi SYSTEM BOILERS
TWIN CHANNEL DIGITAL
PROGRAMMER INSTALLATION &
OPERATING INSTRUCTIONS
General information is given in the users instruction leaflet despatched with the
appliance and/or on the lighting instruction plate fitted to the appliance.
I AUTO O
M
T
W
RUN DHW CH
Th
F
S
Su
8: 3 7
P
DAY
HR
MIN
ADV
Set
Reset
WORCESTER HEAT SYSTEMS LTD (Bosch Group) Cotswold Way, Warndon, Worcester WR4 9SW.
Tel: 01905 754624 Fax: 01905 754619 www.worcester-bosch.co.uk
This booklet is accurate at the date of printing but will be superseded and should be disregarded if specifications
and/or appearances are changed in the interests of continued improvement. All goods sold are subject to our official
Conditions of Sale, a copy of which may be obtained on application
8 716 105 046a 07/02
THESE INSTRUCTIONS APPLY IN THE UK ONLY THESE INSTRUCTIONS
ARE TO BE LEFT WITH THE USER OR AT THE APPLIANCE