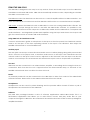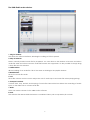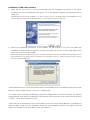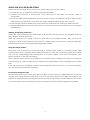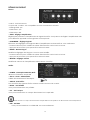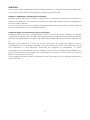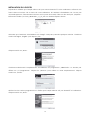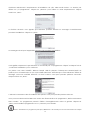
1
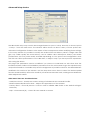
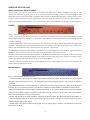
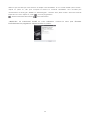
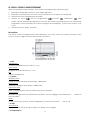
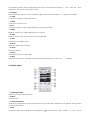
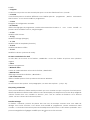
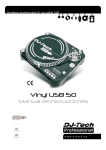
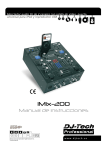
USER MANUAL---------------------------------------------------------------------------------1-26
PREFACE
Congratulations on your purchase of the UBM Solo instrument amplifier with UBM Studio software.
This is a versatile and easy-to-use package that is right at home in a practice room, small
performance, or recording studio. UBM Solo's unique USB functions and UBM Studio software enable
a wide variety of applications. Included in this package:
- 1 UBM Solo instrument amplifier
- 1 UBM Studio CD
- 1 USB cable
- 1 User manual
TABLE OF CONTENTS
PREFACE …………………………………………………………………………………………………………….1
SAFETY INSTRUCTIONS ……………………………………………………………………….……………………2
UBM SOLO FEATURES…...……………………………………………………… …………………………………3
Top Panel Layout ……...……...………………………………………………………… ……………………….3
Rear Panel Layout……… …………………………………………………………………………… ………….4
USING THE UBM SOLO..……………………………………………………………………………………………5
The UBM Studio Main Window ………………………………………………………..…………. ……………6
The Channel Strip ……………..…………………………………………………………….…….… …………..7
Installation of UBM studio software…….……………………………………………………… ……………..8
USING UBM SOLO WITH UBM STUDIO….…..……………………………………………..… …………………9
USING THE VST PLUG-INS………………….……………………………………. ………………………………11
TROUBLESHOOTING………………………….………………………………………… ………………………..12
SPECIFICATIONS……………………………….…………………………………………… ……………………13
1
SAFETY INSTRUCTIONS
The lightning flash with arrowhead symbol inside an equilateral triangle is intended to alert User
that the presence of uninsulated "hazardous voltage"within the product’s enclosure, which
may be of sufficient magnitude to induce a risk of electric shock to persons.
The exclamation mark inside an equilateral triangle is intended to alert user that the presence
of important operating and maintenance (servicing) instructions in the literature accompanying
the product.
The apparatus shall not be exposed to dripping or splashing and that no objects filled with liquids,
such as vases, shall be placed on the apparatus.
WARNING: TO REDUCE THE RISK OF FIRE OR ELECTRIC SHOCK, DO NOT EXPOSE THIS APPLIANCE TO
RAIN OR MOISTURE.
1. Caution: To reduce the risk of electric shock, do not remove
cover(or back). No user-serviceable parts inside. Refer servicing to
qualified personnel.
2. Do not install the equipment in a place exposed to direct sunlight.
3. Do not install the equipment in a dusty, damp or poorly ventilated
place.
4. To prevent damage to the equipment, please unplug from the
power outlet if not in use.
5. To unplug the equipment, always handle the power cord using the
plug. Do not pull out the plug by tugging the cord.
6. Place the equipment on a stable surface and avoid placing other
objects on top.
7. Cleaning care: Use a soft, dry cloth for cleaning. For stubborn dirt,
soak the cloth in a weak detergent solution; wring well and wipe to
remove the dirt. Do not use volatile agents such as benzene or paint
thinner, as they may damage the surface finish of the equipment.
8. Please do not block the cooling vents to avoid overheating.
9. No naked flame sources, such as lighted candles, should be placed
on the apparatus.
2
UBM SOLO FEATURES
TOP PANEL LAYOUT
The top panel controls as shown in the above figure:
1. Input Jack.
This is an XLR “Combo” jack and can accept the following types of input:
- 1/4” guitar cable
- 1/4” microphone cable
-XLR balanced microphone cable
2. Gain.
This controls the input level of the input jack. It has a wide range to accommodate a variety of
inputs (instrument, guitar, bass, or microphone)
3. Parameter.
This is used with the UBM Studio software and is used to change or edit settings in the software. It has
2 functions:
-Turn to increase/decrease the selected value.
- Press the knob to move to the next parameter in the UBM Studio window
4. Preset.
This is used with the UBM Studio software and is used to change the currently selected preset.
5. Master.
This knob controls the overall volume of the UBM Solo.
6. Power LED.
3
REAR PANEL LAYOUT
The rear panel connections as shown in the above figure:
1. Power Switch.
Mains power for UBM Solo.
2. Mains cable.
Connect to a 230V mains source.
3. Line Out.
Stereo RCA outputs to connect UBM Solo to an external amp or recording device.
4. Aux In.
Stereo RCA line-level input to connect an external source such as a CD player, iPod, or other
instrument.
5. Pedal.
Input connection to the optional foot pedal controller.
6. Headphone.
Stereo headphone output.
7. USB.
USB connection to the host computer
4
ESING THE UBM SOLO
The UBM Solo is designed to be easy to set up and use. There are 2 basic ways to use the UBM Solo:
standalone mode and USB mode. UBM Solo automatically switches modes, depending on whether
the USB is connected or not.
Standalone mode: The UBM Solo can be used as a “normal' amplifier without a USB connection. Just
leave the USB cable unconnected and the UBM Solo will function as a normal instrument amplifier.
USB mode: Connect the UBM Solo with a USB cable to a host PC running UBM Studio software. The
audio input is routed through the host PC and with the UBM Studio software, it is possible to mix,
record and add effects on the computer. In USB mode, realize that the UBM Solo is a complete USB
Audio Interface + an integrated speaker and amplifier. Using the input and stereo Line Outputs will
give the same function as a basic USB audio interface.
Using UBM Solo in standalone mode
Connect an instrument, guitar or microphone to the input on the front panel. The GAIN knob can be
used to set the input to the best operating volume so the input is not distorted. Then adjust the
MASTER volume knob to a comfortable level.
Auxiliary Input
The AUX jack can accept a stereo line-level audio source to allow playing along with pre-recorded
music. Connect a CD player, iPod, or another audio source to the input. The GAIN knob and the
volume control on the input source can be adjusted to mix the levels. The AUX input can also be
used as a second input for an instrument with a line-level output such as a keyboard or synthesizer.
Line Out
UBM Solo can be connected to an external mixer, amplifier, or recording device using the Line Out
connection. Note that the Line Out is tapped before the internal audio amp, so the level of the
MASTER volume knob does not affect the Line Out level.
Pedal
An external pedal unit can be connected to the UBM Solo to allow foot control of the UBM Studio
software features. Please refer to the UBM Pedal manual for more details.
Headphones
Headphones can be used for private listening and the speaker will be turned off when a pair of
headphones are connected to the UBM Solo.
Software
The UBM Solo package includes a suite of software applications called UBM Studio. This is a
full-featured application that allows you to add effects, record, and play audio files on your
computer through the UBM Solo. Also included is the Native Instruments Guitar Combo package for
amplifier simulation.
5
The UBM Studio main window:
1. Plug-in window.
This shows the effects interface, allowing the editing of effects presets.
2. Play list window.
Shows currently loaded music file for playback. You can click on this window to browse and select
audio file. MP3 and other common audio file formats are supported. It is also possible to simply drag
'n drop files into this window.
3. LOAD button.
Allows loading of an audio file. This is the same as clicking in the playlist window.
4. MUTE button.
Mutes the music file audio.
5. Vol.
Music file volume can be used to adjust the mix of audio input and music file when playing along.
6. Transport controls.
Controls start, stop, rewind, and looping of music files. Record button allows the recording of audio
input on the UBM Solo to a WAV audio file.
7. Main.
This is the master volume for the UBM studio software.
8. Link.
This switches the Master slider between a combined stereo pair or separate L/R controls.
6
The Channel Strip
1. Input Level Meter with Noise Gate Threshold Control.
The Noise Gate helps to suppress audible noise when the input signal is below the threshold. Drag
the GATE label to an optimized threshold position that cuts unwanted noise while keeping tone
dynamics.
2. Mute.
Mutes the input signal. Note that the signal still goes to the VST plug-in allowing silent tuning and level
adjustments
3. Instrument selector.
Choice of Guitar, Bass or Microphone that loads VST plug-ins optimized for these types of inputs.
4. Edit.
This launches the VST plug-ins so they can be edited.*
5. Bypass.
Bypasses the effects for a “clean” tone.
6. Preset Selector.
This is where you select the effects preset. The PRESET knob on the UBM Solo can be used to change
these presets directly from the amp.
7. Save.
Allows the current configuration to be saved in any of the 64 preset locations.
8. Cho/Flg/Trm.
Controls the effect depth of the Chorus, Flanger, and Tremolo effects.
9. Pan.
Left/Right stereo balance of the input signal.
10. Vol.
Master volume for this input channel.
* The first time Native Instruments Guitar Combo is launched, the plug-in will ask you to register the software.
Please follow the directions in this window to complete the registration process. Serial number for registration
can be found on the UBM Studio CD-ROM plastic bag.
7
Installation of UBM Studio software
1. Insert the CD into your PC. It will automatically start the installation procedure. If the driver
software does not automatically start, go the CD in the Windows Explorer and double-click on
Setup.exe.
IMPORTANT! For the driver installation, do NOT connect and turn on UBM before the installation! In the
driver install procedure, the installer will alert you when UBM should be connected.
2. Follow the installation instructions in the installer. This will require you to have the UBM Solo
available to install the drivers properly. Connect the UBM Solo to the PC with a USB cable when
instructed to do so by the installer.
IMPORTANT! During the installation process, a window will appear that says the UBM Studio software has not
passed Windows Logo Testing. This is normal and not a problem. Click on “Continue Anyway” and continue
with the software installation.
3. Start UBM Studio if it is not automatically done by the installer. Short-cuts will also be placed on the
Desktop, and in Program Menu –> DJ-Tech –> UBM Studio.
4. A setup screen will appear allowing advanced configuration if needed. Normally, the default
settings should work without modification. This window can be opened at any time from the Option
-> Setup... menu or pressing the F12 key.
* Note that you should always use the same USB port on the PC when using UBM Solo. Changing to a
different USB port will start the hardware discovery and installation process over again, and will
require the software to be reinstalled for the new USB port.
8
USING USM SOLO WITH UBM STUDIO
UBM Studio was designed to be easy to use. Follow these steps to get started:
1. Connect the PC to a UBM Solo with the included USB cable.
2. Connect an instrument or microphone to the input jack on the UBM Solo and set GAIN to
mid-position.
3. Launch the UBM Studio application and turn on the power to the UBM Solo. Note: If UBM Studio is
started without a UBM Solo connected, the plug-in windows will be blank. This is normal.
4. The first plug-in window will become active and you should see the activity on the level meter.
5. Adjust the MASTER output levels mid-position. You should now hear your instrument or mic through
the UBM Solo.
Loading and playing audio files
Audio files can be loaded into UBM Studio and played back along with the amplifier input for
play-along or Karaoke functions.
Click the LOAD button or drag 'n drop an audio file into the playlist window. Then you can use
transport controls to play back the audio file. The volume fader can be used to adjust the balance
between audio input and the audio file being played back.
Using the Effects window
UBM Studio has its audio input routed through a “channel strip” similar to a mixing console. UBM
Studio supports only 1 channel strip for UBM Solo because it only has 1 audio input. With the channel
strip you can add/change/edit sound effects to the input signal, save and recall presets, and
launch windows to edit the VST plug-ins.
The instrument select button pre-configures the channel strip and plug-ins for the best settings for
that type of input. Choose Guitar, Bass, or Microphone, depending on what is plugged into the UBM
Solo.
If you edit a preset to your liking, it can be saved using the SAVE button into 1 of 64 preset locations
so it can be instantly reloaded next time.
Preset and Parameter knobs
The UBM Solo has 2 knobs on the top panel that allow “remote control” of UBM Studio. This is useful to
change the settings without having to use a mouse. Use these controls to change the settings in the
UBM Studio plug-in window. Pressing the Parameter knob or the Preset knob will advance the control
to the next parameter in the plug-in window. Turning the Preset knob will change effects presets.
9
Advanced Setup window
The UBM studio setup may need to be changed based on your PC setup. Press F12 or choose Option
-> Setup... from the main menu. The window will be shown as above. Many of these options are
advanced configuration features so be aware of the consequences when modifying these settings.
In the setup window it is possible to modify the audio buffer and latency values. A large value will
give very stable quality but more latency, and a smaller value will improve latency and audio
performance, but may make audio unstable depending on CPU speed and configuration. Note
that this can affect performance of the UBM Solo, so adjust it only if you have previous experience
with tuning the drivers.
VST plug-in file pathnames can be modified if you choose to install and run VSTs other than the
bundled software. Follow VST installation procedures from the VST manual to get the required setup
and path information. Controller setup and the assignment of pedal functions for the UBM Pedal are
modified in this section of the window. Use the drop-down menu items to select the desired pedal
function. Knob Sensitivity affects the sensitivity of Parameter encoder knob, making more detailed or
wider adjustments easier.
Other menu items are described below:
- Load/Save Scene – loads/saves current setting of all channels into external SCN file.
- Minimum/Normal/Full-screen View – adjusts the appearance of the window.
- Factory Reset – resets all presets. It can be used to initialize UBM Studio to be default settings if
necessary.
- Help – View Manual (F1) – shows this user manual on-screen.
10
USING THE VST PLUG-ING
Native Instruments Guitar Combos
Plexi Combo from Native Instruments is bundled with UBM SOLO and is installed and set as the
default VST plug-in for guitar. Demo of AC Box Combo and Twang Combo are also included. The
setup files can be found in folder “Program Files\DJ-Tech\UBMStudio\bundle\”. Please refer to the
Guitar Combos manual for more information. The user manual can be found in “Program Menu –>
Native Instruments Plexi Combo –> Documentation” after the installation of Guitar Combos Plug-ins.
BASiliSk
This is a VST for bass guitar.
- Tuner. A built-in tuner allowing you to tune up. The note display shows the note being played and
the tuning meter shows tuning to +/- 50 cents. It is possible to use the MUTE button in the channel strip
for “silent” tuning.
- Compressor/limiter. This is used to suppress the transients in the bass signal, allowing more gain and
“punch.” The Gate knob sets the threshold when the compressor starts to activate. The Comp knob
adjusts the compression ratio, or how much the signal is “squeezed.”
- EQ. BASiliSk has a 4-band Equalizer to modify the tone of the signal. Knobs are Bass, Mid, Treble and
Presence. The Low Cut button cuts the low frequencies for a “punchier” sound.
- Reverb. The button on the bottom enables or disables the Reverb effect. Dry/Wet knob controls the
balance of reverb and original signal. Time knob sets the delay time for a shorter or longer reverb
sound. The Tone knob controls the tone of the reverb signal.
- Volume. This is the master volume for the signal. For best sound, adjust it so there is no distortion on
the level meter above the knob.
MIChelangelo
This is a VST specially designed for voice.
- Compressor/limiter. This is used to suppress the transients in the mic signal. The Gate knob sets the threshold
when the compressor starts to activate. The Comp knob adjusts the compression ratio, or how much the signal is
“squeezed.”
- EQ. MIChelangelo has a 4-band Equalizer to modify the tone of the signal. Knobs are Bass, Mid, Treble and
Presence. The Low Cut button cuts the low frequencies which are usually nodded so important for human voice.
- Delay. The button on the bottom enables or disables the Delay, or echo effect. Dry/Wet knob controls the balance
of delayed and original signals. Time knob sets the delay time for a shorter or longer delay time. The Feedback
knob controls the number of repeats of the echoes.
- Reverb. The button on the bottom enables or disables the Reverb effect. Dry/Wet knob controls the balance of
reverb and original signal. Time knob sets the delay time for a shorter or longer reverb sound. The Tone knob
controls the tone of the reverb signal.
- Volume. This is the master volume for the signal. For best sound, adjust it so there is no distortion on the level
meter above the knob.
11
TROUBLESHOOTING
Problem
No sound (standalone)
No sound (USB mode)
Solution
1. Is power cable connected? Is power switch turned on?
2. Check instrument volume, GAIN setting, MASTER volume
1. Is power cable connected? Is power switch turned on?
2. Check instrument volume, GAIN setting, MASTER volume
3. Check the volume on windows mixer
4. Check UBM Studio’s volume/mute setting
5. Try to install the driver again.
Audio Glitches
1. Change audio driver and output; adjust buffer size and the number of
IRPs setting.
Cannot load music file
1. Unsupported format, corrupted file or codec problem.
2. Install the proper codec or use other files.
Distorted sound
1.Adjust input/output gain lower.
Cannot record
1. Check the temporary folder in the setup for the correct path.
2. Check the free space of hard disk drive.
PC tries to reinstall UBM
1. Use the original USB port where the UBM Solo was plugged into during
Solo hardware
software installation.
UBM Studio not
1. Uninstall UBM Studio SW and install again.
functioning
Other problems Please contact technical support at www.djtechpro.com and check the online FAQ.
12
SPECIFICATIONS
Acoustic Specifications
·Woofer: 5.25" paper cone woofer
·2 x Tweeter: 1'' silk dome Neo magnet with Ferro Fluid
·Amplifier power: 10 Watts RMS / 20 Watts Max
·Frequency Response: 90Hz ~ 20 kHz
·SPL: 92dB@1m/1W
·Cabinet dimension: 260W×162D×242H mm
Hardware Specifications
·Line output: stacked stereo RCA jacks
·Aux input: stacked stereo RCA jack
·Headphone out: 1/4" stereo jack
·USB type B jack for computer connection
·Support for optional foot pedal controller via 1/4" stereo jack
·ADC 90dB SNR, DAC 100dB SNR
Software: UBM Studio
·USB Host-Plug / HID Control
·NSPTM Audio Streaming Host (PC)
·32-bit IEEE floating-point processing / Integrated DSP Plug-ins:
·EQ, Delay, Tremolo, Reverb, Chorus, Flanger
·Wave/mp3/AIFF/WMA/AU playback (2ch.)
·Audio Recording (2ch.)
·Total Recall: presets load and save
·Guitar Combos Native Instrument bundled with GC Plexi with 64 Presets for each plug-in + Tuner
Minimum PC configuration
·Windows XP
·Intel Pentium IV compatible or higher CPU
·256MB RAM
·One available USB port
·100MB free disk space
Recommended PC configuration
·Windows XP
·Intel Pentium IV compatible or higher CPU
·512MB RAM
·One available USB port
·100MB free disk space
13
CONSIGNES DE SÉCURITÉ ET RECYCLGE………………………………………………………………….….…14
AMPLI USB POUR INSTRUMENTS……………………………………………………………………………….….15
DÉTAILS DU PRODUIT………………………………………………………………………………………………..16
Dessus………………………………………………………………………………………………………………...16
Arrière………………………………………………………………………………………………………………...16
FONCTION……………………………………………………………………………………………………………17
INSTALLATION DU LOGICIEL…………………………………………………………………………………..…..18
LE STUDIO VIRTUEL D‘ENREGISTREMENT………………………………………………………………………….21
Description…………………………………………………………………………………………………….…….21
La fenêtre ampli……………………………………………………………………………………………………22
Le menu des options……………………………………………………………………………………..……….24
DÉPANNAGE……………………………………………………………………………………………….……….26
CONSIGNES DE SÉCURITÉ ET RECYCLGE
• Ce mode d’emploi vous permet de vous servir correctement du produit.
Gardez-le précieusement afin de pouvoir le consulter à tout moment.
• Ne démontez pas l‘appareil, sous peine de perdre toute garantie.
• N‘essayez pas de réparer l‘appareil vous-même. Ne le modifiez pas. Risque
• Faites attention lorsque vous manipulez votre produit. Une chute ou un
de blessure!
coup peuvent l‘abîmer.
• Ne l‘exposez pas à l‘humidité ni à la chaleur. Ne pas recouvrir. Ne le plongez pas dans l‘eau.
• Maintenez hors de portée des enfants. Ce produit n’est pas un jouet.
ATTENTION: N’utilisez l’appareil que comme indiqué dans la notice. Aucune garantie ne pourra être
appliquée en cas de mauvaise utilisation. Nous ne sommes pas responsables des conséquences inhérentes à
un dommage. Le fabricant se réserve le droit de modifier les caractéristiques techniques sans notification
préalable pouvant ainsi entraîner des divergences dans ce manuel.
Conseil important concernant le recyclage
Cet appareil électronique ne doit PAS être jeté dans la poubelle de déchets ménagers.
Votre nouveau produit a été développé avec le plus grand soin et avec des composants de haute qualité. Il
devra cependant être un jour recyclé. Le symbole de la poubelle barrée signifie que votre produit devra être
recyclé séparément des ordures ménagères à la fin de sa durée de vie. A l’avenir, veuillez amener tous les
appareils électriques ou électroniques aux points de ramassage publics de votre municipalité.
Ceux-ci prennent en charge vos déchets pour un recyclage écologique. Vous évitez ainsi les conséquences
négatives sur l’homme et l’environnement pouvant découler d’une mauvaise prise en charge des produits à la
fin de leur durée de vie.
Les détails concernant l’emplacement de tels points de ramassage et des éventuelles restrictions de quantité
existantes par jour/mois/année ainsi que sur des frais éventuels de collecte sont disponibles dans votre
municipalité.
14
AMPLI USB POUR INSTRUMENTS
Chère cliente, Cher client,
Nous vous remercions pour l’achat de cet amplificateur USB. Cet amplificateur pour instruments
s’utilise de manière classique ou pour créer un studio d’enregistrement avec votre PC.
Afin d’utiliser au mieux votre nouvel appareil, veuillez lire attentivement ce mode d’emploi et
respecter les consignes et astuces suivantes.
Caractéristiques
• S’utilise comme ampli classique ou en USB
• Puissance du signal d’entrée réglable pour une qualité sonore optimale
• Port pour pédale de contrôle externe (non fournie)
• Studio virtuel
Contenu
• Ampli USB pour instruments
• Mode d’emploi
• Câble USB
• CD pilote et logiciel
Système requis
Processeur:
Pentium IV ou équivalent/supérieur
Mémoire vive:
256 Mo de RAM
Connectique:
port USB libre
Lecteurs:
CD ou DVD
Mémoire:
170 Mo d’espace disque libre
Système d’exploitation:
Windows XP ou Windows Vista
Données techniques
• Enceinte de basses:
5,25“ Paper Cone
• Enceinte d’aigus:
1“ Silk Dome, Aimant Neodymium
• Puissance:
10 Watt RMS/20 Watt Maximum
• Gamme de fréquences:
90 Hz à 20 kHz
• Pression acoustique:
92 dB @ 1 m / 1 W
• Taille (La x Lo x Ha):
260 x 162 x 242 mm
• Entrée Aux:
Port stéréo Cinch
• Sortie casque:
Port stéréo 1/4“
• Entrée USB:
Type-B USB 1 Port
• Formats de lecture:
Wave / mp3 / AIFF / WMA / AU playback
• Poids:
env. 4,5 kg
15
(2 canaux)
DÉTAILS DU PRODUIT
Dessus
• INPUT - Port instruments
Ce port XLR „Combo“ est compatible avec les connecteurs suivants:
- câble guitare 1/4“
- câble micro 1/4“
- câble micro XLR
• GAIN - Réglage amplification
Réglez ici la puissance d’amplification du signal d’entrée. Ceci permet de régler l’amplificateur USB
pour différents appareils comme guitare et microphone.
• PARAMETER - Réglage logiciel
Effectuez des réglages sur le logiciel UBM si l’amplificateur est branché sur votre ordinateur.
- Tournez le bouton pour modifier la valeur sélectionnée vers le haut ou le bas.
- Appuyez sur le bouton pour passer à la valeur suivante.
• PRESET - Bouton Plug-In
Modifie les réglages des Plug-Ins si vous les avez installés.
- Tournez le bouton pour modifier la valeur sélectionnée vers le haut ou le bas.
- Appuyez sur le bouton pour passer à la valeur suivante.
• MASTER - Réglage volume
Modifiez le volume de l’amplificateur USB (volume d’entrée).
Arrière
• POWER - Interrupteur Marche/Arrêt
Allumer et éteindre l’ampli USB.
• 230 V ~ 50 Hz - Alimentation
Câble de branchement électrique.
• AUX IN - Port Stéréo
Port d’entrée des signaux stéréo externes comme lecteur CD ou MP3.
• PEDAL - Port Pédale
Vous pouvez brancher une pédale.
• H.P. - Port casque
Vous pouvez brancher un casque directement sur l’ampli USB.
NOTE: Quand un casque est branché à l’ampli USB, les haut-parleurs se désactivent automatiquement.
• USB - Port USB
Vous pouvez brancher un câble USB vers votre ordinateur.
16
FONCTION
Vous pouvez utiliser l’ampli USB de deux manières différentes. L’appareil passe automatiquement
d’un mode à l’autre quand vous branchez ou débranchez la prise USB.
Variante 1: Amplificateur classique pour instruments
Branchez la prise électrique et allumez l’amplificateur en plaçant l’interrupteur Marche/Arrêt en
position „ON“. Branchez votre instrument ou micro sur l’ampli USB. Utilisez le bouton d’amplification
pour une qualité optimale.
Les ports Cinch permettent aussi d’utiliser l’ampli USB comme haut-parleur stéréo. Ici aussi, utilisez le
bouton d’amplification pour une qualité optimale.
Variante 2: Boîtier de connexion pour PC et studio virtuel
Installez le pilote et le studio d’enregistrement depuis le CD fourni. Voir les consignes du chapitre
„Installation du logiciel (voir p. 42). Branchez la prise électrique et allumez l’amplificateur en plaçant
l’interrupteur Marche/Arrêt en position „ON“. Branchez le câble USB fourni pour relier l’ampli à votre
PC.
Branchez votre instrument ou micro sur le port instruments de l’ampli USB. Utilisez le bouton
d’amplification pour une qualité optimale. Toutes les fonctions du studio d’enregistrement virtuel
sont maintenant à votre disposition. Respectez les consignes du paragraphe „Le studio
d’enregistrement virtuel“ dans le chapitre „Logiciel“ (voir p. 42). Si vous utilisez l’ampli USB ainsi, vous
pouvez aussi brancher une pédale pour commander les fonctions du studio virtuel sans avoir à
lâcher votre instrument des mains.
Le port USB permet aussi d’utiliser l’ampli USB comme haut-parleur pour un appareil de diffusion à
connecteur USB.
17
INSTALLATION DU LOGICIEL
Préparation: Vérifiez que l’ampli USB ne soit pas encore branché à votre ordinateur. Insérez le CD
fourni dans un lecteur CD ou DVD de votre ordinateur. Si l’assistant d’installation ne s’ouvre pas
automatiquement, sélectionnez le lecteur sur le poste de travail, faites un clic droit puis „Explorer“.
Exécutez le fichier „DJ-Tech_UBMStuido_1_0_2_win“ en double cliquant dessus.
Attendez que l’assistant d’installation soit chargé. Cela peut prendre quelques minutes. Choisissez
ensuite la langue „English“ puis cliquez „OK“.
Cliquez ensuite sur „Next“.
Choisissez maintenant l’emplacement d’installation du programme „UBMStudio“. Le dossier par
défaut est „C:\Programme“. Cliquez sur „Browse“ pour utiliser un autre emplacement. Cliquez
ensuite sur „Install“.
Quittez tous les autres programmes et vérifiez que l’ampli USB ne soit pas branché à l’ordinateur.
Cliquez ensuite sur „Next“.
18
Choisissez maintenant l’emplacement d’installation de „ESI- UBM Audio Driver“. Le dossier par
défaut est „C:\Programme“. Cliquez sur „Browse“ pour utiliser un autre emplacement. Cliquez
ensuite sur „Next“.
La fenêtre suivante vous signale que Windows pourrait afficher un message d’avertissement
pendant l’installation. Cliquez sur „Next“.
Le message suivant peut apparaître plusieurs fois pendant l’installation:
Ceci signifie uniquement que Windows ne reconnaît pas ce programme. Cliquez à chaque fois sur
„Continuer l’installation“ pour continuer.
Les pilotes sont alors installés. Allumez l’ampli USB En plaçant l’interrupteur Marche/Arrêt en
position„ON“ et branchez-le au PC via le câble USB fourni. Attendez que votre ordinateur affiche le
message „Nouveau matériel détecté“ en bas à droite. Ceci peut prendre plusieurs secondes.
Cliquez ensuite sur „Next“.
L’assistant commence alors l’installation des pilotes. Ceci peut prendre plusieurs minutes.
Vous pouvez maintenant installer une version de démonstration du programme „Native Instruments
Plexi Combo“. Ce programme permet l’édition d’enregistrements micro et guitare. Cliquez sur
„Next“ pour installer le programme ou sur „Cancel“ pour annuler.
NOTE: L’installation du programme principal „UBMSutdio“ nécessaire pour le fonctionnement de l’ampli
19
USB n’est pas touchée par votre décision à l’étape 8 de l’installation. Si vous voulez installer „Plexi Combo“,
cliquez sur „Next“ et „OK“ pour accepter la licence et continuer l’installation. Vous trouverez plus
d’informations sur les Plug-Ins „BASilisk“ et „MIChelangelo“, contenus dans „Plexi Combo“ dans leurs manuels
respectifs. Pour cela, cliquez sur „Start“
„Native Instruments PlexiCombo“
„Tous les programmes“
“Documentation“.
„UBMStudio“ est maintenant installé sur votre ordinateur. Cochez la case pour démarrer
immédiatement le programme. Cliquez ensuite sur „Finish“.
20
LE STUDIO VIRTUEL D‘ENREGISTREMENT
Après ces quelques étapes simples, votre studio d’enregistrement virtuel sera prêt.
1.
Branchez l’ampli USB à votre PC via le câble USB fourni.
2.
Branchez votre instrument ou micro au port instrument sur le dessus de l’ampli USB.
3.
Placez le bouton d’amplification au milieu.
4.
Cliquez sur „Start“
„Tous les programmes“
„DJ-Tech“
„UBMStudio“
„UBM
Studio“ afin de démarrer le programme. Le menu des options apparaît quand vous démarrez le
programme pour la première fois. Voir les consignes du paragraphe „Le menu des options“ (voir
p. 54).
5.
Placez le bouton „Main“ au milieu.
Description
Une fois le studio d’enregistrement virtuel démarré, vous avez accès aux options suivantes. Vous
pouvez ouvrir les onglets suivants dans la barre du dessus.
• 1. File
Load Scene…
Ouvre un enregistrement au format „*.scn“.
Save Scene…
Enregistre un fichier au format „*.scn“.
Exit
Ferme le programme.
• 2. Option
Minimum View
Cache le cadre Windows de la fenêtre „UBMStudio“.
Normal View
Affichage classique de la fenêtre „UBMStudio“.
Full-screen View
Affiche l’arrière-plan DJ-Tech par dessus le bureau Windows.
Factory Reset
Rétablit le programme aux paramètres par défaut. Tous les réglages précédemment
sont supprimés.
Setup
Ouvre le menu des options. Voir le paragraphe „Le menu des options“
• 3. Help
View Manual
Ouvre un fichier PDF du mode d’emploi. Ce fichier est en anglais.
• 4. Périphériques
21
(voir p. 54).
effectués
La première fenêtre „Ampli“ apparaît quand vous avez branché l’ampli au
port USB de votre
ordinateur. Les autres cases restent vides.
• 5. Playlist
Liste des fichiers. Vous pouvez simplement glisser un fichier musical pour
l’ajouter à la Playlist.
• 6. Load
Ce bouton charge un fichier musical.
• 7. Mute
Ce bouton coupe le son.
• 8. Vol.
Ce bouton règle le volume des fichiers lus (volume de sortie).
• 9. Main
Règle le volume de l’ampli USB (volume d’entrée).
• 10. Link
Relie les boutons de volume stéréo pour l’ampli USB.
• 11. Rec
Démarre un enregistrement.
• 12. Rew
Retour au début de la lecture.
• 13. Stop
Stoppe la lecture.
• 14. Play
Démarre la lecture de la playlist.
• 15. RPT.
Démarre une boucle. La playlist actuelle est répétée jusqu’à ce que vous
l’arrêtiez.
La fenêtre ampli
• 1. Affichage ampli
Affiche le niveau d’amplification.
• 2. Mute
Coupe le son.
• 3. Choix instrument
Adapte le programme à l’instrument branché à l’ampli USB. Choisissez entre guitare (Guitar), Bass
ou Micro (Microfone).
• 4. Edit
Ce bouton démarre les Plug-Ins du programme „Native Instruments Plexi Combo“ si vous l’avez
22
installé.
• 5. Bypass
Ce bouton coupe les sons de second plan que vous aviez sélectionné sous „Sound“.
• 6. Sound
Cette fenêtre permet d’activer différents sons d’arrière plan du programme „Native Instruments
Plexi Combo“ si vous avez installé ce programme.
• 7. Save
Enregistre la configuration actuelle.
• 8. Channel
Affiche les réglages du programme „Native Instruments Plexi Combo“ si
vous
l’avez
installé
et
permet de les modifier avec le „Plug-In-Regler“.
• 9. Cho
Modifie l’effet Chorus.
• 10. Flg
Modifie le mixage (Flanger).
• 11. Trm
Modifie l’effet d’amplitude (Tremolo).
• 12. Pan
Modifie la balance stéréo.
• 13. Vol.
Modifie le volume (volume de sortie).
Le menu contextuel clic droit
Un clic droit de la souris sur la fenêtre „UMBStudio“ ouvre une fenêtre d’options avec plusieurs
onglets.
• Close
Ferme le programme.
• Minimum View
Cache le cadre Windows autour de la fenêtre „UBMStudio“.
• Normal View
Affichage normal de la fenêtre „UBMStudio“.
• Full-screen View
Affiche l’arrière-plan DJ-Tech par dessus le bureau Windows.
• Setup
Ouvre le menu des options. Voir paragraphe „Le menu des options“ (voir p. 54).
Play-Along et Karaoke
Vous pouvez diffuser un fichier audio pendant que vous chantez ou que vous jouez d’un instrument.
Glissez simplement le fichier audio dans la case de la Playlist puis cliquez sur la touche Play. Réglez le
volume comme bon vous semble. Le bouton „Vol.“ sert au volume du fichier lu et le bouton
„Main“ sert au volume de l’instrument/micro.
Fonction mixage
La fenêtre “Channel“ permet de placer des sons sous la musique comme avec une table de
mixage. Pour cette fonction, vous devez avoir installé le programme „Native Instruments Plexi
Combo“. Le choix de l’instrument place automatiquement les menus sur les valeurs optimales. Vous
pouvez enregistrés les réglages modifiés pour les retrouver la fois suivante.
23
Le menu des options
Ce menu permet de modifier les paramètres du programme. Ouvrez le menu des options à tout
moment avec la touche „F12“ de votre clavier.
• Buffer Size (Tampon Audio)
Augmentez la taille du tampon audio pour assurer une qualité audio stable. Baisser cette valeur
permet d’augmenter la qualité mais augmente aussi les ressources système requises. Augmentez
uniquement cette valeur si votre processeur est assez puissant.
• Number of IRPs (I/O request packets)
Augmentez la valeur IRP audio pour assurer une qualité audio stable. Baisser cette valeur permet
d’augmenter la qualité mais augmente aussi les ressources système requises. Augmentez
uniquement cette valeur si votre processeur est assez puissant. Si vous entendez des interférences
ou des coupures, baissez cette valeur jusqu’à ce que la latence (voir en dessous) baisse.
• Latency (Latence)
Cette valeur affiche le décalage les des échanges de fichiers entre „UBMStudio“ et le système
d’exploitation. La valeur idéale dépend des performances de votre ordinateur.
• VST Plug-in
Si vous avez installé el programme „Native Instruments Plexi Combo“ après „UBMStudio“, vous
pouvez définir ici l’emplacement d’enregistrement des Plug-Ins. Respectez les consignes du mode
d’emploi du programme.
• Disable Screen Saver
Cochez cette case pour désactiver l’économiseur d’écran quand „UBMStudio“ est actif. Ainsi vous
gardez toujours le programme en vue pendant que vous enregistrez et dirigez le programme via
l’ampli USB ou une pédale.
• Allways on Top
Cochez cette case pour que la fenêtre „UBMStudio“ reste toujours active par dessus les autres. Vous
gardez ainsi toujours une bonne visibilité du programme.
• Temporary Folder
Cliquez sur „Browse“ pour sélectionner une nouvel emplacement d’enregistrement des fichiers
temporaires de „UBMStudio“.
• Color
Choisissez la couleur du mode plein écran.
24
• Image
Cochez pour afficher l’arrière plan DJ-Tech en plein écran. Cliquez sur „Browse“ pour choisir une
autre image de votre ordinateur.
Choisissez „Center“ pour afficher l’image au milieu de l’écran.
Choisissez „Tile“ pour afficher une mosaïque.
Choisissez „Stretch“ pour étirer l’image.
• Knob Sensitivity
Réglez la sensibilité du bouton de l’ampli USB. Modifiez cette valeur à votre guise.
• Pedal 1
Définissez quelle fonction correspond au mouvement de pédale. Respectez la description des
fonctions du paragraphe „Description“ (voir p. 48) et le mode d’emploi de votre pédale.
• Pedal 2~4
Les valeurs Pedal 2-4 n’ont pas d’utilité pour ce programme et restent donc grisées.
NOTE: La modification des valeurs „Buffer Size“ et „Number of IRPs“ modifie la latence entre UBMStudio
et Windows. Modifiez ces valeurs uniquement si vous vous y connaissez en enregistrement audio. Si vous avez
modifié ces valeurs et obtenez de mauvais résultat, rétablissez les paramètres du programme UBMStudio par
défaut (voir p. 49).
25
DÉPANNAGE
Aucun son en mode ampli classique.
- Vérifiez que le câble électrique soit branché.
- Vérifiez que l’interrupteur Marche/Arrêt soit sur „ON“.
- Augmentez le bouton de volume.
- Modifiez le bouton d’ampli.
- Vérifiez que le volume sur l’instrument ou le micro soit au maximum.
- Vérifiez que l’instrument ou le micro n’ait pas une fonction „Muet“ activée.
Aucun son en mode ampli USB via l’ordinateur.
- Vérifiez les même points que ci-dessus.
- Vérifiez le volume de la fenêtre UMBStudio.
- Vérifiez que la fonction „Muet“ de UMBStudio ne soit pas active.
- Réinstallez le logiciel UBMStudio et le pilote.
Le son est brouillé.
Adaptez la taille du tampon audio et la valeur IRP. Voir paragraphe „Le menu des options“ (voir p.
54).
Le son est saturé.
Baissez le bouton d’amplification.
Un fichier musical ne peut pas être ouvert.
- Installez les codecs requis sur votre ordinateur.
- Tentez d’ouvrir le fichier avec un autre programme de lecture pour voir s’il est endommagé.
Le programme UBMStudio ne démarre pas.
Réinstallez le programme. Respectez les consignes du paragraphe „Installation“ (voir p. 42).
Impossible d’enregistrer.
Vérifiez d’avoir assez d’espace mémoire pour les fichiers temporaires. Respectez les consignes du
paragraphe „Le menu des options“ (voir p. 54).
26
27