1
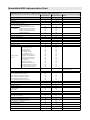
MasterMind
User’s Manual
RJM Music Technology, Inc.
MasterMind
User’s Manual
Version 1.3
August 14, 2008
RJM Music Technology, Inc.
2525 Pioneer Ave.
Suite 2
Vista, CA 92081
+1-760-597-9450
email: [email protected]
web: www.rjmmusic.com
Copyright © 2008 RJM Music Technology, Inc. All Rights Reserved
RG-16, Amp Gizmo, MasterMind and the RJM logo are trademarks of RJM Music Technology, Inc.
Table of Contents
Introduction........................................................................................................................................................................................ 1
MasterMind Features.............................................................................................................................................................................................. 1
Controls and Connectors.................................................................................................................................................................. 4
Front Panel................................................................................................................................................................................................................. 4
Rear Panel................................................................................................................................................................................................................... 4
Basic Operation................................................................................................................................................................................... 5
Using the MasterMind with RJM Music Technology products.................................................................................................................5
Controlling Multiple RJM Music Products.................................................................................................................................................. 6
Alternate Presets.................................................................................................................................................................................................. 6
Expression Pedal.................................................................................................................................................................................8
Remote Access.................................................................................................................................................................................... 9
Setup Mode....................................................................................................................................................................................... 10
Entering Setup Mode.......................................................................................................................................................................................... 10
Setup Mode Buttons............................................................................................................................................................................................ 10
Global Setup........................................................................................................................................................................................................... 11
Entering Global Setup.................................................................................................................................................................................... 11
Preset Setup............................................................................................................................................................................................................ 13
Entering Preset Setup..................................................................................................................................................................................... 14
Exiting Setup Mode ............................................................................................................................................................................................. 16
MIDI Data Transfer............................................................................................................................................................................17
Specifications....................................................................................................................................................................................18
MasterMind MIDI Implementation Chart.................................................................................................................................... 19
Warranty............................................................................................................................................................................................ 22
5
Introduction
Congratulations on purchasing the MasterMind MIDI foot controller. The MasterMind has been designed to be the ideal
mid-sized controller - compact yet powerful, and durable enough withstand the rigors of the road.
When used with other RJM Music Technology products, the MasterMind requires virtually no setup - just plug and play.
The MasterMind can also control standard MIDI devices - up to fourteen MIDI devices on separate MIDI channels. The
MasterMind can access up to 125 presets, and can also control devices by use of the Function button and Expression
Pedal input.
MasterMind Features
•
•
•
•
•
•
•
•
"Plug and play" operation with other RJM products
Transmits up 4 Program Change messages and 8 Continuous Controller messages per preset
Expression pedal input
125 presets, arranged in 25 banks of 5 presets
Function switch sends Continuous Controller messages, or can activate the "alternate preset" capability of the Amp
Gizmo and RG-16.
Phantom power capability when using a 7 pin MIDI cable
Remote In jack, which allows the synchronized use of multiple MasterMind controllers on stage
Rugged 18 gauge steel enclosure
1
2
Function
Select
1
SETUP
RJM Music Technology, Inc.
MIDI Foot Controller
MasterMind
Front Panel
Program / CC
Number
2
8888
Function
CC On/Off
3
SETUP
Global Select
CC Value
4
Bank
MIDI Ch
5
3
Rear Panel
Controls and Connectors
Front Panel
1. Buttons 1 through 5 – These buttons select the active preset number within the current bank. Pressing one of
these buttons will immediately call up the selected preset. The LEDs above these buttons shows which preset is
currently active.
2. Bank Down and Bank Up – These buttons select the bank you wish to select presets from. When either of these
buttons is pressed, the preset number and preset LEDs begin flashing. Pressing Bank Down decreases the current bank
number by 1 (down to a minimum of 0) and pressing Bank Up increases the current bank number by 1 (up to a
maximum of 24). Once you’ve reached the desired bank, press one of the preset (1-5) buttons to select a preset within
that bank. The MasterMind doesn’t send any commands until a preset button is selected.
3. Function button – This button can be used to send Continuous Controller messages, or it can be used to access the
Alternate Preset function found on other RJM Music Technology products. It can be configured differently for each
preset.
4. Display - The display shows the current bank and preset number. It will show a three digit number such as “123”,
where “12” is the current bank number and “3” is the current preset within that bank. If the Alternate Preset feature is in
use, the display will show an “A” before the bank number.
Rear Panel
6. Power – The MasterMind can accept power supplies of 9 to 18 volts, AC or DC. The power supply must be able to
deliver at least 200mA. The connector is a standard 5.5mm/2.1mm barrel connector and can be either center negative
or center positive.
7. Exp Pedal – This jack allows you to connect an expression pedal to the MasterMind.
8. Remote In – This is a MIDI input port. It can be used for receiving MIDI patch data, program changes or can be used
to connect multiple MasterMinds together and allow them to control each other.
9. MIDI Out – This is the main MIDI output. Connect this port to the MIDI device(s) you wish to control. You can use a
standard 5-pin MIDI cable here, but if you connect a 7-pin MIDI cable, you can phantom power the MasterMind over the
MIDI cable. If you phantom power, you can use the MasterMind without it needing its own power supply.
IMPORTANT NOTES ON PHANTOM POWER: Don’t connect a power supply to the MasterMind if you are phantom
powering it! Doing so can damage the MasterMind and/or connected devices! Also, before attempting to phantom
power the MasterMind, please make sure the device you’re connecting to is compatible. The device must provide 9 to
18 volts AC or DC over pins 6 and 7 of the MIDI cable. All RJM Music Technology products are compatible, as are many
others such as those by Rocktron. Products that provide phantom power over pins 1 and 3 of the MIDI cable (such as
the Voodoo Lab GCX) can not phantom power the MasterMind without the use of a special 5-pin to 7-pin adaptor.
Connecting such a product directly to the MasterMind can damage the MasterMind. Please visit the FAQ section of the
RJM Music website for a list of products known to be able to phantom power the MasterMind.
4
Basic Operation
The MasterMind can store up to 125 presets, organized in 25 banks of 5 presets each. Each preset sends MIDI messages
to control different MIDI devices, telling them to load a new program, change a sound parameter, turn an effect on or
off or perform any other function that they’re capable of.
In normal use, the MasterMind’s display shows the current bank and preset number:
Bank Number
024
Preset Number
To change presets within a bank, simply step on one of the buttons numbered 1 through 5. The last digit in the display
will change, and the MasterMind will send the MIDI commands associated with the new preset.
To change banks, use the Bank Up (up arrow) and Bank Down (down arrow) buttons to increase or decrease the bank
number. Pressing each button will increase or decrease by one. Holding the button down will cause the bank number to
count up or down automatically. When you’re done selecting the bank, the preset number in the display will flash,
indicating that you now need to select a preset number. Press one of the preset buttons to complete the selection. The
display will stop flashing and the MasterMind will send the MIDI commands for the new preset.
By default, each preset is set up to send a MIDI Program Change message on MIDI channel 1. This basic setup is enough
to control many MIDI devices without further configuration.
Using the MasterMind with RJM Music Technology products
The MasterMind has been designed to work with other RJM Music products, such as the RG-16 and Amp Gizmo, with a
minimum of setup. Once you’ve connected the MasterMind’s MIDI Output to the other device’s MIDI Input, the
programming process is as follows:
1. On the MasterMind, select a bank number (if needed), then select a preset number.
2. On the device you wish to control, use the front panel buttons to select which functions, loops, etc., you wish to
have active for this preset.
3. On the device you wish to control, hold down the Write button until its LEDs flash.
That’s it! You can repeat this process for each preset you wish to set up.
5
Controlling Multiple RJM Music Products
If you have multiple RJM Music products, controlling them is just as easy. Just make sure that the MIDI Thru of the first
device is connected to the MIDI Input of the second device, the MIDI Thru of the second device is connected to the MIDI
Input of the third device, and so on.
The programming process is the same as above, just follow step 1, then repeat steps 2 and 3 for each device you have.
Alternate Presets
When using the MasterMind with products like the RG-16 and Amp Gizmo, you have access to a special feature called
Alternate Presets. With this feature, you can assign a second preset to each main preset. The Function button on the
MasterMind allows you to toggle between the two presets. When an Alternate Preset is active, an “A” is displayed to the
left of the bank number.
This is especially useful in a performance setting. For example, let’s say you’re using the MasterMind with an RG-16.
You’ve set up the first bank with the following settings:
001: Clean sound (amplifier on clean channel, no effects).
002: Bluesy sound (amplifier on clean channel, overdrive pedal active)
003: Crunch sound (amplifier on crunch channel, no effects)
004: Drive sound (amplifier on lead channel, no effects)
005: Solo sound (amplifier on lead channel, compressor and delay pedals active)
Now, you can add alternate patches that are variants of each of the main patches - sometimes you might want to kick in
a chorus pedal with your clean sound, or you might want to use a harmonizer with your solo sound for certain accent
parts. You can set up something like this:
Main Presets
Alternate Presets
001: Clean sound
A001: Clean sound w/ chorus
002: Bluesy sound
A002: Bluesy sound w/ tremolo
003: Crunch sound
A003: Solo sound
004: Drive sound
A004: Drive sound w/ flanger
005: Solo sound
A005: Solo sound w/ harmonizer
With this setup, you can press the 1 button to get your clean sound, then press Function to turn chorus on or off as
desired. The same applies to the other presets - pressing the Function button will switch between the main preset and
the alternate preset assigned to it. NOTE: When an alternate preset is active, pressing any numbered preset button will
deactivate the alternate preset and switch to the selected main preset.
Please note that the alternate preset doesn’t necessarily need to be a slight modification of the main preset - you can
have the alternate preset call up an entirely different sound, such as presets 003 and A003 in the example above. In that
example, the main and alternate presets have completely different amp channels and effects.
6
Programming an Alternate Preset is very similar to normal programming:
1. On the MasterMind, select a bank number (if needed), then select a preset number.
2. Press the Function button to select the Alternate Preset. An “A” should appear at the left side of the display.
3. On the device you wish to control, use the front panel buttons to select which functions, loops, etc., you wish to
have active for this alternate preset.
4. On the device you wish to control, hold down the Write button until its LEDs flash.
Or, to program both a main preset and its alternate:
1. On the MasterMind, select a bank number (if needed), then select a preset number.
2. On the device you wish to control, use the front panel buttons to select which functions, loops, etc., you wish to
have active for the main preset.
3. On the device you wish to control, hold down the Write button until its LEDs flash.
4. Press the Function button to select the Alternate Preset. An “A” should appear at the left side of the display.
5. On the device you wish to control, use the front panel buttons to select which functions, loops, etc., you wish to
have active for the alternate preset.
6. On the device you wish to control, hold down the Write button until its LEDs flash.
7
Expression Pedal
The MasterMind has a port that allows you to connect an external expression pedal. An expression pedal can be used
with MIDI-capable effects processors to provide real time control of different parameters: volume level, echo rate, etc.
The MasterMind translates the position of the pedal to MIDI Continuous Controller messages and sends them out the
MIDI Out port. The effects processor receives these messages and alters the effects accordingly.
Using Setup Mode, you can set the expression pedal to send a different Continuous Controller message for each preset
on the MasterMind. By default, it sends CC#7 (volume) on MIDI channel 1.
Many expression pedals on the market will work. Pedals that have a stereo (TRS) 1/4” output jack and have the
potentiometer wiper connected to the ring conductor of the output jack will definitely work. The Rocktron Hex is an
example of one that works well, and the Roland EV-5 is an example of one pedal that doesn’t work well. Check the FAQ
section on the RJM Music website for the current list of pedals known to work with the MasterMind.
You can also use a standard volume pedal as an expression pedal. For this you need a 1/4” Y-cable, also known as an
insert cable. The stereo end of the Y cable plugs into the MasterMind and the two mono ends plug into the input and
output of the volume pedal:
To MasterMind Exp Pedal Jack
Tip
Sleeve
Volume Pedal Input
Sleeve
Tip
Volume Pedal Output
Tip
Sleeve
Ring
8
Remote Access
You can connect multiple MasterMinds together and have them operate in unison. Selecting a preset or pressing the
Function button on any controller causes the other controllers to switch to the same settings. This is a great feature for
both stage and studio - you can have multiple controllers at different locations on the stage, have an additional
controller operated off-stage by a tech, or have controllers in both the studio and the control room.
Before enabling Remote Access, all of your MasterMinds need to have the same preset data stored on them. Use the
process described in the MIDI Data Transfer section to transfer the data from one unit to another until all of your
MasterMinds are up to date.
Next, to enable Remote Access, you need to enter Global Setup and turn on the Remote Enable parameter on all of the
MasterMinds you wish to link. Next, connect the Remote In jack of the first MasterMind to the MIDI Out of the second
MasterMind, the Remote In of the second MasterMind to the MIDI Out of the third one, and so on. The first MasterMind
(the only one that doesn’t have its MIDI Out jack connected to the Remote In of another MasterMind) should have its
MIDI Out jack connected to the rest of your rig.
When the MasterMinds are turned on, you’ll notice that all but the first MasterMind will have the Remote indicator lit:
024
Remote Indicator
This means that the controllers are communicating. Pressing a preset button on one controller will cause all of the
controllers to switch to that preset.
Please note that chaining multiple MasterMinds together will incur a small delay in preset switching. With two, three or
even four MasterMinds, you shouldn’t notice any delay. If you start going beyond four, you may notice a little delay,
especially when using the last controller in the line. Also, if you start going beyond four MasterMinds, please contact us
because we really want to hear about the huge rig you’re building!
9
Setup Mode
If you are controlling devices made by other manufacturers or just need additional control over your settings, you can
use Setup Mode to configure the MasterMind. Setup Mode is very powerful and as a result takes some time to learn, but
if you spend the time to get comfortable with it, you can use it to configure the MasterMind for almost any rig.
Setup Mode is divided into two sections: Global Setup and Preset Setup. Global Setup is where you tell the MasterMind
what devices are connected to it and what types of MIDI messages to send to them. Global Setup also allows you to set
other parameters that apply to the MasterMind as a whole - things that don’t change from preset to preset. Also, you
can use Global Setup to perform utility functions such as transfer settings to and from the MasterMind or return the
MasterMind to factory default settings.
Preset Setup is where you tell the MasterMind exactly what MIDI messages should be sent for each preset - what
Program Change and Continuous Controller messages should be sent to each device connected to the MasterMind, and
what the Function button and Expression Pedal should do for each preset.
Entering Setup Mode
To enter Setup Mode, press the 1 and 3 buttons at the same time. The indicator dot just left of the bank number will
flash to tell you that you are now in Setup Mode and will remain flashing until you leave Setup Mode.
Setup Mode Indicator
024
Setup Mode Buttons
When in setup mode, the buttons’ secondary functions are active. These are the gray labels found underneath most
buttons. The buttons function as follows:
1 / Function Select - Enters Preset Setup mode if not already in Preset Setup, or selects the next Preset parameter. The
LED above this button turns on when in Preset Setup mode.
2 / Program/CC Number - Changes the Program Number or Continuous Controller number associated with the current
parameter. The LED above this button turns on when this button is active.
3 / CC On/Off - Toggles a Continuous Controller value between 0 or 127. Or, for parameters that have On/Off values ,
toggles between On and Off. The LED above this button turns on when this button is active.
4 / CC Value - Sets the value of a Continuous Controller. Every time you press this button, the value increments by 1,
until it wraps around to 0. The LED above this button turns on when this button is active.
5 / MIDI Ch - Sets the MIDI channel for a particular parameter. The LED above this button turns on when this button is
active.
10
Function / Global Select - Enters Global Setup mode if not already in Global Setup, or selects the next Global
parameter. The LED above this button turns on when in Global Setup mode.
Bank Down - In Preset Setup, decrements the current preset number by 1. Also used as the “No” button when the
MasterMind is asking a Yes/No question.
Bank Up - In Preset Setup, increments the current preset number by 1. Also used as the “Yes” button when the
MasterMind is asking a Yes/No question.
Global Setup
When you enter Setup Mode for the first time, the first thing you’ll likely want to do is enter Global Setup. Global Setup
allows you to define which devices are connected to the MasterMind and what types of messages are sent to them. You
do this by setting Program Change and Continuous Controller destinations. There are four Program Change
destinations, labeled PC1 through PC4, and eight Continuous Controller destinations labeled CC1 through CC8.
Each Program Change destination can be set to any MIDI channel (or none). Each destination typically corresponds to
one MIDI device. For example, PC1 could be set to the MIDI channel of your RJM RG-16, PC2 could be set to the MIDI
channel of one MIDI-enabled effects processor, and PC3 could be set to the MIDI channel of a second MIDI-enabled
effects processor. Note that you only set MIDI channels here. In Preset Setup (see next section), you will define the
program number that’s sent to each Program Change destination for each preset.
Each Continuous Controller destination is set to a particular MIDI channel and controller number. These destinations
can be set to be Continuous Controllers on multiple MIDI devices, or they can all be on the same device, each
controlling a different parameter. Once the MIDI channel and controller number is set in Global Setup, you can set each
controller’s value for each preset using Preset Setup.
Entering Global Setup
Once you’ve entered Setup Mode, pressing the Function/Global Select button puts you into Global Setup. The green
LED above the button will light to tell you that Global Setup is active. You are now ready to edit the first parameter.
Watching the display, you’ll see that it alternates between displaying PC1 and CH01. It’s telling you that the first Program
Change destination is set to MIDI channel 1. The LED above the 5 / MIDI Ch button will be lit, indicating that it is active
and can be used to change the MIDI channel. Pressing this button will increment the MIDI channel by 1, until it reaches
16 (the maximum). Pressing it again will change it to read CH--, which means no MIDI message will be sent to this
Program Change destination. Pressing the button again will set the channel back to the minimum, which is CH01.
All the other Global parameters can be edited in this way. Pressing the Function / Global Select button will move you
to the next parameter. Once you reach the end of the parameter list, pressing Function / Global Select will bring you
back to the first parameter in the list.
The Global parameters are as follows:
PC1 -
Program Change Destination #1
(MIDI Ch range: CH01 - CH16, CH-- (PC1 disabled) , Default value: CH01 )
Sets the MIDI channel for the first Program Change destination. Press 5 / MIDI Ch to select the MIDI Channel.
PC2 -
Program Change Destination #2
(MIDI Ch range: CH01 - CH16, CH-- (PC2 disabled) , Default value: CH-- )
11
Sets the MIDI channel for the second Program Change destination. Press 5 / MIDI Ch to select the MIDI Channel.
PC3 -
Program Change Destination #3
(MIDI Ch range: CH01 - CH16, CH-- (PC3 disabled) , Default value: CH-- )
Sets the MIDI channel for the third Program Change destination. Press 5 / MIDI Ch to select the MIDI Channel.
PC4 -
Program Change Destination #4
(MIDI Ch range: CH01 - CH16, CH-- (PC4 disabled) , Default value: CH-- )
Sets the MIDI channel for the fourth Program Change destination. Press 5 / MIDI Ch to select the MIDI Channel.
CC1 -
Continuous Controller Destination #1
(MIDI Ch range: CH01 - CH16, CH-- (CC1 disabled) , Default value: CH--)
(CC number range: c000 - c127, Default value: c080)
Sets the MIDI channel and CC number for the first Continuous Controller destination. Press 2 / Program/CC Number to
select the CC number and 5 / MIDI Ch to select the MIDI Channel.
CC2 -
Continuous Controller Destination #2
(MIDI Ch range: CH01 - CH16, CH-- (CC2 disabled) , Default value: CH--)
(CC number range: c000 - c127, Default value: c081)
Sets the MIDI channel and CC number for the second Continuous Controller destination. Press 2 / Program/CC Number
to select the CC number and 5 / MIDI Ch to select the MIDI Channel.
CC3 -
Continuous Controller Destination #3
(MIDI Ch range: CH01 - CH16, CH-- (CC3 disabled) , Default value: CH--)
(CC number range: c000 - c127, Default value: c082)
Sets the MIDI channel and CC number for the third Continuous Controller destination. Press 2 / Program/CC Number to
select the CC number and 5 / MIDI Ch to select the MIDI Channel.
CC4 -
Continuous Controller Destination #4
(MIDI Ch range: CH01 - CH16, CH-- (CC4 disabled) , Default value: CH--)
(CC number range: c000 - c127, Default value: c083)
Sets the MIDI channel and CC number for the fourth Continuous Controller destination. Press 2 / Program/CC Number
to select the CC number and 5 / MIDI Ch to select the MIDI Channel.
CC5 -
Continuous Controller Destination #5
(MIDI Ch range: CH01 - CH16, CH-- (CC5 disabled) , Default value: CH--)
(CC number range: c000 - c127, Default value: c084)
Sets the MIDI channel and CC number for the fifth Continuous Controller destination. Press 2 / Program/CC Number to
select the CC number and 5 / MIDI Ch to select the MIDI Channel.
CC6 -
Continuous Controller Destination #6
(MIDI Ch range: CH01 - CH16, CH-- (CC6 disabled) , Default value: CH--)
(CC number range: c000 - c127, Default value: c085)
Sets the MIDI channel and CC number for the sixth Continuous Controller destination. Press 2 / Program/CC Number to
select the CC number and 5 / MIDI Ch to select the MIDI Channel.
CC7 -
12
Continuous Controller Destination #7
(MIDI Ch range: CH01 - CH16, CH-- (CC7 disabled) , Default value: CH--)
(CC number range: c000 - c127, Default value: c086)
Sets the MIDI channel and CC number for the seventh Continuous Controller destination. Press 2 / Program/CC
Number to select the CC number and 5 / MIDI Ch to select the MIDI Channel.
CC8 -
Continuous Controller Destination #8
(MIDI Ch range: CH01 - CH16, CH-- (CC8 disabled) , Default value: CH--)
(CC number range: c000 - c127, Default range: c087)
Sets the MIDI channel and CC number for the eighth Continuous Controller destination. Press 2 / Program/CC Number
to select the CC number and 5 / MIDI Ch to select the MIDI Channel.
FNBA - Function Key Bank Support
(Enable range: On, OFF, Default value: On)
Turning this parameter on enables MIDI bank support for the Function key. Press 3 / CC On/Off to toggle this parameter
on or off. This needs to be on if you plan to use the Alternate Preset feature with other RJM Music products, but can be
turned off otherwise.
RENA - Remote Enable
(Enable range: On, OFF, Default value: OFF)
Turning this parameter on enables remote access mode, where two or more MasterMinds can be linked together and
synchronized. See the Remote Access section for more details. Press 3 / CC On/Off to toggle this parameter on or off. If
you’re connecting something other than a MasterMind to the Remote In port, this parameter should be set to OFF.
rCCh - MIDI Receive Channel
(MIDI Ch range: CH01 - CH16, CH-- (MIDI receive disabled) , Default value: CH--)
Sets the MIDI channel on which the MasterMind receives Program Change messages. Press 5 / MIDI Ch to select the
MIDI Channel. If this is enabled, a Program Change message coming in on the Remote In port will cause a preset to be
selected and the MasterMind will send all of the MIDI messages for that preset, just as if the preset was selected from
the front panel buttons.
SEND - MIDI Dump Send
(Yes/No selection: Press Bank Up (Yes) to send, Bank Down (No) to exit Setup Mode)
Pressing Bank Up when this parameter is selected will cause the MasterMind to send its configuration data out the MIDI
Out port. If the MIDI Out port is connected to the MIDI In port of another MasterMind, the data will be transferred to the
MasterMind. The data can also be sent to a PC that has a MIDI interface and Sysex librarian software for backup
purposes.
InIt - Initialize
(Yes/No selection: Press Bank Up (Yes) to initialize, Bank Down (No) to exit Setup Mode)
Pressing Bank Up when this parameter is selected will cause the MasterMind to erase its memory, returning to the
factory default state. Be careful! This wipes the entire memory and there’s no way to restore your settings unless you
have previously backed them up to a PC or another MasterMind.
Preset Setup
Once you’ve finished Global Setup, you can set up each preset. In this mode, you set which Program Change number is
sent to each Program Change destination, and set which controller value is sent for each Continuous Controller for
every preset. You can also set up the Function button and Expression Pedal for each preset in this mode.
13
Entering Preset Setup
The MasterMind goes straight to Preset Setup when you enter Setup Mode. If you happen to be in Global Setup, you
can press the 1 / Function Select button to switch to Preset Setup. The red LED above the 1 / Function Select button
will light to tell you that Preset Setup is active. You are now ready to edit the first parameter.
Watching the display, you’ll see that it alternates between displaying the current preset number, PC1 and a program
change number. If you’re on preset 001 and haven’t changed anything from the defaults, you’ll see it alternate between
P001, PC1 and =001. This means that, for preset 001, it will send program change #1 to PC1. (Remember that PC1 is a
destination for Program Change messages and was set to a specific MIDI channel in Global Setup).
The LED above the 2 / Program/CC Number button will be lit, indicating that it can be used to change the program
number. Pressing this button will increment the program number by 1, until it reaches 128 (the maximum). Pressing it
again will set the program number back to the minimum, which is =001.
(Important Note: Some MIDI devices use program numbers 1 through 128 and some use program numbers 0 through
127. If your device is one of the latter, your program numbers will be off by 1. Selecting program 1 on the MasterMind
will cause the device to select program 0. Selecting program 2 on the MasterMind will cause the device to select
program 1, etc.)
All the other Preset parameters can be edited in this way. Pressing the 1 / Function Select button will move you to the
next parameter. If a parameter has been disabled in Global Setup (for example if PC2 is set to CH--), it will not appear in
Preset Setup. Once you reach the end of the parameter list, pressing 1 / Function Select again will bring you back to
the first parameter in the list.
The Preset parameters are as follows:
PC1 -
Program Change #1
(Program Change number range: =001 - =128 , Default value: preset 001 defaults to =001, preset 002 defaults to
=002, etc. )
Sets the program number for the first Program Change destination. Press 2 / Program/CC Number to select the
program number.
PC2 -
Program Change #2
(Program Change number range: =001 - =128 , Default value: 001)
Sets the program number for the second Program Change destination. Press 2 / Program/CC Number to select the
program number.
PC3 -
Program Change #3
(Program Change number range: =001 - =128 , Default value: 001)
Sets the program number for the third Program Change destination. Press 2 / Program/CC Number to select the
program number.
PC4 -
Program Change #4
(Program Change number range: =001 - =128, Default value: 001)
Sets the program number for the fourth Program Change destination. Press 2 / Program/CC Number to select the
program number.
14
FunC - Function Button
(MIDI Ch range: CH01 - CH16, CH-- (Function button disabled) , Default value: CH01)
(CC number range: c000 - c127, Default value: c000)
Sets the Continuous Controller message sent by the Function button for this preset. If bank support is enabled (see
Global Setup), c000 will be displayed instead as ban (bank). Setting this parameter to ban will enable the Alternate
Preset feature for this preset (see Alternate Presets section). Setting it to any other value will cause normal Continuous
Controller messages to be sent. Press 2 / Program/CC Number to select the Continuous Controller number, press 5 /
MIDI Ch to select the MIDI Channel.
PDL -
Expression Pedal
(MIDI Ch range: CH01 - CH16, CH-- (Expression pedal disabled) , Default value: CH01)
(CC number range: c000 - c127, Default value: c007)
Sets the Continuous Controller message sent by the Expression Pedal for this preset. Press 2 / Program/CC Number to
select the Continuous Controller number, press 5 / MIDI Ch to select the MIDI Channel.
CC1 -
Continuous Controller #1
(CC value range: =000 - =127, Default value: 000)
Sets the value for the first Continuous Controller destination. Press 4 / CC Value to set the value, or press 3 / CC On/Off
to quickly toggle between the most commonly used values: =000 and =127.
CC2 -
Continuous Controller #2
(CC value range: =000 - =127, Default value: 000)
Sets the value for the second Continuous Controller destination. Press 4 / CC Value to set the value, or press 3 / CC On/
Off to quickly toggle between the most commonly used values: =000 and =127.
CC3 -
Continuous Controller #3
(CC value range: =000 - =127, Default value: 000)
Sets the value for the third Continuous Controller destination. Press 4 / CC Value to set the value, or press 3 / CC On/Off
to quickly toggle between the most commonly used values: =000 and =127.
CC4 -
Continuous Controller #4
(CC value range: =000 - =127, Default value: 000)
Sets the value for the fourth Continuous Controller destination. Press 4 / CC Value to set the value, or press 3 / CC On/
Off to quickly toggle between the most commonly used values: =000 and =127.
CC5 -
Continuous Controller #5
(CC value range: =000 - =127, Default value: 000)
Sets the value for the fifth Continuous Controller destination. Press 4 / CC Value to set the value, or press 3 / CC On/Off
to quickly toggle between the most commonly used values: =000 and =127.
CC6 -
Continuous Controller #6
(CC value range: =000 - =127, Default value: 000)
Sets the value for the sixth Continuous Controller destination. Press 4 / CC Value to set the value, or press 3 / CC On/Off
to quickly toggle between the most commonly used values: =000 and =127.
CC7 -
Continuous Controller #7
(CC value range: =000 - =127, Default value: 000)
Sets the value for the seventh Continuous Controller destination. Press 4 / CC Value to set the value, or press 3 / CC On/
Off to quickly toggle between the most commonly used values: =000 and =127.
15
CC8 -
Continuous Controller #8
(CC value range: =000 - =127, Default value: 000)
Sets the value for the eighth Continuous Controller destination. Press 4 / CC Value to set the value, or press 3 / CC On/
Off to quickly toggle between the most commonly used values: =000 and =127.
Exiting Setup Mode
To exit Setup Mode, press and hold the 1 / Function Select button, then press the 3 / CC On/Off button, then release
both buttons. The MasterMind will return to normal operating mode and the Setup Mode indicator will stop flashing.
It’s important to note that your changes are not saved until you exit Setup Mode. Be sure to exit Setup Mode before
removing power from the MasterMind.
16
MIDI Data Transfer
Selecting “Send” in Global Setup will send the current MasterMind configuration data out through the MIDI Out port.
You can then save this data to your computer or copy the settings directly to another MasterMind.
If you wish to copy settings from one MasterMind to another, connect the MIDI Out of the transmitting unit to the
Remote In of the receiving unit, then enter Global Setup, select the “Send” parameter and press Bank Up. (Note that the
receiving MasterMind must be in normal operating mode to receive data.) The receiving unit’s display will flash,
indicating that data is being transferred. The transfer goes very quickly, taking only a couple of seconds. In the case of
an error, the receiving unit will flash its LEDs repeatedly.
Once the transfer completes, the receiving unit will reset, then return to normal operating mode. The receiving unit now
has an exact copy of the transmitting unit’s settings.
17
Specifications
Dimensions
Weight
Power
Phantom Power
Memory
18
16 (W) x 6 (D) x 2.75 (H) inches
40.6 (W) x 15.2 (D) x 7 (H) cm
3.9 lbs
1.8 kg
9-18V, AC or DC @ 200mA
5.5mm OD, 2.1mm ID x 9.5mm barrel connector
Accepted over pins 6 and 7 of the MIDI Out jack, same specs as above
Do not connect phantom power at the same time as the AC adaptor!
Do not use pins 1 and 3 for phantom power!
125 presets, arranged in 25 banks of 5
Memory is non-volatile and requires no backup battery
MasterMind MIDI Implementation Chart
MIDI Implementation Chart v 2.0 (Page 1 of 3)
Manufacturer: RJM Music Technology, Inc. Model: MasterMind
Version: 1
Date: August 14, 2008
Transmit/Export
Recognize/Import
1-16
No
1-128
1-16
No
1-128
No
No
No
No
Yes
Yes
No
No
No
No
No
No
No
No
No
No
No
No
No
No
No
No
No
No
No
No
No
No
No
No
No
No
No
Yes
Yes
No
No
No
No
No
No
No
No
No
No
No
No
No
No
No
No
No
No
No
No
No
No
No
No
No
Manufacturer or Non-Commercial System Exclusive
Yes
Yes
NRPNs (Yes/No)
RPN 00 (Pitch Bend Sensitivity) (Yes/No)
RPN 01 (Channel Fine Tune) (Yes/No)
RPN 02 (Channel Coarse Tune) (Yes/No)
RPN 03 (Tuning Program Select) (Yes/No)
RPN 04 (Tuning Bank Select) (Yes/No)
RPN 05 (Modulation Depth Range) (Yes/No)
2. MIDI Timing and Synchronization
MIDI Clock (Yes/No)
Song Position Pointer (Yes/No)
Song Select (Yes/No)
Start (Yes/No)
Continue (Yes/No)
Stop (Yes/No)
MIDI Time Code (Yes/No)
MIDI Machine Control (Yes/No)
MIDI Show Control (Yes/No)
If yes, MSC Level supported
3. Extensions Compatibility
General MIDI compatible? (Level(s)/No)
Is GM default power-up mode? (Level/No)
DLS compatible? (Levels(s)/No)
(DLS File Type(s)/No)
Standard MIDI Files (Type(s)/No)
No
No
No
No
No
No
No
No
No
No
No
No
No
No
No
No
No
No
No
No
No
No
No
No
No
No
No
No
No
No
No
No
No
No
No
No
No
No
No
No
No
XMF Files (Type(s)/No)
No
No
SP-MIDI compatible? (Yes/No)
No
No
Remarks
1. Basic Information
MIDI Channels
Note Numbers
Program change
Bank Select Response? (Yes/No)
If yes, list banks utilized in remarks column
Mode 1: Omni-On, Poly (Yes/No)
Mode 2: Omni-On, Mono (Yes/No)
Modes supported :
Mode 3: Omni-Off, Poly (Yes/No)
Mode 4: Omni-Off, Mono (Yes/No)
Multi Mode (Yes/No)
Note-On Velocity (Yes/No)
Note-Off Velocity (Yes/No)
Channel Aftertouch (Yes/No)
Poly (Key) Aftertouch (Yes/No)
Pitch Bend (Yes/No)
Active Sensing (Yes/No)
System Reset (Yes/No)
Tune Request (Yes/No)
Sample Dump Standard (Yes/No)
Device Inquiry (Yes/No)
File Dump (Yes/No)
MIDI Tuning (Yes/No)
Master Volume (Yes/No)
Master Balance (Yes/No)
Notation Information (Yes/No)
Universal System
Turn GM1 System On (Yes/No)
Exclusive:
Turn GM2 System On (Yes/No)
Turn GM System Off (Yes/No)
DLS-1 (Yes/No)
File Reference (Yes/No)
Controller Destination (Yes/No)
Key-based Instrument Ctrl (Yes/No)
Master Fine/Coarse Tune (Yes/No)
Other Universal System Exclusive
Channel 1 is set by default
RJM Music Technology, Inc.
Manuf. ID: 00 01 5B
MIDI Implementation Chart v 2.0 (Page 2 of 3)
Manufacturer: RJM Music Technology, Inc. Model: MasterMind
Control #
Function
0
Bank Select (MSB)
1
Modulation Wheel (MSB)
2
Breath Controller (MSB)
3
4
Foot Controller (MSB)
5
Portamento Time (MSB)
6
Data Entry (MSB)
7
Channel Volume (MSB)
8
Balance (MSB)
9
10
Pan (MSB)
11
Expression (MSB)
12
Effect Control 1 (MSB)
13
Effect Control 2 (MSB)
14
15
16
General Purpose Controller 1 (MSB)
17
General Purpose Controller 2 (MSB)
18
General Purpose Controller 3 (MSB)
19
General Purpose Controller 4 (MSB)
20
21
22
23
24
25
26
27
28
29
30
31
32
Bank Select (LSB)
33
Modulation Wheel (LSB)
34
Breath Controller (LSB)
35
36
Foot Controller (LSB)
37
Portamento Time (LSB)
38
Data Entry (LSB)
39
Channel Volume (LSB)
40
Balance (LSB)
41
42
Pan (LSB)
43
Expression (LSB)
44
Effect Control 1 (LSB)
45
Effect Control 2 (LSB)
46
47
48
General Purpose Controller 1 (LSB)
49
General Purpose Controller 2 (LSB)
50
General Purpose Controller 3 (LSB)
51
General Purpose Controller 4 (LSB)
52
53
54
55
56
57
58
59
60
61
62
63
Version: 1
Date: August 14, 2008
Transmitted (Y/N)
Recognized (Y/N)
Y
N
Y
N
Y
N
Y
N
Y
N
Y
N
Y
N
Y
N
Y
N
Y
N
Y
N
Y
N
Y
N
Y
N
Y
N
Y
N
Y
N
Y
N
Y
N
Y
N
Y
N
Y
N
Y
N
Y
N
Y
N
Y
N
Y
N
Y
N
Y
N
Y
N
Y
N
Y
N
Y
N
Y
N
Y
N
Y
N
Y
N
Y
N
Y
N
Y
N
Y
N
Y
N
Y
N
Y
N
Y
N
Y
N
Y
N
Y
N
Y
N
Y
N
Y
N
Y
N
Y
N
Y
N
Y
N
Y
N
Y
N
Y
N
Y
N
Y
N
Y
N
Y
N
Y
N
Y
N
Remarks
Function switch default
Exp pedal default
MIDI Implementation Chart v 2.0 (Page 3 of 3)
Manufacturer: RJM Music Technology, Inc. Model: MasterMind Version: 1 Date: August 14, 2008
Control # Function
Transmitted (Y/N)
Recognized (Y/N)
64
Sustain Pedal
Y
N
65
Portamento On/Off
Y
N
66
Sostenuto
Y
N
67
Soft Pedal
Y
N
68
Legato Footswitch
Y
N
69
Hold 2
Y
N
70
Sound Controller 1 (default: Sound Variation)
Y
N
71
Sound Controller 2 (default: Timbre / Harmonic Quality)
Y
N
72
Sound Controller 3 (default: Release Time)
Y
N
73
Sound Controller 4 (default: Attack Time)
Y
N
74
Sound Controller 5 (default: Brightness)
Y
N
75
Sound Controller 6 (GM2 default: Decay Time)
Y
N
76
Sound Controller 7 (GM2 default: Vibrato Rate)
Y
N
77
Sound Controller 8 (GM2 default: Vibrato Depth)
Y
N
78
Sound Controller 9 (GM2 default: Vibrato Delay)
Y
N
79
Sound Controller 10 (GM2 default: Undefined)
Y
N
80
General Purpose Controller 5
Y
N
81
General Purpose Controller 6
Y
N
82
General Purpose Controller 7
Y
N
83
General Purpose Controller 8
Y
N
84
Portamento Control
Y
N
85
Y
N
86
Y
N
87
Y
N
88
Y
N
89
Y
N
90
Y
N
91
Effects 1 Depth (default: Reverb Send)
Y
N
92
Effects 2 Depth (default: Tremolo Depth)
Y
N
93
Effects 3 Depth (default: Chorus Send)
Y
N
94
Effects 4 Depth (default: Celeste [Detune] Depth)
Y
N
95
Effects 5 Depth (default: Phaser Depth)
Y
N
96
Data Increment
Y
N
97
Data Decrement
Y
N
98
Non-Registered Parameter Number (LSB)
Y
N
99
Non-Registered Parameter Number(MSB)
Y
N
100
Registered Parameter Number (LSB)
Y
N
101
Registered Parameter Number(MSB)
Y
N
102
Y
N
103
Y
N
104
Y
N
105
Y
N
106
Y
N
107
Y
N
108
Y
N
109
Y
N
110
Y
N
111
Y
N
112
Y
N
113
Y
N
114
Y
N
115
Y
N
116
Y
N
117
Y
N
118
Y
N
119
Y
N
120
All Sound Off
Y
N
121
Reset All Controllers
Y
N
122
Local Control On/Off
Y
N
123
All Notes Off
Y
N
124
Omni Mode Off
Y
N
125
Omni Mode On
Y
N
126
Poly Mode Off
Y
N
127
Poly Mode On
Y
N
Remarks
CC1 default
CC2 default
CC3 default
CC4 default
CC5 default
CC6 default
CC7 default
CC8 default
Warranty
RJM Music Technology, Inc. warrants this product against any defects in material or workmanship for a period of one
year from the original date of purchase.
Should you experience any difficulty with this RJM Music product, please contact us as described below. If it is
determined that the product has become defective within the warranty period and must be returned to the factory,
RJM Music Technology will issue a Returned Merchandise Authorization (RMA) number and shipping and packaging
instructions.
RJM Music Technology will repair or replace the product free of charge, provided it is returned freight prepaid to RJM
Music Technology with a copy of a valid receipt and RMA number. Return shipping will be paid by RJM Music
Technology within the U.S. only.
This warranty is transferable provided the current owner has the original dated purchase receipt and can provide a copy
of it when submitting the warranty claim.
This warranty shall not apply to any goods that have been repaired or altered by anyone other than RJM Music
Technology, Inc. or an RJM Music Technology authorized service center. This warranty does not cover damage to the
product resulting from accidents or misuse. This is your sole warranty. There are no warranties which extend beyond the
terms described herein.
RJM Music Technology, Inc.
2525 Pioneer Ave.
Suite 2
Vista, CA 92081
+1-760-597-9450
E-Mail: [email protected]