1
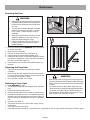
Freestanding Gas Range
Estufa Autoestable de Gas
Cuisinière à gaz amovible
Use and Care Manual
Guide d’utilisation et d’ entretien
Manual de uso y cuidado
for Models beginning with HGS
PLEASE READ ENTIRE INSTRUCTIONS BEFORE PROCEEDING.
IMPORTANT: Save these instructions.
INSTALLER: Please leave these instructions with this unit for the owner.
OWNER: Please retain these instructions for future reference.
Household Appliances
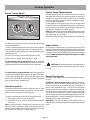
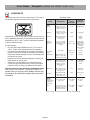
A Special Message
to Our Customers
Dear Bosch Range Owner:
Thank you and congratulations on the purchase of your Bosch Gas Range. Whether
you are an expert chef or an aspiring cook, we know that your new range will exceed
your expectations. Decades of knowledge and experience are built into this range
making it among the highest quality, most versatile and most efficient available.
We ask that you read this manual thoroughly before using your new range. Please pay
particular attention to the safety precautions printed at the front of this book and the
numerous safety hints and cautions placed throughout. Also, be sure to familiarize
yourself with the proper operation of the range and its cleaning and maintenance
procedures. Adherence to these instructions and procedures will assure that you
realize the full potential of your new Bosch range as well as maintain it for years of
dependable use.
Thank you and good cooking,
BSH Home Appliances Corporation
WARNING
When used in accordance with its intended purposes
and properly cared for, your new Bosch range has been
designed to be a safe, reliable appliance. Read all
instructions carefully before using this range. These
precautions will reduce the risk of burns, electric shock,
fire, and injury to persons. Do not operate the oven or
cooktop controls if the glass is broken. Food splatter or
cleaning solution may penetrate a broken control panel
and create a risk of electric shock. Contact a qualified
technician immediately should your glass control panel
become broken. When using kitchen appliances, basic
safety precautions must be followed, including those in
the following pages.
IMPORTANT SAFETY NOTICE
The California Safe Drinking and Toxic Enforcement
Act requires the Governor of California to publish a list
of substances known to the state to cause cancer, birth
defects or other reproductive harm, and requires
businesses to warn customers of potential exposure to
such substances.
The burning of gas cooking fuel and the elimination of
soil during self-cleaning can generate small amounts
of Carbon Monoxide.
The fiberglass insulation in self-clean ovens gives off
very small amounts of formaldehyde during the first
several cleaning cycles.
California lists formaldehyde as a potential cause of
cancer. Carbon Monoxide is a potential cause of
reproductive toxicity.
Exposure to these substances can be minimized by:
1. Providing good ventilation when cooking with gas
2. Providing good ventilation during and immediately
after self cleaning the oven.
3. Operating the unit according to the instructions in
this manual.
The Bosch range referred to thoughout this manual is manufactured by BSH Home Appliance Corp.
Table of Contents
Important Safety Instructions ............................................................................. 1
Getting Familiar with Your Range ....................................................................... 4
Setting Up Your Range
Setting and Changing the Clock ............................................................................
Setting the Functions ...........................................................................................
Accessing and Using the Select Functions Menu ..............................................
Volume ........................................................................................................
Change Temperature .....................................................................................
Temperature Format .....................................................................................
Time Format .................................................................................................
Lock Keys .....................................................................................................
Language Option ..........................................................................................
Clock Display ................................................................................................
Oven Temperature Offset ..............................................................................
Demo Mode ..................................................................................................
Reset Defaults ..............................................................................................
Sabbath Feature ...........................................................................................
6
7
7
8
8
8
8
8
8
9
9
9
9
9
The Cooktop
Cooktop Features ................................................................................................ 10
Cooktop Operation .............................................................................................. 11
The Oven
Oven Modes and Features ....................................................................................
Oven Modes and Features - Bake and Convection Bake ..........................................
Oven Modes and Features - Broil ..........................................................................
Oven Modes and Features - Convection Roast .......................................................
Oven Modes and Features - Dehydrate (HDS24 and HDS25 models only) ................
Selecting the Oven Mode .....................................................................................
Using the Timer (s) .............................................................................................
Using Timed Cook ...............................................................................................
Using the Probe (HDS25 models only) ..................................................................
12
13
14
15
16
17
18
19
20
The Warming Drawer (HDS24 and HDS25 models only) ............................................ 21
Care and Cleaning
Cooktop .............................................................................................................. 23
Oven .................................................................................................................. 24
Self Help, Maintenance, Etc.
Cookware Selection Guide ....................................................................................
Maintenance
Removing the Oven Door ..............................................................................
Replacing the Oven Light ..............................................................................
Self Help .............................................................................................................
Customer Service and Warranty ...........................................................................
27
28
28
29
32
Important Safety Instructions
Please read all instructions before using this appliance.
APPLIANCE SAFETY
• This appliance must be properly installed and grounded by
a qualified technician. Connect only to properly grounded
outlet. Refer to Installation Instructions for details. Have
the installer show you where the gas shut-off valve is.
• This is a high-tech appliance. Service should only be
performed by an authorized service technician who has
undergone training for this specific type of unit. Unauthorized
service technicians may not be familiar with the sophisticated
workings of this appliance, and may therefore cause damage
to the unit or create a hazard. Contact the nearest authorized
service center for examination, repair or adjustment.
• Do not repair or replace any part of the range unless
specifically recommended by an authorized service technician.
• Do not operate this appliance if it is not working properly
or if it has been damaged, until an authorized servicer has
examined it.
• Use this appliance only for its intended use as described in
this manual. If you have any questions, contact the
manufacturer.
• Do not cover or block any openings on this appliance.
• Do not use corrosive chemicals, vapors, flammables or
nonfood products in this appliance. This type of range is
specifically designed to heat or cook food. It is not designed
for industrial or laboratory use. The use of corrosive
chemicals in heating or cleaning will damage the appliance
and could result in injury.
• In the event that personal clothing or hair catches fire,
DROP AND ROLL IMMEDIATELY to extinguish flames.
• Do not allow children to use this appliance unless closely
supervised by an adult. Children and pets should not be left
alone or unattended in the area where the appliance is in
use. They should never be allowed to sit or stand on any
part of the appliance or to play in its vicinity, whether or not
the appliance is in use.
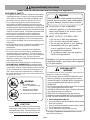
WARNING
•
•
•
ALL RANGES CAN TIP.
INJURY TO PERSONS COULD
RESULT.
INSTALL ANTI-TIP DEVICE
PACKAGED WITH RANGE.
SEE INSTALLATION INSTRUCTIONS.
CAUTION
Items of interest to children should not be stored
in the range, in cabinets above the range or on the
backsplash of the range. Children climbing on the
range to reach items could be seriously injured.
WARNING
If the information in this manual is not followed
exactly, a fire or explosion may result causing
property damage, personal injury or death.
Do not store or use combustible
materials, gasoline or other flammable
vapors and liquids in the vicinity of this
or any other appliance.
WHAT TO DO IF YOU SMELL GAS:
Do not try to light any appliance.
Do not touch any electrical switch.
Do not use any phone in your building.
Immediately call your gas supplier
from a neighbor’s phone. Follow the
gas supplier’s instructions.
If you cannot reach your gas supplier,
call the fire department.
Installation and service must be performed by
a qualified installer, authorized service agency
or the gas supplier.
PERSONAL SAFETY
WARNING
To reduce the risk of injury to persons, in the event of a
grease fire, observe the following:
• In the event of a grease fire, SMOTHER FLAMES with a closefitting lid, cookie sheet, or other metal tray, then turn off the
elements. BE CAREFUL TO PREVENT BURNS. If the flames do
not go out immediately, EVACUATE AND CALL THE FIRE
DEPARTMENT.
• Do not use water, including wet dishcloths or towels, on grease
fires. A violent steam explosion may result.
• SMOTHER FLAMES from other types of food fires with baking
soda. NEVER use water on cooking fires.
• NEVER PICK UP A FLAMING PAN. You may be burned.
• ALWAYS have a working SMOKE DETECTOR near the kitchen.
• LEAVE THE HOOD VENTILATOR ON when flambéing food.
• Use an extinguisher ONLY IF:
• You know you have a Class ABC extinguisher, and you already
know how to operate it.
• The fire is small and contained in the area where it started.
• The fire department is being called.
• You can fight the fire with your back to an exit.
This range is intended for residential use only. It is not
approved for outdoor use.
Page 1
Important Safety Instructions
Please read all instructions before using this appliance.
COOKTOP SAFETY
• When using the cooktop, DO NOT TOUCH THE HOT COOKING
AREA OR THE IMMEDIATE SURROUNDING AREA. Areas
adjacent to the burners may become hot enough to cause
burns. Never let clothing, potholders, or other flammable
materials come in contact with a cooking area until it has
cooled.
• Use high heat settings on the cooktop only when
necessary.Heat oil slowly on no more than a low-medium
setting, to avoid bubbling and splatter. Hot oil is capable
of causing extreme burns and injury.
• Never move a pan of hot oil, especially a deep fat fryer.
Wait until it is cool.
• Never leave the cooktop unattended. Boilovers can
cause smoke and possibly damage the cooktop.
• Hold the handle of the pan to prevent movement of the
utensil when stirring or turning food.
• Other than the use of metal pans, only certain types of
glass,heatproof glass ceramic, ceramic, or other glazed
utensils are suitable for cooktop use. Other types of utensils
may break with sudden temperature changes. Use only on
low or medium heat settings according to the utensil
manufacturer’s directions.
• Take care that drafts like those from fans or forced air
vents do not blow flammable material toward the flames
or push the flames so that they extend beyond the edges of
the pan.
• Always position handles of utensils inward so they do not
extend over adjacent work areas, burners or the edge of
the cooktop.
• Do not clean the cooktop while it is still hot. Some
cleaners produce noxious fumes when applied to a hot
surface.
SELF-CLEANING SAFETY
• Confirm that the door locks and will not open once the
door lock icon appears. If the door does not lock, touch
OFF and do not run Self-Clean. Phone 800/944-2904
for service.
• Note: During a normal Self Clean cycle, the door does not
lock at the beginning of the cycle; However, it does lock prior
to reaching the high self clean temperatures. In a Delayed
Self- Clean cycle, the door locks immediately.
• Do not clean the oven gasket. It is essential for a good seal.
Care should be taken not to rub, damage, move or remove
the oven gasket.
• Do not use commercial oven cleaners or oven liner protective
coatings of any kind in or around any part of the oven.
• Clean only oven parts listed in this manual.
• Before self-cleaning the oven, remove the broiler pan,
oven racks, oven probe and other utensils and wipe
out excess soft spillage.
REGARDING PET BIRDS:
Birds have very sensitive respiratory systems. Keep pet birds
out of the kitchen or other rooms where kitchen fumes could
reach them. During self clean, fumes are released that may be
harmful to birds. Other kitchen fumes such as overheating
margarines and cooking oils may also be harmful.
OVEN SAFETY
To reduce the risk of fire:
• Do not store flammable materials in. on or near the oven.
• Do not use water or a wet rag or towel on a grease fire.
Smother fire with baking soda or use a dry chemical or
foam-type (ABC) extinguisher.
• Have an appropriate fire extinguisher available, nearby,
highly visible and easily accessible near the oven.
• Do not use the oven’s cavity for the storage of any item,
especially anything that is combustible, toxic, or flammable.
• If materials inside the oven should ignite, keep oven door
closed.Turn off oven, disconnect the circuit at the
circuit breaker box and turn off gas supply at shut off valve.
• Do not block any vent openings. NEVER cover any slots, holes
and passages in the oven bottom or cover an entire rack with
materials such as aluminum foil. Doing so blocks air flow
through the oven and may cause carbon monoxide poisoning.
Aluminum foil linings may also trap heat, causing a fire hazard.
• Never use the oven to warm or heat a room. This can
damage the oven parts and may result in carbon monoxide
poisoning or overheating of the oven.
• Never wear loose-fitting or hanging garments while using the
appliance. Be careful when reaching for items stored over the
range. Flammable material could be ignited if brought in
contact with hot surface units or heating elements and may
cause severe burns.
• Do not allow anyone to climb, stand, lean, or sit on any part
of the oven, nor to hang on the oven door, warming drawer,
or storage drawer. This can damage the range, and the unit
may tip over, potentially causing severe injury.
• Have the installer show the location of the gas shutoff valve
and the circuit breaker or fuse . Mark the circuit breaker or
fuse for easy reference.
WARMING DRAWER SAFETY
To reduce the risk of fire, electric shock, or injury to
persons:
• Do not use the warming drawer for storage. Flammable or
combustible material may ignite, and toxic material could
produce toxic vapors or explode.
• Exercise caution when opening the drawer-standing to the
side, open the door slowly and slightly to let hot air and/
or steam escape, keeping your face clear of the opening
and making sure there are no children or pets near the unit.
Only after the release of hot air and/or steam should you
proceed to access the warming drawer. Unless needed for
cooking or cleaning purposes, keep drawer shut, and do
not leave the drawer open unattended.
• Do not place food in unopened containers in the warming
drawer. Pressure could build up and cause containers to
burst.
Page 2
Important Safety Instructions
ADDITONAL PRECAUTIONS FOR GASPOWERED APPLIANCES:
•
•
RANGE SAFETY
If you smell gas, your installer has not done a proper job
of checking for leaks. If the connections are not perfectly
tight, you can have a small leak and, therefore, a faint
smell. Finding a gas leak is not a “do-it-yourself”
procedure. Some leaks can only be found with the burner
control in the ON position and this must be done by a
qualified service technician. See warning, “What to do if
you Smell Gas.”, page 1.
In the event that a burner goes out and gas escapes,
open a window or door. Do not attempt to use the cooktop
until the gas has had time to dissipate. Wait at least five
minutes before using the range.
•
Do not hang articles from any part of the appliance or
place anything against the oven. Some fabrics are quite
flammable and may catch on fire.
•
If the range is near a window, be certain the curtains do
not blow over or near the cooktop burners. They could
catch on fire.
•
When using the cooktop, do not touch the burner grates
or the immediate surrounding area. Areas adjacent to
the burners may become hot enough to cause burns.
•
Never leave the cooktop unattended when in use. Boilovers
cause smoking and greasy spillovers that may ignite.
More importantly, if the burner flames are smothered,
unburned gas will escape into the room. See warning,
“What to do if you Smell Gas”, page 1.
•
•
Avoid high flame settings with a pan larger than the grate
or with one that spans more than one burner, for
prolonged periods of time. That can result in poor
combustion that results in harmful by-products.
For proper lighting performance of the burners, keep the
ignitor ports clean. It is necessary to clean these when
there is a boilover or when the burner does not light even
though the electronic ignitors click.
•
After a spill or boilover, turn off the burner and allow
cooktop to cool. Clean around the burner and burner
ports. After cleaning, check for proper operation.
•
Be sure all cooktop controls are turned off and the cooktop
is cool before using any type of aerosol cleaner on or
around the cooktop. The sprayed chemicals could ignite
or cause hot metal parts to corrode.
•
Grease is flammable. Let hot grease cool before
attempting to handle it. Avoid letting grease deposits
collect. Clean after each use.
•
Do not allow flames to spread around or over the rim of
pan that contains grease. A grease fire could be ignited.
•
Always place pan on burner before turning it on. Be sure
you know which knob controls which burner. When cooking
is complete, turn the burner off before removing the pan.
•
•
•
•
•
•
•
•
•
•
•
•
•
•
Page 3
In order to prevent possible burn injury while using the
appliance, tie long hair so that it does not hang loose, and
do not wear loose fitting clothing or hanging garments,
such as ties, scarves, jewelry, or dangling sleeves. Avoid
reaching or leaning over the appliance. Be aware that
certain clothing and hair sprays may contain flammable
chemicals.
The burners may be hot even though they are not on.
Interior surfaces of an oven become hot enough to cause
burns.
Do not touch burners or interior surfaces of oven during
operation.
During and after use, do not touch or let clothing or other
flammable materials contact the burners or the interior
surfaces of the oven until they have had sufficient time to
cool.
The trim on the sides of the oven door may become hot
enough to cause burns.
Exercise caution when opening the door-standing to the
side, open the door slowly and slightly to let hot air and/or
steam escape, keeping your face clear of the oven opening
and making sure there are no children or pets near the unit.
Only after the release of hot air and/or steam should you
proceed with your cooking. Unless needed for cooking or
cleaning purposes, keep doors shut, and do not leave open
doors unattended.
Do not heat unopened food containers. Build-up of pressure
may cause the container to burst and cause injury.
Always place oven racks in desired location while oven is
cool. If a rack must be moved while oven is hot, do not let
potholder contact the hot heating elements.
Use only dry potholders. Moist or damp potholders on hot
surfaces may result in burns from steam. Do not let potholder
touch hot heating elements. Do not use a towel or other
bulky cloth.
Keep the oven free from grease build up.
Do not place food directly on oven bottom.
When using cooking or roasting bags in the oven, follow the
manufacturer’s directions.
Do not use aluminum foil to line oven bottoms. Improper
installation of aluminum foil may result in a risk of electric
shock or fire.
To avoid electric shock, do not operate the oven without the
light bulb cover in place.
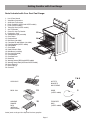
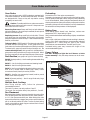
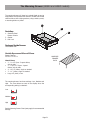
Getting Familiar with Your Range
Parts Included with Your Dual Fuel Range:
1.
2.
3.
4.
5.
6.
7.
8.
9.
10.
11.
12.
13.
14.
15.
16.
17.
18.
19.
20.
21.
22.
23.
24.
25.
26.
27.
28.
Use & Care Manual
Installation Instructions
AHAM Anti-Tip Brochure
Bosch Cookbook (HGS24 and HGS25 models)
Probe (HGS25 models)
Telescopic Rack (HGS25 models)
Anti-Tip Bracket
Screws for Anti-Tip Bracket
15
Registration Card
Incandescent Lights (not visible)
Oven Control
16
Panel and Knob
Broil Burner (not visible)
Convection Fan and Element (not visible)
Probe Receptacle (HGS25 models)
Rack Positions
Oven Gasket
Model & Serial # Plate
Bake Burner (not visible)
Door Lock (not visible)
Oven Rack Back
Oven Rack Front
Broiler Pan
Warming Drawer(HGS24 and HGS25 models)
Warming Drawer Rack (HGS24 and HGS25 models)
Burner Grates (2)
Burner Caps (4)
Oven Vent
12
11
28
24
18
21
7&8
OVEN RACK
ANTI-TIP
BRACKETS
AND SCREWS
22
BROIL PAN
23
PROBE
(HGS25 models)
5
WARMING
DRAWER
RACK
(HGS24 and
HGS25 models)
25
TELESCOPIC
RACK
(HGS25 models)
6
Actual parts are larger than depicted in above graphics.
Page 4
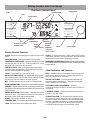
Getting Familiar with Your Range
The Oven Control Panel
Light
Cooking Mode
Temperature
Time
Clock/ Timer
Light
Cooking Mode
AM
PM
Time
Temperature
BAKE
Start
Off
Off
Oven
Temperature
Preheat or Probe
Temperature
Lock
Indicator
Probe
Indicator
(HGS25 models)
Display Window Features
CLOCK– Shows the time of day with a 12-hour or 24-hour clock
option.
Warming
Drawer
Indicator
Start
Control Knob
(HGS24 and
HGS25 models)
COOKING MODE - Touch pad to display cooking mode.
TIMER – There are two timers- TIMER 1 AND TIMER 2; Each
counts down the time in hours and minutes. With less than 60
minutes remaining, the timer also displays seconds.
COOKING OR TIMED MODE – Shows the number of hours and
minutes the oven will be “on.” Cooking mode icon is also
displayed when cooking mode is selected.
WARMING DRAWER INDICATOR (HGS24andHGS25models) Icon displays when warming drawer is in use. Indicates warming
drawer setting.
CONTROL KNOB - Used to set the clock and timers, select
cooking mode and temperature. Turn clockwise to increase
and turn counterclockwise to decrease.
Other Indicators and Features
LIGHT - Touch pad to turn oven light on or off.
DOOR LOCK INDICATOR - Icon is displayed during the selfclean mode when the door is locked. DO NOT attempt to open
the door until the lock symbol is no longer present.
OFF - Touch pad to turn off oven and/ or warming drawer.
OVEN TEMPERATURE - Shows the oven temperature selected.
BEEP - Signals that more information must be entered or
confirms the receipt of an entry. A beep also signals the
end of a program or an oven error.
DEFAULT SETTINGS - The cooking modes automatically
select the default temperature. These can be changed
when a different one is needed.
PREHEAT - Displays temperature of oven during preheat mode.
Also displays internal temperature of meat when probe is in use
(HGS25 models).
FLASHING SYMBOL OR NUMBER - Signals an
incomplete setting and calls for another step or START to
be touched.
PROBE INDICATOR (HGS25 models) - Indicates the probe is
installed in oven. The internal temperature of the meat is
displayed in place of the preheat temperature.
F NUMBER CODES - These codes are displayed if there is
a problem with the range.
START - Touch pad to complete an entry.
TEMPERATURE - Touch pad to select cooking temperature.
TIME - Touch pad to set time of day and/or timer.
CONVECTION FAN - The convection fan operates during
any convection mode. When the oven is operating in the
convection mode, the fan will turn off automatically when
the door is opened except when in the dehydrate mode.
The convection fan will also run during the preheat time
for specific modes and during the self-clean mode.
Page 5
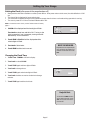
Setting Up Your Range
Setting the Clock (after power to the range has been off)
•
•
•
•
Always set the clock after installation or after a power failure. Once power returns to the oven, the clock defaults to 12:00
am.
The time of day is displayed in hours and minutes.
The clock time will appear during all oven operations except when the timer or a timed cooking operation is running.
The oven is preset to a 12-hour clock and indicates AM or PM.
Note: To switch to a 24 hr. clock, see the "Select Function” section,
page 7.
1. CLOCK will be displayed and the hour digits will flash.
12 : 00
AM
CLOC
K
CLOCK
Turn knob to select hour and AM or PM. Turning to the
right increases by 1 hour increments; turning to the left
decreases by 1 hour increments.
2. Touch TIME. CLOCK will still be displayed and the
minute digits will flash.
3. Turn knob. Set minutes.
BEEP REMINDER
If operation is not completed,the
oven will beep periodically as a
reminder to set clock time. Push
OFF.
4. Touch TIME and the clock is now set.
Changing the Clock Time
1. Touch Time. TIMER 1 will flash in display.
2. Turn knob to select CLOCK .
3. Touch TIME again and hour digits will flash.
4. Turn knob to change hours.
0: 00
5. Touch TIME again and minute digits will flash.
HR:MIN
TIMER
6. Turn knob clockwise or counter-clockwise to change
minutes.
AM
TIMER 1
7. Touch TIME again and the clock is set.
Helpful Hint
To cancel the TIME selection
when setting the clock, touch
OFF at any time while in the
clock mode.
Page 6
Setting Up Your Range
SELECT FUNCTIONS is the section of the menu where you can set or change the following features on your range:
VOLUME (decrease or increase loudness
of control beeps)
TEMPERATURE FORMAT (switch temperature
scale to Fahrenheit or Celsius)
TIME FORMAT (12 hr or 24 hr)
LOCK KEYS (oven control pad lockout )
LANGUAGE OPTION (for display; select English,
Spanish, or French)
CLOCK DISPLAY (yes or no)
OVEN TEMPERATURE OFFSET (used to calibrate
the oven temperature)
DEMO MODE (used by appliance stores)
RESET DEFAULTS (change all function settings
back to original factory settings)
SABBATH FEATURE (for religious faiths with “no
work” requirements on the Sabbath)
NOTE: In the event of a power failure, the functions return
to the factory settings and will need to be reset.
Accessing and Using the Select Functions
Menu
To access the SELECT FUNCTIONS menu, touch and hold
COOKING MODE pad for five (5) seconds.
SELECT FUNCTION is displayed.
1. Turn knob to desired feature.
2. Press START to choose any function, and turn knob to
choose any sub-functions.
3. After selecting feature(s), touch OFF to save settings.
TIPS on Using Functions
• There will be a slight delay before
each message (or feature) can be
seen in the display.
• Turn knob slowly, and wait
approximately one second for
display to show next feature.
• To move through the feature
menu, slowly turn the knob
clockwise one click after each
feature appears.
BEEPS
To indicate when a mode is done,
3 consecutive beeps will sound.
Page 7
Setting Up Your Range
BEEP VOLUME
•
•
LOCK KEYS
The volume of the control beep can be changed from LOW
(softest) to HIGH (loudest).
The control default for beep volume is Medium.
•
•
Changing the beep volume
1. Access SELECT FUNCTION Menu.
2. Turn knob clockwise slowly until VOLUME is displayed.
3. Touch START.
4. Turn knob to select volume level Low, Medium or High.
5. Touch START.
Locking or Unlocking the Oven Control Panel
1. Access SELECT FUNCTION Menu.
2. Turn knob clockwise slowly until LOCK KEYS is
flashing.
3. Touch START. KEY PAD LOCKED is displayed. The
display will beep if a key is pressed to indicate that the
keypad is locked.
4. To unlock keypads, touch COOKING MODE and hold for
5 seconds. Display will read UNLOCKING PAD.
5. When unlocked, the clock will again appear in the display.
Note: This function DOES NOT lock the oven door.
CHANGE TEMPERATURE
• The oven has been preset to the Fahrenheit temperature
scale.
• The feature allows you to switch between Fahrenheit
and Celsius temperature.
Changing the Temperature Scale
1. Access SELECT FUNCTION Menu.
2. Turn knob clockwise slowly until SELECT TEMP F-C is
displayed.
3. Touch START.
4. Turn knob to select Fahrenheit (F) or Celsius (C).
5. Touch START to accept new selection.
TIME FORMAT
•
•
The clock can be set to a 12-hr or 24-hr
format.
The default for clock format is 12-hr.
The keypad can be locked for safety purposes.
This feature can be used to prevent changes to the
oven function.
LANGUAGE DISPLAY
•
•
Language choices are English, Spanish, and French.
English is the default language.
Changing the Language Display
1. Access SELECT FUNCTION Menu.
2. Turn knob clockwise slowly until LANGUAGE OPTION is
12 HR
displayed.
3. Touch START.
4. Turn knob clockwise to select language.
5. Touch START to accept a language change.
Changing the TIME FORMAT
1. Access SELECT FUNCTION Menu.
2. Turn knob clockwise slowly until TIME FORMAT is
displayed.
3. Touch START.
4. Turn knob to select 12 hr or 24 hr format.
5. Touch START to accept new selection.
NOTE
The SELECT FUNCTION menu is
displayed in English only, regardless
of language selected.
Page 8
Setting Up Your Range
RESET DEFAULTS
CLOCK DISPLAY (ON or OFF)
•
•
•
Clock time display can be turned off.
The default display is on.
Turning the Clock Display ON or OFF
1. Access SELECT FUNCTION Menu.
2. Turn knob clockwise slowly until CLOCK DISPLAY is
displayed.
3. Touch START.
4. Turn knob once and ON or OFF will appear in display.
5. Touch START to accept new selection.
Resetting the factory settings.
1. Access SELECT FUNCTIONS Menu.
2. Turn knob clockwise slowly until RESET DEFAULTS
is displayed.
3. Touch START. Display reads SELECT FUNCTION.
OVEN TEMPERATURE OFFSET
SABBATH FEATURE
•
• Allows the adustment of the oven temperature if
food is consistently too brown or too light.
•
Changing the Oven Temp Offset
1. Access SELECT FUNCTION Menu.
2. Turn knob clockwise slowly until OVEN TEMP OFFSET
is displayed.
3. Touch START. 0° F is displayed.
4. Turn the knob to the right to increase temperature
+25°F and to the left to decrease -25° temperature.
5. Touch START to accept a temperature change.
DEMO MODE
The demo mode is for appliance store use only.
This feature is used to change all the “Select Functions”
settings back to the original factory settings (or
defaults).
The oven will bake for 48 hours before automatically turning
off.
Oven or warming drawer cannot be operating to set the
Sabbath Feature.
Setting the Sabbath Feature
1. Access SELECT FUNCTIONS Menu.
2. Turn knob clockwise until SABBATH OPTION
appears.
3. Touch START. BAKE will show in display and
temperature will flash.
4. Turn knob to set oven temperature.
5. Turn oven light on if desired (touch LIGHT).
Note: The light cannot be changed after this point. It will
stay on or off, as selected, during the entire Sabbath
mode.
6. Touch START. Oven starts after 5 seconds.
Note: The probe CANNOT be used during the Sabbath
mode.
While baking in Sabbath mode, the display will show SABBATH
and the BAKE icon will be displayed. The clock will be off and
no temperature will show in the display.
During the Sabbath mode, only the off key will operate.
Press OFF at any time during the Sabbath mode to
end the mode and turn off the oven.
At end of 73 hours, the oven will turn OFF automatically and the
display will show SABBATH END. Touch OFF to return to time
of day.
Page 9
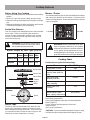
Cooktop Features
Before Using the Cooktop
• Remove all packing materials and labels from the cooktop
surface.
• While cool, wipe with a clean, damp sponge and dry.
• Optimum cooking results depend on the proper cookware
use.
• Read and understand all safety precautions and Use and
Care Manual information prior to operating.
Burner Grates
Your cooktop has two grates: one for the left side of the cooktop
and one for the right side of the cooktop. Position them as
shown in the figure below. Do not operate the burner without
a pan on the grate.
Sealed Gas Burners
Your new cooktop has sealed gas burners and removable
burner caps. There are no burner parts under the
cooktop to clean, disassemble or adjust. Your cooktop
has four (4) different burner cap sizes. Match the pan
size to the burner size.
!
WARNING: To prevent flare-ups do not use
the cooktop without all burner caps and all
burner grates properly positioned.
!
Burner Output by Fuel Type (BTU/hr)
Left
Front
Left Right
Rear Front
Right
Rear
Natural Gas
9100
12500 15000
5500
Propane
7500
11000 15000
5000
WARNING: All burner grates and burner caps
must be properly positioned on the cooktop
whenever the cooktop is in use. Each of the feet
on the grates must be placed into the corresponding dimples in the cooktop. Do not use a
grate if the rubber feet are missing or damaged.
Cooking Chart
Use this chart as a guide for heat settings:
Uses
Right Side Burner - Side View
Burner Grate
Burner Cap
Burner Base
Cooktop
Ignitor
Orifice
Bringing water to a boil
Pan frying, sauteing,
browning meat, deep fat
frying
Most frying, eggs,
pancakes, slow boil
Finish cooking covered
foods, steaming
Melting butter and
chocolate
Right Side Burner Top View
Orifice
Right Side
Left Side
Ignitor
Burner Caps
The burner cap is porcelainized steel. Make sure the
burner cap is completely seated into the burner base
before attempting to light the burner. If the burner cap
is not placed correctly, the burner may not light or the
flame may not burn completely or correctly.
Tomato sauces, soups,
stews, keeping foods warm
Heat Settings
High
Medium High
Medium
Medium Low
Low
Sim (Simmer)
A range of heat settings are listed because the
actual setting depends on:
1) size, type and quality of pan (See “Cookware Selection
Guide”, page 27).
2) type, quantity and temperature of the food
3) burner used
4) the cook’s preference.
CAUTION: To prevent possible damage to the pan or range,
the flame should not extend beyond the edge of the pan.
Page 10
Cooktop Operation
Typical Flame Characteristics
Burner Control Knobs
For natural gas use, the burner flame should be blue in color
and stable with no yellow tips, excessive noise or fluttering. It
should burn completely around the burner cap. For Propane
(LP) use, some yellow tips are normal. See Installation Instructions for further explaination.
Foreign particles in the gas line may cause an orange flame
during initial use. This should disappear with use. Check burner
cap to make sure port holes are not obstructed. If the ports are
clogged, see Cleaning the Cooktop, page 23.
Note: An audible “pop” may be heard when the burner is turned
off manually. The “popping” may be louder with LP gas than
with natural gas. This is normal.
Refer to the Cooking Guide (previous page) for flame settings.
Control Knobs - Front View
OFF
OFF
HI
LO
HI
SIM
LO
The burner controls have an infinite number of heat settings
with no fixed positions.
To LIGHT: Select the appropriate control knob, push in and turn
counterclockwise to the flame symbol. The ignitor will click.
To SET FLAME SIZE: After lighting, turn counterclockwise to the
desired flame size.
Turn OFF by turning the control knob clockwise to OFF.
Power Failure
In the event of a power failure, the cooktop burners can be
ignited manually. Hold a match at the ports and turn the control
knob to the HI position. Wait until the flame is burning all the way
around the burner before adjusting the flame to the desired
height. DO NOT attempt to light the broil burner or bake
burner manually.
A plastic bezel is located under each control knob.
To remove knob, spring and bezel: Place knob in the OFF
position. Pull straight out and off. Spring and bezel will be loose
and can be pulled straight off after the knob is removed.
To replace knob, spring and bezel: Place spring and knob
on top of bezel being careful to line up center holes. Push down
on knob so that spring is tense. With knob in off position, place
center hole around shaft on range and push bezel, spring and
knob in toward range. Release knob.
Electronic Ignition
The cooktop uses electronic igniters to light the burners. There
is no pilot light. Each burner has its own igniter. For best results,
center the pan over the burner before ignition.
The ignitor should be clean and dry for proper operation.
• Avoid getting water or food on the igniter.
• If the igniter is wet or soiled, it may spark without igniting
the burner.
Note: If the burner does not light within 4 seconds, turn the
burner off. Check to see that the cap is positioned correctly on
the burner base and the igniter is clean and dry. If a burner still
fails to ignite, see Self Help - Cooktop, page 29.
!
CAUTION: All igniters spark when any single burner is
turned ON. Do not touch any of the burners when the cooktop
is in use.
Burner Performance
For best cooking results, observe the following burner characteristics:
PowerSim™ Burner (Right Front) (HGS25 models):The
PowerSim™ burner is the most verstile of the burners. The cap
retains heat longer than normal burner caps. This results in a
gentle, more predictable, heat. It can be set low enough to
simmer sauces without scorching. However, the flame can
also be set high enough to stir-fry and boil quickly. The large
size of the burner cap allows the burner to accomodate large
pots, so it is also well suited to cooking large quantities of food.
When the PowerSim™ burner is engaged, the SIM indicator to
the right of the control knob light is lit.
Right Rear: The right rear burner is the smallest burner. It
is well suited for delicate cooking such as melting chocolate and
butter.
Page 11
Oven Modes and Features
Oven Racks
Your oven has three racks. HGS25 models are equipped with
2 flat and one telescopic. All others have 3 flat racks. The racks
are designed with a stop so they will stop before coming
completely out and not tilt.
Caution: To avoid possible burns, place oven racks in
desired positions before turning the oven on. Always use oven
mitts when the oven is warm.
Removing from oven: Grasp rack firmly on both sides and
pull rack toward you. When the stop is reached, tilt rack up and
pull the rest of the way out.
Replacing in oven: Grasp rack firmly on both sides. Tilt rack
up to allow stop into rack holder. Bring rack to a horizontal
position and push the rest of the way in. Rack should be straight
and flat, not crooked.
Telescopic Rack (HGS25 models): The telescopic rack allows
for easier access to cooking food. To use, grasp entire rack
(both sections) of rack and pull straight out until stop is reached.
To extend rack, grasp top section and pull straight out. To
remove telescopic rack, with top section in closed position,
grasp entire rack (both sections) firmly on both sides. When
the stop is reached, tilt rack up and pull the rest of the way out.
Rack Position (see graphic at right for further details)
RACK 6 (highest position) – Use for melting cheese and broiling
thin foods.
RACK 5 – Use for broiling most meats and toasting bread.
Preheating
Preheat the oven if the recipe recommends it.
Preheating is necessary for good results when baking cakes,
cookies, pastry and breads. When using the probe preheating
is not recommended. Setting a higher temperature does not
shorten preheat time. Place oven racks in proper position before
preheating. A beep will confirm that the oven is preheated and
the selected oven temperature will be displayed.
Baking Pans
Glass baking dishes absorb heat, therefore, reduce oven
temperature 25° F when baking in glass.
Shiny, smooth metal reflects heat resulting in lighter, more delicate
browning.
Dark, rough or dull pans will absorb heat resulting in browner,
crisper crust. Some manufacturers recommended reducing
temperature 25° F when using this type of pan. Follow
manufacturer recommendations. Use dark pan for pies.
Insulated baking pans may increase the length of the
recommended baking time.
Power Failure
DO NOT attempt to light the broil burner or bake
burner manually. Only the cootop burners can be lit manually.
Rack Positions
RACK 4 – Use for broiling thicker meats.
6
5
4
3
2
1
RACK 3 – Use for most baked goods when baking on one rack,
such as on a cookie sheet or baking pan, cakes, frozen
convenience foods, biscuits, brownies, muffins.
RACK 2 – Used for pies, casseroles, breads, bundt or pound
cakes, small roasts or poultry.
RACK 1 (lowest position) – Use for angel food cake, large
roasts, turkey.
Multiple Rack Cooking:
When using multiple racks, follow the placement
recomendations below.
Two rack: For cakes, use rack positions 2 and 5.
Three rack: (for convection bake): Use positions 1, 3 and 6.
Pan Placement
Top Rack
Pan Placement
Baking results are better if pans are placed in the center of the
oven. If baking more than one pan on a rack, allow at least 1”
to 1 ½” of air space around the pan. When baking four cake
layers at the same time, stagger pans on two racks so that one
pan is not directly above the other. To allow for best baking
results, place cakes on back of upper rack and front of lower
rack (see graphic at right).
Page 12
Bottom Rack
One Rack
Two Racks
Oven Modes - Bake and Convection Bake
CONVECTION BAKE
BAKE, PROOF (HGS25 models) and
WARM
Baking is cooking with dry, heated air. The lower burner cycles
to maintain the oven temperature:
The Bake mode can be used to prepare a variety of food
items, from pastries to casseroles. It can also be used to roast
meats.
In the Warming mode, the oven uses the lower element to
maintain a low temperature to keep food at serving temperature.
• Use the Warming setting on the oven to keep foods hot
until ready to serve.
• The Warming mode temperatures are 140° - 220° F. The
default temperature is 170° F.
• Foods that need to be kept moist should be covered with
a lid or aluminum foil.
In the Proofing mode, the oven will use the lower burner to
maintain a low temperature to proof bread. Proofing is the
rising of a yeast dough.
• The Proofing mode temeratures are 85° to 110° F. The
default temperature is 100° F.
• Loosely cover the bowl or pan and use any rack that
accomodates the size of the container.
• Keep the door closed and use the oven light to check
the rising of the dough.
Convection Baking is similar to Baking. In this case, heat
comes from the lower element. The main difference in convection
baking is that the heat is circulated throughout the oven by the
convection fan:
The Convection Bake mode is well-suited for baking large
quantities of food on multiple racks. It can be used to prepare
cookies, pies, cupcakes, pastries, breads, snack foods and
appetizers among other items.
The benefits of Convection Baking include:
• Slight decrease in cooking time
• Three rack cooking (more even browning)
• Higher Volume (yeast items rise higher)
• Cook more items at once
For Best Results:
• Reduce recipe temperature by 25° F. Refer to the
Convection Baking chart for examples.
• Place food in low-sided, uncovered pans such as cookie
sheets without sides.
• Center baking pans side to side on the oven rack.
Convection Bake Chart
Food Item
C ake
Cupcakes
Bundt Cake
Angel Food
Pie
2 crust, fresh, 9"
2 crust, frozen fruit, 9"
Cookies
Sugar
Chocolate Chip
Brownies
*The convection bake temperature is 25°F less than
recommended on packages or recipes. The temperature in
this chart has been reduced 25°F.
**This chart is a guide. Actual times depend on the mixes or
recipes baked. Follow recipe or package directions and reduce
temperature appropriately.
Breads
Yeast bread, loaf, 9x5
Yeast rolls
Quick Bread, loaf, 8x4
Biscuits
Muffins
Piz z a
Page 13
Frozen
Fresh
Temp.*
Convection
R ack
(preheated Bake Time
Position
o ven )
** (min)
(F°)
3
2
1
325
325
325
18 - 21
37 - 43
39 - 43
2
2
350 - 400
350
45 - 55
68 - 78
3
3
3
325 - 350
325 - 350
325
6 - 11
10- 15
29 - 36
2
3
2
3
3
350
350 - 375
325 - 350
350 - 375
400
20 - 24
14 - 18
45 - 55
11 - 15
16 - 20
3
3
375 - 425
400 - 425
23 - 26
12 - 15
Oven Modes - Broil
BROIL
Broiling uses intense heat radiated from the broil burner:
The Broil mode is best suited to cooking thin, tender cuts of
meat (1” or less), poultry and fish. It can also be used to brown
breads and casseroles.
The benefits of Broiling include:
• Fast and efficient cooking
• Cooking without the addition of fats or liquids
• Browning as the food cooks
For Best Results:
• Preheat oven 3-4 minutes
• Steaks and Chops should be at least 3/4” thick
• Brush fish and poultry with butter or oil to prevent sticking
• Use the broil pan and grid included with your range
• Do not cover the broiler grid with foil. It is designed to
drain fats and oils away from the cooking surface to
prevent smoking and spattering
• Turn meats once halfway through the recommended
cooking time (see Broil Chart for examples).
• When top browning casseroles, use only metal or glass
ceramic dishes such as Corningware®.
• Never use heat-proof glass (Pyrex®);it cannot tolerate
the high temperature.
ALWAYS BROIL WITH THE DOOR CLOSED
Broil Chart
F o o d an d
Thickness
R ack
Position
Broil
Setting
Internal
Temp.
(°F)
Time
Time
Side 1 Side 2
(min)* (min)*
5
5
5
High*
High
High
145
160
170
6-7
7-8
8-9
5-6
6-7
7-9
4
High
160
9-11
8-10
4
Low*
170
18-20
18-19
4
3
5
High
High
High
160
160
160
8-9
7-9
3-4
7-8
6-8
2-3
4
Low
6-7
DO
Do
noNOT
t turn
B eef
Steak (3/4" - 1 ")
Medium Rare
Medium
Well
Hamburgers (3/4"-1")
Well
Poultry
Breast (bone-in)
Pork
Pork Chops (1")
Sausage - fresh
Ham Slice (1/2")
Seafood
Fish Filets, 1"
Buttered
Bread
Garlic Bread, 1" slices
5
High
Cook until
opaque &
flakes
easily with
fork
TURN
2-4
Broiling times are approximate and may vary slightly.
Times are based on cooking with a preheated broil element.
Page 14
Oven Modes - Convection Roast
CONVECTION ROAST
Convection Roast Chart
Convection Roast uses heat from the bottom burner as well
as heat circulated by the convection fan:
Meats
B eef
The Convection Roast mode is well suited to preparing tender
cuts of meat and poultry.
The benefits of Convection Roasting, include:
• As much as 25% faster cooking than standard Roasting/
Baking
• Rich, golden browning
For Best Results:
• Use the same temperature as indicated in the recipe.
• Check doneness early as roasting time may decrease by
as much as 25%. Refer to Convection Roast Chart for
examples.
• Do not cover meat or use cooking bags.
• Use the broil pan and grid provided with the range for
roasting. A low-sided, uncovered pan can also be used.
• Use the probe or a meat thermometer to determine the
internal temperature of the meat.
• If the meat is browned to your liking, but is not yet done,
a small strip of foil can be placed over the browned area
to prevent overbrowning.
• Let meat stand covered with foil 10-15 minutes after
removing from the oven.
Oven
Weight Temp.
(lb)
(°F)
Roasting
Time*
(min per
lb)
Internal
Temp.
(°F)
Rib Roast
4-6
325
25-32
28-32
145 (med/rare)
160 (medium)
Rib Eye Roast,
( boneless)
4-6
325
24-32
27-32
145 (med/rare)
160 (medium)
Rump, Eye, Tip,
sirloin (boneless)
3-6
325
25-30
28-32
145 (med/rare)
160 (medium)
Tenderloin Roast
2-3
425
15-25
145 (med/rare)
5-8
350
15-25
160
3-6
350
20-30
160
Chicken - whole
3-4
375
14-20
180
Turkey, unstuffed**
12-15
325
10-14
180
Turkey, unstuffed**
16-20
325
9-13
180
Turkey, unstuffed**
21-25
325
6-10
180
Turkey Breast
3-8
325
20-25
170
Cornish Hen
1-1½
350
45-75 (total
time)
180
Pork
Loin Roast
(boneless or bone-in)
Shoulder
Poultry
*Roasting times are approximate and may vary depending on the shape
of the meat.
**Stuffed turkey requires additional roasting time. The minimum safe
temperature for stuffing in poultry is 165°F.
Page 15
Oven Modes - Dehydrate (HGS24 and HGS25 models only)
DEHYDRATE
Dehydrate Chart
Dehydrate dries with heat from lower burner. The heat is
circulated throughout the oven by the convection fan.
Food
Fruit
Apples
Bananas
Dehydrating is used to dry and/or preserve foods such as
fruits, vegetables and herbs. This mode holds an optimum low
temperature (100° F - 160° F) while circulating the heated air
to slowly remove moisture.
For Best Results:
• Dry most fruits and vegetables at 140° F. Dry herbs at
100° F. (Refer to the Dehydrate Chart for examples).
• Drying times vary depending on the moisture and sugar
content of the food, the size of the pieces, the amount
being dried and the humidity in the air. Check food at the
minimum drying time.
• Multiple racks can be used simultaneously. Contact your
Bosch dealer for drying racks.
• Treat fruits with antioxidants to avoid discoloration.
• Consult a food preservation book, county Cooperative
Extension Office or library for additional information.
The door must be open during the Dehydrate mode.
Prop the door open at least 1" by placing an object (i.e.;
wooden spoon) in the upper corner between the door and
the side panel. Be careful that the object does not touch the
oven gasket.
Preparation
Dipped in ¼ cup
lemon juice and 2 cups
water; ¼" slices
Dipped in ¼ cup
lemon juice and 2 cups
water, ¼" slices
Approximate
Drying
Time*(hrs)
Test for
D o n en ess
11-15
Slightly pliable
10-15
Soft, pliable
Cherries
Wash and towel dry.
For fresh cherries,
remove pits
10-15
Pliable,
leathery,
chewy
Orange
Peels and
slices
¼" slices of orange;
orange part of skin
thinly peeled from
oranges
Peels: 2-4
Orange peel:
dry and brittle.
Orange slices:
skins are dry
and brittle,
fruit is slightly
moist
Pineapple
rings
Towel dried
Canned: 9-13
Fresh: 8-12
Soft and
pliable
Wash and towel dry.
Sliced ½ " thick, skin
(outside) down on rack
12-17
Dry, brittle
Peppers
Wash and towel dry.
Remove membrane of
peppers, coarsely
chopped about 1"
p i e ce s
16-20
Leathery with
no moisture
inside
Mushrooms
Wash and towel dry.
Cut off stem end. Cut
into 1/8" slices
7-12
Tough and
leathery, dry
Wash and towel dry.
Cut thin slices, 1/8"
thick, drain well.
16-23
Dry, brick red
color
Rinse and dry with
paper towel
Dry at 100ºF
3-5 hrs
Crisp and
brittle
Use basil leaves 3 to 4
inches from top. Spray
with water, shake off
moisture and pat dry
Dry at 100ºF
3-5 hrs
Crisp and
brittle
Strawberries
Vegetables
Tomatoes
Herbs
Oregano,
sage parsley
and thyme,
and fennel
B a si l
Slices: 12-16
* Oven will stay on for 48 hours before shutting off automatically
Page 16
Selecting the Oven Mode
Setting the Cooking Mode
1. Touch COOKING MODE.
2. BAKE will flash in the display.
If no further setting is made within 5 seconds, control will
beep and flash. If this occurs, press START.
3. To change the cooking mode, turn knob.
4. Push START.
The selected mode will appear in the display, along with
the default temperature for that mode, which will be
blinking.
5. To select a different temperature, turn knob to the
right or left (in 5° increments) to desired temperature.
6. Touch START. If START is not touched, oven will
automatically turn on in 5 seconds.
7. The display alternates between the cooking mode and
preheat.
The preheated temperature is also displayed, starting at
100ºF. The actual temperature increases until set
temperature is reached, at which point the oven will
beep.
8. To change temperature during cooking, touch
Temperature. Turn the knob to select new
Temperature and press START.
9. Once cooking has been completed, touch OFF to turn off
oven.
Note: After the oven has been turned off, HOT appears in the
display where the cooking mode was. This is to indicate that
the oven is off but still hot. When the oven temperature drops
below 176° F, HOT is no longer seen in the display.
Oven Operation Time
The oven will automatically shut off after 12 hours (24 hours
if the time format is set for 24 hour in the SELECT FUNCTION
section).
Oven Vent
The oven vent is located above the cooktop directly below the
display.
It is normal to see steam escaping from the vent and condensation
may collect on the backguard and cooktop.
This area may become hot when the oven is in use.
Do not block the vent as it is important for air circulation.
Page 17
6:35PM
380º
100
BAKE
HELPFUL TIP
To back out of a current
mode, push OFF.
Selecting OFF when not in
a mode menu will stop oven
function.
Using the Timer/s
Setting the Timer/s
1.
Clearing the Timer/s
Touch TIME and TIMER 1 will be displayed.
1.
2.
3.
4.
0:00
TIMER 1
Touch TIME once. TIMER 1 flashes.
Turn knob to select CLEAR TIMER 1(2).
Touch TIME.
If TIME pad is not touched, range will beep and display
will continue flashing.
0:00
2. Turn counterclockwise and TIMER 2 will be displayed.
Select TIMER 1 or 2, then push TIME. SET TIMER
1 (2) appears in display. Minutes flash.
CLEAR TIMER 1
1:00
:00
HR:MIN
TIMER
SET TIMER 2
3. Turn knob to the right to increase by 1 minute
increments or left to decrease by 1 minute increments.
Continue to turn knob until desired minutes are
displayed.
When the specified time has elapsed, the control beeps.
TIMER 1 (2) END flashes in the display.
1. Touch TIME to return to main screen.
If setting only minutes, press START. Otherwise, continue
to step 4.
4. Touch TIME again and the hours will flash.
2:
2:02
PM
HR:MIN
TIMER
SET TIMER 2
5. Turn knob to the right to increase by 1 hour
increments or left to decrease by 1 hour increments
until desired hours are displayed.
6. Touch TIME again.The TIMER is now set.
If TIME or START is not touched, display will beep
and timer will flash.
CANCELLING
Changing the Timer/s
1.
Touch Time. TIMER 1 will appear in display. Select either TIMER
1 or 2.
0:00
:00
TIP
Turn the knob to display the
time of day or further
information about the oven
mode when the timers are in
use.
If operation is not completed, the oven will
beep periodically as a reminder to set time.
Push OFF to exit the TIMER mode.
Selecting OFF when not in a setting mode
will stop oven function.
AM
TIMER 1
2. Push TIME. RESET TIMER 1 (2) appears in the
display. Minute digits flash.
3. Turn knob clockwise or counter-clockwise to change
minutes.
4. Touch TIME again and hour digits will flash.
5. Turn knob clockwise or counter-clockwise to change
hours.
6. Touch TIME and new time is set.
Page 18
Using Timed Cook
The TIMED COOK feature sets the oven to a cooking mode for a set period of time and then turns it off. The TIMED COOK feature
is available for each of the following oven modes: Bake, Convection Bake and Convection Roast.
Be sure that the time-of-day clock displays the correct
time before beginning. See “Changing the Clock Time”
to adjust the time.
350° F
1:20
Setting a Timed Mode
1. Touch COOKING MODE.
2. BAKE will be displayed. To select a different cooking mode,
turn the knob.
3. Touch START.
4. Turn knob to select desired temperature.
5. Touch TIME. TIMED BAKE appears in the display.
6. Touch TIME. SET BAKE TIME appears in the display and
minutes flash. Set minutes. Touch TIME.
7. Hours Flash. Set hours. Touch START.
Note: time required for the oven to reach temperature must be
included in the set cooking time.
8. TIMED BAKE appears in display and the oven begins to
preheat.
HR:MIN
TIMER
DELA
YED BBAKE
AKE
DELAYED
NOTE
At the end of the programmed
cooking time, the oven will
automatically turn off. The
Display will show the mode and
END.
After cooking is complete, display flashes TIME COOK END and
reminder beeps will sound.
Delaying the Start of a Timed Mode
1. Follow steps 1 through 5 above.
2. Turn knob until DELAYED BAKE appears in display.
3. Touch Time. SET BAKE TIME appears in the display and
minutes flash. Set minutes. Touch TIME.
4. Hours Flash. Set hours. Touch TIME.
5. SET BAKE END appears in the display. Touch TIME.
6. Use knob to enter the time of day the oven will stop
cooking or turn off:
Set hours. Touch TIME.
Set minutes. Touch TIME.
The clock automatically calculates the time of day at
which the cooking mode starts and stops. The displayed
cooking time counts down by the minute.
7. At the end of the programmed cooking time, the oven will
automatically turn off. Display will show TIME COOK
END and the oven will beep.
Note: Remove food from oven immediately after cycle has
finished to prevent overcooking. Food left in the oven will
continue to cook even after the cycle is complete.
To check the cooking time and stop time after a delay has
been set, touch TIME. Turn knob to BAKE END or BAKE
TIME. Touch TIME.
Page 19
5:00
HR:MIN
TIMER
400° F
PM
DELA
YED BBAKE
AKE
DELAYED
NOTE
Delayed cooking is not
recomended for foods that
need to rise (i.e.; cookies, cakes,
breads, souffles, etc.)
Using the Probe (HGS25 models)
•
•
•
•
The probe can be used to determine the internal doneness
or the “END” temperature of many foods, especially meats
and poultry.
The temperature range for the probe is 135°F to 200°F
(57°C to 93°C).
Preheating the oven is not recommended when using the
probe. A hot oven will impair your ability to easily connect
the probe to the receptacle and to insert it into the meat.
Oven temperature can be set for 100°F up to 450°F (38°C
up to 232°C).
INSERTING THE PROBE
Insert the probe tip into the food item.
• For meats, insert the probe tip into the thickest part
and do not touch bone, fat, or gristle.
• For large poultry products and turkeys, insert the
probe in the thickest part of the inner thigh.
• For other foods, such as a meatloaf, the probe tip
should be located in the center of the thickest part of
the food.
USING THE PROBE
1. Prepare meat and place in roasting pan (or on rack in
roasting pan as recipe specifies). Insert the probe into
the meat (See “Inserting the Probe”, above).
2. Make sure the probe is not touching gristle, fat, bone, the
roast rack or the pan.
3. Place roasting pan with meat in cold oven on recommended
oven rack. Plug probe into the probe receptacle. The
probe symbol will appear in display.
Note: The probe temperature can only be set when
the probe is installed in the oven.
4. Touch COOKING MODE and select BAKE,
CONVECTION BAKE or CONVECTION ROAST. The
default oven temperature will appear.
5. Turn knob to change temperature if necessary.
6. Touch START.
7. Turn knob to set the probe temperature (desired end
temperature of the food).
8. Touch START.
•
•
•
•
•
•
•
To change only the oven temperature, touch
TEMPERATURE. OVEN TEMP will flash in the display.
Turn the knob to desired temperature and press START
twice.
To change the probe temperature, touch
TEMPERATURE. The oven temperature will flash.
Press STARTand the PROBE TEMP will flash. Turn
the knob to desired temperature and press START
again.
PROBE USE TIPS
• The oven is well insulated and the retained heat will
continue to cook the meat after the oven has shut off.
For this reason, remove the meat from the oven as
soon as the control beeps.
• Since meat continues to cook after being removed
from the oven, set the internal (probe) temperature 5
- 10 degrees below the desired final internal
temperature. Allow “standing time” (10 - 20 minutes)
before carving the meat.
• Always use the handle of the probe for inserting and
removing. Use a potholder to remove since the probe
becomes hot.
• Remove the probe from the oven when it is not being
used.
• The probe cannot be used with frozen meats. For
best results, completely thaw meats before using
the probe.
Note: Always remove probe from oven when cooking is
complete. The probe symbol will remain in the display until the
probe is removed. Do not leave probe attachment in oven during
self-clean. Oven will not self-clean with the probe installed in
the oven.
The chosen oven temperature and mode are displayed
to the right of the time.
The probe temperature is displayed in the center to the
left of the cooking mode. It increases in 5°F
increments until the chosen temperature is reached.
The oven is preheated when the beep signals once.
When the set probe temperature is reached, END
appears in display and oven turns off. Touch OFF to
clear display.
If probe is removed before touching OFF, REINSERT
PROBE is displayed. If this happens, touch OFF.
Page 20
The Warming Drawer (HGS24 and HGS25 models)
The warming drawer will keep hot, cooked foods at serving
temperature. Always start with hot food. DO NOT use to heat
cold food other than crisping crackers, chips, and dry cereal,
or warming dishes or plates.
1
2
Parts Key:
3
1. Stainless Steel
Drawer Interior
2. Gasket
3. Rail Lock
Packaged Inside Drawer:
• Reversible Rack
Usable Space and Utensil Sizes
Drawer Interior:
25"W x 17"D x5" H
WARMING
DRAWER
RACK
Utensil sizes:
• 2 - 9 x 13" Pyrex 3-quart dishes,
side by side.
• 2 - 9 1/2 x 15" Pyrex 4-quart
dishes, side by side.
• 4 - 10 1/2" plates, single or stacked
• 3 - 11" plates, single or stacked
• Large 14" pizza, in box.
The warming drawer has three settings: Low, Meduim and
High. The icons below are seen in the display when the
corresponding setting is selected:
Low
Medium
High
See the Warming Drawer Chart (next page) for recommended
settings.
Page 21
Using Your Warming Drawer (HGS24 and HGS25 models)
Using Your Warming Drawer
Food should be at serving temperature (above 140° F)
before being placed in the warming drawer.
The warming drawer can be used with or without a rack.
• Preheat with rack in place if using that arrangement. It
fits side to side.
• Preheat empty serving dish while preheating drawer.
• Add cooked, hot food in cooking utensil or heat-safe
serving dishes.
• Food may be kept hot in its cooking container or transferred
to a heat-safe serving dish.
• Aluminum foil may be used to cover food.
Warming Drawer Guide
Temperature
C overed/
U ncovered
Hi
Uncovered
Beef, medi um and well
done
Med
C overed
Beef, rare
Low
C overed
Bread, Hard Rolls
Med
Uncovered
Bread, Soft Rolls, C offee
C a ke s
Med
C overed
Buscui ts
Med
C overed
C asseroles
Med
C overed
E ggs
Med
C overed
Fi sh, Seafood
Med
C overed
Hi
Uncovered
Gravy, C ream Sauces
Med
C overed
Ham
Med
C overed
Hi
C overed
Pi es, One C rust
Med
C overed
Pi es, Two C rusts
Med
Uncovered
Pi zza
Hi
C overed
Warming Empty Serving Bowls and Plates
Pork
Med
C overed
•
•
Potatoes, Baked
Hi
C overed
Potatoes, Mashed
Med
C overed
Poultry, Roasted
Med
C overed
Vegetables
Med
C overed
Plates
Low
Uncovered
Plate of Food
Med
C overed
Warming drawer settings are Low, Medium, and High.
Refer to the chart at right for recommended settings.To keep
several different foods hot, set the temperature to the food
needing the highest setting. Place item needing the highest
setting toward the side of the drawer and item needing less
heat on the rack or in the center of the drawer bottom.
Food
Bacon
Fri ed Foods
Setting the Temperature
1. Touch COOKING MODE.
2. Turn knob to select WARMING DRAWER.
3. Push START.
Pancakes
Turning Off and/or Cancelling
1. Press OFF.
2. Turn knob to CANCEL WARMING DRAWER.
3. Press OFF.
•
•
•
Use only heat-safe dishes.
May use reversible rack, in low position to raise utensil
from direct contact with bottom of drawer.
Warm on setting appropriate for utensil.
Check dish temperature during warming period.
Place empty plates or dishes in a cold warming drawer.
Do not preheat.
Crisping Stale Items
•
•
•
Place food in low sided dishes or pans.
Preheat on Low.
Check crispness after 45 minutes. Add time as needed.
Preheating
• For best results, always preheat warming drawer when
•
warming food.
Preheat times are as follows:
Low: 10 minutes
Medium: 15 mintues
High: 20 minutes
CAUTION:
Plastic containers or plastic wrap
can melt if in direct contact with
the drawer or a hot utensil. If it
melts onto the drawer, it may not
be removable.
DO NOT LINE DRAWER WITH ALUMINUM FOIL.
Page 22
Cleaning the Cooktop
Daily Cleaning Techniques
The entire range can be safely cleaned by wiping with a
soapy sponge, then rinsing and drying.
Note: The cleaners recommended in this manual indicate
cleaner types and do not constitute an endorsement of a
particular brand. Use all products according to package
directions.
CAUTION:
•
Before cleaning, be certain the burners are turned off
and the grates are cool.
•
Always use the mildest cleaner that will do the job.
Use clean, soft cloths, sponges or paper towels.
•
Rub stainless steel finishes in the direction of the
grain. Wipe area dry to avoid water marks.
•
Do not clean removable cooktop parts in any selfcleaning oven.
•
After cleaning, place all parts in their proper positions before using cooktop.
Cooktop Care Chart
Cooktop Part / Material
Suggested Cleaners
Important Reminders
Detergent and hot water; rinse and dry.
Abrasive cleansers: Brillo® or S.O.S.® pads.
Rinse and dry.
•
• Hot sudsy water; rinse and dry thoroughly.
• Nonabrasive cleansers: Fantastic®, Formula
409 ®.
• Mild abrasive cleansers: Bon Ami®, Ajax®,
Comet ®.
• Liquid cleaners: Soft Scrub®.
• Reassemble. Make sure that the cap is
seated on the base.
•
Control Knobs and Bezels / Plastic
•
•
Hot sudsy water; rinse and dry immediately.
To remove knobs, place in off position and
pull straight out.
•
•
•
Do not soak knobs.
Do not force knobs onto valve shaft.
Do not use abrasive scrubbers or cleansers,
such as BonAmi®, Ajax®, or Comet®. They may
permanently damage the finish.
Exterior Finish / Stainless Steel
•
Nonabrasive cleaners: Hot water and detergent, Fantastic®, Formula 409®. Rinse
and dry immediately.
Cleaner polish: Stainless Steel Magic® to
protect the finish from staining and pitting;
enhances appearance.
Hard water spots: Household white vinegar.
Mild Abrasive Cleaners: Kleen King® stainless steel liquid cleaner, Cameo® aluminum
& stainless steel cleaner, Bon Ami®.
Heat discoloration: Bar Keepers Friend®.
•
Stainless steel resists most food stains and pit
marks providing the surface is kept clean and
protected.
Never allow food stains or salt to remain on
stainless steel for any length of time.
Rub lightly in the direction of polish lines.
Chlorine or chlorine compounds in some cleaners
are corrosive to stainless steel. Check ingredients on label before using.
Nonabrasive cleaners: Hot water and detergent, Fantastic, Formula 409. Rinse and
dry immediately.
Mild abrasive cleaners: Bon Ami® and Soft
Scrub ® .
•
Burner Base/ Aluminum
Burner Cap and exterior finish
Porcelain Enamel
•
•
•
•
•
•
Grates / Porcelain Enamel on
Cast Iron
•
•
•
•
•
•
•
•
•
•
•
•
•
•
Igniters / Ceramic
•
•
Carefully wipe with a cotton swab dampened with water, ammonia or Formula 409®.
Gently scrape soil off with a toothpick.
Page 23
•
•
Clean ports with a stiff nylon bristle toothbrush to
clean port openings.
Do not scratch or gouge the port openings.
Do not use a tootpick that may break off.
Acidic and sugar-laden spills deteriorate the
porcelain enamel. Remove soil immediately.
Do not use wet sponge or towel on hot porcelain.
Do not soak burner caps.
Always apply minimal pressure with abrasive
cleaners.
Never use oven cleaners, caustic cleaning
agents or abrasive cleaning agents on exterior
of range.
The grates are heavy; use care when lifting.
Place on a protected surface.
Blisters / crazing / chips are common due to the
extreme temperatures on grate fingers and
rapid temperature changes.
Acidic and sugar-laden spills deteriorate the
enamel. Remove soil immediately.
Abrasive cleaners, used too vigorously or too
often, can eventually mar the enamel.
Avoid excess water on the igniter. A damp igniter
will prevent burner from lighting.
Remove any lint that may remain after cleaning.
Care and Cleaning - Oven
Preparing the Oven for Self Clean
Self Cleaning the Oven
Bosch ovens feature a self-cleaning function that eliminates
the manual labor involved with cleaning your oven. During
self-cleaning, the oven uses a very high temperature to burn
away food soil and grease.
• It is common to see smoke and/or an occasional flameup during the Self-Clean cycle, depending on the content
and amount of soil remaining in the oven. If a flame
persists, turn off the oven and allow it to cool before
opening the door to wipe up the excessive food soil.
• In a normal Self-Clean mode, the door does not
lock at the beginning of the cycle; However, it does lock
prior to reaching the high self clean temperatures. The
door lock symbol will appear in the display at this point.
The door will not lock at the start of the cycle.
• The oven light does not operate during this mode.
• During Self-Clean, the kitchen should be well ventilated
to help eliminate odors associated with Self-Clean. Odors
will lessen with use.
• The preset length of cleaning time is 4 hours. The range
can also be set to clean for 3 or 5 hours.
• The mode automatically stops at the end of the clean
hours.
• When the oven heat returns to a safe temperature after
cleaning, the automatic door lock will release and the
door can be opened.
1. Remove all utensils and bakeware.
2. Remove oven racks. If oven racks are left in the oven
during the self-clean cycle, they will permanently lose the
shiny finish and change to a dull dark finish. See Oven
Cleaning Chart for proper care.
3. Wipe up any soft soil spills and grease with paper towels.
Excess grease will cause flames and smoke inside the
oven during self-cleaning.
4. Review illustration below. Some areas of the oven must
be cleaned by hand before the cycle begins. Use a soapy
sponge or plastic scrubber or a detergent-filled S.O.S.®
pad. Hand clean the oven door edge, oven front frame
and up to 1-1/2 inches inside the frame with detergent
and hot water. Do not clean or rub the gasket on the oven.
Rinse all areas thoroughly then dry.
5. Be sure oven light is turned off and the light bulbs and
lens covers are in place. Do not operate oven without
lightbulb and cover in place.
Do not use commercial oven cleaners on the self-clean
oven or any part; They will damage the finish or part.
WARNING
To avoid a burn hazard, keep
the oven gasket flexible, not
hard.
DO hand
clean frame
area outside
gasket
DO hand clean
1-1/2" from
rack guides
to front of oven
cavity.
DO NOT
hand clean
gasket
DO hand
clean door
area outside
gasket
Page 24
Care and Cleaning - Oven
Setting the Self-Clean Mode
1. Touch COOKING MODE.
2. Rotate knob until SELF CLEAN mode appears. Press
START.
3. The default cleaning time is 4 hours. To change cleaning
time, turn knob to change number of hours. Otherwise,
continue to step 4.
4. Touch START. SELF CLEAN flashes. Press START.
5. REMOVE RACKS appears in the display as a reminder
to remove oven racks.
6. Touch START again to begin the self clean.
Note: In a normal Self-Clean mode, the door does not lock at
the beginning of the cycle; however, it does lock prior to
reaching the high self clean temperatures. The door lock
symbol will appear in the display at this point.
WARNING
If door does not lock, press
Cancel and do not selfclean; phone 800/9442904 for service.
SELF CLEAN
3:00
3
Delaying the Start of the Self-Clean
Note: The time of day must be correctly set for this
option to work properly. See section “Setting the Clock”
in “Setting Up Your Range”, Page 5.
1. Touch COOKING MODE.
2. Rotate knob until SELF CLEAN mode appears. Press
START.
3. The default cleaning time is 4 hours. To change cleaning
time, turn knob to change number of hours. Otherwise,
continue to step 4.
4. Touch START.
5. Rotate knob until DELAYED CLEAN mode appears.
Press START.
6. SELF CLEAN END appears in the display.
7. Turn knob to enter the time of day you want the selfclean to end: Set hours, touch time, set minutes.
8. Touch START. The display will remind you to remove
oven racks.
9. Touch START. The display shows DELAYED CLEAN.
The self-clean will automatically start at the appropriate
time.
Note: In the Delayed Self Clean mode, the door latch is
automatically activated at the beginning of the cycle.
The door lock symbol will appear in the display at this
point.
NOTE
The oven lights do not
operate in the Self
Clean mode.
SELF CLEAN
4:00
REMO
VE
REMOVE
RA
RACCKS
SELF CLEAN
3:00
SET CLEAN TIME
SELF CLEAN
5:50
SELF CLEAN END
5:50
SELF CLEAN
DELA
YED
DELAYED
CLEAN
After Self-Cleaning:
1. At the end of the programmed cleaning time, the oven
will automatically turn off. SELF CLEAN END appears in
the display. Press OFF to clear.
Note: To cancel or stop while the mode is operating,
touch OFF. The door will not unlock until the oven
reaches a safe temperature.
2. The self-clean mode may produce ash which will settle in
the oven. If this happens, remove ash with a damp cloth
before using the oven.
3. Wipe rack edges with cooking oil to allow for proper glide.
Wipe off excess.
4. After self-cleaning, the entire oven can be safely cleaned
with a soapy sponge, rinsed and dried.
Page 25
Care and Cleaning - Oven
For oven parts and accessories that cannot be self-cleaned, follow the recommended cleaning methods below.
After self-cleaning, the entire oven can be safely cleaned with a soapy sponge, rinsed and dried.
If stubborn soil remains, follow the recommended cleaning methods below.
•
•
•
•
•
Always use the mildest cleaner that will remove the soil.
Rub metal finishes in the direction of the grain.
Use clean, soft cloths, sponges or paper towels.
Rinse thoroughly with a minimum of water so it does not drip into door slots.
Dry to avoid water marks.
The cleaners listed in this manual indicate types of products to use and are not being endorsed. Use all products according to
package directions.
PART
CLEANING METHOD
Racks
(Oven,
Warming
Drawer)
Wash with hot sudsy water. Rinse thoroughly and dry. Or, gently rub with cleansing powder or soap filled
pads as directed. If oven racks are cleaned in the oven during the self-clean mode, they will lose their shiny
finish and may not glide smoothly. If this happens, wipe the rack edges with a small amount of vegetable oil, then
wipe off excess.
Fiberglass
Gasket
DO NOT HAND CLEAN GASKET.
Glass
Wash with soap and water or glass cleaner. Use Fantastik® or Formula 409® to remove grease
spatters and stubborn stains.
Painted
Clean with hot sudsy water or apply Fantastik® or Formula 409® to a clean sponge or paper towel
and wipe clean. Avoid using powdered cleansers, steel wool pads and oven cleaners.
Porcelain
Immediately wipe up acid spills like fruit juice, milk and tomatoes with a dry towel. Do not use a moistened
sponge/towel on hot porcelain. When cool, clean with hot sudsy water or apply Bon-Ami® or Soft Scrub® to a
damp sponge. Rinse and dry. For stubborn stains, gently use soap filled pads. It is normal for porcelain to craze
(fine lines) with age due to exposure from heat and food soil.
Stainless
Steel
Always wipe or rub with grain. Clean with a soapy sponge then rinse and dry.
Or, wipe with Fantastik® or Formula 409® sprayed onto a paper towel. Protect and polish with Stainless Steel
Magic® and a soft cloth. Remove water spots with a cloth dampened with white vinegar. Use Bar Keeper’s Friend®
to remove heat discoloration.
Probe
Clean probe by hand with detergent and hot water. Then rinse and dry. Do not soak or clean in dishwasher.
Plastic &
Control
Panel
Drawers
(Warming)
When cool, clean with soapy water, rinse and dry.
When cool, wash with hot soapy water, rinse and dry.
Page 26
Cookware Selection Guide
For best results, choose cookware based on the following characteristics:
•
Aluminum or copper bottomed pans conduct heat evenly.
•
Steel pans, if not combined with other metals, may cook unevenly.
•
Cast-iron cookware absorbs heat slowly and cooks more evenly at low-to-medium settings.
•
Flat, heavy bottom pans provide even heat and stability.
DO NOT USE pans that are thin, warped, dented or ridged as they heat unevenly.
Match Pan Diameter to Flame Size
– The flame should be the same size as the bottom of the pan or smaller. Do not
use small pans with high flame settings as the flames can lick up the sides of
the pan.
– Oversize pans that span two burners are placed on the left side, front to rear
(not side to side).
Use Balanced Pans
–
Pans must sit level on the cooktop grate without rocking.
–
Center pan over burner.
Use a Lid That Fits Properly
– A well-fitting lid helps shorten the cooking time.
•
•
Use a wok with a flat bottom.
•
Canners and pressure cookers must meet the same requirements as described above. After bringing
contents to a boil, use lowest heat setting possible to maintain a boil or pressure (for pressure canners/cookers).
For simmering stews and soups, use right front burner. For melting chocolate, use the burner in the right
rear position.
Page 27
Maintenance
Removing the Door
WARNING
•
•
•
•
Make sure oven is cool and power to the oven
has been turned off before removing the door.
Failure to do so could result in electrical shock
or burns.
The oven door is heavy and fragile. Use both
hands to remove the oven door. The door
front is glass. Handle carefully to avoid
breakage.
Grasp only the sides of the oven door. Do not
grasp the handle as it may swing in your
hand and cause damage or injury.
Failure to grasp the oven door firmly and
properly could result in personal injury or
product damage.
Figure A
1. Be sure to read the above WARNING before attempting
to remove oven door.
2. Open the door completely.
3. Flip lever on hinge toward you. (see Figure A).
4. Close the door to approximately halfway open.
5. Holding the door firmly on both sides using both hands,
pull the door straight out of the hinge slots. Hold firmly,
the door is heavy (See Figure B).
6. Place the door in a convenient and stable location for
cleaning.
Replacing the Oven Door
•
•
•
The door can be replaced by reversing the above
procedure.
After moving the hinge brackets back down into position,
be sure to close and open the door slowly to assure that
it is correctly and securely in place.
Door should be straight, not crooked.
Figure B
WARNING
•
Replacing an Oven Light
Make sure the oven and lights are cool and power to
the oven has been turned off before replacing the light
bulb(s). Failure to do so could result in electrical shock
or burns.
The lenses must be in place when using the oven.
The lenses serve to protect the light bulb from breaking.
The lenses are made of glass. Handle carefully to
avoid breakage. Broken glass could cause an injury.
Light socket is live when door is open.
1. Read WARNING at right.
•
2. Turn off power at the main power supply (fuse or breaker
•
box).
•
3. Remove the lens by unscrewing it.
4. Remove the light bulb from its socket by unscrewing it.
•
5. Replace the bulb with a new one. Use a 40Watt approved
appliance bulb. Avoid touching the bulb with fingers, as
oils from hands can damage the bulb when it becomes
hot.
6. Screw the lens back on.
7. Turn power back on at the main power supply (fuse or
breaker box).
• Your range has two oven lights.
• Each light assembly consists of a removable lens, a light bulb as well as a light socket housing that is fixed in place.
Page 28
Self Help - Cooktop
PROBLEM
POSSIBLE CAUSE(S)
SOLUTION(S)
Burners click continuously.
Knob(s) are in the “light” position.
Turn knob(s) to “OFF” position or to desired
flame setting.
Surface burners do not light.
Gas is turned off.
Make sure the gas shut-off valve is in the
ON position and the gas supply to the
house is not shut off.
Unit is not hooked up to gas supply. Call gas company.
Uneven or too high flame,
burner is hard to light.
Uneven flame - LP/ bottled
gas users.
Plug is not completely inserted into
outlet.
Incorrect house wiring. Check the power
supply. Verify that the unit is grounded with
the correct polarity. Make sure the unit is
plugged in.
Circuit breaker is tripped.
Check circuit breaker and reset if
necessary. Check and/or replace fuse.
Burner ports are clogged.
With the cooktop turned off and cool,
remove burner caps. Use a stiff nylon
bristle toothbrush to push debris through
burner ports.
Misaligned burner cap.
Verify that burner caps are properly
positioned over burners.
Ignitor is wet, damaged or dirty.
Check ignitor for moisture. If wet, allow to
air dry before using. Check for burned-on
food or grease. See cleaning
recommendations, page 23. Burner will
not light if ignitor is wet, damaged or
dirty.
Burner ports are clogged.
With the cooktop turned off and cool,
remove burner caps. Use a stiff nylon
bristle toothbrush to dislodge debris.
Misaligned burner cap.
Verify that burner caps are properly
positioned over burners.
Burner cap is wet.
Turn off burner, cool and dry burner cap
and burner base throroughly.
LP conversion not completed
properly.
Call service.
Page 29
Self Help - Oven
PROBLEM
The oven mode or
temperature does not appear
in the display.
POSSIBLE CAUSE(S)
The knob was turned too rapidly.
SOLUTION(S)
Turn the knob slowly when selecting a
mode or temperature. Review manual
instructions when setting the clock, the
timer or self-clean.
The oven door is locked and
Oven is too hot.
will not release after self-clean
cycle.
The oven door is designed to remain
locked after a self-clean cycle until a safe
temperature is reached.
The oven door is locked and
will not release, even after
cooling.
Oven door latch needs to be reset.
Turn the oven off at the circuit breaker
and wait five (5) minutes. Turn the oven
back on. The oven latch will be reset and
the door will open.
Oven is not heating.
Oven temperature is not selected.
Verify that correct temperature has
been selected.
Oven is not receiving proper
electrical power.
Verify that the circuit breaker and/ or
fuse box are working properly. Verify hat
plug is completely inserted into outlet.
Incorrect rack position used.
Refer to recipe, package directions or
cooking charts for proper rack position.
Oven calibration is incorrect.
Adjust oven calibration (See “Oven
Temperature Offset”, page 9).
Using convection bake mode.
Always reduce temperature by 25° F when
using convection bake mode.
Bulb is loose, broken or burned
out.
Verify that bulb is correctly installed.
Replace broken or burned out bulb.
Note: touching the bulb with fingers may
cause it to burn out.
The oven light will not light during
the self-clean mode.
This is normal. See Self-Cleaning section.
The oven light cannot be changed
once the Sabbath mode has
started.
This is normal. See Sabbath Mode section.
Oven door is not closing properly.
Check for obstructions between door and
range. Check for bent hinges.
The oven light cannot be changed
once the Sabbath mode has
started.
This is normal. See Sabbath Mode section.
Electical power to range has been
interrupted.
Check electrical connections. Reset clock
after power is restored. See “Setting the
Clock Time”, page 6.
Clock is set incorrectly.
Reset clock time. See “Changing the Clock
Time”, page 6.
Oven does not cook evenly,
food is undercooked or food is
overcooked.
Oven light does not come on.
Oven light will not turn off.
Clock and/ or Timer are not
working properly.
Page 30
Self Help - Oven (Cont’d)
PROBLEM
Oven does not self-clean
properly.
POSSIBLE CAUSE(S)
Oven was not properly
prepared for the self-clean
process.
SOLUTION(S)
• Allow oven to cool before starting self•
•
•
clean mode.
Wipe out loose soils or heavy spillover.
If oven is badly soilded, set self-clean
mode for five (5) hours.
See section “Preparing the Oven for
Self-Clean”, page 24.
Porcelain chips.
Oven racks were incorrectly
removed.
Always tilt racks up when removing. Do not
force racks.
Tip: Apply vegetable oil to rack edges and
wipe with a paper towel after cleaning to
ease glide.
“F” and a number appears in
display and control beeps.
This is a fault code.
Press OFF to clear display. Reset oven if
necessary. If fault code remains, turn oven
off and call for service.
There is a strong odor when a
new oven is turned on.
This is normal.
The odor will disappear after a few uses.
Operating the self-clean mode will also
help to “burn off” the smell more quickly.
General Range Troubleshooting Tips:
1. Verify that gas shut-off valve is in the ON position and the gas supply to the house is not shut off.
2. Verify that the burner caps are positioned and the burner ports are not clogged. Clear ports with a stiff nylon bristle
toothbrush if clogged.
3. Verify that the igniters are clean and dry.
4. Verify that there is no draft in the room.
5. Check the power supply. It should be properly grounded with the correct polarity. Verify that the unit is
plugged in and the circuit breaker is not tripped.
Note: When the electrical power connection has been activated at the first power up or after an outage, the igniters may
spark once or twice even though all burner knobs are in the off position.
If the cooktop is still not operating properly, please contact your dealer or call BSH Customer Service at 800-944-2904.
Replacement Parts
Replacement parts are available through your Bosch dealer. Contact Bosch Service for a dealer near you:
800-944-2904 or www.boschappliances.com
Page 31
Statement of Limited Warranty
The warranties provided by BSH Home Appliances Corp. in this Statement of Limited Warranty apply only to the BSH Gas
Freestanding Range ("Range") sold to you, the first using purchaser, provided that the Range was purchased (1) for your
use and not for resale and (2) in the United States or Canada and is located in the country of purchase. As used in this
Statement of Limited Warranty, the term "Date of Installation" shall refer to the earlier of the date the Range is installed or
ten (10) business days after the date the Range is sold to the first using purchaser, the warranties stated herein apply only
to the first using purchaser and are not transferable.
Standard Limited Warranty
BSH warrants that its Range is free from defects in materials and workmanship for a period of twelve (12) months from the
date of installation. During the warranty period, BSH or its authorized service center will repair or replace, at its sole option,
any Range that proves to have been defective under conditions of normal use without charge. All removed parts and components
shall become the property of BSH, at BSH's option. All replaced and/or repaired parts shall assume the identity of the original
part for purposes of this warranty and this warranty shall not be extended with respect to such parts.
Other Conditions of the Limited Warranties
The warranties provided in this Statement of Limited Warranty exclude defects or damage resulting from (1) use of the
Range in other than its normal and customary manner (commercial use of the Range shall not be deemed normal or customary),
(2) misuse, abuse, accidents or neglect, (3) improper operation, maintenance, installation or unauthorized service, (4)
adjustment or alteration or modification of any kind, (5) a failure to comply with applicable state, local, city, and county
electrical and/or building codes, (6) spills of food or liquid, and (7) external forces such as floods, fires, acts of God or other
circumstances beyond BSH's control. Also excluded from this warranty are scratches and damages on external surfaces and
exposed parts of Range on which the serial numbers have been altered, defaced of removed.
To the extent allowed by law, this warranty sets out your exclusive remedies with respect to products covered by it, whether
the claim arises in contract or tort (including strict liability and negligence) or otherwise.THE FOREGOING REPRESENTS THE
TOTAL EXTENT OF BSH’S RESPONSIBILITY AND LIABILITY WITH REGARD TO THE PRODUCT. IN NO EVENT WHATSOEVER
SHALL BSH BE LIABLE FOR ANY DAMAGES, INCLUDING WITHOUT LIMITATION CONSEQUENTIAL, PUNITIVE, INCIDENTAL,
SPECIAL, INDIRECT, OR DIRECT DAMAGES, OR FOR ANY ACTS OR OMISSIONS OF THIRD PARTIES, INCLUDING WITHOUT
LIMITATION THOSE OF A DEALER, TRANSPORTER, INSTALLER, OR SERVICER. BSH MAKES NO OTHER WARRANTY, AND
SHALL NOT BE DEEMED TO HAVE MADE ANY OTHER WARRANTY, EXCEPT AS EXPRESSLY PROVIDED FOR HEREIN, WHETHER
EXPRESS OR IMPLIED, INCLUDING WITHOUT LIMITATION ANY WARRANTY OF FITNESS FOR A PARTICULAR PURPOSE OR
WARRANTY OF MERCHANTABILITY. IN ANY EVENT, ANY WARRANTY IMPOSED AT LAW SHALL NOT BE EFFECTIVE FOR ANY
PERIOD OF TIME LONGER THAN THE APPLICABLE PERIOD EXPRESSED HEREIN. No attempt to alter, modify, or amend this
warranty shall be effective unless authorized in writing by an officer of BSH.
How to Obtain Warranty Service
To obtain warranty service for the Range , you should contact the nearest BSH authorized service center or the BSH Customer
Support Call Center, 5551 McFadden Avenue, Huntington Beach, CA 92649, 800/944-2904.
NOTICE TO CALIFORNIA OWNERS
If your Range needs warranty service and there is no authorized BSH service center reasonably close to you, you may notify
the BSH reseller from whom you purchased the Range. If the BSH reseller fails to repair or replace the defective parts, or
partially refund your purchase price (where applicable), you may have the Range repaired at any large appliance repair
shop or center and you will be reimbursed for all reasonable expenses provided the costs are substantiated in writing and
the work performed is covered by this warranty. BSH shall not reimburse any repair costs hereunder which exceed the
depreciated value of the Range.
Page 32