1
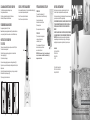
CLEANING AND DISINFECTING YOUR BATH SPA
SUCTION CUP POSITION ADJUSTMENT
1) Your Bath Spa can be cleaned with any mild detergent or soap.
Cleaning is recommended after each use.
Suction cup underneath the handle can be in 1 of 4 positions to suit different bathtubs. (See Fig. 6)
Loosen, remove and then replace screw after adjustment.
2) Disinfect your unit periodically to keep it bacteria_free. With frequent use,
disinfect weekly. With infrequent use, disinfect after each use.
Position A: The outer most position for thick-sided tubs.
Position B: The inner most position for thin-sided tubs.
FITTING AND REMOVING FILTER CAPS
ONE YEAR LIMITED WARRANTY
TO REMOVE CAPS
Conair will repair or replace, at our option, your appliance free of charge for 12 months
from the date of purchase if the appliance is defective in workmanship or materials.
1) Turn cap about 20˚ counterclockwise (Fig. 7).
(Filter caps are located on either side of the motor assembly.)
To obtain service under this warranty, return the defective product to the service center nearest you,
together with your sales slip and $7.50 for postage and handling.
2) Line up single hash mark on cap with
the center seam on the back body of the unit.
RECOMMENDED MASSAGING TIMES
ANY IMPLIED WARRANTIES, OBLIGATIONS, OR LIABILITIES, INCLUDING BUT NOT LIMITED
TO THE IMPLIED WARRANTY OF MERCHANTABILITY AND FITNESS FOR A PARTICULAR
PURPOSE, SHALL BE LIMITED IN DURATION TO THE 12 MONTH DURATION OF THIS
WARRANTY.
3) Pull cap away from unit.
Spa massage should generally last only 15-20 minutes.
4) Rinse cap under water to remove hair, lint, etc.
Caution: Read safety rules and operating instructions carefully. This product is intended for indoor
use on permanent, right wall tubs. Do not use outdoors or on the walls of inflatable tubs or pools.
TO REPLACE CAP
1) Make sure unit is disconnected from the charger and the power knob is in the “OFF” position.
The tub should be clean and empty of water.
2) Turn cap clockwise about 20˚ until the double
hash marks on the cap line up with the center
seam on the back body of the unit.
Position A
2) Extend the folding arm and place unit along edge of tub so the unit is inside the tub and
the arm is resting on edge (Fig. 3).
Position B
3) Moisten suction cups to increase grip.
WARNING: Protect from excess lint, hair, etc... from easily getting caught
in motor, unit should never be used with the filter mesh removed. Injury
or damage to unit could result.
B
O
D
Y
B
E
N
E
F
I
T
S
TM/MD
IN NO EVENT SHALL CONAIR BE LIABLE FOR ANY SPECIAL, INCIDENTAL, OR CONSEQUENTIAL DAMAGES FOR BREACH OF THIS OR ANY OTHER WARRANTY, EXPRESS OR IMPLIED,
WHATSOEVER. Some states do not allow the exclusion or limitation of special, incidental, or
consequential damages, so the above limitation may not apply to you. This warranty gives you
specific legal rights, and you may also have other rights which vary from province to province.
1) Push cap into body so that single hash mark
on cap lines up with the center seam
on the back body of the unit.
HOW TO ATTACH YOUR BATH SPA
TO YOUR TUB
®
(Fig. 7)
Service Centre:
Conair Consumer Products Inc.
156 Parkshore Drive
Brampton, Ontario
L6T 5M1
4) Secure suction cups by gently applying even pressure on bath spa against tub wall (Fig. 4).
5) Adjust suction cup on arm so that it adheres directly onto bathtub edge. See Suction Cup Position
Adjustment section.
Visit us on the web at: www.conair.com
©2001 Conair Consumer Products Inc.
Brampton, Ontario L6T 5M1
6) Adjust height of motor assembly to desired depth by moving motor housing up or down by hand.
Built-in detents will hold the position you desire (Fig. 5).
IB-3996
BTS4C
01CN1415
7) Water may spray if unit is not level when turned on.
(Fig. 6)
Dual Jet
BATH SPA
C O R D L E S S
For your safety and continued enjoyment of this product,
always read the instruction book carefully before using.
(Fig. 3)
(Fig. 4)
(Fig. 5)
INSTRUCTION BOOKLET FOR BTS4C MODELS
IMPORTANT SAFETY
INSTRUCTIONS
SAVE THESE INSTRUCTIONS
FOR HOUSEHOLD USE ONLY
When using an electrical appliance, basic precautions should always be followed, including the
following: Read all instructions before using this appliance.
OPERATING INSTRUCTIONS
DANGER– To reduce the risk of electric shock:
This charger has a polarized plug (one blade is wider than the other). As a safety feature,
this plug will fit into a polarized outlet only one way. If the plug does not fit fully into the outlet, reverse
the plug. If it still does not fit, contact a qualified electrician. Do not attempt to defeat this safety feature.
1) Always unplug this appliance from the electrical outlet immediately after charging and before using
or cleaning.
2) Do not place or store power pack where it can fall or be pulled into a tub or sink.
Do not fully immerse in or drop into water or other liquid. Store in dry place.
WARNING– To reduce the risk of burns, fire, electric shock, or injury to persons:
CAUTIONS
• This unit should not be used in the following cases unless directed by physician: Tuberculosis,
benign and malignant tumors, hemorrhages, inflammations of the skin, phlebitis and thrombosis,
open and fresh wounds, bruises, broken skin or varicose veins, or undetermined calf pain.
• Consult your physician if you have any therapeutic questions regarding spa use.
1) An appliance should never be left unattended when plugged in. Unplug from outlet
when not in use, and before putting on or taking off parts.
• Do not use on any unexplained pain before consulting your physician.
2) Do not operate under blanket or pillow. Excessive heating can occur and cause fire,
electric shock, or injury to persons.
• Do not use on any part of the body that is anesthetized.
3) Close supervision is necessary when this appliance is used by, on, or near
children, invalids, or disabled persons.
4) Use this appliance only for its intended use as described in this manual. Do not use
attachments not recommended by Conair.
5) Never operate this appliance if it has a damaged cord or plug, if it is not working properly, or if it
has been dropped or damaged, or left in water for an extended period of time. Return the appliance
to a Conair Service Center for examination and repair.
6) Do not carry this appliance by supply cord or use cord as a handle.
• Discontinue use of unit if pain increases or swelling occurs after application.
• Do not use on any part of the body where recent surgery has been performed.
HOW TO CHARGE THE BATH SPA
Note: your bath spa is shipped with the batteries partially charged. Before initial use, charge the bath
spa batteries for 2-3 hours.
After the initial charge, your bath spa will require about one hour to fully charge. When bath spa is
fully charged, the charge indicator will no longer be illuminated.
TO CHARGE
7) Keep the cord away from heated surfaces.
1. Unit should be clean and dry. Turn switch to the off position.
8) never operate the appliance with the openings blocked. Keep the inlet openings free of lint,
hair, and other particles.
2. Place bath spa on a flat, dry surface away from water.
9) Never drop or insert any object into any opening.
10) Do not use outdoors.
11) Do not operate where aerosol (spray) products are being used or where oxygen is being administered.
12) To disconnect, turn all controls to the "off" position, then remove transformer plug from outlet.
3. Raise the folding arm and lift up the rubber seal to expose charging jack.
IT IS IMPOSSIBLE TO OVERCHARGE THE BATTERY PACK. The battery pack can be charged
many times, but if your bath spa battery pack no longer accepts a charge, it may be necessary to
replace the battery pack. To replace the battery pack, your bath spa must be returned to an authorized Conair service center. There are no user serviceable parts inside your bath spa. Do not attempt
to disassemble this product. Opening or removing internal parts from your bath spa will void your
warranty and may expose you to voltage or other risks. Incorrect reassembling can cause electric
shock when the appliance is subsequently used.
IMPORTANT: In order to get maximum life from the bath spa battery pack, be sure to charge the bath
spa for 2-3 hours before initial use. Make sure the charge adapter is properly connected and charge
indicator is lit.
IMPORTANT: DO NOT dispose of the unit into household garbage. Your bath spa
contains a nickel cadmium (Ni-Cd) battery pack. Do not open or mutilate the battery
pack. Released electrolyte is corrosive and may cause damage to the eyes or skin.
It may be toxic if swallowed. For information on recycling or proper disposal, consult
your local solid waste collection or disposal organization.
You may experience some water spray if the unit shifts during operation. Do not overfill your tub. For
best results, get into your tub before filling (note: too much water can cause overflow).
HOW TO USE
CARE AND MAINTENANCE
1) Attach unit securely onto tub (see how to attach bath spa to tub).
1) Keep your unit clean and clear of obstruction. Check the outflow control and water intake periodically to make sure they are free of obstruction, hair, lint, and other particles that could block air or
water flow. Clean inlet filters by rotating off sides of the bath spa. Clean by rinsing in a reverse water
flow in a sink or tub. Reinsert on bath spa by using the provided alignment marks.
2) Fill bathtub with water.
3) Adjust height of motor assembly so that outlet nozzles are beneath
water. This can be done by moving the motor assembly up and down
vertically; the housing employs detents which will hold the motor assembly at the desired height.
Jet Stream
Bubbles
(Fig. 1)
2) Store your bath spa in a cool, dry place. Loosely coil charge cord and lay flat to store. Do not
wrap cord around bath spa.
FEATURES
1) Cordless/Chargeable design
2) Quick charge - charges in one hour
Off, On and On/Light
3) Dual multidirectional water jets
4) Telescopic housing
5) Jet stream or bubble option
6) Mood light
7) Removable filter
Mood light
8) Compact convenience
9) Charge light indicator
Adjustable
suction cup
Foldable arm for
easy storage
Bubble/Water
Jet control
switch on side
Rubber Seal and
Charging Jack
Adjustable
motor height
Suction cups
for bathtub wall
Manual direction
dual water jets
Charge Light Indicator
4) Point the water output nozzles downwards.
6) Turn the knob on the top of the bath spa to "on".
6. The charge indicator (beneath mood light lens) will illuminate to show that the unit is properly
charging. When bath spa is fully charged, the charge indicator will no longer be illuminated.
7) Turn the knob to "on/light" and the mood light will illuminate (See fig. 2).
8. To secure unit to bath tub, follow How To Use instructions.
Keep hair, fingers, skin and loose clothing or articles away from suction opening located on sides of
unit while bath spa is in operation. Otherwise, personal injury may result. Use of shower cap is recommended for persons with long hair. Discontinue use of any oils added to bath water that may
affect performance of unit.
The body benefits dual jet bath spa cordless can help you relax, relieve tension, and sooth sore muscles. Consult your physician or physical therapist for recommendations regarding bath spa use,
including water temperature, duration, and frequency.
5. Plug charging transformer power pack into a 120V/60h/z standard electrical outlet.
14) Disconnect power when not charging your bath spa.
IMPORTANT
• DO NOT dispose of battery pack in a fire; the cells may explode.
• DO NOT attempt to open or mutilate battery pack.
5) Adjust the bubble control switch on top of the unit to either "Jet Stream" or
"Bubbles" (see Fig. 1).
13) Do not use if you have sensitive skin areas or poor circulation. Use by unattended children or
incapacitated persons may be dangerous.
CAUTION: IF BATH SPA FALLS AND BECOMES COMPLETELY
IMMERSED IN WATER IN TUB, DO NOT PANIC. THE BATH SPA
HAS BEEN DESIGNED TO WITHSTAND SUBMERSION. BEFORE
CHARGING ALWAYS REMOVE UNIT FROM BATHTUB. PRESS
OFF BUTTON, DRAIN WATER FROM UNIT AND STORE IN A DRY
PLACE FOR AT LEAST 24 HOURS BEFORE CHARGING.
USER MAINTENANCE INSTRUCTIONS
A depleted battery that is ready to be discarded may appear to be no longer useful, but can still contain a residual charge. Certain precautions must be taken to prevent batteries from short-circuiting.
4. Connect the charge adapter plug to the charging jack.
7. After unit has charged (for at least 1 hour), disconnect charge transformer power pack from electrical outlet and then disconnect charge jack from unit. Reseat rubber seal by pressing rubber seal
firmly into the charge jack opening.
15) Never use while sleeping or drowsy.
DO NOT ATTEMPT TO CHARGE UNIT IN THE BATH TUB. DO NOT ATTEMPT TO USE UNIT
WHILE CHARGE ADAPTER IS CONNECTED TO THE UNIT.
8) Adjust the water output nozzles to create customized waterflow in your bathtub. The nozzles can be rotated to customize the direction of the water flow.
Filter Alignment Tabs
6’ cord to spa
Built-in
Charging
Stand
(Fig. 2)
9) After use, turn the know to the "off" position, drain water from tub, then remove bath spa.
10) Rotate your bath spa gently over the bathtub to remove excess water, and dry with a soft cloth
before storage.
Transformer Power Pack
Removable
Filter
CLEANING AND DISINFECTING YOUR BATH SPA
SUCTION CUP POSITION ADJUSTMENT
1) Your Bath Spa can be cleaned with any mild detergent or soap.
Cleaning is recommended after each use.
Suction cup underneath the handle can be in 1 of 4 positions to suit different bathtubs. (See Fig. 6)
Loosen, remove and then replace screw after adjustment.
2) Disinfect your unit periodically to keep it bacteria_free. With frequent use,
disinfect weekly. With infrequent use, disinfect after each use.
Position A: The outer most position for thick-sided tubs.
Position B: The inner most position for thin-sided tubs.
FITTING AND REMOVING FILTER CAPS
ONE YEAR LIMITED WARRANTY
TO REMOVE CAPS
Conair will repair or replace, at our option, your appliance free of charge for 12 months
from the date of purchase if the appliance is defective in workmanship or materials.
1) Turn cap about 20˚ counterclockwise (Fig. 7).
(Filter caps are located on either side of the motor assembly.)
To obtain service under this warranty, return the defective product to the service center nearest you,
together with your sales slip and $7.50 for postage and handling.
2) Line up single hash mark on cap with
the center seam on the back body of the unit.
RECOMMENDED MASSAGING TIMES
ANY IMPLIED WARRANTIES, OBLIGATIONS, OR LIABILITIES, INCLUDING BUT NOT LIMITED
TO THE IMPLIED WARRANTY OF MERCHANTABILITY AND FITNESS FOR A PARTICULAR
PURPOSE, SHALL BE LIMITED IN DURATION TO THE 12 MONTH DURATION OF THIS
WARRANTY.
3) Pull cap away from unit.
Spa massage should generally last only 15-20 minutes.
4) Rinse cap under water to remove hair, lint, etc.
Caution: Read safety rules and operating instructions carefully. This product is intended for indoor
use on permanent, right wall tubs. Do not use outdoors or on the walls of inflatable tubs or pools.
TO REPLACE CAP
1) Make sure unit is disconnected from the charger and the power knob is in the “OFF” position.
The tub should be clean and empty of water.
2) Turn cap clockwise about 20˚ until the double
hash marks on the cap line up with the center
seam on the back body of the unit.
Position A
2) Extend the folding arm and place unit along edge of tub so the unit is inside the tub and
the arm is resting on edge (Fig. 3).
Position B
3) Moisten suction cups to increase grip.
WARNING: Protect from excess lint, hair, etc... from easily getting caught
in motor, unit should never be used with the filter mesh removed. Injury
or damage to unit could result.
B
O
D
Y
B
E
N
E
F
I
T
S
TM/MD
IN NO EVENT SHALL CONAIR BE LIABLE FOR ANY SPECIAL, INCIDENTAL, OR CONSEQUENTIAL DAMAGES FOR BREACH OF THIS OR ANY OTHER WARRANTY, EXPRESS OR IMPLIED,
WHATSOEVER. Some states do not allow the exclusion or limitation of special, incidental, or
consequential damages, so the above limitation may not apply to you. This warranty gives you
specific legal rights, and you may also have other rights which vary from province to province.
1) Push cap into body so that single hash mark
on cap lines up with the center seam
on the back body of the unit.
HOW TO ATTACH YOUR BATH SPA
TO YOUR TUB
®
(Fig. 7)
Service Centre:
Conair Consumer Products Inc.
156 Parkshore Drive
Brampton, Ontario
L6T 5M1
4) Secure suction cups by gently applying even pressure on bath spa against tub wall (Fig. 4).
5) Adjust suction cup on arm so that it adheres directly onto bathtub edge. See Suction Cup Position
Adjustment section.
Visit us on the web at: www.conair.com
©2001 Conair Consumer Products Inc.
Brampton, Ontario L6T 5M1
6) Adjust height of motor assembly to desired depth by moving motor housing up or down by hand.
Built-in detents will hold the position you desire (Fig. 5).
IB-3996
BTS4C
01CN1415
7) Water may spray if unit is not level when turned on.
(Fig. 6)
Dual Jet
BATH SPA
C O R D L E S S
For your safety and continued enjoyment of this product,
always read the instruction book carefully before using.
(Fig. 3)
(Fig. 4)
(Fig. 5)
INSTRUCTION BOOKLET FOR BTS4C MODELS
IMPORTANT SAFETY
INSTRUCTIONS
SAVE THESE INSTRUCTIONS
FOR HOUSEHOLD USE ONLY
When using an electrical appliance, basic precautions should always be followed, including the
following: Read all instructions before using this appliance.
OPERATING INSTRUCTIONS
DANGER– To reduce the risk of electric shock:
This charger has a polarized plug (one blade is wider than the other). As a safety feature,
this plug will fit into a polarized outlet only one way. If the plug does not fit fully into the outlet, reverse
the plug. If it still does not fit, contact a qualified electrician. Do not attempt to defeat this safety feature.
1) Always unplug this appliance from the electrical outlet immediately after charging and before using
or cleaning.
2) Do not place or store power pack where it can fall or be pulled into a tub or sink.
Do not fully immerse in or drop into water or other liquid. Store in dry place.
WARNING– To reduce the risk of burns, fire, electric shock, or injury to persons:
CAUTIONS
• This unit should not be used in the following cases unless directed by physician: Tuberculosis,
benign and malignant tumors, hemorrhages, inflammations of the skin, phlebitis and thrombosis,
open and fresh wounds, bruises, broken skin or varicose veins, or undetermined calf pain.
• Consult your physician if you have any therapeutic questions regarding spa use.
1) An appliance should never be left unattended when plugged in. Unplug from outlet
when not in use, and before putting on or taking off parts.
• Do not use on any unexplained pain before consulting your physician.
2) Do not operate under blanket or pillow. Excessive heating can occur and cause fire,
electric shock, or injury to persons.
• Do not use on any part of the body that is anesthetized.
3) Close supervision is necessary when this appliance is used by, on, or near
children, invalids, or disabled persons.
4) Use this appliance only for its intended use as described in this manual. Do not use
attachments not recommended by Conair.
5) Never operate this appliance if it has a damaged cord or plug, if it is not working properly, or if it
has been dropped or damaged, or left in water for an extended period of time. Return the appliance
to a Conair Service Center for examination and repair.
6) Do not carry this appliance by supply cord or use cord as a handle.
• Discontinue use of unit if pain increases or swelling occurs after application.
• Do not use on any part of the body where recent surgery has been performed.
HOW TO CHARGE THE BATH SPA
Note: your bath spa is shipped with the batteries partially charged. Before initial use, charge the bath
spa batteries for 2-3 hours.
After the initial charge, your bath spa will require about one hour to fully charge. When bath spa is
fully charged, the charge indicator will no longer be illuminated.
TO CHARGE
7) Keep the cord away from heated surfaces.
1. Unit should be clean and dry. Turn switch to the off position.
8) never operate the appliance with the openings blocked. Keep the inlet openings free of lint,
hair, and other particles.
2. Place bath spa on a flat, dry surface away from water.
9) Never drop or insert any object into any opening.
10) Do not use outdoors.
11) Do not operate where aerosol (spray) products are being used or where oxygen is being administered.
12) To disconnect, turn all controls to the "off" position, then remove transformer plug from outlet.
3. Raise the folding arm and lift up the rubber seal to expose charging jack.
IT IS IMPOSSIBLE TO OVERCHARGE THE BATTERY PACK. The battery pack can be charged
many times, but if your bath spa battery pack no longer accepts a charge, it may be necessary to
replace the battery pack. To replace the battery pack, your bath spa must be returned to an authorized Conair service center. There are no user serviceable parts inside your bath spa. Do not attempt
to disassemble this product. Opening or removing internal parts from your bath spa will void your
warranty and may expose you to voltage or other risks. Incorrect reassembling can cause electric
shock when the appliance is subsequently used.
IMPORTANT: In order to get maximum life from the bath spa battery pack, be sure to charge the bath
spa for 2-3 hours before initial use. Make sure the charge adapter is properly connected and charge
indicator is lit.
IMPORTANT: DO NOT dispose of the unit into household garbage. Your bath spa
contains a nickel cadmium (Ni-Cd) battery pack. Do not open or mutilate the battery
pack. Released electrolyte is corrosive and may cause damage to the eyes or skin.
It may be toxic if swallowed. For information on recycling or proper disposal, consult
your local solid waste collection or disposal organization.
You may experience some water spray if the unit shifts during operation. Do not overfill your tub. For
best results, get into your tub before filling (note: too much water can cause overflow).
HOW TO USE
CARE AND MAINTENANCE
1) Attach unit securely onto tub (see how to attach bath spa to tub).
1) Keep your unit clean and clear of obstruction. Check the outflow control and water intake periodically to make sure they are free of obstruction, hair, lint, and other particles that could block air or
water flow. Clean inlet filters by rotating off sides of the bath spa. Clean by rinsing in a reverse water
flow in a sink or tub. Reinsert on bath spa by using the provided alignment marks.
2) Fill bathtub with water.
3) Adjust height of motor assembly so that outlet nozzles are beneath
water. This can be done by moving the motor assembly up and down
vertically; the housing employs detents which will hold the motor assembly at the desired height.
Jet Stream
Bubbles
(Fig. 1)
2) Store your bath spa in a cool, dry place. Loosely coil charge cord and lay flat to store. Do not
wrap cord around bath spa.
FEATURES
1) Cordless/Chargeable design
2) Quick charge - charges in one hour
Off, On and On/Light
3) Dual multidirectional water jets
4) Telescopic housing
5) Jet stream or bubble option
6) Mood light
7) Removable filter
Mood light
8) Compact convenience
9) Charge light indicator
Adjustable
suction cup
Foldable arm for
easy storage
Bubble/Water
Jet control
switch on side
Rubber Seal and
Charging Jack
Adjustable
motor height
Suction cups
for bathtub wall
Manual direction
dual water jets
Charge Light Indicator
4) Point the water output nozzles downwards.
6) Turn the knob on the top of the bath spa to "on".
6. The charge indicator (beneath mood light lens) will illuminate to show that the unit is properly
charging. When bath spa is fully charged, the charge indicator will no longer be illuminated.
7) Turn the knob to "on/light" and the mood light will illuminate (See fig. 2).
8. To secure unit to bath tub, follow How To Use instructions.
Keep hair, fingers, skin and loose clothing or articles away from suction opening located on sides of
unit while bath spa is in operation. Otherwise, personal injury may result. Use of shower cap is recommended for persons with long hair. Discontinue use of any oils added to bath water that may
affect performance of unit.
The body benefits dual jet bath spa cordless can help you relax, relieve tension, and sooth sore muscles. Consult your physician or physical therapist for recommendations regarding bath spa use,
including water temperature, duration, and frequency.
5. Plug charging transformer power pack into a 120V/60h/z standard electrical outlet.
14) Disconnect power when not charging your bath spa.
IMPORTANT
• DO NOT dispose of battery pack in a fire; the cells may explode.
• DO NOT attempt to open or mutilate battery pack.
5) Adjust the bubble control switch on top of the unit to either "Jet Stream" or
"Bubbles" (see Fig. 1).
13) Do not use if you have sensitive skin areas or poor circulation. Use by unattended children or
incapacitated persons may be dangerous.
CAUTION: IF BATH SPA FALLS AND BECOMES COMPLETELY
IMMERSED IN WATER IN TUB, DO NOT PANIC. THE BATH SPA
HAS BEEN DESIGNED TO WITHSTAND SUBMERSION. BEFORE
CHARGING ALWAYS REMOVE UNIT FROM BATHTUB. PRESS
OFF BUTTON, DRAIN WATER FROM UNIT AND STORE IN A DRY
PLACE FOR AT LEAST 24 HOURS BEFORE CHARGING.
USER MAINTENANCE INSTRUCTIONS
A depleted battery that is ready to be discarded may appear to be no longer useful, but can still contain a residual charge. Certain precautions must be taken to prevent batteries from short-circuiting.
4. Connect the charge adapter plug to the charging jack.
7. After unit has charged (for at least 1 hour), disconnect charge transformer power pack from electrical outlet and then disconnect charge jack from unit. Reseat rubber seal by pressing rubber seal
firmly into the charge jack opening.
15) Never use while sleeping or drowsy.
DO NOT ATTEMPT TO CHARGE UNIT IN THE BATH TUB. DO NOT ATTEMPT TO USE UNIT
WHILE CHARGE ADAPTER IS CONNECTED TO THE UNIT.
8) Adjust the water output nozzles to create customized waterflow in your bathtub. The nozzles can be rotated to customize the direction of the water flow.
Filter Alignment Tabs
6’ cord to spa
Built-in
Charging
Stand
(Fig. 2)
9) After use, turn the know to the "off" position, drain water from tub, then remove bath spa.
10) Rotate your bath spa gently over the bathtub to remove excess water, and dry with a soft cloth
before storage.
Transformer Power Pack
Removable
Filter
CLEANING AND DISINFECTING YOUR BATH SPA
SUCTION CUP POSITION ADJUSTMENT
1) Your Bath Spa can be cleaned with any mild detergent or soap.
Cleaning is recommended after each use.
Suction cup underneath the handle can be in 1 of 4 positions to suit different bathtubs. (See Fig. 6)
Loosen, remove and then replace screw after adjustment.
2) Disinfect your unit periodically to keep it bacteria_free. With frequent use,
disinfect weekly. With infrequent use, disinfect after each use.
Position A: The outer most position for thick-sided tubs.
Position B: The inner most position for thin-sided tubs.
FITTING AND REMOVING FILTER CAPS
ONE YEAR LIMITED WARRANTY
TO REMOVE CAPS
Conair will repair or replace, at our option, your appliance free of charge for 12 months
from the date of purchase if the appliance is defective in workmanship or materials.
1) Turn cap about 20˚ counterclockwise (Fig. 7).
(Filter caps are located on either side of the motor assembly.)
To obtain service under this warranty, return the defective product to the service center nearest you,
together with your sales slip and $7.50 for postage and handling.
2) Line up single hash mark on cap with
the center seam on the back body of the unit.
RECOMMENDED MASSAGING TIMES
ANY IMPLIED WARRANTIES, OBLIGATIONS, OR LIABILITIES, INCLUDING BUT NOT LIMITED
TO THE IMPLIED WARRANTY OF MERCHANTABILITY AND FITNESS FOR A PARTICULAR
PURPOSE, SHALL BE LIMITED IN DURATION TO THE 12 MONTH DURATION OF THIS
WARRANTY.
3) Pull cap away from unit.
Spa massage should generally last only 15-20 minutes.
4) Rinse cap under water to remove hair, lint, etc.
Caution: Read safety rules and operating instructions carefully. This product is intended for indoor
use on permanent, right wall tubs. Do not use outdoors or on the walls of inflatable tubs or pools.
TO REPLACE CAP
1) Make sure unit is disconnected from the charger and the power knob is in the “OFF” position.
The tub should be clean and empty of water.
2) Turn cap clockwise about 20˚ until the double
hash marks on the cap line up with the center
seam on the back body of the unit.
Position A
2) Extend the folding arm and place unit along edge of tub so the unit is inside the tub and
the arm is resting on edge (Fig. 3).
Position B
3) Moisten suction cups to increase grip.
WARNING: Protect from excess lint, hair, etc... from easily getting caught
in motor, unit should never be used with the filter mesh removed. Injury
or damage to unit could result.
B
O
D
Y
B
E
N
E
F
I
T
S
TM/MD
IN NO EVENT SHALL CONAIR BE LIABLE FOR ANY SPECIAL, INCIDENTAL, OR CONSEQUENTIAL DAMAGES FOR BREACH OF THIS OR ANY OTHER WARRANTY, EXPRESS OR IMPLIED,
WHATSOEVER. Some states do not allow the exclusion or limitation of special, incidental, or
consequential damages, so the above limitation may not apply to you. This warranty gives you
specific legal rights, and you may also have other rights which vary from province to province.
1) Push cap into body so that single hash mark
on cap lines up with the center seam
on the back body of the unit.
HOW TO ATTACH YOUR BATH SPA
TO YOUR TUB
®
(Fig. 7)
Service Centre:
Conair Consumer Products Inc.
156 Parkshore Drive
Brampton, Ontario
L6T 5M1
4) Secure suction cups by gently applying even pressure on bath spa against tub wall (Fig. 4).
5) Adjust suction cup on arm so that it adheres directly onto bathtub edge. See Suction Cup Position
Adjustment section.
Visit us on the web at: www.conair.com
©2001 Conair Consumer Products Inc.
Brampton, Ontario L6T 5M1
6) Adjust height of motor assembly to desired depth by moving motor housing up or down by hand.
Built-in detents will hold the position you desire (Fig. 5).
IB-3996
BTS4C
01CN1415
7) Water may spray if unit is not level when turned on.
(Fig. 6)
Dual Jet
BATH SPA
C O R D L E S S
For your safety and continued enjoyment of this product,
always read the instruction book carefully before using.
(Fig. 3)
(Fig. 4)
(Fig. 5)
INSTRUCTION BOOKLET FOR BTS4C MODELS