1
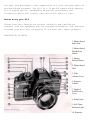
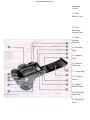
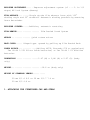
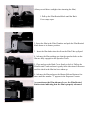
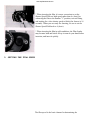
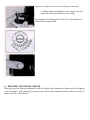
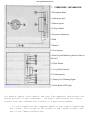
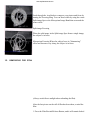
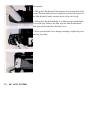
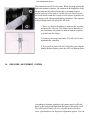
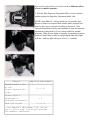
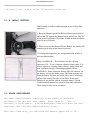
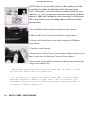
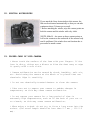
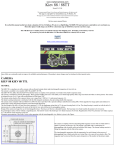
www.orphancameras.com
Users manual Sears KS-2
This manual can be used for many "automatic" camera as the functions are similar.
Some "automatic" cameras have lights, some have swinging arms or digital readouts showing the
shutter speed that the meter chose for that exposure.
This is a typical K-mount Chinon, Sears or Ricoh type camera.
This camera manual library is for reference and historical purposes, all rights reserved.
This page is copyright by [email protected], M. Butkus, NJ.
This page may not be sold or distributed without the expressed permission of the producer
On-line camera manual library
If you find this manual useful, how about a donation of $3 to: M. Butkus, 29 Lake Ave.,
High Bridge, NJ 08829-1701 This will allow me to continue to buy new manuals and pay
their shipping costs. It'll make you feel better, won't it?
If you use Pay Pal, use the link below. Use the above address for a check, M.O. or cash.
Back to my main Chinon information page
Back to Main Chinon Page
CONGRATULATIONS!
You have just purchased a fine camera that will give you many years of
picture-taking pleasure. The KS-2 is a 35 mm SLR camera which assures
you of superb optics. outstanding mechanical performance and
reliability which will justify your choice for years to come.
Before using your KS-2
Please read this instruction booklet carefully and familiarize
yourself with the equipment and its features thoroughly. Your pleasure
in using your KS-2 will be greater if you know your camera properly.
DESCRIPTION OF PARTS
1. Shutter Speed
Index Line
2. Shutter Speed
Dial Release
Button
3. Shutter
Release Button
4. Shutter Speed
Dial
5. Film
Advance Lever
6. Exposure
Counter
7. Depth of
Field Preview
Lever
8. Strap Eyelet
9. Self-Timer
Indicator Light
10. Exposure
www.orphancameras.com
Indication
Switch
11. Lens
Release Lever
12. Lens
Mounting
Locator Node
13. Flash
Synchro
Terminal
14. Focusing
Ring
15. Distance
Scale
16. Depth of
Field Scale
17. F-Stop Ring
18. AE Lock
Button
19. Aperture
Relay Window
20. Film Speed
Index Line
21. Film Speed
Dial
22. Film Rewind Knob (Back Cover Lock Release
Knob)
23. Film Rewind Crank
24. Exposure Adjustment Dial
25. Self-Timer Switch
26. Exposure Adjustment Index Line
33. Tripod Socket
34. Winder Contact
35. Film Rewind Release Button
36. Winder Coupler
37. Winder Positioning Hole
38. Film Pressure Plate
27. Hot Shoe
28. Flash Ready Signal Contact
29. Viewfinder Eyepiece
30. Film Rewind Shaft
39. Back Cover
40. ASA/DIN Conversion Table
41. Film Take-up Spool
42. Sprocket
31. Film Chamber
32. Battery Compartment Cover
43. Multiple Exposure Button
44. Multiple Exposure Lock Switch
SPECIFICATIONS: Sears KS-2
TYPE ..... 35 mm SLR with automatic electronic exposure control focal
plane shutter
4www.butkus.org
FILM FORMAT AND FRAME SIZE........... 35 mm film: 24 x 36 mm
LENS MOUNT........................................... K mount
STANDARD LENSES.................................
www.orphancameras.com
50 mm AUTO SEARS f/1.4 (Multi-coated)
50 mm AUTO SEARS f/1.7 (Multi-coated)
50 mm AUTO SEARS f/2.0 (Coated)
SHUTTER .......... Electronically controlled, vertically moving metal
focal plane shutter
Automatic from 16 to 1/1000 sec.
Manual from 16 to 1/1000 sec. plus B
SELF-TIMER ............ Operating delay about 10 seconds during
operation the red LED light pulsates and an electronic sound is
emitted.
VIEWFINDER ....... Field of view covers 93% horizontally and
vertically Viewing Magnification 0.88X (with 50 mm f/1.4 lens)
Indicators in the viewfinder— Exposure Adjustment. Bulb, Manual,
Overexposure, Underexposure, Shutter Speeds. Slow Shutter, Long Time
Exposure, Battery Low Warning, Flash Ready LED Light, F-Stop Number,
AE Lock.
FOCUSING .............................. Split-image spot in microprism
band
EXPOSURE METER .................... TTL full open metering for centerweighted average
light reading coupled automatically to f-stop.
EXPOSURE COUPLING RANGE... EV 0 - EV 18 (with ASA 100 film 50 mm f/1.4
lens)
FILM SPEED RANGE..................ASA 12 - 3200
FLASH TERMINAL........ X synchro contact
4www.butkus.org
ACCESSORY SHOE...................................Hot Shoe (with Flash
Ready Signal Contact)
Flash Synchro Terminal
EXPOSURE ADJUSTMENT...... Exposure adjustment system (+2 ~ - 2. in 1/3
steps) AE Lock System (Memory)
FILM ADVANCE..........Single stroke film advance lever with 135°
winding angle and 35° stand-off Automatic winding possible by mounting
Sears Autowinder
EXPOSURE COUNTER......Additive, automatic resetting
FILM REWIND.................... Film Rewind Crank System
MIRROR ................ Quick return mirror
BACK COVER...... Hinged type. opened by pulling up Film Rewind Knob
POWER SOURCE................(Mallory MS76, Eveready S76 or equivalent)
Two SR-44 1.55V Silver Oxide batteries; or Two LR-44 1.5V Alkaline
batteries
4www.butkus.
org
DIMENSIONS ...................5.4" (W) x 3,4N (H) x 2.0" (D) (body
only)
WEIGHT...........................16.6 oz (body only)
WEIGHT OF STANDARD LENSES...........
50 mm f/1.4 9.2 oz 50 mm f/1.7 7.4 oz
50 mm f/2 4.9 oz
1. ATTACHING THE VIEWFINDER CAP AND STRAP
www.orphancameras.com
Viewfinder Cap
For instructions on how to use the Viewfinder Cap. read the section on
Self-Timer Photography and Usage of the Viewfinder Cap.
1. Attach the Viewfinder Cap to the strap.
4www.butkus.org
2. Put the strap through the Strap Eyelet and adjust it to the correct
length.
2. CHANGING LENSES
To Remove the Lens from the Camera
1. Keep the Lens Release Lever pressed in. and turn the lens in the direction of the arrow.
To Mount the Lens on the Camera
1. Line up the red dot on the lens mount with the
matching red dot on the camera body. or alternatively.
match the red (dot) mark on the Depth of Field Scale
to the red dot on the camera body.
2. When the lens has engaged. turn it in the direction of the
arrow until it clicks into place.
* For convenience when mounting the lens in the dark. you
can line up the Lens Mounting Locator Node with the Lens
Release Lever.
* Since the body cap has the same mount as the lens. You can
remove or mount lens cap in the same way as the lens.
3. INSERTING THE BATTERIES
The exposure metering and shutter operation of this camera are
powered by batteries, so it is important to insert the batteries correctly
for correct operation.
1. Remove the Battery Compartment Cover by turning it
counterclockwise with a coin.
2. Place the two batteries on top of each other as shown in the
illustration on the battery holder of the Battery Compartment Cover.
www.orphancameras.com
Batteries for the KS-2 [NOTE: click here for a listing of most Chinon
Camera Batteries]
Two LR-44 Alkaline batteries; life-span about 6 months; or two SR-44
Silver Oxide batteries; life-span about 12 months.
* Since dirt or sweat on the batteries may cause a bad contact, wipe
the batteries clean with a dry cloth before inserting them.
* When your camera is not used for a long period of time, remove the
batteries.
* Generally. in cold conditions, the voltage of the batteries
decreases. and this will impair the functioning of the shutter
and exposure meter. In these cases, either warm up the batteries
or keep a spare set of batteries warm in your pocket ready to
insert just before shooting.
* If no batteries are inserted, if they are incorrectly inserted,
or if they are worn out, the camera will not operate. Check that
the batteries are correctly inserted, and if they are and the
camera does not operate, replace them with new batteries.
* When the voltage of the batteries is getting low, the BAT
(Battery Low Warning Signal) in the Viewfinder will blink on and
off.
Please change the batteries without delay.
4. INSERTING THE FILM
4www.butkus.org
(Always avoid direct sunlight when inserting the film.)
1. Pull up the Film Rewind Knob until the Back
Cover snaps open.
2. Insert the film in the Film Chamber and push the Film Rewind
Knob down to its former position.
3. Insert the film leader into the slit on the Film Take-up Spool.
4. Advance the film, making sure that the sprocket holes on the
film are fully engaged on the Sprocket Teeth.
5. Close and press the Back Cover firmly to lock it. Pull up the
Film Rewind Crank and turn it gently in the direction of the arrow
until the slack in the film has been taken up.
6. Advance the film and press the Shutter Release Button a few
times until the number "1" appears in the Exposure Counter.
As you advance the Film Advance Lever, the Film Rewind
Knob rotates indicating that the film is properly advanced.
www.orphancameras.com
* When inserting the film, it is more convenient to set the
Shutter Speed Dial to a high speed rather than A (Auto) for
advancing the film to the number "1" position, to avoid firing
and waiting for a slow shutter speed to finish (the slowest is 16
seconds). When you are ready for shooting, be sure to set the
Shutter Speed Dial back to A (Auto).
* When inserting the film in cold conditions, the Film Leader
may become hard and brittle. Keep it warm in your hand before
insertion, and insert it quickly.
5. SETTING THE FILM SPEED
The film speed is the basic element for determining the
exposure, so please be sure to set the film speed correctly.
1. Pull the Film Speed Indicator outer ring up, and set it
against the film speed number you are using.
For example, if the film speed is ASA 100, set the indicator to
100 on the Film Speed Dial.
6. EXPOSURE INDICATION SWITCH
When you press the Exposure Indication Switch, the liquid crystal indication of shutter speed, will appear
in the Viewfinder. After shooting, the power source will cut off automatically after 8 minutes in order to
preserve the life of the batteries.
www.orphancameras.com
7. VIEWFINDER INFORMATION
1. Microprism Band
2. Split-image Spot
3. Shutter Speeds
4. F-Stop Number
5. Exposure Adjustment
6. Bulb
7. Manual
8. Overexposure
9. Shutter Speed Indicator (pulsates when on
AE lock)
10. Slow Shutter
11. Long Time Exposure
12. Underexposure
13. Battery Low Warning Signal
14. Flash Ready LED Light
The Shutter Speed, Slow Shutter and Long Time Exposure indications are
always present in the viewfinder. The parts indicated by the liquid
crystal show the information relative to a particular moment.
* In cold conditions the response speed of the liquid crystal may
get slower. This is due to the nature of the liquid crystal, and
not to any camera malfunction.
* When using a polarizing filter, depending on the angle of
rotation, there may be cases in which you cannot see the liquid
crystal indications.
8. AE (AUTOMATIC EXPOSURE)
PHOTOGRAPHY
(NOTE FROM MIKE B. - This is will apply to any
Chinon, Pentax or Ricoh automatic camera)
Your KS-2 camera enables you to use automatic
exposure where the shutter speed is automatically
selected, or manual exposure where you may select
the shutter speed yourself.
[NOTE: Mike B. - The shutter speed is chosen by
the meter reading what the lens F-stop is set too at
that time. Change the F-stop and a different shutter
speed will be chosen.]
Press the front button to turn on the metering system (most
cameras have the meter only stay on for a few minutes. Other
brands require you to just gently press the shutter button to activate
the meter system.)
www.orphancameras.com
1. Set the "A" on the Shutter Speed Dial against the Shutter
Speed Index Line.
2. Use the F-Stop Ring to set the desired f-stop number against
the Index Line.
3. When you press the Exposure Indication Switch, the correct
shutter speed for automatic exposure. will be shown by the
Shutter Speed Indicator in the Viewfinder.
4. When the Shutter Speed Indicator is within the orange band.
this means a slow shutter speed. You should either select a
different f-stop setting. or pay particular attention to camera
shake.
5. When the (up triangle) Overexposure mark or the (down
triangle) Underexposure mark appears, you should select another fstop number, as the exposure is incorrect.
* When set to "A". the Shutter Speed Dial is locked into position.
Lighting Conditions
F-stop number
range
Indoors
Outdoors, cloudy
Outdoors, sunshine
Beach in mid-summer
and snow scenes
F/2 - F2.8
F4 - F5.6
F8 - F11
F11 - F16
With film speed ASA 100
9. MANUAL PHOTOGRAPHY
4www.butkus.org
1. Press the Shutter Speed Dial Release
Button. and set the Shutter Speed Dial to the
desired shutter speed.
2. The letter "M" in the Viewfinder will pulsate
to indicate Manual mode.
www.orphancameras.com
3. If the (up triangle) (Overexposure mark) or
the (down triangle) (Underexposure mark)
pulsates, you should select another f-stop
number as the exposure is incorrect. If the (up
triangle) or the (down triangle) marks do not
disappear, even after selecting a different f-stop
number, you should select a different shutter
speed.
SHUTTER SPEED REFERENCE TABLE
Lighting conditions
Shutter speed
range
Indoors
Outdoors. cloudy
1/30 - 1/60
1/60 - 1/125
Outdoors, sunshine
1/125 - 1/250
Beach in mid-summer,
snow scenes
1/250 - 1/1000
10. HOLDING THE CAMERA
Holding the camera correctly when shooting is very important.
1. The camera should be positioned on the palm of your left hand
so that you can use your fingers to turn the Focusing Ring of the
lens easily
2. The index finger of your right hand should rest lightly on the
Shutter Release Button, while your right hand holds the camera
body lightly.
3. Your right arm should be in a comfortable position.
4. Keep your left arm resting lightly against your body, and the
camera should just touch your forehead when you look through the
viewfinder.
* It is important to shoot with the correct body posture, to avoid
blurred or tilted shots.
11. FOCUSING
www.orphancameras.com
Look through the viewfinder to compose your picture and focus by
turning the Focusing Ring. You can focus either by using the center
Split-image Spot or the Microprism Image Band that surrounds the
center circle.
Split-image Focusing
When the split image in the Split-image Spot forms a single image,
the subject is in focus.
Microprism Focusing When the subject loses its "shimmering"
effect and becomes very sharp, the subject is in focus.
12. REWINDING THE FILM
(Always avoid direct sunlight when unloading the film).
After the last picture on the roll of film has been taken, rewind the
film.
1. Press the Film Rewind Release Button, and it will remain locked
into position.
2. Pull up the Film Rewind Crank and turn it in the direction of the
arrow. When the film has been completely rewound, the tension of
the Film Rewind Crank is released and it will revolve freely.
3. Pull up the Film Rewind Knob to its fullest extent and the Back
Cover will open. Remove the film, push the Film Rewind Knob
back into position and close the Back Cover.
* Never open the Back Cover during rewinding, as light will get in
and ruin your film.
13. AE LOCK SYSTEM
www.orphancameras.com
This camera has an AE Lock system. When shooting against the
light on automatic exposure, the contrast in the brightness of the
background and the subject means that you cannot obtain a
correct exposure of the subject. In this case you should use the
AE Lock which retains the exposure of the subject regardless of
the changes in the background lighting conditions. The exposure
will not change until you cancel the AE Lock.
1. Move up close to the subject to measure the exposure,
and press the AE Lock. The Shutter Speed Indicator in
the viewfinder will pulsate to indicate that the exposure
is locked onto the subject.
2. Compose the picture and shoot. The AE Lock is then
automatically cancelled.
4www.butkus.org
3. If you wish to cancel the AE Lock before pressing the
Shutter Release Button, press the AE Lock Button again.
14. EXPOSURE ADJUSTMENT SYSTEM
According to shooting conditions, the camera may be affected
more by the background light than the light of the subject itself.
This will result in under (or over) exposed pictures. In these
cases, you should use the Exposure Adjustment system. You can
also use the system when you wish to create a deliberate effect
of over (or under) exposure.
1. Turn the Film Exposure Adjustment Dial to set the required
number against the Exposure Adjustment Index Line.
[NOTE: from Mike B. - Always bracket if you need the shot.
Expose a frame over-exposed then another under-exposed and
then one the correct exposure according to the meter. This
exposure adjustment is tricky and remember to turn the exposure
adjustment setting back to 0 (zero) when needed for normal
metering. What you are doing is metering, but making the meter
think it is darker then it really is and giving the film more light
with the + and less light when you set it to a - number]
Subject
Exposure Adjustment
Scenery with a lot
of sky
Figure against the
light
+1 to +2
Figure with a
snowscape or
seascape background
+ 1
Spot-lit figure
—1 to —2
* The Exposure Adjustment Dial can be
set to click stop (1/3 steps) between
the numbers indicated.
www.orphancameras.com
* Be sure to set it back to the "O" position after use.
15. B (BULB) SETTING
The B setting is used for shooting night scenes or long time
exposures.
1. Keep the Shutter Speed Dial Release Button pressed down
and set the "B" against the Shutter Speed Index Line. The "B"
mark in the Viewfinder will pulsate to indicate that the shutter
speed is set to B (bulb).
2. When you press the Shutter Release Button, the shutter will
remain open as long as the button is pressed.
* For long time exposures, use a tripod and cable release to
prevent camera shake.
[Note: from Mike B. - The self timer can fire off long
exposures (1/4 - 16 sec.) without a shutter release cable. For
longer exposures a locking cable release is rather cheap and
time exposures can give interesting nighttime effects.
WARNING: Some electronic shutters (like this camera) use
the battery to keep the shutter open. This long exposure can
drain the battery big time and could cause you to lose firing
ability if the battery dies after a few shots. Keep spare
batteries if you do this with an electronic shutter. Spring
loaded (manual shutters) are great for long time exposures.
Their batteries only power the meter.]
16. FLASH PHOTOGRAPHY
The Sears Auto/Thyristor electronic flash 48025) is available
exclusively for use with this camera. [Note: Mike B. - This is
basically a Ricoh camera. A Ricoh dedicated flash will work the auto
functions just like this dedicated Sears flash.]
With this flash unit, you can leave the shutter speed set on "A''.
Also the Flash Ready red LED light conveniently lights up in the
Viewfinder, so that you don't have to take your eye away from the
Viewfinder.
[Note: Mike B. - any "automatic" flash can be used with some excellent results. You must set the
shutter to 1/125 and the lens aperture to whatever the back of the flash states. Usually you get
two or three different F-stops to choose from depending on the flash make, the different F-stops
will also state, on the flash unit, the maximum distance you can have to your subject. Usually any
F-stop that is allowed can be used just 2 or 3 away also. I usually tape a thin tissue over just the
flash tube to diffuse the light for a softer effect when very close. Be careful not to cover that
electric eye. Yes, you can shoot at 25 feet @ F/2.8 but the limited "depth of field" can cause you
blurry images in front and behind what you focus on. Bigger flash units provide more lighting
power and smaller apertures. Many mid size units have bounce and swivel capability for less
"deer in the headlights" looks. See my other web pages with tips on flash units. ]
< With the Special Flash Unit >
1. Attach the flash unit to the camera Hot Shoe. Screw it on just snug.
2. Set the ''A'' on the Shutter Speed Dial against the Shutter Speed
Index Line.
3. Set the f-stop number to the designated exposure for automatic
shooting. The flash unit will automatically control the amount of light
for subjects within the distance range for automatic flash
photography.
[NOTE: Mike B. - some flash units have only one "auto" F-stop
setting, some provide 3 or 4 different F-stops by adjusting
www.orphancameras.com
switches on the flash unit. See the users manual of the flash
unit]
4. Turn the flash unit's power source switch on, and when the flash is
fully charged, the Flash Ready red LED Light will light up and the
Shutter Speed Indicator will show 1/125 sec. and change
automatically to the synchronizing speed.
5. Press the Shutter Release Button and shoot.
* For further details. please refer to the instructions with the flash
unit.
* Do not use other makes of flash units that have special signal pins
exclusively for their cameras. as this will result in incorrect
exposure and may damage the circuitry of the camera.
* If the Shutter Release Button is pressed before the Flash Ready LED
Light lights up, the shutter speed will be the one indicated by the
Shutter Speed Indicator.
[NOTE: Mike B. - Wait for the ready light or you will get underexposed
and most likely extremely blurry images as the shutter will remain
open in the dim light.]
17. FLASH PHOTOGRAPHY
< With Flash Units Other than the Sears Auto/Thyristor (8025) >
1. Set the Shutter Speed Dial to the synchronizing speed of
1/125 sec.
2. The guide number is indicated on the flash unit. Use the
guide number in the following equation to obtain the f-stop
number and set that number to the f-stop index line.
For example. with a flash unit with guide number 40 for ASA 25, and
camera-to-subject distance of 5 feet:
f-stop number (8) = Guide number (40)
-------------------------Camera-to-subject distance 5 feet
With automatic flash units, set the f-stop number designated for
automatic flash photography.
* It is convenient to use the quick reference table on the flash
unit, which shows the f-stop numbers already calculated.
* When using other automatic flash units, please follow the
instructions with the flash unit.
18. MULTIPLE EXPOSURE PHOTOGRAPHY
Order for Multiple Exposure
Multiple exposure is a device to put more than one exposure into the same frame.
www.orphancameras.com
[NOTE: Mike B. If you really want to try this, gently rewind the
rewind knob to tighten the film, then follow the instructions
below. Remember, you must divide the number of shots by your
exposure. e.g. for two exposures stop down one full stop (half the
amount of light) after finding the correct metering for each picture.
This is due to the fact you are adding light to each shot from the
previous shot.]
1. Press the Shutter Release Button to obtain the first exposure.
2. Slide the ME Lock Lever to the left until the red dot appears.
3. Advance the Film Advance Lever while keeping the ME Button
pressed down.
4. Take the second exposure.
* Repeat actions 3 and 4. If you wish to continue adding exposures to the
frame. At this time, the Exposure Counter will not advance.
* Better results can generally be obtained by taking subjects that include
a large area of darker parts.
* When multi-exposure shots are not required. be sure to slide
the ME Lock Lever back into position.
* It is better to inform the camera shop that you have taken
multiple exposures when you take your film for printing, as
sometimes they do not print these pictures, mistaking them for
accidental double-exposures.
19. SELF-TIMER PHOTOGRAPHY
USAGE OF THE VIEWFINDER CAP
The self-timer enables you to include yourself in your own photographs
for commemorative occasions etc.
1. After advancing the film, press the Self-Timer Switch.
2. The Self-Timer Indicator Light will pulsate with an electronic
sound, and about 10 seconds later, the shutter will be released.
3. If you wish to cancel the self-timer once it has started
operating, set the Shutter Speed Dial to L (Lock) or B (Bulb).
* If the film has not been advanced, the self-timer will not operate.
Viewfinder Cap
When using the self-timer with the A (Auto) setting, to avoid incident
light reversal from the light entering the viewfinder eyepiece and
causing incorrect exposure, use the Viewfinder Cap attached to the
strap to cover the viewfinder eyepiece.
[NOTE: Mike B. - This item is useful if you are metering those longer shutter speeds (1/4 to 16
sec.) in "Auto" mode as you normally are not looking through the viewfinder. Light from the rear
can effect the meter reading.
20. DEPTH OF FIELD
www.orphancameras.com
When you focus on a specific subject, an area "in front of" and
"behind" the subject will appear acceptably sharp in your picture.
This area is called the ''Depth of Field".
The depth of field can be determined in the following ways:
1. Each lens has a depth of field scale. For example with a
distance of 10 ft and using f/16. the area within the two
f/16 marks on the scale (about 6.6 ft ~ 26.3 ft) will be in
sharp focus.
2. When you press the Depth of Field Preview Lever. it
will set the lens diaphragm to the corresponding opening
previously set on the F-Stop ring. This enables you to
preview the depth of field of the picture.
* Please do not press the Shutter Release Button while pressing
the Depth of Field Preview Lever.
21. INFRARED PHOTOGRAPHY
The infrared index mark is an index to correct the focusing point
when you use (Black & White film) infrared film and red filters.
Since infrared light rays have a longer wave-length than visible
light rays, after focusing normally on the subject, you have to set
that distance against the infrared index mark.
Taking Infrared Photographs
1. Attach the red filter and focus on the subject.
2. Shift that distance to the infrared index mark. According to the
instructions enclosed with the film, set the f-stop. shutter speed
and release the shutter.
* Infrared light rays are invisible to the eye and the light meter, so
please refer to the instructions with the film for setting the f-stop
number and shutter speed.
4www.butkus.org
22. SPECIAL ACCESSORIES
If you attach the Sears Autowinder to this camera, the
film can be advanced automatically so that you can take
continuous shots (2 frames per second).
* Before attaching the winder, wipe the contact points on
both the camera and the winder with a dry cloth.
[NOTE: Mike B. - An eraser on these contact points as
well as the contacts on the underside of the camera body
can fix problems if the winder does not function due to
poor metal to metal contact.
23. PROPER CARE OF YOUR CAMERA
* Never touch the surface of the lens with your fingers. If the
lens is dirty, either use a blower to blow the dust away or wipe
it gently with a soft cloth.
* Camera malfunction can be caused by shock, humidity, salt air,
etc. Avoid using the camera at the beach or in places that use
chemicals. Wipe it carefully.
* Do not use chemically-treated dusters to clean the camera.
* Take care not to expose your camera to sudden changes in
temperature, as this may cause camera malfunction.
* Do not expose your camera for a long period of time in
extremely high temperatures, such as in the back of your car or
on a beach, as this may cause camera malfunction.
* When using a tripod. do not try to force a long screw into the
socket. (The screw length should be less than 5.7 mm. , JIS 5.5
mm).
www.orphancameras.com
* Do not place the camera near equipment that has strong
magnetism such as television or radio.
* Remove the batteries before storing the camera. and keep it in
a place free of dust and humidity.
* Do not attempt to disassemble or repair your camera yourself.
If service is necessary, bring it to the nearest Sears store.