1
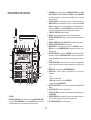
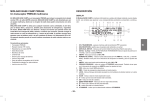
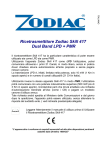
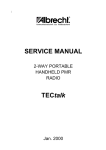
BASE CAMP446
Ricetrasmettitore PMR446 multiuso
Multi-task PMR446 transceiver
Via R. Sevardi 7
42124Reggio Emilia – Italy
www.cte.it
MIDLAND BASE CAMP PMR446
DESCRIPTION
A multi-task PMR446 transceiver
Your MIDLAND BASE CAMP keeps you constantly updated about its operational status through
a Liquid Crystal Display (LCD).
The symbols and their corresponding parameters that may appear, according to the operational
status of the device, are described as follows:
MIDLAND BASE CAMP is a PMR446 transceiver including the VHF MARINE BAND receiver
and AM/FM radio. MIDLAND BASE CAMP as been designed for being a multi-task equipment,
radio and transceiver, for communicating with other devices set to the same channel.
MIDLAND BASE CAMP is the ideal and daily time solution for all the outdoor activities, the
free time and why not, also for emergency and safety situations. As a matter of fact, BASE
CAMP has a built-in flashlight, and a built-in SOS Morse signal function, that allows the transceiver to send messages in code; moreover, the dynamo crank allows you to recharge the
radio during a power outage or anytime away from a power source. Through the USB jack it
is possible to recharge also other devices (mobile phone, iPod, mp3 players) by the dynamo
crank, AC or DC Adapter.
Its small size allows the user to realize radio communications also on the go.
3
2 1
7
10 9 11
13 14
15
12
4
5
MIDLAND BASE CAMP is equipped also with a handheld microphone for an easy and practical
use.
6
8
18 17 16
(TX) TRANSMIT - appears while you are transmitting a signal (PTT button pressed)
(RX) RECEIVE - means that the radio is receiving a signal.
(DW) - DUAL WATCH indicates the DUAL WATCH function is on.
(H)High (L) Low- TRANSMIT POWER LEVEL - indicates TX power setting (H&L) - only in
PMR BAND.
5. AM/PM - indicates that the clock is set in AM or PM.
6. CHANNEL NUMBER - indicates the channel selected (P1-P8 PMR, 1-69 LPD, and 1-88 MARINE). It can also be used to display AM/FM receiver frequency and the clock setting.
7. AM/FM - indicates if the radio is in AM or FM receiving mode.
8. PRIVACY CODE - indicates the CTCSS/DCS privacy code selected by the user. It’s also used
to display the AM/FM receiver frequency and the clock setting.
9. VOX - indicates if VOX mode is active.
10. EMG - emergency channel selected in MARINE BAND.
11. LOCK - indicates that the key lock mode is on (except BAND, battery source, light switch and
MONITOR button).
12. SCAN - indicates if the radio is in SCAN mode.
13. - indicates that the key beep tone of the radio is on.
14.
-indicates the battery level.
15. (RGB)- ROGER BEEP - indicates that the ROGER BEEP tone is on.
16. -indicates that the alarm clock is activated.
17. - indicates that you are in MARINE mode.
18. CTCSS/DCS - indicates the selected CTCSS/DCS code.
1.
2.
3.
4.
Main features:
• PMR446 transceiver
• Vhf MARINE BAND receiver
• Alarm clock/AM/FM radio included
• Sos morse signals
• Handheld microphone
• Flashlight
• Dynamo crank battery charge capability
• Recharge usb jack
• Supplied with a 6v ni-mh rechargeable battery pack
• Working with alkaline batteries
• 2 Pin accessories jack
-9-
UK
DISPLAY
DESCRIPTION OF THE CONTROLS
3. SCAN/MINUTE button - pressing this button while MIDLAND BASE CAMP is tuned on MARINE or PMR BAND, you activate the SCAN mode. If AM/FM is set, pressing SCAN/MINUTE
you select the saved frequency; if you press this button while the radio is off, you can change
the minute of the clock.
4. LOCK/CALL/HOUR button - pressing this button for about 5 seconds while the radio is in
MARINE or PMR mode, you activate the key lock function. If you rather had selected the PMR
BAND and the calling tone (CA) is on, by pressing this button, you send a CALL signal on the
channel in use. If AM/FM is set, by pressing SCAN/MINUTE you select the saved frequency;
if you press this button while the radio is off, you can change the hour of the clock.
5. FLASHLIGHT - BASE CAMP has a built-in flashlight.
6. USB JACK - used for charging mobile phone, mp3 and iPod thru the dynamo crank.
7. EXTERNAL SPEAKER/MIC JACK- allows the connection with external devices as headsets,
microphones...
8. EXTERNAL CHARGER JACK- allows BASE CAMP to be charged by an external charger.
9. SPEAKER - MIDLAND BASE CAMP has a built-in speaker.
10. MENU/MORSE button - pressing this button while the radio is in PMR BAND, you access to
MENU mode. If you are in AM/FM/MARINE BAND, pressing more time this button, you can
send Morse codes.
11. PTT/SELECT/SNOOZE button- if the radio is in PMR BAND, press this button for transmitting,
and release it to receive. When MIDLAND BASE CAMP is in clock mode or synchronized on
whatever other BAND, pressing this button while the alarm clock is ringing, you postpone it.
(snooze)
12. DYNAMO CRANK HANDLE - rotated clockwise or counter-clockwise, you charge the NiMH
battery pack; moreover, it’s possible to recharge mobile telephone, mp3 or iPod thru the USB
jack.
13. BAND SWITCH - used to switch among AM/FM/PMR/MARINE mode.
14. TUNING KNOB - rotated in clockwise or counter-clockwise, you can make these
adjustments:
• clock
• frequencies of radio reception
• MENU settings and selection of the channel (PMR BAND)
• selection of the channel (MARINE BAND)
15. BATTERY SOURCE SWITCH - used to switch between Alkaline and Rechargeable NiMH
batteries.
16. LIGHT ON/OFF SWITCH - used to turn the flashlight on/off.
17. TONE CONTROL KNOB - turn clockwise or counter-clockwise to increase/decrease the tone
(on AM/FM BAND).
18. POWER/VOLUME KNOB - turn clockwise to turn the power on and increase the volume level.
Turn counter-clockwise to decrease the volume level and turn the power off.
19. MIC - MIDLAND BASE CAMP has a built-in microphone.
1
4
LOCK/CALL
HOUR
3
2
SCAN
MONITOR
MINUTE ALARM ON/OFF
10
11
MENU
PTT/SELECT
MORSE
SNOOZE
BASE
CAMP
5
6
12
TUNING
BAND
14
AM FM PMR MARINE
Battery source
7
Alkaline
Rechargeable
TONE
LIGHT
8
OFF
ON
VOL
17
18
OFF
9
19
16 15 13
1. ANTENNA
2. MONITOR-ALARM ON/OFF button - pressing the button while MIDLAND BASE CAMP is
on and set on PMR or MARINE BAND, you activate the MONITOR function. If this button is
pressed when the radio is off, you can activate or de-activate the alarm clock.
- 10 -
OPERATIONS AND FUNCTIONS
INSTALLING THE SHOULDER STRAP
To install the shoulder strap, slide the shoulder strap clip
down into the metal pins on the top of MIDLAND BASE CAMP
until it locks into place.
Rotate the POWER/VOLUME knob clockwise to turn the radio on and to increase the volume level.
Rotate the control counter-clockwise to reduce the volume level and to turn the radio off.
During Power on, the LCD display will show all icons for 1 second and the LCD display will indicate
the last channel/frequency selected.
CONTENT
-- N° 1 MIDLAND BASE CAMP
-- N° 1 Wall adaptor
-- N° 1 800mA/h battery pack
-- N°1 Shoulder strap
-- N°1 2pin mike
BAND SELECTION
Select the PMR BAND using the BAND switch. According to the version you bought, you can
choose amongst the following channels:
Dual BAND version: PMR446 from P1 to P8 and from 9p to 24p (pre-set) / LPD from 1 to 69.
PMR446 version: from P1 to P8 and from 9p to 24p (pre-set).
COVERAGE/RANGE
The pre-set channels correspond (as here following) to:
The maximum range depends on terrain condition and is obtained during use in an open space.
The only limitations to maximum possible range are environmental factors such as blockage caused by trees, buildings, or other obstructions. Inside a car or a metallic construction, the range can
be reduced. Normally the coverage in the city, with buildings or other obstructions is about 1 or 2
Km. In open space but with obstructions like trees, leaves or houses the maximum possible range
is about 4-6 Km. In open space, without obstructions and in sight, like for example in mountain, the
coverage can be more than 12 Km.
9p
10 p
11 p
12 p
13 p
14 p
15 p
16 p
corresponds to channel P1 16
corresponds to channel P2 16
corresponds to channel P3 16
corresponds to channel P4 16
corresponds to channel P5 16
corresponds to channel P6 16
corresponds to channel P7 16
corresponds to channel P8 16
17 p
18 p
19 p
20 p
21 p
22 p
23 p
24 p
corresponds to channel P1 31
corresponds to channel P3 31
corresponds to channel P5 31
corresponds to channel P7 31
corresponds to channel P2 31
corresponds to channel P4 31
corresponds to channel P6 31
corresponds to channel P8 31
CHANNEL SELECTION
In PMR mode, the LCD will display the channel number (for ex. P1).
For selecting the desired channel, you have to turn clockwise/ counter clock-wise the TUNING
KNOB.
TRANSMISSION AND RECEPTION
To communicate, all radios in your group must be set to the same BAND (PMR) and to the same
channel.
To transmit, press and hold the PTT button and speak in a normal voice into the microphone. The
“TX” icon will appear continuously on the LCD display while transmitting.
You can communicate also using an external accessory or a hand mic, pressing and holding the
- 11 -
UK
POWER ON/OFF AND VOLUME
PTT button on the side of the hand mic. For a maximum clarity, hold the device at a distance of
about 2/3 cm.
To receive a CALL, release the PTT button. The “RX” icon will appear on the display when your
radio is receiving a transmission.
The addiction of these codes can be made on these following channels:
PMR446- only on the main PMR channels (from P1 to P8). The pre-set channels from 9p to 24p
can not be modified.
To select a privacy code for the current channel press the MENU button once, then turn the TUNING knob to select the chose code. The Privacy selected Code will appear on the display.
To confirm the selection, press the PTT button or wait for 5 seconds.
To activate the DCS codes, press the MENU button twice, then turn the TUNING knob to select the
desired code. The Privacy selected Code will appear on the display.
To confirm the selection, press the PTT button or wait for 5 seconds.
MONITOR
The MONITOR function allows you to exclude temporarily the automatic squelch for receiving
potential weak signals, which wouldn’t be received.
To activate the MONITOR, press the “MONITOR” button.
This function can be activated exclusively in PMR/MARINE BAND.
To disable the CTCSS/DCS functions, select the private code and then press the MENU button,
until visualize the flashing CTCSS Privacy Code on the right of the display. Select then “off”, turning
the TUNING knob. (It will appear “off” on the display)
To confirm, press PTT.
Note: if you select any CTCSS Privacy Code, any pre-selected DCS Privacy Code will be deleted
and vice-versa. To communicate with other radios, they must be set to the same channel and
Privacy Code selections.
SCAN
MIDLAND BASE CAMP can SCAN all channels for any activity. When the radio is in receiving
mode, the SCAN function will stop, and will resume scanning 5 seconds after the signal is no longer present. This function is useful to control which channels are free. When you press the PTT button to transmit on an active channel, the scanning function will stop
and remain on the active channel.
To resume scanning, quickly press the SCAN button.
This function can be used only in PMR/MARINE BAND.
TRANSMIT (TX) POWER LEVEL SELECTION
MIDLAND BASE CAMP has 2 power level settings. To select the power level, the radio must be on
PMR mode on P1-P8 channels. Press the MENU button until a “Pr” icon will appear on the display,
then turn the TUNING knob to select the TRANSMIT POWER LEVEL High (H) or Low (L). On the
display it will appear H or L according to the power selected.
To confirm, press the PTT button or wait 5 seconds.
When the battery is completely charged, the maximum power is 500 mW (ERP), while the lowest
one is 10mW (ERP).
Thanks to this function, if you don’t have to cover wide distances, you can select the “low power”
mode and so, increase the battery life.
, the TX Power will automatically switch from
! When the battery Meter drops to 1 bar
Hi (H) to Lo (L) level.
KEYPAD LOCK
Press for about 5 seconds the LOCK/CALL button; the KEY LOCK icon will appear on the display.
In this way, the lock function is activated and the MENU and SCAN button will be disable.
This function can work only in PMR/MARINE BAND.
Repeat the same procedure to unlock the keypad.
DISPLAY ILLUMINATION
In clock mode (power off) the display illumination can be activated by pressing the MENU button,
or turning the TUNING KNOB.
During power on, the display illumination will activate for approx. 5 seconds. The display illumination can also be activated pressing the majority of the buttons. (Power on)
VOX
MIDLAND BASE CAMP has 4 VOX levels (off, 1, 2, 3, and 4). This function allows the user to
activate the communication without pressing the PTT button. You just have to speak and the communication is on.
You can set the VOX on 3 levels, with or without accessories.
The fourth level activates the VOX with Talkback function: when one of the two devices transmit for
more than 20 seconds, the VOX Talkback stops the transmission for 10 seconds; so the other user
has himself the opportunity to talk.
CTCSS/DCS TONES
The CTCSS/DCS tones are codes that can be added to the pre-set channel for creating new private ones. For each channel you can choose until 38 CTCSS codes and 83 DCS codes.
- 12 -
The DUAL WATCH function enables users to MONITOR, only in reception, 2 selected channels
for any activity.
To turn on the DUAL WATCH function, press the MENU button until the display shows “DW of”.
Select the second channel by turning the TUNING knob. To select one of the 38 CTCSS/DCS Privacy Codes for the second channel press again the MENU button and select the privacy code
turning the TUNING knob.
To confirm press the PTT button or wait for 5 seconds.
The display will show “DW” alternatively the channel in use and the second one selected.
To turn off the DUAL WATCH function, you can just press the SCAN button or the MENU one.
When the radio will receive a signal on one of the two channels selected, the “DUAL WATCH”
function will temporarily stop, allowing the transmission and the reception of the active signal on
the channel in use.
MIDLAND BASE CAMP will stay in the active channel as long as the signal is present and will
resume scanning 5 seconds after the signal is no longer present.
CALL ALERT SELECTION
MIDLAND BASE CAMP allows to send a CALL alert signal to all the users of the same channel;
on the display it appear the “TX” icon and the tone of confirmation can be heard by your own speaker. MIDLAND BASE CAMP has 5 selectable CALL alerts (oF, 1, 2, 3, 4, and 5).
To CALL, press the LOCK/CALL button.
To select, press the MENU button until a “CA” icon with the current CALL ALERT setting is displayed.
Turn the TUNING knob to make the CALL alert selections; the radio will emit a corresponding tone
for each selection. To confirm, press the PTT button or wait for 5 seconds.
The pressure of the CALL/LOCK button for 5 seconds in AM/FM mode, allows the user to store
a desired radio station.
MARINE BAND
Select the MARINE BAND using the BAND switch, the display will show the least selected channel
and the MARINE icon. MARINE BAND can not transmit, but only receive signals.
When you are in MARINE mode, the display will show the number of the channel (for ex. 1 d).
To select the desired channel, turn clockwise or counter-clockwise the TUNING knob.
In MARINE BAND, you can activate also the SCAN, MONITOR and LOCK functions.
ROGER BEEP (end of transmission tone)
When the PTT button is released, the radio will beep to confirm to other users that you’ve finished
your transmission and that they can begin to speak.
To turn the ROGER BEEP on, press the MENU button till the display shows “rb of”; than by the
TUNING knob, select “rb on”. The display will show the icon “RGB”.
To confirm, push the PTT button or wait for 5 seconds.
To disable this function, repeat the procedure selecting the “rb of” and on the display will disappear
the icon “RGB”.
AM/FM RECEIVER MODE
BASE CAMP can receive AM/FM frequencies, by selecting through the BAND switch the desired
mode. The display will show the selected AM/FM BAND and the active frequency.
Selecting the frequency on AM/FM BAND
To select the AM/FM frequency, turn clockwise and counter-clockwise the TUNING knob. Holding
the knob for 2 seconds, the radio will SCAN for the frequencies until it receives a strong and clear
signal; if you keep holding the knob clockwise or counter-clockwise for 5 seconds, the SCAN
function is continuous, until you stop it just turning slightly the TUNING knob or pushing the PTT
button.
BEEP TONE
This function permit you to produce a beep tone every time you press a button.
If you want to enable this function, press the MENU button until the display shows “bp on”, then
select by the TUNING knob “bp of”.
To confirm, press the PTT button or wait for 5 seconds.
The icon will desapper.
In this way, all “beeps” and “tones” are disabled.
To re-able this function, repeat the procedure selecting the “bp on” by turning the TUNING knob
and confirm by pressing the PTT button or wait for 5 seconds.
Memorizing the frequency
BASE CAMP can store 2 selected frequencies in AM and 2 in FM BAND. To memorize the first
frequency, press for 5 seconds the LOCK/CALL button while for the second one keep pressing
the SCAN button.
- 13 -
UK
DUAL WATCH
To set the VOX level, press the MENU button, until the display shows “VO”.
After that, turning the TUNING knob, you can choose “1”,”2”,”3” or “4”.
To confirm, press the PTT button or wait for 5 seconds.
To disable the VOX function, by turning the TUNING knob, select “oF” and then push the PTT
key.
SETTING THE CLOCK MODE
USING THE FLASHLIGHT
When BASE CAMP is off, the display shows the current time setting.
To visualize the clock while the radio is on, just turn the POWER/VOL knob on off.
BASE CAMP has a built-in FLASHLIGHT.
To turn the FLASHLIGHT ON, set the LIGHT switch to “on”.
To turn the FLASHLIGHT OFF, set the LIGHT switch to “off”.
To change the hour setting of the clock:
-- Press the LOCK/CALL/HOUR button, and the hour digit of the clock will blink.
-- Turn the TUNING knob to change the hour setting.
-- To confirm, press the PTT/SELECT button or wait for 5 seconds.
MORSE CODE
BASE CAMP can send Morse code.
When the radio is on AM/FM/MARINE BAND, pressing the MENU button more time it’s possible
to send Morse signals.
To change the minute setting of the clock:
-- Press the SCAN/MINUTE button while in CLOCK mode and the minute digit of the clock will
blink.
-- Turn the TUNING knob to change the hour setting.
-- To confirm, press the PTT/SELECT button or wait for 5 seconds.
USB JACK
MIDLAND BASE CAMP can be used to charge a mobile phone, iPod, mp3 player by the DYNAMO CRANK, AC or DC Adapter thru the USB jack.
• Attach a USB charging cable (optional) to the USB jack of the MIDLAND BASE CAMP;
• Connect the other end of the USB charging cable to the mobile phone, mp3 or iPod;
• Recharge the mobile phone battery, the mp3 or the iPod by turning rapidly the DYNAMO
CRANK, or by connecting the AC or DC Adapter into the Charging jack.
SETTING THE ALARM CLOCK
BASE CAMP can also function as an ALARM CLOCK.
To turn the ALARM CLOCK on:
Press the MONITOR/ALARM ON/OFF button while in CLOCK mode, the ALARM CLOCK icon
will appear on the display.
To set the hour setting of the ALARM, press the LOCK/CALL/HOUR button while in CLOCK mode
and the hour digit of the clock will blink. Turn the TUNING knob to change the hour setting. To
confirm, press the PTT/SELECT button or wait for 5 seconds.
To set the minute setting of the ALARM, press the SCAN/MINUTE button while in CLOCK mode,
and the minute digit of the clock will blink. Turn the TUNING knob to change the minute setting.
To confirm, press the PTT/SELECT button or wait for 5 seconds.
RECHARGING THE BATTERY PACK
MIDLAND BASE CAMP is equipped for using a 6V NiMH rechargeable battery pack which can be
recharged using an AC wall adapter (included) or a DC adapter (included).
Initial charge time is 12 hours with a charge time of 8/10 hours thereafter.
For maximum battery life, we recommend charging the battery pack when the BASE CAMP is off
comes on.
and the low battery icon
To recharge the battery pack you need to connect the socket of the wall adaptor to a mains power
socket and insert the jack of the wall adaptor into the charging jack of the BASE CAMP.
Remove MIDLAND BASE CAMP from the charger only when the charge time expires.
You can also charge the rechargeable NiMH battery pack using the Dynamo crank. To charge using
the Dynamo Crank rotate rapidly the Dynamo Crank handle clockwise or counter-clockwise.
To turn the ALARM CLOCK off:
To disable the alarm clock, press the MONITOR/ALARM ON/OFF button while in CLOCK mode.
will disappear.
Instead, if you press the MENU/MONITOR/SCAN-LOCK-CALL button, the alarm clock icon will
still be displayed, but the alarm will ring the day after at the same time, that is, after 24 hours from
the pre-setting alarm time.
WARNING
! The supplied wall charger is using “standard charging” method. This is a method, where the charging current is about 10 % of the capacity and the batteries will be charged
over night or within 10-14 hours. Using this method, chargers do not automatically
disconnect charging when batteries are fully charged. It does not matter if you let the
charger connected from time to time longer than necessary, but you should avoid to
Setting the alarm clock snooze
When the ALARM CLOCK goes off, you can activate the SNOOZE function by pressing the PTT/
SNOOZE button. Every time the SNOOZE button is pressed the ALARM CLOCK will go off again
after 8 minutes.
- 14 -
TABLE OF SOLUTIONS
Problem
The radio doesn’t
switch on
! Please use only the supplied wall charger type and no other charger.
The radio switches
off shortly after it has
been switched on
! Dispose of the batteries according to the procedures set out by local regulations.
Possible cause
Solution
Verify that the battery pack is charThe battery pack is discharged and/or
ged and that it has been correctly
has not been installed correctly.
installed.
Discharged battery pack.
Recharge the battery pack.
Inspect the connections of the
battery-charger and the installation of
the batteries.
The site of installation is too shielded. Move to another area.
Adjust the volume.
The radio switches on The volume is too low
Check that the CTCSS tone or DCS
but is
code corresponds to the one set by
unable to receive
Incorrect CTCSS or DCS
signals
the parties you are communicating
with.
Noise is always preThe monitoring function is enabled.
Disable the monitoring function.
sent in reception mode
Select the same radio channel used
An incorrect radio channel has been
by the parties you are communicating
selected.
with.
The radio is installed in a shielded
It is not possible to
area or is too far from the party you
Move to another area.
communicate with
are communicating with
other parties
Check that the CTCSS tone or DCS
code corresponds to the one set by
Incorrect CTCSS or DCS
the parties you are communicating
with.
Try temporarily disabling the squelch
The signal is very weak.
by means of the Monitoring feature.
The transmission distance is exces- Move closer to the party you are
sive and/or there are obstacles in the communicating with or to another
transmission path
area.
Check the traffic on the radio
Reception is fragmented and/or disturbed
Other parties are using the same
channel by means of the Monitoring
channel
feature and select another channel if
required.
The radio has been installed too
Increase the distance between the
close to equipment that causes interradio and this equipment.
ference (televisions, computers, etc.)
Received communicaThe channel in use is too busy.
Select another channel.
tions are not clear
The battery pack does The battery-charger has not been
not recharge
connected or installed correctly.
Battery level indicator
that shows the battery power level.
MIDLAND BASE CAMP has a BATTERY LEVEL METER
Greater is the number of bars visible, stronger will be the battery level. When the battery level is
low, the Battery icon
will flash in the display, indicating that your batteries should be replace or
recharged if using a rechargeable battery pack.
Selecting the power source
MIDLAND BASE CAMP can use either an Alkaline battery or the rechargeable NiMH battery pack.
Just set the BATTERY SOURCE switch to either “alkaline” or “rechargeable” (for NiMH battery
pack) mode.
USE AND CARE
! Use a soft damp cloth to clean the radio. Do not use alcohol or cleaning solutions.
! Do not immerse the radio in water.
! Turn off the radio and remove the batteries during long term storage.
- 15 -
UK
keep the radio permanently connected to the wall charger, when you do not need it.
! The charger is only designed for NiMH rechargeable batteries and cannot be used for
standard Alkaline or other not chargeable batteries. Trying to charge such kind of batteries can be a risk. Such batteries may leak, explode or even burn and cause damage or
personal injuries!
Transmission is not
always possible
VOX causes the radio
to accidentally enable
transmission
The VOX feature
requires speaking in a
loud voice
Logic related faults
(unreadable displayed
symbols, functions )
TECHNICAL SPECIFICATIONS
The channel is used by an excessive
Select another channel. Ask the radio
number of parties or the transmislink provider to disable the block due
sion has been barred due to a busy
to busy channel.
channel.
Reduce transmission time. Ask the
The transmission timer has enabled radio link provider to set the transmission timer to a higher value.
The sensitivity and/or environmental
noise are too high.
Reduce the VOX sensitivity.
The sensitivity is too low.
If the environmental noise is not high,
increase the sensitivity or use an
optional microphone.
Channels...........................................................................................................1~8 PMR, 1~69 LPD
Frequency generation...............................................................................................PLL synthesizer
Frequency range........................................................................446.00625 - 446.09375MHz (PMR)
............................................................................................................ 433.075 - 434.775MHz (LPD)
.......................................................................................................................... 520 - 1620KHz (AM)
........................................................................................................................87.5 - 108.0MHz (FM)
................................................................................................................ 156.3 - 162MHz (MARINE)
Aerial ...............................................................................................12.5 KHz (PMR); 25 KHz (LPD)
Rated power supply.................................................................................................... 6+/- 10% VDC
Operating temperature............................................................................................from -20° to +55°
Size (without antenna)............................................................................................120x180x 55 mm
Weight (without batteries).....................................................................................................0,563 kg
Operation cycle (% on 1 h)................................................................. TX 5%, RX 5%, stand-by 90%
Incorrect setting caused by a problem
Recharge the battery pack.
with the power supply.
Try reducing the transmission time
Commission time is too high.
and/or using a low power.
The autonomy of the
battery pack is limited For NiMH battery packs only: memoEliminate the memory effect.
ry effect on the battery pack
Transmitter
Output power (ERP)..................................................................................10 o 500 mW (Selectable)
Type of circuit................................................................................................................................ FM
Suppression of spurious signals................................................................. Compliant with ETSI law
Receiver
Sensitivity at 12dB Sinad........................................................................................................0,35µV
Spurious signals rejection..........................................................................................................70dB
Audio output power (10% THD).................................................................................................... 2W Medium frequencies.................................................................................. 1°:21,4 MHz ; 2°:455 KHz
Connection for external microphone and recharge..............................................2,5 mm jack stereo
Connector for external speaker.............................................................................3.5 mm jack mono
Specifications are subject to change without notice.
CTE International herewith declares that the product complies with the essential requirements
of EC Directive 99/05/EC; the declaration of conformity of the device can be consulted onto
www.midlandradio.eu
- 16 -