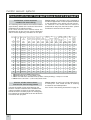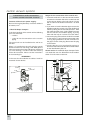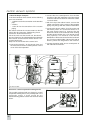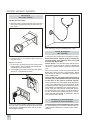
1
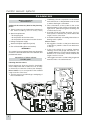
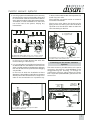
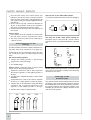
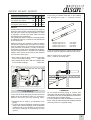
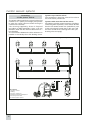
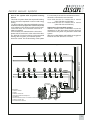
Central vacuum systems HANDBOOK DS SUPER COMPACT DS MODULAR RANGE PLANNING • INSTALLATION • TESTING © Copyright by DISAN S.r.l. Technical drawings and layout: Disan S.r.l. Any unauthorized reproduction, even partial, is forbidden. Photos, drawings and descriptions in this handbook reflect the state of the art at the moment when this catalogue was printed. The company Disan reserves the right to update its production, previous catalogues and handbooks. For further information, please contact “DISAN”’s technical office. Disan acknowledges a 2 years guarantee for parts having manufacturing defects. The guarantee is valid only if the instructions set out in this handbook are fully complied with. 1 st edition 05001000 • Printed in Italy • Tezzele Print Srl TABLE OF CONTENTS Planning 4 Making of the piping 21 Basic planning information ....................................... 4 General instructions ............................................... 21 Location of inlet valves on the floor plan ....................4 Laying of the tubing ................................................ 21 Location of the inlet valves: height ........................... 5 Laying and connection of the water vacuum system ....................................... 22 Location of the central vacuum cleaner .....................5 Planning of the tubing .............................................. 5 Planning of the water vacuum system ...................... 7 Laying of the backup boxes .................................... 23 Installation of the breather pipe 23 Laying of the electric control line 24 Particular requirements of planning ......................... 9 Testing 25 Planning of the power mains .................................. 10 Location of losses .................................................. 26 Characteristics of the fittings .................................... 8 Planning of the breather pipe ................................... 8 Calculation of the materials/Cost-estimate 12 Definition of the material needed for the tubing ....... 12 Choice of the inlet valves and of the electricity plates ........................................... 12 Choice of the cleaning accessories ....................... 16 Approximate calculation of labor for the complete installation of the system ........................................ 16 Installation and connection of the inlet valves and of the central vacuum cleaner 27 Installation and connection of the inlet valves .......... 27 Installation and connection of the central vacuum cleaner 28 Check of the functioning of the by-pass valve on the dust separator .................................... 31 By-pass valves adjustment ..................................... 31 Choice of the central vacuum cleaner .................... 16 Testing of the inlet valves ....................................... 32 List of optional for mod. DS Super Compact ........... 19 Final testing of the system ..................................... 32 List of optional for mod. Ds Modular range ............ 19 Delivery of the finished system to the customer ..... 32 Technical data of the central units .......................... 19 Certification ............................................................ 35 3 Central vacuum systems PLANNING Basic planning information Collect all the necessary data for the planning phase • Preferably point the compasses on the internal walls rather than on the perimeter ones in order to reduce the length of the tubes. • The convenience of the system is due to the • Type of system (no of simultaneous operators in the whole building and on ever y floor) • Special requirements - for the piping line - for the position of the inlet valves - for the position of the central vacuum cleaner • • • Voltage and power supply limited number of inlet valves positioned in the right places. (We advise against installing one socket in each room). • Consider all the possible obstacles (such as walls, pieces of furniture etc.) which reduce the range of action of the hose. • Consider the difficulty of installing inlet valves on bearing walls or pillars. Please notice: Suction of liquids requested (yes/no) • We suggest to install a socket just at the bottom of the stairs to permit to clean it from the bottom to the top. • In the rooms which do not require frequent cleaning, such as the garage, the cellar etc., a 2 m flexible extension can be used (included in the Deluxe kit of accessories) which extends the range of action to 9.5 m. • We suggest to install a socket in the garage and near balconies or floored entrances. Plan of the building (floor and section) ! WARNING ! The central vacuum systems Disan are planned to vacuum the domestic dust both in the domestic and professional sector. Location of inlet valves on the plan Planning the inlet valves Using compasses, draw on the plan (preferably scale 1:100) circles with a radius of 7.5 m, as many as necessary to cover the surface (see example). Please notice: 7,5 m corresponds to the standard range of action of the hose. • Avoid as much as possible large overlapping of the circumferences. Z 842 Reception 4 Office Central vacuum systems Location of the inlet valves: height Planning of the tubing Install the inlet valves at the same height of electricity sockets or switches. Optimal suction depends on the tubing which should be as shor t and linear as possible. As a consequence, variations in the route should be avoided as much as possible. Z 162 • If possible, the vertical descent should be at a central point of the house. Switch • The tubing can be fitted under-track, inside the walls or on the false ceiling Inlet valve Electricity socket • When many simultaneous operators join together, install the reducer as in the drawing on page 6 Z 844 Inlet valve 6- 1/2 08 N 50 IE Square inlet valves or rectangular are available and are compatible with the most popular brands on the market. 2,2 P m 5m e ion mm Ø 50 mm 1 operator 5 -Ø az pir an -S E -C as dis Location of the central vacuum cleaner 6- 1/2 08 N IE 50 E m The central vacuum cleaner has to be located into the cellar, the storeroom, the garage or the hobbyroom, and in any case you have to guarantee a sufficient air-circulation for its cooling. Consider the acoustic and thermal emissions of the turbine motor. • m 3m e- Ø6 n zio a pir an as dis The central vacuum cleaner should preferably be located at the lowest point of the tubing, in order to guarantee that even the heaviest vacuumed material is transported through the tubes to the central vacuum cleaner. -C 3m P -S Ø 63 mm 2 operators working simultaneously 6- 1/2 08 EI P m 0m ne 8 -Ø zio a pir Z 843 an as dis -S m 3m EN 50 -C Ø80 mm 3 operators working simultaneously 6- N 1/2 8 00 5 IE m P m -S E -C 3m 0m ne zio a pir an dis as - 0 Ø1 Ø100 mm From 4 to 6 operators working simultaneously Central unit If it is not possible to install the central unit on the lowest point of the tubing, please contact the technical office Disan. 5 Central vacuum systems Scheme of distribution of the pipe line for a system of 6 operators L D L D L E L E L L L L L L L D D D D D E E E E E ø 50 L ø 50 LD L D E E ø 50 E 1 operator L L D L G B ø 63 F 2 operators ø 63 F 2 operators B ø 63 F 2 operators B ø 63 F 2 operators B ø 63 F 2 operators B D ø 50 L 1 operator E E ø 50 ø 50 1 operator C D L E E E ø 63 H 2 operators L E E D D E E D L D D D I C D ø 63 H D D D L D D D L L L A - ø 100 - Total: 6 operators Central unit A B C D E F G H I L M N 6 = = = = = = = = = = = = horizontal pipe at the vertical descend Ø 100 – 63 – 6 operators sweep TY Ø 100 – 6 operators sweep TY Ø 80 – 3 operators sweep TY Ø 63 – 2 operators sweep TY Ø 50 – 1 operator sweep reducer Ø 100/63 – from 4/6 to 2 operators sweep reducer Ø 100/80 - from 4/6 to 3 operators sweep reducer Ø 80/63 - from 3 to 2 operators sweep reducer Ø 80/50 - from 3 to 1 operator sweep reducer Ø 63/50 - from 2 to 1 operator inspection cap Ø 100 By-pass valve Ø 100 SECOND FLOOR 3 operators * L D L FIRST FLOOR 6 operators * D L ø 100 D L ø 80 L L ø 100 L ø 50 1 operator E E ø 50 E GROUND FLOOR 4 operators * E E THIRD FLOOR 1 operator * Z 845 B M B N * the maximal simultaneousness of the floors can not be added The horizontal pipe line on the floor requests a maximal diameter of 63 mm (2 operators working simultaneously). In the case it is necessary to vacuum on the same floor with more than 2 operators, split the pipe line on the floor into zones. Central vacuum systems • In the big systems it’s advisable to have as many descents as the zones or the building floors and to connect them near the central unit. Install on every descent a sphere valve with manual closing. This allows, in case of assistance on a line, the use of the rest of the system, helping any interventions. In the 5,5 kW models besides the inspection cap install a by-pass valve. The inspection cap makes easier an eventual assistance intervention. The by-pass valve allows the cleaning of the piping. In this case the by-pass vale on the dust separator must be closed in order to allow the valve functioning on the line. Z 846 Z 848 A = inspection cap B = by-pass valve A 63 2 operators A A 63 2 operators B B A 80 3 operators manual closing valve A 63 Ex. Of DS C03 100 modular range, for 3 operators working simultaneously (2 simultaneous operators on every floor) Ex. of installation of the inspection cap and the by-pass valve for modular models with 5,5 kW motors. In the case of a single descent the valve with manual closing is not necessary. • It is not advisable to install long horizontal lines of diameter 80 mm and 100 mm. If on these lines works a smaller number of simultaneous operators than that for which it was planned some clogging are possible. In the cases in which the installation of these diameters is impossible to avoid, plan in the more distant point of the horizontal line a sweep TY in order to be connected to an inspection cap. Planning of the water vacuum system The water vacuum is possible thanks to its special accessory “wet pick-up” (code SZN348) to be dragged during the cleaning, or through an autonomous pipe line, which collects the water into a separator (code SZN361) placed near the central unit. Z 849 Z 847 A = inspection cap To the dry inlet valves Main piping Inlet valve qualified for water suction Pipes Ø 50 mm A Ex. of installation of the inspection cap for modular models with 2,2 kW motors Runner cup 7 Central vacuum systems • • • Plan the inlet valves in the rooms where you intend to vacuum the water. Connect between them the inlet valves with a piping diameter 50 mm, to join to the pipe fittings equipped with the wet pick-up. Plan a runner cap with a minimum diameter of 40 cm, to be placed in front of the separator, where the vacuumed water will be carried. Connect the wet pick-up to the main pipe line of the system. Please notice: • In the rooms where one intends to vacuum both dry and damp, install 2 separate inlet valves • The water vacuum system can be used only by a person at time Characteristics of the fittings Use only 45° or 90° wide radius sweep. “T” sweeps slow down the flow and cause clogging. Z 166 YES YES NO Use only 45° or 90° wide radius sweep ell. Exception: there is only one 90° (narrow radius) sweep ell: which is positioned behind the backup box. Z 167 In order to obtain maximum suction performances, the tubes have to be installed in an air-tight way. YES NO Clutch fittings are not sufficiently tight in the long run and for this reason we advise against using them. We strictly advice against: • fittings with rubber gaskets or with O-rings • spigot-and-socket joint fittings • hot-welded fittings Please notice: using the types of fittings listed above causes the following problems: • depression reductions due to the progressive decrease in tightness of the rubber gaskets or O-rings; • clogging due to step-like obstacles or burrs inside the tubes; • speed-reduction of the air-flow due to step-line obstacles or slight defects inside the tubes; • whistles due to air-infiltrations inside the tubing caused by the progressive decrease in the tightness of the rubber gaskets or O-rings; • whistles due to steps inside the tubes. Z 850 NO 8 NO NO YES YES YES Please notice: planning the tubes so that the suction flow follows a horizontal or sloping route. Avoid long upwards suction flows. Planning of the breather pipe The central vacuum cleaners Disan have a correct air filtering, with environmental protection, and so the breather pipe is not strictly necessary. However, for hygienic reasons, we suggest to install it. The breather pipe shall have a larger diameter of the main line of the system. Central vacuum systems Diameter of the main line 50 63 80 100 If the piping is installed externally to the building and underground, plan a container barrier. Diameter of the breather pipe for lengths less than 5 63 80 100 100 Z 852 Diameter of the breather pipe for lengths more than 5 80 100 125 125 Silencer All the turbines used in the central vacuum systems Disan are silenced with soundproofing materials at the end of the suction and of the delivery, in order to maintain a sound level lower than the levels previewed by the regulations. The models DS Super Compact are equipped with an additional silencer, mounted on the internal part of the central unit. Optional silencer are available in order to reduce the noisiness produced by the motors. The silencer must be mounted on the end of the breather pipe (with whichever inclination), in order to allow the absorption of all the noises produced in the piping. The zinc-coated silencer is available in the following models, to be chosen on the basis of the diameter used on the breather pipe. • Zinc-coated silencer diam. 70/63 mm complete with 2 zinc-coated couplings Code IS10 • Zinc-coated silencer diam. 100 mm complete with 2 zinc-coated couplings Code IS11 Dilatation joint Ø 50 mm Dilatation joint Ø 63 mm Dilatation joint Ø 80 mm Dilatation joint Ø 100 mm code VR056 code VR064 code VR084 code VR104 In the case that the pipe line crosses the fire barrier structure, plan the special collars for wall or floor. Wall: 2 collars (one for every side) Floor: 1 collar on the lower side Z 852 Z 851 Breather pipe Silencer Min. 30 cm from the ground 108 Breather valve 63 135 Sweep reducer 100/63 mm Example of mod. modular DSA01 125 Particular requirements of planning In the case in which the piping crosses structures where there are dilatation joints or it connects 2 different structures use the following items: • • Dilatation joint in order to give flexibility to the piping Covering in thermal insulating material (normally used in the hydraulic field) to avoid condensate problems and to give flexibility to the piping in the case of settlings of the building or of the ground. ! WARNING ! Do not install external piping in contact with sunbeams and atmospheric agents. In these cases we advise to use zinc-coated stainless steel tubes. Contact the technical office Disan. If it is not possible to avoid the installation of external tubes, cover the tube with thermal insulating material (normally used in the hydraulic field). 9 Central vacuum systems Systems up to 30 inlet valves The connection is from inlet valve to inlet valve to the main electric junction box. Planning of the power mains The power mains used for the control of the inlet sockets is 12 V (safety low-voltage) and permits to start the central vacuum cleaner through a contact on the sockets. The covering supplied by Disan is fireproof according to IMQ standards; it has a 16 mm diameter, while the two internal cables have a 1 mm diameter. The connections between the inlet valves are in parallel in the backup box with binding-screw. Systems with more than 30 inlet valves We advise to split the system into zones or for floors, connecting them separately to the electric division box for 12V remote control wire. (code IE212) and to the main electric junction box. In this way it will be easier to find out any damage to the line (see drawing n the next page). Z 853 Systems up to 30 inlet valves 1 4 2 3 5 6 6 Description: 1 electric contact 2 tubing 3 electric control line 4 terminal inside the backup box 5 electric junction box 6 central vacuum cleaner 10 Central vacuum systems Use of the system with sequential starting device it is necessary that both the resistances and the electronic control device are mounted. This kind of system allows the sequential starting device of motors requested. It comes a real energy saving. For the functioning of the sequential starting system, install inlet valves equipped with resistances (IS106) to be welded on the electrical cable at the output of the inlet valve. The connection of the line is always in parallel. If the resistance is ordered with the inlet valve please add “R” at the end of the code of the valve. Ex: SD310R. For the functioning of the sequential starting device system you need the special electronic control. For the functioning of the system Code IS02 device for models with 2 motors (Mod. DS B02 and DS D02) Code IS03 device for models with 3 motors (Mod. DS C03 and DS F03) Suggestions for extended systems With the models DSA01 and DSB01 mount the resistances on the inlet valves and the electronic control device only when it is planned to extend the system. With the models DSB02 and DSD02 we suggest to install at once the device for 3 motors. Z 854 Systems with more than 30 inlet valves ZONES 4 and 5 ZONE 3 1 4 5 ZONE 2 ZONE 1 7 6 3 Description: 1 electric contact 2 tubing 3 electric control line 4 terminal inside the backup box 5 resistance 6 electric division box for 12V remote control wire 7 electric junction box 8 central vacuum cleaner 8 2 11 Central vacuum systems CALCULATION OF THE MATERIALS/COST-ESTIMATE Please notice: the calculation of the materials in the table is approximate. In case of special conditions in the distribution of the tubing (unusual routes) for instance if the central vacuum cleaner is positioned far away from the inlet sockets - please ask Disan’s technical office for advice. Definition of the material needed for the tubing The following table indicates the material needed approximately, based on the number of inlet valves established in the planning phase. From these amounts the material about the diameters 63, 80 and 100 mm must be deducted which will be separately calculated on the plan. Inlet valve Backup box See following pages See following pages PVC pipe length 2m Ø 50 mm 45° PVC sreet ell Ø 50 mm 45° PVC sweep ell Ø 50 mm 45° PVC sweep TY Ø 50 mm PVC coupling Ø 50 mm Remote control wire 25 m Code VR050 Code VR051 Code VR052 Code VR053 Code VR055 Code EM025 PVC adhesive 125 gr tube Code KM125 Breather Tight PVC adhesive valve complete junction box 500 gr with reducer Ø 50 mm can Code* Code Code VR058 EM31/EM32 KM500 **** Wire clamp 30 cm Code** EM033 Collars made of stainless steel Code*** KM501 1 1 5 (10 m) 3 3 2 1 1 1 1 9 6 2 2 8 (16 m) 6 6 1 4 1 1 1 1 16 11 3 3 11 (22 m) 9 9 2 6 2 2 1 1 23 15 4 4 15 (30 m) 12 12 3 8 2 2 1 1 30 20 5 5 18 (36 m) 15 15 4 10 2 1 1 1 36 24 6 6 21 (42 m) 18 18 5 12 3 1 1 1 43 29 7 7 25 (50 m) 21 21 6 14 3 1 1 1 50 33 8 8 28 (56 m) 24 24 7 16 4 1 1 1 57 38 9 9 31 (62 m) 27 27 8 18 4 1 1 1 1 63 42 10 10 36 (72 m) 30 30 9 20 4 1 1 1 1 72 48 53 11 11 39 (78 m) 33 33 10 22 5 2 1 1 1 79 12 12 42 (84 m) 36 36 11 24 5 2 1 1 1 86 57 13 13 46 (92 m) 39 39 12 26 6 2 1 1 93 62 14 14 50 (100 m) 42 42 13 28 6 2 1 1 99 66 15 15 52 (104 m) 45 45 14 30 6 2 1 1 106 71 * EM031 tight junction box/EM032 Junction box ** EM033 wire clamp 30 cm - 1 every meter of tube *** KM501 collar with anchor diameter 50 mm (for tubes over the plastering) – 1 every 1.5 m of tube **** EM025 remote control wire – 1,3 m for every metre of tube Choice of the inlet valves and of the electricity plates Choose the model of inlet valve based on the furniture. Please consider that the available inlet valves are similar to those of the most common brands of electric sockets (square or rectangular). For systems for the industrial sector we advise the inlet valves with pin-jacks. 12 Please notice: for each type of inlet valve there is a backup box. Inlet valves and kits of cleaning accessories are interdependent. See “Choice of the cleaning accessories” on page 16. Central vacuum systems RECTANGULAR INLET VALVES AND BACKUP BOXES MOD. UNIVERSAL - Inlet valve for bTicino Living International Black colour Code SD110 - Inlet valve for bTicino Luna and Matix White colour Code SD113 - Inlet valve for bTicino Light White colour Code SD113 - Inlet valve for bTicino Light Tech Grey Tech colour Code SD114 Inlet valve Mod. “Universal” (decorative electric plates are not included) Backup box with 90° ell code SD101 Backup box with straight coupling code SD102 - Inlet valve for Vimar Idea and Rondò Ivory colour Code SD121 - Inlet valve for Vimar Idea and Rondò Black colour Code SD120 - Inlet valve for Vimar Plana White colour Code SD113 - Inlet valve for Ave Banquise White colour Code SD132 Universal extension code SD802 - Inlet valve for Ave System 45 Black colour Code SD130 - Inlet valve for Legrand, Vela, Cross White colour Code SD150 - Inlet valve for Gewiss Playbus Young Black colour Code SD140 BACKUP BOXES FOR PANEL WALLS - Backup box with 90° ell Code SD504 - Backup box with straight coupling Code SD505 - Minimun extension (1,8 cm) for square inlet valve Code SD824 - Extension (5 cm) for square inlet valve Code SD822 13 Central vacuum systems Inlet valve with microswitch white colour, with decorative trims: - white Code SD530OW - gold Code SD530OG - silver Code SD530OS - nickel Code SD530OB Z 650 Z 172 Inlet valve with pin-jacks, white colour, with decorative trims: - white Code SD531OW - gold Code SD531OG - silver Code SD531OS - nickel Code SD531OB Inlet valve DISAN Mod. OLYMPIA With microswitch or pin-jacks Z 653 Backup box for inlet valve Mod. OLYMPIA Z 172 Backup box 90° with ell - under plaster - for panel wall Backup box with straight coupling - under cover - for panel wall Code SD502 Code SD505 Extension for inlet valve 2,2 cm Frame for inlet valve Code SD824 Code SD825 Decorative trims: - white - gold - silver - nickel Code OW Code OG Code OS Code OB Code SD501 Code SD504 Inlet valve with microswitch white colour, with decorative trims: - white Cod. SD520OW - gold Cod. SD520OG - silver Cod. SD520OS - nickel Cod. SD520OB Inlet valve with pin-jacks, white colour, with decorative trims: - white Cod. SD521OW - gold Cod. SD521OG - silver Cod. SD521OS - nickel Cod. SD521OB Inlet valve DISAN mod. ROYAL With microswitch or pin-jacks Backup box for inlet valve mod. ROYAL Backup box 90° with ell - under plaster - for panel wall Backup box with straight coupling - under cover - for panel wall Cod. SD502 Cod. SD505 Extension for inlet valve 2,2 cm Frame for inlet valve Cod. SD822 Cod. SD825 Decorative trims: - white - gold - silver - nickel Cod. OW Cod. OG Cod. OS Cod. OB Please notice: add “R” to the codex of the inlet valve it the resistance is requested. 14 Cod. SD501 Cod. SD504 Central vacuum systems FLOOR INLET VALVE Z 185 Z 186 Wall and floor inlet valve DISAN mod. METAL in stainless steel with pin-jacks Backup box for inlet valve mod. METAL Floor inlet valve with pin-jacks Code SD911 Backup box with 90° ell Backup box with straight coupling Code SD901 Code SD902 Extension for inlet valve in stainless steel 2,5 cm Code SD801 Z 657 Z 656 Z 649 Floor inlet valve with microswitch Backup box for inlet valve DISAN DISAN Floor inlet valve with microswitch Code SD915 Key for floor inlet valve Code SD919 Backup box with 90° ell Backup box with straight coupling Code SD914 Code SD918 Frame for inlet valve - in stainless steel - black colour Code SD926 Code SD925 Utility valve grey with switch Code SD720 UTILITY VALVES Z 189 Utility valve DISAN mod. FREE with switch Z 660 Z 661 Utility valve DISAN mod. HOBBY with pin-jacks Utility valve white with pin-jacks and with 90° ell Utility valve white with pin-jacks and with straight coupling Code SD724 Code SD723 Please notice: Add „R“ to the codex of the inlet valve if the resistance is requested. 15 Central vacuum systems Choice of the cleaning accessories CHOICE OF THE CLEANING ACCESSORIES Deluxe set with flexible 7,5-m-hose with flexible 9-m-hose Deluxe Super set with flexible 7,5-m-hose with flexible 9-m-hose with flexible 11-m-hose Standard set with flexible 7,5-m-hose with flexible 9-m-hose Standard Super set with flexible 7,5-m-hose with flexible 9-m-hose Garage set with flexible 9-m-hose Animal care tools with flexible 9-m-hose Professional set with flexible 9-m-hose Choice of the central vacuum cleaner CODE SZN301 SZN303 SZN301S SZN303S SZN305S SZN302 SZN308 SZN302S SZN308S SZN307 SZN347 SZN309 See Disan general catalogue, Disan price list and Disan instructions of use. Please notice: inlet valves and cleaning accessories are interdependent. If you choose cleaning tools with on-off switches on the handle of the hose, you necessarily have to install inlet valves with pin-jacks. Decisive factors in the choice of a central unit. 1. the number of operators working simultaneously 2. the pipe length. If we consider that in normal condition every 1,000 m2 of surface works 1 operator, the length of the tubes is lower than the vacuum power of the motors. In a building of 1,500 m2 you need about 30 inlet valves and about 300 m of hose. Airlosses calculation are not requested if we consider this indication. If not so please contact the technical office Disan. 3. the quantity of dust that is vacuumed. In the buildings with many people (offices, banks, hotels, theatres, etc.) we advise dust container capacity in order to avoid many emptying. Considerations about the number of operators working simultaneously needed From the graph we can deduce that in normal conditions the attendants do not work simultaneously on the system. If in a hotel work 6 attendants, on average the system is used by 4 operators at the most, while the other 2 persons do other works. Approximate calculation of labour for the complete installation of the system Z 855 Approximate estimate of the working hours needed to install a system with 15 inlet valves. If the system has more inlet valves, use as model the needed hours with a proportional calculation of the hours in the schedule. 16 INLET VALVES LABOUR HOURS 1 2 3 4 5 6 7 8 9 10 11 12 13 14 15 6 8,30 10,30 12,30 15 17 19 21,30 23,30 25,30 29 31 33 35,30 37,30 4 N u m b e r o f a t t e n d a n t s 3 4 Number of effective attendants 2 2 3 6° 5° 4° 3° 2° 1° 01 02 03 04 05 06 07 08 09 10 11 12 13 14 15 16 17 18 19 20 21 22 23 24 Daily hours Central vacuum systems Models available for number of operators: • Mod. DS B01 100 l Code B100ST Mod. DS B01 125 l Code B125ST This three-phase model is advised in the buildings with max. surface of about 2,000 m2. Unlike the model DS Super Compact 4,5 Turbo the model DSB01 uses dust separators of bigger capacity, to avoid the frequent emptying of the dust container. Furthermore this model can be enlarged to 4 or 6 operators working simultaneously. In this case the diameters of the tubes shall be suitable to allow more operators working simultaneously. • Mod. DS B02 100 l Cod. B200 Mod. DS B02 125 l Cod. B225 This three-phase model is advised in the buildings with max. surface of about 2,000 m2. Unlike the model DS Super Compact 4,5 Turbo the model DSB02 uses dust separators of bigger capacity. This model is preferable to the model DS B01 in the case in which the use of 2 operators working simultaneously is not frequent. It is possible an energy savings thanks to the sequential starting device for motors. Example: in a small hotel during high season work 2 operators simultaneously while during low season the system needs just one operator. This kind of system allows, if requested, the starting of just one motor and an energy saving. This model can be enlarged to 3 operators working simultaneously. In this case the diameters of the tubes shall be suitable to allow more operators working simultaneously. 1 operator • • • Mod. DS Super Compact 1,5 Code 6405 This single-phase model is advised in the buildings with max. surface of about 700 m2. In the buildings with less surface it can be a valid alternative to the single-phase units of ZSA range, when a greater suction power is needed and especially a reduction of maintenance thanks to the automatic filter shaker. The model is compact and all the components (electric control panel included) allow a space reduction and a quick installation. Mod. DS Super Compact 2,2 Cod. 6406 This three-phase model is advised in the buildings with max. surface of about 1,000 m2. The model is compact and all the components (electric control panel included) allow a space reduction and a quick installation. Mod. DS A01 100 l Cod. A100 Mod. DS A01 125 l Cod. A125 This three-phase modular model is advisable in buildings with max. surface of about 1,000 m2. Unlike the model DS Super Compact 2,2 the model DSA01 uses dust separators of bigger capacity, to avoid the frequent emptying of the dust container. Furthermore this model can be enlarged to 2 or 3 operators working simultaneously. In this case also the diameters of the tubes shall be suitable to allow more operators working simultaneously. 2 operators working simultaneously • • Mod. DS Super Compact Turbo 2,2 single-phase Code 6409 This single-phase model is advised in the buildings with max. surface of about 1,000 m2. The model is compact and all the components (electric control panel included) allow a space reduction and a quick installation. Mod. DS Super Compact Turbo 4,5i Code 6408 This compact three-phase model is advised in the buildings with max. surface of about 2,000 m2. The frequency converter allows a suitable suction for 3 kW motor on the kind of filtering surface and on the numbers of operators working on the system. To be operating fully the motor absorbs 4,5 kW. This inverter differs from the others because it modulates the motor power in more than 100 values, thanks to a depression transducer. The model is compact and all the components (electric control panel included) allow a space reduction and a quick installation. 2-3 operators working simultaneously • + Mod. DS BC 100i Cod. BC100i This three-phase model is advised in the buildings with max. surface of about 2,500 m2. The frequency converter allows the adaptation at the kind of cleaning surface or at the number of operators. The model is compact and all the components (electric control panel included) allow a space reduction and a quick installation. 17 3 operators working simultaneously 6 operators working simultaneously • • Mod. DS C03 100 l Code C100 Mod. DS C03 125 l Code C125 This three-phase model is advised in the buildings with max. surface of about 3,000 m2. Mod. DS F03 125 l Cod. F125ST This three-phase model is advised in the buildings with max. surface of about 6,000 m2. 8 operators working simultaneously 3-4 operators working simultaneously • + Mod. DS CD 125i Code CD125i This three-phase model ist advised in the buildings with max. surface of about 3.500 m2. The frequency converter allows the adaptation at the kind of cleaning surface or at the number of operators. The model is compact and all the components (electric control panel included) allow a space reduction and a quick installation. 4 operatori in contemporanea • 18 Mod. DS D02 100 l Code D100ST Mod. DS D02 125 l Code D125ST This three-phase model is advised in the buildings with max. surface of about 4.000 m2. This model can be enlarged to 6 operators working simultaneously. In this case the diameters of the tubes shall be suitable to allow more operators working simultaneously. • Mod. DS H02 125l Cod. H125ST This three-phase model is advised in the buildings with max. surface of about 8,000 m2. The model is for 8 operators working simultaneously, in this case also the diameters of the tubes shall be suitable to allow more operators working simultaneously. Central vacuum systems Please notice: in the case in which one need a central vacuum cleaner with more than 6 operators working simultaneously, we advise to install 2 or more independent systems. ! WARNING ! For the installation, please see the instructions attached to each optional. List of optional for mod. DS Modular range Z 822 • Automatic All the separators are equipped with a manual filter shaker device and they are arranged for the automatic filter shaking device installation which is advised in order to reduce the filter cleaning operations. • List of optional for mod. DS Super Compact • • Filter • • • self-cleaning device with circuit board. This device permits the automatic, daily cleaning of the filter, thereby always guaranteeing its full vacuum efficiency. Code IS91 Double cyclone The upper cyclone protects the filter and brings the mixture flow air-dust by creating a first gravitational separation. The lower cyclone obstructs the lift of the dust Plastic bags for dust collection, 20-piece-package. Code ER628 Supporting bracket for wall fixing, including template. Code IS90 CENTRAL UNIT OF MOD. SUPER COMPACT Operators Motor power Voltage requirement Motor rotation Suction power max Airflow max kW V rpm mbar Inch H O m3/h CFM Airflow @ 140 mbar CFM@56” Airwatt @ Ø32mm W Volume filter chamber l gallons Dust receptacle capacity l gallons Sound level dB Filter surface cm2 sq. inch Weight with packaging/net kg pound Dimensions LxPxA cm h x w x d inch • self-cleaning filter device with electronic card. This device permits the automatic, daily cleaning of the filter, thereby always guaranteeing its full vacuum efficiency. mod. with separator 100 l code IS92 mod. with separator 125 l code IS01 Grill and pipe It allows the use of the plastic bags mod with separator 100 l code IS05 mod with separator 125 l code IS07 Plastic bags for dust collection, 20-piecepackage. mod. with separator 100 l code IE601 mod. with separator 125 l code IE602 Cyclone It divides the filter chamber from the container by protecting the filter from the thicker dust. Mod. with separator 100 l code IS08 For the installation, please see the instructions attached to each optional. Technical data of the central units Mod. DS Super Mod. DS Super Mod. DS Super Compact 1,5 Compact Turbo 2,2 Compact 2,2 single-phase single-phase three-phase 1 1,5 230 2880 300 121” 251 148 180 106 574 70 18,5 40 10,56 65 5.700 884 91 / 81,2 200/180 54 x 40 x 161 15.7x21.3x63.3” 2 2,2@50Hz 230 2880 - 3480 320 128” 306 180 244 - 285 143-168 688 70 18,5 40 10,56 68 7.100 1,100 94 / 84,2 207/185 54 x 40 x 161 15.7x21.3x63.3” 1 2,2 380 - 400 2880 320 128” 320 188 270 159 638 70 18,5 40 10,56 67 5.700 884 98,8 / 89 200/180 54 x 40 x 161 15.7x21.3x63.3” Mod. DS Super Compact Turbo 4,5i three-phase 2 4,5@50Hz 380 – 400 2170 - 5000 360 144” 520 307 150 - 450 88-265 825 70 18,5 40 10,56 68 7.100 1,100 108 / 99 238/218 54 x 40 x 161 15.7x21.3x63.3” 19 20 12 320 316 Volt mbar h h m3/ m3/ Inlets voltage requirement Suction power Airflow max Airflow @140 mbar 57 65 63 153 kg cm cm cm Separator width Separator depth Separator height Dirt receptacle capacity Separator weight 160 l Filter chamber capacity 19.500 50 cm Engine height Filter surface 65 cm Engine depth 100 47,5 cm Engine width cm2 51,5 kg Engine weight l 68 dB 224 Sound level * Approximate values 1x2,2 1.000 1 Code A125 1x5,5 2.000 2 Code B100ST 1x5,5 2.000 2 Code B125ST 2x2,2 2.000 2 Code B200 2x2,2 2.000 2 Code B225 1x4,5 2.500 2+1 Code BC100i 3x2,2 3.000 3 Code C100 3x2,2 3.000 3 Code C125 1x5,5 3.500 3+1 Code CD125i 2x5,5 4.000 4 Code D100 2x5,5 4.000 4 Code D125 3x5,5 6.000 6 Code F125ST 2x7,5 8.000 8 Code H125ST 157 72 80 95 35.000 125 210 50 65 47,5 51,5 68 224 316 320 12 72 157 153 125 100 63 210 160 80 65 65 65 96 96 95 59,5 59,5 57 156 156 35.000 78 78 19.500 407 407 552 360 360 552 12 12 157 47,5 65 97 210 125 157 47,5 65 97 160 100 65 53 63,5 58 160 100 106 47,5 65 97 210 125 106 47,5 65 97 160 100 95 80 72 157 57 65 63 153 57 65 63 153 35.000 95 80 72 157 19.500 57 65 63 153 35.000 68 68 68 68 68 19.500 19.500 655 655 942 165-565 942 440 690 440 632 320 320 340 320 320 632 12 12 12 12 12 325 59,5 96 125 210 125 325 59,5 96 125 160 100 163 67 97 65 210 125 95 80 72 157 57 65 63 153 95 80 72 157 35.000 78 78 71 35.000 19.500 805 805 1100 223-784 1100 360 360 360 868 12 12 12 157 72 80 95 35.000 125 210 185 96 59 486 78 1210 1640 360 12 157 72 80 95 35.000 125 210 145 97 59,5 369 78 1470 1810 380 12 380- 400 380- 400 380- 400 380- 400 380- 400 380- 400 380- 400 380- 400 380- 400 380- 400 380- 400 380- 400 380- 400 380- 400 Volt Voltage requirement 1x2,2 1.000 1 kW ca. m2 Code A100 Mod. Mod. Mod. Mod. Mod. Mod. Mod. Mod. Mod. Mod. Mod. Mod. Mod. Mod. DS A01 DS A01 DS B01 DS B01 DS B02 DS B02 DS BC DS C03 DS C03 DS CD DS D02 DS D02 DS F03 DS H02 100L 125L 125L 125L 125i 100L 125L 100i 125L 100L 125L 100L 125L 100L Nominal motor power Max building suface * Operators Central vacuum cleaner Mod. DS MODULAR Central vacuum systems Central vacuum systems MAKING OF THE PIPING General instructions • • • • The tubing should be installed together with or after the plumbing system in order to avoid changing of the route. The latter should be short and as much as possible. Unlike the plumbing system, the tubes of the suction system do not need any slopes. If obstacles are found, route and slope can be changed. The points of connection of the vertical column and of the breather pipe to the central vacuum cleaner are indicated in the paragraph “Location of the central vacuum cleaner”, on page 5. Laying of the tubing The non-observance of the following instructions causes clogging, a reduction in the air flow speed and annoying whistling. Consider the air-flow When you install the joints, follow the direction of the air-flow. The joints installed and positioned in the opposite direction of the air-flow cause clogging and the slowing down of the flow itself. Z 191 YES NO Insert a secondary line into the main one Mount the special reducers after the sweep TY, if needed. Z 856 How to cut the pipes Pipes must be cut using the pipe-cutter fitting this purpose (e.g. the Disan pipe-cutter code GE801 for diameters of 63 mm and pipe-cutter code GE803 for diameters up to 100 mm). Then eliminate the slight defects inside the tube with a little knife or with glass-paper. A 50 YES A 63 A 50/63 A 63/50 A 63 A 100/63 A 100 A 63 Cutting the tubes with the hacksaw causes irregular cuts and slight defects, which cause clogging. Z 190 A 50 A 100/63 If a secondary line is installed from the bottom to the top, it must be inserted into the main tube on a side or from above. If a secondary line is installed from the bottom to the top and is inserted into the main tube from the bottom, the dust that flows in the tubes falls and deposits inside the inlet valve. Z 192 NO YES NO 21 Central vacuum systems How to glue the tubes Tubes and fittings have to be glued exclusively head to head. Tubes which are not glued head to head or which are improperly cut cause clogging. Laying and connection of the water vacuum system • Insert tight the rubber couplings of the flexible tubes (connected to the water pick-up): 1. to the pipe fitting equipped to connect to the main line of the system. Z 193 2. to the pipe fittings equipped to connect to the line coming from the inlet valves for water suction NO YES • YES NO Please pay attention that the water exhaust valve will be exactly positioned up to the runner cup in order to permit the perfect convey of the vacuumed liquids in the pipe. Please notice: the rubber couplings could be inserted directly in the piping diameter 63 mm or with the reducers of the other diameters. Z 857 Inlet valve for the water vacuum Tubes and fittings are glued using a special adhesive (cold gluing). The adhesive must be exclusively put on the “tongue” connectors/tubes. If the adhesive is put on the “groove” connectors, this causes filaments inside the tube. Z 194 YES NO PV C ST Piping to the main line IC PV C ST IC K PV CS TIC K K Piping to the inlet valves Rubber cup Please notice: when laying several fittings, we recommend - before gluing – to mark with a felt-tip pen the exact point (grading) where the fittings have to be connected. IMPORTANT! The adhesive reacts very quickly (approx. 20 seconds) after which it is impossible to move the glued fittings. ! WARNING ! Do not install external piping in contact with sunbeams and atmospheric agents. In these cases we advise to use zinc-coated stainless steel tubes. Contact the technical office Disan. If it is not possible to avoid the installation of external tubes, cover the tube with thermal insulating material (normally used in the hydraulic field). 22 Central vacuum systems Laying of the backup boxes The backup boxes must be installed flush with the plaster and it must be positioned perfectly in an horizontal position. Installation scheme of the backup box with straight fitting. Z 197 The chases on the wall change according to the inlet socket that one intends to install: • Disan rectangular backup box code SD101/SD102 minimal depth minimal width minimal height • (p) = 70 mm (l) = 125 mm (h) = 125 mm Disan square inlet valve code SD501/SD502 minimal depth (p) = 65 mm minimal width (l) = 85 mm minimal height (h) = 140 mm Application only on the movable boards (panel wall) Use the proper square backup boxes for inlet valves Olympia, Royal and Majestic. Z 195 Depending on the panel thickness fix the box of the backup box with its screws. h Z 865 p Installation scheme of the backup box with 90° ell. 140 mm l 85 mm 85 mm Z 196 75 mm Minimal volume for tracks on the panel INSTALLATION OF THE BREATHER LINE Installing the breather line towards the outside Mount the silencer at the furthest point of the line in order to absorb as much noises as possible (see paragraph “Planning of the breather pipe” on page 8). It is advised that the last meters (max. 5 m) of the breather line have a piping with a larger Ø in comparison with those of the pipes used for the vertical column. (see pages 8-9). It is not advised to use too many sweep ells which could slow down the expulsion and consequently reduce the motor performances. 23 Central vacuum systems LAYING OF THE ELECTRIC CONTROL LINE The electric control line is installed in the following way: the electric cable coming out from the electrical junction box, which is placed near the central unit, is installed together with the tubing and is connected from one backup box to the other. Fix the sheath to the tubes using the suitable wire clamps. The backup boxes are connected by inserting the ends of the electric sheath pre-inserted into the two openings of the backup box. Please notice: in order to allow future connection to the binding screw and to the inlet valve insert the electric cables for approx. 5 cm into the backup box and in the electric junction box. Z 199 YES parallel connection NO serial connection from the central unit last backup box backup box tubing flexible sheath with pre-inserted electric cables 24 Central vacuum systems TESTING Testing occurs after completing the laying of the tubes and before laying the floor. The purpose of the tests is in order to guarantee that the tubes are not damaged and that everything has been properly glued. Otherwise the system may not be air-tight. While the machine is working, read the depression value on the vacuum gauge. Please notice: we suggest to measure the depression at every test, because it can change from site to site due to the different voltage. Z 201 This is very important because: • even the smallest air infiltration into the tubing causes a reduction in depression values and airlosses; • after the laying of the floors, it is very expensive to solve these problems. Please notice: while laying the floors and plasters, be careful not to damage the pipe line. 1. Get the vacuum cleaner tester Disan (code GE815). Disan’s testing kit includes the vacuum cleaner and all the fittings necessary for connection to the pipe line. If you use a traditional vacuum cleaner, ensure a perfect tightness using rubber couplings or similar devices. Disan’s testing-kit is composed of: 1 powerful vacuum cleaner equipped with a premounted inlet valve. 1 vacuum gauge 1 stethoscope 3 PVC reducers 100-50 mm/80-50 mm/63-50 mm adapters Z 200 3. Insert the hose fitting into the end of the pipe line by using the most suitable fitting. The end of the pipe line is the point where the central vacuum cleaner has to be connected. Please notice: • the vacuum cleaner must be connected to the pipe line so that there won’t be any possibility to have reduction of the depression value and airlosses. • Disan’s vacuum cleaner tester is equipped with a thermostat which automatically switches off if the motor gets overheated. After cooling(8-10 minutes) the vacuum cleaner switches on again automatically. Z 202 2. Measure the depression produced by the vacuum cleaner Depression is measured by introducing the corresponding vacuum gauge (code GE800) into the end of the hose of the testing vacuum cleaner. 25 Central vacuum systems 4. Check the closing caps in the backup boxes 6. Switch on the testing vacuum cleaner In order to carry out this part of the testing successfully, you need to make sure that all the 90° bends of the backup boxes are provided with the taps for the airtight closure of the system. Wait a few seconds so that the system creates the depression needed for the measurement. The vacuum gauge will indicate the exact depression value once the pointer has come to a standstill. Z 203 7. Measure the depression at the inlet valve Check that the depression value measured at the inlet valve corresponds with that at the inlet of the testing vacuum cleaner. If the tubes and the fittings have been glued in a perfect way, the values will coincide. Please notice: if the measured values do not correspond, there is an air infiltration in the tubing. Location of losses 1. Locating the origin of the whistles 5. Insertion of the vacuum gauge Insert the vacuum gauge directly into the inlet socket mounted on the vacuum cleaner. Follow systematically the pipe line and check if it is damaged. At the same time, listen if there are any whistles. If this check does not provide any successful result, use the stethoscope (part of Disan’s testing kit) to listen systematically along the tubing for whistles; in particular where fittings and tubes have been glued. Even the minimum loss produces irritating noises! Z 204 2. Repair the tubing If necessary, replace the tube or the fittings so that the tubing is perfectly tight. Repeat the testing of the system. After carrying out the test successfully, Disan suggests giving to the purchaser or to the chief of works a copy of the certificate (see second-last page of this handbook) and of the tubing distribution in order to avoid disputes or future liabilities. 26 Central vacuum systems INSTALLATION AND CONNECTION OF THE INLET VALVES AND OF THE CENTRAL VACUUM CLEANER Installation and connection of the inlet valves Z 206 Rectangular inlet valve 90° bend straight coupling cap Remove the protection cap and the cover of the backup box adattore backup box Connect the inlet valves to the power mains cover The two incoming electric cables must be connected in parallel to the two outgoing cables with a binding screw. Then connect the binding screw to the inlet valve. extension socket plate Resistances If you use the sequential starting device please control if there is a resistance (code IS106) 4700 on every single inlet valve. The resistances can be installed later and welded on one of each outgoing cable of the control operation panel which is on the inlet valve. Protect the resistance with a thermoproof covering. Z 207 Inlet valve mod. Majestic 90° bend straight coupling cap Install the inlet valves • backup box cover Put some soap on the corresponding tightness O.R. for an easier insertion of the inlet valve into the backup box. extension socket Z 859 • Pre-screw carefully the screws of the inlet valve with a screwier, so that the socket is not deformed. • Adjust the position of the inlet valve with a screwdriver, using washers if necessary. Please notice: if the screws are not properly screwed this may compromise the perfect tightness of the inlet valve and as a consequence the performance of the system. Z 208 resistance • Use the proper extensions if the backup box is too embedded with respect to the plaster’s surface (for instance because of the panelling of the walls). If necessary, it is possible to glue several extensions. 27 Central vacuum systems Installation and connection of the central vacuum cleaner Features of the electric power supply: Be sure the section(diameter) of electric cables is at least 2,5 mm2. • Mod. DS Super Compact In the dust container of the central unit the following parts are contained: - 2 collars - 1 tube Air for the connection to the vacuum piping The central unit can be installed on the wall or on the floor. When it is installed on the wall with the special optional bracket for wall fixing (code IS90) please take into account the minimal distances requested (as in the drawing), in order to allow the reaching of the dust container. Please see the instructions in the mounting kit. Stages for the connection of the central unit: 1. connect the tube Air 1 to the vacuum tube 2 which is located on the back side of the central unit and to the vacuum piping to the inlet valves 3, fixing with a collar for the sealed connection 4 on both sides. 2. if you want to install a breather pipe remove the breather protecting screen 5 from the double lock tube 6 by taking out the two lateral rivets 7. With the optional rubber hose (code TE920) connect the zinc tube 6 to the breather piping , by fixing them with the help of 2 collars 4 on both sides. 3. remove the plug of the sockets 10 which is located on the socket 111 and connect to the power main 12 V by paying attention to do the connection on the grips 1 and 2 of the plug. Reconnect the plug to the socket. 4. connect the plug 13 to an electricity socket 14 and the tension should be the same of that written on the identification plate 15. Please notice: the model DS Super Compact Turbo 4,5i needs the use of a differential circuit breaker switch FI of the value of 300 mA. ! WARNING ! In the case of wall installation we advise t install an automatic shaker device. Z 861 3 4 min. cm 80 1 Z 860 cm 50 12 9 4 8 5 7 cm 50 2 10 6 11 15 14 13 28 Central vacuum systems Steps for the dismantling of the central unit 3. remove the supply 3 from the control panel For the installation of some optional and for maintenance reasons it is necessary to dismantle firstly the central unit as described in the following stages. 4. remove the transparent depression tube vacuum gauge 4 from its connection placed on the motor 1. unscrew the hose clamp 1 which connects motorsilencer. Z 868 disan central vacuum cleaning systems Z 866 disan central vacuum cleaning systems 3 4 1 5. dismantle the main switch 5 from the supporting frame covering 6 2. take off the rubber hose 2 of the flexible hose from the zinc sweep ell of the cover and take it out Z 867 6. unscrew the screws 7 of the supporting frame covering 4 from the supporting frame 8 Z 869 disan central vacuum cleaning systems 6 8 2 5 7 7. separate the covering supporting frame 8 After these operation reassemble the central unit by following the steps backwards. 29 Central vacuum systems • 2. connect the zinc-coated junction 4 on the filter chamber of the dust separator to the inlet valves 5 with the rubber hose 6 and fix it with two collars 7 on both sides. Mod. DS Super Compact In the dust container of the central unit the following parts are contained: - 1 rubber hose for the connection to the breather pipe. - 4 collars - 1 tube Air for the connection of the vacuum piping. 3. with the help of the rubber hose 8, connect the rubber connection 9 of the motor to the breather piping 10 by fixing it with two collars on both sides. 4. connect the electric cables 12 of the motor and the electric power 12 V to the inlet valves 13 to the main electric board 14. Connect also the electrical boards of the automatic filter shaking and the electric division box 12 V remote control wire (optional). The schemes of the electric distribution of the boxes can be find into its electric box. For the models DS BC 100i and CD 125i its electric panels are integrated in the machine. We advise to locate the vacuum motors on the left side of the dust separator. If differently, please contact the technical office Disan. Fix on the wall, near the central unit, the electric box and, if present, the switchboard of the automatic filter cleaner and the electric division box for 12V remote control wire. Steps for the connection of the central unit: 5. connect the mains cable 15 to a control panel 16 with 380-400 Volt tension. 1.connect the tube Air 1 to the vacuum hose 2 of the motor and to the zinc-coated junction 3 of the cover of the dust separator. Z 862 16 3 10 14 11 1 5 8 13 12 15 4 9 2 6 7 Ex: Mod. DS D02 Electronic control sequential starting device The models equipped with an electronic control sequential starting device are predisposed in the production stage. If there would be any troubleshooting please contact the technical office Disan. 30 Z 870 Central vacuum systems Check of the functioning of the by-pass valve on the dust separator Z 864 Every dust separator is equipped with a by-pass valve for the vacuum of air which acts when in the piping there is too much suction power. • On the systems with 2,2 kW motors the by-pass 3 valve on the dust separator should be always closed. • The by-pass valve is used only on the systems with 5,5 kW motors, when on a motor just one operator is working. The excess of vacuum power is compensated by the by-pass valve Check that the valve is open and adjust eventually the bolt for a maximal efficiency. Steps for the adjustment of the by-pass valve 1. with a wrench unscrew the bolt of the cover 1 and remove the metal cover and remove the soundproof cover 2. 4. remove one flexible hose from the inlet valve and check that the inlet valve starts working again 5. close the valve to the closing 6. reassemble the soundproof cover By-pass valves adjustment Z 863 2 In the case that in the piping some by-pass valves will be installed for the self-cleaning of the lines, close the valve on the dust separator and adjust such valves as described in the paragraph “Check of the functioning of the by-pass valve on the dust separator”. Steps for the adjustment 1 1. After having removed the soundproof cover of the valve, start the system by inserting 2 flexible hoses into the inlet valves. 2. Adjust the valve as described in the paragraph: “Check of the functioning of the by-pass valve on the dust separator”. 2. start the system by inserting the 2 flexible hoses into the inlet valves and vacuum by both of them. 3. adjust with a wrench the by-pass valve 3, by opening it until when an air infiltration could be heard 31 Central vacuum systems Testing of the inlet valves Z 216 Testing the inlet valves • Start the central vacuum cleaner up by inserting the vacuum gauge into whatever inlet valve of the system. Z 214 After repairing, measure the depression again. Final testing of the system • In this phase the installer tests the finished system. Listen if there are any whistles due to losses of the inlet valves. Whistles are due to: 1. an excessive screwing of the inlet valve into the backup boxes (see paragraph “Mounting and connection of the inlet valves”) 2. a damaged or incorrect mounting of the gasket. Check if it is positioned correctly. Z 215 Start the vacuum cleaner up by inserting the vacuum gauge into whatever inlet valve and measure the depression. Please notice: if you use inlet valves with pin-jacks, the system can be started up creating a bridge with the two 12 V electric cables coming out of the central unit. Wait a few seconds so that the system creates the depression necessary for the measurement. When the pointer has come to a standstill, read the exact value of depression. Then check that the depression measured at the inlet valve corresponds with that measured at the inlet of the central vacuum cleaner. These measures must correspond. Small differences in the value indicated in the “Technical data” sheet can derive from the voltage of the electric system and could be considered in the normal tolerance range. If the two values do not correspond, there is an air-infiltration in the tubing. Locate the origin of the loss by putting the stethoscope on the wall or on the floor along the tubing. An infiltration is present where you locate a whistle. Delivery of the finished system to the customer In case you notice whistles which aren’t caused by the inlet valves, locate the origin of those whistles by placing the stethoscope on the wall or on the floor along the tubing. 32 Practical testing of the functioning of the system It is preferable that the customer himself cleans in order to check whether the suction system works perfectly. Central vacuum systems NOTE: 33 Central vacuum systems NOTE: 34 ertification The installing company confirms the TESTING of the tubing in compliance with Disan’s instructions. Furthermore, it has been ascertained that: 1. no whistles are emitted by the tubing due to air-infiltrations 2. the depression measured at one inlet valve of the vacuum cleaning system corresponds with that measured at the testing vacuum cleaner. Therefore any future damage is exclusively due to the intervention of a third party. The installing company Date Attachment: tubing distribution plan Ringraziamo per l’attenzione nella lettura del manuale, certi che sia stato di Vs. aiuto. PR042(E) Per un ulteriore approfondimento, Disan organizza mensilmente dei corsi di formazione, presso la propria sede. Central vacuum systems Disan S.r.l via di Mezzo ai Piani 13A I - 39100 Bolzano Tel. 0471/ 971000 Fax 0471/ 978888 e-mail: [email protected] internet: www.disan.com