1
Barracuda Load Balancer Administrator’s Guide
Version 2.3
Barracuda Networks Inc.
3175 S. Winchester Blvd.
Campbell, CA 95008
http://www.barracuda.com
Copyright Notice
Copyright 2004-2008, Barracuda Networks
www.barracuda.com
v2.3-081015
All rights reserved. Use of this product and this manual is subject to license. Information in this document is subject to change without notice.
Trademarks
Barracuda Load Balancer is a trademark of Barracuda Networks. All other brand and product names mentioned in this document are registered
trademarks or trademarks of their respective holders.
ii
Barracuda Load Balancer Administrator’s Guide
Contents
Chapter 1 – Introduction . . . . . . . . . . . . . . . . . . . . . . . . . . 7
Overview . . . . . . . . . . . . . . . . . . . .
Powerful Enterprise-Class Solution . . . . .
Features of the Barracuda Load Balancer . . .
Load balancing for all IP-based applications
Easy Setup and Maintenance . . . . . . . .
Intrusion Prevention System . . . . . . . .
Auto-Discover . . . . . . . . . . . . . . . .
Layer 4 IP Persistence . . . . . . . . . . .
Layer 7 Cookie Persistence . . . . . . . . .
Session Directory Integration . . . . . . . .
SSL Offloading / Acceleration . . . . . . . .
Scheduling Policy . . . . . . . . . . . . . .
Automated Service Monitor . . . . . . . . .
Multiple Deployment Modes. . . . . . . . .
High Availability . . . . . . . . . . . . . . .
Web Administrative Interface . . . . . . . .
Last Resort Server . . . . . . . . . . . . .
.
.
.
.
.
.
.
.
.
.
.
.
.
.
.
.
.
.
.
.
.
.
.
.
.
.
.
.
.
.
.
.
.
.
.
.
.
.
.
.
.
.
.
.
.
.
.
.
.
.
.
.
.
.
.
.
.
.
.
.
.
.
.
.
.
.
.
.
.
.
.
.
.
.
.
.
.
.
.
.
.
.
.
.
.
.
.
.
.
.
.
.
.
.
.
.
.
.
.
.
.
.
.
.
.
.
.
.
.
.
.
.
.
.
.
.
.
.
.
.
.
.
.
.
.
.
.
.
.
.
.
.
.
.
.
.
.
.
.
.
.
.
.
.
.
.
.
.
.
.
.
.
.
.
.
.
.
.
.
.
.
.
.
.
.
.
.
.
.
.
.
.
.
.
.
.
.
.
.
.
.
.
.
.
.
.
.
.
.
.
.
.
.
.
.
.
.
.
.
.
.
.
.
.
.
.
.
.
.
.
.
.
.
.
.
.
.
.
.
.
.
.
.
.
.
.
.
.
.
.
.
.
.
.
.
.
.
.
.
.
.
.
.
.
.
.
.
.
.
.
.
.
.
.
.
.
.
.
.
.
.
.
.
.
.
.
.
.
.
.
.
.
.
.
.
.
.
.
.
.
.
.
.
.
.
.
.
.
.
.
.
.
.
.
.
.
.
.
.
.
.
.
.
.
.
.
.8
.8
.9
.9
.9
10
11
11
11
12
12
12
12
12
13
13
13
C h a p t e r 2 – L o a d B a l a n c i n g C o n c e p ts . . . . . . . . . . . . . . . . 1 5
Barracuda Load Balancer Terminology . . . . .
Load Balancer Deployment Options . . . . . .
Route-Path (Recommended) . . . . . . . .
Deploying Route-Path . . . . . . . . .
Bridge-Path . . . . . . . . . . . . . . . . .
Deploying Bridge-Path . . . . . . . . .
Direct Server Return . . . . . . . . . . . .
DSR with Route-Path or Bridge-Path .
Deploying Direct Server Return . . . .
Deployment Notes . . . . . . . . . . .
Deployment in a Linux Environment . .
Deployment in a Windows Environment
Verifying DSR Deployment . . . . . . .
.
.
.
.
.
.
.
.
.
.
.
.
.
.
.
.
.
.
.
.
.
.
.
.
.
.
.
.
.
.
.
.
.
.
.
.
.
.
.
.
.
.
.
.
.
.
.
.
.
.
.
.
.
.
.
.
.
.
.
.
.
.
.
.
.
.
.
.
.
.
.
.
.
.
.
.
.
.
.
.
.
.
.
.
.
.
.
.
.
.
.
.
.
.
.
.
.
.
.
.
.
.
.
.
.
.
.
.
.
.
.
.
.
.
.
.
.
.
.
.
.
.
.
.
.
.
.
.
.
.
.
.
.
.
.
.
.
.
.
.
.
.
.
.
.
.
.
.
.
.
.
.
.
.
.
.
.
.
.
.
.
.
.
.
.
.
.
.
.
.
.
.
.
.
.
.
.
.
.
.
.
.
.
.
.
.
.
.
.
.
.
.
.
.
.
.
.
.
.
.
.
.
.
.
.
.
.
.
.
.
.
.
.
.
.
.
.
.
.
.
.
.
.
.
.
.
.
.
.
.
.
.
.
.
16
19
19
20
21
22
22
25
25
26
26
27
27
C h a p t e r 3 – G e t t i n g Sta r t e d . . . . . . . . . . . . . . . . . . . . . . . . 2 9
Initial Setup . . . . . . . . . . . . . . . . . . . . . . . . . .
Preparing for Installation . . . . . . . . . . . . . . . . .
Connecting the Barracuda Load Balancer to the Network
Configuring WAN IP Address and Network Settings . . .
Configuring Your Corporate Firewall . . . . . . . . . . .
Configuring the Barracuda Load Balancer . . . . . . . .
Updating the Barracuda Load Balancer Firmware . . . .
Verifying Your Subscription Status . . . . . . . . . . . .
Updating the IPS Definitions . . . . . . . . . . . . . . .
.
.
.
.
.
.
.
.
.
.
.
.
.
.
.
.
.
.
.
.
.
.
.
.
.
.
.
.
.
.
.
.
.
.
.
.
.
.
.
.
.
.
.
.
.
.
.
.
.
.
.
.
.
.
.
.
.
.
.
.
.
.
.
.
.
.
.
.
.
.
.
.
.
.
.
.
.
.
.
.
.
.
.
.
.
.
.
.
.
.
.
.
.
.
.
.
.
.
.
30
30
31
31
32
32
34
34
35
iii
Creating Services . . . . . . . . . . . . . . . . . . . . . . . . .
Administrative Settings . . . . . . . . . . . . . . . . . . . . . . . .
Controlling Access to the Administration Interface . . . . . . . .
Customizing the Appearance of the Web Interface . . . . . . . .
Setting the Time Zone of the System . . . . . . . . . . . . . . .
Enabling SSL for Administration . . . . . . . . . . . . . . . . .
Maintaining the Barracuda Load Balancer . . . . . . . . . . . . . .
Backing up and Restoring Your System Configuration . . . . . .
Updating the Firmware of Your Barracuda Load Balancer . . . .
Updating the Intrusion Prevention Rules Using Energize Updates
Replacing a Failed System . . . . . . . . . . . . . . . . . . . .
Reloading, Restarting, and Shutting Down the System . . . . . .
Using the Built-in Troubleshooting Tools . . . . . . . . . . . . .
Rebooting the System in Recovery Mode. . . . . . . . . . . . .
Reboot Options . . . . . . . . . . . . . . . . . . . . . . . .
.
.
.
.
.
.
.
.
.
.
.
.
.
.
.
.
.
.
.
.
.
.
.
.
.
.
.
.
.
.
.
.
.
.
.
.
.
.
.
.
.
.
.
.
.
.
.
.
.
.
.
.
.
.
.
.
.
.
.
.
.
.
.
.
.
.
.
.
.
.
.
.
.
.
.
.
.
.
.
.
.
.
.
.
.
.
.
.
.
.
.
.
.
.
.
.
.
.
.
.
.
.
.
.
.
35
36
36
36
36
36
38
38
38
39
39
39
40
40
41
Chapter 4 – Managing the Barracuda Load Balancer . . . . . 43
Configuring the Barracuda Load Balancer . . . . . . .
Configuring System IP Information . . . . . . . . .
Creating Load-Balanced Services. . . . . . . . . .
Creating a Service . . . . . . . . . . . . . . .
Enabling Persistence . . . . . . . . . . . . . . . .
Session Directory or Terminal Services Integration .
SSL Offloading . . . . . . . . . . . . . . . . . . .
Uploading SSL Certificates . . . . . . . . . . .
Specifying SSL Offloading for a Service . . . .
Selecting a Scheduling Policy . . . . . . . . . . . .
Adaptive Scheduling . . . . . . . . . . . . . .
Pre-Assigned Weight . . . . . . . . . . . . . .
Scheduling Policies . . . . . . . . . . . . . . .
Configuring Intrusion Prevention . . . . . . . . . .
Creating a High Availability Environment . . . . . .
Requirements for High Availability (HA) . . . .
Operation of HA . . . . . . . . . . . . . . . .
Recovery of the Primary System . . . . . . . .
Creating a Cluster and Removing the Cluster .
Data Propagated to Clustered Systems . . . .
Monitoring the Barracuda Load Balancer. . . . . . . .
Monitoring the Health of Services . . . . . . . . . .
Viewing Performance Statistics . . . . . . . . . . .
Viewing the Event Log . . . . . . . . . . . . . . .
Automating the Delivery of System Alerts . . . . . .
Viewing System Tasks . . . . . . . . . . . . . . .
.
.
.
.
.
.
.
.
.
.
.
.
.
.
.
.
.
.
.
.
.
.
.
.
.
.
.
.
.
.
.
.
.
.
.
.
.
.
.
.
.
.
.
.
.
.
.
.
.
.
.
.
.
.
.
.
.
.
.
.
.
.
.
.
.
.
.
.
.
.
.
.
.
.
.
.
.
.
.
.
.
.
.
.
.
.
.
.
.
.
.
.
.
.
.
.
.
.
.
.
.
.
.
.
.
.
.
.
.
.
.
.
.
.
.
.
.
.
.
.
.
.
.
.
.
.
.
.
.
.
.
.
.
.
.
.
.
.
.
.
.
.
.
.
.
.
.
.
.
.
.
.
.
.
.
.
.
.
.
.
.
.
.
.
.
.
.
.
.
.
.
.
.
.
.
.
.
.
.
.
.
.
.
.
.
.
.
.
.
.
.
.
.
.
.
.
.
.
.
.
.
.
.
.
.
.
.
.
.
.
.
.
.
.
.
.
.
.
.
.
.
.
.
.
.
.
.
.
.
.
.
.
.
.
.
.
.
.
.
.
.
.
.
.
.
.
.
.
.
.
.
.
.
.
.
.
.
.
.
.
.
.
.
.
.
.
.
.
.
.
.
.
.
.
.
.
.
.
.
.
.
.
.
.
.
.
.
.
.
.
.
.
.
.
.
.
.
.
.
.
.
.
.
.
.
.
.
.
.
.
.
.
.
.
.
.
.
.
.
.
.
.
.
.
.
.
.
.
.
.
.
.
.
.
.
.
.
.
.
.
.
.
.
.
.
.
.
.
.
.
.
.
.
.
.
.
.
.
.
.
.
.
.
.
44
44
44
44
46
46
47
47
47
47
47
48
48
49
49
49
50
50
50
52
53
53
54
54
54
54
Appendix A – SNMP MIB . . . . . . . . . . . . . . . . . . . . . . . . . . 55
Appendix B – Barracuda Load Balancer Hardware . . . . . . . 57
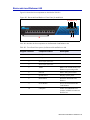
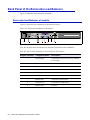
Front Panel of the Barracuda Load Balancer . . . . . . . . . . . . . . . . . . . . 58
Barracuda Load Balancer 240, 340, and 440 . . . . . . . . . . . . . . . . . . 58
iv
Barracuda Load Balancer Administrator’s Guide
Barracuda Load Balancer 640 . . . . . .
Back Panel of the Barracuda Load Balancer .
Barracuda Load Balancer, all models . . .
Hardware Compliance . . . . . . . . . . . .
Notice for the USA . . . . . . . . . . . .
Notice for Canada . . . . . . . . . . . . .
Notice for Europe (CE Mark) . . . . . . .
.
.
.
.
.
.
.
.
.
.
.
.
.
.
.
.
.
.
.
.
.
.
.
.
.
.
.
.
.
.
.
.
.
.
.
.
.
.
.
.
.
.
.
.
.
.
.
.
.
.
.
.
.
.
.
.
.
.
.
.
.
.
.
.
.
.
.
.
.
.
.
.
.
.
.
.
.
.
.
.
.
.
.
.
.
.
.
.
.
.
.
.
.
.
.
.
.
.
.
.
.
.
.
.
.
.
.
.
.
.
.
.
.
.
.
.
.
.
.
.
.
.
.
.
.
.
.
.
.
.
.
.
.
59
60
60
61
61
61
61
A p p e n d i x C – L i m i t e d Wa r r a n t y a n d L i c e n s e . . . . . . . . . . . 6 3
Limited Warranty . . . . . . . . .
Exclusive Remedy. . . . . . . . .
Exclusions and Restrictions . . . .
Software License . . . . . . . . .
Energize Update Software License
Open Source Licensing . . . . . .
.
.
.
.
.
.
.
.
.
.
.
.
.
.
.
.
.
.
.
.
.
.
.
.
.
.
.
.
.
.
.
.
.
.
.
.
.
.
.
.
.
.
.
.
.
.
.
.
.
.
.
.
.
.
.
.
.
.
.
.
.
.
.
.
.
.
.
.
.
.
.
.
.
.
.
.
.
.
.
.
.
.
.
.
.
.
.
.
.
.
.
.
.
.
.
.
.
.
.
.
.
.
.
.
.
.
.
.
.
.
.
.
.
.
.
.
.
.
.
.
.
.
.
.
.
.
.
.
.
.
.
.
.
.
.
.
.
.
63
63
64
64
65
69
v
vi
Barracuda Load Balancer Administrator’s Guide
Chapter 1
Introduction
This chapter provides an overview of the Barracuda Load Balancer and includes the following topics:
•
•
Overview on page 8
Features of the Barracuda Load Balancer on page 9
Introduction 7
Overview
Organizations use load balancers to distribute traffic across a set of servers in their network. In the
event a server goes down, the load balancer automatically detects this failure and begins forwarding
traffic to the remaining functioning servers, maintaining high availability of the services provided by
the servers. The Barracuda Load Balancer is designed to help organizations achieve their high
availability objectives by providing:
•
•
•
Comprehensive failover capabilities in case of server failure
Distribution of traffic across multiple servers
Integrated protection from network intrusions
The Barracuda Load Balancer enables you to set conditions that dictate how traffic should be
distributed to your Real Servers. For example, you can specify that a new connection should be
processed by the Real Server with the lowest CPU load.
The Barracuda Load Balancer also makes it easy to scale your network to handle increased traffic
because you can simply add a Real Server at any time, and the Barracuda system will automatically
detect the new server and add it to the load-balanced farm of servers.
Note
The Barracuda Load Balancer is not designed for link balancing that distributes traffic across
multiple Internet connections.
Powerful Enterprise-Class Solution
The Barracuda Load Balancer uses a variety of factors to make load-balancing decisions. It is
designed to provide comprehensive IP load-balancing capabilities to any IP-based application,
including:
•
•
•
Internet sites with high traffic requirements, including Web, FTP, media streaming, and content
delivery networks
Hosted applications using thin-client architectures, such as Windows® Terminal Services
Other IP services requiring optimal performance, including SMTP, DNS, RADIUS, and TFTP
The Barracuda Load Balancer's integrated Service Monitor ensures that servers and their associated
applications are operational. In the event of server or application failure, the Barracuda Load Balancer
facilitates automatic failover among servers to ensure continuous availability. The Barracuda Load
Balancer also assists in orchestrating scheduled maintenance windows on specific servers while
maintaining application availability through other servers in the server farm.
To minimize the risk associated with failures of the load balancers themselves, two Barracuda Load
Balancers can be deployed in an active/passive configuration. In the event a primary active Barracuda
Load Balancer fails, a backup Barracuda Load Balancer can quickly assume the identity of the
primary Barracuda Load Balancer. The switchover happens automatically to maintain application
availability.
8
Barracuda Load Balancer Administrator’s Guide
Features of the Barracuda Load Balancer
The Barracuda Load Balancer is designed with the following features:
Load balancing for all IP-based applications ..................................... 9
Easy Setup and Maintenance............................................................... 9
Intrusion Prevention System .............................................................. 10
Auto-Discover .................................................................................... 11
Layer 4 IP Persistence....................................................................... 11
Layer 7 Cookie Persistence ............................................................... 11
Session Directory Integration ............................................................ 12
SSL Offloading / Acceleration ........................................................... 12
Scheduling Policy .............................................................................. 12
Automated Service Monitor ............................................................... 12
Multiple Deployment Modes .............................................................. 12
High Availability ................................................................................ 13
Web Administrative Interface............................................................. 13
Load balancing for all IP-based applications
The Barracuda Load Balancer is designed to provide fast and comprehensive IP load-balancing
capabilities to any IP-based application, including:
•
•
•
•
•
•
•
•
•
•
•
•
•
•
•
HTTP
HTTPS (SSL)
SSH
SMTP
IMAP
RDP (Terminal Services)
POP3
NTP
ASP
Streaming Media
DNS
LDAP
RADIUS
TFTP
Other TCP/UDP-based services
Easy Setup and Maintenance
The Barracuda Load Balancer is extremely easy to deploy, featuring automatic discovery of systems
in the server farm and easy-to-use configuration tools through an intuitive Web interface. To
minimize ongoing administration associated with security, the Barracuda Load Balancer can
automatically receive current intrusion prevention and security updates from Barracuda Central, an
advanced technology operations center.
Introduction 9
Intrusion Prevention System
Many security technologies are integrated into the Barracuda Load Balancer. The set-and-forget
Intrusion Prevention System (IPS) helps secure your network, even if you may have missed a patch
or if an exploit manages to get past your existing security. The Barracuda Load Balancer will
automatically block any exploits that are detected across any protocol; no configuration is required.
The built-in IPS also provides Denial of Service (DoS) protection for all load-balanced servers.
There are important differences between an Intrusion Detection System (IDS) and an IPS. An IDS
and an IPS are similar conceptually; however, an IDS merely alerts and can become a significant
source of incoming messages during an attack. An IPS, on the other hand, is capable of rejecting a
connection before damage is done. This makes it much less noisy in that it does not alert on every
attempt, and instead will simply block any malicious activity.
As with any security feature, IPS is designed to complement any existing security measures, not
replace them. The role of the Intrusion Prevention System is to eliminate any damage from an attack
that manages to penetrate the existing security architecture.
The Intrusion Prevention System protects all your load-balanced services from the following common
threats:
•
•
•
•
•
Virus propagation
Buffer overflows
Protocol-specific attacks. The Barracuda Load Balancer contains protocol-specific guards that
protect your Real Servers from attacks targeting the SMTP, DNS, and LDAP protocols.
Application-specific attacks. The Barracuda Load Balancer protects common applications that
are particularly vulnerable to external attacks. These applications include IIS, Websphere, Cold
Fusion, Exchange, and many more.
Operating system-specific attacks. The Barracuda Load Balancer contains Microsoft and UNIXspecific detection capabilities that identify malicious activity against these operating systems.
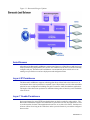
The Intrusion Prevention System is updated with the latest threats every hour by Energize Updates.
The following figure shows how Barracuda Central provides the latest rules and definitions through
the Energize Update feature.
10
Barracuda Load Balancer Administrator’s Guide
Figure 1.1: Barracuda Energize Updates
Auto-Discover
All models of the Barracuda Load Balancer support Auto-Discovery of Real Servers and Services, to
ensure quick and easy deployment of new servers. For common services, there's no need to manually
configure each port. The Barracuda Load Balancer can automatically detect which services are
running on a specified server and save deployment and configuration time.
Layer 4 IP Persistence
The Barracuda Load Balancer supports technology that directs clients back to the same server. In
environments where session persistence is required, Layer 4 IP persistence provides a fast and reliable
solution for most configurations including encrypted e-commerce traffic and database applications.
The length of time that session persistence is maintained during a time of inactivity can be enabled on
a Service level.
Layer 7 Cookie Persistence
Session persistence for many HTTP-based applications can also be tracked by using cookies. The
Barracuda Load Balancer supports all cookies that are generated or used by any application, as well
as cookie insertion for times when applications do not have or use their own cookies. Persistence in
all cases will last for as long as the cookie does unless a period of inactivity exceeds the configured
timeout value.
Introduction 11
Cookie persistence is not available if using the Direct Server Return (DSR) mode of deployment
unless the application manages the cookies. This is because the cookie is inserted into the data stream
by the Barracuda Load Balancer when the traffic is outbound. In DSR the traffic goes directly to the
client, bypassing the Barracuda Load Balancer, so there is no opportunity to insert a cookie.
Session Directory Integration
Session persistence may also be maintained by querying Windows Server 2003 Session Directory or
Windows Server 2008 Terminal Services Session Broker. The Barracuda Load Balancer notes the
open sessions on each Terminal Server and checks if each connecting client already has a session open
on a particular Terminal Server. If the client has an open session, the Barracuda Load Balancer
forwards that user to the appropriate Terminal Server.
SSL Offloading / Acceleration
The Barracuda Load Balancer has the ability to handle SSL encryption and decryption locally, to help
ease the burden on backend Real Servers. Hardware SSL Acceleration is available on selected
models.
SSL offloading is not available if using the Direct Server Return mode of deployment.
Scheduling Policy
The Barracuda Load Balancer supports multiple scheduling technologies that support server
weighting including Weighted Least Connection (WLC) and Weighted Round Robin (WRR). The
Barracuda Load Balancer also supports adaptive scheduling, a resource based algorithm that can
take into account factors like CPU load or a customer modifiable load URL option. You can also
specify that certain servers handle more traffic than others.
Automated Service Monitor
Barracuda Load Balancer features a fully integrated Service Monitor which can be configured to reroute traffic based on automated tests of servers being clustered or their upstream and downstream
dependent infrastructure components. Downed servers are automatically removed from the farm
within seconds of server failure.
Multiple Deployment Modes
The Barracuda Load Balancers support Route-Path, Bridge-Path, and Direct Server Return modes, for
the most flexibility of any load balancer on the market. Route-Path offers increased flexibility, while
Bridge-Path allows deployment without changes to existing IP infrastructure. Direct Server Return
allows for maximum throughput, ideal for content delivery networks.
12
Barracuda Load Balancer Administrator’s Guide
High Availability
With simple setup through the Web administrative interface, the Barracuda Load Balancer supports
High Availability configurations. Just point the backup Barracuda Load Balancer to the primary
Barracuda Load Balancer's management IP address to synchronize configurations and establish a
highly available network that brings your server farm to enterprise grade availability.
Web Administrative Interface
The Barracuda Load Balancer configuration is administered through an SSL-secured Web interface.
With features such as quick server and service adding, health monitoring, and Auto-Discover, the
Barracuda Load Balancer is easy to use. A typical configuration can be performed in less than ten
minutes.
Last Resort Server
The Barracuda Load Balancer allows you to specify a Last Resort Server, which is the server to which
all traffic for a particular Service is routed in the event that all Real Servers associated with that
Service are not available. This Last Resort Server can be located on a different network, or even across
the Internet, so long as the WAN port of the Barracuda Load Balancer has a route to that server. If all
Real Servers for a particular Service are unavailable, the Barracuda Load Balancer will route all
traffic bound for that Service to the Last Resort Server. The Last Resort Server does not need to be
configured as a Real Server for the Service, and the Barracuda Load Balancer will not perform any
health checks on the Last Resort Server.
Introduction 13
14
Barracuda Load Balancer Administrator’s Guide
Chapter 2
Load Balancing Concepts
This chapter provides an overview of the Barracuda Load Balancer and includes the following topics:
•
•
Barracuda Load Balancer Terminology on page 16
Load Balancer Deployment Options on page 19
Load Balancing Concepts 15
Barracuda Load Balancer Terminology
The following is a list of some of the terms used by the Barracuda Load Balancer.
Table 2.1: Barracuda Load Balancer terminology
Term
Description
Service
A combination of a Virtual IP (VIP) and one or more TCP/UDP ports that the
Service is to listen on. Traffic arriving over the designated port(s) to the
specified Virtual IP is directed to one of the Real Servers that are associated
with a particular Service.
Service Monitor
The Service Monitor monitors the availability of the Real Servers. It can be
configured either on a per-Service or per-Real Server basis to use one of
several different methods to establish the availability of a Real Server. If the
Service Monitor finds that no Real Servers are available, you can specify an IP
address to which all traffic for the Service will be routed.
Virtual IP (VIP)
The IP address assigned to a specific Service. A client uses the Virtual IP
address to connect to the load-balanced Service. The Virtual IP address must
be different than the WAN or management IP address, and it must be on the
subnet as the WAN IP address.
Real Server
One of the systems that perform the actual work of the load-balanced Service.
The Barracuda Load Balancer assigns new connections to it as determined by
the scheduling policy in effect for the Service.
Server Farm
A collection of Real Servers.
Client
The entity requesting connection to a load-balanced Service. It can be an
external Web browser accessing your load-balanced Web site, or an internal
user connecting to a load-balanced mail server.
Persistence
A returning connection is routed to the same Real Server that handled a
previous request from the same client within a specified time. Examples of
Servces that may need persistence settings are Web sites that have shopping
carts or require some sort of login. See Enabling Persistence on page 46 for
more information.
Scheduling policy
Specifies how the Barracuda Load Balancer determines which Real Server is
to receive the next connection request. Each Service can be configured with a
different policy.
More information can be found in Selecting a Scheduling Policy on page 47.
Route-Path
Deployment modes for the Barracuda Load Balancer. They differ in how the
Real Servers are connected. Details and benefits of each mode can be found
in the sections Route-Path (Recommended) on page 19 and Bridge-Path on
page 21.
Bridge-Path
16
Direct Server Return
Option that is enabled on individual Real Servers. However, because it can
affect how a deployment is designed, it is often treated as a mode of its own.
More details on this can be found in the section on Direct Server Return on
page 22.
Logical Network
A collection of systems on an isolatable subnet. In Route-Path mode, for
example, all systems associated with the LAN interface would be in one (or
more) logical network(s) 10.1.1.x, and all systems connected to the WAN
interface would be in another logical network of 192.168.1.x. See Figure 2.1: A
logical network layout using Route-Path on page 17 for an example.
Barracuda Load Balancer Administrator’s Guide
Term
Description
Physical Network
A group of systems that are physically connected to each other, usually
over a switch or VLAN. See Figure 2.2: A physical network layout using
Route-Path on page 18 for an example.
WAN IP Address or
Management IP
Address
The IP address assigned to the Barracuda Load Balancer, which is also the IP
address used to access the Web interface.
This address must be different than the Virtual IP addresses assigned to the
Services.
High Availability
A pair of Barracuda Load Balancers, one of which performs the load-balancing
while the other monitors it, ready to take over operations if the first one fails.
For more information, see Creating a High Availability Environment on page
49.
Figure 2.1: A logical network layout using Route-Path
Load Balancing Concepts 17
Figure 2.2: A physical network layout using Route-Path
18
Barracuda Load Balancer Administrator’s Guide
Load Balancer Deployment Options
Services on the Barracuda Load Balancer can be deployed in the following three modes:
Route-Path (Recommended)............................................................... 19
Bridge-Path........................................................................................ 21
Direct Server Return .......................................................................... 22
Choose the deployment mode for the Barracuda Load Balancer based on the type of network
configuration that currently exists at your site as well as on the types of Services you wish to load
balance. The recommended mode is Route-Path because it requires the least amount of invasive
changes to your existing network configuration. For Services that have high outbound traffic,
enabling the Direct Server Return option is recommended for the Real Servers that are producing that
traffic.
All of these deployment modes require specific network configurations. However, the Barracuda
Load Balancer must be in either Route-Path or Bridge-Path mode. Direct Server Return is an option
that you may choose for each Real Server.
Table 2.2 shows the number of logical and physical networks required by each deployment method.
Table 2.2: Deployment Method Details
Deployment Method
Logical Networks
Physical Networks
Route-Path (Recommended)
2
1+
Bridge-Path
1+
2
Direct Server Return
1
1
Route-Path (Recommended)
Route-Path deployment is the most frequently used deployment method, providing the most
flexibility by allowing load-balancing of any server in a downstream route. With Route-Path, the
WAN and LAN interface of the Barracuda Load Balancer must be on separate logical networks. The
load-balanced servers are moved to a new private network and the Barracuda Load Balancer takes
control of the publicly-accessible IP addresses (VIPs) used to reach the Services.
The following table describes the advantages and disadvantages of deploying your Barracuda Load
Balancer in Route-Path mode.
Advantages
Disadvantages
Minimal network re-designing; works with
existing physical configurations
The Barracuda Load Balancer must be the default
gateway for all downstream Real Servers
Fast High Availability failover
Real servers must be on a logically separate network
from the Virtual IP addresses.
Can load-balance any downstream server
All return traffic must be directed through the Barracuda
Load Balancer
No changes to Real Server setups other than
changing their IP addresses
Load Balancing Concepts 19
Figure 2.3: Sample Route-Path network layout
Deploying Route-Path
In the Route-Path method of deployment, the Virtual IP addresses must be on the same subnet as the
Barracuda Load Balancer. The Real Servers must be on a subnet separate from the VIPs and the
Barracuda Load Balancer. This may require changing the IP addresses of your Real Servers.
Normally the Real Servers are on an isolated IP network behind the Barracuda Load Balancer. If IP
address changes are not possible, or if there is no way to make Route-Path deployment work, the next
choice for deployment method is Direct Server Return. See Direct Server Return on page 22 for
details.
Real Servers that are on multiple networks simultaneously may break the route path. If Real Servers
have more than one network adapter enabled, and traffic has a route around the Barracuda Load
Balancer, the deployment will not work properly even though it may appear to work initially. There
are two exceptions where Real Servers may have multiple network adapters:
•
•
The other networks that the Real Servers are on are also isolated and cannot access the WAN
network without going through the Barracuda Load Balancer
Static routes for incoming and outgoing traffic for each IP address of each Real Server have
been defined.
Each Real Server must be one hop away from the LAN port on the Barracuda Load Balancer. This
means their switch must be directly connected into the LAN port of the Barracuda Load Balancer, or
connected to a series of switches that eventually reach the LAN port of the Barracuda Load Balancer
without going through any other machines.
20
Barracuda Load Balancer Administrator’s Guide
If you need to remotely administer your Real Servers individually then you should create new
Services, each of which only load balances a single Real Server. Each Real Server must list the LAN
IP address of the Barracuda Load Balancer as its gateway IP address.
Note that Real Servers in the Route-Path deployment cannot access their own VIPs, or any other VIPs
on their own Barracuda Load Balancer.
If you choose this mode of deployment, make sure that the Operating Mode of the Barracuda Load
Balancer is set to Route-Path on the Basic>IP Configuration page.
Bridge-Path
Bridge-Path provides an easy configuration scenario. Place the Barracuda Load Balancer inline with
your existing IP infrastructure and it can load-balance servers without changing IP addresses. With
Bridge-Path deployment, the WAN and LAN interfaces must be on physically separate networks. The
LAN interface must be on the same logical switch as the servers being load-balanced.
Despite its simple configuration, Bridge-Path deployment is not recommended for most situations.
The following table describes the advantages and disadvantages of deploying your Barracuda Load
Balancer in Bridge-Path mode.
Advantages
Disadvantages
Minimal network changes since the existing IP Slow High Availability failover - longer than 30 seconds.
infrastructure is reused
Real Servers keep their existing IP addresses Separate physical networks required for downstream
Real Servers
Less resilient to network misconfigurations
Sensitive to broadcast storms and other errors related to
loops in a Spanning Tree protocol
Improper configuration of a Bridge-Path network may
result in a broadcast storm, resulting in network outages
Session Directory Integration is not available in BridgePath mode
Load Balancing Concepts 21
Figure 2.4: Sample Bridge-Path network layout
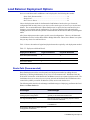
Deploying Bridge-Path
In Bridge-Path mode, the Real Servers must be physically isolated behind the Barracuda Load
Balancer. This means that each Real Server is no longer visible on the network if the Barracuda Load
Balancer becomes unavailable (a separate switch is absolutely required for models 440 and below).
Each Real Server must be one hop away from the LAN port on the Barracuda Load Balancer. This
means their switch must be directly connected into the LAN port of the Barracuda Load Balancer, or
connected to a series of switches that eventually reach the LAN port of the Barracuda Load Balancer
without going through any other machines. The Real Servers must be on the same subnet and logical
network as the Barracuda Load Balancer, the VIPs, and the rest of the WAN, and they must specify
the same gateway as the Barracuda Load Balancer.
Finally, make sure that the Operating Mode of the Barracuda Load Balancer is set to Bridge-Path on
the Basic>IP Configuration page. The LAN IP Address on the same page should be empty.
Direct Server Return
Direct Server Return (DSR) is an option associated with a Real Server which allows for increased
outbound traffic throughput. In DSR, connection requests and incoming traffic still go from the
Barracuda Load Balancer to the Real Server, but all outgoing traffic goes directly from the Real
Server to the client. Because the Barracuda Load Balancer does not process the outbound traffic, the
throughput is increased.
Because the Barracuda Load Balancer does not process the outgoing traffic, Direct Server Return
does not support SSL offloading or cookie persistence.
With DSR, requests come through the WAN interface of the Barracuda Load Balancer and are handed
off to the Real Servers via the WAN port. The Real Servers then respond directly to the request
22
Barracuda Load Balancer Administrator’s Guide
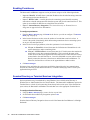
through their own interfaces. This implementation requires enabling a non-ARPing loopback adapter,
a feature that can be found on most server operating systems. Your applications may need to be
explicitly bound to the loopback adapter.
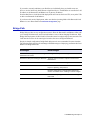
The Barracuda Load Balancer does not alter packets when it delivers them to the Real Servers.
Instead, only the destination MAC address is changed to match the Real Server that is to handle the
request, as shown in Figure 2.5.
Figure 2.5: Direct Server Return Packet Handling
DSR configuration can be more complex than the other methods of deployment. Because of this, it
is recommended that it be used only when there is a specific need. Situations where DSR is
recommended include streaming media, Real Servers not on an isolated subnet, and Windows servers.
• If the outbound traffic is far greater than the inbound traffic, for example, if the Real
Servers are providing streamed audio or visual media, throughput will be increased by
using DSR.
• If the Real Servers cannot be placed on a separate and isolated subnet from the Barracuda
Load Balancer, it may be better to use DSR than Route-Path. If the Real Servers are in a
Load Balancing Concepts 23
flat network and have to access databases on other subnets, or if the Real Servers are on
the same subnet as the Barracuda Load Balancer and the configuration cannot be
changed, then DSR is recommended.
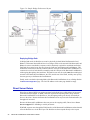
• DSR can assist in optimizing Windows to Windows communication between Real
Servers. If you have Real Servers on active Windows domains where the domain
controllers are not on the same subnet, and Layer 7 features are not required, use DSR.
See Figure 2.6 for an example of this type of layout.
The following table describes the advantages and disadvantages of deploying your Barracuda Load
Balancer in Direct Server Return mode.
Advantages
Disadvantages
Ideal for high-bandwidth requirements such
as content delivery networks
Requires flat network topology
Keeps existing IP addresses of Real Servers
Requires non-ARPing loopback adapter on Real Servers
IP persistence on Layer 4 only
Not compatible with SSL offloading or cookie
persistence.
Figure 2.6: Sample Direct Server Path network layout
24
Barracuda Load Balancer Administrator’s Guide
DSR with Route-Path or Bridge-Path
The Barracuda Load Balancer supports deployment of multiple Services simultaneously, but all
Services must be configured as either Route-Path (recommended) or Bridge-Path. If Direct Server
Return is desired for at least one of the load-balanced Services, then it can be configured in conjuction
with the chosen deployment mode.
Direct Server Return in conjunction with Bridge-Path is not recommended. Please contact
Technical Support if you feel that your corporate network requires this configuration.
DSR is an option which is turned on for each Real Server. You may have DSR servers and non-DSR
servers running the same Service. Real Servers that are in DSR mode must be on the same subnet as
the WAN. If the Barracuda Load Balancer is in Route-Path mode, then the Real Servers that are not
in DSR mode must be on the same subnet as the LAN.
Figure 2.7: Direct Server Return in combination with Route-Path
Deploying Direct Server Return
Direct Server Return uses a flat network topology at the Layer 2 (Switching) and Layer 3 (IP) levels,
which means that the Barracuda Load Balancer, all VIPs, and all Real Servers all must be within the
same IP network and connected on the same switch. Figure 2.6 above shows this topology. Each Real
Server must be one hop away from the Barracuda Load Balancer, but they use the WAN port. This
means their switch must be directly connected into the WAN port of the Load Balancer, or connected
Load Balancing Concepts 25
to a series of switches that eventually reach the WAN port of the Load Balancer without going
through any other machines.
If you specify Route-Path deployment for the Barracuda Load Balancer, but only use Real Servers
with Direct Server Return enabled, the physical LAN port is not used by the Barracuda Load
Balancer, and the LAN adapter may remain undefined in the Web administration interface.
On the Basic>Services page, each Real Server listed under each Service must individually be
configured for Direct Server Return mode. Click Edit for each Real Server, and select Enable for the
Direct Server Return option.
Deployment Notes
When deploying Real Servers in Direct Server Return mode, note the following:
•
•
•
•
The Barracuda Load Balancer needs to have the WAN adapter plugged into the same switch or
VLAN as all of the Real Servers.
The WAN IP, all VIPs, and all of the Real Servers that use Direct Server Return must be on the
same IP subnet.
Each Real Server needs to recognize the VIP as a local address. This requires enabling of a nonARPing virtual adapter such as a loopback adapter and binding it to the VIP address of the loadbalanced Service. Because this is not a true adapter, there should be no gateway defined in the
TCP/IP settings for this adapter.
Real Servers accepting traffic from multiple VIPs must have a loopback adapters enabled for
each VIP. Additionally, the applications on each Real Server must be aware of both the Virtual
IP address as well as the real IP addresses.
Deployment in a Linux Environment
To add a non-ARPing adapter to a Real Server running Linux, add an alias to the lo (loopback)
adapter. The following commands are examples of how to do this for some versions of Linux.
Consult your operating system vendor if you need more details about how to add a non-ARPing
loopback adapter.
1.
Edit your rc.local file (usually located at /etc/rc.d/rc.local)
2.
Add the following to your rc.local file:
sysctl -w net.ipv4.conf.lo.arp_ignore=1
sysctl -w net.ipv4.conf.lo.arp_announce=2
sysctl -w net.ipv4.conf.all.arp_ignore=1
sysctl -w net.ipv4.conf.all.arp_announce=2
ifconfig <interface_name> <ip_address> netmask 255.255.255.255
-arp up
where:
<interface_name> is lo:<number> (e.g. lo:0, lo:1, lo:2)
<ip_address> is the Virtual IP Address for the Service
For example:
ifconfig lo:1 192.168.4.217 netmask 255.255.255.255 -arp up
3.
26
httpd.conf must have a VirtualHost entry for the VIPs. Edit the file to add these two lines:
Barracuda Load Balancer Administrator’s Guide
listen <virtual_ip_address>:80
listen <real_ip_address>:80
where:
<virtual_ip_address> is the Virtual IP Address for the Service
<real_ip_address> is the actual IP Address for the Real Server
4.
To check if the loopback adapter is working, make sure the Real Server is bound to the loopback
adapter’s IP address. Output from the ifconfig command should show the presence of the
loopback adapter.
Deployment in a Windows Environment
For information on how to add a non-ARPing adapter in a Windows/XP environment, refer to
http://support.microsoft.com/kb/839013. Or, check the Microsoft Support Site for your operating
system.
Applications running on Microsoft Real Servers must be configured to accept traffic received on the
VIP addresses (the loopback IP addresses). To do this, add the VIP addresses to IIS (Internet
Information Services) on each Real Server. The VIP addresses must be listed above the real IP address
of the Real Server. Associate the Web site or application with the VIP addresses.
Verifying DSR Deployment
When you are done adding the loopback adapters, try to ping the Real Servers and the VIP, and telnet
to the Real Servers. If the ping doesn’t work or if in response to the telnet you get a connection
refused from the VIP, then the loopback adapter has not been configured correctly.
Try to verify that the loopback adapters are non-ARPing. On either Linux or Windows systems, use
the arp -a command. Also, check the systems event logs to check for IP address conflicts.
If, later, once the Service is set up, the client tries to connect but is unable to access the application,
then the IIS (Windows) or application has not been associated with the real IP address and the VIP.
Note
If you have difficulties, check the Barracuda Networks User Support Forum at
http://forum.barrracudanetworks.com or call Technical Support.
Load Balancing Concepts 27
28
Barracuda Load Balancer Administrator’s Guide
Chapter 3
Getting Started
This chapter provides general instructions for installing, configuring and maintaining the Barracuda
Load Balancer. It includes the following topics:
Initial Setup ....................................................................................... 30
Administrative Settings ...................................................................... 36
Maintaining the Barracuda Load Balancer....................................... 38
Getting Started 29
Initial Setup
These are the general steps to set up your Barracuda Load Balancer. For more detailed instructions
for each step, see the following reference pages.
Preparing for Installation .................................................................. 30
Connecting the Barracuda Load Balancer to the Network ............... 31
Configuring WAN IP Address and Network Settings ......................... 31
Configuring Your Corporate Firewall ............................................... 32
Configuring the Barracuda Load Balancer....................................... 32
Updating the Barracuda Load Balancer Firmware .......................... 34
Verifying Your Subscription Status..................................................... 34
Updating the IPS Definitions............................................................. 35
Creating Services ............................................................................... 35
Preparing for Installation
Before installing your Barracuda Load Balancer, complete the following tasks:
•
•
•
•
30
Decide which type of deployment is most suitable to your network. For more information on the
deployment options, see Load Balancer Deployment Options on page 19.
Make any necessary changes to your network, according to your chosen method of deployment.
Identify the ports used by the services or applications that you want to load-balance.
Verify you have the necessary equipment:
• Barracuda Load Balancer (check that you have received the correct model)
• AC power cord
• Ethernet cables
• Mounting rails and screws
• VGA monitor (recommended)
• PS2 keyboard (recommended)
Barracuda Load Balancer Administrator’s Guide
Connecting the Barracuda Load Balancer to the Network
1.
Fasten the Barracuda Load Balancer to a standard 19-inch rack or other stable location.
Caution
Do not block the cooling vents located on the front and rear of the unit.
2.
If using Route-Path, then the network switch referenced in the following steps may be the same
physical switch. If using Bridge-Path, however, then separate switches on different Layer 2
networks must be used.
2a. Connect a CAT5 Ethernet cable from the WAN interface on the Barracuda Load
Balancer to the network switch where the VIPs reside.
2b. Connect a CAT5 Ethernet cable from the LAN interface on the Barracuda Load
Balancer to the network switch where the Real Servers reside.
Caution
Do not connect any other cables to the unit. The connectors on the back panel are for diagnostic
purposes only.
3.
Connect the following to your Barracuda Load Balancer:
• Power cord
• VGA monitor
• PS2 keyboard
After you connect the AC power cord, the Barracuda Load Balancer may power on for a few
seconds and then power off. This behavior is normal.
4.
Press the Power button located on the front of the unit.
The login prompt for the administrative console displays on the monitor, and the power light on
the front of the Barracuda Load Balancer turns on. For a description of each indicator light, refer
to the section that describes the model of your Barracuda Load Balancer in Front Panel of the
Barracuda Load Balancer on page 58.
Configuring WAN IP Address and Network Settings
The Barracuda Load Balancer is assigned a default WAN IP address of 192.168.200.200. You can
change this IP address using the administrative console or by pressing the RESET button on the front
panel.
Pressing RESET for five seconds sets the WAN IP address to 192.168.200.200. Pressing RESET
eight seconds changes the WAN IP address to 192.168.1.200. Pressing the button for 12 seconds
changes the WAN IP address to 10.1.1.200.
To set a new WAN IP address from the administrative console:
1.
Connect your keyboard and monitor directly to the Barracuda Load Balancer.
2.
At the barracuda login prompt, enter admin for the login and admin for the password.
Getting Started 31
The User Confirmation Requested window displays the current IP configuration of the
Barracuda Load Balancer.
3.
Using your Tab key, click Change and click Enter to change the WAN IP configuration.
4.
Enter the new WAN IP address, netmask, and default gateway for your Barracuda Load
Balancer. Click Save to enter your changes. (The Primary and Secondary DNS fields are
optional at this time, but if not entered at this step then they must be entered in Step 3c.) of To
configure the Barracuda Load Balancer: on page 33). Click Exit.
The new IP address and network settings are applied to your Barracuda Load Balancer.
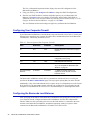
Configuring Your Corporate Firewall
If your Barracuda Load Balancer is located behind a corporate firewall, refer to Table 3.1 for the ports
that need to be opened on your corporate firewall to allow communication between the Barracuda
Load Balancer, Virtual IP(s) and remote servers.
Table 3.1: Ports to Open on Your Corporate Firewall
Port
Direction
Protocol
Description
22
Out
TCP
Remote diagnostics and technical support
services
53
Out
TCP/UDP
DNS (Domain Name Server)
80
Out
TCP
IPS and firmware updates (unless
configured to use a proxy)
123
Out
UDP
NTP (Network Time Protocol)
8000
Out
TCP
The administration Web port. See Step
4c.) of To configure the Barracuda Load
Balancer: on page 33.
any ports used by
Services
as needed
as needed
1:1 NATs as needed, and any port
required to access the VIP of a loadbalanced Service.
The Barracuda Load Balancer must be able to communicate with the mail server over the port
specified on the Basic > Administration page. This may require opening that port on the firewall.
Additionally, if any of the load-balanced Services require access to a designated port on the Virtual
IP for the Service, the appropriate settings will need to be configured on your corporate firewall.
Examples are load-balanced FTP services over a non-traditional port, or streaming media traffic.
Configuring the Barracuda Load Balancer
After specifying the IP address of the Barracuda Load Balancer and opening the necessary ports on
your corporate firewall, configure the Barracuda Load Balancer from the Web administration
interface. Make sure the system being used to access the Web interface is connected to the same
network as the Barracuda Load Balancer, and that the appropriate routing is in place to allow
connection to the Barracuda Load Balancer’s IP address via a Web browser.
32
Barracuda Load Balancer Administrator’s Guide
To configure the Barracuda Load Balancer:
1.
From a Web browser, enter the IP address of the Barracuda Load Balancer followed by a colon
and port 8000.
For example: http://192.168.200.200:8000.
2.
To log into the administration interface, enter admin for the username and admin for the
password.
3.
Select Basic > IP Configuration, and perform the following steps:
3a. Enter the following information in the WAN IP Configuration section:
3b.
3c.
3d.
3e.
Note
• IP Address. The address associated with the port that connects the Barracuda Load
Balancer to the WAN.
• Subnet Mask. The subnet mask assigned to the WAN interface of the Barracuda
Load Balancer.
• Default Gateway. The default router for network traffic not destined for the local
subnet.
If the Barracuda Load Balancer is in Bridge-Path mode, or if only Direct Server Return
mode is being employed, then go to Step 3c.)
If you are configuring a backup Barracuda Load Balancer and have chosen the RoutePath method of deployment, leave the LAN IP and LAN Netmask fields blank on the
backup Barracuda Load Balancer. If the backup unit has to take over, it uses the LAN
IP Address and Netmask from the primary Barracuda Load Balancer. For more
information about configuring Barracuda Load Balancers for High Availability, see
Creating a High Availability Environment on page 49. Go to Step 3c.)
Enter the following information in the LAN IP Configuration section:
• LAN IP Address. The address that connects the Barracuda Load Balancer to the
Real Server network. This is only used for Route-Path mode.
When in Route-Path mode, the LAN interface provides the default gateway for the
Real Servers that are not in DSR mode. All non-DSR Real Server IP addresses need
to be in the same subnet as the LAN IP address because they need to use this IP as
their default gateway.
• LAN Netmask. The subnet mask tied to the LAN. This is only used for Route-Path
mode.
Enter the IP address of your primary and secondary DNS servers.
Enter the default hostname and default domain name of the Barracuda Load Balancer.
Click Save Changes.
When the IP address of your Barracuda Load Balancer on the IP Configuration page is changed,
you will be disconnected from the Web administration interface. Please log in again using the new
IP address.
3f. If you want this Barracuda Load Balancer to operate in Bridge-Path mode, and this is
not a backup Barracuda Load Balancer in a cluster, click Convert to change the
operation from Route-Path to Bridge-Path.
4.
Select Basic > Administration, and perform the following steps:
4a. Assign a new administration password to the Barracuda Load Balancer (optional). This
step is highly recommended.
4b. Make sure the local time zone is set correctly.
Getting Started 33
4c.
4d.
4e.
4f.
Time on the Barracuda Load Balancer is automatically updated via NTP (Network
Time Protocol). It requires that port 123 is opened for outbound UDP (User Datagram
Protocol) traffic on your firewall (if the Barracuda Load Balancer is located behind
one).
It is important that the time zone is set correctly because this information is used to
coordinate traffic distribution and in all logs and reports.
If desired, change the port number used to access the Barracuda Load Balancer
administration interface. The default port is 8000.
Enter the amount of time, in minutes, for the length of your Web administration
interface session before you are logged off due to inactivity.
(Optional) Specify your local SMTP server. Enter the email address for your
administrator to receive system email alerts.
Click Save Changes.
Updating the Barracuda Load Balancer Firmware
To update the firmware on the Barracuda Load Balancer:
1.
Select Advanced > Firmware Update.
2.
Read the release notes to learn about the latest features and fixes provided in the new firmware
version.
3.
Click Download Now next to Latest General Release. Click OK on the download duration
window.
Updating the firmware may take several minutes. Do not turn off the unit during this process.
Download Now is disabled if the Barracuda Load Balancer is running the latest firmware
version.
4.
The Barracuda Load Balancer begins downloading the latest firmware version. Click Refresh to
view the download status, until you see a message stating that the download has completed.
5.
Click Apply Now when the download completes.
6.
Click OK when prompted to reboot the Barracuda Load Balancer.
A Status page displays the progress of the reboot. Once the reboot is complete, the login page
appears.
Verifying Your Subscription Status
Once you install the Barracuda Load Balancer, your Energize Update and Instant Replacement
subscriptions are most likely active. However, it is important for you to verify the subscription status
so that your Barracuda Load Balancer can continue to receive the latest updates to the Intrusion
Prevention System from Barracuda Central. The Energize Update service is responsible for
downloading these updates to your Barracuda Load Balancer.
To check your subscription status:
34
1.
Select Basic > Status.
2.
From the Subscription Status section, verify that the word Current appears next to Energize
Updates and Instant Replacement (if purchased).
Barracuda Load Balancer Administrator’s Guide
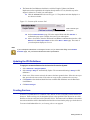
3.
The Barracuda Load Balancer should arrive with the Energize Updates (and Instant
Replacement where applicable) subscription already enabled. If it is, then this step can be
skipped. Otherwise, to enable your subscription:
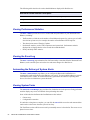
3a. Click the Activate link as shown in Figure 3.1. The product activation displays in a
new browser window.
Figure 3.1: Location of the Activate Link
Click to activate your
subscription
3b. On the Product Activation page, fill in the required fields and click Activate. A
confirmation page opens to display the terms of your subscription.
3c. After a few minutes, from the Barracuda Load Balancer administration interface, click
Refresh in the Subscription Status section of the Basic > Status page. The status of
your subscriptions displays as Current.
Note
If your subscription status does not change to Current, or if you have trouble filling out the Product
Activation page, call your Barracuda Networks sales representative.
Updating the IPS Definitions
To apply the newest definitions for the Intrusion Prevention System:
1.
Select Advanced > Energize Updates.
2.
Select Hourly or Daily for Automatically Update. The recommended setting is Hourly for IPS
definitions.
3.
Check to see if the current version is the same as the latest general release. If the rules are up-todate, proceed to the next section. If the rules are not up-to-date, continue to the next step.
4.
Click Update to download and install the latest available IPS definitions onto the Barracuda
Load Balancer.
5.
Click Save Changes.
Creating Services
A Service is a combination of a Virtual IP (VIP), and one or more TCP/UDP ports that the Service
listens on. Traffic arriving over the designated port(s) to the specified VIP is directed to one of the
Real Servers that are associated with a particular Service. The Barracuda Load Balancer determines
the order in which the traffic is distributed to the Real Servers based on the policy type for the Service.
To create a load-balanced Service, see Creating a Service on page 44.
Getting Started 35
Administrative Settings
This section covers the basic administrative settings for your Barracuda Load Balancer.
Controlling Access to the Administration Interface..............................36
Customizing the Appearance of the Web Interface............................ 36
Setting the Time Zone of the System .................................................. 36
Enabling SSL for Administration....................................................... 36
Controlling Access to the Administration Interface
The Basic > Administration page allows you to perform the following tasks:
•
•
•
•
Change the password of the administration account.
Specify the IP addresses or subnet mask of the systems that can access the Web interface. All
other systems will be denied access. This is configurable in the Administrator IP/Range
section.
Change the port used to access the Web administration interface.
Change the length of time of inactivity allowed until the administrator is logged out of the Web
interface.
Customizing the Appearance of the Web Interface
The Advanced > Appearance page allows you to customize the default images used on the Web
interface. This tab is only displayed on the Barracuda Load Balancer model 440 and above.
Setting the Time Zone of the System
The Basic > Administration page allows you to set the time zone of your Barracuda Load Balancer.
The current time on the system is automatically updated via Network Time Protocol (NTP). When the
Barracuda Load Balancer resides behind a firewall, NTP requires port 123 to be opened for outbound
UDP traffic.
It is important that the time zone is set correctly because this information is used to coordinate traffic
distribution and in all logs and reports.
Note: The Barracuda Load Balancer automatically reboots when you change the timezone.
Enabling SSL for Administration
The Advanced > Secure Admin page allows you to configure SSL for the Web administration
interface for your Barracuda Load Balancer. You can use this page to specify whether to require
HTTPS for secure administration. If you choose to use HTTPS, you can specify the certificate to be
used.
SSL not only ensures that your passwords are encrypted, but also ensures that the rest of the data
transmitted to and received from the Web administration interface is encrypted as well. For users who
want to allow only secured connections, set up SSL.
36
Barracuda Load Balancer Administrator’s Guide
Note
The SSL configuration referred to here is only related to the Web administrative interface. To
enable SSL offloading for a Service, refer to SSL Offloading on page 47.
In order to only allow secured connections when accessing the Web administration interface, you
need to supply a digital SSL certificate which will be stored on the Barracuda Load Balancer. This
certificate is used as part of the connection process between client and server (in this case, a browser
and the Web administration interface on the Barracuda Load Balancer). The certificate contains the
server name, the trusted certificate authority, and the server’s public encryption key.
The SSL certificate which you supply may be either private or trusted. A private, or self-signed,
certificate provides strong encryption without the cost of purchasing a certificate from a trusted
certificate authority (CA). However, the client Web browser will be unable to verify the authenticity
of the certificate and a warning will be sent about the unverified certificate. To avoid this warning,
download the Private Root Certificate and import it into each browser that accesses the Barracuda
Load Balancer Web administration interface. You may create your own private certificate using the
Advanced > Secure Admin page.
You may also use the default pre-loaded Barracuda Networks certificate. The client Web browser will
display a warning because the hostname of this certificate is "barracuda.barracudanetworks.com" and
it is not a trusted certificate. Because of this, access to the Web administration interface using the
default certificate may be less secure.
A trusted certificate is a certificate signed by a trusted certificate authority (CA). The benefit of this
certificate type is that the signed certificate is recognized by the browser as trusted, thus preventing
the need for manual download of the Private Root Certificate.
Getting Started 37
Maintaining the Barracuda Load Balancer
This section describes how to manage and maintain your Barracuda Load Balancer using the Web
administration interface. This section covers the following topics:
Backing up and Restoring Your System Configuration ..................... 38
Updating the Firmware of Your Barracuda Load Balancer.............. 38
Updating the Intrusion Prevention Rules Using Energize Updates .. 39
Replacing a Failed System ................................................................ 39
Reloading, Restarting, and Shutting Down the System ..................... 39
Using the Built-in Troubleshooting Tools .......................................... 40
Rebooting the System in Recovery Mode........................................... 40
Backing up and Restoring Your System Configuration
The Advanced > Backup page lets you back up and restore the configuration of your Barracuda Load
Balancer. You should back up your system on a regular basis in case you need to restore this
information on a replacement Barracuda Load Balancer or in the event your current system data
becomes corrupt.
If you are restoring a backup file on a new Barracuda Load Balancer that is not configured, you need
to assign your new system an IP address and DNS information on the Basic > IP Configuration page.
Note the following about the backup file:
•
•
•
Do not edit backup files. Any configuration changes you want to make need to be done through
the Web interface. The configuration backup file contains a checksum that prevents the file from
being uploaded to the system if any changes are made.
You can safely view a backup file in Windows WordPad or Microsoft Word. You should avoid
viewing backup files in Windows Notepad because the file can become corrupted if you save the
file from this application.
The following information is not included in the backup file:
• System password
• System IP information
• DNS information
Updating the Firmware of Your Barracuda Load Balancer
The Advanced > Firmware Update page allows you to manually update the firmware version of the
system or revert to a previous version. The only time you should revert back to an old firmware
version is if you recently downloaded a new version that is causing unexpected problems. In this case,
call Barracuda Networks Technical Support before reverting back to a previous firmware version.
If you have the latest firmware version already installed, the Download Now button will be disabled.
If you have two Barracuda Load Balancers configured in High Availability mode, update the
firmware on the backup Barracuda Load Balancer first. Then update the firmware on the primary
Barracuda Load Balancer. The backup Barracuda Load Balancer becomes operational when the
primary is rebooted, thus maintaining availability.
38
Barracuda Load Balancer Administrator’s Guide
If your Barracuda Load Balancers are not in High Availability mode, applying a new firmware
version results in a temporary loss of service. For this reason, you should apply new firmware versions
during non-busy hours.
Updating the Intrusion Prevention Rules Using Energize Updates
The Advanced > Energize Updates page allows you to manually update the Intrusion Prevention
System rules, as well as change the interval at which the Barracuda Load Balancer checks for updates.
We recommend that the Automatically Update setting be set to Hourly so your Barracuda Load
Balancer receives the latest rules as soon as new threats are identified by Barracuda Central.
Replacing a Failed System
Before you replace your Barracuda Load Balancer, use the tools provided on the Advanced >
Troubleshooting page to try to resolve the problem.
In the event that a Barracuda Load Balancer fails and you cannot resolve the issue, customers that
have purchased the Instant Replacement service can call Technical Support and arrange for a new unit
to be shipped out within 24 hours.
After receiving the new system, ship the old Barracuda Load Balancer back to Barracuda Networks
at the address below with an RMA number marked clearly on the package. Barracuda Networks
Technical Support can provide details on the best way to return the unit.
Barracuda Networks
3175 S. Winchester Blvd
Campbell, CA 95008
Note
To set up the new Barracuda Load Balancer so it has the same configuration as your old failed
system, restore the backup file from the old system onto the new system, and then manually
configure the new system’s IP information on the Basic > IP Configuration page. For information
on restoring data, refer to Backing up and Restoring Your System Configuration on page 38.
Reloading, Restarting, and Shutting Down the System
The System Reload/Shutdown section on the Basic > Administration page allows you to shutdown,
restart, and reload system configuration on the Barracuda Load Balancer.
Shutting down the system powers off the unit. Restarting the system reboots the unit. Reloading the
system re-applies the system configuration.
You can also reboot the Barracuda Load Balancer by pressing RESET on the front panel of the
Barracuda Load Balancer.
Do not press and hold the RESET button for more than a couple of seconds. Holding it for five
seconds or longer changes the IP address of the system. See Configuring WAN IP Address and
Network Settings on page 31 for more information.
Getting Started 39
Using the Built-in Troubleshooting Tools
The Advanced > Troubleshooting page provides various tools that help troubleshoot network
connectivity issues that may be impacting the performance of your Barracuda Load Balancer.
For example, you can test your Barracuda system’s connection to Barracuda Central to make sure it
can successfully download the latest IPS definitions. You can also ping other devices from the
Barracuda Load Balancer, perform a traceroute from the Barracuda Load Balancer to any another
system, and other tasks.
Rebooting the System in Recovery Mode
If your Barracuda Load Balancer experiences a serious issue that impacts its core functionality, you
can use diagnostic and recovery tools that are available at the reboot menu to return your system to
an operational state.
Before you use the diagnostic and recovery tools, do the following:
•
•
•
Use the built-in troubleshooting tools on the Advanced > Troubleshooting page to help diagnose
the problem.
Perform a system restore from the last known good backup file.
Contact Barracuda Networks Technical Support for additional troubleshooting tips.
As a last resort, you can reboot your Barracuda Load Balancer and run a memory test or perform a
complete system recovery, as described in this section.
To perform a system recovery or hardware test:
1.
Connect a monitor and keyboard directly to your Barracuda Load Balancer.
2.
Reboot the system by doing one of the following:
• Click Restart on the Basic > Administration page.
• Press the Power button on the front panel to turn off the system, and then press the Power
button again to turn the system back on.
The Barracuda splash screen displays with the following three boot options:
Barracuda
Recovery
Hardware_Test
3.
Use your keyboard to select the desired boot option, and click Enter.
You must select the boot option within three seconds of the splash screen appearing. If you do
not select an option within three seconds, the Barracuda Load Balancer defaults to starting up in
the normal mode (first option).
For a description of each boot option, refer to Reboot Options on page 41.
40
Barracuda Load Balancer Administrator’s Guide
Reboot Options
Table 3.2 describes the options available at the reboot menu.
Table 3.2: Reboot Options
Reboot Options
Description
Barracuda
Starts the Barracuda Load Balancer in the normal (default) mode. This
option is automatically selected if no other option is specified within the
first three (3) seconds of the splash screen appearing.
Recovery
Displays the Recovery Console where you can select the following
options:
• Perform filesystem repair—Repairs the file system on the
Barracuda Load Balancer.
• Perform full system re-image—Restores the factory settings on
your Barracuda Load Balancer and clears out all configuration
information.
• Enable remote administration—Initiates a connection to Barracuda
Central that allows Barracuda Networks Technical Support to access
the system. Another method for enabling this toubleshooting
connection is to click Establish Connection to Barracuda Central
on the Advanced>Troubleshooting page.
• Run diagnostic memory test—Runs a diagnostic memory test from
the operating system. If problems are reported when running this
option, we recommend running the Hardware_Test option next.
Hardware_Test
Performs a thorough memory test that shows most memory related
errors within a two-hour time period. The memory test is performed
outside of the operating system and can take a long time to complete.
Reboot your Barracuda Load Balancer to stop the hardware test. You
may do this by pressing Ctrl-Alt-Del on the keyboard, or by pressing
the RESET button on the Barracuda Load Balancer.
Getting Started 41
42
Barracuda Load Balancer Administrator’s Guide
Chapter 4
Managing the Barracuda Load Balancer
This chapter describes the configuration, monitoring, and management tasks you can perform from
the Web interface. For more detailed information about a specific page in the Web interface, view the
online help by clicking the question mark icon on the right side of the page.
The following topics are covered:
Configuring the Barracuda Load Balancer....................................... 44
Monitoring the Barracuda Load Balancer ........................................ 53
Managing the Barracuda Load Balancer 43
Configuring the Barracuda Load Balancer
This section describes the configuration tasks you can perform from the Web administration interface.
The following topics are covered:
Configuring System IP Information ................................................... 44
Creating Load-Balanced Services...................................................... 44
Enabling Persistence ......................................................................... 46
Selecting a Scheduling Policy............................................................ 47
Configuring Intrusion Prevention ...................................................... 49
Creating a High Availability Environment ........................................ 49
Configuring System IP Information
The Basic > IP Configuration page contains the network configuration for your Barracuda Load
Balancer. This page also contains the setting to specify whether this Barracuda Load Balancer
operates in Route-Path or Bridge-Path mode.
Creating Load-Balanced Services
For every Service you need to identify a Virtual IP address and one or more TCP/UDP ports. Traffic
arriving at the designated port(s) for the specified Virtual IP address is directed to one of the Real
Servers that are associated with that particular Service. The Barracuda Load Balancer determines
which connections are distributed to each Real Server based on the scheduling policy selected for the
Service.
This section describes how to create a Service and then monitor a Service and associated Real Servers.
Creating a Service
The Basic > Services page lets you create Services by binding a Virtual IP address, port, and one or
more Real Servers.
As an aid to creating a Service, you can click Auto-Discover to identify all Real Servers that are
currently available and responding to your Barracuda Load Balancer. When you click Auto-Discover,
the Barracuda Load Balancer pings all devices on the same class C network and displays a list of all
responding Real Servers. Checkmark the Real Server(s) that you want bound to the Service you are
adding, provide values for the other fields described below, and click Create Service.
To create a Service without using the Auto-Discover feature:
1.
Specify values for the following fields:
• Service Name: Name used to identify this Service.
• Virtual IP: The IP address used to reach this Service. This can be a public address, a
private address, or a public address on a DMZ port. The Virtual IP address must always
be on the same subnet as the WAN IP address of the Barracuda Load Balancer.
• Protocol: The protocol (TCP or UDP) used for this Service.
• Port: The specific TCP/UDP port the Service listens on. Enter ALL to specify all ports.
If ALL is specified, then ports on the Virtual IP address will map to all the corresponding
ports on the Real Servers. Selecting ALL is useful when you want to load-balance an
44
Barracuda Load Balancer Administrator’s Guide
application that uses a wide range of ports. Otherwise, you would have to configure a
Service for each port.
Note: When ALL is selected, the Service Monitor Default Test uses Ping instead of a
TCP port check to determine if a Real Server is up or down.
• Real Servers. The IP address(es) of the Real Servers that host the load-balanced
application or Service. Each IP address needs to be entered on a separate line.
2.
Click Add.
If the creation of the Service is successful, the Service name appears on the Basic > Services page
with a green, orange, or red health indicator next to it.
If you have a Service that uses SSL but you do not want the Barracuda Load Balancer to perform SSL
offloading, then you must either:
Create a Service with Port ALL, or
Create two Services, one with Port 80 (HTTP port) and the other with Port 443 (SSL port).
Either of these options will require the Barracuda Load Balancer to listen for both SSL and HTTP
traffic. In addition, the Service Persist Type must be Layer 4 (Client IP). Finally, Persist (Seconds)
must match the time that the application is configured for persistence so as to ensure that the session
does not time out before the application has responded.
To configure advanced settings for a Service, click Edit next to the Service. Some common reasons
to configure advanced settings include:
• If you want to specify a Last Resort Server, which is the server to which all traffic for this
Service is routed in the event that none of the associated Real Servers are available.
• If you want the Barracuda Load Balancer to automatically reactivate a Real Server that
was previously not available. If you set the Auto-Recover field to No, then you will have
to use the Basic > Health page to manually enable any Real Server that goes offline.
• If you want to change the Scheduling Policy.
• If you want to change the Testing Method used by the Service Monitor to determine the
availability of the Real Servers.
• If you want to configure Session Persistence, including persistence based on Client IP,
Layer 7 - HTTP cookie, and Session Directory Integration.
• If you want to enable SSL offloading for the Service.
• If you want to enable the Intrusion Prevention System.
• If you want to limit access to the Service to only clients with IP addresses within a certain
range.
Detailed descriptions of the settings are available in the online help. Click Save Changes after
making any modifications to the Service Detail.
3.
To configure advanced settings for a Real Server, click Edit next to the Real Server. From this
page, you can:
• Enable or disable the server. Real Servers should be disabled when performing server
maintenance.
• Change the weight of this Real Server to be used when assigning client connections.
Values are applied as a ratio against weights of all other Real Servers for this Service. For
example, a Real Server with weight of 50 will get half the amount of traffic as a Real
Server with a weight of 100, but will get twice that of a Real Server with a weight of 25.
• Specify if the Real Server is using Direct Server Return.
• Change or execute the Testing Method for the Real Server.
Click Save Changes after making any modifications to this page.
Managing the Barracuda Load Balancer 45
Enabling Persistence
The Barracuda Load Balancer supports session persistence using one of the following methods:
•
•
•
Layer 4 - Client IP. All traffic from a particular IP address after the initial incoming connection
will be directed to the same Real Server.
Layer 7 - HTTP Cookie. A cookie placed on the connecting system identifies returning
connections so that all subsequent traffic from that system will go to the same Real Server. This
option is not available for Real Servers using Direct Server Return.
Layer 7 - Session Directory Integration. See Session Directory or Terminal Services
Integration on page 46 for more information.
To configure persistence:
1.
From the Basic > Services page, click Edit for the Service you wish to configure. The Service
Detail page will pop up.
2.
In the Session Persistence section, enter the number of seconds that a session is to last. A
session is the period of time during which all incoming connections from a connecting system
are to go to the same Real Server.
3.
In the Service Persist Type pulldown, select how persistence is to be determined:
3a. If Layer 4 - Client IP is selected, then enter the L4 Persistence Netmask that is to be
used to determine a unique connecting client.
3b. If Layer 7 - HTTP Cookie is selected, then enter the L7 Cookie name that contains the
session data, or any other connection identifiers. This is typically the name of the
cookie used or created by the application on the Real Server, to ensure that users always
connect back to the same Real Server. Leave this field blank to create cookies only to
identify connections between a client browser and the Barracuda Load Balancer. In
either case, the Real Server will not see the appended data or added cookies.
4.
Click Save Changes.
Persistence lasts until either the persist time specified has elapsed since the last communication
between the connecting system and the Real Server, or until the identifying cookie is unset by the
application being accessed.
Session Directory or Terminal Services Integration
Session persistence may be maintained by using Windows Server 2003 Session Directory or
Windows Server 2008 Terminal Services Session Broker. The Barracuda Load Balancer queries the
Terminal Server to check if each connecting client already had a session open. If the client had an
open session, the Barracuda Load Balancer forwards that user to the appropriate Terminal Server.
To configure Session Directory:
1.
Using the Basic > Services page, create a Service on port 3389.
2.
Set the Enable Session Directory Integration option to Yes.
3.
Click Save Changes.
Note that Session Directory Integration does not work if the Barracuda Load Balancer is in BridgePath mode.
46
Barracuda Load Balancer Administrator’s Guide
SSL Offloading
The Barracuda Load Balancer is able to perform decryption and encryption of SSL traffic to reduce
the load on the Real Servers. It also keeps the SSL certificates associated with that traffic in one
location for easier management.
SSL offloading is not compatible with Direct Server Return.
To set up SSL offloading, complete the following two tasks:
1.
Upload one SSL certificate for each Service to the Barracuda Load Balancer.
2.
Identify the Services that are using SSL offloading.
These two tasks are described in the following sections.
Uploading SSL Certificates
One SSL certificate for each Service to be offloaded must be stored on the Barracuda Load Balancer.
If the Service has never used SSL before, then a certificate has to be ordered from a trusted Certificate
Authority such as Verisign. If the Service has used SSL, then the certificate may be retrieved from a
server providing that Service and loaded on the Barracuda Load Balancer.
To view, edit or add SSL certificates, go to the Basic > Certificate Management page.
Specifying SSL Offloading for a Service
To configure SSL offloading for a Service, go to the Basic > Services page. The Service must specify
a specific listen port and must not be configured as an ALL ports Service. Click Edit for the Service
to see the Service Detail window. Select the SSL certificate you wish to use from the menu. Specify
the SSL Engine Listen Port, which must differ from the port used when configuring the Service. The
Service will also accept non-encrypted traffic to its VIP on the port specified when the Service was
first created.
Encrypted traffic received on the SSL Engine Listen Port will be decrypted before reaching the Real
Servers, and traffic coming from the Real Servers will be encrypted before it leaves the Barracuda
Load Balancer. Since the Real Servers send and receive decrypted traffic, no SSL configuration on
any of the Real Servers is necessary.
Selecting a Scheduling Policy
The Barracuda Load Balancer supports multiple scheduling methods to determine which Real Server
that supports a Service gets the next new connection. Each Real Server is assigned a weight, which
indicates the proportion of the load that this Real Server will bear relative to other Real Servers.
Weights are either calculated dynamically using Adaptive Scheduling, or they are pre-assigned.
These Real Server weights are used by the scheduling algorithm, which is either Weighted RoundRobin or Weighted Least Connections, to determine which Real Server gets the next connection.
Adaptive Scheduling
The Adaptive Scheduling feature polls the Real Servers frequently and assigns weights to those Real
Servers using the information gathered. The parameter polled may be:
•
CPU Load, determined by an SNMP query. In order to use this option, Real Servers must allow
SNMP access to the public community by the Barracuda Load Balancer.
Managing the Barracuda Load Balancer 47
•
•
Number of Windows Terminal Server sessions, determined by an SNMP query. In order to use
this option, Real Servers must allow SNMP access to the public community by the Barracuda
Load Balancer.
A URL provided by each Real Server which specifies a load value. If this option is selected, the
Barracuda Load Balancer will poll the URL http://[Real Server IP Address]/barracuda_load/ and
expect the output to look like LOAD=23 (showing the load as an integer between 0 and 100).
Weights are assigned to each Real Server using the formula (100 - LOAD). For example, if the
Load URL value is 23, the Real Server will be assigned a weight of 77. In order for the URL
query to work, you must create a load determination script and make the results available by
running a Web server on the Real Server that responds to the poll at the Real Server’s IP address
and port 80.
If, for example, all Real Servers have the same number of Windows Terminal Server sessions, then
the Real Servers will be assigned the same weight. These weights will change as the number of
Windows Terminal Server sessions varies.
To configure Adaptive Scheduling for a Service:
1.
From the Basic > Services page, click Edit for the Service you wish to configure. The Service
Detail page will appear.
2.
In the Adaptive Scheduling pulldown, select the algorithm to use when making weight
adjustments.
3.
Click Save Changes.
Pre-Assigned Weight
If Adaptive Scheduling is operational, then the pre-assigned weights are not used. Otherwise, if some
of the Real Servers are faster or have more capacity than others, you can tell the Barracuda Load
Balancer to direct more traffic to them. Do this by specifying weight values for the Real Servers
providing a Service. Varying weight values indicate that some Real Servers should receive more of
the traffic load.
To pre-assign weight for a Real Server:
1.
From the Basic > Services page, click Edit for the Real Server you wish to configure. The Real
Server Detail page will appear.
2.
Enter the weight for the Real Server. Values are applied as a ratio against weights of all other
Real Servers for this Service. For example, a Real Server with a weight of 50 will get half the
amount of traffic as a Real Server with a weight of 100, but will get twice that of a Real Server
with a weight of 25.
3.
Click Save Changes.
Scheduling Policies
The Barracuda Load Balancer considers the weight values for the Real Servers and then applies a
scheduling algorithm, either Weighted Round-Robin or Weighted Least Connections, to determine
which Real Server gets the next connection.
In Weighted Round-Robin, Real Servers with higher weights get more connections than those with
lower weights and Real Servers with equal weights get equal connections. The scheduling sequence
is generated according to the Real Server weights. New connections are directed to the different Real
Servers based on the scheduling sequence in a round-robin manner. The shortcoming with this
method is that a majority of long-lived connections may go to the same Real Server.
48
Barracuda Load Balancer Administrator’s Guide
In Weighted Least Connections, the Barracuda Load Balancer considers the number of live
connections that each Real Server has, as well as the weight values. The Real Servers with higher
weight values will receive a larger percentage of live connections at any one time. The Barracuda
Load Balancer dynamically checks the number of live connections for each Real Server.
Weighted Least Connections is the recommended choice.
To configure the Default Scheduling Policy for a Service:
1.
From the Basic > Services page, click Edit for the Service you wish to configure. The Service
Detail page will appear.
2.
In the Default Scheduling Policy dropdown, choose either Weighted Least Connections or
Weighted Round-Robin.
3.
Click Save Changes.
Configuring Intrusion Prevention
The Basic > Intrusion Prevention page lets you enable and disable the Intrusion Prevention System
of your Barracuda Load Balancer. Refer to Intrusion Prevention System on page 10 for more
information about what the Intrusion Prevention System (IPS) is and how the Energize Updates
feature works.
By default, IPS is disabled for any newly created load-balanced Service.
You can enable or disable IPS for an individual Service by selecting or deselecting the IPS option on
the Basic > Services > Edt > Service Detail page. You can enable or disable IPS for the entire
Barracuda Load Balancer from the Basic > Intrusion Prevention page. The Basic > Intrusion
Prevention page displays a list of all of the Services and whether IPS is enabled for each one.
To test if the IPS is working on the Barracuda Load Balancer, there is a simple URL that will generate
a test IPS catch. To test with this URL, create or locate a Web Service (with at least one Real Server)
on port 80 from the Basic > Services page. Then type the following address in your browser window:
http://VIP/?Barracuda-IPS-Web
where VIP is the VIP of the Web Service. If IPS is on, it will block this. Your browser will give an
error because the connection will be immediately rejected. There should also be an IPS catch in the
Event Log in Basic > Event Log, although it may take up to a minute to appear.
Creating a High Availability Environment
In order to increase the robustness of your network, you can install and configure a second Barracuda
Load Balancer to act as a backup to your primary Barracuda Load Balancer. The backup Barracuda
Load Balancer monitors the primary Barracuda Load Balancer and takes over the load-balancing
operations automatically and quickly if the primary fails for some reason.
Requirements for High Availability (HA)
Some network environments may be less suitable to clustering two Barracuda Load Balancers. For
example, if you have multiple network segments that each require different policies, it may be better
to provide a dedicated, unclustered Barracuda Load Balancer for each segment. This way, you can
configure each Barracuda Load Balancer separately without the configuration settings propagating to
the other systems.
Managing the Barracuda Load Balancer 49
Before joining two systems together, each Barracuda Load Balancer must meet the following
requirements:
•
•
•
•
•
•
Barracuda Load Balancer models 340 or higher.
Be the same model as the other Barracuda Load Balancer and on the same version of firmware.
Be able to access all Real Servers.
Be installed on a unique management IP address. The Barracuda Load Balancers use the
management IP address (over SNMP ports) to communicate for high availability.
Be able to ping each other on the WAN interface (i.e. no firewall between them).
The WAN interface on both Barracuda Load Balancers must be on the same switch (or physical
network).
Operation of HA
The two Barracuda Load Balancers that you use for HA make up a cluster. When you create a cluster,
the configuration is copied from the primary to the backup system. The primary system performs the
load-balancing. The other waits in standby mode and polls the primary Barracuda Load Balancer to
ensure that it is operational. If the backup system determines that the primary is no longer operational,
it takes over the VIP addresses and starts load-balancing just as the primary had been doing.
The backup Barracuda Load Balancer does not do any load-balancing or monitoring of Services or
Real Servers unless the primary system fails. Because it does not do any health monitoring while in
standby mode, all of the Services and Real Servers on a page such as Basic > Services will have red
health indicators.
In a Route-Path deployment, the backup Barracuda Load Balancer automatically becomes active and
takes over operations if it does not receive a reply to its poll of the primary system within 5 seconds.
In a Bridge-Path deployment, the backup Barracuda Load Balancer automatically becomes active if
the backup system does not receive a reply to the poll within 30 seconds.
If the primary system fails and the network is caching ARP requests, then the network will not
immediately associate the MAC address of the backup Barracuda Load Balancer with the VIP
address. Because of this, the length of time it takes for the switchover from primary to backup is:
(the lifetime of the ARP cache)
+ (the time it takes for the backup Barracuda Load Balancer to determine
that the primary system is inactive)
For example, in a Route-Path deployment, if the ARP cache lifetime is 10 seconds, the switchover
will take about 5 + 10 = 15 seconds.
Recovery of the Primary System
If, after an outage, the primary system becomes available again, the backup will detect that the
primary is operational and stop load-balancing. The primary will take over the Virtual IP addresses
and the load-balancing. This switchover from backup to primary is accomplished within a few
seconds. Load-balancing will be disrupted only briefly.
Creating a Cluster and Removing the Cluster
To create a cluster of two Barracuda Load Balancers:
1.
50
Complete the installation process for each system as described in Chapter 3 Initial Setup. For
Route-Path only, leave the LAN IP field blank on the backup Barracuda Load Balancer. To
verify this, go to the Basic > IP Configuration page on the backup Barracuda Load Balancer.
Barracuda Load Balancer Administrator’s Guide
Leave the LAN IP Address and LAN Netmask blank. If the backup unit has to take over, it will
use the LAN IP Address and Netmask from the primary system.
2.
On the Advanced > Task Manager page on the primary Barracuda Load Balancer, verify that no
processes are running. Complete this step on the backup Barracuda Load Balancer as well. No
processes should be running when you add systems to the cluster.
3.
On the Advanced > High Availability page on the primary Barracuda Load Balancer, enter the
Cluster Shared Secret password, and click Save Changes.
4.
On the Advanced > High Availability page on the backup Barracuda Load Balancer:
4a. Enter the Cluster Shared Secret password. Click Save Changes.
4b. In the Clustered Systems section, enter the WAN IP address of the primary Barracuda
Load Balancer, and click Join Cluster.
4c. Click Save Changes.
5.
Reboot the backup Barracuda Load Balancer. On the Basic > Administration page of the backup
Barracuda Load Balancer, click Restart and confirm it. When the backup Barracuda Load
Balancer becomes operational, continue to the next step.
6.
Refresh the Advanced > High Availability page on both Barracuda Load Balancers, and verify
that:
• Each system’s WAN IP address appears in the Clustered Systems table.
• The status of each system is green.
The backup system is the one that joins the cluster. Specifically, it is the one in Step 4b.) above where
you click Join Cluster on its Web administration interface.
To remove a Barracuda Load Balancer from the cluster:
1.
Decide which Barracuda Load Balancer will keep the configuration (including IP address). This
could be the primary or backup system in the cluster.
2.
On the Advanced > High Availability page on the system where the configuration is to be kept,
delete or change the Cluster Shared Secret password, and click Save Changes.
3.
Click the garbage can icon to delete the other system from the Clustered Systems table.
4.
On the Barracuda Load Balancer that was just deleted from the cluster, perform the following
steps:
4a. Click the garbage can icon to delete the first system from the Clustered Systems table.
4b. If the systems are in Route-Path mode, go immediately to the Basic > IP Configuration
page. Change this system's LAN IP Address and Netmask to avoid collisions. Click
Save Changes.
4c. Review this system's other settings and make changes as necessary.
Managing the Barracuda Load Balancer 51
Data Propagated to Clustered Systems
Clustering systems provides redundant coverage of the propagated data. Table 4.1 identifies the data
that is propagated when the cluster is created.
Table 4.1: Data Propagated Between Clustered Systems
Propagated Data
Data Not Propagated
• Global system settings configured
through the Administration interface.
• System IP configuration (IP address, netmask, gateway, and
DNS server) configured on the Basic > IP Configuration
page. However, if this is a Route-Path deployment, the LAN IP
configuration will be propagated.
• Any SSL Certificates that have been
installed.
• System password and time zone as configured on the Basic
> Administration page.
52
Barracuda Load Balancer Administrator’s Guide
Monitoring the Barracuda Load Balancer
This section describes the monitoring tasks you can perform from the Web administration interface
of the Barracuda Load Balancer. This section covers the following topics:
Monitoring the Health of Services..................................................... 53
Viewing Performance Statistics ......................................................... 54
Viewing the Event Log ....................................................................... 54
Automating the Delivery of System Alerts ......................................... 54
Viewing System Tasks......................................................................... 54
Monitoring the Health of Services
The Basic > Services and Basic > Health pages display the health of your load-balanced Service and
associated Real Servers. Figure 4.1 shows an example of the Health page with a Service called
Corporate HTTP.
Figure 4.1: Example of the Health Page
The following table describes the various health indicators displayed for Services.
Service Health Indicator
Description
Green dot
Service is up and all Real Servers are responding to requests.
Orange dot
Service is up, but at least one Real Server is not responding.
Red dot
Service is down, and all Real Servers are not responding.
Managing the Barracuda Load Balancer 53
The following table describes the various health indicators displayed for Real Servers.
Real Server Health Indicator Description
Green dot
Real Server is up and responding to requests.
Orange dot
Real Server has been intentionally deactivated.
Red dot
Real Server is down unexpectedly.
Viewing Performance Statistics
The Basic > Status provides an overview of the health and performance of your Barracuda Load
Balancer, including:
•
•
•
•
Traffic statistics, which shows the number of load-balanced requests for various types of traffic
since the last system reset, for example, the number of load-balanced HTTP requests.
The subscription status of Energize Updates.
Performance statistics, such as CPU temperature and system load. Performance statistics
displayed in red signify that the value exceeds the normal threshold.
Hourly and daily traffic statistics.
Viewing the Event Log
The Basic > Event Log page maintains a list of all noteworthy events that affect the Barracuda Load
Balancer, such as attacks upon various Services and status changes for a Real Server.
Automating the Delivery of System Alerts
The Basic > Administration page allows you to configure the Barracuda Load Balancer to
automatically email notifications to the addresses you specify. To enter multiple addresses, separate
each address with a comma. An email notification is generated if the number of operating Real
Servers for a Service falls below a preset threshold.
Viewing System Tasks
The Advanced > Task Manager page provides a list of tasks that are in the process of being performed
and also displays any errors encountered when performing these tasks.
Some of the tasks that the Barracuda Load Balancer tracks include:
•
•
Cluster setup
Configuration restoration
If a task takes a long time to complete, you can click the Cancel link next to the task name and then
run the task at a later time when the system is less busy.
The Task Errors section will list an error until you manually remove it from the list. The errors are not
phased out over time.
54
Barracuda Load Balancer Administrator’s Guide
Appendix A
SNMP MIB
The Barracuda Load Balancer supports SNMP version 1.
Barracuda-REF DEFINITIONS ::= BEGIN
IMPORTS
MODULE-IDENTITY, enterprises
FROM SNMPv2-SMI;
barracuda MODULE-IDENTITY
LAST-UPDATED "200705080000Z" -- August 24, 1999
ORGANIZATION "Barracuda Networks, Inc."
CONTACT-INFO
"
Barracuda Networks Inc.
3175 S. Winchester Blvd.
Campbell, CA 95008
"
DESCRIPTION
"
Main Barracuda MIB
"
::= { enterprises 20632 } -- assigned by IANA
END
Barracuda-LB DEFINITIONS ::=BEGIN
IMPORTS
MODULE-IDENTITY, OBJECT-TYPE, INTEGER
FROM SNMPv2-SMI
barracuda
FROM Barracuda-REF;
blb MODULE-IDENTITY
LAST-UPDATED "200705080000Z"
ORGANIZATION "Barracuda Networks, Inc."
CONTACT-INFO
"
Barracuda Networks Inc.
SNMP MIB 55
3175 S. Winchester Blvd.
Campbell, CA 95008
"
DESCRIPTION
"
Barracuda Load Balancer MIB.
Provides:
* 1.3.6.1.4.1.20632.5.2 -* 1.3.6.1.4.1.20632.5.3 -* 1.3.6.1.4.1.20632.5.4 -* 1.3.6.1.4.1.20632.5.5 -"
::= { barracuda 5 }
systemActiveServices
systemOperatingServers
systemConnections
systemConnectionRate
systemActiveServices OBJECT-TYPE
SYNTAX
INTEGER
MAX-ACCESS read-only
STATUS
current
DESCRIPTION
"The Barracuda Load Balancer's active services."
::= { blb 2 }
systemOperatingServers OBJECT-TYPE
SYNTAX
INTEGER
MAX-ACCESS read-only
STATUS
current
DESCRIPTION
"The Barracuda Load Balancer's operating servers."
::= { blb 3 }
systemConnections OBJECT-TYPE
SYNTAX
INTEGER
MAX-ACCESS read-only
STATUS
current
DESCRIPTION
"The Barracuda Load Balancer's current open connections."
::= { blb 4 }
systemConnectionRate OBJECT-TYPE
SYNTAX
INTEGER
MAX-ACCESS read-only
STATUS
current
DESCRIPTION
"The Barracuda Load Balancer's current connections per
second."
::= { blb 5 }
END
56
Barracuda Load Balancer Administrator’s Guide
Appendix B
Barracuda Load Balancer Hardware
This appendix provides hardware information for the Barracuda Load Balancer. The following topics
are covered:
Front Panel of the Barracuda Load Balancer................................... 58
Back Panel of the Barracuda Load Balancer.................................... 60
Hardware Compliance ....................................................................... 61
Barracuda Load Balancer Hardware 57
Front Panel of the Barracuda Load Balancer
Figure B.1 and Figure B.2 illustrate the front panels for each model.
Barracuda Load Balancer 240, 340, and 440
Figure B.1 shows the front components as described in Table B.1.
Figure B.1: Barracuda Load Balancer Front Panel for models 240, 340, and 440
1
2
3 4 567 8 9
Table B.1 describes the front components on the Barracuda Load Balancer 240, 340, and 440.
Table B.1: Front Panel Descriptions for Barracuda Load Balancer 240, 340, and 440
Diagram Location
58
Component Name
Description
1
WAN port
Port for WAN connection
2
LAN port
Port for LAN connection
3
Reserved for future use
4
Reserved for future use
5
Traffic
Blinks when the Barracuda Load
Balancer is processing traffic
6
Data I/O
Blinks during data transfer
7
System Power
Displays system power
8
Reset Button
Resets the Barracuda Load
Balancer
9
Power Button
Powers on/off the Barracuda
Load Balancer
Barracuda Load Balancer Administrator’s Guide
Barracuda Load Balancer 640
Figure B.2 shows the front components as described in Table B.2.
Figure B.2: Barracuda Load Balancer Front Panel for model 640
345678 9
]
10
1
2
Table B.2 describes the front components on the Barracuda Load Balancer 640.
Table B.2: Front Panel Descriptions for Barracuda Load Balancer 640
Diagram Location
Component Name
Description
1
WAN port
Port for WAN connection
2
LAN port
Port for LAN connection
3
Reserved for future use
4
Reserved for future use
5
Traffic
Blinks when the Barracuda Load
Balancer is processing traffic
6
Data I/O
Blinks during data transfer
7
System Power
Displays system power
8
Reset Button
Resets the Barracuda Load
Balancer
9
Power Button
Powers on/off the Barracuda
Load Balancer
10
LAN ports
Twelve (12) additional LAN
switches, available to connect to
Real Servers
Barracuda Load Balancer Hardware 59
Back Panel of the Barracuda Load Balancer
Figure B.3 illustrates the back panel for all models.
Barracuda Load Balancer, all models
Figure B.3 shows the back components as described in Table B.3.
Figure B.3: Barracuda Load Balancer Back Panel
1
2
34
5
6
7
8
9
Table B.3 describes the back components on all models of the Barracuda Load Balancer.
Table B.3: Barracuda Load Balancer Back Component Descriptions
Diagram Location
60
Component Name
Description
1
Power Supply
Connection for the AC power cord; standard
power supply
2
Fan
Location of the fan
3
Mouse Port
Connection for the mouse
4
Keyboard Port
Connection for the keyboard
5
Serial Port
Connection for the serial console cable
6
Parallel Port
Connection for the parallel cable
7
Monitor Port
Connection for the monitor
8
USB Ports (4)
Connection for USB devices
9
Ethernet Port
Not used
Barracuda Load Balancer Administrator’s Guide
Hardware Compliance
This section contains compliance information for the Barracuda Load Balancer hardware.
Notice for the USA
Compliance Information Statement (Declaration of Conformity Procedure) DoC FCC Part 15: This
device complies with part 15 of the FCC Rules.
Operation is subject to the following conditions:
1.
This device may not cause harmful interference, and
2.
This device must accept any interference received including interference that may cause
undesired operation. If this equipment does cause harmful interference to radio or television
reception, which can be determined by turning the equipment off and on, the user in encouraged
to try one or more of the following measures:
•
•
•
•
Reorient or relocate the receiving antenna.
Increase the separation between the equipment and the receiver.
Plug the equipment into an outlet on a circuit different from that of the receiver.
Consult the dealer on an experienced radio/ television technician for help.
Notice for Canada
This apparatus compiles with the Class B limits for radio interference as specified in the Canadian
Department of Communication Radio Interference Regulations.
Notice for Europe (CE Mark)
This product is in conformity with the Council Directive 89/336/EEC, 92/31/EEC (EMC).
Barracuda Load Balancer Hardware 61
62
Barracuda Load Balancer Administrator’s Guide
Appendix C
Limited Warranty and License
Limited Warranty
Barracuda Networks, Inc., or the Barracuda Networks, Inc. subsidiary or authorized Distributor
selling the Barracuda Networks product, if sale is not directly by Barracuda Networks, Inc.,
("Barracuda Networks") warrants that commencing from the date of delivery to Customer (but in case
of resale by a Barracuda Networks reseller, commencing not more than sixty (60) days after original
shipment by Barracuda Networks, Inc.), and continuing for a period of one (1) year: (a) its products
(excluding any software) will be free from material defects in materials and workmanship under
normal use; and (b) the software provided in connection with its products, including any software
contained or embedded in such products will substantially conform to Barracuda Networks published
specifications in effect as of the date of manufacture. Except for the foregoing, the software is
provided as is. In no event does Barracuda Networks warrant that the software is error free or that
Customer will be able to operate the software without problems or interruptions. In addition, due to
the continual development of new techniques for intruding upon and attacking networks, Barracuda
Networks does not warrant that the software or any equipment, system or network on which the
software is used will be free of vulnerability to intrusion or attack. The limited warranty extends only
to you the original buyer of the Barracuda Networks product and is non-transferable.
Exclusive Remedy
Your sole and exclusive remedy and the entire liability of Barracuda Networks under this limited
warranty shall be, at Barracuda Networks or its service centers option and expense, the repair,
replacement or refund of the purchase price of any products sold which do not comply with this
warranty. Hardware replaced under the terms of this limited warranty may be refurbished or new
equipment substituted at Barracuda Networks option. Barracuda Networks obligations hereunder are
conditioned upon the return of affected articles in accordance with Barracuda Networks then-current
Return Material Authorization ("RMA") procedures. All parts will be new or refurbished, at
Barracuda Networks discretion, and shall be furnished on an exchange basis. All parts removed for
replacement will become the property of the Barracuda Networks. In connection with warranty
services hereunder, Barracuda Networks may at its discretion modify the hardware of the product at
no cost to you to improve its reliability or performance. The warranty period is not extended if
Barracuda Networks repairs or replaces a warranted product or any parts. Barracuda Networks may
change the availability of limited warranties, at its discretion, but any changes will not be retroactive.
IN NO EVENT SHALL BARRACUDA NETWORKS LIABILITY EXCEED THE PRICE PAID
FOR THE PRODUCT FROM DIRECT, INDIRECT, SPECIAL, INCIDENTAL, OR
CONSEQUENTIAL DAMAGES RESULTING FROM THE USE OF THE PRODUCT, ITS
ACCOMPANYING SOFTWARE, OR ITS DOCUMENTATION.
Limited Warranty and License 63
Exclusions and Restrictions
This limited warranty does not apply to Barracuda Networks products that are or have been (a)
marked or identified as "sample" or "beta," (b) loaned or provided to you at no cost, (c) sold "as is,"
(d) repaired, altered or modified except by Barracuda Networks, (e) not installed, operated or
maintained in accordance with instructions supplied by Barracuda Networks, or (f) subjected to
abnormal physical or electrical stress, misuse, negligence or to an accident.
EXCEPT FOR THE ABOVE WARRANTY, BARRACUDA NETWORKS MAKES NO OTHER
WARRANTY, EXPRESS, IMPLIED OR STATUTORY, WITH RESPECT TO BARRACUDA
NETWORKS PRODUCTS, INCLUDING WITHOUT LIMITATION ANY IMPLIED
WARRANTY OF TITLE, AVAILABILITY, RELIABILITY, USEFULNESS,
MERCHANTABILITY, FITNESS FOR A PARTICULAR PURPOSE, NONINFRINGEMENT, OR
ARISING FROM COURSE OF PERFORMANCE, DEALING, USAGE OR TRADE. EXCEPT
FOR THE ABOVE WARRANTY, BARRACUDA NETWORKS PRODUCTS AND THE
SOFTWARE IS PROVIDED "AS IS" AND BARRACUDA NETWORKS DOES NOT WARRANT
THAT ITS PRODUCTS WILL MEET YOUR REQUIREMENTS OR BE UNINTERRUPTED,
TIMELY, AVAILABLE, SECURE OR ERROR-FREE, OR THAT ANY ERRORS IN ITS
PRODUCTS OR THE SOFTWARE WILL BE CORRECTED. FURTHERMORE, BARRACUDA
NETWORKS DOES NOT WARRANT THAT BARRACUDA NETWORKS PRODUCTS, THE
SOFTWARE OR ANY EQUIPMENT, SYSTEM OR NETWORK ON WHICH BARRACUDA
NETWORKS PRODUCTS WILL BE USED WILL BE FREE OF VULNERABILITY TO
INTRUSION OR ATTACK.
Software License
PLEASE READ THIS SOFTWARE LICENSE AGREEMENT ("AGREEMENT") CAREFULLY
BEFORE USING THE BARRACUDA SOFTWARE. BY USING THE BARRACUDA
SOFTWARE YOU ARE AGREEING TO BE BOUND BY THE TERMS OF THIS LICENSE. IF
YOU DO NOT AGREE TO THE TERMS OF THIS LICENSE DO NOT USE THE SOFTWARE.
IF YOU DO NOT AGREE TO THE TERMS OF THIS LICENSE YOU MAY RETURN THE
SOFTWARE OR HARDWARE CONTAINING THE SOFTWARE FOR A FULL REFUND TO
YOUR PLACE OF PURCHASE.
1. The software, documentation, whether on disk, in read only memory, or on any other media or in
any other form (collectively "Barracuda Software") is licensed, not sold, to you by Barracuda
Networks, Inc. ("Barracuda") for use only under the terms of this License and Barracuda reserves all
rights not expressly granted to you. The rights granted are limited to Barracuda's intellectual property
rights in the Barracuda Software and do not include any other patent or intellectual property rights.
You own the media on which the Barracuda Software is recorded but Barracuda retains ownership of
the Barracuda Software itself.
2. Permitted License Uses and Restrictions. This License allows you to use the Software only on the
single Barracuda labeled hardware device on which the software was delivered. You may not make
copies of the Software and you may not make the Software available over a network where it could
be utilized by multiple devices or copied. You may not make a backup copy of the Software. You
may not modify or create derivative works of the Software except as provided by the Open Source
Licenses included below. The BARRACUDA SOFTWARE IS NOT INTENDED FOR USE IN
THE OPERATION OF NUCLEAR FACILITIES, AIRCRAFT NAVIGATION OR
COMMUNICATION SYSTEMS, LIFE SUPPORT MACHINES, OR OTHER EQUIPEMENT IN
WHICH FAILURE COULD LEAD TO DEATH, PERSONAL INJURY, OR ENVIRONMENTAL
DAMAGE.
64
Barracuda Load Balancer Administrator’s Guide
3. You may not transfer, rent, lease, lend, or sublicense the Barracuda Software.
4. This License is effective until terminated. This License is automatically terminated without notice
if you fail to comply with any term of the License. Upon termination you must destroy or return all
copies of the Barracuda Software.
5. YOU EXPRESSLY ACKNOWLEDGE AND AGREE THAT THE USE OF THE BARRACUDA
SOFTWARE IS AT YOUR OWN RISK AND THAT THE ENTIRE RISK AS TO
SATISFACTION, QUALITY, PERFORMANCE, AND ACCURACY IS WITH YOU. THE
BARRACUDA SOFTWARE IS PROVIDED "AS IS" WITH ALL FAULTS AND WITHOUT
WARRANTY OF ANY KIND, AND BARRACUDA HEREBY DISCLAIMS ALL WARRANTIES
AND CONDITIONS WITH RESPECT TO THE BARRACUDA SOFTWARE, EITHER
EXPRESSED OR IMPLIED OR STATUTORY, INCLUDING, BUT NOT LIMITED TO, THE
IMPLIED WARRANTIES AND/OR CONDITIONS OF MERCHANTIBILITY, OF
SATISFACTORY QUALITY, OF FITNESS FOR ANY APPLICATION, OF ACCURACY, AND
OF NON-INFRINGEMENT OF THIRD PARTY RIGHTS. BARRACUDA DOES NOT
WARRANT THE CONTINUED OPERATION OF THE SOFTWARE, THAT THE
PERFORMANCE WILL MEET YOUR EXPECTATIONS, THAT THE FUNCTIONS WILL
MEET YOUR REQUIREMENTS, THAT THE OPERATION WILL BE ERROR FREE OR
CONTINUOUS, OR THAT DEFECTS WILL BE CORRECTED. NO ORAL OR WRITTEN
INFORMATION GIVEN BY BARRACUDA OR AUTHORIZED BARRACUDA
REPRESENTATIVE SHALL CREATE A WARRANTY. SHOULD THE BARRACUDA
SOFTWARE PROVE DEFECTIVE, YOU ASSUME THE ENTIRE COST OF ALL NECESSARY
SERVICING, REPAIR, OR CORRECTION.
6. License. YOU EXPRESSLY ACKNOWLEDGE AND AGREE THAT YOU WILL PROVIDE
AN UNLIMITED ZERO COST LICENSE TO BARRACUDA FOR ANY PATENTS OR OTHER
INTELLECTUAL PROPERTY RIGHTS UTILIZED IN THE BARRACUDA SOFTWARE
WHICH YOU EITHER OWN OR CONTROL.
7. Limitation of Liability. TO THE EXTENT NOT PROHIBITED BY LAW, IN NO EVENT
SHALL BARRACUDA BE LIABLE FOR PERSONAL INJURY OR ANY INCIDENTAL
SPECIAL, INDIRECT, OR CONSEQUENTIAL DAMAGES WHATSOEVER, INCLUDING,
WITHOUT LIMITATION, DAMAGES FOR LOSS OF PROFITS, LOSS OF DATA, BUSINESS
INTERRUPTION, OR ANY OTHER COMMERCIAL DAMAGES OR LOSSES, ARISING OUT
OF OR RELATED TO YOUR ABILITY TO USE OR INABILITY TO USE THE BARRACUDA
SOFTWARE HOWEVER CAUSED, REGARDLESS OF THE THEORY OF LIABILITY AND
EVEN IF BARRACUDA HAS BEEN ADVISED OF THE POSSIBILITY OF DAMAGES. In no
event shall Barracuda's total liability to you for all damages exceed the amount of one hundred dollars.
8. Export Control. You may not use or otherwise export or re-export Barracuda Software except as
authorized by the United States law and the laws of the jurisdiction where the Barracuda Software
was obtained.
Energize Update Software License
PLEASE READ THIS ENERGIZE UPDATE SOFTWARE LICENSE CAREFULLY BEFORE
DOWNLOADING, INSTALLING OR USING BARRACUDA NETWORKS OR BARRACUDA
NETWORKS-SUPPLIED ENERGIZE UPDATE SOFTWARE.
BY DOWNLOADING OR INSTALLING THE ENERGIZE UPDATE SOFTWARE, OR USING
THE EQUIPMENT THAT CONTAINS THIS SOFTWARE, YOU ARE CONSENTING TO BE
BOUND BY THIS LICENSE. IF YOU DO NOT AGREE TO ALL OF THE TERMS OF THIS
LICENSE, THEN (A) DO NOT DOWNLOAD, INSTALL OR USE THE SOFTWARE, AND (B)
Limited Warranty and License 65
YOU MAY RETURN THE SOFTWARE FOR A FULL REFUND, OR, IF THE SOFTWARE IS
SUPPLIED AS PART OF ANOTHER PRODUCT, YOU MAY RETURN THE ENTIRE
PRODUCT FOR A FULL REFUND. YOUR RIGHT TO RETURN AND REFUND EXPIRES 30
DAYS AFTER PURCHASE FROM BARRACUDA NETWORKS OR AN AUTHORIZED
BARRACUDA NETWORKS RESELLER, AND APPLIES ONLY IF YOU ARE THE ORIGINAL
PURCHASER.
The following terms govern your use of the Energize Update Software except to the extent a particular
program (a) is the subject of a separate written agreement with Barracuda Networks or (b) includes a
separate "click-on" license agreement as part of the installation and/or download process. To the
extent of a conflict between the provisions of the foregoing documents, the order of precedence shall
be (1) the written agreement, (2) the click-on agreement, and (3) this Energize Update Software
License.
License. Subject to the terms and conditions of and except as otherwise provided in this Agreement,
Barracuda Networks, Inc., or a Barracuda Networks, Inc. subsidiary (collectively "Barracuda
Networks"), grants to the end-user ("Customer") a nonexclusive and nontransferable license to use
the Barracuda Networks Energize Update program modules and data files for which Customer has
paid the required license fees (the "Energize Update Software"). In addition, the foregoing license
shall also be subject to the following limitations, as applicable:
Unless otherwise expressly provided in the documentation, Customer shall use the Energize Update
Software solely as embedded in, for execution on, or (where the applicable documentation permits
installation on non-Barracuda Networks equipment) for communication with Barracuda Networks
equipment owned or leased by Customer; Customer's use of the Energize Update Software shall be
limited to use on a single hardware chassis, on a single central processing unit, as applicable, or use
on such greater number of chassis or central processing units as Customer may have paid Barracuda
Networks the required license fee; and Customer's use of the Energize Update Software shall also be
limited, as applicable and set forth in Customer's purchase order or in Barracuda Networks' product
catalog, user documentation, or Web site, to a maximum number of (a) seats (i.e. users with access to
the installed Energize Update Software), (b) concurrent users, sessions, ports, and/or issued and
outstanding IP addresses, and/or (c) central processing unit cycles or instructions per second.
Customer's use of the Energize Update Software shall also be limited by any other restrictions set
forth in Customer's purchase order or in Barracuda Networks' product catalog, user documentation or
Web site for the Energize Update Software.
General Limitations. Except as otherwise expressly provided under this Agreement, Customer shall
have no right, and Customer specifically agrees not to:
i.
transfer, assign or sublicense its license rights to any other person, or use the Energize
Update Software on unauthorized or secondhand Barracuda Networks equipment, and any
such attempted transfer, assignment or sublicense shall be void;
ii.
make error corrections to or otherwise modify or adapt the Energize Update Software or
create derivative works based upon the Energize Update Software, or to permit third parties
to do the same; or
iii. decompile, decrypt, reverse engineer, disassemble or otherwise reduce the Energize Update
Software to human-readable form to gain access to trade secrets or confidential
information in the Energize Update Software.
Upgrades and Additional Copies. For purposes of this Agreement, "Energize Update Software" shall
include (and the terms and conditions of this Agreement shall apply to) any Energize Update
upgrades, updates, bug fixes or modified versions (collectively, "Upgrades") or backup copies of the
Energize Update Software licensed or provided to Customer by Barracuda Networks or an authorized
distributor/reseller for which Customer has paid the applicable license fees. NOTWITHSTANDING
ANY OTHER PROVISION OF THIS AGREEMENT: (1) CUSTOMER HAS NO LICENSE OR
RIGHT TO USE ANY SUCH ADDITIONAL COPIES OR UPGRADES UNLESS CUSTOMER,
66
Barracuda Load Balancer Administrator’s Guide
AT THE TIME OF ACQUIRING SUCH COPY OR UPGRADE, ALREADY HOLDS A VALID
LICENSE TO THE ORIGINAL ENERGIZE UPDATE SOFTWARE AND HAS PAID THE
APPLICABLE FEE FOR THE UPGRADE; (2) USE OF UPGRADES IS LIMITED TO
BARRACUDA NETWORKS EQUIPMENT FOR WHICH CUSTOMER IS THE ORIGINAL END
USER PURCHASER OR LESSEE OR WHO OTHERWISE HOLDS A VALID LICENSE TO USE
THE ENERGIZE UPDATE SOFTWARE WHICH IS BEING UPGRADED; AND (3) USE OF
ADDITIONAL COPIES IS LIMITED TO BACKUP PURPOSES ONLY.
Energize Update Changes. Barracuda Networks reserves the right at any time not to release or to
discontinue release of any Energize Update Software and to alter prices, features, specifications,
capabilities, functions, licensing terms, release dates, general availability or other characteristics of
any future releases of the Energize Update Software.
Proprietary Notices. Customer agrees to maintain and reproduce all copyright and other proprietary
notices on all copies, in any form, of the Energize Update Software in the same form and manner that
such copyright and other proprietary notices are included on the Energize Update Software. Except
as expressly authorized in this Agreement, Customer shall not make any copies or duplicates of any
Energize Update Software without the prior written permission of Barracuda Networks. Customer
may make such backup copies of the Energize Update Software as may be necessary for Customer's
lawful use, provided Customer affixes to such copies all copyright, confidentiality, and proprietary
notices that appear on the original.
Protection of Information. Customer agrees that aspects of the Energize Update Software and
associated documentation, including the specific design and structure of individual programs,
constitute trade secrets and/or copyrighted material of Barracuda Networks. Customer shall not
disclose, provide, or otherwise make available such trade secrets or copyrighted material in any form
to any third party without the prior written consent of Barracuda Networks. Customer shall implement
reasonable security measures to protect and maintain the confidentiality of such trade secrets and
copyrighted material. Title to Energize Update Software and documentation shall remain solely with
Barracuda Networks.
Indemnity. Customer agrees to indemnify, hold harmless and defend Barracuda Networks and its
affiliates, subsidiaries, officers, directors, employees and agents at Customers expense, against any
and all third-party claims, actions, proceedings, and suits and all related liabilities, damages,
settlements, penalties, fines, costs and expenses (including, without limitation, reasonable attorneys
fees and other dispute resolution expenses) incurred by Barracuda Networks arising out of or relating
to Customers (a) violation or breach of any term of this Agreement or any policy or guidelines
referenced herein, or (b) use or misuse of the Barracuda Networks Energize Update Software.
Term and Termination. This License is effective upon date of delivery to Customer of the initial
Energize Update Software (but in case of resale by a Barracuda Networks distributor or reseller,
commencing not more than sixty (60) days after original Energize Update Software purchase from
Barracuda Networks) and continues for the period for which Customer has paid the required license
fees. Customer may terminate this License at any time by notifying Barracuda Networks and ceasing
all use of the Energize Update Software. By terminating this License, Customer forfeits any refund
of license fees paid and is responsible for paying any and all outstanding invoices. Customer's rights
under this License will terminate immediately without notice from Barracuda Networks if Customer
fails to comply with any provision of this License. Upon termination, Customer must cease use of all
copies of Energize Update Software in its possession or control.
Export. Software, including technical data, may be subject to U.S. export control laws, including the
U.S. Export Administration Act and its associated regulations, and may be subject to export or import
regulations in other countries. Customer agrees to comply strictly with all such regulations and
acknowledges that it has the responsibility to obtain licenses to export, re-export, or import Energize
Update Software.
Limited Warranty and License 67
Restricted Rights. Barracuda Networks' commercial software and commercial computer software
documentation is provided to United States Government agencies in accordance with the terms of this
Agreement, and per subparagraph "(c)" of the "Commercial Computer Software - Restricted Rights"
clause at FAR 52.227-19 (June 1987). For DOD agencies, the restrictions set forth in the "Technical
Data-Commercial Items" clause at DFARS 252.227-7015 (Nov 1995) shall also apply.
No Warranty. The Energize Update Software is provided AS IS. Customer's sole and exclusive
remedy and the entire liability of Barracuda Networks under this Energize Update Software License
Agreement will be, at Barracuda Networks option, repair, replacement, or refund of the Energize
Update Software.
Renewal. At the end of the Energize Update Service Period, Customer may have the option to renew
the Energize Update Service at the current list price, provided such Energize Update Service is
available. All initial subscriptions commence at the time of sale of the unit and all renewals
commence at the expiration of the previous valid subscription.
In no event does Barracuda Networks warrant that the Energize Update Software is error free or that
Customer will be able to operate the Energize Update Software without problems or interruptions. In
addition, due to the continual development of new techniques for intruding upon and attacking
networks, Barracuda Networks does not warrant that the Energize Update Software or any equipment,
system or network on which the Energize Update Software is used will be free of vulnerability to
intrusion or attack.
DISCLAIMER OF WARRANTY. ALL EXPRESS OR IMPLIED CONDITIONS,
REPRESENTATIONS, AND WARRANTIES INCLUDING, WITHOUT LIMITATION, ANY
IMPLIED WARRANTY OR CONDITION OF MERCHANTABILITY, FITNESS FOR A
PARTICULAR PURPOSE, NONINFRINGEMENT, SATISFACTORY QUALITY OR ARISING
FROM A COURSE OF DEALING, LAW, USAGE, OR TRADE PRACTICE, ARE HEREBY
EXCLUDED TO THE EXTENT ALLOWED BY APPLICABLE LAW. TO THE EXTENT AN
IMPLIED WARRANTY CANNOT BE EXCLUDED, SUCH WARRANTY IS LIMITED IN
DURATION TO THE WARRANTY PERIOD. BECAUSE SOME STATES OR JURISDICTIONS
DO NOT ALLOW LIMITATIONS ON HOW LONG AN IMPLIED WARRANTY LASTS, THE
ABOVE LIMITATION MAY NOT APPLY TO YOU. THIS WARRANTY GIVES YOU SPECIFIC
LEGAL RIGHTS, AND YOU MAY ALSO HAVE OTHER RIGHTS WHICH VARY FROM
JURISDICTION TO JURISDICTION.
General Terms Applicable to the Energize Update Software License Disclaimer of Liabilities. IN NO
EVENT WILL BARRACUDA NETWORKS BE LIABLE FOR ANY LOST REVENUE, PROFIT,
OR DATA, OR FOR SPECIAL, INDIRECT, CONSEQUENTIAL, INCIDENTAL, OR PUNITIVE
DAMAGES HOWEVER CAUSED AND REGARDLESS OF THE THEORY OF LIABILITY
ARISING OUT OF THE USE OF OR INABILITY TO USE THE ENERGIZE UPDATE
SOFTWARE EVEN IF BARRACUDA NETWORKS OR ITS SUPPLIERS HAVE BEEN
ADVISED OF THE POSSIBILITY OF SUCH DAMAGES. In no event shall Barracuda Networks'
liability to Customer, whether in contract, tort (including negligence), or otherwise, exceed the price
paid by Customer. BECAUSE SOME STATES OR JURISDICTIONS DO NOT ALLOW
LIMITATION OR EXCLUSION OF CONSEQUENTIAL OR INCIDENTAL DAMAGES, THE
ABOVE LIMITATION MAY NOT APPLY TO YOU.
This Energize Update Software License shall be governed by and construed in accordance with the
laws of the State of California, without reference to principles of conflict of laws, provided that for
Customers located in a member state of the European Union, Norway or Switzerland, English law
shall apply. The United Nations Convention on the International Sale of Goods shall not apply. If any
portion hereof is found to be void or unenforceable, the remaining provisions of the Energize Update
Software License shall remain in full force and effect. Except as expressly provided herein, the
Energize Update Software License constitutes the entire agreement between the parties with respect
to the license of the Energize Update Software and supersedes any conflicting or additional terms
contained in the purchase order.
68
Barracuda Load Balancer Administrator’s Guide
Open Source Licensing
Barracuda products may include programs that are covered by the GNU General Public License
(GPL) or other "open source" license agreements. The GNU license is re-printed below for you
reference. These programs are copyrighted by their authors or other parties, and the authors and
copyright holders disclaim any warranty for such programs. Other programs are copyright by
Barracuda Networks.
GNU GENERAL PUBLIC LICENSE, (GPL) Version 2, June 1991
Copyright (C) 1989, 1991 Free Software Foundation, Inc.
51 Franklin St, Fifth Floor, Boston, MA 02110-1301 USA
Everyone is permitted to copy and distribute verbatim copies of this license document, but changing
it is not allowed.
Preamble
The licenses for most software are designed to take away your freedom to share and change it.
contrast, the GNU General Public
By
License is intended to guarantee your freedom to share and change free software--to make sure the
software is free for all its users. This General Public License applies to most of the Free Software
Foundation's software and to any other program whose authors commit to using it. (Some other Free
Software Foundation software is covered by the GNU Library General Public License instead.) You can
apply it to your programs, too.
When we speak of free software, we are referring to freedom, not price. Our General Public Licenses
are designed to make sure that you have the freedom to distribute copies of free software (and charge
for this service if you wish), that you receive source code or can get it if you want it, that you can
change the software or use pieces of it in new free programs; and that you know you can do these things.
To protect your rights, we need to make restrictions that forbid anyone to deny you these rights or
to ask you to surrender the rights. These restrictions translate to certain responsibilities for you
if you distribute copies of the software, or if you modify it.
For example, if you distribute copies of such a program, whethergratis or for a fee, you must give the
recipients all the rights that you have. You must make sure that they, too, receive or can get the
source code. And you must show them these terms so they know their rights.
We protect your rights with two steps: (1) copyright the software, and (2) offer you this license which
gives you legal permission to copy, distribute and/or modify the software.
Also, for each author's protection and ours, we want to make certain that everyone understands that
there is no warranty for this free software. If the software is modified by someone else and passed
on, we want its recipients to know that what they have is not the original, so that any problems
introduced by others will not reflect on the original authors' reputations.
Finally, any free program is threatened constantly by software patents. We wish to avoid the danger
that redistributors of a free program will individually obtain patent licenses, in effect making the
program proprietary. To prevent this, we have made it clear that any patent must be licensed for
everyone's free use or not licensed at all.
The precise terms and conditions for copying, distribution and modification follow.
GNU GENERAL PUBLIC LICENSE TERMS AND CONDITIONS FOR COPYING, DISTRIBUTION AND MODIFICATION
0. This License applies to any program or other work which contains a notice placed by the copyright
holder saying it may be distributed under the terms of this General Public License. The "Program",
below, refers to any such program or work, and a "work based on the Program" means either the Program
or any derivative work under copyright law: that is to say, a work containing the Program or a portion
of it, either verbatim or with modifications and/or translated into another language. (Hereinafter,
translation is included without limitation in the term "modification".) Each licensee is addressed
as "you".
Activities other than copying, distribution and modification are not covered by this License; they are
outside its scope. The act of running the Program is not restricted, and the output from the Program
is covered only if its contents constitute a work based on the Program (independent of having been
made by running the Program). Whether that is true depends on what the Program does.
1. You may copy and distribute verbatim copies of the Program's source code as you receive it, in any
medium, provided that you conspicuously and appropriately publish on each copy an appropriate
copyright notice and disclaimer of warranty; keep intact all the notices that refer to this License
and to the absence of any warranty; and give any other recipients of the Program a copy of this
License along with the Program.
You may charge a fee for the physical act of transferring a copy, and you may at your option offer
warranty protection in exchange for a fee.
2. You may modify your copy or copies of the Program or any portion of it, thus forming a work based
on the Program, and copy and distribute such modifications or work under the terms of Section 1 above,
provided that you also meet all of these conditions:
a) You must cause the modified files to carry prominent notices stating that you changed the files
and the date of any change.
b) You must cause any work that you distribute or publish, that in whole or in part contains or
is derived from the Program or any part thereof, to be licensed as a whole at no charge to all
third parties under the terms of this License.
Limited Warranty and License 69
c) If the modified program normally reads commands interactively when run, you must cause it,
when started running for such interactive use in the most ordinary way, to print or display an
announcement including an appropriate copyright notice and a notice that there is no warranty (or
else, saying that you provide a warranty) and that users may redistribute the program under these
conditions, and telling the user how to view a copy of this License. (Exception: if the Program
itself is interactive but does not normally print such an announcement, your work based on the
Program is not required to print an announcement.)
These requirements apply to the modified work as a whole. If identifiable sections of that work are
not derived from the Program, and can be reasonably considered independent and separate works in
themselves, then this License, and its terms, do not apply to those sections when you distribute them
as separate works. But when you distribute the same sections as part of a whole which is a work based
on the Program, the distribution of the whole must be on the terms of this License, whose permissions
for other licensees extend to the entire whole, and thus to each and every part regardless of who wrote
it.
Thus, it is not the intent of this section to claim rights or contest your rights to work written
entirely by you; rather, the intent is to exercise the right to control the distribution of derivative
or collective works based on the Program.
In addition, mere aggregation of another work not based on the Program with the Program (or with a
work based on the Program) on a volume of a storage or distribution medium does not bring the other
work under the scope of this License.
3. You may copy and distribute the Program (or a work based on it, under Section 2) in object code or
executable form under the terms of Sections 1 and 2 above provided that you also do one of the
following:
a) Accompany it with the complete corresponding machine-readable source code, which must be
distributed under the terms of Sections 1 and 2 above on a medium customarily used for software
interchange; or,
b) Accompany it with a written offer, valid for at least three years, to give any third party, for
a charge no more than your cost of physically performing source distribution, a complete machinereadable copy of the corresponding source code, to be distributed under the terms of Sections 1 and
2 above on a medium customarily used for software interchange; or,
c) Accompany it with the information you received as to the offer to distribute corresponding
source code. (This alternative is allowed only for noncommercial distribution and only if you
received the program in object code or executable form with such an offer, in accord with Subsection
b above.)
The source code for a work means the preferred form of the work for making modifications to it. For
an executable work, complete source code means all the source code for all modules it contains, plus
any associated interface definition files, plus the scripts used to control compilation and
installation of the executable. However, as a special exception, the source code distributed need not
include anything that is normally distributed (in either source or binary form) with the major
components (compiler, kernel, and so on) of the operating system on which the executable runs, unless
that component itself accompanies the executable.
If distribution of executable or object code is made by offering access to copy from a designated
place, then offering equivalent access to copy the source code from the same place counts as
distribution of the source code, even though third parties are not compelled to copy the source along
with the object code.
4. You may not copy, modify, sublicense, or distribute the Program except as expressly provided under
this License. Any attempt otherwise to copy, modify, sublicense or distribute the Program is void,
and will automatically terminate your rights under this License. However, parties who have received
copies, or rights, from you under this License will not have their licenses terminated so long as
such parties remain in full compliance.
5. You are not required to accept this License, since you have not signed it. However, nothing else
grants you permission to modify or distribute the Program or its derivative works. These actions
are prohibited by law if you do not accept this License. Therefore, by modifying or distributing
the Program (or any work based on the Program), you indicate your acceptance of this License to do
so, and all its terms and conditions for copying, distributing or modifying the Program or works
based on it.
6. Each time you redistribute the Program (or any work based on the Program), the recipient
automatically receives a license from the original licensor to copy, distribute or modify the Program
subject to these terms and conditions. You may not impose any further restrictions on the recipients'
exercise of the rights granted herein. You are not responsible for enforcing compliance by third
parties to this License.
7. If, as a consequence of a court judgment or allegation of patent infringement or for any other
reason (not limited to patent issues), conditions are imposed on you (whether by court order,
agreement or otherwise) that contradict the conditions of this License, they do not excuse you from
the conditions of this License. If you cannot distribute so as to satisfy simultaneously your
obligations under this License and any other pertinent obligations, then as a consequence you may
not distribute the Program at all. For example, if a patent license would not permit royalty-free
redistribution of the Program by all those who receive copies directly or indirectly through you,
then the only way you could satisfy both it and this License would be to refrain entirely from
distribution of the Program.
If any portion of this section is held invalid or unenforceable under any particular circumstance, the
balance of the section is intended to apply and the section as a whole is intended to apply in other
circumstances.
It is not the purpose of this section to induce you to infringe any patents or other property right
claims or to contest validity of any such claims; this section has the sole purpose of protecting the
integrity of the free software distribution system, which is implemented by public license practices.
Many people have made generous contributions to the wide range of software distributed through that
system in reliance on consistent application of that system; it is up to the author/donor to decide
70
Barracuda Load Balancer Administrator’s Guide
if he or she is willing to distribute software through any other system and a licensee cannot impose
that choice.
This section is intended to make thoroughly clear what is believed to be a consequence of the rest of
this License.
8. If the distribution and/or use of the Program is restricted in certain countries either by patents
or by copyrighted interfaces, the original copyright holder who places the Program under this License
may add an explicit geographical distribution limitation excluding those countries, so that
distribution is permitted only in or among countries not thus excluded. In such case, this License
incorporates the limitation as if written in the body of this License.
9. The Free Software Foundation may publish revised and/or new versions of the General Public License
from time to time. Such new versions will be similar in spirit to the present version, but may differ
in detail to address new problems or concerns.
Each version is given a distinguishing version number. If the Program specifies a version number of
this License which applies to it and "any later version", you have the option of following the terms
and conditions either of that version or of any later version published by the Free Software Foundation.
If the Program does not specify a version number of this License, you may choose any version ever
published by the Free Software Foundation.
10. If you wish to incorporate parts of the Program into other free programs whose distribution
conditions are different, write to the author to ask for permission. For software which is
copyrighted by the Free Software Foundation, write to the Free Software Foundation; we sometimes
make exceptions for this. Our decision will be guided by the two goals of preserving the free status
of all derivatives of our free software and of promoting the sharing and reuse of software generally.
NO WARRANTY
11. BECAUSE THE PROGRAM IS LICENSED FREE OF CHARGE, THERE IS NO WARRANTY FOR THE PROGRAM, TO THE EXTENT
PERMITTED BY APPLICABLE LAW. EXCEPT WHEN OTHERWISE STATED IN WRITING THE COPYRIGHT HOLDERS AND/OR
OTHER PARTIES PROVIDE THE PROGRAM "AS IS" WITHOUT WARRANTY OF ANY KIND, EITHER EXPRESSED OR IMPLIED,
INCLUDING, BUT NOT LIMITED TO, THE IMPLIED WARRANTIES OF MERCHANTABILITY AND FITNESS FOR A PARTICULAR
PURPOSE. THE ENTIRE RISK AS TO THE QUALITY AND PERFORMANCE OF THE PROGRAM IS WITH YOU. SHOULD THE
PROGRAM PROVE DEFECTIVE, YOU ASSUME THE COST OF ALL NECESSARY SERVICING, REPAIR OR CORRECTION.
12. IN NO EVENT UNLESS REQUIRED BY APPLICABLE LAW OR AGREED TO IN WRITING WILL ANY COPYRIGHT HOLDER,
OR ANY OTHER PARTY WHO MAY MODIFY AND/OR REDISTRIBUTE THE PROGRAM AS PERMITTED ABOVE, BE LIABLE TO
YOU FOR DAMAGES, INCLUDING ANY GENERAL, SPECIAL, INCIDENTAL OR CONSEQUENTIAL DAMAGES ARISING OUT OF
THE USE OR INABILITY TO USE THE PROGRAM (INCLUDING BUT NOT LIMITED TO LOSS OF DATA OR DATA BEING
RENDERED INACCURATE OR LOSSES SUSTAINED BY YOU OR THIRD PARTIES OR A FAILURE OF THE PROGRAM TO OPERATE
WITH ANY OTHER PROGRAMS), EVEN IF SUCH HOLDER OR OTHER PARTY HAS BEEN ADVISED OF THE POSSIBILITY OF
SUCH DAMAGES.
END OF TERMS AND CONDITIONS
How to Apply These Terms to Your New Programs
If you develop a new program, and you want it to be of the greatest possible use to the public, the best way to achieve this is to make it free software
which everyone can redistribute and change under these terms.
To do so, attach the following notices to the program. It is safest to attach them to the start of each source file to most effectively convey the exclusion
of warranty; and each file should have at least the "copyright" line and a pointer to where the full notice is found.
one line to give the program's name and an idea of what it does.
Copyright (C) yyyy
name of author
This program is free software; you can redistribute it and/or modify it under the terms of the GNU
General Public License as published by the Free Software Foundation; either version 2 of the License,
or (at your option) any later version.
This program is distributed in the hope that it will be useful, but WITHOUT ANY WARRANTY; without even
the implied warranty of MERCHANTABILITY or FITNESS FOR A PARTICULAR PURPOSE. See the GNU General
Public License for more details.
You should have received a copy of the GNU General Public License along with this program; if not,
write to the Free Software Foundation, Inc., 59 Temple Place - Suite 330, Boston, MA 02111-1307, USA.
Also add information on how to contact you by electronic and paper mail.
If the program is interactive, make it output a short notice like this when it starts in an interactive mode:
Gnomovision version 69, Copyright (C) 19yy name of author Gnomovision comes with ABSOLUTELY NO
WARRANTY; for details type `show w'. This is free software, and you are welcome to redistribute it
under certain conditions; type `show c' for details.
The hypothetical commands `show w' and `show c' should show the appropriate parts of the General Public License. Of course, the commands you use
may be called something other than `show w' and `show c'; they could even be mouse-clicks or menu items--whatever suits your program.
You should also get your employer (if you work as a programmer) or your school, if any, to sign a "copyright disclaimer" for the program, if necessary.
Here is a sample; alter the names:
Yoyodyne, Inc., hereby disclaims all copyright interest in the program `Gnomovision' (which makes
passes at compilers) written by James Hacker.
signature of Ty Coon, 1 April 1989
Ty Coon, President of Vice
This General Public License does not permit incorporating your program into proprietary programs. If your program is a subroutine library, you may
consider it more useful to permit linking proprietary applications with the library. If this is what you want to do, use the GNU Library General Public
License instead of this License.
Limited Warranty and License 71
Barracuda Products may contain programs that are copyright (c)1995-2005 International Business Machines Corporation and others. All rights reserved.
These programs are covered by the following License:
"Permission is hereby granted, free of charge, to any person obtaining a copy of this software and associated documentation files (the "Software"), to
deal in the Software without restriction, including without limitation the rights to use, copy, modify, merge, publish, distribute, and/or sell copies of the
Software, and to permit persons to whom the Software is furnished to do so, provided that the above copyright notice(s) and this permission notice appear
in all copies of the Software and that both the above copyright notice(s) and this permission notice appear in supporting documentation."
Barracuda Products may include programs that are covered by the BSD License: "Redistribution and use in source and binary forms, with or without
modification, are permitted provided that the following conditions are met:
Redistributions of source code must retain the above copyright notice, this list of conditions and the following disclaimer.
Redistributions in binary form must reproduce the above copyright notice, this list of conditions and the following disclaimer in the documentation
and/or other materials provided with the distribution.
The names of the authors may not be used to endorse or promote products derived from this software without specific prior written permission.
THIS SOFTWARE IS PROVIDED ``AS IS'' AND WITHOUT ANY EXPRESS OR IMPLIED WARRANTIES, INCLUDING, WITHOUT
LIMITATION, THE IMPLIED WARRANTIES OF MERCHANTABILITY AND FITNESS FOR A PARTICULAR PURPOSE."
Barracuda Products may include the libspf library which is Copyright (c) 2004 James Couzens & Sean Comeau All rights reserved. It is covered by the
following agreement: Redistribution and use in source and binary forms, with or without modification, are permitted provided that the following
conditions are met: 1. Redistributions of source code must retain the above copyright notice, this list of conditions and the following disclaimer. 2.
Redistributions in binary form must reproduce the above copyright notice, this list of conditions and the following disclaimer in the documentation
and/or other materials provided with the distribution. THIS SOFTWARE IS PROVIDED ``AS IS'' AND ANY EXPRESSED OR IMPLIED
WARRANTIES, INCLUDING, BUT NOT LIMITED TO, THE IMPLIED WARRANTIES OF MERCHANTABILITY AND FITNESS FOR A
PARTICULAR PURPOSE ARE DISCLAIMED. IN NO EVENT SHALL THE AUTHORS MAKING USE OF THIS LICENSE OR ITS
CONTRIBUTORS BE LIABLE FOR ANY DIRECT, INDIRECT, INCIDENTAL, SPECIAL, EXEMPLARY, OR CONSEQUENTIAL DAMAGES
(INCLUDING, BUT NOT LIMITED TO, PROCUREMENT OF SUBSTITUTE GOODS OR SERVICES; LOSS OF USE, DATA, OR PROFITS; OR
BUSINESS INTERRUPTION) HOWEVER CAUSED AND ON ANY THEORY OF LIABILITY, WHETHER IN CONTRACT, STRICT
LIABILITY, OR TORT (INCLUDING NEGLIGENCE OR OTHERWISE) ARISING IN ANY WAY OUT OF THE USE OF THIS SOFTWARE,
EVEN IF ADVISED OF THE POSSIBILITY OF SUCH DAMAGE.
Barracuda Products may contain programs that are Copyright (c) 1998-2003 Carnegie Mellon University. All rights reserved. Redistribution and use in
source and binary forms, with or without modification, are permitted provided that the following conditions are met: 1. Redistributions of source code
must retain the above copyright notice, this list of conditions and the following disclaimer. 2. Redistributions in binary form must reproduce the above
copyright notice, this list of conditions and the following disclaimer in the documentation and/or other materials provided with the distribution. The
name "Carnegie Mellon University" must not be used to endorse or promote products derived from this software without prior written permission. For
permission or any other legal details, please contact Office of Technology Transfer Carnegie Mellon University 5000 Forbes Avenue Pittsburgh, PA
15213-3890 (412) 268-4387, fax: (412) 268-7395 [email protected] .Redistributions of any form whatsoever must retain the following
acknowledgment: "This product includes software developed by Computing Services at Carnegie Mellon University
(http://www.cmu.edu/computing/)." CARNEGIE MELLON UNIVERSITY DISCLAIMS ALL WARRANTIES WITH REGARD TO THIS
SOFTWARE, INCLUDING ALL IMPLIED WARRANTIES OF MERCHANTABILITY AND FITNESS, IN NO EVENT SHALL CARNEGIE
MELLON UNIVERSITY BE LIABLE FOR ANY SPECIAL, INDIRECT OR CONSEQUENTIAL DAMAGES OR ANY DAMAGES
WHATSOEVER RESULTING FROM LOSS OF USE, DATA OR PROFITS, WHETHER IN AN ACTION OF CONTRACT, NEGLIGENCE OR
OTHER TORTIOUS ACTION, ARISING OUT OF OR IN CONNECTION WITH THE USE OR PERFORMANCE OF THIS SOFTWARE.
Barracuda products may include programs that are covered by the Apache License or other Open Source license agreements. The Apache license is reprinted below for you reference. These programs are copyrighted by their authors or other parties, and the authors and copyright holders disclaim any
warranty for such programs. Other programs are copyright by Barracuda Networks.
Apache License
Version 2.0, January 2004
http://www.apache.org/licenses/
TERMS AND CONDITIONS FOR USE, REPRODUCTION, AND DISTRIBUTION
1. Definitions.
"License" shall mean the terms and conditions for use, reproduction, and distribution as defined by
Sections 1 through 9 of this document.
"Licensor" shall mean the copyright owner or entity authorized by the copyright owner that is granting
the License.
"Legal Entity" shall mean the union of the acting entity and all other entities that control, are
controlled by, or are under common control with that entity. For the purposes of this definition,
"control" means (i) the power, direct or indirect, to cause the direction or management of such entity,
whether by contract or otherwise, or (ii) ownership of fifty percent (50%) or more of the outstanding
shares, or (iii) beneficial ownership of such entity.
"You" (or "Your") shall mean an individual or Legal Entity exercising permissions granted by this
License.
"Source" form shall mean the preferred form for making modifications, including but not limited to
software source code, documentation source, and configuration files.
"Object" form shall mean any form resulting from mechanical transformation or translation of a Source
form, including but not limited to compiled object code, generated documentation, and conversions to
other media types.
"Work" shall mean the work of authorship, whether in Source or Object form, made available under the
License, as indicated by a copyright notice that is included in or attached to the work (an example
is provided in the Appendix below).
"Derivative Works" shall mean any work, whether in Source or Object form, that is based on (or derived
from) the Work and for which the editorial revisions, annotations, elaborations, or other modifications
represent, as a whole, an original work of authorship. For the purposes of this License, Derivative
Works shall not include works that remain separable from, or merely link (or bind by name) to the
interfaces of, the Work and Derivative Works thereof.
"Contribution" shall mean any work of authorship, including the original version of the Work and any
modifications or additions to that Work or Derivative Works thereof, that is intentionally submitted
to Licensor for inclusion in the Work by the copyright owner or by an individual or Legal Entity
authorized to submit on behalf of the copyright owner. For the purposes of this definition, "submitted"
72
Barracuda Load Balancer Administrator’s Guide
means any form of electronic, verbal, or written communication sent to the Licensor or its
representatives, including but not limited to communication on electronic mailing lists, source code
control systems, and issue tracking systems that are managed by, or on behalf of, the Licensor for the
purpose of discussing and improving the Work, but excluding communication that is conspicuously marked
or otherwise designated in writing by the copyright owner as "Not a Contribution."
"Contributor" shall mean Licensor and any individual or Legal Entity on behalf of whom a Contribution
has been received by Licensor and subsequently incorporated within the Work.
2. Grant of Copyright License. Subject to the terms and conditions of this License, each Contributor
hereby grants to You a perpetual, worldwide, non-exclusive, no-charge, royalty-free, irrevocable
copyright license to reproduce, prepare Derivative Works of, publicly display, publicly perform,
sublicense, and distribute the Work and such Derivative Works in Source or Object form.
3. Grant of Patent License. Subject to the terms and conditions of this License, each Contributor
hereby grants to You a perpetual, worldwide, non-exclusive, no-charge, royalty-free, irrevocable
(except as stated in this section) patent license to make, have made, use, offer to sell, sell, import,
and otherwise transfer the Work, where such license applies only to those patent claims licensable by
such Contributor that are necessarily infringed by their Contribution(s) alone or by combination of
their Contribution(s) with the Work to which such Contribution(s) was submitted. If You institute
patent litigation against any entity (including a cross-claim or counterclaim in a lawsuit) alleging
that the Work or a Contribution incorporated within the Work constitutes direct or contributory patent
infringement, then any patent licenses granted to You under this License for that Work shall terminate
as of the date such litigation is filed.
4. Redistribution. You may reproduce and distribute copies of the Work or Derivative Works thereof in
any medium, with or without modifications, and in Source or Object form, provided that You meet the
following conditions:
(a) You must give any other recipients of the Work or Derivative Works a copy of this License; and
(b) You must cause any modified files to carry prominent notices stating that You changed the files; and
(c) You must retain, in the Source form of any Derivative Works that You distribute, all copyright,
patent, trademark, and attribution notices from the Source form of the Work, excluding those notices
that do not pertain to any part of the Derivative Works; and
(d) If the Work includes a "NOTICE" text file as part of its distribution, then any Derivative Works
that You distribute must include a readable copy of the attribution notices contained within such
NOTICE file, excluding those notices that do not pertain to any part of the Derivative Works, in at
least one of the following places: within a NOTICE text file distributed as part of the Derivative
Works; within the Source form or documentation, if provided along with the Derivative Works; or, within
a display generated by the Derivative Works, if and wherever such third-party notices normally appear.
The contents of the NOTICE file are for informational purposes only and do not modify the License. You
may add Your own attribution notices within Derivative Works that You distribute, alongside or as an
addendum to the NOTICE text from the Work, provided that such additional attribution notices cannot
be construed as modifying the License.
You may add Your own copyright statement to Your modifications and may provide additional or different
license terms and conditions for use, reproduction, or distribution of Your modifications, or for any
such Derivative Works as a whole, provided Your use, reproduction, and distribution of the Work
otherwise complies with the conditions stated in this License.
5. Submission of Contributions. Unless You explicitly state otherwise, any Contribution intentionally
submitted for inclusion in the Work by You to the Licensor shall be under the terms and conditions of
this License, without any additional terms or conditions. Notwithstanding the above, nothing herein
shall supersede or modify the terms of any separate license agreement you may have executed with
Licensor regarding such Contributions.
6. Trademarks. This License does not grant permission to use the trade names, trademarks, service
marks, or product names of the Licensor, except as required for reasonable and customary use in
describing the origin of the Work and reproducing the content of the NOTICE file.
7. Disclaimer of Warranty. Unless required by applicable law or agreed to in writing, Licensor provides
the Work (and each Contributor provides its Contributions) on an "AS IS" BASIS, WITHOUT WARRANTIES OR
CONDITIONS OF ANY KIND, either express or implied, including, without limitation, any warranties or
conditions of TITLE, NON-INFRINGEMENT, MERCHANTABILITY, or FITNESS FOR A PARTICULAR PURPOSE. You are
solely responsible for determining the appropriateness of using or redistributing the Work and assume
any risks associated with Your exercise of permissions under this License.
8. Limitation of Liability. In no event and under no legal theory, whether in tort (including
negligence), contract, or otherwise, unless required by applicable law (such as deliberate and grossly
negligent acts) or agreed to in writing, shall any Contributor be liable to You for damages, including
any direct, indirect, special, incidental, or consequential damages of any character arising as a
result of this License or out of the use or inability to use the Work (including but not limited to
damages for loss of goodwill, work stoppage, computer failure or malfunction, or any and all other
commercial damages or losses), even if such Contributor has been advised of the possibility of such
damages.
9. Accepting Warranty or Additional Liability. While redistributing the Work or Derivative Works
thereof, You may choose to offer, and charge a fee for, acceptance of support, warranty, indemnity,
or other liability obligations and/or rights consistent with this License. However, in accepting such
obligations, You may act only on Your own behalf and on Your sole responsibility, not on behalf of any
other Contributor, and only if You agree to indemnify, defend, and hold each Contributor harmless for
any liability incurred by, or claims asserted against, such Contributor by reason of your accepting
any such warranty or additional liability.
END OF TERMS AND CONDITIONS
APPENDIX: How to apply the Apache License to your work.
To apply the Apache License to your work, attach the following boilerplate notice, with the fields
enclosed by brackets "[]" replaced with your own identifying information. (Don't include the brackets!)
The text should be enclosed in the appropriate comment syntax for the file format. We also recommend
Limited Warranty and License 73
that a file or class name and description of purpose be included on the same "printed page" as the
copyright notice for easier identification within third-party archives.
Copyright [yyyy] [name of copyright owner]
Licensed under the Apache License, Version 2.0 (the "License"); you may not use this file except in
compliance with the License. You may obtain a copy of the License at
http://www.apache.org/licenses/LICENSE-2.0
Unless required by applicable law or agreed to in writing, software distributed under the License is
distributed on an "AS IS" BASIS, WITHOUT WARRANTIES OR CONDITIONS OF ANY KIND, either express or
implied. See the License for the specific language governing permissions and limitations under the
License.
Source Code Availability
Per the GPL and other "open source" license agreements the complete machine readable source code for programs covered by the GPL or other "open
source" license agreements is available from Barracuda Networks at no charge. If you would like a copy of the source code or the changes to a particular
program we will gladly provide them, on a CD, for a fee of $100.00. This fee is to pay for the time for a Barracuda Networks engineer to assemble the
changes and source code, create the media, package the media, and mail the media. Please send a check payable in USA funds and include the program
name. We will mail the packaged source code for any program covered under the GPL or other "open source" license.
74
Barracuda Load Balancer Administrator’s Guide
Index
A
H
Adaptive Scheduling 47, 48
administration interface
logging in 33
Administration page 36, 39, 54
alerts 54
hardware compliance information 61
hardware test 41
Health page 53
High Availability 17
updating firmware 38
B
I
back panel details 60
backing up configuration 38
Backup page 38
Barracuda Load Balancer
configuring 32, 44
managing 38
monitoring 53
Barracuda Load Balancer Terminology 16
Bridge-Path 16, 22
IP address
setting 31
IP Configuration page 44
C
Management IP Address 17
monitoring
Services 53
caching ARP requests 50
character tags 55, 57, 63
cluster 50
configuring, Barracuda Load Balancer 32
Cookie Persistence 11
Cookie persistence, not available with DSR 12
D
definitions, updating 35, 39
diagnostic memory test 41
Direct Server Return 16, 22, 26
E
Energize Updates 39
F
failed system, replacing 39
firewall, configuring 32
Firmware Update page 38
front panel details 58
Index - 75
L
Last Resort Server 13, 45
Logical Network 16
M
N
network time protocol 34
notifications 54
NTP 34
P
Persistence 16
Physical Network 17
R
Real Server 16
Real Server weight, pre-assign 48
reboot options 40
recovery mode 40
re-imaging system 41
reloading the system 39
remote administration 41
repairing, file system 41
replacing failed system 39
RESET button, using 39
restarting the system 39
restoring configuration 38
Route-Path 16
S
Scheduling policy 16
Server Farm 16
Service 16
Service Monitor 16, 45
Services, monitoring 53
Session 12
shutting down the system 39
SSL Certificates 47
SSL Offloading 47
SSL Offloading, configuring 47
Status page 54
subscription
activating 35
status 34
T
Task Manager page 54
TCP ports 32
testing memory 41
time zone, setting 36
Troubleshooting page 40
U
UDP ports 32
updating
definitions 35, 39
firmware 38
updating firmware 38
V
Virtual IP (VIP) 16
W
WAN IP Address 17
Weighted Least Connections 49
Weighted Round-Robin 48
76 - Index