1
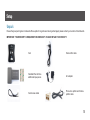
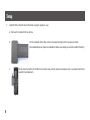
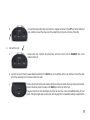
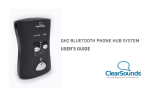
QH2 BLUETOOTH PHONE HUB SYSTEM
USER'S GUIDE
Welcome!
Thank you for purchasing the ClearSounds QH2 Bluetooth Phone Hub System.
We hope that you enjoy the hands-free conversation that your new system provides. The hub amplifies and sends sound between
phones and Bluetooth® headsets, streamers or neckloops.
•
Hands-free conversation within 30 feet of the hub
•
Answer or place calls without lifting the handset from the base.
•
Tone adjustment
•
Compatible with Bluetooth listening devices (headsets, streamers or neckloops)
•
Compatible with all telephones with keys on the base and with all cordless phones
Contact information
Please contact us with any questions that you might have. We are happy to assist you!
ClearSounds Communications, Inc.
1743 Quincy Avenue, Suite 155
Naperville, IL 60540 USA
800-965-9043 (toll-free)
www.clearsounds.com
1
Safety precautions
Carefully read and observe the warnings and cautions in this manual and on the equipment.
Warnings
Warnings must be observed to prevent bodily injury.
WARNING: Use the equipment only in the described manner to avoid bodily injury or damage to the equipment.
WARNING: Locate and use the hub away from water and damp areas, such as swimming pools, bathtubs, sinks and damp
basements, and do not use the hub when you are wet, to avoid electrical shock. If the hub is submerged, unplug the base from
AC power before you retrieve it.
WARNING: Do not overload extension cords or power strips. This can result in electric shock.
WARNING: Use this hub only with the supplied AC power adapter assembly. Other types of power adapter assemblies can
damage the hub and cause personal injury.
WARNING: Avoid using the hub with a corded phone during an electrical storm. There is a slight risk of electrical shock from
lightning during a storm.
WARNING: The hub can amplify volume that can cause hearing loss. For each user, adjust the volume to personal preferences.
WARNING: Do not spill liquid on the hub or clean it while it is plugged in to AC power. This can cause a short circuit, a fire or
electric shock.
WARNING: Do not push any type of object into the hub. Contact with dangerous voltage points can occur, resulting in fire,
electric shock or parts damage.
2
WARNING: Do not disassemble the hub. Dangerous voltages or other risks can occur. Use after incorrect reassembly can lead
to electric shock.
Cautions
Cautions indicate practices that could harm the hub or other objects.
CAUTION: Do not place objects on the cables or cords, and place them away from foot traffic.
CAUTION: Locate the hub away from heat sources of any type. Keep slots and openings on the components uncovered to
enable ventilation and protection against overheating.
CAUTION: Connect the supplied AC power adapter assembly into a surge protector. Power surges can damage the equipment.
CAUTION: Use only a damp cloth to clean the unit. Do not use liquid or aerosol cleaners.
CAUTION: In these circumstances, unplug the hub from AC power, and refer to qualified service personnel:
• Liquid spills in the hub, or it is exposed to rain or precipitation.
• The hub does not operate according to descriptions in this manual, or performance distinctly changes.
• The hub is dropped or the casing is damaged.
3
Contents
Contents
Setup..............................................................................................................................................................................................5
Unpack.................................................................................................................................................................................... 5
Install the hub.......................................................................................................................................................................... 6
Bluetooth pairing and disconnection..................................................................................................................................... 13
Answer or place a call..................................................................................................................................................................15
Answer or place a call using a corded phone system........................................................................................................... 15
Answer or place a call using a cordless phone system......................................................................................................... 17
Troubleshooting............................................................................................................................................................................20
Compliance..................................................................................................................................................................................21
Specifications...............................................................................................................................................................................24
Warranty.......................................................................................................................................................................................25
Accessories..................................................................................................................................................................................26
4
Setup
Unpack
Ensure that your packing box includes all of these parts. If any parts are missing or damaged, please contact your vendor or ClearSounds.
IMPORTANT: YOUR RECEIPT IS REQUIRED FOR WARRANTY. PLEASE RETAIN YOUR RECEIPT.
Hub
Hub-to-lifter cable
Handset lifter with two
additional tape pieces
AC adapter
Hub-to-base cable
Phone line splitter and Hub-tosplitter cable
5
Setup
Install the hub
You can use the QH2 system with these types of telephones.
•
Corded phone with keys on the base and a handset connected with a curly cord
•
Cordless phone
To install the hub for use with a corded phone
To answer and place calls, the handset lifter removes the handset from the phone. The instructions in this section include steps for
installing the handset lifter on your phone.
Note: You do not need to install the lifter if either of these conditions apply to you:
• You prefer to lift and replace the handset manually.
• Your phone includes a headset mode feature. In headset mode, you can connect to a Bluetooth listening device without
lifting the handset. If you want to use your telephone's headset mode, consult your telephone user's manual for instructions.
6
1d
2b
2c
2a
7
Setup
1. Install the lifter. (Skip this step if the Note on page 6 applies to you):
a. Remove the handset from the phone.
b.
On the underside of the lifter, remove the paper backing from the two pieces of tape.
(Two additional pieces of tape are available for future use, should you need to reposition the lifter.)
c.
8
Firmly press the bottom of the lifter to the phone base, directly below the earpiece well, in a position that will lie
beneath the handset arm.
d.
Connect the hub-to-lifter cable: Connect the L-shaped connecter to the LIFT port on the bottom of
hub, and then connect the other end of the cable firmly to the port on the top of the lifter.
2. Connect the hub:
a.
Remove the curly cord from the phone base, and then connect it to the HANDSET port on the
bottom of the hub.
b. Connect one end of the AC power adapter assembly to the DC 9V port on the left side of the hub, and then connect the other
end of the assembly to an AC power outlet in the wall.
c.
Connect the (short) Hub-to-base cable to the phone base port where the curly cord was connected.
Connect the other end of the cable to the BASE port on the top of the hub.
The green light on the hub illuminates only if the hub is on the correct compatibility setting for your
phone. If the green light does not illuminate, refer to page 10 for compatibility settings or adjustments.
9
Setup
3. Check for compatibility:
a. Pick up the telephone handset, and listen for a dial tone.
b. Take one of these steps:
10
•
If you hear a dial tone: On the hub, slide the VOLUME slider until you hear a noticeable change in volume, or
slide the TONE slider until you hear a noticeable change in tone quality. If volume or tone do not change, go to
the next bullet step.
•
If you do not hear an adjustable volume or dial tone: On the back of the hub, turn the dial until you hear a
dial tone. Once you hear a dial tone, on the front of the hub, slide the VOLUME slider until you hear a noticeable
change in volume, or slide the TONE slider until you hear a noticeable change in tone quality. Repeat these steps
until you find a compatible setting for your phone.
To install the hub for use with a cordless phone
1a
1b
11
Setup
1. Connect the hub:
a. Connect one end of the AC power adapter assembly to the DC 9V port on the left side hub, and then
connect the other end of the assembly to an AC power outlet in the wall.
b. Remove the telephones RJ11 jack from your wall phone line socket. Plug in the provided phone splitter.
c. Connect the hub-to-splitter cable: Connect one end of the cable into the LINE port on the hub, and then
connect the other end of the cable to a port on the phone line splitter.
The green light on the hub will not illuminate until you have connected a bluetooth headset,
neckloop or hearing aid streamer to it and engaged the line. See page 13 for "Bluetooth
Pairing and disconnection."
2. Pick up the telephone handset, and confirm that you hear a dial tone.
TIP: Make sure the compatibility dial on the back of the hub is turned to face the white dot for best results.
12
Bluetooth pairing and disconnection
The first time that you use the QH2 system, you must pair the hub with the Bluetooth headset, streamer or neckloop that you will wear while
using the system.
To pair the QH2 hub with a Bluetooth headset, streamer or neckloop
If necessary, consult your Bluetooth listening device user's guide to locate its multi-function button for pairing and to identify its pairing
indicators.
1. Wear your Bluetooth listening device, and remain within three feet of the QH2 hub.
2. On the hub, press and hold
until the blue and red light flashes.
3. Turn on your listening device, and then put it in the Bluetooth pairing mode.
When the hub and listening device are paired, the hub flashes a blue light every three seconds. Your listening device also indicates
when pairing is successful.
4. Confirm that you hear a dial tone by taking one of these steps:
• For systems using a corded-phone with no headset mode and no installed handset lifter:
a. On the hub, press and release
.
b. Manually lift the handset from the base.
You should hear the dial tone in your Bluetooth listening device.
13
Setup
c. Press and release
.
The dial tone stops.
d. Manually return the handset to the base.
• For all other corded or cordless system configurations:
a. On the hub, press and release
.
You should hear the dial tone in your Bluetooth listening device.
b. Press and release
.
The dial tone stops.
c. Check the lifter height: On the hub, press and release
.
The lifter rises and lifts the telephone handset, and you should hear a dial tone in your headset. If you do not hear a dial
tone: On the underside of the lifter move the switch that is to the next position, and try the lifter again. There are three switch
positions, and the position determines the lift height.
14
Answer or place a call
To break the Bluetooth connection between the hub and the listening device
If you find it necessary to break the Bluetooth connection, press and hold
on the hub until the red light flashes.
Otherwise, you should keep the Bluetooth power on, so that you are ready to place or answer calls.
You can answer or place a call when the Bluetooth listening device is within 30 feet of the hub.
To remain ready to answer and place calls, keep these components in this state:
•
Bluetooth listening device (headset, streamer or neckloop) on and Bluetooth-connected
•
QH2 hub connected to AC power and Bluetooth-connected
Note: Instead of pressing
on the hub to answer or end a call, you might be able to use a multi-function button on your
Bluetooth listening device. For example, if you are using a ClearSounds Quattro neckloop, you can press the multifunction button twice
to engage a call and once to disconnect a call. Check your listening device user's manual.
15
Answer or place a call
Answer or place a call using a corded phone system
Note: Besides the following instructions for using the system with Bluetooth, you can simply pick up the telephone handset to answer
and place calls. The hub only acts as an amplifier in this case, so that you can further amplify or adjust the volume and adjust the tone
for the call by using the sliders on the hub.
To answer a call using a corded phone
1. Within 30 feet of the hub, put on your Bluetooth listening device.
2. On the hub, press and release
.
The lifter raises the phone handset, and you hear the caller in your listening device.
Note: If you did not install the handset lifter and your phone does not include a headset mode, you must manually lift the handset
from the phone base.
3. (Optional) Adjust the tone and volume:
• Slide the TONE slider on the hub until you hear the tone that you prefer.
• Adjust volume on your Bluetooth listening device or phone.
Note: If you increase volume on the listening device and the phone, and sound distortion occurs, lower the volume on the
listening device or the phone.
4. To end the call, press and release
on the hub.
The lifter returns the phone handset to the resting position on the base.
16
Note: If you did not install the handset lifter and your phone does not include a headset mode, you must manually return the
handset to the base.
To place a call using a corded phone
1. Within 30 feet of the hub, put on your Bluetooth listening device.
2. On the hub, press and release
.
The lifter raises the phone handset, and you hear the dial tone in your listening device.
Note: If you did not install the handset lifter and your phone does not include a headset mode, you must manually lift the handset
from the phone base.
3. Press the desired keys on your telephone keypad.
4. (Optional) Adjust the tone and volume:
• Slide the TONE slider on the hub until you hear the tone that you prefer.
• Adjust volume on your Bluetooth listening device or phone.
Note: If you increase volume on the listening device and the phone, and sound distortion occurs, lower the volume on the
listening device or the phone.
5. To end the call, press and release
.
The lifter returns the phone handset to the resting position on the base.
Note: If you did not install the handset lifter and your phone does not include a headset mode, you must manually return the
handset to the base.
17
Answer or place a call
Answer or place a call using a cordless phone system
To answer a call using a cordless phone
1. Within 30 feet of the hub, put on your Bluetooth listening device.
2. On the hub, press and release
.
You hear the caller in your listening device.
3. (Optional) Adjust the tone and volume:
• Slide the TONE slider on the hub until you hear the tone that you prefer.
• Adjust volume on your Bluetooth listening device.
Note: If you increase volume on the listening device, and sound distortion occurs, lower the volume on the listening device.
4. To end the call, press and release
.
To place a call using a cordless phone
1. Within 30 feet of the hub, put on your Bluetooth listening device.
2. Lift your cordless handset, press the handset call button, and then press the desired keys on your telephone keypad.
18
3. When you hear the phone dialing through the handset, press and release
on the hub.
When you hear the dialing in your listening device, the hub has transferred the call from the handset to your listening device.
4. Press the End button on your cordless phone, and return the handset to the base.
5. (Optional) Adjust the tone and volume:
• Slide the TONE slider on the hub until you hear the tone that you prefer.
• Adjust volume on your Bluetooth listening device.
Note: If you increase volume on the listening device, and sound distortion occurs, lower the volume on the listening device.
6. To end the call, press and release
.
19
Troubleshooting
Symptom
Solution
The Bluetooth connection is
disrupted (between the hub and
the Bluetooth listening device).
Ensure the following:
• Your listening device is within 30 feet of the hub.
• The listening device Bluetooth feature is on, and it is paired with the hub (the hub flashes a blue
light every three seconds). See page 13.
• The hub is connected to AC power and the hub's green light is on.
The sound is muffled.
If the volume is turned up on the phone and on the Bluetooth listening device, the sound can be
muffled. Turn down the volume on the phone or listening device.
When the handset lifter lifts the
handset, I do not hear a dial
tone in my Bluetooth listening
device.
Adjust the handset lifter height: Move the switch that is on the underside of the lifter to the
next position, and then try the lifter again. There are three switch positions, and the position
determines the lift height.
Sometimes
the
Bluetooth
listening device is not charged,
or it is not near the phone. Can
I use the system without the
Bluetooth listening device?
Yes. You can simply lift the phone handset and dial or speak. You can use the hub to adjust the
volume and tone.
20
Compliance
Hearing Aid Compatibility (HAC)
This phone meets the U.S. Federal Communications Commission (FCC) standards for hearing aid compatibility.
FCC wants you to know
1. This equipment complies with Part 68 of the FCC rules and the requirements adopted by the ACTA. On the bottom of this
equipment is a label that contains, among other information, a product identifier of [US: CLSTE12B]. If requested, this number
must be provided to the phone company.
2. If the ClearSounds® QH2 Bluetooth Phone Hub System causes harm to the phone network, the phone company will notify you in
advance that temporary discontinuance of service may be required. But if advance notice isn’t practical, the phone company will
notify the customer as soon as possible. Also, you will be advised of your right to file a complaint with the FCC if you believe it is
necessary.
3. The phone company may make changes in its facilities, equipment, operations or procedures that could affect the operation of
the equipment. If this happens, the phone company will provide advance notice in order for you to make necessary modification
to maintain uninterrupted service.
4. If you experience trouble with this equipment, you should disconnect it from the network until the problem has been corrected or
until you are sure that the equipment is not malfunctioning.
5. Please follow instructions for repairing if any (e.g. battery replacement section); otherwise do not alternate or repair any parts of
device except as specified.
6. Connection to party line service is subject to state tariffs. Contact the state public utility commission, public service commission or
corporation commission for information.
21
Compliance
7. If the phone company requests information on what equipment is connected to their lines, inform them of:
a. The phone number that this unit is connected to,
b. The ringer equivalence number [1.2b],
c. The USOC jack required [RJ11C], and
d. The FCC Registration Number [US:].
Items (b) and (d) are indicated on the label. The ringer equivalence number (REN) is used to determine how many devices can be
connected to your phone line. In most areas, the sum of the RENs of all devices on any one line should not exceed five (5.0). If too
many devices are attached, they may not ring properly.
Service Requirements
In the event of equipment malfunction, all repairs should be performed by our Company or an authorized agent. It is the responsibility
of users requiring service to report the need for service to our Company or to one of our authorized agents. Service can be facilitated
through our office at:
ClearSounds Communications, Inc.
1743 Quincy Avenue, Suite 155
Naperville, IL 60540
22
Industry Canada CS03 Statement
This product meets the applicable Industry Canada technical specification. This is confirmed by the registration number. The abbreviation,
IC before the registration number signifies that registration was performed based on a Declaration of Conformity indicating that Industry
Canada technical specifications were met. It does not imply that Industry Canada approved the equipment.
Before installing this equipment, users should ensure that it is permissible to be connected to the facilities of the local telecommunications
company. The equipment must also be installed using an acceptable method of connections. The customer should be aware that
compliance with the above conditions may not prevent degradation of service in some situations.
Repairs to certified equipment should be made by an authorized Canadian maintenance facility designated by the supplier. Any repairs
or alterations made by the user of this equipment, or equipment malfunctions, may give the telecommunication company cause to
request the user to disconnect the equipment.
WARNING: Users should not attempt to make such connections themselves, but should contact the appropriate electric inspection
authority, or an electrician, as appropriate.
CAUTION: The Ringer Equivalence Number (REN) assigned to each terminal device provides an indication of the maximum
number of terminals allowed to be connected to a phone interface.
The termination on an interface may consist of any combination of devices subject only to the requirement that the sum of the Ringer
Equivalence Numbers of all the devices does not exceed 5. An alternative indication of the REN is the Load Number (LN); this number
should be divided by 20 to approximate the equivalent REN. The REN Number of this unit is indicated on the bottom of your phone.
If your home has specially wired alarm equipment connected to the phone line, ensure the installation of the ClearSounds QH2
Bluetooth Phone Hub System does not disable alarm equipment. If you have questions about what will disable alarm equipment,
consult your phone provider or a qualified installer.
This Class B digital apparatus complies with Canadian ICES-003. The product is warranted by ClearSounds against manufacturing
defects in material and workmanship under normal use for one (1) year from the date of purchase. Should you experience a problem,
contact our Customer Service department or visit our website at www.clearsounds.com.
23
Specifications
Component
Specification
Ringer-detecting RDI port
15 Hz - 68 Hz
Bluetooth version
3.0
Frequency
2.4 G SIM, Channel 79
Modulation system
FSK
Power
Class 2, -6~4DBM
Indoor conversion distance up to 15 meters, with only the PCB antenna
(without the extra PA and extended antenna)
24
Warranty
Be sure to save your sales receipt as the proof of purchase date should you need warranty service. The serial number for this
product is on the underside of the hub.
Your ClearSounds QH2 Bluetooth Phone Hub System comes with a (1) year limited warranty from the date of purchase. This products
is warranted by ClearSounds against manufacturing defect in material and workmanship under normal use. In the event that this
product fails to function properly due to defects in materials or workmanship within one year of the original purchase, return the unit
(freight prepaid) with proof of purchase (sales receipt or packing slip, no exceptions) to ClearSounds Communications. ClearSounds
Communications will either repair or replace the unit (with a refurbished unit or unit of equal condition) and return it you (using UPS/
USPS ground shipping) at no cost to you. The warranty replacement or repair will be warranted for a period of 90 days or the remainder
of the original warranty period (from original purchase date), whichever is longer.
The warranty does not cover accidents, negligence or breakage to any parts. This includes shipping damage, failure to follow
instructions, misuse, fire, floods, use of incompatible accessories, acts of God or failure in your phone service carrier’s line service. The
product must not be tampered with or taken apart by anyone who is not an authorized ClearSounds Communications® representative.
Tampering with the phone will void any written or implied warranties.
If a defect covered by this warranty should occur, promptly contact a Customer Service representative by phone, or log on to www.
clearsounds.com to obtain a Return Merchandise Authorization (RMA) number and shipping instructions before shipping the product
to us. Any shipment without an RMA number will not be accepted and will be returned to you at your expense. All authorized returned
products must be accompanied with proof of purchase and a brief explanation of the problem.
For out-of-warranty repairs and service, please contact our Customer Service department for instructions. The repair shall be warranted
for 90 days.
IMPORTANT: YOUR RECEIPT IS PART OF YOUR WARRANTY AND MUST BE RETAINED AND PRODUCED IN THE EVENT OF
A WARRANTY CLAIM.
25
Accessories
Please visit the ClearSounds website or call ClearSounds for additional accessories.
ClearSounds CS-QUATTRO Quattro Amplified Bluetooth Neckloop [Requires hearing
aid(s) or cochlear implant(s) with t-coil(s)]
ClearSounds CS-QUATTROKIT1 Quattro Amplified Bluetooth Neckloop with
SmartSound earbuds (suitable for users without hearing aid(s) or cochlear implant(s)
with t-coil(s): pictured left
ClearSounds QUATTROKIT1
26
© 2013 ClearSounds CS-QH2UG Ver 1