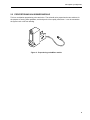
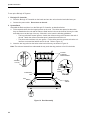
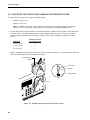
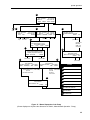
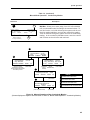
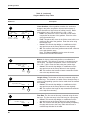
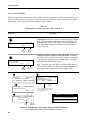
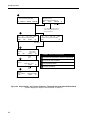
1
BIOLOGIC LP
CHROMATOGRAPHY SYSTEM
INSTRUCTION MANUAL
Catalog Numbers
731-8300
731-8301
Table of Contents
TABLE OF CONTENTS
Safety
Getting Started Quickly
Chapter 1.0
1.1
1.2
1.3
1.4
Introduction...................................................................................................................1
Overview.........................................................................................................................1
Features .........................................................................................................................2
Unpacking.......................................................................................................................3
Description of System Components...............................................................................3
Chapter 2.0
2.1
2.2
2.3
2.4
2.5
Description of Components ........................................................................................6
BioLogic LP ....................................................................................................................6
Proportioning Valve/Mixer Module..................................................................................9
UV Detector....................................................................................................................10
Conductivity Detector .....................................................................................................11
Bio-Rad System Options ................................................................................................12
2.5.1 Model 2110 Fraction Collector ............................................................................12
2.5.2 Model 2128 Fraction Collector ............................................................................13
2.5.3 Model 1327 Chart Recorder................................................................................14
2.6 Non-Bio-Rad System Options ........................................................................................15
2.6.1 Non-Bio-Rad Fraction Collectors.........................................................................15
2.6.2 Non-Bio-Rad Chart Recorders............................................................................16
Chapter 3.0 System Connections....................................................................................................17
Chapter 4.0
4.1
4.2
4.3
4.4
System Plumbing .........................................................................................................22
General Guidelines for Plumbing the System ................................................................22
Adjusting the Platen and Plumbing The Peristaltic Pump ..............................................24
Plumbing the System .....................................................................................................26
Purging the System ........................................................................................................30
Chapter 5.0 System Operation.........................................................................................................31
5.1 Front Panel Controls.......................................................................................................31
5.2 Manual Mode Operation.................................................................................................34
5.2.1 Manual Mode Operation of the Pump .................................................................34
5.2.2 Manual Mode Operation of the Fraction Collector ..............................................38
5.2.3 Manual Mode Operation of the Alarms ...............................................................41
5.2.4 Manual Mode Operation of the UV Monitor ........................................................42
5.2.5 Manual Mode Operation of the Conductivity Monitor..........................................44
5.2.6 Manual Mode Operation of the Valves ................................................................46
5.2.7 Manual Mode Operation of the Chart Recorder..................................................48
5.3 Programming Mode ........................................................................................................49
5.3.1 Programming Mode’s Main Menu .......................................................................51
5.3.2 Creating a New Method ......................................................................................53
5.3.3 Viewing and Editing a Method ............................................................................56
5.3.4 Program Mode’s Pump Table ..............................................................................58
5.3.5 Program Mode’s Fraction Collector Table............................................................62
5.3.5.1 Collect All Mode ...................................................................................64
5.3.5.2 Threshold Collection Mode...................................................................65
Table of Contents
5.3.5.3 Collection Windows Mode ....................................................................67
5.3.5.4 Threshold and Collection Windows Mode............................................70
5.3.6 Programming Mode’s Alarm Table ......................................................................62
5.3.7 Entering Method Names .....................................................................................75
5.4 Run Mode.......................................................................................................................76
5.4.1 Starting a Run .....................................................................................................76
5.4.1.1 Errors Which Prevent the Start of Runs...............................................78
5.4.1.2 Using the Delay Feature.......................................................................78
5.4.2 Run in Progress ..................................................................................................79
5.4.2.1 Information Available during a Run ......................................................80
5.4.2.2 Holding a Run.......................................................................................81
5.4.2.3 Pausing a Run......................................................................................82
5.4.2.4 Manual Override ...................................................................................83
5.4.3 Interpreting the Chart Recorder Trace ................................................................84
Chapter 6.0 Maintenance and Troubleshooting .............................................................................85
6.1 Cleaning and Storage.....................................................................................................85
6.2 Pump Calibration............................................................................................................85
6.2.1 Nominal Calibration .............................................................................................86
6.2.2 User Calibration ..................................................................................................86
6.3 Flushing/Cleaning Valves, Flow Cells, and Filters .........................................................87
6.3.1 Rinsing Valves and Flow Cells............................................................................87
6.3.2 Cleaning Valves and Flow Cells..........................................................................87
6.3.3 Cleaning the UV Optics Module’s Filters ............................................................87
6.4 Care of the Proportioning Valve and Mixer ....................................................................88
6.5 Replacing the Lamp in the UV Optics Module ...............................................................88
6.6 Troubleshooting ..............................................................................................................90
Appendix A. Specifications ...............................................................................................................92
Appendix B. Warranty and Ordering Information ...........................................................................94
LIST OF FIGURES
1. BioLogic LP System .......................................................................................................................1
2. Proportioning valve/Mixer module ..................................................................................................9
3. UV Optics Module...........................................................................................................................10
4. Conductivity Flow Cell and Separate Holder..................................................................................11
5. Model 2110 Fraction Collector........................................................................................................12
6. Model 2128 Fraction Collector .......................................................................................................13
7. Model 1327 Chart Recorder ...........................................................................................................14
8. Pin Assignments for BioLogic LP’s Fraction Collector and Chart Recorder Connectors ...............15
9. Example of a BioLogic LP System .................................................................................................17
10. Rack Assembly ...............................................................................................................................18
11. System Cable Connections ............................................................................................................20
12. Luer Fittings....................................................................................................................................23
13. Plumbing the BioLogic LP Controller’s Pump ................................................................................24
14. System Plumbing............................................................................................................................27
15. Manual Operation of the Pump ......................................................................................................35
16. Manual Operation of the Fraction Collector ...................................................................................39
17. Manual Operation of the Alarms.....................................................................................................41
18. Manual Operation of the UV Monitor..............................................................................................43
19. Manual Operation of the Conductivity Monitor ...............................................................................45
20. Manual Operation of the Valves .....................................................................................................47
21. Contents of a Method .....................................................................................................................50
Table of Contents
22.
23.
24.
25.
26.
27.
28
29.
30.
31.
32.
List of Methods ...............................................................................................................................52
Programming a New Method..........................................................................................................55
Programming: The Pump Table......................................................................................................61
Programming: The Fraction Collector’s Summary .........................................................................63
Programming: The Fraction Collector’s Collect All Mode...............................................................64
Programming: The Fraction Collector’s Threshold Mode...............................................................66
Programming: The Fraction Collector’s Windows Mode ................................................................69
Programming: The Fraction Collector’s Threshold with Collection Windows Mode......................72
Programming: The Alarm Table ......................................................................................................74
Run In Progress..............................................................................................................................79
UV Optics Module...........................................................................................................................89
LIST OF TABLES
1. Description of System Components ...............................................................................................3
2. BioLogic LP Controller’s Front Panel Features ..............................................................................6
3. BioLogic LP Controller’s Rear Panel Connectors ..........................................................................7
4. Comparison of Flow Rate Ranges for Different Tubing IDs ...........................................................22
5. Front Panel Controls.......................................................................................................................31
6. Manual Mode Operation: Pump ....................................................................................................34
7. Manual Mode Operation: Fraction Collector .................................................................................38
8. Manual Mode Operation: Alarms...................................................................................................41
9. Manual Mode Operation: UV Monitor............................................................................................42
10. Manual Mode Operation: Conductivity Monitor .............................................................................44
11. Manual Mode Operation: Valves ...................................................................................................46
12. Manual Mode Operation: Chart Recorder .....................................................................................48
13. Programming Mode Operation: List of Methods ............................................................................51
14. Programming Mode Operation: New Method.................................................................................53
15. Programming Mode Operation: Viewing and Editing a Method .....................................................56
16. Programming Mode’s Pump Table .................................................................................................58
17. Program Mode’s Fraction Collection Table.....................................................................................62
18. Program Mode’s Fraction Collection Table: Collect All..................................................................64
19. Program Mode’s Fraction Collection Table: Threshold Collection.................................................65
20. Program Mode’s Fraction Collection Table: Collection Windows ..................................................67
21. Program Mode’s Fraction Collection Table: Threshold and Collection Windows..........................70
22. Program Mode’s Alarm Table .........................................................................................................73
23. Program Mode: Entering Method Names......................................................................................75
24. Run Mode: Starting a Run.............................................................................................................76
25. Run Mode: Run Hold.....................................................................................................................81
26. Run Pause......................................................................................................................................82
Safety
SAFETY
!
Caution/Warning
Disconnect power to any BioLogic LP component before servicing. No userserviceable parts are inside any component. Refer servicing to Bio-Rad service personnel.
The Bio-Rad BioLogic LP is certified to meet the I.E. C. 1010* safety standard for safety of laboratory equipment. Certified products are safe to use when operated in accordance with the instruction manual. This
safety certification does not extend to other chromatography equipment or accessories not I.E.C. 1010
certified, even when connected to this BioLogic LP system.
This instrument is intended for laboratory use only.
The BioLogic LP conforms to the “Class A” standards for Electromagnetic Emissions, intended for laboratory
equipment applications. It is possible that emissions from this product may interfere with some sensitive
appliances when placed nearby or on the same circuit as those appliances. The user should be aware of
this potential and take appropriate measures to avoid interference.
This instrument should not be modified or altered in any way. Alteration of this instrument will void the
manufacturer’s warranty, void the I.E.C. 1010 certification, and create a potential safety hazard for the user.
Bio-Rad is not responsible for any injury or damage caused by the use of this instrument for purposes other
than for which it is intended or by modifications of the instrument not performed by Bio-Rad or an authorized
agent.
*I.E.C. 1010 is an internationally accepted electrical safety standard for laboratory instruments.
Getting Started
GETTING STARTED QUICKLY
This manual provides detailed discussion of the use and maintenance of the BioLogic LP system. Listed
below is an overview of the steps involved in setting up and using your system.
Setting up the electrical and plumbing connections:
1. Connect system cabling, as shown in Figure 11, System Cable Connections. Note the following:
a. Chart recorder: Be sure to plug the conductivity signal banana plugs into Channel 2 of the chart
recorder. (Refer to Chapter 3, step 6 for connecting the chart recorder.)
All chart recorder controls should be set to the position marked in green.
b. Fraction collector: Because this depends on the type of fraction collector you will be using, it is recommended that you read Chapter 3, steps 7 and 8 for connecting the fraction collector.
2. Select and install the pump head tubing: Select a tubing according to the flow rate that will be used for
the separation. (Refer to sections 4.1 and 4.2 for plumbing the pump.)
3. Adjust the platen pressure: Read section 4.2, which discusses adjusting the platen.
4. Plumb the system: Refer to Figure 14, System Plumbing. Note the following:
a. Arrows embossed on the UV Optics module indicate flow direction.
b. The MV-6 Inject valve will conform to the diagram when the knob is turned counterclockwise.
5. Provide a drain tube for the rack tray.
Setting up the operating conditions:
1. Using the BioLogic Lp’s front panel, from the Mode keys select Manual.
a. Select your fraction collector: From the Instrument keys select Collector. From the screen display
select the Model softkey.
b. Calibrate the pump: This is essential for acquiring an accurate displayed flow rate. From the
Instrument keys select Pump. From the screen display select the Flow softkey. To calibrate, read
section 5.2.1, Manual Mode Operation of the Pump.
c. Purge air from the system: From the screen display select the Purge softkey.
d. When the UV Monitor has warmed up (5 to 10 minutes after power on), select a sensitivity range
and zero the UV Monitor: From the Instrument keys select UV. From the screen display select the
Set Range or Set Max (your choice) and Zero softkeys.
Using the thumbwheel on the chart recorder, adjust the position of the Channel 1 chart recorder pen.
e. Select a sensitivity range for the Conductivity Monitor: From the Instrument keys select Cond.
From the screen display select the Set Range or Min/Max (your choice) softkey.
Using the chart recorder’s thumbwheel, adjust the position of the Channel 2 chart recorder pen.
2. Program a method: From the Mode keys select Program. Refer to section 5.3 for discussion.
Getting Started
3. Make final adjustments. From the Mode keys select Manual, and from the Instrument keys select
Pump. Start the pump, and with fluid flowing through the system, check the following:
a. Check the range setting for the UV Monitor, zero the UV Monitor, and position the Channel 1 pen on
the chart recorder.
b. Check the range setting for the Conductivity Monitor, and position the Channel 2 pen on the chart
recorder.
c. Check that a sufficient number of tubes are in the fraction collector rack.
d. Check all fittings for leaks.
e. Turn the MV-6 valve know to the left, and load the sample loop.
f. Check that the “Waste” tube is in the waste container or drain, and make sure that buffer inlet lines
are submerged to the bottom of their containers.
4. Run the method: From the Mode keys select Run to start the separation. When the run starts, turn the
MV-6 Inject valve knob to the right. (Refer to section 5.4.)
Introduction
1.0 INTRODUCTION
1.1 OVERVIEW
The BioLogic LP low-pressure, gradient chromatography system is designed for the purification of proteins,
peptides, and other biomolecules where recovery of biological activity is of primary concern.
The BioLogic LP Controller is microprocessor controlled, with easy-to-use front panel controls and menu-driven software for manual operation, system setup, method editing and run operations.
The flexible control architecture allows the seamless integration of a wide variety of configurations with other
Bio-Rad and non-Bio-Rad components to meet your purification requirements.
ECONO COLUMN
MV-6 INJECT VALVE
SV-5 BUFFER SELECT
SV-3 DIVERTER VALVE
SV-3 BYPASS VALVE
UV OPTICS MODULE
CONDUCTIVITY FLOW CELL
PROPORTIONING VALVE
AND MIXER MODULE
SYSTEM RACK
MODEL 1327
CHART RECORDER
BIOLOGIC LP
CONTROLLER
MODEL 2128 FRACTION
COLLECTOR
Figure 1. BioLogic LP System
1
Introduction
1.2 FEATURES
The BioLogic LP System provides the following features:
2
•
A space-saving modular and stackable design which minimizes the system footprint on the bench.
•
Programming separation methods is menu-driven, easy and intuitive using either Time-based or
Volume-based steps. Method storage capacity easily meets most laboratory requirements.
•
On-screen help function.
•
Single-point control of pump, UV and Conductivity monitors, chart recorder, fraction collector, valves,
and timer.
•
Dynamic mixing for accurate and reproducible gradient formation.
•
The use of biocompatible materials throughout the flowpath to ensure maximum recovery of biological activity.
•
Operation at 280nm and 254nm, with a preparative UV flow cell
•
Standard conductivity cell to monitor gradient formation.
•
Four Fraction Collection schemes are standard. Collection is volume-based or time-based with
Collect All, Collection Windows, Threshold and Threshold + Collection Window modes. A wide
range of fraction collectors may be used, including Bio-Rad’s Model 2128 and Model 2110 fraction
collectors.
•
Software control of diverter, column bypass, and buffer select valves.
•
Sufficient tray space on the basic System Rack to hold a Model 2110 Fraction Collector or a Model
1327 Chart Recorder. Additional rack components are available to make a three-tray configuration.
•
System Rack includes column supports to eliminate rack clutter.
Introduction
1.3 UNPACKING
When you receive the BioLogic LP System, carefully inspect the shipping containers for any damage which
may have occurred in shipping. Severe damage to a container may indicate damage to its contents. If you
suspect damage to the contents may have occurred, immediately file a claim with the carrier in accordance
with their instructions before contacting Bio-Rad Laboratories.
!
Caution
Lift items from the bottom as you remove them from their containers!
Open each of the shipping cartons and lift the contents out of its packing. Check the contents of each box
against the supplied packing list. Remove the plastic bag from each unit and inspect the unit for external
damage. If any part is missing or damaged, contact Bio-Rad Laboratories immediately.
1.4 DESCRIPTION OF SYSTEM COMPONENTS
The following sections identify the key features of the BioLogic LP System and available options.
Table 1.
Description of System Components
Component
Controller
Function
The BioLogic LP Controller consists of the following:
• System Software. Through the software’s menu-driven interface, each instrument in the
system can be operated manually, or as part of a process as specified by the method you
create. Software controls the Peristaltic Pump, the Mixer/Proportioning valve, the Valves,
the UV/Conductivity Monitors, and peripheral instruments (such as the Model 2128 fraction collector and Model 1327 Chart Recorder) .
• Peristaltic Pump. This is a two-channel, bi-directional, variable speed, peristaltic pump,
delivering flow rates from 0.05 to 40 ml/min.
• Control circuitry for the UV and Conductivity Monitors. Signal export ports for UV and
Conductivity data at 1V and chart recorder control (pen up/down, start/stop).
• Control circuitry for the system valves (low pressure solenoid and buffer select valves).
• An output power connector to the UV lamp.
3
Introduction
Table 1. (continued)
Description of System Components
Component
Function
System Rack
This is the system organizer for columns and cartridges, buffer containers, sample inject
and buffer select valves, UV and Conductivity Flow Cells, and other devices used with the
system. The optional BioLogic Rack Expansion kit is available to extend the rack to 3
trays.
Proportioning
Valve/Mixer
Module
This combination of valve and mixer module mixes and proportions two buffers.
It is designed to be rack mounted or free-standing.
UV Detector
This consists of the UV Optics Module and the control circuitry within the BioLogic LP
Controller. The UV Optics Module includes a mercury lamp and filters for fixed wavelength UV detection at 280nm and 254nm. The flow cell has a path length of 2 mm, an
internal volume of 80 µl, and an illuminated volume of 3µl.
Conductivity
Detector
This consists of the Conductivity Flow Cell and the control circuitry within the BioLogic LP
Controller. The Conductivity Flow Cell provides instantaneous, on-line readings of conductance for monitoring a salt gradient and optimization of column chromatographic conditions.
Valves
Valves for the BioLogic LP include:
• MV-6 Inject Valve
• SV-5 Buffer Select valve
• SV-3 Diverter/Column Bypass valves
Sample Loops
Tygon tubing sample loops are prepared by the user.
Fraction
Collector
Fraction collectors are controlled by the BioLogic LP Controller via the Fraction Collector
port. Fraction advance marks (event marks) are embedded in the UV signal sent from the
Controller to a chart recorder. The following fraction collectors are supported:
• The Model 2128 provides X-Y motion drop dispensing. The Model 2128 accommodates a
wide range of tube diameters and lengths, microtiter plates, micro-tubes, and “bottle size”
fractions. The Model 2128 is ideally suited for both analytical and preparative applications.
• The Model 2110 uses a stationary drop-dispensing head to collect up to 80 fractions in a
carousel. The SV-3 Diverter valve is required for full operation. The Model 2110 is controlled by the BioLogic LP Controller via the Fraction Collector port.
• Generic fraction collectors may be used with the BioLogic LP as long as tube advances
can be initiated by a TTL pulse (active high or active low, 100 ms duration.) The SV-3
Diverter valve is required for full operation.
Regardless of which fraction collector is chosen, fraction time/volume and collection parameters such as Collect All, Collection Windows, Threshold, and Threshold
+ Collection Windows are controlled from the BioLogic LP Controller.
4
Introduction
Table 1. (continued)
Description of System Components
Component
Chart recorder
Function
Bio-Rad offers the Model 1327 Chart Recorder as a system option. This is a dual pen
chart recorder for Conductivity and UV Detector readings. Stop/Start and Pen Up/Down
functions are controlled by the BioLogic LP Controller. Chart speed is set at the recorder
itself (the BioLogic LP Controller does not control this function). Event marks including
fraction advance marks are embedded in the UV signal sent from the BioLogic LP
Controller to the chart recorder.
The BioLogic LP may be used with any recording instrument (such as a chart recorder,
integrator, or data acquisition system) which will accept a 0 to 1 volt analog input.
Tubing
The following tubing is supplied with the unit:
System tubing: 0.8mm ID, 1.6mm ID Tygon® tubing.
Pump head tubing: 0.8mm ID, 1.6mm ID, 3.2mm ID PharMed® tubing.
Fittings
Luer fittings.
PharMed and Tygon are registered trademarks of Norton Co.
5
Description of Components
2.0 DESCRIPTION OF COMPONENTS
The following sections identify the key features of each of the major system components.
2.1 BIOLOGIC LP
The BioLogic LP Controller is described in Table 2.
Table 2.
BioLogic LP Controller’s Front Panel Features
PLATEN ADJUST
SCREW
BioLogic LP
Pump
Fraction Collector
UV Lamp
Chart Recorder
Alarm
Mark
?
1
2
3
4
5
6
7
8
9
C
0
.
Help
Previous
Next
MODE
Manual
Program
Run
Pump
Collector
Alarm
INSTR
UV
Cond
Valves
Recorder
PLUMBING
CONNECTIONS
POWER ON/OFF
Feature
Control
Panel
Description
Consists of the control keys and status LEDs for monitoring and controlling the
system. It is designed to withstand the minor spills associated with use in a laboratory.
Power switch
Turns on/off the BioLogic LP Controller.
Plumbing
Connections
The peristaltic pump may be used with most flexible tubing having an inner diameter
less than or equal to 3.2 mm (1/8”) and a wall thickness of 1.0 mm or less, including
PharMed, and silicone. Inlet and outlet lines attach to the ports at the bottom of the
pump. These ports accept standard luer fittings.
6
Description of Components
Table 3.
BioLogic LP Controller’s Rear Panel Connectors
UV LAMP
Connector
UV
OPTICS
BUFFER
SELECTOR
FRACTION
COLLECTOR
UV
CHART
BYPASS
VALVE
INSTR.
BUS
COND
FLOWCELL
DIVERTER
VALVE
COND
CHART
GRADIENT
MIXER
AUX
12 V
Description
UV Optics: For connecting the UV Optics module to the system.
UV Chart: For UV signal output to a single or dual pen chart recorder. In addition,
when the Bio-Rad Model 1327 is used, chart recorder Pen Up/Down, Stop/Start commands, and event marks are sent from this port.
The Bio-Rad Model 1327 dual pen recorder needs an 8 pin mini-DIN to standard DIN
cable (System Cable 2) available from Bio-Rad.
Generic chart recorders require an 8 pin mini-DIN to banana plug cable (System
Cable 4) available from Bio-Rad.
The chart recorder should be set to 1V full scale.
Cond Flowcell: For connecting the Conductivity Flow Cell to the system.
Cond Chart: For conductivity signal output to a single or dual pen chart recorder.
An 8-pin mini-DIN to banana plugs cable (System Cable 4) for connection to the Model
1327 Chart Recorder is available. Connect the red line to the positive (+) terminal and
the black line to the negative (–) or ground terminal of channel 2 (CH2).
The chart recorder should be set to 1V full scale.
Buffer Selector, Bypass, and Diverter Valves: These connectors are for connecting
Bio-Rad’s low pressure solenoid valves (SV-5 Buffer Select and SV-3 Bypass and
Diverter valves) to the system.
Proportioning valve/Mixer module: This is a combination gradient proportioning
valve and mixer used for the forming of linear gradients as specified by the Method.
The proportioning valve proportions, and then the dynamic mixer rapidly mixes the
two solutions.
7
Description of Components
Table 3. (continued)
BioLogic LP Controller’s Rear Panel Connectors
Connector
Description
Fraction Collector: The BioLogic LP supports the Bio-Rad Model 2110 and Model
2128 fraction collectors, as well as other fraction collectors. This port sends
“Advance” signals to the fraction collector.
Instrument bus (phone jack connector): This connector is reserved for internal BioRad use.
Test Port: This connector is reserved for internal Bio-Rad use.
Aux connector: This connector is reserved for internal Bio-Rad use.
UV Lamp: This specialized 6-pin square port provides electrical power to the mercury
lamp in the UV Optics module’s lamp housing.
12 Volt: This is a 12 V DC power source designed to power optional equipment.
Power Connectors: There are two power connectors. They are keyed so that you
can plug a fraction collector into one power connector and the BioLogic LP
Controller’s power cord into a power strip. This arrangement means the fraction collector’s power switch can be left in the ON position. The BioLogic LP Controller’s
power ON/OFF switch then turns on/off both the BioLogic LP Controller and the fraction collector.
8
Description of Components
2.2 PROPORTIONING VALVE/MIXER MODULE
This is a combination proportioning valve and mixer. The solenoid valve proportions the two solutions for
the purpose of forming linear gradients, and the dynamic mixer rapidly mixes them. It can be mounted to
the system rack or left free-standing.
M
IX
B
ER
A
Figure 2. Proportioning valve/Mixer module
9
Description of Components
2.3 UV DETECTOR
The UV Detector, which consists of the UV Optics Module and the control circuitry within the BioLogic LP
Controller, is a single beam, fixed wavelength UV absorbance detector specifically designed for protein chromatography. The UV Optics Module can be positioned close to a column outlet, minimizing system dead
volume and remixing of peaks. When connecting the UV Optics Module to the system, note the flow direction arrows on the top of the UV Optics Module’s case. It is important that the flow direction through the flow
cell is correct.
FLOW CELL
FILTER HOLDER
AND FILTERS
UNDERSIDE OF
UV OPTICS MODULE
Figure 3. UV Optics Module
The AU readings from the BioLogic LP UV detector will not correspond directly to absorbance readings from
a spectrophotometer. The primary reason for this is the different path lengths; light bandwidths and other
factors have an effect as well. This has no effect on the UV monitor’s ability to detect protein.
Eleven fixed UV absorbance ranges, from 5.0 to .001 Absorbance Units Full Scale (AUFS), are available.
The user may choose a “custom” range using the “Set Max” function. Refer to Table 9.
The UV Optics Module consists of a low pressure mercury lamp, 280nm and 254nm filters, and a flow cell.
The filters are both held by a single tray. The flow cell, which uses luer fittings, has a 2 mm path length. It
has an internal volume of 80 µl and an illuminated volume of 3 µl.
The UV Optics Module receives power from the BioLogic LP Controller, to which it is connected by the UV
Lamp cable. The UV detector communicates with the system via the UV Optics cable, which plugs into the
UV Optics connector on the back of the BioLogic LP Controller.
10
Description of Components
Figure 3 shows how the flow cell and the filters can be changed. To remove the flow cell, you will need to
remove the retaining clip from the bottom of the optics module and pull the luer connectors away from their
holders. Then loosen the thumbscrews and remove the flow cell. When inserting the replacement flow cell,
make sure the O-ring is securely placed on the flow cell. To change the filter, loosen the filter’s thumbscrew
and lift out and rotate the filter holder. The selected wavelength is indicated by the raised arrow on the bottom of the case.
WARNING: To avoid exposure to UV radiation, turn off the UV lamp when changing filters and flow cells.
2.4 CONDUCTIVITY DETECTOR
The Conductivity Detector consists of a small, portable Conductivity Flow Cell and the control circuitry which
resides in the BioLogic LP Controller. This monitoring system provides a means to check equilibration conditions and the formation of a salt gradient, for example, in ion-exchange chromatography and hydrophobic
interaction chromatography. This data helps in optimizing purification protocols and column cleaning procedures.
Figure 4. Conductivity Flow Cell and Separate Holder
The Conductivity Flow Cell consists of the following:
•
Flow cell with Inlet/Outlet ports: For connection of the tubing, using luer fittings. The flow cell allows
flow in either direction.
•
Signal Cable: For connection to the back of the BioLogic LP Controller. Electrical power for the
Conductivity Flow Cell is drawn off the signal cable.
The flow cell can be plumbed immediately after the UV Optics Module’s flow cell or at any other point in the
flowpath. A separate holder for the Conductivity Flow Cell is mounted to the system rack. The swept volume in the cell is a nominal 2 µl.
Conductivity is measured in milli-Siemens (mS). For accurate measurement, the flow cell must be calibrated. Refer to Table 10.
Nine fixed Conductivity ranges, from 500 to 0.5 mS Full Scale (mSFS), are available. The user may choose
a “custom” range using the “Min/Max” function. Refer to Table 10.
11
Description of Components
2.5 BIO-RAD SYSTEM OPTIONS
Bio-Rad offers a number of system options for use with your BioLogic LP. The following instrument options
are described in this section.
•
Models 2110 and 2128 Fraction Collector
•
Model 1327 Chart Recorder
2.5.1
Model 2110 Fraction Collector
The Model 2110 collects up to 80 fractions in a motor-driven carousel. It uses standard 13 x 100 test tubes.
An optional adapter is available for use with 1.5 ml microcentrifuge test tubes.
MODEL 2110 FRACTION COLLECTOR
Figure 5. Model 2110 Fraction Collector
(Dust Cover is optional)
The Model 2110 is connected to the BioLogic LP Controller via System Cable 1. When controlled by the
BioLogic LP Controller, fraction collection is by time or volume. The numeric display screen on the Model
2110 is inactive while the fraction collector is under the control of the BioLogic LP. Only the fraction collector’s Advance key is active during this time.
The SV-3 diverter valve is required by the Model 2110 when doing any collection scheme other than “Collect
All.” The SV-3 diverts flow away from the fraction collector when fractions are not being collected.
Collection parameters such as Collect All, Threshold, Collection Windows, and Threshold + Collection
Windows become available in Program mode.
The Model 2110 is plumbed to the BioLogic LP using Tygon tubing. The Tygon tubing is inserted directly
into the fraction collector’s drop former, without the need for additional fittings.
The Model 2110 fraction collector is described in detail in its separate documentation.
12
Description of Components
2.5.2
Model 2128 Fraction Collector
The Model 2128 provides X/Y motion drop-dispensing, accommodating a wide range of tube diameters and
lengths, microtiter plates, microtubes, and “bottle size” fractions. It is ideally suited for both analytical and
preparative applications.
MOD
E
FRA L 2128
CTIO
N CO
LLE
CTO
R
Thre
sh
Next old
tu
Drain be 2
ADV ing
COL
L
STO
P
7
4
1
8
5
2
HELP
9
6
3
CE
0
.
Figure 6. Model 2128 Fraction Collector
The Model 2128 is connected to the BioLogic LP Controller via the following cables:
•
System Cable 15: This is required whenever the Model 2128 is to be controlled by the BioLogic LP
Controller. It transmits the “Advance” commands. (Note: Only three of the 15 pins on the D-connector are used.)
•
System Cable 3: This is required when the Model 2128’s arm-mounted diverter valve is used, or
when no diverter valve is used. This cable transmits the “Collect/waste” commands from the
BioLogic LP, which tells the fraction collector when to move the drop head to the waste trough, or
when the optional arm-mounted diverter valve is to switch between collect and waste.
When connected as described above and place in its ECONO mode, the Model 2128 is controlled by the
BioLogic LP Controller. Collection and tube advance is controlled by the BioLogic LP. Programming mode
supports the following collection schemes: Collect All, Threshold, Collection Windows, and Threshold +
Collection Windows (all with Delay volume, if desired). The Model 2128’s optional diverter valve mounts on
the collector’s arm and minimizes liquid spills during fraction advances.
The Model 2128 is plumbed to the BioLogic LP Controller using Tygon tubing and either of the following fittings:
•
To connect directly to the drop head, use the luer adaptor (provided with the Model 2128 Fraction
Collector) to adapt the Tygon tubing from the BioLogic LP to the 1/16” tubing leading to the drop
head.
•
To connect to the optional arm-mounted diverter valve, use the luer adaptor (provided with the
Model 2128) to adapt the Tygon tubing from the BioLogic LP to the 1/16” tubing leading to the
“Common” port of the diverter valve.
This instrument is described in detail in its separate documentation.
13
Description of Components
2.5.3
Model 1327 Chart Recorder
When used with the BioLogic LP, the Model 1327 Chart Recorder automatically starts when a method
begins and stops when the method ends. The BioLogic LP’s Manual mode operation of the chart recorder
may be used to start and stop the chart recorder.
The following cables are required to connect the Model 1327 Chart Recorder to the BioLogic LP Controller:
•
System Cable 2: Through this cable, the BioLogic LP outputs the UV analog data signal, pen
up/down, and Stop/Start commands to the Model 1327 chart recorder. It connects to the BioLogic
LP’s UV Chart port and to the chart recorder’s DIN connector.
•
System Cable 4: Through this cable, the Conductivity analog data signal is sent from the BioLogic
LP to the Model 1327 Chart Recorder. The cable connects to the BioLogic LP’s Cond Chart port
and to the chart recorder’s channel 2 banana plug connectors.
•
Power cable and adapter: Operating power for the Model 1327 Chart Recorder is supplied via the
jack next to the chart recorder’s DIN connector. (Note: The Model 1327 Chart Recorder may also
be run on batteries.)
Figure 7. Model 1327 Chart Recorder
In addition, following chart recorder controls should be set:
•
All chart recorder controls with a green setting should be set to their green setting.
•
Paper speed dial: Select a chart speed appropriate for the separation being performed.
•
Manual paper feed: Using this switch, select Paper “fast feed” to quickly advance the paper to the
desired position.
•
Baseline adjustment dial: These dials allow for pen position adjustment. The “zero” position of each
pen is adjusted using the thumbwheel for each channel. When adjusting the pen’s zero position,
make sure that the BioLogic LP instrument (UV or Conductivity Monitor) is zeroed first.
Note: The chart speed is set at the recorder itself. The BioLogic LP Controller does not control this
function.
This instrument is described in detail in its separate documentation.
14
Description of Components
2.6 NON-BIO-RAD SYSTEM OPTIONS
Non-Bio-Rad fraction collectors and chart recorders may be used with the BioLogic LP, as discussed in the
following sections.
UV LAMP
UV
OPTICS
BUFFER
SELECTOR
FRACTION
COLLECTOR
UV
CHART
BYPASS
VALVE
INSTR.
BUS
COND
FLOWCELL
DIVERTER
VALVE
COND
CHART
GRADIENT
MIXER
8
7
5
4
2
6
3
1
AUX
12 V
Figure 8. Pin Assignments for BioLogic LP’s Fraction Collector and Chart Recorder Connectors
2.6.1
Non-Bio-Rad Fraction Collectors
A non-Bio-Rad collector may be used with the BioLogic LP, providing its tube advance function can be initiated by a TTL signal with a duration of 100 milliseconds or greater.
Use System Cable 7 to connect a non-Bio-Rad fraction collector. Pin-outs for the BioLogic LP’s Fraction
Collector port are listed below and shown in Figure 8. Pin 5 is the TTL control wire, and pin 7 is the logic
ground. A wire color to pin number chart is included with System Cable 7. See the pin-out information in
your collector manual.
•
Pin 1: The function of this pin differs, depending on your selection in Manual mode operation of the
fraction collector. (See Table 7, Manual Mode Operation: Fraction Collector for details on selecting a
fraction collector.) Manual mode offers the following selections:
Other or 2128: The BioLogic LP software allows you to select “Other” when indicating a non-BioRad fraction collector. (Selecting 2128 functions similar to Other.) In this mode, this pin is normally
“low” (0 volts). It goes “high” (5 volts) for 100 milliseconds when a tube change is commanded.
2110: When the Model 2110 fraction collector is selected, this pin is normally “high” (5 volts). It
goes “low” (0 volts) for 100 milliseconds when a tube change is commanded.
•
Pins 2 - 4: Not connected.
•
Pin 5: The function of this pin differs, depending on your selection in Manual mode operation of the
fraction collector. (See Table 7, Manual Mode Operation: Fraction Collector for details on selecting a
fraction collector.) Manual mode offers the following selections:
Other or 2128: When Other (or Model 2128) fraction collector is selected, this pin is normally
“high” (5 volts). It goes “low” (0 volts) for 100 milliseconds when a tube change is commanded.
2110: In this mode, this pin is normally “low” (0 volts). It goes “high” (5 volts) for 100 milliseconds
when a tube change is commanded.
•
Pin 6: Not connected.
•
Pin 7, Digital Ground: This is the “ground reference” pin for all control inputs and outputs on this
connector.
•
Pin 8, Event Mark In: This pin is normally high (5 volts). When an external device such as a fraction collector pulls it “low” for 100 milliseconds or more, the BioLogic LP generates an event mark on
the analog output to the Chart Recorder’s channel 1.
15
Description of Components
If you are using a non-Bio-Rad fraction collector, use an SV-3 diverter valve to enable advanced features
such as collection by Threshold and/or Collection Windows. If this optional valve is not used, then only
Collect All is available.
2.6.2
Non-Bio-Rad Chart Recorders
A non-Bio-Rad chart recorder may be used with the BioLogic LP. A mini-DIN to banana plug cable (System
Cable 4) is used to connect the BioLogic LP Controller’s UV Chart port to the chart recorder. The input signal voltage should be set to 1V for both BioLogic LP UV and Conductivity signals.
The pin outs for the BioLogic LP’s UV Chart port are listed below and shown in Figure 8:
•
Pin 1, Stop Paper: This pin is high (5 volts) when a method is running or when the BioLogic LP’s
Manual mode is used to make the chart recorder run. When the method ends, or Manual mode is
used to stop the chart recorder, the BioLogic LP pulls this pin “low” (0 volts) and the chart paper
stops feeding.
•
Pins 2 and 3: Not connected.
•
Pin 4, Integrator (+): This pin sends an unfiltered, unscaled signal to integrators or other data
acquisitions systems. An absorbance of 2 AU will cause a 1 volt signal at this pin, regardless of UV
Monitor range settings. When using this output, connect the negative lead to pin 7, Analog ground.
•
Pin 5, Chart Recorder (+): This pin is connected to the positive lead of the chart recorder channel
1, which displays the UV absorbance trace. This signal is 0 volts when the UV Monitor reads 0 AU,
and 1 volt when the UV monitor reads “full scale”.
•
Pin 6, Pen Lift: This pin is “low” (0 volts) when a method is running, or when the BioLogic LP
Manual mode is used to make the chart recorder run. When the BioLogic LP allows this pin to go
“high”, the pens lift from paper.
•
Pin 7, Chart Recorder (–), analog/digital ground: This pin is connected to the negative lead of
the chart recorder channel, which displays the UV absorbance trace. It also serves as the negative
lead for the integrator signal and the negative connection for all digital signals on this connector.
•
Pin 8: Not connected.
The pin outs for the BioLogic LP’s Cond Chart port are listed below and shown in Figure 8:
16
•
Pins 1 – 4: Not connected.
•
Pin 5, Chart Recorder (+): This pin is connected to the positive lead of the chart recorder’s channel 2, which displays the conductivity trace. This signal is 0 volts when the Conductivity monitor
reads the programmed “minimum” conductivity value, and 1 volt when the conductivity monitor reads
the programmed “maximum” value.
•
Pin 6: Not connected.
•
Pin 7, Chart Recorder (–), analog ground: This pin is connected to the negative lead of the chart
recorder’s channel 2, which displays the conductivity trace.
•
Pin 8: Not connected.
System Connections
3.0 SYSTEM CONNECTIONS
When setting up the system, consider the amount of bench space available, the instruments to be used with
the system, and the devices to be used with the System Rack.
The BioLogic LP can be set up wherever there is available bench space and sufficient power outlets, including in 4° cold rooms or cold boxes. When used in a cold environment, it is recommended that you leave
system power “ON” to minimize condensation.
All BioLogic LP systems will include as a minimum the following:
•
Controller
•
Proportioning valve/Mixer module
•
System Rack (single tray configuration)
•
MV-6 Inject Valve
•
UV Optics Module
•
Fittings kit
•
Conductivity Flow Cell
•
Tubing
Your BioLogic LP system may include components or instruments not listed above. Refer to the separate
supporting documentation for each of the following types of devices:
•
Bio-Rad Model 2128 or Model 2110 Fraction Collector
•
Bio-Rad Model 1327 Chart Recorder
•
additional valves
•
instruments not purchased from Bio-Rad, such as a generic fraction collector or chart recorder
ECONO COLUMN
MV-6 INJECT VALVE
SV-5 BUFFER SELECT
SV-3 DIVERTER VALVE
SV-3 BYPASS VALVE
UV OPTICS MODULE
CONDUCTIVITY FLOW CELL
PROPORTIONING VALVE
AND MIXER MODULE
SYSTEM RACK
MODEL 1327
CHART RECORDER
BIOLOGIC LP
CONTROLLER
MODEL 2128 FRACTION
COLLECTOR
Figure 9. Example of a BioLogic LP System
17
System Connections
To set up the BioLogic LP System:
1. BioLogic LP Controller.
a. Place the BioLogic LP Controller on the bench and turn the unit so that the back side faces you.
b. Connect the power cable. Do not turn on the unit.
2. System Rack.
Assemble the Rack and place it on the BioLogic LP Controller, as described below.
a. Fit the tapered collars into the ringed grooves on the rods. The collars are tapered so that when
they are attached to the rods and the rods are fitted into the holes at each end of the tray, the rods
and collars serve as the legs of the tray. With this in mind, note the following guidelines:
• The long rods have several grooves. Attach the collars to the groove closest to the end of
the rod. Attach the collars so that the taper is toward the end of the rod.
• The short rods each have only one groove. Fit the collars onto the grooves so that the collars flare out toward the farthest end of the rod. Refer to Figure 10.
b. Insert the two long rods into the holes at the back of the tray, as shown in Figure 10.
Note: The rods are inserted from underneath the tray such that they produce a firm fit in the holes.
COLUMN
CLAMPING
ARRANGEMENT
TAPERED
COLLAR
DETAIL
DRAIN
FITTING
HORIZONTAL
BAR
SIDE VIEW
TRAY
DRAIN
TUBING
Figure 10. Rack Assembly
18
System Connections
c. Insert the two short rods into the remaining holes.
d. Mount the 2-piece column clamping arrangement across the two long rods using the attached
thumbscrews.
e. The horizontal bar may be positioned between the upright bars using the rod clamps (tightened by
the Allen wrench) supplied with the system.
f. Place the rack into the four corner holes of the BioLogic LP Controller. Since the back of the
BioLogic LP Controller is facing you, you will want the back of the rack (the side with the two long
rods) also facing you.
If a hole is covered by a green cap, remove the cap.
3. Proportioning valve/Mixer module.
a. Attach the Proportioning valve/Mixer module to a suitable position on the vertical bar using the module’s rod clamp.
b. Connect the signal cable from the Proportioning valve/Mixer module to the port marked “Gradient
Mixer” on the rear of the BioLogic LP Controller.
4. Buffer Select valve.
a. If you will be using the SV-5 Buffer Select valve, attach the valve to a suitable position on the horizontal bar using the valve’s rod clamp.
b. Connect the signal cable from the Buffer Select valve to the port marked “Buffer Selector” on the
rear of the BioLogic LP Controller.
5. UV Optics Module and Conductivity Flow Cell.
a. Attach the UV Optics Module to a suitable position on the horizontal bar using a rod clamp to hold
one of the module’s two foot-posts.
b. Connect the power cable (square connector) from the UV Optics Module lamp into the port marked
“UV Lamp” on the rear of the BioLogic LP Controller.
c. Connect the UV Optics Module’s signal cable (mini-DIN connector) to the port marked “UV Optics”
on the rear of the BioLogic LP Controller.
d. Connect the Conductivity Flow Cell’s combined power and signal cable (mini-DIN connector) to the
port marked “Cond. Flowcell” on the rear of the BioLogic LP Controller.
e. Attach the Conductivity Flow Cell’s holder to a suitable position on the horizontal bar using the holder’s rod clamp.
f. The Conductivity Flow Cell is designed to be held in its holder, but may be placed anywhere in the
fluid path as desired by the user.
19
System Connections
MODEL 1327
CHART
RECORDER
SYSTEM
CABLE 2
UV OPTICS
MODULE
SV-5
BUFFER
SELECT
VALVE
SYSTEM
CABLE 4
SYSTEM
CABLE 15
CONTROLLER
SYSTEM
CABLE 1
SV-3
COLUMN
BYPASS
SV-3 DIVERTER VALVE
(2110 FRACTION
COLLECTOR)
CONDUCTIVITY
FLOW CELL
MODEL 2128
FRACTION COLLECTOR
MIXER
B
A
OR
PROPORTIONING
VALVE AND
MIXER MODULE
SYSTEM
CABLE 3
Figure 11. System Cable Connections
20
MODEL 2110
FRACTION COLLECTOR
System Connections
6. Chart Recorder; Model 1327.
The Model 1327 chart recorder may be positioned on the rack shelf or on the bench.
a. Connect System Cable 2 between the BioLogic LP Controller and the recorder as follows:
• The mini-DIN connector is connected to the port marked “UV Chart” on the rear of the
BioLogic LP Controller.
• The DIN connector is connected to the single DIN port on the side of the chart recorder.
This cable provides system control of pen up/down, event marks and paper advance, but chart
speed MUST be set on the recorder faceplate itself.
b. Conductivity signals are recorded on channel 2 of the recorder using System Cable 4 as follows:
• The mini-DIN connector is connected to the port marked “Cond. Chart” on the rear of the
BioLogic LP Controller.
• The banana plugs are connected to the ports marked CH 2 on the side of the recorder (red
wire to +, black wire to ground | ).
c. Set both channel inputs on the recorder to 1V. Set all other switches to their position marked in
green. Connect the power adapter to a wall outlet, and plug the power lead into the chart recorder.
7. Fraction Collector; Model 2110.
a. The Model 2110 fraction collector may be positioned on the rack shelf or on the bench.
b. Connect System Cable 1 between the BioLogic LP Controller’s Fraction Collector port and the fraction collector as shown in Figure 11 and described below:
• The 9-pin D connector is connected into the single D port on the rear of the Model 2110.
• Connect the power cable. (A power cable is available to connect the fraction collector to the
BioLogic LP Controller, eliminating the need for a wall outlet.)
c. Position the SV-3 valve on the rack using the integral clamp.
d. Connect the SV-3 valve cable mini-DIN connector to the Diverter Valve port.
8. Fraction Collector; Model 2128.
a. Place the Model 2128 fraction collector on the bench, next to the BioLogic LP.
b. Connect System Cable 15 between the BioLogic LP Controller’s Fraction Collector port and the
fraction collector as shown in Figure 11. The 15-pin D connector is connected into the single D port
on the rear of the Model 2128.
c. Connect System Cable 3 between the BioLogic LP Controller’s Diverter Valve port and the fraction
collector as shown in Figure 11. The mini-DIN connector is connected into the single mini-DIN port
on the rear of the Model 2128.
d Connect the power cable. (A power cable is available to connect the fraction collector to the
BioLogic LP Controller, eliminating the need for a wall outlet.)
When all the connections have been made, turn the units around. Plug all the power cables into an
approved power-strip. The system can now be plumbed.
21
System Plumbing
4.0 SYSTEM PLUMBING
This chapter begins with discussion of plumbing practices and general guidelines, followed by a general procedure for plumbing the major system components. Later sections discuss how to plumb Bio-Rad’s low
pressure valves.
4.1 GENERAL GUIDELINES FOR PLUMBING THE SYSTEM
The BioLogic LP uses the following tubing:
•
System tubing: 0.8mm ID or 1.6mm ID Tygon tubing.
•
Pump Tubing: 0.8mm ID, 1.6mm ID, or 3.2mm ID PharMed tubing. Refer to the following table
when selecting a tubing.
Warning
Do not use pump tubing with wall thickness greater than 1.0 mm. Using tubing with a wall thickness
greater than 1.0 mm can damage the pump and void the warranty.
Table 4
Comparison of Flow Rate Ranges for Different Tubing IDs
FLOW RATE RANGE ml/hr
3.0
TUBING SIZE
(ID/WALL)
1.0
5.0
10
30
50
100
1000
0.8/0.8 mm
OPTIMAL RANGE
1.6/0.8 mm
MAXIMUM RANGE:
0.8 mm: 0.05 to 1.75 ml/min
1.6 mm: 0.1 to 6.5 ml/min
3.2 mm: 0.2 to 20.0 ml/min
3.2/0.8 mm
.02
.04
.06 .08
.2
.4
.6 .8
2
FLOW RATE RANGE ml/min
22
300 500
4
6 8
20
System Plumbing
All plumbing connections require Luer fittings. A fittings kit is included with the BioLogic LP system. The figure below shows the different Luer connectors available for use in plumbing the BioLogic LP system.
MALE LUER
FOR SYSTEM TUBING
CONNECTIONS
FEMALE LUER
FOR PUMP TUBING
MALE-TO-MALE CONNECTOR
FEMALE 'T' CONNECTOR
Figure 12. Luer Fittings
When plumbing the system, be sure to keep tubing lengths to a minimum. Also, all fittings should be fingertight.
The procedures for plumbing the pump and all components in the BioLogic LP system are provided on the
following pages.
23
System Plumbing
4.2 ADJUSTING THE PLATEN AND PLUMBING THE PERISTALTIC PUMP
The peristaltic pump requires the following tubing lengths:
•
PharMed 179 ±1.5mm
•
Silicone 171±1.5mm
Note: PharMed is preferred. (Tygon should not be used in the pump head because it fatigues
rapidly.) If you are not using pre-cut tubing, cut the tubing to the lengths indicated above.
1. Proper adjustment of platen pressure increases flow stability, minimizes flow pulsation, and prolongs the
life of the tubing. To adjust platen pressure, use the platen adjustment screw. First turn the platen
adjust screw counterclockwise until it stops. Then turn the screw clockwise according to the table
below:
Number of Turns
From Fully Open
5
4
3
Tubing ID
0.8 mm (1/32”)
1.6 mm (1/16”)
3.2 mm (1/8”)
Note: Overtightening the platen reduces flow rate and shortens tubing life. A loose platen will cause the
flow rate to decrease as the backpressure increases.
PLATEN ADJUST
SCREW
LOCK-RING
TUBING
LUER FITTING
SEE DETAIL
1
4
7
m
lar
A
C
2
5
8
0
3
6
9
.
Figure 13. Plumbing the BioLogic LP Controller’s Pump
24
System Plumbing
2. Pull the platen cam lever away from the pump head to unlock the platen and slide the platen away from
the pump head frame assembly, exposing the rollers.
3. Slip a lock-ring onto one end of the tubing. The lock rings must be put on before luer fittings, and the
recessed parts of the lock rings should face each other. The size and color of each lock ring is as follows:
Tubing ID
0.8 mm (1/32”)
1.6 mm (1/16”)
3.2 mm (1/8”)
Lock Ring Color
Red
Orange
Yellow
Insert a barbed female luer-fitting into the same end until the tubing reaches the flange of the fitting.
Clamp the luer fitting into place by sliding the lock-ring along the tubing over the barbed fitting. Repeat
the procedure for the other end of the tubing. For flow rates greater than 20.0 ml/min see the note
below.
4. Insert one end’s fitting into one of the tubing retaining brackets of the pump head. Pull the tubing
around the rollers, and insert the other end’s fitting into the bracket on the opposite side of the pump
head. Use the same bracket on each side of the pumps, either the front brackets or the back brackets.
5. Slide the platen back into the pump head frame assembly until it contacts the tubing. Press the cam
lever in toward the pump head, locking the platen up against the tubing and rollers. Note that the platen
can be inserted with the cam lever on the left or the right.
Note: To obtain flow rates from 20.0 to 40.0 ml/min prepare two pieces of 3.2 mm pump tubing as
in step 3. Use two Female “T” Connectors, see figure 12, and four short lengths of tubing with male
luer fittings on both ends to join the two pieces together. Place both pieces of pump tubing into the
pump head as in step 4. For accurate flow rates when this is done you must perform User
Calibration. Refer to section 6.2.2.
!
Caution
Each time the pump’s tubing is changed, especially if the tubing size is changed,
the pump must be recalibrated. Refer to Section 6.2, Pump Calibration.
25
System Plumbing
4.3 PLUMBING THE SYSTEM
1. Plumbing the inlets to the Proportioning valve/Mixer module.
a. Cut two suitable lengths of Tygon tubing (0.8mm ID or 1.6mm ID).
b. Attach the barbed end of a male luer to one end of each piece of tubing. (Warming the Tygon tubing in warm water makes it more flexible and easier to work with.)
c. Connect each fitting to one inlet port of the Proportioning valve. Twist the fitting clockwise to lock.
Do not over-tighten.
d. Immerse the ends of the tubing in a container of high quality water or buffer.
2. Plumbing the outlet from the Proportioning valve/Mixer module.
If you are not using the optional SV-5 Buffer Select valve, plumb the Mixer module’s outlet to the left
port of the pump. Then proceed to step 5.
If you are plumbing to the optional Buffer Select Valve:
a. Cut a suitable length of Tygon tubing that will reach from the Proportioning valve/Mixer module outlet
to the SV-5 Buffer Select valve.
b. Attach male luer fittings to each end.
c. Connect the tubing to the outlet port on the Proportioning valve/Mixer module and to port A/B of the
SV-5 Buffer Select valve. Twist clockwise to lock. Do not over-tighten.
3. Plumbing the outlet from the SV-5 Buffer Select Valve to the BioLogic LP Controller’s pump.
a. Cut a length of Tygon tubing that will reach from the SV-5 Buffer Select valve to the BioLogic LP
Controller’s pump.
b. Attach male luer fittings to each end.
c. Connect the fitting to the Common port on the SV-5 Buffer Select valve and to the left port of the
pump. Twist clockwise to lock. Do not over-tighten.
4. Plumbing from Buffer Reservoirs C through E to the Buffer Select Valve.
a. Cut a length of Tygon tubing that will reach from each Buffer Reservoir to the SV-5 Buffer Select
valve.
b. Attach the male luer to one end of each piece of tubing.
c. Screw the tubing into inlet ports C through E of the SV-5 Buffer Select valve. Twist clockwise to
lock. Do not over-tighten.
d. Immerse the ends of the tubing in a container of high quality water or buffer.
5. Plumbing from the BioLogic LP Controller’s pump to the MV-6 Inject Valve.
a. Use the screw fitting on the MV-6 Inject valve to secure the valve to the system rack. Turn the MV-6
knob counterclockwise so it matches that shown in Figure 14.
b. Cut a suitable length of Tygon tubing that will reach from the BioLogic LP Controller’s pump to the
MV-6 Inject valve.
c. Attach male luer fittings to each end.
d. Connect the tubing to the pump’s right port and to the MV-6 Inject valve and secure firmly using a
twisting action. Turn clockwise to lock; do not overtighten.
26
System Plumbing
SAMPLE LOOP
INJECT
PORT
MV-6
INJECT
VALVE
WASTE
FILL
CONTROLLER
SV-3
COLUMN BYPASS
VALVE
COMMON
SV-5
BUFFER
SELECT
WASTE
SV-3
COLUMN
C
E
UV OPTICS
MODULE
D
CONDUCTIVITY
FLOW CELL
COMMON
PROPORTIONING
VALVE AND
MIXER
MODULE
WASTE
SV-3
DIVERTER
VALVE
SV-3
MIXER
B
B
A
BUFFERS
B AND A
A
COLLECT TO
MODEL 2128
FRACTION
COLLECTOR
OR
COLLECT TO
MODEL 2110
FRACTION
COLLECTOR
Figure 14. System Plumbing
27
System Plumbing
6. Plumbing the MV-6 Valve’s Sample Loop.
Plumb the inject valve’s sample loop according to Figure 14. Use male luer fittings at each end of the
loop tubing. A sample loop of any volume can be prepared. Volumes may be determined empirically, or
by following the example below:
Total volume of sample = Valve volume + Fittings volume + Tubing volume
where,
Volume valve passage and fittings = .325 ml
Tubing volume = Length of tubing x Volume/cm, as determined from the following:
ID
Volume/cm
0.8
.005 ml/cm
1.6
.020 ml/cm
3.2
.08 ml/cm
Example: A 2 ml sample loop using 1.6 mm ID tubing:
a. Subtract volume of fittings and valve passage:
2 ml - 0.325 ml = 1.675 ml
b. Divide the tubing volume needed by the volume/cm of tubing:
1.675 ml ÷ 0.020 ml/cm = 83.75 cm of tubing
In this example, the volume of the valve and fittings, plus the internal volume of 83.75 cm of the 1.6 mm
ID tubing, equals 2 ml.
7. Plumbing the SV-3 Bypass valve. (Optional)
Note: If you will not be using the optional SV-3 Bypass valve, proceed to the next step.
a. Connect a length of Tygon tubing between the MV-6 Inject valve and the SV-3 Bypass valve common port (labeled “Common”) using male luer fittings.
b. Connect a piece of Tygon tubing from the ‘Bypass” port of the SV-3 Bypass valve (see figure 14) to
a suitable waste container.
8. Plumbing the Column.
Note: The column will be positioned in the fluid path after the system is purged of air. In its place, temporarily connect the column inlet line to the column outlet line.
a. Plumb the column inlet as follows:
•
•
If you are using an SV-3 Bypass valve, cut a length Tygon tubing that will reach between the
SV-3 Bypass valve and the column inlet. Attach male luer fittings to each end. Connect one
end to the SV-3 valve’s “Collect/Column” port.
If you are not using the SV-3 Bypass valve, cut a length that will reach between the MV-6 Inject
valve and the column inlet. Attach male luer fittings to each end. Connect one end to the MV-6
valve’s “Outlet” port.
b. To plumb the column outlet, cut a length of tygon tubing that will reach from the column outlet to the
UV Optics Module. Attach a male luer fitting at one end and a female luer fitting at the other.
c. Connect the column inlet line to the column outlet line. This will be disconnected to insert the column after purging the system.
28
System Plumbing
9. Plumbing the UV Optics Module and Conductivity Flow Cells.
a. Connect the column outlet line to the inlet port of the UV Optics Module.
(Arrows on the UV Optics Module indicate flow direction.)
b. Cut a short length of Tygon tubing and attach luer fittings to each end.
Screw one end into the output port of the UV Optics Module’s flow-cell and the other end into the
Conductivity Flow Cell. (Note: The Conductivity Flow Cell is bi-directional.)
c. Place the Conductivity flow cell into its holder.
10. Connection to a Model 2110 Fraction Collector or Non-Bio-Rad Fraction Collector. Note: This
step involves the use of an SV-3 Diverter valve.
a. Connect a piece of Tygon tubing between the Conductivity flow cell and the SV-3 Diverter valve
common port (labeled “Common”) using the luer fittings.
b. Connect a piece of Tygon tubing from the SV-3 Diverter valve’s “Waste” port for use as a waste line.
c. Connect a piece of Tygon tubing from the SV-3 Diverter valve’s “Collect” port to the Model 2110 fraction collector drop-head. This tubing sits inside the drop-head, and no fittings are required.
11. Connection to a Model 2128 Fraction Collector.
For further discussion on plumbing the Model 2128, refer to the Model 2128 Fraction Collector
Instruction Manual.
Note: The tubing’s length must allow unrestricted movement of the fraction collector arm.
When using the Model 2128 Fraction Collector with the BioLogic LP, you have three options for diverting
“waste” fluid.
a. No diverter valve used: In this configuration, tubing from the Conductivity flow cell is connected
directly to the fraction collector’s drop head. This requires a female luer adapter (supplied with the
Model 2128) to connect the tubing from the Conductivity flow cell to the 1/16” tubing from the Model
2128. This will require using a barb-to-male fitting from the BioLogic LP fittings kit. (Note: Be sure
that System Cable 3 is connected between the Model 2128 and the Controller’s Diverter Valve port.)
When you turn on the Model 2128, select “Econo” mode from the Model 2128’s startup screen. The
system prompts with the message “Is 2128 valve cable connected.” (This refers to System Cable
3.) Answer YES.
b. Using the Model 2128’s arm-mounted diverter valve: Tubing from the Conductivity flow cell is
connected to the diverter valve’s Common port. This requires a female luer adapter (supplied with
the Model 2128) to connect the tubing from the Conductivity flow cell to the 1/16” tubing from the
Model 2128. This will require using a barb-to-male fitting from the BioLogic LP fittings kit.
Plumb the diverter valve’s Collect port to the drop head and its Waste port to a suitable waste container. Use the 1/16” tubing and ferrules supplied with the Model 2128.
(Note: Be sure that System Cable 3 is connected between the Model 2128 and the Controller’s
Diverter Valve port.) When you turn on the Model 2128, select “Econo” mode from the Model
2128’s startup screen. The system prompts with the message “Is 2128 valve cable connected.”
(This refers to System Cable 3.) Answer YES.
29
System Plumbing
c.
Using an SV-3 Diverter valve: Mount the valve on the System Rack so that it is as close as possible to the Model 2128 Fraction Collector. Plumb the system as shown in Figure 14. (Note: This
configuration requires the valve be connected to the Diverter Valve port on the BioLogic LP.)
When you turn on the Model 2128, select “Econo” mode from the Model 2128’s startup screen. The
system prompts with the message “Is 2128 valve cable connected.” (This refers to System Cable
3.) Answer NO.
Note: If you answer YES, no fractions will be collected because there will be no System Cable 3 to
send commands from the BioLogic LP. To correct the problem, you will need to use the fraction collector’s control panel to “park” the drop head and arm and then de-select “Econo” mode. Then reselect “Econo” mode and answer NO to the message “Is 2128 valve cable connected.”
4.4 PURGING THE SYSTEM
Before a method can be run, you must take proper steps to evacuate all air from the system.
1. Make sure the column is not connected to the system and the column inlet tubing is connected to the
column outlet tubing.
2. Verify that all buffer inlet lines are submerged in a container of high quality water or buffer.
3. Turn on the BioLogic LP Controller. When you turn on the BioLogic LP Controller, the system automatically shows Manual mode for Pump operation. Verify that the arrow on the left side of line 2 of the LCD
points to the right.*
4. Press the Purge softkey to run the pump at its maximum flow rate. Water or buffer will now flow
through the system.
5. While the pump is running, press the Buffer softkey and cycle through all of the ports on the SV-5 Buffer
Select valve. After all buffer lines have been filled with liquid, stop the pump.
6. Using the system’s manual mode operation of the pump, set a flow rate that is safe for the column. To
do this,
a. From the front panel of the BioLogic LP, press the Manual key, followed by the Pump key.
b. Using the softkeys below the front panel’s display, press the Flow softkey.
c. Using the front panel’s keypad, enter a flow rate that is safe for the column.
7. Disconnect the column inlet and column outlet lines and insert the column. Avoid introducing air to the
inlet side of the column.
8. Press the front panel’s Run key to purge air which may have entered the system when the column was
connected.
*This arrow indicates the direction of flow. If the arrow points to the left press the Flow softkey followed
by the Forward softkey to change the direction of flow. Finally press the OK softkey to confirm the
change.
30
System Operation
5.0 SYSTEM OPERATION
5.1 FRONT PANEL CONTROLS
Table 5.
Front Panel Controls
BioLogic LP
Pump
Fraction Collector
UV Lamp
Chart Recorder
Alarm
Mark
?
1
2
3
4
5
6
7
8
9
C
0
.
Help
Previous
Next
MODE
Manual
Program
Run
Pump
Collector
Alarm
INSTR
UV
Key
Cond
Valves
Recorder
Description
Softkeys: These four keys are located directly below the LCD display. They are
collectively referred to as softkeys, because the function each key executes
depends on the corresponding text displayed directly above the key.
Previous and Next keys: Use these keys to move the cursor around the screen
display. Their LED is lit when these keys are active.
Previous
Next
Keypad keys:
0
To
C
.
9
1 - 9: Use these keys to enter a numeric value or name a method.
C: To return a field’s value to zero or its default value.
Decimal key: To enter a decimal point. When naming a method, this key enters a
space.
31
System Operation
Table 5. (continued)
Front Panel Controls
Key
Description
Mark key: This key signals the chart recorder to put an event mark on the UV
trace.
Mark
Help key: Pressing this key at any time displays information about the screen that
is currently displayed. Use the Prev and Next keys to scroll through the Help
screens. To exit help, again press the Help key.
?
Help
Pump
Fraction Collector
UV Lamp
Chart Recorder
Alarm
Modes
Mode keys: These keys allow you to select a mode of operation. The LED next to
the key indicates the mode selected. For Program mode, a flashing LED indicates
the mode was changed before the operation was completed. For Run mode, a
flashing LED indicates the system is ready to start or is paused.
• Manual: Allows you to individually control instruments and functions. Select
the instrument to be controlled using any of the keys listed in the INSTR
(Instrument) line of the front panel.
Manual
• Program: Allows you to write, edit, store, and recall a separation method. You
can program and store up to 50 methods. Program mode’s LED flashes when
you select Manual mode before completing the Method.
Program
• Run: Allows you to run the currently selected method. Run mode’s LED flashes when you select Pause during the run.
Run
!
32
LEDs: The LEDs at the top left of the front panel are lit when the indicated function
is activated. The Pump’s LED flashes when the pump is running at purge speed;
the UV’s LED flashes when the lamp is warming up.
System Operation
Table 5. (continued)
Front Panel Controls
Key
Description
Instr
Instr (Instrument) keys: These keys allow you to select individual instruments to
control. The selected component is indicated by its corresponding LED on the front
panel and its corresponding control screen is displayed. Note that the Pump,
Collector, and Alarm keys are grouped in a shaded area, indicating that these functions (pump operation, fraction collection, and alarms) are programmed as part of a
separation method. Valve Buffer Select and Divert functions are programmed in a
method, but Bypass functions are only selectable in Manual mode. All other functions are not programmed as part of a method, but may be selected prior to and
during a run.
Pump
Collector
• Pump: Allows you to set the flow rate and buffer mixture for the BioLogic LP
pump. Pump operating conditions are programmed as part of a method.
• Collector: Allows you to set the operating conditions for the Fraction
Collector. Fraction collection is programmed as part of a method.
• Alarm: Allows you to set the timer for the Alarm. Alarm values are programmed as part of a Method.
Alarm
UV
Cond
Valves
Recorder
• UV: Allows you to set the operating conditions for the UV monitor. UV settings may not be programmed as part of a method, but may be changed during a run.
• Cond: Allows you to set the operating conditions for the BioLogic LP
Conductivity Monitor. Conductivity settings may not be programmed as part
of a method, but may be changed during a run.
• Valves: Allows you to set the operating conditions for the BioLogic LP Valves.
The SV-3 Diverter valve and SV-5 Buffer Select valve functions are controlled
by the method program; the SV-3 Bypass function is not programmed as part
of a method.
• Recorder: Allows you to start/stop the Bio-Rad Model 1327 Chart Recorder.
When a method is run, the chart recorder automatically starts when the
method begins and stops (pens lift up) when the method ends. Pressing the
Recorder key on the front panel during a run can start/stop chart recorder
activity.
33
System Operation
5.2 MANUAL MODE
There are three modes of operation: Manual mode, Program mode, and Run mode. Manual mode is used
to prepare the system to run a programmed method, or to perform tasks that do not require a programmed
method, such as simple pumping tasks. When you first turn on the system, the Manual mode’s Pump
Control screen is displayed so that you can purge the system, calibrate the pump, and select the buffers for
your application. To select other Manual mode functions, use the Instrument keys on the front panel. The
top line of each screen in Manual mode displays the following:
• Method name: The name of the currently loaded method. Changing the method name is done in
Program mode.
• Mode of operation: The mode is also indicated by the key’s LED being lit.
5.2.1 Manual Mode Operation of the Pump
Table 6 discusses each of the functions available in Manual mode operation of the pump. An overview of
Manual mode operation of the Pump is shown in Figure 15.
Table 6.
Manual Mode Operation: Pump
Reference
Description
Manual
To
a.
b.
c.
Pump
MP
Method: <<name>>
–> Flow: 1.00 ml/min
Buffer: A
START
PURGE
M1
M2
Manual Operation
UV: 0.0111 AU
Cond: 0.000 mS
FLOW
BUFFER
M3
begin Manual mode operation of the pump:
From the Mode keys select Manual.
From the Instrument keys select Pump.
The main menu for manual mode operation of the pump is
shown below.
Main Menu screen: The display shows the following:
• Flow: The current flow rate set for the pump. The arrow
shows the direction of flow.
• UV: The current UV reading.
• Buffer A through E or %B: The currently selected buffer or
a mixture, as specified by the amount of buffer B.
• Cond: The current Conductivity reading.
M4
Description of the soft key choices follows.
34
System Operation
MP
Method: <<name>>
Flow: 1.00 ml/min
Buffer: A
START
PURGE
M1
STOP
M2
Manual Operation
UV: 0.0111 AU
Cond: 0.000 mS
FLOW
BUFFER
M3
Method: <<name>>
Flow: 1.00 ml/min
Buffer: A
STOP
RUN
pump
stops
Manual Operation
UV: 0.0111 AU
Cond: 0.000 mS
BUFFER
M4
Method: <<name>>
Manual Operation
Flow: 1.00 ml/min UV: 0.0111 AU
Buffer: A
Cond: 0.000 mS
CALIBRATE FORWARD
CANCEL OK
pump continues
M3a
at run rate
REVERSE
Method: <<name>>
Manual Operation
Buffers: M [A] B C D E
(Select MIX for Mixture of A and B)
MIX
CANCEL
OK
(return to MP)
(return to MP)
Method: <<name>>
Manual Operation
Current Tubing Diameter: 3.2 mm
Press "PUMP" to CANCEL
0.8 mm
1.6 mm
3.2 mm
OTHER
(If [A-E], go to
M1screen)
(If [M], go to
next screen)
M3b
M4a
Method: <<name>>
Manual Operation
Nominal Pump Calibration complete.
Calibrate pump at desired flow rate?
NOMINAL SET FLOW
CANCEL
(return to MP)
Method: <<name>>
Manual Operation
Enter Mixture: 50%B
(Mixture will contain buffers A and B)
CANCEL
OK
(return to MP)
M3c
M3d
(return to MP)
Method: <<name>>
Manual Operation
Pump Calibration
Flow Rate: 1.00 ml/min
Time: 5.00min
START
FLOW RATE
TIME
CANCEL
Method: <<name>>
Manual Operation
Pump Calibration
Flow Rate: 25% of Max
Time: 0.00min
START
TIME
CANCEL
Set Flow Rate or Time, (return to MP)
press OK
and return to this screen
Set Time, (return to MP)
press OK
and return
to this screen
M3d
LEGEND
MP
MANUAL MODE: PUMP
M2
PUMP PURGE MENU
M3
PUMP FLOW MENU
M3a FLOW CALIBRATE MENU
M3e
M3b CALIBRATE FOR PRESET TUBING SIZE
Method: <<name>>
Manual Operation
Pump Calibration
Delivered Volume: 0.00
CANCEL
OK
M3c SET FLOW FOR PRESET TUBING
M3d SET TIME FOR OTHER TUBING SIZE
M3e CALIBRATION COMPLETE
M4
BUFFER MENU
M4a ENTER MIXTURE
Figure 15. Manual Operation of the Pump
(Screen displays are keyed to the discussion in Table 6, Manual Mode Operation : Pump)
35
System Operation
Table 6. (continued)
Manual Mode Operation: Pump
Reference
Description
M1
MP
Method: <<name>>
–> Flow: 1.00 ml/min
Buffer: A
STOP
PURGE
M1
M2
Manual Operation
UV: 0.0111 AU
Cond: 0.000 mS
FLOW
BUFFER
M3
M2
Manual Operation
UV: 0.0111 AU
Cond: 0.000 mS
BUFFER
M4
M1
M3
M1
MP
Method: <<name>>
–> Flow: 1.00 ml/min
Buffer: A
CALIBRATE
FORWARD
M3a
M1
MP
Method: <<name>>
–> Flow: 1.00 ml/min
Buffer: A
STOP
RUN
M1
M4
(REVERSE)
Manual Operation
UV: 0.0111 AU
Cond: 0.000 mS
CANCEL
OK
M1
M3
Method: <<name>>
Manual Operation
Current Tubing Diameter: 3.2 mm
Press "PUMP" to CANCEL
0.8 mm
1.6 mm
3.2 mm
OTHER
M3b
36
M3d
Purge Screen: Selecting Purge from the Main Menu screen
sets the flow rate to maximum and runs the pump. The Purge
screen is shown at left. During purge, the pump’s status LED
flashes. You then have the following choices:
• Stop: Stops the pump.
• Run: Returns to the normal set flow rate and continues
operation. The status LED changes to ON.
• Buffer: Allows you to change the buffer. Refer to the
Buffer screen.
Flow Screen: To change the flow rate, use the keypad to enter
the desired flow rate and then press OK. To change the direction of the flow, press the Forward softkey. Forward is clockwise, and Reverse is counter-clockwise. Note: The arrow in
the display indicates the direction of flow.
In addition, the Flow screen’s menu allows you to calibrate the
pump, as described below. The system uses the flow rate to
determine fraction size and for gradient control when measuring
by volume rather than time. The system calculates the flow rate
by multiplying the pump head speed (rpm) by a flow rate factor
which is determined by calibrating the pump, as discussed
below. Note: You must select a tubing size or calibrate before
running a gradient method.
M1
M3a
Start/Stop Screen: The first softkey in the Main Menu screen
allows you to start/stop the pump using its currently set flow
rate. When the pump is running, its status light is ON.
• Pressing Stop stops the pump.
• Pressing Purge increases pump speed to maximum. Refer
to the Purge screen.
• Pressing Flow allows you to set the flow rate. Refer to the
Flow screen.
• Pressing Buffer allows you to specify the buffer. Refer to
the Buffer screen
Calibrate: Values from the calibration are used by the system
to determine flow rate. Calibration is based on the tubing size
installed in the pump head. Calibration begins with the selection of a standard tubing size or non-standard (Other) tubing
sizes.
Note: Before calibrating, check the adjustment of the platen
pressure screw on the pump. Refer to section 4.2.
System Operation
Table 6. (continued)
Manual Mode Operation: Pump
Reference
Description
M3b
M3a
Method: <<name>>
Nominal Pump Calibration complete.
Calibrate pump at desired flow rate?
NOMINAL SET FLOW
Manual Operation
CANCEL
M1
M3c
M1
M3c
M3b
Method: <<name>>
Manual Operation
Pump Calibration
Flow Rate: 1.00 ml/min
START
FLOW RATE
TIME
M3e
Time: 5.00min
CANCEL
Set flow rate and time
(duration of the calibration)
M1
M3d
M3a
Method: <<name>>
Manual Operation
Pump Calibration
Flow Rate: 25% of Max
START
TIME
M3e
Calibration for standard tubing sizes (0.8 mm, 1.6 mm, 3.2
mm): If a standard tubing size is installed in the pump head,
you may select Nominal to use a nominal flow rate factor.
Selecting Set Flow allows you to do a “user calibration,” which
provides greater accuracy, as described below.
Time: 0.00min
CANCEL
Set time
User Calibration (Set Flow) for improved flow accuracy:
This screen allows you to calibrate for standard tubing sizes by
experimentally determining the flow rate factor. This procedure
is advisable when using columns with high counter-pressure or
when improved flow rate accuracy is desired. Calibration
should be done with all components connected and the column
installed. To calibrate:
1. Once the system is set up, select Purge to purge air from
the system. Select Stop to stop the pump, and place the
waste tube in a graduated cylinder.
2. Select Flow followed by Calibrate.
3. Select a standard tubing size, enter Flow Rate and Time,
and then press Start to calibrate. If more than one flow
rate is to be used, calibrate for the flow rate to be used during the most critical period of the separation. For best
results, set a Time of at least 5 minutes. During calibration,
you can select Stop to shorten the calibration run.
4. At the end of the calibration period, when the pump has
stopped, enter the total volume delivered and press OK.
User Calibration for non-standard tubing size: To calibrate
for non-standard tubing (Other), follow the procedure above.
Calibration will proceed for the duration that you specify, at a
flow rate of 25% of full speed. Press Start to begin calibration.
M1
M3e
M3c
Method: <<name>>
M3d
Manual Operation
Pump Calibration
Delivered Volume: 0.00
CANCEL
OK
Calibration complete: When the calibration run is complete,
enter the delivered volume and press OK. The pump is now
calibrated.
M1
37
System Operation
Table 6.
Manual Mode Operation: Pump
Reference
Description
M4
M3
Method: <<name>>
Manual Operation
Buffers: M [A] B C D E
(Select MIX for Mixture of A and B)
MIX
CANCEL
OK
M4a
M1
Buffer screen: Selecting Buffer from the Main Menu screen
displays the Buffer screen, shown to the left. This screen
allows you to select the buffer to be delivered to the column.
Use the Prev and Next keys to select a single buffer (A through
E) or a mixture of buffers A and B. To set a mixture, select the
Mix soft key and enter the percent of buffer B. Note: If a valve
is not connected on the BioLogic LP, its letter or letters appear
in lower case and cannot be selected.
5.2.2 Manual Mode Operation of the Fraction Collector
Table 7 discusses each of the functions available in Manual mode operation of the fraction collector. An
overview of the Fraction Collector’s Manual mode operation is shown in Figure 16.
Table 7.
Manual Mode Operation: Fraction Collector
Reference
Description
Manual
To
a.
b.
c.
Collector
MF
Method: <<name>>
Fx Size: 1.00 ml
Diverting to Waste
START
F/X SIZE
M1
M2
Manual Operation
UV: 0.0111 AU
Cond: 0.000 mS
ADVANCE
MODEL
M3
begin Manual mode operation of the fraction collector:
From the Mode keys select Manual.
From the Instrument keys select Collector.
The main menu for manual mode operation of the fraction
collector is shown below.
The display shows the following:
• Fraction Size: The fraction size can be specified as a volume (ml) or time (minutes).
• UV: The current UV reading.
• Diverting to Waste/ Collect: Indicates the position of the
SV-3 Diverter valve.
• Cond: The current Conductivity reading.
M4
Description of the soft key choices follows.
38
System Operation
Table 7. (continued)
Manual Mode Operation: Fraction Collector
Reference
Description
M1
Method: <<name>>
Fx Size: 1.00 mil
Diverting to Waste
STOP
F/X SIZE
M2
Start/Stop screen: This first softkey in the Main Menu screen
allows you to start/stop the fraction collector.
• Pressing Stop stops the fraction collector.
• Pressing FX Size allows you to change the fraction size.
• Pressing Advance causes the fraction collector to advance
to the next tube.
• Pressing Model allows you to specify the type of Fraction
Collector being used.
MF
Manual Operation
UV: 0.0111 AU
Cond: 0.000 mS
ADVANCE
MODEL
M2
M3
M4
When the fraction collector is running, its status light is ON.
MF
Method: <<name>>
Manual Operation
Fx Size: 1.00 ml
UV: 0.0111 AU
Diverting to Waste Cond: 0.000 mS
START F/X SIZE ADVANCE MODEL
M1
STOP F/C
M3 Advance F/C
M4
Select Fraction Collector
Current model: 2110
2128
2110
OTHER
(return to MF)
M2
CANCEL
(return to MF)
Method: <<name>>
Manual Operation
Fraction Size: 1.00 ml
Collection Units: Volume
TIME
(volume)
CANCEL
OK
LEGEND
fraction size
changes from
Volume to Time
fraction size
set as volume
MF
MANUAL MODE: FRACTION COLLECTOR
M2
SET FRACTION SIZE
M4
SELECT MODEL NUMBER
(return to MF)
(return to MF)
Figure 16. Manual Operation of the Fraction Collector
(Screen displays are keyed to the discussion in Table 7, Manual Mode Operation : Fraction Collector)
39
System Operation
Table 7. (continued)
Manual Mode Operation: Fraction Collector
Reference
Description
M2
MF
Method: <<name>>
Manual Operation
Fraction Size: 1.00 ml
Collection Units: Volume
TIME
(volume)
CANCEL
OK
(change Volume
to Time)
MF
M3
MF
Method: <<name>>
Fx Size: 1.00 ml
Diverting to Waste
START
F/X SIZE
M1
(Advance
fraction collector
one position)
M2
M4
MF
Select Fraction Collector
Current model: 2110
2110
OTHER
M1
40
Advance: Advances the fraction collector to the next tube.
Manual Operation
UV: 0.0111 AU
Cond: 0.000 mS
ADVANCE
MODEL
M4
2128
F/X Size screen: This allows you to set the fraction size based
on either Time or Volume. If fraction size is set as a Volume,
the fraction size is specified in ml and the (volume) softkey is
displayed. To set a fraction size based on time, press the Time
softkey.
CANCEL
Model screen: Select 2110 or 2128 if you are using Bio-Rad’s
Model 2110 or 2128 Fraction Collectors. Select Other for all
other fraction collectors.
System Operation
5.2.3 Manual Mode Operation of the Alarms
Table 8 discusses Alarm’s Manual mode functions. Figure 17 shows an overview of these functions.
Table 8.
Manual Mode Operation: Alarms
Reference
Description
Manual
To
a.
b.
c.
Alarm
MA
Method: <<name>>
Manual Operation
Alarm Timer: 0.00 min
Stop Instruments: NO
(start)
(stop)
SET ALARM
CLEAR
(to start/pause
the timer)
(clears the
timer setting)
M1
set an alarm or turn off an alarm setting:
From the Mode keys select Manual.
From the Instrument keys select Alarm.
The main menu is shown below.
The display shows the following:
• Alarm Timer: This is the time at which the alarm is set to
sound and stop instruments.
• Stop Instruments: In addition to sounding an audible alarm,
the alarm function can shut off all active instruments.
Description of the soft key choices follows.
Start/Stop: These are selectable when the Alarm Timer is set.
Use these to start/stop timer countdown.
MA
M1
Method: <<name>>
Manual Operation
Alarm Timer: 0.00 min
Stop Instruments: NO
STOP ON
(stop off)
CANCEL
OK
Set Alarm: You can set an audible alarm to sound at any time
during system operation. By pressing the Stop On soft key
(which changes the display from “Stop Instruments: No” to
“Stop Instruments: Yes”), you can stop system operation when
the alarm sounds. To silence the Alarm, press any key.
MA
Clear: Clears the Alarm Timer setting.
MA
Method: <<name>>
Manual Operation
Alarm Timer: 0.00 min
Stop Instruments: NO
(start)
(stop) SET ALARM CLEAR
Clear the alarm setting
LEGEND
M1
Method: <<name>>
Manual Operation
Alarm Timer: 0.00 min
Stop Instruments: NO
STOP ON
(stop off)
CANCEL
OK
enter alarm timer value;
stop inst. changes to yes
MA
MANUAL MODE: ALARM
M1
SET ALARM
(return to MA)
Figure 17. Manual Operation of the Alarms
(Screen displays are keyed to the discussion in Table 8, Manual Mode Operation : Alarms)
41
System Operation
5.2.4 Manual Mode Operation of the UV Monitor
Table 9 discusses each of the functions available in Manual mode operation of the UV Monitor. For an
overview of these functions, refer to Figure 18.
Table 9.
Manual Mode Operation: UV Monitor
Reference
Description
Manual
To
a.
b.
c.
UV
MU
Method: <<name>>
Manual Operation
UV Monitor: 0.0111 AU
Range: 1.000 AUFS
SET RANGE
ZERO
SET MAX
LAMP
manually control the UV Monitor:
From the Mode keys select Manual.
From the Instrument keys select UV.
The main menu is shown below.
The display shows the following:
• UV Monitor: The current UV reading.
• Range/Max Range: The chart range for UV detection.
Description of the soft key choices follows.
M1
M2
M4
M3
M1
MU
Method: <<name>>
Manual Operation
UV Monitor: 0.0111 AU
Range: 1.000 AUFS
INCREASE
DECREASE
CANCEL
OK
(Increment/decrement
the range by
approximately 50%
each time the button
is pressed)
MU
Set Range: Allows you to increase/decrease the full-scale AU
(Absorbance Unit) value for the UV output to the chart recorder.
For example, when the range is set to 1.000 AUFS
(Absorbance Units Full Scale), the chart recorder pen will be at
its highest point (“full scale”) when the absorbance of the sample in the flow cell is 1 AU. The following set ranges are available: 2.0, 1.0, 0.5, 0.2, 0.1, 0.05, 0.02, 0.01, 0.005, 0.002,
0.001 AUFS.
M2
Method: <<name>>
Manual Operation
UV Monitor: 0.0111 AU
Range: 1.000 AUFS
SET RANGE
ZERO
SET MAX
LAMP
M1
42
(sets the
current UV
reading to
0.0000)
M3
M4
Zero: This allows you to zero the UV baseline on the chart
recorder.
System Operation
Table 9. (continued)
Manual Mode Operation: UV Monitor
Reference
Description
M3
MU
Set Max: Use this function to set a UV range other than that
selectable using Set Range. When the UV absorbance reading
reaches the maximum range set, the system delivers 1 volt to
the chart recorder. Enter a value between 2.0 and .001 AUFS.
Method: <<name>>
Manual Operation
UV Monitor: 0.0111 AU
Max Range: 2.000 AUFS
CANCEL
OK
MU
M4
Method: <<name>>
Lamp: This turns the UV lamp on/off. You may want to leave
the BioLogic LP system ON but shut off the lamp when the system is not in use.
Manual Operation
UV Lamp: On
(lamp on)
LAMP OFF
OK
(Turns Lamp
ON/OFF)
MU
MU
Method: <<name>>
Manual Operation
UV Monitor: 0.0111 AU
Range: 1.000 AUFS
SET RANGE ZERO SET MAX
LAMP
M4
M2
M1
sets the
current UV
reading to
0.0000 AU
Method: <<name>>
UV Lamp: On
(lamp on)
LAMP OFF
Manual Operation
OK
M3
LEGEND
Method: <<name>>
Manual Operation
UV Monitor:
0.0111 AU
Range: 1.000 AUFS
INCREASE DECREASE CANCEL
OK
press to set the
UV Monitor range
(return to MU)
Method: <<name>>
Manual Operation
UV Monitor:
0.0111 AU
Max Range: 2.000 AUFS
CANCEL
OK
(return to MU)
MU
MANUAL MODE: UV MONITOR
M1
SET RANGE MENU
M3
SET MAX MENU
(return to MU)
Figure 18. Manual Operation of the UV Monitor
(Screen displays are keyed to the discussion in Table 9, Manual Mode Operation : UV Monitor)
43
System Operation
5.2.5 Manual Mode Operation of the Conductivity Monitor
Table 10 discusses the Conductivity Monitor’s Manual mode operation. Figure 19 provides an overview.
Table 10.
Manual Mode Operation: Conductivity Monitor
Reference
Description
Manual
To
a.
b.
c.
Cond
MU
Method: <<name>>
Manual Operation
Conductivity Monitor: 0.0111 mS
Range: 500 mS
SET RANGE CALIBRATE MIN/MAX
manually control the Conductivity Monitor:
From the Mode keys select Manual.
From the Instrument keys select Cond.
The main menu for manual control of the Conductivity
Monitor is shown below.
The display shows the following:
• Conductivity Monitor: The current Conductivity reading.
• Range: The chart range for Conductivity detection.
Description of the soft key choices follows.
M1
M2
M3
M1
MU
Method: <<name>>
Manual Operation
Conductivity Monitor: 0.0111 mS
Range: 500.0 mS
INCREASE
DECREASE
CANCEL
OK
(Increment/decrement
the range by
approximately 50%
each time the button
is pressed)
MU
M2
MU
Conductivity Cell Constant:
(constant)
SOLUTION
(Calibrate using
Constant value or
value of Solution)
44
40.0000
CANCEL
OK
MU
Set Range: Allows you to increase/decrease the full scale conductivity value (in millisiemens) for the conductivity output to the
chart recorder. For example, when the range is set to 100.0
mS (millisiemens), the chart recorder pen will be at its highest
(“full scale”) when the conductivity of the sample in the flow cell
is 100 millisiemens per centimeter. The following Set Ranges
are available: 500.0, 200.0, 100.0, 50.0, 20.0, 10.0, 5.0, 1.0,
and 0.5 mS.
Calibrate: Allows you to calibrate using either of the following
values:
• Constant: When a conductivity flow cell is installed for the
first time, use this selection to enter its cell constant into the
system. Enter a constant value (less than 100) using the
numeric keypad. Each cell is labeled with a cell constant.
The nominal cell constant is 40.
• Solution: Use this selection to calibrate the system using a
solution of known conductivity. (This may be a solution for
which conductivity was determined using a benchtop conductivity bridge, or a solution purchased specifically to provide a conductivity standard.) Fill the flow cell with the
solution, and then enter its conductivity value. Calibration
solutions should be between 10 and 100 mS/cm.
System Operation
Table 10. (continued)
Manual Mode Operation: Conductivity Monitor
Reference
Description
M3
MU
Min/Max: Allows you to set a range, from 0.00 mS to 999.99
mS, not selectable under Set Range’s incremental values. To
use this function, run buffer A through the system until the conductivity reading stabilizes, and note the conductivity reading.
Then run buffer B through the system and note its conductivity
reading. In the conductivity Min/Max screen, enter the noted A
and B values as the minimum and maximum.
Method: <<name>>
Manual Operation
Conductivity Monitor: 0.0111 mS
Range: Min: 0.00 mS
Max: 5.00 mS
(set min)
SET MAX
CANCEL
OK
(Set the Minimum and
Maximum values for
the range of detection)
MU
MC
M1
Method: <<name>>
Manual Operation
Conductivity Monitor: 0.00 mS
Range:
500.0 mSFS
SET RANGE CALIBRATE
MIN/MAX
Method: <<name>>
Manual Operation
Conductivity Monitor:
0.0111 mS
Range: 500.0 mSFS
INCREASE DECREASE
CANCEL
OK
press to increment/
(return to MC)
decrement the range value
by approximately 50% each time
the button is pressed
M3
Method: <<name>>
Manual Operation
Conductivity Monitor:
0.0111 mS
Range: Min: 0.00 mS
Max: 5.00 mS
(set min)
SET MAX
CANCEL
OK
(set minimum
(Set the
value is maximum value)
selected)
M2
Conductivity Cell Constant:
(constant)
SOLUTION
M2a
40.0000
CANCEL
LEGEND
OK
(return to MC)
Enter the Conductivity of the solution
now in the Conductivity Flow Cell:
0.00 mS/cm
CONSTANT
(solution)
CANCEL
(return to previous screen)
(return to MC)
OK
MC
MANUAL MODE: CONDUCTIVITY
M1
SET CONDUCTIVITY RANGE
M2
CALIBRATE FOR CONDUCTIVITY
M3
SET MIN/MAX VALUES FOR CONDUCTIVITY
(return to MC)
Figure 19. Manual Operation of the Conductivity Monitor
(Screen displays are keyed to the discussion in Table 10, Manual Mode Operation : Conductivity Monitor)
45
System Operation
5.2.6 Manual Mode Operation of the Valves
Table 11 discusses each of the functions available in Manual mode operation of the Valves. Figure 20 provides an overview of those functions.
Table 11.
Manual Mode Operation: Valves
Reference
Description
Manual
To
a.
b.
c.
Valves
MV
Method: <<name>>
Manual Operation
Buffer: A
Divert Valve: Collecting
Bypass Valve: Column In Line
BUFFER
DIVERT
BYPASS
M2
M1
manually control the Valves:
From the Mode keys select Manual.
From the Instrument keys select Valves.
The main menu for manual control of the Valves is shown
below.
The display shows the following:
• Buffer: The currently selected buffer (A - E) or mixture of
Buffers A and B.
• Divert Valve: The status of the SV-3 Diverter valve.
• Bypass Valve: The status of the SV-3 Bypass valve.
Description of the soft key choices follows.
M3
Note: If the Divert or Bypass valves are not connected, their softkeys are displayed in lowercase letter and cannot be selected.
M1
MV
Method: <<name>>
Manual Operation
Buffers: M [A] B C D E
(Select MIX for Mixture of A and B)
MIX
CANCEL
OK
M1a
MV
Buffer screen: Allows you to select the buffer delivered to the
column. You can select buffers A through E, or a mixture of
buffers A and B. Use the Prev or Next keys to select a buffer;
to select a mixture of buffers A and B, press the MIX soft key.
(Refer to the Mix screen shown below.)
Note: If a valve is not connected to the controller it’s letter or
letters appear in lower case and cannot be selected.
M1
M1a
Method: <<name>>
Manual Operation
Enter Mixture: 50% B
(Mixture will contain buffers A and B)
CANCEL
OK
MV
46
Mix screen: Enter the percentage of Buffer B such that
%A + %B = 100%.
System Operation
Table 11. (continued)
Manual Mode Operation: Valves
Reference
Description
M2
MV
Divert screen: Allows you to set the SV-3 Diverter valve in
either the “Divert to Waste” position or the “Collecting into
Tubes” position.
Method: <<name>>
COLLECT
Manual Operation
Divert Valve Operation
Status: Diverting to Waste
(divert)
RETURN
(To set collecting
into Tubes)
MV
M3
MV
Bypass: Allows you to set the SV-3 Bypass valve in either the
“Column in Line” position or the “Bypassing Column” position.
Note: The SV-3 Column Bypass valve is operated only in
Manual mode; its operation cannot be programmed as part of a
Method.
Method: <<name>>
Manual Operation
Bypass Valve Operation
Status: Column in Line
(column)
BYPASS
RETURN
(To bypass the
column)
MV
MV
Method: <<name>>
Manual Operation
Buffer: A
Divert Valve: Collecting
Bypass Valve: Column In Line
BUFFER
DIVERT
BYPASS
M3
M1
Method: <<name>>
Manual Operation
Bypass Valve Operation
Status: Column in Line
(column)
BYPASS
RETURN
Method: <<name>>
Manual Operation
Buffers: M [A] B C D E
(Select MIX for Mixture of A and B)
MIX
CANCEL
OK
LEGEND
M1a
(return to MV)
Method: <<name>>
Manual Operation
Enter Mixture: 50% B
(Mixture will contain buffers A and B)
CANCEL
OK
(return to MV)
M2
(to bypass column)
(return to MV)
Method: <<name>>
Manual Operation
Divert Valve Operation
Status: Collecting into Tubes
COLLECT
(divert)
RETURN
(to divert to waste)
MV
MANUAL MODE: VALVES
M1
SET BUFFER SELECT VALVE
M2
SET DIVERTER VALVE
M3
SET BYPASS VALVE
(return to MV)
Figure 20. Manual Operation of the Valves
(Screen displays are keyed to the discussion in Table 11, Manual Mode Operation : Valves)
47
System Operation
5.2.7 Manual Mode Operation of the Chart Recorder
Table 12 discusses each of the functions available in Manual mode operation of the Chart Recorder.
Table 12.
Manual Mode Operation: Chart Recorder
Reference
Manual
Description
Recorder
Method: <<name>>
Manual Operation
Chart Recorder Operation
Status: Idle
RECORD
(stop)
(recording begins;
pen down, paper
feed ON)
48
To manually control the Chart Recorder:
a. From the Mode keys select Manual.
b. From the Instrument keys select Recorder.
The Chart recorder screen allows you to start and stop the chart
recorder. The following selections are available:
• Record: The chart recorder will begin to record data (pen
down, paper feed ON).
• Stop: The chart recorder will stop (pen up and paper
stopped).
System Operation
5.3 PROGRAMMING MODE
Programming mode is used to define a sequence of actions which collectively comprise a method. Once a
method is written the BioLogic LP can carry out the programmed actions unattended by running the method.
To enter the Programming Mode press the Program mode key. When viewing a method, the “Method List”
presents all programmed actions in the order in which they will occur when the method is run. The Method
List is generated automatically each time a method is created, modified, or recalled from storage (opened).
The Method List cannot be created or modified directly. The process of creating or modifying a method consists of completing three separate tables which together comprise the method:
1. Pump Step Table: This table is used to define all pump parameters throughout the entire method.
The table is divided into numbered steps and can contain up to 50 steps. Each step includes a
buffer, a duration or length, and a flow rate. The buffer can be a single solution, a mixture of two
solutions, or a linear gradient. The duration of a step will be in either units of time (minutes) or volume (ml) depending upon the choice made when the method is created. The flow rate will be in
ml/min. To view or make changes to the Pump Step Table press the Pump instrument key.
2. Fraction Collector Table: This table is used to define the fraction collection parameters for the
entire method. Fraction collection can be programmed in any of four different ways including collecting the entire run (“Collect All”), collecting only when the UV detector signal indicates a peak
(“Threshold”), collecting during specific periods in the run only (“Windows”), and a combination of
the threshold and windows schemes (“Threshold + Windows”). Collection parameters such as fraction size and collection “windows” will be programmed in units of time (minutes) or volume (ml)
depending upon the choice made when the method is created. To view or make changes to the
Fraction Collection Table press the Collector instrument key.
Note: Fraction collection is not required in a method although most methods will typically include
fraction collection. When Windows are used the method may contain up to 50 windows.
3. Alarm Table: This table is used to define up to three specific points in the progress of a run when
an alarm will sound. If desired, a Hold can be placed at the time of an alarm to stop the progress of
the run until the user chooses to continue the run. To view or make changes to the Alarm Table
press the Alarm instrument key.
Note: Alarms are not required in a method and are only valuable when the user will be nearby during the run.
Figure 21 shows the relationship between the contents of the three tables described above and the Method
List.
49
System Operation
CONTENTS OF A METHOD
Method Name and Duration (Time or Volume)
(Refer to section 5.3.2, Creating a New Method)
PUMP TABLE
(refer to section 5.3.4)
Step Time (min) Buffer
>01
02
03
04
05
1.00
20.00
2.00
2.00
5.00
BUFFER A
0 - 70% B
70 - 100% B
BUFFER B
BUFFER A
FRACTION COLLECTOR TABLE
(refer to section 5.3.5)
ml/min Total (min)
1.00
1.00
1.00
6.00
6.00
Window Start (min) End (min)
>01
02
03
1.00
21.00
23.00
25.00
30.00
4.00 to
8.00 to
18.00 to
ALARM TABLE
(refer to section 5.3.6)
Fr (min) Th (AU)
6.00
18.00
22.00
1.50
0.75
2.00
0.0050
0.0100
0.0200
STORED METHOD
List Time (min)
01
02
03
04
05
0.00
0.75
1.00
4.00
6.00
8.00
18.00
18.00
21.00
22.00
22.00
23.00
25.00
Buffer
to 1.00
BUFFER A
Alarm and Hold
to 21.00
0 - 70% B
Col: 1.50 min
TH: 0.0050
Divert to Waste
Col: 0.75 min
TH: 0.0100
Divert to Waste
TH: 0.0200
Col: 2.00 min
to 23.00
70 - 100% B
Alarm
Divert to Waste
to 25.00 BUFFER B
to 30.00 BUFFER A
ml/min
1.00
1.00
AU
AU
AU
6.00
6.00
<End of Method>
Figure 21. Contents of a Method
50
>Alarm 1
Alarm 2
Alarm 3
0.75 min
Hold Method: Yes
22.00 min
Hold Method: No
Not Programmed
System Operation
5.3.1 Program Mode’s Main Menu
To enter Program mode, press the Prog key. The Program display shows the currently opened method, and
provides a main menu consisting of four softkey selections:
•
List of Methods: Selecting this softkey displays the list of stored methods. Use this softkey to
select a method to open, rename, or delete a method. For details, refer to Table 13, List of
Methods.
•
New Method: Selecting this softkey allows you to begin creating a new method. For further discussion, refer to section 5.3.2, Creating a New Method.
•
Save Method: This softkey allows you to enter a name and save a method. For further discussion,
refer to section 5.3.7, Entering Method Names.
•
View Method. This softkey allows you to view the Method List in the currently opened method. To
scroll through the list, press the Prev and Next keys on the front panel.
Table 13.
Program Mode Operation: List of Methods
Reference
Description
PM
Method: name
Volume: 7.00 ml
LIST OF
METHODS
NEW
METHOD
PL
(Refer to
Table 14)
SAVE
METHOD
VIEW
METHOD
(See description above)
PL
>>
1 name_1
2 name_2
3* name_3
OPEN
RENAME
L1
L2
Volume:
Time:
Volume:
DELETE
(Deletes the
selected
method)
7.00 ml
10.00 min
3.00 ml
EXIT
PM
Main Menu screen: The display shows the name of the currently selected method and its total duration.
To display the list of all available methods, select List of
Methods.
List of Methods screen: This is a list of all methods which are
stored in memory along with the duration of the method. The
duration of the method is labeled in the units chosen when the
method was written. Stored methods are displayed in the list in
alphabetical order. The current method is indicated by the
asterisk (*). The method which is selected and will be affected
by the actions of the soft keys is indicated by the double arrowhead (>>). Use the Prev and Next keys to scroll through the
list and view all of the methods stored.
•
Open: This retrieves the selected method from storage and
makes it the current method. The display will show the
Method List for the selected method. For a description of
the Method List and how to use this list see section 5.3.3.
Note: If the current method is not saved when opening
another method then it is permanently lost.
51
System Operation
Table 13. (continued)
Program Mode Operation: List of Methods
Reference
Description
•
Rename: This allows you to change the method’s name.
•
Delete: Deletes the selected method. Deleting the open
method (indicated by the asterisk), deletes it from the List
of Methods, however, it remains the current method as
“< untitled >”. Deleting any Method other than the open
method means it cannot be recovered.
•
Exit: Returns to programming’s main menu screen, without
changing the current method.
PM
Method: <<name>>
Volume: 7.00 ml
LIST OF
METHODS
NEW
METHOD
SAVE
METHOD
1<<name_1>>
2<<name_2>>
3*<<name_3>>
OPEN
RENAME
Volume:
Time:
Volume:
DELETE
VIEW
METHOD
PL
>>
7.0
ml
10.00 min
3.00 ml
EXIT
L1
deletes the (return to PL)
indicated
method
List: Volume(ml)
Buffer
ml/min
01
0.00 to 1.00
0-1%B
1.00
02
0.00 to 2.00
1-10%B 1.00
PUMP FRAC COLL
ALARM
DONE
L2
SEE SECTIONS
5.3.4 - 5.3.6
Enter Method name: [name_ ]
0-9 for digits, "." for SPACE, or
Select character group below:
A-J
K-T
U-Z
shows
A through J
LEGEND
PM
PROGRAM MODE: MAIN MENU
PL
LIST OF METHODS
L1
OPEN METHOD
L2
RENAME METHOD
SEE SECTIONS
5.3.4 - 5.3.6
DONE
FOR PROGRAMMING
THE PUMP, FRACTION
COLLECTOR AND
ALARM TABLES
shows
shows
K through T U through Z
Figure 22. List of Methods
(Screen displays are keyed to the discussion in Table 13, Program Mode Operation : List of Methods)
52
System Operation
5.3.2 Creating a New Method
To create a new method enter Programming mode by pressing the Program mode key. From the
Programming mode main menu the New Method softkey is used to create an entirely new method. Note: It
is often easier to open a stored method which is similar to the desired new method, modify it as desired, and
then save it using a new name. See section 5.3.3 for a description of how to do this.
Table 14.
Program Mode Operation: New Method
Reference
Description
PN
Method: <<untitled>>
Volume:
Select Programming Mode
TIME
VOLUME
0.00 ml
CANCEL
(return to PM)
N1
L1
List:
Volume(ml)
01
0.00 to 1.00
02
0.00 to 2.00
PUMP
FRAC COLL
Buffer
ml/min
0-1%B
1.00
1-10%B
1.00
ALARM
DONE
Refer to Sections 5.3.4 - 5.3.6
Select Time or Volume mode: The units used to define the
actions within a method can be either time (minutes) or volume
(ml). Once this selection is made the method cannot be
changed from one unit type to the other unit type. After this
selection is made the method actions are programmed starting
with the pump steps. For a description of programming pump
steps see section 5.3.4. When all pump steps have been programmed, the OK softkey displays the Method List containing
only pump steps.
Method List: This list shows the actions which will take place
when the method is run in the order in which they will occur.
The numbered steps indicate the pump steps within the
method. Use the Prev and Next keys to scroll through the list
and view the method. The units of duration are in either time
(minutes) or volume (ml) depending upon the choice made
when the method was created.
If additional pump steps or changes to the pump steps are
desired see section 5.3.4. If fraction collection is desired during
this method see section 5.3.5 which describes fraction collection programming. If Alarms are desired within the method see
section 5.3.6 which describes alarm programming.
After each table is completed the Method List will be displayed
again including the changes made and can be reviewed . You
will notice that the list shows fraction collection and alarms as
events and places them directly under the pump step in which
they occur. When all desired actions have been programmed
and the method is complete, press the Done softkey.
Notes: A method must contain at least one pump step; however
fraction collection and alarms are optional. The other BioLogic
LP instruments (UV Monitor, Conductivity Monitor, Chart
Recorder, and Valve Controller) are not part of programmed
methods. They can be operated by pressing the
53
System Operation
Table 13. (continued)
Program Mode Operation: New Method
Reference
Description
appropriate instrument key at any time, except while actually
viewing and editing a method. Although the Chart Recorder is
not programmed, it automatically records all runs.
N1a
Note: If you selected Volume as the unit of measure, the top line of this screen would display:
Method: <untitled>
Volume:
10 ml.
Method: <untitled>
Time:
Name and Save this method or use the
method without saving as <untitled>
SAVE
NO SAVE
(Enter Method’s
name before
returning to PM.
For further discussion refer to
discussion at
start of section
5.3.7.)
54
PM
10 min
Save Method screen: This screen allows the following choices:
• Save: This allows a name to be entered for the method
and the method to be saved in permanent storage. For a
description of how to enter method names see section
5.3.7.
Note: All methods which have names other than “<untitled>” have been saved in permanent storage.
• No Save: This allows the method to remain the current
method and for it to be run without saving it in permanent
storage. This option is typically used when a method will
never be repeated or when 50 methods are already stored
in permanent memory. A method which is not saved will
always be named “<untitled>”.
Note: The “<untitled>” method loaded as the current
method is not lost when the power is shut off and remains
the current method when power is restored.
System Operation
PM
Method: <<name>>
Volume: 7.00 ml
LIST OF
METHODS
SAVE
METHOD
NEW
METHOD
VIEW
METHOD
PN
Method: <<untitled>>
Volume: 0.00 ml
Select Programming Mode
TIME
VOLUME
N1
CANCEL
N1
Step Time (min) Buffer ml/min Total (min)
>01 New Step to be added
Step Vol (ml) Buffer ml/min
>01 New Step to be added
ADD
ADD
OK
SEE SECTION
5.3.4
Total (ml)
OK
SEE SECTION
5.3.4
List: Time(min)
Buffer
ml/min
01
0.00 to 1.00
0-1%B
1.00
02
0.00 to 2.00
1-10%B 1.00
PUMP FRAC COLL
ALARM
DONE
List: Volume(ml)
Buffer
ml/min
01
0.00 to 1.00
0-1%B
1.00
02
0.00 to 2.00
1-10%B 1.00
PUMP FRAC COLL
ALARM
DONE
SEE SECTIONS
5.3.5 AND 5.3.6
SEE SECTIONS
5.3.5 AND 5.3.6
N1a
LEGEND
Method: <untitled>
(Time or Vol is displayed)
Name and Save this method or use the
method without saving as <untitled>
SAVE
NO SAVE
(return
to PM)
PM
PROGRAM MODE: MAIN MENU
PN
NEW METHOD: SELECT TIME OR VOLUME
N1
STEP SCREEN
SEE SECTIONS
5.3.4 - 5.3.6
Enter Method name: [name_ ]
0-9 for digits, "." for SPACE, or
Select character group below:
A-J
K-T
U-Z
shows
A through J
shows
shows
K through T U through Z
DONE
FOR PROGRAMMING
THE PUMP, FRACTION
COLLECTOR, AND
ALARM TABLES
N1a SAVE METHOD
(return
to PM)
(see Section 5.3.7)
Figure 23. Programming a New Method
(Screen displays are keyed to the discussion in Table 14, Program Mode Operation: New Method)
55
System Operation
5.3.3 Viewing and Editing a Method
Whenever a method is Opened, or whenever View Method is selected, the Method List is displayed. From
the Method List it is possible to review the contents of the entire method including the pump steps, fraction
collection parameters, and the alarms. If desired, the method can be edited to make whatever changes are
necessary. When the contents of the method are correct, press the Done softkey. If changes are made,
you must then confirm whether or not you want to save the method. Refer to section 5.3.7 for saving the
method. The system then returns to the Program mode main menu. To run the method, see section 5.4.
Table 15.
Program Mode Operation: Viewing and Editing a Method
Reference
Description
Accessed from any of the following
Program mode main menu selections:
•
List of Methods
•
New Method
•
View Method
List:
Volume(ml)
01
0.00 to 1.00
02
0.00 to 2.00
PUMP
FRAC COLL
Buffer
ml/min
0-1%B
1.00
1-10%B
1.00
ALARM
DONE
Refer to Sections 5.3.4 through 5.3.6
(returns to
Program mode’s
main menu)
Method List: This list shows all actions which will take place
when the method is run in the order in which they will occur.
The numbered steps indicate the pump steps within the
method. Below each step are any fraction collection events or
alarm events which will occur during the step. Use the Prev
and Next keys to scroll through the list and view the method.
The units of duration are in either time (minutes) or volume (ml)
depending upon the choice made when the method was created.
The instrument softkeys or the corresponding instrument keys
are used to edit or make changes to the table for the appropriate instrument. For a description of the Pump Table see section
5.3.4. For a description of the Fraction Collection Table see
section 5.3.5. For a description of the Alarm Table see section
5.3.6. After the tables are completed the Method List will be
displayed again including any changes made and can be
reviewed . When the method is complete, press the Done softkey. If the method has only been viewed without making any
changes the Program mode Main Menu will be displayed. If
any changes or additions have been made to the method the
Save As menu will be displayed.
Notes: A method must contain at least one pump step; however
fraction collection and alarms are optional. The other BioLogic
LP instruments (UV Monitor, Conductivity Monitor, Chart
Recorder, and Valve Controller) are not part of programmed
methods. They can be operated by pressing the appropriate
instrument key at any time, except while actually viewing and
editing a method. Although the Chart Recorder is not programmed, it automatically records all runs.
56
System Operation
Table 15. (continued
Program Mode Operation: Viewing and Editing a Method
Reference
Method: name
Time: 2.00 min
Replace existing method with this name,
use a new name, or use without saving?
REPLACE NEW NAME
NO SAVE
(refer to
section 5.3.7)
Description
CANCEL
Save As... screen: This screen provides a number of options.
• Replace: This replaces the previous version of a method
with the newly modified method. In this case the previous
version is permanently lost.
• New Name: This allows the modified method to be saved
using a new name. In this case both the original method
and the modified method with a different name are saved.
• No Save: This allows the method to remain the current
method and for it to be run without saving it in permanent
storage. This option is typically used when a method will
never be repeated or when 50 methods are already stored
in permanent memory. Methods which are not saved will
always be named “<untitled>”.
Note: The “<untitled>” method loaded as the current
method is not lost when the power is shut off and remains
the current method when power is restored.
• Cancel: This gives the option to abandon the changes or
additions to the original method and revert to the method as
it was before. There will be a confirmation screen with a
Yes/No choice to prevent accidental loss of the modified
method if this key is pressed unintentionally.
57
System Operation
5.3.4 Program Mode’s Pump Table
The Pump Table displays the contents of all pump steps within the method. This table can be viewed by
pressing the Pump instrument key while in Program mode or by pressing the Pump softkey on the Method
List screen. Each pump step contains a buffer composition, a duration, and a flow rate. Table 16 describes
how to program the Pump Table.
Table 16.
Program Mode’s Pump Table
Reference
P1
Description
A previously programmed step is selected,
as indicated by arrow.
Step Time (min)
Buffer
>01 10.00
Buffer A
02 New Step to be added
INSERT
EDIT
P2
P1
DELETE
Total (min)
10.00
OK
P2
A blank step is selected, as
indicated by arrow.
Step Time (min)
Buffer
01 10.00
Buffer A
>02 New Step to be added
ADD
P2
ml/min
1.00
Pump Table: Each step in a method is shown in a scrolling list
format. The selected step is shown with an arrow (>) pointing
to the step. Use the Prev and Next keys to move the selection
up and down the list. When the selected step is already programmed, the softkeys are as shown in the top picture and
when the selected step is not already programmed the softkeys
are as shown in the bottom picture.
ml/min
1.00
Total (min)
10.00
OK
The table consists of 5 columns: the step number, the duration,
the buffer, the flow rate, and the cumulative method duration
including the step. Up to 50 steps can be programmed in a
method and the duration units will be either time (minutes) or
volume (ml), depending upon the choice made when the
method was created.
• Insert: This places a new step into the method, which will
have the same step number as the current selected step.
The currently selected step and all subsequent steps will
have their step number increased by one.
• Edit: This allows the contents of the selected step to be
changed.
• Delete: This removes the selected step from the table. The
step cannot be retrieved.
• Add: This allows a new step to be added to the end of the
table.
• OK: This indicates that the table is complete and returns to
the Method List.
Note: To program the Fraction Collector Table or the Alarm
Table without returning to the Method List press the Collector
and Alarm keys respectively while viewing the Pump Table.
58
System Operation
Table 16. (continued)
Program Mode’s Pump Table
Reference
Description
P2
Method:
Volume: 1.00 ml
Step: 1
Buffers: G M [A] B C D E
(GRAD=Linear Gradient, MIX=%B Mixture)
GRAD
MIX
CANCEL
OK
P2a
P2b
(return
to P1)
P3
Select Buffer: The buffers available are indicated by the letters
A through E plus the letters G and M which are shown on line 2
of the LCD. If a buffer is available the letter will be an upper
case letter. When a buffer is not available it is shown in a lower
case letter.
The availability of buffers is controlled by the presence or
absence of the system valves. Buffer A is always available.
Buffer B becomes available when the Proportioning Valve/Mixer
is plugged into the Controller. Buffer C becomes available
when an SV3-2 valve is plugged into the Buffer Selector port.
Buffers C, D, and E become available when an SV5-4 valve is
plugged into the Buffer Selector port. The Controller senses the
presence of the valves and automatically updates this list as
valves are plugged and unplugged from the Controller.
For convenience, all buffers can be programmed in a method
even when not currently available. To run the method the
appropriate valves must be connected.
The letters G and M stand for Gradient and Mixture. Gradient
refers to a linear gradient made from buffers A and B and
Mixture refers to a single solution made by mixing buffers A and
B. Gradient and Mixture compositions are expressed in %B.
The brackets around one of the buffers, [A], indicate which
buffer is currently selected. Use the Prev and Next keys to
change the selection.
•
•
•
•
Grad: This is used to program a linear gradient in this step.
Mix: This is used to program a mixture in this step.
Cancel: This cancels the addition or modification of this
step and returns to the Pump Table as it was originally.
OK: This confirms the selected buffer as indicated by the
brackets surrounding the letter and continues to the next
entry.
Note: The Grad and Mix softkeys are identical to selecting
the G and the M respectively from the list.
59
System Operation
Table 16. (continued)
Program Mode’s Pump Table
Reference
Description
P2a
Method:
Volume: 1.00 ml
Step: 1 Linear Gradient Conditions
Initial: 0%B
Final: 0%B
(initial)
FINAL
CANCEL
OK
(set the initial value)
(set the
final value)
(return
to P1)
P3
P2b
Method:
Step: 1
Volume: 1.00 ml
Isocratic Mixture Conditions
Mixture: _ %B
CANCEL
OK
(return
to P1)
P3
P3
Method:
Step: 1
Volume: 1.00 ml
Length of Step: 0.00 ml
CANCEL
OK
(return
to P1)
P4
P4
Method:
Step: 1
Volume: 1.00 ml
Flow Rate: 1.00 ml/min
CANCEL
(return
to PT)
60
OK
Linear Gradient: A linear gradient consists of a continuous
change in the buffer composition from an initial mixture of
buffers A and B to a final mixture of buffers A and B. Buffer
composition is set in %B such that %A + %B = 100%.
• Initial: This places the cursor in the field to enter buffer
composition at the start of the gradient. Enter the value
using the number keys.
• Final: This places the cursor in the field to enter buffer composition at the end of the gradient. Enter the value using
the number keys.
• Cancel: This cancels the addition or modification of this
step and returns to the Pump Table as it was originally.
• OK: This confirms the linear gradient entered and continues
to the step duration entry.
Note: The Prev and Next keys also move the cursor
between the initial and final values.
Mixture: A mixture continuously delivers a combination of
buffers A and B. This delivery is isocratic or constant throughout the step. The buffer composition is set in %B such that
%A + %B = 100%. Enter the value using the number keys.
• Cancel: This cancels the addition or modification of this
step and returns to the Pump Table as it was originally.
• OK: This confirms the isocratic mixture entered and continues to the step duration entry.
Length of Step: The duration of this step is entered using the
number keys. The duration is in either units of time(minutes) or
volume (ml) depending upon the choice made when the method
was created.
• Cancel: This cancels the addition or modification of this
step and returns to the Pump Table as it was originally.
• OK: This confirms the length of step entered and continues
to the step flow rate entry.
Flow Rate: The flow rate of this step is entered using the number keys. The flow rate entry is the final entry for a pump step.
• Cancel: This cancels the addition or modification of this
step and returns to the Pump Table as it was originally.
• OK: This confirms the flow rate entered thereby completing
the step and returns to the Pump Table with the new or
modified step included in the table.
System Operation
PT
SEE SECTIONS
5.3.5 - 5.3.6
P1
P1
Step
Vol(ml)
Buffer
ml/min
> 01
10.00 Buffer A
1.00
02
New Step to be added
INSERT
EDIT
DELETE
Step
Vol(ml)
Buffer
ml/min
01
10.00 Buffer A
1.00
> 02 New Step to be added
ADD
Total (ml)
1.00
OK
Total (ml)
1.00
OK
P2
Method:
Volume: 1.00 ml
Step: 1
Buffers: G M [A] B C D E
(GRAD=Linear Gradient, MIX=%B Mixture)
GRAD
MIX
CANCEL
OK
return
to P1
P2b
Method:
Step: 1
Volume: 1.00 ml
Isocratic Mixture Conditions
Mixture: _ %B
CANCEL
OK
return
to P1
P2a
LEGEND
Method:
Volume: 1.00 ml
Step: 1
Linear Gradient Conditions
Initial: 0%B Final: 0%B
(initial)
FINAL
CANCEL
OK
P3
PT
return
to P1
Method:
Volume: 1.00 ml
Step: 1
Length of Step: 0.00 ml
CANCEL
P4
PUMP TABLE
P2
SELECT BUFFER/SOLUTION FOR THE STEP
P2a PROGRAM A LINEAR GRADIENT USING BUFFERS A & B
OK
return
to P1
Method:
Volume: 1.00 ml
Step: 1
Flow Rate: 1.00 ml/min
CANCEL
P1
OK
P2b PROGRAM A MIXTURE OF BUFFERS A & B
P3
LENGTH OF STEP
P4
FLOW RATE FOR THE STEP
SEE SECTIONS
5.3.5 - 5.3.6
return
to PT
Figure 24. Programming: the Pump Table
(Screen displays are keyed to the discussion in Table 16)
61
System Operation
5.3.5 Program Mode’s Fraction Collector Table
The Fraction Collector Table displays the fraction collector parameters within the method. This table is
viewed upon the completion of selecting a collection mode and entering the necessary parameters. To
begin this process press the Collector instrument key while in Program mode or press the Frac Coll softkey
on the Method List screen. If fraction collection has not been programmed within the method, the Select
Collection Mode screen will be presented. There are four different fraction collection modes which can be
used: Collect All, Threshold Collection, Collection Windows, and Threshold plus Collection Windows. Each
of these modes will be discussed individually below. If a fraction collection mode was previously programmed within the method, then the Fraction Collection Summary screen will be presented.
Table 17.
Program Mode’s Fraction Collector Table
Reference
Description
F1
Method:
Volume: 1.00 ml
Select a Fraction Collector Mode
ALL
THRESHOLD
WINDOWS
THRES+WIN
F3
F4
F5
F2
Select Collection Mode: The fraction collection mode is chosen using the softkeys. There must be an SV3-2 valve (or
System Cable 3 with a Model 2128) plugged into the Diverter
Valve port on the Controller to run a method using any collection mode except Collect All.* After making a selection, the
parameter entry screen(s) for that collection mode will be presented. For descriptions of these screens consult the appropriate sections below.
Note: If no fraction collection is desired use the Pump key or
Alarm key to leave this screen without making a selection.
• All: Selects Collect All mode which collects fractions
throughout the entire method. See section 5.3.5.1.
• Threshold: Selects Threshold Collection mode which
allows you to only collect peaks by defining a threshold
value in absorbance units (AU). See section 5.3.5.2.
• Windows: Selects Collection Windows mode allows you to
specify periods called “windows” within the method when
fractions will be collected. See section 5.3.5.3.
• Thresh+Win: Selects Threshold plus Collection Windows
mode is a combination of the two modes described above.
See section 5.3.5.4.
*For convenience, all collection modes can be programmed
without the valve connected.
62
System Operation
Table 17. (continued)
Program Mode’s Fraction Collector Table
Reference
Description
Fraction Collection Summary: This screen shows the current
collection mode and an estimate of the number of fractions
which will be collected when the method is run. The estimate is
accurate when threshold collection is not used and no manual
overrides are performed during the run. This estimate will be
incorrect if manual overrides are performed during the run or
when a threshold is used. In either case the actual number of
fractions collected can be either more or less than the estimate.
• Edit: Allows the fraction collection parameters to be viewed
and changed.
• Erase: Removes the existing fraction collection programming from the method. No fraction will occur when the
method is run.
• New Mode: Allows the collection mode to be changed by
displaying the Select Collection Mode screen.
• OK: Returns to the Method List
F1a
Method:
Volume: 1.00 ml
FC Mode: Collect All
Estimated Number of Fractions: 20
EDIT
ERASE
NEW MODE
OK
F3
F2
F5
F4
F1
F1a
Method: name
Volume: 1.00 ml
Select a Fraction Collector Mode
Method: name
Volume: 2.00 ml
FC Mode: Collect all
Estimated Number of Fractions: 20
EDIT
ERASE
NEW MODE
OK
ALL THRESHOLD
WINDOWS
THRES+WIN
See Sections 5.3.5.1 -5.3.5.4
Allows you to
change the
collection parameters.
To change
collection mode.
To remove Method's
fraction collection
mode; no fraction
collection will occur
when the Method is run.
LEGEND:
F1
SELECT COLLECTION MODE
SELECT COLLECTION MODE
F1a FRACTION COLLECTION SUMMARY
SEE SECTIONS
5.3.5.1 - 5.3.5.4
FOR FRACTION COLLECTION MODES
Figure 25. Programming: the Fraction Collector Table’s Summary
(Screen displays are keyed to the discussion in Table 17)
63
System Operation
5.3.5.1 Collect All Mode
Collect All mode uses a single fraction size to collect fractions throughout a method. The units used for the
fraction size are either time (minutes) or volume (ml), depending upon the choice made when the method
was created. Table 18 describes how to program Collect All Mode.
Table 18.
Program Mode’s Fraction Collector Table: Collect All
Reference
Description
F2
Method:
Enter Fraction size: 1.00ml
Volume: 1.00 ml
CANCEL
OK
F3
F3
F3
Method:
COLLECT ALL MODE
Fraction size: 1.00ml
Fraction Size: Enter the fraction size desired using the number
keys. The OK softkey confirms the fraction size entered. The
Cancel softkey reverts to the original or the default fraction
size. Both softkeys display the Fraction Collection Table for
Collect All mode.
Volume: 1.00 ml
EDIT
Fraction Collection Table for Collect All mode: This table
shows the current fraction mode and the collection parameters.
To change the parameters press the Edit softkey. To display
the Method List press the OK softkey.
OK
Displays
Method List
F2
Note: To program the Pump Table or the Alarm Table without
returning to the Method List, press the Pump and Alarm keys
respectively while viewing the Fraction Collector Table.
F1
F1a
Method: name
Volume: 1.00 ml
Select a Fraction Collector Mode
Method: name
Volume: 2.00 ml
FC Mode: Collect all
Estimated Number of Fractions: 20
EDIT
ERASE
NEW MODE
OK
ALL THRESHOLD
WINDOWS
THRES+WIN
(return
to F1)
F2
Method: name
Volume: 1.00 ml
Enter Fraction size: 1.00ml
CANCEL
OK
To remove Method's fraction collection
mode; no fraction collection will occur
when the Method is run.
F2a
LEGEND:
Method: name
Volume: 1.00 ml
COLLECT ALL MODE
Fraction Size:
1.00 ml
EDIT
OK
(return
to F2)
F2
SELECT COLLECTION MODE
COLLECT ALL MODE: ENTER FRACTION SIZE
F2a FRACTION COLLECTOR TABLE FOR COLLECT ALL
(return to
Method List)
Figure 26. Programming: the Fraction Collector Table’s Collect All
(Screen displays are keyed to the discussion in Table 18)
64
System Operation
5.3.5.2 Threshold Collection Mode
Threshold Collection mode allows you to only collect peaks by defining a threshold value in absorbance
units (AU). When the absorbance is above the threshold value the Diverter Valve sends the fluid to the fraction collector and the collector advances as programmed. When the absorbance is below the threshold
value the Diverter Valve sends the fluid to waste. To prevent air bubbles and noise from being collected as
peaks there is an optional Bubble Filter. This filter can be set to High, Medium, Low, or Off. As the setting is
increased broader peaks are considered air bubbles or noise and are not collected. When the filter is Off,
all peaks are collected. The units used for the fraction size are either time (minutes) or volume (ml),
depending upon the choice made when the method was created. Table 19 describes how to program
Threshold Mode.
Table 19.
Program Mode’s Fraction Collector Table: Threshold Collection
Reference
Description
F3
Method:
Enter Fraction size: 1.00ml
Volume: 1.00 ml
CANCEL
OK
(return
to F1)
F3a
F3a
Method: name
SET BF
Volume: 1.00 ml
Threshold: 2.0000 AU
Bubble Filter: Medium
CANCEL
OK
(return
to F1)
F3b
Press to select
between Low,
Medium, High, and Off
F3b
Method: name
THRESHOLD MODE
Thresh: 1.5000 AU
Volume:
1.00 ml
Frac size:
1.00 ml
Bubble Filter: Off
EDIT
OK
(return
to F1)
P5
Fraction Size: Enter the fraction size desired using the number
keys. The OK softkey confirms the fraction size entered and
continues to the threshold and bubble filter entry screen. The
Cancel softkey displays the Select Collection Mode screen.
Threshold and Bubble Filter: Enter the threshold using the
number keys. The Set BF softkey will increment the bubble filter setting through a circular list. The OK softkey confirms the
threshold and bubble filter entered and softkeys display the
Fraction Collection Table for Threshold mode. The Cancel softkey displays the Select Collection Mode screen.
Fraction Collection Table for Threshold mode: This table
shows the current fraction mode and the collection parameters.
To change the parameters press the Edit softkey. To display
the Method List press the OK softkey.
Note: To program the Pump Table or the Alarm Table without
returning to the Method List press the Pump and Alarm keys
respectively while viewing the Fraction Collector Table.
65
System Operation
F1
F1a
Method:
Volume: 1.00 ml
Select a Fraction Collector Mode
Method: name
Volume: 2.00 ml
FC Mode: Collect all
Estimated Number of Fractions: 20
EDIT
ERASE
NEW MODE
OK
ALL THRESHOLD
WINDOWS
THRES+WIN
F3
(return
to F1)
Method:
Volume: 1.00 ml
Enter Fraction size: 1.00ml
CANCEL
SET BF
OK
(return
to F1)
F3a
Method:
To remove Method's
fraction collection
mode; no fraction
collection will occur
when the Method is run.
Volume: 1.00 ml
Threshold: 2.0000 AU
Bubble Filter: Medium
CANCEL
OK
LEGEND:
Low/Med/Hi/Off
F3b
Method:
THRESHOLD MODE
Thresh: 2.0000 AU
(return
to F1)
F3
Volume: 2.00 ml
Frac size:
1.00 ml
Bubble Filter: Medium
EDIT
OK
(return
to F3)
THRESHOLD MODE
THRESHOLD MODE: ENTER FRACTION SIZE
F3a ENTER THRESHOLD VALUE AND SET BUBBLE FILTER
F3b FRACTION COLLECTION TABLE FOR THRESHOLD MODE
(return to
Method List)
Figure 27. Programming: the Fraction Collector’s Threshold Mode
(Screen displays are keyed to the discussion in Table 19)
66
System Operation
5.3.5.3 Collection Windows Mode
Collection Windows mode allows you to specify periods called “windows” within the method when fractions
will be collected. Each window can have a different fraction size. During a window the Diverter Valve sends
the fluid to the fraction collector and the collector advances as programmed. Outside of the windows the
Diverter Valve sends the fluid to waste. The units used for the fraction size and Collection Windows are
either time (minutes) or volume (ml) depending upon the choice made when the method was created. Table
20 describes how to program Collection Windows Mode.
Table 20.
Program Mode’s Fraction Collector Table: Collection Windows
Reference
F4
Description
A previously programmed
Window is selected,
as indicated by arrow
Window
Start (ml)
End
>01
0.00 to 60.0
02 New collection window to be added
INSERT
EDIT
DELETE
F4a
F4
F4a
OK
(return
to FT,
Table 17)
A blank Window is selected,
as indicated by arrow
Window Start (ml)
End
01
0.00 to 60.0
>02 New collection window to be added
ADD
F4a
Frac (ml)
5.00
Frac (ml)
5.00
OK
(return
to FT,
Table 17)
Fraction Collector Table for Collection Windows Mode:
Each window in a method is shown in a scrolling list format.
The selected window is shown with an arrow (>) pointing to the
window. Use the Prev and Next keys to move the selection up
and down the list.
When the selected window is already programmed the softkeys
are as shown in the top picture and when the selected window
is not already programmed the softkeys are as shown in the
bottom picture.
The table consists of 4 columns: the window number, the start
of the window, the end of the window, and the fraction size. Up
to 50 windows can be programmed in a method and the units
will be either time (minutes) or volume (ml) depending upon the
choice made when the method was created.
•
•
•
•
•
Insert: This places a new window into the method using the
window number of the current selected window. The currently selected window and all subsequent windows have
their window number increased by one.
Edit: This allows the contents of the selected window to be
changed.
Delete: This removes the selected window from the table.
The window cannot be retrieved.
Add: This allows a new window to be added to the end of
the table.
OK: This indicates that the table is complete and returns to
the Method List.
Note: To program the Pump Table or the Alarm Table without
returning to the Method List press the Pump and Alarm keys
respectively while viewing the Fraction Collector Table.
67
System Operation
Table 20. (continued)
Program Mode’s Fraction Collector Table: Collection Windows
Reference
Description
F4a
Method: <untitled>
Window: 1
(start)
(enter the
start time for
the window)
END
(enter the end
time for the
window)
Start:
End:
CANCEL
(return
to F4)
Volume: 1.00 ml
0.00 ml
0.00 ml
OK
F4b
Window Start and End: Enter the times or volumes when the
collection window should occur within the method.
• Start: This places the cursor in the field to enter the start of
the window. Enter the value using the number keys.
• Final: This places the cursor in the field to enter the end of
the window. Enter the value using the number keys.
• Cancel: This cancels the addition or modification of this
window and returns to the Fraction Collector Table as it was
originally.
• OK: This confirms the start and end values entered and
continues to the fraction size entry.
Note: The Prev and Next keys also move the cursor between
the start and end values.
F4b
Method:
Window: 1
Time: 1.00 ml
Fraction Size:
1.00 ml
CANCEL
OK
(return to F4)
68
Fraction Size: Enter the fraction size desired using the number
keys. The OK softkey confirms the fraction size entered and
returns to the Fraction Collector Table with the new or modified
window in the table. The Cancel softkey returns to the Fraction
Collector Table as it was originally without adding or modifying
the window.
System Operation
F1
Method:
Volume: 1.00 ml
Select a Fraction Collector Mode
ALL THRESHOLD
WINDOWS
THRES+WIN
Method: name
Volume: 2.00 ml
FC Mode: Collect all
Estimated Number of Fractions: 20
EDIT
ERASE
NEW MODE
OK
(return to F1)
To remove Method's fraction collection
mode; no fraction collection will occur
when the Method is run.
F4
Window Start (ml) End (ml)
Frac (ml)
>01
0.00 to 60.0
5.00
02 New collection window to be added
INSERT
EDIT
DELETE
OK
Window Start (ml) End (ml)
Frac (ml)
01
0.00 to 60.0
5.00
>02 New collection window to be added
ADD
OK
(return
to FT)
F4a
Method:
Window: 1
(start)
END
Volume: 1.00 ml
Start: 0.00 ml
End:
0.00 ml
CANCEL
OK
LEGEND:
(return
to F4)
F4b
Method:
Window: 1
(return
to FT)
Time:
F4
1.00 ml
Fraction Size:
1.00 ml
CANCEL
OK
WINDOWS MODE
FRACTION COLLECTION TABLE FOR WINDOWS MODE
F4a START AND END TIMES FOR WINDOW
F4b FRACTION SIZE FOR WINDOW
(return to F4)
Figure 28. Programming: the Fraction Collector’s Windows Mode
(Screen displays are keyed to the discussion in Table 20)
69
System Operation
5.3.5.4 Threshold and Collection Windows Collection Mode
Threshold plus Collection Windows mode is a combination of Threshold Collection Mode and Collection
Windows Mode. The description of this mode assumes a complete understanding of the two individual
modes which are described in sections 5.3.5.2 and 5.3.5.3.
In Threshold plus Collection Windows Mode each window can have a different threshold as well as a different fraction size. In this mode the Diverter Valve sends the fluid to the collector only when both inside a collection window and above the threshold for the window. In all other circumstances the fluid is sent to waste.
The units used for the fraction size and collection windows are either time (minutes) or volume (ml) depending upon the choice made when the method was created. Table 21 describes how to program Threshold
plus Collection Windows Mode.
Table 21.
Program Mode’s Fraction Collector Table: Threshold with Collection Windows
Reference
F5
Description
A previously Programmed
Window is selected, as
indicated by arrow.
Window Start (ml)
End
Frac (ml)
>01
0.0
1.00
1.00
02 New collection window to be added
INSERT
EDIT
DELETE
OK
(return to FT,
Table 17)
F5a
F5a
F5
A blank Window is selected, as
indicated by arrow.
Window Start (ml)
End
Frac (ml)
01
0.0
1.00
1.00
>02 New collection window to be added
ADD
F5a
Th (AU)
1.000
Th (AU)
1.000
OK
(return to FT,
Table 17)
Fraction Collector Table for Threshold plus Collection
Windows Mode: Each window in a method is shown in a
scrolling list format. The selected window is shown with an
arrow (>) pointing to the window. Use the Prev and Next keys
to move the selection up and down the list.
When the selected window is already programmed, the softkeys
are as shown in the top picture; and when the selected window
is not already programmed, the softkeys are as shown in the
bottom picture.
The table consists of 5 columns: the window number, the start
of the window, the end of the window, the fraction size, and the
threshold. Up to 50 windows can be programmed in a method,
and the units will be either time (minutes) or volume (ml),
depending on the choice made when the method was created.
• Insert: This places a new window into the method using the
window number of the current selected window. The currently selected window and all subsequent windows have
their window number increased by one.
• Edit: This allows the contents of the selected window to be
changed.
• Delete: This removes the selected window from the table.
The window cannot be retrieved.
• Add: This allows a new window to be added to the end of
the table.
• OK: This indicates that the table is complete and returns to
the Method List.
Note: To program the Pump Table or the Alarm Table without
returning to the Method List, press the Pump and Alarm keys
respectively while viewing the Fraction Collector Table.
70
System Operation
Table 21. (continued)
Program Mode’s Fraction Collector Table: Threshold with Collection Windows
Reference
Description
F5a
Method: <untitled>
Window: 1
(start)
(enter the
start time for
the window)
END
(enter the end
time for the
window)
Volume:
1.00 ml
Start: 0.00 ml
End: 0.00 ml
CANCEL
OK
(return
to F5)
F5b
Window Start and End: Enter the times or volumes when the
collection window should occur within the method.
• Start: This places the cursor in the field to enter the start of
the window. Enter the value using the number keys.
• Final: This places the cursor in the field to enter the end of
the window. Enter the value using the number keys.
• Cancel: This cancels the addition or modification of this
window and returns to the Fraction Collector Table as it was
originally.
• OK: This confirms the start and end values entered and
continues to the fraction size entry.
Note: The Prev and Next keys also move the cursor between
the start and end values.
F5b
Method:
Window: 1
Volume:
Fraction Size:
1.00 ml
CANCEL
1.00 ml)
OK
Fraction Size: Enter the fraction size desired using the number
keys. The OK softkey confirms the fraction size entered and
continues to the threshold and bubble filter entry screen. The
Cancel softkey returns to the Fraction Collector Table as it was
originally, without adding or modifying the window.
(return to F5)
F5c
F5c
Method:
Window: 1
Threshold: 2.0000 AU
SET BF
Press to select
between Low,
Medium, High, and Off
Volume: 1.00 ml
Bubble Filter: Medium
CANCEL
OK
(return
to F5)
(return
to F5)
Threshold and Bubble Filter: Enter the threshold using the
number keys. The Set BF softkey will increment the bubble filter setting through a circular list. The OK softkey confirms the
threshold and bubble filter entered and returns to the Fraction
Collector Table with the new or modified window in the table.
The Cancel softkey returns to the Fraction Collector Table as it
was originally, without adding or modifying the window.
71
System Operation
F1
Method:
Volume: 1.00 ml
Select a Fraction Collector Mode
ALL THRESHOLD
WINDOWS
Method: name
Volume: 2.00 ml
FC Mode: Collect all
Estimated Number of Fractions: 20
EDIT
ERASE
NEW MODE
OK
THRES+WIN
(return to F1)
To remove Method's fraction collection
mode; no fraction collection will occur
when the Method is run.
F5
Window Start (ml) End Frac (ml) Th (AU)
>01
0.0
1.00
1.00
1.000
02 New collection window to be added
INSERT
EDIT
DELETE
OK
Window Start (ml) End Frac (ml) Th (AU)
01
0.0
1.00 1.00
1.000
>02 New collection window to be added
ADD
OK
(return
to FT, Table 17)
F5a
Method:
Window: 1
(start)
END
Time: 1.00 ml
Start: 0.00 ml
End: 0.00 ml
CANCEL
OK
LEGEND:
(return
to F5)
F5b
Method:
Window: 1
Time:
F5
1.00 ml
Fraction Size: 1.00 ml
CANCEL
THRESHOLD AND WINDOWS MODE
FRACTION COLLECTION TABLE FOR THRESHOLD + WINDOWS MODE
F5a START AND END TIMES FOR WINDOW
F5b FRACTION SIZE FOR WINDOW
OK
F5c THRESHOLD FOR WINDOW
F5c
Method:
Window: 1
Thresh: 2.0000 AU
SET BF
Low/Med/Hi/Off
(return
to F5)
Volume: 2.00 ml
Bubble Filter: Medium
CANCEL
OK
(return to F5)
Figure 29. Programming: the Fraction Collector’s Threshold with Collection Windows Mode
(Screen displays are keyed to the discussion in Table 21)
72
System Operation
5.3.6 Program Mode’s Alarm Table
The Alarm Table displays the alarms programmed within the method. This table can be viewed by pressing
the Alarm instrument key while in Program mode or by pressing the Alarm softkey on the Method List
screen. When an alarm occurs the alarm status light will turn on, the Alarm instrument light will flash, and a
beeper will sound. The first key pressed when an alarm occurs will not have it’s normal effect but will
instead simply cancel the alarm. As an option the method can be placed on Hold when an alarm occurs.
When a method is held, the run timer stops counting but the pump continues to pump the current buffer. All
other instruments continue to operate during this time as well. Holds last until the user “Continues” the run.
For more information about holding a run see section 5.4.2.2. The units used for the alarms are either time
(minutes) or volume (ml) depending upon the choice made when the method was created. Table 22
describes how to program the Alarm Table.
Table 22.
Program Mode’s Alarm Table
Reference
A1
Description
A previously Programmed Alarm is
selected, as indicated by the arrow.
>Alarm 1 10 min
Hold Method: Yes
Alarm 2 Not Programmed
Alarm 3 Not Programmed
EDIT
DELETE
OK
(return to Method List)
A1a
A1
A Blank Alarm is selected,
as indicated by the arrow.
Alarm 1 10 min
Hold Method: Yes
>Alarm 2 Not Programmed
Alarm 3 Not Programmed
ADD
OK
(return to Method List)
A1a
Alarm Table: Each alarm in a method is shown in a scrolling list
format. The selected alarm is shown with an arrow (>) pointing
to the alarm. Use the Prev and Next keys to move the selection up and down the list.
When the selected alarm is already programmed, the softkeys
are as shown in the top picture; and when the selected alarm is
not already programmed, the softkeys are as shown in the bottom picture. The table consists of 2 columns: the alarm time or
volume and the Hold choice made for the alarm.
Up to 3 alarms can be programmed in a method, and the units
will be either time (minutes) or volume (ml), depending upon the
choice made when the method was created. Alarms do not
have to be entered in the order in which they will occur. The
next time the Alarm Table is viewed, the alarms will be
rearranged in order of occurrence.
• Edit: This allows the parameters of the selected alarm to be
changed.
• Delete: This removes the selected alarm from the table.
The alarm cannot be retrieved.
• Add: This allows a new alarm to be added to the end of the
table.
• OK: This indicates that the table is complete and returns to
the Method List.
Note: To program the Pump Table or the Fraction Collector
Table without returning to the Method List, press the Pump and
Collector keys respectively while viewing the Alarm Table.
73
System Operation
Table 22. (continued)
Program Mode’s Alarm Table
Reference
Description
A1a
Method: Volume: 1.00 ml
Alarm: 1
HOLD ON
(hold off)
Changes Hold
from NO to YES
Volume:
0.00 ml
Hold Method: NO
CANCEL
OK
Method will
not be
stopped by
alarm
(returns to
A1)
(returns to
A1)
Alarm Settings: Enter the time or volume for the alarm to occur
using the number keys.
• Hold On: This programs the method to Hold when the
alarm occurs.
• Hold Off: This programs the method run normally when the
alarm occurs.
• Cancel: This returns to the Alarm Table without added or
modifying the alarm.
• OK: This returns to the Alarm Table with the new or modified alarm in the table.
A1
>Alarm 1 Not Programmed
Alarm 2 Not Programmed
Alarm 3 Not Programmed
ADD
OK
>Alarm 1 1.00 ml Hold Method: Yes
Alarm 2 Not Programmed
Alarm 3 Not Programmed
EDIT
DELETE
OK
return to
Method List
A1a
LEGEND
Method:
Alarm: 1
Volume: 1.00 ml
HOLD ON
Volume: 0.00 ml
Hold Method: NO
(hold off)
CANCEL
OK
A1
ALARM TABLE
A1a PROGRAM ALARM
return
to A1
Figure 30. Programming: the Alarm Table
(Screen displays are keyed to the discussion in Table 22)
74
System Operation
5.3.7 Entering Method Names
Since up to 50 methods can be stored in the BioLogic LP, method names are necessary to keep track of the
methods stored. Method names consist of up to 12 characters and can include upper case letters (A-Z),
numbers (0-9), and spaces. Careful selection of names makes it easier to retrieve the method desired. In
Manual and Run modes the name of the current method will be on the top line of the LCD as a reminder.
Note: The List of Methods used to retrieve stored methods is displayed in alphabetical order.
Table 23.
Program Mode: Entering Method Names
Reference
L2
Description
A letter range has
not been selected.
Enter Method name: [ION EXCH 12_]
0 – 9 for digits, " . " for SPACE, or
Select character group below:
A-J
K-T
U-Z
(Displays the characters
within the indicated range)
L2a
DONE
(finishes
name entry)
Letter range A-J has
been selected.
Enter Method name: [ION EXCH 12_]
A=1 B=2 C=3 D=4 E=5 F=6 G=7 H=8 I=9 J=0
Use SOFT keys to change character groups
A-J
K-T
U-Z
0-9
(Displays the characters
within the indicated range)
L2
Method Name Entry screen: This screen allows method
names to be entered. The underscore shown within the method
name on the top line is the insertion point where the next character will be placed. The insertion point can be moved using
the Prev and Next keys.
To enter a letter character, select the softkey which shows the
range containing the desired letter followed by the number key
indicated after selecting the range. To enter a number, press
the number key directly. Use the decimal (.) key to place a
space in the name.
Line 2 of the LCD displays the current function of each number
key. Press the Done soft key to return to the List of Methods
after the name has been entered.
Note: The bottom picture shows that after a letter range has
been selected the Done softkey is replaced by a 0-9 softkey
which can be used to cancel the range selection.
75
System Operation
5.4 RUN MODE
Run mode is used to carry out the sequence of actions which are programmed within the current method.
The name of the current method which can be run is shown on the top line of the LCD in Manual mode and
on the main menu of Program mode. To run a method which is not the current method, see section 5.3
Programming Mode, and section 5.3.1 Programming Mode’s Main Menu. The following sections describe
starting runs, runs in progress, and interpreting the chart recorder trace.
5.4.1 Starting a Run
To start the Run Mode press the Run mode key. When entering Run mode, an internal system check is
made to make certain that all of the required valves are connected and that all run parameters are valid.
Section 5.4.1.1 describes the possible errors and how to resolve them and allow the method to be run.
Table 24 describes the Run Mode.
Note: The internal check before each run cannot determine if a fraction collector or chart recorder are connected and will assume that they are connected. To avoid problems, check these components before starting a run.
Table 24.
Run Mode: Starting a Run
Reference
Description
R1
Method: <<name>>
Volume:
0.51 ml
Number of Runs: 1
Delay:
1.00 min
(Automatic Run Start in 8 seconds.)
MULTIRUN
DELAY
CANCEL
START NOW
R1a
R1b
(returns to
Manual
Mode:
Pump
Operation)
(see
Section
5.4.2)
Countdown screen: When entering Run mode, the start of the
run is delayed 10 seconds to provide the opportunity to set the
Multirun and Delay features. The current status of these features is shown on line 2 of the LCD.
The Multirun setting is always set to 1 when entering Run
mode. The Delay setting is remembered between runs so it is
important to check this setting. When the Multirun or Delay
softkeys are pressed the countdown is stopped while editing the
appropriate parameter.
After the parameter is set, the countdown timer is reset to 10
seconds and begins counting again. The run automatically
starts when the countdown expires.
• Multirun: This allows number of runs to be set or changed.
• Delay: This allows the Delay to be set or changed.
• Cancel: This cancels the run and places the BioLogic LP in
Manual mode with the Pump instrument active.
• Start Now: This bypasses the countdown and starts the run
immediately.
Note: When entering Run mode, if you do not want to use multiple runs and you are certain that the delay setting is correct,
pressing the Run mode key two times will bypass the countdown exactly like pressing the Start Now softkey.
76
System Operation
Table 24. (continued)
Run Mode: Starting a Run
Reference
Description
R1a
Method: <<name>>
Number of Runs: 1
Volume: 0.51 ml
CANCEL
OK
Multiruns: This allows the method to be run the method from 1
to 999 times. Enter the number of runs desired using the number keys. The OK softkey returns to the Countdown screen
with the number of runs entered. The Cancel softkey returns to
the Countdown screen with the original number of runs prior to
selecting Multiruns.
(returns
to R1)
Note: The Multirun feature requires a fraction collector capacity
of the number of tubes for each run times the number of runs.
For example, if 25 fractions are to be collected in each run and
Multirun is set to 3 then 25 x 3 = 75 fractions will be collected.
R1b
Method: <<name>>
Delay: 1 ml
Volume: 0.51 ml
CANCEL
OK
(returns
to R1)
Delay: This allows the delay setting to be entered with a value
between 0 and the smallest fraction size programmed within the
method. Enter the delay setting desired using the number keys.
The OK softkey returns to the Countdown screen with the delay
setting entered. The Cancel softkey returns to the Countdown
screen with the original delay setting prior to selecting Delay.
Note: For a description of the Delay feature see section 5.4.1.2
below.
77
System Operation
5.4.1.1 Errors Which Prevent the Start of Runs
The errors listed below can prevent a method from being run.
•
A Required Valve is Missing: A valve which is necessary for the method to run is not present. To
resolve this error the valve indicated must be connected to the Controller, or the method must be
edited to omit any use of the valve indicated. The OK softkey returns to Manual Mode with the
Pump active.
•
The Flow Rate Exceeds Pump Calibration: The flow rate programmed within at least one step in
the method cannot be reached with the current tubing and calibration. To resolve this error, one or
more of the following must be done:
1) the pump tubing must be changed,
2) the pump must be recalibrated, and/or
3) the flow rate within the method must be reduced.
The OK softkey returns to Manual Mode with the Pump active.
•
The Delay Exceeds the Fraction Size: The current Delay setting is larger than the smallest
Fraction Size within the method. To resolve this error, either the delay setting must be reduced or
the fraction size must be increased. The Change softkey will display the Delay entry screen. The
Cancel softkey cancels the start of the run and returns to Manual Mode with the Pump active.
•
The UV Lamp is Not On: The UV Lamp was turned off. The Change softkey turns on the lamp
and returns to the Countdown screen. The Ignore key leaves the lamp off and proceeds to the
Countdown screen. If the lamp remains off, the UV trace on the chart recorder will not reflect actual
run data; however the event marks will still be drawn.
•
The Bypass Valve is set to Bypass: The Bypass Valve is currently set to bypass the column. The
Change softkey changes the valve to the Column position and proceeds to the Countdown screen.
The Ignore softkey leaves the valve in the Bypass position and proceeds to the Countdown screen.
The Ignore option allows the Bypass Valve to be used for some other purpose if desired.
Note: The BioLogic LP will run a method even if the UV Monitor Flow Cell and Conductivity Monitor Flow
Cell are not connected to the Controller. If either of these are not connected then the chart recorder trace(s)
will not reflect actual run data although the UV trace will show the event marks. The BioLogic LP cannot
determine if a fraction collector or chart recorder are connected and will assume that they are connected. To
avoid problems, check these components before starting a run.
5.4.1.2 Using the Delay Feature
The Delay feature is used to coordinate the UV Monitor signal and event marks on the chart recorder with
the fractions collected. The fluid in the UV Monitor flow cell does not actually reach the fraction collector
immediately because it has to pass through the tubing, the Conductivity Flow Cell, and the Diverter Valve
first. The Delay is defined as the period in which the fluid is moving through the path from the UV Flow Cell
to the Fraction Collector Drop Head.
When the Delay is set to a value greater than 0, each fraction advance is delayed by the value set after the
event mark is drawn to allow the fluid in the UV Monitor Flow Cell to travel to the Fraction Collector Drop
Head. In this way the fluid generating the UV Monitor signal at the time the event mark is drawn is actually
the first fluid delivered to the corresponding fraction in the collector. When the Delay is set to 0, the event
mark and the fraction advance occur simultaneously, and the first fluid collected in the fraction is not the fluid
generating the UV Monitor signal.
Determining the correct Delay setting requires that you know the volume of the fluid path between the UV
78
System Operation
Monitor Flow Cell and the Fraction Collector Drop Head. This is best determined empirically using a
syringe. To do this, first make certain the tubing path is full of fluid. Connect an empty syringe to the tubing
at the Fraction Collector Drop Head, disconnect the tubing from the UV Monitor Flow Cell, and then draw the
fluid from the path into the syringe. Measure the volume of the fluid in the syringe; this is the Delay Volume.
The Delay setting is remembered between runs because it is assumed that the fluid path does not change
between runs. Whenever the tubing is changed, the Delay setting should be redetermined unless the same
diameter and length of tubing is used to make the connections.
Note: When running time-based methods, where delay time is used instead of delay volume, the correct
delay setting must be determined using the formula below:
Delay Time = Delay Volume / Flow Rate
If multiple flow rates are used within the method, then calculate the delay using the flow rate when the most
critical peaks are expected to elute.
5.4.2 Run in Progress
While a run is in progress, the Run Screen is displayed. Runs do not require that the operator be present;
however there are a number of options available when present during the run. The information available
during a run is described in section 5.4.2.1. There are three types of action which can be taken by the operator during a run: Holding a Run, Pausing a Run, and Manual Override. These are discussed in sections
5.4.2.2 though 5.4.2.4 respectively. The Chart Recorder trace is discussed in section 5.4.3.
R2
Method: <<name>>
Pump: 1.00 ml/min A
Frac: No Program
RUN STATUS HOLD
R2b CONTINUE
R2c
Volume: 0.51 ml
UV: 0.0208 AU
Cond:
0.10 mS
PAUSE STOP RUN
Are you sure;
multiple runs
will be cancelled:
yes/no
Run Vol: 0.51 ml
Pump: Step 1 of 4
Frac: Next Window
LEGEND
RESUME RUN
R2a
R2
End: 7.00 ml
End: 1.00 ml
Start: 2.00 ml
RUN SCREEN
(return
to R2)
RUN SCREEN
R2a RUN STATUS SCREEN
R2b HOLD CONDITION
R2c PAUSE CONDITION
Figure 31. Run in Progress
79
System Operation
5.4.2.1 Information Available During a Run
There are two screens of information available ring a run which are described in Table 25.
Table 24.
Run Mode: Information Available During a Run
Reference
Description
R2
Method:
Pump:
Frac:
RUN
name
1.00 ml/min A
(Collecting)
STATUS
HOLD
(Continue)
Volume: 0.51 ml
UV: 0.0208 AU
Cond:
0.00 mS
PAUSE
STOP RUN
(Resume Run)
R2a
R2b
(confirm
message)
R2c
R2a
Run Time: 3 ml
Pump:
Step 1 of 5
Frac:
Collect All
End:
End:
Size:
15 ml
5 ml
1 ml
RUN SCREEN
(returns
to R2)
80
Run Screen: This displays the most important run information.
The method name and the elapsed time or volume are shown
on the top line of the LCD. The left side of the LCD shows the
Pump and Fraction Collector status, and the right side of the
LCD shows the UV Monitor and the Conductivity Monitor signals.
• Run Status: This displays the Run Status screen described
below.
• Hold: This places the run on Hold. For a description of
Holding a Run see section 5.4.2.2 below.
• Pause: This Pauses the run. For a description of Pausing a
Run see section 5.4.2.3 below.
• Stop Run: This stops the run without finishing the programmed method. To prevent accidentally stopping a run,
there is a Yes/No confirmation screen after pressing this
softkey.
Run Status Screen: The elapsed time or volume in the run
and the total time or volume of the run are shown on line 1 of
the LCD. The current pump step, the total number of steps in
the method, and the end time or volume for the current step are
shown on line 2. The fraction collector status is shown on line
3. The information provided depends upon the fraction collection mode programmed in the method:
• Collect All: the fraction size
• Threshold: the threshold setting and whether the current
UV Monitor signal is above or below the threshold
• Collection Windows and Threshold plus Collection
Windows:
- Inside a Window: the current window number, the
total number of windows in the method, and the end
time or volume for the current window
- Outside All Windows: the next window number and
when it will start
System Operation
5.4.2.2 Holding a Run
Runs can be placed on Hold manually by pressing the Hold softkey on the Run Screen or they may occur
automatically when an Alarm is programmed with Hold On. For information on programming Alarms with
Hold On see section 5.3.6.
Table 25.
Run Mode: Run Hold
Reference
Description
R2b
Method: <<name>>
Pump: 1.00 ml/min A
Frac: Collecting
CONTINUE
R2
Volume: 0.51 ml
UV:
0.0208 AU
Cond:
0.10 mS
STOP RUN
(confirm and exit
Run mode)
During a Hold, all instruments continue to operate as they were
when the Hold took effect; however the elapsed time or volume
in the run stops changing. The pump continues to deliver the
same buffer even if the Hold is placed in the middle of a gradient. For example if a 0-50%B gradient was placed on Hold at
33%B, then 33%B will continue to be delivered. If fractions
were being collected, then they continue to be collected with the
same fraction size and fraction advances. The Continue softkey concludes the Hold by starting the elapsed time or volume
counter.
Note: Since the elapsed time or volume is not increasing during
a Hold, the run will go on indefinitely. This can cause buffer
containers to become empty, fraction collectors to run out of
tubes, and other problems. This feature must be used carefully.
81
System Operation
5.4.2.3 Pausing a Run
Runs can only be Paused by pressing the Pause softkey on the Run Screen they cannot be programmed to
occur.
Table 26.
Run Mode: Run Pause
Reference
Description
R2c
Method: <<name>>
Pump: 1.00 ml/min A
Frac: Collecting
RESUME RUN
R2
Volume: 0.51 ml
UV:
-0.0208 AU
Cond:
0.10 mS
STOP RUN
(confirm and exit
Run mode)
During a Pause, all instruments stop functioning and the
elapsed time or volume will not change. The Resume Run
softkey concludes the Pause by starting all instruments and the
elapsed time or volume counter.
During a Pause, the method itself can be changed before the
run is resumed. This is accomplished by pressing the Program
mode key to enter Program mode. The Run mode key light
starts flashing as a reminder that a run in progress has been
paused. While in program mode, the method can be edited
normally with a single important exception. The exception is
that the parts of the method which have already occurred cannot be changed. The pump step in progress can be edited, but
doing so will split the step into two steps: the part of the step
which has already occurred will be the first of the two steps,
and the part of the step which has not yet occurred will be the
second step. As a result of the split, the number of steps in the
method will increase by one. After editing the method, a choice
will be presented to either replace the original method, to save
the modified method using a new name, or to finish the run with
the modified method not saved. Completing this choice returns
to the Run Paused screen.
For information describing how to edit the method, and the
naming and saving options, see section 5.3 Programming
Mode.
82
System Operation
5.4.2.4 Manual Override
Many of the operations which the BioLogic LP instruments can perform in Manual mode can also be performed in Run mode. To access these capabilities, press the instrument which is appropriate for the desired
action. The Run Mode Manual Override screens are almost identical to the Manual mode screens and function in the same way. For a description of how to use these screens, consult section 5.2 Manual Mode.
There are some consequences of using the manual override capabilities which must be understood. The list
below describes the operations which are available, how to accomplish them, and any important information
to know about using the capabilities.
•
Event Marks: Using the Event Mark key to draw an event mark on the chart recorder trace will
make an identical mark to the fraction advance marks and will make interpreting the chart recorder
trace more difficult. See section 5.4.3 for additional information.
•
Flow Rate: Changing the Flow Rate can be done using the Pump override screen. The new flow
rate will take effect immediately and will last until the next pump step starts. When the next pump
step starts, the programmed flow rate will be used. To make a permanent change to the flow rate,
you must Pause and edit the method, see section 5.4.2.3.
•
Fraction Size: Changing the Fraction Size can be done using the Collector override screen and the
Frac Size softkey (the Edit softkey must be used when Thresholds are used). This change is permanent unless Collection Windows are in use. When Collection Windows are used, the new
Fraction Size effects only the current or next window. During subsequent windows the fraction size
will be as originally programmed within the method. Since using this capability changes the number
of fractions collected, remember to consider how many tubes are available in the collector.
•
Fraction Advance: The fraction collector can be advanced using the Collector override screen and
the Advance softkey. A normal fraction advance (including an event mark and any Delay set) will
occur. Since using this capability changes the number of fractions collected, remember to consider
how many tubes are available in the collector.
Note: When the Advance softkey is pressed, it cannot be pressed again until the fraction advance
actually occurs. This is only applicable and noticed when the Delay setting is greater than 0.
•
Collect or Divert: The state of the Diverter Valve can be changed using the Collector override
screen and the Collect or Divert softkey (which key is available depends upon the current state of
the Diverter Valve). When using “Collect All” the override is permanent, however when using other
collection modes the override is not permanent.
In “Threshold”, “Collection Windows”, or “Threshold plus Collection Windows” modes this override
lasts until the Window or Threshold would have the opposite effect. For example, in Threshold
mode, pressing Collect while below the threshold setting causes fractions to be collected until the
UV signal passes above the threshold setting and then back below the setting again. In Threshold
mode, pressing Divert while above the threshold setting causes fraction collection to stop until the
UV signal passes below the threshold setting and then rises above it again. In Collection Windows
mode, pressing Collect before a window starts causes fraction collection to start until the next window ends. In Collection Windows mode, pressing Divert while inside a window causes collection to
stop until the next window starts. Although the situation is more complex in Threshold plus
Collection Windows, the same rules are applicable. Since using this capability changes the number
of fractions collected, remember to consider how many tubes are available in the collector.
•
UV Monitor: The UV Monitor can be controlled exactly like it is in Manual mode, except that the
lamp cannot be turned off.
83
System Operation
•
Conductivity Monitor: The Conductivity Monitor can be controlled exactly like it is in Manual mode,
except that the Flow Cell cannot be calibrated.
•
Chart Recorder: The Chart Recorder can be started and stopped at any time during a run.
Note: The Chart Recorder always starts when a run begins and always stops when a run ends.
There are some operations which are not allowed during a run. Manual override operation of the Alarms
and the Valves are not allowed during a run. Changing the operation of these features can have large
effects on the run, and to use these features the run must be Paused and edited. See section 5.4.2.3 for
information on doing this.
Note: Although the Valves cannot be controlled by Manual Override, pressing the Valve instrument key displays a screen showing the state of each valve.
5.4.3 Interpreting the Chart Recorder Trace
The chart recorder trace contains the following information. Pen 1 is the UV Monitor signal and also contains the event marks. Pen 2 is the Conductivity Monitor signal. When a run is started there is a special
large event mark indicating this. Each time the fraction collector is advanced there is a normal event mark.
Each time the Event Mark key is pressed there is a normal event mark.
The BioLogic LP is designed to place an extra fraction advance between collection periods when the
Diverter Valve sends the fluid to waste. The extra fraction is called the “Delay Tube”. When the Delay is set
to 0, this tube will be empty; but when the Delay is greater than 0, this tube will contain a volume equal to
the delay setting. This design is used for two reasons which are described below.
The first reason for the Delay Tube is to insure that for each gap between event marks there is a corresponding fraction collected. When the fluid is diverted between two different collection periods, there is a
gap between the event mark signaling the end of the first collection period and the event mark signaling the
start of the second collection period. The Delay Tube is the tube “collected” during this time. Since this feature is present, you can count the gaps between event marks and they will correspond to the number of
fractions collected. It is important to remember that pressing the Event Mark key will cause extra event
marks to be drawn and makes counting fractions more difficult.
The second reason for the Delay Tube is only important when the Delay setting is actually used, meaning
that the delay setting is not 0. Setting the appropriate delay prevents contamination of the first fraction collected after a period when fractions were not collected; i.e., there is a “gap” in collection. The potential for
this contamination occurs because the fluid which was between the Diverter Valve and the Fraction Collector
Drop Head is trapped until collection resumes, when it will be placed into the next fraction. When the appropriate delay is set, the Delay Tube collects this fluid instead of having it contaminate the first fraction.
84
Maintenance and Troubleshooting
6.0 MAINTENANCE AND TROUBLESHOOTING
The BioLogic LP System requires very little maintenance to assure reliable operation. This chapter discusses standard BioLogic LP components; discussion of optional components such as valves, is left to their separate documentation.
6.1 CLEANING AND STORAGE
During normal operation, spills and splashes may cause residues to form on component surfaces. To avoid
damage or injury, unplug any instrument before cleaning it. Use a damp cloth to wipe down the outer case.
Avoid wetting the power switch located below the front panel and the connectors on the rear of the unit. The
System Rack’s tray can be rinsed via the drain at the rear.
If the BioLogic LP will be stored for a long period, be sure to remove buffer salts from the valves and monitors by flushing with de-ionized water followed by a 20 % solution of ethanol to prevent microbial growth.
6.2 PUMP CALIBRATION
Pump calibration is important for a method programmed using volumes, because the BioLogic LP system
uses the displayed flow rate to determine fraction size and for gradient control. The BioLogic LP calculates
the flow rate by multiplying the pump head speed (rpm) by a flow rate factor determined during calibration.
The pump should be calibrated:
1. When the system is new. You must tell the system which size tubing is installed.
2. When changing tubing size.
3. When new tubing is installed or columns with different counterpressure are installed. For best accuracy, “user calibration” (described on the following page) is recommended.
4. Whenever the observed flow rate is reduced due to tubing wear, “user calibration” (described on the
following page) is recommended. Worn tubing can be recognized by stretching, flat spots, or holes.
If possible it is best to replace worn tubing.
The procedures for performing Nominal Calibration and User Calibration are discussed on the following
page.
Note: For best flow rate accuracy, before calibrating your pump, check the adjustment of the platen pressure screw. (This is the large slot-head screw located on the pump head, near the lever that releases the
platen.) First turn the platen adjustment screw counterclockwise until it stops. Then turn the screw clockwise according to the table below.
Number of Turns
Tubing ID
0.8 mm (1/32”)
1.6 mm (1/16”)
3.2 mm (1/8”)
From Fully Open
5
4
3
Also check the condition of the tubing; fatigued “flattened” tubing reduces the output of the pump.
85
Maintenance and Troubleshooting
6.2.1 Nominal Calibration
Nominal flow rate factors for the three standard tubing sizes (0.8, 1.6, and 3.2mm ID) are programmed into
the system at the factory. Many users find that the flow rate accuracy obtained with “nominal” calibration is
sufficient for their purposes. To use the nominal calibration values:
1. At the BioLogic LP’s front panel, press the Manual mode button, followed by the Pump instrument
button. This will display the pump’s Manual mode screen.
2. Press the Flow softkey.
3. Press the Calibrate softkey. From the three tubing size options, press the softkey for the tubing
size you will use.
4. Press the Nominal softkey. The system then will use the nominal calibration for the tubing size you
have selected.
6.2.2 User Calibration
The user calibration feature allows the user to determine a flow rate factor experimentally and to program
this factor into the system. This procedure is advisable when using columns with high counterpressure,
when using pump head tubing of a non-standard size, or whenever precise flow rate accuracy is desired.
For best accuracy, calibrate the system with your column installed, and all other system components connected. Set the calibration flow rate to the flow rate you will be using during your run. If multiple flow rates
will be used, calibrate at the flow rate for the most critical part of the separation.
To perform a user calibration,
1. Connect your system as you intend to use it, including the column. Place the inlet tubes in containers of buffer. Make sure the “waste” tube from the system also will reach a graduated cylinder
placed on the bench.
2. Press the Manual mode button, followed by the Pump instrument button to display the Pump’s main
Manual mode screen.
3. With the “waste” tube in a waste container, press the Purge softkey to purge air from the system.
4. When the purge is complete, from the pump’s main Manual mode screen, press the Flow softkey.
5. Press the Calibrate softkey to display the three tubing size options. Press the softkey for the tubing
size you will be using. If you are using a non-standard tubing size in the pump head, press the
Other softkey and proceed to step 7; the system will calibrate at 25% of full pump speed.
6. Press the Set Flow softkey, followed by the Flow Rate softkey. Using the numeric keypad, enter
the flow rate for the calibration. Press the OK softkey.
7. Press the Time softkey. Using the numeric keypad, enter the total time period for the calibration.
(For best results, enter a time of 5 minutes.) Press the OK softkey.
8.
Place the “waste” outlet tube into the empty graduated cylinder. Press the Start softkey. The pump
will run and the display will count down the time remaining.
9. At the end of the calibration period, the pump will stop. Using the numeric keypad, enter the total
volume delivered to the graduated cylinder. Press the OK softkey. The system is now calibrated for
the tubing and system configuration used.
86
Maintenance and Troubleshooting
6.3 FLUSHING/CLEANING VALVES, FLOW CELLS, AND FILTERS
6.3.1 Rinsing Valves and Flow Cells
When the BioLogic LP will not be used for more than a day or two, it is important to flush salt solutions from
the valves and flow cells. Over time, salt solutions may crystallize inside of valves and flow cells, causing
damage. To flush the system:
1. Remove the column from the system and connect the column inlet tube to its outlet tube.
2. Place all buffer inlet tubes in water, and from the Pump’s Manual mode, select the Purge softkey. This
runs the pump at maximum speed.
Note: If the system will be stored for more than a week, follow the water wash with a 20% ethanol to
the water to retard microbial growth in the system.
3. As the pump runs, use the Pump’s Manual mode to select buffers “A” through “E” in turn, allowing time
for each inlet tube to clear.
4. Switch to Manual mode operation of the Valves. From the Valves manual mode screen, select the
Divert softkey. Switch the diverter valve from “Collect” to “Divert” to Waste. Allow water to flow for 15
seconds, then switch back to Collect. If an SV-3 Column Bypass valve is installed, select the Bypass
softkey from the Valves manual mode. Switch to “Bypass” mode for 15 seconds, then return to
“Column” mode.
Note: If you choose to write a Method to accomplish the procedure above, keep in mind that you will need
to manually switch the SV-3 Bypass valve.
6.3.2 Cleaning Valves and Flow Cells
If valves and/or flow cells show signs of clogging, they can be cleaned as described below. Cleaning times
may be extended for severe clogging or microbial growth.
1. Remove the column from the system and connect the column inlet tube to its outlet tube.
2. Pump 1 M NaOH (Sodium Hydroxide) through the system at 1 ml/min, for 30 minutes. If valves are
being cleaned, manually switch valve positions several times during this procedure.
3. Flush the system with water. If valves are being cleaned, manually switch valve positions several times
during this procedure.
4. Pump 1 M HCl (Hydrochloric acid) through the system at 1 ml/min, for 30 minutes. If valves are being
cleaned, manually switch valve positions several times during this procedure.
5. Flush the system with water as described in Section 6.3.1 above.
6.3.3 Cleaning the UV Optics Module’s Filters
The filter tray contains both a 280 nm and a 254 nm filter. To clean the filters, loosen the filter’s thumbscrew
and lift out the filter holder. The Filters should be cleaned only when necessary using a dry lens tissue.
87
Maintenance and Troubleshooting
6.4 CARE OF THE PROPORTIONING VALVE AND MIXER
Normally, the only maintenance required is to flush the Proportioning Valve with water. To do this, use the
Pump’s manual mode to set the buffer to 50%B. Place both inlet tubes in a vessel of water and pump until
the salt is purged from the valve. Do not leave high salt buffers in the valve, as the crystallized salt may
damage the valve. To more vigorously clean the mixing chamber of residue such as salt:
1. Disconnect the Mixer’s cable from the BioLogic LP Controller.
2. Use a 3/8” socket driver or box wrench to carefully remove the top of the mixer by rotating the top counterclockwise.
3. The magnetic stir bar may be removed from the mixing chamber by turning the unit upside down and
tapping the unit in the palm of your hand until the stir bar drops out of the chamber.
4. The mixing chamber and top may now be cleaned as required.
5. The chamber can be flushed by connecting a luer-tipped syringe to the “A” port and slowly passing fluid
through the valve and mixing chamber. Do not attempt to force liquid through the closed “B” port; this
may damage the proportioning valve.
To reassemble the unit:
1. Wipe the mixing chamber and threads clean.
2. Insert the stir bar back into the mixing chamber with the flat end of the stir bar toward the bottom of the
chamber. Gently push the stir bar to the bottom of the chamber.
3. Wipe the top and threads clean.
4. If the 1.0cm O-ring seal on the top is damaged it must be replaced or the mixer will leak. (Bio-Rad part
number for O-ring: 910-0075.)
5. Use a 3/8” socket driver or box wrench to screw the top on the mixer by rotating the top clockwise until
the lip around the top is just flush with the top of the mixing chamber. The seal is made by a properly
seated O-ring, not by the screw threads. To avoid damaging the unit, do not overtighten the top.
6.5 REPLACING THE LAMP IN THE UV OPTICS MODULE
Indications that a lamp replacement is necessary include an unstable baseline and a decreased response to
a standard concentration of a test chromophore. In this latter case, it is advisable to ensure that the flow cell
is clean and that the correct wavelength filter is chosen before replacing the lamp.
Note: Before performing the following procedure, make sure the BioLogic LP Controller is turned off. This
will eliminate the risk of electric shock to you or damage to the Optics module.
To remove the lamp from the UV Optics Module,
1. Turn off all electrical power to the BioLogic LP Controller and unplug the UV Lamp cable. Wait 10 minutes for the UV Optics Module to cool.
2. Remove the filter tray and flow cell, as discussed in the previous section.
88
Maintenance and Troubleshooting
3. Remove the screws holding the optics module together and remove the bottom half of the case.
4. Pull the UV lamp out of its holder and unplug it from its connector.
When inserting the new UV lamp, never handle the quartz surface of the lamp; grease and fingerprints will
damage the lamp. This procedure is also discussed in the instruction sheet for the replacement lamp.
Note: When re-assembling the case, be sure the O-ring is properly seated. An incorrectly seated O-ring will
cause the unit to leak light and give poor performance.
RETAINING
CLIP
FILTER
TRAY
FLOW
CELL
RACK
MOUNT
RACK
MOUNT
LAMP
CONNECTOR
UV LAMP
LAMP
HOLDER
O-RING
Figure 32. UV Optics Module
89
Maintenance and Troubleshooting
6.6 TROUBLESHOOTING
Listed below are some guidelines for troubleshooting the system:
Unstable baseline. This may be caused by any of the following:
•
Bubbles in Flow Cell: BioLogic LP Flow Cells are designed to clear bubbles. Confirm that the flow
cell tubes are connected properly. Note the flow direction arrows on top of the UV Optics module
case. Be sure that the UV Optics module is mounted upright on the rack, with the mounting posts
pointing down.
•
Dirty or Obstructed flow cell: Turn the UV lamp “off” , remove the flow cell, and look through the
sample window. If visible obstruction is seen, clean the flow cell (see section 6.3).
•
Light leaks: The optics module case is sealed against light by three O-rings- One each on the flow
cell and filter drawer, and one between the case halves. To check for light leaks, pump buffer
through the unit, and squeeze the optics module case halves together gently, using your thumb and
forefinger. Observe the chart recorder pen- if squeezing the optics module causes noticeable deflection of the UV (channel 1) pen, a light leak is probable.
If a light leak is suspected, turn the UV lamp off, remove the flow cell and filter drawer, and confirm
that the O-rings are in place. Remove the four screws holding the case halves together, separate
the case halves, and confirm that the sealing O-ring is in place. Reassemble the optics module and
repeat the test for light leaks.
•
Lamp exhausted: If the UV lamp is nearing the end of its service life, the base line may become
unstable. Replace lamp.
Flow rate is not as displayed.
90
•
Check for worn tubing, and confirm that platen pressure is adjusted properly. Refer to section 4.2.
•
Check pump calibration:
a. If Nominal calibration is used, confirm that proper tubing size is selected. Consider performing
User calibration. Refer to section 6.2, Pump Plumbing and Calibration.
b. If User calibration is used, repeat calibration- it is best to calibrate with column, etc. installed in
system, and with the actual buffers used for the separation. Set the flow rate to the same rate
used for the separation. Refer to section 6.2, Pump Plumbing and Calibration.
•
Check for obstructed tubing , columns, or valves.
Maintenance and Troubleshooting
Gradient not as expected.
1. Check that the buffers are prepared properly, and the correct method has been selected.
2. Check the range setting on Gradient Monitor.
3. Check switch settings and connections of Chart Recorder. All switches should be set to position labeled
in green, and the conductivity signal cable (banana plugs) must be plugged into channel 2.
4. Measure actual flow rate through buffer “A” port with stopwatch and graduated cylinder, and compare to
actual flow rate. If the difference between indicated and actual flow rates is significant:
a. Check for worn tubing and improper platen adjustment;
b. Check for obstructed tubing, fittings, columns, or valves. You may wish to clean the system as
described in section 6.3, Flushing/Cleaning Valves, Flow Cells, and Filters.
5. Measure actual flow rate through buffer “B” port with stopwatch and graduated cylinder, and compare to
actual flow rate through “A” port. If the actual flow rates differ significantly, check for obstructions in the
proportioning valve or in the tubing leading to the valve.
Error Messages.
Under certain abnormal circumstances, the BioLogic LP may display an error message. The format of the
error message is:
BioLogic LP Error Trap!
<Text>
<Text>
Cycle system power to restart.
If an error message is seen, turn power “off”, wait 15 seconds, then turn power “on”. Turning the power off
will not lose methods or calibration values. If the message reappears, write down the exact text displayed,
and then contact your local Bio-Rad representative. (In the U.S., call 1-800-4-BIORAD for technical assistance.)
91
Specifications
APPENDIX A.
SPECIFICATIONS
BioLogic LP System
Power
115 V ~ 5.3 A
230 V ~ 3.5 A
50 - 60 Hz
Operating temperature
2° to 40°C, ≤95% humidity
Construction Material
Polypropylene and other solvent resistant plastics
Flow rate range
(per channel)
0.05 to 20 ml/min (depending on tubing diameter)
Pump head speed
25 rpm (max.)
Tubing diameter
0.4 mm (ID) to 3.2 mm (ID), maximum 1 mm wall thickness
Speed adjustment
.01 ml/min
Speed stability
1% full scale
Counterpressure (max.)
30 psi (2 kg/cm2 or bars)
UV Monitor
Mercury/Phosphor Lamp
Wavelength: 280 and 254 nm (both filters supplied)
Auto Zero Feature
Eleven fixed ranges, 2.0 to 0.001 AU Full Scale
User set range 2.0 to 0.001 AU Full Scale
Cuvette volume: 80 µl
Path length: 2 mm
Illuminated volume: 3 µl
Full Scale output to chart recorder: 1 volt
Non Scaled Integrator output: 1 volt @ 2 AU
Conductivity Monitor
AC excitation
Nine fixed ranges, 500 to 0.5 mS/cm Full Scale
User Set minimum and maximum values from 500 to 0.5 mS/cm
Flow Cell swept volume: 8 µl
Accuracy: Within 2% of full scale
Full Scale output to chart recorder: 1 volt
Proportioning Accuracy: Within 1 % of full scale (3% to 97% B)
Gradient Linearity: Within 3 % of full scale (3% to 97% B)
92
Specifications
Valve Control
•
Proportioning valve/Mixer module, Diverter valve (SV-3), Bypass valve (SV-3), and Buffer Select
valve (SV-5, or SV-3)
•
One low-pressure manual valve (MV-6) for sample injection
Fraction Collection
•
Model 2128 Fraction Collector (collection by Collect All, Threshold, Collection Windows, Collection
Window + Threshold)
•
Model 2110 fraction collector (collection by Collect All; collection by Threshold, Collection Windows,
Collection Window + Threshold available with SV-3 Diverter valve)
Chart Recorder Control
•
Model 1327 Dual pen recorder. Paper feed Start/Stop, Pen Up/Down
93
Warranty and Ordering Information
APPENDIX B.
WARRANTY AND ORDERING INFORMATION
The BioLogic LP System is warranted for 1 year against defects in materials and workmanship. If any
defects should occur during this warranty period, Bio-Rad Laboratories will replace the defective parts without charge. However, the following defects are specifically excluded:
1. Defects caused by improper operation.
2. Repair or modification done by anyone other than Bio-Rad Laboratories or their authorized agent.
3. Use with fittings or other spare parts not specified by Bio-Rad Laboratories.
4. Damage caused by deliberate or accidental misuse.
5. Damage caused by disaster.
6. Damage due to use of improper solvent or sample.
7. Tubing and fittings.
For additional help, contact your local Bio-Rad representative. In the United States, call Technical Service at
1-800-4BIORAD.
WARRANTY INFORMATION
Model: ________________________________________________________________________
Serial Number: _________________________________________________________________
Date of Delivery: ________________________________________________________________
Warranty Period: ________________________________________________________________
94
Warranty and Ordering Information
ORDERING INFORMATION
BioLogic LP Systems
731-8300
BioLogic LP, 110V
LP Controller, System Rack, UV Optics Module, Conductivity flow cell, Injection valve,
Proportioning Valve/Mixer, tubing and fittings kit.
731-8301
BioLogic LP, 220V
Same as 731-8300, except 220 V.
731-8302
BioLogic LP, with Model 2110 Fraction Collector, 110V
LP Controller, System Rack, UV Optics Module, Conductivity flow cell, Injection valve, Model
2110 Fraction Collector, SV-3 Diverter Valve and System Cable 1, Proportioning Valve/Mixer,
tubing and fittings kit.
731-8303
BioLogic LP, with Model 2110 Fraction Collector, 220V
Same as 731-8302, except 220 V.
731-8304
BioLogic LP, with Model 2128 Fraction Collector, 110V
LP Controller, System Rack, UV Optics Module, Conductivity flow cell, Injection valve, Model
2128 Fraction Collector, Model 2128 Diverter Valve and System Cables 3 and 15,
Proportioning Valve/Mixer, tubing and fittings kit.
731-8305
BioLogic LP, with Model 2128 Fraction Collector, 220V
Same as 731-8304, except 220 V.
750-0251
BioLogic Rack
750-0268
750-0260
750-0261
750-0262
750-0263
750-0264
750-0265
750-0266
750-0269
Rack expansion kit (2 trays, 2 vertical bars, 16 sleeves)
Column clamp set
Rack tray, 1 (+8 sleeves, 1 drain/plug)
Vertical bar, long, 2
Vertical bar, short
Horizontal bar kit (2 tie bars, 4 bar clamps)
Bar clamps, 5
Cable Manager clips, 4
System wrench set
95
Warranty and Ordering Information
Ordering Information (Continued)
Peripherals
731-8122
731-8120
Model 2110 Fraction Collector, 110 V
Model 2110 Fraction Collector, 220 V
731-8123
731-8124
Model 2128 Fraction Collector, 110 V
Model 2128 Fraction Collector, 220 V
731-8250
Model 1327 Econo Recorder, with USA, Canada, Japan, Mexico, Taiwan, and Latin America
power adapter
731-8253
Model 1327 Econo Recorder, with UK, Commonwealth power adapter
731-8254
Model 1327 Econo Recorder, with Australia and New Zealand power adapter
731-8255
Model 1327 Econo Recorder, with European power adapter
Valves
731-8320
731-8321
731-8322
BioLogic LP Injection Valve (MV-6)
BioLogic LP Buffer Select Valve
BioLogic LP Column Bypass/Fraction Collector Diverter Valve
731-8323
BioLogic LP Proportioning Valve/Mixer Module
731-8324
731-8165
731-8166
731-8167
BioLogic LP UV Optics Module
Flow Cell, replacement
Lamp , replacement
Filter assembly, 280 and 254 nm
731-8155
Conductivity Flow Cell replacement
Cabling
731-8261
System Cable 1, 8-pin mini-DIN to DB-9 connector, to connect a Model 2110 Fraction
Collector to the BioLogic LP
731-8262
System Cable 2, 8-pin mini-DIN to 8-pin standard DIN to connect a Model 1327 Chart
Recorder to the BioLogic LP
731-8263
System Cable 3, 8-pin mini-DIN to 8-pin mini-DIN to connect a Model 2128 Fraction
Collector to the BioLogic LP
731-8264
System Cable 4, 8-pin mini-DIN to banana plug cable, connects the Model 1327 Chart
Recorder to the BioLogic LP Conductivity Chart output.
96
Warranty and Ordering Information
Ordering Information (Continued)
Cabling (continued)
731-8267
System Cable 7, 8-pin mini-DIN to bare wires, connects the BioLogic LP to non-Bio-Rad
components
731-8269
System Cable 9, 8-pin mini-DIN to Pharmacia FRAC-100, to connect a Pharmacia FRAC100 fraction collector to the BioLogic LP
731-8283
System Cable 12, 8-pin mini-DIN to Isco DB-15 connector, to connect an Isco Retriever II
collector to the BioLogic LP
731-8285
System Cable 14, 8-pin mini-DIN to Gilson connector, to connect a Gilson FC 203 fraction
collector to the BioLogic LP
731-8286
System Cable 15, 15-pin D to mini-DIN to connect a Model 2128 Fraction Collector to the
BioLogic LP.
BioLogic LP System Fittings
731-8220
System Fittings Kit; 250 pieces
731-8221
731-8222
731-8223
Female luer with barb for 0.8 mm ID Tubing (25)
Female luer with barb for 1.6 mm ID Tubing (25)
Female luer with barb for 3.2 mm ID Tubing (25)
731-8224
731-8225
731-8226
Male luer with barb for 0.8 mm ID Tubing (25)
Male luer with barb for 1.6 mm ID Tubing (25)
Male luer with barb for 3.2 mm ID Tubing (25)
731-8228
731-8230
731-8232
731-8233
Female-to-Female luer (10)
Male-to-Male luer (10)
Female luer plugs (25)
Male luer plugs (25)
731-8102
731-8103
731-8107
2-way stopcock, Female-to-Male luer; polycarbonate (10)
3-way stopcock, 2 Female to 1 Male luer; polycarbonate (10)
3-way stopcock; nylon, solvent resistant (10)
732-8300
732-8302
0.8 mm Barb-to-Barb connector (25)
0.8 mm Barb T-connector (25)
97
Warranty and Ordering Information
Ordering Information (Continued)
BioLogic LP System Tubing
731-8210
731-8211
731-8212
Silicone, 0.8 mm ID, 0.8 mm wall, 10 m length
Silicone, 1.6 mm ID, 0.8 mm wall, 10 m length
Silicone, 3.2 mm ID, 0.8 mm wall, 10 m length
731-8214
731-8215
Tygon, 0.8 mm ID, 0.8 mm wall, 10 m length
Tygon, 1.6 mm ID, 0.8 mm wall, 10 m length
731-8207
731-8208
731-8209
PharMed, 0.8 mm ID, 1.0 mm wall, 10 m length
PharMed, 1.6 mm ID, 1.0 mm wall, 10 m length
PharMed, 3.2 mm ID, 1.0 mm wall, 10 m length
731-8240
731-8241
731-8242
Pump Tubing kit, 0.8 mm ID silicone, 20 precut lengths and 4 sets of fittings
Pump Tubing kit, 1.6 mm ID silicone, 20 precut lengths and 4 sets of fittings
Pump Tubing kit, 3.2 mm ID silicone, 20 precut lengths and 4 sets of fittings
731-8247
731-8248
731-8249
Pump Tubing kit, 0.8 mm ID PharMed, 20 precut lengths and 4 sets of fittings
Pump Tubing kit, 1.6 mm ID PharMed, 20 precut lengths and 4 sets of fittings
Pump Tubing kit, 3.2 mm ID PharMed, 20 precut lengths and 4 sets of fittings
98
Bio-Rad
Laboratories
Life Science
Group
Bulletin 0000
US/EG
Web site www.bio-rad.com Bio-Rad Laboratories Main Office 2000 Alfred Nobel Drive, Hercules, CA 94547, Ph. (510) 741-1000, Fx. (510) 741-5800
Also in: Australia Ph. 02 9914 2800, Fx. 02 9914 2889 Austria Ph. (01) 877 89 01, Fx. (01) 876 56 29 Belgium Ph. 09-385 55 11, Fx. 09-385 65 54
Brazil Ph. 55 21 507 6191 Canada Ph. (905) 712-2771, Fx. (905) 712-2990 China Ph. 86-10-8201-1366/68, Fx. 86-10-8201-1367
Denmark Ph. 45 44 52-1000, Fx. 45 4452 1001 Finland Ph. 358 (0)9 804 2200, Fx. 358 (0)9 804 1100 France Ph. 01 47 95 69 65, Fx. 01 47 41 9133
Germany Ph. 089 318 84-177, Fx. 089 318 84-123 Hong Kong Ph. 852-2789-3300, Fx. 852-2789-1257 India Ph. (91-124)-6398112/113/114, Fx. (91-124)-6398115
Israel Ph. 03 951 4124, Fx. 03 951 4129 Italy Ph. 34 91 590 5200 , Fx. 34 91 590 5211 Japan Ph. 03-5811-6270, Fx. 03-5811-6272
Korea Ph. 82-2-3473-4460, Fx. 82-2-3472-7003 Latin America Ph. 305-894-5950, Fx. 305-894-5960 Mexico Ph. 52 5 534 2552 to 54, Fx. 52 5 524 5971
The Netherlands Ph. 0318-540666, Fx. 0318-542216 New Zealand Ph. 64-9-4152280, Fx. 64-9-443 3097 Norway Ph. 47-23-38-41-30, Fx. 47-23-38-41-39
Russia Ph. 7 095 979 98 00, Fx. 7 095 979 98 56 Singapore Ph. 65-2729877, Fx. 65-2734835 Spain Ph. 34-91-590-5200, Fx. 34-91-590-5211
Sweden Ph. 46 (0)8-55 51 27 00, Fx. 46 (0)8-55 51 27 80 Switzerland Ph. 061-717-9555, Fx. 061-717-9550 United Kingdom Ph. 0800-181134, Fx. 01442-259118
Rev A
00-000
0000
Sig 1200
4006072 Rev D