1
Model UB-543
Traduction
1WMPD4003012
Contents
Dear Customers................................................................................................................................................... 2
Preliminary Remarks ........................................................................................................................................... 2
Precautions.......................................................................................................................................................... 2
Parts Identification ............................................................................................................................................... 4
Symbols ............................................................................................................................................................... 5
Using the Monitor................................................................................................................................................. 7
1. Installing / Changing the Batteries.............................................................................................................. 7
2. Selecting a User......................................................................................................................................... 8
3. Adjusting the Built-in Clock Before Use...................................................................................................... 8
4. Applying the Cuff........................................................................................................................................ 9
5. How to Take Proper Measurements........................................................................................................... 9
6. The C.P.G. Function Switch ...................................................................................................................... 10
7. Selecting the C.P.G. and my C.P.G. ........................................................................................................... 10
8. Measurement ........................................................................................................................................... 11
9. After Measurement................................................................................................................................... 11
Measurements ................................................................................................................................................... 12
Recalling the Memory Data ............................................................................................................................... 13
Deleting Data Stored in Memory........................................................................................................................ 14
What is an Irregular Heartbeat?......................................................................................................................... 15
Pressure Bar Indicator ....................................................................................................................................... 15
The C.P.G. Indicator .......................................................................................................................................... 16
About Blood Pressure........................................................................................................................................ 17
What is Blood Pressure?.............................................................................................................................. 17
What is Hypertension and How is it Controlled? .......................................................................................... 17
Why Measure Blood Pressure at Home? ..................................................................................................... 17
Blood Pressure Variations............................................................................................................................ 18
Maintenance ...................................................................................................................................................... 18
Troubleshooting ................................................................................................................................................. 19
Technical Data................................................................................................................................................... 20
English 1
Dear Customers
Congratulations on purchasing a state-of-the-art A&D blood pressure monitor, one of the most advanced monitors
available today. Designed for ease of use and accuracy, this device will facilitate your daily blood pressure regimen.
We recommend that you read through this manual carefully before using the device for the first time.
Preliminary Remarks
The device is designed for use on adults only, not newborns or infants.
Environment for use. The device is for use in the home healthcare environment.
This device is designed to measure blood pressure and pulse rate of people for diagnosis.
Precautions
Precision components are used in the construction of this device. Extremes in temperature, humidity, direct
sunlight, shock or dust should be avoided.
Clean the device with a dry, soft cloth or a cloth dampened with water and a neutral detergent. Never use alcohol,
benzene, thinner or other harsh chemicals to clean the device.
Avoid tightly folding the cuff for long periods, as such treatment may shorten the life of the components.
The device is not water resistant. Prevent rain, sweat and water from soiling the device.
Measurements may be distorted if the device is used close to televisions, microwave ovens, cellular telephones,
X-ray or other devices with strong electrical fields.
Used equipment, parts and batteries are not treated as ordinary household waste, and must be disposed of
according to the applicable local regulations.
When reusing the device, confirm that the device is clean.
English 2
Do not modify the device. It may cause accidents or damage to the device.
To measure blood pressure, the wrist must be squeezed by the cuff hard enough to temporarily stop blood flow
through the artery. This may cause pain, numbness or a temporary red mark to the wrist. This condition will appear
especially when measurement is repeated successively. Any pain, numbness, or red marks will disappear with time.
Do not apply the device to a wrist with other medical electrical equipment attached. The equipment may not
function properly.
People who have a severe circulatory deficit in the arm must consult a doctor before using the device to avoid
medical problems.
Do not self-diagnose the measurement results and start treatment by yourself. Always consult your doctor for evaluation of
the results and treatment.
Do not apply the device on a wrist with an unhealed wound.
Do not apply the device on an arm receiving an intravenous drip or blood transfusion. It may cause injury or
accidents.
Do not use the device where flammable gases such as anesthetic gases are present. It may cause an explosion.
Do not use the device in highly concentrated oxygen environments, such as a high-pressure oxygen chamber or an oxygen tent.
It may cause a fire or explosion.
English 3
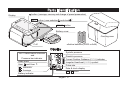
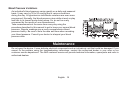
Parts Identification
button ( average, memory and change of preset parameters)
Display
SET
button ( user selection
and clock
START
)
button
Battery cover
Carrying case
Cuff
Alkaline batteries (LR03 or AAA)
Display
JNC7 classification indicator
and
Pressure bar indicator
Heart mark
User
and User
MEMORY
Average
Battery indicator
Systolic pressure
Diastolic pressure
Correct Position Guidance (C.P.G.) indicator
Irregular Heartbeat (I.H.B.) symbol
Pulse rate
Date & clock display
AM / PM mark
English 4
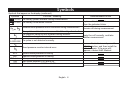
Symbols
Symbols that are printed on the device case
Symbols
SN
Standby and Turn the device on
Battery installation guide
Direct current
Serial number
Function / Meaning
Type BF: Device and cuff are designed to provide special protection against electrical shocks.
Refer to instruction manual / booklet
User selection
IP
International protection symbol
Keep dry
Symbols that appear on the display
Symbols
Function / Meaning / Recommended Action
The heart mark appears while measurement is in progress. It blinks when the pulse is detected.
Remain as still as possible.
Irregular Heartbeat (I.H.B.) symbol appears when an irregular heartbeat is detected.
It may light when a very slight vibration like shivering or shaking is detected.
User 1 and user 2
Previous measurements stored in MEMORY
Average data
English 5
Symbols
Symbols that appear on the display (continued)
Symbols
Function / Meaning
Full Battery The battery power indicator during measurement
Low Battery The battery is low when it blinks
or
Unstable blood pressure due to movement during measurement
Replace all batteries with new ones
when the indicator blinks.
Take another measurement.
Remain still during measurement.
The systolic and diastolic values are within 10 mmHg of each other.
The pressure value did not increase during inflation.
Apply the cuff correctly, and take
The cuff is not applied correctly.
another measurement.
PUL. DISPLAY ERROR The pulse is not detected correctly.
Remove the batteries and press the
START button, and then install the
batteries again. If the error still
appears, contact A&D Medical.
Blood pressure monitor internal error
SYS.
DIA.
PUL./min.
AM
PM
Recommended Action
Systolic blood pressure in mmHg
Diastolic blood pressure in mmHg
Pulse per minute
Data taken between 4:00 and 9:59
Data taken between 18:00 and 1:59
English 6
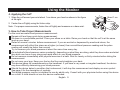
Using the Monitor
1. Installing / Changing the Batteries
1. Remove the battery cover.
2. Remove the used batteries and insert new batteries into the
battery compartment as shown, taking care that the polarities
(+ and -) are correct. Use only LR03 or AAA batteries.
Battery cover
3. Attach the battery cover.
Used batteries
New batteries
Insert the batteries as shown in the battery compartment.
If installed incorrectly, the device will not work.
When
(LOW BATTERY mark) appears on the display,
replace all batteries with new ones. Do not mix old and new
batteries. It may shorten the battery life, or cause the device
to malfunction.
(LOW BATTERY mark) does not appear when the
batteries are drained.
The battery life varies with the ambient temperature and may be shorter at low temperatures.
Use the specified batteries only. The batteries provided with the device are for testing monitor performance and
may have a limited life.
Remove the batteries if the device is not to be used for a long period of time. The batteries may leak and cause a
malfunction.
When removing the batteries, preset parameters (of clock, user and my C.P.G.) are reset.
English 7
2. Selecting a User
1. Press the
Using the Monitor
SET button when turning off the device. The indicator
or
Turn off
is blinking.
SET button
SET button.
2. Select a user from user and user using the
Press the START button to turn off the device.
After three minutes of non-operation, the device will turn off automatically.
User
or user
START button
3. Adjusting the Built-in Clock Before Use
1. Press and hold the
SET button until the year starts blinking.
2. Select the year using the
button.
SET button to set the current year and move to month/day selection.
Press the
The date can be set anywhere between the years 2010 and 2059.
3. Select the month using the
button.
SET
Press the
button to set the current month and move to day selection.
Press and hold
Year
Month
4. Select the day using the
button.
SET button to set the current day and move to hour/minute selection.
Press the
Day
5. Select the hour using the
button.
SET
Press the
button to set the current hour and move to minute selection.
Hour
6. Select the minute using the
button.
SET button to proceed to "4. Applying the Cuff".
Press the
Minute
Holding down the
button will change the value continuously.
START
Pressing the
button will turn the device off anytime.
button
SET button
button
SET button
button
button
SET button
SET button
button
SET button
The operation proceeds to "6.
The C.P.G. Function Switch".
Notes: After three minutes of non-operation, the device will turn off automatically.
When the clock has not been set,
is indicated for the clock display.
When removing the batteries, preset parameters (of clock, user and my C.P.G.) are reset.
English 8
SET button
Using the Monitor
4. Applying the Cuff
1. Wrap the cuff around your wrist about 1 cm above your hand as shown in the figure
at the right.
About 1 cm
2. Fasten the cuff tightly using the Velcro strip.
Note: For proper measurements, fasten the cuff tightly and measure on a bare wrist.
5. How to Take Proper Measurements
For the most accurate blood pressure measurement:
Remain still and keep quiet during measurement.
Sit down in a comfortable position. Place your elbow on a table. Raise your hand so that the cuff is at the same
level as your heart.
Relax for several minutes before measurement. If you are excited or depressed by emotional stress, the
measurement will reflect this stress as a higher (or lower) than normal blood pressure reading and the pulse
reading will usually be faster than normal.
Try to measure your blood pressure at about the same time every day.
An individual's blood pressure varies constantly, depending on what they are doing, what they have eaten and what
they drink can have a very strong and rapid effect on your blood pressure.
Do not measure immediately after physical exercise or a bath. Rest for twenty or thirty minutes before taking the
measurement.
Do not cross your legs. Keep your feet on the floor and straighten your back.
This device bases its measurements on the heartbeat. If you have a very weak or irregular heartbeat, the device
may have difficulty determining your blood pressure.
Should the device detect a condition that is abnormal, it will stop the measurement and display an error symbol.
See page 6 for the description of symbols.
This blood pressure monitor is intended for use by adults only. Consult with your physician before using this device
on a child. A child should not use this device unattended.
English 9
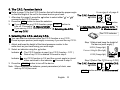
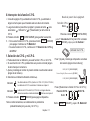
6. The C.P.G. Function Switch
Refer to page 16 for the C.P.G. function that will indicate the proper angle
From step 6 of page 8
so that the height of the cuff is the same level as your heart.
The C.P.G. function
button
1. After step 6 in page 8, press the
button to select either " " or " "
concerning the C.P.G. function.
2. Press the SET button to store the selection.
Press the SET button
3.
If you do not use my C.P.G. function, press START button to
turn off. Proceed to "8. Measurement".
To "7. Selecting the C.P.G. and my C.P.G." or
If you use my C.P.G. function, proceed to "7. Selecting the C.P.G.
START button and to "8. Measurement"
and my C.P.G.".
The C.P.G. indicator
7. Selecting the C.P.G. and my C.P.G.
You can select an indicator either the C.P.G. function or my C.P.G. .
Preset a proper posture (wrist angle) in memory if you use the my C.P.G. .
1. Adjust and keep the height of the blood pressure monitor to the
same level as your heart using your wrist angle.
2. Select an indicator using the
Indicator
.....The
Indicator
.....my
button.
C.P.G. function is used. (my C.P.G. function : OFF )
Data of my C.P.G. is deleted. Proceed to step 3.
C.P.G. function is ON and the current angle is stored
when switched to the indicator . Proceed to step 3.
3. Press the START button to turn off the device.
Note: When removing the batteries, preset parameters (of clock, user
and my C.P.G.) are reset.
English 10
Step 1 [Adjust and keep the height of
the device (wrist angle) ]
HIGH (Orange light)
Correct Height (Blue light)
LOW (Orange light)
Step 2 [Select The C.P.G. or my C.P.G.]
The C.P.G. function
button
My C.P.G.
START button and to "8. Measurement"
8. Measurement
During measurement, it is normal for the cuff to feel very tight.
9. After Measurement
While readings are displayed, if you press the START button to turn the device off, new readings are stored in
memory.
While readings are displayed, if you press the
button to turn the device off, new readings are not stored.
Remove the cuff and record your data.
Notes: The device is provided with an automatic power shut-off function which stores the current data in the memory
and turns the device off automatically one minute after measurement. Allow at least three minutes between
measurements on the same person.
English 11
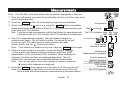
Measurements
Note: The UB-543, once used, will provide an inflation appropriate to the user.
1. Wrap the cuff around your wrist. Sit comfortably with the cuff at the same level
as your heart and relax.
2. Press the START button. All of the display segments are displayed.
3. Select a user from user and user using the
Adjust and keep the height of the cuff (with blue light) to the same level as your
heart using the C.P.G. indicator.
Note: If you do not use user selection, wait for the inflation for several seconds.
If you do not use the C.P.G. function, the C.P.G. indicator is not displayed.
All segments
SET button immediately.
User
or user
:
The C.P.G. indicator: Orange Blue Orange
LOW LEVEL HIGH
4. Zero (0) is displayed blinking briefly. Then the display changes, as
At heart level
measurement begins. The cuff starts to inflate. It is normal for the cuff
to feel very tight. The measurement starts automatically when
Zero display
(heart mark) blinks.
inflation starts, and the
Inflation is started
Note: If you wish to stop inflation at any time, press the START button again.
5. When the measurement is complete, the device displays readings
( of the systolic and diastolic pressure readings, pulse rate, WHO
classification, I.H.B. symbol and C.P.G. indicator). While readings are
displayed, the date and time are displayed alternately. The cuff
exhausts the remaining air and completely deflates automatically.
Note: If you do not want to store new readings in memory, press the
button while readings are displayed.
6. Press the START button again to turn the device off. Remove the cuff.
Notes: The device is provided with an automatic power shut-off function.
Allow at least one minute between measurements on the same person.
English 12
SET button
Inflating and
Measurement in progress
Systolic pressure
Diastolic pressure
JNC7 classification
I.H.B. symbol
Pulse rate
The C.P.G. indicator
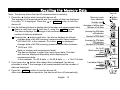
Recalling the Memory Data
Turn off
Note: This device stores the last 60 measurements in memory.
1. Press the
button when turning the device off.
The average of all measurements and the number of data are displayed.
If no data, “0” is displayed. Press the
or START button to turn the
device off.
2. Use the following buttons to display data (of number and measurement data).
SET button.
Select a user from user and user using the
The device displays the average of all measurements and the
number of data are displayed.
Pressing the
button each time , the device displays as follows:
Average data of all AM (morning) measurements taken between
4:00 and 9:59. In the example, If no data,
is displayed.
Average data of all PM (evening) measurements taken between
18:00 and 1:59.
Data (of number and measurement data).
The device displays in order from most recent data. The date
and time are displayed alternately while displaying the
measurement data.
In the example: No.30 & data
No.29 & data
No.01 & data.
3. If you press the
button after oldest data is displayed, the device
proceeds to step 1, the average of all measurements and the number of
data are displayed.
4. Press the START button to turn the device off.
After one minute of non-operation, the device will turn off automatically.
English 13
Memory mode
User selection
Example: user
button
button
Average of all the data
Number of all data
Average for AM data
AM indicator
Number of AM data
Average for PM data
PM indicator
Number of PM data
Ex.: No.30
Most recent data
Date
Time
3 seconds
Last data (Oldest)
Date
Time
3 seconds
button
button
button
button
button
button
Turn off
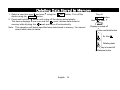
Deleting Data Stored in Memory
1. Select a user from user and user
device using the START button.
using the
SET button. Turn off the
2. Press and hold the
button until truing off the device automatically.
The device displays a user icon and the
mark, deletes data stored in
memory while blinking the
mark and turns off automatically.
Note: This operation will delete specified user data stored in memory. You cannot
select which data to delete.
Turn off
SET button
User
or user
Display is turned off
Press and hold button
Ex.: User
Deleting data
Display is turned off
Release button
English 14
What is Irregular Heartbeat?
Model UB-543 blood pressure monitor provides a blood pressure and pulse rate measurement even when an
irregular heartbeat occurs. An irregular heartbeat is defined as a heartbeat that varies by 25% from the average of
all heartbeats during the blood pressure measurement. It is important that you be relaxed, remain still and do not
talk during measurements.
symbol frequently.
Note: We recommend contacting your physician if you see this
7 Classification Indicator
Stage 2 Hypertension
Stage 1 Hypertension
Pressure Bar Indicator
Prehypertension
Pressure Rating Indicator is a feature which proNormalThe
vides a snapshot of your blood pressure classification
ension
based on your measurements. This will let you know
what your blood pressure readings what your blood
pressure readings mean.
Each segment of the bar indicator corresponds to the
Seventh Report of the Joint National Committee (JNC7)
on Prevention, Evaluation and Treatment of High Blood
Pressure from the National Heart, Lung and Blood Institute - May 2003.
: The indicator displays a segment, based on the current measurement,
corresponding to the JNC7 Classification.
NOTE: Due to other risk factors (e.g. diabetes, obesity, smoking, etc.) in addition to your
blood pressure measurement, the Pressure Rating Indicator is approximate.
Please consult with your physician for interpretation and diagnosis of your blood
pressure measurements.
English 15
Pressurizing
Inflation in progress
Measurement in progress
Inflation complete
Stage 2 Hypertension
Stage 1 Hypertension
Prehypertension
Normal
Example
Stage 2
Hypertension
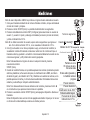
The C.P.G Indicator
The C.P.G. Indicator
The C.P.G. (Correct Position Guidance) indicator is the function to inform a
difference between the height (wrist angle) of the blood pressure monitor and
your cardiac height in the correct posture (Example: sitting posture, height of
table and chair, etc.) during the measurement. The indicator can be used to get
more stable measurement condition.
The C.P.G. indicator
The position of the device is checked both before and after measurement.
If both checks show a correct measurement position the LEVEL indicator is lit (blue)
For all other measurements an indicator for LOW or HIGH measurement position will be lit (orange)
How To Use My C.P.G.
The C.P.G. function can be used with proper posture (wrist angle) in the
majority of measurements. If you need to change the posture to adjust the
height so that the height of the blood pressure monitor is the same level as
your cardiac height, you can use my C.P.G. function to store a personal
posture. Preset your angle to my C.P.G. function before measurement.
Proper Posture
Sit straight back on a
chair and put your
elbow on a table.
The Indicator Dur ng Measurement And Recalling Memor
The C.P.G. indicator can be displayed at the beginning of measurement and is included
in data stored in the memory. Adjust and keep the angle during measurement.
English 16
Table
Chair
About Blood Pressure
What is Blood Pressure?
Blood pressure is the force exerted by blood against the walls of the arteries. Systolic pressure occurs when the
heart contracts. Diastolic pressure occurs when the heart expands. Blood pressure is measured in millimeters of
mercury (mmHg). One's natural blood pressure is represented by the fundamental pressure, which is measured
first thing in the morning while one is still at rest and before eating.
What is Hypertension and How is it Controlled?
Hypertension, an abnormally high arterial blood pressure, if left unattended can cause many health problems
including stroke and heart attack. Hypertension can be controlled by altering lifestyle, avoiding stress, and with
medication under a doctor’s supervision.
To prevent hypertension or keep it under control:
Do not smoke
Exercise regularly
Reduce salt and fat intake
Have regular physical checkups
Maintain proper weight
Why Measure Blood Pressure at Home?
It is now well known that, for many individuals, blood pressure readings taken in a doctor’s office or hospital setting
might be elevated as a result of apprehension and anxiety. This response is commonly called “white coat
hypertension.”
In any case, self-measurement at home supplements your doctor’s readings and provides a more accurate,
complete blood pressure history. In addition, clinical studies have shown that the detection and treatment of
hypertension is improved when patients both consult their physicians and monitor their own blood pressure at
home.
English 17
Blood Pressure Variations
An individual’s blood pressure varies greatly on a daily and seasonal
basis. It may vary by 30 to 50 mmHg due to various conditions
during the day. In hypertensive individuals variations are even more
pronounced. Normally, the blood pressure rises while at work or play
and falls to its lowest levels during sleep. So, do not be overly
concerned by the results of one measurement.
Take measurements at the same time every day using the
procedure described in this manual to get to know your normal blood
pressure. Regular readings give a more comprehensive blood
pressure history. Be sure to note the date and time when recording
your blood pressure. Consult your doctor to interpret your blood
pressure data.
Maintenance
Do not open the device. It uses delicate electrical components and an intricate air unit that could be damaged. If you
cannot fix the problem using the troubleshooting instructions, contact the authorized dealer in your area or our
customer service department. The A&D customer service will provide technical information, spare parts and units to
authorized dealers.
English 18
Troubleshooting
Problem
Possible Reason
Batteries are drained.
Nothing appears in the
display, even when the Battery terminals are not in the correct
device is turned on.
position.
The cuff does not
inflate.
Battery voltage is too low.
(LOW BATTERY mark) blinks. If
the batteries are drained completely, the
mark does not appear.
The cuff is not applied properly.
You moved your wrist or body during the
measurement.
The device does not
measure.
Readings are too high The cuff position is not correct.
or too low.
Other
Recommended Action
Replace all batteries with new ones.
Reinstall the batteries with negative and positive
terminals matching those indicated in the battery
compartment.
Replace all batteries with new ones.
Apply the cuff correctly.
Make sure you remain very still and quiet during
the measurement.
Sit comfortably and still.
Raise your hand so that the cuff is at the same
level as your heart.
If you have a very weak or irregular heat beat, the
device may have difficulty in determining your
blood pressure.
The value is different from that measured
See “Why Measure Blood Pressure at Home?”.
at a clinic or doctor’s office.
Remove the batteries. Place them back properly
and try measurement again.
Note: If the actions described above do not solve the problem, contact the dealer. Do not attempt to open or repair
this product yourself, as any attempt to do so will make your warranty invalid.
English 19
Technical Data
Type
Measurement method
Measurement range
Measurement accuracy
Power supply
Number of measurements
Wrist circumference
Classification
Applied part
Useful life
Clinical test
EMC
Memory
Operating conditions
Transport / storage conditions
Dimensions
Weight
Ingress protection
UB-543
Oscillometric measurement
Pressure: 0 – 299 mmHg
Pulse:
40 – 180 beats / minute
Pressure: ±3 mmHg
Pulse:
±5%
2 x 1.5V alkaline batteries (LR03 or AAA)
Approx. 180 measurements, when AAA alkaline batteries are used, with pressure value
of 170 mmHg at room temperature of 23°C.
5.3" – 8.5" (13.5 – 21.5 cm)
Internally powered ME equipment (Continuous operation mode)
Cuff Type BF
Device: 5 years (when used six times a day)
According to ANSI / AAMI SP-10 1992
IEC 60601-1-2: 2007
Last 60 measurements each for user 1 and user 2.
+50°F to +104°F (10°C to 40°C) / 15% RH to 85 %RH/ 800 hPa to 1060 hPa
-4°F to +140°F (-20°C to 60°C) / 10%RH to 95 %RH
Approx. 2.2" (5.6 cm) [W] x 3.5" (8.8 cm) [H] x 0.7" (1.8 cm) [D]
Approx. 3.6 oz (103 g), not including batteries
IP20
Note: Specifications are subject to change for improvement without prior notice.
English 20
WARRANTY INFORMATION
LIMITED 5 YEAR WARRANTY
A&D Medical Blood Pressure Monitor
Only for Retail Purchasers within the US. [For retail purchasers outside the US, NO warranty is provided by
A&D – please contact your local distributor or dealer.]
A&D Medical (“A&D”) warrants to the first retail purchaser (“You”) that this blood pressure monitor (the “Product”) will
be free from defects in material and workmanship for 5 years under normal use. If the Product contains a blood
pressure cuff, the warranty period for such cuff is limited to two years from the date You purchased the Product. This
Limited Warranty is personal to You and is not transferable. If a Product is defective, You can return the Product to
the retailer You purchased it from (if within such retailer’s return time frame) or return it to A&D in accordance with
the procedure set forth below. A&D’s warranty obligation is limited to the repair or replacement, at A&D’s option, of
the defective Product that has been returned by You within the warranty period. Such repair or replacement will be at
no charge to You. The repaired or replacement Product is warranted hereunder for the longer of the remainder of the
original warranty period or 90 days from the date of shipment of the repaired or replacement Product. If you return
the Product for warranty service to A&D, You must return the Product, freight and insurance prepaid, within the warranty period to the address set forth below, together with satisfactory proof of the date of Your purchase (such as a
sales receipt or statement of online warranty registration). Also, please enclose a check for return shipping and
insurance of the Product back to You.
In the United States, to:
A&D Medical
Attn.: Warranty Department
1756 Automation Parkway
San Jose, CA 95131
1-888-726-9966
Please contact in the US: A&D Medical, at the numbers set forth above for the appropriate shipping costs.
WARRANTY INFORMATION
This Limited Warranty does not cover, and A&D will not be liable for (i) any shipment damage, (ii) any damage or
defect due to misuse, abuse, failure to use reasonable care, failure to follow written instructions enclosed with
the Product, accident, subjecting the Product to any voltage other than the specified voltage, improper environmental conditions, or modification, alteration or repair by anyone other than A&D or persons authorized by
A&D, or (iii) expendable or consumable components.
THIS LIMITED WARRANTY IS THE ONLY WARRANTY FROM A&D; THERE ARE NO OTHER EXPRESS
WARRANTIES. If A&D cannot reasonably repair or replace the Product, A&D will refund the amount You paid
for the Product (not including taxes), less a reasonable charge for usage. To receive a refund you must have
returned the Product and all associated materials to A&D. The above remedy of repair, replacement or refund is
your only and exclusive remedy. IN NO EVENT SHALL A&D BE LIABLE FOR ANY DAMAGES, INCLUDING,
WITHOUT LIMITATION, LOST PROFITS, LOST INFORMATION OR REPLACEMENT COSTS, ARISING OUT OF
YOUR USE OF OR INABILITY TO USE THE PRODUCT, INCLUDING, WITHOUT LIMITATION, ANY SPECIAL,
INCIDENTAL OR CONSEQUENTIAL DAMAGES, EVEN IF A&D HAS BEEN ADVISED OF THE
POSSIBILITY OF SUCH DAMAGES. Some states do not allow the exclusion of incidental or consequential
damages, so that the above exclusions may not apply to you. This warranty gives you specific legal rights, and
you may also have other rights that may vary from state to state.
No distributor, dealer or other party is authorized to make any warranty on behalf of A&D or to modify this
warranty, or to assume for A&D any liability with respect to its products.
CONTACT INFORMATION
For more information regarding use, care or servicing of your blood pressure monitor, contact:
A&D Medical
A division of A&D Engineering, Inc.
1756 Automation Parkway
San Jose, CA 95131
A&D Medical Customer Service
Toll-Free: 1-888-726-9966
Visit our web site at www.andmedical.com for warranty
information and registration.
Í ndice
Estimados clientes............................................................................................................................................... 3
Observaciones preliminares ................................................................................................................................ 3
Precauciones ....................................................................................................................................................... 3
Parts identificación de componentes ................................................................................................................... 5
Símbolos ............................................................................................................................................................. 6
Símbolos ............................................................................................................................................................. 7
Uso del monitor ................................................................................................................................................... 8
1. Instalación/cambio de pilas ........................................................................................................................ 8
2. Selección de un usuario ............................................................................................................................. 9
3. Ajuste del reloj incorporado ...................................................................................................................... 10
4. Cómo colocar el brazalete........................................................................................................................ 11
5. Para efectuar mediciones correctas ......................................................................................................... 11
6. Interruptor de la función............................................................................................................................ 12
7. Selección de C.P.G. y mi C.P.G................................................................................................................. 12
8. Medición...... ........................ ............ ........................................................................................................ 12
9. Después de la medición..................
.
........... .............................................................................................. 12
Mediciones ........................................................................................................................................................ 13
Cómo recuperar datos de la memoria .............................................................................................................. 14
Cómo eliminar datos almacenados en la memoria............................................................................................. 15
¿Qué es el latido irregular del corazón? ............................................................................................................ 16
Indicador de barra de presión ............................................................................................................................ 16
Indicador de C.P.G.... ........................................................................................................................................ .17
Aspectos sobre la tensión arterial....................................................................................................................... 18
¿Qué es la tensión arterial? ........................... ........................... ..................................................................18
¿Qué es la hipertensión y cómo controlarla? ............................................................................................... 18
¿Por qué debe medirse la tensión arterial en la casa? ................................................................................. 18
Variaciones de la tensión arterial .................................. ..............................................................................19
Mantenimiento ................................................................................................ ..................................................19
Localización y corrección de fallos .................................................................................................................... .20
Datos técnicos ................................................................................................ .................................................. 21
Español
1
Español
2
Es tim ados clientes
Enhorabuena. Usted ha comprado un monitor de presiones sanguíneas A&D, el aparato màs avanzado
tecnológicamente y con un uso senzillo y práctico para su utilización diaria.
Se recomienda leer este manual de instrucciones detenidamente antes de usarlo por primera vez.
Obs ervaciones prelim inares
Este aparato está diseñado para ser utilizado en adultos, no en niños ni en recién nacidos.
Ámbito de uso
Este aparato está diseñado para uso en interiores.
Este aparato se ha diseñado para medir la presión sanguínea y la frecuencia del pulso de las personas para el
diagnóstico.
Precauciones
En la fabricación de este aparato, se han usado componentes de precisión. Deberá evitarse su exposición a
temperaturas extremas, ambientes humedad, rayos solares directos, golpes o polvo.
Limpie el aparato y el brazalete con un paño seco y suave humedecido con agua y jabón neutro. No utilice nunca
alcohol, benceno, diluyentes u otros productos químicos agresivos para limpiar el aparato o el brazalete.
Evite dejar doblado el brazalete durante períodos largos, ya que este trato podría acortar la duración de los
componentes.
Tanto el aparato como el brazalete no son resistentes al agua. Por lo tanto, evite que la lluvia, la transpiración y el
agua mojen el aparato y el brazalete.
Las mediciones pueden verse afectadas si el aparato se usa cerca de televisores, microondas, teléfonos moviles,
Español
3
rayos X u otros dispositivos que produzcan campos eléctricos.
El aparato, sus componentes y pilas no deben considerarse como desperdicios domésticos ordinarios y deberán
eliminarse de acuerdo con el reglamento establecido a este respecto.
Cuando se reutiliza el aparato, confirme que el dispositivo esté limpio.
No modifique el aparato. Puede provocar accidentes o daños al aparato.
Para medir la presión sanguínea, la muñeca debe ser apretado por el brazalete lo suficiente como para detener
temporalmente el flujo sanguíneo a través de la arteria. Esto puede provocar dolor, entumecimiento o una marca
roja temporal en la muñeca. Este estado aparecerá especialmente cuando la medición se repite sucesivamente.
Cualquier dolor, entumecimiento o marcas rojas desaparecerán con el tiempo.
No aplique el brazalete a un brazo con otro equipo eléctrico médico acoplado. Es posible que el equipo no
funcione correctamente.
Las personas que tienen una deficiencia circulatoria grave en el brazo deben consultar a un médico antes de usar
el aparato, para evitar problemas médicos.
No autodiagnostique los resultados de la medición ni se ponga un tratamiento usted mismo. Consulte siempre a su
médico para la evaluación de los resultados y el tratamiento.
No aplique el brazalete a un brazo con una herida no curada.
No aplique el brazalete a un brazo que está recibiendo un goteo intravenoso o transfusión sanguínea. Puede
provocar lesión o accidentes.
No utilizar el aparato cuando se encuentran presentes gases inflamables como, por ejemplo, gases anestésicos.
Puede provocar una explosión.
No usar el aparato en entornos con alta concentración de oxígeno, como por ejemplo en, cámaras de oxígeno a
alta presión o una tienda de oxígeno. Puede provocar un incendio o explosión.
Español
4
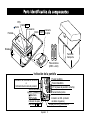
Parts identificaci ón de com ponentes
CPG
Botón
Botón SET
2 usuarios
Pantalla
Brazalete
Botón START
Cubierta
de pilas
3
-54
UB
Funda de
transporte
Pilas alcalinas
(LR03 o AAA)
Indicación de la pantalla
Presión sistólica
Indicador de clasificación de JNC7
e
Indicador de la barra de presión
Presión diastólica
C.P.G (Guía de posición correcta)
Símbolo de corazón
Usuario 1 y Usuario 2
Frecuencia del pulso
Memoria
Promedio
Indicador de I.H.B. (indicador
de latidos irregulares)
Indicador de pilas
Marca de AM / PM
Display del reloj y de la fecha
Español 5
Símbolos
Símbolos impresos en la carcasa del aparato
Símbolos
Función / Significado
SN
Interruptor de espera y encendido
Guía para instalación de pilas
Corriente continua
Número de serie
Tipo BF: El aparato y el brazalete están diseñados para
proporcionar protección especial contra electrochoques.
Consulte el manual/folleto de instrucciones
Un escalofrío o un temblor.
IP
Símbolo de protección internacional
Manténgase Seco
Símbolos que aparecen en la pantalla
Símbolos
Función / Significado / Acción recomendada
Aparece cuando la medición está en curso. Este indicador parpadea cuando se detecta el pulso.
La medición está en curso. Quédese muy tranquilo durante la medición.
Indicador de latidos irregulares . Este indicador aparece
cuando se detectan latidos irregulares del corazón. Puede
iluminarse cuando se detecta una vibración muy ligera, como
Usuario 1 y Usuario 1
Las mediciones previas almacenadas en la memoria.
Datos Promedios
Español
6
Símbolos
Símbolos que aparecen en la pantalla (Continuación)
Símbolos
Full Battery
Función / Significado
Acción recomendada
Indicador de la potencia de las pilas durante la medición.
Low Battery Las pilas son débiles cuando parpadea esta marca.
or
Presión sanguínea inestable debido al movimiento durante la
medición.
Los valores sistólico y diastólico se encuentran dentro de 10
mmHg.
El valor de presión no ha aumentado durante la inflación.
El brazalete no está colocado correctamente.
PUL. DISPLAY ERROR
DIA.
PUL./min.
AM
PM
Coloque el brazalete correctamente, y vuelva a
medir otra vez.
El pulso no se ha detectado correctamente.
Error interno del monitor de presiones sanguíneas
SYS.
Reemplace todas las pilas con unas nuevas,
cuando destelle esta marca.
Take another measurement.
Remain still during measurement.
Presión sanguínea sistólica indicada en mmHg.
Presión sanguínea diastólica indicada en mmHg.
Frecuencia del pulso por minuto
Datos tomados entre las 4:00 y las 9:59 horas
Datos tomados entre las 18:00 y las 1:59 horas
Español 7
Extraiga las pilas, presione el botón START y a
continuación vuelva a colocar las pilas. Si el error sigue
apareciendo, póngase en contacto con su distribuidor.
Us o del monitor
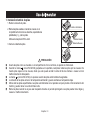
1. Instalación/cambio de pilas
1. Retire la cubierta de pilas.
Cobertor de Bateria
2. Retire las pilas usadas e inserte las nuevas en el
compartimiento tal como se describe, respetando las
polaridades (+ y -) de las pilas.
Utilice solo las pilas LR03 o AAA.
Baterias Usadas
Baterias Nuevas
3. Cierre la cubierta de pilas.
PRECAUCIÓN
Inserte las pilas como se muestra en el compartimiento. De lo contrario, el aparato no funcionará.
Cuando la marca
(marca de PILAS GASTADA) parpadea en la pantalla, reemplace todas las pilas por las nuevas. No
mezcle pilas viejas con las nuevas, dado que esto puede acortar la vida útil de las mismas o causar un mal
malfuncionamiento del aparato.
La marca
(marca de PILAS GASTADA) no aparece cuando las pilas están totalmente agotadas.
La vida útil de las pilas varía con la temperatura ambiental y puede acortarse a temperatura baja.
Utilice sólo las pilas especificadas. Las pilas suministradas con el aparato son para probar el funcionamiento del
monitor y pueden tener una vida útil más corta.
Retire las pilas cuando no vaya a usar el aparato durante un período prolongado. Las pilas pueden tener fugas y
causar un malfuncionamiento.
Español
8
Uso del monitor
2. Selección de un usuario
1. Presione el botón
2. Utilice el botón
SET (CONFIGURAR) al apagar el dispositivo. El indicador
SET (CONFIGURAR) para seleccionar un usuario de usuario
o
Apagar
parpadea.
Botón
y usuario .
SET
(Configurar)
Usuario o Usuario
Botón START (Iniciar)
Presione el botón START (INICIAR) para apagar el dispositivo.
Al cabo de tres minutos de inactividad, el dispositivo se apagará automáticamente.
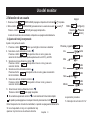
3. Ajuste del reloj incorporado
Ajuste el reloj antes de usarlo.
SET hasta que los dígitos comiencen a destellar
1. Presione el botón
2. Seleccione el año utilizando el botón .
SET para ajustar el año en curso y pase a la
Presione el botón
selección del mes/día. El año puede ajustarse entre el 2010 y el 2059.
3. Seleccione el mes utilizando el botón .
Presione el botón
SET para ajustar el mes en curso y pase a la
día.
selección del
4. Seleccione el día utilizando el botón .
Presione el botón
SET para ajustar el día en curso y pase a la selección
de la hora /minuto.
5. Seleccione la hora utilizando el botón .
SET para ajustar la hora en curso y pase a la
Presione el botón
selección del minuto.
6. Seleccione el minuto utilizando el botón
.
Año
Mes
botón
button
Minuto
SET botón
SET botón
Día
Hora
SET botón
botón
button
SET botón
SET botón
botón
SET botón
Presione el botón START para apagar el aparato.
Si se mantiene presionado el botón
Presione y aguante
, el valor cambia de forma ininterrumpida.
El aparato puede apagarse en cualquier momento presionando el botón START
Nota: Después de tres minutos de inactividad, el aparato se apaga automáticamente.
Si no se ha ajustado el reloj, en la pantalla del reloj
aparecen ray tal como se muestra a la derecha.
Español
9
La operación procede a
“6. Interruptor de la función C.P.G.”
Us o del monitor
Apagar
4. Cómo colocar el brazalete
1. Envuelva el brazalete alrededor de su muñeca aproximadamente 1 cm más arriba
de su mano tal como se muestra en la figura de la derecha.
2. Ajuste el brazalete fuerte utilizando la cinta Velcro.
Nota: Para una medición adecuada, ajuste el brazalete en su muñeca desnuda.
5. Para efectuar mediciones correctas
Aprox. 1 cm
Para una mejor precisión en la medición de la tensión arterial:
Siéntese cómodamente en una silla. Apoye su brazo sobre la mesa.
No cruce las piernas. Mantenga los pies en el suelo y enderece la espalda.
Relájese durante unos 5 a 10 minutos.
Levante su mano de manera que el brazalete quede al mismo nivel que su corazón
Permanezca quieto y en silencio durante la medición.
No efectúe la medición inmediatamente después de un ejercicio físico o baño. Descanse unos 20 ó 30 minutos
antes de la medición.
Trate de medir la tensión arterial a la misma hora todos los días.
La presión arterial de un individuo varía constantemente según lo que esté haciendo y lo que haya comido. Lo que
bebe puede tener un efecto muy fuerte y rápido en la presión arterial.
Este dispositivo mide la presión según los latidos. Si las pulsaciones son muy débiles o irregulares, el dispositivo
puede tener inconvenientes para determinar la presión arterial.
Si el dispositivo detectara un estado anormal, detendrá la medición y aparecerá un símbolo de error. Consulte la
página 6 para ver la descripción de los símbolos.
Este monitor de presión arterial está diseñado para ser utilizado solamente por adultos. Consulte a su médico
antes de utilizar este dispositivo en un niño. Los niños no deben utilizar este dispositivo sin supervisión.
Español
10
r
t
P.G.
6. Interruptor de la función C.P.G.
□ Consulte la página 16, que detalla la función C.P.G., que indicará el
ángulo correcto para que el brazalete esté a la altura del corazón.
1. Luego de realizar el paso 6 de la página 8, presione el botón
para
seleccionar " " "Activada" u " " ("Desactivada") en la función de
C.P.G.
2. Presione el botón SET (CONFIGURAR) para guardar la selección.
3. □ Si no usa la función mi C.P.G., presione el botón START (INICIAR)
para apagar. Continúe con "8. Medición".
□ Si usa la función mi C.P.G., continúe con "7. Selección de C.P.G. y
mi C.P.G.".
7. Selección de C.P.G. y mi C.P.G.
□ Puede seleccionar un indicador, ya sea la función C.P.G. o mi C.P.G.
□ Si usa la función mi C.P.G, predetermine una postura correcta (ángulo
de la muñeca) en la memoria.
1. Ajuste y mantenga el monitor de presión arterial a la altura del corazón
(ángulo de la muñeca).
2. Seleccione un indicador utilizando el botón
.
Indicador
..... Se utiliza la función C.P.G. (función mi C.P.G.: OFF (DESACTIVADA)
Indicador
..... la función mi C.P.G. está ON (ACTIVADA) y el ángulo actual se
Los datos de mi C.P.G. se eliminan. Continúe con el paso 3.
almacena cuando se cambia al indicador . Continúe con el paso 3.
3. Presione el botón START (INICIAR) para apagar el dispositivo.
Nota: si retira las baterías, se restablecerán los parámetros
predeterminados (reloj, usuario y mi C.P.G.).
Español 1 1
Desde el paso 6 de la página 8
Función C.P.G.
Botón
Presione el botón SET (CONFIGURAR)
para "7. Selección de C.P.G. y mi C.P.G" o el botón
START (INICIAR) y vaya a para "8. Medición".
Indicador de C.P.G.
Paso 1 [Ajuste y mantenga el dispositivo a la altura
del corazón (ángulo de la muñeca)]
HIGH (ALTO) (luz anaranjada)
Correct Height (Altura correcta) (luz azul)
LOW (BAJO) (luz anaranjada)
Paso 2 [Seleccione la función C.P.G o mi C.P.G.]
Función C.P.G.
Botón
Botón
Mi C.P.G.
START (INICIAR) y vaya a "8. Medición"
8. Medición
Durante la medición, es normal que sienta el brazalete muy apretada (no se alarme por esto).
9. Después de la medición
Después de la medición, presione el botón START para apagar el aparato.
Retire el brazalete y registre sus datos de medición.
Nota: El aparato cuenta con la función de desconexión automática de la alimentación, que desconecta la
alimentación automáticamente un minuto después de la medición.
Deje que transcurran por lo menos tres minutos si las mediciones se realizan en la misma persona.
Español 12
Mediciones
Nota: Al usar el dispositivo UB-543 se produce un ingreso de aire adecuado al usuario.
1. Coloque el brazalete alrededor de la muñeca. Siéntese cómodo, coloque el brazalete
al nivel del corazón y relájese.
2. Presione el botón START (Inicio). La pantalla mostrará todos los segmentos.
3. Presione inmediatamente el botón SET (Configurar) para seleccionar un usuario de
Todos los segmentos
usuario 1 y usuario 2. Ajuste y sostenga el brazalete (la luz azul) al nivel del corazón,
y utilice el indicador de C.P.G.
SET botón
Nota: Si no utiliza la selección de usuario, espere varios segundos a que ingrese el
Usuario o Usuario :
aire. Si no utiliza la función C.P.G., no se visualiza el indicador de C.P.G..
Indicator de C.P.G: Anaranjado Azul Anaranjado
4. Cero (0) se muestra con un breve parpadeo. Luego, al comenzar la medición, la
BAJO NIVEL
ALTO
visualización cambia. El brazalete comienza a recibir aire. Es normal sentir que el
A la altura del corazón
brazalete está muy ajustado. La medición comienza automáticamente cuando el aire
comienza a ingresar y el ♥ (símbolo del corazón) parpadea.
Nota: Si desea detener el ingreso de aire en cualquier momento, presione
Pantalla en cero
nuevamente el botón
El ingreso de aire
START (Inicio).
ha comenzado
5. Cuando la medición finaliza, en la pantalla aparecen las lecturas (lecturas de presión
El aire está ingresando y
sistólica y diastólica, la frecuencia del pulso, la clasificación de la OMS, el símbolo
la medición está en
de latido irregular y el indicador de C.P.G.). Mientras se muestran las lecturas, en la
progreso
pantalla aparecen la fecha y la hora de manera alternada. El brazalete libera el aire
restante y se desinfla por completo automáticamente.
Presión sistólica
Nota: Si no desea almacenar nuevas lecturas en la memoria, presione el botón ◄
Presión diastólica
en el momento en que aparecen las lecturas en la pantalla.
Clasificación de la JNC7
6. Presione nuevamente el botón START (Inicio) para apagar el dispositivo. Quítese el Símbolo de latido irregular
brazalete.
Frecuencia del pulso
Notas: El dispositivo tiene una función de apagado automático. Espere por lo menos
Indicador de C.P.G.
un minuto entre cada medida que realice una misma persona.
Español 13
Cómo
datos de
Revis
i n recuperar
de los datos
delalamemoria
m em oria
Nota: Este dispositivo almacena en la memoria las últimas 60 mediciones.
Apagar
1. Presione el botón ◄ para apagar el dispositivo. Se muestra el promedio de todas
butón
Modo de memoria
las mediciones y la cantidad de datos. Si no hay datos, aparece "0". Presione el
Selección de usuario
butón
botón ◄ o START (Inicio) para apagar el dispositivo.
Ejemplo:
usuario
2. Presione los siguientes botones para ver los datos (cantidad y datos de la
medición).
Promedio de todos los datos
□ Presione el botón SET (Configurar) para seleccionar un usuario de usuario 1 y
Cantidad de todos los datos
usuario 2. El dispositivo muestra el promedio de todas las mediciones y la canti
Promedio de datos AM
button
dad de datos.
□ Cada vez que se presiona el botón ◄, en la pantalla aparece lo siguiente:
Indicador AM
• Datos promedio de todas las mediciones AM (mañana) realizadas entre las 4:00 y Cantidad de datos AM
las 9:59. (En el ejemplo, si no hay datos, aparece
button
Cantidad de datos PM
• Datos promedio de todas las mediciones PM (noche) realizadas entre las 18:00 y
Indicador PM
la 01:59.
Cantidad de datos PM
• Datos (cantidad y datos de la medición) El dispositivo muestra los datos más reci
button
entes en orden. Mientras se muestran los datos de la medición, en la pantalla
P.
ej.:
N.º
30
aparecen la fecha y la hora de manera alternada.
Datos más recientes
En el ejemplo, N.º 30 y datos → N.º29 y datos → → N.º 01 & y datos.
Fecha
3. Si se presiona el botón ◄ luego de que se los datos más antiguos aparecen en la
Hora
button
pantalla, el dispositivo continúa con el paso 1, y se muestra el promedio de todas
3 segundos
las mediciones y la cantidad de datos.
button
4. Presione el botón START (Inicio) para apagar el dispositivo. Después de un
Últimos datos (más antiguos)
minuto de inactividad, el dispositivo se apagará automáticamente.
Fecha
Hora
3 segundos
button
Apagar
Español
14
Cómo eliminar datos almacenados en la memoria
Apagar
1. Presione el botón SET (Configurar) para seleccionar un usuario de usuario 1 y
SET botón
usuario 2. Presione el botón START (Inicio) para apagar el dispositivo.
o Usuario
2. Presione el botón ◄ hasta que el dispositivo se apague automáticamente. En la Usuario
pantalla aparece un ícono de usuario y el símbolo [M], se eliminan los datos
almacenados en la memoria mientras el símbolo [M] parpadea y el dispositivo se
Se apaga la pantalla
apaga automáticamente.
Mantenga presionado el botón
P. ej.: usuario
Eliminando datos
Se apaga la pantalla
Suelte el botón
Español 15
¿Qué es el latido irregular del coraz ón?
El tensiómetro modelo UB-542 ejecuta la medición de la tensión arterial y frecuencia del pulso aún en caso de
latido irregular del corazón. El latido irregular del corazón se define como aquel que varía en un 25% del promedio
setipulado de (latidos del corazón ). Es importante que usted se relaje, permanezca quieto y no hable durante las
mediciones.Indicator
Classification
Nota: Le recomendamos consultar con a su médico cuando vea este indicador
con frecuencia.
Stage 2 Hypertension
Stage 1 Hypertension
Prehypertension
I ndicador de barra de pres ión
Normal
2
nsion
Presurizando
l Indicador de Clasificación de Presión™ es una característica que
provee una instantánea de la clasificación de su presión arterial basada
en sus medidas. Esto le permitirá saber rápidamente lo que significan
sus medidas de presión arterial. Cada segmento de la barra indicadora
corresponde al Séptimo Reporte del Comité de la Junta Nacional (JNC7)
en Prevención, Evaluación y Tratamiento de Alta Presión Arterial del
Instituto Nacional del Corazón, Pulmones y Sangre Mayo 2003.
: El indicador muestra un segmento, basado en la medida más actual,
correspondiente a la clasificación JNC7.
NOTA: Debido a otros factores de riesgo (Ej.: diabetes, obesidad, fumar, etc.) en adición a sus medidas de presión arterial, el Indicador de Clasificación de Presión es aproximado. Por favor consulte con
su Doctor para interpretación y diagnostico de sus medidas de presión arterial.
NOTA: Residentes fuera de los Estado Unidos (Ej.: Canadá y México) deben consultar la Tabla de
Clasificación WHO en la página S-21 para comparar sus mediciones de presión arterial.
Español
16
Inflación en progreso
Medición en progreso
Ingreso de aire completo
Indicador de C.P.G.
Indicador de C.P.G.
El indicador de C.P.G. (Correct Position Guidance [Guía de posición correcta]) es
la función que informa si existe alguna diferencia entre la altura (ángulo de la muñeca) del
monitor de presión arterial y la del corazón cuando la persona está en la postura correcta
(por ejemplo: estar sentado, la altura de la mesa y la silla, etc.) durante la medición. El
indicador se puede usar para obtener una condición de medición más estable.
Indicador de C.P.G.
Indicador de C.P.G.
La altura del monitor de presión arterial
es inferior al nivel del corazón.
Ángulo bajo
Altura incorrecta
Indicador de C.P.G.: LOW (BAJO)
El monitor de presión arterial se
encuentra a la altura del corazón.
Ángulo correcto
Altura correcta Ángulo alto
Indicador de C.P.G.: LEVEL (NIVEL)
Cómo usar la función mi C.P.G.
La función C.P.G. se puede usar con la postura correcta (ángulo de la muñeca) en
la mayoría de las mediciones. Si necesita cambiar de postura para que el monitor
de presión arterial esté a la altura del corazón, puede usar la función mi C.P.G. para
guardar una postura personal. Predetermine el ángulo correcto para la función mi
C.P.G. antes de realizar la medición.
El indicador durante la medición y la función recordar medición
El indicador de C.P.G. se puede visualizar al comienzo de la medición y está
incluido en los datos almacenados en la memoria. Ajuste y mantenga el ángulo
durante la medición.
Español
La altura del monitor de presión arterial
es superior al nivel del corazón.
17
Altura incorrecta
Indicador de C.P.G.: HIGH (ALTO)
Postura correcta
Siéntese con la
espalda derecha y
apoyada sobre el
respaldo de la silla y
apoye el codo sobre
la mesa.
Mesa
Silla
Aspectos sobre la tension arterial
¿Qué es la tensión arterial?
La tensión arterial es la fuerza que ejerce la sangre contra las paredes de las arteriales. La tensión sistólica ocurre
cuando el corazón se contrae, y la tensión diastólica ocurre cuando el corazón se expande.
La tensión arterial se mide en milímetros de mercurio (mmHg). La presión arterial de una persona está
representada por la tensión fundamental, que es la que se mide primero por la mañana cuando la persona está aún
descansada y antes de haber ingerido alimentos.
¿Qué es la hipertensión y cómo controlarla?
La hipertensión es la tensión arterial anormalmente alta, si no se corrige, puede causar muchos problemas de salud,
incluyendo ataques al corazón y apoplejía.
La hipertensión puede controlarse cambiando el estilo de vida, evitando el estrés y con medicamentos siempre bajo
supervisión médica.
Para evitar la hipertensión o para mantenerla bajo control:
No fume.
Realice ejercicio con regularidad.
Reduzca la ingestión de sal y grasa.
Sométase a exámenes físicos
Mantenga un peso apropiado.
con regularidad.
¿Por qué debe medirse la tensión arterial en la casa?
La medición de la tensión arterial en una clínica o una consulta médica puede causar temor y, por lo tanto
producir una lectura elevada, de 25 a 30 mmHg mayor que medirlo en casa. La medición en casa reduce los
efectos de influencias externas en la lectura de tensión arterial, se recomienda que informe a su médico
afín de proporcionar un historial más completo y exacto de la tensión arterial.
Español
18
Variaciones de la tensión arterial
La tensión arterial de una persona varía considerablemente en base diaria y
estacional. La misma puede variar en 30 a 50 mmHg dependiendo de diversas
condiciones durante el día. En personas hipertensas, estas variaciones son aun
más notables.
La tensión arterial normalmente se eleva cuando se está trabajando o jugando y
baja a sus niveles más bajos
durante el sueño. Por lo tanto, no se preocupe demasiado de los resultados
realizados en una sola medición. Mídase la tensión arterial a la misma hora
todos los días usando el procedimiento descrito en este manual y sea
Mantenimiento
No abra el aparato, ya que éste contiene componentes eléctricos delicados y una unidad de aire compleja podrían
dañarlo. Si no puede solucionar el problema aplicando las instrucciones de localización y corrección de averías, solicite el
servicio de reparación a su proveedor o al grupo de servicio de A&D. El grupo de servicio de A&D proveerá información
técnica, repuestos y unidades a los proveedores autorizados.
Español 19
Localiz ación y corrección de fallos
Problema
Causa probable
No aparece nada Las pilas se han agotado.
en la pantalla, aun
cuando se
Los terminales de las pilas no están en posición
conecta la
correcta.
alimentación.
El voltaje de las pilas están bajos. Destella la
El brazalete no se marca
(marca LOW BATTERY). Si las
infla.
pilas están agotadas completamente, no
aparece esta marca.
El brazalete no está ajustado debidamente.
El aparato no
Movió su brazo o cuerpo durante la medición.
mide la presión
arterial. Las
El brazalete no está posicionado
lecturas so
correctamente.
demasiado altas o
demasiado bajas.
Acción recomendada
Reemplace ambas pilas con unas nuevas.
Coloque las pilas con sus terminales negativo y positivo
coincidiendo con los indicados en el compartimiento.
Reemplace ambas pilas con unas nuevas.
Ajuste el brazalete correctamente.
Asegúrese de permanecer quieto y en silencio durante la
medición.
Siéntese cómodamente y manténgase quito. Eleve el
mismo de tal modo que el brazalete se encuentre al
mismo nivel que su corazón.
Si el latido de su corazón es muy débil o irregular, el
aparato tendrá dificultad en determinar su tensión arterial.
El valor se diferencia de aquel medido en una Consulte el capitulo, ¿Por qué debe medirse la tensión
clínica o en consultorio médico.
arterial en la casa?
Otros
Retire las pilas. Colóquelas nuevamente de forma
correcta e intente la medición nuevamente.
Nota: Si las acciones descritas anteriormente no solucionarán el problema, póngase en contacto con su distribuidor. No intente
abrir o repara este producto Ud. mismo, pues cualquier intento de hacerlo invalidará su garantía.
Español
20
Datos técnicos
Tipo
Método de
medición
Gama de
medición
Precisión de
medición
UB-543
Medición oscilométrica
Tensión: 0 a 299 mmHg
Pulso: 40 a 180 latidos/minuto
Tensión: ±3 mmHg
Pulso:
±5%
Pieza aplicada
Vida útil
Prueba clínica
Brazalete
Aparato: 5 años (cuando se usa seis veces al día)
De acuerdo con ANSI/AAMI SP-10 1992
EMC
IEC 60601-1-2: 2007
Alimentación
2 pilas alcalinas de 1.5 V (LR03 o AAA)
Número de
mediciones
Aprox. 180 mediciones, cuando se usan pilas
alcalinas AAA, con valor de presión de 170
mmHg a temperatura ambiente de 23°C
Almacenamiento
de datos
Condiciones
ambientales de
funcionamiento
Condiciones
ambientales para
almacenamiento
13.5 a 21.5 cm
Dimensiones
Aprox. (56 [An] x 88 [Al] x 18 [Pr]) mm
Tip BF
Peso
Aprox.103 g, excluyendo las pilas
Circunferencia
de la muñeca
Clasificación
Protección de
Ingreso
(suministrado por pilas)
Las 60 medidas de 2 usuarios en memoria.
Temperatura de +10°C a +40°C / RH de 15% a
85%
Temperatura de -20°C a +60°C / RH de 10% a
95%
IP20
Nota: Las especificaciones estarán sujetas a cambios por mejoramiento, sin previo aviso.
Español
21
INFORMAC IÓN DE LA GARANTÍA
GARANTÍA LIMITADA DE 5 AÑOS
Monitor de presión arterial A&D Medical
Solo para vendedores minoristas de los Estados Unidos. Para vendedores minoristas fuera de los Estados Unidos,
A&D NO brinda garantía, contáctese con su agente o distribuidor local.]
A&D Medical (“A&D”) le garantiza al primer comprador minorista (“Usted”) que este monitor de presión arterial (el
“Producto”) no presentará defectos en su material ni mano de obra durante 5 años en condiciones normales de uso.
Si el Producto incluye un brazalete para medición de la presión arterial, el periodo de garantía de dicho brazalete se
limita a tres (2) años a partir de la fecha que Usted compra el Producto. Esta Garantía limitada es específica para
Usted y no es transferible. Si un Producto presenta un defecto, puede devolverlo al minorista donde lo compró (si
está vigente el plazo de devolución al minorista) o devolverlo a A&D conforme al procedimiento establecido a continuación. La obligación por garantía de A&D se limita a la reparación o sustitución, según sea la decisión de
A&D, del Producto defectuoso devuelto por Usted dentro del período de garantía. Tal reparación o sustitución no
tendrá costo para Usted. El Producto reparado o de reemplazo está garantizado conforme a lo aquí estipulado
durante el plazo que reste de la garantía original o 90 días a partir de la fecha del envío del Producto reparado o de
reemplazo, el que sea mayor. Si devuelve el Producto por garantía a A&D, Usted debe devolver el Producto
pagando los costos de transporte y seguro, dentro del período de garantía a la dirección que se indica a
continuación, junto con la debida prueba de la fecha en que Usted realizó la compra (como el recibo de venta o la
declaración de registro de garantía en línea). Asimismo, debe adjuntar un cheque para cubrir el transporte de
reenvío y el seguro correspondiente del Producto.
En los Estados Unidos, a:
A&D Medical
Attn.: Warranty Department
1756 Automation Parkway
San Jose, CA 95131
1-888-726-9966
En los Estados Unidos contáctese con: A&D Medical, en los números indicados más arriba para consultar los costos
de reenvío correspondientes.
Esta Garantía limitada no cubre, y A&D no será responsable por, (i) ningún daño ocasionado en el envío, (ii) ningún daño o defecto
por uso indebido, excesivo, descuidado, por no seguir las instrucciones escritas incluidas con el Producto, accidente, uso del
Producto con un voltaje distinto al voltaje especificado, en condiciones ambientales inadecuadas o modificación, alteración o
reparación por parte de un tercero distinto a A&D o al personal autorizado por A&D, ni (iii) componentes no renovables o
consumibles.
ESTA GARANTÍA LIMITADA ES LA ÚNICA GARANTÍA DE A&D; NO EXISTEN OTRAS GARANTÍAS EXPRESAS. Si A&D no
puede reparar razonablemente o sustituir el Producto, A&D reembolsará el monto que Usted haya pagado por el Producto (sin
incluir impuestos), menos un descuento razonable por el uso. Para recibir un reembolso, debe haber devuelto el Producto y todos
los
materiales asociados a A&D. La solución de reparación, sustitución o reembolso mencionada arriba es su única solución. EN
NINGÚN CASO A&D SERÁ RESPONSABLE POR DAÑOS, INCLUIDOS ENTRE OTROS, PÉRDIDA DE GANANCIAS
COMERCIALES, PÉRDIDA DE INFORMACIÓN O COSTOS DE SUSTITUCIÓN, QUE SURJAN DE SU USO O DE SU IMPOSIBILIDAD DE USO DEL PRODUCTO, INCLUIDOS ENTRE OTROS, TODO DAÑO ESPECIAL, ACCIDENTAL O RESULTANTE,
AUNQUE A&D HUBIERA ADVERTIDO DE LA POSIBILIDAD DE TALES DAÑOS. Algunos estados no permiten la exclusión de
daños incidentales o resultantes, de manera que las exclusiones mencionadas arriba pueden no aplicarse en su caso. Esta
garantía le otorga derechos legales específicos y es probable que tenga otros derechos según su estado.
INFORMAC IÓN DE C ONT AC T O
Para obtener mas información sobre el uso, el mantenimiento o la reparación del monitor de presión arterial, comuníquese con:
Servicio de atención al cliente de A&D Medical
Numero gratuito: 1-888-726-9966
Toll-Free: 1-888-726-9966
Visite nuestro sitio Web en www.andmedical.com
para registrar la garantía.
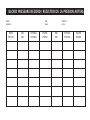
BLOOD PRESSURE RECORD/ REGISTRO DE LA PRESION ARTERIAL
NAME
AGE
WEIGHT
NOMBRE:
EDAD:
PESO:
DATE
FECHA
AM
AM
SYS/DIA
SYS/DIA
PULSE
PULSO
PM
PM
SYS/DIA
SYS/DIA
PULSE
PULSO
BLOOD PRESSURE RECORD/ REGISTRO DE LA PRESION ARTERIAL
NAME
AGE
WEIGHT
NOMBRE:
EDAD:
PESO:
DATE
FECHA
AM
AM
SYS/DIA
SYS/DIA
PULSE
PULSO
PM
PM
SYS/DIA
SYS/DIA
PULSE
PULSO
BLOOD PRESSURE RECORD/ REGISTRO DE LA PRESION ARTERIAL
NAME:
AGE:
WEIGHT:
NOMBRE:
EDAD:
PESO:
DATE
FECHA
AM
AM
SYS/DIA
SYS/DIA
PULSE
PULSO
PM
PM
SYS/DIA
SYS/DIA
PULSE
PULSO
A&D Company, Limited
1-243 Asahi, Kitamoto-shi, Saitama 364-8585 JAPAN
Telephone: [81] (48) 593-1119
A&D ENGINEERING, INC.
1756 Automation Parkway, San Jose, California 95131 U.S.A.
Telephone: (888) 726-9966