1
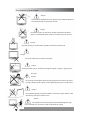
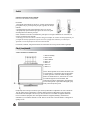
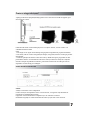
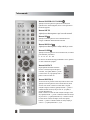
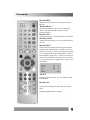
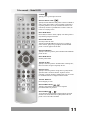
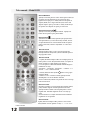
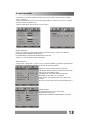
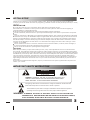
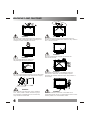
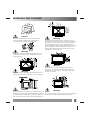
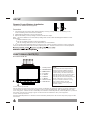
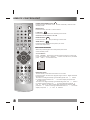
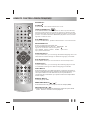
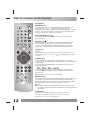
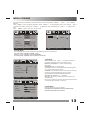
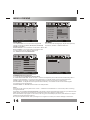
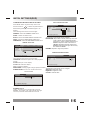
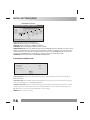
 Manual de instrucţiuni LCD-TV / DVD Combi
ALD1910
Manual de instrucţiuni (RO) CUPRINS:
SPECIFICATII: PAG 1 INSTALARE: PAG 3 INSTRUCTIUNI IMPORTANTE DE SIGURANTA PAG 3 AVERTISMENTE SI PRECAUTIUNI PAG 4 SETARI PAG 5 PAG 5 VEDERE LATERALA A ECRANULUI LCD PAG 7 TELECOMANDA PAG 8 TELECOMANDA TELETEXT PAG 10 TELECOMANDA MOD DVD PAG 11 ECRANELE MENIULUI PAG 13 SETARI INITIALE DVD PAG 15 SFATURI DE DEPANARE PAG 17 CAUZELE INTERFERENTELOR PAG 18 PARTI FUNCTIONALE Specificaţii Sistem de recepţie
Sistemul de culori
Panou LCD
Ieşire antenă
Ieşiri/Intrări
B/G, D/K, I, L/L’, (Opţional)
PAL,SECAM,(Opţional)
482.6mm(19 inch) diagonala
Cablu coaxial 75 ohm
HDMI,YPbPr, AV, SCART, Cablu PC de
intrare, cască
Boxe
8 Ohm
Ieşire audio
3Wx 2
Consumul de energie:
40W
Consumul de energie în modul de aşteptare: 1W
Racord energie
AC 110-240V 50/60Hz
Dimensiuni
L460 xG170.8 xI380(mm)
Greutate netă
5.25KG
Notă
Designul şi specificaţiile pot suferi modificări fără notificare în prealabil
TELECOMANDA
Sistem de transmitere: infraroşu
Alimentare: DC 3V
Instalare
Vă mulţumim foarte mult pentru achiziţionarea acestui produs, cel mai natural de culoare
Televiziune Receiver. Pentru a vă bucura pe deplin de toate avantajele lui de la bun început, citiţi
acest manual cu atenţie şi păstraţi-l la îndemână pentru orice referinţă.
Instalare
Poziţionaţi receptorul în cameră acolo unde lumina nu este orientată spre ecran. Întunericul total
sau reflecţia pe ecran poate duce la obosirea ochilor. Un iluminat indirect şi uşor este recomandat
pentru o vizualizare confortabilă.
Lăsaţi spaţiu suficient între receptor şi de perete pentru a permite ventilaţia.
Evitaţi locaţiile cu temperaturi ridicate pentru a preveni posibilele daune la cabinet sau eşecuri
premature ale componentelor.
Acest televizor funcţionează folosind curent continuu furnizat de adaptorul AC-DC. Tensiunea este
menţionată pe eticheta de pe partea din spate a capacului. Folosiţi întotdeauna adaptorul AC-DC
livrat cu televizorul şi niciodată nu conectaţi aparatul direct la priza de curent alternativ. Adaptorul
AC-DC funcţionează pe reţeaua de aprovizionare cu curent alternativ; tensiunea este menţionată pe
eticheta de pe adaptorul AC-DC. Conectaţi priza DC a adaptorului AC-DC la priza DC 12V din
spatele televizorului. Conectaţi adaptorul AC-DC şi cablul principal. Conectaţi cablul principal în
priza de perete cu tensiune de 110-240V.
Nu instalaţi receiver-ul în apropierea surselor de căldură, precum radiatoare, conducte de aer,
lumina directă a soarelui.
Nu acoperiţi orificiile de ventilaţie atunci când utilizaţi acest set.
Precauţie
Nu atingeţi componentele din interiorul acestui set sau orice alte controale de ajustare care nu sunt
menţionate în acest manual. Panoul LCD folosit în acest produs este fabricat din sticla, prin urmare,
se poate sparge în momentul în care produsul este scăpat sau este supus unui impact. Aveţi grijă la
bucăţile de sticlă în cazul în care panoul LCD este spart. În momentul în care doriţi să curăţaţi
panoul LCD de praf sau de o picătură de apă, deconectaţi cablul de alimentare din priză şi abia apoi
ştergeţi receptorul cu o cârpă uscată şi moale. În timpul furtunelor cu tunete şi fulgere deconectaţi
cablul de alimentare şi cablu antenei pentru a preveni defectarea televizorului. Toate receptoarele
de televiziune sunt instrumente de înaltă tensiune. Toate reparaţiile de componente din interiorul
receptorului ar trebui să fie efectuate doar de către personal specializat.
Dacă din motive necunoscute aparatul nu funcţionează corect, vă rugăm să-l deconectaţi de la sursa
de energie şi să-l reporniţi.
Instrucţiuni importante de siguranţă AVERTISMENT: PENTRU A REDUCE RISCUL DE ELECTROCUTARE NU ÎNLĂTURAŢI
CAPACUL. ÎN INTERIOR NU EXISTĂ COMPONENTE CE POT FI REPARATE DE
UTILIZATOR. APELAŢI LA PERSONAL CALIFICAT.
Acest simbol avertizează în privinţa unor tensiuni periculoase în aparat care sunt
suficient de puternice pentru a provoca electrocutarea.
Acest semn indică utilizatorului prezenţa unor importante operaţiuni şi instrucţiuni
speciale de intreţinere.
AVERTISMENT: PENTRU A REDUCE RISCUL DE ELECTROCUTARE NU EXPUNEŢI
ACEST APARAT LA PLOIE SAU UMEZEALĂ, IAR OBIECTE UMPLUTE CU APĂ,
PRECUM VASE, NU TREBUIE PLASATE PE APARAT.
Avertismente şi precauţiuni
Atenţie!
Nu aruncaţi sau împingeţi obiecte în sloturile sau deschiderile aparatului.
Nu vărsaţi lichide pe receptorul televizorului.
Atenţie!
Nu introduceţi nimic în orificille de ventilaţie. Pătrunderea de obiecte
metalice sau inflamabile poate conduce la incendiu sau şocuri electrice.
Atenţie!
Nu plasaţi obiecte pe această unitate, suprafaţa ecranului se putea deteriora.
Atenţie!
Nu striviţi cablul sursei de tensiune sub aparat.
Atenţie! Nu aruncaţi nimic spre set. Ecranul de sticlă poate exploda la impact şi poate provoca
răni grave. Atenţie! Nu vă aşezaţi sau rezemaţi de aparat sau împingeţi brusc televizorul de pe suport.
Acordaţi o atenţie sporită copiilor. Căderea aparatului poate provoca la răni grave. Atenţie!
Nu poziţionaţi aparatul pe suporturi instabile. Televizorul se poate deteriora dacă
este trântit şi poate provoca răni serioase.
Atenţie!
Când aparatul nu este folosit pentru o perioadă îndelungată de timp,
este recomandat să se deconecteze cabul de alimentare de la priză.
Avertismente şi precauţiuni
Atenţie!
Nu blocaţi orificiile de ventilaţie din spatele aparatului.
Ventilaţia adecvată este esenţială pentru a preveni defectarea
componentelor electrice.
Atenţie! Evitaţi expunerea aparatului la lumina directă a soarelui şi a
altor surse de căldură. Nu aşezaţi aparatul direct pe alte
produse ce pot emite căldură. Nu aşezaţi pe televizor produse de
iluminat ce ard, precum candela. Nu expuneţi ecranul LCD la lumina
solară, suprafaţa ecranului
s-ar putea deteriora.
Atenţie!
Aveţi grijă să nu conectaţi mai multe aparate la aceeaşi
priză deoarece acest lucru ar putea conduce la incendiu sau şoc electric.
Atenţie!
Modul de funcţionare al acestui aparat presupune tensiuni
înalte. Nu îndepărtaţi capacul din spatele setului. Apelaţi la personal
calificat.
Atenţie!
Pentru a preveni pericolul de incendiu sau de şocuri
electrice, nu expuneţi aparatul la ploaie sau umiditate.
Atenţie!
Pentru propria siguranţă, nu atingeţi principalele cabluri în timpul
furtunilor
cu descărcări electrice.
Avertisment!
Dacă aparatul este poziţionat în înteriorul unui
compartiment sau în mod similar într-un spaţiu închis,
distanţele minime trebuie respectate. Acumularea treptată a
căldurii poate reduce durata de viaţă a produsului şi poate fi,
deasemenea, periculoasă.
Setări
Instalarea bateriilor în telecomandă.
Este nevoie de 2 baterii AAA(livrate).
Procedură
1. Poziţionaţi telecomanda cu faţa în jos. Scoateţi capacul bateriei
prin apăsarea în jos pe marcajul de pe capac şi glisaţi-l în direcţia
indicată.
2. Instalaţi bateriile astfel încât polaritatea să fie cea corectă.
3. Repoziţionaţi capacul bateriei prin glisare în sens invers până
când dispozitivul de blocare pocneşte.
Notă: Instalarea incorectă a acumulatorilor poate provoca scurgerea bateriilor sau coroziune, iar
acestea pot deteriora telecomanda.
4. Dacă aţi provocat o descărcare statică la atingerea unităţii, iar unitatea nu mai funcţioneză, pur
şi simplu deconectaţi aparatul de la priza de curent, aşteptaţi câteva minute şi reconectaţi-o.
Aparatul ar trebui să funcţioneze din nou în mod normal.
Corosiunea, oxidarea, scurgerea bateriilor sau alte defecte de acest tip duc la anularea garanţiei.
Părţi funcţionale
Vedere frontală a ecranului LCD
1. Butonul Standby
2. Buton Sursa
3. Buton MENU
4. Buton P+
5. Buton P6. Button V+
7. Button V NOTA: Dacă aparatul nu are semnal de intrare şi nu
se efectuează nici o operaţiune timp de aproximativ
5 minute, aparatul va intra în modul de aşteptare.
Pentru alte intrări decât TV, televizorul nu va intra
în modul de aşteptare în mod automat, fără
instrucţiuni din partea utilizatorului. Dacă aparatul
nu este folosit pentru o perioadă îndelungată, opriţi
setul şi deconectaţi de la priză.
Pentru pornirea televizorului
Poziţionaţi televizorul pe locul dorit, apoi conectaţi cablul DC al adaptorului AC-DC la mufa DC
12V din partea stânga a aparatului. Conectaţi cablul principal al adaptorului la priza de perete;
indicatorul LED de lampă va deveni roşu, iar televizorul va fi în modul de aşteptare/modul de
lucru. În modul de aşteptare, dacă este apăsat butonul de aşteptare(Standby), indicatorul de
alimentare îşi va modifica culoarea la verde. Este nevoie de câteva secunde înainte ca imaginea să
apară pe ecran.
Pentru a stinge televizorul
Apăsaţi pe butonul de aşteptare(Standby) pentru a trece televizorul în modul de aşteptare, apoi
deconectaţi de la priză.
Odata introdus discul în slotul DVD player-ul îl va reţine în interior, si sursa curenta va fi
schimbata automat in DVD.
Notă:
1. Nu ataşaţi nici un sigiliu sau etichetă pe disc(pe partea înregistrată sau pe partea etichetată).
2. Nu folosiţi CD-uri cu forme neregulate(de exemplu, octogonale) deoarece acestea pot produce
defecţiunilor.
3. Anumite operaţiuni de derulare a CD-urilor video şi DVD-urilor pot fi programate de către
producătorii software. Această unitate redă CD-uri video şi DVD-uri în funcţie de conţinutul
discului conceput de producătorul software, prin urmare unele functii de redare pot să nu fie
disponibile sau alte funcţii pot fi adăugate.
Vedere laterală a ecranului LCD NOTĂ:
Atenţie la conectarea cu alte echipamente
Când se foloseşte un echipament extern cu acest televizor, vă rugăm să citiţi manualele de
instrucţiuni ale echipamentelor externe.
Opriţi toate surse de alimentare la echipament şi la TV înainte de conectare.
Întotdeauna asigurăţi-vă că toate terminalele de intrare şi ieşire sunt corect conectate.
Telecomanda Butonul POWER ON/STANDBY
Apăsaţi acest buton pentru a aprinde televizorul (dacă
aparatul este în modul aşteptare) sau de a trece aparatul în
modul de aşteptare.
Butonul MUTE
Apăsaţi acest buton pentru a opri sau reda sunetul.
Butonul P.P
Apăsaţi acest buton pentru a selecta modulul dorit de
imagine: NORMAL/SOFT/RICH/CUSTOM.
Butonul DISPLAY
Apăsaţi acest buton pentru a afişa setările pe ecran.
Butonul SLEEP
Apăsaţi acest buton pentru a seta cronometrul de, în ordinea
prezentată mai jos(minute):
0 - 15 - 30 - 45 – 60 – 120
În cazul în care durata de timp prestabilită a trecut, aparatul
va intra în modul de aşteptare.
Butonul SOURCE
După apăsarea butonului SOURCE
meniul va fi afişat în partea dreapta a
ecranului, sus; apăsaţi PROG+/- pentru
a selecta sursa AV, apoi apăsaţi VOL+/pentru a intra în modul AV.
Butonul DIGIT(0-9)
Acest televizor vă permite să selectaţi canale de la 0 la 254.
Apăsaţi acest buton pentru a selecta canale din una, două
sau trei cifre. Pentru a selecta un canal dintr-o singură
cifră(de exemplu, Canalul 8), apăsaţi butonul -/-- pentru a
schimba canalul de selecţie de pe ecran la - şi apăsaţi o
singură dată butonul 8.
Pentru a selecta un canal din două cifre(de exemplu, Canal
28), apăsaţi butonul -/-- pentru a schimba canalul de selecţie
de pe ecran la -- şi apăsaţi butoanele 2 şi 8. Pentru a selecta
un canal de trei cifre(de exemplu, Canal 128) apăsaţi
butonul -/-- pentru a schimba canalul de selecţie afişat pe
ecran la --- şi apăsaţi butoanele 1, 2 şi 8.
Telecomanda Butonul MENU
Apăsaţi acest buton pentru a accesa meniul de setări şi
adjustări.
Butonul PROG +/Apăsaţi butonul PROG + pentru a selecta programul
următor. Apăsaţi butonul PROG- pentru a selecta
programul anterior.
Butonul VOL+/Apăsaţi butonul VOL+/- pentru adjustarea nivelului sonor.
Butonul Q VIEW
Apăsaţi acest buton pentru a reveni la programul anterior
vizionat.
Butonul SWAP
Puteţi ordona lista dumneavoastră de programe apăsând
butonul SWAP. Meniul SWAP va fi afişat pe ecran ca în
imaginea de mai jos (ex. Pentru a interschimba programele
0 şi 7, apăsaţi butonul SWAP, apăsaţi PROG+/- pentru a
selecta FROM şi apăsaţi VOL+/- pentru a seta valoarea 0,
ulterior în mod asemănător selectaţi TO şi setaţi valoarea
7, la final selectaţi SAVE şi apăsaţi VOL+/- pentru a salva
modificările)
ASPECT
Selectarea modului de afişaj: 16:9, 4:3, ZOOM, 16:9FS,
PANORAMA
Butonul S.M. :
Apasati acest buton pentru a selecta unul din modurile
audio:
NORMAL/NEWS/MUSIC/CUSTOM
Telecomanda – TELETEXT
Doar pentru modelele cu funcţionalitate Teletext
Butonul TEXT
Apăsaţi acest buton pentru a accesa sau a părăsi
modul teletext.
Butonul INDEX
Apăsaţi acest buton pentru a accesa pagina de
pornire.
Butonul REVEAL
Apăsaţi acest buton pentru a afişa informaţiile
ascunse dintr-o pagină teletext (ex. ghicitori,
anagrame). Apăsaţi din nou pentru a ascunde
aceste informaţii.
Butonulul MIX
Apăsaţi acest buton pentru a accesa , modul mixt.
(pentru a vedea ştirile , vă rugăm folosiţi acest
mod). Apăsaţi din nou pentru a anula modul mixt.
Butonul SIZE
Apăsaţi acest buton pentru a selecta modul de
afişare al paginii teletext:
- prima jumătate a ecranului mărită
- a doua jumătate a ecranului mărită
- afişaj normal
Butonul STOP
Apăsaţi acest buton pentru a bloca pagina teletext şi a
opri schimbarea acesteia. Apăsaţi din nou pentru a
debloca.
SUB PAGE(Opţional)
Apăsaţi acest buton pentru a afişa subpagina.
Butoanele fara inscriptie:
Nu au nici o functie
e
Telecomanda - Modul DVD
POWER
Apăsaţi pentru a porni/opri televizorul.
Butonul OPEN/CLOSE
Apăsaţi butonul OPEN/CLOSE pentru a încărca un DVD în
aparat. Ţineţi discul fără a-i atinge suprafaţa, poziţionaţi-l
cu partea printată în sus, fixaţi-l conform. În cazul în care
introduceţi un DVD cu posibilitate de control a redarii, un
meniu va fi afişat pe ecran.
Buton DVD MENU
Dacă redaţi un DVD cu meniu, apăsaţi acest buton pentru a
afişa meniul principal al discului.
Butonul PROGRAM
Selectaţi un titlu din listă.
Apăsaţi butonul PROGRAM, apoi acesta va fi afişat pe
ecran. Ulterior, puteţi naviga şi apăsaţi butonul ENTER
pentru a selecta opţiunea de START.
Butonul SUBTITLE
Apăsaţi acest buton pentru a putea schimba limba subtitrării
pentru un disc.
Buton DVD SETUP
Setările pentru DVD.
Butonul AUDIO
Apăsaţi acest buton pentru a schimba limba vorbită pe disc,
dacă acest lucru este pus la dispoziţie de disc.
Butonul GOTO
Apăsaţi acest buton pentru a merge direct la poziţia dorită.
Aparatul oferă 3 moduri de căutare. În partea de sus a
ecranului veţi putea introduce numărul dorit. Nu vor fi luate
în considerare numere ce depăşesc limitele oferite.
Butonul DISPLAY
Pentru afişajul pe ecran.
)
Butonul PREV/NEXT(
Apăsaţi aceste butoane pentru a accesa capitolul
precedent/următor de pe DVD.
)
Butonul FR/FF(
Aceste butoane permit derularea rapidă înainte sau înapoi
folosind 5 nivele de intensitate. Apăsaţi butonul PLAY
pentru a reveni la redarea normală.
Telecomanda - Modul DVD
Butonul REPEAT
Apăsaţi acest buton pentru a reda în mod repetat un titlu (de
pe DVD) sau toate melodiile (de pe CD) atunci când
opţiunea ALL apare pe TV. Puteţi reda în mod repetat un
capitlor (DVD) sau o singura melodie (CD) atunci cand
‘Repeat chapter’ apare pe ecranul TV. Puteţi anula funcţia
de repetare cand ‘Repeat off’ apare pe ecranul TV.
Butonul PLAY/PAUSE
Apăsaţi acest buton pentru a porni redarea. Apăsaţi acet
buton din nou pentru a pune pauză redării.
Butonul STOP
Apăsând acest buton o dată, aparatul reţine poziţia unde a
fost oprită redarea şi va relua din acelaşi moment, dacă se
va apăsa butonul PLAY. Dacă butonul STOP este apăsat
pentru a doua oară, reluarea conţinutului se va face de la
început.
Butonul TITLE
Apăsaţi butonul TITLE şi veţi accesa meniul discului.
Folosiţi butoanele direcţionale şi butonul ENTER pentru a
alege opţiunile dorite.
Butonul ZOOM
1. Apăsaţi ZOOM în timpul redării sau în timpul pauzei de
redare pentru a activa funcţionalitatea Zoom. Va apărea un
pătrat de mărire în colţul dreapta jos al imaginii.
2. Fiecare apăsare a butonului ZOOM schimbă afişajul în
următoarle secvenţe:
2X mărime – 3X mărime – 4X mărime – ½ mărime – 1/3
mărime – ¼ size - mărime normală
pentru a naviga prin
3. Folosiţi butoanele direcţionale
imaginea mărită.
4. Pentru a reveni la redarea normală, apăsaţi butonul
ZOOM până se revine la mărimea normală.
Notă: Această funcţionalitate este posibil să nu fie activă pe
unele discuri DVD.
Butonul ANGLE
Dacă discul conţine scene înregistrate din unghiuri diferite,
puteţi schimba unghiul de redare apăsând acest buton.
Apăsaţi butonul ANGLE în mod repetat pentru a selecta
unghiul dorit. Numărul unghiului curent va fi afişat pe
ecran.
Notă: Indicatorul va fi afişat intermitent dacă schimbarea
unghiurilor nu este posibilă
Butonul SLOW
Apăsaţi butonul în timpul redării pentru a activa această
funcţionalitate. Fiecare apăsare va afişa: ½ - ¼ - 1/8 -1/16 –
redare normală.
Ecranele meniului
Acest aparat TV vă permite adjustarea setărilor din meniul de setări folosind butoanele MENU,
VOL+/- şi PROG+/-.
Apăsaţi butonul MENU pentru a afişa meniul, apăsaţi PROG+/- pentru a naviga, VOL+/- pentru
adjustarea setărilor itemurilor alese.
Apăsaţi butonul MENU din nou pentru a ieşi din meniu.
MENIU IMAGINE
Puteţi regla contrastul, luminozitatea, nuanţa (numai pentru NTSC), culoarea sau claritatea.
COLOUR TEMP: NORMAL/WARM/COOL
PICTURE MODE: NORMAL/SOFT/DINAMIC/CUSTOM
ASPECT: 16:9/4:3/ZOOM/16:9FS/PANORAMA
MENIU REGLAJ
AUTO SCAN: Apăsaţi VOL+/- pentru a începe căutarea automată a programelor, apăsaţi MENU
pentru a părăsi căutarea automată.
MANUAL: Pentru căutarea manuală a posturilor.
CHANNEL: Numărul reprezintă canalul curent. Puteţi de
asemenea să interschimbaţi canale.
COLOUR SYS. AUTO/PAL/SECAM (opţional)
SOUND SYS. B/G, D/K, I, L, L (opţional)
SKIP: Setaţi această opţiune pentru a sări peste postul
vizionat.
Fine Tune: Pentru căutare fină, folosind butoaneleVOL+/ MENIU SUNET
Accesaţi meniul de sunet. Aici puteţi regla:
BASS/INALTE/BALANS;
MOD SUNET: NORMAL/NEWS/MUSIC/ CUSTOM
MENIUL DE SETĂRI
TXT LANGUAGE.Puteţi alege fontul pentru
teletext dintre AUTO, WEST, RUSSIAN, ARABIC şi FARSI.
REDUCERE ZGOMOT: Puteti selecta filtru de zgomot ON/OFF.
ECRAN ALBASTRU: Puteti selecta fundal alabastru ON/OFF.
ASPECT: Puteţi seta modul de afişare al imaginii 16:9, 4:3, ZOOM,16:9FS, PANORAMA.
MENIUL OSD
Aveţi posibilitatea să alegeţi limba, să reglaţi poziţia-H, poziţia-V, durata şi halftone.
MENIUL PC(numai în modul PC)
Aveţi posibilitatea de a ajusta contrastul, luminozitatea.
HPOS/VPOS :Apăsaţi butoanele Vol+/- pentru a regla poziţia imaginii pe orizontală şi pe
verticală.
Ceas: Apăsaţi butoanele Vol+/- pentru a minimiza orice bare verticale sau dungi vizibile în fundal.
PHASE: Când este necesar, a regla pixel etapă a imagine, pentru a evita interferenţe imagine.
AUTO CONFIG: Pentru a regla poziţa ecranului în mod automat. Această operaţiune va dura
câteva secunde şi în timpul procesului ecranul va fi negru.
COLOUR TEMP: Pentru ajustarea modului color temp pentru PC.
NOTĂ:
În cazul în care aparatul este rece, este posibil să existe o mică scânteiere în momentul în care este
pornit. Este normal, nu este nimic în neregulă cu aparatul.
Dacă este posibil, utilizaţi modul video VESA 1024X768@60Hz pentru a obţine cea mai bună
calitate a imaginii pentru monitorul LCD.
Unele puncte pot apărea pe ecran, de exemplu puncte roşii, puncte verzi sau puncte albastre. Cu
toate acestea, performanţa monitorului nu va avea de suferit.
Nu apăsaţi pe ecranul LCD cu degetul pentru o perioadă îndelungată de timp deoarece ecranul se
poate deteriora.
Setăriiniţiale(DVD)
Proceduri generale ale setărilor iniţiale
Apăsaţi butonul DVD SETUP pentru a accesa meniul
Setup.
Folosiţi butoanele direcţionale "
" pentru a
selecta postul preferat. După finalizarea setărilor,
apăsaţi din nou pe butonul DVD SETUP.
Următoarele elemente ale meniului pot fi modificate:
GENERAL: selectează meniul GENERAL PAGE.
AUDIO:selectează meniul audio.
DOLBY: selectează meniul DOLBY DIGITAL.
VIDEO: selecteaza meniul VIDEO SETUP PAGE
PREFERENCE: selectează meniul PREFERENCE
PAGE.
Următoarele elemente ale meniului pot fi modificate:
TV DISPLAY: selectează aspect ratio-ul de redare al
fotografiei.
NORMAL/PS: afişare pan şi scanare.
NORMAL/LB: afişare letterbox.
WIDE: afişare widescreen.
ANGLE MARK: vizualizare opţiuni unghiuri(dacă
este cazul).
SCREEN SAVER: opţiuni de activare/dezactivare
pentru screen saver.
Această pagină este pentru configurarea boxelor de
ieşire.
DOWNMIX Stereo
LT/RT: 2ch ieşire, canalul principal cu surround.
STEREO: 2ch ieşire, principalul canal dreapta cu
surround dreapta; principalul canal stânga cu surround
stânga.
Următoarele elemente ale meniului pot fi modificate:
DUAL MONO: Modul Multiplicare, utilizat numai în
cazul în care intrarea este alcătuită din două canale
audio independente(modul 1/1).
Selecţiile posibile sunt:
STEREO: Reproduce ambele canale, aşa cum sunt.
L-MONO: Reproduce numai canalul stânga.
R-MONO: Reproduce numai canalul dreapta.
Implicit este STEREO.
DINAMIC: Intervalul dinamic de comprimare.
Următoarele elemente ale meniului pot fi modificate:
Sharpness: valoarea clarităţii.
Brightness: valoarea luminozităţii.
Contrast: valoarea contrastului.
Setăriiniţiale(DVD)
Următoarele elemente de meniu pot fi modificate:
AUDIO: Selectează o limbă pentru audio(dacă este cazul).
SUBTITLE: Selectează o limbă pentru subtitrări(dacă este cazul).
DISC MENU: Selectează o limbă pentru meniurile discului(dacă este cazul).
PARENTAL [disponibil numai pentru DVD]: Posibilitatea de a dezactiva redarea DVD-urilor cu
conţinut nepotrivit pentru copii. Unele DVD-uri sunt codificate cu un nivel specific de rating. În
cazul în care nivelul de rating al discului este mai mare decât cel prestabilit în setup-ul de
funcţionare, redarea discului va fi interzisă. După selectarea elementului PARENTAL, pe ecran va
apărea o pagină ce necesită o parolă. Parola iniţială din fabrică este 1369.
PASSWORD: Selectează meniul PASSWORD CHANGE PAGE.
Pagina de modificare a parolei
OLD PASSWORD: introduceţi vechea parolă(parola din fabrică este 1369) şi cursorul va trece în
mod automat la NEW PASSWORD.
NEW PASSWORD: introduceţi noua parolă. Introduceţi 4 cifre din telecomandă folosind
butoanele numerice, iar cursorul va sări în mod automat la CONFIRM PASSWORD.
CONFIRM PASSWORD: Confirmaţi noua parolă, introducând-o din nou. În cazul în care
confirmarea este incorect, cursorul va rămâne în această coloană. După introducerea corectă a noii
parole, cursorul va sări automat la OK.
OK: Când cursorul este pe acest buton, apăsaţi tasta ENTER pentru a confirma setarea.
DEFAULT: Înapoi la setările din fabrică.
Sfaturidedepanare
Înainte de a suna pentru asistenţă, puteţi verifica următoarele soluţii:
Nu este imagine:
Schimbaţi canalul, poate este o problemă a postului.
Ajustaţi indicatorul de control.
Asiguraţi-vă că setarea de intrare este configurată pe opţiunea TV.
Asiguraţi-vă că televizorul este pornit.
Asiguraţi-vă că echipamentul este conectat corect.
Fară sunet şi sunet distorsionat:
Asiguraţi-vă că setările de intrare pentru TV şi sunet sunt corecte.
Ajustaţi indicatorul de control.
Posibile interferenţe locale, cum ar fi un aparat.
Reorientaţi antena(dacă este de tip interior).
Asigurati-vă că echipamentul este conectat corect.
Probleme cu telecomanda:
Verificaţi dacă bateriile sunt conectate cu polarităţile corespunzătoare.
Îndreptaţi telecomanda către senzorul de control de la distanţă şi apăsaţi un buton.
Îndepărtaţi obstacolele dintre telecomandă şi senzorul de control.
Folosiţi telecomanda la o distanţă mai mică de 8 metri de senzorul de control.
Sfaturi de depanare(modul PC)
Mesajul NO SIGNAL afişat:
Verificaţi dacă firele sunt conectate corect.
Mesajul UNSUPPORTED afişat:
Verificaţi dacă setarea de intrare este compatibilă cu cea de pe specificaţiile monitorului.
Verificaţi dacă firele sunt conectate corect.
Ledul indicator este aprins dar nu este afişată nici o imagine:
Verificaţi setările monitorului: contrast, luminozitate.
Verificaţi dacă firele sunt conectate corect.
Apar puncte neobisnuite pe ecran:
Anumite puncte pot apărea pe ecran, cum ar fi puncte roşii, verzi sau albastre; totuşi ,acestea nu au
nici un impact sau efect asupra performanţelor monitorului.
Cauzeleinterferenţelor
În cadrul receptorului TV sunt integrate cele mai noi dispozitive pentru eliminarea
interferenţelor. Cu toate acestea, radiaţiile locale pot perturba vizibilitatea imaginii.
Instalare corectă şi buna aerisire sunt condiţiile dumneavoastră de siguranţă împotriva
acestor perturbări.
INTERFERENŢE RF
Apariţia undelor pe ecran sunt cauzate de transmiterea sau primirea de unde scurte de
la echipamentele radio din apropiere.
DIATERMIE
Herringbone model şi pierderea parţială a imaginii poate rezulta din modul de
funcţionare al echipamentelor de la diatermie din apropierea unui cabinet medical sau
spital.
ZĂPADA
Semnalele TV slabe provenite de la staţiile de la distanţă au ca rezultat o imagine cu un
efect asemănător căderii de zăpadă. O antenă de ajustare sau un amplificator pot fi
necesare.
FANTOMĂ
Multiple imagini cauzate de semnale TV reflectate de clădiri, dealuri, aeronave etc.
Aceste efecte sunt minimizate prin poziţionarea aerienă corectă.
PORNIREA AUTOTURISMELOR
Pornirea de autoturisme şi motoare electrice poate provoca mici unde dincolo de
imagine sau balansarea imaginii.
AKAI
Reciclarea echipamentelor electrice şi electronice uzate:
Acest simbol prezent pe produs sau pe ambalaj semnifică
faptul că produsul respectiv nu trebuie tratat ca un deşeu
menajer obişnuit. Nu aruncaţi aparatul la gunoiul menajer
la sfârşitul duratei de funcţionare, ci duceţi-l la un centru de
colectare autorizat pentru reciclare. În acest fel veţi ajuta la
protejarea mediului înconjurător şi veţi putea împiedica
eventualele consecinţe negative pe care le-ar avea asupra
mediului şi sănătăţii umane.
Pentru a afla adresa celui mai apropiat centru de colectare:
Contactaţi autorităţile locale;
Accesaţi pagina de internet: www.mmediu.ro ;
Solicitaţi informaţii suplimentare de la magazinul de unde aţi
achiziţionat produsul.
ALD 1910
19" TFT LCD TV+DVD COMBO
Operating Instructions
,
PAL/SECAM B/G,D/K, I, L/L , (Optional)
AC 110-240V 50/60Hz
SCART IN, PC IN
TELETEXT
NTSC PLAYBACK
INSIDE DVD
SUPPORT FORMAT: SVCD, VCD, WMA, HDCD,
KODAK PICTURE CD, DVD
MPEG4
TABLE OF CONTENTS
Table of Contents
1
Inital Settings(DVD)
Specifications
2
Troubleshooting Tips
17
Installation
3
The Causes of interference
18
Warnings and Cautions
4-5
Setup
6
Functional Parts(TV)
6
Functional Parts(DVD)
7
Rear view of TV set
7
Remote Control unit
TELETEXT Operations
15-16
8-9
10
Remote Control Operation(DVD)
11-12
MENU Screens
13-14
1
SPECIFICATIONS
Receiving System:
Colour System:
LCD Panel:
Ext.Antenna:
Ext. In/Out:
,
B/G,D/K,l,L/L , (Optional)
PAL,SECAM,(optional)
482.6mm(19 inch) diagonal
75 Ohm Coaxial Cable
HDMI,YPbPr,AV,PC Input, SCART IN,Earphone
Speaker:
8 Ohm
Audio Output:
3W x 2
Power consumption:
Standby power consumption:
Power Supply:
40W
1W
AC 110-240V 50/60Hz
Dimension:
W460 x D170 X H380(mm)
Net Weight:
5.25KG
Note:Design and specifications are subject to change without prior notice.
OPEN/CLOSE
POWER
P.P
REMOTE CONTROL
Q.
VIEW
-/--
Transmitting System :Infrared
MUTE
Power Supply
:DC 3V
SWAP
REPEAT
SOURCE
PROG+
VOL-
ASPECT
MENU
PROG-
REVEAL
SIZE
INDEX
TEXT
ANGLE
SLOW
STOP
VOL+
S.M
MIX
SUB.PAGE
TITLE
ZOOM
PROGRAM SUBTITLE
DVD MENU
AUDIO
ENTER
DVD SETUP
2
GOTO
DISPLAY
INSTALLATION
Thank you very much for your purchase of this product, the most natural Colour Television Receiver.
To enjoy your set to the full from the very beginning, read this manual carefully and keep it handy for ready
reference.
INSTALLATION
Locate the receiver in the room where direct light does not strike the screen.
Total darkness or a reflection on the picture screen can cause eyestrain. Soft and indirect lighting is
recommended for comfortable viewing.
Allow enough space between the receiver and the wall to permit ventilation.
Avoid excessively warm locations to prevent possible damage to the cabinet or premature component
failure.
This TV operates on a DC supply provided by the AC-DC adaptor. The voltage is as Indicated on the label
on the back cover.Only use the AC-DC adaptor supplied with the TV and never apply an AC mains to the TV
directly. The AC-DC adaptor operates on and AC mains supply, the voltage is as indicated on the label of
the AC-DC adaptor. Connect the DC plug of the AC-DC adaptor to the DC 12V socket at the back of the TV.
Connect the AC-DC adaptor and its mains cord. Insert the mains plug in the wall socket having a mains
voltage of 110-240V.
Do not install the receiver in a location near heat sources such as radiator, air ducts, direct sunlight ,or
in a place somewhere like close compartment and close area.
Do not cover the ventilation openings when using the set.
CAUTION
Never tamper with any components inside your set, or any other adjustment controls not mentioned in
this manual. The LCD panel used in this product is made of glass. Therefore,it can break When the product
is dropped or applied with impact. Be careful not to be injured by broken glass pieces in case the LCD panel
breaks.When you clean up dust or stick of a water drop on the LCD panel. The power cord should be pulled
out from the plug receptacle, then wipe the receiver with dried soft cloth .During thunder and lighting ,
unplug the power cord and antenna cord to prevent your TV set from damage. All television receivers are
high voltage instruments. All "inside work" on your receiver should be performed only by the TV service
personnel.
If some abnormal phenomena happens , may be you have some mis-opertion,please take off power and
restart your TV set .
IMPORTANT SAFETY INSTRUCTION
WARNING
RISK OF ELECTRIC SHOCK
DO NOT OPEN
WARNING: TO REDUCE THE RISK OF ELECTRIC SHOCK DO NOT
REMOVE COVER OR BACK. NO USER-SERVICEABLE PARTS INSIDE.
REFER SERVICING TO QUALIFIED SERVICE PERSONNEL.
The lighting flash with arrow head within a triangle is intended to tell the user that
parts inside the product are a risk of electric shock to persons.
The exclamation point within a triangle is intended to tell the user that important
operating and servicing instructions are in the papers with the appliance.
WARNING: TO REDUCE
THE RISK OF ELECTRIC SHOCK DO NOT EXPOSE THIS
APPARATUS TO RAIN OR MOISTURE AND OBJECTS FILLED WITH LIQUIDS,
SUCH AS VASES, SHOULD NOT BE PLACED ON THIS APPARATUS.
3
WARNINGS AND CAUTIONS
Caution
Do not drop or push objects into the television
cabinet slots or openings. Never spill any kind
of liquid on the television receiver.
Caution
Do not insert anything in the ventilation holes. If
metal or something flammable enters, it may result in
fire or electric shock.
Caution
Caution
Do not squash power supply cord under the
television receiver.
Do not place objects on this unit, it
may damage the screen surface.
Caution
Caution
Do not throw anything at the set. The screen glass
may explode by impact and cause serious injury.
Never stand on, lean on, or suddenly push the
television or its stand. You should pay special
attention to children. Serious injury may result if it
should fall.
Caution
Do not place your television on an unstable
cart , stand , shelf or table. Serious injury to
an individual, and damage to the television,
may result if it should fall.
4
Caution
When the television receiver is not used for an
extended period of time, it is advisable to disconnect
the AC power cord from the AC outlet .
WARNINGS AND CAUTIONS
Caution
Do not block the ventilation holes in the back
cover. Adequate ventilation is essential to
prevent failure of electrical component.
Warning
Avoid exposing the television receiver to direct
sunlight and other source of the heat. Do not stand
the television receiver directly on other produces
which give off heat .E.g.video cassette players.
Audio amplifiers. Do not place naked flame sources,
such as lighted candle on the television. Do not
expose the LCD screen surface to the sun, it may
damage the screen surface.
Warning
Take care not to connect many appliances to the
same mains socket as this could result in fire or
electric shock.
Warning
Warning
To prevent fire or electrical shock hazard, Do not
expose the television receiver to rain or moisture.
Caution
High voltages are used in the operation of this
television receiver.Do not remove the cabinet
back from your set. Refer servicing to qualified
service personnel.
Warning
If the television is to be built into a Compartment or
similarly enclosed, the minimum distances must be For you own safety, Do not touch any part of the set,
main lead or aerial lead during lighting storms.
maintained. Heat build-up can reduce the service
life of your television, and can also be dangerous.
5
¼ò ½é
SETUP
Remote Control Battery Installation
Requires two AAA batteries(supplied).
Procedure
1. Turn the remote control face down. Remove battery cover by pressing down on the marking on the
cover and sliding it off in the direction indicated.
2. Install batteries matching(+) and(-) polarity signs.
3. Replace the battery cover by sliding in reverse until the lock snaps.
Note: Incorrect installation can cause battery leakage and corrosion that will damage the Remote control.
Precautions
Replace batteries in pair.
Do not mix battery types(zinc carbon with alkaline).
Do not recharge, heat, short-circuit, disassemble, or burn batteries.
4. If you cause a static discharge when touching the unit, and the unit fails to function, simply unplug the
unit from the AC outlet, wait a few minutes, and plug it back in. The unit should return to normal operation.
FUNCTIONAL PARTS(TV)
Front View of LCD Set
7 6 5 4 3 2 1
V-
V+
P-
P+ MENU SOURCE STANDBY
1. Standby Button
2.
3.
4.
5.
6.
7.
8.
9.
8
9
SOURCE Button
MENU Button
P+ Button
P- Button
V+Button
V- Button
Remote sensor
LED indicator
NOTE
If TV is the selected input without
signal received and NO operation
is performed for about 5 minutes
continuously, the TV set will enter
standby mode. For any inputs other
than TV, the TV set will not enter
standby mode automatically without
users instruction. If you are not
going to use this TV set for a long
time, switch off the set and
disconnect the power plug from
the wall outlet.
To turn the TV power ON
Put the TV set on the correct place, then connect the DC plug of the AC-DC adaptor to the DC 12V socket
at the back of the TV set. Connect the adaptor main cord to the wall outlet ,then the LED indicator lamp
turns red/green and the TV set is at Standby/work Mode. At Standby Mode, if Standby Button is pressed
the power indicator will change to green. It takes a few seconds before the picture appears.
To turn the TV power OFF
Press the Standby Button to make the TV set in Standby Mode, then disconnect the power plug from the
wall outlet.
6
FUNCTIONAL PARTS(DVD)
3
2
4
1
1. DVD Slot
2. Open/Close
3. Stop
4. Play/Pause
Once you insert the disk to DVDslot, the player will suck it in, and the current source will be switched
to DVD status automatically.
Notes:
1.Do not attach any seal or label to either side (the labeled side or the recorded side) of a disc.
2.Do not use irregularly shaped CDs (e.g., Heartshaped or octagonal)since they may result in
malfunctions.
3.Some playback operations of DVDs and Video CDs may be intentionally programmed by software
manufacturers. This unit plays DVDS and Video CDs according to disc content designed by the
software manufacturer, therefore some playback features may not be available or other functions
may be added.
REAR VIEW OF TV SET
TO DC IN 12V
TO POWER SOURCE
ANT.
PC-A IN
SCART
Y
Pb
Pr
VIDEO
L
R
VGA
HDMI
DC-12V
NOTE
Precautions when connecting to other equipment
When using external equipment with this TV set, please read the instruction manual of the external equipment.
Switch off all power supplies to the equipment and TV set before connection.
Always ensure that the input and output terminals are correctly connected.
7
REMOTE CONTROL UNIT
OPEN/CLOSE
POWER
P.P
POWER ON/STANDBY button
Press this button to switch on the TV when at standby mode or enter
standby mode.
MUTE button
Press this button to mute or restore sound.
P.P
P.P Button
Press this button to select the desired picture mode:
NORMAL/SOFT/DYNAMIC/CUSTOM
DISPLAY Button
Press this button to display the setting on the screen.
Q.
VIEW
-/--
SWAP
SLEEP Button
Press this button to set the sleep timer, the order
shown below(minutes):
REPEAT
OFF - 15 - 30 - 45 - 60-120
MUTE
SOURCE
When the preset length of time has passed, the TV set
enters standby mode.
PROG+
VOL-
ASPECT
MENU
PROG-
REVEAL
SIZE
INDEX
TEXT
ANGLE
SLOW
STOP
VOL+
S.M
MIX
SUB.PAGE
TITLE
AUDIO
ENTER
DVD SETUP
8
GOTO
TV
AV
DVD
YPBPR
PC
HDMI
SCART
ZOOM
PROGRAM SUBTITLE
DVD MENU
SOURCE Button
Press ¡°SOURCE¡± button,there will be some word show on the right
top of the screen, press ¡°PROG+/-¡± to select the AV source, and then
press ¡°VOL+/-¡±to enter AV mode.
DISPLAY
DIGIT Button(0-9)
This TV allows you to select channels from 1 to 254.
Press this button to select one-digit,two digit or three -digital channels
input options.
To select a one-digit channel(e.g. Channel 8),press this ¡°-/--¡±button
to change channel selection to ¡°-¡±on screen display and press the
¡°8¡±button only.
To select a two-digit channel(e.g. Channel 28),press this ¡°-/--¡±button
to change channel selection to ¡°--¡±on screen display and press¡°2¡±
and ¡°8 ¡± buttons. To select a three-digit channel(e.g. Channel 128),
press this¡°-/--¡±button to change channel selection to ¡°---¡±on screen
display and press¡°1¡±,¡°2¡±and ¡°8¡± buttons.
REMOTE CONTROL UNIT
OPEN/CLOSE
POWER
P.P
MENU Button
Press this button to enter the menu screens for various optional
adjustable settings.
PROG+/- Button
Press the program up button to select the program forwards. Press
the program Down button to select the program Backwards.
VOL+/- Button
Press volume up/down buttons to adjust sound level.
Q.VIEW Button
Press this button to return to the previously viewed program.
Q.
VIEW
-/--
SWAP
REPEAT
MUTE
SOURCE
SWAP Button
You can adjust your TV program list order, press this button, the
program swap menu will displayed, as shown below. E.g. to swap
channel 1 and 7 , press ¡°SWAP¡± button, press¡°PROG+/-¡± to
choose .FROM and press ¡°VOL+/-¡± to set the channel number as
¡°0¡±,and as the same way to set the TO as¡°7¡±,last to do choose
the¡°SAVE¡± and press ¡°VOL+/-¡± to implement this fuction.
PROG+
VOL-
ASPECT
MENU
PROG-
VOL+
S.M
FROM
CH
1
TO
CH
7
SAVE
REVEAL
SIZE
INDEX
TEXT
ANGLE
SLOW
STOP
MIX
SUB.PAGE
TITLE
ZOOM
PROGRAM SUBTITLE
DVD MENU
AUDIO
S.M Button:
Press this button to select the sound mode:
NORMAL/NEWS/MUSIC/CUSTOM
ENTER
DVD SETUP
ASPECT Button:
Press this button to select scaler mode:
16:9 4:3 ZOOM 16:9FS PANORAMA
GOTO
DISPLAY
9
TELETEXT OPERATIONS (OPTIONAL)
For models with Teletext function only.
OPEN/CLOSE
POWER
TEXT Button
Press this button to enter or exit the teletext mode.
INDEX Button
Press the button to go to the index page.
P.P
REVEAL Button
Press this button to reveal the hidden information for
some Teletext pages(e.g. answers to puzzles or riddles).
Press again to hide the information.
Q.
VIEW
-/--
SWAP
REPEAT
MUTE
SOURCE
MIX Button
Press this button enter to mix mode.(For SUBTITLE or
NEWSFLASH page, please use mix mode).
Press this button again to exit.
SIZE Button
Press this button to change the Teletext screen display
mode among the following:
- Upper half screen enlarged
- Lower half screen enlarged
- Normal screen state
PROG+
VOL-
ASPECT
MENU
PROG-
REVEAL
SIZE
INDEX
TEXT
ANGLE
SLOW
STOP
VOL+
S.M
MIX
SUB.PAGE
TITLE
ZOOM
PROGRAM SUBTITLE
DVD MENU
AUDIO
ENTER
DVD SETUP
10
GOTO
DISPLAY
STOP Button
Press this button to hold the Teletext page on display to prevent the
page from changing. Press again to release the hold state.
SUB.PAGE (Optional)
Press this button to display subpage.
NO SILK BUTTONS:
Have no function£¡
REMOTE CONTROL OPERATION(DVD)
DVD Mode:
OPEN/CLOSE
POWER
POWER
Press this button to switch television on or off.
OPEN/CLOSE Button
P.P
Press OPEN/CLOSE button to load disc on disc tray. Hold the disc
without touching either of its surfaces, position it with the printed
title side facing up, align it with the guides, and place it in its proper
position. In case of interactive DVDs with playback control, a menu
appears on the TV screen.
DVD MENU Button
Q.
VIEW
-/--
SWAP
If play some DVD discs, press this button back to root menu screen.
PROGRAM Button
Place a track on the program list.
REPEAT
MUTE
SOURCE
PROG+
VOL-
MENU
Press PROGRAM button, then the ¡°PROGRAM¡± will
appear on TV screen now you can press¡°> ¡÷¨Œ¡ ±
and¡°ENTER¡±button to select ¡°START¡± option and
enjoy the desired tracks.
SUBTITLE Button
VOL+
To press this button, you can change the subtitle language from one
selected to the initial settings to a different language, if available.
DVD SETUP Button
ASPECT
PROG-
S.M
Press SETUP button you can accesses or removes setup menu.
AUDIO Button
REVEAL
SIZE
INDEX
TEXT
ANGLE
SLOW
STOP
MIX
SUB.PAGE
TITLE
ZOOM
PROGRAM SUBTITLE
DVD MENU
AUDIO
To press this button, you can change the audio language from the
one selected at settings to a different language, if available.
GOTO Button
Press this button to go to desired position. The player provides 3
search mode When the above items are showed on TV screen, you
can input number to locate desire sector, then press PLAY to
commence play The number you input is invalid if it is beyond the
track's capcity.
ENTER
DVD SETUP
GOTO
DISPLAY
DISPLAY Button
To display player OSD.
PREV/NEXT Button(
,
)
Press these button to go to the previous/next chapter(DVD).
FR/FF Button(
,
)
These buttons allow skipping ahead/back at 5-level speed. Press
¡°PLAY¡±button to return to normal playback.
11
REMOTE CONTROL OPERATION(DVD)
DVD Mode:
OPEN/CLOSE
POWER
P.P
REPEAT Button
To press this button you can repeatedly play a title(DVD) or all
tracks(CD) when¡°ALL ¡±appears on TV screen, you can
repeatedly play a chapter (DVD) or a single track(CD) when¡°Repeat
chapter¡±appears on TV screen, you can cancel repeat functions
when no¡°Repeat off¡±appears on TV screen.
PLAY/PAUSE Button
Press this button to start playback. Press this button again to
pause playback.
Q.
VIEW
-/--
SWAP
When this button is pressed once, the unit records the stopped
point, from where playback will resume (resume function) if
¡°PLAY¡±is pressed after wards. But if STOP button is pressed
again instead of PLAY button, there will be no resume function.
REPEAT
MUTE
SOURCE
PROG+
VOL-
STOP Button
MENU
TITLE button
DVD disc:
Press TITLE button, then the DVD menu or titles available on the disc
will be displayed. Then you can use "
" and ENTER button to select
programs.
VOL+
ZOOM button
ASPECT
PROG-
REVEAL
SIZE
INDEX
TEXT
ANGLE
SLOW
STOP
S.M
MIX
SUB.PAGE
TITLE
ZOOM
PROGRAM SUBTITLE
DVD MENU
AUDIO
3. Use the
buttons to move through the zoomed picture.
4. To resume normal playback, press ZOOM button until screen
becomes 1X.
N
Note:Zoom may not work on some DVDs.
ANGLE button
ENTER
DVD SETUP
1.Press ZOOM during playback or still playback to activate the
Zoom function. The square frame appears briefly in the right bottom
of the picture.
2. Each press of the ZOOM button changes the TV screen in the
following sequence:
GOTO
DISPLAY
If the disc contains scenes recorded at different camera angles, you
can change to a different camera angle during playback. Press
ANGLE repeatedly during playback to select a desired angle. Note
that the number of the current angle appears on screen.
N
Note:
The angle indicator will blink on the TV screen during scenes
recorded at different angles as an indication that angle switching
is possible.
SLOW Button
Press this button during playback to activate the slow function.
Each press on this button change the TV screen in the follow
sequence:1/2 - 1/4 - 1/8 - 1/16 normal play
12
MENU SCREENS
This TV allows you to adjust any setting from the menu screens using ¡°MENU¡±,¡°VOL+/-¡±and ¡°PROG+/-¡±
buttons.
Press ¡°MENU¡±button to display the menu, press¡°PROG+/-¡±to change menu from one to another, ¡°VOL+/-¡±
to enter the chosen menu, press¡°PROG+/-¡±to select the item, and then press ¡°VOL+/-¡±to adjust each
item.
Press ¡°MENU¡± again to exit the menu mode.
PC
PC
PICTURE
PICTURE
CONTRAST
ASPECT
16:9
BRIGHTNESS
PICTURE MODE
NORMAL
HUE
COLOUR
SHARPNESS
COLOUR TEMP
MOVE
NORMAL
SELECT
EXIT
MOVE
SELECT
EXIT
PICTURE MENU
You can adjust thecontrast, brightness, tint(NTSC only) colour,sharpness.
COLOUR TEMP: NORMAL / WARM / COOL
APPECT: 16:9/4:3/ZOOM/16:9FS/PANORAMA
PICTURE MODE: NORMAL/SOFT/DYNAMIC/CUSTOM
PC
TUNE
COUNTRY
FRANCE
AUTO SCAN
MANUAL PROGRAM
PROGRAM LIST
MOVE
SELECT
EXIT
PC
TUNE MENU
AUTO SCAN: Press¡°VOL+/-¡±to begin auto search
program, and press menu to exit auto search.
MANUAL PROGRAM: To enter manual setting
sub menu.
PROGRAM LIST: To edit program.
COUNTRY: Select correct before auto searching,then
you can get right program order.
CHANNEL: The number is the current channel, and you
can also change channel from one to another.
COLOUR SYS. AUTO/PAL/SECAM (optional)
SOUND SYS. B/G,D/K,I,L,L¡¯(optional)
SKIP: Set this item on to skip the channel which you
are Watching.
Fine Tune: Frequency data can be fine-tuned in upward
or downward by the VOL+/- buttons.
SOUND
SOUND MODE
NORMAL
SOUND MENU
Enter sound menu, you can adjust.
SOUND BASS/TREBLE/BALANCE/SOUND MODE:
NORMAL/NEWS/MUSIC/CUSTOM
BASS
TREBLE
BALANCE
MOVE
SELECT
EXIT
13
MENU SCREENS
PC
PC
SETUP
OSD
TXT LANGUAGE
WEST
LANGUAGE
NOISE REDUCE
ON
H-POSITION
BLUE SCREEN
OFF
V-POSITION
ENGLISH
DURATION
HALFTONE
OSD SIZE
MOVE
SELECT
EXIT
MOVE
2 TIMES
SELECT
EXIT
SETUP MENU
OSD MENU
TXT LANGUAGE.You can choose the supported
You can choose the language, adjust the H-position,
teletext fonts among AUTO,WEST,EAST,RUSSIAN, V-position, duration 1 halftone and size..
ARABIC and FARSI.
NOISE DURACE: You can set the noirse filter to ON or OFF.
BULE SCREEN: You can set background ON or OFF.
You can set the picture display mode 16:9,
4:3 ,ZOOM,and 16:9FS,PANORAMA.
PC
PC
PC
PC
CONTRAST
COLOUR TEMP
BRIGHTNESS
AUTO CONFIG
H-POSITION
V-POSITION
CLOCK
PHASE
MOVE
SELECT
EXIT
MOVE
SELECT
EXIT
PC MENU(under PC mode only)
You can adjust the CONTRAST, BRIGHTNESS
H-POSITION/V-POSITION: Press the VOL+/- buttons to adjust the picture Horizontal and Vertical position.
CLOCK : Press the VOL+/- to minimize any vertical bars or stripes visible on the screen background.
PHASE : When necessary, adjust the pixel phase of the picture to avoid picture interference.
AUTO CONFIG : To adjust the screen position automatically. It will take a few seconds and during this
process the screen will be black.
COLOUR TEMP: To ADJUST the PC mode color temperature.
NOTE:
If the set is cold ,there may be a small¡°flicker¡± when the set is switched on. It is normal, There is nothing
wrong with the set.
If possible, use the VESA 1024X768@60HZ video mode to obtain the best image quality for your LCD monitor.
Under other resolutions some scaled or processed pictures may appear on the screen.
Some dot defects may appear on the screen, like red, green or blue Spots, However,this will have no impact
oreffect on the monitor performance.
Do not press the LCD screen with your finger for a long time as it may incur some damage to the screen.
14
INITAL SETTINGS(DVD)
COMMON PROCEDURES OF INITIAL SETTINGS
Press SETUP button to get the setup menu. Use
direction buttons "
" to select the preferred item .
After finishing settings, press SETUP again to TV
DOLBY DIGITALSETUP PAGE
Audio
General
-- Dolby Digital Setup -Dual Mono
Dolby
Video
STR
Dynamic
FULL
display.
3/4
1/2
The following menu items can be changed:
Preference
Stereo
L-Mono
R-Mono
Mix-Mono
1/4
GENERAL: selects the GENERAL PAGE menu.
OFF
Go To Dolby Digital Setup
AUDIO : selects the Audio menu.
DOLBY : selects the DOLBY DIGITAL SETUP menu.
VIDEO : selects the VIDEO SETUP PAGE menu.
PREFERENCE: selects the PREFERENCE PAGE menu.
GENERAL SETUP PAGE
Dolby
Audio
General
-- General Setup Page -TV display
Angle Mark
Osd Lang
Screen Saver
Ps
On
Eng
On
Video
Preference
On
English Off
Japanese
On
Off
Normal/Ps
Normal/Lb
Wide 16:9
The following menu items can be changed:
DUAL MONO: Reproduction mode, used only when the
input consists of two independent audio
channels(1/1 mode). Possible selections are:
STEREO: Reproduce both channels as is.
L-MONO: Reproduce the left channel only.
R-MONO: Reproduce the right channel only.
The default is STEREO.
DYNAMIC: Dynamic range compression.
VIDEO DIGITALSETUP PAGE
Audio
General
-- Video Setup Page --
Go To General Setup Page
Dolby
Video
Preference
Sharpness
Low
The following menu items can be changed:
Brightness
00
TV DISPLAY: selects the aspect ratio of the playback
Contrast
00
picture.
NORMAL/PS: pan & scan display.
Go To Video Setup Page
NORMAL/LB: letterbox display.
WIDE: widescreen display.
ANGLE MARK: viewing angles change option(if available).The following menu items can be changed:
Sharpness: sharpness value.
SCREEN SAVER: this is to turn on/off screen saver.
Brightness: brightness value.
AUDIO SETUP PAGE
Contrast: contrast value.
Audio
General
-- Speaker Setup Page -Downmix
STR
Dolby
Video
High
Medium
Low
Preference
LT/RT
Stereo
Go To Speaker Setup Page
This page is for setup speaker output.
DOWNMIX Stereo
LT/RT: 2ch output, main channel with surround.
STEREO: 2ch output, main right channel with right
surround; main left channel with left surround.
15
INITAL SETTINGS(DVD)
PREFERENCE SETUP PAGE
Preference Page
Audio
Dolby
Audio
General
--
Subtitle
Eng
Eng
Disc Menu
Eng
Parental
Password
Default
Video
Preference
--
Change
Reset
1 Kid Saf
2G
3 Pg
4 Pg 13
5 Pgr
6R
7 Nc17
8 Adult
English
French
Spanish
Chinese
Japanese
Korean
Russian
English
French
Spanish
Chinese
Japanese
Korean
Russian
English
French
Spanish
Chinese
Japanese
Korean
Russian
Go To Preference Page
The following menu items can be changed:
AUDIO: Selects a language for audio(if available).
SUBTITLE: Selects a language for subtitles(if available).
DISC MENU: Selects a language for DISC menus (if available).
PARENTAL[DVD only]: This is to disable the playing of specified DVDs which are unsuitable for children. Some
DVDs are encoded with specific rating level. If the rating level of the disc is higher than that preset in the setup
operation, playback of the disc will be prohibited. After selecting one of the PARENTAL items the screen will
change to the PASSWORD page, and password is required , The factory initial setting is 1369.
PASSWORD: Selects the menu setup PASSWORD CHANGE PAGE.
PASSWORD CHANGE PAGE
PASSWORD CHANGE PAGE
OLD PASSWORD
[ XXXX ]
NEW PASSWORD
[ YYYY ]
CONFIRM PASSWORD
[ YYYY ]
OK
OLD PASSWORD: Enter the OLD password, (Factory setting is 1369), and the cursor will jump automatically to
NEW PASSWORD.
NEW PASSWORD: Enter the NEW password. Enter 4 digits from the remote control unit numeric buttons, and the
cursor will automatically jump to CONFIRM PASSWORD.
CONFIRM PASSWORD: Confirm the NEW password by entering it again. If the confirmation is incorrect, the cursor
will stay in this column. After entering, the correct new password again, the cursor will jump automatically to OK.
OK: When cursor is on this button, press ENTER key to confirm setting.
DEFAULT: Back to the factory setting.
16
TROUBLESHOOTING TIPS
Before calling for service, you can check the following items on symptoms and solutions.
No picture:
Check other channel, maybe station problem.
Adjust the tuning control.
Ensure that the input setting is at TV state.
Ensure that the LCD is on.
Ensure that the equipment is connected properly.
No sound and distorted sound:
Ensure that the input settings for the TV and sound are proper.
Adjust the tuning control.
Probably local interference, such as an appliance.
Re-orient aerial(if indoor type).
Ensure that the equipment is connected properly.
No remote Control:
Check the battery are installed with the correct polarity.
Point the remote control unit at the remote control sensor and operate.
Remove the obstacles between the remote control and the remote control sensor.
Operate the remote control unit at a distance of not more than 8 meters from the remote control sensor.
Troubleshooting tips(PC mode):
¡°NO SIGNAL¡±displayed
Check if the wire is connected correctly.
Ensure the computer or other equipments are at power on mode.
Ensure the computer is not at power save mode.
Ensure the TV input setting is at pc mode.
¡°UNSUPPORTED¡±displayed
Check if the input setting is compatible to the monitor specification.
Check if the wire is connected correctly.
Led lamp indicator on but no picture
Check the monitor setting :contrast ,brightness.
Check if the wire is connected correctly.
Some unusual spots on screen:
Some dot defects may appear on the screen, like red, green or blue, Spots, However, this will have no
impact or effect on the monitor performance.
17
THE CAUSES OF INTERFERENCE
Incorporated in your TV receiver are the most up-to-date devices to eliminate interference.Local radiation
however, can create disturbances which visibly affect your picture. Proper installation, a good aerial are
your best safe-guards against these disturbances.
RF INTERFERENCE
Moving ripples across the screen are caused by nearby transmitting or receiving short-wave radio
equipment.
DIATHERMY
Herringbone pattern and partial picture loss can result from the operation of diathermy equipment from a
nearby doctor' s surgery or hospital.
SNOW
Weak TV signals from long distant stations result in an instead picture and give the effect of falling snow.
An antenna adjustment or antenna amplifier may be needed.
GHOST
Multiple image caused by TV signals reflected back from surrounding buildings, hills, aircraft, ect. Is
minimized by correct aerial positioning.
CAR IGNITION
Nearby cars and electrical motors can cause small streaks across the picture or make the picture roll.
18